DR40X - Voice recorder TASCAM - Free user manual and instructions
Find the device manual for free DR40X TASCAM in PDF.
| Product Type | Linear PCM Recorder |
| Brand | Tascam |
| Model | DR-40X |
| Dimensions (W × H × D) | 70 × 155 × 35 mm (microphones closed); 90 × 155 × 35 mm (microphones open) |
| Weight | 213 g (without batteries); 282 g (with batteries) |
| Power Supply | 3 AA batteries (alkaline or NiMH); optional AC adapter Tascam PS-PS20E; USB bus power |
| Battery Life (stereo recording 44.1 kHz/16-bit) | ≈ 18 hours with alkaline batteries; ≈ 16 hours with NiMH batteries |
| Recording Media | SD card (64 MB – 2 GB), SDHC (4 – 32 GB), SDXC (48 – 128 GB) |
| Recording/Playback Formats | WAV (16/24-bit, 44.1/48/96 kHz); MP3 (32 – 320 kbps, 44.1/48 kHz) |
| Recording Modes | Mono, Stereo, Dual, 4-Channel, Overdub (mix or separate) |
| Built-in Microphones | 2 adjustable stereo microphones (A-B positions for wide stereo field, X-Y for precise stereo image) |
| External Inputs | 2 XLR/6.35 mm combo jacks (with +48 V phantom power) |
| Outputs | LINE OUT jack (3.5 mm stereo mini-jack, also headphone output); built-in mono speaker (0.3 W) |
| Main Functions | Recording, playback, USB audio interface, low-cut filter, limiter, markers, auto stop, key lock (HOLD) |
| Frequency Response | 20 Hz – 20 kHz (±1/-3 dB) at 44.1 kHz; 20 Hz – 40 kHz (±1/-3 dB) at 96 kHz |
| Total Harmonic Distortion | 0.05% (EXT IN to LINE OUT) |
| Signal-to-Noise Ratio | 92 dB or more (EXT IN to LINE OUT) |
| Maintenance and Cleaning | Wipe with a dry, soft cloth. Do not use chemicals, thinner, or alcohol. |
| Safety | Use compliant batteries; do not expose to humidity; disconnect during storms; follow disposal instructions. |
| Spare Parts and Reparability | AA batteries, microSD card, PS-PS20E AC adapter (optional); repair by qualified technician. |
| General Information | Operating temperature: 0 – 40 °C; power consumption 1.7 W max; USB 2.0 High Speed interface; legal warranty of country of purchase. |
Frequently Asked Questions - DR40X TASCAM
User questions about DR40X TASCAM
0 question about this device. Answer the ones you know or ask your own.
Ask a new question about this device
Download the instructions for your Voice recorder in PDF format for free! Find your manual DR40X - TASCAM and take your electronic device back in hand. On this page are published all the documents necessary for the use of your device. DR40X by TASCAM.
USER MANUAL DR40X TASCAM
PYKOBOCTBO NOLb3OBATEJIa
RUSSIAN
取極說明書
日本語
TASCAM is a registered trademark of TEAC Corporation.
SDXC Logo is a trademark of SD-3C, LLC.

MPEG Layer-3 audio coding technology licensed from Fraunhofer IIS and Thomson.
Supply of this product does not convey a license nor imply any right to distribute MPEG Layer-3 compliant content created with this product in revenue-generating broadcast systems (terrestrial, satellite, cable and/or other distribution channels), streaming applications (via Internet, intranets and/or other networks), other content distribution systems (pay-audio or audio-on-demand applications and the like) or on physical media (compact discs, digital versatile discs, semiconductor chips, hard drives, memory cards and the like). An independent license for such use is required. For details, please visit http://mp3licensing.com.
- Other company names, product names and logos in this document are the trademarks or registered trademarks of their respective owners.
TEAC CORPORATION
https://tascam.com/us/
Phone: +1-323-726-0303
10410 Pioneer Blvd. Suite #1 and #4, Santa Fe Springs, California 90670, U.S.A.
TEAC UK Ltd.
https://www.tascam.eu/en/
Phone: +44-1923-797205
Meridien House, 69-71 Clarendon Road, Watford, Herts,
WD17 1DS, United Kingdom
TEAC EUROPE GmbH
https://www.tascam.eu/en/
Phone: +49-611-71580
Room 817, Block A, Hailrun Complex, 6021 Shennan Blvd.,
Futian District, Shenzhen 518040, China
Owner's Manual
IMPORTANT SAFETY PRECAUTIONS
For U.S.A.
INFORMATION TO THE USER
This equipment has been tested and found to comply with the limits for a Class B digital device, pursuant to Part 15 of the FCC Rules. These limits are designed to provide reasonable protection against harmful interference in a residential installation. This equipment generates, uses, and can radiate radio frequency energy and, if not installed and used in accordance with the instruction manual, may cause harmful interference to radio communications. However, there is no guarantee that interference will not occur in a particular installation. If this equipment does cause harmful interference to radio or television reception, which can be determined by turning the equipment off and on, the user is encouraged to try to correct the interference by one or more of the following measures.
a) Reorient or relocate the receiving antenna.
b) Increase the separation between the equipment and receiver.
c) Connect the equipment into an outlet on a circuit different from that to which the receiver is connected.
d) Consult the dealer or an experienced radio/TV technician for help.
CAUTION
Changes or modifications to this equipment not expressly approved by TEAC CORPORATION for compliance could void the user's authority to operate this equipment.

This product complies with the European Directives request and the other Commission Regulations.
For Canada
THIS CLASS B DIGITAL APPARATUS COMPLIES WITH CANADIAN ICES-003.
CET APPAREIL NUMERIQUE DE LA CLASSE B EST CONFORME A LA NORME NMB-003 DU CANADA.
Declaration of Conformity
Model Number: DR-40X
Trade Name:TASCAM
Responsible party: TEAC AMERICA, INC.

Address: 10410 Pioneer Blvd. Suite #1 and #4, Santa Fe Springs, California 90670, U.S.A.
Telephone number: 1-323-726-0303
This device complies with Part.15 of FCC Rules.
Operation is subject to the following two conditions:
1) This device may not cause interference, and
2) This device must accept any interference, including interference that may cause undesired operation.
IMPORTANT SAFETY INSTRUCTIONS
- Read these instructions.
- Keep these instructions.
- Heed all warnings.
- Follow all instructions.
- Do not use this apparatus near water.
- Clean only with dry cloth.
- Do not block any ventilation openings. Install in accordance with the manufacturer's instructions.
- Do not install near any heat sources such as radiators, heat registers, stoves, or other apparatus (including amplifiers) that produce heat.
- Do not defeat the safety purpose of the polarized or grounding-type plug. A polarized plug has two blades with one wider than the other. A grounding type plug has two blades and a third grounding prong. The wide blade or the third prong are provided for your safety. If
the provided plug does not fit into your outlet, consult an electrician for replacement of the obsolete outlet.
10. Protect the power cord from being walked on or pinched particularly at plugs, convenience receptacles, and the point where they exit from the apparatus.
11.Only use attachments/accessories specified by the manufacturer.
12.Use only with the cart,stand, tripod, bracket, or table specified by the manufacturer, or sold with the apparatus. When a cart is used, use caution when moving the cart/ apparatus combination to avoid injury from tip-over.
13. Unplug this apparatus during lightning storms or when unused for long periods of time.
14.Refer all servicing to qualified service personnel. Servicing is required when the apparatus has been damaged in any way, such as power-supply cord or plug is damaged, liquid has been spilled or objects have fallen into the apparatus, the apparatus has been exposed to rain or moisture, does not operate normally, or has been dropped.
The apparatus draws nominal non-operating power from the AC outlet with its POWER or STANDBY/ON switch not in the ON position.
The mains plug is used as the disconnect device, the disconnect device shall remain readily operable.
Caution should be taken when using earphones or headphones with the product because excessive sound pressure (volume) from earphones or headphones can cause hearing loss.
- if you are experiencing problems with this product, contact TEAC for a service referral. Do not use the product until it has been repaired.
WARNING

To prevent possible hearing damage, do not listen at high volume levels for long periods.
CAUTION
Do not expose this apparatus to drips or splashes.
Do not place any objects filled with liquids, such as vases, on the apparatus.
Do not install this apparatus in a confined space such as a book case or similar unit.
The apparatus should be located close enough to the AC outlet so that you can easily grasp the power cord plug at any time.
If the product uses batteries (including a battery pack or installed batteries), they should not be exposed to sunshine, fire or excessive heat.
CAUTION for products that use replaceable lithium batteries: there is danger of explosion if a battery is replaced with an incorrect type of battery. Replace only with the same or equivalent type.
CAUTIONS ABOUT BATTERIES
This product uses batteries. Misuse of batteries could cause a leak, rupture or other trouble. Always abide by the following precautions when using batteries.
- Never recharge non-rechargeable batteries. The batteries could rupture or leak, causing fire or injury.
When installing batteries, pay attention to the polarity indications (plus/minus ( / ) orientation), and install them correctly in the battery compartment as indicated. Putting them in backward could make the batteries rupture or leak, causing fire, injury or stains around them.
When you store or dispose batteries, isolate their terminals with insulation tape or something like that to prevent them from contacting other batteries or metallic objects.
When throwing used batteries away, follow the disposal instructions indicated on the batteries and the local disposal laws.
Do not use batteries other than those specified. Do not mix and use new and old batteries or different types of batteries together. The batteries could rupture or leak, causing fire, injury or stains around them.
Do not carry or store batteries together with small metal objects. The batteries could short, causing leak, rupture or other trouble.
Do not heat or disassemble batteries. Do not put them in fire or water. Batteries could rupture or leak, causing fire, injury or stains around them.
If the battery fluid leaks, wipe away any fluid on the battery case before inserting new batteries. If the battery fluid gets in an eye, it could cause loss of eyesight. If fluid does enter an eye, wash it out thoroughly with clean water without rubbing the eye and then consult a doctor immediately. If the fluid gets on a person's body or clothing, it could cause skin injuries or burns. If this should happen, wash it off with clean water and then consult a doctor immediately.
The unit power should be off when you install and replace batteries.
Remove the batteries if you do not plan to use the unit for a long time. Batteries could rupture or leak, causing fire, injury or stains around them. If the battery fluid leaks, wipe away any fluid on the battery compartment before inserting new batteries.
Do not disassemble a battery. The acid inside the battery could harm skin or clothing.
For European Customers
Disposal of electrical and electronic equipment
(a) All electrical and electronic equipment should be disposed of separately from the municipal waste stream via designated collection facilities appointed by the government or the local authorities.
(b) By disposing of the electrical and electronic equipment correctly, you will help save valuable resources and prevent any potential negative effects on human health and the environment.
(c) Improper disposal of waste equipment can have serious effects on the environment and human health as a result of the presence of hazardous substances in electrical and electronic equipment.
(d) The crossed out wheeled dust bin symbol indicates that electrical and electronic equipment must be collected and disposed of separately from household waste.

(e) The return and collection systems are available to the end users. For more detailed information about disposal of old electrical and electronic equipment, please contact your city office, waste disposal service or the shop where you purchased the equipment.
Disposal of batteries and/or accumulators
(a) Waste batteries and/or accumulators should be disposed of separately from the municipal waste stream via designated collection facilities appointed by the government or the local authorities.
(b) By disposing of waste batteries and/or accumulators correctly, you will help save valuable resources and prevent any potential negative effects on human health and the environment.
(c) Improper disposal of waste batteries and/or accumulators can have serious effects on the environment and human health as a result of the presence of hazardous substances in batteries and/or accumulators.
(d) The crossed out wheeled dust bin symbol indicates that batteries and/or accumulators must be collected and disposed of separately from household waste.

Pb,Hg,Cd
If the battery or accumulator contains Pb, Hg, Cd more than the specified values of lead (Pb), mercury (Hg), and/or cadmium (Cd) defined in the Battery Directive (2006/66/EC), then the chemical symbols for lead (Pb), mercury (Hg) and/or cadmium (Cd) will be indicated beneath the crossed out wheeled dust bin symbol.
(e) The return and collection systems are available to the end users. For more detailed information about disposal of waste batteries and/or accumulators, please contact your city office, waste disposal service or the shop where you purchased them.
Contents
Introduction. 5
Note about the Reference Manual 5
Items included with this product 5
Cleaning the unit 5
Precautions for placement and use. 5
Beware of condensation 5
Names and Functions of Parts 6
Top panel 6
Front panel. 6
Left side 6
Right side panel. 7
Bottom Panel. 7
Making preparations. 7
Installing batteries. 7
Inserting a card. 7
Turning the unit on 7
Using the built-in microphone 8
Attaching the tilt foot. 9
Screen overview 9
Using the menu. 10
Recording 10
Setting the recording mode 10
Using the low-cut filter. 11
Setting the limiter. 11
Playing recordings. 12
Selecting files 12
Using as an audio interface 13
Preparation. 13
Connection. 13
Monitoring 13
Disconnecting. 13
Troubleshooting 14
Specifications. 15
Ratings 15
Inputs and outputs. 15
Audio performance. 15
Recording times 16
Other specifications 16
Introduction
Thank you very much for purchasing the TASCAM DR-40X Linear PCM Recorder.
Before using this unit, read this owner's manual carefully so that you will be able to use it correctly and enjoy working with it for many years. After you have finished reading this manual, please keep it in a safe place for future reference.
Note about the Reference Manual
This Owner's Manual explains the main functions of this unit. Please see the Reference Manual for information about all the unit's functions.
You can also download this Owner's Manual and the Reference Manual from the TEAC Global Site
(http://teac-global.com/)
Items included with this product
This product includes the following items.
Take care when opening the package to avoid damaging the items.
Take care when opening the package to avoid damaging the items. Keep the packing materials for transportation in the future.
Please contact the store where you purchased this unit if any of these items are missing or have been damaged during transportation.
Main unit. 1
AA alkaline batteries. 3
Tilt foot.
Owner's Manual (this document) including warranty × 1
Cleaning the unit
To clean the unit, wipe it gently with a soft dry cloth. Do not wipe with chemical cleaning cloths, benzene, thinner, alcohol or other chemical agents. Doing so could damage the surface or cause discoloration.
Precautions for placement and use
The environmental temperature operating range of this unit is 0 - 40^ (32-104°F).
Do not install this unit in the following types of locations. Doing so could degrade the sound quality and/or cause malfunctions.
Places with significant vibrations
Near windows or other places exposed to direct sunlight
Near heaters or other extremely hot places
Extremely cold places
Places with bad ventilation or high humidity
Very dusty locations
Places exposed directly to rain or other water
Do not place this unit on top of a power amplifier or other device that generates heat.
if this unit is placed near a power amplifier or other device with a large transformer, it could cause a hum. If this occurs, increase the distance between this unit and the other device.
This unit could cause color irregularities on a TV screen or noise from a radio if used nearby. If this occurs, use this unit farther away.
This unit might produce noise if a mobile phone or other wireless device is used nearby to make calls or send or receive signals. If this occurs, increase the distance between this unit and those devices or turn them off.
Beware of condensation
Condensation could occur if the unit is moved from a cold place to a warm place, it is used immediately after a cold room has been heated or it is otherwise exposed to a sudden temperature change. To prevent this, or if this occurs, let the unit sit for one or two hours at the new room temperature before using it.
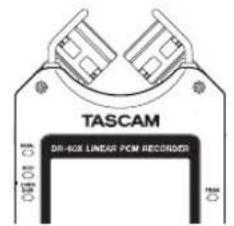
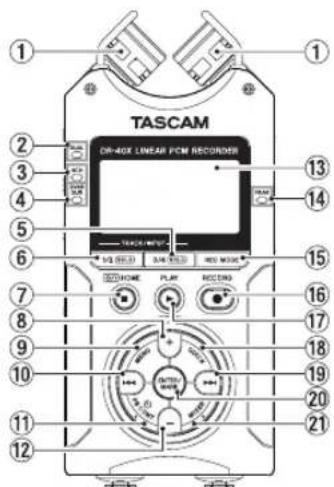
Names and Functions of Parts
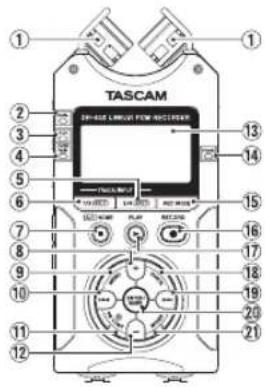
Top panel
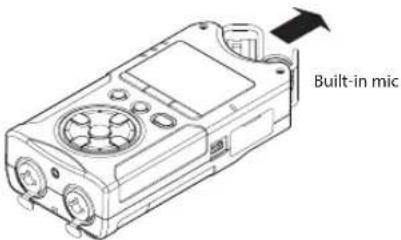
① Built-in stereo microphone
② DUAL indicator
③ 4CHindicator
④ OVERDUBindicator
3/4 [SOLO] button Select and solo channels 3/4
1/2 [SOLO] button Select and solo channels 1/2
(1) (HOME)[ ] button Press to stop, turn the power on/off (O/I) and open the Home Screen HOME
+ button Plus/up
9 MENU button Open Menu Screen
10 1 button Search backward/left/cancel
PB CONT button OpenPlaybackControlscreen
12 - button Minus/down
13 Display
14 PEAK indicator Lights when recording level is too high
REC MODE button Open the recording mode menu screen
RECORD [●] button/REC indicator Shows recording status
17 PLAY[ ]button
18 QUICK button Open the quick men
19 button Search forward/right/confirm
20 ENTER/MARK button Set/clear marks
21 MIXER button Open the mixer screen
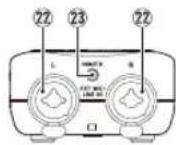
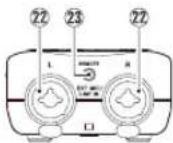
Front panel
EXT MIC/LINE IN L/R jacks (XLR/TRS) Mic/external input jack
23 REMOTE jack (2.5 mm dia. TRS jack)
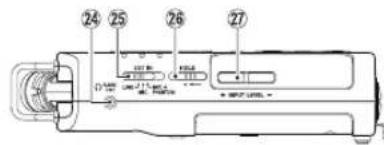
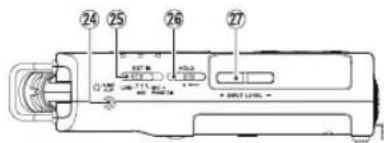
Left side
24 Ω/LINE OUT jack
Headphone/line output jack
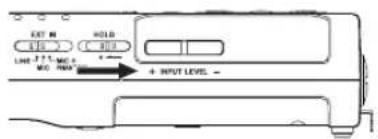
EXTIN switch
26 HOLD switch Set hold function
27 INPUT LEVEL (+ / - ) buttons
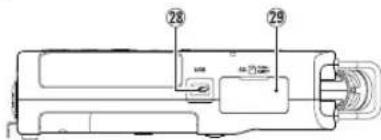
Right side panel
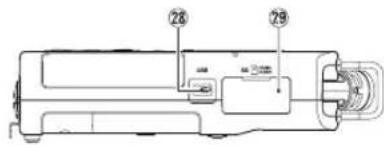
USB port
microSD card slot
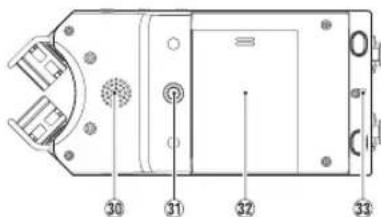
Bottom Panel

30 Mono speaker
③ Tripod or tilt foot mounting threads (1/4-inch)
Battery compartment cover
33 Strap attachment
Battery compartment
Making preparations
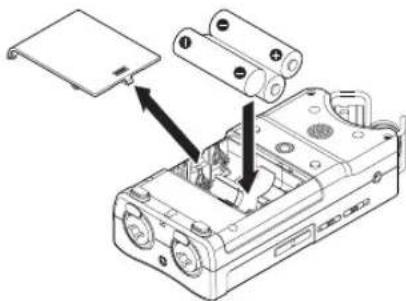
Installing batteries
While pressing the battery compartment cover on the back of the unit, slide it open. Then, install batteries.
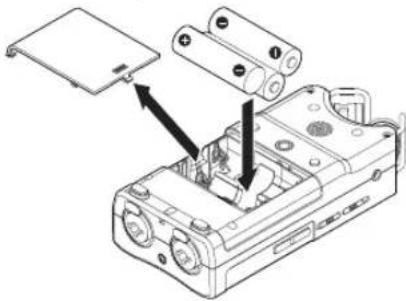
TIP
The TASCAM PS-P520E AC adapter can also be used with this unit.
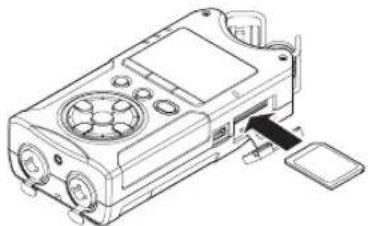
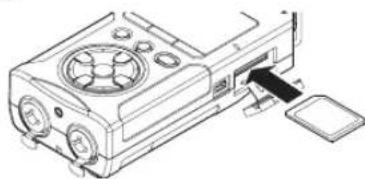
Inserting a card
Open the microSD slot cover on the right side panel, and insert a microSD card.
Turning the unit on
- Slide the HOLD switch in the direction of the arrow to unlock it.
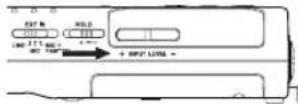
TIP
By sliding it toward HOLD, button operations can be disabled, preventing misoperation during recording.
- Press and hold the /1 (HOME) [ ] button for several seconds.
The first time the power is turned on after purchase, setting screens like the following will open.
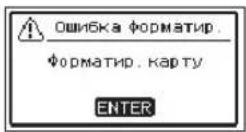
Formatting cards
Press the ENTER/MARK button to to execute.

CAUTION
Execution of formatting erases all data currently on the card.
This message will not appear for cards that have already been formatted.
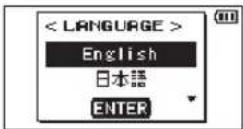
Setting the language
Select the language used for menus and messages.
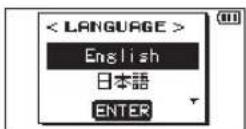
Use the + and - buttons to select the language, and press the ENTER/MARK button to confirm.
DATE/TIME
Set the date and time.
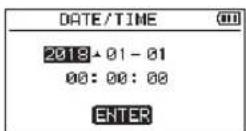
Use the 一 and buttons to move the cursor, and use the + and - buttons to change the date and time. Press the ENTER/MARK button.

The language and date/time settings can be changed later from the menu.
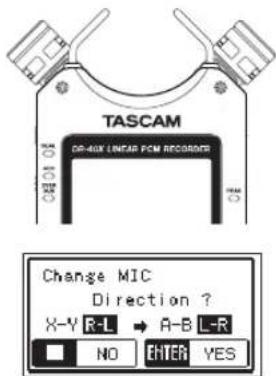
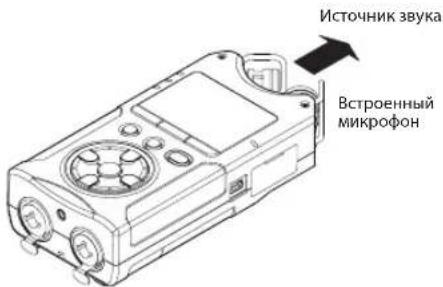
Using the built-in microphone
This unit's built-in microphones can be adjusted, allowing the angles of the microphones to be changed. You can choose clear stereo sound or wide stereo sound according to the recording source, situation, etc. by opening or closing the microphone pair.
Setting the mics to record a wide stereo sound (A-B position)
Spread the stereo microphone to the left and right. (A-B position)
Set this way, the two microphones are spread widely left and right, and recording is possible with a strong stereo field that is good for music, for example.
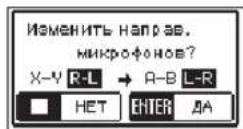
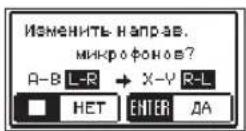
If you open or close the microphone pair while using the built-in stereo microphone and the left-right channels does not suit the angle of the microphone, a pop-up message appears to ask whether you want to swap the left-right channels of the microphone.
CAUTION
Set the left-right channels of the built-in microphone to L-R.
When you are using the built-in microphone and the setting is not L-R, 3.45 ears on the Home screen.
Setting the mics to record a clear stereo sound (X-Y position)
Close the stereo microphone. (X-Y position)
Set this way, the microphone pair is close, and recording is possible with a clear stereo field with less phase difference. If you open or close the microphone pair while using the built-in stereo microphone and the left-right channels does not suit the angle of the microphone, a pop-up message appears to ask whether you want to swap the left-right channels of the microphone.
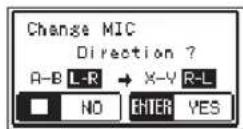
CAUTION
Set the left-right channels of the built-in microphone to R-L.
When you are using the built-in microphone and the setting is not R-L, L-R's on the Home screen.
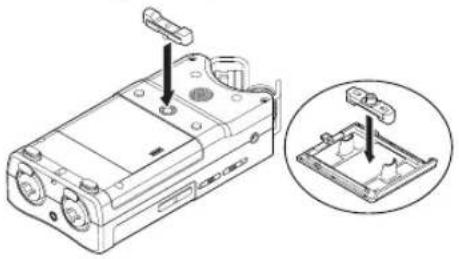
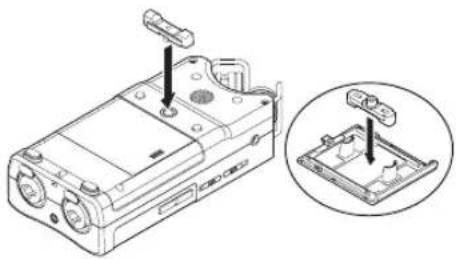
Attaching the tilt foot
When recording with the built-in mic, you can attach the included tilt foot to the tripod mounting threads to prevent the mic from being too low when placing the unit with the bottom side (battery compartment cover side) down. When not using the tilt foot, you can put it between the two protrusions on the inside of the battery compartment cover for storage and transportation.
Screen overview
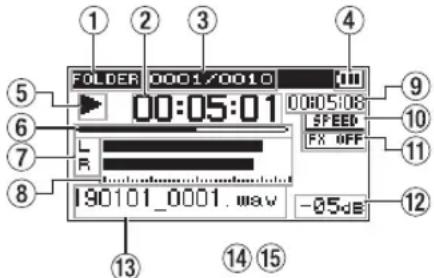
When stopped or playing back
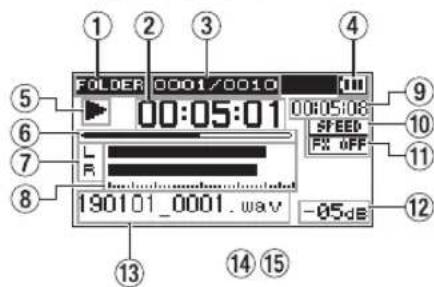
① Playback area
② Elapsed time
Current playback file number/total number of files
Remaining battery charge/power supply status
⑤ Playback status
⑥ Playback position display
⑦ Track status
⑧ Playback level meters
Remaining time
⑩ Playback speed status
Effect status
12 Peak value (decibels)
⑬ Playback file name
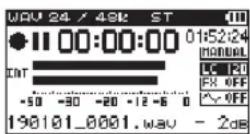
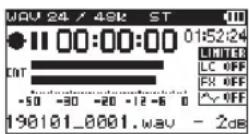
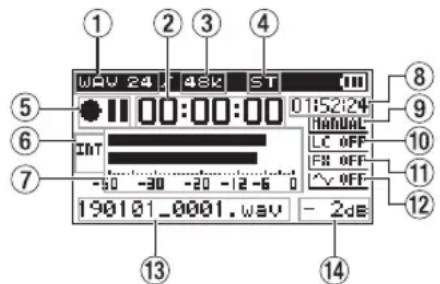
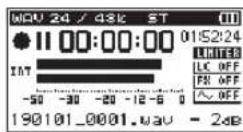
When recording or in recording standby
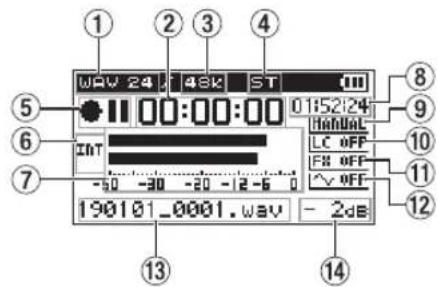
① Recording format
② Elapsed recording time
③ Recording sampling frequency
Number of recording channels
⑤ Recording status
Input source
⑦ Recording level meters
們 Remaining recording time
9 Level mode setting status
Low cut filter status
Effect status
12 Tone output setting status
13 Recording file name
14 Peak value (decibels)
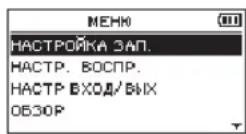
Using the menu
Use the menu to change various settings, including recording, playback and system settings, and to execute various functions.
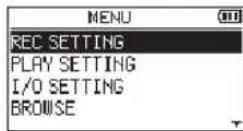
- Press the MENU button.
The MENU screen appears.
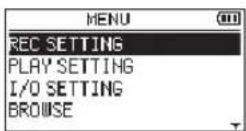
- Use the + and - buttons to select the menu item, and press ENTER/MARK.
The setting screen will open.
3.Use the ^+ and -buttons to select the setting item, and press
Settings can now be changed and functions executed.
- Use the + and - buttons to change the setting.
NOTE
Press the MENU button to return to the previous screen.
To return to the Home Screen, press the 念 /山 (HOME) [ ] button.
10 TASCAM DR-40X
Recording
- Point the built-in mic towards the sound to be recorded.
Sound source
- Press the RECORD [●] button to enter recording standby.
Recording standby will start, will appear on the display, and the REC indicator will blink.
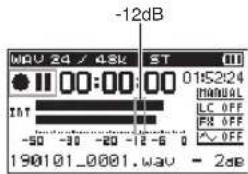
- Adjust the recording level.
Adjust the built-in mic orientation and distance from the sound source as well as the input level so that the recording level meters stay near -12dB at the peak input level.
and buttons to adjust the input level.
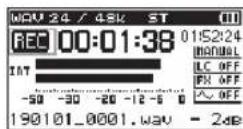
- Press the RECORD [●] button to start recording.
Recording will start, appear on the display, and the REC indicator will light.
- Press the / (HOME)[ ] button to stop recording. Recording stops, and appears on the display.
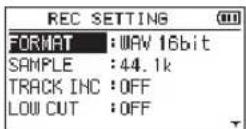
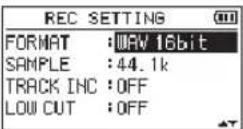
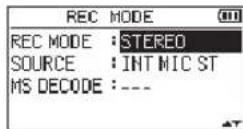
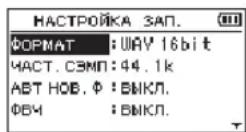
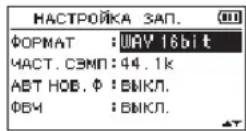
Setting the recording mode
This recorder has five recording modes.
Set the recording mode on the REC IODE screen.
The settings available differ according to the recording mode.
- When stopped, press the REC MODE button. This opens the REC IODE menu.
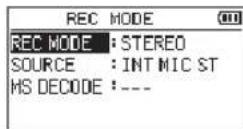
- Use the + and - buttons to select REC MODE, and press the ENTER/MARK button.
This enables changing the REC MODE setting.
MONO mode
This is a mode for mono recording.
STEREO mode (default)
This is a mode for stereo recording of two independent left and right channels.
DUAL mode
This mode uses one input source to create two files with different input level settings (Level Mode setting screen). Either two mono or two stereo recording files are created.
4CH mode
This mode uses both the built-in mics and the external inputs to record two pairs of inputs as two files. Two stereo recording files are created.
OVERDUB mode
This recording mode add new sounds to the playback file.
The NIH setting mixes the playback sound and input sound to create a new file. The SEPARATE setting creates a new recording file with only the input sound.
When in OUERDUE mode, select one of these two options using the DUE MODE setting.
Using the low-cut filter
Noise from air conditioning and other sources can be reduced when recording.
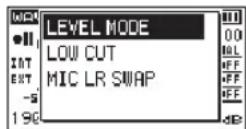
- When in recording standby, press the QUICK button. This opens the Quick menu.
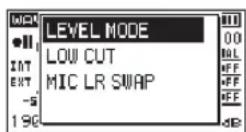
- Use the + and - buttons to select the Low-cut filter, and press ENTER/MARK. The setting screen for the low-cut filter will open.
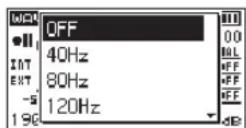
Options:0FF,40Hz,80Hz,120Hz,220Hz
-
Use the ^+ and - buttons to select the setting, and press ENTER/MARK. This changes the setting and returns to the QUICK menu screen.
-
Press the / (HOME)[ ] button The Home Screen will reopen.
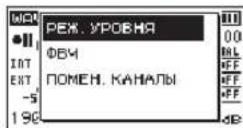
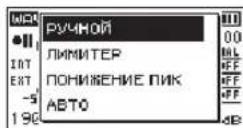
Setting the limiter
This can help prevent sound from becoming distorted when loud noises are input suddenly during recording.
- When in recording standby, press the QUICK button. This opens the Quick menu.
- Use the + and - buttons to select the LEVEL MODE, and press ENTER/MARK. This opens the Level Mode setting screen.
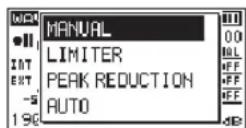
Options: MANUAL (default), LIMITER, PEAK REDUCTION, AUTO
-
Use the + and - buttons to select the setting, and press ENTER/MARK. This changes the setting and returns to the QUICK menu screen.
-
Press the / (HOME)[ ] button The Home Screen will reopen.
Playing recordings
- Select a file, and press the PLAY [▶] button to start playback.
Playback starts, and appears on the display. - Adjust the volume.
Use the + and - buttons to change the output volume. - Press the /1 (HOME) [ ] button to stop playback.
Playback stops, and appears on the display.
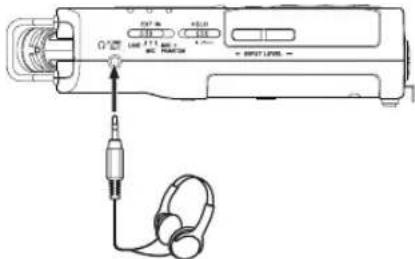
Listening with headphones
Connect headphones to the LINE OUT jack on this unit.
Operations during playback
| Pause playback Press the \( \blacksquare \) button | |
| Search forward | Press and hold the \( \blacktriangleright \blacktriangleright \) button |
| Search backward | Press and hold the I- \( \blacktriangleleft \) button |
| Skip to start of playing file | Press the I- \( \blacktriangleleft \) button once briefly |
| Skip to start of file before playing file | Press the I- \( \blacktriangleleft \) button twice briefly |
| Skip to start of file after playing file | Press the \( \blacktriangleright \blacktriangleright \) button once briefly |
| Go back the set amount of time (options: OFF, 1 sec, 3 sec, 5 sec, 10 sec, 30 sec, 1 min, 5 min, 10 min) | Press the \( \blacktriangleright \) button during playback |
| Add a mark | Press the MARK button during playback |
Selecting files
- Press the MENU button. The MENU screen appears
- Use the + and - buttons to select BROWSE, and press ENTER/MARK.
Browse screen appears.
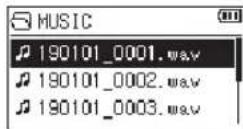
- Use the + and - buttons to select a file, and press The Home Screen will reopen.
TIP
Press the ENTER/MARK button to start playback and return to the Home Screen.
Using as an audio interface
By connecting this unit to a computer (Windows/Mac) or iOS device, you can use it as an audio interface.
Preparation
- Use a USB cable to connect the unit to a computer, and turn the unit on.
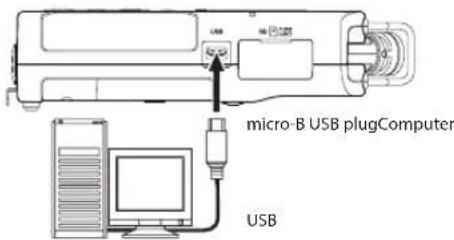
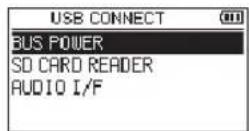
The USB CONNECT screen will open.
NOTE
- When being used as an audio interface, the DR-40X itself cannot record or play back files.
An Apple Lightning-USB camera adapter is necessary to connect the unit to an iOS device
- Use the + and - buttons to select AUDIO I/F, and press ENTER/MARK.
The AUDIO I/F screen will open.

Connection
- Select the type of connected device.
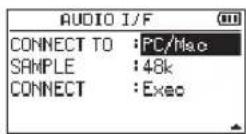
Options:PC/Hac(default),105
NOTE
When "PC/Mac" is selected, the unit with operate on bus power from the computer.
- Set the sampling rate.
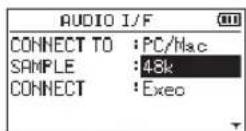
Options:44.1k,48k(default)
- Select Exec at the CONNECT item.
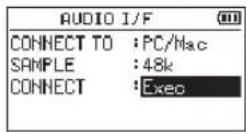
When the unit connects with the external device, the USB AUDIO I/F screen will open.
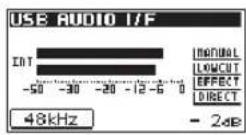
Monitoring
- Press the MENU button. The MENU screen appears.
- Selecting the monitored signal
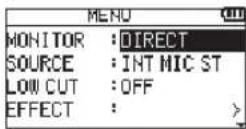
Options
PC/Hac(default): Monitor the playback sound from the PC or Mac.
DIRECT: Monitor the input sound without latency.
NOTE
The meters can be used to check the playback sound of the external device.
Sound will not be output from the speaker.
Use headphones to hear the sound.
Disconnecting
- Press the MENU button. The MENU screen appears.
- Select Exec at the DISCONNECT item.
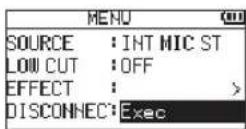
The recorder disconnects from the external device, and the Home Screen opens.
Troubleshooting
If you are having trouble with the operation of this unit, please try the following before seeking repair. If these measures do not solve the problem, please contact the store where you purchased this unit or TASCAM customer support service.
Power will not turn ON.
Confirm that batteries are installed correctly.
Confirm that the HOLD switch is not set.
The unit turns off automatically.
Check the automatic power saving function setting. Set it to "Off" to prevent the power from turning off automatically. See "Setting the automatic power saving function" in "12 - Settings and Information" of the Reference Manual.
The microSD card is not recognized.
Confirm that the microSD card is inserted completely.
No sound is output or sound is not output from the speaker.
Confirm that the output volume is not lowered it too much.
Confirm that the speaker setting is on. Even if the speaker setting is on, sound will not be output from the speaker when headphones are connected or when the unit is recording or in recording standby.
Recording is not possible.
Confirm that the REC indicator is lit. If the REC indicator is blinking, the unit is in recording standby.
Check the remaining available recording time shown on the Recording Screen.
The recorded sound is quiet or distorted.
Check the input level setting.
The unit is not recognized by a computer connected using a USB cable.
Confirm that the connected computer uses a compatible operating system.
The USB function used must be selected from the menu to enable a computer to recognize this unit.
Confirm that the USB cable is not designed only for charging.
Confirm that the connection is not being made through a USB hub.
Sound skips or noise occurs when in USB audio interface mode.
For Windows
Performance options
Select "Adjust for best performance".
Power options
Select"High performance".
The wrong language was set accidentally.
After pressing the 日 / 1 (HOME)[ ] button to turn the unit off, press the 日 / 1 (HOME)[ ] button while pressing and holding the MENU button.
The language selection menu will appear, and you will be able to select the language.
Specifications
Ratings
Recording media
SD card (64 MB - 2 GB)
SDHC card (4 GB - 32 GB)
SDXC card (48 GB - 128GB)
Recording/playback formats
BWF:44.1/48/96 kHz, 16/24 bit
WAV:44.1/48/96 kHz, 16/24 bit
MP3: 44.1/48 kHz, 32/64/96/128/192/256/320 kbps
Number of channels
4 channels (stereo × 2
Inputs and outputs
EXT MIC/LINE IN jacks (XLR connectors can provide phantom power)
Connector
XLR-3-31 (1: GND, 2: HOT, 3: COLD) (support phantom power)
6.3mm (1/4") standard TRS jacks (Tip: HOT, Ring: COLD, Sleeve: GND)
LINE OUT jack
Connector: 1 / 8'' (3.5mm) stereo mini jack
Built-in speaker
0.3W (mono)
Control input/output ratings
USB port
Connector type: Micro-B
Format: USB 2.0 HIGH SPEED mass storage class
REMOTE jack
Connector: 2.5mm TRS jack
Audio performance
Frequency response
20 Hz - 20 kHz +1/-3 dB (EXT IN to LINE OUT, 44.1 kHz sampling frequency, JEITA*)
20 Hz - 22 kHz +1/-3 dB (EXT IN to LINE OUT, 48 kHz sampling frequency, JEITA*)
20 Hz - 40 kHz +1/-3 dB (EXT IN to LINE OUT, 96 kHz sampling frequency, JEITA*)
Total harmonic distortion
0.05% or less (EXT IN to LINE OUT, 44.1/48/96 kHz sampling frequency, JEITA*)
S/N ratio
92 dB or higher (EXT IN to LINE OUT, 44.1/48/96 kHz sampling frequency, JEITA*)
Note) JEITA: Conforming to JEITA CP-2150
C
Mode d'emploi
PRECAUTIONS DE SECURITE IMPORTANTES

THIS CLASS B DIGITAL APPARATUS COMPLIES WITH CANADIAN ICES-003.
CET APPAREIL NUMERIQUE DE LA CLASSE B EST CONFORME A LA NORME NMB-003 DU CANADA.
INSTRUCTIONS DE SECURITE IMPORTANTES
Options:NON,48Hz,88Hz,120Hz,220Hz
BWF:44,1/48/96 kHz, 16/24 bit
WAV:44,1/48/96 kHz, 16/24 bit
MP3:44,1/48 kHz,32/64/96/128/192/256/320 kbit/s
Nombre de canaux
4 canaux (stereo × 2
Entrées et sorties
Prises EXT MIC/LINE IN
Responsible: TEAC AMERICA, INC.
Dirección: 10410 Pioneer Blvd. Suite #1 and #4, Santa Fe Springs, California 90670, U.S.A.
Telefon:1-323-726-0303
BWF:44.1/48/96 kHz, 16/24 bits
WAV:44.1/48/96 kHz, 16/24 bits
MP3: 44.1/48 kHz, 32/64/96/128/192/256/320 kbps
Numero de canales
4 canales (stereo × 2
Entradas y開放s
Tipde conector: Micro-B
Formato: USB 2.0 HIGH SPEED mass storage class
Toma REMOTE
Conector: clavija TRS de 2.5 mm
Rendimiento audio
WAV:44,1 kHz, 48 kHz, 96 kHz, 16/24 Bit
MP3: 44,1 kHz, 48 kHz; 32/64/96/128/192/256/320 Kbit/s
Format: USB 2.0 High-Speed, Mass Storage Class
This opens the Level Mode setting screen.

card SD (64 MB - 2 GB)
card SDHC (4 GB - 32 GB)
card SDXC (48GB - 128GB)
BWF:44.1/48/96 kHz, 16/24 bit
WAV:44.1/48/96 kHz, 16/24 bit
MP3:44.1/48 kHz, 32/64/96/128/192/256/320 kbps
Numero di canali
4 canali (stereo × 2
Ingressiuscite
PykoBoOCTBO noIb30BaTeJIa
BAXHbIE MEPbl IPEdoctOPOxHOCTN
ДлгСWA
INHOPMAUJNIOJIb3OBATEJI
DaHHoe oobopyoabHnne npOoiNo nCbTaHnN I NOITBepDnIO COOTBeTCTBnE yCTAHOBNEHbIM nppeIam DnIePBOBbIX yCTPOIcTB KlaCCa B COrNaCHO 15 PpaBInΦepeAIBHO KOMmCCmN NO CBA3N.3NI ppeIbI yCTAHOBHeBICeJIbIO o6eIeNeHnA aKeBAtHO 3aIITbIOT He b6NaIopPiHTHO BO3dECTBnA HA yCTAHOBKn B XINbX NOMEeHnX DaHHoe oobpyoBaHnO co3aET, INcONb3yET N MOKET N3NuYaTb PAIOuAcTOTHU O3HEpRnIO, E cINOn OHO He 6yTeJCTAHOBHeN O INcONb3OBaTbC B COOTBeTCTBN C PPINBEHbIMN B HACToIaEM pyKOBoIDCTBe IHCTpyKcIaMn, OHO MOKET OKa3bBaTb b6NaIopPnIaTHOE BO3dEICTBnE Ha paINOcB3b. Tem He MeHe, He rapaNTpyETc, YTO B KOHNPTOH KOHfHpyaUNy UCTaHOBKn NOMEXN 6yDyT OTCYCTBOBaT. EcnI daHHoe oobopyoABnE OKa3bBaet He b6NaIopPnIaTHOE BO3dEHTBnA HA pIeM PaINOcIRHaII NIN TeneBnIOHORO CnIHana, TO MOKHO ONPeDEJIbN PyTm BKNIOeHn N BYIKIOeHn OOBpyoABnH, N0b3OBateTIIO peKOMeHDyETc OTKOPPEKTIPOBAtb TaKoe BInIaHne, pInHBQ OHy INN HeCKOJIbKO INPBEDeHHbIX HIXke MEP:
a. NOBEPHyTb NIN Nepemecntb npimEHHy aHTeHHy. b. YBeHnHTb paCCToHne MExdy 6OpyDobAHm E NpIeMHNkOM. c. POnKlIOuHTb O6OpyDObAHne K pO3Te CTeN, OTNIHOH OT CTeN, K KOTOpOH NODKnIOeH NpIeMHNk. d. O6PaTtCBc3a NMOUbIg K npOdaBu NpOdaBuN ONbTHOMy INXKeHepy No pAINO / TeneBUNHOH CBsNI.
BHIMAHNE
I3MeHeHn IIN MoNIOKauN, RbHO He YTBepXdEHHBe KOMNaHne TEAC CORPORATION kAK COOTBcTbUOuNE, MOrY TNOBNeYb 3a Co6oJ LIneHne noJIb3OBaTeN IpaB Ha EKnIpyatauN daHnHO yCTpoiCTBa.

I3dennne cooTBeCTBye Tpe6oBaHnM Ebponecknx dnpektnb nDpynnx PpaBnE Bpokomccnn.
3aABnEHmO COOTBETCTBMN
Homep moen: DR-40X
Toproboe
HannMeHOBaHne:TASCAM
OTBetCTBeHHHa
CTOPOHa: TEAC AMERICA, INC.
Adpec: 10410 Pioneer Blvd. Suite #1 and #4, Santa Fe Springs, California 90670, U.S.A.
Tenephon: 1-323-726-0303
YCTPOICTBO COOTBETCTByeT pa3dJe 15 PpaBnΦeepaIbHOI KOMnCCn CB8n C7A.
Функюнроване yctpoicTBa OTbeaet DByM CNeDyUIOUM yCNOBAM:
1)DaHHoe yCTPOINCTBO He DOnJHO Bb3BbATb NOMEXN,
2) DaHHoe yCTpoIcTBO DOJIKHO BbIDepKINBaTB BCE NOLyaeMbIe NOMEXN, B TOM YHCNE NOMEXN, CNOCO6HbIe Bb3BaTb HeNpaBnHbHOE fYHKUHOHPOBAHne.
BAXKhIe IHCTPYKlM NIO B3ONACHOCTN
1 PpOHTaTte DaHbIe HNCTpyKUIN.
2 CoxpaHaiTe daHbte HnCTpyKuM.
3 06paTte BHMMaHHe Ha BCE npEynpExeHn.
4 BbInoJIHnIe BCE INCTpyKcIM.
5 He nCnoB3yIe o6OpyDobAHne B6n3N BoDbI.
6 Ounuataye yctpoieCTBO TOnbKO cyxO TkaHbIO.
7 He 3aŋyuənTe BēHTnIaIIOHbIe OTBepCTn. BbINOJIHnTe yCTaHOBky COOTBeTCTBnC INCHTpKUAMN I3rTOBtEnJ.
8 He yctaHabnBaIte yCTPOINCTBO B6n3N nCTOuHKnOB Tennla, TaKnx KaKa padnaTOpbl, oBorpeBaTeN, neu n npyoe o6OpyDobAHne (B TOM uNCLe ycunnten), KOTOPOE BbIeJenrET Teno.
9 He npenebepea Te Mepam 6e3oNaChOCTn, TaKIMN KAK NcNoIb3oBaHne nolapn3oBAHNO BUNKn. POnp3oBAHHA BUNKa DOnkHa IMeTb Dba WtBipr, OOnH IN3 KOTOpbX Wnpe DpyRoro. BUnKa 3aEmnHnro Tnna IMeET Dba WtBipr IN Tpetn 3aEmnIOuN mTnΦT. UInpOKu TStBpr IN Tpet NtWtNΦT INPeDaHaNaeHbI JIe 6e3oNaChOCTn. Ecnn BNka, BXoJaTaB KOMPNeKT YcTPOJcTBa, He noDxOHT K BaWei
TASCAM DR-40X-Pyko6oocm8o noIb3oamenn
po3ETke, npokohcynbTnpyntecb c 3neKtpnKOM O 3ameHe yctapeBwien po3ETKn.
10 3aunntte Ka6ebn nTaHnra TaK, YTo6bHa Hrero He MoRn HAcTyuNTb, nepeDaBnB, B CaCTHOCTN, B MeCTax CoeINHeHn C BUnKaMn, 3JIeKTpuYeCKIMn PO3ETkAMn N ToHKoB BbIXOda N3 yCTpoiCTBa.
11 NcnoB3yTe TOnbKO CoeHHeHn/ BcNoMOraTeNbHbIe CpeCTBa, yKa3aHHbIe N3rTOBHTeNEM.
12 IcnoB3yIte TOnbKO TeLeKky, CToIky, WtATINB, KOHcONb n CTOnIK, peKOMeHNyEmbIe INrTOBOTeIeM INn BKNIOUeHNbIe B KOMNKeT yCTpOJCTBa. KoJa IcNoB- 3yETcR TeLEKka, CoNIOaJITe MepeI pPeDOCTopoXHOCTn BO BPEMa NepEMeUeHn ETeKKn CytAoHBNeHHbIM Ha HeY cTPOIcTBOM N o6OpdyoBaHHeM, YTObIuN36ExKaT pe3yNbTaTe ONpOKnDbAHaHn.

13 OTKIOUaIte 6OpyoBaHne OT pOeTKN BO BpEMr rpo3b ININ KOrDa OHO dONrOe BpEMr He nCnOJIb3yETcR.
14 CepBnCHOe 6cbnyKbAHne DOnJKeH BblonHbT bKaIINpOBAHHbI cepBnCHbN nepcoHaJI. CepBnCHOe 6cbnyKbAHne Tpe6yeTc, cEnI yCTpoiCTBO 6blIO KAKIM-TO o6pa3OM NOBpeXHeO, HApnpMep, pNIOBpeJKeHN IPOBOA NITAHN INN BUNKN, IPOINBE JIKKOCTN INN IIOJaDHNN NOCTOPoHnIX O6BeKtOB, A tAKKE nEyCTpoiCTBO NIOJ IOJ DeIeCTBNE DOxJr INN BlaRn, He pa6oTaET HopMaIbHo INN eCN erO yOpHNH.
- UcpoiCTBOIOTpe6JIaETHOMHaJIbHoeIITaHHeBHepa6OeMcoCToHHNOT cTeI nepemehoro ToKa, KOrJa erO nepeKJIouateIb POWER nINSTANDBY/ON haxoJntcra He b IonoJxhen Off.
CetebaaBnIkaNCnoIb3yeTcBAKaueCTBe pa3MbkaTea, KOtOpbldoJIkeH BcerdaocBaTaBCaDOctynhIM.
CneNyetcoBIOaTbOCTOpOXHOCTBpNNCIOb3OBAHNNayuHNKOBc yCTPOIcTBOM,TakKaKUpe3MepHOe3ByKOoeAabJeHHe(rgomKoCTb)B HayuHNkaxMOKeT Bb3BaTbNOTepHcNoCyxa. - Ecn y Bac Bo3HKnI np6JIeMbI npn IcNoIb3ObaHN daHoro n3denn, 6opatntecb B kompaHIO TEAC 3a nomoubI. He IcNoIb3yIte n3dJeNne do tex nop, noka OHO He 6yder OTpeMOHTnpoBaHO.
IPEyIPEXJEHNE

Bo n36eXaHne noBpeXeHnna CnyxHa, He donyckaTe dInTeIbHoro npocnyuINBaHnHa 60nbwoI rpoMkoCTn.
BHIMAHNE
- N36eraaTe nonaHaNna Kanelb H 6pb3r Ha yctpoiCTBO.
- HepacnojaraIte o6BeKtbl,HaonHeHHbIe BOIOI,taKe KaK Ba3bl,Ha NOBepxHOCTn yCTpOCTBa.
He yctaHabnBaIte ye cTpoiCTBO B OrpaHueHHOM IpoctpaHCTBe, HanpMep,B Wkafoy.
YcTpoIcTBo DOnJHOb 6bITb paCnOIOKeHO DoCTaTOUHO 6JI3KO OT PO3eTKI ceTeBOrO NITAHN, TAK YTObMoKHO 6bIIO JERKO OTCoeHNHTB BUNKy UHypa NITAHN B IIO6OE BpEM. - Ecn yctpoiCTBOM nCnOJIb3yIOTc6 bATapeu (BKNIOUa8 6aTapeHbIb 6NOK INN OTdJIbHbIe 6aTapeu), INx He cIeJyET noDBePraTb BO3JeCTBUNo CONHeYHOrO CBeta, ORH INN NOBIIeHHORo Tenla.
- PPEIOCTEPEXEHNE IINI IN3dENII, B KOTOpbIX NcN0Nb3yIOCTC MEnHbIE IITnueBbIE 6aTapei: cyuectByET OAnchocTb B3pbiBA, eCNI 6aTapeIO 3aMeHNtHa 6aTapeIO HenoDxOJaIeTO Tnna. 3aMeHJTe TOnbKO INeHTuHHbIMn 6aTapeAMn INI 6aTapeAMn TORO Ke Tnna.
PNEUYIPEXKDEHNE,KACAIOUEECA BATAPEI
BnDennn nCnoNb3yIOCT 6atape. Pn HnPabInbHOM nCnoNb3oAHn 6atape Bo3MOxHa yTeKa, pa3nOM nn Dpyrne npOBeMbI. Pn nCnoNb3oBAHN 6atape Bcerda co6JIoJaTe npuBeHHeIe HnKe Mepbl npedocTo- pOKHOCTn.
HnKorda He 3apJkaIte Henepe3apJkaemble 6aTapeu. 3To MoKeT NOBpeDITb 6aTapeu IN BblBaTb yTeKY, 4TO MoKeT npNBecTN KnoKapy nIN TpaMe.
Bo Bpem yctahOBKn 6aTapei co6nOdaIte yka3aHHyIO nolapHocTB (nlloc/MmHyc, / ), uYCTAHABNBAITE 6bTapeM B TOOHOM COOTBETCTBN C yka3aHEM NOJAPHOCTN BOCTe IIN 6bTapei. YcTaHOBKa C Heco6IO-DeHNEM NOJIAPHOCTN MOKeT NOpeNTb 6bTapeu INN Bbl3BaTb yTeKY, TTO MOKeT Bbl3BaTb NOKap, TpaMbY INN NOBpeXdHeNE NOBepxHOCTe BOKpyr 6bTapei.
Pnpxpanenm n ytnnnn3aun 6atape, n3oynpyte nx tepmnnaIbI n3oneHToI nn aHaIOnuHbIM cpeCTBOM, YTO6bl npedOTbPAITb KOHTAKD npymm 6atapeMn nn MetaIIueckmN o6bekTAMN.
- PnBb6paCbBAHm 6aTapei, co6JIOaIte INCTpyKUIN NO yTuIN3aUNyKa3aHHbe Ha 6aTapeX, IMecTHoe 3aKOHOaTeNbCTBO.
He nCnoB3yIte 6aTapeN, KpOmeTex, KOtOpbe peKoMeHIOBaHbI. He nCNoB3yIte BmecTe HOBble N CTapble 6aTapeN ININ 6aTapeN pa3HbIX BnIOB. 3To MoKeT NOBpeINb 6aTapeN ININ Bbl3BaT yTeKy, YTO MOKeT Bbl3BaT bNOkAp, TpaMbY ININ NOBpeKdHeNne NOBepXHOCTe BOKpyr 6aTapeN.
He depknte n He xpaHte 6aTapeu BmecTe C metaanueckmN o6bekTamn. Bo3moKHO 3ambikaHne 6aTapeu, YTO npBBeEeK yTeueKe, pa3nomy nn npyrrn mnpo6nemam.
He HargbaeH He pa36npaTe 6batae. He KnaIte 6batae B orOhb IIN BOy. 3To MOKeT NOBpeNTb 6batae INN Bbl3BaT bTeky, 4To MOKeT Bbl3BaT noXap, TpaMBy INN NOBpeXdHne NOBepXHOCTe BOKpyr 6batae.
Ecnn n3 6atapeB BbTEKaET KJIKKOCb, BbITPnTe KJIKKOCb C Kopnyca OTeceka 6atape nepey yctaHOBKO HOBx. NopadHne KJIKKOCTN 6atape B rna3a MoKet Bb3BaTb Notepk 3pEHN. Pnp noJaAHm KJIKKOCTN B rna3a TuaTeNbHO IpomOte Rna3a YnCToN BOIO, He TpIe N HeMeDnHNO bpaTNTeck B BpaY. Pnp noJaAHm KJIKKOCTN Ha TeNo ODeXy BO3MOXHO nobpeXdHeM KoKn Nn OKOrn. EcnTo IpoN3oUlo, CMOtE KJIKKocb YnCTO BDOIO N HeMeDnHNO oPaTNTeck B BpaY.
BoBpMa yCTaHOBKn IIN 3aMeHbI 6aTapeN PNTAHHe yCTpoiCTBa DOJIxHO 6bITb OTKJIIOUeHO.
- Ecnn BbI He nnaHpyeTe nCnOB3oBaTb ycTpoiCtBO dNITeNbHoe BpeM, nBNEknte 6aTaape. B npOTNBOM Cnyae BO3MOXHa yTeKa 6atapei, qTO MOKeT Bbl3BaTb NOpax, TpaBM MyNIOBpeXdEne NOBepXHOCTe BOKpyr 6aTapei. Ecnn Ns 6aTaape BblTEKaET XNDKOCTB, BbITpuTe XNDKOCCTc OTCceKa dA 6aTapei nepeyctahOBKO HOBbIX.
He pa36npaate 6atapeo. KncnoTa BHTpn 6atapeu moKet noBpeNTb Koxy nn odeJdy.
Дя ebponecknx notpe6nten
Ytun3aun 3neKtpueckoro n 3neKtpoHoro o6opydoBaHn
(a) BcE 3eKtpnueckoe H 3eKtpoHHe O6OpyObaHne DOnJxHO yTINN3npoBaTbCg OTDeIbHO OT 6bITOBbIX OTXODOB NocpeCTBOM CNEuaNbHbIX cnyk6 c6opa,Ha3HaueHHbx npaBNTbCTBOM JIN MeCTbIMN BlaCTMNI.
(b) IpaBnIbHo yTuIN3Npyr 3NeKtpnuecKe n 3NeKtpoHoe o6OpyoBaHne, Bbl NOMORAte CoXpAHNb Tbe CEHHbIe pEcypcbI n PpeDToBpaTNTbNOTeHuaJIbHO HeRaTHBOE BO3JeCTBHe Ha 3DopOBBe YenOBeka n OKpykaIOUyO cpeNy.
(c) HenpaBnBnaYttnaunObOpyDbaHm MoKeT OKa3bBaTb cepbe3Hoe Bo3eNCTBnE Ha OkpyJauOyUcpeNy 3doPObBe IIOeI
I3-3a ONachbIX BeueCTB, KOtOpblc COpejXnT 3neKtpuYeCKoe IN 3JIeKTPoHHOe O6OpyoBaHne.
(d) 3Haouc c n3o6paKeHem nepeepKHyToro MycOpHOro KOHeIeHepa Yka3bIbaet Ha To,TO eNekTpneueckoe N 3eKtPOnHOO6OpyDobAHne DoJXHO CoBpaTbcn yTunu3ipOBaTbC rOtebHO O t6BtOBorO Mycopa.
(e) CnCTeMbI Bo3BpaTa n c60pa DoCTyHbI KOHeuHbIM nOtpE- 6BtENAM.Bolee NoDp6Hyo INHOpMaUIO 6yTmN3aUN CTaporo 3neKTPnuecKOrIO n 3neKTPoHrTO o6OpyOBAHn MOKHO nOLyHTB B rOpOcKOr aDMNHctpaU, cLyXk6e BBIO3a OTxOIOB mN B MarazInHe, B KOTOPOM Bbl npNo6peIN o6OpyOBAHn.

Ytuiu3aun6aTapeu n/uunnakymyTOpOB
(a)NcnoB3OBAHbIbe 6atape N/nnkAkyMnyTOpby DOnKbIy TnHNI3IpObaTbCByOTDeBHO 06bTOBbX OTXoDOb NOpcTeCBTM CneuNaIbHbIX CNYK6 C6opa, H3aHaueHHbX npABUteBcTBOM Nm MeCTbIMN BJACTRM.
(b) IpaBnBHO yTnnN3npy nCnOJb3OBaHHbIe 6aTapeu n/nnn aKKMyJITopbl, Bbl NOMoAeTe COxpaHNTb CEHNbIe pecypcbI n PpeIOTBpaNTbIOTehnnaJIbHOe HraTINBHOE BO3dIeCTBHe Na 3doOpOBBe YelOBeka N OKpykaHOU cyDy.
(c) Henpabnibhna ytnin3aunncnojb30BaHHbx 6atape n/wnn akkymnyrTopoB MoKeT OKa3bIbTaB cpebe3Hoe BO3eJCTBne Ha OKpykaOuyo Cpeyu 3dOpOBBe IIODeN3-3a OAnChbIX BeueCTB, KOtOpBe CoepKAT 6atapen n aKKymnyrTopbl.
(d) 3haok c n3o6paKeHnem nepeepkHyToro MycOpHO KOHTeHepa yka3bIbaet Ha To, UTO baTapeu H/INn aKKymyTOpbI DOJNkhbl co6npaTbcn uTytnm3nPoBaTbcr OTJeBHo OT 6bITOBORO mycopa. Ecln 6bapeer INn aKKymyTApTo copeepKNT CBnHa (Pb), pTytn (Hg) n/INn KaDMna (Cd) 60JIbe, Yem onpepeEno B DInpeKtUBe o 6bapeex (2006/66/EC), noD 3haukom nepeepkHYTORO MycOpHO KONTeHepa yka3bIbaOTcX XMMueckne CMBONb CBnHa (Pb), pTytn (Hg) n/INn KaDMna (Cd).
(e) CnCTembBo3Bpata nC6opa DoCTynHb KOHeuHbIM NOTpe6HTeIaM. BoJee npDpo6HyIO HhOpaMaIIO OyTINIm3aIIM INcNoIb3OBaHbIX 6aTapei I/IIIn aKKymIaTOPOB MOxHO NOLyUHTB B ROPoDCKoi aDMNHcTpaIIN, CNyX6 Be BBIO3a OTXODOB INB MArA3IHe, B KOTOPOM Bbl IN pNIO6peJI.
Copepknne
BctynneHne 80
PykoBocTBo no 3Kcnnyataunn .80
Komnnekt n3dennna 81
Mepb npedoctopoxhoctn npn pa3mee
HHHINNCIOB3OBAHNN 81
I36eaiTe KOHcHcaun. 81
OuNTka yctpoNCTBa. 81
O kaptax microSD 81
IcnoB3ObaHne web-caTt KaMnHaHm TEAC....82
Ycnyn KneHTcko noDepKkTASCAM.82
Ha3BaHnI n cyHKunu y3NoB 82
Bepxnaenb. 82
IpeHnaHb. 83
JIeBa 6okOBa naHb. 83
PpBaB6okOBa nHeIb. 83
HnKnaHeB 83
IoproTOBka Kpa6oTe 83
YcTaHOBka 6aTapei. 83
YCTAHOBKa KaPTb NAMrTn. 83
BknueHne yctpoNCTBa 84
IcnoB3OBaHHe BCTPOeHHORo MKNpO0Ha......84
Kpennne Hne noctabkn 85
Ob3op dincnne 86
UcnoB3OBAHnE MeHIO 86
3aIncb. 87
Hacpoika peKIma 3anuCn. 87
VcnoB3OBaHHe FnBbTpBa BbICOKX YaCTOT.88
BxOdbI N BbIXOdbI 92
BxOHHb/ByXoHbIe npaMeTpb pa3bEMOB
ynpabnene 92
3ByKobBx xapaKTepeNCTnKn 92
IINITeNbHOCTb 3aHNCu. 92
IpoueXapaKTeepntu 93
BctynneHne
5naorapn3a npno6pTeHne pekopepa TASCAM DR-40X Linear PCM Recorder. Pered 3Kcnnyatauey uCtpoCTBa BHNMaTeNbHO pOuHTaIte HAcTOnuee pyKOBoDCTBO NOb3oBATEN, YTObI NCNoB3OBAb Tb N3dJeN nPABINbHO n C MaKcMnALbHO 30fKeTNBHO tB TeueHne MHorix IET. Pocne npOHTeHn HAcToJero pyKOBoDCTBa XpaHNTe ERO B 6e3oNaChom MecTe C BO3MOxHOCTbU NCNoB3OBAHnE rO npn Heo6xoDMOCtN.
PykoBocTBO NOIb3OBaTeH N PykoBocCTBO no KcNpyatauMn MoXHo TaKaYe C CaYa komnaHn TEAC (http://teac-global.com/).
PykoBoDCTBO no экплуataци
B HactoIeM PykoOdbCTBe noIb30BaTeIaTaTnpeDCTabJIeHne 06 OCHOBHbIX FyHKUHXyCTPOINCTBa. INΦOpMaUNI 06 BCEX FyHKUAXyCTPOINCTBa PnIBoDITcB RPykoOdbCTBe NO3KcNpyataun yCTPOINCTBa.
PykoBODCTBO NOIb3OBaTeN I PykoBODCTBO no EeKcIIyatauMn MOxHO TaKaHc B CaHaT KomnaHn TEAC (http://teac-global.com/).
KomnneK T3dennr
Hnke npBedeH npeueHb KOMnoHeHOB, npedocTabIeMbIX B KOMPNeKTe C yCTpoIcTBOM. BckpbBaYnaKOBky, co6IIOaIte OCTOpOxHOCtB, uTo6bl N36ExaTb NOBpeXJdeHn KOMNOHEHOT n3dEInra. BckpbBaYnaKOBky, co6IIOaIte OCTOpOxHOCtB, uTo6bl N36ExaTb NOBpeXJdeHn KOMNOHEHOT n3dEInra. CoXpaHnTe ynaKOBky Ha cnyuA Heo6xoDMIOCTN TpAHCNOPTIPOBKN B 6yduem.
EcnnKaKnE-To KOMNHOENTbO TcyTCTByIOTnn 6bIIN NOBpeKdEnbI pI npTaHcnpTnpOBKe, CBXnTECb nPoaBcMn3denn.
- UcTpoiCTBO. X1
-ⅢeJouHbIe 6aTapeN Tnna AA. X3 - Pndctabka. X1
PykoBOcTBo NOIb3OBATeJIa (HacToIuee pyKO BOcTBo), rapaHTnHiBt TaIOH. 1
Mepblnpedoctopoxhoctn npn pa3meuehen n mCnoIb3ObaHm
-Дианалон pa6oynx TemnepaTy yctpoiCTBa: 0-40°C.
He yctahabnbaiteyctpoCTBO B CLeDyox MeCTax (B nPTOBHOM Cnyae BO3MOKHO yxydwe Hne KaueCTBa 3Byka N/nnn He npaBnIbHoe fHKUOHPOBaHne):
C NOBbIeHHbIMyPOBHmN Bn6paun
B6JIN3N OKOH INN B Dpyrnx MeCTax NOI pRMBM BO3DcEChTBnEM COJIHeHbIX Lyuei
B6Jn3n 6oRpeBaTeNe n Bpynx MeCTax C OueHb BicOKoI TempeaTypoi
- pnp ouheHb Hn3KoT Tempepatype
B MeCTax C PINOXOI BEHTUNLAUe NIN BbICOKOIBNaJXHOCTbIO
B MeCTaX C NOBbIeHHOH 3aNbJIeHHOCTbIO
ПОД ПИРМьIM BO3ДeIcTBnEMdoJNДpyrNIX OcaIkOB
PnI NOMEUHIN B6JN3YUCNJNTeJI MOnHOCTHnnDpyTOrO O6OpyDObAHnC,CoepKzAeero 6oJbSho TpaHcΦopMaTOp,B03MoXHO rYeHne. B TAKOM CNYae yBEnuBtpe paCCTOHN MeMdy yCTpOHTCBOM IN DpyrIM O6OpyDoBaHmE.
- Pn nCnONb3OBaHN Ha 6nI3KOM paCCToHHN daHHoe yCTpojCTBO MOKeT Bbl3BaT bCeTOBbie naMEXn Ha 3kpaHe TeneBn3Opa NIn uym paAnOpnpneMHnKa. B 3om cnUyae paCnONoxNte yCTpojCTBO DaJIbSe OT TeNEBn3Opa NIn paAnOpnpneMHnKa.
YcTpoiCTBO MoXeT BOCnPoN3BOOHTb Wym,ecnHa 6nI3KOM pacCToHm nCNoIb3yETcMo6nIbHbI TepeOH nnDpyrne 6ecnpoB0dHbIe yCTpoiCTBa DnI 3BOHKO nnPiNeMa I
pepaun CnHAnOB. B TaKOM cnYyae yBEnuHbTe pacctOaHne MeJdy ycTPOcTBOM nDpym m6OpPyoBaHnem nn BbIKIOHTe o6OpyoDaHnE.
-ДяобсесениHaNEXkaUeroTENNOOTBODA HnUero He KnaDte Ha yCTpoIcTBO.
He paccnnaaTe yctpoCTBO Ha ycuiintene MouHocTN INI dpyrom oobopyoBaHN, BbJeJIIOUeM TENTNo.
I36eraTe KOHdeHcaun
KoHHeCaIg MoKeT Bo3HKnHyb npn nepMe-
UeTPOCTBa n3 XOJOna B TEnIO, npn
NcPONb3OBAHN yCTPOCTBa B 6bICTPO HArpTeOM
NOMEeHIN nII B INhBix CnyAaPe3KORO
N3MeHENHa TEMpePaTybl. YTo6bl 3TOr O3BeJAtb
nII eCNy Jepn3OToNo N3MeHENe TEMpePaTybl.BiDEpXnTEyCTBO pnp HOBo
TEMpePAType NOMEeHIN B TeueHIn OdHOro IIN
DByx YacOB NepeD Tem, KaK erO NcNOJIb3OBAtB.
OuNTka yctpoiCTBa
IpoTpaIte yctpOCTBO cyxO MfKoT KKaHbIO. He npToIpaTe caIfoTeKAMn, npOnITaHHbIMn XmMueCeCKIMN OCHNTeJIaMMn, pactBOpHTeJIeM, CInPTOM IpyrIMN XmMueCeCKIMN BeIeCTBaMn. 3To MoKeT Bbl3BaT nobpeXdEHe Nn o6ecBcYuBaHne NOBepXHOCTn.
O KapTax microSD
Ipeueenb SD KapT, KOtOpBie rapaHTnpOBaHNO MOry tncOJb3ObaTbcra DaHHbIM UCTPOiCTBOM, npBvEeH h cAte Hauwekompann. IpeeiNITE, noXaYcTA, hA CTpaHcy dHaHoro u3dEINHA caTe TEC Global (http://teac-global.com), YTO6bI cKaAeTBpeueenb, li6o 6opatntecb B Cnyk6by nOndepKKn KomanHn TASCAM.
TASCAM DR-40X-Pyko6oocm8o noIb3oamenn
IcnoJIb3OBAHne web-caIta komnHaHn TEAC
O6HOBnEHn Dn DaHHOro yCTpoiCTBa DOCTynHbHa caTte TEAC Global:
http://teac-global.com/
Bpa3dene 3arpy30k Bb6epnte HxHbI y3bIK, TTO6bl OTkpblCTpaHnUy 3arpy30k webCaNTa Ha COOTBETCTByIOUcEM 3bIke.
YcnyrKlneHTcko noadepkKn TASCAM
Iopndepkka n3eenn TASCAM npedeocabneHepaHTN OcyeceBnTcTOBko BCTpaHepoHnIX pnpO6PteHH.
ДяТOrO,чTo6blNoCte npno6peTeHnIzIeHnI NOyUHTbTexHnueckyIONoIepKkY,HaIuIte HaCaIteTEACGlobal(http://teaC-global.com/) B CnICKe DnCTpN6bIoTePob TASCAM MeChTyIO KOMNaHIO-NpeDctBaTIENo,HaxOJaUioC B TOM perHOne,rge 6bIa npno6peTeHa npOdyKu,n O6paTInTeCbB3TyOpraHnIaIIO.
PnO6paueHnn, yka3aHne apeca (nnN URL apeca) mara3nHa (nnN INtepHET mara3nHa), rDe 6bIIO npno6pEtHO n3dene, a taKKe DaTb copeBWeH NOKyKnO, oBa3aTeNbHO. KpOME TOrO, TaKKe MOrY TNOAdo6nbcra papaHTNHbTaNtOH N YeK, noDTHepKaDaIoUnc COpeBHeNE NOKyKn.
Ha3BaHnI n yHKuIn y3IOB
BepxnaHb
① BCTpoeHHbI cTepeOMKnpoΦoH
② INHINKATOP DUAL [JBOHAR 3AINCb]
③ INHdkaTop4CH[4-KAHAbhblPEXIM]
④ NHHKAtop OVER DUB [HAJIOXHEHNE]
⑤ Khonka 3/4 SOLO [3/4 COJO]
Bb6op n BkIoueHne napbl kaHaIOB 3/4 B peKmE cOLO
⑥ Khonka 1/2 SOLO [1/2 COJO]
Bb6op n BkIoueHne napbl KaHaIOB 1/2 BpeKmE colo
⑦ Khonka /I/HOME (■)
McNoB3yETcA DnOCTaHOBK, BkJIoueHNA/OTKIOUeHNA nTuHNA (1) n nepeXoJa BIaHBn EKpaH (HOME).
⑧ Khonka+
TnOC/BBepx
⑨ Khonka MENU [MEHIO]
OTKpbItb 3KpaH MeHIO
10 Khonka
ПОИСКHAЗДВЛЕВО/OTMeHa
11 KhoNka PB CONT [HACTPOIKA BOCIPON3-BEDEHEN]
OTKpbTne 3KpaHa HAcTpOaN BocnpoN3Be-DeHnA
12 KhoNka
MnHyC/BnH3
13 Ducnnnei
14 INHnKaTOp PEAK [YPOBHB NIKOB] 3aropaetc, KOrda ypoBeHb 3aNcH Upe3MepHO BICOK.
15 Khonka REC MODE [PEKIM 3AINCN]
OTKpbITne 3kpapaMeHIOpeKIMMa3aINCN
16 KhonKa/HHaKaTOp RECORD (●) [3AInCb]
Toka3bBAeT COCTOHN 3aHNC
17 KhoKa PLAY () [BOcPiPOU3BEDEHME]
Bocnpon3BeHne Tekyuero faina
18 Khonka QUICK [6bICTpoe MeHIO]
OTKpbBaet6bCTpoMeHIO
19 Khonka
Ponck BnepeBnpaBO/nTBepeNTb
20 Khonka ENTER/MARK [BBOJ/METKA]
NoCTaBnTb/CTepeTb MeTKN
21 Khonka MIXER [MUKUEP]
OTKpbIbAeT KpaH MUKWepa
IpepeHnaHeB
22 JIeBb/npaBb pa3bEmbl EXT MIC/LINE IN (XLR/TRS) Pa3bEM MKNPOOHa/BHeHrero BXoJa
23 Pa3bEM REMOTE (pa3bem TRS dnaMeTpom 2,5 MM)
Jeb86okobaa naHeIb
24 Pa3bEM/LINE OUT [JIHHeHbI BbIXO] Pa3bEM HAYUHINKOB /JIHHeHORO BbIXOda
25 PepeknoyateNBEXTIN [BHEUHNI BXO]
26 PepeknouatenbHOLD [BIOKNPOBKA] YcTaHOBKaФyHKUm6NOKPOBKn
27 KhoNkINPUTLEVEL (+ / - ) [YPOBEHb BXOHOFO CMHAJA]
PpaBaa 6okobaa naHeIb
28 USBnopT
Cnot dIg kaptbI microSD
HxHnaHeB
30 MoHO dHaMUK
3 Pe3b60Boe OTBepCTne IINI WITATnBa NIM NOCTABK (1/4 DIOHMa)
32 Kpbiuka oTecka dna 6aTapei
33 KpenneHne npeMeoka
34 OTeCkIa6aTapei
Ioprotobka K pa6ote
YctaHObKa 6atapei
OTkpoTe KpbIuKy OTeKa 6aTapeH Na3aHHe NaHeIn yCTPOINCTBa, HAdaBn IN CdBHyB eE B CTOPOny. 3aTeM yCTaHOBtE 6aTapeN.
COBET
Danhoe ycmpoucmgo makke moxem paobommb om aanmepa numah TASCAM PS-P520E.
YcTaHOBKa KapTbI naMaTn
OTKpoTe cnot nA KapTbI microSD Ha npabO B60kOBn naHEnn N BCTaBtE COOTBeTcByIOuYo KApTy.
BknouenHyeCTpoNCTBa
1 CdbnHbTe nepeKluoyateNb HOLD [BLOKNIPOBKA] B HanpaBneHnn Yka3aHHoHa pncyHke cTpeKN, YTO6bl pa36NoKpObaTb yCTpoIcTB0.
COBET
Tepeknouehuem cnaepepa 8 cmopohy HOLD MOxHO BO ePMA 3anucu 6nokupobamb KHONK Dn npedombaeHue Cnyauhix MAHunynyua.
2 HaxMMTe n ydepKnBaTBe Tteehne HeckoIbKnx cekyHd KOnky /1/HOME (■).
3 Pn npBbOM BkIouhen Nocne nokynKn Ha dncnnee noaBnIOTc CndyIOune 3KpaHbI HacTpoek.
OpMaTIpOBAHne KapTbI
Haxmte KhONky ENTER/MARK, yTO6bl NOITBepNTb BbINONHeHne.
BHMMaHMe
Iocne noodmbepehdeHua fOpamupoBaHa ece Umeouqueca Ha Kapme daHHbte 6ydym cmepmb. 3mo coo6uehe He noBnemc, ecu KaPma yke omfopamupoBaHa.
HactpoKa 3bka
Bb6epnTe 3bIK OTo6paKeHnMaHIO n coo6eHH.
BbIePnte Ra3bIK C NOMOoiBIO KHOIOnK + H - N NOaTBePnTe HaXaB KHONKY ENTER/MARK.
DATA/BPEM
YcTaHOBnTe DaTy n BpEmr.
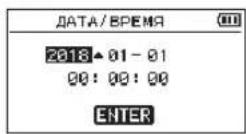
Data n Bpemy yctHaBnBaOTc c NOMOu bOp
nepeMeueHn KypCopa KHONKaMn I n
n3MeHn 3HaueHn KHONKaMn + n-.
tOobI noTBePntb DaHHbIe, HxMMTe KHONkY
ENTER/MARK.
COBET
Hacmpouku r3bika, dambu epemhu moxho u3MeHumb b MeHIO no3OHee.
Mknpo0ha
BCTpoEHbIe MKNpOoHbI yctpoIcTa bnpdyc MaTpBaIOH hAcTpoKy NocpeDcTBOM 3mMeHeHHy YrN0x paCNOJoxEHn. YCTaHaBnBaAOTKpBiTe UIN 3akpblToe NOJoxEHne napbi MKNpOoHOB, MOXHO BbIpaTb NcTOe ININ WIpOKoe cTepeo 3ByuHHe B 3ABNCUMOCTN OTNCTOUYHkAaNNi, CNTyaUN I T.D.
Hactpoika MIKpOFOHOB dIaIINcHIMPOKOro cTepeo 3ByuHaHnA (noJoxHeA-B)
Pa3BepHHTepeoMnKpofohblBneBOuBnpaBO (noJooKeHneA-B).
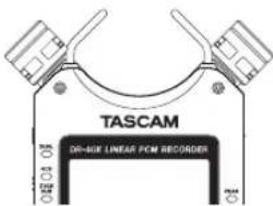
B3TOM NIOJKeHN MIKpOfoHb pa3BepHytbluPOKOBCTOPoHb,06eCNHUBa BO3MOXHOCTb3aNcN BYCIOBnAX CNbHOrO aKyCTUeCKOroNONA, YTO XOpOio NOxOdnt, HAnpMep, dIa3NcN My3bKn.
Ecnn BO Bpemn nCnONbOBAHn BCTpoEHHO CTpeo MKNpOfoHa OTKpbTb nn 3aKpbTb npy
MKNPOOHOB INPn 3OM JEBBI IN PABBI KAHANBE COOTBCTBYOT YCTAOHOBENHOMY UTY paCNOLOXHEIN MKNPOOOHOB, NOBUTCA BCNbIBAIOUeEOO6UHeNE C 3AnpOCOM PeEKNUHTb JEBBI INnpABB KaHAN MKNPOOHOA.
BHMaHne
UcmaHobume hacmpouky JI-IP ne6o2u npaa0zo KANAOB cStpoehno MUKpOHa. Ecu bU uCnOb3ye me CStpoehhble MuKpOho, u OHu ye CImaHOBNeHb HA JI-IP, H2ZnaHOM 3kpaHe no8nEemr
HaCtpoKa MmKpOfoHOBI3aHNCuYMCTORO Ctepeo 3ByuHaNna (noNoXeHne X-Y)UCTAOBHTe 3akpbIToe nNOxHe NcTepeoMnKpOfoHa(X-Y).
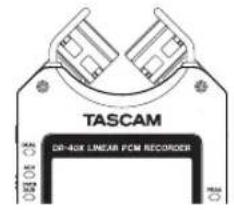
B3OMNNOLOXeHNnnapaMkP0oHOB3akpbItA, 6OcNEUBABO3MOXHOCTb3aNNuBycNOBNx YUCTORcTepeoAKyCTNuCKOrO NOIc HAnMeHBwepa3HOCTbOΦa3. EcINBovBpemaNCNoB3OBAHHN BCTpoEHHORO cTepeoMkP0oHObAOKpbITbN3aKpbTb npy MkP0oHOBnPiN3OMNeBbInnpaBbKaHa
He COOTBeCTByOT yCTaHOBEnHOMO yTny paCnoIoxKeHnMkPofoHOB, NOABNTcBcNbIBaIOoe coo6ueHnC 3aPocOM nepeKIOHTb IeBbl n npAbBl KaHaBl MkPofoHa.
BHMMaHne
Ycmaohobume hacmpouky IIP-JI nebozo u npaboo kaanoe bcmpoehnoo mukpofoha. Ecu bu cncnbaemyecmpoehhble MUKPOFObl, u OHy e ycmahOBneHb HA IIP-JI,Ha 2na8Hom 3kpahe noaBnemcra
KpenneHne noctabkn
PnBbINONHeHH 3aHNC C NcNoJIb3OBAHNEM BCTPOEHNO MKNpOFOHa MOXHO YCTAHOBNTb NOCTABKY, BXoJMyU B KOMIJIeKT YCTPOICTBa, B pe36BOOE OTBepCTNe YCTPOICTBa. TTo No3BOJNT npINOHNrTb YCTPOICTBO, KOrDa OHO pACNOIOKeHO Ha HIXKHe CTOpOE (rHe HaxoJITcR KpbIiKa OTECaJa 6aTapei).KOrDa NODCTABKa He NCIOJIb3yETc, eE MoXHO pACNOIOXHTb MeKdy DByMBAblCTyNamn Ha BHYTpEnHe CTOpOE KpbIiKa OTeKa 6aTapei dNl XpaHEHn I TpaHCnOPTnpOBKn.
063op dncnne
Iocne octaHOBKn nn BO BpeMa Bocnpoun3BedeHn
① O6naCTb HcNoB3yEmbIX φaIIOB dI BOCnpon3BedeH
② NCTekKuee BpeMa
③ Homic Bocnpoun3BODnMOro Tpeka/06uee uCNO TpeKOB
4 HdkaTop 3apda 6atapen / nntan
⑤ CoctoHnue Bocnpon3BeDHeHn
⑥ BpemeHHaWKaA BoCnpoun3BedeHn
⑦ CoctoHne Tpeka
⑥ ypoBn CnHana Bocnpon3BegeHn
OCTaBweecBpeM
10 YctahOBHeHHaCKOpocTb BOCnpon3Be-
11 CtaTyc 0000kTA
12 TnKOBbIe 3HaueHnB Deu6enax (a6)
HaMeHOBaHne Bocnpn3BOHMoro aHa
Bo Bpem3aHnCn HnB COCTOHN IOTOBHOCTN K 3aHNCN
① ΦopMaT3anncn
② PpOJdEHHoe BpeMa 3aHnC
③ Yactota cMnnpoBaHn np3aHn
4 YnCIO 3aIINCbIbAembIX KaHaNoB
⑤ HmKATOP BKIOHHO3A
6 MTOUHK BXOHORO CnHnHa
⑦ 3mepuTeenuypOBH3aunC
⑧ OctabWeecB BpeM 3aannC
9 YcTaHOBHeHHbpeKmypOBH3aHnCn
10 乌bTp BbICOKX qACTOT
11 CtaTyc aΦΦeKtA
12ФyHKU3BvKOBORoCnRnAcnHxPOHN 3aun
13 Mmaaana zanncn
14ПИКOBbIe3aueHnBdEu6eJax(D6)
IcnoJb3ObaHne MeHIO
MeHIO nCnONb3yeTcraIgN3MeHeHnpa3nUHbIX npaMeTPOB 3aNNi, BOCnPOn3BeJeHH, CNTeMHbIX HaCTpoE, a TaKke IJRA BKInOeHHu BBkInOeHH BCEBO3MOXhBx FyHKun.
1 HaxMnte KhoNky MENU.
OTkpoetcaKpaH MEHO.
2 KhoNkamn+ n -BbI6epnte npHKT MeHIO n HaxMNTe KhoNky ENTER/MARK.
PONBNTCAOKHOHAcTpoek.
3 KhoNkamn+ n -BbI6epnte pa3dEn hactpoek n HaxMNTe KhoNky ENTER/MARK.
3aTeM MoXHO N3MeHHTb HaCTpOuKn IN BKNIOHTb FyHKUIN.
4 NcnoB3yIte KHOKN+ -n- n3MeHnna 3NaueHnHaCTpOKn.
PIMMEYAHVE
-ДЯоьepaama e npedobiyu uэраннakmume Khonky MENU.
4mo6bI bepHymbc8 2na8HbU 3KpaH, HaxMume Khonky HOME.
3anncb
1 HanpaBbTe BCTpoEHHbIMMKpOoH BCTOPOHY 3aNcBbAeMOrO 3ByKa.
B 3aBNCUMOCTN OT pEXKMA MeHJOTC NOCTYNHbIE HACTPOKN 3aUNCI.
1 B coctoHnn octaHOBKn HaxMMte KhoNky PEK 3AII.
OTKPOEcMeHIOPEX3AII.
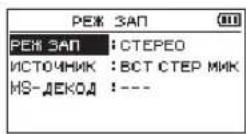
2 Khonkamn+ n-Bb6epnte PEX 3A1, n Haxmte KhoNky ENTER/MARK.
Bb6opHactpoekPEK3AANTAKTNBnpyerca
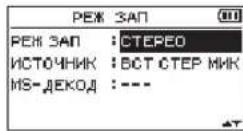
HO-DAHbpeKMMno3BONReTdenaTO MOHO 3aIINCI.
CTEPO (no ymonuHaHIO) -DaHHbI pexHM
OebcneuHbaET Ctepeo 3aNcB cunHAnOB n3
DByOTDeNbHbIX KAHAIOB:NEBOrO INpaboro.
BOHOJ - DaHHbI peXHM NcNoB3EyOTnH
NCTOCHIK BXOHDORO CnHnA DnC03aHnR
DByx PauNOB Cpa3bIMn HAcTPOkAMn
BXoHOro YpOBnB (Kpanh BblbOpa Pekmua
UpyOBn).Co3aOtTe nnBa faJaMa MOH
3aNcnnnBdaPfnaCTepe 3aNcN.
4KAH-ДангьшпpeхимисплььетВсроehhhь MEKpOfoHbИ BHeWHNE BXOdbIДЯЗIMCN DBYx Nap BXOHBIX CNHANOB BDAbaa. Co3dAOTcIbBaФaIIaCTepeo 3anCn.HAOEHN -ДангьшпpeхимзamCudo6aJIET HOBbie 3ByKn BBOCPON3BODmblФaII.
BpeKmE MHCK BxOHDn N BOCpON3BO- DnMb CnHbI CBODTcN 3AnNCbBAOTcR B OIN OHn FaiN. B peKmE OTJEJIbHO B HOBB FaiN 3aNNCbBaTeC TOnbKO BXoHDn CnHn.
Bb6epnte OINH 3Tnx BapnaHTOB HACrpoKax PEX HAJI Ba3dene HAIIOEHH
UcnoJb3ObaHne qnIbTpBaBICOKNX YACTOT
UWM KOHNIOHOpeOB INpynX NCTOCHKO BMOXHO CHN3NTB INPOUCCE 3aINCI.
1ДЯЗTOBEPeKIMeOxuHaHua3aHnCn HaxMMTe KhoNkyQUICK.
OTKpoetcBbictpeMeHIO.
2 CnOMOJIbKHOHONK+N-Bbl6epnteΦB, n HaxMMTE KhoNKy ENTER/MARK.
OTKpoetc3kpaH HAcTpoek fNbTpbaBepxHnx YactOT.
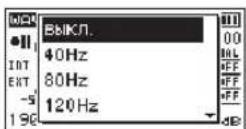
Bapnhtb: BkJ, 4Hz, Hz, 120Hz, 220Hz
3 C nomoubIO KhoNOK + N - Bbl6epnTe HactpoKy u HaxMnte KhoNky ENTER/MARK.
U3MeHeHnBCTynaKt Bcunny, npOxCoDHT BO3BpA K 6bICTpOMy MeHIO.
4 Haxmte KhoNky /I/HOME (■).
PONBNTcraabHbIeKpaH.

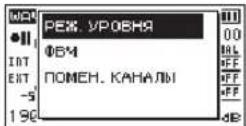
HacpoKa JIMUTepa
C NOMOJIbIO 3TOI ΦYHKUIN MOXHO ppeIoTbpaITb NCKaKeHnO T BHe3aHbIX rPOMKx 3ByKO B BO Bpemr 3aIncN.
1ДЯЗTOBEPeKIMeOxNdaHn3aHnCn HaxMMTe KhoNky QUICK. OTKpoEcBaICTpeMeHIO.
2 KhoNkAMn + n - BB6epuTe PEK YPOBHa n HaxMnte KhoNky ENTER/MARK.
OTKpoetc3kpaH hactpoeK peKIMa perynIOBKN yOBH3aINCN.
BapnAHTb:PYUHOH (no ymOnaHaHNO), JINMHTEP,IOHNKHHNE INK,ABTO
3 C nomoubky KhoNOK + n - Bbl6epnte HactpoKy u HaxMnte KhoNky ENTER/MARK.
N3MeHeHNA BCTyNaOT BCnIy, npOxCoNDT BO3BpaT K 6bICTpOMy MEHO.
4 HaxMMTe KhoNky 1/HOME (■). IIOBNTcraABHbI 3KpaH.
Bocnpon3BeDeHne 3anncen
1 Bb6epnte faan n haxmte PLAY ▷nBocnpon3BeDeHn. HauHETcBOcnpon3BeHne,HaDncnnee OTo6pa3ntc
2 HactpoTe rpoMKocTb. POMKocTbperynnpyeTc KhONkAMn+u-
3ДЯ OCTAHOBK 3aHNCn HaxMITE KHOKNy O/HOME(■). Bocnpou3BeHeHne OCTAHOBNTc,Ha DnCnnee oTo6pa3ntc
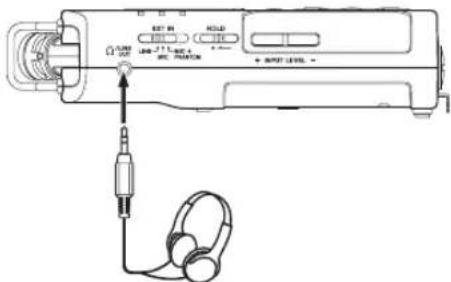
PpocnyuBaHne c HayuHnKaMn KIOUHTe HauuHnKn Kpa3bemy LINEOUT Ha OoYCTBe.
Onepaun BO BpemB BoCppon3BepeHn
Bo3MOXHbIeBapHaHTbI:
PC/Hac (HaCTpoKNo yMOnuaHnO):
IpocnyuBaHne CnHana BocnpOn3Be-DeHHNc NKnnMac.
PMAH:
IpocnyuBaHne BxOHoro CnHana 6e3 3aepKKn.
NIPMMEYAHNE
HoukamopbypOBeMuOxHO uCNoB3oBamb OmclKueBaHua cuHa nOcnpou3e- DeHua BHeuHezo ycmpoUcmea.
3eyK He 6ydem ebeoodmbcHa duHAMUK.
- npocnyuubauBBOcnonb3yumecb HayuHukamu.
OTKJIIOUeHne
Haekpane MEHBOBb6epute OTKJIOHTBn Haxmte BII.
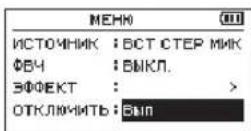
Pekopep pa3opBcT coeHHeHc C BHeHm UCTPOCTBOM IN BEpHTcR B rnaBHyk EKpaH.
YcTpaHHe HenoJaOK
EcnC yctpoiCTBOM Bo3HKnI KaKne-1n6o np6bEmbl, nonp6oyTe npedpnHrtb HxkeJe duoume uarn, npexde qem o6paatbcra 3a nOmoUb. Ecn3Tm Mepbl He nomory T peuNTb np6bemy, o6patntecb B mara3HN, rBe bI npno6pennyyctpoiCTBO,nnB Cnpy6y noDpekXKN KomnHn TASCAM.
UcTPOINCTBO HE BKNIOHuaeTCA.
- Y6eDnTecb, yTO 6aTapen yCTaHOBHeHb npabInbHo
- Y6eIMTeCb,уTo He yCTaHOBNeHa 6IOKINPOBka HOLD.
YcTPOIcTBo CaMOnpOu3BOBbHO BblKlIOUaETCA.
IpoBepbTe FyHKnIO ABTomATNueCKORO
3HEPrc6epeXeHJyCTaHOBHte eHa 已 BkJI
1nI npDoTbPAuEHJABtOMATNueCKORO
BbIKUoEHJN.CM. 已 HAcToPiKa FyHKuIN
ABtOMatNueCKOrO 3HePrc6epeXeHJN B
pa3ne 12-HactpOKn u INΦOpMaJn
PykoBODCTBa no 3KcnnyatauIN.
Kapta microSD He uHTaTcra
Y6eHntecb, YTO KapTa microSD BCTaBnHa nonHOCTbIO
OTcyTCTByET BbIXoHoi CnHraI nn 3ByK He BOCIPON3BODNTCnHaMnKOM.
y6eHntecb, yTO rPOMKoCTb He CnIuKOM HN3Ka.
PIOBOpBeT,TO DNHaMnK BkIIOueH B NaCTPOJKaX. DaKe PnB BKIOueHHOM DnHaMnKe,3ByK He 6yJeT BbBOIDHTbCn Ha DNHaMnK,ecNn NOkKIOueHb HauWHKn,a TaKke BpeKIme 3aIINcN N pOJDROTBKN K 3aINcN.
3auncb HeBO3MOxHa.
-ПюоверпгЕИнДикатOPREC.EсиИнДикатOPRECMURAET,yCTpoNTBOHAXOДNTCByPEXKIMEFOTOBHOCTN3aIINCN.
-Поверпге Ндсппee Дocтунhoe octabWeecBpeMЯЗИСN.
CunHan 3anucn cna6bui nn nCKaKHeHHb.
PpOBepeYpOeHb BXoHOrO CnHana.
UcpoIcBO He ono3HaETcKOMNbIOTepOM npn IIOKnIyueHINnocpeCTBOM USB ka6eJ.
- Y6eIITecb, yTO NOJKNIOUChHbIKOMNbIOTeP IMeET NOIDepKINBaEMyO nepaUNHOHyIO CnCTeMy.
YTo6bI KOMNbIOTeP HaaH onpeDenrTb yctpOCTBO npn IcNoIb3OBAHN USB, COOTBeCTBlyIOU pexKIM DoJIKeH 6bITb BbIbPaH B CINCKE MEHO. - Y6eIntecb, yTO Ka6enb USB He npedHa3NaueH NCKIIouHTeBHO DnA 3apraJaYCTPOIcTB.
- Y6eIITecb, yTO NOKIOUeHHe BbIOJIHeHO He uepe3 USB xa6.
B pexime aydno nHTepeicaba BO3HnKaIOT npoBaJIb 3ByaHnna nnuym.
DnA Windows
-ПараметрьбыстpoideCTBnB Bb6epnte«O6ecneuHTb HannyUwee 6bICTPOeICTBNE»
-3JIeKTPoPNTaHHe Bb6epntE《BbICOKAmpn3BOaNTeNbHOCTb》
CnyauHObbBb6paH HeTOr3blK.
Iocne HaxaTnKhONkO/1/HOME nBbIKNo-ueHnYcTpOicCTBa,HaxMNTe KhONky O/1/HOME, ydepXNBaB HaxaTOM COCToHmN KhONky MENU. IorBntc MeHO Bbl6opa Ra3bKa,N Bbl CMOKeTe Bbl6paTb Ra3bIK CHOBA.
XapakTePncTnKu
NapaMetpbI
UcTpoiCTBaXpaHEnHa
KapTa microSD (64Mb-2GB)
Kapra microSDHC (4-32 FB)
KapTa microSDXC (48-128 F5)
ΦopMaTb3aHcN/BOcPpOn3BedeHn
BWF:44,1/48/96 KΓι, 16/24 έι
WAV:44,1/48/96 kTU, 16/24 6nT
MP3:44,1/48 kTμ, 32/64/96/128/192/256/320 k6nt/c
KoInueCTBO KaHaIOB
4KaHana (CTepeo × 2
BxOdbi N BblXoDbI
Pa3bEmblEXTMIC/LINEIN(XLRpa3bEmblnoidepXnBAOT
XLR-3-31 (1: 3emna, 2: Topany, 3: XonoHb) (cnndepkko
ΦaHTOMHOrO nHTaHnA)
6,3 MM CtaHdpThbI pa3bEM TRS (KoHcIK: TOpaH, KOnbO: XoJIoHbI, TInb3a: 3eMn)
Pa3b@M /LINE OUT [JIHHeiHbIi BblXO]
Pa3bEM:3,5MMCTepeo MUNH-DJKeK
BcTpoeHHbI dHaMVK
0,3BT (MOHO)
Bxohh/Byixohhie napametpbipa3bEMOB ynpabneHn
USBnopT
Pa3bEm: Micro-B
ΦopMaT: USB 2.0 BbICOKOCKOPOCTHOI mass storage class
■ REMOTE
Pa3bEM:2,5MMTRS
3BykoBbie xapaKTePncTmKn
HepaBHomepeHoctb A4X
20Γu-20KΓu+1/-3dB
(MIC/EXT IN K LINE OUT, 44,1 KU, JEITA)
20Γu-22KΓu+1/-3d5
(MIC/EXT IN K LINE OUT, 48 kF, JEITA)
20Γ-40KΓ+1/-3
(MIC/EXT IN K LINE OUT, 96 kFU, JEITA)
Ko3ΦΦnUeHT HeJIINHeHbIX NcKaXeHN
0,05% mnn Mehee
(MIC/EXT IN K LINE OUT,Частота диckретиаши 44,1/48/96 kГД, JEITA*)
OTHOWeHne CnTHa/UrM
92 db u nn Bbwe
(MIC/EXT IN K LINE OUT,чстота дскретиаци 44,1/48/96 kГU, JEITA*)
ПиMuMeaHne: JEITA-coOTBeTcTBye cTaHApTy JEITA CP-2150
TnTeNbHOCTb 3annCn
| Формат Фаль (насстroyka запис) | Емкость |
| 4 ГБ | |
| WAV 16 сИТ (CTEPEO) 44,1 кГι 6:44:00 | |
| WAV 24 сИТ (CTEPEO) 96 кГι 2:04:00 | |
| MP3 (CTEPEO/MOHО), 20 кбИт/c 44,1 кГι, 48 кГι 29:48:00 |
- Yka3aHHoe BbIe BpEme 3aIcN IaJIeTcra Pn6Hn3HTbeHbIM. OHO MoKet pa3Hn4bCra dIra Kapr microSD/microSDHC/microSDXC pa3HbIX npO3B0dUTenien.
- Yka3aHHoe Bblie Bpem 3aNcH He ABnEeTcH HepepbHBbM BpemeHem 3aNc, a ckopee o6uM BO3MOxHbIM BpemeHem 3aNc dJa KapT microSD/ microSDHC/microSDXC.
Ppoune xapaKTepeNtKu
■Питане
36atapen AA (uienouhbe nn Ni-MH)
This warranty gives you specific legal rights and you may also have other rights which vary from state to state. This warranty is only valid within the country the unit was originally purchased.
WHAT IS AND IS NOT COVERED
Except as specified below, this warranty covers all defects in materials and workmanship in this product. The following are not covered by the warranty:
- Damage to or deterioration of the external cabinet.
- Damages resulting from accident, misuse, abuse or neglect.
- Damage resulting from failure to perform basic daily maintenance and/or calibration or otherwise resulting from failure to follow instructions contained in your owner's manual.
- Damage occurring during shipment of the product. (Claims must be presented to the carrier)
- Damage resulting from repair or attempted repair by anyone other than TEAC or an authorized TASCAM service station.
- Damage resulting from causes other than product defects, including lack of technical skill, competence, or experience of the user.
- Damage to any unit which has been altered or on which the serial number has been defaced, modified or is missing.
WHO IS COVERED UNDER THE WARRANTY
This warranty may be enforced only by the original purchaser. This warranty is not valid if the product was purchased through an unauthorized dealer.
LENGTH OF WARRANTY
All parts except heads and disk drives are warranted for one (1) year from the date of original purchase. Heads and disk drives are warranted to ninety (90) days from date of original purchase. Labor is warranted for ninety (90) days from date of original purchase.
WHAT WE WILL PAY FOR
We will pay all labor and material expenses for items covered by the warranty. Payment of shipping charges is discussed in the next section of this warranty.
HOW YOU CAN GET WARRANTY SERVICE
Your unit must be serviced by an authorized TASCAM service station in the United States. (This warranty is not enforceable outside the U.S.) If you are unable to locate an authorized TASCAM service station in your area, please contact us. We either will refer you to an authorized service station or instruct you to return the unit to the factory. Whenever warranty service is required, you must present a copy of the original dated sales receipt from an Authorized TASCAM Dealer.
You must pay any shipping charges if it is necessary to ship the product to service. However, if the necessary repairs are covered by the warranty, we will pay return surface shipping charges to any destination within the United States.
LIMITATION OF IMPLIED WARRANTYES
Any implied warranties, INCLUDING WARRANTYS OF MERCHANTABILITY AND FITNESS FOR A PARTICULAR PURPOSE, are limited in duration to the length of this warranty.
EXCLUSION OF DAMAGES
TEAC's liability for any defective product is limited to repair or replacement of the product, at TEAC's option. TEAC shall not be liable for:
- Damages based upon inconvenience, loss of use of the product, loss of time interrupted operation or commercial loss; or
- Any other damages, whether incidental, consequential or otherwise. Some states do not allow limitations on how long an implied warranty lasts and/or do not allow the exclusion or limitation of incidental or consequential damages, so the above limitations and exclusions may not apply to you.
To locate an Authorized Service Center in Your Area
CALL 1-800-447-8322
This warranty gives you specific legal rights, and you may also have other rights that vary by country, state or province.
If you have a warranty claim or request, please contact the dealer where you bought the product.
If you require repair services for your TASCAM equipment, please contact the dealer where the product was purchased from or the TASCAM Distributor in your country. A list of TASCAM Distributors can be found on our website at: http://teac-global.com/
WARRANTY / 保證書
Address/Adresse/Adresse
Indirizzo/Direccion/Apec/住所