
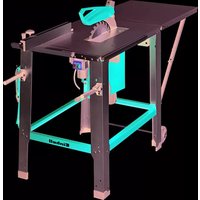
TCTS 820 - Electric saw EINHELL - Free user manual and instructions
Find the device manual for free TCTS 820 EINHELL in PDF.

| Product type | Table circular saw |
| Brand | Einhell |
| Model | TCTS 820 |
| Power supply | 230 V, 50 Hz |
| Power | 800 W (S2 10 min) |
| No-load speed | 2950 rpm |
| Saw blade | Ø200 x Ø16 x 2.4 mm, 20 teeth, hard metal |
| Table dimensions | 500 x 335 mm |
| Max cutting height | 43 mm (90°), 36 mm (45°) |
| Dust extraction connection | Ø35 mm |
| Weight | Approximately 13 kg |
| Delivery contents | Saw blade, parallel stop, push stick, tool for blade change, cross stop, riving knife, instruction manual |
| Intended use | Longitudinal and cross cutting of wood (suitable diameter) |
| Safety instructions | Wear hearing protection, dust mask, safety goggles |
| Maintenance and cleaning | Regular cleaning, check guards, blade change |
| Warranty | 24 months on material and manufacturing defects |
| Spare parts and repairability | Available through after-sales service by indicating type and identification number |
Frequently Asked Questions - TCTS 820 EINHELL
User questions about TCTS 820 EINHELL
0 question about this device. Answer the ones you know or ask your own.
Ask a new question about this device
Download the instructions for your Electric saw in PDF format for free! Find your manual TCTS 820 - EINHELL and take your electronic device back in hand. On this page are published all the documents necessary for the use of your device. TCTS 820 by EINHELL.
USER MANUAL TCTS 820 EINHELL
- Safety regulations
- Layout and items supplied
- Proper use
- Technical data
- Before starting the equipment
- Assembly
- Using the saw
- Operation
- Replacing the power cable
- Cleaning, maintenance and ordering of spare parts
- Disposal and recycling
- Storage


Caution - Read the operating instructions to reduce the risk of inquiry.

Wear ear-muffs. The impact of noise can cause damage to hearing.

Wear a breathing mask. Dust which is injurious to health can be generated when working on wood and other materials. Never use the device to work on any materials containing asbestos!

Wear safety goggles. Sparks generated during working or splinters, chips and dust emitted by the device can cause loss of sight.

Caution! Risk of Injury! Do not reach into the running saw blade.

Lifting point
-18

GB
Important!
When using the equipment, a few safety precautions must be observed to avoid injuries and damage. Please read the complete operating instructions and safety regulations with due care. Keep this manual in a safe place, so that the information is available at all times. If you give the equipment to any other person, hand over these operating instructions and safety regulations as well. We cannot accept any liability for damage or accidents which arise due to a failure to follow these instructions and the safety instructions.
1. Safety regulations
The corresponding safety information can be found in the enclosed booklet.
Caution!
Read all safety regulations and instructions.
Any errors made in following the safety regulations and instructions may result in an electric shock, fire and/or serious injury.
Keep all safety regulations and instructions in a safe place for future use.
2. Layout and items supplied
2.1 Layout
1 Sawing table
2 Saw blade guard
3 Push stick
4 Saw blade
5. Splitter
6. Table insert
7. Parallel stop
8.Motor
9.Power cable
10. Stand
11. On/Off switch
12 Locking grip for parallel stop
13. Scale for angle selling
14 Locking grip
15 Screw for saw blade guard
16. Cable holder (for machine transport)
17 45° stop
2.2 Items supplied
Please check that the article is complete as spcific ed in the scope of delivery. If parts are missing, please contact our service center or the nearest branch of the DIY store where you made your purchase at the latest within 5 work days after purchasing the article and upon presentation of a valid bill of purchase. Also, refer to the warranty table in the warranty provisions at the end of the operating instructions.
-
Open the packaging and take out the equipment with care.
-
Remove the packaging material and any packaging and/or transportation braces (if available).
Check to see if all items are supplied. - Inspect the equipment and accessories for transport damage.
If possible, please keep the packaging until the end of the guarantee period.
Important!
The equipment and packaging material are not toys. Do not let children play with plastic bags, foils or small parts. There is a danger of swallowing or suffocating!
- Splitter
Carbide-tipped saw blade
Parallel stop
Push stick
Blade change tool - Bench-type circular saw
Cross stop
Original operating instructions
Safety information
3. Proper use
The bench-type circular saw is designed for the slitting and cross-cutting (only with the cross stop) of all types of timber commensurate with the machine's size. The equipment is not to be used for cutting any type of round wood.
The equipment is to be used only for its prescribed purpose. Any other use is deemed to be a case of misuse. The user / operator and not the manufacturer will be liable for any damage or injuries of any kind caused as a result of this.

GB
Please note that our equipment has not been designed for use in commercial, trade or industrial applications. Our warranty will be voided if the machine is used in commercial, trade or industrial businesses or for equivalent purposes.
The equipment is to be operated only with suitable saw blades (saw blades made of HM or CV) It is prohibited to use any type of HSS saw blade and cutting-off wheel.
To use the equipment properly you must also observe the safety information, the assembly instructions and the operating instructions to be found in this manual.
All persons who use and service the equipment have to be acquainted with these operating instructions and must be informed about the equipment's potential hazards. It is also imperative to observe the accident prevention regulations in force in your area. The same applies for the general rules of health and safety at work.
The manufacturer will not be liable for any changes made to the equipment nor for any damage resulting from such changes. Even when the equipment is used as prescribed it is still impossible to eliminate certain residual risk factors.
The following hazards may arise in connection with the machine's construction and design:
- Contact with the saw blade in the uncovered saw zone.
- Reaching into the running saw blade (cut injuries).
- Kick-back of workpieces and parts of workpieces.
Saw blade fracturing - Cataputting of faulty carbide tips from the saw blade.
- Damage to hearing if essential ear-muffs are not used.
- Harmful emissions of wood dust when used in closed rooms.
4. Technical data
AC motor 230V-50Hz
Power P 800 W S2 10 min Idle speed n 2950 min
Cutting-off wheel . 0200x016x2.4mm Number of teeth 20
Table size 500 x 335 mm
Cutting height max. 43 mm/90°
35mm/45°
Extractor socket 35 mm
Weight approx. 13 kg
Load factor:
A load factor of S2 10 min (intermittent periodic
duty) means that you may operate the motor
continuously at its nominal power level (800
W) for no longer than the time stipulated on the
specifi cateions label (10 min). If you fail to observe
This time limit the motor will overheat. During the
OFF period the motor will cool again to its starting
Sound and vibration
Sound and vibration values were measured in accordance with EN 61029.
Operation
Lpa sound pressure level 95 dB(A)
uncertainty 3 dB
Lsound power level 108 dB(A)
uncertainty 3 dB
The quoted values are emission values and not necessarily reliable workplace values. Although there is a correlation between emission and immission levels it is impossible to draw any certain conclusions as to the need for additional precautions. Factors with a potential influence on the actual immission level at the workplace include the duration of impact, the type of room, and other sources of noise etc., e.g. the number of machines and other neighboring operations. Reliable workplace values may also vary from country to country. With this information the user should at least be able to make a better assessment of the dangers and risks involved.
Wear ear-muff s.
The impact of noise can cause damage to hearing.


Keep the noise emissions and vibrations to a minimum.
- Only use appliances which are in perfect working order.
Service and clean the appliance regularly.
Adapt your working style to suit the appliance. Do not overload the appliance. - Have the appliance serviced whenever necessary.
Switch the appliance off when it is not in use.
Residual risks
Even if you use this electric power tool in accordance with instructions, certain residual risks cannot be rules out. The following hazards may arise in connection with the equipment's construction and layout:
-
Lung damage if no suitable protective dust mask is used.
-
Damage to hearing if no suitable ear protection is used.
- Health damage caused by hand-arm vibrations if the equipment is used over a prolonged period or is not properly guided and maintained.
5. Before starting the equipment
Before you connect the equipment to the mains supply make sure that the data on the rating plate are identical to the mains data.
Always pull the power plug before making adjustments to the equipment.
- Unpack the bench-type circular saw and check it for damage which may have occurred in transit.
The machine has to be set up where it can stand firmly, e.g. on a work bench, or it must be bolted to a strong base. - All covers and safety devices have to be properly fitted before the machine is switched on.
It must be possible for the saw blade to run freely. - When working with wood that has been processed before, watch out for foreign bodies such as nails or screws etc.
Before you actuate the On/Off switch, make sure that the saw blade is correctly fitted and that the machine's moving parts run smoothly.
6. Assembly
Important! Always pull out the power plug before carrying out any maintenance or conversion work.
6.1 Fitting the saw blade (Fig. 2/3)
- Important! Pull out the power plug.
- Unscrew the fixing screws (20) and chip bin cover (19).
- Undo the nut (21) with a ring wrench (30) on the nut itself and a face spanner (31) on the saw shaft (31) to apply counter-pressure.
- Important! Turn the nut in the direction of rotation of the saw blade (4).
- Remove the outer flange (22)
- When fitting a saw blade for the first time: Clean the mounting flange, insert a new saw blade and re刊登 the flange (22).
- When changing the saw blade: Take off the old saw blade. Clean the mounting flange, insert a new saw blade and reighten the flange (22).
Important! Note the running direction! The running direction of the saw blade is marked on the blade as a direction arrow.
6.2 Adjusting the splitter (Fig. 4-6)
- Take off the saw blade guard (2) (see 6.3).
- Take out the table insert (6) (see 6.4).
- Fasten the splitter (5) with the two screws (24) (Fig. 5).
Adjust the splitter (5) so that the gap between the saw blade (4) and the splitter (5) equals 3 - 5 mm (see Fig. 6). - The splitter (5) has to be in line with the saw blade (4) in longitudinal direction.
- Retighten the two screws (24).
- The setting of the splitter has to be checked each time after changing the saw blade.
6.3 Fitting the saw blade guard (Fig. 4)
Mount the saw blade guard (2) on the splitter (5) and align.
- Insert the screw (15) through the hole in the saw blade guard (2) and in the splitter (5) and secure it with the nut.
To dismantle, proceed in reverse order.

GB
6.4 Replacing the table insert (Fig. 4)
Important: Pull out the power plug!
Remove the 6 screws (23).
Take off the saw blade guard (2) (see 6.3).
Lift the worn table insert (6) up and out.
- Fit the replacement table insert by following the above in reverse.
7. Operation
7.1 Switching On and Off (Fig. 1)
- The saw can be switched on by pressing the green pushbutton, i.
The red pushbutton, 0^ has to be pressed to switch off the saw.
7.2 Parallel stop
7.2.1 Stop height (Fig. 7/8)
The parallel stop (7) supplied with the bench-type circular saw has two different guide faces.
- For thick material you must use the stop rail (25) as shown in Fig. 7, for thin material you must use the stop rail as shown in Fig. 8.
To change the height of the stop, slacken the two locking grips (12) and pull the stop rail (25) off the carrier rail (26).
Turn the stop rail (25) 180^ to the left or the right, depending on the required height of the stop, and plug in back on the carrier rail (26).
Tighten the locking grips (12).
7.2.2 Cutting width (Fig. 8)
The parallel stop (7) has to be used when making longitudinal cuts in wooden workpieces.
- Slide the parallel stop (7) to the right or left side of the saw table (1).
The parallel stop (7) can be set to the required dimension with the help of the scale (b) engraved on the saw table (1).
- Tighten the two thumb screws (12) in order to fix the parallel stop (7).
7.3 Setting the angle (Fig. 9/10)
- Undo the locking grid
- Slide the two locking grips (14) to set the blade (4) to the required angle value (see scale (13)).
Retighten the locking grips (14).
8. Operation
After every new adjustment we recommend you to make a trial cut in order to check the new settings.
After switching on the saw, wait for the blade to reach its maximum speed of rotation before commencing with the cut.
Secure long workpieces against falling off at the end of the cut (e.g. with a roller stand etc.)
Take extra care when starting the cut.
8.1 Cutting narrow workpieces
(width less than 120 mm) (Fig. 11)
Adjust the parallel stop (7) to the width of workpiece you require.
Feed in the workpiece with two hands. Always use the push stick (3) in the area of the saw blade (4). (A push stick is supplied with the saw!)
Always push the workpiece through to the end of the splitter (5).
Important! With short workpieces, use the push stick from the beginning.
8.2 Cutting extremely narrow workpieces (width less than 30mm
- Adjust the parallel stop (7) to the width of workpiece you require.
Use the push block to press the workpiece against the stop rail (25) and push the workpiece with the push block through to the end of the splitter (5).
There is no push block supplied with the
(Available from your specialist dealer)
9. Replacing the power cable
If the power cable for this equipment is damaged, it must be replaced by the manufacturer or its after-sales service or similarly trained personnel to avoid danger.
10
Aln
10.
10.
br
lao
10.
1
10.
[Tab]
.
For
WW
-22
3
m = 311 ;
de
b-
3
3ys
of
e
ed,
31


10. Cleaning, maintenance and ordering of spare parts
Always pull out the mains power plug before starting any cleaning work.
10.1 Cleaning
- Keep all safely devices, air vents and the motor housing free of dirt and dust as far as possible. Wipe the equipment with a clean cloth or blow it with compressed air at low pressure.
We recommend that you clean the device immediately each time you have finished using it.
Clean the equipment regularly with a moist cloth and some soft soap. Do not use cleaning agents or solvents; these could attack the plastic parts of the equipment. Ensure that no water can seep into the device. The ingress of water into an electric tool increases the risk of an electric shock.
10.2 Carbon brushes
In case of excessive sparking, have the carbon brushes checked only by a qualifi ed electrician. Important! The carbon brushes should not be rep laced by anyone but a qualifi ed electrician.
10.3 Maintenance
There are no parts inside the equipment which require additional maintenance.
10.4 Ordering replacement parts:
Please quote the following data when ordering replacement parts:
Type of machine
Article number of the machine
Identification number of the machine
Replacement part number of the part required
For our latest prices and information please go to www.isc-gmbh.info
11. Disposal and recycling
The equipment is supplied in packaging to prevent it from being damaged in transit. The raw materials in this packaging can be reused or recycled. The equipment and its accessories are made of various types of material, such as metal and plastic. Never place defective equipment in your household refuse. The equipment should be taken to a suitable collection center for proper disposal. If you do not know the whereabouts of such a collection point, you should ask in your local council offices.
12. Storage
Store the equipment and accessories out of children's reach in a dark and dry place at above freezing temperature. The ideal storage temperature is between 5 and 30^ . Store the electric tool in its original packaging.
-23

GB

For EU countries only
Never place any electric power tools in your household refuse.
To comply with European Directive 2002/96/EC concerning old electric and electronic equipment and its implementation in national laws, old electric power tools have to be separated from other waste and disposed of in an environment-friendly fashion, e.g. by taking to a recycling depot.
Recycling alternative to the return request:
As an alternative to returning the equipment to the manufacturer, the owner of the electrical equipment must make sure that the equipment is properly disposed of if he no longer wants to keep the equipment. The old equipment can be returned to a suitable collection point that will dispose of the equipment in accordance with the national recycling and waste disposal regulations. This does not apply to any accessories or aids without electrical components supplied with the old equipment.
The reprinting or reproduction by any other means, in whole or in part, of documentation and papers accompanying products is permitted only with the express consent of the ISC GmbH.
Subject to technical changes
24

GB
Warranty provisions
isc GmbH or the DIY store where you made you purchase guarantees the repair of defects or replacement of the equipment in accordance with the overview below. Statutory guarantee claims are unaffected.
| Category Example Warranty | ||
| Defect with regard to material or construction | 24 months | |
| Wear parts* V-bell, carbon brushes, table insert, push stick | 6 months | |
| Consumables* Saw blade Warranty only in case of an im- | mediate defect (24 hours after purchase / date on the bill) | |
| Missing parts 5 work days | ||
- Not necessarily included in the scope of delivery!
For consumables, wear parts and missing parts iSC GmbH guarantees the correction of defects or a new delivery only if the defect is reported within 24 hours (consumables), 5 work days (missing parts) or 6 months (wear parts) after purchase and the purchase date is verified with the bill.
In case of defects concerning the material or construction, we kindly request you to submit the equipment together with the fully completed warranty card supplied with the equipment. It is important that you enter an exact description of the defect.
To do so, answer the following questions:
Did the equipment work at all or was it defective from the beginning?
Did you notice anything (symptom or defect) prior to the failure?
What malfunction does the equipment have in your opinion (main symptom)?

GB
Warranty certifi cate
Dear Customer,
All of our products undergo strict quality checks to ensure that they reach you in perfect condition. In the unlikely event that your device develops a fault, please contact our service department at the address shown on this guarantee card. Of course, if you would prefer to call us then we are also happy to offer our assistance under the service number printed below. Please note the following terms under which guarantee claims can be made:
-
These guarantee terms cover additional guarantee rights and do not affect your statutory warranty rights. We do not charge you for this guarantee.
-
Our guarantee only covers problems caused by material or manufacturing defects, and it is restricted to the rectification of these defects or replacement of the device. Please note that our devices have not been designed for use in commercial, trade or industrial applications. Consequently, the guarantee is invalidated if the equipment is used in commercial, trade or industrial applications or for other equivalent activities. The following are also excluded from our guarantee: compensation for transport damage, damage caused by failure to comply with the installation/assembly instructions or damage caused by unprofessional installation, failure to comply with the operating instructions (e.g. connection to the wrong mains voltage or current type), misuse or inappropriate use (such as overloading of the device or use of non-approved tools or accessories), failure to comply with the maintenance and safety regulations, ingress of foreign bodies into the device (e.g. sand, stones or dust), effects of force or external influences (e.g. damage caused by the device being dropped) and normal wear resulting from proper operation of the device. This applies in particular to rechargeable batteries for which we nevertheless issue a guarantee period of 12 months. The guarantee is rendered null and void if any attempt is made to tamper with the device.
- The guarantee is valid for a period of 2 years starting from the purchase date of the device. Guarantee claims should be submitted before the end of the guarantee period within two weeks of the defect being noticed. No guarantee claims will be accepted after the end of the guarantee period. The original guarantee period remains applicable to the device even if repairs are carried out or parts are replaced. In such cases, the work performed or parts fitted will not result in an extension of the guarantee period, and no new guarantee will become active for the work performed or parts fitted. This also applies when an on-site service is used.
- In order to assert your guarantee claim, please send your defective device postage-free to the address shown below. Please enclose either the original or a copy of your sales receipt or another dated proof of purchase. Please keep your sales receipt in a safe place, as it is your proof of purchase. It would help us if you could describe the nature of the problem in as much detail as possible. If the defect is covered by our guarantee then your device will either be repaired immediately and returned to you, or we will send you a new device.
Of course, we are also happy offer a chargeable repair service for any defects which are not covered by the scope of this guarantee or for units which are no longer covered. To take advantage of this service, please send the device to our service address.
Also refer to the restrictions of this warranty concerning wear parts/consumables and missing parts as set forth in the warranty conditions in these operating instructions.
26

Sommaire
m = 311 ;
Chere CLIENT, Cher Client
m = 311
7.4
7.1
7.2
7.2
7.2
7.3

5. Pre puštanja u pigeon
Pro uklüčivanja proverite odgovaraju ili podaci na tipskovi ploci podacina o mrezki.
Pre nego preocte na podesaveata ureadaj, izvucite utkaik Iz uticnke.
Raspakujte testeroi proverite im la kakkivth transportinstostecnca.
Maśina mora de sa pośtavit stabilo, Ḍṭa znači prčivrstī na radni sto ili fíksno postolé.
Pre pustanja u rad moraju propiso da se montiraju svli pokolci sigurnesnapre
List testere mora slobodno da se krece.
- Dvo koje cete obradvati proverite na eventuello zaostala strana tela, kao npr. eksere li zavtnje i sl.
- Pre Ngo ukljucite prekida za ukljucivanje/ iskjlucivanje proverate da li je list testere pravlino montiran i krocu li so投放ntri delovl jako.
6. Montaza
Paznjal Pre svih radnji odrzavanja i prelnacavanja kruze testere potrebno je izvuci mrezn utikac.
6.1 Montaza lista testere (sl. 2/3)
Paznja! Izvuclte mreznutikaC
Olabavite pričržne zavtrjne (20) I sklinte po-klopac sa kutje za iver (19).
Olabavite naivrku (21) tako da prstenasti kluč (30) nasadite na naivrku i rupicastim klučem (31) kontrirate na osovini testere.
- Pažnaj! Navrku obrčte u smeru rotacije lista teste (4).
- Skinite spoljnu pirubnicu (22).
Kod prvo montazo lista testero: Olditio pri-rubnicu prihatnuka, umnetne novi list testere i ponovno prieglignite prirubnicu (22).
Kod zamene lista testere: Skinite stari list tes
tere. Ocitite pirubnicu prihvatnika, umetnite
novi list testere I ponomvo pritegnite pirubniciu (22).
- Păznajl Obratite paznju na smer vrtnej Smer vrtje lista testere ulisnut je na listu o obliku strellice.
6.2 Podesavanje klinza cepanje (sl. 4-6)
- Skinite zàitùlìa liste testere (2) (vidi 6.3).
- Odstranite umetak za sto (6) (vidi 6.4).
Priovrata sa oba zavrtnja (24) klin za copanjo (5) (sl. 5).
Klin za cepanje (5) podesite laku da razmak izmedla lista testere (4) i klin za cepanje (5) iznosi 3-5 mm. (vidi silku 6)
Klin za copanje (5) mora da bude u uzduznom smruu linji s listm testere (4). - Ponovo stegnite oba zavrtna (24).
- Podesenost kla nza cepanje mora da se proveri nakon svake zamene lista testere.
6.3 Montaza zašite lista testere (sl. 4)
- Za'tihi lista testere (2) namestite na klin za capanie (5) i poravnaite.
Zavtanj (15) umetnito kroz rupu u zaistil lista testere (2) i klinu za cepanje (5) i osiguraje navlkom.
Demontaza se vrsi obrutim redom.
6.4
.
m = 311
7.1
7.1
7.2
7.2
7.2
.
7.3
| RS | |
| 6.4 Zamena umetka za sto (sl. 4)Pozor: Izvučite mrežni ulkacI Odstranite šest zavtrjanja (23).Skinte zažtiti lista testere (2) (vidi 6.3).Izvadite odozgo istrošeni umetak za sto (6).Montažna novog umetka za sto odvjia seobrunim redom. | 8. PogonNakon svakog novog podesavanja preporučujemo da se napravl probn rez kako bl se proverla podesena mera.Nakon uključivanja testere sacekajte da list testere postigne maksimalan broj obtraja pre nego ste cete započeti sa testerisanjem.Dugacke radne predmete obezedite odprevrantanja na kraju procesa rezanja (npr. podupiraci).Paznjakod zarezivanja. |
| 7. Rukovanje 7.1 Uključivanje, iskjučivanje (sl. 1) Pritiskom na zeeleni taster, imo要考虑 dauključite testuru.Da biste testeru ponovo iskjučili, morate da pritsinete crveni taster,0. | 8.1 Rezanje uskih radnih predmeta (sirina manja od 120 mm) (sl. 11) Paraleini grančnik (7) podesite na odgovarajudi nacin prema prodvidenim sibirnama radnih predmeta. Radni predmet pomeralje oberna rukama, u području lista testore (4) obavezno koristite komad za guranje (3). (U sadraj zu isporuke!) Radni predmet upek proguraje do kraja klna za cepanje (5). Paznjal Kod kračin radnih predmeta tj kadom za guranje treba da se koristi već na počeku rezanja. |
| 7.2 Paraleini grančnik 7.2.1 Visina graničnika (sl. 7/8) Isporučen paraleini grančnik (7) ima dve povrsine vodilica razlicih visina.Zavisno od debljne materijala za rezanje mora da se koristi grančnă vodilica (25)prema sl. 7 za deblj imaterjali prema sl. 8 za tanji materijal.U svru premešanja visine grančnika olabavite ob drške za fiksiranje (12) i skinke grančnu vodiluc (25)nsaca (26). Grančnu vodiluc (25) okrenite za 180°ulevo ili udnesno, zavrisno od potrebne visinergrančnika i ponovo nataknine nosac (26). Pritegnite drške za fiksiranje (12). | 8.2 Rezanje veoma uskih radnih predmeta (sirina manja od 30 mm) Paraleini grančnik (7) treba da se podesi na sibirnu rezanja radnog predmeta.Pritisnite radni predmet s drivtom za guranje o grančnu vodiluc (25) i proguraje ga s kopalmadom za guranje do kraja klna za cepanje (5). Drvo za guranje nilne sadržano u lsporuč! (Moze da se nabavi u odgovarajućoj spečijalizovanoj prodavnici) |
| 7.2.2 Širina rezanja (sl. 8) Kod uzduznog rezanja delova drva mora da se koristi paraleini grančnik (7). Paraleini grančnik (7) gumite na desnu il levu stranu stola testere (1). Pomocu skale (b) na stolu testere (1) paraleli ni grančnik (7) moze da se podesi na zejlenu meru.Steglite oba leptirasta zavtrinja (12) kakobis te fiksirali paraleini grančnik (7). | 9. Zamena mrežnog priljićnog vodaAko se ostesti mrežni priljićnovi od vogu uredalja, mora da ga zameni proizvodac ili njegova servisi sluzba ili kvaliti kovano lice, kako bi se izbegle opasnostl. |
| 7.3 Podesavanje ugla (sl. 9/10) Olabavite drške za fiksiranje (14). Pomoranjem obo drška (14)list testero (4)moze da se podesi na zejlenu ugaonu meru (vidi skalu (13)). Ponomno slegnile drške za fiksiranje (14). | |


10. Čišćenje, odžavanje i porudžbina rezervnih delova
Pre svih radova ciiscenja izvucite mreznui ulkač.
10.1 Cliccenje
Zaistine naprav, ventilazione ovte i kuciiste motora uvek sto bolje ociiste od prasei i priavstine. Istrijante uredaj cistom krpon iig ga ispustie komprimiranim zrakom pod niskim pritiskom.
- Preporušamo da uredaj očistite odmah nakov svakog korišćanja.
- Uredaj redovno stiţile vlažnom kropom i malo mekog sapuna. Nemojte koristiti opatala i sredstva za dinşenje; oni bi moglj ostestiplasticne dijelove ureðaja. Pripazite na to da u unutrasnost uredajna ne dospije voda. Prodiranjte vode u elektroureddaj povečava rizik od elektrčnog udara.
10.2 Ugljene cetkice
Kod prekomjernog iskronja potrebno je da elektric provjeri ugliene otceike.
Annex IV Notified Rep.
Notified Body No.: MOA 13-072192 01212 Notified Body No.: TUV SUD Product Service GmbH
Reg. No.:
2000/14/EC_2005/88/EC
Annex V
Amex VI Nose:measured L-dB(A);guaranteed L-dB(A)
P = KW; L/D = cm²
Noll or Ross?
Nimrod So
2004/26/EC Emission No:
m - 1 0 ;
x2011/69/EC
Standard references: EN 61029-1; EN 61029-2-1;
EN 55014-1; EN 55014-2; EN 61000-3-2; EN 61000-3-3
Art.-No.:43,404.10 I-No.:11012 Subject I change without notice
Archivc-File/Recrd: NAPR06019
Documents registrar: Siegfried Rieder Wiesersee 22, D-84405 Landaustrat
-109
Anl_TH_TS_820_SPK1.indb 109
22.05.13 16:36

EH05/2013(01)
Anl_TH_TS_820_SPK1.indb 112
22.05.13 16:36


- GB
- Important!
- Safety regulations
- Caution!
- Layout and items supplied
- Layout
- Items supplied
- Proper use
- Technical data
- Load factor:
- Sound and vibration
- Operation
- Wear ear-muff s.
- Residual risks
- Before starting the equipment
- Assembly
- Fitting the saw blade (Fig. 2/3)
- Adjusting the splitter (Fig. 4-6)
- Fitting the saw blade guard (Fig. 4)
- Replacing the table insert (Fig. 4)
- Operation
- Switching On and Off (Fig. 1)
- Parallel stop
- Stop height (Fig. 7/8)
- Cutting width (Fig. 8)
- Setting the angle (Fig. 9/10)
- Operation
- Cutting narrow workpieces
- Cutting extremely narrow workpieces (width less than 30mm
- There is no push block supplied with the
- (Available from your specialist dealer)
- Replacing the power cable
- Cleaning, maintenance and ordering of spare parts
- Cleaning
- Carbon brushes
- Maintenance
- Ordering replacement parts:
- Disposal and recycling
- Storage
- Warranty provisions
- Warranty certifi cate
- Sommaire
- Pre puštanja u pigeon
- Pre nego preocte na podesaveata ureadaj, izvucite utkaik Iz uticnke.
- Montaza
- Paznjal Pre svih radnji odrzavanja i prelnacavanja kruze testere potrebno je izvuci mrezn utikac.
- Montaza lista testere (sl. 2/3)
- Podesavanje klinza cepanje (sl. 4-6)
- Montaza zašite lista testere (sl. 4)
- Čišćenje, odžavanje i porudžbina rezervnih delova
- Cliccenje
- Ugljene cetkice
Brand : EINHELL
Model : TCTS 820
Category : Electric saw