FM102DAB - Audio Receiver IMG STAGE LINE - Free user manual and instructions
Find the device manual for free FM102DAB IMG STAGE LINE in PDF.
| Product type | Digital audio and FM receiver |
| Brand | IMG STAGE LINE |
| Model | FM102DAB |
| Dimensions | 482 × 44 × 210 mm (1U) |
| Weight | 2.15 kg |
| Power supply | 230 V / 50 Hz |
| Operating temperature | 0 to 40 °C |
| FM frequency range | 87.5 – 108 MHz |
| DAB+ frequency range | 174.928 – 239.200 MHz |
| Presets | 20 FM + 20 DAB+ |
| Audio output level | 0.4 V (RCA) |
| FM sensitivity | 10 µV |
| DAB+ sensitivity | -97 dB |
| FM selectivity | 31 dB (adjacent channel), ≥49 dB (distant channels) |
| Antenna | Telescopic supplied |
| Remote control | Yes, with 2× R03 batteries |
| Main functions | Auto scan, presets, RDS display, Sleep timer |
| Maintenance and cleaning | Soft dry cloth, no chemicals |
| Safety | Indoor use, avoid water splashes, unplug if damaged |
| Repairability | Repair by specialized technician only |
| Included accessories | Power cord, antenna, remote control, batteries |
Frequently Asked Questions - FM102DAB IMG STAGE LINE
User questions about FM102DAB IMG STAGE LINE
0 question about this device. Answer the ones you know or ask your own.
Ask a new question about this device
Download the instructions for your Audio Receiver in PDF format for free! Find your manual FM102DAB - IMG STAGE LINE and take your electronic device back in hand. On this page are published all the documents necessary for the use of your device. FM102DAB by IMG STAGE LINE.
USER MANUAL FM102DAB IMG STAGE LINE
Digitaler Stereotuner
for the Reception of DAB+ and FM


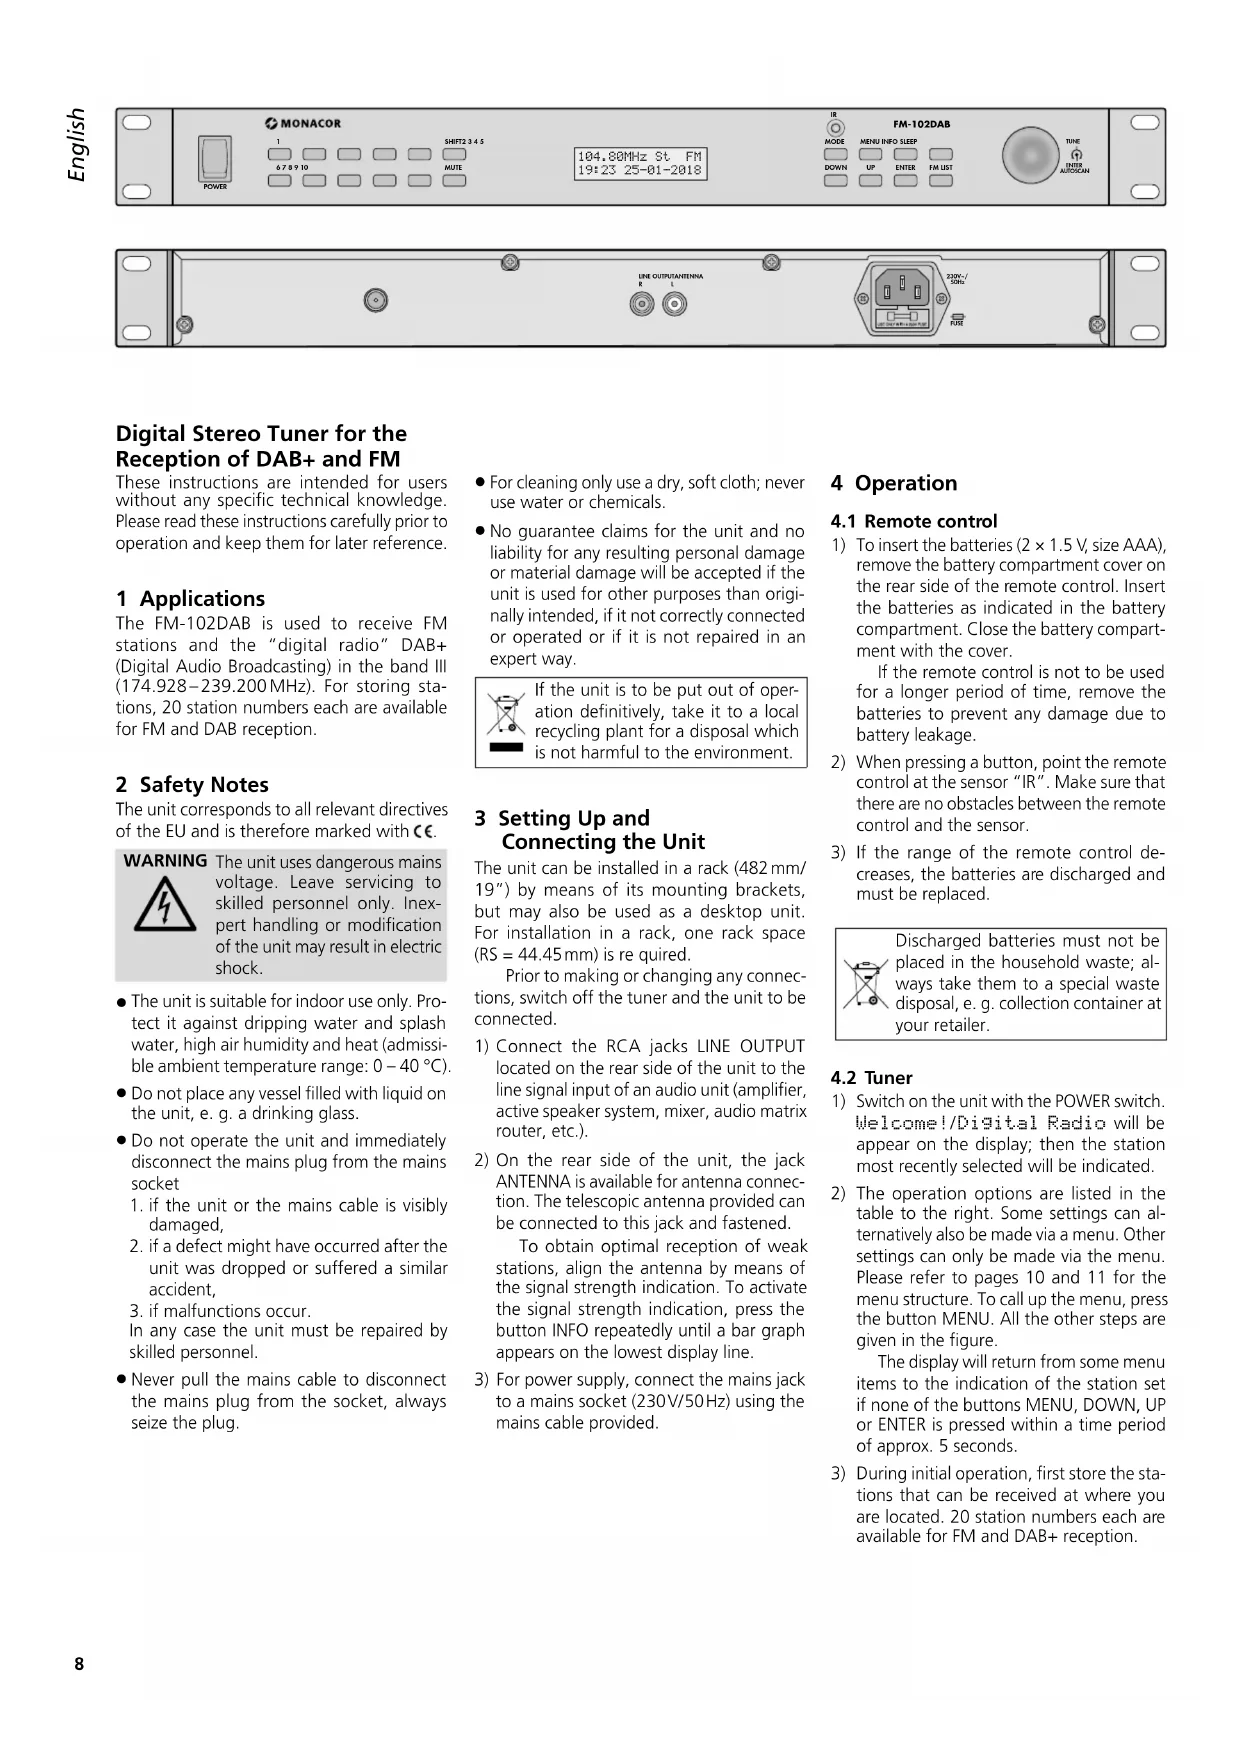
FM-102DAB
Empfangsfrequency: .87,5-108MHz
Digital Stereo Tuner for the Reception of DAB+ and FM
These instructions are intended for users without any specific technical knowledge. Please read these instructions carefully prior to operation and keep them for later reference.
1 Applications
The FM-102DAB is used to receive FM stations and the "digital radio" DAB+ (Digital Audio Broadcasting) in the band III (174.928-239.200MHz). For storing stations, 20 station numbers each are available for FM and DAB reception.
2 Safety Notes
The unit corresponds to all relevant directives of the EU and is therefore marked with
WARNING

The unit uses dangerous mains voltage. Leave servicing to skilled personnel only. Inexpert handling or modification of the unit may result in electric shock.
The unit is suitable for indoor use only. Protect it against dripping water and splash water, high air humidity and heat (admissible ambient temperature range: 0 - 40^
- Do not place any vessel filled with liquid on the unit, e. g. a drinking glass.
- Do not operate the unit and immediately disconnect the mains plug from the mains socket
- if the unit or the mains cable is visibly damaged,
- if a defect might have occurred after the unit was dropped or suffered a similar accident,
- if malfunctions occur. In any case the unit must be repaired by skilled personnel.
-
Never pull the mains cable to disconnect the mains plug from the socket, always seize the plug.
-
For cleaning only use a dry, soft cloth; never use water or chemicals.
- No guarantee claims for the unit and no liability for any resulting personal damage or material damage will be accepted if the unit is used for other purposes than originally intended, if it not correctly connected or operated or if it is not repaired in an expert way.

If the unit is to be put out of operation definitively, take it to a local recycling plant for a disposal which is not harmful to the environment.
3 Setting Up and Connecting the Unit
The unit can be installed in a rack (482 mm/ 19") by means of its mounting brackets, but may also be used as a desktop unit. For installation in a rack, one rack space (RS = 44.45 mm) is re quired.
Prior to making or changing any connections, switch off the tuner and the unit to be connected.
1) Connect the RCA jacks LINE OUTPUT located on the rear side of the unit to the line signal input of an audio unit (amplifier, active speaker system, mixer, audio matrix router, etc.).
2) On the rear side of the unit, the jack ANTENNA is available for antenna connection. The telescopic antenna provided can be connected to this jack and fastened.
To obtain optimal reception of weak stations, align the antenna by means of the signal strength indication. To activate the signal strength indication, press the button INFO repeatedly until a bar graph appears on the lowest display line.
3) For power supply, connect the mains jack to a mains socket (230V / 50Hz) using the mains cable provided.
4 Operation
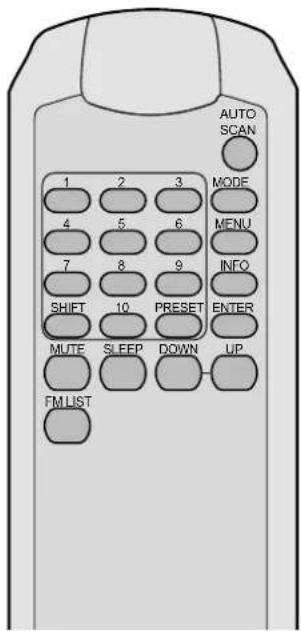
4.1 Remote control
1) To insert the batteries (2× 1.5V, size AAA), remove the battery compartment cover on the rear side of the remote control. Insert the batteries as indicated in the battery compartment. Close the battery compartment with the cover.
If the remote control is not to be used for a longer period of time, remove the batteries to prevent any damage due to battery leakage.
2) When pressing a button, point the remote control at the sensor "IR". Make sure that there are no obstacles between the remote control and the sensor.
3) If the range of the remote control decreases, the batteries are discharged and must be replaced.
Discharged batteries must not be placed in the household waste; always take them to a special waste disposal, e. g. collection container at your retailer.
4.2 Tuner
1) Switch on the unit with the POWER switch. Welcome!/Digital Radio will be appear on the display; then the station most recently selected will be indicated.
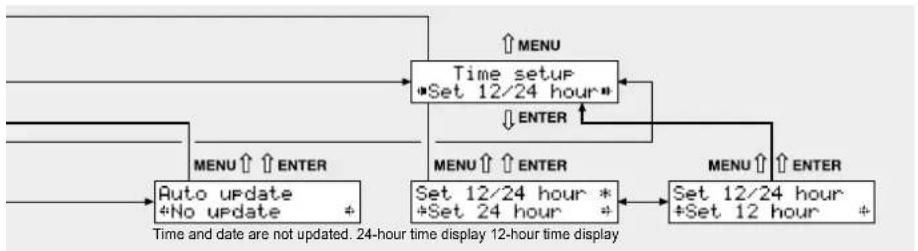
2) The operation options are listed in the table to the right. Some settings can alternatively also be made via a menu. Other settings can only be made via the menu. Please refer to pages 10 and 11 for the menu structure. To call up the menu, press the button MENU. All the other steps are given in the figure.
The display will return from some menu items to the indication of the station set if none of the buttons MENU, DOWN, UP or ENTER is pressed within a time period of approx. 5 seconds.
3) During initial operation, first store the stations that can be received at where you are located. 20 station numbers each are available for FM and DAB+ reception.
5 Specifications
DAB+
Frequency received: .174.928 MHz to 239.200 MHz
Selectivity
to adjacent channel: 31dB
to more remote
channels: 49dB
Sensitivity: .97 dB
FM
Frequency received: .87.5-108MHz
Tuning increment: .50 kHz
Sensitivity: 10 V
Output
Output level: .0.4 V
Connection: .RCA
General information
Power supply: 230V/50Hz
Power consumption: . . . . . . 50 VA max.
Ambient temperature: . . .0-40°C
Dimensions (W× H× D) .. 482× 44× 210mm 1 RS (rack space)
Weight: 2.15 kg
Subject to technical modification.
All rights reserved by MONACOR® INTERNATIONAL GmbH & Co. KG. No part of this instruction manual may be reproduced in any form or by any means for any commercial use.
| Button | Function | ||
| on the remote control | |||
| on the unit | |||
| MODE x x | To switch between: -FM reception (FM appears on the upper right of the display) -DAB+ reception (FM disappears) | ||
| Storing DAB+ stations | |||
| AUTO SCAN x x | To scan all stations and store them automatically in a list: Keep the button / knob pressed for 2 seconds until Scanning appears on the display. All stations are stored when the display indicates the first station from the list. | ||
| TUNE DOWN UP | x x | To call up a station from the list: Turn the knob TUNE and press the button ENTER* or press the button DOWN or UP (repeatedly) and press the button ENTER*. | |
| To assign a station number (1 - 20) to the station set: 1. Press the button PRESET. 2. Use the button DOWN or UP to select the station number desired. 3. Keep the button ENTER pressed for 2 seconds until PRESET ... saved appears on the display. | |||
| PRESET x | |||
| Storing FM stations | |||
| AUTO SCAN x x | To scan all stations and store them automatically in a list: Keep the button / knob pressed for 2 seconds until Scanning appears on the display. All stations are stored when the display indicates the first station from the list. | ||
| FM LIST x x | To call up a station from the list: 1. Press the button FM LIST: FM Station List appears on the display. 2. Turn the knob TUNE or press the button DOWN or UP to select the station. 3. Press the button ENTER* to call up the station. | ||
| DOWN UP x x | To start the station scan: Keep the button pressed until the figures start to appear on the frequency indication. Fine tuning by 0.05 MHz increments: Briefly press the button (repeatedly). | ||
| TUNE | x | To set stations manually: Turn the knob. | |
| PRESET x | To assign a station number (1 - 20) to the station set: 1. Press the button PRESET. 2. Use the button DOWN or UP to select the station number desired. 3. Keep the button ENTER pressed for 2 seconds until PRESET ... saved appears on the display. | ||
| Calling up saved stations | |||
| 1...10,SHIFT | x x | No. Buttons 4 4 10 10 18 SHIFT, 8 20 SHIFT, 10 | |
| TUNE | x | Turn the knob TUNE. For DAB+: Select a station from the list and call it up with the button ENTER*. For FM: Manually tune the receiving range by 0.05 MHz increments. | |
| PRESET x | To call up the previous / next station: 1. Press the button PRESET. 2. Press the button DOWN or UP (repeatedly). A station number where no station is stored will be indicated by Preset ... empty. 3. Press the button ENTER*. | ||
| Additional functions | |||
| MUTE | x x | To mute and unmute the sound. | |
| INFO | x x | To view additional information for DAB+ RDS (radio data system for FM, None appears when no information is available) × × Information on title/programme……… [ABBA - Mama Mia ] × × Genre……… [Pop Music ] × × Name of the broadcasting station……… [BBC digital ] × × Time/Date……… [15:29 16-81-2018] × − Channel and frequency……… [5C 178.352MHz ] × − Data rate, mono/stereo……… [72kbps Stereo ] × × Signal strength……… [磁性磁带磁带] × − Error rate……… [Signal error 2] | |
| SLEEP | x x | To switch off the tuner automatically: 1. Press the button SLEEP so that Sleep off appears on the display. 2. Use the button DOWN or UP or the knob TUNE to set the time in minutes that is to elapse until the tuner is switched off. 3. Press the button ENTER*. 4. To show / hide the remaining time to elapse, use the button SLEEP. When the remaining time is shown on the display, the function can be switched off again (Sleep off). 5. When the time set has elapsed, the tuner will switch off automatically. However, any button can be pressed to briefly switch on the display illumination and to read the time and the date. 6. To activate the function again, press the button SLEEP. The switch-off time can also be set via the menu. | |
| * Instead of the button ENTER, the rotary knob TUNE - ENTER /AUTOSCAN can be briefly pressed. (However, this is not possible when the button ENTER must be pressed for 2 seconds to store a station.) | |||
Menu structure


English

To activate the tuner again, press the button SLEEP.


Alimentation: 230V/50 Hz
Consummation: .50 VA max.