
YAS108 - Soundbar YAMAHA - Free user manual and instructions
Find the device manual for free YAS108 YAMAHA in PDF.

| Product type | Soundbar |
| Brand | YAMAHA |
| Model | YAS-108 |
| Dimensions (W x H x D) | 890 x 53 x 131 mm (placement on furniture) |
| Weight | 3.2 kg |
| Power supply | AC 110-240 V, 50/60 Hz (depending on model) |
| Power consumption | 27 W (standby: 0.3-1.2 W depending on settings) |
| Total output power | 120 W (30 W × 2 front + 60 W subwoofer) |
| Front speakers | 2 × 5.5 cm cone + 2 × 25 mm dome (tweeter) |
| Built-in subwoofer | Dual 7.5 cm cone (bass-reflex type) |
| Supported audio formats | PCM (up to 5.1), Dolby Digital, DTS |
| Connectivity | HDMI (ARC), digital optical, analog (3.5 mm), Bluetooth 5.0, Subwoofer out |
| Main features | DTS Virtual:X 3D surround, Clear Voice, Bass Extension, HDMI control, ARC, Bluetooth multipoint |
| Included accessories | Remote control (battery included), optical cable, power cable, wall mounting template, spacers |
| Wall mounting | Possible (use the template and suitable screws, not included) |
| Maintenance | Clean with a soft, dry cloth; do not use chemical products |
| Safety | Auto power off after 8 hours of inactivity; surge protection |
| Repairability | Spare parts available from authorized Yamaha dealers |
Frequently Asked Questions - YAS108 YAMAHA
User questions about YAS108 YAMAHA
0 question about this device. Answer the ones you know or ask your own.
Ask a new question about this device
Download the instructions for your Soundbar in PDF format for free! Find your manual YAS108 - YAMAHA and take your electronic device back in hand. On this page are published all the documents necessary for the use of your device. YAS108 by YAMAHA.
USER MANUAL YAS108 YAMAHA
Front Surround System
PykoBODCTBO noJIb3OBaTeIa
使用说明书
ENFRDESVITES
PTMLRUZH-CN
G
English
Français
Deutsch
Svenska
Italiano
Espanol
Portugues
Nederlandsls
Pycckn
简体中文
CONTENTS
PRECAUTIONS 4
NOTICE AND INFORMATION 8
BEFORE USING THE UNIT 12
Features 12
Accessories 14
Using the remote control. 14
Part names and functions. 16
PREPARATION 20
1 Installation 20
Installing the unit on a TV stand, etc. 20
2 Connecting a TV 21
Connecting a TV that supports Audio Return Channel (ARC) 21
Connecting a TV that does not support Audio Return Channel (ARC) 22
3 Connecting playback devices. 23
HDMI connection with a playback device. 23
Analog connection with a playback device 23
4 Connecting an external subwoofer 24
Connecting an external subwoofer 24
5 Connecting the power cord. 24
Connecting the power cord. 24
PLAYBACK 25
Basic operations 25
Basic procedure for playback 25
Enjoying your favorite sound. 27
Playback with 3D surround sound. 27
Playback with surround sound 27
Playback with 2-channel stereo sound. 27
Playback of human voices clearly (clear voice) 28
Enjoying enhanced bass sound (bass extension). 28
Use of a Bluetooth device 29
Listening to music stored on a Bluetooth device 29
Connecting the unit to two Bluetooth devices simultaneously (multipoint connection) 31
Useful features for playback 32
Using a TV's remote control to operate the unit (HDMI control) 32
Showing audio information with playback 33
Operating the unit with the HOME THEATER CONTROLLER app. 34
CONFIGURATIONS 35
Configuring various functions 35
Changing the brightness of the indicators (DIMMER) 35
Configuring the HDMI control function 35
Configuring HDMI audio output 36
Setting the auto power standby function 36
Enabling/disabling touch panel control (child lock function) 37
Configuring the Bluetooth standby function 37
38
APPENDIX 39
When any problem appears (General) 39
When any problem appears (Power and system function) 39
When any problem appears (Audio) 42
When any problem appears (Bluetooth®) 44
Specifications 46
Specifications 46
Supported HDMI audio and video formats. 47
Supported digital audio formats. 48
Information for qualified contractors or dealers. 49
Mounting the unit on a wall. 49
PRECAUTIONS
PLEASE READ CAREFULLY BEFORE USE. BE SURE TO FOLLOW THESE INSTRUCTIONS.
The precautions listed below are to prevent risk of harm to the user and others, as well as to prevent property damage, and to help the user use this unit properly and safely. Be sure to follow these instructions.
After reading this manual, be sure to keep it in a safe place where it can be referenced at any time.
- Be sure to request inspections or repairs from the dealer where you purchased the unit or from qualified Yamaha service personnel.
- Yamaha cannot be held responsible for injury to you or damage of the products caused by improper use or modifications to the unit.
- This product is for ordinary homes. Do not use for applications requiring high reliability, such as managing lives, health care or high-value assets.

WARNING
This content indicates "risk of serious injury or death."
If you notice any abnormality
- If any of the following abnormalities occur, immediately turn off the power and disconnect the power plug. If you are using batteries, remove the batteries from this unit.
The power cord/plug is damaged. - An unusual smell, unusual sound or smoke is emitted from the unit.
Foreign material or water gets into the interior of the unit. - There is a loss of sound during use.
- There is a crack or damage in the unit.
Continued use could cause electric shocks, a fire, or malfunctions. Immediately request an inspection or repair from the dealer where you purchased the unit or from qualified Yamaha service personnel.
Power supply
-
Do not do anything that could damage the power cord.
-
Do not place it near a heater.
- Do not bend it excessively or alter it.
-Do not scratch it. - Do not place it under a heavy object.
Using the power cord with the core of the cord exposed could cause electric shocks or a fire.
- Do not touch the power plug or cord if there is a chance of lightning. Failure to observe this may cause electric shocks.
-
Use this unit with the power supply voltage printed on it. Failure to connect to an appropriate AC outlet may cause a fire, electric shocks, or malfunctions.
-
Be sure to use the supplied power cord. Also, do not use the supplied power cord for other units.
Failure to observe the above may cause a fire, burns, or malfunctions. - Check the electric plug periodically and remove any dirt or dust which may have accumulated on it.
Failure to observe this may cause a fire or electric shocks. - When setting up the unit, make sure that the AC outlet you are using is easily accessible.
If some trouble or malfunction occurs, immediately turn off the power switch and disconnect the plug from the AC outlet. Even when the power switch is turned off, as long as the power cord is not unplugged from the wall AC outlet, the unit will not be disconnected from the power source.
If you hear thunder or suspect approaching lightning, quickly turn off the power switch and pull the power plug from the AC outlet.
Failure to observe this may cause a fire or malfunctions.
If not using the unit for long periods of time, be sure to pull the power plug from the AC outlet.
Failure to observe this may cause a fire or malfunctions.
Installation
Install in the manner instructed in the manual.
Falling or toppling may result in injury or damage.
- Confirm that the finished installation is safe and secure. Also, carry out safety inspections periodically.
Failure to observe this may cause devices to fall and result in injury.
Do not disassemble
- Do not disassemble or modify this unit.
Failure to observe this may cause a fire, electric shocks, injury, or malfunctions.
Water warning
- Do not expose the unit to rain, use it near water or in damp or wet conditions, or place on it any containers (such as vases, bottles or glasses) containing liquids which might spill into any openings or places where water may drop. A liquid such as water getting into the unit may cause a fire, electric shocks, or malfunctions.
- Never insert or remove an electric plug with wet hands. Do not handle this unit with wet hands.
Failure to observe this may cause electric shocks or malfunctions.
Fire warning
- Do not place any burning items or open flames near the unit, since they may cause a fire.
Maintenance and care
- Do not use aerosols or spray-type chemicals that contain combustible gas for cleaning or lubrication.
The combustible gas will remain inside the unit, which may cause explosion or fire.
Handling caution
- Be careful not to drop or apply strong impact to this unit.
Failure to observe this may cause electric shocks, a fire, or malfunctions.
Battery use
DO NOT INGEST BATTERY, CHEMICAL BURN HAZARD
The remote control supplied with this product contains a coin/button cell battery. If the coin/button cell battery is swallowed, it can cause severe internal burns in just 2 hours and can lead to death.
Keep new and used batteries away from children. If the battery
compartment does not close securely, stop using the product and keep it away from children.
If you think batteries might have been swallowed or placed inside any part of the body, seek immediate medical attention.
Do not disassemble a battery.
If the contents of the battery get on your hands or in your eyes, it can cause blindness or chemical burns.
Do not dispose of a battery in fire.
Do not expose a battery to high temperatures, such as direct sunlight or a fire.
Doing so may result in the battery bursting, causing a fire or injury.
- Do not attempt to recharge batteries that are not intended to be charged. Charging could cause the battery to burst or leak, which can cause blindness, chemical burns, or injury.
If the batteries do leak, avoid contact with the leaked fluid. Battery fluid is corrosive and may possibly cause loss of sight or chemical burns. If the batteries do leak, avoid contact with the leaked fluid. If the battery fluid should come in contact with your eyes, mouth, or skin, wash immediately with water and consult a doctor.
Wireless unit
- Do not use this unit near medical devices or inside medical facilities. Radio waves from this unit may affect electro-medical devices.
- Do not use this unit within 15cm (6 in) of persons with a heart pacemaker implant or a defibrillator implant. Radio waves from this unit may affect electro-medical devices, such as a heart pacemaker implant or defibrillator implant.

CAUTION
This content indicates "risk of injury."
Power supply
-
Do not use an AC outlet where the power plug fits loosely when inserted. Failure to observe this may cause a fire, electric shocks, or burns.
-
When disconnecting the power plug, always hold the plug itself and not the cord.
Pulling by the cord can damage it and cause electric shocks or a fire. - Insert the power plug firmly all the way into the AC outlet. Using the unit when it is not plugged in sufficiently can cause dust to accumulate on the plug, causing a fire or burns.
Installation
- Do not place the unit in an unstable position where it might accidentally drop or fall over and cause injuries.
-
When installing this unit, do not obstruct heat dissipation. - Do not cover it with any cloth.
-
Do not install it on a carpet or rug.
- Do not block this unit's ventilation holes (cooling slits).
- Do not install the unit in other ways than indicated.
- Do not use the device in a confined, poorly-ventilated location.
Failure to observe the above may trap heat inside the unit, causing a fire or malfunctions. Ensure that there is adequate space around the unit: at least 10cm (4 in) on top, 10cm (4 in) on the sides, and 10cm (4 in) on the rear.
- Do not install the unit in other ways than indicated.
Failure to observe this may cause malfunctions or for the unit to fail and cause injury. - Do not install the unit in places where it may come into contact with corrosive gases or salt air or places that have excessive smoke or steam. Doing so may result in malfunction.
- Avoid being near the unit during a disaster, such as an earthquake. Since the unit may turn over or fall and cause injury, quickly move away from the unit and go to a safe place.
- Before moving this unit, be sure to turn off the power switch and disconnect all connection cables.
Failure to observe this may damage the cables or cause you or someone else to trip and fall.
- For proper mounting the unit on a wall, make sure to have it done by the dealer from where you purchased the unit or by qualified service personnel.
Failure to observe this may cause the installation to fall and result in injury. Installation requires special skills and experience.
Hearing loss
- Do not use the unit for a long period of time at a high or uncomfortable volume level, since this can cause permanent hearing loss. If you experience any hearing loss or ringing in the ears, consult a physician.
Before connecting the unit to other devices, turn off the power for all devices. Failing to do so may result in hearing loss, electric shock, or device damage.
Maintenance and care
- Remove the power plug from the AC outlet before cleaning the unit. Failure to observe this may cause electric shocks.
Handling caution
- Do not insert foreign materials such as metal or paper into the openings of this unit.
Failure to observe this may cause a fire, electric shocks, or malfunctions.
- Keep small parts out of the reach of infants.
Your children may accidentally swallow them.
Do not do the following:
- stand on or sit on the equipment.
- put heavy items on top of the equipment.
- place the equipment in a stack.
- apply unreasonable force to buttons, switches, input/output terminals, etc.
- hang on the equipment.
- lean against the equipment.
Failure to observe this may cause injuries or damage to the equipment.
- Avoid pulling the connected cables to prevent injuries or damage to the unit by causing it to fall.
Battery use
- Do not use batteries other than specified batteries.
Doing so cause fire, burns, or inflammation due to leakage.
- Keep batteries away from children.
A child could accidentally swallow a battery. Failure to observe this may also cause inflammation due to battery fluid leaks. - Do not put in a pocket or bag, carry, or store batteries together with pieces of metal.
The battery could short, burst, or leak, causing a fire or injury.
Always make sure all batteries are inserted in conformity with the +/polarity markings.
Failure to do so might result in a fire, burns, or inflammation due to fluid leaks.
- When the batteries run out, or if the unit is not to be used for a long time, remove the batteries from the remote control to prevent possible leakage of the battery fluid.
- When storing or discarding batteries, insulate the terminal area by applying tape, or some other protection.
Mixing them with other batteries or metal objects can cause a fire, burns, or inflammation due to fluid.
NOTICE AND INFORMATION
Notice
Indicates points that you must observe in order to prevent product failure, damage or malfunction and data loss.
Power supply
- If not using the unit for a long period of time, be sure to pull the power plug from the outlet. Even if this unit is turned off by [O] (Standby/On), a minute current is still flowing.
Installation
- Do not use this unit in the vicinity of other electronic equipment, such as a TV, radio, or mobile phone. Failure to observe this may cause this unit or the TV or radio to produce noise.
- Do not use this unit in a location that is exposed to direct sunlight that becomes extremely hot, such as near a heater, or extremely cold, or that is subject to excessive dust or vibration. Failure to observe this may cause the unit's panel to become deformed, the internal components to malfunction, or for operation to become unstable.
- If using a wireless function, avoid installing this unit near metal walls or desks, microwave ovens, or other wireless network devices.
Obstructions could shorten the transmission distance.
Connections
If connecting external units, be sure to thoroughly read the manual for each unit and connect them in accordance with the instructions.
Failure to properly handle a unit in accordance with the instructions could cause malfunctions.
- Do not connect this unit to industrial units.
Digital audio interface standards for consumer use and industrial use are different. This unit has been designed to connect to a consumer-use digital audio interface. Connections to an industrial-use digital audio interface could not only cause this unit to malfunction, but could also damage the speakers.
Handling
- Do not place vinyl, plastic, or rubber products on this unit. Failure to observe this may cause discoloration or deformation in the panel of this unit.
- If the ambient temperature changes drastically (such as during unit transportation or under rapid heating or cooling) and there is a chance condensation may have formed in the unit, leave the unit for several hours without turning on the power until it is completely dry before use. Using the unit while there is condensation can cause malfunctions.
Maintenance and care
- When cleaning the unit, use a dry, soft cloth. Using chemicals such as benzine or thinner, cleaning agents, or chemical scrubbing cloths can cause discoloration or deformation.
Speakers
- Do not touch the speaker units. Failure to observe this may damage the speaker units.
About disposal
- Be sure to discard used batteries in accordance with local regulations.
Information for users on collection and disposal of old equipment and used batteries:

These symbols on the products, packaging, and/or accompanying documents mean that used electrical and electronic products and batteries should not be mixed with general household waste. For proper treatment, recovery and recycling of old products and used batteries, please take them to applicable collection points, in accordance with your national legislation.

By disposing of these products and batteries correctly, you will help to save valuable resources and prevent any potential negative effects on human health and the environment which could otherwise arise from inappropriate waste handling.

For more information about collection and recycling of old products and batteries, please contact your local municipality, your waste disposal service or the point of sale where you purchased the items.

For business users in the European Union:
If you wish to discard electrical and electronic equipment, please contact your dealer or supplier for further information.
Information on Disposal in other Countries outside the European Union:
These symbols are only valid in the European Union. If you wish to discard these items, please contact your local authorities or dealer and ask for the correct method of disposal.
Note for the battery symbol (bottom two symbol examples):
This symbol might be used in combination with a chemical symbol. In this case it complies with the requirement set by the EU Battery Directive for the chemical involved.
(weeebattery_eu_en_02)
Information
Indicates notes on instructions, restrictions on functions, and additional information that may be helpful.
About the name plate of the unit
The model number, serial number, power requirements, etc., may be found on or near the name plate, which is at the bottom of the unit.
You should note this serial number in the space provided below and retain this manual as a permanent record of your purchase to aid identification in the event of theft.
Model No.
Serial No.
(bottomen_01)
Trademarks
DOLBY AUDIO
Manufactured under license from Dolby Laboratories. Dolby, Dolby Audio, Pro Logic, and the double-D symbol are trademarks of Dolby Laboratories.

dt
Digital Surround

For DTS patents, see http://patents.dts.com.
Manufactured under license from DTS, Inc. DTS, the Symbol, DTS and the Symbol together, DTS Digital Surround, and DTS VirtualX are registered trademarks or trademarks of DTS, Inc. in the United States and/or other countries.
DTS, Inc. All Rights Reserved.
App Store
App Store is a service mark of Apple Inc.
Hami
The terms HDMI, the HDMI Logo, and High-Definition Multimedia Interface are trademarks or registered trademarks of HDMI Licensing LLC in the United States and other countries.
x.v.ColorTM
"x.v.Color" is a trademark of Sony Corporation.

Bluetooth
The Bluetooth® word mark and logos are registered trademarks owned by Bluetooth SIG, Inc. and any use of such marks by Yamaha Corporation is under license.
Blu-rayTM
"Blu-ray Disc", "Blu-ray", and the logos are trademarks of the Blue-ray Disc Association.
About content in this manual
- This manual is for the following readers:
the users of the unit - the constructor, builder and dealer that mount the unit on the wall
This manual uses the following signal words for the important information:
WARNING
This content indicates "risk of serious injury or death."
CAUTION
This content indicates "risk of injury."
-NOTICE
Indicates points that you must observe in order to prevent product failure, damage or malfunction and data loss, as well as to protect the environment.
- NOTE
Indicates notes on instructions, restrictions on functions, and additional information that may be helpful.
- The illustrations and screens in this manual are for instructional purposes only.
- The company names and product names in this manual are the trademarks or registered trademarks of their respective companies.
- Software may be revised and updated without prior notice.
BEFORE USING THE UNIT
Features
Introduction
This front surround system with its built-in subwoofer allows for the enjoyment of dynamic sound with video played on a TV.
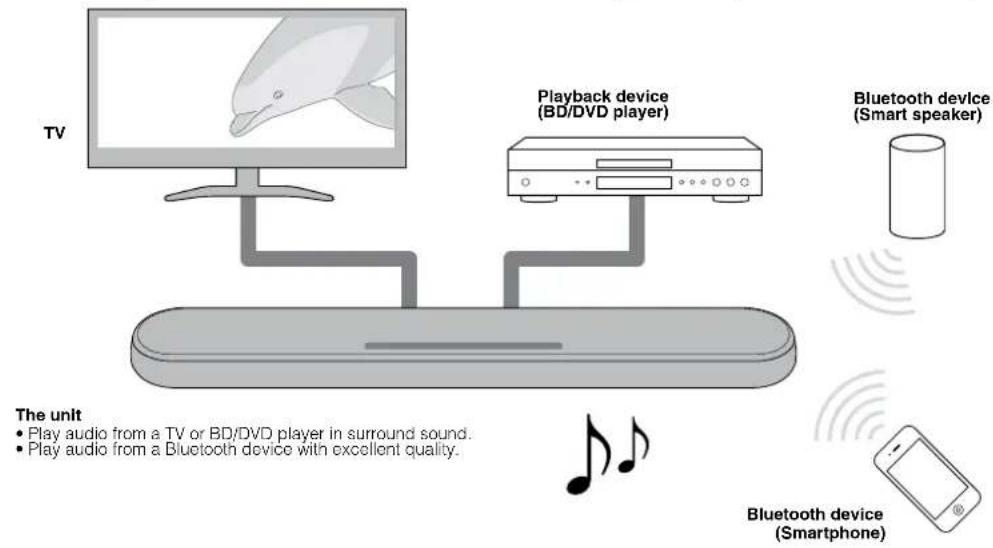
3D surround playback
Surround sound can be heard not only from horizontal directions, but also from varying heights when DTS Virtual:X is used. For details, see the following:
- "Playback with 3D surround sound" (p.27)
Transmission of 4K high dynamic range (HDR) video
Enjoy high-resolution video from a cable or satellite set top box, or a BD/DVD player. When a TV that supports Audio Return Channel (ARC) is used, this ARC-compatible unit can be connected to the TV via a single HDMI cable. For details, see the following:
"Connecting a TV that supports Audio Return Channel (ARC)" (p.21)
"Supported HDMI audio and video formats" (p.47)
HDMI control function
Link functions of a TV and the unit are available using the TV's remote control. For details, see the following:
- "Using a TV's remote control to operate the unit (HDMI control)" (p.32)
Support for multipoint connection of Bluetooth devices
Easily play content from a Bluetooth-compatible smartphone, tablet, or PC. In addition, the unit supports multipoint connection and can switch between two Bluetooth devices for playback. Our exclusive
Compressed Music Enhancer technology improves sound quality and characteristics, and can be used to enjoy realistic and impressive sound. For details, see the following:
- "Connecting the unit to two Bluetooth devices simultaneously (multipoint connection)" (p.31)
HOME THEATER CONTROLLER app
HOME THEATER CONTROLLER, a free app for smartphones, allows you to easily operate the unit using a smartphone. For details, see the following:
- "Operating the unit with the HOME THEATER CONTROLLER app" (p.34)
Bass extension
The bass extension function boosts low bass levels to enjoy more powerful sound. For details, see the following:
- "Enjoying enhanced bass sound (bass extension)" (p.28)
Clear voice
The clear voice function makes speech, such as dialog and narration, clearer. For details, see the following:
"Playback of human voices clearly (clear voice)" (p.28)
Accessories
Checking the accessories
Make sure you have received all of the following accessories.

Remote control

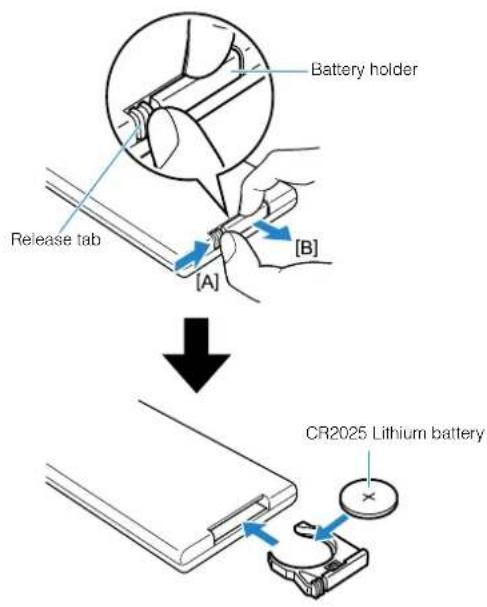
A CR2025 Lithium battery has already been inserted into the remote control.

Power cord

Optical digital audio cable
Mounting template

Use when mounting the unit on awall.

Spacers (x 2/shoot) Use when mounting the unit on a wall.

Owner's Manual (this booklet)
Using the remote control
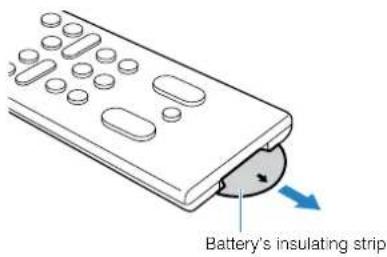
Preparing the remote control
Remove the battery's insulating strip before attempting to use the remote control.
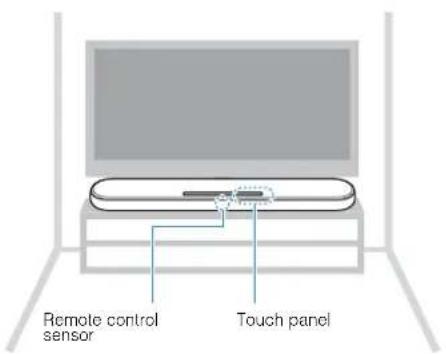
Operating range of the remote control
Operate the remote control within the range shown in the following figure.

NOTE
When the unit is mounted on a wall, point the remote control at the remote control sensor on the top panel. For details, see the following:
"Part names and functions of the front/top panel" (p.16)
- "Mounting the unit on a wall" (p.49)
Replacing the battery in the remote control
Press and hold the release tab firmly in the direction indicated by [A], and slowly slide the battery holder out in the direction indicated by [B].
Part names and functions
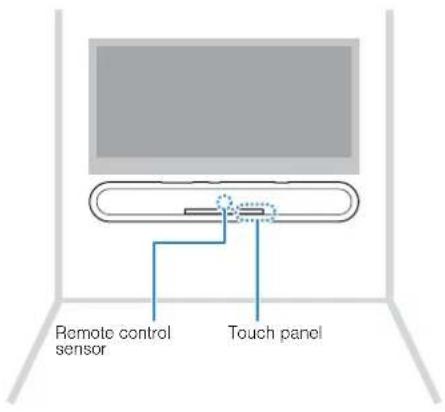
Part names and functions of the front/top panel
The part names and functions of the front and top panels are as follows.
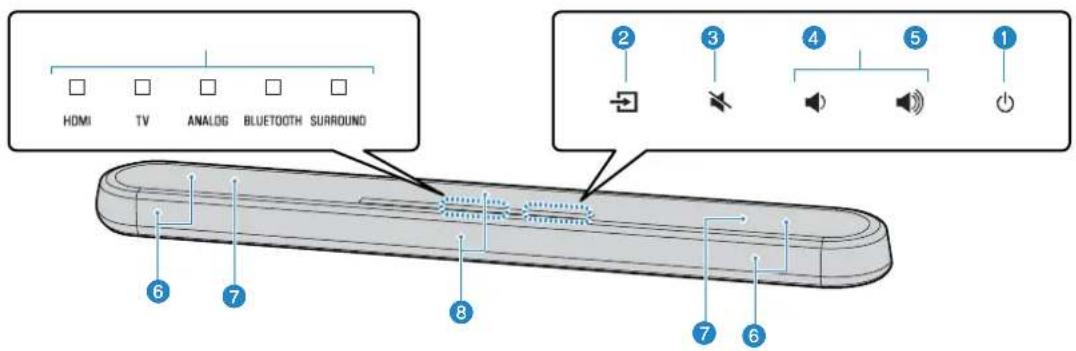
Indicators
The indicators on the top panel flash or glow, to show the operation and setting status. In this manual, indicators status, such as off, glowing, and flashing, are shown as the illustrations below.

Off

Glows

Flashes
NOTE
The brightness of the indicators can be changed using DIMMER on the remote control. For details, see the following:
Changing the brightness of the indicators (DIMMER) (p.35)
(1)
Select an input source to be played back (p.25).
(mute)
Mute the audio output (p.25). Touch again to unmute.
volume+/-
Adjust the volume (p.25).
(power)
Turn on or off the unit.
NOTE
The unit may automatically turn off when the auto power standby function is enabled (p.36).
Speakers
Dual built-in subwoofoers
The built-in subwoofer are located in the top part of the unit.
Remote control sensors
Receive infrared signals from the remote control of the unit (p.15).
NOTE
- 2,3,4 and 5 are touch sensors. Touch icons with your finger to control functions.
- Do not place any objects on the touch panel as doing so may result in unintended operations.
- When touch panel control is disabled, no operations can be performed using the unit's touch panel. This prevents accidental operation of the unit. For details, refer to the following:
"Enabling/disabling touch panel control (child lock function)" (p.37)
Part names and functions of the rear panel
The part names and functions of the rear panel are as follows.
The illustrations in this manual include labels next to the jacks on the bottom of the unit for easy identification.

AC IN jack
Connect the power cord of this unit (p.24).
UPDATE ONLY jack
Use to update this unit's firmware. The jack is located inside the cover.
Refer to the instructions supplied with the firmware for details.
ANALOG Input Jack
For connecting to an external device with a 3.5mm stereo mini plug cable and inputting audio signals (p.23).
TV input jack
For connecting to a TV with an optical digital audio cable and inputting audio signals (p.22).
SUBWOOFER OUT jack
For connecting to an external subwoofer with an RCA mono cable (p.24).
HDMI IN jack
For connecting to an HDMI-compatible playback device, such as a BD/DVD player, a satellite and cable TVuner,and a game console, and inputting video/audiosignals (p.23).
HDMI OUT (ARC) jack
For connecting to an HDMI-compatible TV and outputting video/audiosignals (p.21). When a TV that supports Audio Return Channel (ARC) is used, TV audio signal can also be input through this jack.
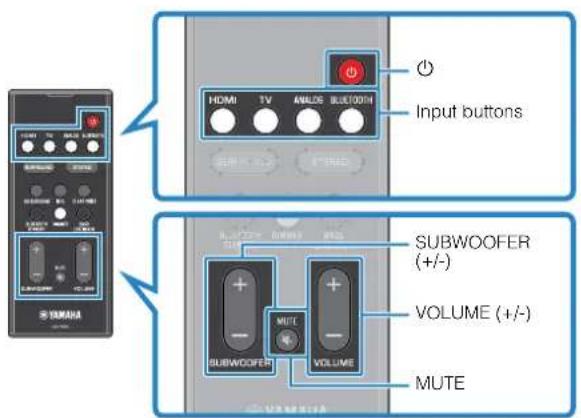
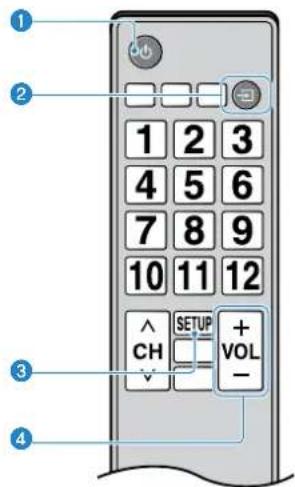
Part names and functions of the remote control
The part names and functions of the supplied remote control are as follows.
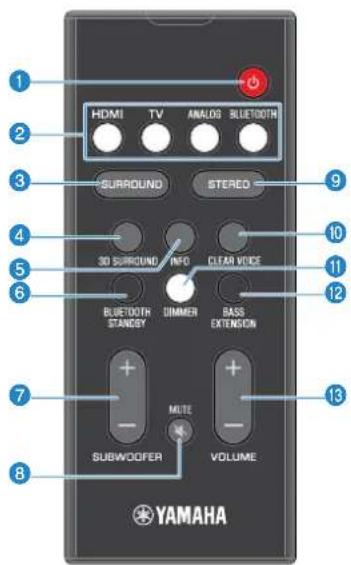
( power) button
Turn on/off the unit.
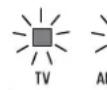
Turned on


The indicator for the last input source selected glows.
Turned off (Bluetooth standby function
enabled) (p.37)


Input buttons
Select an input source to be played back.
- HDMI: Sound from a device connected to the HDMI IN jack (p.23)
TV:TV audio (p.21) - ANALOG:Sound from a device connected to the ANALOG input jack (p.23)
- BLUETOOTH : Sound from a Bluetooth device (p.31)
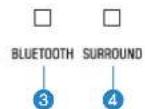
3 SURROUND button
Switch to surround playback (p.27).
3D SURROUND button
Switch to 3D surround playback (p.27).
INFO button
Indicate audio signal information of the input source being played or bass extension setting (p.33).
BLUETOOTH STANDBY button
Hold down the key for more than 3 seconds to enable/disable the Bluetooth standby function (p.37).
SUBWOOFER (+ / - ) button
Adjust the volume of the subwoofer (p.25).
MUTE button
Mute the audio output (p.25). Press the key again to unmute.
STEREO button
Switch to stereo (2-channel) playback (p.27).
10 CLEAR VOICE button
Enable/disable the clear voice function (p.28).
DIMMER button
Change the brightness of the indicators (p.35).
BASS EXTENSION button
Enable/disable the bass extension function (p.28).
VOLUME (+/-) button
Adjust the volume of the unit (p.25).
PREPARATION
1 Installation
Installing the unit on a TV stand, etc.
Position the unit with the touch panel facing up on a TV stand, etc.
NOTICE
- Do not stack the unit and a BD/DVD player or other device directly on each other. Doing so may cause a malfunction due to vibrations.
- Avoid touching, and never place any weight or pressure on the speakers (portion covered with fabric) on the top of the unit. Doing so may damage the speakers.
- The unit contains non-magnetic shielding speakers. Do not place magnetically sensitive items (hard disk drive, etc.) near the unit.
NOTE
The unit can also be mounted on a wall. Some knowledge of building construction is required for safe installation. Please have a qualified contractor or dealer install the unit on a wall. For details, refer to the following:
Information for qualified contractors or dealers" (p.49)
2 onnecting a TV
Connecting a TV that supports Audio Return Channel (ARC)
Connect the TV, which supports Audio Return Channel (ARC), to the unit with an HDMI cable (sold separately).
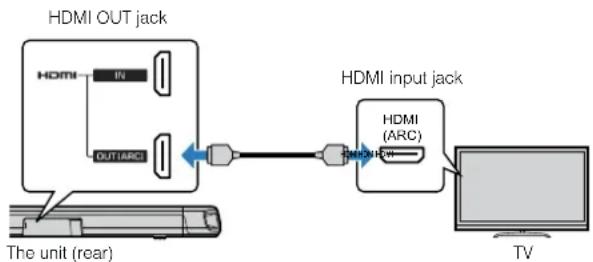
What is Audio Return Channel (ARC)?
In order for the unit to play audio from a TV, the TV must usually be connected to the unit via an audio cable as well as an HDMI cable. If, however, the TV supports Audio Return Channel (ARC), TV audio signals can be input to the unit via the HDMI cable that outputs video signals from the unit to the TV.
NOTE
- Connect an HDMI cable to the audio return channel supported jack (the jack with "ARC" indicated) on TV.
-
Enable the HDMI control function of the unit to activate the Audio Return Channel (ARC). For details, see the following:
-
"Configuring the HDMI control function" (p.35)
-
Use a 19-pin HDMI cable with the HDMI logo printed on it. A cable with a maximum length of 5m (16 ft) is recommended to prevent degradation of signal quality.
- Use a premium high-speed HDMI cable for playback of 3D and 4K video content.
- The unit supports HDCP version 2.2, a copy protection technology. For playback of 4K video, connect the unit to the HDMI input jack (one compatible with HDCP 2.2) on an HDCP 2.2-compliant TV.
- The TV input jack cannot be used when a TV that supports the Audio Return Channel is connected to the unit.
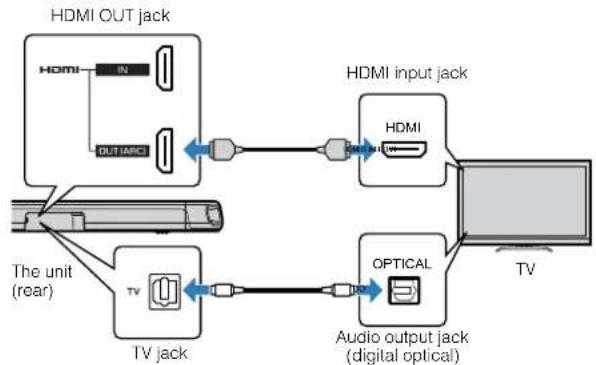
Connecting a TV that does not support Audio Return Channel (ARC)
Connect the TV to the unit with an HDMI cable (sold separately) and an optical digital audio cable (supplied).
NOTE
- Use a 19-pin HDMI cable with the HDMI logo printed on it. A cable with a maximum length of 5m (16 ft) is recommended to prevent degradation of signal quality.
- Use a premium high-speed HDMI cable for playback of 3D and 4K video content.
- The unit supports HDCP version 2.2, a copy protection technology. For playback of 4K video, connect the unit to the HDMI input jack (one compatible with HDCP 2.2) on an HDCP 2.2-compliant TV.
- When connecting the supplied optical digital audio cable, be sure to remove the cap and check the plug's orientation before connecting it.
- If the TV has no optical jack, connect the audio output jack on the TV to the ANALOG input jacks on the unit. For details, see the following: "Analog connection with a playback device" (p.23)
3 onnecting playback devices
HDMI connection with a playback device
Connect a playback device such as a BD/DVD player to the unit with an HDMI cable (sold separately). Use the HDMI cable to best connect a playback device equipped with the HDMI output jack.
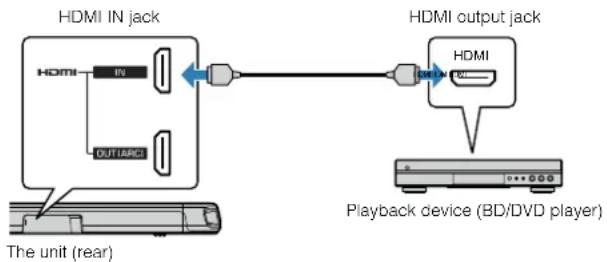
NOTE
- Once the HDMI control function has been activated, video and audio contents from playback devices can be output from the TV even when the unit is turned off (HDMI signal pass-through). For details, see the following: "Configuring the HDMI control function" (p.35)
- Use a 19-pin HDMI cable with the HDMI logo printed on it. A cable with a maximum length of 5m (16 ft) is recommended to prevent degradation of signal quality.
- Use a premium high-speed HDMI cable for playback of 3D and 4K video content.
- The unit supports HDCP version 2.2, a copy protection technology. For playback of 4K video, connect the unit to the HDMI output jack on a HDCP 2.2-compliant BD/DVD player.
Analog connection with a playback device
Connect a playback device, such as a game console or a TV that does not have an optical digital audio output, to the unit via a 3.5 mm stereo mini plug cable (sold separately).

CAUTION
- If volume can be adjusted on the device connected to the unit's ANALOG input jack, set that device's volume to the same level as that of other devices connected to the unit's HDMI IN jack to prevent volume from being louder than expected.
NOTE
When connecting the video device, connect the video device's video output to the TV's video input directly.
4
Connecting an external subwoofer
Connecting an external subwoofer
The unit has dual built-in subwoofoers; however you can connect a subwoofer equipped with built-in amplifier when you want to enhance low frequency sound.
Connect an external subwoofer to the unit via an RCA mono cable (sold separately).

NOTE
Sound is output from both the built-in subwoofer and external subwoofer.
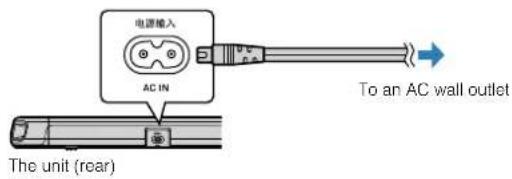
5 onnecting the power cord
Connecting the power cord
After all connections are complete, connect the supplied power cord to the AC IN jack on the unit and plug the power cord into an AC wall outlet.
PLAYBACK
Basic operations
Basic procedure for playback
Basic procedure for playing back music is as follows.
1 Press to turn on the unit.
2 Turn on the external devices (such as a TV or BD/DVD player, game console) connected to the unit.
3 Use the input buttons to select an input source to be played back.
HDMI: Sound from a device connected to the HDMI IN jack
TV: TV audio
ANALOG:Sound from a device connected to the ANALOG input jack
BLUETOOTH:Sound from a Bluetooth device
The indicator for the selected input source glows.
Example When TV is selected


4 Start playback on the external device selected in step 3.
5 Press VOLUME (+/-) to adjust the volume.

Volume down (-) Volume up (+)
When audio is output from both TV speaker and the unit, mute the TV sound.
6 Adjust sound settings to suit individual preferences.
NOTE
- For details on adjusting sound settings, see the following:
"Playback with 3D surround sound" (p.27)
"Playback with surround sound" (p.27)
"Playback with 2-channel stereo sound" (p.27)
"Playback of human voices clearly (clear voice)" (p.28) - "Enjoying enhanced bass sound (bass extension)" (p.28)
For details on playback music files stored on a Bluetooth device, see the following:
- "Listening to music stored on a Bluetooth device" (p.29)
To mute the sound, press MUTE. Press MUTE again to unmute.
- When sound input to the HDMI IN jack is output from the TV, the volume level does not change even if you press VOLUME (+/-) or MUTE.
- To adjust the subwoofer volume, press SUBWOOFER (+/-). The subwoofer volume can be adjusted separately from the whole volume.

- When playing audio/video from a device connected to the TV, select TV as the unit's input source, and select the playback device with the input selector on the TV.
Enjoying your favorite sound
Playback with 3D surround sound
Press 3D SURROUND to switch to 3D surround playback according to the input source or your individual preference.
When 3D surround playback is selected, DTS Virtual:X makes it possible to hear sound not only from horizontal directions, but also from varying heights.
The SURROUND indicator glows blue.


SURROUND
Glows (blue)
NOTE
The TV Program, Movie, Music, Sports, or Game surround mode can be selected using the HOME THEATER CONTROLLER app installed on a smartphone that supports the Bluetooth function. For details, see the following:
- "Operating the unit with the HOME THEATER CONTROLLER app" (p.34)
Playback with surround sound
Press SURROUND to switch to surround playback according to the input source or your individual preference.
The SURROUND indicator glows white.


SURROUND
Glows (white)
NOTE
The TV Program, Movie, Music, Sports, or Game surround mode can be selected using the HOME THEATER CONTROLLER app installed on a smartphone that supports the Bluetooth function. For details, see the following:
- "Operating the unit with the HOME THEATER CONTROLLER app" (p.34)
Playback with 2-channel stereo sound
Press STEREO to switch to 2-channel stereo playback. You can enjoy playback sources with your favorite sound mode.
When stereo playback is enabled, the SURROUND indicator goes out.


SURROUND
off
Playback of human voices clearly (clear voice)
Press CLEAR VOICE to turn on the clear voice function. Human voices such as lines in movies and TV shows, or news and sport commentary, are played clearly.
Press the button again to disable the function.

CLEAR VOICE


BLUETOOTH

Flash three times (enabled) Flash once (disabled)
NOTE
Press INFO to confirm whether the clear voice function is enabled or disabled. For details, refer to the following:
- "Showing audio information with playback" (p.33)
Enjoying enhanced bass sound (bass extension)
Press BASS EXTENSION to turn on the bass extension function. You can enjoy enhanced bass sound and more powerful sound.
Press the button again to disable the function.


NOTE
Press INFO to confirm whether the bass extension function is enabled or disabled. For details, refer to the following:
- "Showing audio information with playback" (p.33)
Use of a Bluetooth device
Listening to music stored on a Bluetooth device
Music files stored on a Bluetooth device, such as a smartphone, smart speaker, or digital music player, can be played back on the unit over a wireless connection.
The unit can be connected to two Bluetooth devices simultaneously (Music cannot be played from both devices simultaneously).

Bluetooth device


NOTE
The Bluetooth standby function is enabled by default. When a Bluetooth device is connected to this unit while the unit is off, the unit will be turned on and will be immediately ready to play sound from the Bluetooth device. For details, refer to the following:
- "Configuring the Bluetooth standby function" (p.37)
1 Press BLUETOOTH to select "Bluetooth" as the input source.
The BLUETOOTH indicator on the unit flashes.


Flashes
NOTE
If Bluetooth devices have been connected before, the unit will connect to the last played device when BLUETOOTH is pressed.
2 On the Bluetooth device, enable the Bluetooth function.
The Bluetooth device list appears on the Bluetooth device.
3 Select "YAS-108 Yamaha" (or "YamahaAV") in the list.
If a passkey (PIN) is required, enter the number "0000".
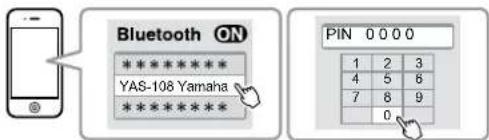
When the connection between the Bluetooth device and the unit is established, a completion message is displayed on the Bluetooth device, and the BLUETOOTH indicator on the unit glows.

BLUETOOTH
Glows
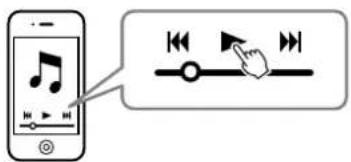
4 Play back a song on the Bluetooth device.
The unit will begin playing audio from the Bluetooth device.
NOTE
- To terminate the Bluetooth connection, perform one of the following operations.
- Turn off the Bluetooth function on the Bluetooth device.
- Hold down BLUETOOTH for more than 3 seconds.
- Select an input source other than Bluetooth using the input buttons on the unit.
-
Turn off the unit.
-
If the Bluetooth connection is terminated when the unit's input is BLUETOOTH, the BLUETOOTH indicator flashes and the unit enters the connection wait status.
- Adjust the volume level of the Bluetooth device as required.
- Perform Bluetooth connection with the Bluetooth device and unit within 10 m (33 ft) of each other.
- See documentation supplied with your Bluetooth device for more information.
Connecting the unit to two Bluetooth devices simultaneously (multipoint connection)
The unit can be connected to two Bluetooth devices at the same time.
Follow these instructions to switch between the Bluetooth devices for playback.
1 Stop playback on the Bluetooth device from which audio is currently being played.
2 Start playback on the other Bluetooth device.
The unit will begin playing audio from the other Bluetooth device.
NOTE
When connecting a Bluetooth device that has not previously been connected to the unit, disconnect the Bluetooth device currently connected to the unit and connect the new Bluetooth device.
Useful features for playback
Using a TV's remote control to operate the unit (HDMI control)
The HDMI control function coordinates TV and unit operation so that the unit can be operated using the TV's remote control.
When the unit is connected to a TV via HDMI cable, the TV's remote control can be used to perform the following operations.
Operations that can be controlled via the TV's remote control
Turn on/off
Both the TV and the unit turn on/off at the same time.
Switch input sources
The unit's input source switches accordingly when the TV's input source is switched.
For example, when a TV program is selected on the TV, the unit's audio input source is switched to the HDMI OUT (ARC) jack using the ARC function or TV input jack.
And also, when a BD/DVD player is connected to the HDMI IN jack on the unit, the unit's input source switches to HDMI when the BD/DVD player is selected with the TV's remote control.
Switch the audio output device
You can switch the audio output device to the TV or the unit.
Adjust volume
The unit's volume can be adjusted when the TV's audio output is set to the unit.
NOTE
- If you are unable to operate the unit with your TV's remote control, configure the HDMI control function of your TV and the unit. For details, see the following: - "Configuring the HDMI control function" (p.35)
The input source can be switched while the unit is off (HDMI signal pass-through).
The volume displays on the TV and unit may not be the same.
Showing audio information with playback
The type of audio signal being played, whether Dolby Pro Logic II is enabled or disabled, and bass extension and clear voice settings can be confirmed by the status of indicators.
Press INFO on the remote control.
The indicators on the unit will show the following audio information for three seconds immediately after INFO is pressed.

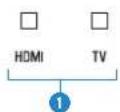

Show the type of audio signal.
HDMI glows (white): Dolby Digital
HDMI glows (red): DTS
TV glows (white). AAC
HDMI and TV off: PCM/analog input/no input
Show whether Dolby Pro Logic II is enabled or disabled. Dolby Pro Logic II is enabled automatically when 2-channel stereo signals are played in surround sound.
Giows: Enabled
Off:Disabled
Show the bass extension function setting.
Glows:Enabled
Off:Disabled
Show the clear voice function setting.
Glows: Enabled
Off:Disabled
Operating the unit with the HOME THEATER CONTROLLER app
When the free HOME THEATER CONTROLLER app is installed on a mobile device such as a smartphone, the unit can be operated using the mobile device. In addition to basic unit operation, various functions, including surround mode selection and tone adjustment, can be more precisely configured using the app than is possible using the remote control.
For details on the HOME THEATER CONTROLLER app, see the product information on the Yamaha website.
CONFIGURATIONS
Configuring various functions
Changing the brightness of the indicators (DIMMER)
Change the brightness of the indicators on the unit.
Each time DIMMER is pressed, the brightness of the indicators changes as follows.
Dim (default setting) Off Bright Dim ...

Indicators glow brightly just after operation and change to the specified brightness after a few seconds.
Configuring the HDMI control function
Enable or disable the unit's HDMI control function (link function). This function coordinates TV and unit operation so that the unit can be operated using the TV's remote control.
This function is enabled by default.
1 Turn off the unit.
2 Press and hold HDMI at least three seconds.
The HDMI control function is enabled or disabled, and the unit turns on. The indicator shows HDMI control function status for several seconds immediately after the unit is turned on.


Glows (enabled; default) Off (disabled)
NOTE
- Enable the HDMI control function when connecting a TV that supports Audio Return Channel (ARC), or when using HDMI signal pass-through. For details, see the following:
- "Connecting a TV that supports Audio Return Channel (ARC)" (p.21)
- "Using a TV's remote control to operate the unit (HDMI control)" (p.32)
- If the unit cannot be operated with the TV's remote control, confirm that the HDMI control function of this unit is enabled and the HDMI control function is enabled on the TV. For details, see the following:
"The unit cannot be operated using the TV's remote control" (p.41) - The unit's power consumption will be reduced if the HDMI control function is disabled.
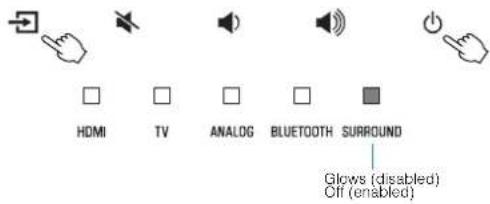
Configuring HDMI audio output
Select the device from which audio input via the unit's HDMI IN jack will be played when the HDMI control function is disabled. HDMI audio is output from this unit by default.
Settings
The unit (default) Play HDMI audio input signal from the unit.
TV Play HDMI audio input signal from the TV.
1 Turn off the unit.
2 Press and hold SURROUND at least three seconds.
HDMI audio output switches between the unit and the TV, and the unit turns on. The indicator shows HDMI audio output status for several seconds immediately after the unit is turned on.


ANALOG
Glowa (audio is played from the unit.
default) Off (audio is played from the TV)
NOTE
- When playing back HDMI audio input signal from the TV, the unit cannot be used to adjust volume. Use TV controls to adjust volume.
-
For details on the HDMI control function, see the following:
-
"Configuring the HDMI control function" (p.35)
-
To configure HDMI audio output with the HDMI control function enabled, select the audio output device configured for the TV connected to the unit.
- HDMI video signals input to the HDMI IN jack of this unit are always output from the HDMI OUT (ARC) jack of the unit.
Setting the auto power standby function
Enabling the auto power standby function prevents the unit from remaining on when not in use. When the auto power standby function is enabled, the unit automatically turns off in any of the following situations.
No operations for 8 hours
- No audio input and no operations for 20 minutes when Bluetooth or HDMI is selected as the input source.
1 Turn off the unit.
2 Touch and hold 3 and touch 0 on the unit to turn on the unit.
The auto power standby function is enabled or disabled. The indicator shows auto power standby function status for several seconds immediately after the unit is turned on.
NOTE
The default setting for the auto power standby function varies by country or region.
U.K. Europe, and Korea models: enabled
- Other models: disabled
Enabling/disabling touch panel control (child lock function)
Disable touch panel control to prevent children from accidentally operating the unit. When touch panel control is disabled, operations can be performed only via the remote control or dedicated free "HOME THEATER CONTROLLER" app. This function is enabled by default.
1 Turn off the unit.
2 Press and hold the INFO key at least three seconds.
The touch panel control is enabled or disabled, and the unit is turned on. The indicator shows touch panel control status for several seconds immediately after the unit is turned on.


HDMI
Glows (enabled; default) Off (disabled)
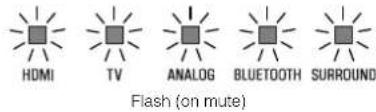
Configuring the Bluetooth standby function
If the Bluetooth standby function is enabled, the unit will be turned on and will be ready to play sound from the Bluetooth device when Bluetooth connection is made on a Bluetooth device. This function is enabled by default.
Press and hold BLUETOOTH STANDBY at least three seconds to switch function status between enabled and disabled.
The indicators on the unit show Bluetooth standby function status for several seconds immediately after switching function status.


Flash 3 times (enabled; default)
Flash once (disabled)
Initializing the unit
Reset the settings of the unit to the factory presets.
1 Turn off the unit.
2 Touch and hold 喜 and on the unit until all indicators flash.
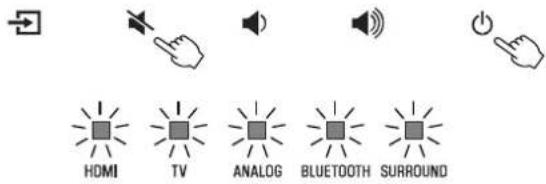
Flash (initialized)
APPENDIX
When any problem appears (General)
First in trouble, check the following:
Refer to the following when the unit does not function properly.
- The power cord of the unit, TV and playback devices (such as BD/DVD players) are connected to AC wall outlets securely.
- The unit, TV and playback devices (such as BD/DVD players) are turned on.
- The connectors of each cable are securely inserted into jacks on each device.
If there is no problem with the power and cables, see the following:
- "When any problem appears (Power and system function)" (p.39)
- "When any problem appears (Audio)" (p.42)
- "When any problem appears (Bluetooth®)" (p.44)
If the problem you are experiencing is not listed or if the instructions do not help, turn off the unit, disconnect the power cord, and contact the nearest authorized Yamaha dealer or service center.
When any problem appears (Power and system function)
The power turns off suddenly
The auto power standby function activated.
When the auto power standby function is enabled, the unit automatically turns off in any of the following situations:
- No operations have been performed for 8 hours.
- BLUETOOTH or HDMI is selected as the input source, but no audio has been input to the unit or no operations have been performed with the unit for more than 20 minutes.
Turn on the unit again. If the auto power standby function is not used, disable the function. For details, see the following:
- "Setting the auto power standby function" (p.36)
The protection circuitry has been activated. (The HDMI indicator flashes white or red.)
After confirming that all connections are made properly, turn on the unit again. If the power still turns off frequently, unplug the power cord from the AC wall outlet and contact the nearest authorized Yamaha dealer or service center.
The power cannot be turned on
- The protection circuitry has been activated three times consecutively. (If you try to turn on the power in this condition, the HDMI indicator will flash red.)
To protect the product, the power cannot be turned on. Unplug the power cord from the AC wall outlet and contact the nearest authorized Yamaha dealer or service center.
No operations can be performed from the unit's touch panel
The touch panel control is disabled.
Enable the touch panel control. For details, see the following:
- "Enabling/disabling touch panel control (child lock function)" (p.37)
All indicators go out although the unit is turned on (it may seem that the unit is turned off)
The unit is configured so that indicators do not glow or flash unless the unit is being operated.
Press DIMMER to select the desired brightness. For details, see the following:
- "Changing the brightness of the indicators (DIMMER)" (p.35)
The unit does not function correctly
- The internal microcomputer is frozen, due to an external electric shock (such as lightning or excessive static electricity) or to a drop in the power supply voltage.
Unplug the power cord from the AC wall outlet and plug it again.
The unit turns on by itself
- Another Bluetooth device is being operated nearby.
Terminate Bluetooth connection with the unit. For details, see the following:
- "Connecting the unit to two Bluetooth devices simultaneously (multipoint connection)" (p.31)
The TV's 3D glasses do not work
The unit is blocking the TV's 3D glasses transmitter.
Confirm the position of the TV's 3D glasses transmitter, and position the unit so that it does not obstruct the transmitter.
HDMI video is not displayed on TV screen
The HDMI cable is not securely connected.
Connect the HDMI cable properly. For details, see the following:
"Connecting a TV that supports Audio Return Channel (ARC)" (p.21)
- "Connecting a TV that does not support Audio Return Channel (ARC)" (p.22)
When the unit is turned off, video and/or audio from a playback device are not output to the TV
The HDMI control function is disabled.
Enable the HDMI control function. For details, see the following:
- "Configuring the HDMI control function" (p.35)
The unit cannot be operated using the remote control
The unit is out of the operating range.
Use the remote control within the operating range. For details, see the following:
- "Operating range of the remote control" (p.15)
The batteries are weak.
Replace with new batteries. For details, see the following:
-
"Replacing the battery in the remote control" (p.15)
-
The remote control sensor of the unit is exposed to direct sunlight or strong lighting.
Adjust the lighting angle, or reposition the unit.
The TV cannot be operated using the TV's remote control
The unit is blocking the TV's remote control sensor.
Position the unit so that it does not obstruct the TV's remote control sensor.
The unit cannot be operated using the TV's remote control
The HDMI control function is incorrect.
Confirm the settings are properly configured as follows.
- The HDMI control function of the unit is enabled.
- The HDMI control function is enabled on the TV.
- Set audio output to any option other than TV.
If the unit cannot be operated with the TV's remote control, even after the settings have been applied correctly:
- Turn off the unit and the TV, and then turn them back on again.
- Disconnect the power cord of the unit and external devices connected to the unit via HDMI cable. Plug them in again after about 30 seconds.
The TV and BD/DVD player are not from the same manufacturer.
We suggest using devices such as a TV and BD/DVD player from the same manufacturer.
The TV does not support the unit's functions.
Even if your TV supports the HDMI control function, some functions may not be available. For details, refer to documentation supplied with your TV.
When any problem appears (Audio)
No sound
Another input source is selected.
Select an appropriate input source. For details, see the
following:
"Basic procedure for playback" (p.25)
The mute function is activated.
Cancel the mute function. For details, see the following:
"Basic procedure for playback" (p.25)
The volume is too low.
Turn up the volume. For details, see the following:
"Basic procedure for playback" (p.25)
The power cord of the unit is not connected properly.
Make sure that the power cord of the unit is connected to an AC wall outlet securely. For details, see the following:
"Connecting the power cord" (p.24)
- Input jacks on a playback device are connected.
Connect the input jack on the unit and the output jack on the playback device.
- Signals that the unit cannot play back are being input.
Change the digital audio output setting on the playback device to PCM, Dolby Digital or DTS.
The unit is configured so that HDMI audio input signals are output from the TV.
Configure the unit so that HDMI audio input signals are output from the unit. For details, see the following:
- "Configuring HDMI audio output" (p.36)
The HDMI control function is disabled.
When connecting a TV that supports ARC (Audio Return Channel) to the unit using an HDMI cable only, enable the HDMI control function.
To output audio signals from the unit with the HDMI control function disabled, connect the TV's audio output jack to the unit's TV input jack (optical digital) via the optical digital audio cable.
For details, see the following:
- "Configuring the HDMI control function" (p.35)
"Connecting a TV that does not support Audio Return Channel (ARC)" (p.22)
Sound from an HDMI control-enabled TV is set for output from the TV's built-in speakers.
Use the TV's HDMI settings to set audio output to any option other than the TV's built-in speakers.
No sound is coming from the subwoofer
The volume of the subwoofer is too low.
Turn up the volume of the subwoofer. For details, see the following:
"Basic procedure for playback" (p.25)
The playback source does not contain low-frequency signals.
Play back a sound source containing low-frequency signals, and confirm that the sound is output from the subwoofer.
The volume decreases when the unit is turned on
The automatic volume adjustment function is activated.
To prevent excessive loudness, the unit automatically controls its volume within a certain level when the unit is turned on. Turn up the volume as required. For details, see the following:
"Basic procedure for playback" (p.25)
No surround effect
- Stereo playback is selected.
Select surround playback or 3D surround playback. For details, see the following:
- "Playback with 3D surround sound" (p.27)
"Playback with surround sound" (p.27)
The volume is too low.
Turn up the volume. For details, see the following:
"Basic procedure for playback" (p.25)
The TV or playback device is set to output 2 channel audio (such as PCM) only.
Change the digital audio output setting on the TV or playback device to Bitstream.
Sound is also heard from the TV built-in speakers.
Set the TV volume to minimum. For details, see the following:
"Basic procedure for playback" (p.25)
The listening position is too close to the unit.
The listening position should be at some distance from the unit.
Noise is heard
- The unit is too close to another digital or high-frequency device.
Move those devices away from the unit.
When any problem appears (Bluetooth®)
The unit cannot be connected to a Bluetooth device
- Bluetooth is not selected as the input source.
Select Bluetooth as the input source. For details, see the following:
-
"Connecting the unit to two Bluetooth devices simultaneously (multipoint connection)" (p.31)
-
The unit is too far away from the Bluetooth device.
Move the Bluetooth device closer to the unit.
- A device emitting electromagnetic waves (such as a microwave oven, a wireless device and so on) may be located nearby.
Do not use the unit near devices that emit electromagnetic waves.
The Bluetooth device you are using may not support the A2DP profile.
Use a Bluetooth device that supports the A2DP profile.
The connection profile registered in the Bluetooth device may not be functioning correctly for some reason.
Delete the connection profile in the Bluetooth device, and then connect the Bluetooth device to the unit.
The passkey for devices such as a Bluetooth adapter is not "0000".
Use a Bluetooth device with a passkey of "0000".
- The unit is already connected to another Bluetooth device. (Using a Bluetooth device that has never been connected to the unit.)
Terminate the current Bluetooth connection, and then connect to the new device.
The unit is already connected to two Bluetooth devices. (Using a Bluetooth device that has been connected to the unit.)
Terminate one of the Bluetooth connections, and then connect to the new device.
No sound can be heard, or the sound cuts off intermittently from a Bluetooth device
The volume on the Bluetooth device may be too low.
Raise the volume on the Bluetooth device.
- Bluetooth is not selected as the input source.
Select Bluetooth as the input source. For details, see the following:
- "Connecting the unit to two Bluetooth devices simultaneously (multipoint connection)" (p.31)
- Playback on the Bluetooth device has not been performed.
Perform playback on the Bluetooth device.
The sound output on the Bluetooth device may not be set to the unit.
Select the unit as the output destination on the Bluetooth device.
- The connection to the Bluetooth device was terminated.
Connect with the Bluetooth device one more time.
The unit may be too far away from the Bluetooth device.
Move the Bluetooth device near the unit.
- A device emitting electromagnetic waves (such as a microwave oven, a wireless device and so on) may be located nearby.
Do not use the unit near devices that emit electromagnetic waves.
- Audio from another Bluetooth device is playing.
Stop playback on the Bluetooth device from which audio is currently being played, and start playback on the other Bluetooth device.
Specifications
Specifications
The specifications of the unit are as follows.
Amplifier Section
Maximum Rated Output Power
- Front L/R 30 W × 2ch
- Subwoofer 60 W
Speaker Section
Front L/R
- Type
Acoustic suspension type (non-magnetic shielding)
- Driver 5.5 cm (2-1/8') cone × 2
Frequency Response 160 Hz to 20 kHz
Impedance 6 Ω
Tweeter
- Driver 25 mm (1') dome x 2
Frequency Response 4 kHz to 23 kHz
Impedance 6Ω
Subwoofer
- Type
Bass reflex type (non-magnetic shielding)
- Driver 7.5 cm (3') cone x 2
Frequency Response 60 Hz to 160 Hz
Impedance 3 (6 × 2)
Decoder
Supported audio signal PCM (up to 5.1ch)
Dolby Digital (up to 5.1ch)
DTS Digital Surround (up to 5.1ch)
Input Jacks
HDMI 1 (HDMI IN)
Digital (Optical) 1 (TV)
Analog (3.5 mm stereo mini) 1 (ANALOG)
Output Jacks
HDMI 1 (HDMI OUT (ARC))
Analog (RCA/monaural) 1 (SUBWOOFER OUT)
Other Jacks
USB
1 (UPDATE ONLY)
Bluetooth
Bluetooth version
Ver 5.0
Supported profiles
A2DP
Supported codecs
SBC, MPEG-4 AAC
| Bluetooth class | Bluetooth Class2 |
| Range (line-of-sight) | Approx. 10 m (33 ft) |
| Supported content protection method | SCMS-T |
| [U.K. and Europe models] | |
| • Radio frequency (Operational frequency) | 2402 MHz to 2480 MHz |
| • Maximum Output Power (EIRP) | 20 dBm (100 mW) |
| General | |
| Power Supply | |
| • [U.S.A. and Canada models] | AC 120 V, 60 Hz |
| • [Australia model] | AC 240 V, 50/60 Hz |
| • [Europe, Central and South America and Asia models] | AC 110 to 240 V, 50/60 Hz |
| • [U.K. model] | AC 230 V, 50 Hz |
| • [Taiwan model] | AC 110 V, 60 Hz |
| • [China model] | AC 220 V, 50 Hz |
| • [Korea model] | AC 220 V, 60 Hz |
| Power Consumption | 27 W |
| Standby Power Consumption | |
| • [U.S.A., Canada and Taiwan models] | |
| - HDMI Control Off | 0.3 W |
| - HDMI Control On | 1.2 W |
| • [U.K. and Europe models and other models] | |
| - HDMI Control Off | 0.4 W |
| - HDMI Control On | 1.2 W |
| Dimensions (W x H x D) | |
| • Installing the unit in front of a TV, etc. | 890 × 53 × 131 mm (35' × 2-1/8" × 5-1/8") |
| • Mounting the unit on a wall, with spacers | 890 × 131 × 62 mm (35' × 5-1/8" × 2-1/2") |
| Weight | 3.2 kg (7.1 lbs) |
NOTE
The contents of this manual apply to the latest specifications as of the publishing date. To obtain the latest manual, access the Yamaha website then download the manual file.
Supported HDMI audio and video formats
The following HDMI audio and video formats can be used by the unit.
Audio signals
| Audio signal types | Audio signal formats | Compatible media |
| 2ch Linear PCM | 2ch, 32 kHz to 192 kHz, 16/20/24 bit | CD, DVD-Video, DVD Audio, etc. |
| Multi-ch Linear PCM | 6ch, 32 kHz to 192kHz, 16/20/24 bit | DVD-Audio, Blu-ray disc, HD DVD, etc. |
| Bitstream | Dolby Digital, DTS | DVD-Video, etc. |
Video signals
The unit is compatible with the following video signals.
- Deep Color
x.v.Color
3D video signal
High Dynamic Range (HDR) video
-HDR10
-HLG
The unit is compatible with the following resolutions.
VGA
480i/60 Hz
- 480p/60 Hz
- 576i/50 Hz
- 576p/50 Hz
- 720p/60 Hz, 50 Hz
- 1080j/60 Hz, 50 Hz
- 1080p/60 Hz, 50 Hz, 30 Hz, 25 Hz, 24 Hz
- 4K/60 Hz, 50 Hz, 30 Hz, 25 Hz, 24 Hz
NOTE
- Refer to documentation supplied with the playback device, and set the device appropriately.
- When CPPM copy-protected DVD-Audio is played back, video and audio signals may not be output depending on the type of the DVD player.
- The unit is not compatible with HDCP-incompatible HDMI or DVI devices. Refer to documentation supplied with the HDMI or DVI device for HDCP compatibility.
- To decode audio bitstream signals on the unit, set the input source device appropriately so that the device outputs the bitstream audio signals directly (does not decode the bitstream signals on the device). Refer to documentation supplied with the device for details.
The resolution of transmitted video signal varies according to specifications of the TV connected to the unit. - The contents of this manual apply to the latest specifications as of the publishing date. To obtain the latest manual, access the Yamaha website then download the manual file.
Supported digital audio formats
The following digital audio formats can be used by the unit.
Optical
| Audio signal types | Audio signal formats | Compatible media |
| 2ch Linear PCM | 2ch, 32 kHz to 96 kHz, 16/20/24 bit | CD, DVD-Video, DVD Audio, etc. |
| Bitstream Dolby Digital | DTS DVD-Video, etc. |
HDMI (ARC)
| Audio signal types | Audio signal formats | Compatible media |
| 2ch Linear PCM | 2ch, 32 kHz to 96 kHz, 16/20/24 bit | TV |
| Bitstream Dolby Digital | DTS TV |
NOTE
The contents of this manual apply to the latest specifications as of the publishing date. To obtain the latest manual, access the Yamaha website then download the manual file.
Information for qualified contractors or dealers
Mounting the unit on a wall
Mount the unit on a wall so that the touch panel faces forward.

CAUTION
- To prevent the unit from falling, attach it to a wall constructed of drywall (plasterboard).
- Make sure you use screws (sold separately) that can support the weight of the installation. Using clamps other than specified screws, such as short screws, nails, and two-sided tape, may cause the unit to fall.
Fix the cables in place where they will not become loose. If your foot or hand accidentally gets caught on a loose cable, the unit may fall. - Do not lean on the unit or apply excessive force to the top of the unit. Doing so may cause the unit to fall.
- Check that the unit is fixed securely after the installation. Yamaha will bear no responsibility for any accidents caused by improper installations.

Attach the mounting template (supplied) on a wall and mark for the screw holes.
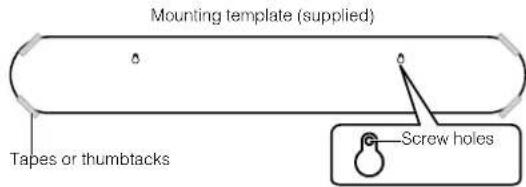
2 Remove the mounting template from the wall, and then install screws (sold separately) at the points marked on the wall.

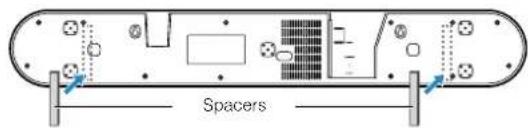
3 Peel off the backing paper from the spacers (supplied) and attach the adhesive face to the bottom of the unit.
4 Hang the unit on the screws.
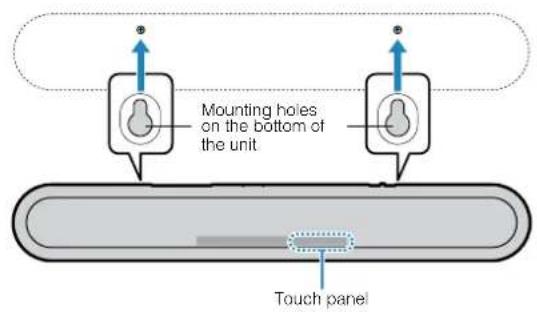
TABLE DES MATIÈRES
PRECAUTIONS D'USAGE 4
AVIS ET INFORMATIONS 9
AVANT D'UTILISER L'UNITE 13
(weee battery eu fr 02)
Informations
Accentuation des graves
Touche (alimentation)
4K High Dynamic Range (HDR)-Sendungen
Buchse SUBWOOFER OUT
High Dynamic Range (HDR)-Video
-HDR10
-HLG
BASS EXTENSION-knapp
Aktiverar/inaktiverar basforstarkningsfunktionen (s.28).
VOLUME (+/-) -knapp
Närett problem uppst (Bluetooth®)
Transmission di video HDR (High Dynamic Range) 4K
Cos' Audio Return Channel (ARC)?
Dimensioni (L x H x P)
apoiar-se no equipments.
Para as patentes DTS, visite http://patents.dts.com.
Conector SUBWOOFER OUT
KENNISGEVING EN INFORMATIE
9
VOOR U HET TOESTEL GAAT GEBRUIKEN 13
Kenmerken 13
Accessoires 15
KENNISGEVING EN INFORMATIE
Kennisgeving
Wat is Audio Return Channel (ARC)?
TV brandt (wit): AAC
Pone3HbIe yHKuIN IJN BOCnpOn3BeDeHnA 34
IcnoB3OBAHne nybTa Dy TeleBn3Opa dna ynpabHeHn annapatom (ynpabHeHne uepe3 HDMl) 34
OTo6paJHHeMHΦOpMaunn 6 ayuNocnHaIe BO BpEmBaCpOn3BeDeHn
UnpaBHeHne annapaTOM c nOmoIbI npIIOKeHnA HOME THEATER CONTROLLER 36
KOHΦιΓΥΡΑύΠι 37
HacpoKa pa3nHybIX fynKcui 37
U3meHHe HeepKocTn HnDkaTopoB (DIMMER) 37
HacTpoKa yHKun ynpableny uee3 HDMI 37
HacTpoKa ayDIOBbIXOJa chepe3 HDMI 38
HaCtpoKa ABTopeKIma OxJaHn. 39
BkIIOueHHe/BbIKIOueHHe ynpabLeHnC nOMOUsbCeHCOPHO naHn
(Функцяблokировкnt ot DeTei) 39
HactpoiKa yHKmpeKIma oXnDaHnB Bluetooth 40
Hnuaaiaaaannapata 40
ПРИLOЖЕНС 41
PpB BO3HKnHOBeHn KaKnx-Im6o npo6nem (o6zero xapaKTepa) 41
PpB Bo3HKnKHOBeHH KaKnx-Im6o npo6nem (nHTaHne n pa60Ta cnCTeMbI). 41
PpB Bo3HKnKHOBeHm KaKx-Im6o npo6nem (aydnocnHa). 44
При ВОЗнКНовен Каши-лб6о пpo6лem (Bluetooth®) 46
Texnueckne xapaKTepnCTnKn 48
Texnueckne xapaKTepnCTnKn. 48
IoppeKnaBaembe opmaTb ayno n Bndeo HDMI. 49
IopepKnBaembe fOpMaBtuNfpoBoro ayuocnHa. 50
HhopmaunIg KBaIIuNupoBaHHbIX noepdukOB nn dJePob 51
Kpennne annapata Ha cteHe 51
MEPbI 6E3ONACHOCTN
NEPEI NCIOJIb3OBAHmE BHNMATEJIbHO IPOYNTAITE DAHHBIE YKA3AHNA.CLEyIte 3TNIM HCHPTKUNM.
MpeBb 630nacHocTn, npBBeHHbe HnKe, no3BOJHO TpeoDBaHTb pck NOnyueHHy YBebY nOblBOaTeIeM nn DpyHMn IInuAMn INOBpeKHeHne co6CTBeHHOCTn. OH dnIXKnbl NOMouN bIOJIbOaTeIIO KopkeKTHO 630nACHO KcNlNyATnpOBaTb np6Op.CJeDyIte 3TNm HnCTpyKUHaN.
Iocne npouTeHnXpaHnTe 3To pyKOBoCTBO B HApExHOM MecTe, YTO6bIK HEMy MoKHO 6blIO 6paTntbcB JIO6oe Bpemr.
HaipabnIte 3anpoCbHa OCMOT nIpeMOHT npedCTaBnteHIO, yKOTOPORo Bbl npno6pEn yCTPOiCTBO, nIcneuaNtCTy ceHTpa TeXHueckoro o6cnyKINBaHn KOpnpauuYamaha.
KopnpaunyaYamaha He Hecet OTBeTcBHeHOct3a TpaBMBI INN NOBpeKdEHN 3dEIN, Bbl3BaHHbIE HenpaBnIbHOH 3KcNlyaTauee INN MoDnΦkauNe yCTpoCTBa.
JaHHe yctpoCTBO npedHa3Haeho dIa NOBceHBeHOrO uCNoJIb3OBaHNa DOMa. He nCIOJIb3yIe erO B o6laTAX, Tpe6yUOnx BBICOKo HAeXHOCTN, HAnpIMep B cfepe Kn3HeO6ecneHEn, 3dpaBOoxpaHEnn nn np pa6ote cakTNBaMn BBICOKo CTOnMOCTN.

PPEyPExKdEHNE
Danhua Hhphiopmaun npepynpekdaet o pncke cmeptn nnn nanyehn cepbe3hbx ybeu.
BheWtathbte cnTyauu
PnB03NHIOBENHNIHO60N3YkA3AHbIXNHe NpO6NEM HeMeDJIeHNO 0TKHHTNEHNTHE NTOCQDNHTE BNIKNYIHTAHN.B CNYaue MCNoNb3oBAHN 6atapei 3BNEKITE 6atapen 3NCTPOCTB4.
Ka6eBn nHTaHn nn BnKna NOBpeKeDeHbI.
-ИЗустоюСТВаИСХОДТНЕОБИЧныЗАпax,ЗВКИИДыIM.
-BHtpb yctpoctba nonano noctopoHHee BueectBO HnB0da.
-BoBpeM3Kcnnyatau nponaet3Byk
Ha yctpoicTBe IMeIOCTra TpeuHbI NnN NOBpeKdEHN.
PpOoJIKeHHe 3KcIpyaTuAMn MOKeT npBecTn KnpaJeeHNO 3NeKTpuCeKHM TOKOM, noXAPy HnH NeuCpABHOCTn. HeaMeIeNTbHO OTnpabBe Tzapoc HA OCMOpT nI pEmOH TpeDCTaBntEHo, yKOTOPo BBy PnObEpiY cTpoCTBO, HnI CneuAnJIcHTy CEHTPA TExMHcEKO6CbNyKbAHmN KopnpaAm YamaHa.
IcToHnK nTaHn
He donyckai Te IIOb6x DeHCTBn, KOtOpBle MoryT npMBecTN K NOBpeKdEHHO Ka6eI NITAHIN.
-He pacnonaraiTe eropraDm cO6orpeBaTeIaMn.
-HeckpyuBaIteHneCrt6aTeero.
-He zapanaiTe ero.
-He cTabbTe Ha Hero TAgKeIbe IpeDMeTbI.
3KcnnnyataaKa6eIaHnCOrOeHHoJcHTpaBHOHmNOMOTET TaTb npuHNOH NOXapaUN NopaaKeHHa3NeKTpueckm TOKOM.
He npKacaiTecb K BnIke nn Ka6eIIO nTuHaH, ecn cyuEcTByet BepoTHocb rpo30BOrO p3pda.
Hec6nloeHne 3toro yka3aHn moKET npBcTeN K npaKeHHO 3JIeKTpueckm TKOM.
HAnpKaHeHnE NcToUHnKa PnTaHnI DOnKHO COoTBcTcBOBaTb yKa3aHHOMy Ha HEM 3NaueHnO.
IopKnIOUeHHe K HEnoDxOJaue P0eTKe NpeMeHenHO TOKa MoKet CTaB npNnHO NoXapA, NopaxHeN 3JIeKTPueckm TKOM UIN HenCnpabHOCTN.
Ncnonb3yIe BxOaAunB KOMnIeKt NOCTABKN Ka6eIb NITANHIA.TAOKE He cNoIb3yIte BxOaAunB KOMnIeKt NOCTABKN Ka6eIb NITANHIA C DpyfMM yCTPOINCTBAMi.
Hec6nIOeHne 3TOYkA3AHm MOKET npBecTN KnojApy,OKoram nn HcnpaBHOCTM.
- PepnoDnueckn npOBepaTe ceTeByu Bnky N OOnuae ee ot cKoNMBeCn
Hec6nOHeHne3TOro yka3aHHa MoKET npBecTu K noKapy nn nopaeHHo 3JIeKTPnueckm TOKOM.
- NapeHacTpoKoN yCtpoIcTBa y6eHITecb, 4TO nCnOJb3yEmaP po3eTKa nepemehHOrTo TOKa JERKOdocTyHa.
PnB03HKnHOBeHHn KaKOro-Jin6o c6o8n Hn HncnPabHocTHn HeMeDJIeHHO OTKNIOHTe NITAHNE C NOMIOBbBbIKNooTaeTN M3BNeKNTe BNKyI3 P03eTKN NEpeMeHHORo TOKa. DaJxE cINbBbIKNoTaeTNPiTaHHaOHNCTB B BbIKNOYehHom NOJIOKeH,do TEs NOP NOKA BnIKA HEOTcOeHNHeAOT p03eTKN,yCTPOJCTBO OCTaTeCn POKnIOUeHHBM K ICTOUYHKNPTaHHN.
Bcnyae rpoMa nn np6nHexnra rpo3bI HeaMeJInTehBO OTKIOHHTe BIKIOUATel NTAHN IN 3BNeKNTe BNkYu NTAHN IN pOzETKN NepemEHNO TOKA.
Heco6IIOeHHe 3TOrO ykaaHnma MoKet npBecTn KnoKapy IIN HcnpabBOCTM.
- EcnnyyctpoCTBO He 6ydt NcNOnb3OBaTbc B TeueHne dNtnteHoro BpemeHn, N3BNEKNTE BNKY NITAHN N3 PO3ETKN NEPMeHHOR TOKA.
Hec6nloeHne 3TOO ykaaHn moKET npBecTu K noKapu HnEHCnpabHOCTM.
YctaHOBka
-
YctaHOBNTe B COOTBeTCTBnC OINcHHeM, PpIBeDEHHbIM B pyKOBOJCTBE. PaedHne HnOnpOKuDyBaHHe yCTpoiCTBa MoKeT npNBecTN K TpaBMam Hn NOBpeXdHnM.
-
86eHNTecb,4TO 3aBepWeHHa YCTaHOBKa RbIaTeCg 6e3oNaCHO HnHaekHO. TaKke nepiOuDneCKn BInOpJHnTe npOBepKn 6e3oNaCHOtN.
Hec6nIeHHe 3TOrO ykaaHnMa MoKeT npBecTn K naeHHo ycToiCTB nNoyueHHo TpaMbI.
He pa36npaTb
He pa36bpaTne HcBHOCTe M3MeHEnH B 3To yCtpoIcTB0. Hec6bIOJeHnE 3TOO yKa3AHnMOKet pNHBcT N KOxApy, KaJKeHNo 3NeKTpyueCKM TOKOM, TpaBMAM ININ HEICnPpABCHOTm.
Bepeu b OT BObl
- He donyckai Te nonadHnry yCTPOIcTBa nOdoKdb, He noB3yTeCB m pRdOM C BOIO, B yCNOBIAx cIPOCTN uN NOBIIeHHOH bNAAxHOCTN. He CTABBe Ha yCTPOIcTBO KAKHe-Ni6o EMKOCTN C XIKIOCTbO (HanPIMep, BA3b, 6yTbIKN N I Nc CTAKAH), KOTOPAR MOKET PONITCB N NOACTb B OTBepCTN, a TAKKe He NoJIb3yTECb NM TAM, fHe na Hero MOKETNONACTb BOJa. NaPADAHme XIKIOCTN, HANPMep BOiD, BHYTPb YCTPOIcTBa MOKET CTaB npuHnHO nOKapa, NOPaHexHnE3NEKTPUeCKHM TOKOM NIN HENCnPaBHOCTN.
HnBkoemCnyaeHeBCTabnIteHneBbHIMaTeCEtEBYIO BnIKyMOKpbIMnypkamN.He6epntec3a yctpoCTBO BlaXkbIMnypkamN.
Hec6nOeHne 3TOrO yKa3AHnMoKET npMBcT N nOpaKeHHo 3NeKTpueckm TOKOM HHeCNpPaBHOCTM.
Bepeyb oT orHa
He pa3MeaIte TOpAunie npEmdTebln NcToCHNk OTKpbTOrO ORH pAOm C yCTPOCTBOM, NOCKoJIbKy 3TO MOKeT PnBecT K BO3rOpaHIO.
Texnueckoe 06cnykBaHne uyxod
He nIpoNb3yIe InI OUcTKn NIN CmA3Kn AaP03OnN INn paCnblIReMbIe XMMueckne BeueCTBa, codepkaune roIpOyne ra3bl.
TOpOuHra3 MoKet OCTaBcBHyTpN yCtpoNCTBa H CnpoBOUpOBaTB B3pbIB IIN NOxap.

Mepbi 6e3onachocTn npn 3Kcnnyatau
He poHnTe Hne noDBePraTe yCtpoCTBO fH3NueCKOMy BO3DeIcTBIO. HecO6JIIOJeHne 3TOrO yKa3AHn MOKeT pINBeCTK NopAkeHIO 3NEkTpueckm TOKOM, NOXApY nHn HEnCnpaBHOCTM.
McnojIb3OBAHne 6aTapen
OCTEPEAITECBIPOFJIATbIBAHNA EATAPEIKN, CYIECTBYET ONACHOCTb XIMNUYCEKOTO OXKORA
Nyt DY, noctabnembI c daHHbIM n3eHnEM, coepKt NnOCKyIO/ KHOPOHy6 batapeKy. IporIaTbBAHne NIOCKo/HKOHOHO BatapeKIn KOMeT pINBeCTN K TAKeBIM BHYTeHNM OOKOrAM B TeueHnE BCero 2 acoB IN PnBcNEK C MCEPTN.
XpaHnTE HoBbIe NcNoB3OaHbIe 6BaTeApKIN B MeCTax, HepocTyNHbIX DnI dTeT. EcnI 6BaTeApHbIy OTCek He 3aKpbIAEcTcH aHeKHO, PpeKpATInTe XncNoB3OaHbIe NcDEJIYN XpaHnEO ER B MCTe, HepocTyNHOM DnI dTeT.
PnB03HKnHOBeHHN NIOO3peHnI, YTO 6aTaapeKIM MOrJIb 6bTb npOrNoeHbl ININnonACTBHyTpB KaKIM-Ni6o DpyrMM CNOco6OM, HEMeJNeHNO 6paTInTeCb 3a MEmUINHCKN NOMIoBb.
He pa36npaiTe 6aTapeio.
PonadaHne coedePKMoro 6aTapeB rIa3a nn Ha pyKMOKeT npNBecTe K noTepe 3peHn nn XmMueckOMy OXORY.
He 6pocaiTe 6aTapeioB oroHb.
He noDBepraTe 6bataeIO B03JeCTBnIO BbICOKHX TeMnepaTpy, HanpIMep npMOrO COJIeHcHOro CBeta IINI ORHJ.
3TOMOKETnpBcTeNKO B3pBBy 6aTaeNnCTaB npNCHNOI NOXAPA HIN TPAbB
He bttaiTecb 3apKAtb Batape, He paccUHTaHnHbIe H naOBTOHy 3apdky. 3apAka MoKTe KpBcEeN K BpBly HnnpToekAnHIO Batape, TTO, B CBOIO OuepeB, MOKTe Bb3BATb NtOteP3epH, XMHmEckn OOKr Hn TpaBMY.
- Ecnn 6aTapeN BCE Xe npoteKnn, n36eaiTe KOHTa C BbITEKunm 3NEKTPoNTOM.
3NeKtpoNIT -3TO eIQKoe BEEcEeTBO, CnOC6Hoe Bb3BaTb nOtePto 3peHnIIN XmHueCkne OOKr. Ecln 6aTaepen BCE ne npoteKIn, n36eIaTe KOtAKTa C BbTEKUHM 3NeKtpoNIT B cLIyae NOnaDAnHg 3NeKtpoNIT B rIa3a, POI IIN Ha KOKy, HEmEdJENHO CMOITE 3NeKtpoNIT BOOJ IN o6paTInTECb BPvaY.
Modylb 6ecnpoBHOHcB3N
He nCnoIb3yIte daHnOe yctpoIcTBO pAOM C MeDnHckmN np6opam NIN BMeDnHCKnx yUpeKdEHHX.
Pdann3nyeHne daHHoro yctpoiCTBa moKet nobnraTb Ha pa60Ty 3NeKTpuuecknx MeuunHCKnx np6opob.
He nCnoIb3yUte daHnoe yctpoIcTBO B npedeJax 15cmOTnUc CBKINBneHHbIM KApDIOCTMmYJrTOpOM mN deOpHJrTOpOM.
PaHOBJIbI,ReHepnPyEmbe DaHHbIM yCTpoiTBOM,MOYr NOBINHbHa pa6Oty 3JeKtpuNcKm ENaHcKHNx yCTpoiCB, HApHmep BxNbEHNbIX KapNDIOCTMUYTOPOB INHnDeΦnBnTPOB.

BHIMAHHE
Danhua HhphiMaun npedynpeKdaeTo pncke nonyehn TaPbMbbl.
NCTOCHNK NITAHNA
He nIpbayuTe po3eTKn nepemehHoro ToKa, B KOToPbIX BNka NITaHna depKNTcra HnIIOTHO.
Hec6nOHeHne 3TOrO yKa3aHHN MoKET nPnBecTN KnoJapy, npaKeHHo 3NeKTpuueckm TokOM NIN OXorAM.
BoBpemrOToeMHHeHnBUNKINITAHNBCERda6epntecb3aBnky,a He 3a Ka6eb.
3TO MOKET pINBecT N KOBpeJKeHIO Ka6eN I CTaTb npuHHoI npaKeHn 3JIeKTpUHeCKM TOKOM NIM IOKapa.
BCTabnIte BUNky NITANHAR B POSETKy NEPEMEHORO TOKA NLOTHO H O yNOPA. IcNIOb3OBaHNe YcTPOKCTBA, BINKA KOToPORo HEoCTaTOHNO NIOtHO BCTaBHeA BPOSETKY, MOKTE Bb3BaTb HAcONJIeHne YacTNU PbIIN Ha BInKE I CTaTb PnUHHoN oNkapa HNI OXORA.
yCTaHOBKa
He octabnTe yctpoCTBO B HeCYTOHOB NOnOKeHN. YcTPOCTBO MOKET cnyaHNOynactbNnpBecTNktpaBMam.
BoBpemy yctahOBKn ycTpoNCTBa He co3daaIte IpePnTCTBn dIra OTbOa Tennla.
-HeHaKpbIaBaiTeYcTpoiCtBOTKaHbI.
- He CTaBbTe yCtpoiCTBO Ha KOBpIKN HJI KOBpbI.
-He3aKpbBaIeBENTnIaHIOHHbIeOTBepCTn(OxnaKaIoune npope3N)ycTPOcTBA.
-He yctanabnbaaTe ycTpoiCTBO INbIM o6pa3oM,ueM yka3aHO.
-HeNoJIb3yIteBcYCTpOoiCTBOM BTeChbIX,IIIOXo IPOBeTpBaembIX NOMEUeHnIX.
Heco6nloeHne NpBHeEHNbIX Bblwe yka3aHm MOKeT npBcEtN K hapyeHNO OTbOa TEnIa OYcToPCTBa.3To MOKeT cTaB pNnHOn NOpKa aIN HncnPABHOCTeY, Y6BeNTcB hAaHInO DCtAOTHO MecTA BOKpy yCtpoiCTBa, no KpaJIHMepe 10 cm CbepxY, 10 cm No 6Okam IN 10 cm 3aAn.
He yctaHaBnBaIte yctpoNCTBO HbIM 6pa3OM, hem yka3aHO.
HecobkloqHe HeTo yka3aHm MoKet CTaTb npuHnH HeCnPabHOcTe Hnn npBecn K naeHnO yctpoCTBa n TpaBMnpoHaHIO.
YeCTaHaBbBAeTeYCTPOIcTB BoMeTAX,ge Ha Hero MOrY Bo3deXtBOBaTb Bb3bBaOuJe Koppo3HIO Ra3b Nn COJEnb HOB3dyx,A TaKKe B MeCTax C CNbHOH 3aDbIMHeHOCbTO JIN NOBbUeHNHbM CoepKaHem Napa. 3To MoKet CTaTb PnVHNO HeNCpNaBHOCTN.
Hepekomehyctc HaxoHbTcB HENOCpeCTBeHHO6n30CTOnOTycpOCTBa BO BpemCTNXHbIX 6eCTBn, HanPMep 3emNetPrcenHn.
Tak kaycypoictBO moKet nepeBepHybcn nn ynactb n npuHnHtbpamMy, HEmedienHO OToMnte OT Hero B6e0nachoe MeCTO.
- Nepei nepemieuHemcYCTPOBCTBAOTKIOHHTe BbIKIOHTe bNTAHnIa NTOCoeHHNTE BcO NpOKCIOHHeHNbKaEbn.
Hec6nOHeHne3Toro ykaaHnMoKETnpBecTN K nobpeKeHNO Ka6eNe. TaKke Bblnn KTO dpyro MoKET cNOTKNyactb.
ДлнадижашусУCTAHOBKYNCTPOINCTBAHcTeNeO6CNEbTe,TO6bI OHA 6blaBnIOHHe npctdABtENe, yKOTOPBO Hbnpno6pEny UcTpoINCTBO, INN CNEUANINCTO CEHTPA TExMHcKcROO6CbNyKbHAnB.
Hec6bIIOJeHHe 3TOrO yKa3aHnB IN pOcEce yCTaHOBKn MOKeT npBeCTN K naDEHNO yCtpoRCTBa IN NOyueHNo TpaMbI.ДЯ yCTaHOBKn Tpe6yETcA HauHnue CneuaJIbHbIX HauBbIKo ANDbIaT.
Iontepcnyxa
He cneJeYeT dOnrFO nOJb3OBaTcBcYcTPOHCTBOM npn BbcOKOM nnHEKOMΦoPTHOM yOpBHe rPoMKoCTN, NOCKoJIbKy 3TO MOKeT pnpBeCt N KnoTepeCnyxa. PnI yxUdSeHm Cnyxa Hnn 3BOHe bVaxh6paTInTeCb K bpay.
- Ppeep noikHouHenm yctpoCTBa K dpyrUm ycTPOcTBa OTKIOHTe Hx
NHTAHNE.
B npotubom cnyae 3To moKet npnbecTn K notepe cnyxa, npaKeHHO
3NEKTPnueckm TOKOM NIN NOBpeKeHNO yCTPOcTBA.
Texnueeckoe 06cnykBaHne uyxod
Bo Bpemr qnctkn OTcoeHnHnTe BNkny nHTaHn OTo pO3ETKn NpeMeHHoro TOKA.
Heco6IIOJedHeN3TOrOyka3aHnMoKTePnpBcTeN K npaoXeHHo
3JIeKTPnueCKmTOKOM.
Mepbi 6e3oNaChOCTn npn EKcnnyaTaun
He BCTabIte NoCToPOHnHE MaTePnaJIbI, HAnpIMep MetaJIIN nn 6yMaRy, BO TBePCrN DAHHORO YCTPOINCTBa.
Hec6nOeHne 3TOrO yKa3aHnM MoKET npBecTn KnpaKeHIO 3NeKtPnuEckm TOKOM HHeNcnpaBHOCTM.
XpaHHTeMeJKeIeTeaIINBdAnIOtTeT.
EtMOryTcnyaHn nporIOTHTb HX.
3anpeaaetc:
-BCTaBaTbHa o6OpydoBaHne nnCnTeb Ha HeM.
CTaBtTB TjXeIbI nepeMeTbI Ha o6OpydoBaHne.
-ctabntbobopyobBaHne npyr ha npya.
- npHmEHaTb N36bIToOHyIO CnIy K KHONKAM, NepeKJIHOaTeJAM, pa3beMaMBBOda-BbIBOda nT.I.
BnCHyTb Ha o6OpydoBaHm.
-06IokauBaTbcHa 06OpdyoBaHne.
HecobdHHe 3TOO yka3aHnM MoKET npNBcT N NOlyeHHIO TpaBM IIN IOBpeKeHHIO yCTPOIcTBa.
He TAHHTe 3a noKJIIOUeHHbIe Ka6eHIN.3To MOKeT npHBecTN K TpaBMam NnN NOBpeXdEHNO yCTPOJCTBA BCNECTBNE erO naDeHnR.
IcnoJIb3OBAHne 6aTapeu
- NcnoIb3yIte 6atapei TOnbKO yka3aHoro Tnna. Hec6bIoHeHene 3TOr Tpe6oBaHnHa MoMeT cTaB npuHHoN IOkapa, OKOrOB mN BocPnAmHeHn H3-3a npOTeKaHN 6atapei.
XpaHnte 6atapeKn B mectax, HeoctynbIx dIaTeei. Pe6eHOK MOKET cnyauHIO nporotHTb 6atapeIo. HecobHouHe 3Toro yka3AHN TAKKe MOKET npBBeCTN K BO3rOpaHNU BCJeCTBneYteKN 3JIeKTpOInTA.
He nomeuate 6batae B KapmaH nn NaKeT, He Hocnte H He xpaHnte 6batae PdAm c metanlnecknMn npedmetamn. Pnp KopoTkom 3aMbkaHn 6batae MoKet B3OpBaTbcra, IIn6o N3 Hee MoKet Notey XkIOcOtB, CTAB pNPHNOI NOXapa Hn TpABMIs. - 063aTeNbHo yctahabInBaBte 6aTapeN B COOTBETCTBNH COTMkAMN +/-, yKa3bIbAoumIM NOLPHoCTb. HecO6LIOHeHne 3TOrO yka3aHaNMA MoKet npNBECTn KOKOram HIN BO3ropaHIO BCNECDTBNe yTEyKn 3NEKtPOnlnta.
- Ecnn 6aTape np3paJxHbI nnE cNn yCToPcTBo He 6ydt NcNoB3oBaTbcHa npoTtKeHHnn dnttehBoro nepnoDa BpEmHe, nBBeKeNTe 6aTape n3 yCToPcTBA nnNyta bIctaHcuOHHO ynpabNeHH, YTO6bI ppeOtpBatnB BO3MOXHy0YTeKyAneKTpOnTa.
- PπxpaHennn nn yTnnaaun 6batape n3oynpyte o6naactb noHOCB c moNooJIeKIOIeHTb nn npdyrTO ratoepnla. KOtAKT cDpynnm 6batapeMn nn MeTAnneYecKMN ppeMetamn MoKET npNBecCT N NOXApy, OOKAR mnn BO3rOpAHNO 13-3a yTEeK KNDKOCTN.
YBEOMJIeHNe IN HΦOPMAÇIЯ
yBvEdomJIeHne
Yka3aHn, KOToBie Heo6xOuIMo Co6IIOaTb BO n36eKaHHe HncnPabHocTn, NOBpeKdEHH Nn HApUeHH pa60Tb I3dEHHa TaKke Notepn DaHbIX.
IcToUHMK NHTAHN
- EcIn yctpoictBO He 6ydt NcOnNoB3oBaTbC B TeueHne nnTeNbHoro BpeMeHN, 063aTeNbHO OTCOeHNHTe BUNKy nITAHNOr OT po3eTKn 3JKeTPOcETn. DaJke ecIN daHHOe ycTpoCTBO BbIKIOUeHO C nOMoIbO [OxNdaHHe/BKn], He3NaHTeNbHbN Tok npdoJNkaet npoTEKaTb.
yCTaHOBKa
He nCnOb3yTe daHHe oYcTpoiCTBO pAOM C pyrHM 3JeKTPoHHbIM O6OpDobAHmE, HApnPImep, TLeEBM3OpOM, paHIO NINMO6NtBbIM TepeHOM. Hec6KnOdeHne 3TOO yKa3aHnMoKeT npNBecT K BOCpOnu3BeDeHnO Wyma daHbIM ycTpoiCTBOM, TLeEBN3OpOM INIpaNo.
He nCnOJIb3yIte 3TO yCTpoIcTBo B MeCe, KOToPoE NOBepKeHO BO3DeIcTBIO IPRAMOTO COIHEuHORO CBETA, KOToPoE MOKeT CIIWKO CMILbHO HArpeTbCSa (HaNPMMep, PdOM C O6OrpeBaTeNEM) ININ OXIAJITCBa INI KOTOpOE NOBepKeHO CIIWKO CMILbHOMy BO3DeIcTBIO bbl INI INI Bn6paun. Heco6KnOJeHne 3TORO yKa3AHN MoKET pInBeCTK DEOpMAuIN NaHeIN daHHOуCTBA, BB3BaTb HEICnPabBOHcTb BHYTpEHNIX KOMNOHEHTOB ININ CTaTb INpUHHO HeCTaBnIBHO pa60tbl.
-ПиИСпОЛьЗOBAHIN6ecnpoBODHcTeN36eRaiteyCTaHOBKN daHHORO yCtPoIcTBaPraDOMcMeTALINueCKIMNCTeHaMNI IN CTOLAMM,MIKPOBOJIHOHBIMNNEaMNI INpPyrIMN6ecnpoBDbIMN ceTeBbIMNycTpOInCBAMN.
PpenTCTBnMOrTcOKpaTntb pacctOaHne nepeaun.
Iopknouhen
- Pn noJknHueHN BHeuHNx yCTpoNCTB 683aTeNbHO BNMaTeNbHo npOHTaTE pyKOBODCTBO DnA KAKDOrYCTPOINbI NOKnIOHTe HnCOBTBeCTBN C nPnBEDeHHbIMn INCHPTyKUqMN. HenpABInbHOe noKJIKNoHue yCTPOINCTBA, HapyaIoQee INCHPTyKUqMN, MOKeT nPnBeCTN Kero HenpabInbNo pa60te.
He npKIOUaIte 3To yCtpoCTBO KnpMbIeHbIM ycTpoCTBAM.ДЯБTOBOrO IN pOMbIeHHO NcONb3OBaHnR npMHeHOTcpa3INuHBe IuΦpOBBe aynOnHTepeFcBc.3To yCtpoCTBOnpHa3NaHcEHO INoKIIuOeHnK6bTobOMy uΦpOBOMyayOnHTepeFcy.NoKlQKeHne KnpMbIeHHomy uΦpOBOMyayOnHTepeFcyMOKET He ToJbKO nPbBEcTN KHeNCnPabHOCTNyCtpoCTBa.HO IN NobPeNTb DnHAMKnK.
06paueHne cannapaTOM
He CTabbTe Ha 3TO yCTpoIcTBo BUNHIOBble,IIaCTMacCOBbie n pe3INHOBble npEIMeTb.I. HecO6NIODeHne 3TOr Oka3AHn MOKeT cTaTb npuHNO DeOpMaunnn BbUcBeTaHH naHeEN yCTpoIcTBa.
- Ecn npn pe3kOM n3MeHEn HBeWeH TeMnepaTpyb (HanpImep, npn TpaHcNoptPObE yctPoTCTBa Hn npn 6bICTpom Harpe Bn60 oxJaKeHN) eCTb BepoTHOCTb o6pa3OBAHOBKa KOHehCaTaB a yctPoTCTBe, neped INCNOlb3OBAHmE OCTaBtE erHa HeckOnbko
YacOB, He BkHouyA NHTAHN, NOKA OHO He BbICOXHET NOHOCtBIO.
IcnoB3OBaHne yCTPOINCTBa npn HAnuN B HEM
CKOHcHcPOBaBWeeBnMOKeT npBecTu K ernoBpeKdHIO.
Texnueckoe 06cnyknuBaHne uxyo
ДячNTKуСТpoIeTBA NOJb3yIeTcB MЯrKO cyxOu TkaHbHO. NcNoJIbSOBaHMe XmMnKaTOB, TaIXK Ka6BeHn Hnn pa36aBnTeB, MOOJIIN CpeCTB NnTKaHeN DnXmNueeCKO YCtKN MoKeT npINBeCTN KdeOpMaunN nnObeCuBeHbHnO.
DnHaMnKn
He npKacaiTecb K dHnHAMKam. Hec6IIOJeHne 3TOrO yKa3aHnMoKeT pNBeCTN K NOBpeKeDeHHo DnHAMKOB.
IcnoIb3OBaHHb6aTapeuDJIKNbIyTNIN3NPOBaTBcB COOTBeCTBmCdeIcTBIOIMMeCTHBIM3aKHOHaTeJbCTBOM.
HOpMaun
Copepknt npmeuahn K nHCTpykqum, orpaHneHm fynKcun n DOnoHNHeBHyIO INHΦopMaUIO, KOToPA MOKeT 6bIb NpE3HoN.
O nacnopTho Ta6nUcKe yctpoIcTbA
Homep MoIeN, cepiHbI Hoomep, Tpe6oBaHnK KcTouHKnY IITaHnI N np. Yka3aHbI Ha Ta5JIuKe C H3aBaHmE M3dEInn B HIXKHeJyAc7n YcTroPcTBa IINI PdOM C HeI. 3aIIuINTe cepiHbI Homep B paacIoIOXeHHOM HIXe IOnE IcoxpaHtE daHHOe pkyOBODCTBO Ka NOpTBePjXDeHne NOKyKN; 3TO NOMOKe IIndHTfMcpuPoBaTb PnHaDJIeXHoCTb YcTroPcTBa B Cnyae KpaKn.
HOMep MoTeJI.
CepinHbH Homep.
(bottom RU_02)
ToBapHbIe 3HaKn
DOLBY AUDIO
N3orToBHeNo NnIeHcHnn KOMnAHHn Dolby Laboratories. Dolby, Dolby Audio, Pro Logic nCmBOL B BuDE bByx 6yK D RbJIaTOrTc ToBapHbIMn 3HaKaAMn Dolby Laboratories.

dt
Digital Surround

Patent DTS npedctablenha caite http://patents.dts.com.
M3rotOBLeHNO NJIueHcHNN KOMNaHNN DTS,Inc.DTS,CMBON,DTS IN CMBON BMeCTe, DTS Digital SurroundnDTS Virtual:X JRAJNTOC 3apERNTpUPOBaHHIMTOBAPHbIMN 3HaKaAMn INI TOBAPbHMn 3HaKaAMn DTS,Inc.B CUSA n/INn dpYrNx cTpaHax.
DTS, Inc. Bce npaba 3aunuieHbI.
App Store
App Store yBnreTc3 hakom o6nykuaApple Inc.

TepMinHbHDMi, JorotnHDMi H High-Definition Multimedia Interface 8BnIOTcTobAPbHmN 3AkAMn HApERMcTprpOBaHHMn TOBaPbHMn 3HaKaAMn HDMl Licensing LLC B CUSA ndpyrnx ctpahanak.
x.v.ColorTM
"X.v.Color" RAJIaTcT OBaPbHbIM 3HaKOM Sony Corporation.

Bluetooth
CNoBcHb3nKnIoroTnbluBtooth*YBaJIOTc3apeRNCtpnpoBaHbIMn TOBapHbIMN 3HaKAMm, pPnHApIeKauMm Bluteoth Sig, Inc., nIO6oe INcNObOBAHHe DaHHbX ToBapHbIX 3HaKOB YAmaha Corporation ocUyecTeBnRETC corNaCHO NnEHN.
Blu-rayTM
"Blu-ray DiscTM", "Blu-rayN N norotnblbAIBNAOTc TOBapHbIM 3hakamn Blue-ray Disc Association.
O codepkaHn3TOro pykoBoDCTBa
JaHHe pyKOBoDCTBO npedHa3HaueHo Ira cIeJyOux KaTeOpn YHTaTeN:
-ПовьователустуpoctBa
-KOHCTpyKTop, CTpOnteIb IIN npOdaBeU, yCTaHAbNBAHOuIyCTpOoiCTBO HA CTeHe
BDAHHom yCTPOINCTBE nCnONb3yOTcRcNEDyIOUne CnHbHe cNoBa DnBAKHO INHOPMaun:
-! PNEyPENPEHNE
DAnHnHnΦopMaun npEynpeKdaet O pncKe CmepTu nn NOnLyHeHn cepBe3HbX yBeyu.
BHMMAHME
DaHHa HhOpMaun npedynpexkaetopncknoIyehn TpaBmbl.
- YBEODOMJIEHNE
Copejnt NyHKtby, KoToPbIe Heo6xOJIMMo co6JIIOaTb dnn
npTe0BpaueHHeNcPbaHOCTn, NOBpeKdEHNr IIN HApUeHnra
pa60tby UcTpoiCTBa, NOpTe pHa DAHHbIX, a TaKKe dI 3aunTbI
okpykaOuoeI cpebl.
-ПРИМЕЧАНС
CopeKHT npmeaHn K INCTpykUAM, ORpaHneHnM FyHKnI n DOnIOHNTEbHyO INΦOpMaUNo, KOtOPa MoKeT 6bTb NOe3HOJ.
-ⅢIJIIOCTpaUNI CHIMKIN 3KpaHOB B DaHHOM PYKOoDCTBe npNBedeHbI TOJIbKO B KaueCTBE pnpmePOB.
Ha3BaHnKOMPAnHnI npOyKTOB BdaHHOM pyKOBOCTBe ABJRAOTc TOBAPHBIM3HaKaAMNI 3apeNCTpnpoBAHHbIMTOBapHBIM 3HaKaAMn COOTBetCTBYOUXKOMPAnHn.
-ПограмнhoeобсесспсMuKET6bITbN3MeHcHoN06HOBHeHO6e3 npedBapntelbHOrOyBeOMLeHn.
ПЕД ИСПОЛьЗOBAHNERДАHHORO АПAPATA
Функцm
BVeJeHne
DAnHHaPOnHTaJIbHaN CNTema OKpykaioe 3ByaHnco BCTpoEHbIMn Ca6ByΦepaMn IO3BOJraT HacIaXdaTbcR DInHaMnueckm 3BykOM C BOCpON3BODMbIM Ha TeJeBn3ope Bndeo.
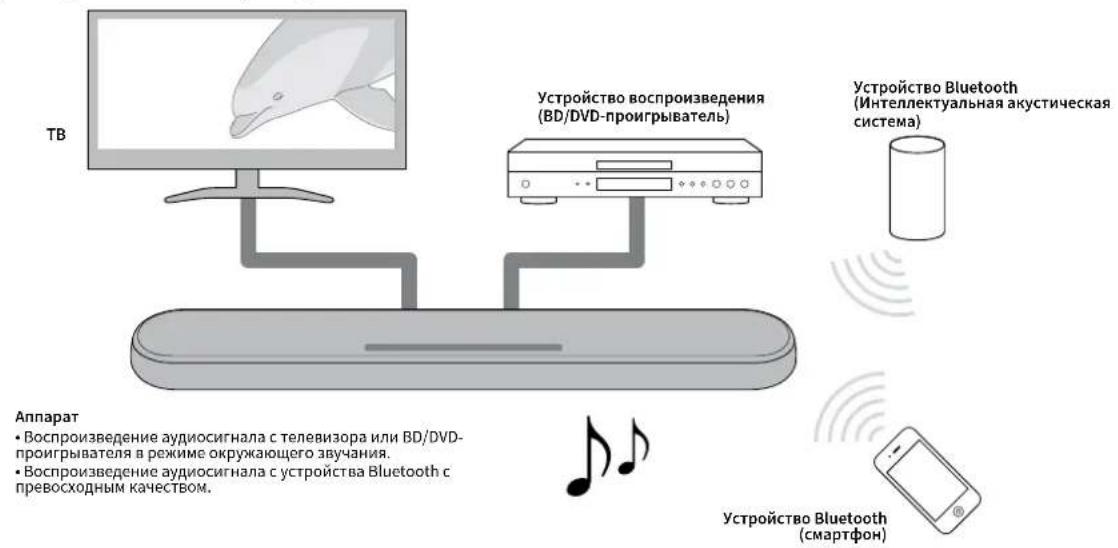
Okpykaouee 3D-3Byuahne
PnHcNoB3oBaHnn DTS Virtual:X OkpykaOuI 3ByK MOxHO yCbIaTb He ToIbKO OT Ropn3OHTaBbIX HAnpaBHeH, HO TaXKe IOT HanpaBHeH, MeHaOuXcR NO Bicote. POpbo6Hee o6 3OM CM. dAee:
“Bocnpoun3BeHneHcokpykaUoum3D-3Bykom”(c.28)
IpepaBua Bndeocurhana 4K c paunpeHHbIM dHamaueckm dnana3oHOM (HDR)
HacnaKaIteB npocmToPOM BnOe C BbICOKM pa3peHHeM ot Ka6eBHO HnCnTHKOBo TB-npncTABKn Hn BD/DVDnpnIRpbAteY. EcnH nCnOJb3yETc TeneBn3Op c noDnepKoAio Audio Return Channel (ARC), daHHb AR-CobMeTumbAn annapat MoXHo noDKIOHTb K TeneBn3Opyeep3 OIN Ka6eB HDM.IoDpo6He e 03TOM CM.daee:
- "Повлочене Телевизора с подөрхкой Audio Return Channel (ARC)" (c. 22)
“POndepknBaembeΦopMaTbI ayDNo n BInDeo HDMl" (c.49)
Функциya упразваенья черз HDMI
C nomoubno nybta Dy TeBn3opa Doctynho Ccennene Hkykni TeBn3opa n annapata. Noppo6hee 06 tOM cm. daJe:
"NcnoIb3OBAHnne nyIbTa Dy TeIeBn3Opa dIy npabHeHn aInpaTOM (ynpabHeHne uepe3 HDMI)" (c. 34)
Poipepka MhoroToueHoro coeMHenny yctpoiCTB Bluetooth
C JERKOCTBIO BOCPON3BODHTe COEPKMOE CMAPTOHA, PJIAHWE Ta HIN PI K NOIDEPKKOIBLuteoth. Kpome TOro, annapat NODEPKBAET MHOToUeHHeO CoENHeHne MoKeT NepeKlNoaTbCa MeKdy DByMa
yctpoctBamn Bluetooth nla Bocnpon3BedeHna. Haa 3ckknO3NBnA
texhnoi Compressed Music Enhancer ynyuetae KaeeCTBO n
xapaKtepncn 3Byka n MoKeT uCNoIb3oBaTbcn Iyra Co3dHaHn
peaNtnuHoro n BneatJIOUeero 3ByuHn. POnpo6Hee o 3TOM cm.
danee:
“Подклочене annapata K DBYM yctpoiCTBam Bluetooth® OДНовремно (MHROTOTOчHoe coeMHHeHne)" (c. 33)
Пиюжende HOME THEATER CONTROLLER
C nomoub6ecnnaTHoro npinnoxehnI dIg cmapTfoHOB HOME THEATER CONTROLLER MOKHO IeKO ynpabIbIbIbIaInapaTOM CO cmapTphiHa. NpOpo6Hee 06 tOM cm. danee:
"YnpabneHnene annapatom c nomooh npnoJoxen HOM THEATER CONTROLLER"(c.36)
YcJIeHne6acOB
ФункцуснгьябасовпдимаetнИЗкIMуровьбасOB,пОЗВOLЯнслakдысьеше60ileeMoUHbIM3BykOM.ПоюрбHee 06 3TOMc.DaIee:
“Bocnpon3BedeHne ynyuueHHoro 3ByaHn86acob (ycnneHne6acob)”(c.30)
YnctbIy roJoc
ФункцячсTORO rONoca denaet 60nee YetKoR peYb, Hapnmepe duANOH N NOBecTBOBaHry. POnpo6Hee 630m Cm. danee:
“YeTKeB BOCnPOn3BeDeHHe YeNoBcEcknx rOLOcoB (HCTbI Roroc)”(c.29)
Akceccyapbl
PpOBepka akceccyapOB
Y6eHNTecb HAIINH BCex IpeueHCJIENHHIX HIXe AKCECCyapOB.

Annapat
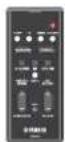

HypnntaHn
OTNeKueNnHpOBoW ayDnokAebJe

Nyblr
JINTHeBAA6aTepeKHa C2003596000000000
CR202Xyke BCTaBnBe B nybT DY

MOHTAKHbI W6nOH
IcnoIb3yIe npn KpeIeHnn annapata Ha cTeHe.

PpOCTaBKNx2/nnCT)
Ncnojb3yntepn
KPNENHn annpataHa CTHe.
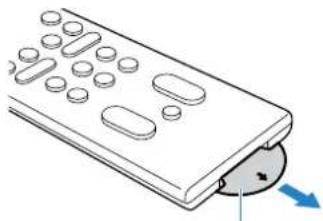
H3oIpyuOa npoknlaKa
6aTaapeKu
Dnana3oH pa6oTbI npybTa Dy
IcnoB3yTe npbT yB npepeiaaHa, noKa3aHOro Ha cnedyouem pncyKe.

NPMMEAHNE
Ecn annapat sakpenlen Ha cTeHe, HanpaBnIte nyIbT YHa ceHcOp DHa bepxne HaneHn. NpObo6Heo 3om Cm. dAee:
“HaBaHnI N fHyHKmN KOMNoHErTOB nepeDHe/BepxHe nanei" (c.17)
"KpenneHne annapaTa Ha cTeHe" (c. 51)
3aMeHa 6aTapeKn B nyIbTe Dy
HaKMMTe N yIepKINBaIte FIKCaTOp B HAnpaBLeHn, 06O3NaueHHom [A], n MeDJIeHHo BblBnHbTe IepKaTeIb 6aTapeKn B HAnpaBLeHn, 06O3NaueHHom [B].
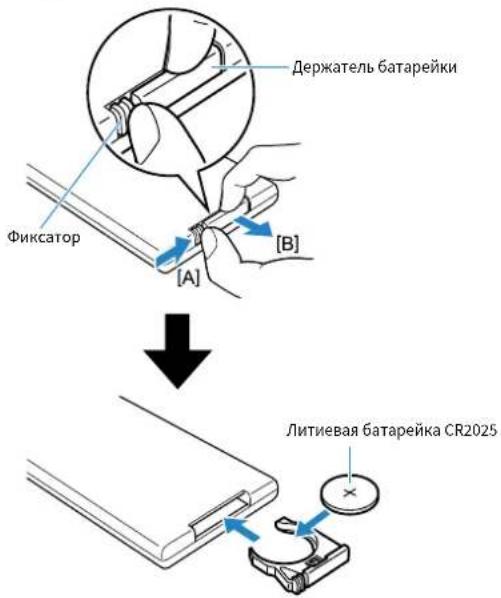
Ha3BaHnKOMNoHEnTOB mnx yHKn
Ha3BaHnI ΦyHKuIN KOMNoHErTOB nepeHHe/BepxHe nAHeJI
Danaee npuBedeHb Ha3BaHHa n yHKun KOMnoHETOpeHne H Bepxne naHee.
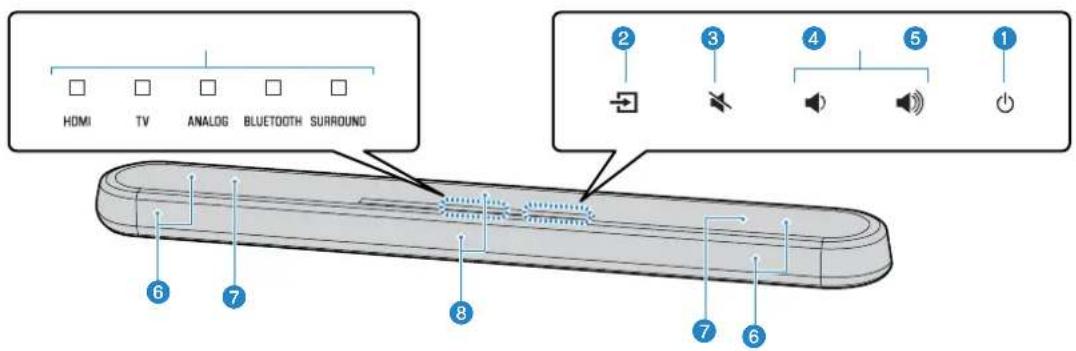
1 NHHKaTOpbI
HINDAKATOPBb HApBePHENaHENMNAHOITNHN
TROPHeHnpebpHNO,OTobpaKaCoCTOHNHE
OnepaHnHaCTPOKn. BdAHOM
PYKOBOCTBE CoCTOHNH INHnKAtoPOB, a
HMnHO:BbIKIOUeH,TOPTN NIN MNGAET,
OTobpaKaOTc Ka HnnIOCTpaKaIHXHKe

BbIKIOeHO

Topnt

Muraet
ПИМЕЧАНЕ
JHPOCTb HINHINATOPOB MOHO H3MOHHTb C NOMOUBIO DIMMER HA NJIte D. Noipo6hee 06 3TOM CM. danee:
"IMMehne npKoCTH HNDKaTOPOB (DIMMER)(c.37)
(axoA)
Bb6epnteIra Bocnpoun3BeHn HcToOHK BXoHOrO CnHana (c.26).
(OTKnIOueHne 3Byka)
OTKIOUHHe 3Bkya ayDNObIXoJa (c.26). CHOBA HAXMITE KONKY dN BKNIOUeHn 3Byka.

/(rpomKoctb+/-)
HDMI:3BykOTyCTpoiCTBa,NOKlnHoeHHoro KrHe3dyHDMI IN (c.24)
-TV:AydnocnHnTeneBn3opa(c.22)
ANALOG:3BvOyCTpOJCTBA, NOKJIIOUeHHoK BXoDHOMy IHe3dY ANALOG (c.24)
- BLUETOOTH:3byk ot yctpoiCTBa, noqknouenHoro no Bluetooth (c. 33)
Khonka SURROUND
IpeeknouHTeHaBocpon3BeedeHne OKpykaouero38yauHHa (c.28).
Khonka 3D SURROUND
IpeeknouHTeHaBocpon3BeedeHne okpykaiooero3D-3buaHna(c.28).
KHonka INFO
ДуУказань Информаци 66ob aydnocnHale BOCPON3BODIMORO ICTOCHNKA BXOHNORO CINHana nIIM yCTAHOBKe yCINHeHЯ 6acob (c.35).
Khonka BLUETOOTH STANDBY
Hakmatte N ydepknaahe KhoNky 6oane 3 cekyH, T0b6bl BkIOuHTb/OTKIOuHTb YfHKnIO pekmka OxikdAnh Bluethout (c. 40).
Khonka SUBWOOFER (+ / - )
PerynipobKa rpoMkoCTn ca6Byepepa (c. 26).
Khonka MUTE
OTKIOUeHHe 3ByKa ayDnObIxOda (c.26).ДЯ BIKIOUeHHe 3ByKa HAKMITEy KHOIIky CHOBA.
KHONKA STEREO
NpeeknoHne HcTepeoOnueckoe (2- KaHbHoe) Bocpon3BedeHne (c. 29).
10 KHonka CLEAR VOICE
BkIOueHne/OTKIOueHne FyHKnN YnCTOro roIocA (c.29).
1 Khonka DIMMER
I3MeHHeHne npKocTn HndkaTopoB (c. 37).
Khonka BASS EXTENSION
BkIOueHne/OTKIOUeHne FyHKcUN yCInJeHn6acOB (c.30).
KhoKa VOLUME (+ / - )
PerynpobkA rpoMKoCTn annapata (c. 26).
ПОДГOTOBKA
1CTaHOBKa
YctaHOBka annapaTa Ha Tym6e TeneBn3opa nT.n.
YCTAHOBNTe annapat ceHCOPHO naHeBIO BBepx Ha Tym6e TeIeBn3opa nT.I.
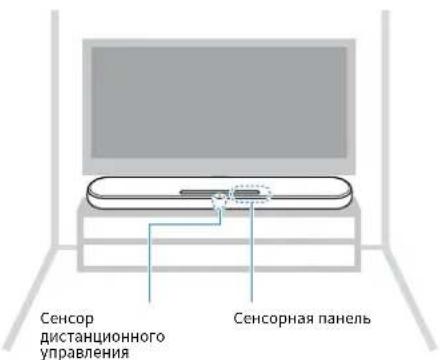
YBDEOMAHEHNE
He yctaHabHbIe annapat H BD/DVD-npOHRpbBaTeIb nnn dpyroye cypoCTBO HenocepTeBHO npyraHa npyra. 3To moKet CTb npuHHo HEnCnpaBHO3-3a Bn6paun.
CTapaTecbHe KacatbCn HNKOgA He pnpKnaIbBaiTe kakoi-Ni6o Bec NJIyCNHNE KINHAMKAM (POKbTIbTKaHbYIOHACOeBPOxHcHtN) Ha BepXHECTOPHOI ANAPATA.370MOKET PNOBECTK NOBPOXDEHN HNAMHKW
Bannapate Haxopatc DnHAMNK C HEMARHTHbM KpAHPOBAHMe. He paonolanae 603nn anapata ycbTBeNbHbK marrHtMy npEeMtB (XeCTKNE DNCKN T.N.).
ПРИМЕЧАНЕ
Anapat MOHO TaHae 3aKpENb Ha CTHe. dIra BeOnachOyCTAHOBN HeoXoDMnOpNeDEeHHb 3AHNr O KOHCpyuH3AHNr. UcTAHOBA annapata HA CTHe DOJIHKH OCCyueCTBnTcB KBAINHPOBaHbM NOpRdYKOM NINpePOM. IInnoynHnNOpO6Hn INHFOpMaunm Cm. cneDyoUee:
"MHΦopMaunIyKBAHINΦmHPOBaHHbIX NOpRdNtHOB Nn DnepoB"(c.51)
2 OdkloucheHne TeJeBu3opa
Tto Takoe Audio Return Channel (ARC)?
TtO6bI Bocpnn3Becn Ha annapate 3Byk C TeNEB3oPa, TeneB3Op o6bHNO noDknHOaHOT K annapataye3 aydmoKabeb, a takoK Ka6bH DMI. OndhAO, ecnn TeneB3Op noDepKbaet Audio Return Channel (ARC), 3bykoB cnHAn c TeneB3oPMAOHO noDabHa BxOaonnapataye3 Ka6bH DMI, KOtoby BbIOHNT BIndeocnHAbI ot annapata Ha TeneB3Op.
ПРИМЕЧАНО
Повлкунше Кабел HDMI с Рнеджков Audio Return Channel (Rhe3do c 603aHnEHM "ARC") на TelebniOte.
BkHnHTA H annapate fHyHKnHIO ynpaBHeNHa Ype3 HDMI, TTOb6 AKTINbPOBaTb Audio Return Channel (ARC). NpOpa6hee o8 tOM cm. danee: "HactpoKa FHyHKnIy npaBHeNHa Ype3 HDMI" (C. 37)
NcnoBbyeTn-90KoTakThnKa6eBbHDMiCHaHeceHHbIMNorOtnHomHDMI.YtO6bM36eKaBbYxyDWeHnKaHeCTBaCnHana,peKoMeHNyEeTCnHONb3OBaTbKa6eBbCMAcMnAHOBdINHO5M.
Дявocрпон3бeDEHЯВdEOKHTeHTa 3Dи4KHCnOJIb3yIteBbICOKOCKOPcTHO Ka6eIbHDMI.
Aannapat noepknaeT texhnofK 3aunbTo tKnnpoBnHn HDCP Bepnn2.2. DnBocnpo3BedeHn BuDeo B opoMaTe 4K nOeknOHTe annapat K BXOHOmyrHE3y HDMI (coBmecTNMOmy C HDCP 2.2) Ha TeleBnOpe c noepckko HDPC 2.2
BxOHeHne rH3eTo TEHeBn0A He moKet iNIObIbOaBtBa, eCNI K annapaty nokKnIeTHeMeBnO C nOdePekKn Aioo Rcvirn Channel.
Подкlioуене Телевизopa 6e3 подержkn Audio Return Channel (ARC)
CoeHnHe annapat nTeBn3Op c nOmoBIO Ka6EaH HDMI (npoaeTc8 OTdENo) nONTNueCKoro uΦpOBOrKa6Ea (npnaeraTc8).
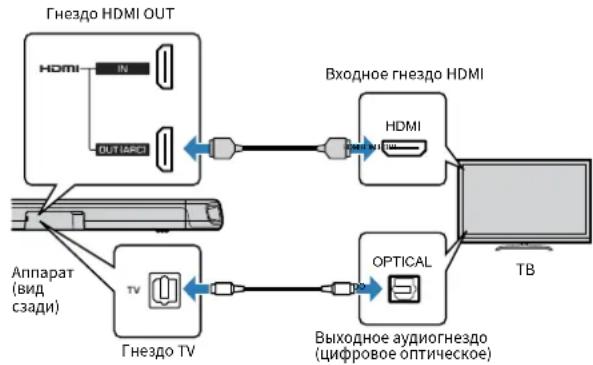
IPNIMEYAHNE
NcnoIb3yIe19-koTakThnKa6BbHOMICHaHeceHHbIMJorOTINOMHDMILYTO6bM36ekBaTb yUdWeHnKaHeCTBaCmHHa,peKoMeHNDeTcHcNoB3OBaTb Ka6BeMakCNMaBHO nnHIO5M.
ДагьпсponиЗБЕDEнгИВМЕОКHTERTAДИКHCNOLBJ3YteBbICOKOCKOPCTHOHKa6eBJHDMI.
-ДанньшappaT nopeKnaeTe xHONorH 3aunbTo OT konnpobanH HDCP Bepn2.2.ДЯ BocpoNtBcEHeHn Buae Bo fOpMaTe 4K noeknOHTe annapat K BXoDHomY rhe3dy HDMI (coBmecTmOMy c HDCP 2.2) Na TeNeBnOpe C nopepKkoH HDCP 2.2.
PnnpoknoeHnnpnilaeremoOntnueckoro ndpofooroaynoka5ne H 3abyTe ChnTbKoNpOBeRnOpHeNTauuWteKepepeero npoknloHem.
EcnIy TeneBn3opa OTCYCTBYET ONTNUeCKOe FHe3do, coedNHHTe BbIXoHoe ayuOnrHe3do Ha TeneBn3ope C BXoHbIM THe3dAMN ANALOG Ha annapate. IpoDp06He6 oe 30m CM. danee:
“AHAnorOBoe nOdknIOueHHe KcTPOiCTBy BocIpOnBBeDeHn" (c.24)
3 OdkloueHne Bocnp0n3BODaunx yctpoiCTB
Bannapate nmeetc DBA BCTpoehhix ca6byepa; Ondako, YTO6bl yBENHTb MOHOCtB HN3KoAcT0THO 3ByKa, MOXHO NOKIOUHTb ca6byep, ochaeeHHBI BCTpoehHHIM ycuiNTenEM.
PoiKIOUHTe BHeHnCa6Byep K annapaty yepe3 MoHoka6enb RCA (npoaeTcra OTdENoHO).

NPMMEYAHNE
3Byk6ydtBbBOaTbcnNOT BCTPOeHHbIX caBbyfepeo, NOT BHeuHero caBbyfepa.
5 Odklkueyne shhypa nItaHnA
IopKJIIOUeHHe UHypa nHTAHn
Iocne 3aBepseHnB CEx NoKIOUeHn NIOCoEHNHe npNarAembIuHyp nHTAHnK rHe3dy AC IN Ha annapate N BCTaBbTe wTencelb HHypaNTAHnB pO3eTKy cETn nepemehHO TOka.
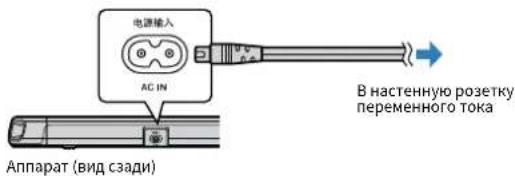
BOCPON3BEdHne
Ochobhbie onepaun
OchOBHaj npoceDypa JnB BocnpOn3BeDeHn
OchOBHnA npoueDpya nBBOcnpOn3BeDeHnMy3bIK COCTOHT B cnedyioem.
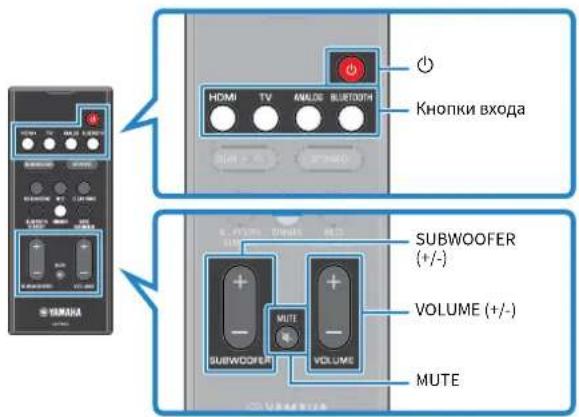
1 Haxmnte KhoNky, YTo6bI BkNooyntb annapat.
2 BkIIOHTe BHeHnE yCtpoNCTBa (Hanpumep TeIeBn3Op nn BD/DVD-npOurPbIbATEnb, nRpOByo npncTabky), noKIOUeHHbIe K annapaty.
3 C NOMOJIbIO KHOJOK BXoJa BbI6epHte NCTOuHNK BXoJHO rCnHaNA, KOToPbI Heo6xoJIMBOcIpOn3BecTH.
HDMI: 3Byk oT yctpoiCTBa, noKnHoueHHoro K rHe3dy HDMI IN
TV: AydnocnHan TeneBn3opa
ANALOG:3BykOTyCTPOINCTBa,NOKNIQUeHHOROKBXOHNOMY rHe3dy ANALOG
BLUETOOTH: 3Byk oT yCtpoiCTBa, noKluoyeHHoro no Bluetooth
TOpNT HnHnKaTOP BbIbpaHHOrO NCToOHnKa BXoHOrO CnHaja.
PpMep
EcnBbI6paH TeneBn3Op


HDMI
ANALOG
BLUE TOOTH
SURROUND
Topnt
4 HauHnTe BocnpOn3BeDeHne Ha BHeuHem ycTpoNCTBe, BB6paHHOM B ware 3.
5 HaxmajTe VOLUME (+ / - ) nperynnpBkn rpomkoctn.
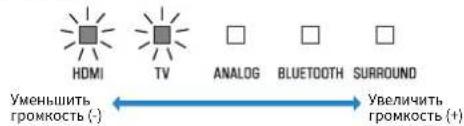
ECN 3BYK BBIOBNDTCaK C dHAMNKOB TeneBn30pa, TaK c DaHHORO annapaTa, OTKNIOHTe 3BYK TeneBn30pa.
6 Otperynpyte Hacptpoikn 3Byka B COOTBETCTBn C HndnBuayalbHbIMn PpeDNOyTeHNM.
IPMMEAHNE
- nanyuhen no npobno Hnphiouo np 0 perynpoe Hacptpoek 3byka cm. cnedyooee:
"BoCpOn3BedeHHe cOkpyKaIOUIM 3D-3ByKOM"(c.28)
-Bocnpoun3BedeHne cokpykaoum 3Bykom" (c.28)
-Bocnpoun3BedeHHe c 2-kaHaJIbHbIM CTepeo3ByKOM" (c.29)
“YeTKoe BOCPON3BedeHne YeNoBEeCKnx rOIOcoB (yNCTbI rOIOc)”(c.29)
“Bocnpoun3BeHHe ynyuWeHHoro 3ByaHn8acOB (ycnneHn6acOB)”(c.30)
Длг�ноуеваяногаоборовскийчсоюрп�бденимузькалынхфайон.КOTOPMEX XAPAHTRCAH YA cYPToPcIe BrTeUHTC,cm.CnedyuOue:
-"PpocnyuWBAHnne My3bIK, KOTOPaYpaHnTc H aYcTPOiCtBe Bluteoth" (c. 31)
YTO6bO tKIOJIOHTB 38yK, HAKMNTE MUTE. CHOBA HAKMNTE MUTE DRA BKIOUHENH 38yKa.
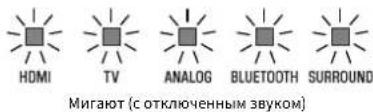
E CINBbYK c TeBnBIOpaN OaTeaTc H bXoH DMDI IN, yOpeBb rPoMKoCTH He nmeHeHTc DaAe pnn HauKaTHnVOLU (+12) nnMUTE.
-Дяретуларовкгрмкoctn ca6byфepaнakmaite SUBWOOFER(+/-).rpoMkoCTb ca6byfepa moKet peylnpoBaTcraOtdenbHoOTo6uei rpoMkoCTn.
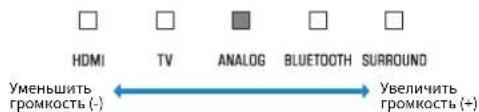
- PnB BocnpOn3BedeHnn ayDNo/BNDeO C yCTpoCTBa, NOKnIOeHHoro K TeneBu3Opy, BB6peTe TeneB3oP B KaHeCTBe NCTOHNka BXoHOrO CmHana H bIbePte YcTPOCTBO BOCpOn3BedeHnn c NOMouBbCeLEKTopa BXoHOrO CmHana Ha TeneBu3OpE.
HacnaXdaITeScb IIO6nMbIM 3ByKOM
Bocnpo3BeDeHne cokpykaIoUIM 3D-3BykOM
Haxmnte 3D SURROUND nIe nepeKIOUeHn Ha BocpOn3BeJeHne Okpykaioeero 3D-3ByaHnB CooTBeCTBnC nCTOuyHKoM BXoHOro CNHaHa HIN INNINNBNDyAalbHbIMn PpeNoHTeHmN.
Korda Bb6paho Bocnpon3BedeHne OkpykaUoJero 3D-3ByaHnna, DTS Virtual:X no3BOJnE T cbluTaB 3Byk He ToIbKO OT rOpN3OHTaNbHbIX HnpaBNeHn, HO TaKHe N OT HnPaBLeHn, MeHraKUxXcR NO BbcOTe. INdkaTop SURROUND rOpNT CnHM uBeTom.

3D SURROUND

SURROUND
Topt (cHnn)
ПИМЕЧАНЕ
PENM OKpykaOeero 3bYka TV Program, Movie, Music, Sports Hn Game MoHNO Bb6paTb c NOMOULIO pNHOJIOKeHHN HOME THEATER CONTROLLER, yCTAHOBIEHORo HA cMapTFOHe c NOdEeHHKoI FyHKuIN Bluetooth. IOpDp6ee 06 3TOM CM. dAJIe:
"YnpaBHeHne annapatom c nomouchn npuToKeHn HOMETHEATER CONTROLLER" (c.36)
Bocnpo3BeDeHne cokpykaIoUIM 3BykOM
HaKMMTe SURROUND nI nepeKIOUeHn Ha BOCpON3BeDeHne OKpyKaIoUeero 3ByaHnB C COOTBeTCTBmC NCTOCHNkOM BXoHOrO CNHaIa IIN INDINbYaJIbHbIMn PpeIOHTeHnMn.
HdkaTop SURROUND ropnt 6enbIM cBeTom.


SURROUND
Topnt(6eBbii)
ПРИМЕЧАНС
PENIM OKpynaioe 3byHa TV Program, Movie, Music, Sports Game MoHHo BbIpaTb c nOmoUbIO npHIOKeHHa HOME THEATER CONTROLLER, yCTAHOBHeHHoro Ha cMaprFOhe c noDaeHHKoiy Hkunn Bluethoo. NoDpO6hee o6 3tOM CM. dAee:
- "Уразавлиейно annapataTomсnomoцьno npuiokeHЯ HOMETHEATER CONTROLLER" (c. 36)
Bocnpon3BeDenHe c 2-kaHaJIbHbIM cTepeo3ByKom
HaKmTe STEREOI nepeKIOUeHnHa 2-kaHaJIbHoe CTepoOHOHueCKOE BOCnpON3BeHeHne. Bbl MoKeTe HacnaKaTaBcR BOCpON3BeHeHem NCTOUYHKnOB 3Byka C NOMOuBcBOero IIO6MOro peKIma 3Byka.
PnBkHueHn CtepeofoHnueckoro Bocnpoun3BeHn HndkaTOp SURROUND racHeT.


SURROUND
BbIKHueHo
YeTKoe BocnpOn3BeDeHne YeNoBuecKnx roLOCOB (YnCTbI ROnoc)
HaKMTe CLEAR VOICE IBAKJIIOUeHnIyHKuINYHCtOro rOloca.
HeNoBueCeckne roLoCa, HAnpIMep peNIIKN B OInbMax, TeEnepedaX, HOBOCTbIX npOrpAMax n CnpTnBbIX KOMMeHTapnx, BOCnpoN3B0dTc6 60nee YETko.
TObb BbIKNoHTb FyHKUIO, HaxMNTe 3Ty KhoNkY epe pa3.

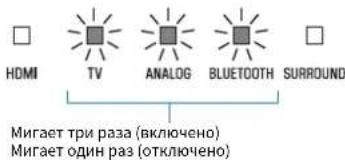
NPMEYAHNE
HaKMMTE INFO,TO6bI npOBepnB,BIIOHcHema HIN BIKIOHcHcHpyHKUaNCHCTORO roLoCa.ДЯ NOyueHnNOpOboHnHΦOpMauCm.CIEyOuCe:
"OtobpaHHeHne HnOpMauno6 ayuOcHnae Bo BpemBocnpOnsBeHn" (c. 35)
Bocnpon3BeHne ynyuweHHoro 3ByuHaHn6acOB (ycnJeHne 6acOB)
Haxmte BASS EXTENSION nBkIOUeHn yHKuyn ycInneHn 6acob. Bb moKeTe HacnaKaTbcyIyUHeHHbIM BocnpOn3BeDeHem 6acob N 6oone MoHbIM 3Bykom.
TTo6bI BbIKHIOHTb FyHKUIO, HAKMNTe 3Ty KONKy epe pa3.

EXTENSION

HDMI

IV

ANALOG

ETOOTH SURROUND

Muraet OaHpa3 (OTKIOUeHO)
DPMMEYAHNE
HaHMMTE INFO, YTObI npOBepNTb, BILIOHOHa HINBbIKIOHOHa FyHKnYcNHeHNA 6acob.ДЯ NOJUeyHnnoDpo6HOHnFOOpMaunmC. CneJyOooee:
“0To6paHHeHHe HOpMaunn 06 ayuOncnHaJe BO Bpemr BocnpOn3BeDeHHN" (c. 35)
IcnoJb3OBaHne yctpoiCTBa Bluetooth
PnyuCTaHOBKe 6ecnlaTHorO npnIOxHeH NHOME THEATER
CONTROLLER Ha mo6nIbHOM ycTpoIcTBe, HAnpImep cMapTfoHe,
annapaTOM MOXHO ynpabJIbTc NMOOuB MO6NlbHOrO yCTPOICTBa.B
dONHHeHNE K OCHOBHbIM ONepaunm cannapaTOM, c nOMOsbIO
npnoKeHnMoKHO6oNeeToHNO KOHpypObaTpa3nHbIe
fHKnBkIouaBb6oppeKMaOKpyKaHcero3ByaHn
pernynpobkTyToHa,No cpaBHeHIO C BO3MOXHOCTaY
Iopno6bIe cBeHnO npNoJxehn HOMETHEATERCONTROLLERcm.
BnHOpMaunO npodyKe Ha Be6-caTe Yamaha.
KOHΦιΓΥΡΑΤΙΝ
HactpoJa pa3nHybIX fynKcui
I3MeHHeApKocTn HndkATOpOB (DIMMER)
I3MeHHe IyPKoCTN HnDnKaTOpOB Ha annapaTe.
Pn KaKdom HaxaTmN DIMMER npKOCTb HndkaTOPOB n3MeHReTcneDyOuM m6pa30m.
TcKnbln (HactpoKa no ymoHaHIO) He ropnt Apkn Tcyckbln
→…

HndkaTOpbI roprApoKcPc3y nocLe oepaunn HmMeHKeT aRkoCTb Ha yka3aHnyope3 HeckoJIbKO CeYHd.
HacrpoKaФyHKcNn ynpaBHeHna cepe3 HDMI
BknouaTe nnn OTKnouaTe yhKnIO ynpabneHnaepe3 HDMI (fynkcuo cenuneHa).3ta fynkcu cornacobbbaet pa60ty TeneBnOpa nannapata kum 6p30m,TO annapaTOM moKHO npypanBaTc nmoocbu nybta Dy TeneBnOpa.
3TaΦyHKUINoYMOJUaHnIOBKNIOHeHa.
1 BbIKIOUHTe annapaT.
2 Haxmte n yepknaTe HDMI He Mehee Tpex cekyHd.
Функцу упаьеня четс HDMIBKIOUaetcnn OTKIOUaETcra, a annapat BKIOUaETcra. B TeueHne HeckoJIbKxS ckyHd nocle BKIOUeHnAnnapata HndkaTOp oTo6paKaet coCTOAHne chyHKzN ynpabHnue chpe3 HDMI.


Fogrit (BKIOUHO:No yMOUCHHO) He fogrit (OKIOUHO:Y)
ПРИМЕЧАНЕ
BknHHTe yHKUNO npypanenHe Ype3 HDI npn oKIOHcHm TeneBnOpa, KOTpor nDopkBaET Audio Rout Channel (ARC),nnn npn HcNb30aHN CKBo3HO KAHANDA HNI. NpOo6He 6oTOM cm.danee:
-“PoiKIOUeHHe TeneBUNOpa CnoepKoA Audio Return Channel (ARC)"(c.22)
"McnoIbOaBHe NpIbIa TY TeleBnOpa Iy npAbeHAn annapATom (ynpAbneHme Hepe3 HMD) (c. 34)
Ecn He ydaetc npabnTb annapatom c nmoouy npbTa DY teneBn30pa, y6eHITecb, cyo fykun ynpaBHeHne Ype3 HDM daHHoro annapata BKnOHeHa BKNIOHeHa yHKUN ynpaBHeHn Hepe3 HDM b TeneBn3ope. NpOp6Hee 6 3OM CM. danee:
"HeydaetcnypabnTb TeneBn30POM c nOmoaIy npIbTa dy TeneBn3opa" (c. 43)
PnI OTKOyHEnyDfYHKuyn ynpaBneHnuepe3HDMNOTpe6nemaaannapatom MoHcTb CHN3TcR.
HactpoJa aYdnoBbIXOa uepe3 HDMI
BbIepeyctpoiCTBO,CKOTOPORO6yET BOCPON3BDITbc8 aynncnHn,noabaemblyepe3rhe3doannapaTahDMINnpo OTKIOUeHHN yHKcynynpabHeHHype3HDMI.Noymuahno aynncnHn HDMI bIBoDHTcyepe3 daHHn annapat.
HacTpoKu
Fogrit (2yBv BocPnOBAoDHTC H a nannapate, no YMOnHAnHO) He ropit (3yBv BocPnOBAoDTCA HA TeneBno3ope)
ПРИМЕЧАНЕ
- PnH Bocnpo3BedeHN BXOHO rAOxOCHrHana HDMIC TeneBH3opa annapat HeOB3MOHXHO nCNOb3ObATB Dny perynyPOBKN rPOMKcTn. Dny perynpOBKN rPOMKcTn CNDyET NCONb3ObATs TeneBH3Op.
Jnnoyehnno npo6ho nHOpmaun o fynkun ynpabneHn Hpe3 HDI cM. cnedyooee: "HactpoKa fynkun npabneHn Hpe3 HDI" (c. 37)
YtOb6HbAeTPOHbTyBbIXoHDMPiN BkIOeHHoFyHKUINynpaBHeHnpe3 HDM, bIb6epTe yCpOCTbOy AynIOBbXoHa, HcTPOEHHOJn pa6ObTc TeneBn3POM,KOTOpN PNDKIOeH KTOTMyAnpAPy.
BvEoecnHbI HDMl, noctyanoiue n bXoTn rHe3a HDMl IN annapata, Bcerda BbVbOaTcyepe3rHe3o HDMl OUT (ARC) annapata.
Ecn annapaT yHKUHOHpye T He npabnBbHo, Cm. cneyooee.
Hyp nntan annapata, TeneBn3opa npctpoiCTB Bocnpoun3BeDene (HaNPmep BD/DVD-npOurpbBatenu) HadeKHO NOKIOUeH K HAcTeHHbIM p03ETkAM nepemehHOro ToKa.
Annapat, TeneBn3Op nycTroPocTBA Bocnpoun3BedeHnra (HaNPmep BD/DVD-npOurpblBaTeHn) BKIOUeHbI.
-ⅢTekepbKaKdoRoKa6eJHaJaEHO BCTaBHeHbBCOTBeTCTByUcne THe3da KaKdoRo yCToPocTba.
PnOTCyTCTBmI npo6bem C nHTaHMeN Kα6eJIaMm Cm. CneNyooee:
“Пи рьо3ннковени кaknx-л60 npo6nem (ntaHne npa6ota cnCTeMbI)”(c.41)
“Pnpu Bo3HnKHOBHeHH KaKnx-Im6 npo6nem (aymocnHa)”(c.44)
“Пи ВОЗнКНБЕИΝΚАКИХ-ДИСЮпОБлЕМ(BluTeothoB)”(c.46)
Ecnn npo6nema, cKOTOpO BblcTOnkHylnnc, He yka3aHa nn en ccnnHCTpyKmHne NOMOrn, BbIKNoHTe annapat, OTCoeHNHTe HhypNITAHnI 6opATntecK 6JnxKaHemy ABTOpH3OBaHHOMy DInlepy nnBcePBChbI ueHrP YamaHa.
He BbINOJIHЯOTcI onepaun c ceHCOPHO nanei annapaTa
- YnpabHeHc nOmoBIO ceHCOPHO naHeIN OTKIOyeHo.
Bknoute ynpablenhe c nomoosbcnccopno naen. Npdo6nee 03om cm.danee:
-BKIOUeHne/BbIKIOUeHne ynpaBHeNc nOMOUsbcHcCpHO naHeJI (fYHKUN6nOKuPOBKNOTTei) (c.39)
XOTa annapat BKJIIOUeH, HN ODNH INdNKaTOP He rOpNT (KaK 6yITo annapat BbIKIOUeH)
AnnapaT Hactpoen TAKM06pa3OM, YTO6bI HnDnKaTOpbI He ropeH N He MrrAin, ecnn AnnapaT He nCnOlb3yETc.
HaxmTe DIMMER nBb6opa HxhoI npKocTn. Ioppo6Hee 06 3TOM CM. danee:
“ИзмehнгяркocTNинdkaTopOB(DIMMER)”(c.37)
Annapat pa6otaet HenpaBnIbHo
3aBnC BHYtpEHNN MNUKPOKOMbHOp H3-3a BO3deICTBnA CnIbHOro 3JIeKTPNueCKoR OHaNPJKeHnO T BHeuHNX NCTOCHNOB (HaPnPmep, MoHNn Hnn CnIbHOrO CTaTNueCKoR 3JIeKTPNueCTBa) Hnn H3-3a NaJeHn HaNPJKeHn 3JIeKTpONHTAHN.
OTcoeHNHTe 5Hyp NtTaHnO Tpo3ETKn NpeMeHHoro ToKa INoDcoeHNHTe erO cHOBa.
Annapat camonpon3BOLbHO BkIouaetcA
- Iop6n3ocTN HcnoIb3yETc4pyroyeycptpOCTBO Bluetooth.
3aBepuTe coeHHeHne no Bluetooth c annapaTOM. POpO6Hee 06 3TOM CM. dAnee:
-“PnokIyHeHne annapaTa KDbym yCtpoCTBaM Bluetooth" OndOBpeMeHHo (MHOrToOueHoe coeHNHeHne)" (c.33)
He pa6oTaIOT 3D-ouKn TeJeBn3opa
AnnapaT 6nokpye TnepeaTuk 3D-ouKOB TeJeBnOpa.
IpoBoeBte pacnoLoXKeHHe nepeaTnHa 3D-OhKOB TeLeBnOpa I pa3MeCTe annapat Tak, Yo6bI OH He MeeaJ pa6oTe nepeaTnHa.
Bvideo HDMI He oTo6paXaetcHa 3KpaHe TeneBu3opa
Hehadejxho noqkIIOueH ka6eJb HDMl.
IpaBnIbHO NOkIIOHtE Ka6eIb HDMl. Ioppo6Hee 06 3OM cm. daJe:
Korda annapaT BbIKIOueH, BnDeo n/nnn 3ByK OT yCTpoIcTBa BocnpOu3BeDeHnA He BbIOJrTaHa TeLeBn3Op
OTKJIUeHaФyHKnYynpaBHeHnYepe3HDMI.
BkHouTe FyHKuY npaBHeHnuepe3 HDMI.NoDpo6Hee o6 3TOM CM. danee:
-HacTpoiKaФyHKuIynypaBneHnYepe3HDMI" (c.37)
Hebo3MOxHO ynpabTb annapaTom c nOmoIyIyTa IY
AnnapaT haoDnTc3 a npedeIampu6oeryo paCToHHa.
IcnoIb3yIte nyIbT Dv B nppeJenax pa6oeryo paCCTOHHa.
Iopnp6Hee 03TOM cm. danee:
“Dnana3oH pa60tby nybTa D”(c.16)
Cna6oe HnpanjxKeHne 6aTaapeek.
3aMeHnTe 6aTapeuKn. NpOpo6Hee 06 3tOM cm. dAnee:
-“3aMeHa 6aTapeKn B nyIbTe Dy" (c.16)
Ha cencop Dy annapaTa DeHCTBYOT npAble conHeuHbIe lyuNnnrpkn CBET.
OtperynyyTe yroI nonadaHn CBeTa nn H3MeHnTe pacnoJoxHe nappapa.
He ydaetcya npablaTb TeNeBu3Opom c nomoou npynbTa Dy TeNeBu3opa
AnnapaT 3akpbibaertcehcop Dy teneBn3opa.
YCTAHOBHTe annapat TaK, YTO6bI OH He Meuapan pa6ote cehcopa Dy TeJIeBn30pa.
He ydaetca ynpabnaytb teneBu30pom c nomoou npynbTa Dy teneBu30pa
HeBepHo pa6oTaet yHKnua ynpaBneHnuepe3 HDMI.
y6eintecbB npaBnIbHoh HacTpoKe npaMeTPOB CneDyUOuM 06pa30M.
-Функцуypablenueчep3HDMI annpapaВКлочeHa.
-Функциупраьеничepe3HDMIВКИоуehaВтелевизеpe.
- YcTaHOBuTe DnayauNIOBbIXOda JIO6yO onCuIO, Kpome TeNEBUN3Opa.
Ecn annapat He pearnyet Ha nybT dy TeleBn3opa daKe nocne npabInbHoro BbINOHHeNHaCTpOKN:
-BbIKIOHHTe,a3aTeM cHOBA BKIOHOTe anIcapaN TeLEBnOp.
-OTcoeHnHTe shyP nHTaHnO t annpaTa n O T BHeHnx
yctpoiCTB, kOTOpbIe NIOKJIIOUeHb I aIIpAPaty C nOMOuBIO Ka6eIaHDMI. POnCOeINHTe erO cHOBA npN6JIn3NTeBHo Uepe3 30 cekyND.
- IcnoIb3yIOCTeTeBn3Op n BD/DVD-npOnrpbIbATEnb pa3HbIX npOn3BOuNTeNe.
PekomeHdyetcNcnoIb3ObaTb yctpoIcTba, HanpImep TeIeBUN3Op BD/DVD-npOurpbIbATen, oHOro npOn3BOUInTeIa.
TeIeBn3Op He nOndepKINBaet FyHKnn annapata.
Daxe ecn TeneB3Op npdeepKnaBaet yHKunio ynpaBneHnuepe3 HDM,OTdIbHbIe fHKmMOryT 6bIT HeocTyHbI. NpOpo6HyIO NHoPmauCm.B DOKyMeHTaun daHHoro TeneB30pa.
PnB03HnKHOBeHn KaKnx-1n6o npo6nem (aydnocnHan)
OTcyTCTByeT 3ByK
BbI6paH npyro nCTOuHnK BXoHoro CmHaJa.
Bb6epnte npabnblbHn HcToyHKn BXoHoro CnHaIa. Pnpo6Hee 06 TOM cm.danee:
-OchOBHnpoeDpyaIINBocnpOn3BeHeHHa" (c.26)
BkIIOueHa yHKnua OTKIOUeHHa 3Byka.
OTMeHnTe FyHKUIO OTKIOUeHnI 3Byka. IOpO6Hee O6 3OM CM. dAee:
"OCHOBHnIpoueypaIraBocnpOn3BeDeHnA" (c.26)
CnHsKOM Hn3Ka rIpOMKoCTb.
YBENyBTe rpoMkoCTb. NpOp6Hee 06 3TOM cm. daJe:
-“OCHOBHnA npouepya nIy BocnpOn3BedeHn”(c.26)
HenpaBnIbNo nOdkNIOeH uHy p NtTaHn annapata.
Y6eDNTecb, YTO WHyp NITaHnAannapata HAdEJHO NOKJIUOeH K po3eTke nepemehoro ToKa. NoPpO6Hee 06 TOM cm. daJe:
“PoiKJIoueHne WHypa NITaHnra”(c.25)
Ha yctpoonCTBE BocnpoIN3BedeHn noDknOChEhbl BXoDhbI rHe3da.
CoeHNHe BXoHoe rHe3nHa annapaTe C BbIXoHbIM rHe3dOM Ha yctpoiCTBe BocpOun3BedeHn.
Ha Bxog noctynaot cnHnbl, KOtOpbIe annapat He MoKet Bocnpoun3BecTu.
I3MeHnTe HaCTpoKy uΦpOBOra ayINObXoJa Ha ycTPOuCTBe BocnpOn3BedeHnHa PCM,Dolby Digital nIN DTS.
Annapahtnactpoeh TaK,4To6bI CnHnbl ayDnOBXoDa HDMI Bocnpoun3BODnJIncb Ha TeJeBnOpe.
HactpoTe annapat TaK, YTO6bI CNrHaJIb ayuINOBxOa HDMI BOCPOn3BODnIncH ha annpaTe. POnpOHee 06 3TOM cm. daJe: - "HactpoKa ayuNObblxOa uepe3 HDM1" (c.38)
OTKIOUeHaФyHKuIynpaBHeHnIYepe3HDMI.
Pn noKIOeHm TeJeBn3Opa, KOtOpb nOndepKnaBaET ARC (Audio Return Channel), K annapaTy c nomoIbToIbKO Ka6eHa HDMI, BkIOHTe FyHKuio ynpabJIeHnuepe3 HDMI.
TtO6bI ayDnOncrHaIbI BOCpOn3BODINcHb Ha annpaTe npi OTKnIOUeHHoH FyHKuIN ynpABLeHHra Ype3 HDMI, coeHNHTe BIXOHDoe AyIOrHe3Do TENEbHOpa C BxOJHbIM rHe3dOM TV (ONTHueckm UΦpOBm) annapaTa Ype3 ONTHueckn UΦpOBom ayNDOKa6eJIb.
IpoPo6Hee 06 3ToM cm. daJe:
-HactpoKaФyHKuynynpaBneHnuepe3HDMI" (c.37)
-“PonKJIuCyHne TeLeBn3opa 6e3 noDnepKKn Audio Return Channel (ARC)”(c.23)
3BykOTTeLEBn3opa,ynpabIyemoroYepe3HDMI,hacTpoehHa Bocpon3BeHeHeYepe3BCTpoehHbIeDHHAMNKTeLEBn3opa.
IcnoB3yuteHactpoKnHDMIBTeJeBn3ope,TO6bYCTaHOBNtB DnyayIOBbIXOdaJIIO6yIOOnIO, KpOmeBCTpoEHbIXDNHaMnKO B TeJEB3Opa.
He noctynaet 3Byk n3 ca6ByΦepa
- PpOMKoCTb ca6Byepa CnHsKOM MaJa.
YBENHbTe rpoMocb ca6byepa. NpOp6Hee 06 3TOM cm. dAee: “OChOBnA npOeDpya IIN BOCPON3BeDHeN” (c.26)
MCTOCHNK BOCPON3BeHnHe CoepKHT Hn3KoAcToTHbIX CNrHaIOB.
Bocpon3Beinte NCTOHTHK 3Byka, coepkaun Hn3KoactOTHbIe CnHaIbI, n y6eINTecb, YTO 3Byk BbIOndTcN 3ca6Byepa.
При вкlioочenvom annapate rpoMkoctb yMeHbShaetc
BkHoueHa fHyKunA bTOMaTHuecko peryInnpOBKn rPOMKocTN.
IpyneObPaueHHn Upe3MePHo rPOMKocN BkHIOueHHbI
annapaAT aTOMaTHueCKn NOpDepeXNBaet rPOMKocTb Ha
onpeJenEHom yPoBHe. YBeINbTe rPOMKocTb DO HxHHO rPobHra.
PiopboHee o6 30m CM. danee: -OChOBHaa IpoceDpya nla BOCpOnu3BeHeHHa" (c.26)
HeT 3ΦΦeKta OkpykaIooero 3ByuHaHnA
Bb6paHO cTepeoohnueckoe Bocpnon3BeHne.
Bb6epnte peKIM OKpykaIOUero 3ByuHaNn IIN OkpykaIOUero 3D- 3ByuHaNn. PoIpo6He e 6 TOM cm. dAinee: - "BocnpOn3BeHne cOKpykaIOUmM 3D-3BykOM" (c.28) - "BocnpOn3BeHne cOKpykaIOUmM 3BykOM" (c.28)
CnHsKOM Hn3KaI rPOMKOCTb. YBeINuYTe rPOMKoCTb. IOpO6Hee 06 3ToM cM. dAlee: -OChOBHa nPoueDpya Ira BocIpOn3BedeHn" (c.26)
TeJIeBn3Op HnYcTpOuCTBO BOCpOn3BeDeHnHaCTPoeHO TOnbKa Ha 2-KaHaJIbHbIyBIOg 3Byka (Hapmep,PCM). NImeHTe HAcTpoKU cHpOBOrO aynIObIXoJa B TeJIeBn3ope HnYcTpOuCTBe BOCpON3BeHnHa Bitstream.
3Byk cnblweh TaKke YpeE 3BCTpoeHHbIe DNHAMNK TeLEB3Opa. UcTaHOBInTe MNHmAlbHyIO rPOMKocTb TeLEB3Opa. IOpDp6Hee o6 3Tom CM. dAJeee: -OChOBHa npoueypa Ira BocnpON3BeDeHn" (c.26)
- Пложжени посслuyшаня паспложжени сишkom 6инзкогannapaty. Пложжени посслuyшаня должно 6ыть на_HEКOTOPompacstordи ot annapaTA.
Cnbiweh wym
AnnapaTpacnooKeH CnIeKOM 6N3KO K npyROMy UΦPOBOMY NIN BbICOKOAcTOTHOMY yCTpoiCTBy. YcTAHOBrte 3TN yCTpoiCTBa Ha DoCTaTOUHOM pacctOHHN OT annapata.
При ВОЗнКовец Каши-лб6о npo6nm (Bluetooth®)
He ydaetcnodklouHTb annapat K yctpoiCTBy Bluetooth
Bluetooth He Bb6pAH B KaueCTBe NcTOUHnKa BXoHOrO CnHana. Bb6epnte Bluetooth B KaueCTBe NcTOUHnKa BXoHOrO CnHana. Pnpo6Hee o6 30m CM. danee:
“POnKInoueHne annpapaKa NDbym yCtpoNCTBAM Bluetooth° ONDOBpemHeHO (MHOrToOueyHoe CoeDnHeHne)" (c. 33)
AnnapaT pacnoJoxen cnHkOM daIeKO ot yctpoCTBa Bluetooth. NpeMeCTNe yctpoNCTBO Bluetooth 6nke kannapaty.
Bo3MOXHO, no6nH3OCTn pacnoLoKeHo yctpoiCTBO, n3nyauouee 3NEKPTPOMARHTNHtBE BoJHbI (HanpIMep, MHKPOBOLHOBAI neyb, 6ecnpOBHOHe yctpoiCTBO n T.I.). He nCNoJIb3yTe 3OT aannapat OKoIyo yctpoiCTB, KOToPbIE N3NYaOHOT 3NEKTPOMARHTNHtBE BoJHbI.
Bo3MOxH0,HCnOlb3yEmoe yctpoIcTBO Bluetooth He noDdepKbAeT npoΦnB A2DP.
IcnoIb3yIte ycTpoIcTBo Bluetooth, KoTopoe noIepKuBaET npoΦnIb A2DP.
- PpOeHb NpOKKIOUeHn, 3apeHCTPnpoBaHHb B yctPoIcTBe Bluetooth, BO3MOxHo, NO KaKNM-To npuHNAM FyHKUOHpyET HnppaBHLbHo. UdaJIte PpOeHb NpOKKIOUeHn B yctPoIcTBe Bluetooth, a 3aTeM NpOKKIOHTe yctPoIcTBo Bluetooth K ATomy annapaty.
KIOU doCTyna dIra TAKIN yCTpoiCTB, KaA aAnTep Bluetooth, OTnuaetcraT "0000". IcnoJIb3yIte yCTpoiCTBO Bluetooth c KIOUOM doCTyna "0000".
AnnapaYxue noKlnoueH Kdpyromy yctpoiCTBy Bluetooth. (UcnoJb3OBAHne yctpoiCTBa Bluetooth, kToopoE HkOrda paHe He noKlouaocb KaannapaTy.)
3aBepuTe TeKyuuee coeHHeHne no Bluetooth, a 3aTe m yCTaHOBtE CoeHNHeHne C HOBbIM yCTpOiCTBOM.
Annapat yxe noeknloeyen KdymyctpoictbAM Bluetooth. (NcnoIb3oBaHne yctpoictba Bluetooth, kOtopooe paee noeknloayocb k annapaty.)
3aBepuTe OJHO n3 coeHHeHn no Bluetooth, a 3aTeM yCTaHOBnTe coeHHeHne C HOBbIM ycTPOIcTBOM.
3Byk c yctpoiCTBa Bluetooth® He cnblweHnn nepnoDnueckn nponaadaet
Bo3MOxHNo,Ha yCTpOcTBe Bluetooth ycTaHOBNeHa cNtIKOM Hn3KaI rPOMKocTb. YBeINyTe rPOMKocTb Ha yCTpOcTBe Bluetooth.
Bluetooth He Bb6paB K KaueCTBe HcToUHnKa BXoHOrO CnHa.
Bb6epnte Bluetooth B KaueCTBe NcToUHnKa BXoHOrO CnHa.
Piop6Hee 06 3TOM CM. Danee: - "POnKlIOeHne annapaTa K dBym ycTpOciTBam Bluetooth" OHOBpEmHo (MHorOToUeHoe CoEINHeHne)" (c. 33)
He BbInoJIHReTc BoCpOn3BedeHne Ha yCTpoIcTbe Bluetooth. HauHnTe BocPOn3BedeHne Ha yCTpoIcTbe Bluetooth.
Bo3MOxH0, annapaT He 3aHaB KaucTeBpe npHemnKa 3Byka dIy BbIXoJa yCTpoiCTBa Bluetooth. Bb6epnte annapaT B KaueCTBe aDpeCata BbIXoJa Ha yCTpoiCTBe Bluetooth.
CoeDHeHne c yCTpoBcBom Bluetooth 3aBepseHo. POnkIOuHTecb KycTPOcTBy Bluetooth eue pa3.
Bo3MOxHo,annapatpacnoIoxKeH cIIuKOM daIeKO ot yctpoiCTBa Bluetooth. IpeMeecntyeycptoIcTBO Bluetooth 6nke K annapaty.
Bo3MOxHO, no6n3OCTn pacnoNoKeHo yctpoiCTBO, n3nyaHooee 3NEKTPomarHHTbIe BOHbI (HanpIMep, MKNPOBONHOBa neyb, 6ecnpoBDHoe yctpoiCTBO nT.n.).
He nCnoB3yIte 3OT annapaT OKONO yCTpOncTB, KOTOpbIe N3lyuAOT 3NEKTPOMaTHNTHbe BOHbl.
Bocnpon3BouNTcaayDnOcnrHc npyOrO yctpoCTBa Bluetooth.
OctahOBITE BOCPON3BEdHHe Na yCTpOCTBe Bluetooth, c KOTOPO B daHHb MOMENT BbINOJIReTc BOCPON3BEdHHe, H NaHTNE BOCPON3BEdHHe Na dpyrO uCTpOCTBe Bluetooth.
TexhneckxapaKtepncTnKn
TexHnueckne xapaKTepeNCTnKN
AnnapaT NMeet CnEduOuIe TexHnueckne XapakTepcntKn.
Ceknua ycnntenla
MaKcMmaNbHaBbIXOHaHMOuHOCTb
ΦpoHTIeBbI/npaBbI 30BTx2KaHaHa
Ca6byΦep 60 MB
CekuaIyHnHaMnKOB
ΦoHTJIeBbI/npaBbI
Tn
Akyctnueckna nOBecka
(HemarHHTHoe 3KpaHnpOBaHne)
-10nOBkaDnHaMaKKa KOHc5,5cm×2
-actoTHaXapaKTepeNtkaOT60TDO20K
-Полhoe coPOTnBneHne 6Ω
B4-DnHaMnK
-ФОВБКДИНAMNKaKунON25MM×2
-actoTHaXapakTeepnkaO4Ku do 23K
-Nonhoe conpotnbene 6Ω
Ca6ByΦep
Ttn
Φa30nHbepTop
AHAnorOBoe (RCA/MoHO) 1 (SUBWOOFER OUT)
Apyrne rhe3da
USB1 (UPDATE ONLY)
Bluetooth
Bepcrae Bluetooth Bep. 5.0
PoiepkmbaembI npophi
A2DP
PoipepKnBaembIe KoKeN
SBC, MPEG-4 AAC
Knacc Bluetooth
Bluetooth knacc 2
AnnapaT MoXeT NcNoB3OBAb cIeNyUoNne fOpMaTbI ayDnO n BnDeo HDMI.
AydncnunhaJIbI
VGA
480i/60Γu
480p/60T
- 576i/50 Γι
-576p/50Γu
-720p/60Γu,50Γu
1080i/60Γu,50Γu
1080p/60Γu,50Γu,30Γu,25Γu,24Γu
4K/60Γu,50Γu,30Γu,25Γu,24Γu
IPIMMEAHNE
6OpatnteBcK dokmeytaHn, npilraaemaK yctpOHTbY BocpnOnBaDEenH, yctAohOBy tycPoTcBO COOTBeTCTBuONM o6pa30J.
- Pnir Bocnpno3BedeHHN DnCKa DVD-Audio C 3aazntoT ON KOHNPOBAHNA NO TEHXOARH CPPM BnEO- n AydnocnHaBBI MOyT HE BOCpno3BODITcR B 3abNCmOCTN OT TINPA nporqrpmbTeAe NDCKOB DVD.
AnpatapHe COBcEMTH C HDCP-HECOBcEMTHIMbIMN YCTpoIcTBAMH DMI INN AYTOINCTBAH DNVI.HTObynpoBepIn,NOpejKnaeT NITyCPOIcTBHOHDMINDVI CTANDAH TDCP.CM.DOKyMeTAuINo,npNIAaEmyo KCYPOITCBY.
JaekdoHapBAny auymocHrHANOB 6HTOBORo nToKa Ha annapate yCTAHOBnTE yCTPOIcTB0-IOHNOHN BxHOHNO CRHNA COOTBEcTBYOuIM O6P3AOM,TOb6H OHO BByBOINo ayDnOCnHnALbl 6HTOBORo nToKoHa HnprMyIO (6e3 deKOHPoBANr CHTANOB 6HTOBORo nToKa HA yCTOBIE).DOONHITENbIe cBeDEHnC M.B DOKYMHeTAMn, PnpnaAeMOn KCTPOINCTBY.
Pazpeшенипесдаиморо Виебоча захисут ОразкетерICTК Телевизoga, рождкуновеног К с apparatus.
CoepkaHHe dAnHoro pykoOcbCTbCooBteCTbEy nocneHnHa DaTy ny6nKaun TeHXeNCKXpAkapTePcTtHMKn. JIaNoJyHnHn OncNeHn Bepcn pykoOBCTBa NOcETtMe B6e-CaIT KopnpaunYamaHa a3rpyTaI qnCpKOCTBOM.
IopdepxnBaemble opMaTbI uΦpoBoro aydnocnHana
AnnapaT MoKeT nCnOlb3OBaTb CneDyUoNue FOpMaTbI uΦpOBOraaynOcHHa.
OnTnueckn
4 HabecbTe annapat Ha BnHTbl.

目录
注意事项 4
须知和信息 7
使用须知 10
功能 10
配件 12
使用遥控器 12
部件名称和功能 14
准备工作 18
1安装 18
将本机安装到电视支架上等。 18
2连接电视 19
Manual Development Group © 2018 Yamaha Corporation
Published 04/2018发行ODNV-A0 Printed in China
AV17-0067