
6000SX - Tanning device PHILIPS - Free user manual and instructions
Find the device manual for free 6000SX PHILIPS in PDF.
| Product type | Professional tanning device |
| Brand | PHILIPS |
| Model | 6000SX (HB604) |
| Power supply | 230 V, three-phase, 16 A protection |
| Maximum timer | 24 minutes |
| Number of lamps | 40 (23 in canopy, 17 in bench) |
| Lamp type (canopy) | Philips Cleo Professional R 140 W |
| Lamp type (bench) | Philips Cleo Professional R 100 W |
| Facial lamp | HPA HP 400 SH |
| Sound level | Lc = 72 dB [A] |
| Use | Reserved for tanning salons, beauty parlors |
| Max tanning hours per year | 7 hours (420 minutes) |
| Main functions | Adjustable timer, facial lamp intensity (0/50%/100%), body cooling fan (5 levels) |
| Control panel | User and owner menus, digital display |
| Automatic cooling | 3 minutes after switching off (adjustable 30-900 s) |
| Maintenance | Clean with a damp cloth every 250 hours |
| Spare parts | Lamps, starters, acrylic plates, gas springs |
| Warranty (excluding parts) | Lamps, acrylic plates, gas springs excluded |
| Installation | Only by a qualified electrician, requires 2 persons |
Frequently Asked Questions - 6000SX PHILIPS
User questions about 6000SX PHILIPS
0 question about this device. Answer the ones you know or ask your own.
Ask a new question about this device
Download the instructions for your Tanning device in PDF format for free! Find your manual 6000SX - PHILIPS and take your electronic device back in hand. On this page are published all the documents necessary for the use of your device. 6000SX by PHILIPS.
USER MANUAL 6000SX PHILIPS
natural_image
Simple line drawing of two abstract shapes connected by lines, no text or symbols presentENGLISH 4
POLSKI 12
ROMÂNĂ 20
РУССКИЙ 28
ČESKY 37
MAGYAR 45
SLOVENSKY 53
УКРАЇНСЬКА 61
HRVATSKI 69
EESTI 77
LATVISKI 85
LIETUVIŠKAI 93
SLOVENŠČINA 101
БЪЛГАРСКИ 109
SRPSKI 118
USER'S PART OF THE INSTRUCTION MANUAL
ENGLISH |28
POLSKI 132
ROMÂNĂ 136
русский 140
ČESKY 144
MAGYAR 148
SLOVENSKY 152
УКРАЇНСЬКА 156
HRVATSKI 160
EESTI 164
LATVISKI 168
LIETUVIŠKAI 172
SLOVENŠČINA 176
БЪЛГАРСКИ 180
SRPSKI 184
Introduction
Professional Line tanning appliance with integrated facial tanning unit
This Philips Professional Line tanning appliance provides professional tanning results and reliable performance at outstanding value for money. The special frosted acrylic sheets merge the light given off by each of the tubes without compromising an effective tanning process, immersing users in a soft sea of light rather than surrounding them with a battery of naked tubes. The design of the couch and the canopy gives users increased freedom of movement while ensuring optimal side tanning.
It comes with a control panel with special menus that give you full control of the appliance and all its features and functions. With this control panel you can determine which settings the user can adjust and to what extent. The appliance has a 40-minute timer (HB604/6000SX has a 24-minute timer) to prevent overexposure.

Meaning of the symbol
Tanning appliances provided with this symbol are intended for use in tanning salons, beauty salons and similar premises only.
Important
Check if the voltage indicated on the appliance corresponds to the local mains voltage before you connect the appliance.
This appliance requires a mains voltage of 230 volts.
This appliance must be connected to a three-phase power supply that is protected with 16A standard fuses or automatic fuses.
A high mains impedance may result in noticeable light intensity changes from light bulbs when the tanning appliance is switched on. To fulfil the legal EMC requirements on this point, the modulus of the mains impedance has to be lower than 0.3 ohm. For information, contact your utility.
If you require another type of plug than the one fitted to the appliance, please contact a registered electrician.
This appliance may only be installed by a registered electrician.
If the mains cord is damaged, it must be replaced by Philips, a service centre authorised by Philips or similarly qualified persons in order to avoid a hazard.
Water and electricity are a dangerous combination! Do not use this appliance in wet surroundings (e.g. near a shower or swimming pool).
Make sure the cord does not become trapped under one of the legs when you move the appliance.
Make sure the vents to cool the tanning lamps in the canopy and in the couch remain open during use.
Make sure there is an adequate supply of fresh air to the room where the tanning appliance is used.
Do not let children use the tanning appliance.
As owner of this tanning appliance, you should give your customers the following instructions.
For your convenience we have also included these instructions in a separate section that can be cut out of this manual and can be made available to customers.
Never use the appliance when the control panel or an acrylic sheet is defective.
Do not exceed the recommended tanning time and the maximum number of tanning hours (see 'Tanning sessions: how often and how long?').
Always wear the protective goggles provided with the appliance while tanning to protect your eyes against overexposure (also see the chapter 'Tanning and your health').
Do not tan a particular part of your body more than once a day. Avoid excessive exposure to natural sunlight on the same day.
Do not use the tanning appliance if you have a disease and/or use medication or cosmetics that increase the sensitivity of your skin. Be extra careful if you are hypersensitive to UV light. Consult your doctor in case of doubt.
Do not use the tanning appliance and consult your doctor if unexpected effects such as itching occur within 48 hours after the first session.
Consult your doctor if persistent lumps or sores appear on the skin, or if there are changes in pigmented moles.
Do not use the tanning appliance if you get sunburnt without tanning when exposed to the sun, if you suffer from sunburn, if you suffer (or have previously suffered) from skin cancer or are predisposed to skin cancer.
Remove creams, lipstick and other cosmetics well in advance of a tanning session.
Do not use any sunscreens or suntan accelerators.
If your skin feels taut after the tanning session, you may apply a moisturising cream.
Noise level: Lc = 72 dB [A]
Tanning and your health
As owner of this tanning appliance, you should give your customers the following information.
For your convenience we have also included this information in a separate section that can be cut out of this manual and can be made available to customers.
Overexposure to ultraviolet light (natural sunlight or artificial light from a tanning appliance) can cause sunburn.
Besides many other factors, such as overexposure to natural sunlight, incorrect and excessive use of a tanning appliance may increase the risk of skin and eye problems. The degree to which these effects occur is determined by the nature, intensity and duration of the exposure on the one hand and the sensitivity of the person involved on the other hand.
The more the skin and the eyes are exposed to UV light, the higher the risk of keratitis, conjunctivitis, damage to the retina, cataracts, premature skin ageing and the development of skin tumours will be. Some medications and cosmetics increase the sensitivity of the skin.
Therefore it is highly important:
that you follow the instructions in the chapters 'Important' and 'Tanning sessions: how often and how long?';
that you do not exceed the maximum number of tanning hours per year (see 'Tanning sessions: how often and how long?');
▶ that you always wear the goggles provided while tanning.
Tanning sessions: how often and how long?
As owner of this tanning appliance, you should give your customers the following information.
For your convenience we have also included this information in a separate section that can be cut out of this manual and can be made available to customers.
HB600/3200SX
Take one tanning session a day for five to ten days. Wait at least 48 hours after the first session before taking the second session. After this 5- to 10-day course, we advise you to stop tanning for a while.
▶ Approximately one month after a course, your skin will have lost much of its tan. You can then start a new course.
If you want to keep your tan, do not stop tanning after the course, but continue taking one or two tanning sessions a week.
Whether you choose to stop tanning for a while or whether you continue tanning on a lower frequency, always keep in mind that you must not exceed the maximum number of tanning hours. The maximum for this appliance is 16 hours (= 960 minutes) a year.
Example
Suppose you take a 10-day tanning course, with a 6-minute session on the first day and a 20-minute session on the nine following days.
The entire course will then last (1 x 6 minutes) + (9 x 20 minutes) = 186 minutes.
This means you can take 5 of these courses in a year, as 5 × 186 minutes = 930 minutes.
Table
As is shown in the table, the first session of a tanning course should always last 6 minutes, irrespective of the sensitivity of the skin.
If you think that the sessions are too long for you (e.g. because your skin feels taut and tender after the session), we advise you to reduce the length of the sessions by e.g. 5 minutes.
| Duration of the tanning session for each separate part of the body | For persons with very sensitive skin | For persons with normal sensitive skin | For persons with less sensitive skin |
| 1st session | 6 minutes | 6 minutes | 6 minutes |
| rest of at least 48 hours | |||
| 2nd session | 10 minutes | 15-20 minutes | 20-25 minutes |
| 3rd session | 10 minutes | 15-20 minutes | 20-25 minutes |
| 4th session | 10 minutes | 15-20 minutes | 20-25 minutes |
| 5th session | 10 minutes | 15-20 minutes | 20-25 minutes |
| 6th session | 10 minutes | 15-20 minutes | 20-25 minutes |
| 7th session | 10 minutes | 15-20 minutes | 20-25 minutes |
| 8th session | 10 minutes | 15-20 minutes | 20-25 minutes |
| 9th session | 10 minutes | 15-20 minutes | 20-25 minutes |
| 10th session | 10 minutes | 15-20 minutes | 20-25 minutes |
HB601/4000SX
Take one tanning session a day for five to ten days. Wait at least 48 hours after the first session before taking the second session. After this 5- to 10-day course, we advise you to stop tanning for a while.
▶ Approximately one month after a course, your skin will have lost much of its tan. You can then start a new course.
If you want to keep your tan, do not stop tanning after the course, but continue taking one or two tanning sessions a week.
Whether you choose to stop tanning for a while or whether you continue tanning on a lower frequency, always keep in mind that you must not exceed the maximum number of tanning hours. The maximum for this appliance is 12 hours (= 720 minutes) a year.
Example
Suppose you take a 10-day tanning course, with a 5-minute session on the first day and a 15-minute session on the nine following days.
The entire course will then last (1 x 5 minutes) + (9 x 15 minutes) = 140 minutes.
This means you can take 5 of these courses in a year, as 5 x 140 minutes = 700 minutes.
Table
As is shown in the table, the first session of a tanning course should always last 5 minutes, irrespective of the sensitivity of the skin.
If you think that the sessions are too long for you (e.g. because your skin feels taut and tender after the session), we advise you to reduce the length of the sessions by e.g. 5 minutes.
| Duration of the tanning session for each separate part of the body | For persons with very sensitive skin | For persons with normal sensitive skin | For persons with less sensitive skin |
| 1st session | 5 minutes | 5 minutes | 5 minutes |
| rest of at least 48 hours | |||
| 2nd session | 8 minutes | 10-15 minutes | 15-20 minutes |
| 3rd session | 8 minutes | 10-15 minutes | 15-20 minutes |
| 4th session | 8 minutes | 10-15 minutes | 15-20 minutes |
| 5th session | 8 minutes | 10-15 minutes | 15-20 minutes |
| 6th session | 8 minutes | 10-15 minutes | 15-20 minutes |
| 7th session | 8 minutes | 10-15 minutes | 15-20 minutes |
| 8th session | 8 minutes | 10-15 minutes | 15-20 minutes |
| 9th session | 8 minutes | 10-15 minutes | 15-20 minutes |
| 10th session | 8 minutes | 10-15 minutes | 15-20 minutes |
HB604/6000SX
Take one tanning session a day for five to ten days. Wait at least 48 hours after the first session before taking the second session. After this 5- to 10-day course, we advise you to stop tanning for a while.
▶ Approximately one month after a course, your skin will have lost much of its tan. You can then start a new course.
If you want to keep your tan, do not stop tanning after the course, but continue taking one or two tanning sessions a week.
Whether you choose to stop tanning for a while or whether you continue tanning on a lower frequency, always keep in mind that you must not exceed the maximum number of tanning hours. The maximum for this appliance is 7 hours (= 420 minutes) a year.
Example
Suppose you take a 10-day tanning course, with a 3-minute session on the first day and an 8-minute session on the nine following days.
The entire course will then last (1 x 3 minutes) + (9 x 8 minutes) = 75 minutes.
This means you can take 5 of these courses in a year, as 5 x 75 minutes = 375 minutes.
Table
As is shown in the table, the first session of a tanning course should always last 3 minutes, irrespective of the sensitivity of the skin.
If you think that the sessions are too long for you (e.g. because your skin feels taut and tender after the session), we advise you to reduce the length of the sessions by e.g. 3 minutes.
| Duration of the tanning session for each separate part of the body | For persons with very sensitive skin | For persons with normal sensitive skin | For persons with less sensitive skin |
| 1st session | 3 minutes | 3 minutes | 3 minutes |
| rest of at least 48 hours | |||
| 2nd session | 4 minutes | 5-10 minutes | 10-12 minutes |
| 3rd session | 4 minutes | 5-10 minutes | 10-12 minutes |
| 4th session | 4 minutes | 5-10 minutes | 10-12 minutes |
| 5th session | 4 minutes | 5 -10 minutes | 10 -12 minutes |
| 6th session | 4 minutes | 5 -10 minutes | 10 -12 minutes |
| 7th session | 4 minutes | 5 -10 minutes | 10-12 minutes |
| 8th session | 4 minutes | 5 -10 minutes | 10 -12 minutes |
| 9th session | 4 minutes | 5 -10 minutes | 10 -12 minutes |
| 10th session | 4 minutes | 5 -10 minutes | 10 -12 minutes |
Preparing for use
HB604/6000SX only: The tanning appliance should be placed on a smooth, level floor.
This appliance may only be installed by an authorised electrician.
It requires two people to assemble and move the tanning appliance.
During assembly the appliance becomes heavier and more difficult to move. We therefore advise you to assemble the appliance at the place where it will be used. Make sure there is enough free space beside (at least 50 cm), behind (at least 30 cm) and in front (at least 1 metre) of the appliance.
HB604/6000SX only: Leave approx. 50 cm free space behind the tanning appliance to allow assembly of the exhaust unit.
If the couch and/or canopy have to be placed on the floor, put them on the floor with the tube lamps facing downwards to avoid internal damage. Make sure you place them on a soft surface (e.g. a carpet or rug) to prevent damage to the housing (fig. 1).
1 Assemble the legs of the frame by fastening the angle sections with the bolts supplied (fig. 2).
2 Place the couch on the legs carefully. Make sure the legs slide steadily into the appropriate openings in the couch (fig. 3).
NB: the openings for assembling the canopy must be located at the back of the couch.
If necessary, you can move the couch slightly by sliding its legs across the floor or by carefully lifting it slightly off the floor together with another person. Make sure there is enough free space beside (at least 50 cm), behind (at least 30 cm) and in front (at least 1 metre) of the appliance.
HB604/6000SX only: Leave approx. 50 cm free space behind the tanning appliance to allow assembly of the exhaust unit.
Never try to move the appliance in the manner shown in the picture. This could cause the frame to become detached from the couch (fig. 4).
3 Lift the canopy together with another person and position its connecting tubes over the connecting holes. Slide the tubes steadily into the connecting holes of the couch (fig. 5).
▶ Be careful not to get your fingers stuck between the couch and the canopy.
▶ Make sure the cords do not get stuck between the couch and the canopy.
4 Fasten the side panel brackets to the legs by means of the bolts supplied for this purpose (fig. 6).
5 Fasten the side panels to the side panel brackets with the bolts supplied (fig. 7).
▶ NB: the Velcro strips should be pointing forwards.
6 Open the cover of the power supply unit.
7 To connect the cords of the couch to the connectors inside the power supply unit, loosen the nut of the cord relief bushing (fig. 8).
8 Place the cord relief bushing in the appropriate recess of the power supply unit and tighten the nut (fig. 9).
The 3 cord relief bushings of the cords connected to the canopy should be placed in the recesses on the right-hand side. The 2 cord relief bushings of the cords connected to the couch should be placed in the recesses on the left-hand side (fig. 10).
9 Connect the cord connectors to the appropriate connectors in the power supply unit.
The connectors have been colour marked.
Insert the cord connectors in the connectors of the power supply unit that are marked with the same colour.
▶ HB604/6000SX only: Connect the power supply cable of the exhaust unit.
10 Close the cover of the power supply unit (HB600/3200SX and HB601/4000SX only).
11 Put the mains cord behind the power supply unit and push the power supply unit slowly and carefully under the couch from the front (fig. 11).
12 Press the front panel against the side panels, exerting exert some pressure to ensure that the Velcro strips engage properly (fig. 12).
The purpose of the panel is to hide the power supply unit and the legs from view and to enhance the appearance of the appliance.
13 HB604/6000SX only: Place the exhaust unit behind the tanning appliance (fig. 13).
14 HB604/6000SX only: Press the back panel against the rear side of the appliance (fig. 14).
15 HB604/6000SX only: Fasten the encasing of the exhaust unit to the panels of the tanning appliance.
16 HB604/6000SX only: Fit the hose supplied with the appliance between the exhaust opening of the tanning appliance and the exhaust unit and fasten it with the hose clamp supplied (fig. 15).
17 HB604/6000SX only: Fit a discharge hose with a 25cm diameter and a length of max. 3m to the top cover of the exhaust unit.
Avoid acute bends in the hose!
The counterpressure at the fan outlet may not exceed 150 Pa.
18 HB604/6000SX only: Fasten the hose by means of a hose clamp (fig. 16).
19 Close the canopy.
20 Put the mains plug in the wall socket.
Using the appliance
User's instructions for using the appliance
As owner of this tanning appliance, you should give your customers the following instructions.
For your convenience we have also included these instructions in a separate section that can be cut out of this manual and can be made available to customers.
The control panel shows all the functions that have to be adjusted (fig. 17).
Symbol ✅ blinks on the display.
Adjusting functions
I Use the ◀ and ▶ buttons to switch from function to function (fig. 18).
The blinking symbol indicates which function is being adjusted.
2 Options:
- Select ⚙ to set the time.
- Select to set the facial tanner.
- Select ✿ to set the body cooler.
Setting the time for a tanning session
I Select ⚙ to set the time.
2 Press the + button to put the time forward and push the - button to put the time backward (fig. 19).
Keep the button pressed in to adjust the time more quickly.
Setting the facial tanner
I Select to set the facial tanner.
2 Press the + and - buttons to set the intensity of the facial tanner (fig. 20).
= off
- I = 50% of its full intensity
- 2 = full intensity
If you have not set the intensity within approx. 5 seconds, the set tanning time will be shown on the display again. To set the facial tanner, select .
If you do not set the facial tanner, the facial tanner will burn at full intensity.
Setting the body cooler
I Select ✿ to set the body cooler.
2 Press the + and – buttons to set the fan power of the body cooler (fig. 21).
- O = no body cooling
- I = body cooler fan at minimum setting
- 2 = body cooler fan at moderate setting
- 3 = body cooler fan at high setting
- 4 = body cooler fan at maximum setting
If you have not set the fan power within approx. 5 seconds, the set tanning time will be shown on the display again. To set the body cooler, select ✗.
If you do not set the body cooler, the body cooler fan will work at maximum setting.
Tanning
Put on the protective goggles provided.
2 Switch the tanning lamps on by pressing the green I button.
The display shows the remaining tanning time.
During the tanning session, the dot next to the time indication blinks.
If you want to switch the appliance off during the tanning session, press the red O button.
A few seconds after the appliance has been switched off, the cooling fans go on automatically to cool down the appliance for 3 minutes (if the standard setting has not been changed). Symbol ⚪ and the remaining cooling time (180-0 seconds) are shown on the display.
You can adjust the intensity of the facial tanner during the tanning session. Use the ◀ and ▶ buttons to select ℰ and then set the required intensity. The new setting becomes active immediately.
▶ If you have not set the intensity within approx. 5 seconds, the remaining tanning time will be shown on the display again.
If you want to set the facial tanner from O (off position) to 1 or 2 while the lamps have not yet cooled down sufficiently, the O symbol will blink on the display.
You can adjust the fan power of the body cooler during the tanning session. Use the ◀ and ▶ buttons to select ✗ and then set the required power. The new setting becomes active immediately.
If you have not set the fan power within approx. 5 seconds, the remaining tanning time will be shown on the display again.
During the last 5 seconds of the tanning session, you will hear a beeping sound and the appliance will switch off automatically after these 5 seconds.
A few seconds after the appliance has been switched off, the cooling fans go on automatically to cool down the appliance for 3 minutes (if the standard setting has not been changed). Symbol ™ and the remaining cooling time (180-0 seconds) are shown on the display.
Adjusting the appliance
Owner's instructions for adjusting the appliance
This part of the manual contains information about additional adjustment options for the owner.
Setting the additional options
Freezing the set time
I Select ⚙ to set the time.
- Press the + button to put the time forward and push the - button to put the time backward.
- Keep the button pressed in to adjust the time more quickly.
2 Hold down the red O button while pressing the + button, the - button and the + button in succession. Then release the O button. The set time is now frozen.
The set time can no longer be adjusted.
Symbol ☀ stops blinking.
3 Switch the tanning lamps on by pressing the green I button.
Unfreezing set time
Hold down the red O button while pressing +, - and + in succession. Then release the O button. The set time is no longer frozen.
2 Set a new tanning time and press the green I button to switch the lamps on.
Operating hour registration
I Select ⚙ to set the time.
2 Set the time to 00.
3 Set the body cooler to position O.
4 Press the O button to display the operating hours.
The maximum number of hours that can be displayed is 999. When this value has been reached, the counter will start counting up from 000 again.
5 When you release the O button, the number of operating hours disappears from the display.
Setting the menus
To enter the owner's menus, hold down the I button while pressing +, -, +, the O button, - and + in succession. Then release the I button.
▶ C00 will appear on the display.
▶ Press + and – to navigate through the menus.
Setting the operating hours (menu C01)
The standard setting is 400 hours. You can change this setting. The selection range is 150-750 hours.
I Press the I button.
2 To increase the number of operating hours, press the O button.
The step size is 50 hours.
The display counts up to 750. If you continue to press the O button when 750 has been reached, the display will start counting up from 150 again.
3 Confirm the new setting by pressing the I button again.
Time setting menu (C02)
The default setting is 0, which means that users can adjust the tanning time between 0 to 24 minutes according to their own wishes.
I Press the I button.
2 Press the O button once to select setting I. This setting allows users to set the tanning time between 1 minute and a maximum time to be set in menu C03.
3 Confirm the new setting by pressing the I button again.
Users cannot set a tanning time that is longer than the maximum tanning time set, but they can set a shorter time.
Note: If you have selected setting 1 in menu C02 and have accidentally limited the tanning time to 1 minute in menu C03, users will not be able to set a tanning time.
Setting maximum tanning time (menu C03)
This option is only available to you if you have selected setting 1 in menu C02.
I Press the I button.
2 Hold down the O button to increase the time in minutes.
The display counts up to 40 (24 for the HB604/6000SX). If you continue to hold down the O button when 40 (24 for the HB604/6000SX) has been reached, the display will start counting up from I again.
Use this option to shorten the maximum settable tanning time for users.
3 Confirm the new setting by pressing the I button again.
Setting the cooling time (menu C04)
The default setting is 180 seconds. The selection range is 30-900 seconds.
I Press the I button.
2 Hold down the O button to increase the time in seconds.
The step size is 30 seconds.
The display counts up to 900. If you continue to hold down the O button when 900 has been reached, the display will start counting up from 30 again.
3 Confirm the new setting by pressing the I button again.
▶ Note: As the facial tanner requires a cooling time of 180 seconds, we advise you not to set a shorter cooling time.
Retrieving software data (menu C05)
Select this menu to view the version number of the software.
▶ You may need this information when you require service.
Resetting operating hour counter (menu C06)
When you are in this menu, press the O button to reset the operating hour counter.
This will remove the L from the display.
'Facial-off blocking' function (C07)
The default setting is 0, which means that the 'facial-off blocking' function has not been activated. Confirm the new setting by pressing the I button again.
Setting the body cooler (C20)
The default setting is 4. Setting options are 0 to 4.
Service menus
Menus C08, C09, C10, C11, C12 are service menus that can only be adjusted by staff of an authorised Philips service centre.
Leaving owner's menus
Return to menu C00 and press the I button to leave the menus.
Cleaning
Always unplug the appliance and let it cool down before you start cleaning it.
Never use alcohol, methylated spirits, petrol and acetone or cleaners containing these substances to clean the acrylic sheets, as this may cause irreparable damage.
- Clean the outside of the appliance with a damp cloth.
Do not let any water run into the appliance.
Clean the appliance with a damp cloth after every 250 operating hours to limit discolouration of the parts of the appliance exposed to UV.
Replacement
The light emitted by the tanning lamps will become less bright in time. When this happens, you will notice a decrease in the tanning capacity of the appliance. You can solve this problem by setting a slightly longer tanning time or by replacing the tanning lamps.
To replace the tanning lamps and/or starters, proceed as follows.
Remove the mains plug from the wall socket.
2 Undo the quarter-turn screws in the fastening strips at both ends of the acrylic sheet (fig. 22).
3 Snap loose the strips along both sides of the acrylic sheet by placing your fingers under the strip and pulling it up at various places (fig. 23).
4 Remove the acrylic sheet.
Always remove the mains plug from the wall socket before removing the acrylic sheet.
5 Remove the lamp end covers (fig. 24).
6 To remove the lamps, turn them to the left or to the right so that you can lift them out of their holders.
7 The starters can be removed by turning them to the left.
8 Insert new lamps and/or starters.
Always replace the tanning lamps with Philips Cleo Performance SR tube lamps. Put 100W lamps in the couch and 80W lamps in the canopy.
NB: The canopy of HB600/3200SX contains 16 80W tube lamps and two 100W tube lamps.
NB: The canopy of HB604/6000SX contains 23 140 W Philips Cleo Professional R tube lamps.
NB: The couch of HB604/6000SX contains 17 100W Philips Cleo Professional R tube lamps.
Always replace starters with Philips S12 starters or Cleo Sunstarters.
9 Slide the lamp end covers back into the end covers on either side.
10 Put the acrylic sheet back and fasten it by snapping home the strips on either side.
Tighten the quarter-turn screws in the fastening strips at both ends of the acrylic sheet.
The lamps and/or starters of the couch and canopy are replaced in the same way.
Replacing an HPA lamp
I Remove the acrylic sheet.
Always remove the mains plug from the wall socket before removing the acrylic sheet.
2 Remove the lamp end cover at the facial tanner side of the canopy.
3 Loosen the screws that hold the HPA lamp unit in place.
4 Tilt the HPA lamp unit out of the canopy.
5 Turn the black retaining screws and remove them.
6 Slide the filter glass out of the lamp unit.
7 Remove the HPA lamp and put in a new one.
Always replace the HPA lamps with HP 400 SH lamps.
8 Slide the filter glass back into the lamp unit and fasten it with the black retaining screws.
9 Push the HPA lamp unit back into the canopy and fasten it with the screws.
10 Reassemble the lamp end cover and the acrylic sheet.
To replace the starter of the HPA lamp, proceed in the same way.
Always replace starters with Philips CD Z 400M starters.
Coin box or remote control unit
This appliance can also be connected to a coin box or a remote control unit. These devices may only be connected by a registered electrician.
Please note that you may only connect coin boxes or external devices that have been certified according to IEC:EN 60335-2-27, 4th edition, clause 22.105.
If you connect devices that do not comply with IEC:EN60335-2-27, Philips cannot be held liable for any damage and/or malfunction arising from the use of such a device or for resulting claims, and the international Philips guarantee will no longer apply to this appliance.
The appliance and its parts may only be connected or adjusted according to the instructions in the service manual.
Environment
The lamps of the appliance contain substances that can be harmful to the environment. When you discard the lamps, make sure they are not thrown away with the normal household waste but are handed in at an official collection point.
Do not throw the appliance away with the normal household waste at the end of its life, but hand it in at an official collection point for recycling. By doing this you will help to preserve the environment (fig. 25).
Guarantee & service
If you need service or information or if you have a problem, please visit the Philips website at www.philips.com or contact the Philips Customer Care Centre in your country (you will find its phone number in the worldwide guarantee leaflet). If there is no Customer Care Centre in your country, turn to your local Philips dealer or contact the Service Department of Philips Domestic Appliances and Personal Care BV.
Guarantee restrictions
The following parts are not covered by the terms of the international guarantee:
- tanning lamps
- acrylic sheets
- gas springs
Troubleshooting
If problems should arise with this appliance and you are unable to solve them by means of the troubleshooting guide below, please contact the nearest Philips service centre or the Philips Customer Care Centre in your country.
| Problem | Cause/Solution |
| The appliance does not start | The mains plug has not been properly inserted into the wall socket. |
| The timer has not been set. | |
| One or more fuses of the three-phase power supply system cut off the power when you switch the appliance on or when it is in use. | Check the fuses. The correct type is a 16A standard fuse or an automatic fuse. |
| Poor tanning results | You are using an extension cord that is too long and/or does not have the correct rating (16A). Consult your dealer. Our general advice is not to use an extension cord. |
| Make sure users follow the tanning schedule suitable for their skin type. | |
| When the lamps have been used for a long time, the tanning capacity will decrease. You can solve this problem by selecting a slightly longer tanning time or by replacing the lamps. | |
| The display shows error code E01 | Check if the vents of the power supply unit are open. |
| The display shows error code E02 | Stop using the appliance at once and contact your dealer or a Philips service centre. |
Wstep
Cut out and hand to users!
▶ Cut out page 127 - 131
Important
Do not exceed the recommended tanning time and the maximum number of tanning hours (see 'Tanning sessions: how often and how long?').
Never use the appliance when the control panel or an acrylic sheet is defective.
Always wear the protective goggles provided with the appliance while tanning to protect your eyes against overexposure (also see the chapter 'Tanning and your health').
Do not tan a particular part of your body more than once a day. Avoid excessive exposure to natural sunlight on the same day.
Do not use the tanning appliance if you have a disease and/or use medication or cosmetics that increase the sensitivity of your skin. Be extra careful if you are hypersensitive to UV light. Consult your doctor in case of doubt.
Do not use the tanning appliance and consult your doctor if unexpected effects such as itching occur within 48 hours after the first session.
Consult your doctor if persistent lumps or sores appear on the skin, or if there are changes in pigmented moles.
Do not use the tanning appliance if you get sunburnt without tanning when exposed to the sun, if you suffer from sunburn, if you suffer (or have previously suffered) from skin cancer or are predisposed to skin cancer.
If you have just been swimming or have just taken a shower, dry yourself thoroughly before using the appliance.
Remove creams, lipstick and other cosmetics well in advance of a tanning session.
Do not use any sunscreens or suntan accelerators.
If your skin feels taut after the tanning session, you may apply a moisturising cream.
Noise level: Lc = 72 dB [A]
Tanning and your health
Overexposure to ultraviolet light (natural sunlight or artificial light from a tanning appliance) can cause sunburn.
Besides many other factors, such as overexposure to natural sunlight, incorrect and excessive use of a tanning appliance may increase the risk of skin and eye problems. The degree to which these effects occur is determined by the nature, intensity and duration of the exposure on the one hand and the sensitivity of the person involved on the other:
The more the skin and the eyes are exposed to UV light, the higher the risk of keratitis, conjunctivitis, damage to the retina, cataracts, premature skin ageing and the development of skin tumours will be. Some medications and cosmetics increase the sensitivity of the skin.
It is therefore highly important:
that you follow the instructions in the chapters 'Important' and 'Tanning sessions: how often and how long?';
that you do not exceed the maximum number of tanning hours per year (see 'Tanning sessions: how often and how long?');
▶ that you always wear the goggles provided while tanning.
Tanning sessions: how often and how long?
HB600/3200SX
Take one tanning session a day for five to ten days. Wait at least 48 hours after the first session before taking the second session. After this 5- to 10-day course, we advise you to stop tanning for a while.
▶ Approximately one month after a course, your skin will have lost much of its tan. You can then start a new course.
If you want to keep your tan, do not stop tanning after the course, but continue taking one or two tanning sessions a week.
Whether you choose to stop tanning for a while or whether you continue tanning on a lower frequency, always keep in mind that you must not exceed the maximum number of tanning hours. The maximum for this appliance is 16 hours (= 960 minutes) a year.
Example
Suppose you take a 10-day tanning course, with a 6-minute session on the first day and a 20-minute session on the nine following days.
The entire course will then last (1 x 6 minutes) + (9 x 20 minutes) = 186 minutes.
This means you can take 5 of these courses in a year, as 5 × 186 minutes = 930 minutes.
Table
As is shown in the table, the first session of a tanning course should always last 6 minutes, irrespective of the sensitivity of the skin.
If you think that the sessions are too long for you (e.g. because your skin feels taut and tender after the session), we advise you to reduce the length of the sessions by e.g. 5 minutes
| Duration of the tanning session for each separate part of the body | For persons with very sensitive skin | For persons with normal sensitive skin | For persons with less sensitive skin |
| 1st session | 6 minutes | 6 minutes | 6 minutes |
| rest of at least 48 hours | |||
| 2nd session | 10 minutes | 15-20 minutes | 20-25 minutes |
| 3rd session | 10 minutes | 15-20 minutes | 20-25 minutes |
| 4th session | 10 minutes | 15-20 minutes | 20-25 minutes |
| 5th session | 10 minutes | 15-20 minutes | 20-25 minutes |
| 6th sessio | 10 minutes | 15-20 minutes | 20-25 minutes |
| 7th session | 10 minutes | 15-20 minutes | 20-25 minutes |
| 8th session | 10 minutes | 15-20 minutes | 20-25 minutes |
| 9th session | 10 minutes | 15-20 minutes | 20-25 minutes |
| 10th session | 10 minutes | 15-20 minutes | 20-25 minutes |
| 10 minutes | 15-20 minutes | 20-25 minutes |
HB601/4000SX
Take one tanning session a day for five to ten days. Wait at least 48 hours after the first session before taking the second session. After this 5- to 10-day course, we advise you to stop tanning for a while.
▶ Approximately one month after a course, your skin will have lost much of its tan. You can then start a new course.
If you want to keep your tan, do not stop tanning after the course, but continue taking one or two tanning sessions a week.
Whether you choose to stop tanning for a while or whether you continue tanning on a lower frequency, always keep in mind that you must not exceed the maximum number of tanning hours. The maximum for this appliance is 12 hours (= 720 minutes) a year.
Example
Suppose you take a 10-day tanning course, with a 5-minute session on the first day and a 15-minute session on the nine following days.
The entire course will then last (1 x 5 minutes) + (9 x 15 minutes) = 140 minutes.
This means you can take 5 of these courses in a year, as 5 x 140 minutes = 700 minutes.
Table
As is shown in the table, the first session of a tanning course should always last 5 minutes, irrespective of the sensitivity of the skin.
If you think that the sessions are too long for you (e.g. because your skin feels taut and tender after the session), we advise you to reduce the length of the sessions by e.g. 5 minutes.
| Duration of the tanning session for each separate part of the body | For persons with very sensitive skin | For persons with normal sensitive skin | For persons with less sensitive skin |
| 1st session | 5 minutes | 5 minutes | 5 minutes |
| rest of at least 48 hours | |||
| 2nd session | 8 minutes | 10-15 minutes | 15-20 minutes |
| 3rd session | 8 minutes | 10-15 minutes | 15-20 minutes |
| 4th session | 8 minutes | 10-15 minutes | 15-20 minutes |
| 5th session | 8 minutes | 10-15 minutes | 15-20 minutes |
| 6th session | 8 minutes | 10-15 minutes | 15-20 minutes |
| 7th session | 8 minutes | 10-15 minutes | 15-20 minutes |
| 8th session | 8 minutes | 10-15 minutes | 15-20 minutes |
| 9th session | 8 minutes | 10-15 minutes | 15-20 minutes |
| 10th session | 8 minutes | 10-15 minutes | 15-20 minutes |
HB604/6000SX
Take one tanning session a day for five to ten days. Wait at least 48 hours after the first session before taking the second session. After this 5- to 10-day course, we advise you to stop tanning for a while.
▶ Approximately one month after a course, your skin will have lost much of its tan. You can then start a new course.
If you want to keep your tan, do not stop tanning after the course, but continue taking one or two tanning sessions a week.
Whether you choose to stop tanning for a while or whether you continue tanning on a lower frequency, always keep in mind that you must not exceed the maximum number of tanning hours. The maximum for this appliance is 7 hours (= 420 minutes) a year.
Example
Suppose you take a 10-day tanning course, with a 3-minute session on the first day and an 8-minute session on the nine following days.
The entire course will then last (1 x 3 minutes) + (9 x 8 minutes) = 75 minutes.
This means you can take 5 of these courses in a year, as 5 × 75 minutes = 375 minutes.
Table
As is shown in the table, the first session of a tanning course should always last 3 minutes, irrespective of the sensitivity of the skin.
If you think that the sessions are too long for you (e.g. because your skin feels taut and tender after the session), we advise you to reduce the length of the sessions by e.g. 3 minutes.
| Duration of the tanning session for each separate part of the body | For persons with very sensitive skin | For persons with normal sensitive skin | For persons with less sensitive skin |
| 1st session | 3 minutes | 3 minutes | 3 minutes |
| rest of at least 48 hours | |||
| 2nd session | 4 minutes | 5-10 minutes | 10-12 minutes |
| 3rd session | 4 minutes | 5-10 minutes | 10-12 minutes |
| 4th session | 4 minutes | 5-10 minutes | 10-12 minutes |
| 5th session | 4 minutes | 5 -10 minutes | 10 -12 minutes |
| 6th session | 4 minutes | 5 -10 minutes | 10 -12 minutes |
| 7th session | 4 minutes | 5 -10 minutes | 10-12 minutes |
| 8th session | 4 minutes | 5 -10 minutes | 10 -12 minutes |
| 9th session | 4 minutes | 5 -10 minutes | 10 -12 minutes |
| 10th session | 4 minutes | 5 -10 minutes | 10 -12 minutes |
Using the appliance
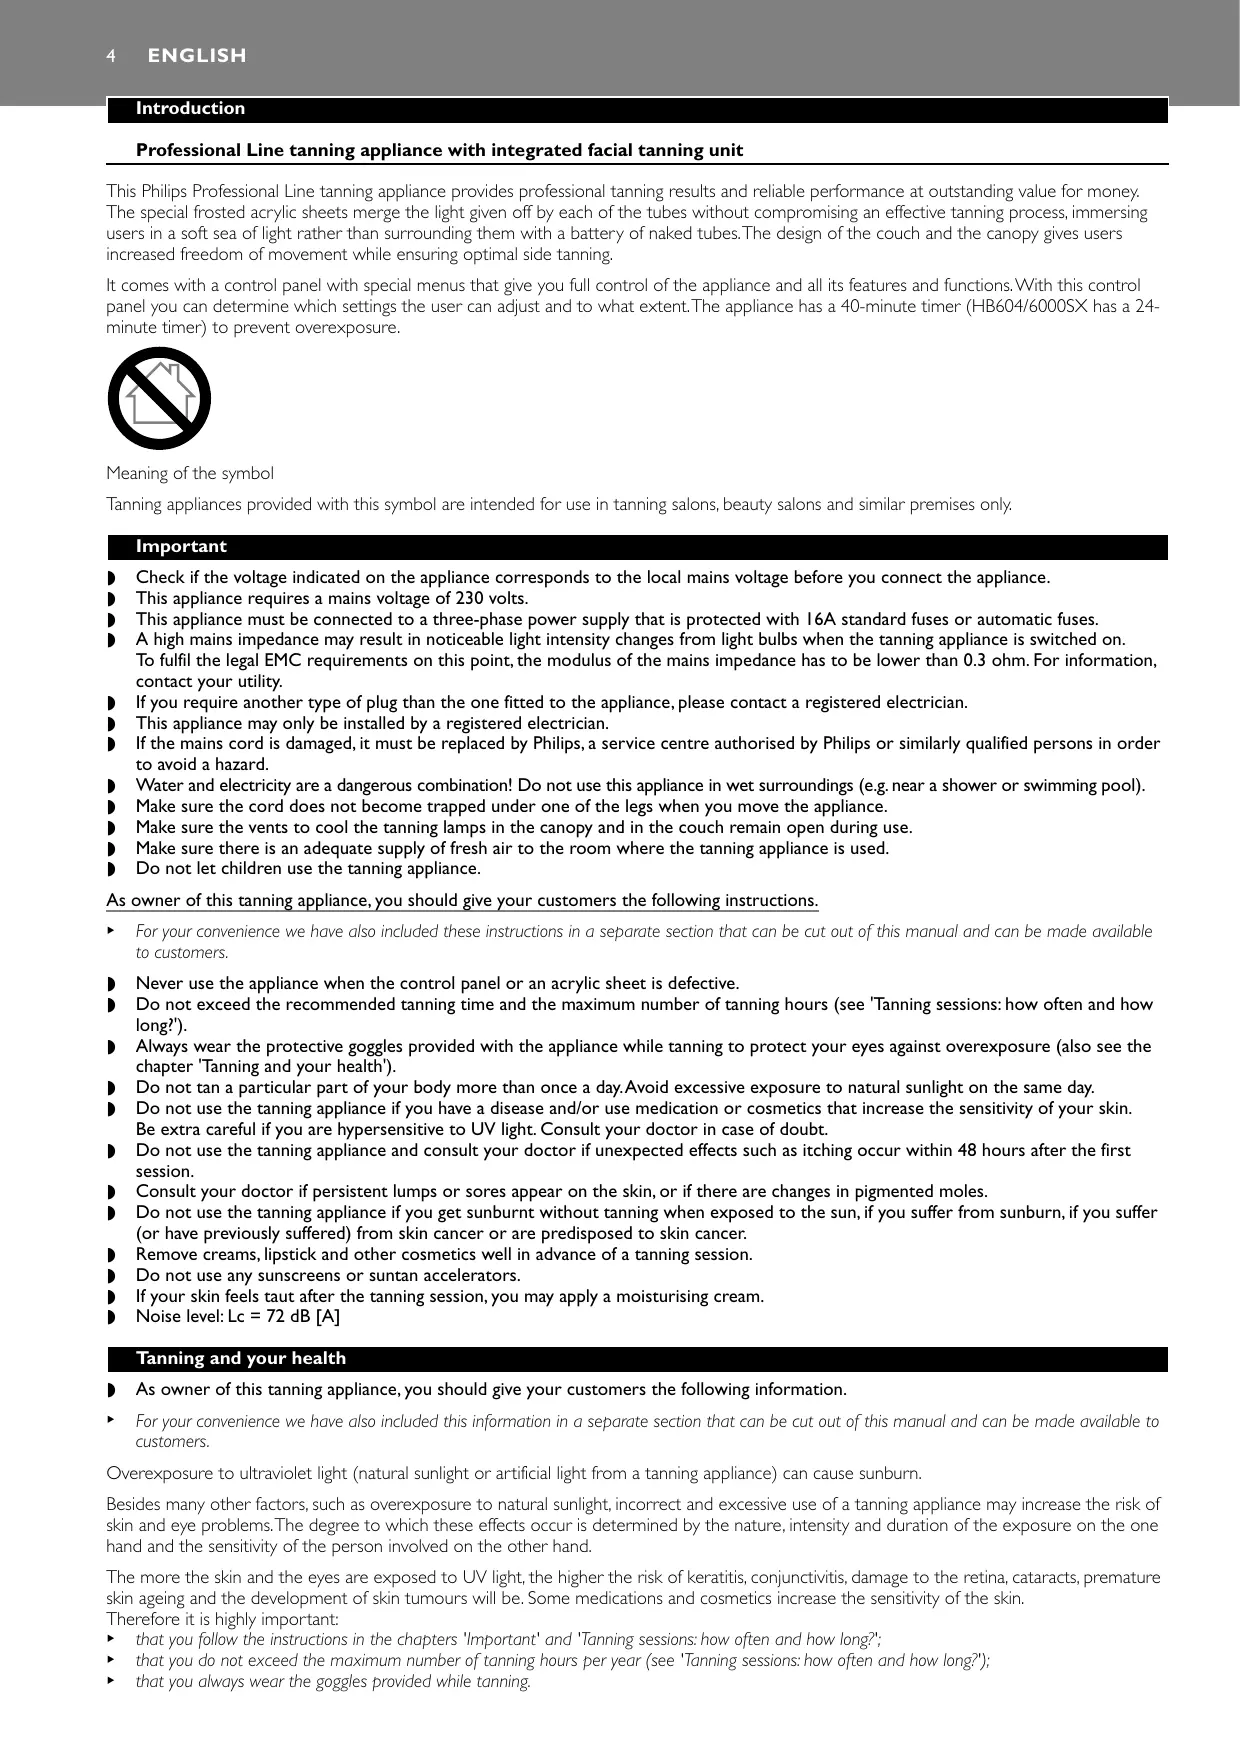
The remote control shows all the functions that have to be adjusted.
Symbol 🙏 blinks on the display.
I Use the ◀ and ▶ buttons to switch from function to function (fig. 26).
The blinking symbol indicates which function is being adjusted.
2 Options:
- Select ⚙ to set the time.
- Select £ to set the facial tanner.
- Select ✿ to set the body cooler.
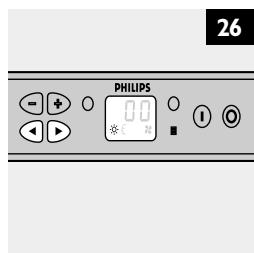
Setting the time for a tanning session
I Select ⚙ to set the time.
2 Press the + button to put the time forward and push the – button to put the time backward (fig. 27).
Keep the button pressed in to adjust the time more quickly.
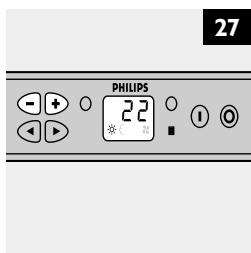
Setting the facial tanner
I Select to set the facial tanner.
2 Press the + and – buttons to set the intensity of the facial tanner (fig. 28).
- = off
- I = 50% of its full intensity
- 2 = full intensity
If you have not set the intensity within approx. 5 seconds, the set tanning time will be shown on the display again. To set the facial tanner, select .
If you do not set the facial tanner, the facial tanner will burn at full intensity.
Setting the body cooler
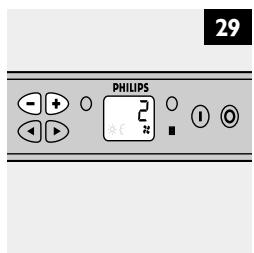
I Select ✿ to set the body cooler.
2 Press the + and – buttons to set the fan power of the body cooler (fig. 29).
- O = no body cooling
- I = body cooler fan at minimum setting
- 2 = body cooler fan at moderate setting
- 3 = body cooler fan at high setting
- 4 = body cooler fan at maximum setting
If you have not set the fan power within approx. 5 seconds, the set tanning time will be shown on the display again. To set the body cooler, select ✗.
If you do not set the body cooler, the body cooler fan will work at maximum setting.
Tanning
I Put on the protective goggles provided.
2 Switch the tanning lamps on by pressing the green I button.
The display shows the remaining tanning time.
During the tanning session, the dot next to the time indication blinks.
If you want to switch the appliance off during the tanning session, press the red O button.
A few seconds after the appliance has been switched off, the cooling fans go on automatically to cool down the appliance for 3 minutes (if the standard setting has not been changed). Symbol Ⅱ and the remaining cooling time (180-0 seconds) are shown on the display.
You can adjust the intensity of the facial tanner during the tanning session. Use the ◀ and ▶ buttons to select ℰ and then set the required intensity. The new setting becomes active immediately.
▶ If you have not set the fan power within approx. 5 seconds, the remaining tanning time will be shown on the display again.
If you want to set the facial tanner from O (off position) to 1 or 2 while the lamps have not yet cooled down sufficiently, the O symbol will blink on the display.
You can adjust the fan power of the body cooler during the tanning session. Use the ◀ and ▶ buttons to select ✗ and then set the required power. The new setting becomes active immediately.
▶ If you have not set the fan power within approx. 5 seconds, the remaining tanning time will be shown on the display again.
During the last 5 seconds of the tanning session, you will hear a beeping sound and the appliance will switch off automatically after these 5 seconds.
A few seconds after the appliance has been switched off, the cooling fans go on automatically to cool down the appliance for 3 minutes (if the standard setting has not been changed). Symbol ™ and the remaining cooling time (180-0 seconds) are shown on the display.
- USER'S PART OF THE INSTRUCTION MANUAL
- Introduction
- Professional Line tanning appliance with integrated facial tanning unit
- Important
- Tanning and your health
- Tanning sessions: how often and how long?
- HB600/3200SX
- Example
- Table
- HB601/4000SX
- HB604/6000SX
- Preparing for use
- Using the appliance
- Adjusting functions
- Setting the time for a tanning session
- Setting the facial tanner
- Setting the body cooler
- Tanning
- Adjusting the appliance
- Setting the additional options
- Freezing the set time
- Unfreezing set time
- Operating hour registration
- Setting the menus
- Setting the operating hours (menu C01)
- Time setting menu (C02)
- Setting maximum tanning time (menu C03)
- Setting the cooling time (menu C04)
- Retrieving software data (menu C05)
- Resetting operating hour counter (menu C06)
- 'Facial-off blocking' function (C07)
- Setting the body cooler (C20)
- Service menus
- Leaving owner's menus
- Cleaning
- Replacement
- Replacing an HPA lamp
- Coin box or remote control unit
- Environment
- Guarantee & service
- Guarantee restrictions
- Troubleshooting
- Wstep
Brand : PHILIPS
Model : 6000SX
Category : Tanning device