
ES7016 - Shaver PANASONIC - Free user manual and instructions
Find the device manual for free ES7016 PANASONIC in PDF.
| Product type | Electric shaver |
| Brand | Panasonic |
| Model | ES7016 |
| Category | Shaver |
| Shaving type | Wet and dry |
| Usage | In the shower, with shaving foam or dry |
| Initial charging time | 8 hours |
| Normal charging time | 1 hour (full charge) |
| Runtime | Approximately 20 shaves (3 minutes per shave) |
| Power supply voltage | 100-240 V (auto-sensing) |
| Power adaptor | Model RE3-88 |
| Charge indicator | Red (charging), Green flashing (full charge) |
| Shaving head | System outer foil with inner blade |
| Integrated trimmer | Yes, pop-up |
| Cleaning | Under running water with liquid soap |
| Outer foil replacement | Every year |
| Inner blades replacement | Every two years |
| Battery type | Nickel-metal hydride (NiMH) |
| Included accessories | Protective cap, wall holder, cleaning brush, travel case |
| Weight | Approx. 180 g |
| Dimensions | Approx. 150 x 60 x 40 mm |
| Certification | Household use |
| Adaptation period | About one month for skin and beard |
Frequently Asked Questions - ES7016 PANASONIC
User questions about ES7016 PANASONIC
0 question about this device. Answer the ones you know or ask your own.
Ask a new question about this device
Download the instructions for your Shaver in PDF format for free! Find your manual ES7016 - PANASONIC and take your electronic device back in hand. On this page are published all the documents necessary for the use of your device. ES7016 by PANASONIC.
USER MANUAL ES7016 PANASONIC
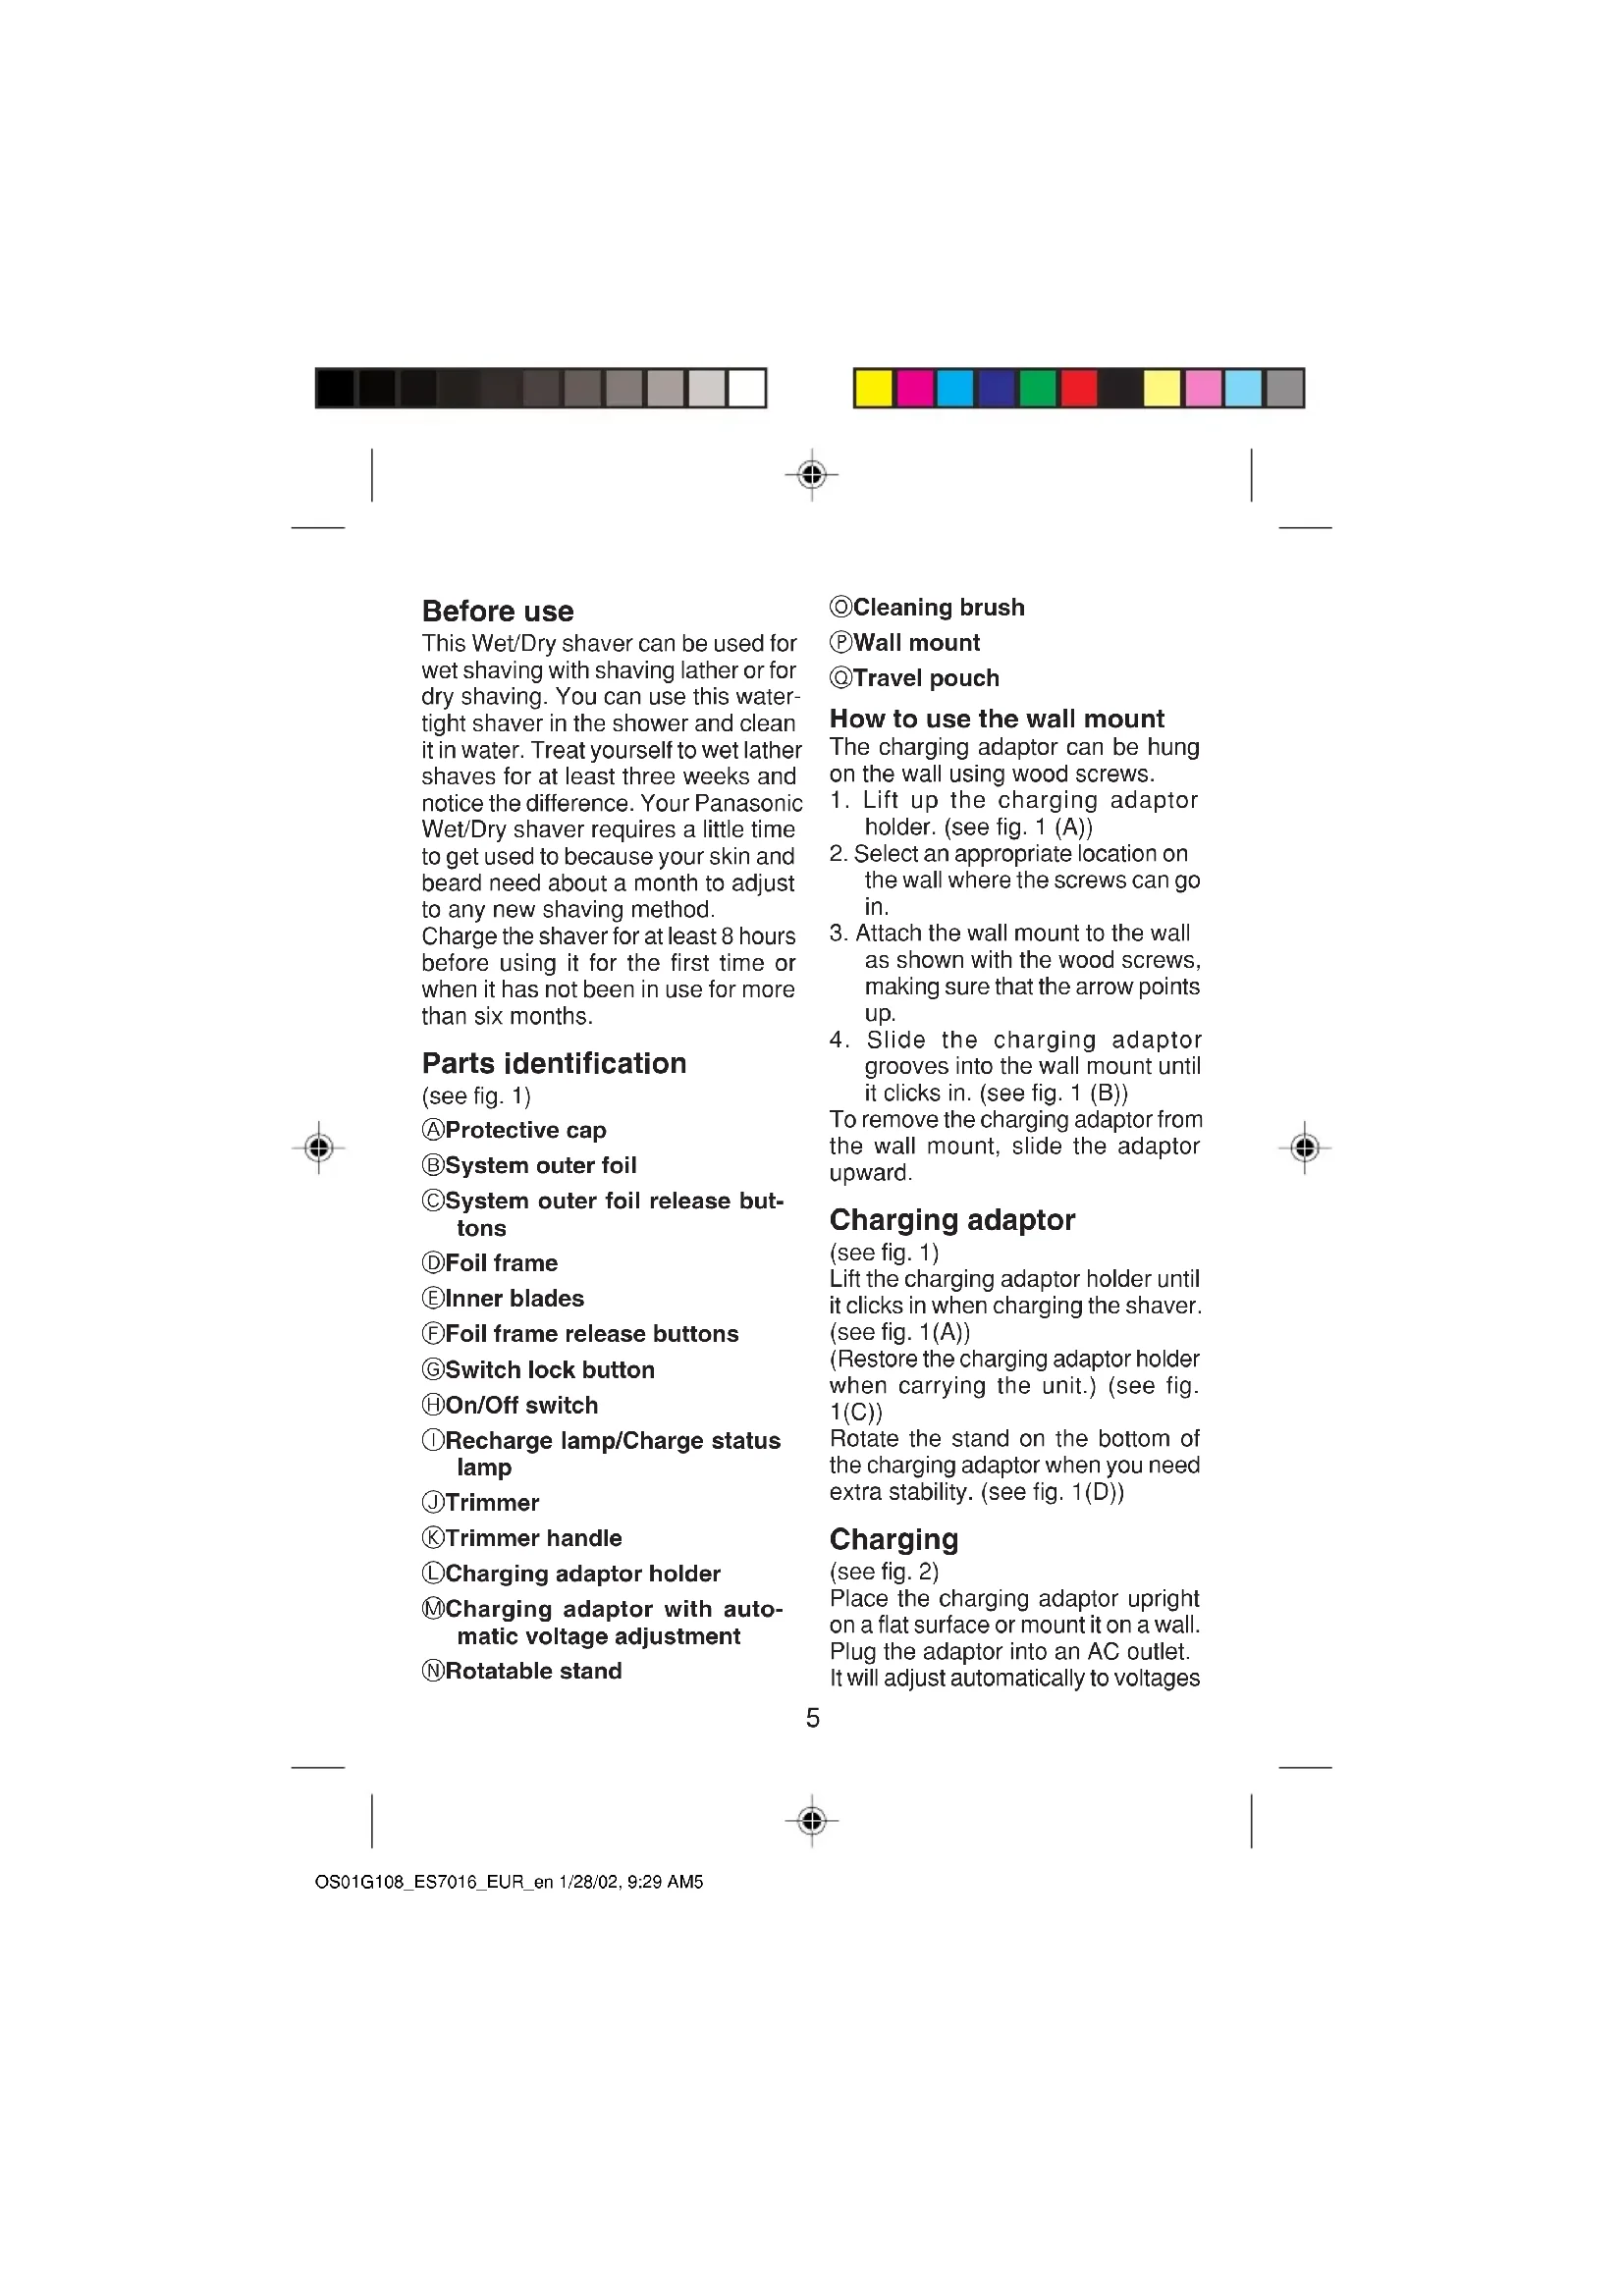
Wet/Dry Rechargeable Shaver
Operating Instructions
Model No. ES7016
Before operating this unit, please read these instructions completely. Thank you for purchasing the Panasonic Wet/Dry Rechargeable Shaver Model No.ES7016.


Index
ENGLISH Page 5 NORSK Side 43
This Wet/Dry shaver can be used for wet shaving with shaving lather or for dry shaving. You can use this watertight shaver in the shower and clean it in water. Treat yourself to wet lather shaves for at least three weeks and notice the difference. Your Panasonic Wet/Dry shaver requires a little time to get used to because your skin and beard need about a month to adjust to any new shaving method.
Charge the shaver for at least 8 hours before using it for the first time or when it has not been in use for more than six months.
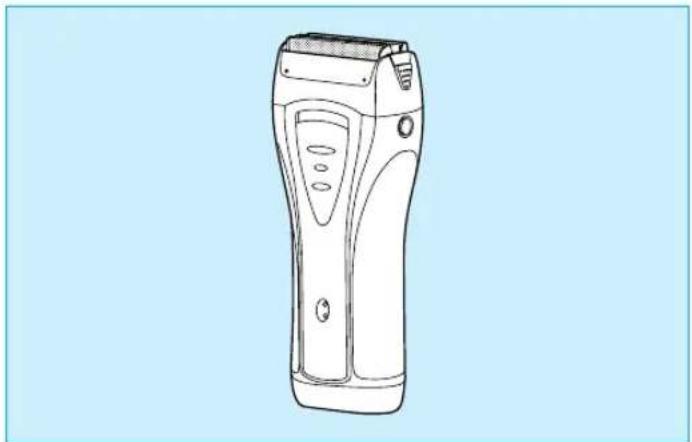
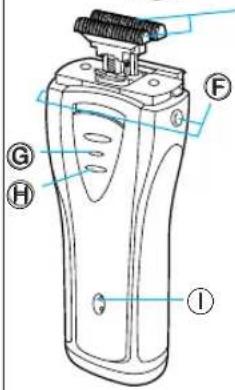
Parts identification
(see fig. 1)
Protective cap
System outer foil
System outer foil release buttons
① Foil frame
Inner blades
Foil frame release buttons
Switch lock button
On/Off switch
①Recharge lamp/Charge status lamp
①Trimmer
Trimmer handle
Charging adaptor holder
Charging adaptor with automatic voltage adjustment
Rotatable stand
Cleaning brush
Wall mount
@Travel pouch
How to use the wall mount
The charging adaptor can be hung on the wall using wood screws.
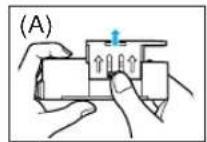
- Lift up the charging adaptor holder. (see fig. 1 (A))
- Select an appropriate location on the wall where the screws can go in.
- Attach the wall mount to the wall as shown with the wood screws, making sure that the arrow points up.
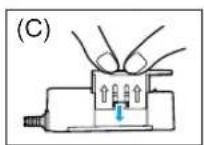
- Slide the charging adaptor grooves into the wall mount until it clicks in. (see fig. 1 (B))
To remove the charging adaptor from the wall mount, slide the adaptor upward.
Charging adaptor
(see fig. 1)
Lift the charging adaptor holder until it clicks in when charging the shaver. (see fig. 1(A))
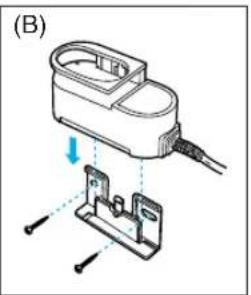
(Restore the charging adaptor holder when carrying the unit.) (see fig. 1(C))
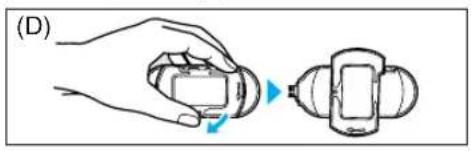
Rotate the stand on the bottom of the charging adaptor when you need extra stability. (see fig. 1(D))
Charging
(see fig. 2)
Place the charging adaptor upright on a flat surface or mount it on a wall. Plug the adaptor into an AC outlet.
It will adjust automatically to voltages


between 100-240V AC.
In some areas, a special plug adaptor may be required.
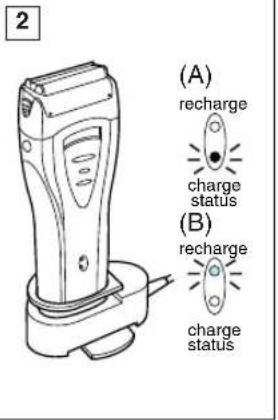
Switch the shaver to the "0 - charge" position and place it upright into the charging adaptor with the switch facing toward the front.
The charge status lamp will glow red when the shaver is placed on the correct position. It will flicker red when the charging is completed (see fig. 2 (A)).
You can fully charge the shaver in one hour if the recharge lamp flashes green (see fig. 2 (B)).
A full charge will supply enough power for about 20 shaves (three minutes per shave for a normal beard).
You can always store your shaver in the charging adaptor to maintain full power capacity. This shaver cannot be overcharged.
Before traveling, charge it fully for 1 hour if you will not be taking the charging adaptor with you.
Using your shaver
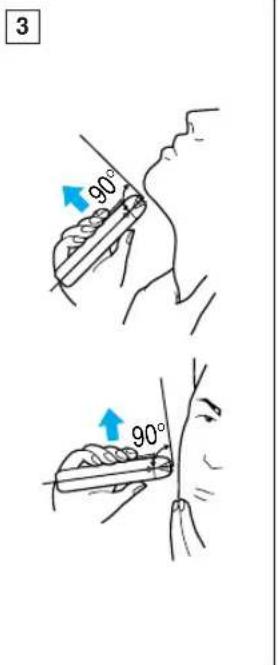
Depress the switch lock button and slide the On/Off switch upward to turn the shaver on. Hold the shaver at a right angle (90^) to your skin (see fig. 3). Start out shaving by applying gentle pressure to your face. Stretch your skin with your free hand and move the shaver back and forth in the direction of your beard. You may gently increase the amount of pressure as your skin becomes accustomed to this shaver. Applying excessive pressure does not provide a closer shave.
System outer foil
(see fig. 4)
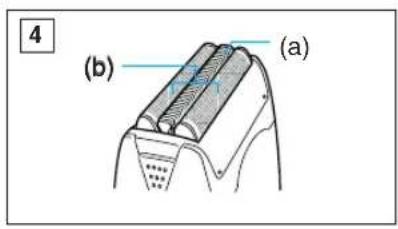
System outer foil has a slit blade (a) between two foils (b). They move up and down independently to follow the contours of your face.
The slit blade catches and cuts longer and lying hairs easily.
For wet shaving
Put a thin layer of shaving foam on your face which works as a lubricant. Shaving foam is the most suitable among many other shaving aids (gel, soap, cream, etc). Do not put a thick layer of shaving foam as it may affect the shaver's performance. If the shaving head is clogged with foam, simply rinse it under running water.
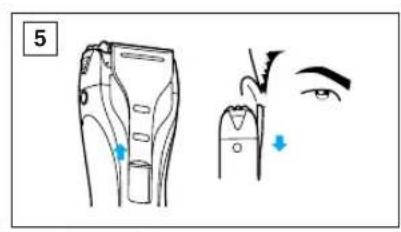
Using the trimmer
(see fig. 5)
Slide the trimmer handle up to the position until it clicks in.
Place the trimmer at a right angle to your skin and move it downward to trim sideburns.
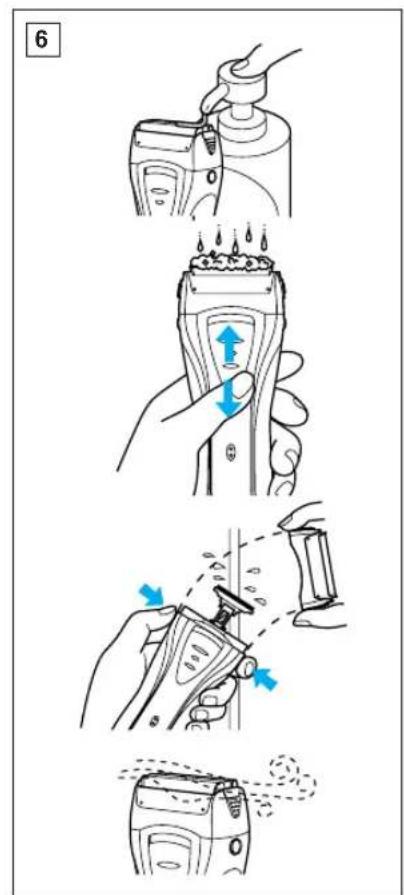
Cleaning your shaver
(see fig. 6)
For cleanliness and convenience, we recommend that you clean your shaver with water and a liquid hand soap. Regular cleaning will keep your shaver in good condition while preventing odors or bacteria from developing, and maintain the cutting performance.
With the system outer foil in place, apply some hand soap onto the outer foil.


Turn the shaver on and pour some water over the outer foil.
After about 10-20 seconds, turn the shaver off.
Remove the foil frame and clean it with running water.
Wipe off any moisture from the shaver with a dry cloth and remove the protective cap to allow the system outer foil to dry completely.
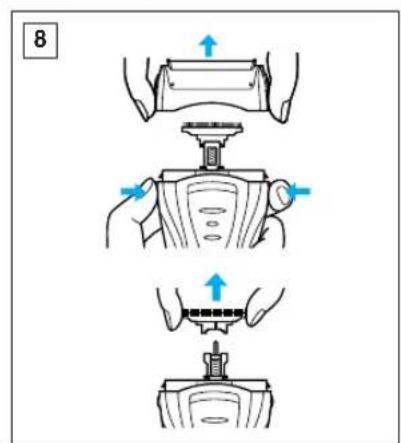
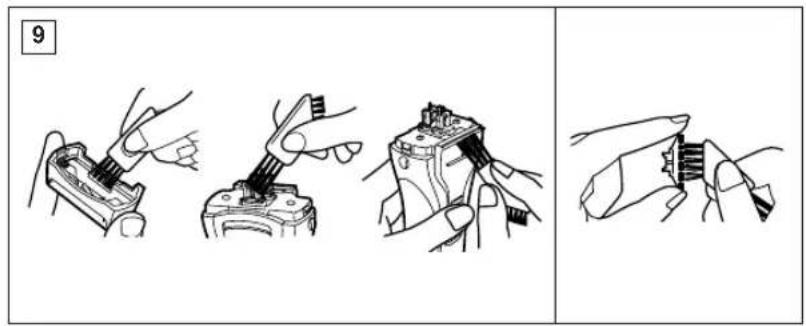
Brush cleaning
Squeeze the system outer foil release buttons and lift the system outer foils upward to remove them (see fig. 7). Remove the inner blades by grasping them firmly at both ends and pulling them straight away from the shaver (see fig. 8). Clean the outer foils, the shaver body and the trimmer with the long side of the brush. Clean the inner blades with the short side of the brush. Do not use the short brush to clean the outer foils (see fig. 9).
Replacing shaving head components
It is recommended that you replace the outer foil at least every year and the inner blades at least every two years to maintain your shaver's cutting performance.
Replacing the system outer foil (see fig. 7)
Squeeze the system outer foil release buttons and lift the system outer foil upward to remove it. To insert the new system outer foil, press down until it snaps into place.
Replacing the inner blades (see fig. 8)
Squeeze the foil frame release buttons and lift the foil frame upward to remove it. Remove the inner blades, one at a time, by grasping them firmly at both ends and pulling straight away from the shaver. To insert the new inner blades, hold the blades, one at a time, at both ends and press downward until they snap into place.
For environmental protection and recycling of materials
This shaver contains Nickel-Metal Hydride battery(s).
Please make sure that the battery(s) are disposed of at an officially assigned location, if there is one in your country.
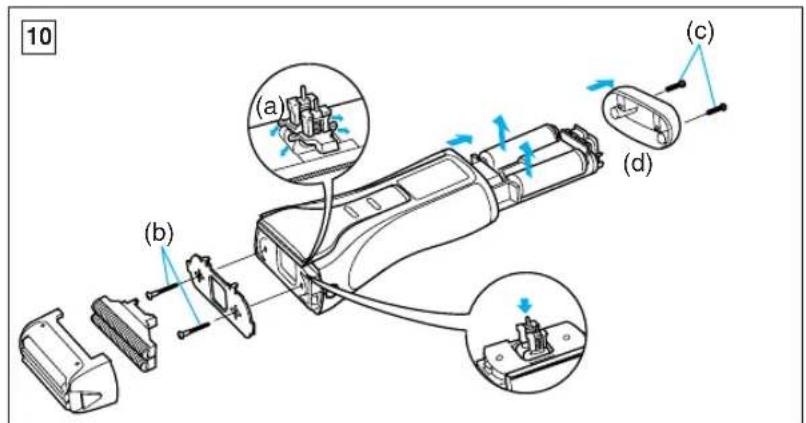
How to remove the built-in rechargeable battery(s) before disposal of the shaver (see fig. 10)
The battery(s) in this shaver is not intended to be replaced by consumers. However, the battery(s) may be replaced at an authorized service center. The procedure described below is intended only for removal of the rechargeable battery(s) for the purpose of proper disposal.
- Remove the cap, outer foil frame and inner blades.
- Remove the two screws (b) and driving bars (a).
- Remove two screws (c) and bottom cover (d).


- Push the chassis out of the housing.
- Remove the battery(s) from the chassis.
Caution
- Do not charge the shaver where the temperature is below 0^ (32^) or above 40^ (104^) , where it will be exposed to direct sunlight or a heat source, or where there is a lot of moisture.
- Use only the included shaver charging adaptor RE3-88 to charge the ES7016 shaver.
- The supply cord of the charging adaptor cannot be replaced; if the cord is damaged, the entire charger should be discarded.
- Dry the shaver completely before setting it in the charging adaptor.
- Keep the charging adaptor away from water and handle it only with dry hands. Do not use an extension cord to connect the charging adaptor to an outlet.
- The shaver may not immediately begin to charge after being placed into the charging adaptor after use. Allow the shaver to sit in the charging adaptor for a few- minutes and check again to make sure that it is being charged.
- Do not place any metal objects like coins and paper clips on the charging adaptor as they will become warm.
-
Grip the plug when disconnecting the charging adaptor from a receptacle; tugging on the cord may damage it.
-
Store the charging adaptor and its cord set in a dry area where it will be protected from damage.
- The outer foil is very thin. If handled improperly, it can be easily damaged. To avoid personal injury, do not use the shaver if it has a damaged foil or inner blade.
- Wash the shaver in tap water. Do not use salt water or boiling water. Also, do not use cleaning products that are designed for toilets, bath rooms or kitchen appliances. Do not submerge the shaver for a long time.
- Do not wipe any part of the shaver with thinner, benzine or alcohol. Clean it by using a cloth dampened with soapy water.
- Do not take the housing apart as this can affect the watertight construction.
- If the shaver is not working properly, have it inspected at the place of purchase or an authorized service center.
Always use your shaver for its intended use, as described in this manual.
This product is intended for household use only.


Vor dem Gebrauch
HaMeHOBaHne y3IOB n DeTalei
(cm.pnc.1)
3aHTbIKoJNaOc
BHeuHra CeTKa CnCTeMbI
KhoNkOcBo6oJdeHnBHeuHcTeKn CNTeMbI
PamaДЛЯсТКI
BByTpeHHH HOX
ΦuKcaToppaMbI DnA CeTkn
ΦHKcaTop BbIKnIOuTaTeIa
HbiknouateIb"Bkn./BbIKn."
① CBetOBOu HNDKATOp NO3apRANK/CBeTOBOU HNDKATOp COCTOHN 3apKn
①Hoxhnhcbi
PcHnKn
DepXaTeIb 3apAnHoro yctpoiCTBa
3apnHoe yctpoNCTBO c aBtOMaTnuecknM TpaHcΦopMaTOpom Hnpanjxehn
NobopaunaBaemar onopa
UeTkaIJIYnCTKn
HacteHHbIKPOHHTeH
DopokhnyeXon
YkpenneHnHe HacteHHoro KpoHwTeHa
3apnHoe yctpoNCTBO MOXHO yKpeNTb Ha cTeHe C NMOUbIO uypyNoB.
- Пондимпе Дерхать 3ардногу устpoиства.(см. рс.1(A))
- BbIbePte COOTBeTCTByIOUeemecTo Ha cTeHe, Kyda MOryTBOITn Wpynbl.
- 3aKpEnnte KpoHtTeH na CteHe, KaK yKa3aHo Ha nnIIOCTpaunn, C NOMOsbU O wypynOB, y6eINBwncb, YTO CTpeNkA HAnpaBneHa BBepx.
4.ПюдвигаиTe KaHaBKn 3apHOrO yCTpoIcTBA B HAcTeHHbIKPOHHTeIN Do Tex


nop, noka oHO He 3aKpeNITc co UeJIyKom. (CM. pnc. 1 (B))
YTO6bI CHATb 3apAnHoe yCTpoiCTBO C HAcTeHHoro KpOHHTeHa, npOdBnHbTe 3apAnHoe yCTpoiCTBO BBepx.
3apnHoe yctpOcTBO
(cm.pnc.1)
Pn3apAKe 6pntBbl NOHMnTe depKaTeIb 3apAnHOrO yCTpoNCTBa do ueNka. (CM.pnc.1(A))
(BepHnTe depKaTeB 3apAnHOrO yctpOcTBa B nepBOHaayabHoe noJoxHeH, KOrJa nCNoJb3yTe 6pntBy). (CM.pnc.1(C))
Iobepnhtoe onopy 3apndoro yctpoicTBa,ecnn Tpe6yetcdoonHHTeJIbHaYcTouHBOCTb. (cm.pnc.1(D))
3apnka
(cm.pnc.2)
IomeCTte 3apJHoe yctpoiCTBO BepTKaJIbHO Ha poBHOI NOBepxHocTn IIN 3akpeNITE erO HcTeHe. POKJIouHTe 3apJHoe yctpoiCTBO K pO3eTke NepemEHOROToka.
OHO 6ydt aBtOMaTnUcKn prynpoBaTb HnprxHn ot 100-240 B.
B HeKOTopbIX perHOax, BO3MOxHNO, nOTpe6yeTc CneuaNbHbI nepeXoDNIK dNn NOkNIOueHEN K pOzETke nepemEHOro TOKa.
IpeKJIIOHTe 6pNTby Ha nO3nHIO, 06o3NaeHHyO "0" (noJoxKeHne 3apAKn), n NOMeCTnte ee BepTKaIbHO B 3apAHOe yCTpoiCTBO TaK, YTO6bl BBIKIOUaTeNb paONaRaJcH aHa
Ipeedne CTopoHe.
Ecnn 6pnTbna npaBnIbHo nOmeueHa B3apAHHoe yCTPOINCTBO,CBeTOBOH INDkaTOP COCTOAHN 3apAKN6yDet KpaChbIM.KoJaNoD3apAka3aKOHHTcR,OH CTAHET MIRaTb KpaChbIM (CM.pnc.2(A)).
BbMOXeTe NIOHOCTbIO 3apAaNTb6pNTBy B TeueHne OndHO YoACA,ecn CBETOBOn HNDKaTOp NO3apAaDN MInraet 3eNHeBIM (CM.pnc.2(B)).
Ponha 3apAka o6ecneuHT DocTaToUHyO 3HeprIO np6nnteIbHO n20 ceaHcoB 6pntb (Tpi MNHytba Ha 6pntbe npn HopMaIbHOM BOIOCAHOM NOKPOBE).
BbBCerda MoKTe XpaHHTb 6pNTBy B3aprHOM yCTPOINCTBE, YTO6bl NODepXNBaTb ee NOHOCTBIO 3apxKeHoi. 3ta moJeNb 6pNTBbl 3aunueHa OT n3bIToCHOH 3apJKN.
Ecnn Bbyye3kaete n He 6epeTe c co6oB 3apAHOe yCTpOINCTBO, NnHOCTbIO 3apAInTe 6pNTBy B TeueHne Ondoro Yaca.
IcnoJb3OBAHHe 6pntTbbi
HaKMTe qKcTOp BbIKIOuATEnI npoDBHbTe BbIKIOUaTeB BkI./ BbIK. BBepx, yTo6bl BKIOUHTb 6pNTBy. DepKNTe 6pNTby NOI npMIM yIOM K KOKe (90^) (CM. pnc.3). PnCtynaiTe K 6pNTbHO, OCTOPOXHO npIXmAM 6pNTby K InuCy. HATrNBaIte Koxy CBO6OHDHpyKOH n NpeMeMaHTe 6pNTBy B3aN BnpePeNo HAnpaBHeHIO BOLOCHoro NOKPOBa. No Mepe TOR, KaBaa KOKKa 6yDet PnBBkAtb K 6pNTBe,


BblMOKeTeOCTOPOXHOYCINNTb HaKIM Ha KOxy.136bIToUHbI HaKIMHaKOxyHeTpe6yETc,TaKa Ka 3TO He Daet yJyUWeHn KaueCTBa 6pntb.
CnCTema BHeWHeN CeTKn N NODbemHaH NpactHa
(cm.pnc.4)
CnCTema BHeHHe cETKn NMeet DnCKOBb Hox (a), 3akpeIeHHbIM MExdy DByMc cETKaMn (b). OHn DBnraOTc BBepx-BHN3 He3aBNCmO dpyr ot npya, CneDy OeepTaHnM Baewero Niua.
DnCKOBH HOK NERKO 3aXBaTbIbAeT n 06pe3aET 6OJIe DInHHbIe, npJlERaHOUne K LNUy BOIOcbl.
MOKporo6pntb
Hahecnte Tohkn Cnoi nebl dIg
6pntbHa IINO: 3Ta neHa 6ydet
BblIOJIHATb Cma3bIBaIOUyIO
fynKcuio. NeHa dIg 6pntbI -
Iyyuwe cpeCTBO B cpabHeHN C
MHOrnMn Dpyrnn (ReB, MblNo,
Kpem nT.d.). He HaHocnte neHy Ha
IINIO TOnCTbIM CNOEM, TAK KaK 3TO
MOKeT OTPnateJbHO Cka3aTbCn HA
3000ekTNBHOCTn paobtbl 6pntbbI.
Ecnn 6pntBHeHHa rOIOBka ByeTe3a6nTa NeHOn,TO DOCTaTOUHO npononoCKaTb ee NOKpaHOM.
IcNoJIb3OBAHnE HOXHnU
(cm.pnc.5)
IpoBnHbTe pyKu HOxNt BBePx Do NOJoxeHnOka OHa He 3aKpeNTcCo UeNkOM.
IomeCTNE HOXHNUBI NOIDPnRMbIM yrnom K KOKEHnpoDBURAHTe 6pNTBy BHN3, YTO6bi NOIDPOBHATB BuCKN/
6aKeH6apIbI.
Ynctka 6pntBbl
(cm.pnc.6)
B cIeJx rHnHeHb I o6cneeyHn yIO6CTBa NcNoJIb3OBAHN peKOMeHdyETc HcTNTb 6pNTBy BOOn I XnIKM MbIOM.
PeryIaHnA YnCTKa NOMOKeT NOIeepKnBaTb 6pNTby B XopoWem COcTOHnn, IpeDoTbpaaJr NORBJIeHne HENpNArTHbIX 3anaxOB INIb6aKTepn, a TaXke ObecneuT BbICOKyIO 3oPeKtNBHOCTb 6pNTb. He ChmMa BHeuHIO CetKy, HAMblTe ee MbJlOM.
BKnIOuHTe 6pNTby n npOMoITe BHeUHIO CEtky BOIo. PnpMepHO uepe3 10-20 cekyHbBikIOuHTe 6pNTby.
YdaJInte pamky cetkn n npomOnTe ee NOd npOTouHOBOJ.
Cyxon Tpnooyu danite Bnary C 6pnTbI n CHmnte 3aunTHbI KOJnaayok C TEM, YTOsbI BHeHra CETka NOHOCbIO BbICoxla.
OuNCTKa c NOMOuBIO
etkn
Coxmnte fKcTopb CnCTembl BHeHne CETKN ydaNTe CNCTemy BHeHne CETKN, NOHNB eB Bepx (cm. pnc. 7). Chmnte BHyTpeHHne HOXN, yBepeHHO 3axBaTbIBaN IN C DByX CTOpOH N BbITARNBaN IN 3 6pNTBbl (cm. pnc. 8). IpOuNCtNE BHeHIO CETKY, KOpYNc 6pNTBbl IN HOXHNUcI DInHHoC TcPOHOJ ΜeTKN. IpOuNCtNE BHyTpeHHne HOXN KOpOTKO CTOpOH ΜeTKN. He nCNoJIb3yNe KOpOTKY O ΜeTKY


Matsushita Electric Works, Ltd.
1048, Kadoma, Osaka 571-8686, Japan
No.1 EN, GR, FR, IT, NE, SP, DN, PO, NR, SW, FN, Po, Cz, Hu, Ru, Russi
Printed in China

- Wet/Dry Rechargeable Shaver
- Operating Instructions
- Index
- Parts identification
- How to use the wall mount
- Charging adaptor
- Charging
- Using your shaver
- System outer foil
- For wet shaving
- Using the trimmer
- Cleaning your shaver
- Brush cleaning
- Replacing shaving head components
- Replacing the system outer foil (see fig. 7)
- Replacing the inner blades (see fig. 8)
- For environmental protection and recycling of materials
- How to remove the built-in rechargeable battery(s) before disposal of the shaver (see fig. 10)
- Caution
- Vor dem Gebrauch
- HaMeHOBaHne y3IOB n DeTalei
- YkpenneHnHe HacteHHoro KpoHwTeHa
- 3apnHoe yctpOcTBO
- 3apnka
- IcnoJb3OBAHHe 6pntTbbi
- CnCTema BHeWHeN CeTKn N NODbemHaH NpactHa
- MOKporo6pntb
- IcNoJIb3OBAHnE HOXHnU
- Ynctka 6pntBbl
- OuNCTKa c NOMOuBIO
- etkn
Brand : PANASONIC
Model : ES7016
Category : Shaver