DSXA416BT - Car stereo SONY - Free user manual and instructions
Find the device manual for free DSXA416BT SONY in PDF.

User questions about DSXA416BT SONY
0 question about this device. Answer the ones you know or ask your own.
Ask a new question about this device
Download the instructions for your Car stereo in PDF format for free! Find your manual DSXA416BT - SONY and take your electronic device back in hand. On this page are published all the documents necessary for the use of your device. DSXA416BT by SONY.
USER MANUAL DSXA416BT SONY
FM/MW/LW Bluetooth® Car Audio
FM/MW/LW Bluetooth®
ABTOMOБильhoe Aудно
| Operating Instructions | GB |
| Bedienungsanleitung | DE |
| Mode d'emploi | FR |
| Istruzioni per l'uso | IT |
| Manual de instrucciones | ES |
| Инстукция по{$akropolitan | RU |
To cancel the demonstration (DEMO) display, see page 18.
For the connection/installation, see page 30.
HCTpyKuIN NO yCTaHOBKe/NoDKJIIOUeHNIO CM. Ha cTp. 36.

For safety, be sure to install this unit in the dashboard of the car as the rear side of the unit becomes hot during use. For details, see "Connection/Installation" (page 30).
Made in Thailand
The nameplate indicating operating voltage, etc., is located on the bottom of the chassis.
The validity of the CE marking is restricted to only those countries where it is legally enforced, mainly in the countries EEA (European Economic Area).
CE
Hereby, Sony Corporation declares that this equipment is in compliance with Directive 2014/53/EU.
The full text of the EU declaration of conformity is available at the following internet address:
http://www.compliance.sony.de/
Notice for customers: the following information is only applicable to equipment sold in countries applying EU Directives
This product has been manufactured by or on behalf of Sony Corporation. EU Importer: Sony Europe B.V.
Inquiries to the EU Importer or related to product compliance in Europe should be sent to the manufacturer's authorized representative, Sony Belgium, bijkantoor van Sony Europe B.V., Da Vincilaan 7-D1, 1930 Zaventem, Belgium.

Disposal of waste batteries and electrical and electronic equipment (applicable in the European Union and other countries with
separate collection systems)
This symbol on the product, the battery or on the packaging indicates that the product and the battery shall not be treated as household waste. On certain batteries this symbol might be used in combination with a chemical symbol. The chemical symbol for lead (Pb) is added if the battery contains more than 0.004% lead. By ensuring that these products and batteries are disposed of correctly, you will help to prevent potentially negative consequences for the environment and human health which could be caused by inappropriate waste handling. The recycling of the materials will help to conserve natural resources. In case of products that for safety, performance or data integrity reasons require a permanent connection with an incorporated battery, this battery should be replaced by qualified service staff only. To ensure that the battery and the electrical and electronic equipment will be treated properly, hand over these products at end-of-life to the appropriate collection point for the recycling of electrical and electronic equipment. For all other batteries, please view the section on how to remove the battery from the product safely. Hand the battery over to the appropriate collection point for the recycling of waste batteries. For more detailed information about recycling of this product or battery, please contact your local Civic Office, your household waste disposal service or the shop where you purchased the product or battery.
CAUTION
The following frequency 65 - 74 MHz range is not allocated to sound broadcasting in the European Common Allocations table and cannot be used in Europe.
Warning if your car's ignition has no ACC position
Be sure to set the AUTO OFF function (page 18). The unit will shut off completely and automatically in the set time after the unit is turned off and the clock is displayed (i.e. press and hold OFF for 1 second), which prevents battery drain. If you do not set the AUTO OFF function, press and hold OFF until the display disappears each time you turn the ignition off.
Disclaimer regarding services offered by third parties
Services offered by third parties may be changed, suspended, or terminated without prior notice. Sony does not bear any responsibility in these sorts of situations.
Important notice
Caution
IN NO EVENT SHALL SONY BE LIABLE FOR ANY INCIDENTAL, INDIRECT OR CONSEQUENTIAL DAMAGES OR OTHER DAMAGES INCLUDING, WITHOUT LIMITATION, LOSS OF PROFITS, LOSS OF REVENUE, LOSS OF DATA, LOSS OF USE OF THE PRODUCT OR ANY ASSOCIATED EQUIPMENT, DOWNTIME, AND PURCHASER'S TIME RELATED TO OR ARISING OUT OF THE USE OF THIS PRODUCT, ITS HARDWARE AND/OR ITS SOFTWARE.
Dear customer, this product includes a radio transmitter.
According to UNECE Regulation no. 10, a vehicle manufacturers may impose specific conditions for installation of radio transmitters into vehicles.
Please check your vehicle operation manual or contact the manufacturer of your vehicle or your vehicle dealer, before you install this product into your vehicle.
Emergency calls
This BLUETOOTH car handsfree and the electronic device connected to the handsfree operate using radio signals, cellular, and landline networks as well as user-programmed function, which cannot guarantee connection under all conditions. Therefore do not rely solely upon any electronic device for essential communications (such as medical emergencies).
On BLUETOOTH communication
- Microwaves emitting from a BLUETOOTH device may affect the operation of electronic medical devices. Turn off this unit and other BLUETOOTH devices in the following locations, as it may cause an accident.
- where inflammable gas is present, in a hospital, train, airplane, or petrol station
- near automatic doors or a fire alarm
- This unit supports security capabilities that comply with the BLUETOOTH standard to provide a secure connection when the BLUETOOTH wireless technology is used, but security may not be enough depending on the setting. Be careful when communicating using BLUETOOTH wireless technology.
- We do not take any responsibility for the leakage of information during BLUETOOTH communication.
If you have any questions or problems concerning your unit that are not covered in this manual, consult your nearest Sony dealer.
Table of Contents
Guide to Parts and Controls. 5
Getting Started
Detaching the Front Panel 6
Resetting the Unit. 7
Setting the Clock. 7
Preparing a BLUETOOTH Device 7
Connecting a USB Device. 9
Connecting Other Portable Audio Device 10
Listening to the Radio
Listening to the Radio 10
Using Radio Data System (RDS). 11
Playback
Playing a USB Device 12
Playing a BLUETOOTH Device 12
Searching and Playing Tracks 13
Handsfree Calling (via BLUETOOTH only)
Receiving a Call. 14
Making a Call. 14
Available Operations During Call 15
Useful Functions
Sony | Music Center with iPhone/Android™ Smartphone 16
Using Voice Recognition (Android Smartphone only). 17
Using Siri Eyes Free. 17
Settings
Canceling the DEMO Mode 18
Basic Setting Operation 18
General Setup (GENERAL) 18
Sound Setup (SOUND) 19
Display Setup (DISPLAY). 20
BLUETOOTH Setup (BLUETOOTH) 21
Sony | Music Center Setup (SONY APP) 21
Additional Information
Updating the Firmware 22
Precautions. 22
Maintenance. 23
Specifications 23
Troubleshooting 25
Messages 28
Connection/Installation
Cautions 30
Parts List for Installation 30
Connection 31
Installation 34
Guide to Parts and Controls
Main unit

1 Front panel release button
2 SRC (source)
Turn on the power.
Change the source.
OFF
Press and hold for 1 second to turn the source off and display the clock.
Press and hold for more than 2 seconds to turn off the power and the display.
3 Control dial
Rotate to adjust the volume.
PUSH ENTER
Enter the selected item.
Press SRC, rotate then press to change the source (timeout in 2 seconds).
MENU
Open the setup menu.
- VOICE (page 15, 17)
Press and hold for more than 2 seconds to activate voice dial, voice recognition (Android smartphone only), or the Siri function (iPhone only).
N-Mark
Touch the control dial with Android smartphone to make BLUETOOTH connection.
4 Display window
5 S E E K - / + )
Tune in radio stations automatically. Press and hold to tune manually.
1/prev/next)
( fast-reverse/fast-forward)
6 PTY (program type)
Select PTY in RDS.
Q (browse) (page 13)
Enter the browse mode during playback.
(Not available when a USB device in
Android mode or iPod is connected.)
7 CALL
Enter the call menu. Receive/end a call.
Press and hold for more than 2 seconds to switch the BLUETOOTH signal.
back)
Return to the previous display.
MODE (page 7, 10, 15)
Receptor for the remote commander
10 Number buttons (1 to 6)
Receive stored radio stations. Press and hold to store stations.
ALBUM ▼/▲
Skip an album for audio device. Press and hold to skip albums continuously.
Not available when a USB device in Android mode or iPod is connected.)
(repeat)
(Not available when a USB device in Android mode is connected.)
(shuffle)
(Not available when a USB device in Android mode is connected.)
MIC (page 15)
II (play/pause)
11 EXTRA BASS
Reinforce bass sound in synchronization with the volume level. Press to change the EXTRA BASS setting: [1], [2], [OFF].
12 AUX input jack
13 DSPL(display)
Press to change display items.
SCRL (scroll)
Press and hold to scroll a display item.
14 USB port
Getting Started
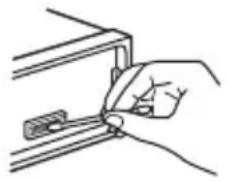
Detaching the Front Panel
You can detach the front panel of this unit to prevent theft.
1 Press and hold OFF ① until the unit turns off, press the front panel release button ②, then pull the panel towards you to remove.
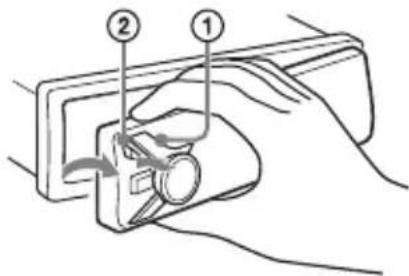
Caution alarm
If you turn the ignition switch to the OFF position without detaching the front panel, the caution alarm will sound for a few seconds. The alarm will only sound if the built-in amplifier is used.
Serial numbers
Make sure the serial numbers on the bottom of the unit and the back of the front panel are matched correctly. Otherwise you cannot make BLUETOOTH pairing, connection and disconnection by NFC.
Attaching the front panel

Resetting the Unit
Before operating the unit for the first time, after replacing the car battery, or changing the connections, you must reset the unit.
1 Press DSPL and (back)/MODE for more than 2 seconds.
Note
Resetting the unit will erase the clock setting and some stored contents.
Setting the area/region
After resetting the unit, the area/region setting display appears.
1 Press ENTER while [SET AREA] is displayed.
The area/region currently set appears.
2 Rotate the control dial to select [EUROPE] or [RUSSIA], then press it.
3 Rotate the control dial to select [YES] or [NO], then press it.
If the setting area/region is changed, the unit is reset, then the clock is displayed.
This setting can be configured in the general setup menu (page 18).
Setting the Clock
1 Press MENU, rotate the control dial to select [GENERAL], then press it.
2 Rotate the control dial to select [SET CLOCK-ADJ], then press it.
The hour indication flashes.
3 Rotate the control dial to set the hour and minute.
To move the digital indication, press
1/▶(SEEK-/+).
4 After setting the minute, press MENU.
The setup is complete and the clock starts.
To display the clock
Press DSPL.
Preparing a BLUETOOTH Device
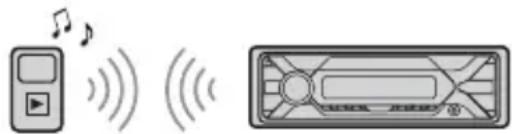
You can enjoy music, or perform handsfree calling depending on the BLUETOOTH compatible device such as a smartphone, cellular phone and audio device (hereafter "BLUETOOTH device" if not otherwise specified). For details on connecting, refer to the operating instructions supplied with the device.
Before connecting the device, turn down the volume of this unit; otherwise, loud sound may result.
Connecting with a Smartphone using One-touch connection (NFC)
By touching the control dial on the unit with an NFC* compatible smartphone, the unit is paired and connected with the smartphone automatically.
- NFC (Near Field Communication) is a technology enabling short-range wireless communication between various devices, such as mobile phones and IC tags. Thanks to the NFC function, data communication can be achieved easily just by touching the relevant symbol or designated location on NFC compatible devices.
For a smartphone with Android OS 4.0 or lower installed, downloading the app "NFC Easy Connect" available on Google Play is required. The app may not be downloadable in some countries/regions.
1 Activate the NFC function on the smartphone.
For details, refer to the operating instructions supplied with the smartphone.
2 Touch the N-Mark part of the unit with the N-Mark part of the smartphone.
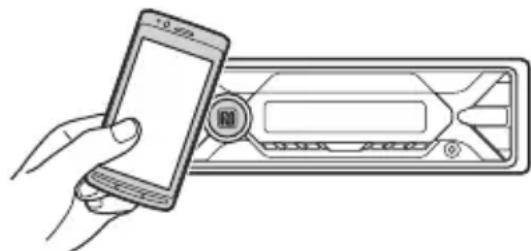
Make sure that rights up on the display of the unit.
To disconnect using NFC
Touch the N-Mark part of the unit with the N-Mark part of the smartphone again.
Notes
- When making the connection, handle the smartphone carefully to prevent scratches.
- One-touch connection is not possible when the unit is already connected to two NFC compatible devices. In this case, disconnect either device, and make connection with the smartphone again.
Pairing and connecting with a BLUETOOTH device
When connecting a BLUETOOTH device for the first time, mutual registration (called "pairing") is required. Pairing enables this unit and other devices to recognize each other. This unit can connect two BLUETOOTH devices (two cellular phones, or a cellular phone and an audio device).
1 Place the BLUETOOTH device within 1 m (3 ft) of this unit.
2 Press MENU, rotate the control dial to select [BLUETOOTH], then press it.
3 Rotate the control dial to select [SET PAIRING], then press it.
4 Rotate the control dial to select [SET DEVICE 1] or [SET DEVICE 2], then press it.
flashes while the unit is in pairing standby mode.
- [SET DEVICE 1] or [SET DEVICE 2] will be changed to the paired device name after pairing is complete.
5 Perform pairing on the BLUETOOTH device so it detects this unit.
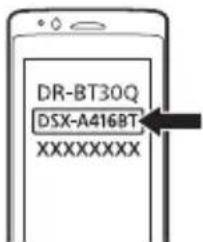
6 Select [DSX-A416BT] shown in the display of the BLUETOOTH device. If your model name does not appear, repeat from step 2.
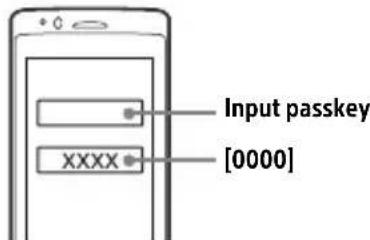
7 If passkey* input is required on the BLUETOOTH device, input [0000].
- Passkey may be called "Passcode," "PIN code," "PIN number" or "Password," etc., depending on the device.
When pairing is made, stays lit.
8 Select this unit on the BLUETOOTH device to establish the BLUETOOTH connection.
or rights up when the connection is made.
Note
While connecting to a BLUETOOTH device, this unit cannot be detected from another device. To enable detection, enter the pairing mode and search for this unit from another device.
To start playback
For details, see "Playing a BLUETOOTH Device" (page 12).
To disconnect the paired device
Perform steps 2 to 4 to disconnect after this unit and the BLUETOOTH device are paired.
Connecting with a paired BLUETOOTH device
To use a paired device, connection with this unit is required. Some paired devices will connect automatically.

1 Press MENU, rotate the control dial to select [BLUETOOTH], then press it.
2 Rotate the control dial to select [SET BT SIGNL], then press it.
Make sure that fights up.
3 Activate the BLUETOOTH function on the BLUETOOTH device.
4 Operate the BLUETOOTH device to connect to this unit.

or lights up.
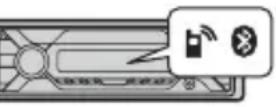
Icons in the display:
| Lights up when handsfree calling is available by enabling the HFP (Handsfree Profile). | |
| Lights up when the audio device is playable by enabling the A2DP (Advanced Audio Distribution Profile). |
To connect the last-connected device from this unit
Activate the BLUETOOTH function on the BLUETOOTH device.
To connect with the audio device, press SRC to select [BT AUDIO] and press (play/ pause).
To connect with the cellular phone, press CALL.
Note
While streaming BLUETOOTH audio, you cannot connect from this unit to the cellular phone. Connect from the cellular phone to this unit instead.
Tip
With BLUETOOTH signal on: when the ignition is turned to on, this unit reconnects automatically to the last-connected cellular phone.
To install the microphone
For details, see "Installing the microphone" (page 33).
Connecting with an iPhone/iPod (BLUETOOTH Auto Pairing)
When an iPhone/iPod with iOS5 or later installed is connected to the USB port, the unit is paired and connected with the iPhone/iPod automatically.
To enable BLUETOOTH Auto Pairing, make sure [SET AUTOPAIR] in [BLUETOOTH] is set to [ON] (page 21).
1 Activate the BLUETOOTH function on the iPhone/iPod.
2 Connect an iPhone/iPod to the USB port.
Make sure that lights up on the display of the unit.
Notes
- BLUETOOTH Auto Pairing is not possible if the unit is already connected to two BLUETOOTH devices. In this case, disconnect either device, then connect the iPhone/iPod again.
- If BLUETOOTH Auto Pairing is not established, see "Preparing a BLUETOOTH Device" (page 7).
Connecting a USB Device
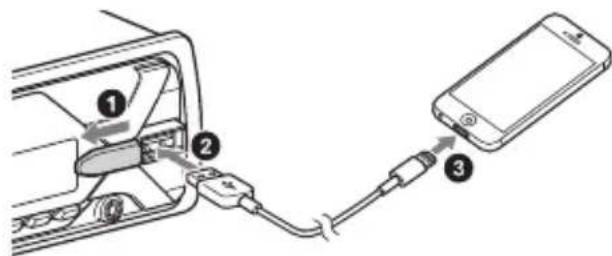
1 Turn down the volume on the unit.
2 Connect the USB device to the unit.
To connect an iPod/iPhone, use the USB connection cable for iPod (not supplied).

Connecting Other Portable Audio Device
1 Turn off the portable audio device.
2 Turn down the volume on the unit.
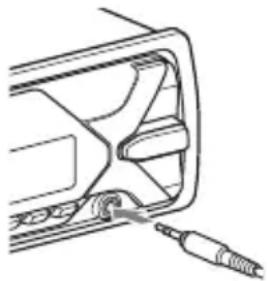
3 Connect the portable audio device to the AUX input jack (stereo mini jack) on the unit with a connecting cord (not supplied)*.
- Be sure to use a straight type plug.
4 Press SRC to select [AUX].
To match the volume level of the connected device to other sources
Start playback of the portable audio device at a moderate volume, and set your usual listening volume on the unit. Press MENU, then select [SOUND] [SET AUX VOL] (page 20).
Listening to the Radio
Listening to the Radio
To listen to the radio, press SRC to select [TUNER].
Storing automatically (BTM)
1 Press MODE to change the band (FM1, FM2, FM3, MW or LW).
2 Press MENU, rotate the control dial to select [GENERAL], then press it.
3 Rotate the control dial to select [SET BTM], then press it. The unit stores stations in order of frequency on the number buttons.
Tuning
1 Press MODE to change the band (FM1, FM2, FM3, MW or LW).
2 Perform tuning.
To tune manually
Press and hold 1 / > (SEEK-/+ to locate the approximate frequency, then press 1 / > (SEEK-/+ ) repeatedly to fine adjust to the desired frequency.
To tune automatically
Press / (SEEK-/+).
Scanning stops when the unit receives a station.
Storing manually
1 While receiving the station that you want to store, press and hold a number button (1 to 6) until [MEM] appears.
Receiving the stored stations
1 Select the band, then press a number button (1 to 6).
Using Radio Data System (RDS)
Setting alternative frequencies (AF) and traffic announcement (TA)
AF continuously retunes the station to the strongest signal in a network, and TA provides current traffic information or traffic programs (TP) if received.
1 Press MENU, rotate the control dial to select [GENERAL], then press it.
2 Rotate the control dial to select [SET AF/TA], then press it.
3 Rotate the control dial to select [SET AF-ON], [SET TA-ON], [SET AF/TA-ON] or [SET AF/TA-OFF], then press it.
To store RDS stations with the AF and TA setting
You can preset RDS stations along with an AF/TA setting. Set AF/TA, then store the station with BTM or manually. If you preset manually, you can also preset non-RDS stations.
To receive emergency announcements
With AF or TA on, emergency announcements will automatically interrupt the currently selected source.
To adjust the volume level during a traffic announcement
Level will be stored into memory for subsequent traffic announcements, independently from the regular volume level.
To stay with one regional program (REGIONAL)
When the AF and REGIONAL functions are on, you will not be switched to another regional station with a stronger frequency. If you leave this regional program's reception area, set [SET REGIONAL] in [GENERAL] to [SET REG-OFF] during FM reception (page 19).
This function does not work in the UK and some other areas.
Local Link function (UK only)
This function enables you to select other local stations in the area, even if they are not stored on your number buttons. During FM reception, press a number button (1 to 6) on which a local station is stored. Within 5 seconds, press again a number button of the local station. Repeat this procedure until the local station is received.
Selecting program types (PTY)
1 Press PTY during FM reception.
2 Rotate the control dial until the desired program type appears, then press it.
The unit starts to search for a station broadcasting the selected program type.
Type of programs
NEWS (News), AFFAIRS (Current Affairs), INFO (Information), SPORT (Sports), EDUCATE (Education), DRAMA (Drama), CULTURE (Culture), SCIENCE (Science), VARIORED (Varied), POP M (Pop Music), ROCK M (Rock Music), EASY M (M.O.R. Music), LIGHT M (Light classical), CLASSICS (Serious classical), OTHER M (Other Music), WEATHER (Weather), FINANCE (Finance), CHILDREN (Children's program), SOCIAL (Social Affairs), RELIGION (Religion), PHONE IN (Phone In), TRAVEL (Travel), LEISURE (Leisure), JAZZ (Jazz Music), COUNTRY (Country Music), NATION M (National Music), OLDIES (Oldies Music), FOLK M (Folk Music), DOCUMENT (Documentary)
Setting clock time (CT)
The CT data from the RDS transmission sets the clock.
1 Set [SET CT-ON] in [GENERAL] (page 19).
Playback
Playing a USB Device
In these Operating Instructions, "iPod" is used as a general reference for the iPod functions on an iPod and iPhone, unless otherwise specified by the text or illustrations.
For details on the compatibility of your iPod, see "About iPod" (page 22) or visit the support site on the back cover.
AOA (Android Open Accessory) 2.0, MSC (Mass Storage Class) and MTP (Media Transfer Protocol) type USB devices* compliant with the USB standard can be used. Depending on the USB device, the Android mode or MSC/MTP mode can be selected on the unit.
Some digital media players or Android smartphones may require setting to MTP mode.
- e.g., a USB flash drive, digital media player, Android smartphone
Notes
- For details on the compatibility of your USB device, visit the support site on the back cover.
- Smartphones with Android OS 4.1 or higher installed support Android Open Accessory 2.0 (AOA 2.0). However, some smartphones may not fully support AOA 2.0 even if Android OS 4.1 or higher is installed.
For details on the compatibility of your Android smartphone, visit the support site on the back cover.
- Playback of the following files is not supported. MP3/WMA/FLAC:
-copyright-protected files
- DRM (Digital Rights Management) files
-Multi-channel audio files MP3/WMA:
- lossless compression files
Before making a connection, select the USB mode (Android mode or MSC/MTP mode) depending on the USB device (page 19).
1 Connect a USB device to the USB port (page 9).
Playback starts.
If a device is already connected, to start playback, press SRC to select [USB] ([IPD] appears in the display when the iPod is recognized).
2 Adjust the volume on this unit.
To stop playback
Press and hold OFF for 1 second.
To remove the device
Stop playback, then remove the device.
Caution for iPhone
When you connect an iPhone via USB, phone call volume is controlled by the iPhone, not the unit. Do not inadvertently increase the volume on the unit during a call, as a sudden loud sound may result when the call ends.
Playing a BLUETOOTH Device
You can play contents on a connected device that supports BLUETOOTH A2DP (Advanced Audio Distribution Profile).
1 Make BLUETOOTH connection with the audio device (page 7).
To select the audio device, press MENU, then select [BLUETOOTH] [SET AUDIODEV] (page 21).
2 Press SRC to select [BT AUDIO].
3 Operate the audio device to start playback.
4 Adjust the volume on this unit.
Notes
- Depending on the audio device, information such as title, track number/time and playback status may not be displayed on this unit.
- Even if the source is changed on this unit, playback of the audio device does not stop.
- [BT AUDIO] does not appear in the display while running the "Sony | Music Center" application via the BLUETOOTH function.
To match the volume level of the BLUETOOTH device to other sources
Start playback of the BLUETOOTH audio device at a moderate volume, and set your usual listening volume on the unit. Press MENU, then select [SOUND] [SET BTA VOL] (page 20).
Searching and Playing Tracks
Repeat play and shuffle play
Not available when a USB device in Android mode is connected.
1 During playback, press (repeat) or (shuffle) repeatedly to select the desired play mode.
Playback in the selected play mode may take time to start.
Available play modes differ depending on the selected sound source.
Searching a track by name (QuickBrowZerTM)
Not available when a USB device in Android mode or iPod is connected.
1 During USB playback, press (browse)* to display the list of search categories. When the track list appears, press (back) repeatedly to display the desired search category.
- During USB playback, press (browse) for more than 2 seconds to directly return to the beginning of the category list.
2 Rotate the control dial to select the desired search category, then press it to confirm.
3 Repeat step 2 to search the desired track. Playback starts.
To exit the Quick-BrowZer mode
Press (browse).
Searching by skipping items (Jump mode)
Not available when a USB device in Android mode or iPod is connected.
1 During USB playback, press (browse).
2 Press (SEEK +).
3 Rotate the control dial to select the item.
The list is jumped in steps of 10% of the total number of items.
4 Press ENTER to return to the QuickBrowZer mode.
The selected item appears.
5 Rotate the control dial to select the desired item, then press it.
Playback starts.
Handsfree Calling (via BLUETOOTH only)
To use a cellular phone, connect it with this unit. You can connect two cellular phones to the unit. For details, see "Preparing a BLUETOOTH Device" (page 7).


Receiving a Call
1 Press CALL when a call is received with a ringtone.
The phone call starts.
Note
The ringtone and talker's voice are output only from the front speakers.
To reject the call
Press and hold OFF for 1 second.
To end the call
PressCALL again.
Making a Call
You can make a call from the phonebook or call history when a cellular phone supporting PBAP (Phone Book Access
Profile) is connected.
When two cellular phones are connected to the unit, select either phone.
From the phonebook
1 Press CALL.
When two cellular phones are connected to the unit, rotate the control dial to select either phone, then press it.
2 Rotate the control dial to select [PHONE BOOK], then press it.
3 Rotate the control dial to select an initial from the initial list, then press it.
4 Rotate the control dial to select a name from the name list, then press it.
5 Rotate the control dial to select a number from the number list, then press it.
The phone call starts.
From the call history
1 Press CALL.
When two cellular phones are connected to the unit, rotate the control dial to select either phone, then press it.
2 Rotate the control dial to select [RECENT CALL], then press it.
A list of the call history appears.
3 Rotate the control dial to select a name or phone number from the call history, then press it.
The phone call starts.
By phone number input
1 Press CALL.
When two cellular phones are connected to the unit, rotate the control dial to select either phone, then press it.
2 Rotate the control dial to select [DIAL NUMBER], then press it.
3 Rotate the control dial to enter the phone number, and lastly select [ ] (space), then press ENTER*.
The phone call starts.
- To move the digital indication, press I▶/▶I (SEEK -/+).
Note
[ ] appears instead of [#] on the display.
By redial
1 Press CALL.
When two cellular phones are connected to the unit, rotate the control dial to select either phone, then press it.
2 Rotate the control dial to select [REDIAL], then press it.
The phone call starts.
By voice tags
You can make a call by saying the voice tag stored in a connected cellular phone that has a voice dialing function.
1 Press CALL.
When two cellular phones are connected to the unit, rotate the control dial to select either phone, then press it.
2 Rotate the control dial to select [VOICE DIAL], then press it.
Alternatively, press and hold VOICE for more than 2 seconds.
3 Say the voice tag stored on the cellular phone.
Your voice is recognized, and the call is made.
To cancel voice dialing
Press VOICE.
Available Operations During Call
To adjust the ringtone volume
Rotate the control dial while receiving a call.
To adjust the talker's voice volume
Rotate the control dial during a call.
To adjust the volume for the other party (Mic gain adjustment)
Press MIC.
Adjustable volume levels: [MIC-LOW], [MIC-MID], [MIC-HI].
To reduce echo and noise (Echo Canceler/Noise Canceler Mode)
Press and hold MIC.
Settable mode: [EC/NC-1], [EC/NC-2].
To switch between handsfree mode and handheld mode
During a call, press MODE to switch the phone call audio between the unit and cellular phone.
Note
Depending on the cellular phone, this operation may not be available.
Useful Functions
Sony | Music Center with iPhone/Android™ Smartphone
Downloading the latest version of "Sony | Music Center" application is required from the App Store for iPhone or from available on Google Play for Android smartphone.
Notes
- For your safety, follow your local traffic laws and regulations, and do not operate the application while driving.
- "Sony | Music Center" is an app for controlling Sony audio devices which are compatible with "Sony | Music Center", by your iPhone/Android smartphone.
- What you can control with "Sony | Music Center" varies depending on the connected device.
To make use of "Sony | Music Center" features, see the details on your iPhone/Android smartphone. - For further details on "Sony | Music Center," visit the following URL: http://www.sony.net/smcqa/
- Visit the website below and check the compatible iPhone/Android smartphone models.
For iPhone: visit the App Store
For Android smartphone: visit Google Play
Establishing the Sony | Music Center connection
1 Make the BLUETOOTH connection with iPhone/Android smartphone (page 7).
To select the audio device, press MENU, then select [BLUETOOTH] [SET AUDIODEV] (page 21).
2 Launch the "Sony | Music Center" application.
3 Press MENU, rotate the control dial to select [SONY APP], then press it.
4 Rotate the control dial to select [CONNECT], then press it.
Connection to iPhone/Android smartphone starts.
For details on the operations on iPhone/Android smartphone, see the help of the application.
If the device number appears
Make sure that the number is displayed (e.g., 123456), then select [Yes] on the iPhone/Android smartphone.
To terminate connection
1 Press MENU, rotate the control dial to select [SONY APP], then press it.
2 Rotate the control dial to select [CONNECT], then press it.
Selecting the source or application
You can operate to select the desired source or application on iPhone/Android smartphone.
To select the source
Press SRC repeatedly. Alternatively, press SRC, rotate the control dial to select the desired source, then press ENTER.
To display the source list
Press SRC.
Announcement of SMS by voice guide (Android smartphone only)
Messages of SMS are automatically read out through the car speakers when they are received.
For details on settings, refer to the help of the application.
Replying a message of SMS (Android smartphone only)
You can reply a message by touching the reply icon.
1 Activate the "Sony | Music Center" application, then touch the [Reply] (reply) icon.
The message input display appears on the "Sony | Music Center" application.
2 Input a reply message by voice recognition. The list of message candidates appears on the "Sony | Music Center" application.
3 Rotate the control dial to select the desired message, then press it.
The message is sent out.
Making sound and display settings
You can adjust the settings relating to sound and display via iPhone/Android smartphone.
For details on settings, refer to the help of the application.
Using Voice Recognition (Android Smartphone only)
1 Press and hold VOICE to activate voice recognition.
2 Say the desired voice command into the microphone.
To deactivate voice recognition
Press VOICE.
Notes
- Voice recognition may not be available in some cases.
- Voice recognition may not work properly depending on the performance of the connected Android smartphone.
- Operate under conditions where noise such as engine sound is minimized during voice recognition.
Using Siri Eyes Free
Siri Eyes Free allows you to use an iPhone handsfree by simply speaking into the microphone. This function requires you to connect an iPhone to the unit via BLUETOOTH. Availability is limited to iPhone 4s or later. Make sure that your iPhone is running the latest iOS version. You must complete BLUETOOTH registration and connection configurations for the iPhone with the unit in advance. For details, see "Preparing a BLUETOOTH Device" (page 7). To select the iPhone, press MENU, then select [BLUETOOTH] [SET AUDIODEV] (page 21).
1 Activate the Siri function on the iPhone.
For details, refer to the operating instructions supplied with the iPhone.
2 Press and hold VOICE for more than 2 seconds.
The voice command display appears.
3 After the iPhone beeps, speak into the microphone.
The iPhone beeps again, then Siri starts responding.
To deactivate Siri Eyes Free
Press VOICE.
Notes
- The iPhone may not recognize your voice depending on usage conditions. (For example, if you are in a moving car.)
- Siri Eyes Free may not function properly, or the response time may lag in locations where iPhone signals are difficult to receive.
Depending on the iPhone's operating condition, Siri Eyes Free may not function properly, or may quit. - If you play a track with an iPhone using the BLUETOOTH audio connection, when the track starts playback via BLUETOOTH, Siri Eyes Free automatically quits and the unit switches to the BLUETOOTH audio source.
- When Siri Eyes Free is activated during audio playback, the unit may switch to the BLUETOOTH audio source even if you do not specify a track to play.
- When connecting the iPhone to the USB port, Siri Eyes Free may not function properly, or may quit.
- When connecting the iPhone to the unit via USB, do not activate Siri with the iPhone. Siri Eyes Free may not function properly, or may quit.
- There is no audio sound while Siri Eyes Free is activated.
Settings
Canceling the DEMO Mode
You can cancel the demonstration display which appears when the source is off and the clock is displayed.
1 Press MENU, rotate the control dial to select [GENERAL], then press it.
2 Rotate the control dial to select [SET DEMO], then press it.
3 Rotate the control dial to select [SET DEMO-OFF], then press it. The setting is complete.
4 Press (back) twice.
The display returns to normal reception/ play mode.
Basic Setting Operation
You can set items in the following setup categories:
General setup (GENERAL), Sound setup (SOUND), Display setup (DISPLAY), BLUETOOTH setup (BLUETOOTH), Sony | Music Center setup (SONY APP)
1 Press MENU.
2 Rotate the control dial to select the setup category, then press it. The items that can be set differ depending on the source and settings.
3 Rotate the control dial to select the options, then press it.
To return to the previous display
Press (back).
General Setup (GENERAL)
AREA (area)
Specifies the area/region to use this unit: [EUROPE], [RUSSIA].
If the area/region currently set is changed, this unit is reset, then the clock is displayed.
(Available only while the source is off and the clock is displayed.)
DEMO (demonstration)
Activates the demonstration: [ON], [OFF].
CLOCK-ADJ (clock adjust) (page 7)
CAUT ALM (caution alarm)
Activates the caution alarm: [ON], [OFF] (page 6).
(Available only while the source is off and the clock is displayed.)
BEEP (beep)
Activates the beep sound: [ON], [OFF].
AUTO OFF (auto off)
Shuts off automatically after a certain time when the unit is turned off and the clock is displayed (i.e. press and hold OFF for 1 second): [ON] (30 minutes), [OFF].
STEERING (steering)
Registers/resets the setting of the steering wheel remote control.
(Available only while the source is off and the clock is displayed.)
STR CONTROL (steering control)
Selects the input mode of the connected remote control. To prevent a malfunction, be sure to match the input mode with the connected remote control before use.
CUSTOM (custom)
Input mode for the steering wheel remote control
PRESET (preset)
Input mode for the wired remote control excluding the steering wheel remote control (Automatically selected when [RESET CUSTOM] is performed.)
EDIT CUSTOM (edit custom)
Registers the functions (SOURCE, ATT, VOL + / - , SEEK + / - VOICE, ON HOOK, OFF HOOK) to the steering wheel remote control:
1 Rotate the control dial to select the function you want to assign to the steering wheel remote control, then press it.
While [REGISTER] is blinking, press and hold the button on the steering wheel remote control you want to assign the function to. When registration is complete, [REGISTERED] is displayed.
3 To register other functions, repeat steps 1 and 2.
(Available only when [STR CONTROL] is set to [CUSTOM].)
RESET CUSTOM (reset custom)
Resetsthe setting of the steering wheel remote control: [YES], [NO].
(Available only when [STR CONTROL] is set to [CUSTOM].)
Notes
- While making settings, only button operation on the unit is available. For safety, park your car before making this setting.
- If an error occurs while registering, all the previously-registered information remains. Restart registration from the function where the error occurred.
- This function may not be available on some vehicles. For details on the compatibility of your vehicle, visit the support site on the back cover.
USB MODE (USB mode)
Changes the USB mode: [ANDROID], [MSC/MTP].
(Available only when the USB source is selected.)
CT (clock time)
Activates the CT function: [ON], [OFF].
AF/TA (alternative frequencies/traffic announcement)
Selects the alternative frequencies (AF) and traffic announcement (TA) setting: [AF-ON], [TA-ON], [AF/TA-ON], [AF/TA-OFF].
REGIONAL (regional)
Restricts reception to a specific region:
[ON], [OFF].
(Available only when FM is received.)
BTM (best tuning memory) (page 10)
(Available only when the tuner is selected.)
FIRMWARE (firmware)
(Available only while the source is off and the clock is displayed.)
Checks/updates the firmware version. For details, visit the support site on the back cover.
FW VERSION (firmware version)
Displays current firmware version.
FW UPDATE (firmware update)
Enters firmware update process: [YES], [NO].
Updating the firmware takes a few minutes to complete. During the update, do not turn the ignition to the OFF position, nor remove the USB device.
Sound Setup (SOUND)
This setup menu is not available when the source is off and the clock is displayed.
EQ10 PRESET (EQ10 preset)
Selects an equalizer curve from 10 equalizer curves or off:
[OFF], [R&B], [ROCK], [POP], [HIP-HOP], [EDM], [JAZZ], [SOUL], [COUNTRY], [KARAOKE]*, [CUSTOM].
The equalizer curve setting can be memorized for each source.
- [KARAOKE] reduces the vocal sound but cannot fully remove it during playback. Also, using a microphone is not supported.
EQ10 CUSTOM (EQ10 custom)
Sets [CUSTOM] of EQ10.
Setting the equalizer curve: [BAND1] - [BAND10] (32 Hz, 63 Hz, 125 Hz, 250 Hz, 500 Hz, 1 kHz, 2 kHz, 4 kHz, 8 kHz, 16 kHz).
The volume level is adjustable in 1 dB steps, from -6 dB to +6 dB.
BALANCE (balance)
Adjusts the sound balance: [RIGHT-15] - [CENTER] - [LEFT-15].
FADER (fader)
Adjusts the relative level: [FRONT-15] - [CENTER] - [REAR-15].
([ATT] is displayed at the lowest setting.)
Selects the subwoofer phase: [SUB NORM], [SUB REV].
LPF FREQ (low pass filter frequency)
Selects the subwoofer cut-off frequency:
[80Hz], [100Hz], [120Hz].
HPF FREQ (high pass filter frequency)
Selects the front/rear speaker cut-off frequency: [OFF], [80Hz], [100Hz], [120Hz].
AUX VOL (AUX volume level)
Adjusts the volume level for each connected auxiliary device: [+18dB] - [0 dB] - [-8 dB].
This setting negates the need to adjust the volume level between sources.
(Available only when the AUX is selected.)
BTA VOL (BLUETOOTH audio volume level)
Adjusts the volume level for each connected BLUETOOTH device: [+6dB] - [0 dB] - [-6 dB].
This setting negates the need to adjust the volume level between sources.
(Available only when the BT audio or application is selected.)
Display Setup (DISPLAY)
DIMMER (dimmer)
Changes the display brightness:
[OFF], [ON], [AT] (auto), [CLK] (clock).
([AT] is available only when the
illumination control lead is connected, and the head light is turned on.)
To set this function to be active only
during a fixed period, select [CLK], then set the start and end times.
- To set the brightness when the dimmer function is activated:
Set [DIMMER] to [ON], then adjust [BRIGHTNESS].
- To set the brightness when the dimmer function is deactivated:
Set [DIMMER] to [OFF], then adjust [BRIGHTNESS].
The brightness setting is stored and applied when the dimmer function is activated or deactivated.
BRIGHTNESS (brightness)
Adjusts the display brightness. The brightness level is adjustable: [1] - [10].
BUTTON-C (button color)
Sets a preset color or customized color for the buttons.
COLOR (color)
Selects from 15 preset colors, 1 customized color.
CUSTOM-C (custom color)
Registers a customized color for the buttons.
RGB RED, RGB GRN, RGB BLUE
Adjustable color range: [0] - [32] ([0]
cannot be set for all color ranges).
DSPL-C (display color)
Sets a preset color or customized color for the display.
COLOR (color)
Selects from 15 preset colors, 1 customized color.
CUSTOM-C (custom color)
Registers a customized color for the display.
RGB RED, RGB GRN, RGB BLUE
Adjustable color range: [0] - [32] ([0]
cannot be set for all color ranges).
SND SYNC (sound synchronization)
Activates the synchronization of the illumination with the sound: [ON], [OFF].
AUTO SCR (auto scroll)
Scrolls long items automatically: [ON], [OFF].
(Not available when the AUX or tuner is selected.)
BLUETOOTH Setup (BLUETOOTH)
PAIRING (pairing) (page 8) Connects up to two BLUETOOTH devices: [DEVICE 1], [DEVICE 2]. [DEVICE 1] or [DEVICE 2] will be changed to the paired device name after pairing is complete.
AUDIODEV (audio device)
Selects the audio device.
[+] appears on the device paired with [DEVICE 1] or the current A2DP compatible audio device.
RINGTONE (ringtone)
Selects whether this unit or the connected cellular phone outputs the ringtone: [1] (this unit), [2] (cellular phone).
AUTO ANS (auto answer) Sets this unit to answer an incoming call automatically: [OFF], [1] (about 3 seconds), [2] (about 10 seconds).
AUTOPAIR (auto pairing)
Starts BLUETOOTH pairing automatically when iOS device version 5.0 or later is connected via USB: [ON], [OFF].
BT SIGNL (BLUETOOTH signal) (page 8) Activates/deactivates the BLUETOOTH function.
BT INIT (BLUETOOTH initialize)
Initializes all the BLUETOOTH related settings (pairing information, device information, etc.): [YES], [NO].
When disposing the unit, initialize all the settings.
(Available only while the source is off and the clock is displayed.)
Sony | Music Center Setup (SONY APP)
AUTO LAUNCH (auto launch) Activates the "Sony | Music Center" auto launch: [ON], [OFF]. When [ON] is selected, "Sony | Music Center" will automatically connect after the BLUETOOTH connection is complete.
CONNECT (connect) Establish and terminate "Sony | Music Center" function (connection).
Additional Information
Updating the Firmware
To update the firmware, visit the support site on the back cover, then follow the online instructions.
Note
During the update, do not remove the USB device.
Precautions
- Do not leave the front panel or audio devices on the dashboard.
- When the unit is turned on, the power antenna (aerial) extends automatically.
- Do not splash liquid onto the unit.
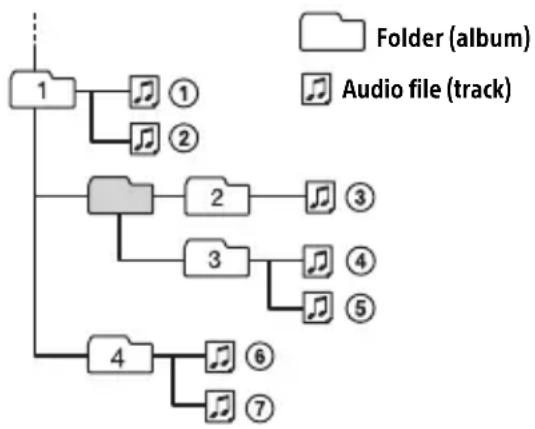
Playback order of audio files
About iPod
- You can connect to the following iPod models. Update your iPod devices to the latest software before use.
Compatible iPhone/iPod models
| Compatible Model | Bluetooth® | USB |
| iPhone X √ | √ | |
| iPhone 8 √ | √ | |
| iPhone 8 Plus √ | √ | |
| iPhone 7 √ | √ | |
| iPhone 7 Plus √ | √ | |
| iPhone SE √ | √ | |
| iPhone 6s √ | √ | |
| iPhone 6s Plus √ | √ | |
| iPhone 6 √ | √ | |
| iPhone 6 Plus √ | √ | |
| iPhone 5s √ | √ | |
| iPhone 5c √ | √ | |
| iPhone 5 √ | √ | |
| iPhone 4s √ | √ | |
| iPod touch (6th generation) | √ | √ |
| iPod touch (5th generation) | √ | √ |
| iPod nano (7th generation) | √ |
- Use of the Made for Apple badge means that an accessory has been designed to connect specifically to the Apple product(s) identified in the badge, and has been certified by the developer to meet Apple performance standards. Apple is not responsible for the operation of this device or its compliance with safety and regulatory standards.
Please note that the use of this accessory with an Apple product may affect wireless performance.
If you have any questions or problems concerning your unit that are not covered in this manual, consult your nearest Sony dealer.
Maintenance
Cleaning the connectors
Avoid touching the connectors directly. The unit may not function properly if the connectors between the unit and the front panel are not clean. In order to prevent this, detach the front panel (page 6) and clean the connectors with a cotton swab. Do not apply too much force. Otherwise, the connectors may be damaged.

Note
For safety, do not remove the front panel while driving.
Specifications
Tuner section
FM
Tuning range: When [AREA] is set to [EUROPE]: 87.5 MHz - 108.0 MHz When [AREA] is set to [RUSSIA]: FM1/FM2: 87.5 MHz - 108.0 MHz (at 50 kHz step) FM3:65 MHz - 74 MHz (at 30 kHz step) Usable sensitivity: 8 dBf Signal-to-noise ratio: 73 dB Separation: 50 dB at 1 kHz
MW/LW
Tuning range: MW: 531 kHz - 1,602 kHz LW: 153 kHz - 279 kHz Sensitivity: MW: 26 V, LW: 50 V
USB Player section
Interface: USB (Full-speed)
Maximum current: 1 A
Maximum number of recognizable folders and files:
-Folders (albums): 256
- Files (tracks) per folder: 256
Compatible Android Open Accessory protocol (AOA): 2.0
Corresponding codec:
MP3 (.mp3)
Bit rate: 8 kbps - 320 kbps (Supports VBR (Variable Bit Rate))
Sampling rate: 16 kHz - 48 kHz
WMA (.wma)
Bit rate: 32 kbps - 192 kbps (Supports VBR (Variable Bit Rate))
Sampling rate: 32 kHz, 44.1 kHz, 48 kHz
FLAC (.flac)
Bit depth: 16 bit, 24 bit
Sampling rate: 44.1 kHz, 48 kHz
Supported file system: FAT16, FAT32
Wireless Communication
Communication System: BLUETOOTH Standard version 3.0 Output: BLUETOOTH Standard Power Class 2 (Max. Conducted +1 dBm)
Maximum communication range: Line of sight approx. 10m (33 ft)*1
Frequency band:
2.4 GHz band
(2.4000 GHz - 2.4835 GHz)
Modulation method: FHSS
Compatible BLUETOOTH Profiles*
A2DP (Advanced Audio Distribution Profile) 1.3
AVRCP (Audio Video Remote Control Profile) 1.3
HFP (Handsfree Profile) 1.6
PBAP (Phone Book Access Profile)
SPP (Serial Port Profile)
Corresponding codec:
SBC (.sbc), AAC (.m4a)
1 The actual range will vary depending on factors such as obstacles between devices, magnetic fields around a microwave oven, static electricity, reception sensitivity, antenna (aerial)'s performance, operating system, software application, etc.
2 BLUETOOTH standard profiles indicate the purpose of BLUETOOTH communication between devices.
NFC Communication
Frequency band: 13.56 MHz
Power amplifier section
Output: Speaker outputs
Speaker impedance: 4 Ω - 8 Ω
Maximum power output: 55W× 4 (at 4
General
Power requirements: 12 V DC car battery (negative ground (earth))
Rated current consumption: 10 A
Dimensions:
Approx. 178mm× 50mm× 177mm
(7 1/8 in × 2 in × 7 in) (w/h/d)
Mounting dimensions:
Approx. 182mm× 53mm× 160mm
(7 1/4 in × 2 1/8 in × 6 5/16 in) (w/h/d)
Mass: Approx. 0.8kg (1 lb 13 oz)
Package contents:
Main unit (1)
Microphone (1)
Parts for installation and connections (1 set)
Ask the dealer for detailed information.
Design and specifications are subject to change without notice.
Copyrights
The Bluetooth® word mark and logos are registered trademarks owned by the Bluetooth SIG, Inc. and any use of such marks by Sony Corporation is under license. Other trademarks and trade names are those of their respective owners.
The N-Mark is a trademark or registered trademark of NFC Forum, Inc. in the United States and in other countries.
Windows Media is either a registered trademark or trademark of Microsoft Corporation in the United States and/or other countries.
This product is protected by certain intellectual property rights of Microsoft Corporation. Use or distribution of such technology outside of this product is prohibited without a license from Microsoft or an authorized Microsoft subsidiary.
Apple, iPhone, iPod, iPod nano, iPod touch, and Siri are trademarks of Apple Inc., registered in the U.S. and other countries. App Store is a service mark of Apple Inc.
IOS is a trademark or registered trademark of Cisco in the U.S. and other countries and is used under license.
Google, Google Play and Android are trademarks of Google LLC.
libFLAC
Copyright (C) 2000-2009 Josh Coalson
Copyright (C) 2011-2013 Xiph.Org Foundation
Redistribution and use in source and binary forms, with or without modification, are permitted provided that the following conditions are met:
- Redistributions of source code must retain the above copyright notice, this list of conditions and the following disclaimer.
- Redistributions in binary form must reproduce the above copyright notice, this list of conditions and the following disclaimer in the documentation and/or other materials provided with the distribution.
- Neither the name of the Xiph.org Foundation nor the names of its contributors may be used to endorse or promote products derived from this software without specific prior written permission.
THIS SOFTWARE IS PROVIDED BY THE COPYRIGHT HOLDERS AND COLNTRIBUTORS "AS IS" AND ANY EXPRESS OR IMPLIED WARRANTY, INCLUDING, BUT NOT LIMITED TO, THE IMPLIED WARRANTY OF MERCHANTABILITY AND FITNESS FOR A PARTICULAR PURPOSE ARE DISCLAIMED. IN NO EVENT SHALL THE
FOUNDATION OR CONTRIBUTORS BE LIABLE FOR ANY DIRECT, INDIRECT, INCIDENTAL, SPECIAL, EXEMPLARY, OR CONSEQUENTIAL DAMAGES (INCLUDING, BUT NOT LIMITED TO, PROCEDURE OF SUBSTITUTE GOODSOR SERVICES;LOSSOFUSE, DATA,OR PROFITS;OR BUSINESSINTERRUPTION) HOWEVER CAUSED AND ON ANY THEORY OF LIABILITY,WHETHERINCONTRACT,STRICT LIABILITY,OR TORT (INCLUDING NEGLIGENCEOR OTHERWISE)ARISING IN ANYWAY OUT OF THE USE OF THIS SOFTWARE,EVEN IF ADVISED OF THE POSSIBILITY OF SUCH DAMAGE.
Troubleshooting
The following checklist will help you remedy problems you may encounter with your unit. Before going through the checklist below, check the connection and operating procedures.
For details on using the fuse and removing the unit from the dashboard, see "Connection/Installation" (page 30). If the problem is not solved, visit the support site on the back cover.
General
No sound or the sound is very low.
The position of the fader control [FADER] is not set for a 2-speaker system.
The volume of the unit and/or connected device is very low.
- Increase the volume of the unit and connected device.
No beep sound.
An optional power amplifier is connected and you are not using the built-in amplifier.
Stored stations and correct time are erased.
The fuse has blown. Makes a noise when the position of the ignition is switched.
The leads are not matched correctly with the car's accessory power connector.
During playback or reception, the demonstration mode starts.
If no operation is performed for 5 minutes with [DEMO-ON] set, the demonstration mode starts.
- Set [DEMO-OFF] (page 18).
The display disappears from/does not appear in the display window.
The connectors are dirty (page 23).
The display/illumination flashes.
The power supply is not sufficient. Check that the car battery supplies enough power to the unit. (The power requirement is 12 V DC.)
The operation buttons do not function.
Press DSPL and back)/MODE for more than 2 seconds to reset the unit. The contents stored in memory are erased.
Radio reception
The radio reception is poor. Static noise occurs.
Connect the antenna (aerial) firmly.
65 MHz to 74 MHz in FM3 cannot be tuned in.
[AREA] is set to [EUROPE]. - Set [AREA] to [RUSSIA] (page 18).
RDS
RDS services cannot be received (when [AREA] is set to [RUSSIA]).
FM3 is selected. -Select FM1 or FM2.
RDS services are unavailable in the current region.
The SEEK starts after a few seconds of listening.
The station is non-TP or has weak signal. -Deactivate TA (page 11).
No traffic announcements.
Activate TA (page 11).
The station does not broadcast any traffic announcements despite being TP. -Tune in another station.
PTY displays [- - - -]
The current station is not an RDS station, or the radio reception is poor.
Program service name flashes.
There is no alternative frequency for the current station.
- Press / (SEEK -/+ ) while the program service name is flashing. [PI SEEK] appears and the unit starts searching for another frequency with the same PI (program identification) data.
USB device playback
A USB device takes longer to play.
The USB device contains files with a complicated tree structure.
The audio file cannot be played.
For details on supported formats, see "Specifications" (page 23). If the audio file still cannot be played, refer to the operating instructions supplied with the USB device, or contact the manufacturer of the USB device.
Operations for skipping an album, skipping items (Jump mode), and searching a track by name (QuickBrowZer) cannot be performed.
Set [USB MODE] to [MSC/MTP] (page 19).
The sound cannot be output during playback in Android mode.
Check the status of the audio playback application on the Android smartphone.
NFC function
One-touch connection (NFC) is not possible.
If the smartphone does not respond to the touching.
- Check that the NFC function of the smartphone is turned on.
- Move the N-Mark part of the smartphone closer to the N-Mark part on this unit.
- If the smartphone is in a case, remove it.
NFC receiving sensitivity depends on the device.
If One-touch connection with the smartphone fails several times, make BLUETOOTH connection manually.
BLUETOOTH function
The connecting device cannot detect this unit.
Before the pairing is made, set this unit to pairing standby mode.
While connected to two BLUETOOTH devices, this unit cannot be detected from another device.
- Disconnect either connection and search for this unit from another device.
When the device pairing is made, set the BLUETOOTH signal output to on (page 8).
Connection is not possible.
The connection is controlled from one side (this unit or BLUETOOTH device), but not both.
- Connect to this unit from a BLUETOOTH device or vice versa.
The name of the detected device does not appear.
Depending on the status of the other device, it may not be possible to obtain the name.
No ringtone.
Adjust the volume by rotating the control dial while receiving a call.
Depending on the connecting device, the ringtone may not be sent properly. - Set [RINGTONE] to [1] (page 21).
The front speakers are not connected to the unit.
- Connect the front speakers to the unit. The ringtone is output only from the front speakers.
The talker's voice cannot be heard.
The front speakers are not connected to the unit.
- Connect the front speakers to the unit. The talker's voice is output only from the front speakers.
A call partner says that the volume is too low or high.
Adjust the volume accordingly using Mic gain adjustment (page 15).
Echo or noise occurs in phone call conversations.
Lower the volume.
Set EC/NC Mode to [EC/NC-1] or [EC/NC-2] (page 15).
If the ambient noise other than the phone call sound is loud, try reducing this noise. E.g.: If a window is open and road noise, etc., is loud, shut the window. If an air conditioner is loud, lower the air conditioner.
The phone is not connected.
When BLUETOOTH audio is played, the phone is not connected even if you press CALL.
- Connect from the phone.
The phone sound quality is poor.
Phone sound quality depends on reception conditions of cellular phone.
- Move your car to a place where you can enhance the cellular phone's signal if the reception is poor.
The volume of the connected audio device is low (high).
Volume level will differ depending on the audio device.
- Adjust the volume of the connected audio device or this unit (page 20).
The sound skips during playback of a BLUETOOTH audio device.
Reduce the distance between the unit and the BLUETOOTH audio device.
If the BLUETOOTH audio device is stored in a case which interrupts the signal, remove the audio device from the case during use.
Several BLUETOOTH devices or other devices which emit radio waves are in use nearby.
- Turn off the other devices.
- Increase the distance from the other devices.
The playback sound stops momentarily when the connection between this unit and the cellular phone is being made. This is not a malfunction.
The connected BLUETOOTH audio device cannot be controlled.
Check that the connected BLUETOOTH audio device supports AVRCP.
Some functions do not work.
Check if the connecting device supports the functions in question.
A call is answered unintentionally.
The connecting phone is set to answer a call automatically.
Pairing failed due to a timeout.
Depending on the connecting device, the time limit for pairing may be short.
- Try completing the pairing within the time.
BLUETOOTH function cannot operate.
Turn off the unit by pressing OFF for more than 2 seconds, then turn the unit on again.
No sound is output from the car speakers during handsfree call.
If the sound is output from the cellular phone, set the cellular phone to output the sound from the car speakers.
Siri Eyes Free is not activated.
Perform the handsfree registration for an iPhone that supports Siri Eyes Free.
Set the Siri function on the iPhone to on.
Cancel the BLUETOOTH connection with the iPhone and the unit, and reconnect.
Sony | Music Center operation
Application name is mismatched with the actual application in "Sony | Music Center".
Launch the application again from the "Sony | Music Center" application.
While running the "Sony | Music Center" application via BLUETOOTH, the display automatically switches to [BT AUDIO].
The "Sony | Music Center" application on BLUETOOTH function has failed.
Run the application again.
The "Sony | Music Center" application is automatically disconnected when the display switches to [IPD].
The "Sony | Music Center" application on iPhone/iPod does not support iPod playback.
- Change the source of the unit to other than [IPD], then establish the "Sony | Music Center" connection (page 16).
The "Sony | Music Center" connection is automatically disconnected when the USB mode of the unit is changed to [ANDROID].
The Android smartphone is not supporting playback in Android mode. - Set the USB mode of the unit to [MSC/ MTP], then establish the "Sony | Music Center" connection (page 16).
Messages
The following messages may appear or flash during operation.
INVALID
The selected operation could be invalid.
[USB MODE] cannot be changed during iPod playback.
READ
Wait until reading is complete and playback starts automatically. This may take some time depending on the file organization.
(underscore): The character cannot be displayed.
For USB device playback:
HUB NO SUPRT: USB hubs are not supported.
IPD STOP: iPod playback has finished.
Operateryour iPod/iPhone to start playback.
NOT SUPPORT -Android MODE
A USB device not supporting AOA (Android Open Accessory) 2.0 is connected to the unit while [USB MODE] is set to [ANDROID]. - Set [USB MODE] to [MSC/MTP] (page 19).
USB ERROR
Connect the USB device again.
USB NO DEV
Make sure the USB device or USB cable is securely connected.
USB NO MUSIC
Connect a USB device containing playable files (page 23).
USB NO SUPRT
For details on the compatibility of your USB device, visit the support site on the back cover.
OVERLOAD: The USB device is overloaded.
Disconnect the USB device, then press SRC to select another source.
The USB device has a fault, or an unsupported device is connected.
For RDS operation:
NO AF: No alternative frequencies.
Press 144 / 10 (SEEK-/+)while the program service name is flashing. The unit starts searching for another frequency with the same PI (program identification) data ([PI SEEK] appears).
NO PI: No program identification. The selected station has no PI (program identification) data.
Select another station.
NO TP: No traffic programs.
The unit will continue searching for available TP stations.
For BLUETOOTH function:
BTANODEV:TheBLUETOOTHdeviceisnotconnected orrecognized.
Make sure the BLUETOOTH device is securely connected, or the BLUETOOTH connection is established with the BLUETOOTH device.
ERROR: The selected operation could not be performed.
Wait for a while, then try again.
UNKNOWN: A name or phone number cannot be displayed.
WITHHIELD: The phone number is hidden by the caller.
For Sony | Music Center operation:
APP: A connection with the application is not established.
Make the "Sony | Music Center" connection again (page 16).
APP DISCNCT: The application is disconnected.
Make the "Sony | Music Center" connection (page 16).
APP DISPLAY: A screen setting display of the application is open.
Exit the screen setting display of the application to enable button operation.
APP LIST: The contents list of the USB is open.
Exit the list of the application to enable button operation.
APP MENU: A setting display of the application is open.
Exit the setting display of the application to enable button operation.
APP NO DEV: The device with the application installed is not connected or recognized.
Make the BLUETOOTH connection and establish the "Sony | Music Center" connection again (page 16).
APP SOUND: A sound setting display of the application is open.
Exit the sound setting display of the application to enable button operation.
OPEN APP: The "Sony | Music Center" application is not running.
Launch the application.
For steering wheel remote control operation:
ERROR
Register again from the function where the error occurred (page 19).
TIMEOUT
Try completing the registration while [REGISTER] is blinking (about 6 seconds) (page 19).
For firmware update operation:
FILE ERROR: The updater is not stored in the USB device.
Store the updater in the USB device, then try again (page 22).
UPDATE ERROR PRESS ENTER: Firmware update is not completed properly.
Press ENTER to clear the message, then try again.
During the update, do not turn the ignition to the OFF position, nor remove the USB device (page 22).
If these solutions do not help improve the situation, consult your nearest Sony dealer. If you take the unit to be repaired because of device playback trouble, bring the device that was used at the time the problem began.
Connection/Installation
Cautions
- Run all ground (earth) leads to a common ground (earth) point.
- Do not get the leads trapped under a screw, or caught in moving parts (e.g., seat railing).
- Before making connections, turn the car ignition off to avoid short circuits.
- Connect the power supply lead ⑥ to the unit and speakers before connecting it to the auxiliary power connector.
- Be sure to insulate any loose unconnected leads with electrical tape for safety.
Precautions
- Choose the installation location carefully so that the unit will not interfere with normal driving operations.
- Avoid installing the unit in areas subject to dust, dirt, excessive vibration, or high temperature, such as in direct sunlight or near heater ducts.
- Use only the supplied mounting hardware for a safe and secure installation.
Note on the power supply lead (yellow) When connecting this unit in combination with other stereo components, the amperage rating of the car circuit to which the unit is connected must be higher than the sum of each component's fuse amperage rating.
Mounting angle adjustment Adjust the mounting angle to less than 30^
Parts List for Installation
(1)
(2)
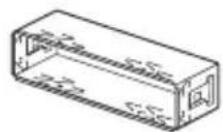

(3)
(4)


(5)
6


7
⑧


This parts list does not include all the package contents.
- The bracket ① and the protection collar ③ are attached to the unit before shipping. Before mounting the unit, use the release keys ② to remove the bracket ① from the unit. For details, see "Removing the protection collar and the bracket" (page 34).
- Keep the release keys ② for future use as they are also necessary if you remove the unit from your car.
Connection
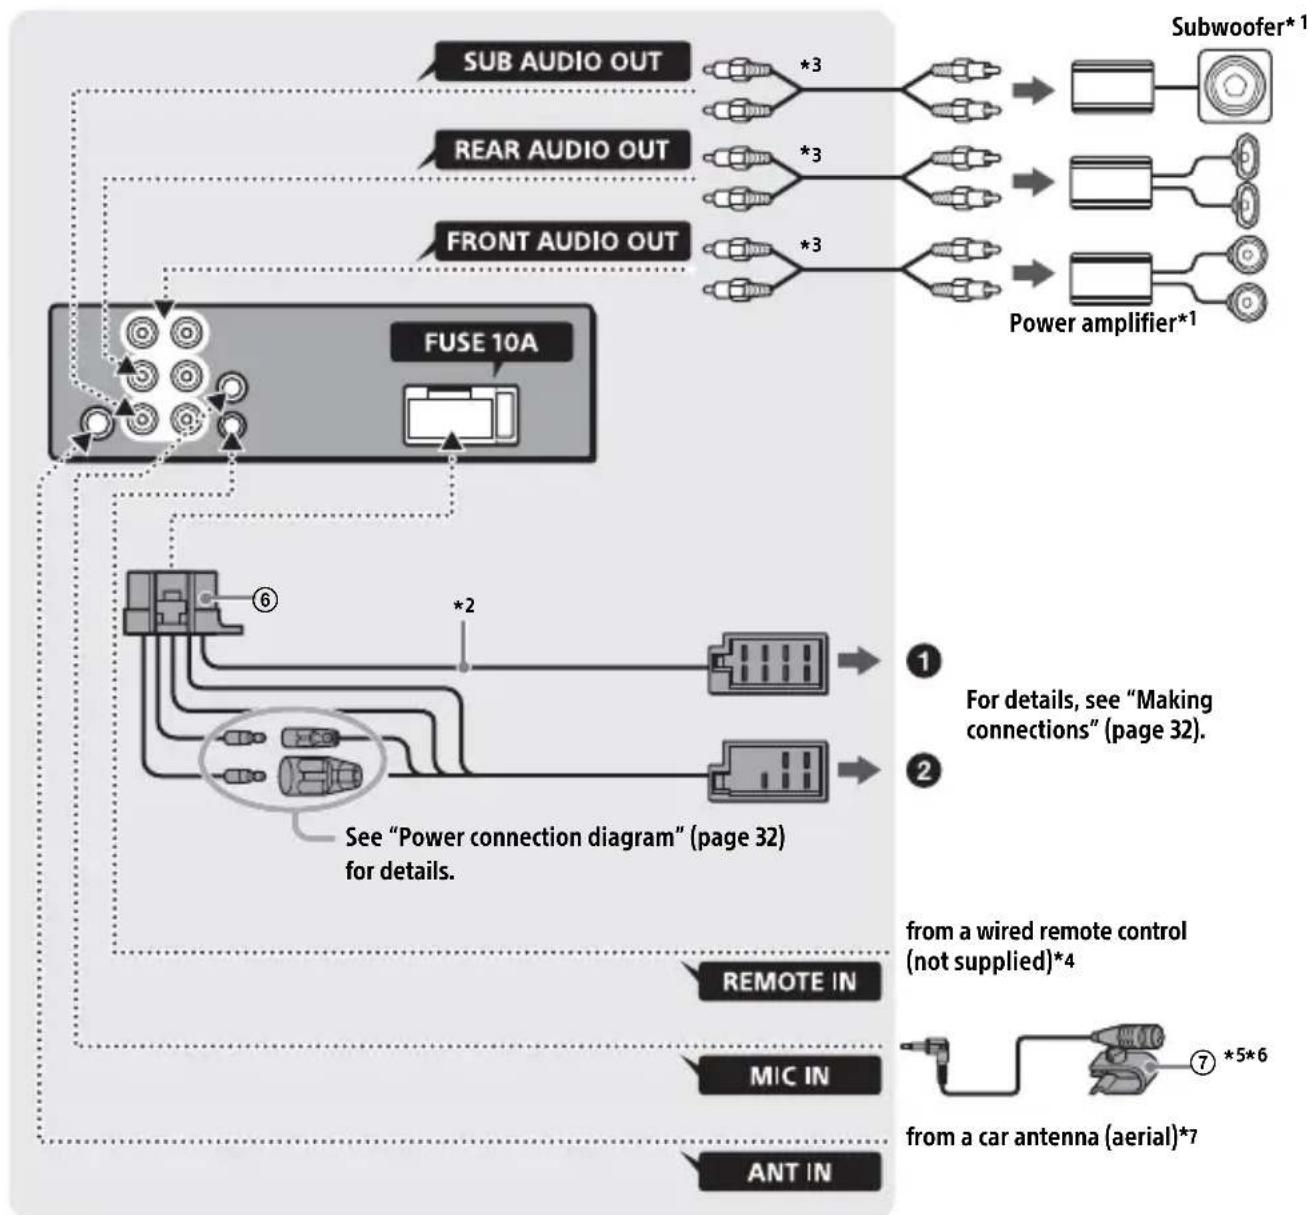
1 Not supplied
2 Speaker impedance: 4 - 8 × 4
3 RCA pin cord (not supplied)
4 Depending on the type of car, use an adaptor for a wired remote control (not supplied). For details on using the wired remote control, see "Using the wired remote control" (page 33).
5 Whether in use or not, route the microphone input cord such that it does not interfere with driving operations. Secure the cord with a clamp, etc., if it is installed around your feet.
6 For details on installing the microphone, see "Installing the microphone" (page 33).
*7 Depending on the type of car, use an adaptor (not supplied) if the antenna (aerial) connector does not fit.
Making connections
If you have a power antenna (aerial) without a relay box, connecting this unit with the supplied power supply lead ⑥ may damage the antenna (aerial).
To the car's speaker connector
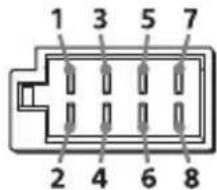
| 1 | Rear speaker (right) | ⊕ | Purple |
| 2 | Purple/black striped | ||
| 3 | Front speaker (right) | ⊕ | Gray |
| 4 | Gray/black striped | ||
| 5 | Front speaker (left) | ⊕ | White |
| 6 | White/black striped | ||
| 7 | Rear speaker (left) | ⊕ | Green |
| 8 | Green/black striped |
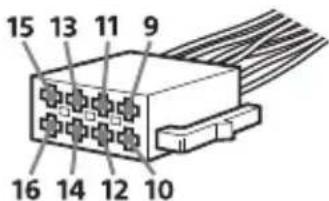
To the car's power connector
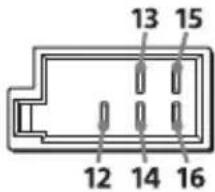
| 12 | continuous power supply | Yellow |
| 13 | power antenna (aerial) /power amplifier control (REM OUT) | Blue/white striped |
| 14 | switched illumination power supply | Orange/ white striped |
| 15 | switched power supply | Red |
| 16 | ground (earth) Black |
Subwoofer Easy Connection
You can use a subwoofer without a power amplifier when it is connected to a rear speaker cord.
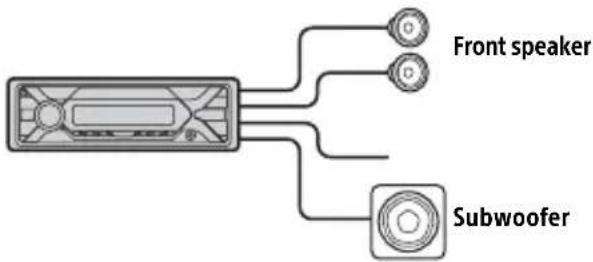
Notes
- Preparation of the rear speaker cords is required.
- Use a subwoofer with an impedance of 4 Ω to 8 Ω and with adequate power handling capacities to avoid damage.
Memory hold connection
When the yellow power supply lead is connected, power will always be supplied to the memory circuit even when the ignition switch is turned off.
Speaker connection
Before connecting the speakers, turn the unit off.
- Use speakers with an impedance of 4 to 8 , and with adequate power handling capacities to avoid damage.
Power connection diagram
Check your car's auxiliary power connector, and match the connections of cords correctly depending on the car.
Auxiliary power connector
Common connection

Yellow Yellow
| 12 | continuous power supply | Yellow |
| 15 | switched power supply Red |
When the positions of the red and yellow leads are inverted
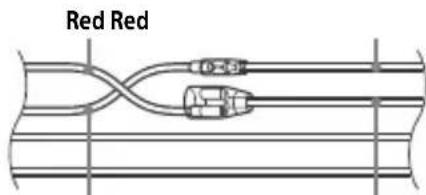
Yellow Yellow
| 12 | switched power supply Yellow | |
| 15 | continuous power supply | Red |
When the car without ACC position

Yellow
Yellow
After matching the connections and switching power supply leads correctly, connect the unit to the car's power supply. If you have any questions and problems connecting your unit that are not covered in this manual, consult the car dealer.
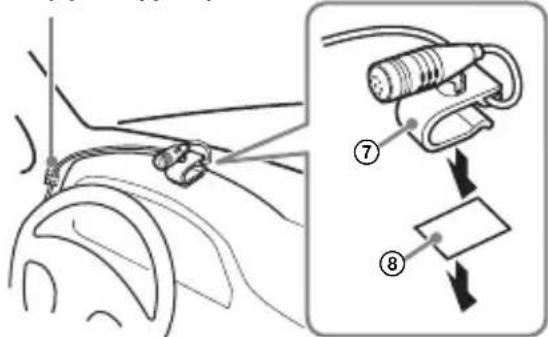
Installing the microphone
To capture your voice during handsfree calling, you need to install the microphone ⑦.
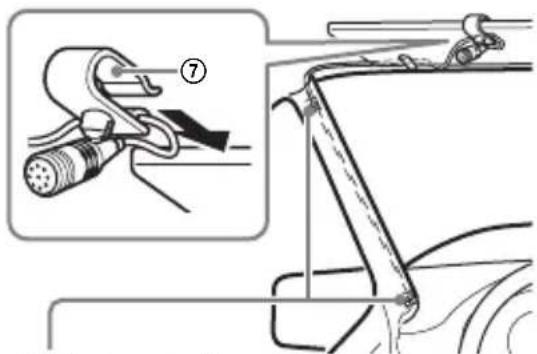
Clip (not supplied)
Cautions
It is extremely dangerous if the cord becomes wound around the steering column or gearstick. Be sure to keep it and other parts from interfering with your driving operations.
- If airbags or any other shock-absorbing equipment is in your car, contact the store where you purchased this unit, or the car dealer, before installation.
Note
Before attaching the double-sided tape ⑧ , clean the surface of the dashboard with a dry cloth.
Using the wired remote control
1 To enable the wired remote control, set [STR CONTROL] in [SET STEERING] to [PRESET] (page 18).
Installation
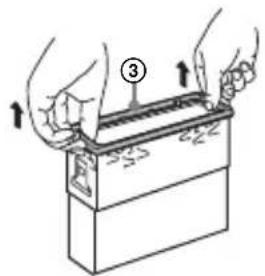
Removing the protection collar and the bracket
Before installing the unit, remove the protection collar ③ and the bracket ① from the unit.
1 Pinch both edges of the protection collar ③, then pull it out.
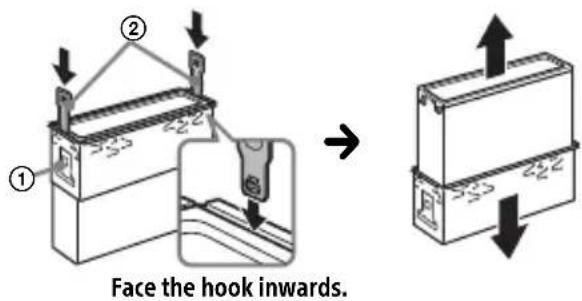
2 Insert both release keys ② until they click, and pull down the bracket ①, then pull up the unit to separate.
Mounting the unit in the dashboard
Before installing, make sure the catches on both sides of the bracket ① are bent inwards 2mm (3/32 in).
1 Position the bracket ① inside the dashboard, then bend the claws outward for a tight fit.
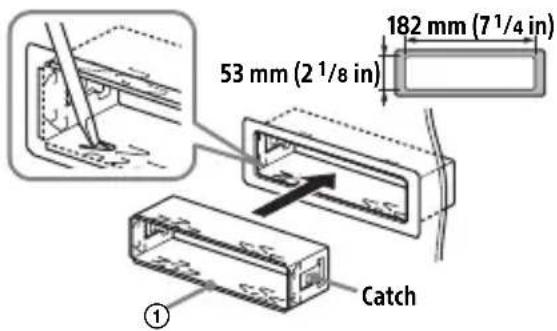
2 Mount the unit onto the bracket ①, then attach the protection collar ③.

Notes
- If the catches are straight or bent outwards, the unit will not be installed securely and may spring out.
Make sure the 4 catches on the protection collar ③ are properly engaged in the slots of the unit.
Detaching and attaching the front panel
For details, see "Detaching the Front Panel" (page 6).
Resetting the unit
For details, see "Resetting the Unit" (page 7).
Fuse replacement
When replacing the fuse,
be sure to use one
matching the amperage
rating stated on the
original fuse. If the fuse
blows, check the power
connection and replace the
fuse. If the fuse blows again after
replacement, there may be an internal
malfunction. In such a case, consult your
nearest Sony dealer.
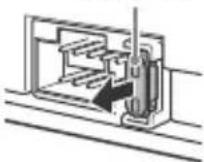
Fuse (10 A)
FW VERSION (Firmwareversion)
Abstrate: 16 kHz - 48 kHz
WMA (.wma)
Bitrate: 32 Kbps - 192 Kbps (Unterstutz VBR (variable Bitrate))
Abtastrate: 32 kHz, 44,1 kHz, 48 kHz
FLAC(.flac)
Raccordement/Installation
Attention. 34
La lecture commence.
DEMO (demonstration)
Permet d'activer la démonstration : [ON], [OFF].
EDIT CUSTOM (modifier personnalisation)
[OFF], [R&B], [ROCK], [POP], [HIP-HOP],
[EDM], [JAZZ], [SOUL], [COUNTRY], [KARAOKE]*, [CUSTOM].
[BAND1] - [BAND10] (32 Hz, 63 Hz, 125 Hz, 250 Hz, 500 Hz, 1 kHz, 2 kHz, 4 kHz, 8 kHz, 16 kHz).
Raccordement/Installation
Attention
[OFF], [R&B], [ROCK], [POP], [HIP-HOP], [EDM], [JAZZ], [SOUL], [COUNTRY], [KARAOKE]*, [CUSTOM].
AVRCP (Audio Video Remote Control Profile) 1.3
HFP (Handsfree Profile) 1.6
PBAP (Phone Book Access Profile)
SPP (Serial Port Profile)
Codec correspondenti: SBC (.sbc), AAC (.m4a)
[OFF], [R&B], [ROCK], [POP], [HIP-HOP],
[EDM], [JAZZ], [SOUL], [COUNTRY],
[KARAOKE]*, [CUSTOM].
[BAND1] - [BAND10] (32 Hz, 63 Hz, 125 Hz, 250 Hz, 500 Hz, 1 kHz, 2 kHz, 4 kHz, 8 kHz, 16 kHz).
Según el estado del(other dispositivo,SEO,SEO,SEO,SEO,SEO,SEO,SEO,SEO,SEO,SEO,SEO,SEO,SEO,SEO,SEO,SEO,SEO,SEO,SEO,SEO,SEO,SEO,SEO,SEO,SEO,SEO,SEO,SEO,SEO,SEO,SEO,SEO,SEO,SEO,SEO,SEO,SEO,SEO,SEO,SEO,SEO,SEO,SEO,SEO,SEO,SEO,SEO,SEO,SEO,SEO, SEO, SEO, SEO, SEO, SEO, SEO, SEO, SEO, SEO, SEO, SEO, SEO, SEO, SEO, SEO, SEO, SEO, SEO, SEO, SEO, SEO, SEO, SEO, SEO, SEO, SEO, SEO, SEO
Cpok xpaHeHn He yCTaHOBneH.

YTNIN3aunna NCNOJb3OBaHHbIX 3JeMeHTOB NITAHnI OTCnyKbWeRo 3JeKtpnueckoroN
3JIeKToHOrO O6OpUdoBaHnA (DInpeKtNbA npImeHmAb CtpaHax Ebpoco03a n Dpynx CtpaHax, rDe DeiCTByIOT CNCTeMbI pa3dJeBHorO c6opa OTXODOB)
IpeDynpexKdHne dJa clyuAeB, KOrda B 3aMKe 3aXnraHnHa Het noLoXkeHnA CC
Y6eHNTecb, yTO HAcTpoEHa FyHKcua AUTO OFF (ctp. 21). YCTPOIcTBIO NOJIHOCTbIO OTKJIIOUHTcA ABTOMaTHueCKN NO IcTeueHn 3aDaHNOBO BpeMeHN, KOrda YCTPOIcTBIO BbIKJIOUHTcN OTO6pa3rTcA cacbl (HaNPImep, npn HaxKaTmN KHONKn OFF n ydePxAHHn ee B TeueHne 1 cekynbl). 3TO npedeOTBpaauaet pa3pykny aKKymyIaTopa. EcIn FyHKcna AUTO OFF He HAcTpoEHa, npn KaXdOM OTKJIIOUeHn 3aXnraHnna HaxMnte n ydePxNBaIte OFF, NOKa 3KpaH He NotyxHET.
OTka3 OT OTBeTCTBHeHOctn B OTHoWeHn YcIyr, npeOCTaBJaEmbIX CTOpOHnMn NoCTaBUnkamN
Cnyk6bl, npedocTabIeMbIe CTOpOHHIMN NOCTaBnKAMN,MOyT 6bITb N3MeHeHbI, pnoctaHOBJIeHbI NN OTMeHeHbI 6e3 npedBapntelbHoro yBeOMJeHn. KompanaHn Sony He Hecet OTBeTCTBeHHOCTn 3a cnTyauu nOdo6Horo poJa.
IIMnopTeP Ha TeppuTOpu nCTpaH TaMOxKeHHoro coo3a AO "CoHn 3JIeKtpoHnKc", PocCn, 123103, MockBa, KapamblweBckn npoe3d, 6
OprHn3auny, yNoJHOMOueHHa npHIMatb npTeH3nn OT nOtpe6nteJeHa TeppuTOpN Ka3axCTaHa AO "COnn 3NeKtpoHnKc" PpeDCTabNTeJIbCTBO B Ka3axCTaHe, 050010, Pecny6nka Ka3axCTaH, r. AImatbl, np. Doctbk, dom 117/ 7
Ka3aKCTAH JepiHderi TyTbHyuBnapDbIH
waFBIM-TanantapbIH Ka6blndayfay okiJeTTi
YbIM «CoHH 3neKtpoHnKC» AK
Ka3aKCTAHdaFBI OkiDiiri,050010,Ka3aKCTAH
Pecny6nKacbl,AImatbl K.,DocTBk DaHfbIbl,
117/7y
BaxkhoepnmeuHne
BHMaHne!
KOMNAHNASONY HN IN KAKNX
YCJIOBnAX HE HECET OTBETCTBEHHOCTNI3A JIIOBOI CNYAuaHbI, KOCBEHNbI,
IOBOuHbI ININ DpyTNE BIDbl YUeP6A,
BKJIIOUyA, NOMMO IPOUeFO,
UYNUsEHNBIE DOXoDbI, YNYUeHHYIO
BbIPyUKY, NOTEPHO DAHHbIX,
HEBO3MOxHOCTb INCNOJb3OBAHNIA
PPOJyKTa ININ JIOBOTO CBra3AHHOTo C
HIM OBOUPyIOBAHnRA, PPOCTOn N
NOTEPIO BPEMEHIN POKYNATELEMMB
CBr3N C INCNoJIb3OBAHnEM DAHHOTo
PPOJyKTa, A TAKKE OBOPYIOBAHnRA
ININ PPOrPAMMHOTo OBecneEHHNIA,
BXODJaIeTO B COCTAB PPOJyKTa.
B coCTabe daHoro npOdykTa nMeetcra
paIIOpepeaIOoee yCTpoiCTBO.
CorlaacHO HopMaTnHBOMy aKTy
3KOHOmUneCKoKOMnCCnI dJa CTpaH
EbpOnbI (UNECE) N° 10 npOn3BOJnteJIi
TpAHCnOpTHbIX CpeDCTB MOrY TOrOBapNBaTb
ONpeJeHHbIe YCJIOBnY UCTaHOBKn
paIIOpepeaIOuX YCTPOICTB B
TpAHCnOpTHbIe CpeDCTBa.
PpexJe Yem YCTaHaBnBA Tb DaHHbI
npOdyKT B CBoI ABTOMObNb, I3yUInTe
pyKOBOdCTBO NO 3KcPiyaTaun ABTOMObNJa
JIb6O pPOKOHcyMbTupyITecb c eRo
PpOn3BOJNTeJEM IIIN PpOdaBcM.
BbI3OBbI 3KCTpeHHbIX cnyk6
Данна abTomobильна rapнтура BLUETOOTH n nodknIOueHHoe K Hei элкtpoHnoe yCTpoIcTBO nCNoJb3yIOT paAnocuHaJIbI, COTOBIE n Ha3eMHbIe CeTn, a TaKxe 3aIporpaMMnpOBaHHbIe NOlb3OBaTeJIem ΦyHKcUN n He rapaHTnpyIOT cTa6nJIbHOe noDKNIOueHne npn JIO6bIX YcNOBnx.
TOMy npn Heo6xOIMOCtN COBepuNTb BaxHbI Bbl3OB (HaNPmep, 3aPocntb 3KCTpeHHyIO MeiunHCKyIO NOMoub) HNKOrda He nolaraTeCb TOnbKO Ha OdHO 3JIeKTPOHHoe yCTpOINCTBO.
YTo6bI Bbl6paTb,IpyroNCTOuHNK
CnHaJa, HaxMnte KhoNky SRC,
NOBePHnTe DnCKOBbl peYJlAToP, a
3aTeM HaxMnte erO (BpeM OxNdaHnA —
2cekyHdbI).
MENU
BxOД B MeHIO HaCTpOuKN.
- VOICE (ctp. 17, 20)
HaKmTe DnCKOBbI peryJrTOp uYdepXNBaIe erO haxaTbIM 6oJee
2cekyH, yTo6bI aKtNBnPoBaTb fyHKuNIO roLoCoBOro Ha6opa Homepa, yHKcNIO
pacno3HaBaHnpeu (ToIbKO dJa
cMapTfoHOB c OC Android) nn
fYHKsIO Siri (ToIbKO dJa iPhone).
3HaK N
YTO6bI yCTaHOBnTb NOKJIIOUeHne No BLUETOOTH, KOCHNTecb DnCKOBORO
peryIaTopa cMapTfoHOM c OC Android.
4 Okosko dncnpej

SE E K -/ + )
AByOMaTnuecka HAcTpOyKa Ha paAnocTaHcN. HaxMnte n
ydepXnBaITe IJIa HAcTpoKn BpyHyIO.
1/1 (npebidyua/cneyuoua)
(yckopeHHa nepeMoTKa
Ha3aJ/yckOpenhna nepemOTka
Bnepeπ)
6 PTY (tn nporpamMbbl)
Bb6op Tuna nporpaMMbl (PTY) B RDS.
Q (o63op) (cTp. 15)
IepexoBpeKmO63opa npn BocnpOn3BeDeHn.
(Heioctynho,ecnnnoKJIOUeHo
yCTPOIcTBo USB B pexnme Android nnn yCTPOIcTBo iPod.)


CALL
BxoD B MeHIO BbI3OBOB. PpHem 3aBepuHne Bbl3OBA.
HaKmTe KHOkU yJePxNbaTte ee HaxaToI 6oJIee 2 cekyHd, YTO6bl nepeKJIouHTb cnHan BLUETOOTH.

(Ha3aD)
Bo3BpaT K npeIbIyUcEmy 3KpaHy. MODE (ctp.7,11,18)

PpneMHnK cnHnOB c nylbTa dNCTaHcNOHHoro ynpabNeHn

HomepHbke KhoNkn (1-6)
PpneM coxpaHeHHbIX B naMaTn paNocTaHcH. HaxMITE u ydepKINBaTe dIra coXpaHeHr cTaHcN.
ALBUM▼/▲
Iponyck aIb60Ma dJa
aydnooyctpoiCTBa.Haxmnte n
ydepXnBaIe dJa HnepepbIBHoro
Iponycka aIb60MOB.
(Heoctynho,ecnn noKnUoyeho
ycptpoiCTBO USB B pexime Android nn
ycptpoiCTBO iPod.)

(nobtop)
(Heioctynho,ecnnoKIOUeHo yctpoiCTBO USB b pexime Android.)

(cnyaHna nocneObaTeIbHOCTb)
(Heioctynho,ecnnoKIOUeHo yCTpoiCTBO USBBpeXmEAndroid.) MIC (cTp.17)

(Bocnpon3BedeHne/nay3a)

EXTRA BASS
YcunJeHne 3ByaHn6bAcOBOro 3ByKa npOnOpUHOHaJIbHO yPoBHO rPOMKocTn. HaxMTe, YTO6bI N3MeHHTb HaCTpOrykEXTRA BASS: [1], [2], [OFF].

BxoHoe rHe3do AUX

DSPL (ducnnei)
HaxMTe, yTO6bI n3MeHnTb OTO6paXaembIe 3JIeMeHTbl.
SCRL (npokpyka) Haxmte n ydepxnBaIte dIy npokpykn INHdkauu.

Nopr USB
Hauano pa60tbl
ChyTne nepedne naheIi
Bo n36exaHne kpaXn yCTpoiCTBa MOxHO CHrTb C HeRo nepeDIOI naHeJIb.
1 HaKMnte u ydepxnBaIte KhoNky OFF ① do tex nop, noka yctpoicTBO He OTKJIIOUHTc. HaKMnte KHOINcy CHaTna NpeDne NaHeN ②, a 3aTeM NotHnTe NaHeNb Ha Ce6y n CHIMnte ee.

IpeDynpedTeHbI 3ByKOBOcNrHaI
EcnI Do NOBOPoTa BbIKNoUaTeJ
3aXnraHnB NnoLoXeHne OFF cyCTpoiCTBa
He 6bla ChrTa nepeDnY naHeIb,TO B
TeueHne HeckOJIbKnx CekyHd 6yDeT CblIseH
PpeDynpTeJIbHbI 3BykoBoi CnHaI.
3BykoBOc nHaI 6yDeT CblIseH, TOnbKO
ecnNcNOJb3yeTcR BCTPOeHHbY cUNlTeJIb.
3aBoDcKneHomepa
Y6eIITecb, YTO 3aBOIDCKne HOMepa B HnKHeJ qactn aappapaT n Ha 3aHNe Jactn NpeedHe naneHIn COBnaAdIoT. Ecn OHN He COBnadaIO, Bam He ydaCTcR BblOJIHTb COnpJxKeHne no KaHaJy BLUETOOTH, CO3DaBaTb n 3aKpbIBaTb NOdkIIOueHnC POMoUbIO TexHOJOrn NFC.
YcTaHOBKa nepeDnei naHeJI

Ipe3arpy3ka yctpoiCTBa
IpeEIIePBbIM HcIOJIb3OBaHHem yCTpoHCTBa, IIOcJIe 3aMeHbI aBTOMo6HJIbHO rAKKMyJIrTopa HIN IOBTOpHOrO IIOcOeHNHeHnKa6JIeN Heo6xOJIMO nepe3arpy3HTb yCTpoHCTBO.
1 HaKMnte KhoNk DN SPL n (Ha3aD)/ MODE n ydepKuBaIte nx HaKaTbIMn 6oJee 2 cekyHd.
IpmeaHne
Ipe3arpyka yctpoiCTBa npHeiet K ydaJIeHHIO
HaCTpoek YacOB H HeKOTopbIX COxpaHeHHbIX
3JIEMENTOB COJIepKIMOTO.
YctaHOBKa CTpaHbI/perNoHa
IocJIe Ipe3aRpy3KN yCTpoiCtBA OTKpoeTcMeHIO HAcTPOiKN CTpaHbI/perHOHa.
1Пи отобрахен [SET AREA] haxmnte KhoNky ENTER.
OTo6pa3ntcTekyuzaCTpaHa HnH peHOn.
2 NobopaunBaJ DNCKOBbl peRyJIaTOp, BbI6epnte [EUROPE] nIn [RUSSIA], a 3aTeM HaXMMte DnCKOBbl peRyJIaTOp.
3 NOBOPaUNBa DNCKOBbI peYJrTOp, BbI6epnte [YES] nIn [NO], a 3aTeM HaxMMte DNCKOBbI peYJrTOp. Pn n3MeHennpeHOna nIn cTpaHbI yCTpOiCTBO Ipe3aRpy3HTcra, IocJIe Yero Ha dncIIee OTO6pa3rTa qacbl.
TOTInapaMeTpMOxHOHaCTPOHTBMEHIO 6uxI npaMeTPOB (cTp.21).
YctahOBka yacob
1 HaXMMTe KhoNky MENU, NOBepHnTe DnCKOBbl peRyJrTOp dIa Bbl6opa [GENERAL], 3aTeM HaXMMte DnCKOBbl peRyJrTOp.
2 NobopaunBaJ DNCKOBbl peYIaTOp, Bbl6epnte [SET CLOCK-ADJ], 3aTeM HaxMMte DNCKOBbl peYIaTOp.
HaHT MmTaT b HnNkauH yaca.
3 NOBOPaUBaIe DnCKOBbI peYJrTOp IJIy UCTaHOBKn 3HaueHna YacOB mHyT. JJIy Bb6opa HAcTpaHbAemOro pa3pJa HCIOJIb3yIte KHOIIKN |/▶ (SEEK-/+).
4 Nocne yctaHOBKN MmHyT HaXMMTe KhoNkY MENU.
YcTaHOBKa 3aBepHeHa,IOcJIe Yero YacbI NaHyT OTCyET BpeMeHH.
Дя OTO6paKeHЯ qacOB HaxMITE KHOJky DSPL.
Под�товka устpoиства BLUETOOTH
BbMOKeTe CJIuHaT My3bIKy HIN COBepHAtb TeJIefoHHbIe 3BOHKN BpeKHMe 6ecPiPoBOJHOr rapHHTypbI B 3aBHCIMOCTH OT TOrO, KaKoe yCTpOInCTBO, COBMcETHMoe C TexHOJorHe BLUETOOTH, Bb HCIOJIb3yeTe: cMapTFOH, MOHJIbHbI TeJIefoH HIN ayDnOyCTpOInCTBO (JaJIee Ha3bIBaembIe "yCTpOInCTBO BLUETOOTH", ecJH He yKa3aHO HHOe). CBeJeHHa O TOM, KaK IIOKJIHOuaTB yCTpOInCTBa, CM. B pyKOBoiCTBax, IIOCTABJIeMbIX C 3THMN yCTpOInCTBAMH. IIpeKJde Yem IOKJIIOuHaTb yCTpOInCTBO, yMeHbIIHTe rPOMKoCTb Ha aIIIapate. B IIPOTHBHom CJIyae MOKeT pa3dAToBcra rPOMKn 3ByK.
1 Pa3mecntte yctpoicTBO BLUETOOTH Ha paCCTOAHn He 6oJee 1 M ot DaHHoro annapata.
2 HaxmTe KhoNky MENU. NobopaNBaJ dNcKOBbI peYJrTOp, BbI6epnTe [BLUETOOTH], 3aTeM HaxmTe dNcKOBbI peYJrTOp.
3 NobopaunBaJdNcKOBbI peYJrTOp, BbI6epnte [SET PAIRING], a 3aTeM Haxmnte dNcKOBbI peYJrTOp.
4 NOBOPaUHbA dNcKOBbI peYJIaTOp, BbI6epnte [SET DEVICE 1] nII [SET DEVICE 2], a 3aTeM haxmTe dNcKOBbI peYJIaTOp.
MURAeT, KOrda aannapat HaxoNTcBpeKIMe OxuHaHnCOnpJKeHn.
*P0 3aBepseHnCOnpJxKeHnBAMeCTO HauDnucn [SET DEVICE 1] nnn [SET DEVICE 2] 6ydt OTO6paKaTbCn mMa COnpJxKeHHoro yCTpoiCTBa.
5 BbINOJIHnTe cOpJxKeHne Ha yCTpoIcTBe BLUETOOTH, UTo6bl OHO 06HapyKnlo annapaT.
6 BbI6epnte nYHKT [DSX-A416BT], oTo6paXaembl Ha dncnlee yCTpoiCTBa BLUETOOTH. EcnHa3BaHne moJeN BaJero annapata He oTo6paXaETcra, NOBTOpTe BCE ONEpaun, HauHna C DeiCTBna 2.

7 Ecnn Ha yctpoiCTBe BLUETOOTH Heo6xOIMMO BBeCTn KJIoudocTyna*, BBeINTe [0000].
*B 3aBnCmOCTn OT nCnONb3yeMOro yCTpoiCTBa KJIIOU DOCTyNa MoKeT Ha3bIbA TbCra "CeKpeTHbl I KOJ", "PiH-KoJ", "Homep NIH", "napoIb" n T. D.
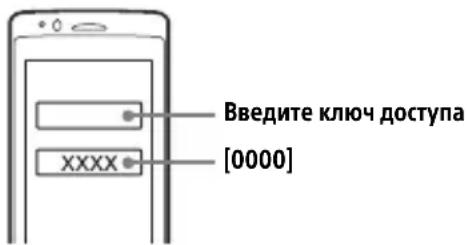
Iocne ydaunoro copjxehn6ydet OTo6paXaTbc3HaQOK
8 BbIbePnte daHHbI aannapaT ha yCTpoNCTBe BLUETOOTH, TTo6bl co3DaTb noKluOHeNe BLUETOOTH.
HnI TO6paKaIOTCa,ecnN NOKJIuOHeHc CO3DaHO.
PpimMeuHne
Bo Bpemn noKnHoueHn K yCTpoNCTBy BLUETOOTH DpyrOmy yCTPOINCTBy He ydaCTcra ObHapyKNTb DaHHbnn annapat. YTO6bl yCTPOINCTBO CMOrNo 0bHapyKNTb annapat, BKIOHnTe peXmM COnpJxHnHa N BblONHnTe NOnCK DaHHORo aannapaTa Ha dpyrom yCTPOINCTBe.
BkIIOUeHne FyHKcIN BocnpOn3BeDeHn
Iopno6HbIe CBeDeHnA cm. B pa3JeIe "BocnpoN3BeJeHne c yCTpoiCTBa BLUETOOTH" (cTp. 14).
OTKIOUeHne cOpJKeHHoro yCTpOuCTBa
YTo6bI nocle copjxehnJaHHoro annapata u yctpoiCTBa BLUETOOTH OTKIOuHTb INx dpyOT dpyra, BbINOJHnte DeiCTBn 2-4.
Повлоченк conрженистpoиCTBY BLUETOOTH
YTO6bl NcNoIb3OBAtB COnpJxHeHoe YCTPOICTBO, Heo6xoDnMo CO3DaTb NOKJIoueHne K aannapaty. HeKOTOpbIe COnpJxKeHHbIe YCTPOICTBa NOKJIIOuAOTcA BBTOMaTnueckN.
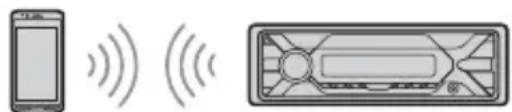
1HaXMMTe KhoNky MENU.
ПоворауньдиCKOBын peуларop, bI6epnte [BLUETOOTH], 3aTeM haKMnTeДИСКOBынpeуларOp.
2 NobopaunBaJdNcKOBbI peYJrTOp, BbI6epnte [SET BT SIGNL], a 3aTeM Haxmnte dNcKOBbI peYJrTOp.
Y6eIITecb, YTO BKJIIOUeH INHINKaTOp
3 AKTINBnpyTe yHKuIO BLUETOOTH Ha ycTpoNCTBe BLUETOOTH.
4 BbINOHNHeo6xOIMMbIe DeiCTBnHa yctpoNCTBe BLUETOOTH, TTo6blNoDKJIIOHTb eRo K DaHHOMy annapaTy.
HJN yJeT CBeNTbCra.
3NaKnHaDncPJIe
YpOBeHb rPOMKoCTn 6yJeT COxpaHeN B NaMaTn IJRA NocLeNyUOSeIro PnpEma TaKnx COoBSeHn, He3aBNCmO OT ObbyHOrO yPoBhraPOMKOCTn.
Дя послuyиваня odнов PernohaJIbHoi nporpaMMbl (REGIONAL)
KordaФyHKUAFNREGIONALBKNIOUeHbI, yCTpoiCTBOHe6yDetnepeKIOUaTbcnHa dpuyuOpernoHaJIbHyIOCTAHcUIOc6oJeec nIbHOJuaCTOTOn.IpnBbIe3de3a npedeJIbIOblactnnpemaOppeJeEHNO pernoHaJIbHOJnpoPamMbI3aJaTe dI npaMeTpA[SET REGIONAL]3NaueHne[SET REG-OFF]BMehIOHacTpoIKn[GENERAL]Bo BpemApnemaFM-padnoctaHcUN(ctp.22). 3TaΦyHKUHHepaBotaET B BeINko6pntAHmNHeKOTOpbIXdpYHX pernoHax.
ФункцЯ MeCTHÖN npNB3KN (TOJIbKOдя BeINko6pntAHn)
3TaФyHKUЯ NO3BOJIAeT HAcTpaNBaTbCЯ Ha BOJHy dpyrIX MeCTHbIX CTaHcIIN B DaHHOM paOHe,Джe ecIn OHN He 3aHeceHbIB NaMrtb npneMHnKa NOD HOMepHBIM KHOKNAMi. BoBpem npnemaB Dnana3oHe FM HaxMMTe HOMepHyIO KONky (1-6),ДЯ KOtopoN 3aNporpamMnPOBaHa MeCTHa r CTaHcIJa. He 60JIee Yem uepe3 5 cekyHd eue pa3 HaxMMTe HOMepHyIO KONky MeCTHOI CTaHcIIN. IOBTopraIte pOuEdupy, noka He 6yDet HaJdeHa MeCTHa raDnOCTaHcIJa.
Bb6op TnIOB nporpaMM (PTY)
1 Haxmte PTY Bo Bpem npneMa B dnaana3OHe FM.
2 NobopaunBaute DnCKOBbl peryIaTOp, noka He OTo6pa3ntc Tpe6yeMbI TnnporpaMMbl, 3aTeM hXMMte DnCKOBbl peYJIaTOp. YcTpoiCTBO NaHET NOnCK CTaHcUN, nepeDaIOUeN nporpaMMy BbIbpaHHoro Tnna.
Tun nporpamM
NEWS (Hobocn), AFFAIRS (Tekyune co6bItna), INFO (HhOpMaun), SPORT (CnpT), EDUCATE (O6pa30BaHne), DRAMA (Драматческne nepeaun), CULTURE (KynbTypa), SCIENCE (Hayka), VARIOED (Pa3HbIe TeMbI), POP M (Non-My3bika), ROCK M (PoK-My3bika), EASY M (Дорожнaya My3bika), LIGHT M (Лerkaя Klaaccuueckay My3bika), CLASSICS (Cepbe3naя Klaaccuueckay My3bika), OTHER M (Проча My3bika), WEATHER (NoroDA), FINANCE (Финансbl), CHILDREN (Прогрмьдя DeTei), SOCIAL (Ош戒指вная ХиЗн), RELIGION (Pelenr), PHONE IN (перадус с TelefoHHbIMN 3BOHKamn paadinocnyuataTee), TRAVEL (Пуteшев), LEISURE (Дocyr), JAZZ (Джазовая My3bika), COUNTRY (Музбкав CTINe "KaHTpr"), NATION M (ЭТнческay My3bika), OLDIES (Старая музьka), FOLK M (ФолК-Му3bika), DOCUMENT (ДokуMeHTaJIbHbIe nepedaun).
YcTaHOBka YacOB (CT)
Дя OCTaHOBKI BOCnpon3BeJeHHN
HaxmTe u ydepXnBaIte KhoNky OFF b TeueHne 1 ceKyHdbI.
CobepweHne Bbl3OBA n3 KypHaJa Bbl3OB0B
2 NobopaunBaJnCKOBbI peYJrTOp, Bbl6epnte [RECENTCALL], a 3aTeM HaxMMte nCKOBbI peYJrTOp.
OTo6pa3ntcCnncOKKypHaJaBbI3OBOB.
3 NOBOPaUvBaI DnCKOBbl peYJrTOp, BbI6epnte IIMMa IIN HOMep TeJefoHa B JxypHaJIe Bbl3OBoB, a 3aTeM HaxMMte DnCKOBbl peYJrTOp.
HaHHeTcTeIeΦOHbI pa3roBOp.
CobepweHne Bbl3Oba NyTem BBoDa HOMepa TelefoHa
1 HaxmTe Khonky CALL.
EcnK aannapaty noDKIIOyeHb IBa MObNbBbIX TeJefoHa,TO NOBOPaUNBa IINCKOBBI peYJrTOp,BbIbepTe JIO6oN I3 TeJefoHOB,a 3aTEM HaKMITE INCKOBBI peYJrTOp.
2 NobopaunBaJ DNCKOBbI peYJrTOp, BbI6epnTe [DIAL NUMBER], a 3aTeM Haxmnte DNCKOBbI peYJrTOp.
3 ПовернITE ДиCKOBьп рergуЯТОр, BBeДNTe HOMeР TeJIeФОHa, NOTOM BbIберnte [ ] (npo6eI), a 3aTeM haxmnte ENTER*.
HaunHeTcTeIefoHHbIpa3roBOp.
*IyBb6opaHaCTpaNBAeMOro pa3praIa nCNoJIb3yIte KHOJKN I/ (SEEK-/+).
PpmeHne
Ha nucnnee BmecTo CmBOJa [#] OTo6pa3ntcA CmBOJ [].
CobepweHne Bbl3Oba nyTem nobtophoro Ha6opa Homepa
1 Haxmte KhoNky CALL.
EcnK aannapaty noDKIIOueHb IBa MObNbHbIX TelefoHa,TO NOBOPaUNBa IINCKOBBI peyJrTOp,BbIbepTe JIO6oN I3 TeJefoHOB,a 3aTEM HaxMMTe IINCKOBBI peyJrTOp.
2 NobopaunBaJ DNCKOBbI peYJrTOp, BbI6epnte [REDIAL], a 3aTeM HaxMMte DNCKOBbI peYJrTOp.
HaunHeTcTeIefoHHbIpa3roBOp.
CobepweHne Bbl3Oba c nOMoUbIO roJocOBbIX MeTOK
BbIMoKTe COBepuNTb Bbl3OB, npOn3HeCra
ROLOCOBYMOETKY, XpaHryIOcR B
IPOKJIHOyeHHOM MObIbHOM TeJefoHe,
KOTOpBIOOCHaUeH cyHKUeN RoLOCOBOrO
Ha6opa Homepa.
1 Haxmte KhoNky CALL.
EcnK aannapaty noKJIOUeHbI DBa MO6nJIbHbIX TeJefoHa,TO NOBOPaUNBa IuCKOBbl peryIaTOp,Bbl6epnte IIO6oN U3 TeJefoHOB,a 3aTeM HaxMITE DNCKOBbl peryIaTOp.
2 NobopaunBaJdNcKOBbI peRyJIaTOp, BbI6epnte [VOICE DIAL], a 3aTeM HaxMMte dNcKOBbI peRyJIaTOp.
Kpome TOrO, Bbl MoXeTe HaxaTb KHONky VOICE n ydepxknbTaB ee HaxaToi 6oJee 2 cekyHd.
3 PpOn3Hecnte rOIOcoBvIO MeTKy, XpaHraUioCBA MObnIbHOM TeJefoHe.
Baawa peub6ydt paocno3HaHa, nocne yero 6ydt coBepweH BbI3OB.
OTmeHa roJocoboro Ha6opa Homepa HaxmTe VOICE.
Onepaun,doctynhble BO BpeMa Bbl30Ba
HacrpoKa rPOMKocT MeIoDNn Bbl30Ba
IpnnoctynplenBxOJaIeRo BbI3OBA NOBepHnTe DnCKOBbI peYJrTOp.
HactpoRka rpoMkoCTn roLoCa c6eecdHnKa
Bo Bpem TelefoHHoro pa3roBopa nOBepHnTe DnCKOBbI peyJrTOp.
HactpoKa rpoMKocTn dIra co6eEdnka (HaCtpoKa ycJIeHna cnHaJa c MmKpOfoHa)
HaxmTe MIC.
Moxho nCnoJb3ObaTb CneDyIOUne
HaCTpaIbAembly ypoBn rPOMKocTn:
[MIC-LOW], [MIC-MID] n [MIC-HI].
YMeHbWeHne yPoBnI xO n Wyma (peXm Echo Canceler/Noise Canceler)
Haxmnte KhoNky MIC n ydepxnBaTe ee HaxaToi.
BblMOKeTe Bbl6paTb CneDyUOUsne peKmbl: [EC/NC-1] n [EC/NC-2].
IpeekloueHne MeKdy peXNMOM 6ecnpoBOJHOI raphNtpybI N obblbIM peXNMOM TeJefoHa
Bo Bpem TeIefoHHoro pa3roBopa c nOMoUbIO KHOJKN MODE Bbl MoKeTe nepeKJIouaTb 3ByK MeKdY aannapaTom mMObNbHbIM TeIefoHOM.
Ppimechne
OCTynHOCTb 3TOI ONepaunn 3aBNCUT OT NcNoJb3yEmoM MoJeN Mo6NJbHOro TeNeΦOHa.
Pone3HbIe yHKcnn
Испобзоване прiloxжени Sony | Music Center с iPhone иmapТфОнOM C OC Android™
Bam notpe6yeTcKaaTaB nocJeHIOU BercnIO npInIoXeHnra "Sony | Music Center" u3 App Store (ДЯ iPhone) nIu n3 Google Play (ДЯ смарТфОна c OC Android).
Ppimechn
PaHn CO6CTBHeHHo 6e30NaChOcTN Co6JIIOaIte MeCTHbI 3aKOHbI IN npaBUNa DOpOXHOro DBHXKeHn I He MCNOJb3yIte 3TO npuINOKeHne BO BpeM BOXKeHn ABTomO6NJ.
"Sony | Music Center" - 3TO npuIooKeHne IynpaBHeHnCobMeCTmMbIMN C HUM ayDIOUcTpoiCTBaMn Sony c nomOu bIO iPhone nn cMaprfoHOB c OC Android.
- IpeueHb fYHKU, KOTOpbIMN Bbl CMOKeTe ynpabIaTb c NOMOUsbIO npNUoXeHnA "Sony | Music Center", 3aBucnt OT nOdkJIuOeHHOrO yCTpOInCTBa.
- CbeHnO O TOM, KaK NcNoJIb3OBaTb FyHKuIN "Sony | Music Center", cm. Ha cBoem iPhone nnn cMaprfohe c OC Android.
-Доноителыбіе CBeДeнгьо npиLOженny "Sony | Music Center"сm. no cneIyIoUeMy URLaIpecy: http://www.sony.net/smcqa/
- NocetTe yka3aHHbH HnHexe Be6-caNT u n3yUHTe cnNcOK COBmecTmblx MoJeIeN iPhone n cMaprfoHOB c OC Android. IЯ iPhone: nocetTe App Store. IЯ cMaprfoHOB c OC Android: nocetTe Google Play.
1 Haxmte KhoNky MENU, nobepHnTe dncKobbl peryIaTOp Ira BbI6opa [SONY APP], 3aTeM Haxmte nckobbl peryIaTOp.
2 NobeprHyB dNCKOBbI peYJrTOp, Bbl6epNTe [CONNECT], a 3aTeM haxMMTe dNcKObI peYJrTOp.
Bb6op nctouHka cnHaJa nn npJIOXeHn
BbIMoKeTe BbI6paTb Heo6xOaMbI INCTouHnK CnHaJa nn npJIoXeHne Ha iPhone nn cMapTfoHe c OC Android.
BbI6Op nCTOuHnKa cnHaJa
Haxmte KhoNky SRC HeckoJbko pa3.
Kpome TOrO, MoXHo HaxaTb KhoNky SRC,
NoBepHyTb DnCKOBbl peYJrTOp, Bbl6paTb
Tpe6yEmbl NCTouHnik, a 3aTeM HaXaTb
KhoNky ENTER.
OTo6paXeHne cNnCKa nCToUHnKOB cnHaJIOB
HaxmTe KhoNky SRC.
06bYBHeHne SMS c nOmoIbIO yHKcIMn BocnpOn3BeDeHnpeuN (ToJIbKO dIa CMapTfoHOB C OC Android)
Пи полунецни SMS систema abTomатuellekn 3auntbBaet ero uepe3 ГомКOrOBOpnteJn ABTomO6nJI.
CbeHnO COOTBeTCTByIOuNX npaMeTpax cm. B pa3dJe "CnpabKa" npnloxehn.
OTBeT Ha SMS (ToIbKO dIЯ cMaprfoHOB cOC Android)
BbIMoXeTeOTBeTntbHaCoO6uEHe,HaXaB 3HaQOKOTBeTa.
1 AkTbBpyuTe npJIoXeHne "Sony | Music Center", a 3aTeM haxMnte 3Haayok [Reply] (OTBeT). B npJIoXeHn "Sony | Music Center" oTo6pa3NTcA kpaH BBOda coo6ueHn.
2ПоизнecTe OTBET Ha COO6uzHne, nCNoJIb3yЯ Функцю paCno3HaBaHnЯ peu. B npInoxeHn "Sony | Music Center" oTo6pa3ntcЯ cnICOK aIpecaTob COO6uzHn.
3 NOBOPaUNBa DNCKOBbI peYJrTOp, Bbl6epnte Heo6xOdImOe coo6uEHe, a 3aTeM HaxMMte DnCKOBbI peYJrTOp. Coo6uEHe 6yJeT OTnpaBNeHo.
HactpoKa npaMeTpOB 3ByKa n DnCpIeJ
C nomoubI o iPhone nIIN cMapTfoHa C OC Android Bbl MoKeTe HacTpOINTb npaMeTpbl, CBra3aHHbIe CO 3BYKOM I DnCnJIeem.
CbeHnO COOTBcTByIOuNX npaMeTpax cm.B pa3dJe "CnpabKa" npnloxehn.
ИспOLSьОВане Функциnpacno3HaBaHЯ peuN(TOLbKO ДЯ СмарТфОHOBOC Android)
14To6bI aKTHBnPoBaTb yHKnIO paCNo3HaBaHnpeu,HaKMnte uYdePknBaTe KhoNky VOICE.
2 PpOn3Hecnte Heo6xOaMyu roJocOByIO KOMaHdy B MmKpOfoH.
BbIKIIOUeHne yHKcnn paCnO3HaBaHna peuN
HaxmTe VOICE.
Ppimechn
B HeKoTOpbIx CnyaX fYHKUpaPacNo3HaBaHnpeu MoKeT 6bIbHeIOCTyInHa.
- Φункця paacno3HaBaHЯ peyu MoKet pa6oTaTb HENpaBnIbHO. KaueCTBO pa6oTb 3Toi ΦyHKcN 3aBnCtOT NOdkNoeHHOrO CMapTfoHa C OC Android.
- IVcnoJIb3yIte yHKUHO npu MNHmAlbHOM yPOBHe Wyma (HaNPIMep, Wyma OT DnBraTeJ).
Исторьогане Фунkedи Siri Eyes Free
Благорару Функции Siri Eyes Free Bbl Можete Incnoьзоватb iPhoneВ ржиме 6ecnpobodnoногapн'typbl,прocто пpon3нося Heo6xODIMbIe ФразыВ MnKpofoH.Тобы Incnoьзоватb 3Tu Функцию,Вамnotpe6yetcngodknIOuHTb iPhoneКданHomу annapaTy chepe3 BLUETOOTH.ЗТа ФункцияdoctynhaHa iPhone 4s n 60ilee HoBbIX moDEJax iPhone. Y6eDITecb,чToHa BaWem iPhone Incnoь3уETcngocleДнЯ Верси iOS. Прждчem BblINHЯТь onncahNble HnXe DeiCTBnA,Heo6xOДIMBO BblONHITb pernctpaunio no KaHany BLUETOOTHи HacTpOINTb NOdkJIQUeHne iPhoneКданHOMy annapaTy.ПоДрОБны сbeDeHnCm.B pa3dJe "POnrTOBka yctpoiCTBa BLUETOOTH" (cTp.7).ЧTo6bl BB6paTb Heo6xOДIMoe yctpoiCTBo iPhone,нжмITE KHONKY MENU,Затem BB6epnte [BLUETOOTH] SET AUDIODEV.
1 AktnBnpyTe yHKuio Siri ha ycTpoNCTBe iPhone. OIOJIHnTeIbHbIe CBeJeHnA CM.B pyKOBOdCTBe, nOcTaBnEHom c iPhone.
2 HaxmTe KhoNky VOICE u YdepxnBaIte ee HaxaToi 6oJIe 2 cekyH. OTo6pa3ntcraKpaH rOIOCOBbIX KOMaHd.
3 Nocle toro kak iPhone n3dact cnHaI, npOn3HecnTe KOMaHdy BMKpOoOH. iPhone n3dact eue oDInh cnHaI, n Siri NaHcET OTBeuATb.
BbIKJIoueHne yHKunSiri Eyes Free HaxmTe VOICE.
PpimMeaHn
- YctpoNCTBO iPhone MOKeT He paCNo3HaTb BaUy peYb, TAK KAK KAueCTBO paCNo3HaBaHnA peu 3aBNCNT OT YcNoBn, B KOTOpbIX OHO nCNoJIb3yETc. (HanpImep, Bbl HaxOJntEcB B DnBxUeMcra ABTomO6nJe.)
BpacnoJoxeHnx CnIOxum cnHaIOM nI iPhone cyHKun Siri Eyes Free MoKeT pa6oTaTB He npabNbHO uIN c 6OJIbUIMM 3aepKkAm.
B 3abucnmoCTOn OYcNOBm NcNoIb3ObaHna YcTPOINCTBa iPhone fynKunr Siri Eyes Free MoKet pa60TaTB HeNpaBnIbHO nn 3aBepuNTb CBOIO pa60Ty. - Ecnn Bbl Bocnpo3BODnte My3bkaIbHyIO dopoxky c iPhone, nCnoIb3yay aynonOIOKJIouHeNe BLUETOOTH,TO KOrda NaHETcBocnpo3BeJeHne DOpoxKnYepe3 BLUETOOTH,ФункцЯ Siri Eyes Free abTomatueckn 3aBepuNT CBOIO pa60Ty, N daHHbI annapaT nepeKJIouHTcra Ha ayDnONCTOuyHK BLUETOOTH.
- Ecnn BkIIOHTb fynKcNIO Siri Eyes Free BO Bpem RA BOCnpON3BeJeHnaydno,TO daHHbAnnapaT MoKeT nepeKNIOpNTbcraHa ayDNOCTOuHnK BLUETOOTH,JaXe ecnn Bbl He yKa3aIn DopoKy, KOtopyIO Heo6xOIMMO BOCnpON3Bectn.
- Pn noKnIoueHnn iPhone K nopTy USB fynKcunSiri Eyes Free MoKeT pa6oTaB He nppaBnIbHo nn3aBepuNTb CBOIO pa6Oty.
- Пи подклочецни iPhone К данHomу annapaTy uepes USB He Bklnouaite Siri ha iPhone.Функцura Siri Eyes Free moket pa6oTaTb HnрpaBnIbHo nIn 3abepwnTb cBOU pa6Oty.
- EcniФункиЯ Siri Eyes FreeakTnBupoBaHa,aydno He6ydtBOcnpOu3BOOnTbcra.
NapametpbI
OTmeHa peXmMa DEMO
Moxho BbIuN3 DeMOHCTpaCNoHHOro pexima, KOtOpB 3aNyCKaETc npn OTKIOUeHN NCTOCHNA, N OTo6paXaTb acbl.
1 HaKmTe KhONKy MENU, NOBepHnTe DnCKOBbl peRyJrTOp dIa BbI6opa [GENERAL], 3aTeM HaKmTe DnCKOBbl peRyJrTOp.
2 NobopaunBaJ DNCKOBbI peYJrTOp, BbI6epuTe [SET DEMO], 3aTeM HaxMMte DNCKOBbI peYJrTOp.
3 Поворачвая дисковый ретуларop, bblберпгe [SET DEMO-OFF], a 3aTe m Haxmnte disckobiy perylartop. Habtroponka 3abepseha.
4ДВaЖдыHaЖмITEKHONKY (Ha3aI).
ДиспеловернетсьржIMобИчHoropnema/BocnpoN3BedeHn.
Ochobhpie onepaunn haCTpoKn napametpoB
HactpoKa 3JIeMeHTOB BbINOJIHReTcR IO TaKIM KaTeROpNAM:
HactpoKa 6OuX npaMeTpOB (GENERAL), HactpoKa 3Byka (SOUND), HactpoKa
dncnpey (DISPLAY), HactpoKa BLUETOOTH (BLUETOOTH), HactpoKa npInIoKeHna
Sony | Music Center (SONY APP).
1HaxmTe KhoNky MENU.
2 NobopaunBaJ DNCKOBbl peYIaTOp, BbI6epnte KaTeropnIO HAcTpOKn, a 3aTeM HaxMMte DnCKOBbl peryIaTOp. HactpaunBaembl e 3JIeMeHtbl OTNIuHaOTcB 3aBNCIMoCTN OT NCTOCHNkA IN npapMeTPOB.
3 NobopaunBaJ DNCKOBbI peYyIaTOp, Bbl6epnte npaMeTpbl, a 3aTe HaxMnTe DNCKOBbI peYyIaTOp.
CLOCK-ADJ (yCTaHOBka yacob) (cTp. 7)
CAUT ALM (nppeynpeinteHbI 3ByKOBOcHnHaI)
BkIIOUeHne npEduynpeDuNTeJbHoro 3ByKOBOrO cnrHaJa: [ON], [OFF] (cTp.6). (DocTyNHO ToJbKO npu BblKIOUeHHOM nCToUHKe, KOrDa oTo6paXaIoTc qacbl.)
BEEP(3BykoBoi cnHaJI)
AKTUN3aun 3ByKOBOO cnHa: [ON], [OFF].
AUTO OFF (aBTOMaTnueckoe OTKIOUeHne) ABTomaTnueckoe OTKIOUeHne uepe3 onpeJeHHoe Bpem,ecNI yCTPOIcTBO BbIKIOUeHO N OTO6paXaIOTc Yacbl (HaXMnTe N ydePKNBaIte KhoNky OFF b TeueHne 1 cekyHdbI): [ON] (30 MInHyT), [OFF].
STEERING (ynpaBJIeHne Ha pyJe)
PereTpaun/In3MeHHe HacTpoKn pyJIbTa DnCTaHcNHOHOrO ynpabLeHna Ha
(IOCTyNHO TOJbKO npn BbIKNoeHHOM nCTOuHnKe, KOrda OTo6paKaIOTc yacbl.)
STR CONTROL (nybT dntaHcnoHHoYnpabHeHa pyne)
Bb6oppeKIma BBOda noDKIoueHHoro nylbTa DnCTaHcNOnHOrO ynpabLeHn.Bo 36exKaHne HeNCpabHocTe nepei NcNoJIb3OBaHnEM NoD6epuTe COOTBeTCTByUoUsn peKm BBoDa dJa NOkJIIOueHHOrO nplbTa DnCTaHcNOnHHOrO ynpabLeHn.
CUSTOM (cneuaJIbHbI)
Pexm BBOda IJnIyIbTa IInCTaHcUHOHOrO ynpabHeHnHa pyne.
PRESET (CTaHdapTbI)
Pexm BBOda InI npoBODHO npbTa InCTaHcNoHOrO ynpaBHeN3a NCKJIuOHeHEm npbTa
ДиСТанцИОНHOrOупаВлeняHapyе (BbIbIpaETcAвTOMaTичeCKn пи BblINJIHeHn [RESET CUSTOM]).
EDIT CUSTOM (HactpoikcneuaJIbHoropekum)
Pernctpaunya yHKn (SOURCE, ATT, VOL + / - ,SEEK + / - VOICE,ON HOOK n OFF HOOK)IyNbTa IInCTaHcNoHoro ynpabNeHna pyne:
1 NOBOPaUNBaI DnCKOBbI peryJrTOp, Bbl6epNTe 0yHKcNIO, KOTOpYIO HxKHO Ha3HaunTB IJIpyIbTa DnCTaHcUOnHOrO ynpaBJeHna Ha pyJe, a 3aTeM HaxMMTe DnCKOBbI peryJrTOp.
2ПиMuraIoUeMcoo6uEHHN [REGISTER]HaxMMTe n ydepxnBaIte KHOKNyHa NylbTe DnCTaHcUNOHOrO ynpabJeHnHa pyne, KOtopoI Tpe6yeTcHa3HaunTB cyHKnIO. No 3aBepWeHn peHcTpaCn OTo6pa3ntcR [REGISTERED].
3Для Pernctpaunn Dpynx FyHKuyn IOBTOpe DeiCTBnA 1 N 2. (OcTyHNO, TOnbKO ecn 3HaueHne npaMeTpa [STR CONTROL] yctaHOBJIeHo Ha [CUSTOM].)
RESET CUSTOM (c6poc cneuaNbHbIX NaCTpoeK)
I3MeHHe HAcTpoE NylbTa IInCTaHcUHOHHOrO ynpaBHeHnHa pyJe: [YES], [NO].
(Дocунho,Только ecn 3haueHne napametpa [STR CONTROL] yctaHOBJIeHo Ha[CUSTOM].)
PpimmeaHnA
- Bo Bpemr n3MeHnHaCTpoeK DoCTynHO ToIbKO KhONoUHoe YnpaBLeHne Ha DaHHOM yCTpoiCTBe. B cJIeX 6e3OnacHoCTn OCTaHOBtTe aBTOMo6uNb IpeEi n3MeHeHEm 3Tnx HAcTpoeK.
- Ecnn BO Bpemr pernctpaun npoun3oynet Own6ka, Bcra paHee 3apernctpnpobAHna HnphiopmauncoxpaHntc.BbInonHnte npoueDpype nncptpaun 3aHOBO,HauHna C Toi FyHKun, Ige npoun3oUla Own6ka.
3TaΦyHKUmaMOKeT6bITbHeIOCTynHbHEKOTopbIX TpaHCnOpTHbIX CpeIcTBax.ДЯNOJyueHna NOIpO6hBix CbeJeHnO COBMeCTMnOCtIN BaWero TpaHCnOpTHoro CpeIcTBa NocTeBe6-caNTNoIDepXKN, YKa3aHHbHa 3aDHeN CTOpOHe O6noKKN.
USB MODE (pexkm USB)
I3MeHeHnepeXmAma USB:[ANDROID], [MSC/MTP].
[0] - [32] (Знayaши [0] He
NcNoJIb3YeTcH NДJIa KaKNX Dnana3OHOB UBeTOB).
DSPL-C (UBeT dncnne)
HactpoikKa npedBapnteIbHo HactpoeHHoro nIIN NOIb3OBaTeIbCKOro UbetaTdNDCnpe.
COLOR (uBeT)
Bb6op n3 15 npeBapntbHo NaCTpoeHHbIX UBeTOB I
1 noIb3OBaTeJIbCKOrO UBeTa.
CUSTOM-C (noIb3OBAteIbckn UBeT)
Hactpoika noJIb3OBaTeJbckOro cBeta Ira dncnne.
RGB RED, RGB GRN, RGB BLUE
HactpoJa cBeToBOrO dnaana30Ha:
[0] - [32] (Знayaши [0] He
NcNoJIb3yETcH NДЯ KaKNX Dnana3OHOB CBetOB).
SND SYNC (cHxpoHn3aunIIO 3ByKy)
BkIIOueHne cnHXPOHn3aunn NOcCBETKn co 3Bykom: [ON], [OFF].
AUTO SCR (aBtOMaTnuecka npokpyTk)
AByToMaTuNuecka npokpyTKa nnHHbIX 3JeMeHToB: [ON], [OFF].
(HeioctynHO,ecn BbIbpaH nCTOuHNK AUXnn TIOhep.)
HactpoJa BLUETOOTH (BLUETOOTH)
PAIRING (conpkaeHne) (ctp. 8)
ПодкlioquEHne Do DByX yCTpoiCTB
BLUETOOTH: [DEVICE 1], [DEVICE 2].
По завершENn conpkaeHn BmecTo
надпиСn [DEVICE 1] nIn [DEVICE 2] bYdTe
OTOBpaKaTbCЯ nMЯ conpkaeHHoro
yCTpoiCTBa.
AUDIODEV (aydnooyctpoiCTBO) Bb6op aydnooyctpoiCTBa. Ha annapaTe, cnpjxKeHHOM C ycTPOICTBOM [DEVICE 1] nIu TekyuIm aYdnooyCTPOICTBOM, COBMeCTnMbIM C npoHJIeM A2DP, oTo6paXaETcra CmBOJ [ ]
RINGTONE (MeIOnBbI3OBA) BbI6Op yCTpOInCTBa,Ha KOTOpOM DoJXHa 3ByuTaB MeIOAnB Bbl3OBA (aannapat nn INoDKJIIOUeHHbIM MObINbHbIM TeJefoH): [1] - annapaT, [2] -MObINbHbIM TeJefoH.
AUTO ANS (aBTOMaTnueckn OTBeT) Hactpoynka annapata dny aBTOMaTnueCKoro OTBeTa Ha BXOJaUne Bbl3OBbl: [OFF], [1] - c 3aepKko npn6IIN3nteJbHo 3 cekyHdbI, [2] - c 3aepKko npn6IIN3nteJbHo 10 cekyHd.
AUTOPAIR (aBToMaTnueckoe cOpjKeHne) ABToMaTnueckn 3aNyCK cOpjKeHn rno BLUETOOTH npn noKJIuOeHnn yctpoiCTBa c iOS 5.0 nIn 6oJee nO3dHe Bercn qpe3 USB: [ON], [OFF].
BT SIGNL (cɪrɪhən BLUETOOTH) (ctp. 9)
BkIIOUeHne nɪn BbɪKJIIOUeHne φyɪKünN BLUETOOTH.
BT INIT (nHnuaJn3auny BLUETOOTH) HnuaJn3auny Bcex Hactpoek, CBa3aHbIX C BLUETOOTH (cBeJeHn o copJxKeHn, cBeJeHn o6 yCTpoiCTBe n T. d.): [YES], [NO]. Pn yTnJIn3aunn daHHoro aannapata BblIOJIHNTE nHnuaJn3aunu BCex Hactpoek. (OocTyIHO ToJIbKO npn BbIKIooEHHom NCTOCHNe, KOrDa OTO6paXaIOTcYacbl.)
Hac troponka npiloxeHna Sony | Music Center (SONY APP)
AUTO LAUNCH (aBtOMaTnueckn 3anyck) BkIoueHne aBtOMaTnueckoro 3anycka npiloxeHnra "Sony | Music Center": [ON], [OFF]. EcnBbIbpaHo 3naeHne [ON], npiloxeHne "Sony | Music Center" aBtOMaTnueckn yCTaHOBNT NOKJIIOUeHne NO 3aBepWeHH NpOKJIIOUeHn BLUETOOTH.
CONNECT (noKluoyehne) Bkluoyehne n Bbikluoyehne yHKunn noKluoyehna "Sony | Music Center".
OTHOWeHne "CunHn-lym":73 n6
Pa3dJeIeHne:50Db npn1KrU
MW/LW
Dna30H HAcToKn:
MW: 531 kT - 1602 kT
LW:153KΓu-279KΓu
YyBCTBnteJbHocTb: MW: 26 MKB, LW: 50 MKB
PpOurpbBateIb USB
Open Accessory (AOA): 2.0
CoOTBeTCTByUoUsn KoDek:
MP3 (.mp3)
Ckopooctb nepeaun daHnbix: 8K6nt/c-320K6nt/c (noJepxka VBR (nepeMeHHa cKopoctb nepeaun daHnbix))
YacToTa nnckpeTn3aun: 16 Kt- 48Kt
WMA (.wma)
Ckopooctb nepedaun daHHbIX: 32 K6nt/c-192 K6nt/c (noepka VBR (nepeMeHnackopoctb nepedaun daHHbx))
YacToTa DnCKpeTn3aun: 32 KtU, 44,1 KtU, 48 KtU
FLAC (.flac)
Pa3pIHocTb: 16 6nt, 24 6nt
YacToTa nnckpeTn3aunn: 44,1 KtU, 48KtU
PoiDepKINBaemAaIIOBaaCnCTema:
FAT16, FAT32
BecnpoBODnA CB3b
CnCTema CBa3n:
ctanapT BLUETOOTH Bepn 3.0
BbIXOJ:
ctaHapr BLUETOOTH,Knacc
MOUHOCTN2(MaKc.+1DbM)
MaKcMmaNbHnaJaNbHoCTbCBra3n:
BnpedeJax npaMOBnDmOCTN:
Pn6J.10 M*1
Dnana3OHyACTOT:
Дианаэон2,4Γ
(ot 2,4000 TgU,do 2,4835 TgU)
MeToD MoUyIaIuN: FHSS
CobmecTmblne npoФnlln BLUETOOTH*2:
A2DP (Advanced Audio Distribution
Profile) 1.3
AVRCP (Audio Video Remote Control
Profile) 1.3
HFP (Handsfree Profile) 1.6
PBAP (Phone Book Access Profile)
SPP (Serial Port Profile)
CoOTBeTCTByUoUsn KoDeK:
SBC (.sbc), AAC (.m4a)
*1ФakTnueckaДаьHoCTb CBa3N 3aBNCIT OT
pa3JIuHbIXΦaKTopOB,HaNPmEpOT
PpeTCTBmMeKdy UcTpoNCTBaMn, MaHHTbIX
NoJe BOKpy MKNPOBOJHOBbIX Neuei,
CTaTnueckoro 3JeKTpnueeCTBa,
YBCTBNTeJIbHOCTn npneMHnka, 00EKTNBHOCTN
aHTeHHbI, OpepaLIOHHO CNCTeMbI,
nporpaMMHOro npuIOXeHHnT.
*2 CtaHapThIbe npoФиN BLUETOOTH yka3bIbaIOT
Ha zelb o6MeHa daHHbIMN IO npOTOKOly
BLUETOOTH mexky yctpojCTBaAMn.
PoiKluoyeHne no NFC
Dnana3oH yactot: 13,56 Mf
Ycnilntelb MouHoctn
BbIXoI: BbIXoIbI rPOMKOrOBOpnteJIeI
PonHoe cOnpoTnBLeHne
rpoMkoROBOpnteJeN:4Ω-8Ω
MaKcImMaJIbHaB BbIXOHaM OMuHOCb:
55BT × 4 npn coppoTbneHnn 4 Ω
067aHnΦopMaun
TpeboHnK nCTOHyKy nHTaHn:
abTomoNbHbIaKKymyTOp 12B
IOCTOHHOROTOKa (COTpNuaTeJIbHbIM
3a3eMJIeHnem)
HOMHaJIbHbI TOK:10A
Pa3mepbl:
πρι6π.178MM×50MM×177MM
(ω/B/r)
MOHTaXHbIe pa3Mepbl:
TpaHcnpToPObaTbBOpnHaJIbHOI
UynaKOBKe, BO BpeMra TpaHcnpOpTnPOBKn He
6pocatb, obeperaTb ot naJeHn, ydapOB,
He noDbBepraTb n3JnUHHe Bn6paun.
Peaun3aunO OCUeCTBnTb B COOTBeTCTBn
C DeIcTByIOUzIMN Tpe6OBaHnA M
3aKHOdaTeIbCTBa.OTcLyXnBWee n3dJIne
yTNn3npOBaTb B COOTBeTCTBNN C
DeiCTBvUOzIMN TpeBoHaHnA M
3aKOHoDaTeJIbCTBa.
Ecnn HencnpaBHOCTb He ydaETcYCTpaHHTb
CJIeDyIaHHoH INHCTpyKcUN -O6paTntecbB
6JInxKaIshn aBTOpI3OBAHbI SONY ceHTp
no pemohTy n o6cnykBaHnIO.
Abtopckne npaba
CIOBechbl TOBapHbI 3HaK n IOROTnbl Bluetooth
YBJIHOTc3apeRnCTpnpoBaHHbIMTOBapHbIMN
3HaKaMn Kopnpaunn Bluetooth SIG, Inc. n
MCNoB3yIOCTc Sony Corporation no JnueH3nn.
ДргпЕ TOВАБПYE 3HaKNI TOpROBьE Ha3BaHЯ
PnHaIeXaT COOTBeTCTByIOUzIM BlaJeIbIaM.
3HaK N YBJIaETCa TOBaPbIM 3HaKOM IJIN
3apernctpnpoBaHHbIM TOBapHbIM 3HaKOM NFC
Forum, Inc. B CUSA n pynx ctpaHax.
Windows Media KBJIETCB TOBapHbIM 3HaKOM nIn 3apernctpnpoBaHHbIM TOBapHbIM 3HaKOM Kopnpaunn Microsoft Corporation B CUSA n/nIn dpynx CTpaHax.
JaHHe 3aUeHoOppeEeHHbIMn
PpABAMN INTeJIeKTyAIBHO Co6CTBeHHOCTN
Microsoft Corporation. NcNoIb3oBaHne nIi
pacnpoctpaHHeNe IIO6HO TexHOJOrn, Kpome KaB DAnHOM npOdyKe, Be3 IuueH3nn
KopnpaMn Microsoft nIi ABTopu3OBaHnHO
npedCTaBnteNbCTBa KopnpaMn Microsoft
3aIpeSeHo.
Apple, iPhone, iPod, iPod nano, iPod touch n Siri Явлайтс Товарнын 3нakамn Apple Inc., Зaperистрированын B СИА n Дугх CTрах. App Store явлайтс 3нakOM obсclужваши komпаши Apple Inc.
IOS YBnEeTcTOBapHbIM 3HaKOM NIN 3apernctpnpoBaHHbIM TOBapHbIM 3HaKOM KOMnAHnCISCO B CUSA IN dpyrnx cTpaHax, KOtOpbl INCNOB3yeTcB COOTBeTCTBnC JInueH3nei.
Google, Google Play n AndroidялгOTc TOBAPHbIMn 3HaKaAMn Kopnpaunn Google LLC.
libFLAC
Abtopckoe npabo (C) 2000-2009 rr. Jxooi Koalcoh Abtopckoe npabo (C) 2011-2013 rr. Xiph.Org Foundation
PacnpoctpaHHeHne n IcNoJIb3ObaHne B IcxOJbIx n IBOUHybIX oOpMax C n3MeHeHnMaN i 6e3 Hnx pa3peWaeTc npn BblONHeHn CneDyUoIxycIOBn:
-BpacnpocpaHReMOMNCxoDHomKoJe DOJXHO coxpaHnTbcraYka3aHHoeBblIeYBeDOMneHneOb ABTOPCKNX npabax,daHHbICNcOK ycIOBn IN CNe dyUoee 3aABLeHne O6 OTKa3eOT rapaHTn.
-PacnpoctpaHReMbIe B DBOUHOn FOIpMe FaiNbI bOJXHbI COxpaHHTb Yka3aHHoe BblIe yBeDOMJIeHne 06 aBTOPCKNX IpaBax, DaHHbI CNICOK YcIOBNI cNeyIOoee 3aYBaJIeHne 06 OTKa3E OT rapaHTN B DOKymeHTaCNI N/IN dpyrIX MaTePnAJaX, PpeIOCTabJIeMbIX C pacnpoctpaHReMbIM NaKeTOM.
-IMy foHda Xiph.org Foundation n ImeHa yactHnKOB fOHNa HeJIb3A NcNoJIb3OBA TbДЯ NOOupeHnI INI pOJdBXKeHn IpoDyKTOB, CO3dAnHHbIX Ha OCHOBE 3TOrO npORpaMMHO OBeceNeueHn 6e3 npEdBapntelbHoro INCsbMeHHo pa3peWeHn.
DAHHOE IPOIPOPMMHOE OBCNEUEHNE
IPDEIOCTABJIETCJ DEPKATEJIAMN ABTOPCKNX
IPAB N UYACTHNIKAM KAK ECTb. IPN 3TOM HE
IPDEIOCTABJIOTC HNKAKNE FAPAHNTN, YBHbIE
NJN IOJPA3YMBAEMbIE, B TOM YNCJIe
IOJPA3YMBAEMbIE FAPAHNTN KOMMEPQUECKO
IPIN JOHOCTN IN PNIROHOCTN JIa
ONPEJEENHOI CEJI.N H N PAKNX
OBCTOJTEJBCTBAX FOHN IJN YUCAHTHNIK
FOHDA HE BYDHT HECTN OTBETCTBEHHOCt b 3A
JIIOBbIE IIPMbIE,KOCBEHHbIE,CJUYAHbIE, CNEUJAHbIE,IPNCYKDEHHbIE B NOPAKe HAKA3AHN INIINIOCEYEIOUe YbBITKIN(B TOM YNCIE IIPNOBpETEHNE TOBAOB INI YCJYT JIA 3AMEHbI,NOTEPIPIFOIDHOCTN,DAHHbIX INI INPbblIN,IIPEPBIBAHNE DEATELBHOCTN), BO3HNKWHNE IO JIOBOI PNIuHNE,IN3A JIOBbIE O6R3ATEJBCTBA,KAK KOHTPAKTHBIE,CTPOITNE INI DEJIKATHBIE (BKJIIOUaXAIATHOCTb NT. D.),KOTOPbIE BO3HNKJIIN PNI JIOBOM NCIOJIb3OBAHnN 3TOTO IPOPTAMMHOTO O6ECNEUEHnN,DAXE ECNI bIIO COOBUHEO O BO3MOXHOCTN NOIOBHOTo YUePbA.
He cIbIweH 3ByKOBoN cnHnA.
ΠoДКЛЮЧЕн ДОПОЛНИТЕЛБНБИ YСЛNTЕЛБ MOШOCТи, a BCTPOЕHHБИ He NCПОЛБ3YEТСЯ.
I3 namrtn ydaJIeHbI
3aIporpaMMnPOBaHHbIe paNIOCTaHcII N UCTaHOBka BpeMeHN.
Ipeperopel npedoxpAHntelb.
CbIweH wym npn nepeKIOUeHm
NoLOXeHNA KIOUa 3aXnraHn.
→Пювда He npaBnIbHNo NOcOeDINHeHbI K pa3bemy 3JIeKTpOnItaHnB BCNOMORAteIbHOro O6OpyIDOBaHnA aBTOMO6nIy.
Bo BpemBocnpOn3BeDeHnI nn npneMa NaunHaeTcA demOHCTpaZna.
Ecnn npn BkIIOUeHHOM
dEmOHCTpaunOHHom peKmme [DEMO-ON]
B TeueHne 5 MNHyT He BbINOJNHaOTcra
HnKaKHe ONEpaUN, HauINHaETcra
dEmOHCTpaun.
-YctaHOBe 3HaueHne [DEMO-OFF] (cTp.21).
Ipona/He oTo6paxaetcHnDnkaunB OKoUke nucnpe.
KOHTaKTbI 3arpa3HeHbI (CTp.27).
Ducnnei/NoCDBeTkaMuraet.
HeoctaToHnaNoaHa nHTAHn. -Y6eNTecb, YTO Ha yCTpOInCTBO noTaTcAIOCTaTOUHO nHTAHn OT aBTOMoBnIbHO rAKyMylrTopa. (Tpe6oBaHne K nCTouHnky nHTAHn: 12 B nOCToRHHOrTo kKa.)
He pa6oTaOT KhoNk ynpaBleHn.
→ Haxmnte u ydepknaBaiTe KhoNKn DSPL n (Ha3aD)/MODE 6oJee 2 cekyH, YTO6bl nepe3arpy3nTb yCTpOiCTBO. CoepxImoe namrtn 6yDet ydaIeHo.
PpneM paNocTahn
Cna6bip padnocnHaJ. CTaTnueckn wym.
IpoBepbTe NOdCoeUHeHne aHTehHbl.
B dnaana3oHe FM3 He ydaTcHacTpOuTb 65 Mf-74 Mf.
→ДЯ [AREA] BbIbpaHOb [EUROPE]. -YcTaHOBnTeДЯ [AREA] 3HaueHne [RUSSIA] (cTp.21).
RDS
He ydaetc npnHryb ycIyRn RDS (KoIa dIa napameTp a [AREA] 3aDaHO 3HaueHne [RUSSIA]).
→ BbI6paH dnaana3OH FM3. -BbI6epnte FM1 nIn FM2.
YcIyRn RDS HeIOCTyINbI B DaHHom perNoHe.
Iocne HeckoJIbKnx CekyHd npocnyuBbAHn BkJIIOyaeTcra yHKunr SEEK.
→ CtaHnIa He nepeJaet daHbIe TP nJI npepaet cIIuKOM cIa6bIcRHaJ. -OTKnIOUHTe TA (CTp.12).
DopoxKhble coo6ueHn He nepeaotcra.
BKJHouHTeTA(cTp.12).
→ CtaHnIa He TpaHCInpyeT DopoXhblx coo6uHn, XOTn OTHocntcK Tnny TP. -HaCtpoNTecb Ha npyTu CTaHcuio.
Ipn BkIIOueHn HyHKcnn PTY oTo6paXkaetc HndNkaun [---].
→ПинMuMaemЯ cTaHцЯ He nepeJaet daHHbIe RDS, nIu cIa6bI paIauocurHaJ.
Ha3BaHne nporpaMMHOyCnyr MmraeT.
→ДЯ ВьбраHHОВ ДаHHыМOMeHT CTaHи He NcNoIb3yETcA aIbTePHaTINBHa YacToTa.
- Haxmnte KhoNky />I (SEEK -/+), noka muraet Ha3BaHne nporpaMMHO ycnyr. NOBuTcRnHnDnKaunra [PI SEEK], n yCTPOINCTBO NaHETNONCKdpyroJ yactotbIC TaKIMn JKe DaHHbIMn PI (nporpamMna ndeHTnΦnKaunra).
Bocnpo3BeDeHne c yctpoiCTBa USB
YcIpoiCTBO USB Tpe6yeT 6oJIbwe BpeMeHn IJRA BOCIpOu3BeDeHn.
YcTpoiCTBO USB coepxnt fainbI cCIOXHO pa3BETBHeHHoN CTpykTypoINnOK.
He ydaetc Bocnpon3Bectn aydnofoaJl.
→ CbeHnO o NOdEepKnBaembIX fOpMaTAX cm. B pa3deJe "TexHnueckne xapaKTepeNCTNK" (ctp. 27). Ecn yadnooafn no-npeXhemy He BOCPON3BOIDTCs, CM. pYKOBOCTBO K yCTpoiCTBy USB nIn o6paTntEcB K npOn3BOIDTeJIO yCTpoiCTBa.
He ydaetcBbINOJHnTb onepaunn nponycka aIb6oma, nponycka 3JeMeHTOB (pexim nepexoDa) n noncka komnozuni no Ha3BaHnIO (QuickBrowZer).
→ДпяnapaMeTpapbUSBMODE]yctaHOBNTe 3NaueHne MSC/MTP.
B pexime Android 3Byk c annapata He BocnpOn3BODNTc.
→ ПоверпсocToHnne npIoXKeHnЯ ДЯ BOCIpOn3BeDeHnЯ aydno Ha cMapTfoHe C OC Android.
Функця NFC
He ydaetcBbINOJHnTb NOKJIuOeHne OdHM KacaHnem (C nCnoJb3OBaHnem FyHKunNFC).
Ecnn cMapTfoH He pearnpyet Ha KaCaHne, BbIIOJIHnTe yKa3aHHbIe HNXe DeiCTBnJ.
- PpOBepbTe, BKNIOueHa JIN yHKuN NFC Ha cMapTfoHe.
- Euple 60JIbWe npn6JIn3bTe o6JaCTb Co 3HaKOM N Ha cMaprfoHe K o6JaCTn Co 3HaKOM N Ha daHHom aannapate.
- Ecnn CmapTfoH B yexne, CHMnTe yexoJ.
YyBCTBNTeJIbHOCtI npHEmHnka NFC 3aBNCIT OT KOHKpeTHOrO yCTpoiCTBa. Ecn HeckoJbKO pa3 He ydaetcra co3dAtb NOkNIOUeHne K CMapTfoHy ODNHM KaCaHnEM, CO3dAte NODKlIOUeHne BLUETOOTH BpyHyIO.
Функць BLUETOOTH
IopKJIIOUaEMOMy yCTpOINCTBy He ydaetc8 06HapxNtB daHHbI aannapaT.
YTO6bI BbINOJHnTb cOpJxKeHne, nepeBeIte aAnpaT bpeXIM OxNJaHna cOpJxKeHn.
Korda annapaT noDKIIOueH K DBym yCTpoiCTBAM BLUETOOTH, pyromy yCTPOICTBY He ydaCTcOOBAPxNtB erO. -3akpoiTBe CPe noDKIIOueHnI BbINOJIHNTe NOnCK DaHHoro aannapataHa dpyROM yCTPOICTBE.
Nocne BbINOHeHnCOnpJxKeHnCyCTPOINCTBOM BKIOUHTe BbIXOHOcNrHaI BLUETOOTH (ctp.9).
He ydaetc co3daTb noKJIOUeHne.
Поdkлioуehem уnpaBЯET Oнha n3 CTopoH (daHHbI aNnapaT nIN yCTpoiCTBO BLUETOOTH), Ho He oBe oDHObpemeHo.
-ПодклюаиТecьКаannapatусустpoиCTBa BLUETOOTH nIn haO6oPoT.
He oTo6paKaetcI Mm o6HapyKeHHoro yCTpoiCTBa.
→ B 3aBnCmOCTN OT COCToHnA DpyrOryctpoiCTBa, BO3MOxHo, He ydaCTcnoJyUHTb eRo IMr.
OTcyTCTByeMeJIOyBbl3OBa.
→Пи NOCTyIeHn BxOJaIeRo BbI3OBa HAcTpoITe rPOMKoCTb, NOBopauNBAДИСКOBыI peRyJIaTOp.
B 3aBucmocn OT NOKJIuOeHHoro yCTpoiCTBa MeIoDnBbI3OBA MoKeT OTnpaBnTbcr He npaBnIbHo.
- 3aαnte nla napametpa [RINGTONE] 3naueHne [1] (cTp. 25).
→Переднигомороговпени He noДКЛЮЧны К данHomу annapaTy.
-ПодключITE nepeДнue rgomkoROBOpNTeI K aannapaTy. MeIoJnBa BocnpOn3BOJntc ToIbKO Yepe3 NepeDnue rgomkoROBOpNTeI.
He cIbIshO co6eceHnka.
PoiocoeHnHTe yCTpoiCTBO USB C BOCnpoIN3BOIMMbIMn faJnAmn (cTp. 27).
USB NO SUPRT
→ДяпolyчehнnoДрбнbIX CbeDeHn O COBMeCTNMOCTn yCtpoiCTBa USB NocetTte Be6-caI T NOdEprKKn, Yka3aHHbI Ha 3aDHeI CTOpOHe 06LoKKN.
OVERLOAD: yctpoicTBO USB nepenolHeNo.
→ OTKJIHOUHTe yCTpOJCTBO USB, a 3aTeM HaxMMTE KHOKNKy SRCДЯ Bb6opa dpyrOro nctOuHNka.
YcTpoiCTBO USB noBpeXdEHO, nJIN POIcoEINHeHO HeIOIePJKBaEMOE YcTpoiCTBO.
Pn npneMe cTanuRDS:
NO AF: OTCYTCTBYOT aJIbTePHaTUNBhbie YactOTbl.
→Haxmnte KhoNky /▶/ (SEEK-/+), noka mnaet Ha3BaHne npoRpaMMHO yCnyr. YcTpoiCTBO hauHaeT NOIC dpyroJyactOTbI C TeMn Je daHHbIMn PI (npoRpaMMHa nDeHTnΦnKaζn) (noaBlaer cnHdNkaζn [PI SEEK]).
NO PI: Het nporpaMMHO nDeHTnΦnKaun.
IЯ Bbl6paHHoN cTaHUn OTCyTCTBYOT
daHHbIe PI (nporpaMMHO
nDeHTnΦnKaun).
→ Bb6epnte npyryo cTaHnIO.
NO TP: Het coo6uHn o TeKyuJe nCtyaun Ha doporax.
YcTpoiCTBO npoOJXHT nonCK cTaHcN, nepeJaIOxN nporpaMMy TP.
APP NO DEV: yCTpoiCTBO C yCTaHOBJIeHHbIM npIIOXeHnEM He IODKJIIOUeHO INI Hpeacno3HaHO.
Co3daiTe noKluoyeHne BLUETOOTH, a 3aTeM eue pa3 co3daiTe noKluoyeHne K npIIOxehnIO "Sony | Music Center" (cTp.18).
APP SOUND: OTKpbITo MeHIO napaMeTpOB 3ByKa B npNJIOXeHN.
→ YTO6bIMOxH0 6bIIO NcNoJIb3OBaTb KHOPIK, BbI,INTe IN3 MeHIO npaMeTpOB 3ByKa B pNIOJKeHN.
OPEN APP:прложене "Sony | Music Center" He зауцени.
MepbI npedoctopoXHOCTN
TuaTeJIbHO BbIbnpaIte MeTo dJa yCTaHOBKn aPnapaTa, YTObI OH He MeJauynpaBHeNIO aBTOMObIeM.
- He yctaHaBnBaIe Taannapat TaM, rde OH 6ydet nOdBepXeH BO3DeiCTBIO nbIN, rpa3N, Ype3MepHO Bn6paCNI INBbICOKNX TempeATyp, HApPIMep B MeCTax, Kya IONaDAIoT npAble COJIHeuHbIe JLyU, INI N6JIn3N BeHTINLAIOHHbIX peWetOK o6OrpeBaTeJeIe.
B ueJx o6ecneueHnHaJeKHO n 6e3OnaChoYCTaHOBKn NcNoIb3yInTe IINb BXOJaUe B KOMPJIeKT MOHTaXHbIe DeTaII.
PnmeaHne OTHocnteIbHo npoBoda nTaHna (KeIb)
Pn noKIOueHn DaHHoro yCTpOcTbBA BMeCTe C DpyrMM nTepeOKOMNOHeHTaM HOMHaJIbHOE 3NaueHne CNbl TOKa B KOHType NtTaHn ABTOMOUIA DoJXHO pReBbIaTb CymMapHOE 3NaueHne CNbl TOKa, YKa3aHHoe Ha npdeOxpaHnteJx BCex KOMNoHETOB.
Peynilpobka yrna yctaHOBKn
OtperynipyTe yroJ yctaHOBKn TaK, UTo6bI OH coCTaBJI MeHee 30^
Ipeuehb deTaJei dJa UCTaHOBKn
①
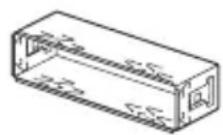
②

(3)

(4)

(5)

6

7
8


B 3TOT cncOK BXOJNT He BCE coJepeKUMoe KOMJIeKTA NOCTaBKN.
-KpoHHTeH ① 3aUHTHaMaHKeTa ③ npKpeJIeHbI K yCTpOYCTBY IO NOCTaBKn. Ipeed yCTaHOBKOYCTPOINCTBa BOCNoJIb3yITecb KIOUHaMn DnA DeMOHTaKa ② ,TO6bl OTcoEHNHTb KPOHHTeH ① OT yCTpOYCTBa.IoDPo6HbIe CBeDeHnA cm.B pa3dene "OTcoEHNHeHne 3aUHTHOm MaHXeTb IN KPOHHTeHa" (cTp.40).
-CoxpaHnte KJIIOUIN IJN DEMOHTaJa ② JI INCPOJb3OBaHN B6yDyUeM, NOCKoJIbKy OHI TAKKe NOTpe6yIOTc npN DEMOHTaKe aannapata n3 aBTOMO6nJI.
Поклоченье
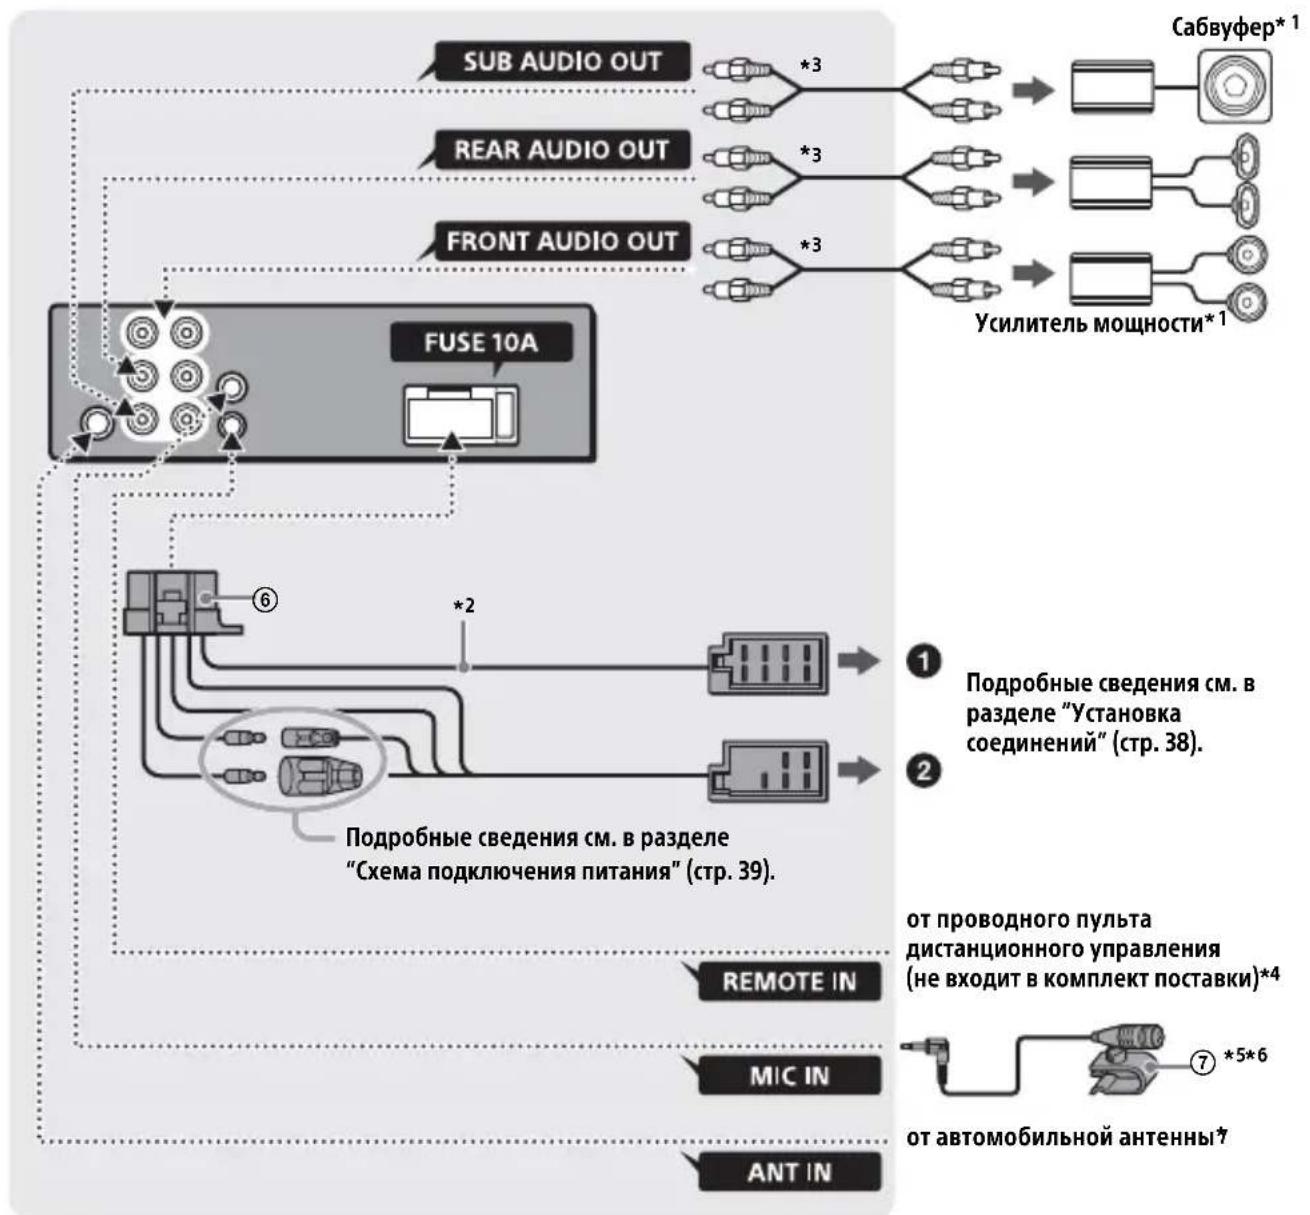
1 He BXOДNT B KOMПЛЕКТ NOCTaBKN.
2 Полhoe copotubneHne rpoMkorOBopnteJen: 4Ω-8Ω×4
*3 Ka6eIb c pa3beMaMu RCA (He BXoIIT B KOMJIeKT NOCTaBKn).
*4B 3aBnCmOCTn OT Tnna ABTomO6nJRA, BO3MOxHNO, NOTpe6yETcNcNoIb3OBaTb aAnTeP IJI npoBOHO rnybTa INCTaHnOHHoro ynpabNeHr (He BXoIIT B KOMnIeKTI NOCTABKn). POnp6HbIe CBeJeHr O6 INcNoIb3OBAHn NpOBoHOrO nylbTa INCTaHnOHHORynpabNeHr CM. B pa3dJe "IncNoIb3OBaHne npoBOHO rnybTa INCTaHnOHHORynpabHnra" (cTp. 40).
5 He3aBnCmO OT TORo, 6yDte JI N BblncnoJIb3OBaTb MnkpofoH, npoloxNte Ka6eJbMnkpofoHa TaK, YTO6bl OH He Me7aIBOXdEHHIO. 3akpeNITE Ka6eJIb 3aXHMOM, ecJIH, HApPIMep, OH npoxOHT pAIDom C BaAMHNOramn.
^6 CBeHeHnO6 yCTaHOBKe MmKpOoHa cm. B pa3Je "YCTaHOBka MmKpOoHa" (cTp. 39).
*7B3aBnCmOCTnOT Tnna aBTOMo6nla nCnoJb3yIte aIantep (He BXoNT B KOMNKeKT NOCTaBKn),ecn pa3beM aHTeHHbI He NOxOaNT.
YcTaHOBka CoeHHeHn
Ecn nncnojb3yETc aHTeHnac 3NeKtpoPnPBODOM6e3peJeHOrO6JIOKa, POnCoeDnHeHne 3TOrO yCTpOYCTBa C NOMOuI npNlaRaEMO rpoBoDa nITaHn ⑥ MoKeT npBecTN K NOBpeXdEHN OaHTeHHbl.
Kpa3bemyrpoMkoROBOpHTeJIaBTOMo6nJIa
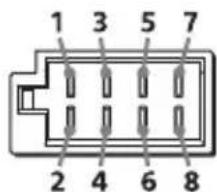
EcnKpaChbI N XeJIbI npoBoda nepeCTaBHeHbI MeCTaMn

XeIbI XeIbI
- Ecnn ΦικcaTopbI He coHryTbI NII NBHyTbI Hapyxv, yCTpOncTBo He 6ydt YcTaHOBNeHO NaJIeXaUIM O6pa3OM M0KET BbInactb.
- Y6eIntecb, yTo 4 ΦnKcaTopa Ha 3aunTHoMaHKeTe ③ HaJIeXkaUIM o6pa3OM BCTaBHeHbIBOTBepCTN, IMeIOUneCeB YCTPOIcTBe.
Сяты NGyCTaHOBKa nepeDnei naHeIi
POnpObHbIe CBeDeHnA CM.B pa3JeNe "ChraTne nepeDHe nAHeJIn" (CTp.6).
Ipee3arpy3ka yctpoiCTBa
Ioppo6HbIe CBeJeHnA cm. B pa3dJeIe "IpeepaRpy3ka ycTpoiCTBa" (ctp. 7).
3ameHa npeOxpaHnteIa
Ipn 3aMeHe npedeoxpaHnteJe o6raTeBHO NcNoJIb3yIte TOJIbKO Te, KOTOpbie COOTBeTCTBYIOT CnJIe TOKa, yKa3aHHo Ha
opnHaJIbHOM npedoxpaHnteJe. Ecn
peperopej ppeoxpaHntJIb, npOBepbTe
IodKIOUeHne NITaHnN 3aMeHNTe
ppeoxpaHntJIb. EcIn noCle 3aMeHbl
peoxpaHntJIb cHOBa peperopeJ, 3TO
MOKeT O3NaaTb HeNCnpaBHOCTb
yCTpoiCTBa.B 3tOM clyuae o6paTItecb K
6bnJaWemy dIJIepy Sony.
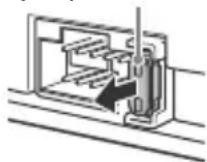
IpeoXpaHnteB (10A)
BbIrapckn
C国有资产,SonyCorporationДeКларupa,ueTOBaOБОуДВаHe eBcBoTBeTCTBnE CДиpeKТИBa2014/53/EU.
LJIIOCTHnT TeKCT Ha EC JeKnapaunTa 3a cbOTBETCTBne MOKe Da Ce Hamepn Ha CNeHNHaHTepHeT aDpeC:
http://www.compliance.sony.de/
Hrvatski
Sony Corporation ovime izjavljuje da je ova oprema u skladu s Direktivom 2014/53/EU. Cjeloviti tekst EU izjave o sukladnosti dostupan je na sljedecoj internetskoj adresi: http://www.compliance.sony.de/
Cesky
Hereby, Sony Corporation declares that this equipment is in compliance with Directive 2014/53/EU. The full text of the EU declaration of conformity is available at the following internet address: http://www.compliance.sony.de/
Eesti keel
If you have any questions or for the latest support information on this product, please visit the web site below:
Site d'assistance
Register your product online now at:
Support by Sony app - Find information and get notification about your product:
App. de smartphone
https://sony.net/SBS
Made for

iPhone
iPod


Bluetooth