
XTDTV1 - Car stereo SONY - Free user manual and instructions
Find the device manual for free XTDTV1 SONY in PDF.
| Product type | Digital TV tuner for vehicle |
| Brand | Sony |
| Model | XTDTV1 |
| Dimensions (W × H × D) | Approx. 182 × 43 × 174 mm |
| Weight | Approx. 920 g |
| Power supply | 12 V DC (negative ground) |
| Power consumption | 1.2 A |
| Input frequency range | VHF: 174-230 MHz, UHF: 470-862 MHz |
| Video decoding | DVB MPEG-2 up to MP@ML, resolution up to 720×576 pixels |
| Audio decoding | MPEG Layer 1/2 |
| Inputs | 2 TV antennas, remote control (sensor), service (RS232) |
| Outputs | Video (1), Audio L/R (1) |
| Main features | Auto and manual search, EPG, favorite list (up to 2000 channels), parental lock, dual tuner, mobile reception |
| Remote control | Mini remote control RM-X711 with lithium battery CR2025 |
| Supplied accessories | Installation parts, remote control (with battery), power cord, remote sensor, manuals |
| Care and cleaning | Clean with a dry cloth; replace the fuse with one of the same rating; replace the remote control battery with a CR2025 |
| Safety | Installation by a professional; do not obstruct visibility or airbags; obey traffic laws; use appropriate fuses |
| Spare parts and repairability | Consult an authorized Sony dealer for any repair; fuse available; standard remote control battery |
| General information | Manual available in multiple languages; operating temperature 0-45°C |
Frequently Asked Questions - XTDTV1 SONY
User questions about XTDTV1 SONY
0 question about this device. Answer the ones you know or ask your own.
Ask a new question about this device
Download the instructions for your Car stereo in PDF format for free! Find your manual XTDTV1 - SONY and take your electronic device back in hand. On this page are published all the documents necessary for the use of your device. XTDTV1 by SONY.
USER MANUAL XTDTV1 SONY
Operating Instructions GB
Sony Corporation Printed in Thailand
XT-DTV1
© 2005 Sony Corporation

natural_image
Symbol of a trash bin crossed with no text or labelsDisposal of Old Electrical & Electronic Equipment (Applicable in the European Union and other European countries with separate collection systems)
This symbol on the product or on its packaging indicates that this product shall not be treated as household waste. Instead it shall be handed over to the applicable collection point for the recycling of electrical and electronic equipment. By ensuring this product is disposed of correctly, you will help prevent potential negative consequences for the environment and human health, which could otherwise be caused by inappropriate waste handling of this product. The recycling of materials will help to conserve natural resources. For more detailed information about recycling of this product, please contact your local Civic Office, your household waste disposal service or the shop where you purchased the product.
Applicable accessory: Remote commander
Welcome!
Thank you for purchasing the Sony Digital TV Tuner.
• High fidelity DVD quality video presentation.
• 2,000 programmable favourite channels.
- EPG function, supports PIG (Picture in Graphics) display.
- Parental lock option available.
- Last channel memory function.
- Dual tuner options available for diversity function.
- Mobile reception mode, can receive several dozens terrestrial digital TV programmes during moving in high speed.
Table of contents
Welcome! 2
Precautions....4
Location of controls 6
Operation
Searching channels 8
Receiving channels 10
Using channel manager 11
Checking the Programme Guide 15
Switching the audio channel 16
Switching the audio language.... 16
Displaying the subtitle and teletext 17
Changing Setup
Changing the menu settings 18
Locking the unit 20
Additional Information
Maintenance 22
Specifications 24
Troubleshooting 25
Messages 25
Precautions
To avoid the risk of serious injury or accident, read the following precautions before installing and operating the unit.
On safety
Comply with your local traffic rules and regulations.
On installation
- Installing this unit requires technical expertise. This unit should be installed by a qualified technician or service personnel.
- If you try to install this unit by yourself, do it properly, referring to the installation and wiring diagrams in the installation/connections manual. Improper installation may result in fire or electric shock.
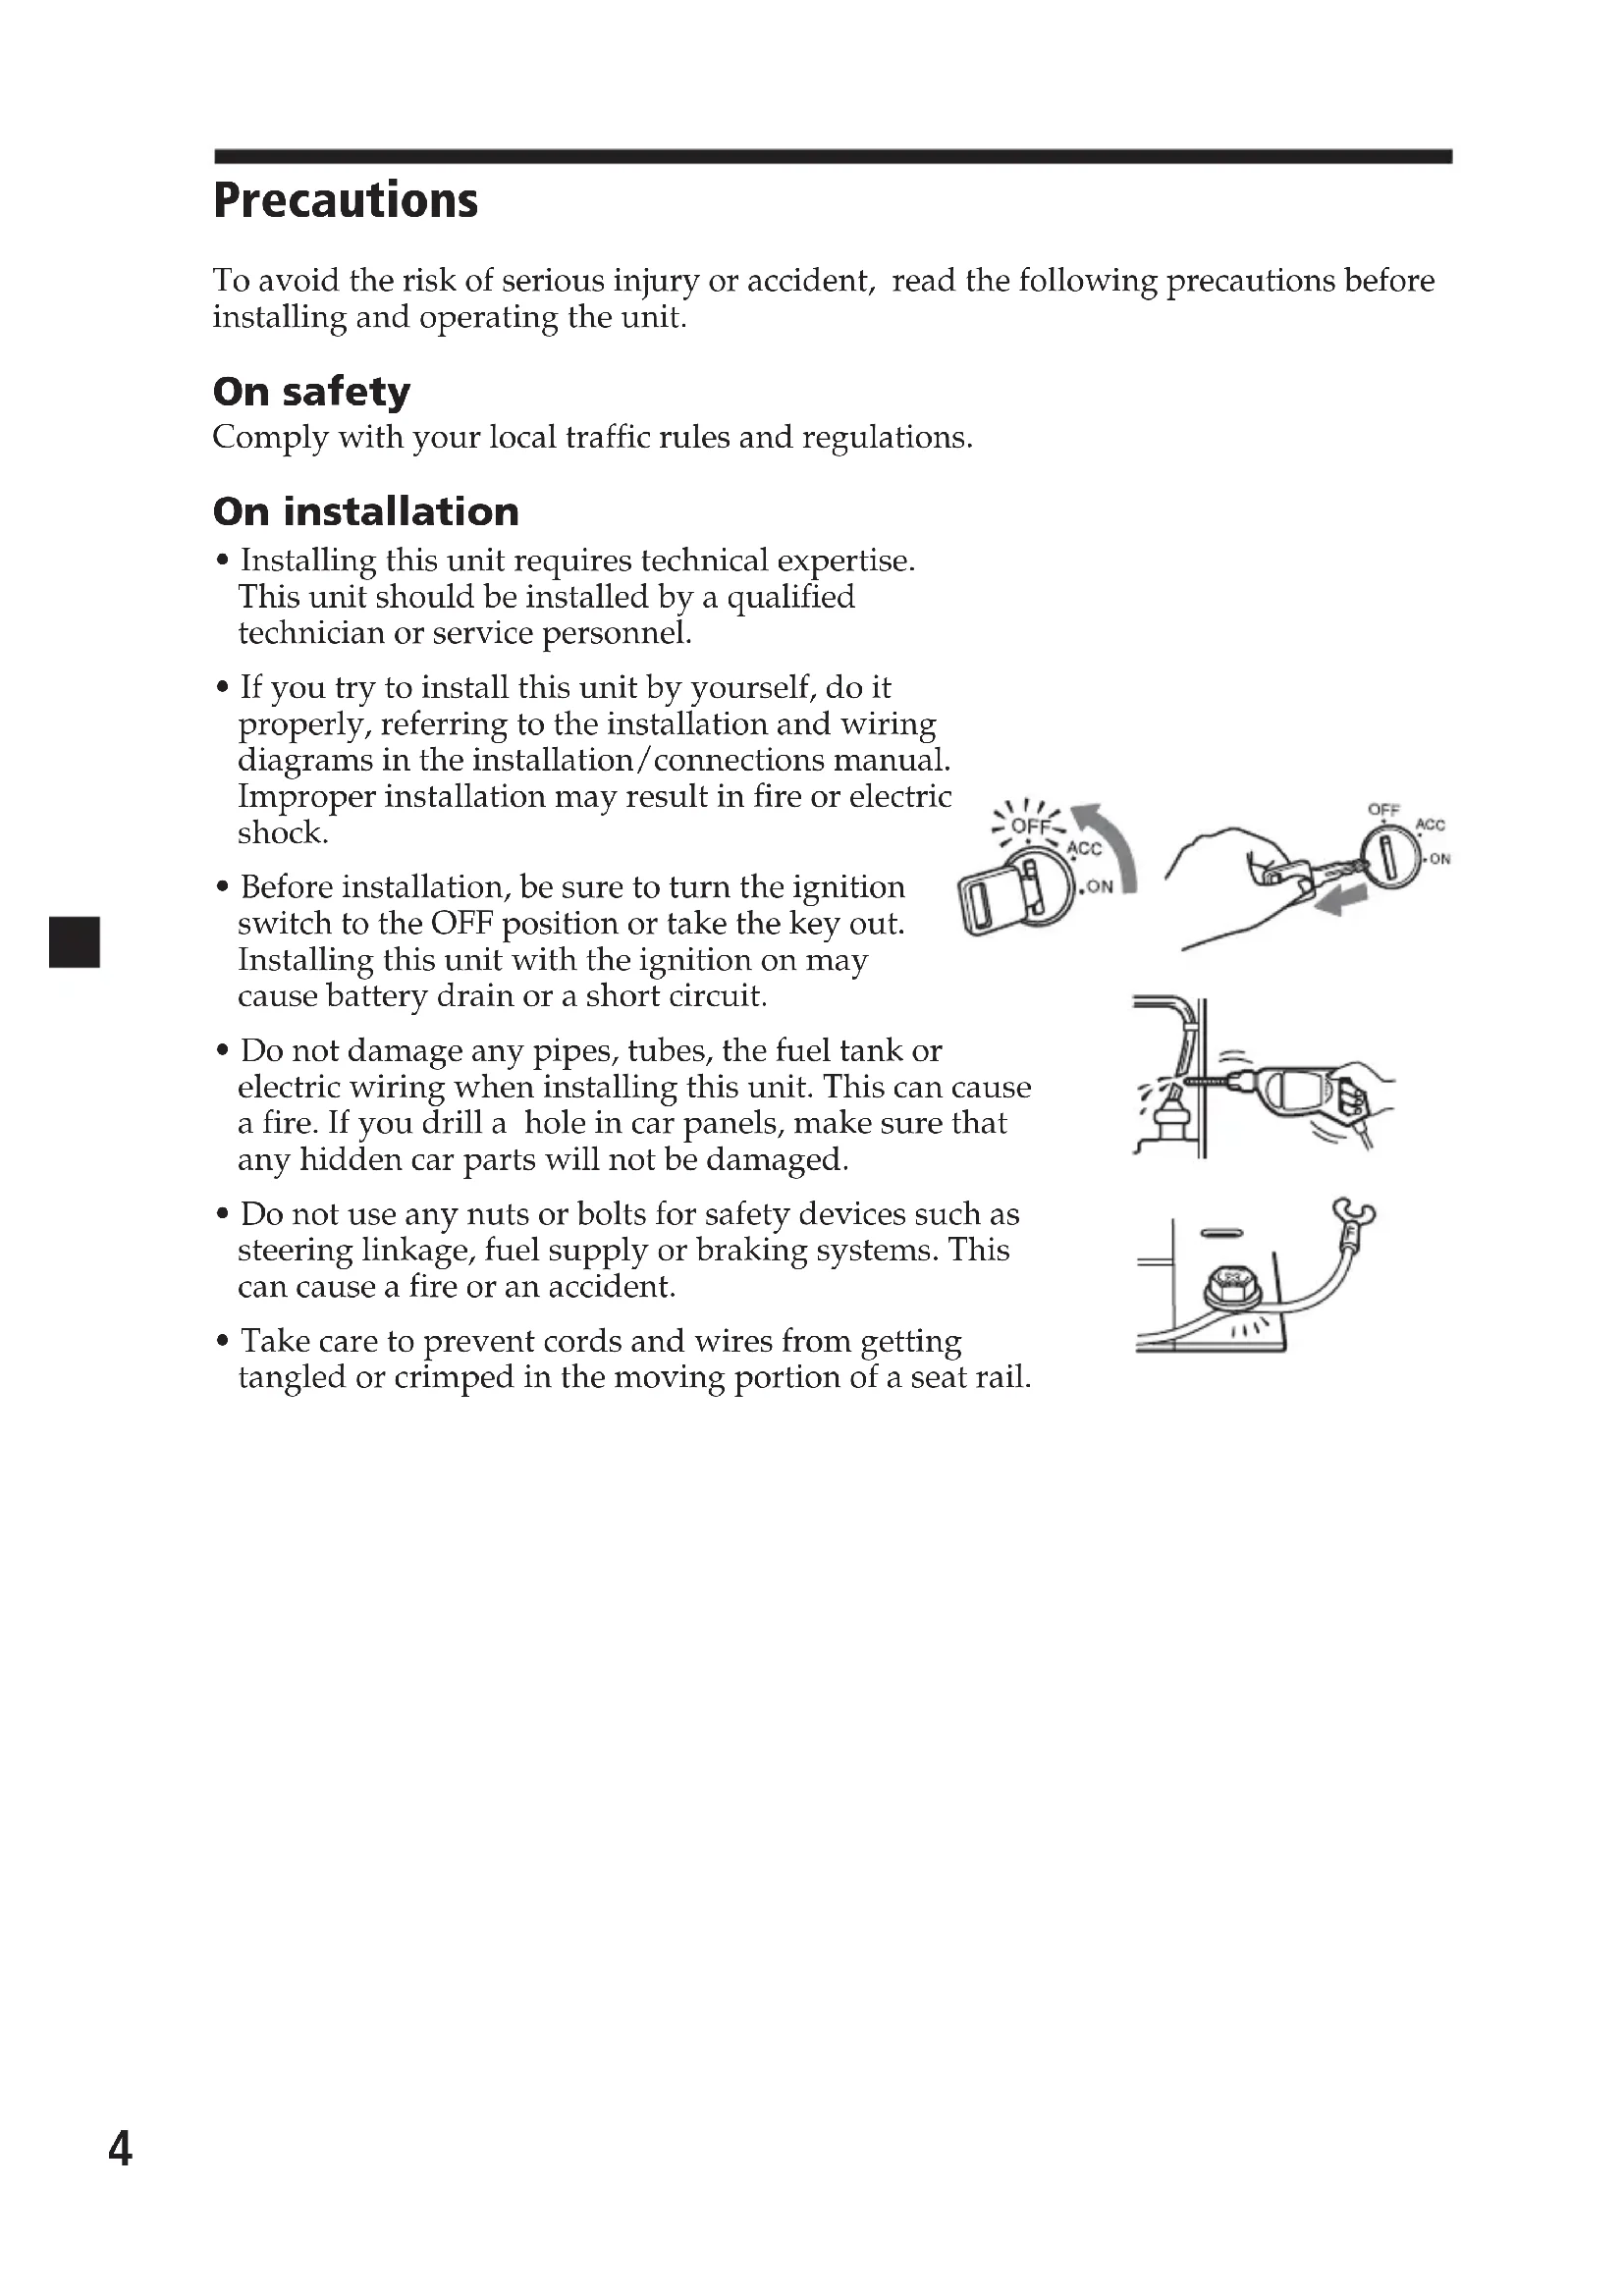
- Before installation, be sure to turn the ignition switch to the OFF position or take the key out. Installing this unit with the ignition on may cause battery drain or a short circuit.
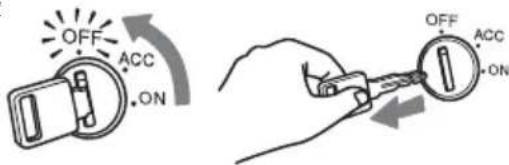
- Do not damage any pipes, tubes, the fuel tank or electric wiring when installing this unit. This can cause a fire. If you drill a hole in car panels, make sure that any hidden car parts will not be damaged.
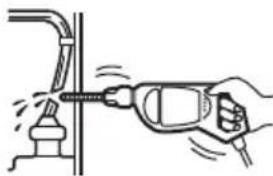
- Do not use any nuts or bolts for safety devices such as steering linkage, fuel supply or braking systems. This can cause a fire or an accident.
• Take care to prevent cords and wires from getting tangled or crimped in the moving portion of a seat rail.
natural_image
Illustration of a hand using a power drill to lift a pipe (no text or symbols)
natural_image
Simple line drawing of a mechanical component with a bolt and curved connector (no text or symbols)Where to install
Before installing this unit, please check your local traffic rules and regulations.
Do not install this unit where:
- It will obstruct the driver's view.
- It will obstruct the operation of the airbag system.
- It will obstruct the operation of the vehicle, especially the steering wheel, shift lever, or brake pedal.
- A driver or passengers may injure themselves when getting into or out of the car.

natural_image
Illustration of a person lying in bed with hands clasped, no text or symbols presentIf you have any questions or problems concerning your unit that are not covered in this manual, please consult your nearest Sony dealer.
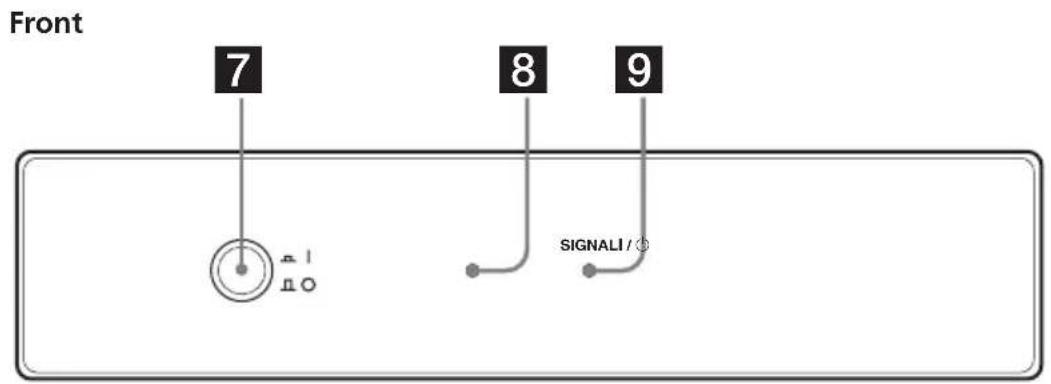
Location of controls
Digital TV Tuner
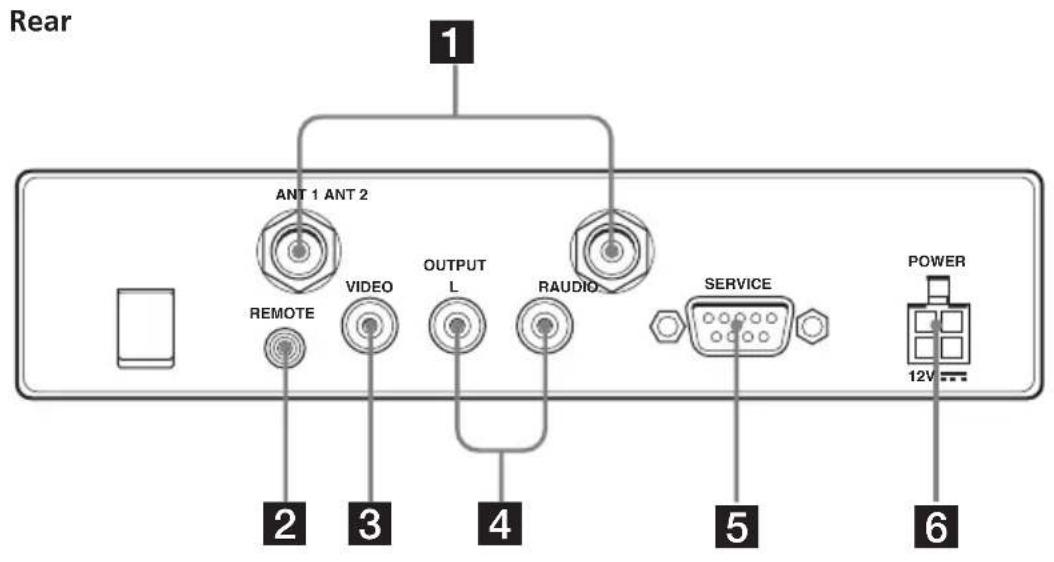
1 ANT 1/ANT 2 terminals
Input to connect the antennas.
2 REMOTE jack
Input to connect the remote control sensor.
3VIDEO jack
Connect to the video input jack on your monitor, etc.
4 AUDIO jacks
Connect to the audio input jacks on your monitor, etc.
5 SERVICE (RS232) terminal
This terminal is for service only.
6 POWER 12V jack
Connect the power supply cord here.
7 I/O (power) button*
Turns on or off the unit.
8I/ (power) indicator
9 SIGNAL indicator
* When installing in a car without an ACC (accessory) position on the ignition switch, be sure to press this button to turn off the unit when you do not use it. Otherwise the battery will drain.
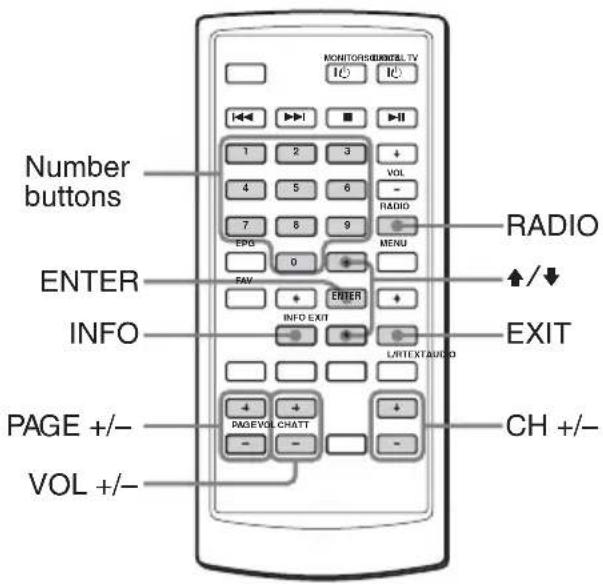
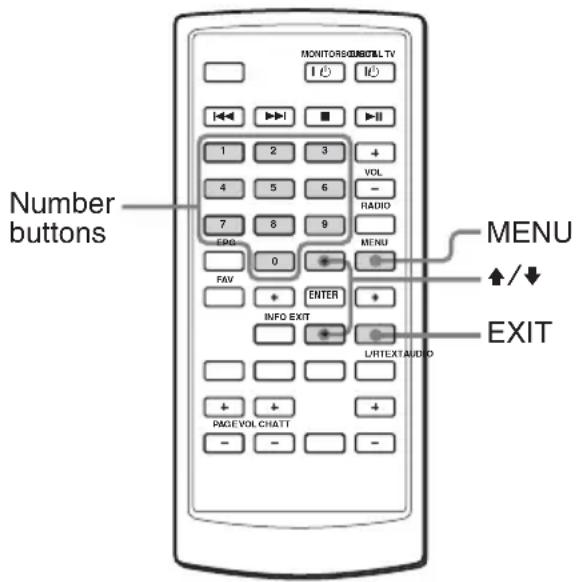
Card remote commander RM-X711
Refer to the pages listed for details.
1 These buttons are used when operating connected Sony equipments (MV-700HR, XVM-F65/F65WL).
SOURCE button
To select the input source.
◀◀/▶▶I (previous/next) buttons
■ (stop) button
MONITOR I/⏻ (power) button
▶II (play/pause) button
VOL +/- buttons
2 Number buttons 10, 17, 21
3 EPG button 15, 17
To display the Programme guide.
4 FAV button 12
To display the Favorite List or change the Favorite mode.
5 INFO button 10
To display the channel information.
6 AUDIO (red) button 14, 16
To change the audio language.
To enter the Delete CH mode as the red button.
7 Green button 12, 15
To enter the Favorite mode.
8 PAGE +/- buttons 10, 12, 13, 14
To change the page list when the selection has many pages.
9 VOL +/- buttons 11
10 DIGITAL TV I/⏻ (power) button 8
11 RADIO button 10
To switch between TV and radio mode.
12 MENU button 8, 11, 13, 14, 15, 18, 20, 21
To display the Main Page.
13 ↑/↓/←/→ buttons 8, 9, 10, 11, 12, 13, 14, 15, 17, 18, 19, 20, 21
14 ENTER button 8, 9, 10, 11, 12, 13, 14, 15, 17, 18, 19, 20, 21
15 EXIT button 9, 10, 12, 13, 14, 17, 18, 19, 20, 21
16 L/R (blue) button 13, 15, 16
To change the audio channel.
To enter the Lock mode as the blue button.
17 TEXT (yellow) button 15, 17
To display the subtitle or teletext.
18CH +/- buttons 10
19ATT button
Turning off the sound temporarily.
When you press the button, the sound is turned off and "☐" appears in the display.
To restore the sound, press the button again (or VOL +).
Tip
Refer to "Replacing the lithium battery" for details on how to replace the batteries (page 23).
Searching channels
Searching channels automatically
If the radio signal is included in the broadcast, you can also store the radio stations.
Notes
- Make sure to connect the antennas correctly.
- When searching channels, make sure to perform while the car is stopped.
1 Press the power button on the main unit to turn on the unit.
On the remote, press 📊. When you turn on the unit for the first time, the Main Page appears. If the Main Page does not appear when you turn on the unit, press ⓂMENU on the remote.
2 Press ↑ or ↓ to select "User Installation", then press ENTER.
3 Press ↑ or ↓ to select "Channel Search", then press ENTER. Channel Search window appears.
4 Press ↑ or ↓ to move the cursor to the search mode bar.
Search mode bar
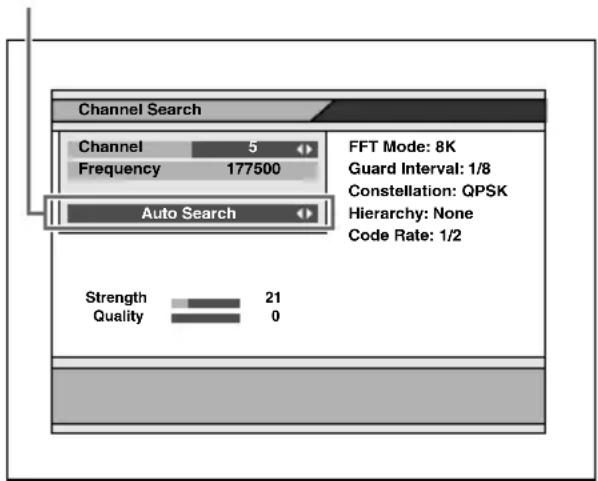
5 Press ← or → to select "Auto Search", then press ENTER.
6 Press ↑/↓/←/→ to select "Start Channel" and "End Channel".
Select the scanning channel range (5 to 69).
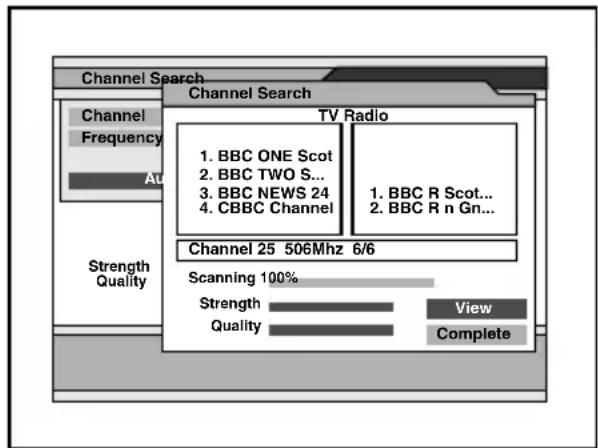
7 Press ↑ or ↓ to select "Search", then press ENTER.
The search starts. The scanned channels are automatically stored in order. If the broadcasting station is scanned, a numerical value of “Strength” and “Quality” will increase.
To stop searching, press EXIT.
8 When the search is completed, press ↑ or ↓ to select "View" or "Complete", then press ENTER.
- If you select "View", the selected channel will be received immediately.
- If you select "Complete", the Channel Search window is closed. You need to close the Main Page by pressing EXIT repeatedly to make the settings effective.
Notes
- When the unit finds the same broadcast in the same channel, the broadcast will be overwritten. When the unit finds the same broadcast in a different channel, the broadcast will be additionally stored.
- If you search channels in a different region (country) again, two or more same broadcasting stations may be stored by the same name. In this case, if you select a channel directly by pressing the number buttons (page 10), it may take time until the screen is displayed.
Searching channels automatically in your local area
1 Follow steps 1 to 3 in "Searching channels automatically".
2 Press ← or → to select the desired channel.
Select the scanning channel range.
3 Press ↑ or ↓ to move the cursor to the search mode bar.
4 Press ← or → to select "Search local channels", then press ENTER.
The search starts. The scanned channels are automatically stored in order. If a broadcasting station is scanned, a numerical value of "Strength" and "Quality" will increase.
To stop searching, press EXIT.
5 When the search is completed, press ↑ or ↓ to select "View" or "Complete", then press ENTER.
- If you select "View", the selected channel will be received immediately.
- If you select "Complete", the Channel Search window is closed. You need to close the Main Page by pressing EXIT repeatedly to make the settings effective.
- If the reception is poor, the channel information is displayed as TVch 1, 2... and will not be properly displayed. In this case, try it again in a different area.
Searching channels manually
1 Follow steps 1 to 3 in "Searching channels automatically".
2 Press ← or → to select the desired channel.
3 Press ↑ or ↓ to move the cursor to the search mode bar.
4 Press ← or → to select "Search single channel", then press ENTER.
The search starts.
To stop searching, press ⒽEXIT.
Receiving channels
Selecting TV or radio mode
While watching TV, press RADIO. Each time you press the button, the unit changes between TV and radio mode.
Changing channels
Press +or - .
Using the number button
Select channels directly by pressing buttons 0 to 9.
Example:
To select channel 5, press 5. To select channel 25, press 2 and 5. To select channel 125, press 1, 2 and 5.
Selecting channels from channel list
You can select channels from the channel list.
1 While watching TV, press ENTER. The channel list appears.
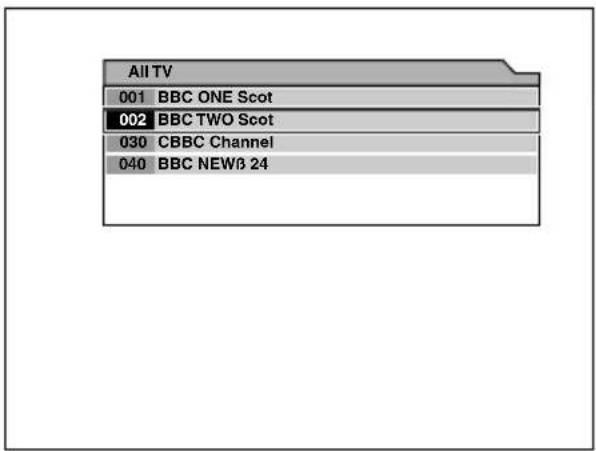
2 Press ↑/↓ or PAGE +/- to select the channel you want to watch, then press ENTER.
To close the channel list
Press EXIT.
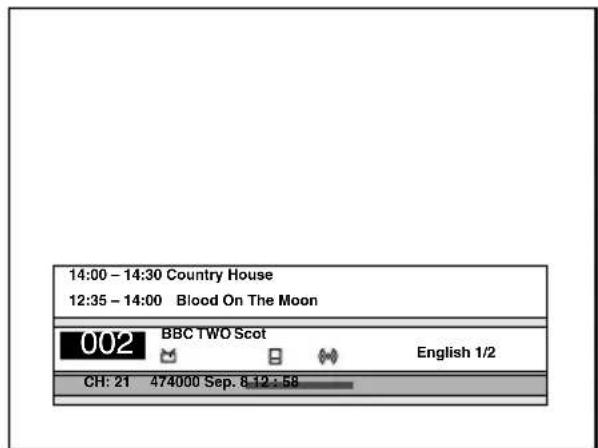
Viewing the channel information
You can display the channel information and programme description you selected.
While watching TV, press INFO.
To close the channel information, press EXIT.
Note
The programme description may be unavailable for some programmes.
Adjusting the volume
Press VOL + or -.
Notes
- This unit does not support scrambled channels.
- This unit does not support data broadcasts. If the data broadcast is received, you can hear the audio sound but the image is not displayed.
When you select the channel
When you select the channel, the information display appears. Meaning of the icons indicated in the information display is as follows:
TV programme
: Radio programme
😊: Favorite programme
S: Scrambled programme
: Parental lock programme
目: Teletext service
☐: Subtitle service
☐: Mute status
(o): Stereo status
©: Output left sound
Output right sound
Using channel manager
Channel manager helps you organize the stored channels.
Channel manager consists of the following three modes:
- Favorite mode
- Lock mode
- Delete mode
Using the Favorite List
You can find the desired channels quickly and easily while using the Favorite List.
You can store up to 2,000 broadcasts to Favorite List.
Use this function when two or more same broadcasting stations are stored in a same channel number in a different region (country).
Storing channels to Favorite List
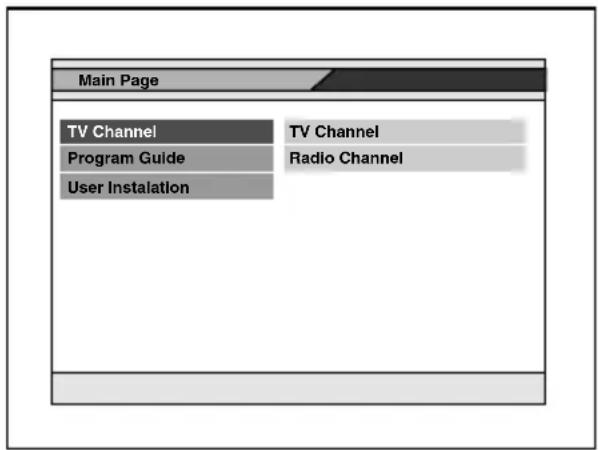
1 While watching TV, press MENU. The Main Page appears.
2 Press ↑ or ↓ to select "TV Channel", then press ENTER.
3 Press ↑ or ↓ to select "TV Channel" or "Radio Channel", then press ENTER.
The Channel Manager window appears.
Using channel manager (contiuned)
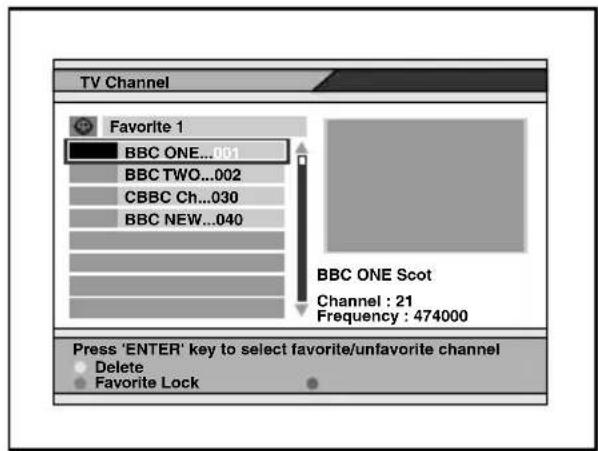
4 Press the green button repeatedly to select "Favorite 1", "Favorite 2" or "Favorite 3".
5 Press ↑/↓ or PAGE +/- to select the desired channel.
6 Press ENTER.
“💡” appears next to your selected channel name. And the channel is stored to the Favorite List.
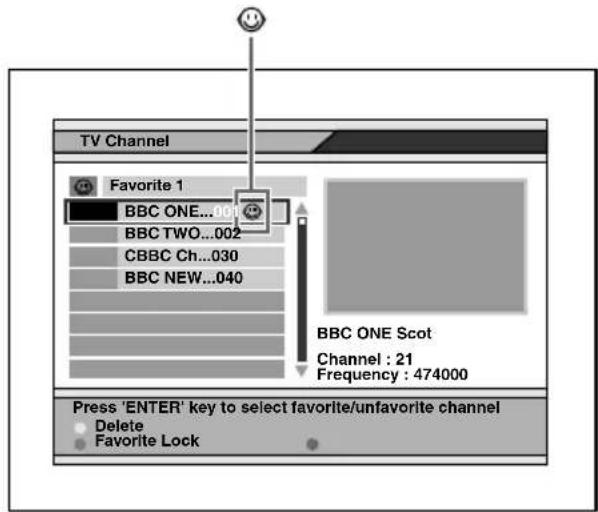
7 Repeat steps 3 to 6 to store additional channels to the Favorite List.
8 Press EXIT repeatedly to close the Channel Manager window and Main Page.
The setting is completed.
Deleting channels from the Favorite List
In the step 6, press ENTER repeatedly so that "disappears.
Note
After changing the settings, you need to close the Main Page by pressing EXIT repeatedly to make the settings effective.
Selecting channels from the Favorite List
1 While watching TV, press FAV. The Favorite List appears.
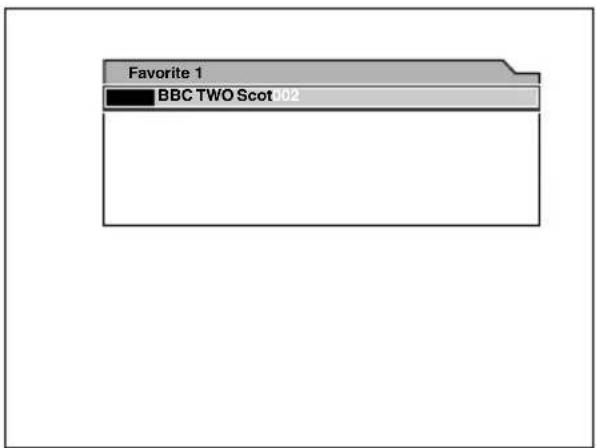
2 Press FAV repeatedly to select "Favorite 1", "Favorite 2" or "Favorite 3".
3 Press ↑/↓ or PAGE +/- to select desired channel, then press ENTER.
4 Press EXIT to close the Favorite List.
Locking channels
You can lock channels using the Lock mode in the Channel Manager.
When you lock the channel, you have to enter the password to watch the desired channel.
To perform this function, make sure to activate the Parental Lock first (page 20).
Locking the channels
1 While watching TV, press MENU. The Main Page appears.
2 Press ↑ or ↓ to select "TV Channel", then press ENTER.
3 Press ↑ or ↓ to select "TV Channel" or "Radio Channel", then press ENTER.
The Channel Manager window appears.
4 Press the blue button.
The Lock mode window appears. In case a password input window is displayed, enter the 4-digit password.
5 Press ↑/↓ or PAGE +/- to select the desired channel.
6 Press ENTER.
" 🔒" appears next to your selected channel name.
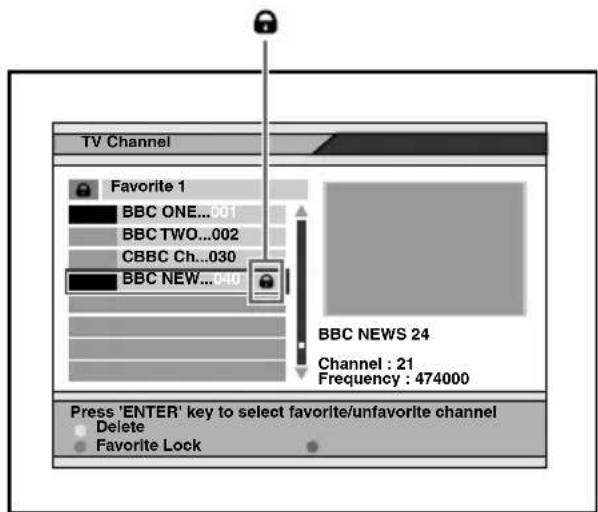
7 Repeat steps 3 to 6 to lock additional channels.
8 Press EXIT repeatedly to close the Channel Manager window and Main Page.
The setting is completed.
Once this setting is made, you have to enter the password next time you select the locked channel.
Unlocking channels
In the step 6, press ENTER repeatedly so that "disappears.
Note
After changing the settings, you need to close the Main Page by pressing EXIT repeatedly to make the settings effective.
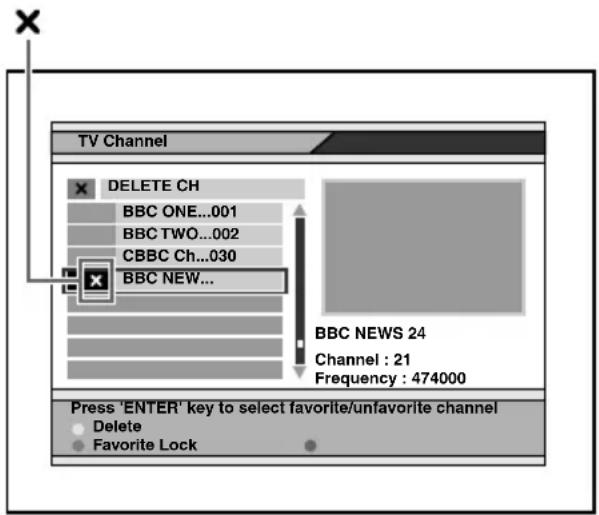
Deleting channels
You can delete the stored channels using the Delete CH mode in the Channel Manager.
1 While watching TV, press MENU. The Main Page appears.
2 Press ↑ or ↓ to select "TV Channel", then press ENTER.
3 Press ↑ or ↓ to select "TV Channel" or "Radio Channel", then press ENTER.
The Channel Manager window appears.
4 Press the red button.
The Delete CH mode window appears.
5 Press the red button repeatedly to select "Delete CH", "Delete Multiplex" or "Delete all".
Delete CH: delete the selected channel
Delete Multiplex: delete all the channels in the same frequency.
Delete all: delete all stored channels in the unit
6 Press ↑/↓ or PAGE +/- to select the desired channel.
7 Press ENTER.
“X” appears on the selected channel name.
8 Press EXIT once.
The confirmation window appears. If you do not want to delete the channel, select "CANCEL".
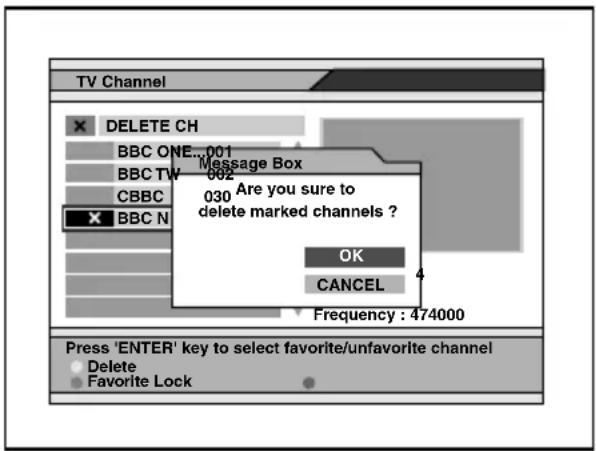
9 Select "OK", then press ENTER. The selected channels are deleted.
10 Repeat steps 3 to 9 to delete additional channels.
11 Press EXIT repeatedly to close the Channel Manager window and Main Page.
The setting is completed.
To cancel deleting channels
In the step 7, press ENTER repeatedly so that “✗” disappears.
Notes
- After changing the settings, you need to close the Main Page by pressing ⒷEXIT repeatedly to make the settings effective.
- The deleted channels cannot be recovered unless the search function is performed again.
Checking the Programme Guide
This unit provides you EPG function to access to the TV Guide (or Radio Guide if you are listening to the radio channels) that shows titles and other information of the current and next programmes on the different channels. The information is only available from the network of the channel you are watching.
Viewing the Programme Guide
While watching TV, press EPG.
Selecting from the Main Page
1 While watching TV, press MENU.
2 Press ↑ or ↓ to select "Program
Guide", then press ENTER.
The Programme Guide window appears.
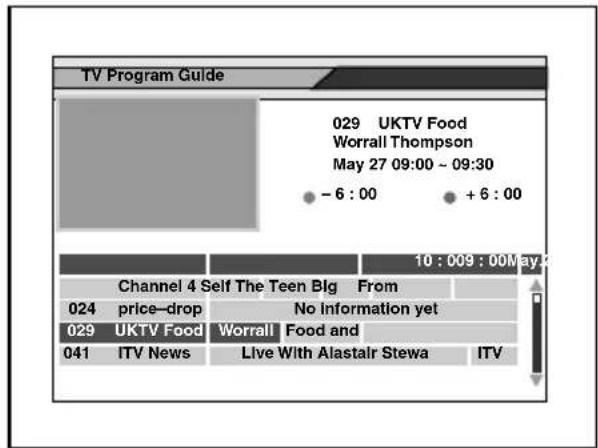
If you want to check the previous or next information of the channel, press and hold or so that the cursor (▼) moves to the desired time. Or, press the yellow button (progresses for 6 hours) or green button (returns for 6 hours).
Viewing the details of the selected programme
Move the cursor (▼) by pressing ↑/↓/←/→ to select the programme name, then press the blue button.
The detail information box appears.
Note
If the selected channel does not provide EPG data, "No data available" is displayed.
Switching the audio channel
You can select the desired audio channel from Stereo, Left channel and Right channel.
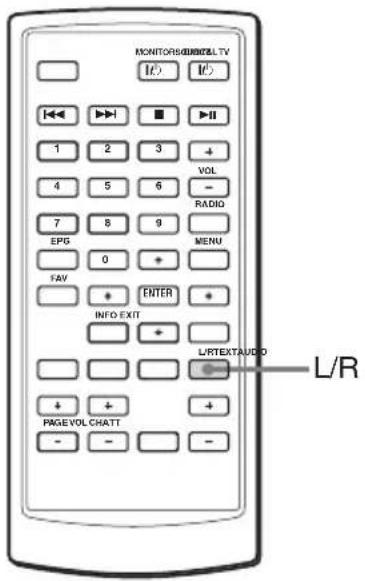
While watching TV, press L/R repeatedly to select the desired setting.

Stereo

Left channel

Right channel
Switching the audio language
If you watch the programme that provides multi-language services, you can switch the language. This depends on the transmission of the audio signal.
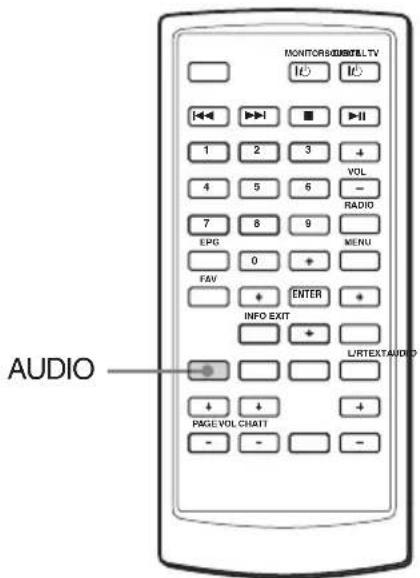
While watching TV, press AUDIO repeatedly to select the desired language.
Note
This setting affects only when the current broadcasting supports the selected language in the System Setting (page 19). When the broadcasting does not support the selected language, it is output in the original language.
Displaying the subtitle and teletext
You can turn on/off the subtitles or teletext.
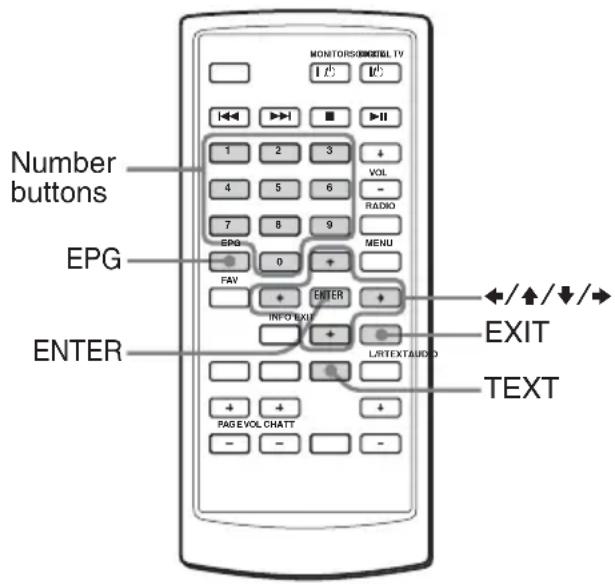
The subtitle and/or teletext window appears to let you select the subtitle language or teletext if the broadcasting station is disseminating information. Follow the displayed contents to operate.
Note
When you set "TV Type" to "NTSC", the subtitle and/or teletext may not be displayed correctly. In this case, press 9, 5, 1, 4, 7 and EPG to change the mode to "PAL".
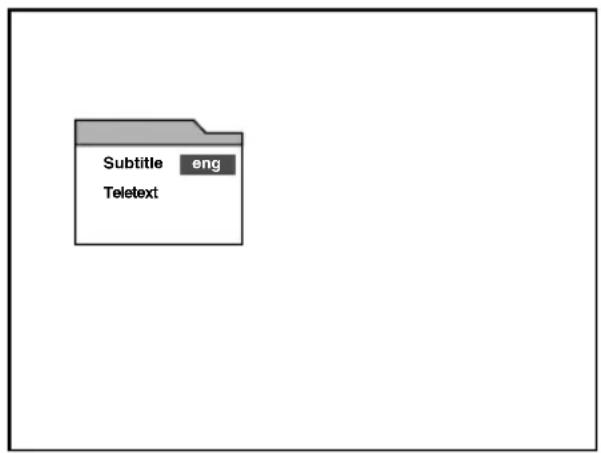
Subtitle:
Press ↑/↓/←/→ to select the items and press ENTER.
To cancel the subtitles, press EXIT.
Note
Depending on the programme, it may take time until a subtitle is displayed, or the subtitle may not be displayed.
Teletext:
Press ↑/↓/←/→ to select the items and press ENTER.
You can select it directly by pressing the number buttons.
To cancel the teletext, press EXIT.
Note
The colour keys (red/blue/yellow/green) cannot be used to select the teletext.
Changing the menu settings
You can set up this unit using the on-screen System Setting menus. Most settings need to be set when you first use this unit.
System Setting menus are:
- OSD Language
- Audio Language
- Set Local Time
- Summer Time
- Antenna feed 5 V
- Screen Format
• TV Type - Start On Channel
1 Press MENU.
The Main Page appears.
2 Press ↑ or ↓ repeatedly to select "User Installation", and press ENTER.
3 Press ↑ or ↓ repeatedly to select "System Setting", and press ENTER.
System Setting menu appears.
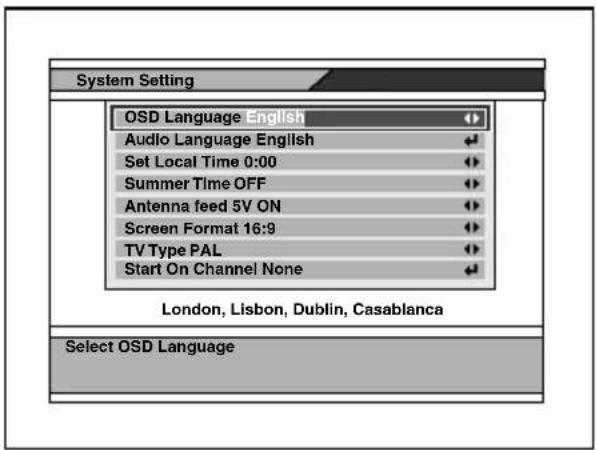
4 Press ↑ or ↓ repeatedly to select the desired item.
5 Press ← or → repeatedly to change the selection, or press ENTER to show the Drop-Down List Box that displays the selection list.
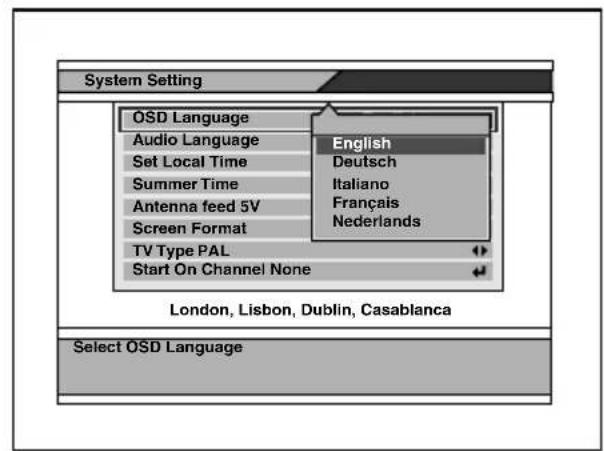
6 Press ENTER on the desired selection.
7 Press EXIT repeatedly to close the Main Page.
See the next page for the System Setting options.
| Settings Setting options | |
| OSD Language Default: EnglishChanging the OSD language. | |
| Audio Language Default: EnglishChanging the audio language.1 Press ENTER on “Audio Language”.A popup window showing the 4 language priorities appears.2 Press ← or → repeatedly to select the desired audio language for each priority.3 Press ↑ or ↓ repeatedly to select “OK” to change the setting or “CANCEL” to cancel the setting.NoteYou can select the desired audio language priority under the condition that the selected language is supported by the channel. | |
| Set Local Time Settable time: -12:00 to +12:00 (default setting is “0:00”)Setting the time zone. This will affect the time of the unit and EPR time. | |
| Summer Time ON, OFFSetting the Summer Time. Turning on this selection forwards the time for one hour. | |
| Antenna feed 5 V ON, OFFSelecting whether to feed or not 5 volts from the unit to the antenna. If you use the TV antenna amplifier unit, turn it ON (5 V, 20 mA ANT 1/ANT 2). If you use a TV antenna without amplifier, turn it OFF. | |
| Screen Format 4:3, 16:9, 4:3 letter boxSetting the screen mode.4:3: An image with an aspect ratio of 4 to 3.16:9: An image with an aspect ratio of 16 to 9.4:3 letter box: An image with an aspect ratio of 4:3 enlarged to the edges of the screen. | |
| TV Type NTSC, PAL, PAL&NTSCSetting the colour system to NTSC or PAL. | |
| Start On Channel Setting the channel to start when the unit is turned on.1 Press ENTER on “Start On Channel”.A popup window with a channel list appears.2 Press ↑ or ↓ repeatedly to select the channel.3 Press ENTER. | |
| NoteOnce you set the Start On Channel, a message box appears to confirm if you want to activate the Start On Channel. In this case, select “OK” to change the setting, or select “CANCEL” to cancel. |
Note
After changing the above settings, you need to close the Main Page by pressing EXIT repeatedly to make the settings effective.
Locking the unit
Setting the password
1 Press MENU.
The Main Page appears.
2 Press ↑ or ↓ repeatedly to select "User Installation", then press ENTER.
3 Press ↑ or ↓ repeatedly to select "Parental Lock", then press ENTER.
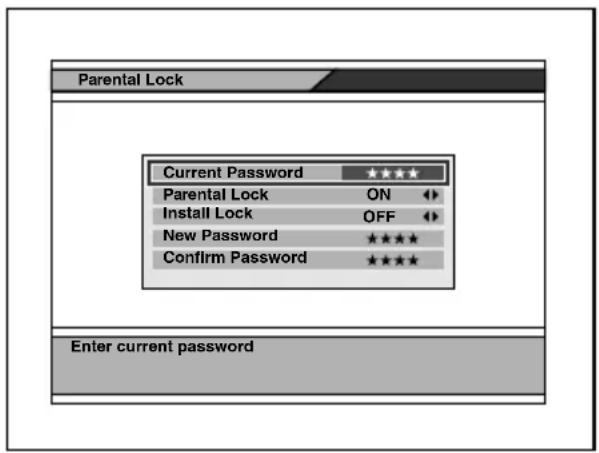
4 Enter the current password.
The default password is 0000.
5 Press EXIT repeatedly to close the Main Page.
Changing the password
1 Press MENU.
The Main Page appears.
2 Press ↑ or ↓ repeatedly to select "User Installation", then press ENTER.
3 Press ↑ or ↓ repeatedly to select "Parental Lock", then press ENTER.
4 Enter the current password.
5 Press ↑ or ↓ repeatedly to select "New Password".
6 Enter the new password, then press ↓ to move the cursor to "Confirm Password".
7 Enter the new password again to confirm.
8 Press EXIT repeatedly to close the Main Page.
Settings for the Parental Control
You can set the parental control using the Parental Lock function.
1 Press MENU.
The Main Page appears.
2 Press ↑ or ↓ repeatedly to select "User Installation", then press ENTER.
3 Press ↑ or ↓ repeatedly to select "Parental Lock", then press ENTER.
4 Enter the current password.
5 Press ↑ or ↓ repeatedly to select "Parental Lock", then press ENTER.
6 Press ← or → repeatedly to select "ON".
To cancel the Parental Lock, select "OFF".
7 Press EXIT repeatedly to close the Main Page.
Note
After changing the settings, you need to close the Main Page by pressing EXIT repeatedly to make the settings effective.
Setting the Install Lock
You can protect your installed data and information using the Install Lock.
1 Press MENU.
The Main Page appears.
2 Press ↑ or ↓ repeatedly to select "User Installation", then press ENTER.
3 Press ↑ or ↓ repeatedly to select "Parental Lock", then press ENTER.
4 Enter the current password.
5 Press ↑ or ↓ repeatedly to select "Install Lock".
6 Press ← or → repeatedly to select "ON".
To cancel the Install Lock, select "OFF".
7 Press EXIT repeatedly to close the Main Page.
Note
After changing the settings, you need to close the Main Page by pressing EXIT repeatedly to make the settings effective.
If you forget the password
While the Main Page is displayed, press 4, 7, 8, 9 and 3. The Factory Default window appears. Then select "OK" and press ENTER. The setting of the unit will be set back to the factory default. To cancel, select "CANCEL".
Note
If the unit is set back to the factory default, all the settings will be lost. Make the settings again.
Maintenance
Fuse replacement
When replacing the fuse of the power cord, be sure to use one matching the amperage rating stated on the original fuse. If the fuse blows, check the power connection and replace the fuse. If the fuse blows again after replacement, there may be an internal malfunction. In such a case, consult your nearest Sony dealer.
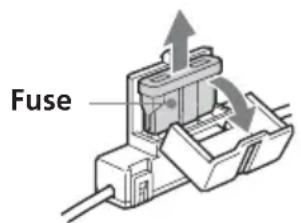
Warning
Never use a fuse with an amperage rating exceeding the one supplied with the unit as this could damage the unit.
Replacing the lithium battery
Under normal conditions, batteries will last approximately 1 year. (The service life may be shorter, depending on the conditions of use.)
When the battery becomes weak, the range of the card remote commander becomes shorter. Replace the battery with a new CR2025 lithium battery. Use of any other battery may present a risk of fire or explosion.
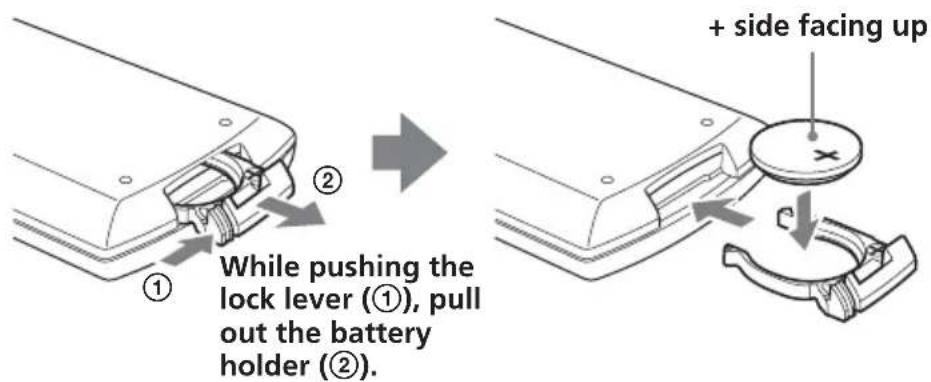
Notes on lithium battery
- Keep the lithium battery out of the reach of children. Should the battery be swallowed, immediately consult a doctor.
- Wipe the battery with a dry cloth to assure a good contact.
- Be sure to observe the correct polarity when installing the battery.
- Do not hold the battery with metallic tweezers, otherwise a short-circuit may occur.
WARNING
Battery may explode if mistreated. Do not recharge, disassemble, or dispose of in fire.
Specifications
Digital TV Tuner
Video decoding
MPEG-2 DVB compliant up to MP@ML
Video bit rate up to 15 Mbit/sec
Video format 4:3 (letter box if source
is in 16:9) and 16:9
Resolution up to 720 × 576 pixels
Audio decoding
MPEG layer 1/2
Reception format
NTSC/PAL
Input frequency range
VHF: 174 – 230 MHz
UHF: 470 - 862 MHz
IF 36.125 MHz
Power requirement
12 V DC
(negative ground)
Power consumption
1.2 A
Inputs TV antenna (2)
Remote (1)
Service (RS232) (1)
Outputs Video (1)
Audio L/R (1)
Dimensions
Approx. 182 × 43 × 174 ~mm
(including projecting parts
and controls) (W × H × D)
Mass Approx. 920 g
Temperature range
0 - 45^
Card remote commander RM-X711
Power requirements
CR2025 lithium battery
Operable range
Approx. 2.5 m
Dimensions
55 × 125 × 15 mm
(W× H× D)
Mass Approx. 50 g
(including batteries)
Supplied accessories
Parts for installation (1 set)
Card remote commander RM-X711
(with supplied battery) (1)
Power supply cord (1)
Remote conrol sensor (1)
Installation/Connections manual (1)
Operating Instructions (1 set)
Optional accessories
TV antenna VCA-130 (left/right) (1 set)
Mobile Monitor XVM-F65/F65WL
Portable DVD Player MV-700HR
Design and specifications are subject to change without notice.
Troubleshooting
The following checklist will help you solve problems you may encounter with your unit.
Before going through the checklist below, check the connection and operating procedures.
General
No picture
• The power cord has been disconnected.
• The signal is weak.
→ Check all antenna connections and make sure they are all firmly pushed into sockets.
→ Move the car to the good position for receiving.
• The fuse has blown.
- Data broadcasting is received. This unit does not support data broadcasting. (Displays "No Video !".)
- Wrong "TV Type" is selected.
→Press 9, 5, 1, 4, 7 and EPG to change the mode to "NTSC" or "PAL".
Good picture, but no sound
- Press VOL (+) or ATT on the card remote commander.
- Dolby AC3 signal is received. This unit does not support the Dolby AC3 signal. (Displays "AC3".)
Sometimes see a squared pattern on the screen, your picture is "freezing" or a picture showing a TV with a noisy pattern.
- The antenna connection has become loose or disconnected. → Check all antenna connections and make sure they are all firmly pushed into sockets.
- There could be a transmission problem.
→ This normally is only a temporary situation and should correct itself.
Cannot access a particular channel, even using the number buttons.
• The parental lock has been activated. → Enter your password to access the channel (page 13) or unlock the channel (page 20).
No response when pressing the buttons on the card remote commander.
• The battery may be exhausted.
Time or EPG is not displayed correctly.
- The programme of which time is not rectified, such as repeat programme, is received. → After receiving another programme, turn off the unit once and turn it on again.
Messages
The following indications appear when a problem occurs in the unit.
ANT-1 Antenna feed overloaded
Automatically switched off
ANT-2 Antenna feed overloaded
Automatically switched off
The device will automatically switch off 5V output.
Antenna feed overloaded
Automatically switched off
The ANT-1 and ANT-2 are overloaded.
Program overflow
More than 2,000 channels were about to be stored. You cannot memorize any more channels.
HDTV Signal is not Supported
The unit received HDTV signal. This unit does not support the HDTV signals.
No Video Signal!
No Signal!
No mpeg video data is input to the unit.
Bad Signal!
Mpeg data error occurred in the unit.
No Video!
No Video PID is input to the unit.
Scrambled!
The unit received a scrambled programme.
Please wait for saving data.
The unit is saving the data.

natural_image
Symbol of a trash bin crossed with no text or labels
natural_image
Illustration of a hand using a power drill to lift a pipe (no text or symbols)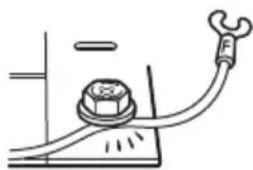
natural_image
Simple line drawing of a pipe fitting with a bolt, no text or symbols presentInstallationsort
natural_image
Cartoon illustration of a person lying on the floor with a blanket and a pillow, no text or symbols present8 PAGE +/- Tasten 10, 12, 13, 14
12 MENU-Taste 8, 11, 13, 14, 15, 18, 20, 21
13 ↑/↓/←/→ Tasten 8, 9, 10, 11, 12, 13, 14, 15, 17, 18, 19, 20, 21
14 ENTER-Taste 8, 9, 10, 11, 12, 13, 14, 15, 17, 18, 19, 20, 21
15 EXIT-Taste 9, 10, 12, 13, 14, 17, 18, 19, 20, 21
16 L/R (blaue) Taste 13, 15, 16
Mobiler Monitor XVM-F65/F65WL
Tragbarer DVD-Player MV-700HR
ANT-1 Antenna feed overloaded Automatically switched off ANT-2 Antenna feed overloaded Automatically switched off
Antenna feed overloaded Automatically switched off
HDTV Signal is not Supported
Please wait for saving data.
natural_image
Simple line drawing of a trash bin with crossed lines indicating no waste or restriction (no text or symbols)Lieu d'installation
natural_image
Illustration of a person lying in bed with hands clasped, no text or symbols present7 Touche I/O (alimentation)*
8 Touches PAGE +/- 10, 12, 13, 14
12 Touche MENU 8, 11, 13, 14, 15, 18, 20, 21
Pour afficher la «Menu principal».
13 Touches ↑/↓/←/→ 8, 9, 10, 11, 12, 13, 14, 15, 17, 18, 19, 20, 21
14 Touche ENTER 8, 9, 10, 11, 12, 13, 14, 15, 17, 18, 19, 20, 21
15 Touche EXIT 9, 10, 12, 13, 14, 17, 18, 19, 20, 21
16 Touche L/R (bleue) 13, 15, 16
Pour changer de canal audio.
ANT-1 Antenna feed overloaded Automatically switched off ANT-2 Antenna feed overloaded Automatically switched off
Antenna feed overloaded Automatically switched off
HDTV Signal is not Supported
Please wait for saving data.
natural_image
Simple line drawing of a trash bin with crossed lines indicating no waste or restriction (no text or symbols)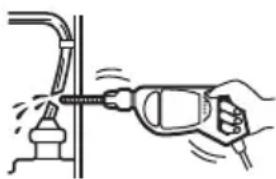
natural_image
Illustration of a hand using a power tool to lift or adjust a wall component (no text or symbols present)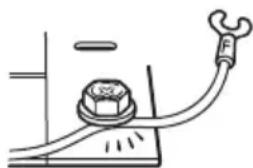
natural_image
Simple line drawing of a mechanical component with a nut and curved pipe (no text or symbols)natural_image
Cartoon illustration of a person lying on the floor with a blanket and a hand, no text or symbols present8 Tasti PAGE +/- 10, 12, 13, 14
12 Tasto MENU 8, 11, 13, 14, 15, 18, 20, 21
13 Tasti ↑/↓/←/→ 8, 9, 10, 11, 12, 13, 14, 15, 17, 18, 19, 20, 21
14 Tasto ENTER 8, 9, 10, 11, 12, 13, 14, 15, 17, 18, 19, 20, 21
15 Tasto EXIT 9, 10, 12, 13, 14, 17, 18, 19, 20, 21
16 Tasto L/R (blu) 13, 15, 16
Sottotitoli:
Monitor mobile XVM-F65/F65WL
ANT-1 Antenna feed overloaded Automatically switched off
ANT-2 Antenna feed overloaded Automatically switched off
Antenna feed overloaded Automatically switched off
HDTV Signal is not Supported
Please wait for saving data.
natural_image
Symbol of a trash bin crossed with no text or labels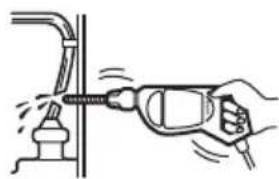
natural_image
Illustration of a hand using a power tool to adjust or install a pipe fitting (no text or symbols present)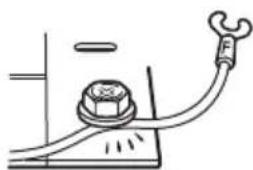
natural_image
Simple line drawing of a pipe fitting with a bolt and valve (no text or symbols)natural_image
Illustration of a person lying in bed with hands clasped, no text or symbols present12 MENU toets 8, 11, 13, 14, 15, 18, 20, 21
13 ↑/↓/←/→ toetsen 8, 9, 10, 11, 12, 13, 14, 15, 17, 18, 19, 20, 21
14 ENTER toets 8, 9, 10, 11, 12, 13, 14, 15, 17, 18, 19, 20, 21
15 EXIT toets 9, 10, 12, 13, 14, 17, 18, 19, 20, 21
Parental Lock programma

Teletekstservice

Ondertitelingsservice

Geluiddempingsstatus

Stereostatus

ANT-1 Antenna feed overloaded Automatically switched off ANT-2 Antenna feed overloaded Automatically switched off
Antenna feed overloaded Automatically switched off
HDTV Signal is not Supported
Please wait for saving data.

- XT-DTV1
- Disposal of Old Electrical & Electronic Equipment (Applicable in the European Union and other European countries with separate collection systems)
- Welcome!
- Table of contents
- Operation
- Changing Setup
- Additional Information
- Precautions
- On safety
- On installation
- Where to install
- Location of controls
- Digital TV Tuner
- Card remote commander RM-X711
- SOURCE button
- Searching channels
- Searching channels automatically
- Notes
- Press the power button on the main unit to turn on the unit.
- Press ↑ or ↓ to select "Search", then press ENTER.
- When the search is completed, press ↑ or ↓ to select "View" or "Complete", then press ENTER.
- Searching channels automatically in your local area
- Follow steps 1 to 3 in "Searching channels automatically".
- Press ↑ or ↓ to move the cursor to the search mode bar.
- Press ← or → to select "Search local channels", then press ENTER.
- When the search is completed, press ↑ or ↓ to select "View" or "Complete", then press ENTER.
- Searching channels manually
- Receiving channels
- Selecting TV or radio mode
- Changing channels
- Using the number button
- Example:
- Selecting channels from channel list
- To close the channel list
- Viewing the channel information
- Note
- Adjusting the volume
- When you select the channel
- : Parental lock programme
- Using channel manager
- Using the Favorite List
- Storing channels to Favorite List
- Using channel manager (contiuned)
- Deleting channels from the Favorite List
- Selecting channels from the Favorite List
- Locking channels
- Locking the channels
- Unlocking channels
- Deleting channels
- To cancel deleting channels
- Checking the Programme Guide
- Viewing the Programme Guide
- Selecting from the Main Page
- Viewing the details of the selected programme
- Switching the audio channel
- Switching the audio language
- Displaying the subtitle and teletext
- Subtitle:
- Teletext:
- Changing the menu settings
- Locking the unit
- Setting the password
- Changing the password
- Settings for the Parental Control
- Setting the Install Lock
- If you forget the password
- Maintenance
- Fuse replacement
- Warning
- Replacing the lithium battery
- Notes on lithium battery
- Specifications
- Supplied accessories
- Optional accessories
- Troubleshooting
- General
- No picture
- Good picture, but no sound
- Sometimes see a squared pattern on the screen, your picture is "freezing" or a picture showing a TV with a noisy pattern.
- Cannot access a particular channel, even using the number buttons.
- No response when pressing the buttons on the card remote commander.
- Time or EPG is not displayed correctly.
- Messages
- ANT-1 Antenna feed overloaded
- Automatically switched off
- ANT-2 Antenna feed overloaded
- Antenna feed overloaded
- Program overflow
- HDTV Signal is not Supported
- No Video Signal!
- No Signal!
- Bad Signal!
- No Video!
- Scrambled!
- Please wait for saving data.
- Installationsort
- Lieu d'installation
- ANT-1 Antenna feed overloaded Automatically switched off ANT-2 Antenna feed overloaded Automatically switched off
- Antenna feed overloaded Automatically switched off
- Sottotitoli:
- ANT-1 Antenna feed overloaded Automatically switched off
- ANT-2 Antenna feed overloaded Automatically switched off
Brand : SONY
Model : XTDTV1
Category : Car stereo