
MV650STR - Car stereo SONY - Free user manual and instructions
Find the device manual for free MV650STR SONY in PDF.
| Product Type | Car Radio with Portable DVD/CD Player |
| Brand | Sony |
| Model | MV650STR |
| Dimensions (L × H × D) | 184,2 × 59,5 × 232,5 mm |
| Weight | 1,4 kg |
| Power Supply | 12 V DC (mains adapter or cigarette lighter) |
| Screen Type | Color LCD TFT 6,5 inches (16:9) |
| Screen Resolution | 280 800 pixels (1200 × 234) |
| Playable Disc Formats | DVD VIDEO, DVD-R/RW, DVD+R/RW, Video CD, Audio CD, CD-R/RW |
| File Formats | MP3, JPEG, DivX |
| Audio Outputs | Headphone × 2, digital optical, stereo analog audio |
| Video Output | Composite (yellow RCA) |
| Audio/Video Inputs | Composite audio and video input (RCA) |
| Frequency Response | 20 Hz – 20 kHz |
| Signal-to-Noise Ratio | 90 dB (A) |
| Harmonic Distortion | 0,03 % |
| Dynamic Range | 90 dB |
| Special Functions | Programmed playback, repeat, direct search, parental control, screen saver |
| Included Accessories | Mini remote control RM-X708, mains adapter, cigarette lighter cord, mounting brackets, installation panel, carry bag, instruction manual |
| Operating Temperature | 0 °C to 45 °C |
| Maintenance | Clean the disc with a soft cloth from the center outward; replace the fuse with one of the same rating; replace the remote control battery with a CR2025 |
| Repairability | In case of malfunction, contact an authorized Sony dealer; do not attempt to repair yourself |
Frequently Asked Questions - MV650STR SONY
User questions about MV650STR SONY
0 question about this device. Answer the ones you know or ask your own.
Ask a new question about this device
Download the instructions for your Car stereo in PDF format for free! Find your manual MV650STR - SONY and take your electronic device back in hand. On this page are published all the documents necessary for the use of your device. MV650STR by SONY.
USER MANUAL MV650STR SONY
Operating Instructions GB
For installation and connections, refer to "Connection" on page 9.
You are cautioned that any changes or modifications not expressly approved in this manual could void your authority to operate this equipment.
CLASS 1 LASER PRODUCT
This label is located on the bottom of the chassis.
CAUTION :CLASS 1M VISIBLE/INVISIBLE LASER RADIATION WHEN OPEN AND INTERLOCKS DEFEATED. DO NOT VIEW DIRECTLY WITH OPTICAL INSTRUMENTS.
This label is located on the drive unit's internal chassis.
CAUTION
- When installation, be sure to fix certainly.
- While operating, be sure to fasten seatbelts to avoid injury in the event of a sudden movement of the vehicle.
Table of Contents
Welcome! 4
Enjoying DivX ^® videos 4
Precautions 5
About this manual 6
About the discs this player can play ...... 6
Connection 9
Resetting the player 11
Location of controls 12
Various Playback
Playing a disc 14
Searching a chapter/title/track directly .....15
Resume playback 16
Using MP3/JPG/DivX® menu 16
Playing repeatedly (Repeat Playback) ...... 19
Creating your own program (Program Playback) 20
Displaying elapsed time 21
Changing the subtitle language 22
Using a DVD menu 23
Using the TOP MENU button 23
Using the MENU button 23
Changing the audio language 24
Changing angles 24
Changing the audio output 25
Using the PBC ( playback control) function .... 25
Changing Setup
Setting for DVD player - General Setup Page 27
Settings for digital audio output - Audio Setup Page....28
Language settings for DVD playback - Language Page 29
Settings for the Parental Control - Parental Setup Page 30
Selecting the Parental Control mode on and off - Parental Control 30
Setting the password - Password 30
Preparing for the initial parental setting - Level ....31
Monitoring video signals input from the connected device 31
Selecting the color system for the input video signal .... 31
Settings by using the S-MENU button on the monitor .... 32
How to set preference 32
Turning the image upside down.... 34
Setting the reference volume 34
Additional information
Maintenance 35
Notes on discs 36
About MP3 files 37
Specifications 38
Troubleshooting.... 39
Error display 40
Language Code List 41
Welcome ! Enjoying DivX
Thank you for purchasing this Sony Portable DVD Player. You can enjoy its various features even more with:
•DVD/Video CD/Audio CD playback.
- Support DTS/Dolby Digital through optical digital output terminal.
- MP3/JPG/DivX file playback (recorded on CD-ROMs/CD-Rs/CD-RWs).
•Supplied controller accessory
Card remote commander RM-X708
Before operating the player, please read these operating instructions thoroughly and retain them for future reference.
Copyrights
This product incorporates copyright protection technology that is protected by method claims of certain U.S. patents, other intellectual property rights owned by Macrovision Corporation, and other rights owners. Use of this copyright protection technology must be authorized by Macrovision Corporation, and is intended for home and other limited viewing uses only unless otherwise authorized by Macrovision Corporation. Reverse engineering or disassembly is prohibited.
Manufactured under license from Dolby Laboratories. "Dolby", "Pro Logic", and the double-D symbol are trademarks of Dolby Laboratories.
"DTS," "DTS Digital Surround" and "DTS Digital Out" are trademarks of Digital Theater Systems, Inc.


DivX is a registered trademark of DivXNetworks, Inc.

® videos
About DivX Video Files
DivX ^® is a video file compression technology, developed by DivXNetworks, Inc. This product is an official DivX ^® Certified product and can play DivX ^® 5, DivX ^® 4, DivX ^® 3 and DivX ^® VOD video content.
You can play DATA CDs and DATA DVDs that contain DivX video files.
DivX video files of format conforming to ISO 9660 Level 1/Level 2, or its extended format, Joliet
— DivX video files of format conforming to UDF.

DATA CDs and DATA DVDs that the player can play
Playback of DATA CDs (CD-ROMs/CD-Rs/CD-RWs) and DATA DVDs (DVD-Rs/DVD-RWs/DVD+Rs/DVD+RWs) on this player is subject to certain conditions;
— With DATA CDs that contain DivX video files in addition to MP3 audio tracks or JPEG image files, you can select the file and play.
How to play the DivX files, see page 16 for details.
Precautions
To avoid the risk of serious injury or accident, read the following precautions before installing and operating the player.
On safety
Do not put any foreign objects in the DC IN 12 V jack.
On power sources
- Use house current or a car battery (12 V DC).
- For use in your house, use the AC power adaptor supplied with the player. Do not use any other AC power adaptor since it may cause the player to malfunction.
Polarity of the plug

- Connect the AC power adaptor to an easily accessible AC outlet. Should you notice an abnormality in the AC power adaptor, disconnect it from the AC outlet immediately.
- The player is not disconnected from the AC power source (mains) as long as it is connected to the wall outlet, even if the player itself has been turned off.
- If you are not going to use the player for a long time, be sure to disconnect the power supply (AC power adapter or car battery cord). To remove the AC power adaptor from the wall outlet, grasp the plug itself; never pull the cord.
On heat build-up
Heat may build up in the player if it is used for an extended period of time. This, however, is not a malfunction.
For driver's safety
Comply with your local traffic rules and regulations.
-
While driving
— The driver must not watch or operate the player. It may lead to distraction and cause an accident.
— The driver must not use the headphones. It may lead to distraction and cause an accident.
Park the car in a safe place when the driver watches and operates the player or uses the headphones. -
While operating
— Do not insert your hands, fingers or foreign objects into the player. It may cause injury or damage to the player.
— Take extra care not to wind the wire of the headphones around your neck avoiding injury or suffocation in the event of a sudden movement of the vehicle.
— Keep small articles out of the reach of children. - If the player does not work, check the connections first. If everything is in order, check the fuse.
- If your car was parked in direct sunlight, allow the player to cool off before operating it.
- Avoid installing the player in places:
— subject to temperature below 0 ^ or above 45 ^
— subject to direct sunlight
— near heat sources (such as heaters)
— exposed to rain or moisture
— exposed to excessive dust or dirt
— subject to excessive vibration
— subject to heat:
Keep the player away from nearby hot vehicle components that heat up over time such as hoses, high current wires, and braking systems components. Make sure to leave enough room for ventilation on openings and slots to protect from over heating.
If you have any questions or problems concerning the player, please consult your nearest Sony dealer.
Moisture condensation
On a rainy day or in a very damp area, moisture condensation may occur inside the lenses. Should this occur, the player will not operate properly. In such a case, remove the disc and wait for about an hour until the moisture has evaporated.
To maintain high sound quality
Be careful not to splash a drink such as juice or other soft drinks onto the player or discs.
About this manual
Conventions
- Instructions in this manual describe how to use the player mainly by using the controls on the supplied wireless card remote commander.
- "DVD" may be used as a general term for DVD VIDEOS, DVD-Rs/DVD+Rs and DVD-RWs/DVD+RWs.
•The icons below are used in this manual:
| Icon Meaning | |
 — — | Function available for DVD VIDEOs, DVD-Rs/DVD+Rs or DVD-RWs/DVD+RWs in video mode, or for DVD-RWs in VR (Video Recording) mode |
 — — | Functions available for Video CDs or CD-Rs/CD-RWs in video CD format |
 | Functions available for music CDs or CD-Rs/CD-RWs in music CD format |
 | Functions available for files in MP3 format stored on CD-ROMs/CD-Rs/CD-RWs |
 | Functions available for files in JPEG format stored on CD-ROMs/CD-Rs/CD-RWs |
 | Functions available for files in DivX format stored on CD-ROMs/CD-Rs/CD-RWs, DVD-Rs/DVD+Rs or DVD-RWs/DVD+RWs |
About the discs this player can play
This player can play the following discs:
• DVD
•DVD-R/DVD+R
• DVD-RW/DVD+RW
- Video CD
- Audio CD
- CD-R/CD-RW
| Disc type Label on the disc | ||
| DVD Videos |  |  |
 |  | |
 |  | |
| Video CDs |  |  |
| Audio CDs |  |  |
 | ||
| MP3 files/JPEG files/DivX®files |  |  |
 |  | |
"DVD VIDEO," "DVD-R" and "DVD-RW" are trademarks.
Notes on CD-Rs (recordable CDs)/CD-RWs (rewritable CDs)/DVD-Rs (recordable DVDs)/DVD+Rs/DVD-RWs (rewritable DVDs)/DVD+RWs
- Some CD-Rs/CD-RWs/DVD-Rs/DVD+Rs/DVD-RWs/DVD+RWs (depending on the equipment used for its recording or the condition of the disc) may not play on this player.
- You cannot play a CD-R/CD-RW that is not finalized*.
- You cannot play a CD-R/CD-RW that is recorded in Multi Session.
- You can play MP3/JPEG/DivX files recorded on CD-ROMs, CD-Rs, CD-RWs, DVD-Rs, DVD+Rs, DVD-RWs and DVD+Rs.
* A process necessary for a recorded CD-R/CD-RW disc to be played on the audio CD player.
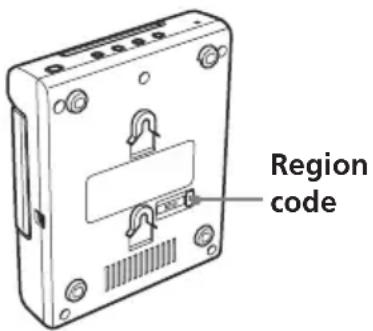
Region code of DVDs this player can play
This player has a region code printed on the bottom of the player and will only play DVDs that are labeled with identical region codes. DVDs labeled 📂 will also be played on this player.
If you try to play any other DVD, the message "Wrong Region" will appear on the screen.
Depending on the DVD, the region code indication may not appear even if the DVD is prohibited by area restrictions.
Note on the picture skipping
If a DVD has a crack, dirt, etc., it may be unable to be read or a picture skipping may be occurred.
Very rarely, playback sound could be skipped due to compatibility with the player.
In this case, take the disk and the player to your nearest Sony dealer.
Cautions
- This player CANNOT play these discs.
— DVD-Audio — DVD-RAM
— DVD-ROM — CD-G
— SVCD — CD-I
— Photo-CD — VSD
— Active-Audio (Data)
— CD-Extra (Data)
— Mixed CD (Data)
— CD-ROM (the data other than the MP3/JPEG/DivX file)
- This product incorporates copyright protection technology that is protected by method claims of certain U.S. patents and other intellectual property rights owned by Macrovision Corporation and other rights owners. Use of this copyright protection technology must be authorized by Macrovision Corporation, and is intended for home and other limited viewing uses only unless otherwise authorized by Macrovision Corporation. Reverse engineering or disassembly is prohibited.
Note on PBC (Playback Control)

This player conforms to Ver. 1.1 and Ver. 2.0 of Video CD standards. You can enjoy two kinds of playback according to the disc type.
| Disc type | You can |
| Video CDs without PBC functions (Ver. 1.1 discs) | Video playback (moving pictures) as well as music. |
| Video CDs with PBC functions (Ver. 2.0 discs) | • Interactive software with menu screens displayed on the monitor (PBC Playback, page 25). • Video playback functions. • High-resolution still pictures if they are included on the disc. |
Note on DTS-encoded CDs
When playing DTS*-encoded CDs, excessive noise will be heard from the analog stereo outputs. To avoid possible damage to the audio system, the consumer should take proper precautions when the analog stereo outputs of this player are connected to an amplification system. To enjoy DTS Digital Surround™ playback, an external 5.1-channel DTS Digital Surround™ decoder system must be connected to the digital output of this player.
* "DTS," "DTS Digital Surround" and "DTS Digital Out" are trademarks of Digital Theater Systems, Inc.
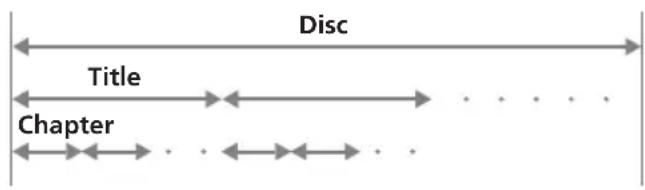
Terms for discs
DVD structure
flowchart
graph LR
    A["Disc"] --> B["Title"]
    B --> C["Chapter"]
    C --> D["..."]
    D --> E["..."]
Video CD/Audio CD structure

• Title
The longest section of a picture or music feature on a DVD, e.g., a movie for video software, or an album for audio software, etc.
- Chapter
Sections of a picture or a music feature that are smaller than titles. A title is composed of several chapters. Each chapter is assigned a chapter number enabling you to locate the chapter you want. Depending on the disc, chapters may not be recorded.
- Track
Sections of a picture or a music feature on a Video CD/Audio CD. Each track is assigned a track number enabling you to locate the track you want.
- Scene
On a Video CD with PBC ( playback control) functions, the menu screens, moving pictures and still pictures are divided into sections called “scenes.” Each scene is assigned a scene number enabling you to locate the scene you want.
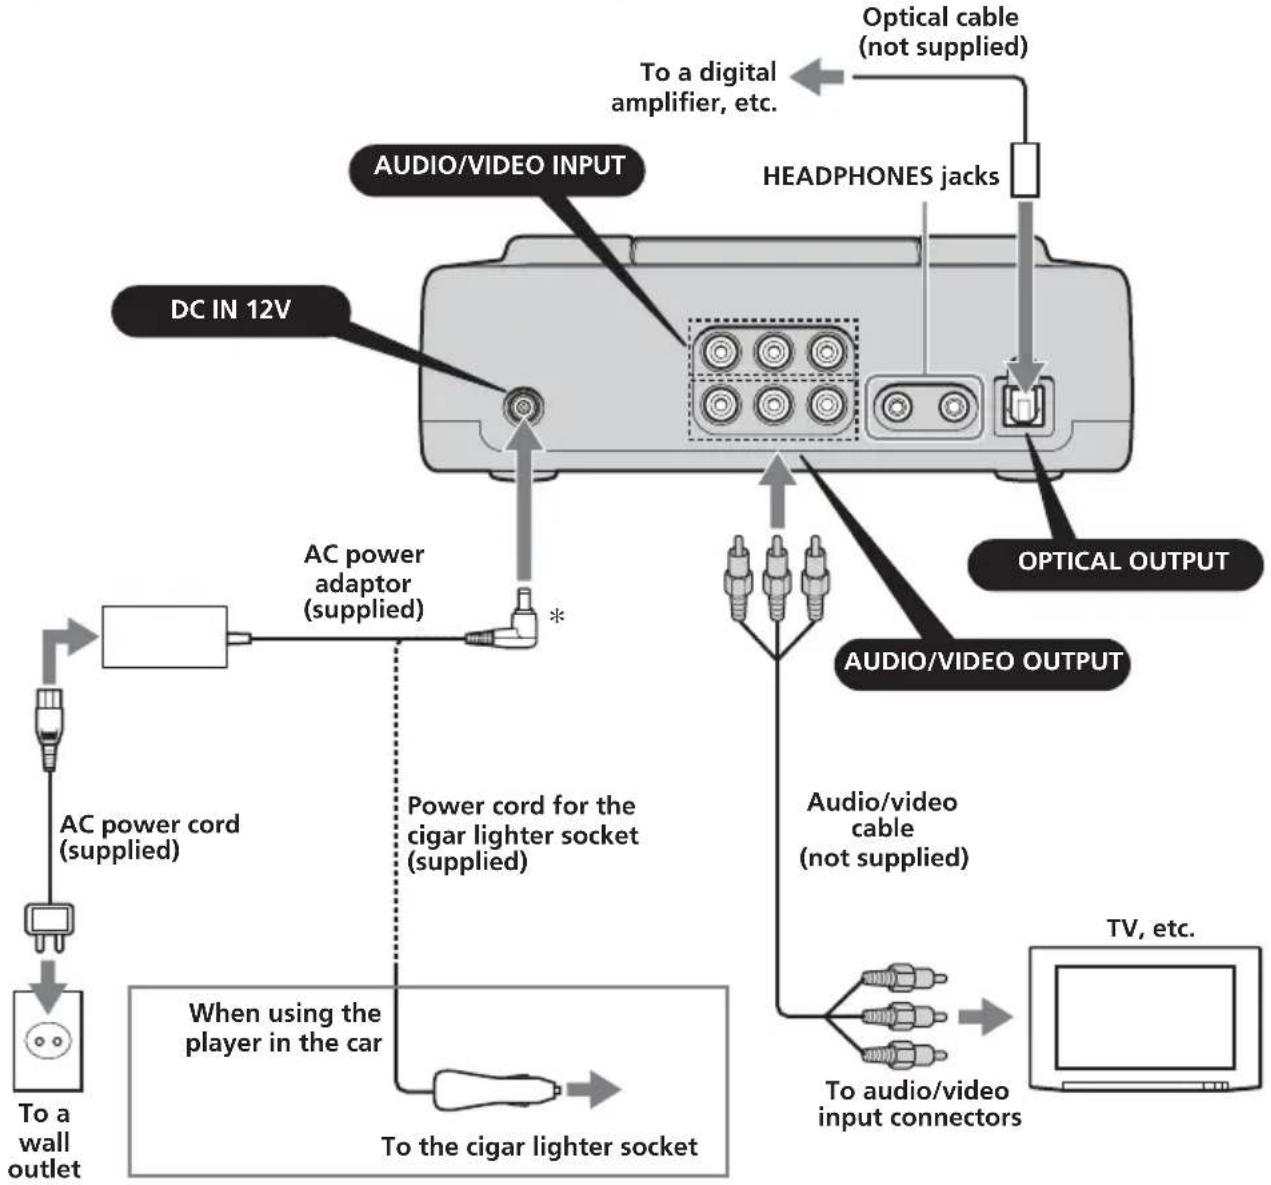
Connection
This player is supplied with two types of power cable. When you use the player in the car, connect the player to the cigar lighter socket; when using at home, connect it to the AC outlet.
flowchart
graph TD
    A["To a wall outlet"] --> B["AC power cord (supplied)"]
    B --> C["Power cord for the cigar lighter socket (supplied)"]
    C --> D["When using the player in the car"]
    D --> E["To the cigar lighter socket"]
    E --> F["AC power adaptor (supplied)"]
    F --> G["DC IN 12V"]
    G --> H["AC video/VIDEO INPUT"]
    H --> I["HEADPHONES jacks"]
    I --> J["Optical cable (not supplied)"]
    J --> K["OPTICAL OUTPUT"]
    K --> L["Audio/VIDEO OUTPUT"]
    L --> M["TV, etc."]
    M --> N["To audio/video input connectors"]
    N --> O["Three connectors"]
    O --> P["Three connectors"]
    P --> Q["Audio/video cable (not supplied)"]
    Q --> R["AC video/VIDEO OUTPUT"]
    R --> S["Headphones jacks"]
On AUDIO/VIDEO OUTPUT connectors
You can connect a TV to the AUDIO/VIDEO OUTPUT connectors to output the contents being played back on the player. Connect the yellow plugs of the audio/video cable to the video connectors on both the TV and the player, and connect the white plugs to the white (left audio) connectors and the red plugs to the red (right audio) connectors respectively.
On AUDIO/VIDEO INPUT connectors
You can connect a VTR, etc. to the AUDIO/VIDEO INPUT connectors to input the contents being played back on the device. You can connect the device in the same way as described on "On AUDIO/VIDEO OUTPUT connectors" above.
On HEADPHONES jacks
You can connect the 2 sets of headphones to the HEADPHONES jacks.
Notes
- When connecting another device to the player, be sure to connect the player to the power source after all other connections are completed.
- If an obstacle such as cigar ash is caught inside the cigar lighter socket, the contact between the power cord plug and the socket becomes incomplete and the plug may get extremely hot during use. To avoid this, check the socket and clean it if necessary before connecting the power cord.
* Polarity of the plug

Installing the player in a car
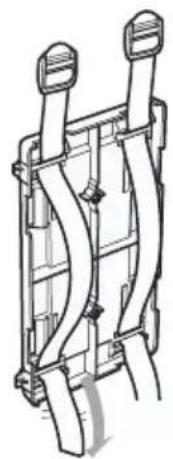
The player can be installed in a car by using the supplied installation board and mounting straps.
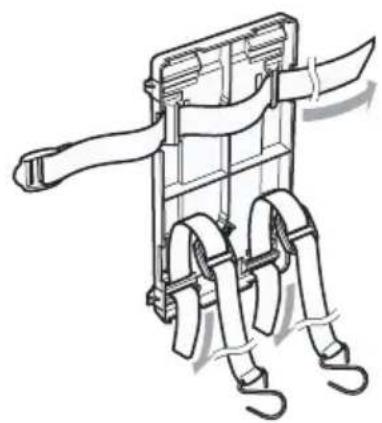
1 Hook the mounting straps to the brackets on the installation board as follows.
When attaching behind the headrest
natural_image
Technical line drawing of a mechanical assembly with two vertical supports and curved internal components (no text or symbols)When attaching behind the seat
natural_image
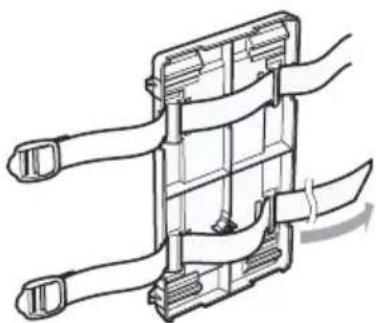
Technical line drawing of a mechanical device with attached straps and levers (no text or symbols)When attaching to the center console
natural_image
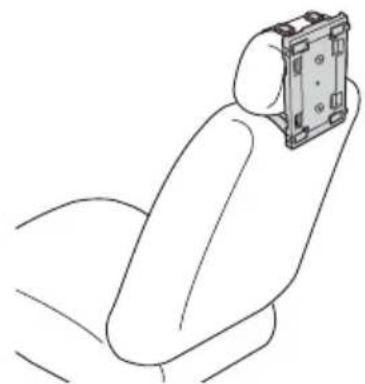
Technical line drawing of a mechanical component with multiple arms and a central shaft (no text or symbols)2 Attach the round hooks to the car.
Be sure to hook the installation board to steady objects such as the headrest shafts of the seat or the seat rails.
3 Reel in the slack of the belts to secure the installation board.
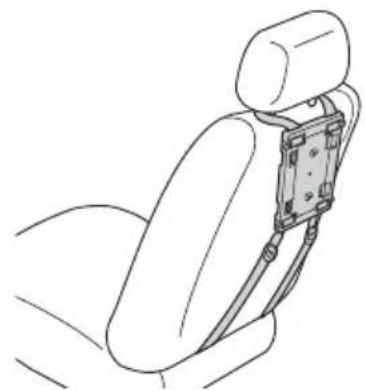
Example when the player is attached behind the headrest
natural_image
Line drawing of a person seated in a chair holding a smartphone (no text or symbols)Example when the player is attached behind the seat
natural_image
Line drawing of a car seatbelt device with attached armrest (no text or symbols)Example when the player is attached to the center console
natural_image
Line drawing of a hand gripping a small electronic component (no text or symbols)When the player is attached to the center console
- When picture noise appears or the sound dropouts occur due to vibrations from the car, place a cushioning material under the player.
- If a gap exists between the top of the center console and the bottom of the player, fill the gap with a material with optimum thickness so that the player becomes stable.
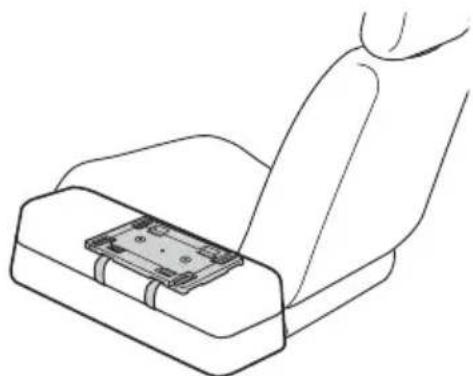
Attaching the player to the installation board
Slide the player on the board until stabilized.
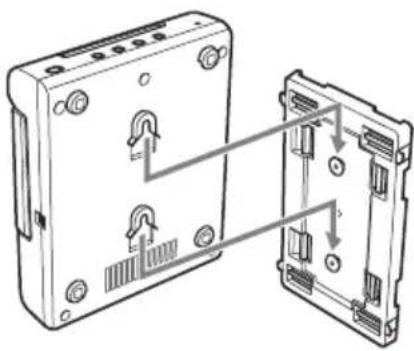
natural_image
Diagram of a device showing two views of an internal component with labeled ports and connectors (no text or symbols present)When the player is installed behind the seat
The player is installed upside down. Follow the procedure below to turn the picture on the screen upside down and switch the audio channels to use the player.
1 Open the monitor of the player, rotate it in 180 degrees, then close it with the screen facing upward.

natural_image
Mechanical assembly diagram showing a bracket with rotating arrows indicating motion (no text or symbols)2 Turn on the player, then press REVERSE on the monitor.
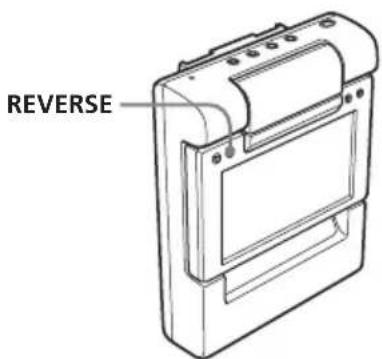
To cancel this, press REVERSE again.
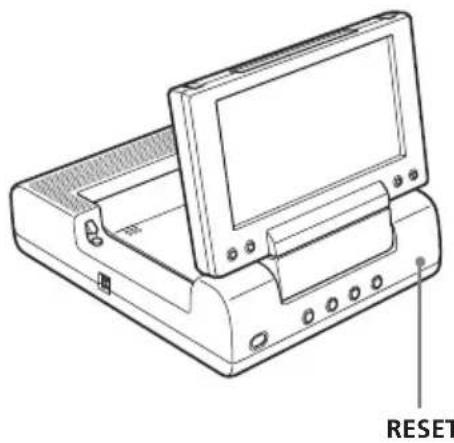
Resetting the player
Before operating the player for the first time, you must reset the player.
Press RESET with a pointed object, such as a ballpoint pen. Pushing it with force by using a needle may damage the player.
natural_image
Line drawing of a desktop computer with monitor and keyboard (no text or symbols)Notes
- When you press RESET, some of the previous settings may be lost. If this occurs, make the settings again.
- It takes about 10 seconds for the player to reset itself after pressing RESET. Do not insert a disc during this time. If you do, the player may not be reset properly.
Location of controls
MV-650STR
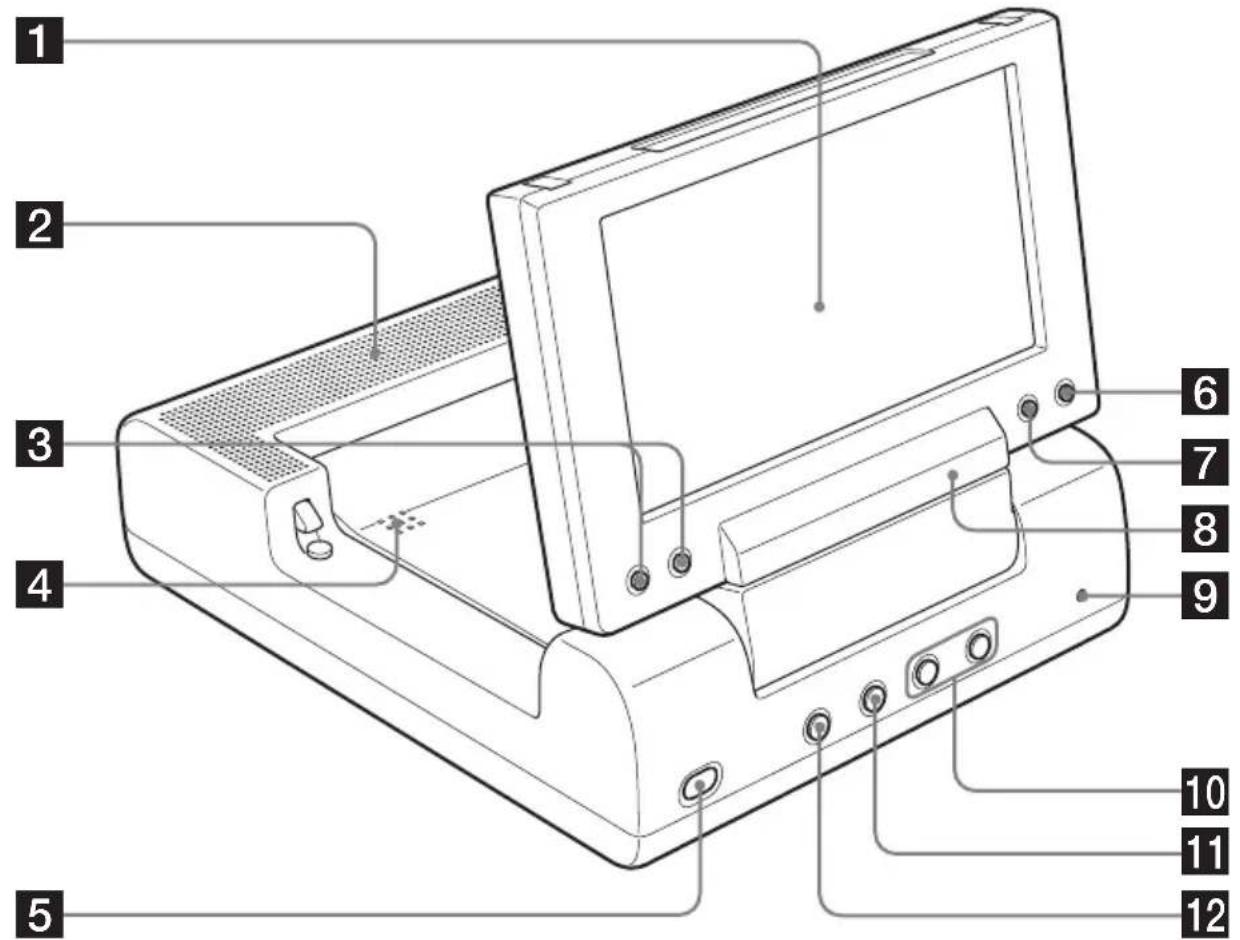
Refer to the pages listed for details.
1 Monitor
2 Speakers (left/right)
3 VOLUME -/+ buttons 14, 31, 32, 34
To turn up or down the volume or to select the item during menu operation.
4 PUSH OPEN 14
To open and close the disc cover.
5 POWER (on/off) button 14, 31, 34
To turn on/off the player.
6 S-MENU button 32
To make various display settings.
7 REVERSE button 11, 34
To switch images upside down and reverse the output of the audio channels.
8 Receptor for the card remote commander
9 RESET button 11
10 ◀◀ (previous)/▶▶I (next) buttons 15
11 ■ (stop) button 15, 16, 17, 20
12▶II (play/pause) button 14, 15, 16, 17
continue to next page →
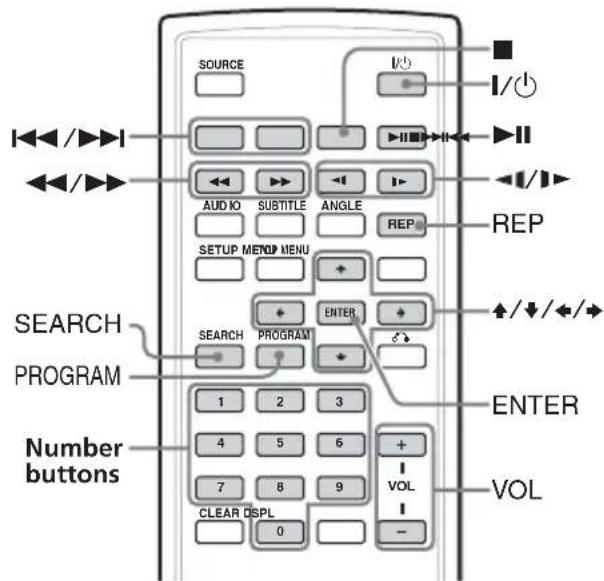
Card remote commander RM-X708
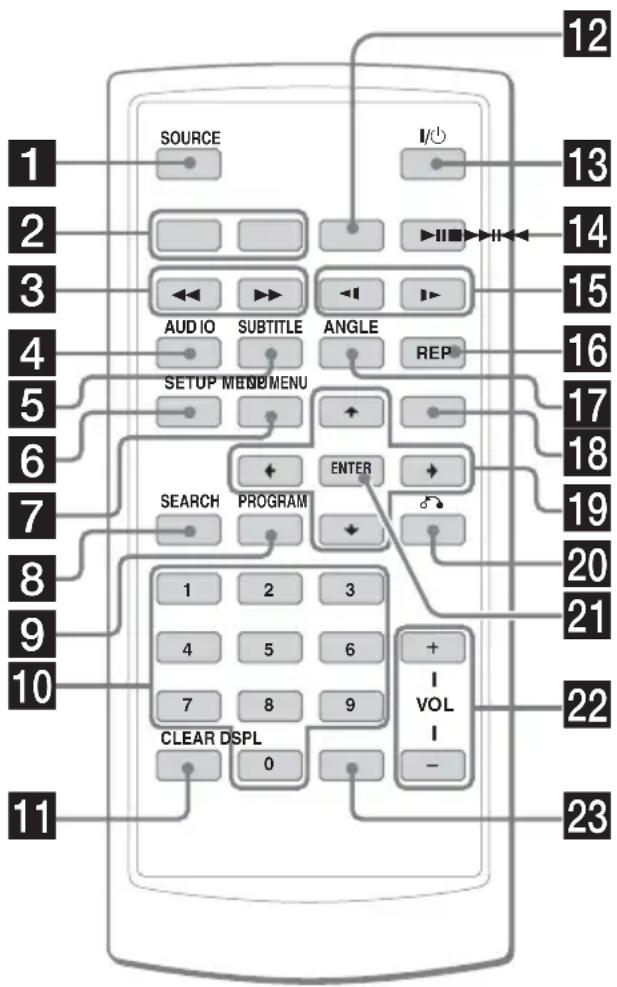
Refer to the pages listed for details.
1 SOURCE button 31
To select the input source.
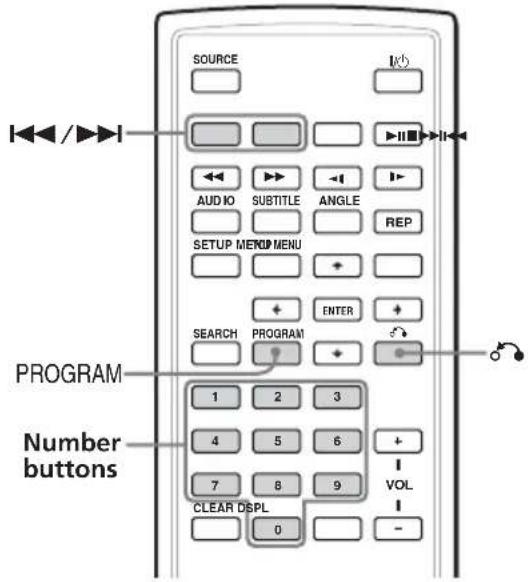
2 ◀◀◀/▶▶▶ (previous/next) buttons 15, 25
3◀◀ (fast reverse)/▶▶ (fast forward) buttons 15
4 AUDIO button 24, 25
To change the audio output/audio language.
5 SUBTITLE button 22
To change the subtitle language while playing a DVD.
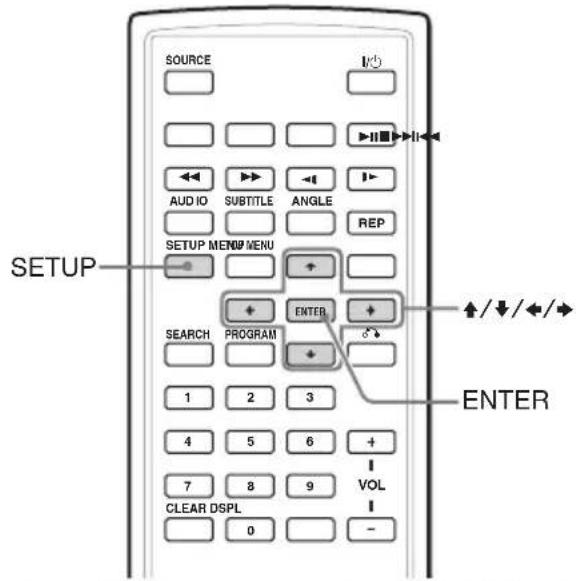
6 SETUP button 26, 27, 30, 31
Used to perform menu operations.
7 TOP MENU button 23, 25
To display the top menu of a recorded DVD.
8 SEARCH button 15
To specify a desired point on a disc by chapter, title or track.
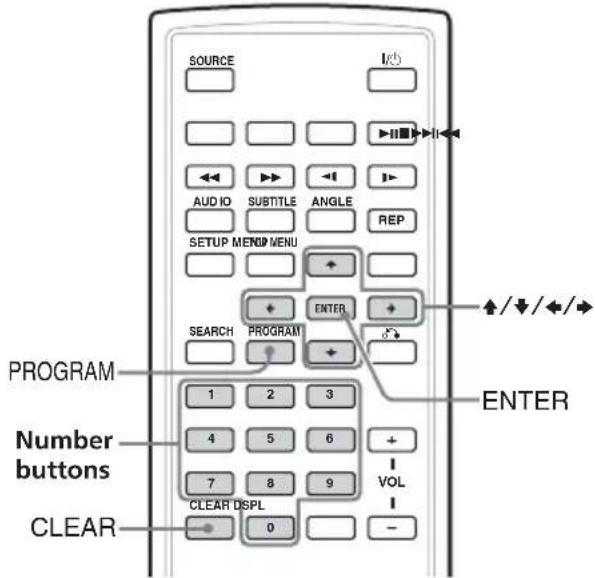
9 PROGRAM button 17, 20
To enter the program Playback Mode.
10 Number buttons 14, 15, 20, 25
The corresponding buttons of the card remote commander control the same functions as those on the player.
Instructions in this manual describe how to use the player by mainly using the card remote commander.
Tip
Refer to "Replacing the lithium battery of the card remote commander" for details on how to replace the battery (page 35).
11 CLEAR button 20, 30
12 ■ (stop) button 15, 16, 17, 20
13I/ button 14
14▶II (play/pause) button 14, 15, 16, 17
15 ◀ (slow reverse)/▶ (slow forward) buttons 15
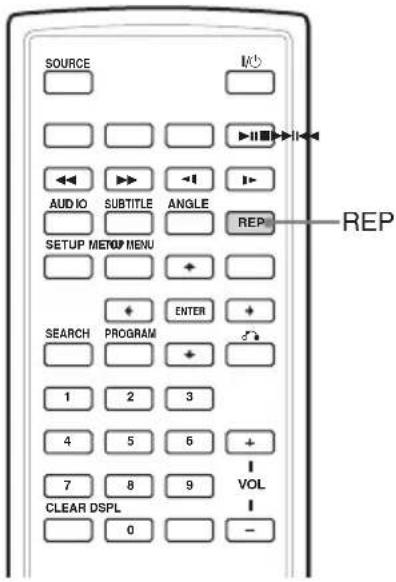
16 REP button 18, 19
To select the repeat mode (DVD/Video CD/Audio CD), or playback mode (MP3/JPEG/DivX).
17 ANGLE button 24
To select the multiple angles of view while paying a DVD.
18MENU button 17, 23
To display the recorded DVD menu.
19 ↑/↓/←/→ buttons 15, 17, 20, 23, 26, 30, 31
20 (return) button 25
21 ENTER button 15, 17, 20, 23, 26, 27, 30, 31
To enter a setting.
22VOL (+/-) buttons 14
23 DSPL button 17, 21
To display the time information of the disc.
Various Playback
This chapter describes various functions for playback.
Playing a disc DVD VCD

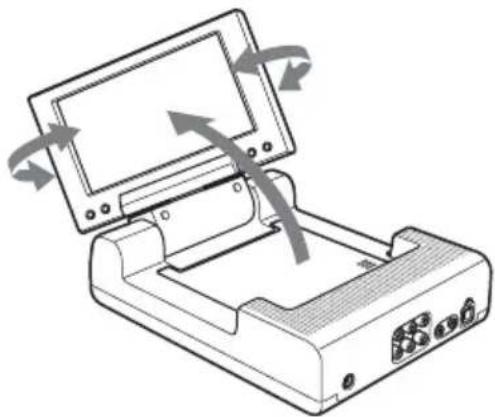
1 Open the monitor and adjust the tilt and swivel.
natural_image
Diagram of a device with arrows indicating motion or rotation around its screen (no text or symbols present)2 Press POWER to turn on the player.
On the card remote commander, press ⏻.
The monitor turns on and the green light of the POWER switch on the player lights up.
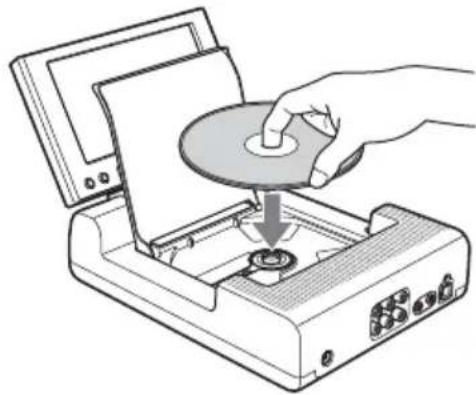
3 Press PUSH OPEN to open the disc cover.
4 Place a disc with the label side up and push around the center of it.
natural_image
Illustration of a hand inserting a CD into an open CD or DVD device (no text or symbols visible)5 Close the disc cover by pressing PUSH OPEN.
Playback starts automatically. If a disc is already inserted or playback does not start automatically, press ▶II to start playback.
6 Press VOL (+) or VOL (-) (VOLUME (+) or VOLUME (-) on the monitor) to adjust the volume.
To turn off the power
Press POWER (or the card remote commander) so that the green light of the POWER switch on the player turns off.
After use
Turn off the player and disconnect the power cord from the power source.
Note on using the player in the car
Using the player while the ignition key is in ACC position and the engine is stopped may cause the car battery to run down.
Notes
- Read the instruction manual supplied with the disc to play with this player.
- Do not open the disc cover during playback.
- Depending on the recording method used on the disc, it may take a minute or more before playing.
- Depending on the condition of the disc, it may not play back (page 37).
- A high-bit rate MP3 file such as 320 kbps may not play back properly.
- A large-sized JPEG file may take some time to be displayed.
Operation for playback
To Do this
| Stop playback Press ■* | 1 | |
| Eject the disc Press PUSH OPENon the player afterthe disc stops. | ||
| Pause Press ▶■ * | 2. | |
| Press again toresume playback. | ||
| Go to the next chapter, Press ▶▶ltrack, or scene | ||
| Go back to the preceding Press ◀◀◀chapter, track, or scene | ||
| Fast forward/ Press ▶▶/ ◀◀ whilefast reverse playing* | 3 *4Each press changesthe playback speedas follows: 2 timesof normal speed→4 times of normalspeed →8 times ofnormal speed →16times of normalspeed →32 times ofnormal speed →normal playbakspeed. | |
| Slow forward Press ▶▶/ (DVD/Video CD only)/ slowing reverse Each press changes(DVD only) the playback speed | <↓>slow reverse Each press changes(DVD only) the playback speedas follows: 1/2 timesof normal speed →1/4 times of normalspeed→1/8 timesof normal speed→1/16 times of normalspeed→normalplayback speed. | |
*1 If the resume playback function is activated, you can resume playback later by pressing ▶II. For details, see "Resume playback" (page 16).
^*2 DVD/Video CD/JPEG
"II" is displayed on the screen.
*3 DVD/Video CD/JPEG/DivX
No sound is output during fast forward or fast reverse.
^*4 A MP3 disc returns to normal playback when a MP3 file finishes.
Searching a chapter/title/track directly
1 Press SEARCH to display search screen.
• DVD
Each time you press ⒽSEARCH, the search screen changes as follows:
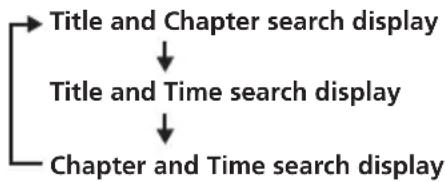
flowchart
graph TD
    A["Title and Chapter search display"] --> B["Title and Time search display"]
    B --> C["Chapter and Time search display"]
You can select the displayed items by pressing or button.
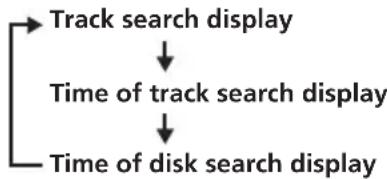
•Video CD/Audio CD*
Each time you press SEARCH, the search screen changes as follows:
flowchart
graph TD
    A["Track search display"] --> B["Time of track search display"]
    B --> C["Time of disk search display"]
You can select the displayed items by pressing or button.
2 Press the number buttons to enter the desired chapter/title/track number.
When "Title" and "Chapter" are displayed
| Title 01/01 Chapter | -- | /01 |
When "Title" and "Time" are displayed
| Title 01/01 Time | -:-:-:- |
3 Press ENTER.
* You can use the number buttons on the card remote commander to select the track.
Note
You cannot set "0."
Resume playback
You can resume playback from the point where the playback has been stopped. The player memorizes the point even after the power is turned off.
1 During playback, press ■ to stop.
The player memorizes the point where playback is stopped.
•DVD/Video CD/Audio CD
"Press Play Key To Continue" appears on the screen.
2 Press ▶II to start playback.
Playback starts from the point where playback has been stopped.
•MP3/JPEG/DivX
When resume playback is activated, playback starts from the beginning of the MP3/JPEG/DivX file (track) which you have stopped playback.
Notes
- To deactivate the resume function, press ■ again while playback is stopped. "Press Play Key To Continue" appears on the screen at this time.
- The resume function will be deactivated when the disc is ejected.
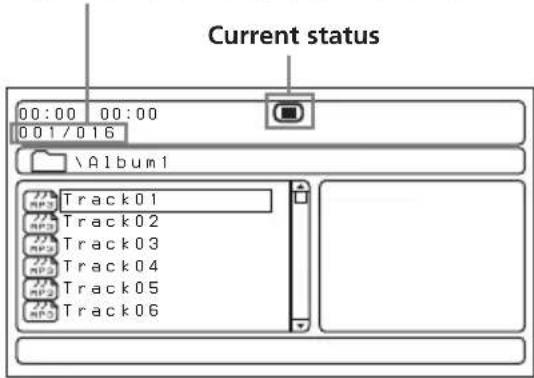
Using MP3/JPG/DivX® menu
1 Insert a disc containing MP3, JPEG or DivX files.
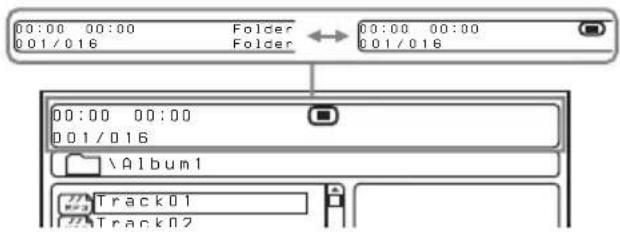
Screen Example:
•for MP3
Current file number/Total file number
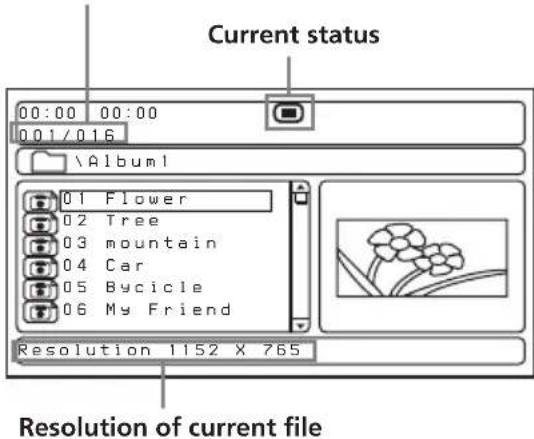
• for JPEG
Current file number/Total file number
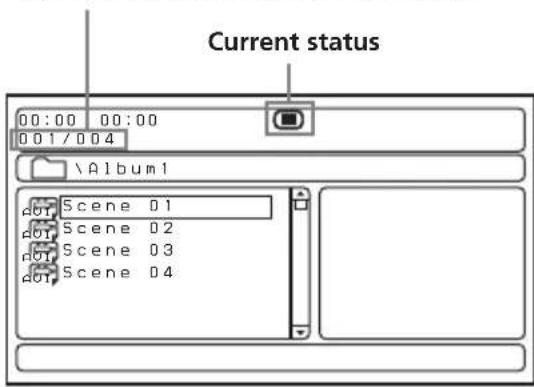
• for DivX
Current file number/Total file number
2 Press ▶II.
Playback starts and the MP3/JPEG/DivX menu appears on the screen.
Screen example for MP3:
Current file number/Total file number
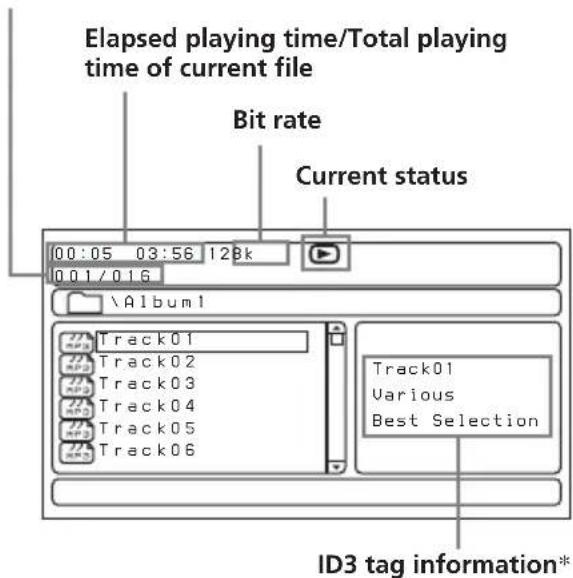
* This player supports ID3 tag of MP3 files version 1.0.
To select a folder or a file
While the player is stopped, use ↑/↓ buttons to select the folder or a file, then press ENTER.
When you press ENTER after selecting a folder, files inside the folder appear.
To select the display mode
Press PROGRAM. For MP3, press PROGRAM while in stop mode.
Each time you press PROGRAM, the screen will change to folder mode or file list mode. In the file list mode, you can see all the files in the disc.
Also if you press DSPL, you can change the display mode to the current status.
Using the thumbnail mode of JPEG disc
1 Press ■ while the JPEG image is displayed.
Images of files appear in 12 subscreens.
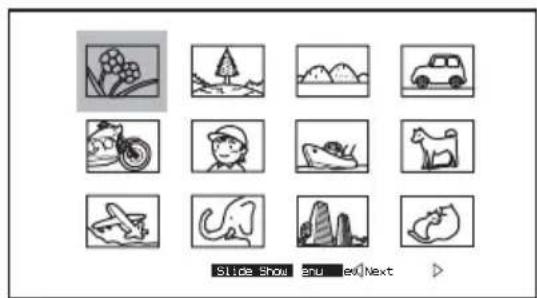
natural_image
Grid of 12 grayscale icons representing various scenes or objects, including animals, trees, and landscapes (no text or symbols)2 Select the image you want to view by pressing ↑/↓/←/→ buttons and press ENTER.
A JPEG image is displayed on the screen.
To go to the next or previous JPEG image list, press ↑/↓/←/→ to select "◀ Prev" or "Next ▷", then press ENTER.
To view the images as a slideshow, press ↑/↓/←/→ to select Slide Show, then press ENTER. The slideshow starts from the selected image.
To return to the MP3/JPG/DivX menu, press MENU.
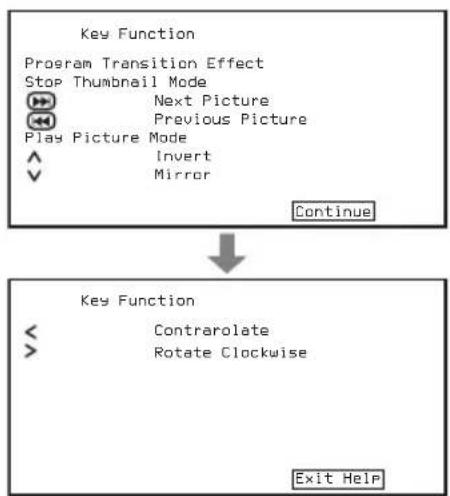
To view the remote key functions
You can view the remote key functions in thumbnail mode.
Press ↑/↓/←/→ to select "Menu", then press ENTER.
continue to next page →
To select the playback mode
Press REP to select the playback mode. Each time you press REP, playback mode changes as follows:
•MP3/JPEG
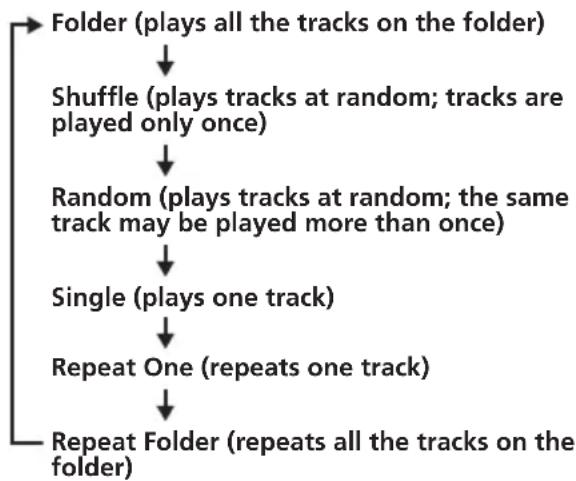
flowchart
graph TD
    A["Folder (plays all the tracks on the folder)"] --> B["Shuffle (plays tracks at random; tracks are played only once)"]
    B --> C["Random (plays tracks at random; the same track may be played more than once)"]
    C --> D["Single (plays one track)"]
    D --> E["Repeat One (repeats one track)"]
    E --> F["Repeat Folder (repeats all the tracks on the folder)"]
•DivX
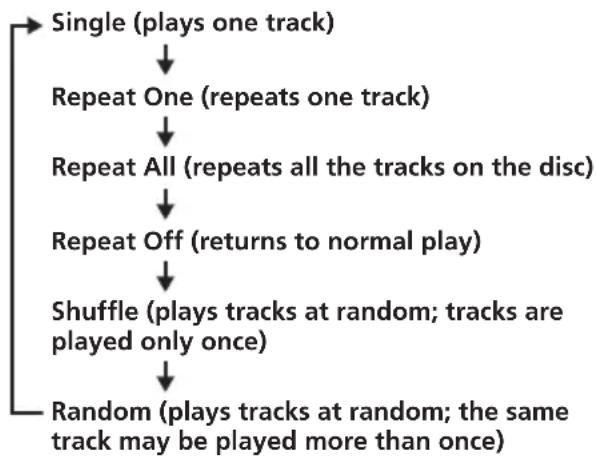
flowchart
graph TD
    A["Single (plays one track)"] --> B["Repeat One (repeats one track)"]
    B --> C["Repeat All (repeats all the tracks on the disc)"]
    C --> D["Repeat Off (returns to normal play)"]
    D --> E["Shuffle (plays tracks at random; tracks are played only once)"]
    E --> F["Random (plays tracks at random; the same track may be played more than once)"]
Notes
- While playing back, you cannot change a folder or file with the MP3/JPG/DivX menu. Only the files in the selected folder can be selected with the ◄◀◀/▶▶▶ button. To change the folder, stop playback.
- Names for the MP3 folders and files are displayed properly when they consist of alphabets, numbers, or symbols only. The characters which this unit does not support are displayed as “-”.
DivX® video files that the player can play
The player can play data that is recorded in DivX format, and data that has the extension ".AVI" or ".DIVX". The player will not play files with the extension ".AVI" or ".DIVX" if they do not contain a DivX video.
Notes
- The player may not play a DivX video file when the file has been combined from two or more DivX video files.
- The player cannot play a DivX video file of a size more than 720 (width) ×576 (height)/2GB.
- Depending on the DivX video file, the picture may be unclear or the sound may skip.
- The player cannot play some DivX video files that are longer than 3 hours.
- Depending on the DivX video file, the picture may pause or be unclear. In that case, it is recommended that you create the file at a lower bit rate. If the sound is still noisy, MP3 is the recommended audio format. Note, however, this player does not conform to WMA (Windows Media Audio) format.
- Because of the compression technology used for DivX video files, it may take some time after you press ▷ for the picture to appear.
- Depending on the DivX video file, the sound may not match the picture on the screen.
Playing repeatedly (Repeat Playback)

You can play all of the chapters or titles on a disc or a single track repeatedly. You can use a combination of Program Playback mode.
Press REP during playback.

Each time you press the button, repeat playback mode changes as follows:
• DVD
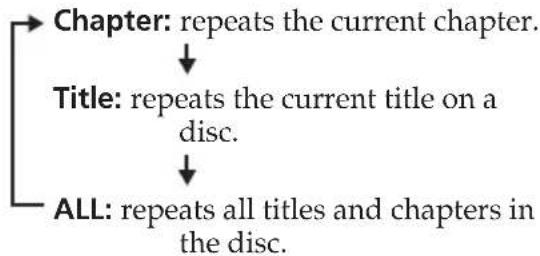
flowchart
graph TD
    A["Chapter: repeats the current chapter."] --> B["Title: repeats the current title on a disc."]
    B --> C["ALL: repeats all titles and chapters in the disc."]
• Video CD (only when PBC is off)/Audio CD
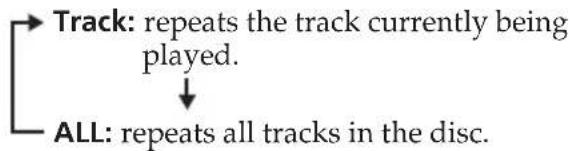
flowchart
graph TD
    A["Track: repeats the track currently being played."] --> B["ALL: repeats all tracks in the disc."]
To return to normal playback
Press REP repeatedly until the repeat icon disappears.
Creating your own program (Program Playback)

You can play the contents of a disc in the order you want by arranging the order of the titles, chapters, or tracks on the disc to create your own program. You can program up to 20 titles, chapters, and tracks.
1 Press PROGRAM.
The program menu screen appears.
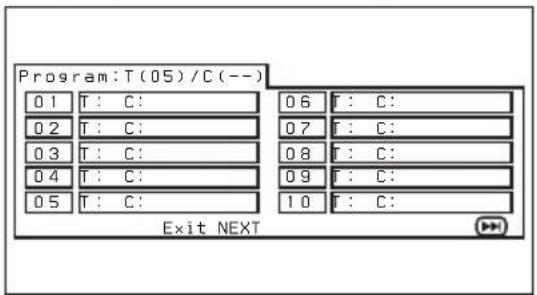
2 Select the title, chapter or track you want to program.
• DVD
Example: to select chapter "03" of title "02".
Press 0, 2, 0 and 3 on the number buttons.

• Video CD/Audio CD
Example: to select track "02".
Press 0 and 2 on the number buttons.
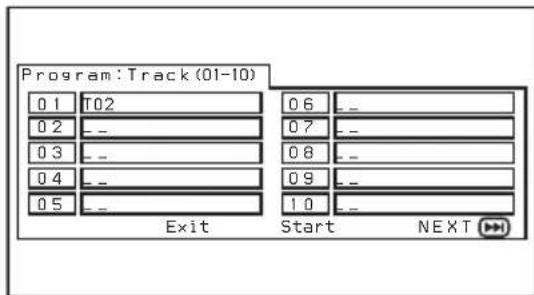
3 Repeat step 2 to program other titles, chapters or tracks.
To move to next program list, press ↑/↓/←/→ buttons to select "NEXT", then press ENTER.
4 Press ↑/↓/←/→ buttons to select
"Start", then press ENTER.
To repeat the program playback
Press (REPEAT) to select "ALL" during program playback. The player repeats all programmed tracks.
To return to normal playback
Press ■ during program playback.
To change a program
1 Press PROGRAM.
2 Press ↑/↓/←/→ buttons to select "Stop", then press ENTER.
3 Follow step 2 of "Creating your own program (Program Playback)" for new programming.
To cancel the program
Press PROGRAM when the program menu screen appears.
Displaying elapsed time

You can display the elapsed time and the remaining time of DVDs, Video CDs and Audio CDs.
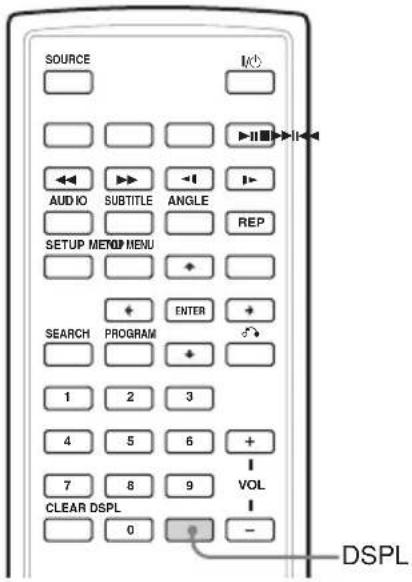
During playback, press DSPL.
The elapsed time or the remaining time is displayed at the upper left.
Each time you press DSPL, the display changes as follows:
• DVD
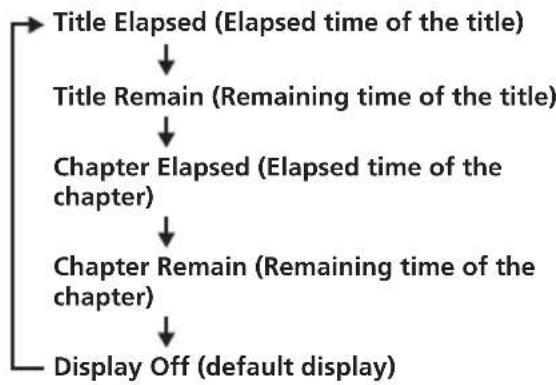
flowchart
graph TD
    A["Title Elapsed (Elapsed time of the title)"] --> B["Title Remain (Remaining time of the title)"]
    B --> C["Chapter Elapsed (Elapsed time of the chapter)"]
    C --> D["Chapter Remain (Remaining time of the chapter)"]
    D --> E["Display Off (default display)"]
• Video CD (when PBC is on)/DivX
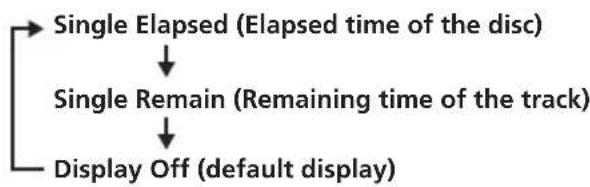
flowchart
graph TD
    A["Single Elapsed (Elapsed time of the disc)"] --> B["Single Remain (Remaining time of the track)"]
    B --> C["Display Off (default display)"]
• Video CD (when PBC is off)/Audio CD
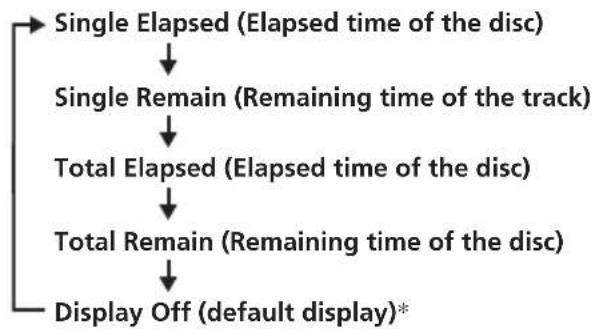
flowchart
graph TD
    A["Single Elapsed (Elapsed time of the disc)"] --> B["Single Remain (Remaining time of the track)"]
    B --> C["Total Elapsed (Elapsed time of the disc)"]
    C --> D["Total Remain (Remaining time of the disc)"]
    D --> E["Display Off (default display)*"]
* It is not displayed when playing back an audio CD.
To turn off the time information
Press DSPL repeatedly to select "OFF."
Changing the subtitle language DVD
Some DVDs have recorded subtitles in one or more languages. You can turn the subtitles on or off, or change the subtitle language on such DVDs.
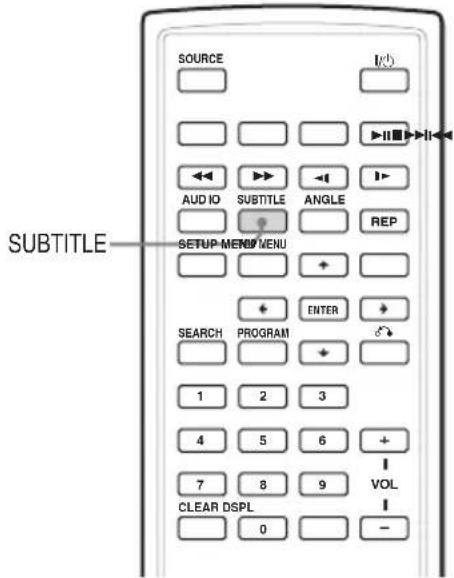
Press SUBTITLE during playback.
The subtitle language is displayed at the upper left.
Example: a subtitle language display
The disc contains 2 subtitle languages and the first language is currently selected.
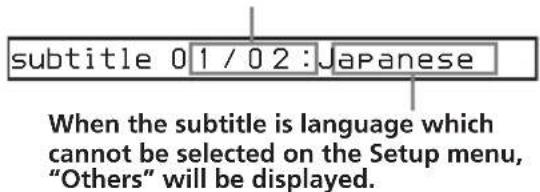
Each time you press SUBTITLE, the language switches within the list of subtitle languages recorded on the disc.
To turn off the subtitle
Press SUBTITLE repeatedly to select "Off."
Notes
- You can also change the subtitle languages by changing Setup*. See "Subtitle" (page 29).
* You can change to a specific subtitle language using the DVD SETUP menu, only if the language is included in both the disc and the menu. In some discs, the initial language to be displayed is specified regardless of the DVD SETUP menu setting. - This function varies or may not work, depending on the DVDs.
Using a DVD menu

With some DVDs you can use the original menu such as Title menu and DVD menu. In title menu, you can play your favorite scene or song by selecting titles of songs and scenes. You can select an item, subtitle language, audio language etc. by selecting a DVD menu. The contents of title menus and DVD menus differ depending on the DVD. There may be some DVDs which have no recorded menus.
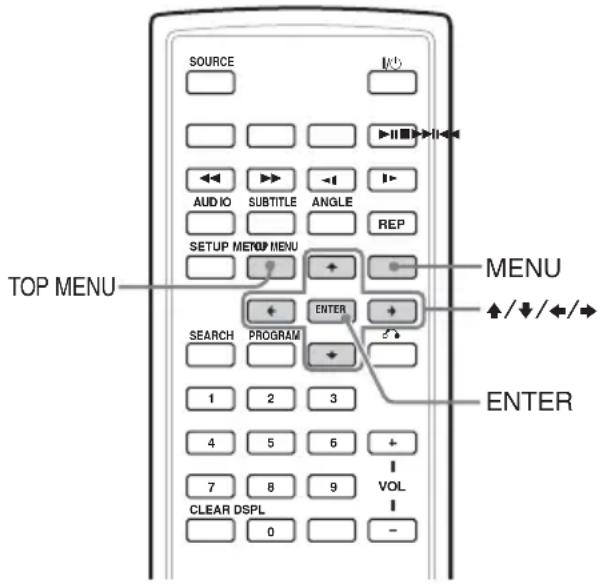
Using the TOP MENU button
Some DVDs have a title menu. From the title menu you can select a title for playback. Titles are the longest sections of a picture or music feature on a DVD, e.g., a movie, or an album for audio software, etc. The TOP MENU button is available to display the initial menu screen.
1 During DVD playback, press TOP MENU. The title menu* (top menu) is displayed.
* The contents of the title menu differ, depending on the DVD.
2 Press /// to select the desired title.
3 Press ENTER.
The title you selected starts to play.
Using the MENU button
Some DVDs have more comprehensive menu that includes things such as the audio languages, subtitle languages, titles, and chapters, etc.
1 During a DVD playback, press Ⓜ MENU. The DVD menu is displayed.
2 Press /// to select the desired item.
3 Press ENTER.
If additional selection screens appear, repeat step 2 and 3.
Notes
- Some DVDs do not have a DVD menu and on some DVDs, the contents of the DVD menu and title menu are the same.
- On some DVDs, "DVD Menu" may be expressed as "MENU."
- On some DVDs, "Press ENTER" may be expressed as "Press SELECT" in step 3.
- The contents of the DVD menu differ, depending on the DVDs.
- Read the instruction manual supplied with a DVD.
Changing the audio language DVD
Some DVDs have multiple audio languages you can choose from.
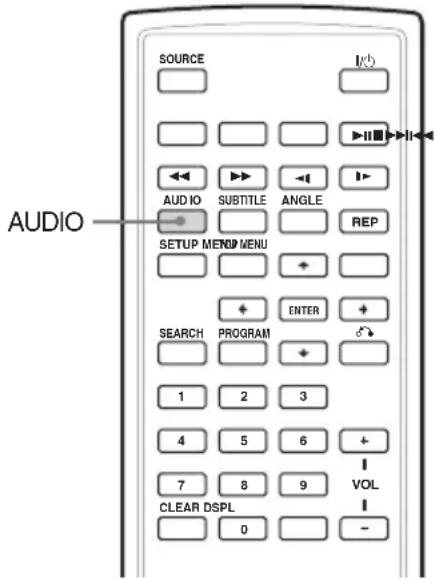
During playback, press AUDIO repeatedly to select the desired audio language.
The current audio language is displayed at the upper left.
Example: an audio language display
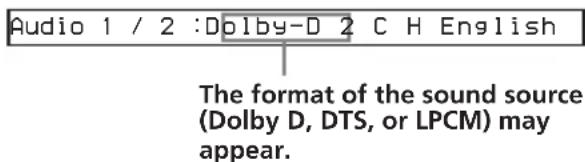
When the display for the language code appears, input the language code corresponding to the desired language (page 41).
Notes
- You can switch the audio language only if multiple audio languages are recorded on the DVD.
- You can also change the audio languages by using the DVD menu (page 23) or the DVD SETUP menu* (page 29).
* You can change to a specific audio language using the DVD SETUP menu, only if the language is included in both the disc and the menu. In some discs, the initial language to be output is specified regardless of the DVD SETUP menu setting. - This function varies or may not work, depending on the DVDs.
Changing angles

Some DVDs have multiple alternative angles recorded for certain scenes. If you have set "Angle Mark" to "On" (page 27), a notice appears at the scene.
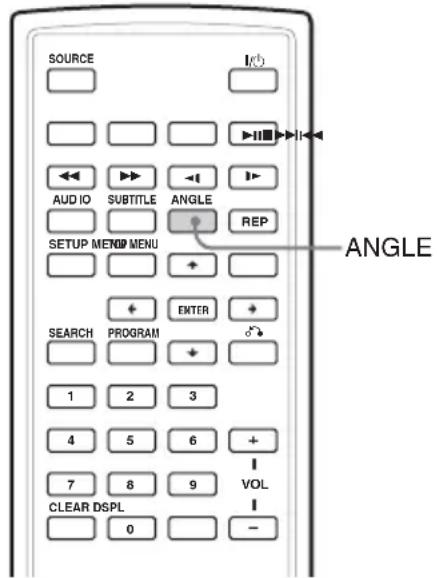
1 During playback of a DVD having multiple alternative angles recorded, press ANGLE when a notice appears.
The number of the currently selected angle is displayed at the upper right.
2 Press ANGLE repeatedly to select your favorite angle number, while the angle number is displayed.
Each time you press ANGLE, the angle number switches.

The angle number you have currently selected/the total number of multiple alternative angles
Notes
- You can switch the angle only if multiple angles are recorded on the DVD.
- The total number of recorded angles differs depending on the DVDs and scenes.
- You can switch the angle only during normal playback. You cannot switch the angle during fast forward/reverse playback.
- When the selected scene with multi angles appears, the angle is automatically switched to the angle number you selected in step 2.
- This function varies or may not work, depending on the DVDs.
Changing the audio output

You can select the desired audio output from "Stereo", "Mono Left", "Mono Right" or "Mix-Mono" during Video CD or Audio CD playback.
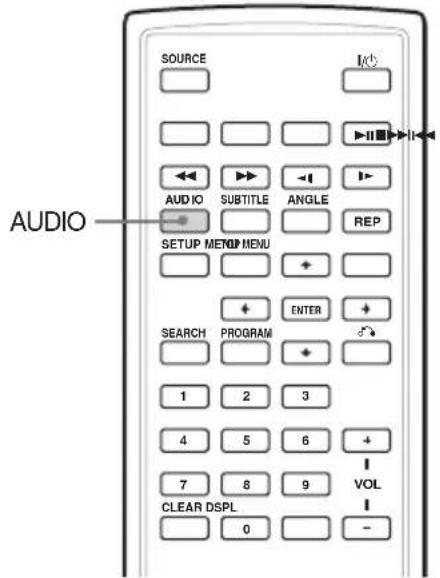
1 During playback, press AUDIO.
The current output is displayed at the upper left.
Example: an audio output display
Mono Right
2 Press AUDIO to select the desired output from "Stereo", "Mono Left", "Mono Right" or "Mix-Mono" while the output is displayed.
Each time you press AUDIO, the output switches.
Using the PBC (playback control) function VCD
During playback of a PBC compatible Video CD, you can display the PBC menu and select the item from the menu.
1 Start playback a video CD with PBC functions.
The menu for your selection appears.
2 Press the number buttons to select the number of the desired item.
3 Follow the instructions in the menu for interactive operations.
Refer to the instructions supplied with the disc, as the operating procedure may differ depending on the Video CDs.
To return to the menu
Press
Tip
To play without using PBC, press TOP MENU. "PBC Off" appears on the TV screen and the player starts continuous play. To return to PBC playback, press TOP MENU again.
Notes
- During playback of a Video CD with "PBC ON," press ◄◀/▶▶ to change the item. The PBC menu is not displayed but the item you selected starts to play.
- During playback of a Video CD with "PBC ON," press ⬆ to display the PBC menu and the ▶ mark.
Changing Setup
You can set up and adjust this player using the on-screen setup menus. Most settings need to be set when you first use this player.
Setup menus are:
- General Setup Page (system settings)
• Audio Setup page (settings for digital audio output)
•Language Page (language settings) - Parental Setup Page (setting for parental control)
Refer to "Settings by using the S-MENU button on the monitor" (page 32) for settings of the monitor.
1 Press SETUP.
2 Press ← or → button to select the desired item.
General Setup Page
♪: Audio Setup Page
Aä:Language Page
:Parental Setup Page
3 Press ENTER.
4 Press ↑ or ↓ button to select the desired setting.
5 Press ENTER.
6 Press ↑ or ↓ or ← or → to select (adjust) the setting option.
7 Press ENTER.
8 Press SETUP.
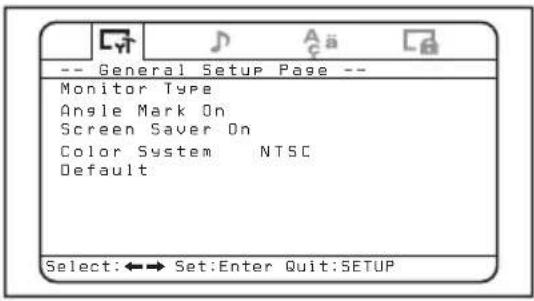
Setting for DVD player
- General Setup Page
◆ Monitor Type
When you connect the player to a TV to watch the DVD on TV screen, make this setting according to the type of the TV screen.
The default settings are underlined.
4:3/Pan Scan Select this when you connect a 4:3 screen TV. The wide picture will be automatically displayed on the entire screen and the portions that do not fit will be cut off.
4:3/Letter Box Select this when you connect a 4:3 screen TV. The wide picture with the bands on the upper and lower portions of the screen will be displayed.
16:9 Select this when you connect a wide-screen TV or a TV with a wide mode function.
◆ Angle Mark
If various angles (multi-angles) for a scene are recorded on the DVD and you have set the "Angle Mark" to "On", a notice appears at the scene.
On A notice will appear at the scene.
Off A notice will not appear at the scene.
◆ Screen Saver
If you set the "Screen Saver" setting to "On", the screen saver image appears when you leave the player in pause or stop mode for more than about 15 minutes. The screen saver will prevent the monitor from damage.
On Turns on the screen saver.
Off Turns off the screen saver.
◆ Color System
When you connect the player to a TV to watch the DVD on TV screen, make this setting according to the color system of your country. Note that this setting does not affect the screen of the player.
PAL Always outputs the PAL signal.
AUTO Changes the color system for the video signal output from the player automatically according to the color system recorded on the DVD.
NTSC Always outputs the NTSC signal.
Default
You can reset setup menus to the factory setting.
1 Press SETUP, then press ← or → button repeatedly until "General Setup Page" appears on the screen.
2 Press ENTER.
3 Press ↑ or ↓ button repeatedly to select "Default".
4 Press ENTER.
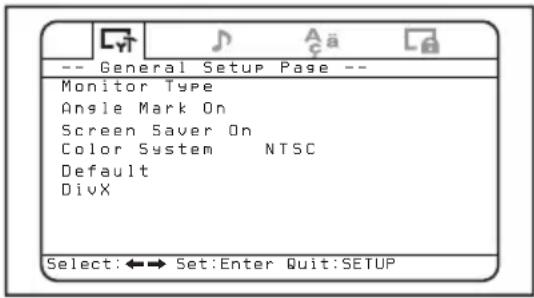
DivX
Displays the registration code for this player. For more information, go to http://www.divx.com/vod on the Internet.
Settings for digital audio output - Audio Setup page
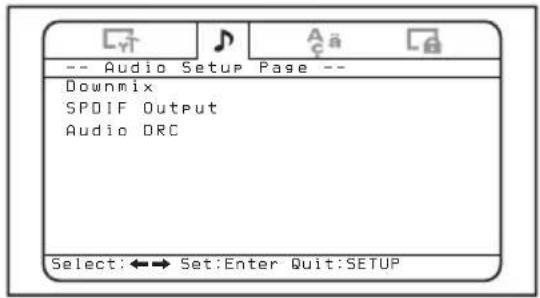
Downmix
You can select the downmix mode from "Surround" or "Normal". The downmix function is used to create stereo (2-channel) signals from more than 5 separated digital signals of a source. This setting affects the outputs of AUDIO OUTPUT.
Surround Select this when the connected audio equipment supports Dolby Surround (Pro Logic).
Normal Select this when the connected audio equipment does not support Dolby Surround (Pro Logic).
◆ SPDIF Output
You can set the mode of the audio signals output from the OPTICAL OUTPUT connector.
Off No signal is output from OPTICAL OUTPUT connector.
RAW Select this when you connect an audio component with a built in Dolby Digital decoder or DTS decoder.
PCM 48K Select this when you do not connect an audio component with a built in Dolby Digital decoder or DTS decoder.
Notes
- When "Off" is selected, no signal is output from the OPTICAL OUTPUT connector.
- When you connect the player and a digital recording device such as an MD player through an optical cable to record the CD contents with that device, the contents will be recorded as one continuous track.
Audio DRC
Makes the sound clear when the volume is turned down when playing a DVD that conforms to "Audio DRC". You can set the DRC (Dynamic Range Control) level from 8 steps. This setting affects the outputs of AUDIO OUTPUT.
FULL: Makes the low sounds clear even if you turn the volume down. OFF
Language settings for DVD playback - Language Page
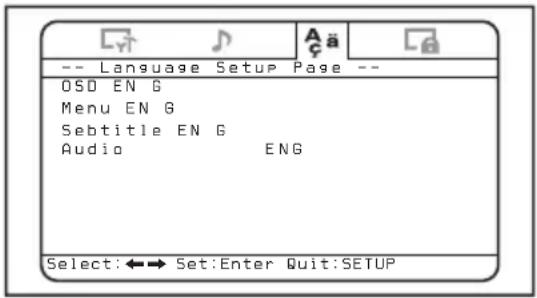
♦ OSD
Switches the language used for the menus on the screen.
◆ Menu
You can select the desired language for the disc's menu.
Note
Regardless of your setting, the language other than you set may be automatically activated, depending on the DVD.
Subtitle
Switches the language for the subtitle recorded on the DVD VIDEO.
Note
Regardless of setting to the desired language, other language may be automatically activated, depending on the DVD.
Audio
Switches the language of the sound track. When you select "Original", the language given priority in the disc is selected.
Notes
- Regardless of your setting, the language other than you set may be automatically activated, depending on the DVDs.
- Some DVDs are prohibited to change the audio language output, even if multiple languages are recorded.
Settings for the Parental Control - Parental Setup page
When you set the password for the first time, be sure to set the parental control together.
Selecting the Parental Control mode on and off - Parental Control
1 Press SETUP.
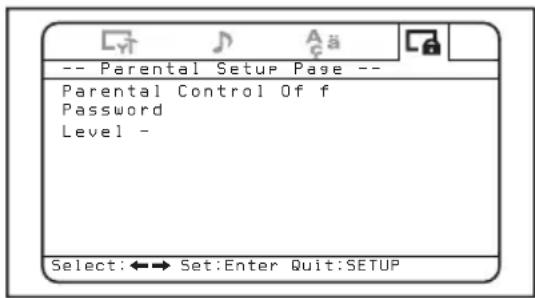
2 Press ← or → button repeatedly until "Parental Setup Page" appears on the screen.
3 Press ENTER.
4 Press ↑ or ↓ button repeatedly to select "Parental Control", then press ENTER.
5 Press ↑ or ↓ button repeatedly to select "On" or "Off", then press ENTER.
6 Press SETUP to exit the Setup menu.
Setting the password - Password
1 Press SETUP, then press ← or → button repeatedly until "Parental Setup Page" appears on the screen.
2 Press ENTER.
3 Press ↑ or ↓ button repeatedly to select "Password", then press ENTER.
4 Press the number buttons to enter "5370".
The player is ready to accept a new password.
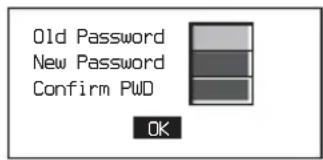
5 Press the number buttons to enter a new password.
6 Press the number buttons to enter the password again to confirm.
7 Press SETUP to exit the Setup menu.
Note
If you forget your registered password, enter "5370".
Preparing for the initial parental setting - Level
Playback of some DVDs can be limited according to a predetermined level, such as the age of the viewer. The Parental control function allows you to set a playback limitation level.
This setting is possible only when a password is entered as described in "Setting the password-Password" (page 30).
1 Press SETUP, then press ← or → button repeatedly until "Parental Setup Page" appears on the screen.
2 Press ENTER.
3 Press ↑ or ↓ button repeatedly to select "Level", then press ENTER.
4 Press ↑ or ↓ button repeatedly to select the limitation level, then press ENTER.
5 Press SETUP to exit the Setup menu.
Refer to the following table. Parental levels of the table are on the MPAA (Motion Picture Association of America) rating system. If you set this player to level "4" for example, DVDs with levels "5", "6", '7", and "8" cannot be played.
This Player MPAA Rating System
| “1” “G”: General audience |
| “2” - |
| “3” “PG”: Parental guidance suggested |
| “4” “PG13”: Parents strongly cautioned |
| “5” - |
| “6” “R”: Restricted |
| “7” “NC17”: No one 17 and under admitted |
| “8” No restriction |
Monitoring video signals input from the connected device
Switch the input channel to monitor video signals input from the device connected to the VIDEO INPUT connector of the player.
1 Press POWER to turn on the player. The current input channel (DVD) appears on the screen for 5 seconds.
2 Press SOURCE on the card remote commander repeatedly to select "VIDEO."
Each time you press the button, "DVD" and "VIDEO" alternate.
Be sure to change the input channel setting to "DVD" to play the DVD with this player.
Selecting the color system for the input video signal
The player detects the color system of the input video signal (PAL or NTSC) and changes the setting automatically (auto mode).
Follow the steps below to change the color system setting for the input video signal manually.
1 Press POWER to turn on the player.
The current input channel (DVD) appears on the screen for 5 seconds.
2 Press VOLUME +/- on the monitor repeatedly to select "PAL" or "NTSC."
Note
When changed manually, the color system setting for the input video signal does not return to auto mode until the player is turned off or input channel setting is changed. Therefore, when it is set to "PAL," the DVD recorded in NTSC system cannot be viewed on the monitor of the player unless you turn off the player, then turn it on again.
Settings by using the S-MENU button on the monitor
You can make settings for the monitor by using S-MENU on the monitor. Each time you press S-MENU, the setting screen changes in the following sequence: Picture → Brightness → Color → Hue*¹ → Dimmer → Video Adjust → Mode → Blue Back → IR Headphone → DVD LEVEL REVISION → SYSTEM MENU Off.
*1 "Hue" appears only when the NTSC color system is selected as the input source (page 31).
Note
While making the following settings, the VOL +/- buttons on the card remote commander can be used to adjust the volume.
How to set preference
1 Press S-MENU on the monitor repeatedly to select desired item.
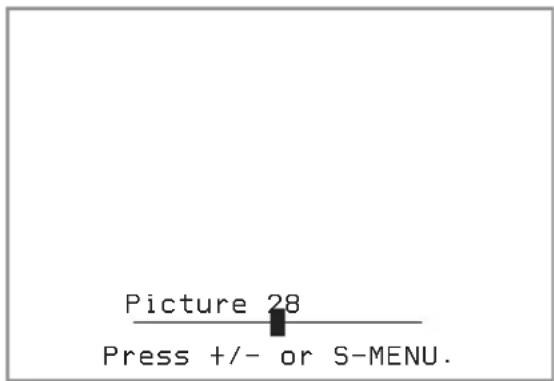
2 Press VOLUME (+) or VOLUME (-) on the monitor to select (or adjust) the setting option.
Exiting the menu operation
1 Press S-MENU on the monitor repeatedly until the "SYSTEM MENU OFF" appears.
2 Press S-MENU on the monitor again. The normal screen resumes.
When 5 seconds elapse with no button pressed, normal display resumes.
The default settings are underlined.
| Settings Setting options | |
| Picture Settable range: 0 to 63 (default setting is "36")Adjusting the contrast. | |
| Brightness Settable range: 0 to 63 (default setting is "30")Adjusting the brightness. | |
| Color Settable range: 0 to 63 (default setting is "36")Adjusting the color. | |
| Hue Adjust this if the picture is reddish or greenish. The default setting is "CTR (center)".• "Hue" is displayed for NTSC system only. | |
| Dimmer On, Off___Adjusting the dimmer. | |
| Video Adjust Resetting the picture, brightness, color, hue, dimmer setting at single operation.NoteInput channel, color system for the input video signal (PAL/NTSC), screen mode, and blue background setting will not be reset when you reset the adjustments. | |
| Mode Normal, Wide, Full, Zoom___Setting the screen mode.Normal: An image with an aspect ratio of 4 to 3 (regular image).Wide: An image with an aspect ratio of 16 to 9.Full: An image with an aspect ratio of 4 to 3 enlarged to the left and right edges of the screen.Zoom: An image with an aspect ratio of 4 to 3 enlarged to the left and right edges of the screen, with the overflowing parts (top and bottom) cut off to fill the screen. | |
| Blue Back On, Off___Setting the blue background screen. | |
| IR Headphone On, Off___Turning on and off the IR(Infrared Ray) headphone. When this item is set to "On", you can use the IR headphone | |
| DVD LEVEL REVISION On, Off___Reducing gap of the audio output level. If the playback sound of DVD is low, set this item to "On". The player reduces gap of the audio output level. |
Turning the image upside down
To use the player in upright position, do the following steps to turn the images on the monitor upside down and switch the audio channels.
Press REVERSE on the monitor.
"Reverse On" appears for 5 seconds and the image on the monitor turns upside down.
To resume the normal images, press
REVERSE on the monitor again.
"Reverse Off" appears for 5 seconds.
Setting the reference volume
You can set the reference volume level for adjusting the volume by using +/- on the monitor.
Press POWER and press VOLUME +/- on the monitor while no menu screen appears.
The settable range is 0 to 47, and the default setting is 10.
When you keep pressing down the button, the value changes continuously.
Additional information
Maintenance
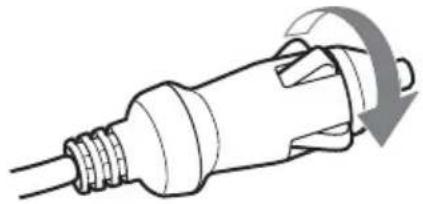
Fuse replacement
When replacing the fuse of the power cord for the cigar lighter socket, be sure to use one matching the amperage rating stated on the original fuse. If the fuse blows, check the power connection and replace the fuse. If the fuse blows again after replacement, there may be an internal malfunction. In such a case, consult your nearest Sony dealer.
natural_image
Line drawing of a plug with a circular arrow indicating rotation (no text or symbols)↓
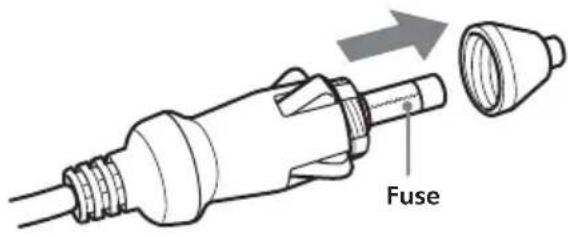
Warning
Never use a fuse with an amperage rating exceeding the one supplied with the player as this could damage the player.
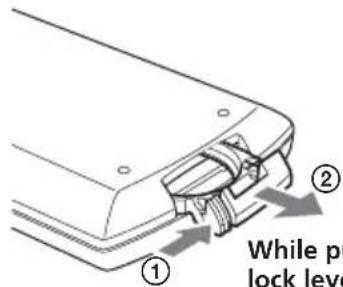
Replacing the lithium battery of the card remote commander
When the battery becomes weak, the range of the card remote commander becomes shorter. Replace the battery with a new CR2025 lithium battery. Use of any other battery may present a risk of fire or explosion.
↓
While pushing the lock lever (①), pull out the battery holder (②).
+ side facing up
natural_image
Technical diagram of a mechanical component with arrows indicating motion or force direction (no text or symbols)Notes on lithium battery
- Keep the lithium battery out of the reach of children. Should the battery be swallowed, immediately consult a doctor.
- Wipe the battery with a dry cloth to assure good contact.
- Be sure to observe the correct polarity when installing the battery.
- Do not hold the battery with metallic tweezers, otherwise a short-circuit may occur.
WARNING
Battery may explode if mistreated. Do not recharge, disassemble, or dispose in fire.
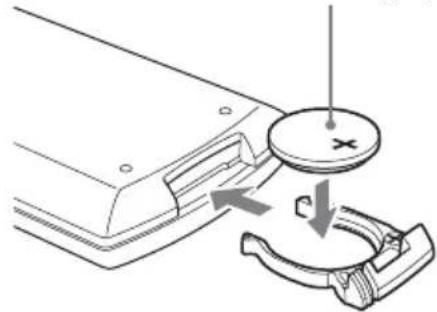
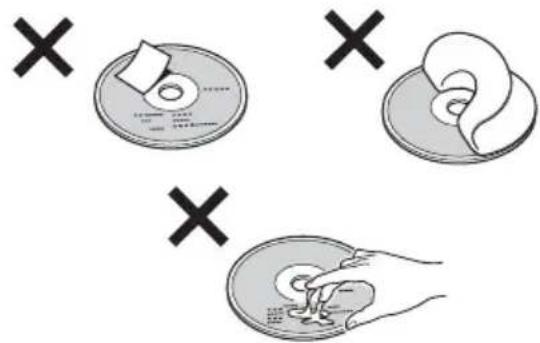
Notes on discs
• To keep the disc clean, do not touch the surface. Handle the disc by its edge.
- Keep your discs in their cases or disc magazines when not in use. Do not subject the discs to heat/high temperature. Avoid leaving them in parked cars or on dashboards/rear trays.
natural_image
Illustration showing a hand holding a disc and a CD with a cross symbol (no text or labels)- Do not attach labels, or use discs with sticky ink/residue. Such discs may stop spinning when used, causing a malfunction, or may ruin the disc.
- Do not use any discs with labels or stickers attached.
The following malfunctions may result from using such discs:
— Inability to eject a disc (due to a label or sticker peeling off and jamming the eject mechanism).
— Inability to read audio data correctly (e.g., playback skipping, or no playback) due to heat shrinking of a sticker or label causing a disc to warp.
• Discs with non-standard shapes (e.g., heart, square, star) cannot be played on this player. Attempting to do so may damage the player. Do not use such discs.
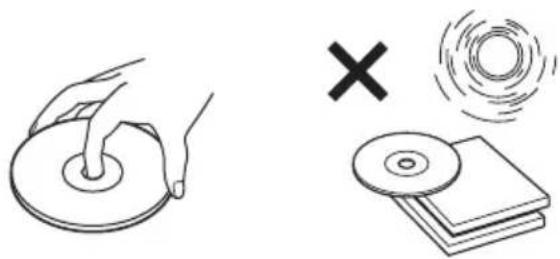
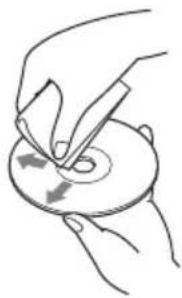
- Before playing, clean the discs with a commercially available cleaning cloth. Wipe each disc from the center out. Do not use solvents such as benzine, thinner, commercially available cleaners, or antistatic spray intended for analog discs.
natural_image
Illustration of hands using scissors to cut a circular object with directional arrows (no text or symbols)Music discs encoded with copyright protection
This product is designed to play back discs that conform to the Compact Disc (CD) standard. Recently, various music discs encoded with copyright protection are marketed by some record companies. Please be aware that among those discs, there are some that do not conform to the CD standard and may not be playable by this product.
About MP3 files
MP3 (MPEG 1 Audio Layer-3) is a standard technology and format for compressing a sound sequence. The file is compressed to about 1/10 of its original size. Sounds outside the range of human hearing are compressed while the sounds we can hear are not compressed.
Recommended MP3 file format
Sampling frequency 32k, 44.1k, 48k (Hz)
Bitrate (bps) 128k
Notes on discs
You can play MP3 files recorded on CD-ROMs, CD-Rs, and CD-RWs.
The disc must be in the ISO 9660* Level 1 or Level 2 format, or Joliet in the expansion format.
\* ISO 9660 Format
The most common international standard for the logical format of files and folders on a CD-ROM.
There are several specification levels. In Level 1, file names must be in the 8.3 format (no more than 8 characters in the name, no more than 3 characters in the extension ".MP3") and in capital letters. Folder names can be no longer than 8 characters. There can be no more than 8 nested folder levels. Level 2 specifications allow file names up to 31 characters long.
Each folder can have up to 8 trees.
For Joliet in the expansion format, make sure of the contents of the writing software, etc.
Notes
- With formats other than ISO 9660 Level 1 and Level 2, folder names or file names may not be displayed correctly.
- When naming, be sure to add the file extension ".MP3" to the file name.
- If you put the extension ".MP3" to a file other than MP3, the player cannot recognize the file properly and will generate random noise that could damage your speakers.
- The following discs take a longer time to start playback.
— a disc recorded with complicated tree structure.
— a disc to which data can be added. - A high-bit rate MP3 file such as 320 kbps may not play back properly.
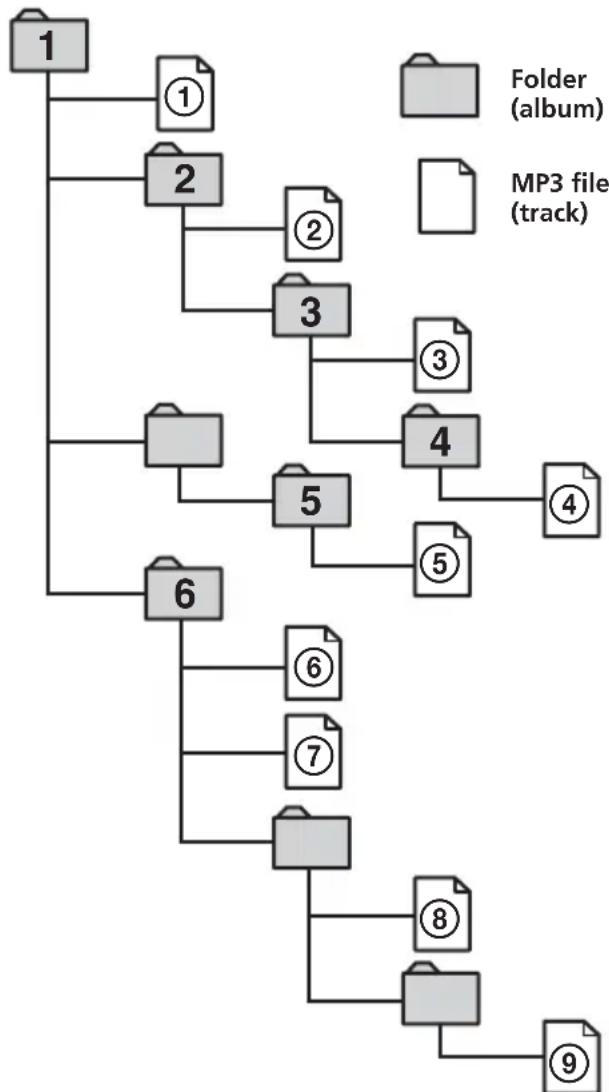
The playback order of the MP3 files
The playback order of the folders and files is as follows:
flowchart
graph TD
    1["1"] --> 2["2"]
    1 --> 6["6"]
    2 --> 3["3"]
    2 --> 5["5"]
    3 --> 4["4"]
    3 --> 5
    4 --> 4
    4 --> 5
    5 --> 6
    5 --> 7["7"]
    6 --> 8["8"]
    6 --> 9["9"]
    7 --> 8
    7 --> 9
    style 1 fill:#ccc,stroke:#333
    style 2 fill:#ccc,stroke:#333
    style 3 fill:#ccc,stroke:#333
    style 4 fill:#ccc,stroke:#333
    style 5 fill:#ccc,stroke:#333
    style 6 fill:#ccc,stroke:#333
    style 7 fill:#ccc,stroke:#333
    style 8 fill:#ccc,stroke:#333
    style 9 fill:#ccc,stroke:#333
Tree 1 Tree 2 Tree 3 Tree 4 Tree 5 (root)
Tip
To specify a desired playback order, before the folder or file name, input the order by number (e.g., "01," "02"), then record contents onto a disc (The order differs depending on the writing software).
Specifications
System
Laser Semiconductor laser
Signal format system PAL/NTSC
Audio characteristics
Frequency response 20 Hz to 20 kHz
Signal to noise ratio 90 dB (A)
Harmonic distortion 0.03 %
Dynamic range 90 dB
Wow and flutter below measurable limits
(±0.001% W PEAK)
General
Outputs Audio output
Video output
Optical output
Headphones output × 2
Inputs Audio input
Video input
DC 12 V input
Power requirements 12 V DC
Dimensions
Approx. 184.2 × 59.5 ×
232.5 mm
(w/h/d)
Mass Approx. 1.4 kg
Operating temperature 0 °C to 45 °C
Supplied accessories Mounting straps (2 kinds × 2)
Installation Board (1)
AC power adaptor (1)
(including AC power cords (2))
Power cord for the cigar
lighter socket (1)
Card remote commander
RM-X708 (including
lithium battery (1))
Carrying bag (1)
Operating Instructions (1)
Monitor
System Liquid crystal color display
Display Manual flipdown panel
Drive system TFT-LCD active matrix system
Picture size 6.5 inches wide screen (16:9)
Picture segment 280,800 (w 1200 × h 234) dots
Design and specifications are subject to change without notice.
Troubleshooting
The following checklist will help you remedy problems you may encounter with the player. Before going through the checklist below, check the connection and operating procedures.
General
The player does not turn on.
- Check that the AC power adaptor or the power cord for the cigar lighter socket is connected correctly.
- If the power cord for the cigar lighter socket is used, check the fuse.
→ If the fuse is blown, replace it with a correctly rated fuse.
→ If the fuse blows again, consult your nearest Sony dealer.
• The player may be overheated.
→ Make sure that the player is turned off.
Wait until the player cools off, then
press POWER again.
Disc playback
A disc cannot be loaded.
- Another disc is already loaded.
• The disc is placed upside down.
MP3 files cannot be played back.
- Recording was not performed according to the ISO 9660 level 1 or level 2 format, or the Joliet convention in the expansion format.
- The file extension ".MP3" is not added to the file name.
- Files are not stored in MP3 format.
MP3 files take longer to play back than others.
The following discs take a longer time to start playback.
— a disc recorded with a complicated tree structure.
— a disc to which data can be added.
Playback functions such as pause are deactivated.
- The RESET button has been pressed.
• The disc is ejected.
The sound skips.
- Dirty or defective disc.
- The player is installed in the place subject to severe vibrations.
Picture
There is no picture.
•Color system setting has been changed manually while playing a DVD.
→ Change the setting according to the color system of the DVD, turn off the player and turn it on again, or switch the input channel to “VIDEO,” then switch it to “DVD.”
- Check that the device connected to the AUDIO/VIDEO INPUT connectors is connected correctly.
- If there is no picture on the TV screen or other devices connected to the player, check that the device is correctly connected to the AUDIO/VIDEO OUTPUT connectors.
Picture noise appears.
- Dirty or defective disc.
- The player is installed in the place subject to severe vibrations.
Operation
The card remote commander does not function.
- Remove any obstacles between the card remote commander and this player.
- Use the card remote commander closer to the remote control sensor.
- Point the light emitter of the commander at the receptor for the card remote commander of the player.
- Replace the battery in the remote if it is weak.
The player does not play from the beginning when playing a disc.
- Resume Playback may be activated.
→ Press ■ again or eject the disc. - Depending on the DVDs, a title menu or a DVD menu may automatically appear on the monitor during playback.
→ Select the desired menu (page 23). - Depending on the Video CD, the PBC menu display automatically appears on the monitor during playback.
→ Select the desired menu (page 25).
continue to next page →
Playback stops automatically.
The disc may contain an auto pause signal. While playing such a disc, this player stops playback at the signal.
You cannot perform certain functions, such as Stop or Search Playback.
With some discs, you cannot activate these functions.
The language for the sound track cannot be changed when you play a DVD.
- Multilingual tracks are not recorded on the DVD.
- Changing the language for the track is prohibited on the DVD.
The subtitle language cannot be changed when you play a DVD.
- Multilingual subtitles are not recorded on the DVD.
- Changing the subtitle language is prohibited on the DVD.
The subtitles cannot be turned off when you play a DVD.
Depending on the DVDs, you may not be able to turn the subtitles off.
The angles cannot be changed when you play a DVD.
- Multi-angles are not recorded on the DVD.
- Change the angles at a scene recorded with multiple angles (page 24).
- Changing the angles is prohibited on the DVD.
The player does not operate properly.
Static electricity, etc., may affect this player's operation.
→ Turn off the player, allow the player to cool, then press POWER again.
Error display
Error displays
The following indications will be displayed for about 8 seconds.
POWER OFF OVERHEAT
The player may be overheated.
→Allow the player to cool off, then press POWER again.
Wrong Region
The region code of the DVD currently in the player does not conform to the player.
→Make sure the region code of the DVD and the player (page 7).
DISC ERROR
• The data recorded on the disc is damaged.
- The player does not support the format in which the data is recorded to the disc.

The operation cannot be done.
Language Code List
The language spellings conform to the ISO 639: 1988 (E/F) standard.
Code Language Code Language Code Language Code Language
| 6565 Afar 7089 Frisian 7771 Malagasy 8382 Serbian | |||
| 6566 Abkhazian 7165 Irish 7773 Maori 8385 Sundanese | |||
| 6570 Afrikaans 7168 Scots/Gaelic 7775 Macedonian 8386 Swedish | |||
| 6577 Amharic 7176 Gallician 7776 Malayalam 8387 Swahili | |||
| 6582 Arabic 7178 Guarani 7778 Mongolian 8465 Tamil | |||
| 6583 Assamese 7185 Gujarati 7779 Moldavian 8469 Tegule | |||
| 6588 Aymara 7265 Hausa | 7782 Marathi 8471 Tajik | ||
| 6590 Azerbaijani | 7273 Hindi | 7783 Malay | 8472 Thai |
| 6665 Bashkir | 7282 Croatian | 7784 Maltese | 8473 Tigrinya |
| 6669 Byelorussian 7285 Hungarian 7789 Burmese | 8475 Turkmen | ||
| 6671 Bulgarian | 7289 Armenian | 7865 Nauru | 8476 Tagalog |
| 6672 Bislama | 7365 Interlingua | 7869 Nepali 8479 Tonga | |
| 6678 Bengali | 7378 Indonesian 7876 Dutch 8482 Turkish | ||
| 6679 Tibetan | 7383 Icelandic | 7879 Norwegian | 8484 Tatar |
| 6682 Breton | 7384 Italian | 7982 Oriya | 8487 Twi |
| 6765 Catalan | 7387 Hebrew | 8065 Punjabi | 8575 Ukrainian |
| 6779 Corsican 7465 Japanese | 8076 Polish | 8582 Urdu | |
| 6783 Czech | 7473 Yiddish | 8083 Pushto/Pashto | 8590 Uzbek |
| 6789 Welsh | 7487 Javanese | 8084 Portuguese | 8673 Vietnamese |
| 6865 Danish | 7565 Georgian | 8185 Quechua | 8679 Volapük |
| 6869 German 7575 Kazakh | 8277 Raeto-Romance | 8779 Wolof | |
| 6890 Bhutani | 7576 Greenlandic | 8279 Romanian | 8872 Xhosa |
| 6976 Greek 7577 Cambodian | 8285 Russian | 8979 Yoruba | |
| 6978 English | 7578 Kannada | 8365 Kinyarwanda | 9072 Chinese |
| 6979 Esperanto | 7579 Korean | 8368 Sanskrit | 9085 Zulu |
| 6983 Spanish | 7583 Kashmiri | 8372 Serbo-Croatian | |
| 6984 Estonian | 7585 Kurdish | 8373 Sinhalese | |
| 6985 Basque | 7589 Kirghiz | 8375 Slovak | |
| 7065 Persian | 7665 Latin | 8376 Slovenian | |
| 7073 Finnish | 7678 Lingala | 8377 Samoan | |
| 7074 Fijian | 7679 Laotian | 8378 Shona | |
| 7079 Faroese | 7684 Lithuanian 8379 Somali | ||
| 7082 French | 7686 Latvian Lettish | 8381 Albanian | |
Achtung
CLASS 1 LASER PRODUCT
CAUTION :CLASS 1M VISIBLE/INVISIBLE LASER RADIATION WHEN OPEN AND INTERLOCKS DEFEATED. DO NOT VIEW DIRECTLY WITH OPTICAL INSTRUMENTS.
natural_image
Technical line drawing of a mechanical assembly with two vertical supports and curved internal components (no text or symbols)natural_image
Technical line drawing of a mechanical device with attached straps and a handle (no text or symbols)natural_image
Technical line drawing of a mechanical component with multiple arms and shafts (no text or symbols)natural_image
Line drawing of a person sitting in a chair holding a small electronic device (no text or symbols visible)natural_image
Line drawing of a car seatbelt device with no text or symbolsnatural_image
Line drawing of a hand gripping a small electronic component (no text or symbols)natural_image
Diagram of a device showing two connected modules with internal components and directional arrows (no text or symbols)natural_image
Technical line drawing of a mechanical housing component with rotational arrows indicating motion (no text or symbols)natural_image
Line drawing of a desktop computer with monitor and keyboard (no text or symbols)Hinweise
6 Taste SETUP 26, 27, 30, 31
12Taste ■ (Stopp) 15, 16, 17, 20
13I/⏻ Taste 14
14Taste ▶II (Wiedergabe/Pause) 14, 15, 16, 17
19 ↑/↓/←/→ Tasten 15, 17, 20, 23, 26, 30, 31
natural_image
Diagram of a device with arrows indicating rotation or movement, no text or symbols presentnatural_image
Illustration of a hand inserting a CD into an open computer case (no text or symbols visible)natural_image
Grid of 12 grayscale icons including animals, landscapes, and cars, displayed without any text or symbols.natural_image
Illustration showing a hand holding a circular object with a cross mark, next to a CD and a ring with a cross symbol (no text or labels)natural_image
Line drawing of a hand holding a circular object with arrows indicating direction (no text or symbols)CLASS 1 LASER PRODUCT
CAUTION :CLASS 1M VISIBLE/INVISIBLE LASER RADIATION WHEN OPEN AND INTERLOCKS DEFEATED. DO NOT VIEW DIRECTLY WITH OPTICAL INSTRUMENTS.
natural_image
Technical line drawing of a mechanical assembly with two vertical posts and curved components (no text or symbols)natural_image
Technical line drawing of a mechanical device with attached straps and levers (no text or symbols)natural_image
Technical line drawing of a mechanical component with multiple arms and shafts (no text or symbols)natural_image
Line drawing of a person sitting in a chair holding a smartphone (no text or symbols)natural_image
Line drawing of a car seatbelt device with adjustable arm and seat (no text or symbols)natural_image
Line drawing of a hand gripping a small electronic component (no text or symbols)natural_image
Diagram of a device showing two connected modules with internal components and mounting holes (no text or symbols)natural_image
Technical line drawing of a mechanical bracket with rotational arrows indicating motion (no text or symbols)natural_image
Line drawing of a desktop computer with monitor and keyboard (no text or symbols)Remarques
6 Touche SETUP 26, 27, 30, 31
11 Touche CLEAR 20, 30
14 ▶II Touche (lecture/pause) 14, 15, 16, 17
19 ↑/↓/←/→Touches 15, 17, 20, 23, 26, 30, 31
21 Touche ENTER 15, 17, 20, 23, 26, 27, 30, 31
23 Touche DSPL 17, 21
natural_image
Diagram of a device with arrows indicating rotation or movement, no text or symbols presentnatural_image
Illustration of a hand inserting a CD into an open computer case (no text or symbols visible)natural_image
Grid of 12 grayscale icons including animals, trees, cars, and animals (no text or symbols)natural_image
Illustration showing a hand holding a circular object and a CD with a cross symbol (no text or labels)natural_image
Illustration of hands using a tool to cut a circular object with arrows indicating direction (no text or symbols)CLASS 1 LASER PRODUCT
CAUTION :CLASS 1M VISIBLE/INVISIBLE LASER RADIATION WHEN OPEN AND INTERLOCKS DEFEATED. DO NOT VIEW DIRECTLY WITH OPTICAL INSTRUMENTS.
natural_image
Technical line drawing of a mechanical assembly with two vertical supports and curved internal components (no text or symbols)natural_image
Technical line drawing of a mechanical device with attached straps and a handle (no text or symbols)natural_image
Technical line drawing of a mechanical component with multiple arms and a central shaft (no text or symbols)natural_image
Line drawing of a person sitting in a chair holding a smartphone (no text or symbols)natural_image
Line drawing of a car seatbelt device with attached bracket (no text or symbols)natural_image
Line drawing of a hand gripping a small electronic device (no text or symbols)natural_image
Diagram of a device showing two connected modules with internal components and mounting holes (no text or symbols)natural_image
Mechanical assembly diagram showing a bracket with rotational arrows indicating motion (no text or symbols)natural_image
Line drawing of a desktop computer with monitor and ports, labeled 'RESET' (no text or symbols on device)Note
6 Tasto SETUP 26, 27, 30, 31
11 Tasto CLEAR 20, 30
12 ■ Tasto (arresto) 15, 16, 17, 20
13 Tasto I/14
19 ↑Tasti /↓/←/→ 15, 17, 20, 23, 26, 30, 31
21 Tasto ENTER 15, 17, 20, 23, 26, 27, 30, 31
23 Tasto DSPL 17, 21
natural_image
Diagram of a device with an open screen and arrows indicating rotation or movement (no text or symbols present)natural_image
Illustration of a hand inserting a CD into an open computer case (no text or symbols visible)natural_image
Grid of 12 grayscale icons including animals, trees, cars, and animals (no text or symbols)natural_image
Illustration showing a hand holding a disc and a CD with a cross symbol (no text or labels)natural_image
Illustration of hands using a tool to cut or mark a circular object with arrows indicating direction (no text or symbols)CLASS 1 LASER PRODUCT
CAUTION :CLASS 1M VISIBLE/INVISIBLE LASER RADIATION WHEN OPEN AND INTERLOCKS DEFEATED. DO NOT VIEW DIRECTLY WITH OPTICAL INSTRUMENTS.
Opmerking over PBC (Playback
Control) VCD
- Titel
natural_image
Technical line drawing of a mechanical component with two vertical supports and curved internal structure (no text or symbols)natural_image
Technical line drawing of a mechanical device with attached straps and levers (no text or symbols)natural_image
Technical line drawing of a mechanical component with two curved arms and a central shaft (no text or symbols)natural_image
Line drawing of a person sitting in a chair holding a smartphone (no text or symbols)natural_image
Line drawing of a car seatbelt device with adjustable arm and seat (no text or symbols)natural_image
Line drawing of a hand gripping a small electronic component (no text or symbols)natural_image
Diagram of a device showing two connected modules with internal components and directional arrows (no text or symbols)natural_image
Technical line drawing of a mechanical housing or bracket assembly with rotational arrows indicating motion (no text or symbols)natural_image
Line drawing of a desktop computer with monitor and keyboard (no text or symbols)Opmerkingen
6 SETUP toets 26, 27, 30, 31
12■ (stoppen) toets 15, 16, 17, 20
13I/⏻ toets 14
19 ↑/↓/←/→ toetsen 15, 17, 20, 23, 26, 30, 31
20 (terug) toets 25
21 ENTER toets 15, 17, 20, 23, 26, 27, 30, 31 Een instelling bevestigen.
natural_image
Diagram of a device with an open screen and arrows indicating rotation or movement (no text or symbols present)natural_image
Illustration of a hand inserting a CD into an open CD or DVD device (no text or symbols visible)natural_image
Grid of 12 grayscale icons including animals, trees, cars, and animals (no text or symbols)- General Setup Page
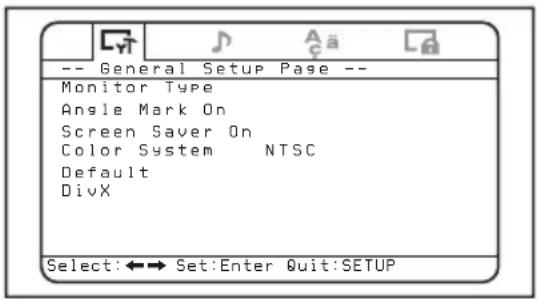
◆ Monitor Type
natural_image
Diagram of a plug with a screw and arrow indicating rotation (no text or symbols)↓
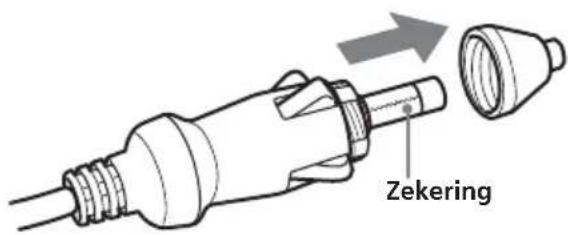
Waarschuwing
natural_image
Technical line drawing of a mechanical component with a circular component and curved base (no text or symbols)Opmerkingen over lithiumbatterijen
natural_image
Line drawing of two hands holding a circular object with a central hole (no text or symbols)×


natural_image
Illustration of hands using a tool to cut a circular object with arrows indicating direction (no text or symbols)
- CLASS 1 LASER PRODUCT
- CAUTION
- Table of Contents
- Various Playback
- Changing Setup
- Additional information
- Welcome ! Enjoying DivX
- Copyrights
- ® videos
- About DivX Video Files
- DATA CDs and DATA DVDs that the player can play
- Precautions
- On safety
- On power sources
- Polarity of the plug
- On heat build-up
- For driver's safety
- Moisture condensation
- To maintain high sound quality
- About this manual
- Conventions
- About the discs this player can play
- Notes on CD-Rs (recordable CDs)/CD-RWs (rewritable CDs)/DVD-Rs (recordable DVDs)/DVD+Rs/DVD-RWs (rewritable DVDs)/DVD+RWs
- Region code of DVDs this player can play
- Note on the picture skipping
- Cautions
- Note on PBC (Playback Control)
- Note on DTS-encoded CDs
- Terms for discs
- • Title
- - Chapter
- - Track
- - Scene
- Connection
- On AUDIO/VIDEO OUTPUT connectors
- On AUDIO/VIDEO INPUT connectors
- On HEADPHONES jacks
- Notes
- Installing the player in a car
- Hook the mounting straps to the brackets on the installation board as follows.
- Attach the round hooks to the car.
- Reel in the slack of the belts to secure the installation board.
- When the player is attached to the center console
- Attaching the player to the installation board
- When the player is installed behind the seat
- Resetting the player
- Location of controls
- Card remote commander RM-X708
- The corresponding buttons of the card remote commander control the same functions as those on the player.
- Playing a disc DVD VCD
- To turn off the power
- After use
- Note on using the player in the car
- Operation for playback
- Searching a chapter/title/track directly
- Press SEARCH to display search screen.
- Press the number buttons to enter the desired chapter/title/track number.
- Press ENTER.
- Note
- Resume playback
- During playback, press ■ to stop.
- Press ▶II to start playback.
- Using MP3/JPG/DivX® menu
- Insert a disc containing MP3, JPEG or DivX files.
- Screen Example:
- Press ▶II.
- Screen example for MP3:
- To select a folder or a file
- To select the display mode
- Using the thumbnail mode of JPEG disc
- Press ■ while the JPEG image is displayed.
- Select the image you want to view by pressing ↑/↓/←/→ buttons and press ENTER.
- To view the remote key functions
- To select the playback mode
- DivX® video files that the player can play
- Playing repeatedly (Repeat Playback)
- To return to normal playback
- Creating your own program (Program Playback)
- Press PROGRAM.
- Select the title, chapter or track you want to program.
- Repeat step 2 to program other titles, chapters or tracks.
- Press ↑/↓/←/→ buttons to select
- To repeat the program playback
- To change a program
- To cancel the program
- Displaying elapsed time
- To turn off the time information
- Changing the subtitle language DVD
- To turn off the subtitle
- Using a DVD menu
- Using the TOP MENU button
- Using the MENU button
- Changing the audio language DVD
- Changing angles
- Changing the audio output
- Using the PBC (playback control) function VCD
- To return to the menu
- Tip
- Setting for DVD player
- - General Setup Page
- ◆ Monitor Type
- ◆ Angle Mark
- ◆ Screen Saver
- ◆ Color System
- Default
- DivX
- Settings for digital audio output - Audio Setup page
- Downmix
- ◆ SPDIF Output
- Audio DRC
- Language settings for DVD playback - Language Page
- ♦ OSD
- ◆ Menu
- Subtitle
- Audio
- Settings for the Parental Control - Parental Setup page
- Selecting the Parental Control mode on and off - Parental Control
- Setting the password - Password
- Preparing for the initial parental setting - Level
- Monitoring video signals input from the connected device
- Selecting the color system for the input video signal
- Settings by using the S-MENU button on the monitor
- How to set preference
- Exiting the menu operation
- Turning the image upside down
- Setting the reference volume
- Maintenance
- Fuse replacement
- Warning
- Replacing the lithium battery of the card remote commander
- Notes on lithium battery
- Notes on discs
- Music discs encoded with copyright protection
- About MP3 files
- Recommended MP3 file format
- \* ISO 9660 Format
- The playback order of the MP3 files
- Specifications
- System
- Audio characteristics
- General
- Monitor
- Troubleshooting
- The player does not turn on.
- Disc playback
- A disc cannot be loaded.
- MP3 files cannot be played back.
- MP3 files take longer to play back than others.
- Playback functions such as pause are deactivated.
- The sound skips.
- Picture
- There is no picture.
- Picture noise appears.
- Operation
- The card remote commander does not function.
- The player does not play from the beginning when playing a disc.
- Playback stops automatically.
- You cannot perform certain functions, such as Stop or Search Playback.
- The language for the sound track cannot be changed when you play a DVD.
- The subtitle language cannot be changed when you play a DVD.
- The subtitles cannot be turned off when you play a DVD.
- The angles cannot be changed when you play a DVD.
- The player does not operate properly.
- Error display
- Error displays
- POWER OFF OVERHEAT
- Wrong Region
- DISC ERROR
- Language Code List
- Achtung
- Hinweise
- Remarques
- Opmerking over PBC (Playback
- Control) VCD
- - Titel
- Opmerkingen
- Waarschuwing
- Opmerkingen over lithiumbatterijen
Brand : SONY
Model : MV650STR
Category : Car stereo