VPLVW570ES - Projector SONY - Free user manual and instructions
Find the device manual for free VPLVW570ES SONY in PDF.

User questions about VPLVW570ES SONY
0 question about this device. Answer the ones you know or ask your own.
Ask a new question about this device
Download the instructions for your Projector in PDF format for free! Find your manual VPLVW570ES - SONY and take your electronic device back in hand. On this page are published all the documents necessary for the use of your device. VPLVW570ES by SONY.
USER MANUAL VPLVW570ES SONY
VPL-VW570ES VPL-VW270ES
VPL-VW570ES VPL-VW270ES


About the Quick Reference Manual
This Quick Reference Manual explains the installation and basic operations for projecting pictures. It also describes important notes and cautions to which you have to pay attention when handling and using this unit.
Refer to "Warning Indicators" and "Replacing the Lamp," as necessary.
For details on the operations, refer to the Operating Instructions contained in the supplied CD-ROM.
Step 1
Preparing Page 12
Step 2
Installing the Unit... Page 13
Step 3
Connecting the Unit...Page 15
Step 4
Selecting the Menu Language......Page 16
Step 5
Projecting.. Page 17
Error Handling Warning Indicators.. Page 19
Maintenance Replacing the Lamp.. Page 20
English
Before operating the unit, please read this manual thoroughly and retain it for future reference.
WARNING
To reduce the risk of fire or electric shock, do not expose this apparatus to rain or moisture.
To avoid electrical shock, do not open the cabinet. Refer servicing to qualified personnel only.
WARNING
This apparatus must be earthed.
WARNING
When installing the unit, incorporate a readily accessible disconnect device in the fixed wiring, or connect the power plug to an easily accessible socket-outlet near the unit. If a fault should occur during operation of the unit, operate the disconnect device to switch the power supply off, or disconnect the power plug.
CAUTION
For safety, do not connect the connector for peripheral device wiring that might have excessive voltage to the following port: LAN connector
WARNING
-
Use the approved Power Cord (3-core mains lead) / Appliance Connector / Plug with earthing-contacts that conforms to the safety regulations of each country if applicable.
-
Use the Power Cord (3-core mains lead) / Appliance Connector / Plug conforming to the proper ratings (Voltage, Ampere).
If you have questions on the use of the above Power Cord / Appliance Connector / Plug, please consult a qualified service personnel.
CAUTION
- Danger of explosion if battery is incorrectly replaced. Replace only with
the same or equivalent type recommended by the manufacturer.
- When you dispose of the battery or the product, you must obey the law in the corresponding area or country. Do not dispose of the battery or the product in a fire or a hot oven, or mechanically crush or cut the battery. It may explode or cause a fire. Do not subject the battery to extremely low air pressure that may result in an explosion or the leakage of flammable liquid or gas.
- Do not place the battery in a high temperature place, such as under direct sunlight or near fire. It may ignite, explode, or cause a fire. Do not immerse or wet the battery in water or seawater. This may cause an electric shock.
CAUTION
The following size and number of batteries are required for the remote control.
- Size AA (R6)
- Two
To avoid risk of explosion, use only the following type of battery.
- Size AA (R6) manganese or alkaline batteries
Caution on replacement/disposal of the battery for the 3D glasses
Danger of explosion if battery is incorrectly replaced.
Replace only with the same or equivalent type recommended by the manufacturer.
When you dispose of the battery, you must obey the law in the relative area or country.
About 3D Glasses
The 3D Glasses communicate with the projector via Bluetooth technology to display 3D signals.
(a) frequency band(s) in which the radio equipment operates:
2.4 - 2.4835 GHz
(b) maximum radio-frequency power transmitted in the frequency band(s) in which the radio equipment operates:
4.30 dBm (E.I.R.P.)
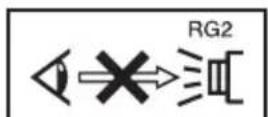
As with any bright light source, do not stare into the beam, RG2 IEC 62471-5: 2015.
For the customers in the U.S.A.
This equipment has been tested and found to comply with the limits for a Class B digital device, pursuant to part 15 of the FCC Rules. These limits are designed to provide reasonable protection against harmful interference in a residential installation. This equipment generates, uses and can radiate radio frequency energy and, if not installed and used in accordance with the instructions, may cause harmful interference to radio communications. However, there is no guarantee that interference will not occur in a particular installation. If this equipment does cause harmful interference to radio or television reception, which can be determined by turning the equipment off and on, the user is encouraged to try to correct the interference by one or more of the following measures:
- Reorient or relocate the receiving antenna.
- Increase the separation between the equipment and receiver.
- Connect the equipment into an outlet on a circuit different from that to which the receiver is connected.
- Consult the dealer or an experienced radio/TV technician for help.
You are cautioned that any changes or modifications not expressly approved in this manual could void your authority to operate this equipment.
All interface cables used to connect peripherals must be shielded in order to comply with the limits for a digital device pursuant to Subpart B of part 15 of FCC Rules.
If you have any questions about this product, you may call;
Sony Customer Information Service Center 1-800-222-7669 or http://www.sony.com/
Supplier's Declaration of Conformity
Trade Name:SONY
Model: VPL-VW570ES
VPL-VW270ES
Responsible party: Sony Electronics Inc.
Address: 16535 Via Esprillo,
San Diego, CA 92127
U.S.A.
Telephone Number:858-942-2230
This device complies with part 15 of the FCC Rules. Operation is subject to the following two conditions: (1) This device may not cause harmful interference, and (2) this device must accept any interference received, including interference that may cause undesired operation.
This transmitter must not be co-located or operating in conjunction with any other antenna or transmitter.
For the customers the U.S.A.
Radiated Exposure Statement:
The product complies with the US portable RF exposure limit set forth for an uncontrolled environment and is safe for intended operation as described in this manual. The further RF exposure reduction can be achieved if the product can be kept as far as possible from the user body or if the device is set to lower output power if such function is available.
For the customers the U.S.A. and Canada
Radiated Exposure Statement:
The product complies with the US/Canadian portable RF exposure limit set forth for an uncontrolled environment and is safe for intended operation as described in this manual. The further RF exposure reduction can be achieved if the product can be kept as far as possible from the user body or if the device is set to lower output power if such function is available.
For the customers in Canada
CANICES-3 (B)/NMB-3(B)
For the customers in Canada
This device complies with Industry Canada's applicable licence-exempt RSSs. Operation is subject to the following two conditions: (1) This device may not cause interference; and
(2) This device must accept any interference, including interference that may cause undesired operation of the device.
For kundene i Norge
Dette utstyret kan kobles til et ITstromfordelingsystem.
| Bulgarian | Спастошто, Sony Corporation десларна, чу това оборуванец в съответства 2014/53/EU. ПадостнистTekst на EC десларшита за съответства може за с在这方面 на следные adpres: http://www.compliance.SONY.eu/ |
| Croatian | Sony Corporation ovime izjavlujde da je ova oprema u skladu s Direktivom 2014/53/EU. Cjeloviti tekst EU izjave o sukladnosti dostupan je na sljedećoj internetskoj adresi: http://www.compliance.SONY.eu/ |
| Czech | Sony Corporation tímtro prohlášuje,Že toto zařízení je v souladu se směrnici 2014/53/EU. Uplné znéni EU prohlášeni o shodě je k dispozici na tétoto internetové adresc: http://www.compliance.SONY.eu/ |
| Danish | Herved erklærer Sony Corporation, at dette udstyr er i overensstemmelse med direktiv 2014/53/EU. Den fulde ordlyd af EU-overensstemmelseserklaeringen er tilgängelig på følgende internetadresse: http://www.compliance.SONY.eu/ |
| Dutch | Hierbij verklaart Sony Corporation dat deze radioapparatuur conform is met Richtlijn 2014/53/EU. De volledige tekst van de EU-conformiteitsverklaring kan worden geraadpleegd op het volgende internetadres: http://www.compliance.SONY.eu/ |
| English | Hereby, Sony Corporation declares that this equipment is in compliance with Directive 2014/53/EU. The full text of the EU declaration of conformity is available at the following internet address: http://www.compliance.SONY.eu/ |
| Estonian | Käesolevaga deklareerib Sony Corporation, et kääseslev seade vastab direktiivi 2014/53/EL nõutele. ELi vastavusdeklaratsiooni tãielik tekst on kättesaadav järgmisel internetiaadressil: http://www.compliance.SONY.eu/ |
| Finnish | Sony Corporation vakuuttaa, että tämä laite on direktiivin 2014/53/EUMukainen. EU-vaatimustenmukaisuusvakuutuksen tãysimittainen teksti on saatavilla seuraavassa internetosoitteessa: http://www.compliance.SONY.eu/ |
| Greek | Me την παρούσα Sony Corporation δηλώνει στι, αυτή η συσκεύη πληροί τους ύους της ύδηγίας 2014/53/EU. To πλήρες κειμένον της δήλωσης συμμόρφωσης EE διατιθεται στην ακόλουθηιστοσελίδα στο διαδικτυο: http://www.compliance.SONY.eu/ |
| Hungarian | A Sony Corporation igazolja, hogy ez a készülék megfelel a 2014/53/EU irányelvnek. Az EU-megfelelóségí nyilatkozat teljes szövege elérhető a következő internetes címen: http://www.compliance.SONY.eu/ |
| Latvian | Ar šo Sony Corporation deklare, ka ši iekārta atbilst direktivai 2014/53/ES. Pilns ES atbilstibas deklaracijas teksts ir piecejams šādā interneta vietnē: http://www.compliance.sony.eu/ |
| Lithuanian | Mes, Sony Corporation, patvirtiname, kad šis irenginys atitinka direktyvä 2014/53/ES. Visas ES atitikties deklaracijos tekstas pasiekiamas šiuo internetiniu adresu: http://www.compliance.sony.eu/ |
| Norwegian | Herved erklærer Sony Corporation at utstyrdtypen er i samsvar med direktiv 2014/53/EU. EU-erklæring fulltekst finner du på Internet und under: http://www.compliance.sony.eu/ |
| Polish | Sony Corporation niniejszym oświadcza, ze to urzadzenia jest zgodne z dyrektywa 2014/53/UE. Pełny tekst deklaracji zgodnosci UE jest dostępty pod nastepujacym adresem internetowym: http://www.compliance.sony.eu/ |
| Portuguese | O(a) abaixo assinado(a) Sony Corporation declara que o presente equipoamento está em conformidade com a Diretiva 2014/53/UE. O texto integral da declaração de conformidade está disponível no segunte endereço de Internet: http://www.compliance.sony.eu/ |
| Romanian | Prin preventa, Sony Corporation declara că acest echipament este în conformitate cu Diretiva 2014/53/UE. Textul integral al declaratiei UE de conformitate este disponible la următoarea adresă internet: http://www.compliance.sony.eu/ |
| Slovak | Sony Corporation támto vyhlasuje, Že zariadenie je v súlade so smernicou 2014/53/EU. Üplné vyhlasenie EU o zhode je k dispozícii na tejto internetovej adrese: http://www.compliance.sony.eu/ |
| Slovenian | Sony Corporation potrjuje, da je ta oprema skladna z Direktivo 2014/53/EU. Celotno besedilo izjave EU o skladnosti je na voljo na naslednjem splenet nem naslovu: http://www.compliance.sony.eu/ |
| Swedish | Härmed försakrar Sony Corporation attenna utrustning overensstämmer med direktiv 2014/53/EU. Den fullständiga texten till EU-försakran om overensstammelse finns på följande webbadress: http://www.compliance.sony.eu/ |
| Turkish | Sony Corporation, bu cihazın 2014/53/EU Direktifile uyumlu oluguṇu beman eder. AB uygunluk beyannın tam metni asağidaki internet adresinde mevcuttur: http://www.compliance.sony.eu/ |
For Customers in UAE (United Arab Emirates)
TRA
REGISTERED No: ER0115212/13
DEALER No: DA0065531/11
For the Customers in Brazil only Apenas para clientes no Brasil
DESCARTE DE PILHAS E BATORIAS
For the customers in the U.S.A.
SONY LIMITED WARRANTY - Please visit http://www.sony.com/psa/warranty for important information and complete terms and conditions of Sony's limited warranty applicable to this product.
For the customers in Canada SONY LIMITED WARRANTY - Please visit http://www.sonybiz.ca/pro/lang/en/ ca/article/resources-warranty for important information and complete terms and conditions of Sony's limited warranty applicable to this product.
For the customers in Europe
Sony Professional Solutions Europe - Standard Warranty and Exceptions on Standard Warranty. Please visit https://pro.sony/en_GB/support-services/warranty/support-professional-solutions-europe-standardproduct-warranty for important information and complete terms and conditions.
For the customers in Korea SONY LIMITED WARRANTY - Please visit http://bpeng.sony.co.kr/handler/ BPAS-Start for important information and complete terms and conditions of Sony's limited warranty applicable to this product.
Precautions
On safety
- Check that the operating voltage of your unit is identical with the voltage of your local power supply.
- Should any liquid or solid object fall into the cabinet, unplug the unit and have it checked by qualified personnel before operating it further.
- Unplug the unit from the wall outlet if it is not to be used for several days.
- To disconnect the cord, pull it out by the plug. Never pull the cord itself.
- The wall outlet should be near the unit and easily accessible.
- The unit is not disconnected to the AC power source (mains) as long as it is connected to the wall outlet, even if the unit itself has been turned off.
- Do not look into the lens while the lamp is on.
- Do not place your hand or objects near the ventilation holes. The air coming out is hot.
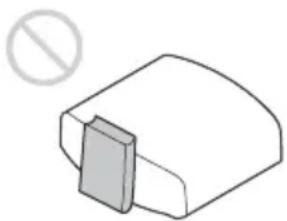
- Make sure to remove the protective packaging lens cap before projection. Projection with the cap attached may melt the cap by heat.
- Do not place any object just in front of the lens that may block the light during projection. Heat from the light may damage the object. Use the picture muting function to cut off the picture.
On preventing internal heat buildup
After you turn off the power with the I/ON/STANDBY) button, do not disconnect the unit from the wall outlet while the cooling fan is still running.
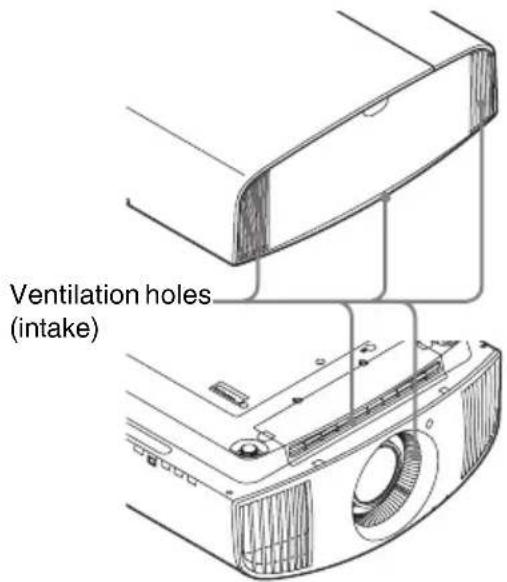
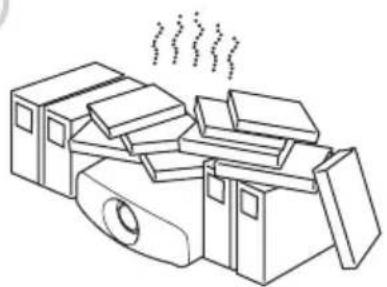
Caution
This unit is equipped with ventilation holes (intake) and ventilation holes (exhaust). Do not block or place anything near these holes, or internal heat build-up may occur, causing picture degradation or damage to the unit.
On repacking
Save the original shipping carton and packing material; they will come in handy if you ever have to ship your unit. For maximum protection, repack your unit as it was originally packed at the factory.
On watching 3D video images
Safety precautions
- You should only use the 3D glasses for watching 3D video images.
- If you observe flickering or flashing, turn off the lighting in the room.
- Not for use by children without proper adult supervision.
- Be careful not to pinch your fingers in hinges of the 3D glasses when bending the temple frames.
- Do not drop or modify these 3D glasses.
- If these glasses are broken, keep broken pieces away from your mouth or eyes.
On LCD Projector
The LCD projector is manufactured using high-precision technology. You may, however, see tiny black points and/or bright points (red, blue, or green) that continuously appear on the LCD projector. This is a normal result of the manufacturing process and does not indicate a malfunction. Also, when you use multiple LCD projectors to project onto a screen, even if they are of the same model, the color reproduction among projectors may vary, since color balance may be set differently from one projector to the next.
On condensation
If the room temperature where the projector is installed changes rapidly, or if the projector is moved suddenly from a cold to a warm place, condensation in the projector may occur. As the condensation may cause malfunction, be careful in adjusting
temperature settings of the air conditioner. If condensation occurs, leave the projector turned on for about two hours before use.
Notes on security
- SONY WILL NOT BE LIABLE FOR DAMAGES OF ANY KIND RESULTING FROM A FAILURE TO IMPLEMENT PROPER SECURITY MEASURES ON TRANSMISSION DEVICES, UNAVOIDABLE DATA LEAKS RESULTING FROM TRANSMISSION SPECIFICATIONS, OR SECURITY PROBLEMS OF ANY KIND.
- Depending on the operating environment, unauthorized third parties on the network may be able to access the unit. When connecting the unit to the network, be sure to confirm that the network is protected securely.
- From a safety standpoint, when using the unit connected with the network, it is strongly recommended to access the Control window via a Web browser and change the access limitation settings from the factory preset values (refer to "Using Network Features" in the Operating Instructions).
Changing the password regularly is also recommended.
- Do not browse any other website in the Web browser while making settings or after making settings. Since the login status remains in the Web browser, close the Web browser when you complete the settings to prevent unauthorized third parties from using the unit or harmful programs from running.
SONY WILL NOT BE LIABLE FOR DAMAGES OF ANY KIND RESULTING FROM THE USE OF THIS UNIT FOR PURPOSES OTHER THAN GENERAL HOME USE, EITHER DURING THE WARRANTY PERIOD OR AFTER EXPIRATION OF THE WARRANTY.
Notes on Installation and Usage
Unsuitable installation
Do not place the unit in the following situations, which may cause malfunction or damage to the unit.
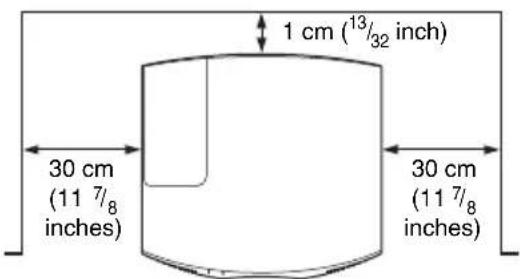
Near walls
To maintain the performance and reliability of the unit, leave space between walls and the unit as illustrated.
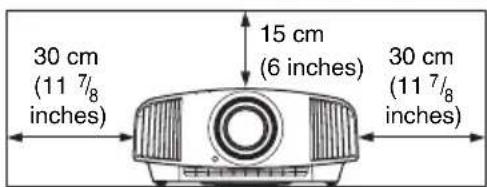
Air from air conditioners or the ventilation holes of this unit or other devices, may cause oscillation on the screen. Be sure not to install this unit in the area where the air from air conditioners or the ventilation holes of these devices reach to the front side of this unit.
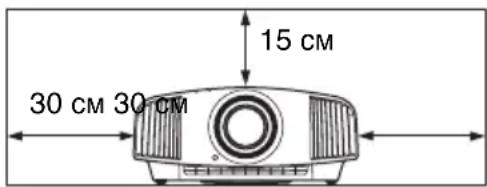
Poorly ventilated location
Leave space of more than 30cm (11^7 / 8 inches) around the unit.
Hot and humid

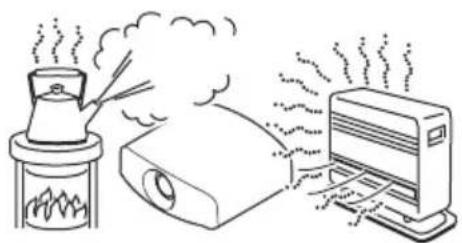
Locations subject to direct cool or warm air from an air-conditioner
Installing the unit in such a location may cause a malfunction of the unit due to moisture condensation or rise in temperature.
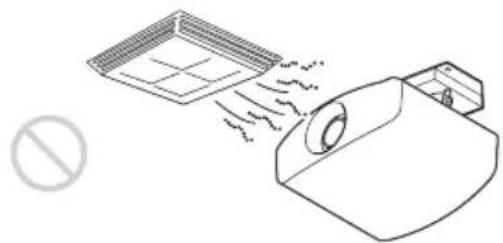
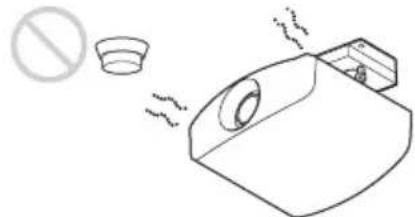
Near a heat or smoke sensor
Malfunction of the sensor may occur.
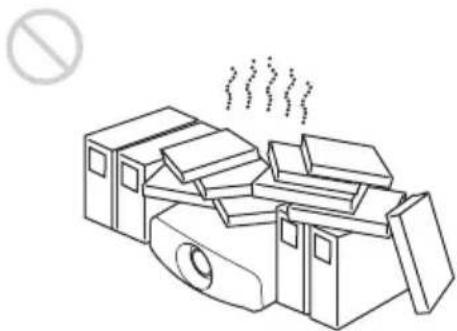
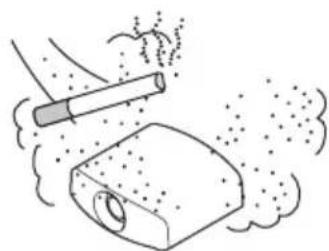
Very dusty and extremely smoky locations

Unsuitable Conditions
Do not do any of the following while using the unit.
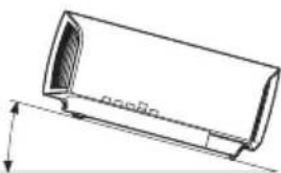
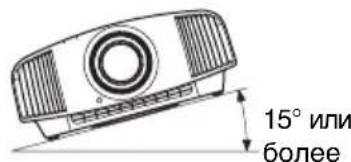
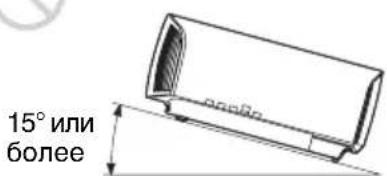
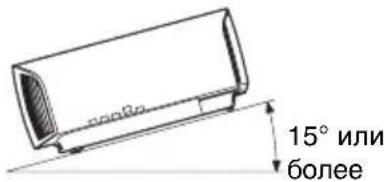
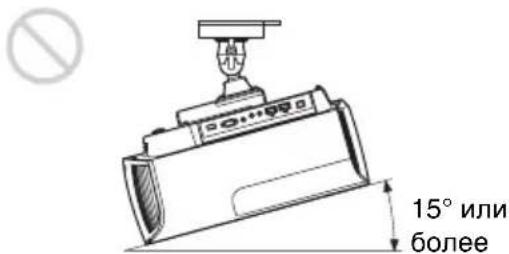
Tilting front/rear and left/right
Avoid using the unit tilted at an angle of more than 15 degrees.
Do not install the unit anywhere other than on a level surface or on the ceiling. Installing the unit in such a location may result in uneven color uniformity or reduce the reliability of the effects of the lamp.
If the unit is tilted up or down, the image on the screen may be trapezoidal.
Position the unit so that the lens is parallel to the screen.

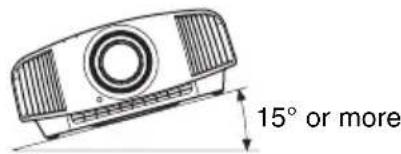

15^ or more

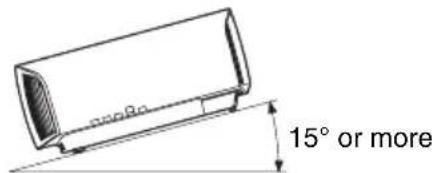

15° or more


When installing the unit at high altitudes
When using the unit at an altitude of 1,500m (approx. 4,900 ft) or higher, set "High Altitude Mode" on the Setup
menu to "On". Failing to set this mode when using the unit at high altitudes could have
adverse effects, such as reducing the reliability of certain components.
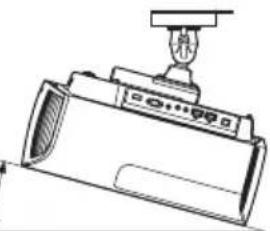
Safety precautions for installing the unit on a ceiling
- Never mount the projector on the ceiling or move it by yourself. Be sure to consult with qualified Sony personnel (charged).
- When installing the unit on a ceiling, be sure to use a safety wire, etc., to prevent the unit from falling. Entrust the installation to an experienced contractor or installer.
For dealers
- When the projector is mounted on the ceiling, a Sony bracket or recommended equivalent must be used for installation.
- Be sure to secure the cabinet cover firmly when installing to the ceiling firmly.
Checking the Supplied Accessories
Check the carton to make sure it contains the following items:
- Remote control (1)
VPL-VW570ES:RM-PJ24
VPL-VW270ES: RM-PJ28
- Size AA (R6) batteries (2)
- Lens cap (1)
When you purchase the projector, a lens cap is on the lens. Remove the lens cap before you use the projector.
- AC power cord (1)
- Quick Reference Manual (this manual) (1)
- Operating Instructions (CD-ROM) (1)
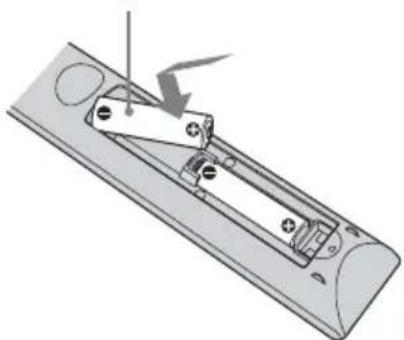
Inserting the Batteries into the Remote Control
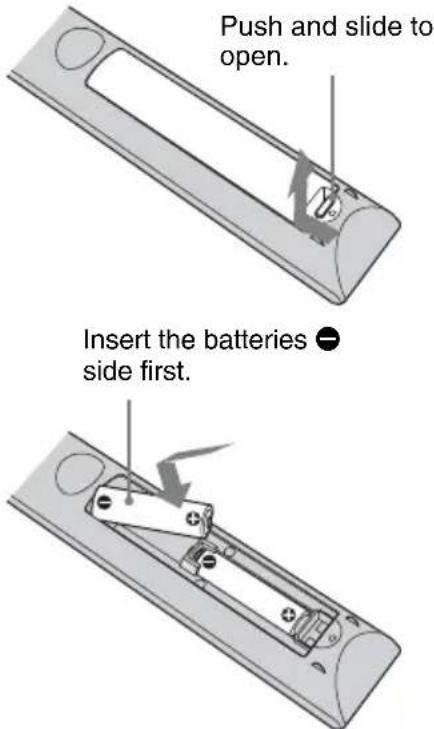
Caution about handling the remote control
-
Handle the remote control with care. Do not drop or step on it, or spill liquid of any kind onto it.
-
Do not place the remote control in a location near a heat source, a place subject to direct sunlight, or a damp room.
Using the CD-ROM manual
The manual can be read on a computer with Adobe Reader installed.
You can download Adobe Reader free from the Adobe website.
1 Open the index.html file in the CD-ROM.
2 Select and click on the manual that you want to read.
Note
If you have lost or damaged the CD-ROM, you can purchase a new one from your Sony dealer or Sony service counter.
1 Position the unit so that the lens is parallel to the screen.
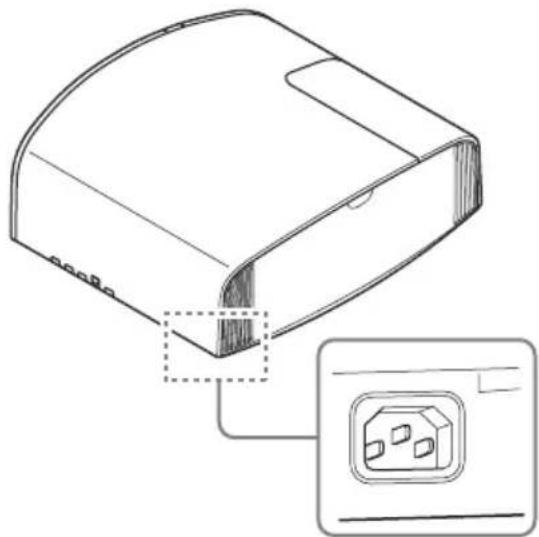
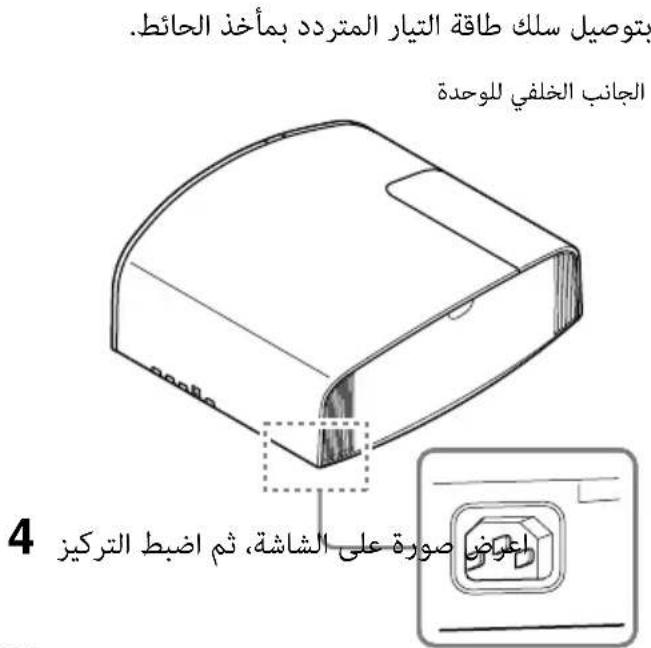
2 After connecting the AC power cord to the unit, plug the AC power cord into a wall outlet.
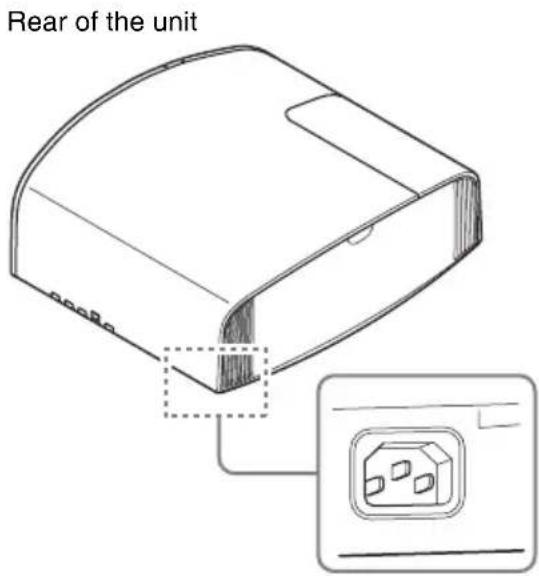
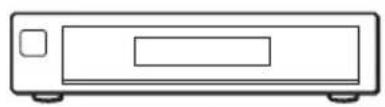
Front of the unit
Note
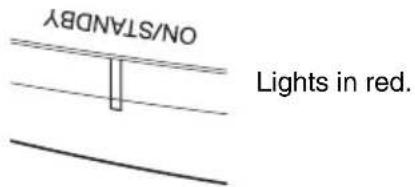
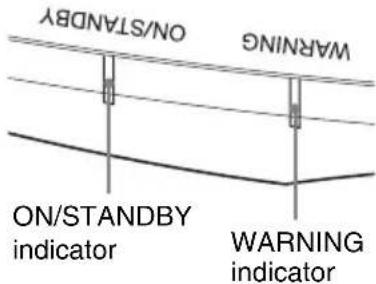
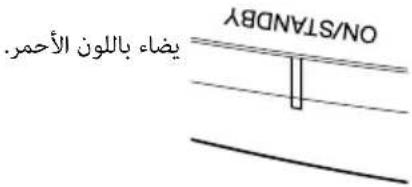
After connecting the AC power cord to the unit, the ON/STANDBY indicator may blink in orange.
You may not be able to control the unit while the indicator is blinking, but this is not a malfunction. Wait until it stops blinking and remains lit in red.
3 Press the I/ (ON/STANDBY) button to turn on the unit.
Front of the unit
Flashes in green for tens of seconds and then lights in green.
4 Project an image on the screen, then adjust the focus, size, and position.
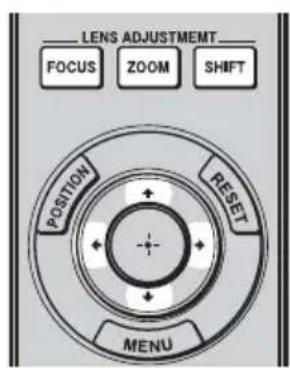
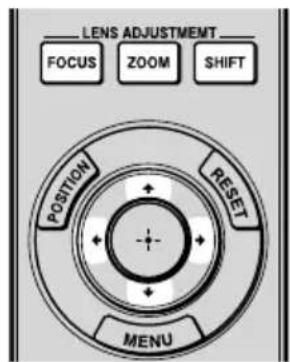
VPL-VW570ES
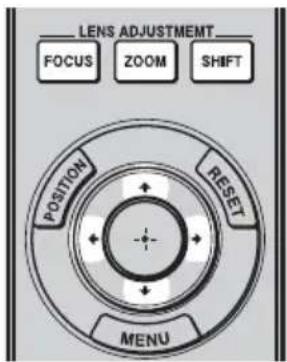
Adjust the focus.
Press the LENS ADJUSTMENT (FOCUS) button to display the Lens Focus adjustment window (test pattern). Then adjust the focus of the picture by pressing the / / / buttons.
Adjust the picture size.
Press the LENS ADJUSTMENT (ZOOM) button to display the Lens Zoom adjustment window (test pattern). Then adjust the size of the picture by pressing the / / / buttons.
Adjust the picture position.
Press the LENS ADJUSTMENT (SHIFT) button to display the Lens Shift adjustment window (test pattern). Then adjust to the proper position of the picture by pressing the / / / buttons.
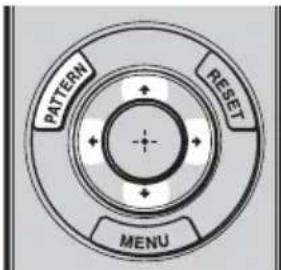
VPL-VW270ES

Adjust the focus.
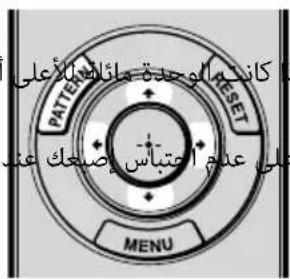
Press the PATTERN button repeatedly to display the Lens Focus adjustment window (test pattern). Then adjust the focus of the picture by pressing the / buttons.
Adjust the picture size.
Press the PATTERN button repeatedly to display the Lens Zoom adjustment window (test pattern). Then adjust the size of the picture by pressing the / buttons.
Adjust the picture position.
Press the PATTERN button repeatedly to display the Lens Shift adjustment window (test pattern). Then adjust to the proper position of the picture by pressing the / / / buttons.
To adjust the tilt of the installation surface
If the unit is installed on an uneven surface, use the front feet (adjustable) to keep the unit level.
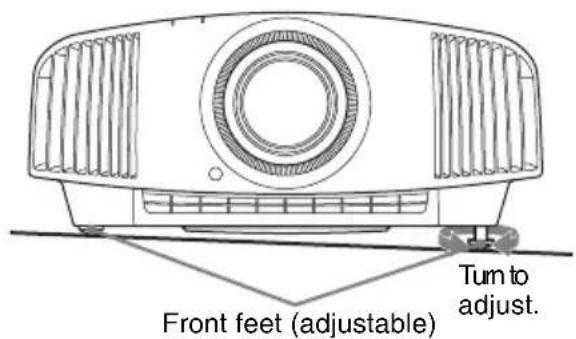
Notes
- If the unit is tilted up or down, the projected image may be trapezoidal.
- Be careful not to catch your finger when turning the front feet (adjustable).
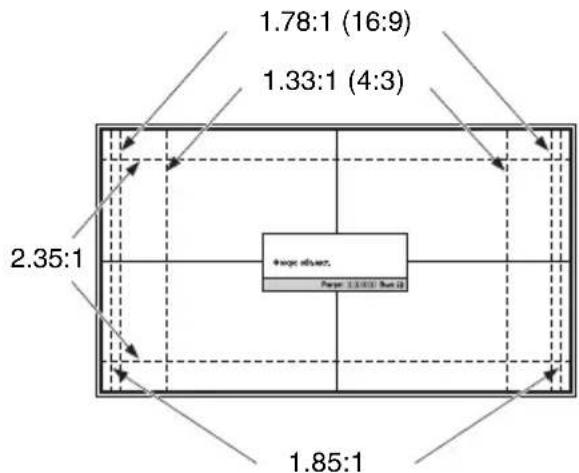
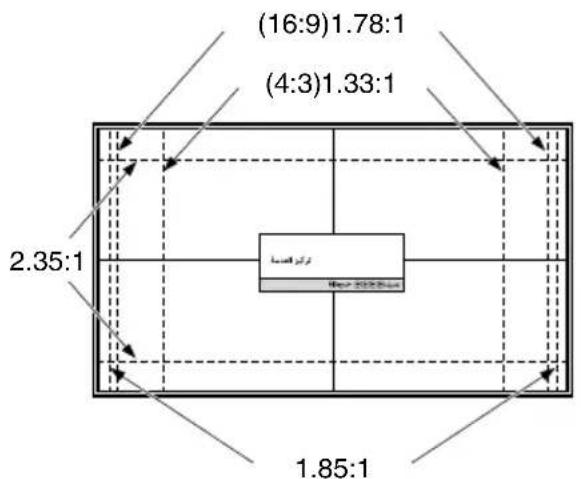
Lens adjustment window (test pattern)

The dashed lines show the screen sizes of each aspect ratio.
For more information, refer to "Connections and Preparations" in the Operating Instructions contained in the supplied CD-ROM.
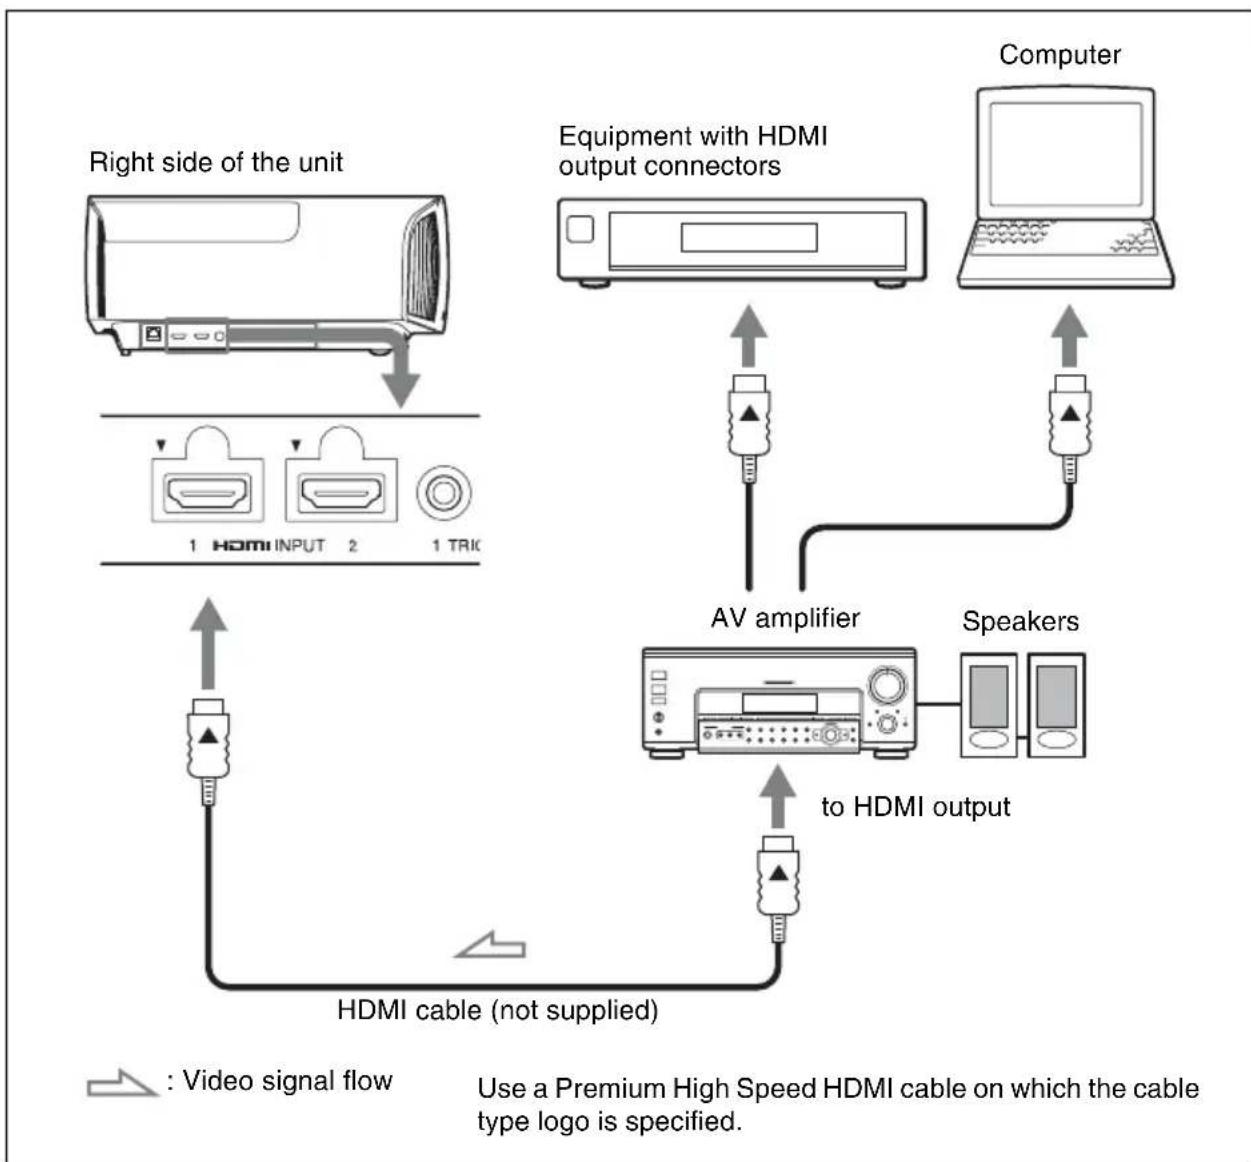
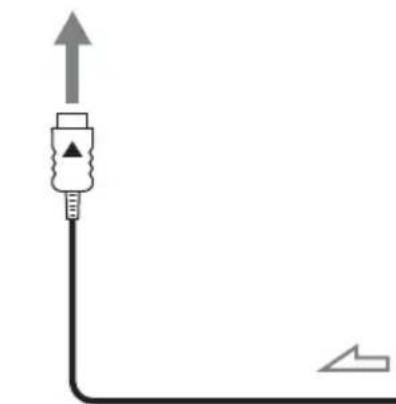
When making connections, be sure to do the following:
- Turn off all equipment before making any connections.
- Use the proper cables for each connection.
- Insert the cable plugs properly; poor connection at the plugs may cause a malfunction or poor picture quality. When pulling out a cable, be sure to pull it out from the plug, not the cable itself.
Refer to the operating instructions of the connected equipment.
For more information, refer to "Connections and Preparations" in the Operating Instructions contained in the supplied CD-ROM.
Step 4
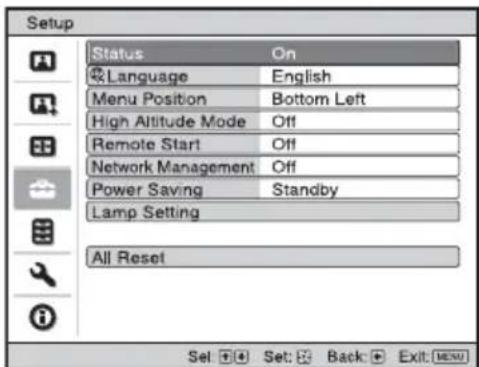
Selecting the Menu Language
You can select the language for displaying the menu and other on-screen displays. To change the current menu language, set the desired language with the menu screen.
1 Press MENU.

The menu appears.
2 Press / to select the Setup menu, and press or
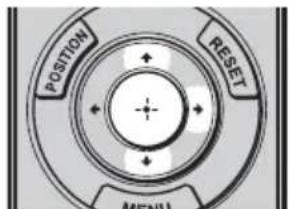
The setting items of the selected menu appear.

3 Press / to select "Language," and press or
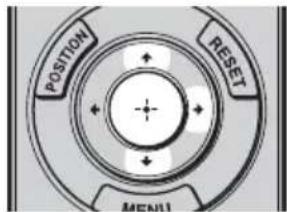
4 Press / / / to select a language, and press

The menu changes to the selected language.
To clear the menu
Press MENU.
Projecting the Picture
1 Turn on both the unit and the equipment connected to the unit.
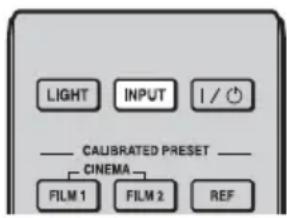
2 Press INPUT to display the input palette on the screen.
3 Select the equipment from which you want to display images.
Press INPUT repeatedly or press / . (enter) to select the equipment from which to project.

Example: To view the picture from the video equipment connected to the HDMI 1 connector of this unit.
Turning Off the Power
1 Press the I/ (ON/STANDBY) button.
A message "POWER OFF?" appears on the screen.
2 Press the I/ (ON/STANDBY) button again before the message disappears.
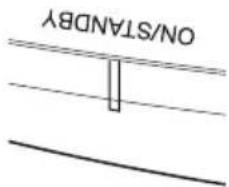
The ON/STANDBY indicator flashes in green and the fan continues to run to reduce the internal heat.
The fan stops and the ON/STANDBY indicator changes from flashing green to remaining red.
The power is turned off completely, and you can disconnect the AC power cord.
Note
Never disconnect the AC power cord while the indicator is flashing.
Tip
You can turn off the unit by holding the I/ (ON/STANDBY) button for about 1 second, instead of performing the above steps.
For more information, refer to "Projecting" in the Operating Instructions contained in the supplied CD-ROM.
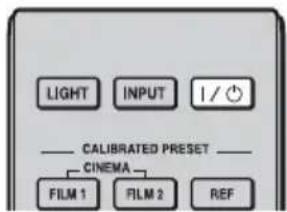
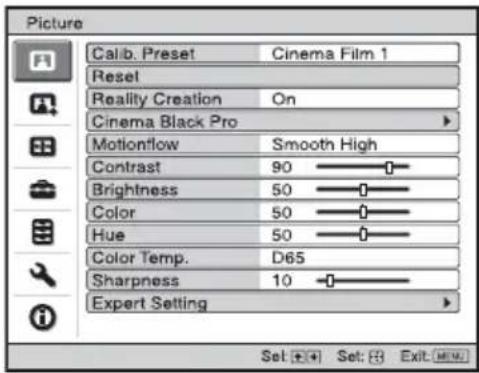
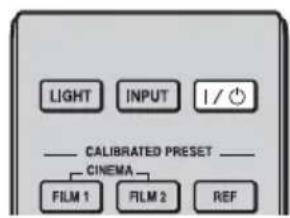
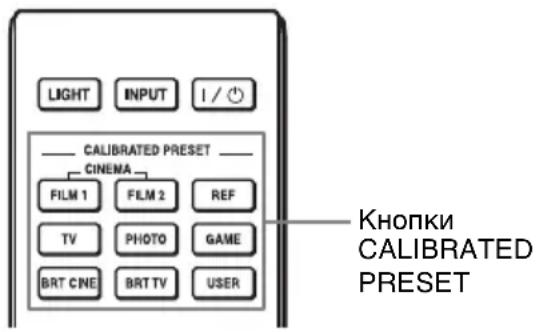
Selecting the Picture Viewing Mode
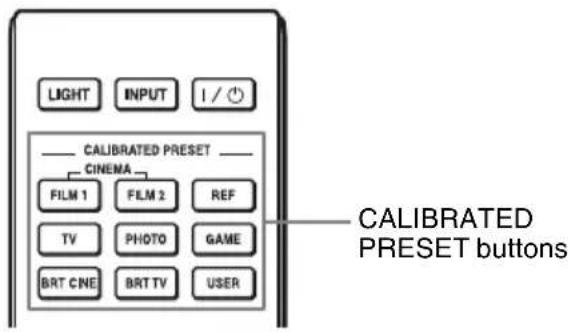
Press one of the CALIBRATED PRESET buttons.
| Setting items Description | |
| CINEMA FILM 1 Picture quality | suited to reproducing the highly dynamic and clear images typical of master positive film. |
| CINEMA FILM 2 Picture quality | suited to reproducing the rich tone and color typical of a movie theater, based on the Cinema Film 1. |
| REF A picture quality setup suitable | ble for when you want to reproduce faithfully the original image quality, or for enjoying image quality, without any adjustment. |
| TV Picture quality suited for watching TV programs, sports, concerts, and other video images. | |
| PHOTO Ideal for projecting still | images taken with a digital camera. |
| GAME Picture quality suited to | gaming, with well-modulated colors and fast response. |
| BRT CINE Picture quality suited | for watching movies in a bright environment, such as a living room. |
| BRT TV Picture quality suited for | watching TV programs, sports, concerts, and other video images in a bright environment, such as a living room. |
| USER Adjusts the picture quality | to suit your taste then saves the setting. The factory default setting is the same as “REF.” |
For more information, refer to "Projecting" in the Operating Instructions contained in the supplied CD-ROM.
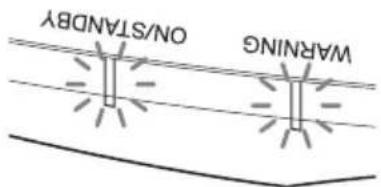
Warning Indicators
The ON/STANDBY or WARNING indicator lights up or flashes if there is any trouble with your projector.
Flashing/Lighting indicators The number of flashes
Cause and Remedy

(Flashes in red)(Lights in red)
Twice Close the lamp cover securely, then tighten the screws securely.
Three times The temperature of lamp is unusually high.
Turn off the power and wait for the lamp to cool, then turn on the power again.
If the symptom persists, the lamp may be at the end of its service life. In this case, replace the lamp with a new one.
Both indicators flash
(Flashes in red) (Flashes in red)
Twice The internal temperature is unusually high.
Check to ensure that if nothing is blocking the ventilation holes or whether or not the unit is being used at high altitudes.
Three times The fan is broken. Consult with qualified Sony personnel.
Note
If the symptom persists even after carrying out the above methods, consult with qualified Sony personnel.
If the indicator starts flashing in a way of other than the above, turn off, and then turn on the power with the / (On/Standby) button on the remote control or control panel of the unit.
If the symptom is shown again, consult with qualified Sony personnel.
If there is any problem or an error message appears on the screen, refer to "Error Handling" in the Operating Instructions contained in the supplied CD-ROM.
Maintenance
The lamp used for the light source has a certain lifespan. When the lamp dims, the color balance of the picture becomes strange, or "Please replace the Lamp." appears on the screen, the lamp may be exhausted. Replace the lamp with a new one (not supplied) without delay.
Tip
The lifespan of the lamp used for the light source changes depending on the installation environment or use conditions. You can use the lamp longer by avoiding turning the lamp off until several minutes pass after turning the lamp on.
Tools you need to get started:
- Projector Lamp (Optional)
VPL-VW570ES: LMP-H280
VPL-VW270ES: LMP-H220 - Standard Phillips screwdriver
- Cloth (for scratch protection)
Caution
- The lamp remains hot after the unit is turned off with the I/ (ON/STANDBY) button. If you touch the lamp, you may burn your fingers. When you replace the lamp, wait for at least 1 hour for the lamp to cool.
- Do not touch the surface of the lamp. If you touch it, wipe off the fingerprints with a soft cloth.
- Pay special attention to replacing the lamp when the unit is installed on the ceiling.
- When replacing the lamp of a unit which is on the ceiling, do not stand directly under the lamp cover. When removing the lamp door (inner cover), avoid twisting it. If the lamp explodes, fragments may cause injury.
- When removing the lamp unit, make sure it remains horizontal, then pull straight up. Do not tilt the lamp unit. If you pull out the lamp unit while tilted and if the lamp breaks, the pieces may scatter, causing injury.
Notes
- Be sure to use a specified projector lamp for the replacement. If you use lamps other than
the specified projector lamp, the unit may malfunction.
- Be sure to turn off the unit and unplug the power cord before replacing the lamp, then check the ON/STANDBY indicator has already been turned off.
Replacing the Lamp
1 Turn off the unit and unplug the AC power cord.
2 When setting the unit on a flat surface such as a desk etc., put a cloth to prevent the surface from being scratched. Place the unit on the cloth.
Note
Be sure that the unit is placed on a stable surface.
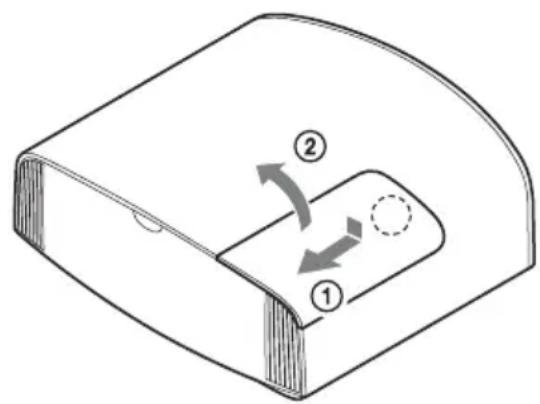
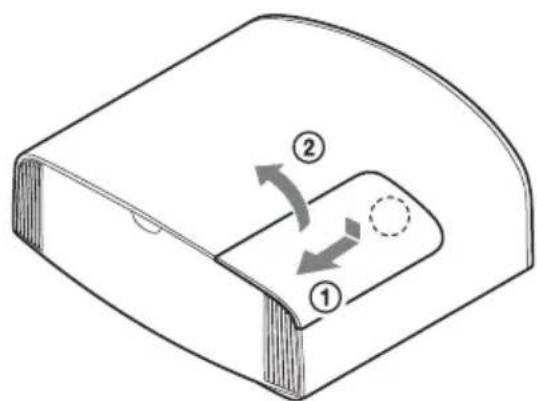
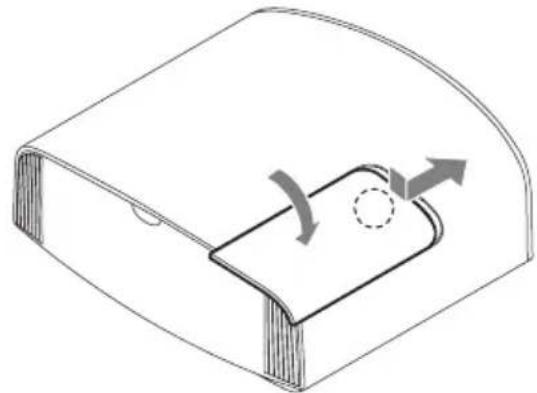
3 While pressing the part indicated in the lamp cover illustration, slide ① and then open ② the lamp cover.
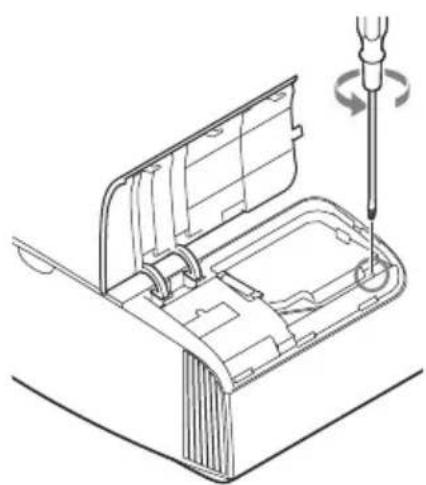
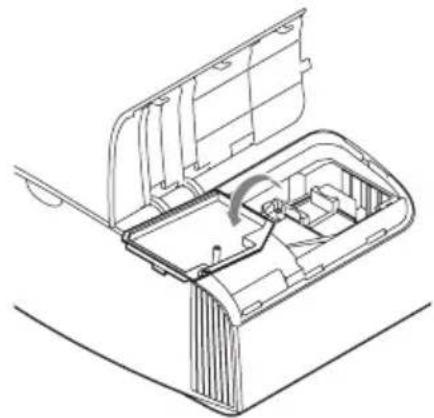
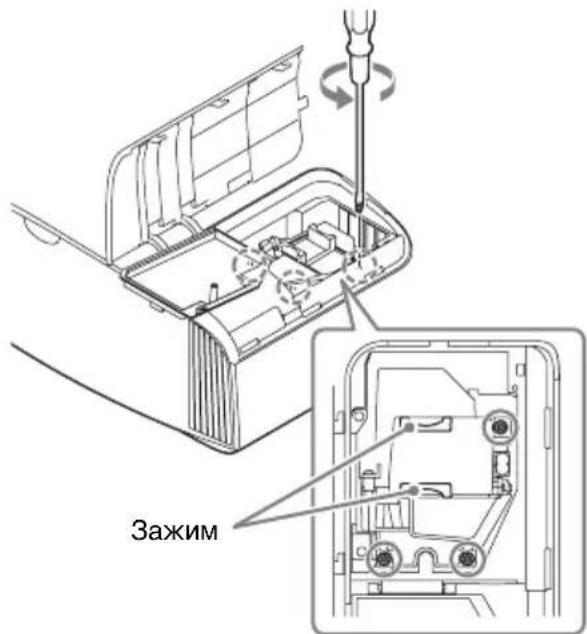
4 Loosen the lamp door (inner cover) screw with a Phillips screwdriver, and then open the lamp door.
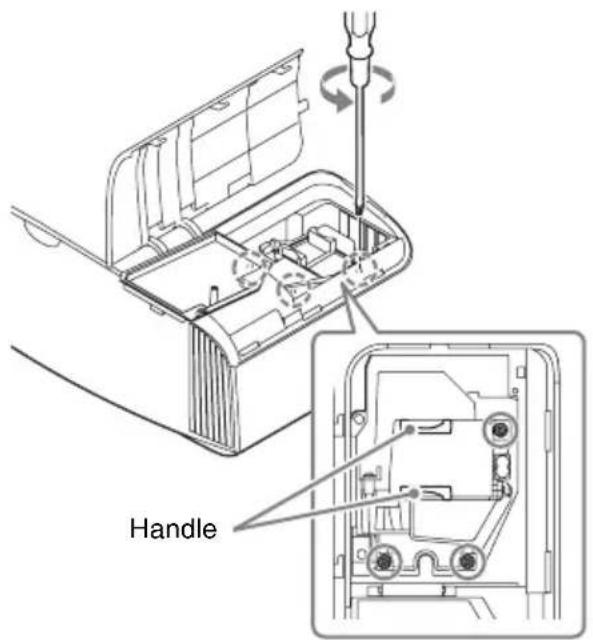
5 Loosen the 3 screws on the lamp with the Phillips screwdriver. Hold up the handle, then pull the lamp straight out.
Notes
- Do not loosen other screws except the 3 specified screws.
- Hold the lamp by the handle to remove and attach it.
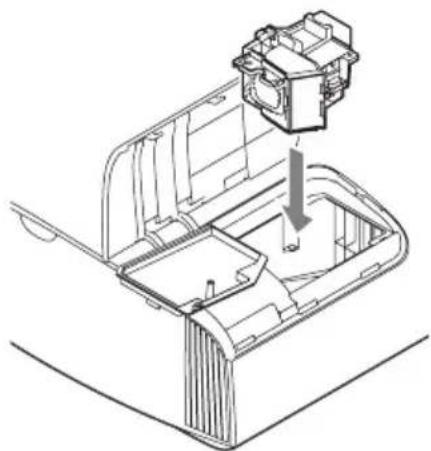
6 Push in the new lamp by the handle securely until it reaches the end, and then tighten the 3 screws.
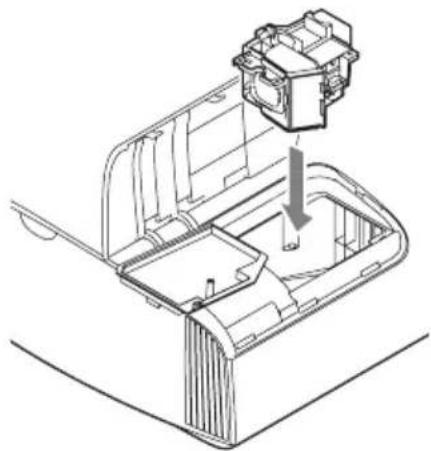
Note
Be careful not to touch the optical block inside the unit.
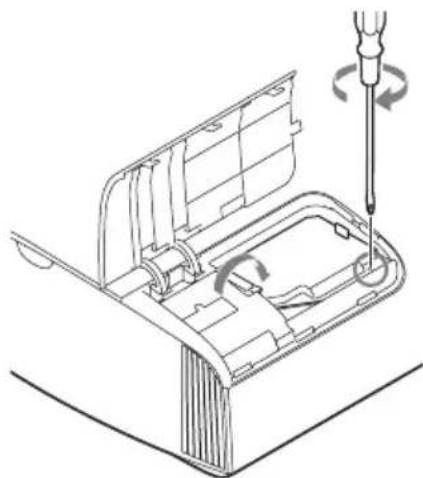
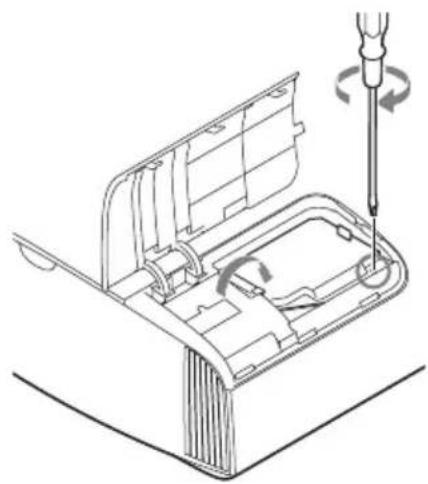
7 Close the lamp door (inner cover), and then tighten the screw.
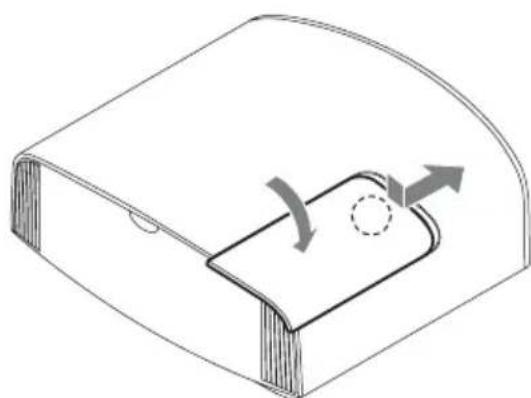
8 Close the lamp cover.
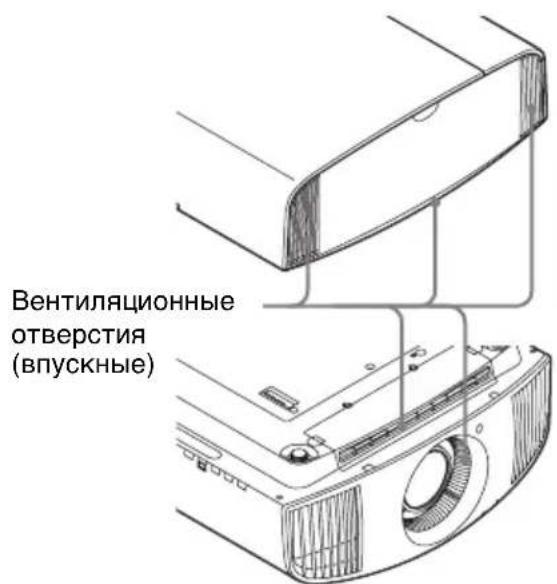
9 Wipe dust off the ventilation holes (intake) with a soft cloth.
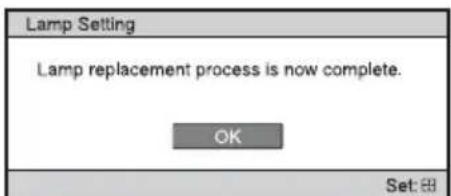
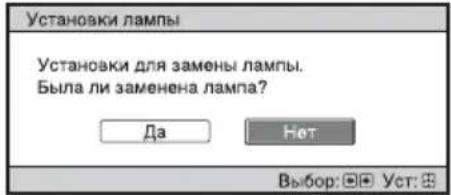
10Turn on the unit, then select the lamp setting item on the Setup menu. The menu screen below will be appeared.
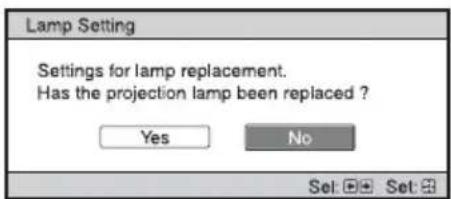
Tip If "Settings Lock" is set to "Level B," set to "Off" once.
11Select "Yes."
Caution
Do not put your hands into the lamp replacement slot, and do not allow any liquid or other objects into the slot to avoid electrical shock or fire.
Notes
- The unit will not turn on unless the lamp is securely installed in place.
The unit will not turn on unless the lamp cover are securely closed.
- To clear a message displayed on the screen, press any button either on the remote control or the control panel of the unit once.
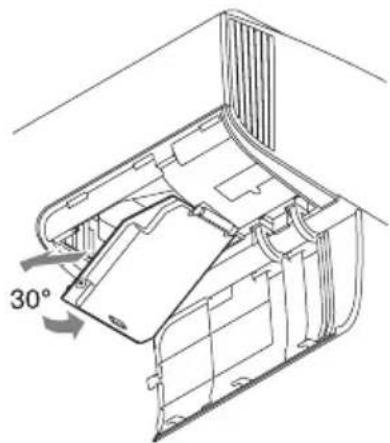
Note on replacing the lamp when broken, in the case of a ceiling installation
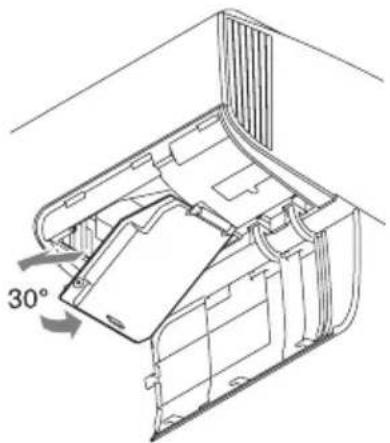
If the lamp breaks, broken lamp pieces may scatter and cause injury. When the unit is on the ceiling, remove the lamp door (inner cover) by sliding it horizontally slowly after raising it with 30 degree opened. Avoid twisting the lamp door (inner cover).
Note
The lamp contains mercury. The disposal rules for used fluorescent tubes depend on where you live. Follow the waste disposal policy in your area.
Projection.. Page 14
Gestion des erreurs
YcTaHOBka yCTpoiCtBa Ctp.11
War 3.
Подключене устpoиства.....Ctp.13
War 4.
BbI6Op Ra3bika MeHIO...Ctp.14
War 5.
Прoeцироване...Ctp.15
UcTpaHHeOuN6ok
PpeDynpexkaioune HndnKaTOpbl ..Ctp.17
TexHnueckoe o6cIyXuBaHne
3aMeHa Iamnbl. Ctp. 18
Pycckn
BndeopoeKTop VPL-VW570ES VPL-VW270ES
Ipei IcnoJIb3OBAHHeM ycTpoIcTBa BHNMaTeJIbHO IIPOuHTaIte HAcTOIeepyKOBOCTBO H COxpaHITe eRO IJIa IIOJIyuEHHa Heo6XoIMoHnHΦOpMaIIH B 6yDyIeM.
ПЕДУПЕЖDEHNE
Длг chнжehн риcka BO3ropaHnИ NopaxeHn 3JIeKtpnuecknM TOKOM He DoNYcKaIte BO3dIeCTBnHa aannapat BnIuN I cbIpocTn. ЧтобИ nCKJIIOUHTb pUCK NopaxeHnI 3JIeKtpnuecknM TOKOM, He ВСКрьIBAIte KOpNyc. ОБслуЖиBaHne annapaTa DoJXHbl ВыINOLHЯrToJbKO КВаЛФицIpOBaHHbIe СпeциаJIncТbl.
ПЕДУПЕЖДEHNE Данhoe устpoиCTBOdoJxHo 6bIb 3a3eMJIeHo.
PPEdUnPEXDEHNE
IaHHoe yctpoiCTBO He HmeeT IpepeKJIIOUaTeJIaNTaHnI. Ipru ycTaHOBKe ycTPOIcTBa HCIOJIb3yIte JleKoIOCTYINHbI IpepbIBaTeJIb IIITaNHe C fHKcHpOBaHHo IIPOBOJKOII INIOKJIIOHTe IIPOBD IIITAHNIA K IeKoIOCTyIHHO HaCTeHHO IHoP03eTKe, paIOJOxKeHHo pAOM c ycTPOIcTBOM. EcIn B IIpocece 3KcIIJyatauNN 6JIOka BO3HNKHET HeNCIIpaBHOCTb, C IIOMOIIbIO IpepbIBaTeJIa OTKJIIOHTe IIITaHHe, INIOTCOEINHHTe IIPOBOd IIITAHnI.
BHIMAHNE
B ueJx 6e30IacHOCTn He IIOJKIIOUaHTe pa3bem IPOBOIKN IepHcpeHnHBIX ycTPOHCTB, KOTOpBIMoKet IOJaTB Ype3MepHoe HaIIpJxKeHHe Ha cJeIyIOIIINIOPT: pa3bEM LAN
PNEyPPEKDEHNE
1.ИсIOJIb3yIte pa3peIIeHHbIe K IIpIMHeHnIO IHHyp IINTaHnI (c 3-ЖИЛБНБIM cHIOBBIM IPOBOIOM) / pa3beM IJIЯ IIOJKIIOUeHnIg6bITOBbIX IIpH6OpOB / IITeINCeJIbHyIO BNIJKY C 3a3eMJIIAIOHMK OHTaKTAMN, COOTBeTCTBYIOUne IeICTBYIOUm HOPMaTexHnKN 6e3OIIaCHOCTN KaJIOI OTJeJIbHOI CTpaHbI.
2.ИсПОЛБ3уНTe IHHyp ПИТаHнЯ (c 3-ЖИЛьнБIM cHJOOBbIM IIPOBOIOM)/ pa3bemДлЯ ПОДКЛIOUeHnRA 6bITOBbIX IIpH6OpOB /IITeINCEJIbHyIO BnJIky, COOTBeTCTBvIOUIne IOIIyCTHMbIM HOMHaJIbHBIM XapaKTePnCTHKaM (HaIIprJxKeHHe, cNJa TOKa).
B cIyuae BOIIPOCOB OTHOCHTeJIbHO
HcIOJIb3OBaHHYIOMaHYtBX BbIIIE
IIIHypa IIITAHN/ pa3BeMa IJIa
IIOKJIIOUeHHa 6bITOBbIX IIpHbOpOB /
IIITeINCeJIbHOB HJIKN, IOXaJIyInCTa,
O6paIIaNTecb K KBaJIHΦHIIuPoBAHHbIM
CIIeIIHaJInCTam IIO cepBnCHOMy
O6cJIyXnBaHHIO.
BHIMAHNE
-Прн HeIIpaBnJIbHоN 3aMeHe ΘJIeMeHTOB IITaHn BO3HnKaeT OIIacHOCTb B3pIbIa.ИсIOJIb3yIteДJIa 3aMeHbI TOJIbKO IJIeHTNCHbIe IJIH 3KBHBAJIeHTHBIE ΘJIeMeHTbI IITaHnI, peKOMeHIIyEmbIe N3ROTOBHTeJIeM.
-ПриуTNJIIN3aIaN aKKMyJIrTOpa HIN 3IeJIINcJIeIyET CO6JIIOJaTb 3aKOHbI COOTBeTCTByIOIeN cTpaHbI ININ COOTBeTCTByIOIeR o perHOHa. He yTNJIN3npyIte aKKMyJIrTOp ININ 3IeJIIne B ONGHe ININ B rOpYeN IIeU, He yHNHTOJaTe INX MEXaHHueCKHM IyTEM IN He pa3pe3aIte aKKMyJIrTOp. OH MoKET B3OPBaTbcN ININ pINBecTH K IIOJkapy. He IIOBepraIte aKKMyJIrTOp BO3JeNCTBINO Upe3BBiUaHIO HN3KOFO aTMOCΦepHOro IaBJIeHn, KOTOpOE MoKET IIprNBecTH K B3PbIBy ININ yTeUKe BOCIIJaMeHRAIOIIeNcR JNIKKoCTN ININ BOCIIJaMeHRAIOIIeROcR Ra3a.
-He pa3MeIaHTe aKKyMyJITOP B MeCTax C BbICOKO TeMIIepaTyPOH, HaIIpIMeP IOI BO3JeNCTBHeM IIpA MbIX
COJIHeuHbIX JIyEe HJIN BO3JIe OrHJ. OH MOKeT 3aRopeTbcra, B3OpBaTbcra HJIN IIpNBecTN K IIOXapy. He IIOJBepraIte aKKyyJIaTOP BO3JeIcTBnIO BOJbI. 3TO MOKeT IIpNBecTN K IIOpaXeHHIO 3JIeKTPnueckm TOKOM.
BHIMAHNE
IyIbTa IuctaHIOHOHorO yIpaJIeHnTpe6yeTc cJeIyIOIee YIIO aKKymJITOpOB cJeIyIOIeRo pa3Mepa.
- pa3mepa AA (R6);
- KOJIInyEcTBe 2 IIIT.
YTO6bI H36eKaTb ONaCHOCTN B3pbIBa, HCIOJIb3yHTe TOJIbKO aKKyMjTOpbl CJJeDyIOUeRO TIIa.
pa3Mepa AA (R6),MapraHueBbIe HJIH IIeJIOuHbIe.
CobnoaTe octopoxhoctb np3ameHe/yTnIIN3aunn 3JeMeHToB nHTaHn dJa 3D-0uKOB
Ipn HeIpaBnJIbHOJ 3aMeHe 3JIeMeHTOB IITaHnRA BO3HNKaet OIIaCHOCTb B3PbIBa. IcIOJIb3yIte JJIra 3aMeHbI TOJIbKO IIeHTNCHbIE NIN 3KBHBAJIeHTHBie 3JIeMeHTBI IITaHHa, peKOMeHdyeMbIe H3rTOBHTeJIeM.
IpyuTHJIN3aUHnOtpa6oTaHHbIX
JIeMeHTOB IINTaHnHaHEo6XoIMOMCJIeIOBaTb IpaBnJaM,JeCTByIOUHMBCOOTBeTCTByIOUempeHNOHeNJIN CTpaHe.
O 3D-04kax
3D-ouKn B3aHMOeIcTByIOT c
IIpoEKTOpOM IO TexHOJIOrHi Bluetooth v.3.0 IJIa OTO6paKeHn 3D-cnHnaIob.
a) pa6oTaIOuIb IuaIa3OHe 2400-2483.5 MΓu
b) MaKcHMaJIbHyIO BbIXOJHyIO MOIIHOCTb 4.30 dBm (E.I.R.P.)
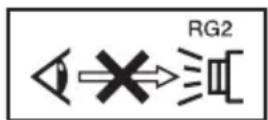
KaK n B cIyue c JIO6bIM HCTOuHNKOM npKO rCBeTa, He CMOTpHTe IIpyMo Ha JyuRG2 IEC 62471-5:2015.
SONY
CoHn KopnopeiHH
1-7-1 KoHaH MnHaTo-Ky TokNo, 108-0075
ЯПОнЯ
CnJaHO B KnTaC
HMIIOPTep Ha TeppHTOpHH cTpaH TaMOXeHHORo COIO3a AO «CoHH 3JIeKTPoHNKc», PocChn, 123103, MockBa, KapamblIeBCKn IIpoe3I,6
TOyCTPOIcTBOABJIeTcI IPOEKTOpOM IIIAIPOEICNPOBAHnI3O6paKeHN C IOKJIIOUeHHORO KOMIIbIOTepa HJIN BIIeOO6OpyIDOBAHNA.
YcIOBnKpaTKocpOuHOro XpaHeHHXpaHHTb B TemhBX, cyHX, YnCTbIX, BEHTNJHPyEmbIX IOMeIeHHx, H3OJInpOBaHHbIMN OT MeCT XpaHeHHNKCJOT N IIeJOUeH.
XpaHHTb BlaJIN OT HCTOuHNKOB TeJIa IN BlaIr BO H36eKaHne KOHJeHcaIIHH.
-XpaHHTb npn TeMHepeType oT -20^ 1o +60^
-XpaHHTb IIpH OTHOCHTeJIbHOB BIAJXHOCTH He 6oJIee10% Do 90%, 6e3 o6pa3OBaHHa KOHHeHcata. CpOK XpaHeHHa He yCTaHOBJIeH.
TpaHcIIOPTnpoBaTb BOpHrHaJIbHOyIIaKOBKe, BO BpeM TpaHCIOPTnPOBKnHe 6pOcaTb, oBepeRaTb OT IIaJeHN, yIapOB, He IIOBBePraTb N3JIINHei Bn6paun.
EcHHeHCIIpaBHOCTb He ydaeTcra
ycTpAHNTb cJIeIyra daHHoH IHCTpyKuHN-06paHTecb B 6JIHXaHnH
aBTOpH3OBAHHbI SONY ueHtp IIO
peMOHTy H 06CJIyXHBaHHIO.
TO yctpoCTBO IOIepKNaeT TexHOIOHN 6ecIIPOBOHON CB3N JIA TactOTHO nnna3OHa 2,4 _山
TODBbIycka:cm.IHΦopMaUHOHyTOa6JIuKyuHa H3JeJIHN JIn yIaKOBOuHOJ Kopo6Ke.
IIpIepep (2016-01): 2016: roJ. 01: meca
3AO "CoHH 3JIeKTPoHnKc" Pocchna,123103,MockBa, KapamblieBcKn IIpoe3I6 TeJ. +7 4952587667, a c +7 4952587650
Ka3aKcTaH, AJMaTbI KaJIacbI, HBaHHIOB
KoIIeci, 58, 050059
TeI. +7 (727) 3201145, φaKc
+7 (727) 3201149
PcaJIN3aIINIO OcyIeCTBJIaTb B COOTBeTCTBHN C JeIcTBYIOIIMN Tpe6OBAHnM 3aKOHOJaTeJIbCTBa. OTCJyXHBIIee H3JeJIne yTHJIN3HpOBaTb B COOTBeTCTBHN C JeIcTBYIOIIMN Tpe6OBAHnM 3aKOHOJaTeJIbCTBa.
- EcJn OuyKn pa36HJIncB, He IOnyckaIte HONJaHaHHO CKOJIKOB B POIT HJN B rJa3a.
KndkokpncTaJInuYeckn npoekTop
KK-ⅡpoekTop co3aH c
HIOJIb3OBAHHem BbICOKOTOHbIX
TexHOJOrn. OHaKo, Ha əKpaHe KK
IIpoeKTopa MoryT IepNoIueckn
IOABJIaTbcr MeJIkne YepHbIe H/NIH
IpyKHe (KpaChbIe, CInHne HIN 3eJIeHbIe)
TOUKN. 3TOT 30fpeKT YBJIaETcR
HOPMaJIbHbIM pe3yJIbTaTOM
IPOUN3BOIDCTBeHHORI IIpoUcecca H He
CBNTeJIbCTByeT O HeNCIIpaBHOCTH.
KpOME TORO, IIpn HCIOJIb3OBAHH NJIa
IpoeIIuPoBaHHa OOnH 3KpaH
HeCKOJIbKHX KK-IIpoeKTopOB, JdAke
OHDON MOJeJIH, IBeToIIpeJaCa pa3HBIX
IIpoeKTopOB MoKeT OTJNuAtbCra, TaK
KaK 6aJIaHC IIBeTa Ha HIN X MOKeT 6bITb
HaCTpoEH IO-pa3HOMY.
OKohdeHcaun
IIpn 6bICTpOM H3MeHeHH TeHepaTpybl B IOMeIeHH, B KOTOpOM yCTaHOBJeH IIpoEKTop, HIN IIpi N 6bICTpOM IepemeIeHH IIpoEKTopa H3 XOJIIOHO B TEIIIOe MeCTO BHYTPn HEo MOKeT O6pa3OBaTbcra KOHJeHcaT. TaK KaK KOHJeHcaT MOKeT IIpNBecTH K HeHCpaBHOCTn, CO6JIIOJaTe OCTOPOXHOCTb IIpi H3MeHeHH HaCTPOeK TeMIIePaTypbI KOHJIOHOHa. IIpn 6pa3OBaHH KOHJeHcTa TpeiN HCIOJB3OBaHHem IIpoEKTopa OCTaBBte erO BKJIOueHHbIM IIp6JIIN3HTeJIbHO Ha IBa Yaca.
HeDOnyCTnMbIe BapNaHTbI yCTaHOBKn
He pa3MeIaIe ycTPOcTBO B cJIeIyIOIIx ycJIOBHX, KOTOpbIe MOYr IINBecTHK HEnCIIpaBHOCTH JIN IOBpeKdEHHIO ycTPOcTBa.
Praom co cTeHAMN
IIra 06ecneueHnIPOH3BOJNTeJIbHOCTn HHaJeXHOCTn yCTpOcTBA OCTaBbTe MeCTo MeKJy CTeHaMn H yCTpOcTBOM, KaK IOKa3aHo Ha pncyHke.
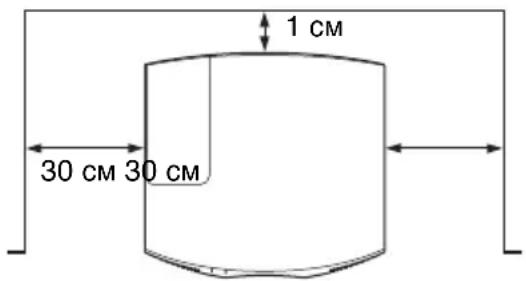
Bo3IyX H3 KOHIIINIOHepa HIN BeHTNJIAIHOHHbIX OTBepCTNJaHHOro aIIIapata NIN JpyTNX yCTPONCTB MOKeT IIpNBecTH K KOJIe6aHnM 3KpaHa. He ycTaHaBJIIBaIte JaHHbI aIIIapAT MeCTe, TIE BO3JyX H3 KOHIIINIOHepa HIN BeHTNJIAIIOHHbIX OTBepCTN yCTPONCTB IIOIaJaET Ha IpePdHIIO CTOPOHy aIIIapata.
PomeueHne c pIoXoB BeHTnJIaCnei
OCTaBbTe BOKpyr yctpoIcTBA MNHIMaJIbHOe IIOcTpahCTBO B 30 cm.
Xapkoe n BnaJxHoe nOmeueHne
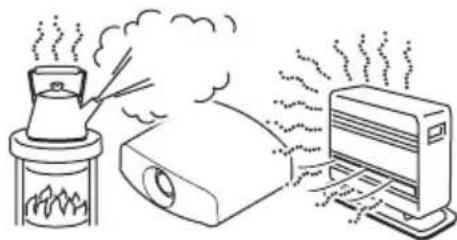
PomeuHn, NOBepKeHHbIe BO3dEiCTBnIO NOTOKa XoJIoHOrO mN TeNlOro BO3dUxa n3 KOHNcNoHepa
YcTaHOBka B TaKOM MeCTe MoXeT IIpNBecTN K HeHcIIpaBHOCTN yCtPoIcTBa BCJIeIcTBHe KOHJeHcaIIHN BJIaH NJIH IOBbIIIIeHn TeMIIpePaTypbl.
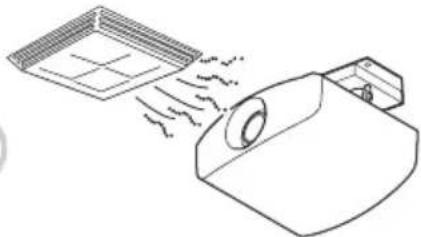
Praom c daTcHKOM TeNla nn Dbima
TO MoKeT IIpNBecTH K JIOXHOMy cpa6aTaBbAHnO JaTUnKa.

CnIbHo 3aIbJIeHHbIe nIIcNJIbHO 3aIbIMJIeHHbIe NOMEueHnA

Heonucmbie ycnoBna 3Kcnnyatau
IpnHcIOJIb3OBaHHnJaHHORO yCtpoHCTBa 3aIIpeIaEcTcBbIOJIHrTb cJeNyIOUHe ONEpaUN.
HaKIOH BnpeI/ha3aI IN BnpaBO/BNeBO
H36eAaTe HcIOJIb3OBAHnYcTPOINCTBa cHaKJIOHOM IOJ yIOM 6oJIce 15 rpaIycob.
YcTaHaBJIHBAIte yCTPOINCTBO TOJIbKO Ha POBHOIOBepXHOCTN HJIN HA IIOTOJIke. YcTaHOBKa yCTPOINCTBa B TaKOM MecTe MOKeT IIpNBecTH K NCKaXeHHIO IBeTOB HJIN CHNXeHHIO HaJeXHOCTn pa6OTbI JAmIIbI.
EcJIN yCTPOIcTBo HAKJOHO BBepx HJIN BHN3, H3O6paXeHHe Ha 3KpaHe MOKeT 6bITb TpaIIeIeIaJIbHBIM.
PacIOJIOKHTe yCTPOINCTBO TaKM O6pa3OM, YTO6bI 06BeKTNB HAXOJIICn IapaJIJIbHO 9KpaHy.

YcTaHOBka yCtpoiCTBa Ha 6OJIbwoB BbICOTE NaD yPoBHeM MOpA
Ipn HcIOJIb3OBaHH yCTpoINCTBa Ha BBICOTE 1500 M NJIH BBIIE yCTaHOBHT IJII IapameTppa "PexHM BBIC.IIOJ" B MeHIO "HAcTPOINKa" aayehne "BKII".EcJIN He yCTaHOBHTb 3TOTpeKIM IIpN HCIOJIb3OBaHH yCTPOINCTBa BBICOKO HAI yPOBHEM MOpR, 3TO MOKeT IIpNBecTH K He6JIaTOINTHbIM IOCJIeIcTBnM, HAIIpIMeP KymeHbIIeHNIO HaJeKHOCTH HEKOTOPbIX KOMIOHEHTOB.
Mepbl npedoctopoxknoctn npu yctahOBKe ycTpoiCTBa Ha notolke
He IIbTaIaTeCb yCTaHOBHTb IPOeKTop Ha IOTOJIke HJIN IepEMecTHTb eRO camOCToTcTeJIbHO.Ob3aTeJIbHO IPOKOHcyJIbTHpyIteCb C KBAJIHΦHIIpOBaHHbIM IepcoHaJIOM KOMIIaHHN Sony, KOMIeTeHTHBIM B JaHHOM BOIIpoCe.
- YcTaHaBJIbBa yCTPOIcTBO Ha IIOToJIke, O6a3aTeJIbHO HcIIoJIb3yHTe CTpaXOBOuHbI IIHyp NJI INpyrHe cpeICTBa IIJI INpeIoTbPaIIeHnI IaJeHnI yCTPOIcTBA. IOBepebTe yCTaHOBky OIIbITHOMy CIIeUHaJIInCTy IIO MOHTaKy.
HΦopMaζηДЯДиJIeρOB
-
IyctaHOBKn IIpoeKTopa Ha IIOToJIKe HeO6XoJIMO HcHIOJIb3OBaTb KPOHIteHN IIPOIN3BOJCTBa KOMIIaHHN Sony IIN aHaIIOrHNoe peKOMeHIOBaHHoe KpeIIJeHne.
-
Pn yctaHOBKe Ha IIOToJIOK IIIOTHO 3aKpbBaTe KpbIHKy KopNyca.
Пюверka akceccyapов n3 KOMпжКТа NOCTaBKN
IpoBepbTe yIIaKOBky HaHaJIInHe cJeDyIOUHX 3JIeMeHToB.
-ПиJBТДИСТаHиОнHOrOупapВJIeHnA (1) VPL-VW570ES:RM-PJ24 VPL-VW270ES:RM-PJ28
- BaTapen pa3Mepa AA (R6) (2)
KpbIIka 06beKTnBa (1)
IpnIOkyIke IpoeKTopa KpbIIka
06beKTnBa HaTeHa 06beKTNB.
IpeepNcIOJIb3OBAHHem IpoeKTopa
CHHmnte KpbIIkY 06beKTnBa.
Ka6eJIb IITaHnI NepemcHHoro TOka (1)
KpaTKoe cIIpaBOuHoe pyKOBoCTBO (aHHoe pyKOBoCTBO) (1)
- INHCTpyKIIINIIO 3KcNJIyataaNN (KOMIIaKT-ⅡNCK) (1)
YcTaHOBKa 6aTapeB NyIbT DnCTaHcNoHHO ynpaBJIeHnA
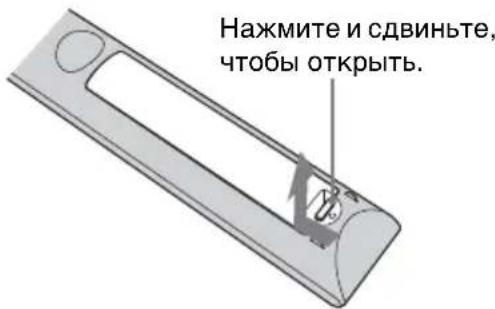
Bctabte 6aTapen CTOPHOH
PpeDynpexKdHne OTHOCHTeBHO NCNoJIb3OBAHnIyJIbTa DnCTaHcUOnHOrO ynpabJeHnI
- BepexHo 6paHauTecb c NyJBtOM HnctaHIOHO r yIpaBJIeHn. He 6pocaiTe ero, He HaCyIIaHTe Ha HeRo H He IpoJINBaHTe Ha HeFo HnKaKHe KnIKOCTn.
He ocTaBJIaTe IyIbT
HCTaHIIOHOYIIpaBJeHHB6JIN3N
HCToHHKOB TeIIJa HJIN B MeCTe,
IOJBepKeHHOM IIpIMOMY
BO3JeICTBIO COJIHeUHbIX JIyueH, HJIN
BOBJaXHOM IOMEJIeHHH.
Испобьзоване pykoBoDCTBa Ha KOMNaKT-ДиСke
PyKOBOCTBO MOxHO OTKpbITb c
HOMOIOI KOMIIbIOTepa,Ha KOTOPOM
ycTaHOBJeHa IporpaMa Adobe Reader.
PiPorpMy Adobe Reader MoxHo
6ecIIaTHo cKaaTb c Be6-caTa Adobe.
1OTKpoIte paI index.html ha KOMIIaKT-ⅡNCKe.
2BbI6epHTe HxKHOe pyKOBOCTBO II IeJIKNHTe IIO HeMy.
PpimMeuHne
B cIyae yTepr HIN IOBpeJdeHn KOMIIaKT-ⅡNcKa HOBbI IINCK MOxHO IIpHO6peTn y 6JIHXaIIero IIJIepa Sony HIN B cepBHCOM IeHTpe Sony.
1PacIOJIOKHTe ycTPOHCTBO TaKHM 6pa3OM, YTO6bI O6beKTINB HaxOJIICnI npaJIJIeJIbHO 3KpaHy.
2IocJIe IOnKJIIOueHnKa6eJIa IITaHnI IepMeHHORo TOKa K yCTPOIcTBy IOnKJIIOHTe Ka6eJIb IITaHnI IepMeHHORo TOKa K cTeBOI pO3eTKe.
3aDHeuactn yCTpoIcTBA
IpeenHra yactb ycTpoiCTBa
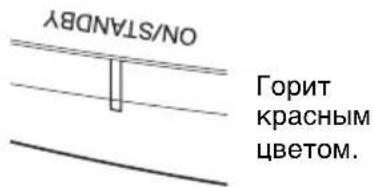
PpymeuaHne
IocJIeIOKJIIOUeHnKa6eJIa
IepemeHHoro TOka K yCTPOINCTBY
HHNKaTOP ON/STANDBY MoKeT
MnraTb OpaHKeBbIM.
YIpabJIeHHe ycTPOINCTBOM MOKeT
6bITb HCBO3MOKHbIM, cCJIN HHINKAtop
MnraeT, OJHaKO 3TO He JABJIeTcR
HeNCIIpaBHOCTbIO. IOXINTEcB, IOKa
HHINKaTOP IIpeCTaHEr MnRaTb H
HaHT TOpTeKpaCHbIM.
3 HaKMnTe KHOIIKy I/ (ON/ STANDBY), TTO6bI BKJIIOHTb yCTPOINCTBO.
IpeenHra yactb ycTpoiCTBa
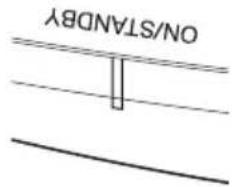
Mnrae3eJIeHbIM B TeueHne HECKoJIbKINx DeCAtKOB CeKYHd, 3aTEM rOpNT 3eJIeHbIM.
4BbIOJIHITe IIpoeIINPOBAHHe 3O6paXKeHnHa 3KpaH, 3aTeM OTpErYJInpyIte fokyc, pa3Mep I IOJOKeHne.
VPL-VW570ES
OTperpynnpyTe pokychoe paCCTOHHe.
HaKMTe KHOIIky LENS ADJUSTMENT (FOCUS),TO6bI OTo6pa3nTb OKHO peRyJInpOBKn "ΦOKyc o6bKeT." (TeCTOBHn 6pa3eU).OTpeRyJInpyJte 3aTeM φOKyc n3o6paJxHcNc IOMOIIbH KOHOK ↑/↓/←/→.
Otperynpyte pa3mep n3o6paXKeHn.
HaXMMTe KHOIIKy LENS ADJUSTMENT (ZOOM),TO6bI OTo6pa3HTb OKHO peRyJINpOBKn "Bapnoo6beKTHB" (TeCTOBH
06pa3eU). OtperyJnpyTe 3aTem pa3Mep H3o6paKeHnC IOMOuKHOIOK ↑/↓/←/→.
OtpereynpuTe noIoxKeHne n3o6paxKeHn.
HaKMnTe KHOIIKy LENS ADJUSTMENT (SHIFT),TO6bI OTo6pa3NtB OKHO peRyJInpOBKn "CdBnO6BeKT." (TeCTOBHn 6pa3eU).OTpeRyJInpyTHe HaJIeXaIiee IIIOJOKeHHe H3o6paKcEHnC IIOMOIiBIO KHOIOK ↑/↓/←/→.
VPL-VW270ES
OTperpynnpyTe foKychoe pacctoHne.
IocJIeIOBaTeJIbHO HaXHMaHTe KHOIIKY PATTERN IIJr OTo6paKeHnOkHa peRyJIInpOBKn "ΦOKyc o6bEkT".(TeCTOBiN 06pa3eI).OTpeRyJIInpyIte 3aTeM φokyc H3O6paKeHnC IOMOIIbIO KHOIOK ↑/↓/←/→.
OTPeryIpyuTe pa3mep n3o6paXKeHn.
IocJIeIOBaTeJIbHO HaXHMaHTe KHOIIKY PATTERN IJIa OTo6paXeHHo OKHa peYJINpOBKn "BapNoO6bekTnB" (TeCTOBHn 06pa3eU).OTpeYJInpyJte 3aTeM pa3MeP n3O6paXeHHc HOMOuBo KHOIOK / / - / -
OtperynpyTe noIoxKeHne n3o6paXeHN.
IocJIeIOBaTeJIbHO HaXHMaHTe KHOIIKY PATTERN IJIa OTo6paKeHnO OKHa peRyJInpOBKn "CdBnO6BeKT." (TeCTOBbI O6pa3eI).OTpeRyJInpyTHe HAnJeKaIiuee IIOJOKeHne
H3O6paJxEHNcIOMOIIbIO KHOIOK↑/↓/←/→.
PerynilpoBkaHaKJIOHa NOBepXHOCTH yCTaHOBKN
EcJn yctpoCTBO yctaHOBJeHO Ha HepOBHOn IOBepxHOCTH, HCIOJIb3yIte IpeHNHe HOKKn (peRyJInpyEmbie), YTO6bl IOJIepKaTb POBHoe IOJIOKeHHc ycTPOCTBa.

PpmeaHn
- EcJIN yCTpOInCTBO HAKJOHO BBepx HJIN BHN3, IIPOeIINpyEmOE IN306paXKeHne MOKeT 6bITb TpaIIeIeIaJIbHBIM.
- EyIbTe oCtOpOxHbI, YTO6bI He 3aIeMnTb IIaJIbIbI IIpr IIOBopote IpeIHHX HOKeK (peRyJINpyeMbIe).
Okho perylnpoBkn obekTnBa (TeCTOBbl 6pa3e)
IyHKTnHbIe IINHN yKa3bIBaIOT Ha pa3Mepbl 3KpaHa KaXdOrO fOpMaTHoro COOTHOWeHNA.
Ira noayehua donohumebhou uhoopmauu cM.pa3deA "Coedunehua u nodomobka"6 dokymehme Hcmpyquna no ekcnayamaauu, codepaueemha npulaaemom komnakm-ducke.
Pn noDKIIOUeHn BbINOJHInTe CneDyIOuJe DeNCTBna.
- BbIKJIIOHTc BCE O6OpUIOBaHnC IpeIi BBIOJIHcHnE JIO6bIX IOJKIIOUChn.
- IcnoJIb3yIte COOTBeTCTByIOUHn Ka6eJIb JIA KaKJOrO CoEINHeHnA.
BCTaBbTe IIITEKepeI Ka6eJIHaJIeJXaIIM O6pa3OM; HeHaJeXHOe COeINHeHne IIITEKePOB MOKeT IIpNBecTHK HeHCIIpaBHOCTH HJIHN HN3KOMy KaueCTBy H3O6paKeHHra. IIpn OTcoeINHeHHN Ka6eJI TaHHte 3a IIITEKeP, a He 3a cam Ka6eJIb. - CM. INHCTpykunn IO 3KcIIyatau nn NOKJIIOueHHORO 6OpuyIOBaHnI.
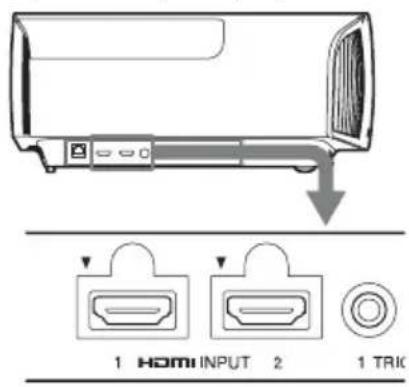
PpabaCtOPOHa yCTPoNcTbA
O6OpyIOBaHHe C BBIXOHNbIMn pa3beMaH HDMI

2 HaXMnTe ↑/↓, YTO6bIBbI6paTb MeHIO Setup aTeM HaXMnTe HJIN

OTo6pa3rTcHacTpOnKn 3JIeMeHTOB BbI6paHHoro MeHIO.
BbIKIIOUeHHe NITaHnA
1 HaKMITE KHOIIky I/ (ON/ STANDBY).
Ha ekpahe oTo6pa3ntcra coo6iueHne "IINTAHNE BbIKJ?".
2 HaKmTe KhoIky I/ (ON/ STANDBY) eue pa3 IO TORO, KaK coo6uHHe Hcye3HeT.
HINKaTOp ON/STANDBY 6yTeMnTaTb 3eJIeHbIM, a BeHTnJIaTOp IIpoJIOJkaTb pa6OtaTb IJIABHyTpeHHeRO OXJaXJeHHa.
BeHTHJIaTOp oCTaHOBHTcA, a HnIkaTOp ON/STANDBY n3MeHnT COCToHnHe, OH npeCtHaHcT MnraTb 3eJIeHbIM n 6yJeT TOpE Tb KpaCHbIM.
IHTaHHe 6yTeT IIOJIHOCTbHO OTKJIIOUeHO, MOxHo OTCoEcINHITb Ka6cJIb IITaHnI IepMeHHOrO TOka.
PpMpeHne
HnKoIa He oTcoeINHЯTe Ka6eJIb HHTAHNIIpepeMeHHOToKa, KOrJa MnTaet HnIKaTOP.
Cobet
Moxho OTKJIOHTb ycTpoIcTBO, yIepxNBa KHOIKy I/ (ON/STANDBY) B TeueHne OKoJIo 1 cekyHbI, He BBIIIOJIHHa BBIIeYKa3aHHbIe JeCTBn.
Ira noayehna donoHaumebHou uHopMaauu cm. pa3deI "PpoeupoBaHue" b DokyMeHme Hcmpkyua no 3Kcn.ayamauu, codepaueMca ha npuna2aemom KOMnak-m-udke.
Bb6op peKIma npocMoTpa n3o6paXeHn
HaXMMTe OndHy I3 KHOIOK CALIBRATED PRESET.
| HactpanBaemble Злемны | Опесанne |
| CINEMA FILM 1 КачесТВО | Изображени, пождддддддддддддддддддддддддддддддддддддддддддддддддддддддддддддддддддддддддддддддддддддддддддддддддддд ВOCПОНЗBEДЕНЯ B6ICOKOДINHAМИHBIX N YeTKIX Изobражени, ТППЧьб IX ДЛ ПОЗHTNBOB. |
| CINEMA FILM 2 КачесТВО | Изображени, пожддддддддддддддддддддддддддддддддддддддддддддддддддддддддддддддддддддддддддддддддддд ВOCПОНЗBEДЕНЯ HAcbIДEHNbIX N ICBETHBIX ИЗБражени, ТППЧьб IX ДЛ KINHoteaTPOB, Ha OCHOB e IapaMeTp a "Кинокфпьм 1". |
| REF Habtrpoиka KauchesТВа | Изobражени, пожддддддддддддддддддддддддддддддддддддддддддддддддддддддддддддддддддддддддддддддддд ВOCПОНЗBEДЕНЯ ДОCTOBерHOrO opRTHINHaJIbHOrO Изobражени Или OTOбражени KaucheTBA ИЗБражени Бe3 KaKINx-JINbOpeRyJIInPoBOK. |
| TV KauchesТВо ИЗБражени. | Пождддддддддддддддддддддддддддддддддддддддддддддддддддддддддддддддддддддддддддддддддддд ТЮхODДIeEEДIg INPocMOTpa TeJIeBn3IOHNbIX IIpORpAMM, CIIOPTRIBHbIX МePONIIprYAnI, KOHZePrtOBи IpyrHx BnDEOMIIM N MaJIbIM ВрemeHem OTKJINKa. |
| PHOTO ИдeаЛьно ИохoДи | Пожддддддддддддддддддддддддддддддддддддддддддддддддддддддддддддддддддддддддд ТЮрЕЦРОВАнЯ ФОТСНМКOB, СнэТьх IINФрОВКamрО. |
| GAME KaucheTBo ИЗБражени. | Пождддддддддддддддддддддддддддддддддддддддддддддддддддддддддддддддддддддддддддддддддддд MOДуЛИрОВaHHbIMN ICBetAmN И MaJIbIM ВрemeHem OTKJINKa. |
| BRT CINE KaucheTBo ИЗБражени. | Пожддддддддддддддддддддддддддддддддддддддддддддддддд ФИЛьмов B усJOВиХ ярКОг OCSbeIeHEN, NaIIprHmep B ROCTHINÖ. |
| BRT TV KaucheTBo ИЗБраж苇eHry. | Пожддддддддддддддддддддддддддддддд ТЮрЕЦРОВАнЯ IIpOrcMOTpa TeJIeBn3IOHNbIX IIpORpAMM, CIIOPTRIBHbIX МePONIIprYAnI, KOHZePrtOBи IpyrHx BnDEOHN3OБражени B усJOВиХ ярКОг OCBeIeHry, NaIIprHmep B TROCTHINÖ. |
| USER PeruJIinpovBa KaucheTВ | Ба ИЗБражени B COOTBETCTBHN C ПпeДПчITeHIMN ПОЛьЗОВаTeЯ И coXpaHEnHe эТои Настрйки. ПО уmoЛчаню hab相对较ika coBпадаet c "REF." |
Ira noyuueHua donoAhuemeBHO uHfopMauu cM. pa3dei "PpoeuupoBaHue" b DokyMeHme Hcmpykuua no 3KcnIayamaauu, codepaueemcHa npua2aemom kOmaekm-ducke.
PpeDynpexkaIOuIne HndNKaTOPbl
Iotppe6yOTc cJeDyUoune HnCTpyMeHtbl:
- JIaMIIa IIpoEKTopa (IOIOJIHHTeJIbHO)
VPL-VW570ES: LMP-H280
VPL-VW270ES: LMP-H220 - CtaHapTHaЯ KpeToo6pa3HaЯ OTBepTKa
TkaHb(JIa3aHTbIOTapapanHH)
OctopoxHo
-IOcJIe BbIKJIOUeHn yCtPOIcTBA c HOMOIIbIO KHOIIKN I/ (ON/ STANDBY) JAmIIa ocTaetc rOpAeH. KaCaHHe JAMIIbIMoKTe IIpNBecTn K OxKOry IIaJIbueB.IpeE 3aMeHOJ JAMIIbI IOIOXJInTe KaK MHHMym 1 Yac, YTO6bI DaTb JAMIIe OCTbITb.
He npKacauTecb K IOBepxHocTH IaMIIbI. Pn KaCaHH COtpHTe OTNeAaTKIaJIbUeMBMRKO TKaHbIO.
Co6JIIOJaIte OcO6yIO OCTOpOXHOCTB IIpn 3aMeHe JAmIIbI,ecJIn yCTpOINCTBO yCTaHOBJeHO Ha IIOToJIke.
-ПиЗаме HeJIaMbI yCtpoNcTBA, yCTaHOBJIeHHOHa IIOToJIke, He BCTaBaIte HeIOcpeJCTBcHNO IOI KpbIiKoJIaMbI. Pn ChrTIN IBePiiBlJIaMbI (BHyTpEHHa KpbIIka), cJIeIHTe, YTO6bI OHa He KpyTNJaCb. B CJlyuae B3pbIBaJIaMbI
fpaarmeHTbIMORYTcTaTbIpHUNHO TpaBMbl.
- IIpn H3BJIeueHNN JIaMIIbI yIcprKHNBaNTe ee B rOpN3OHTaJIbHOM IOJIOKeHH, a 3aTeM IIOIHMMITE IIpyMO BBepx. He HaKJOHOte JIaMIIy. EcJIN BO BpeMa H3BJIeueHNN JIaMIIbI IIOJ HaKJOHOM JIaMIIpa3o6bEtC, pa3JIeTaIOUHeecr OCKOJIKN MOrT IIpNCHHTb TpaBMY.
PpMmeyHn
- O6a3aTeJIbHNO HcIOJIb3yIte IJIaMeHbI yKa3aHHYIO JAmNpy IpOeKTopa.
IcIOJIb3OBAHHe JAmII,OTJINuHbIX OT yKa3aHHoJ IaMIIb IIpoeKTopa,MOKeT IIpNBecTH K HeNCIIpaBHOCTN IIpoeKTopa. - BbIKJIOuHaIte yCTPOINCTBOHOTCOeHNHTe Ka6eJIb IITaHnI IpeI3aMcHOJ IaMIbI, y6eINTEcB, YTOHHINKaTOp ON/STANDBY He ropNT.
3aMeHa JAmNbl
1BbIKJIOUHTe IINTaHHe N BbIKJIOUHTe H3 PO3eTKN BNJIky Ka6eJIaIITaHHa IIepMeHHORO TOKa.
2Пи yctaHOBKe ycTPOcTBa Ha IIIOCKoI IOBepxHocTH,HaIIpIMep Ha cTOJIe H T.I.,IIIOJXHTe TKaHB BO I36eKaHHe IIOBJIeHnI ZaapanH Ha IOBepxHocTH. IIIOJXHTe ycTPOcTBO Ha TkaHb.
PpimmeaHne
y6eHITecb, yTO yCTPOINCTBO
pacnoJIOxKeHO Ha yCTOHNBOI
IOBepxHOCHTN.
3IpnHaKaTnHacTN yKa3aHHoHa pncyHKe KpbIIIKN IaMIIbI, cBnHbTe ① nOTKpOHTe KpbIIIKY JaMIIbI ②.
4OcJIa6bTe BnHT IBePbI JaAMIIbI (BHyTpEHHra KpbIIka) KpeCTOO6pa3HOH OTBepTKoH, 3aTeM OTKpOIte JBepu JAmIIbI.


5OcJa6bTe 3 BnHTa Ha JAmIe KpecTOo6pa3HOJ OTBepTKoJ. YIepKINBaJ 3aXIM, H3BJIeKInTe JAmIIy 6e3 IpekeKoca.
PpmeaHn
He ocla6JIaIe npyrne BnHTbI, KpOme 3 yKa3aHHbIX.
- YIepKnBaHTe JAMny 3a 3axm Ipn H3BJIeueHHN UyCTaHOBKe JAmIIbI.
6BCTaBbTe HOByIO JAMIIy,HaJeXHO yIepKHBa 3a 3aXHM,IO KOHua, 3aTeM 3aTaNHTe 3 BnHTa.
Ppimechane
Co6JIIOaIte oCtOpOxHocTb, He IIpHKacaiTec b K OIITHueCKOMy 6JIOKY BHyTpH yCTpoHcTba.
73aKpoITe IBeepuIy JaMIIbI (BHyTppeHHra KpbHIIka), 3aTeM 3aTAHTE BnHT.
83aKpoTe KpbIuKy JaMnbl.
9CoTpHTc IIbJIb C BcHTnJIaHIOHHbIX OTBepCTn (BIIyCKHbIe) MraKoN TKaHbIO.
10BkJIOHTe yCTPOINCTBO,3aTeMBbI6epHT Tpe6yEMbI INJIeMeHTHAcTPOIKNJAMIIbIB MeHOO "HacTPOKA"
OTo6pa3nTc8 cIeNyIOuN 3KpaH.
Cobet
EcIIIJII IapAmEtpa "BIOK.
HAcTpoeK"ycTaHOBJeHO 3HaueHne
"YpOBeHb B",yCTaHOBHTe 3HaueHne
"BbIKJ".
11BbI6epHTe“Ja”.

OctopoxHo
He 3acOBbIbAte pyKn BHyTpB Ia3a, cIyKaIeRo JJIa 3aMeHbI JAmIIbI, H He IOIIyckaTe IIIOIIaHaNb B IIa3 KJIKOcTe HJI INHOpOINbIX IIpeIMeTOB, YTO6bI HCKJIIOuHTb Pnck BO3rOpAHn H IopajEHH eJIeKTPnueckm TOKOM.
PpmeaHnA
- YcTPOHCTBO He BKJIOHTC, IOKa JAMHa He 6yIeT HAnEJKHO yCTaHOBJeHa.
- YcTpoIcTBo He BKJIIOHHTcra, IOKa He 6yJeT HaJExKHO 3aKpbIta KpbIIka JAmIIbI.
- IydaJIeHH coo6Hnna, OTO6paKaemOrHa 3KpaHe, OHOKpaTHO HaKMNTc JIO6yIO KHOIKy Ha IIyIbTe HCTaHIOHOYIpabJIeHH HA IIaHeJIN yIpapBJIeHH ycTPOHCTBa.
PpIMeuaHne OTHOCHTeNbHO 3aMeHbI pa36nToJ lamnbI npu yCTaHOBKe yCTpoiCTBa Ha NotoJIke
EcJH JAMnpa3o6bEtCra, pa3JIeTaIOIIeC8 OCKOJIKN MOryT IIpHuHHtB TpaBMy.
EcJy yctpoCTBO yctaHOHa IOTOJIke,CHMMTe IBepu JAmIIbI (BHyTpeHHra KpbIIka),MeJIeHHO CINHBy ee IO rOpH3OHTaJIN IIIOJHB B OTKpbITOM IOJOKeHN Ha 30 rpaJycob. CJeINTe, YTO6bI DBepua JAmIIbI (BHyTpeHHra KpbIIka) He KpyTHJIacb.
PpimmeaHne
JaMaHa coepKHT pTyTb. IpaBnJa
yTHJIN3aHnN HcIOJIb3OBaHHbIX
JIOMNHecIeHTHBIX JaAM 3aBNCrT OT
MeCTa IIPOXnBaHN. CJEyIte IOJInTHKe
yTHJIN3aHnN OTXoIOB, IIpHMHeMOn B
O6JIaCTH IIPOXnBaHN.
關於快速參考手冊
jlll l bclll jlln 0gall
↑/↓/←→
VPL-VW270ES
oolo
J 1
.(b)
- aalal 1
()
aJ 150
.
1
PATTERN 1
Lens Shift JJJJJ
Jgall
1/1/←/→
wjj 1200!
Josu gusg 1s 00gll s j p3 15
Agsu ooggl ayy (buaa al) aolol
Jg j 100000000000000000000000000000000000000000000000
(ON/STANDBY)
.
3
.aaLaaJg0
1 aowell o

Ooogolololololol
J 1
.8gogg
VPL-VW570ES
.
LENS ADJUSTMENT 1234567890 FOCUS)
↑/↓/←/→
.0gall
LENS ADJUSTMENT 1234567890123456789012345678901234567890123456789012345678901234567890123456789012345678901234567890123456789
1/1/←/→
ooogololoJil
四边形 AOBC 为正方形
a d a a a a a a a a a a a a a a a a a a a
a 1
aolwuljcdwglwgljg jil
Jolly Jg Cblo
SONY
aLl 1 j 1 1 1 1 1 1 1 1 1 1 1 1
yaii 1
jdoLwU Ueua g Jauu Uaolgo jc uul
.
JUgogol no 4KgJgOggo
jU5i.
.100 4 200 25
aJUgogll 0y
a 1
gJ) laa aabgaaal gaaal q no Uogol
()
pblj jgwrll 15
·
.1uyl 1rjI JgJ UdUyI 1rjI LwI
yjg jyj
gai 1suiy i suiiue y
g o gll plu w joo d aaiol j 5
.0Jolal
j 1 j 1 j 1 j 1 j 1 j 1 j 1 j 1 j 1 j 1 j 1 j 1 j 1 j 1 j 1 j 1 j 1 j 1 j 1 j 1 j 1 j 1 j 1 j 1 j 1 j 1 j 1 j 1 j 1 j 1 j 1 j 1 j 1 j 1 j
jlaal afo sglaiu
(gall)aagjclaoyobogll0o jgj gclalol.(gglg)aagjg 1gJgJgJgJgJgJgJgJgJgJgJgJgJgJgJgJgJgJgJgJgJgJgJgJgJgJgJgJgJgJgJgJgJgJgJgJgJgJgJgJgJgJgJgJgJgJgJgJgJgJg
a 100000000000000000000000000000000000000000000000000000000000