
Tower M NGT335 - Fan Vornado - Free user manual and instructions
Find the device manual for free Tower M NGT335 Vornado in PDF.
| Product Type | Tower Fan |
| Brand | Vornado |
| Model | Tower M NGT335 |
| Power Supply | 230 V ~ 50 Hz AC |
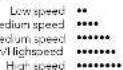
| Speeds | 4 speeds (low, low/medium, medium, high) |
| Timer | Yes, adjustable in one-hour intervals |
| Remote Control | Yes, with CR2032 button cell battery included |
| Oscillation | Yes, Versa Flow adjustment (air direction) |
| Cleaning Method | Vacuum cleaner with brush, soft cloth |
| Removable air intake grille | Yes, for cleaning blades |
| Warranty | 5 years (materials and labor) |
| Remote Control Battery Type | CR2032 3V |
| Dimensions (approx.) | Height approx. 90 cm, round base (see manual) |
| Weight (approx.) | Approximately 4 kg (estimated) |
| Intended Use | Indoor air circulation only |
| Dust Protection | Removable air intake grille for access to blades |
| Repairability | Vornado authorized service center only |
| Safety Instructions | Do not use outdoors, do not immerse, unplug before cleaning |
Frequently Asked Questions - Tower M NGT335 Vornado
User questions about Tower M NGT335 Vornado
0 question about this device. Answer the ones you know or ask your own.
Ask a new question about this device
Download the instructions for your Fan in PDF format for free! Find your manual Tower M NGT335 - Vornado and take your electronic device back in hand. On this page are published all the documents necessary for the use of your device. Tower M NGT335 by Vornado.
USER MANUAL Tower M NGT335 Vornado

models NGT335 & NGT425
WHOLE ROOM TOWER CIRCULATOR OWNER'S GUIDE
we expect this product to be PERFECT
if it's not, WE will make it right
CONTENTS
Important Instructions ....4 Troubleshooting ....14
Features 7 Product Information 15
Getting Started....9 Warranty....16
Controls....9
How To Use 10
RemoteControl....12 Davap p. 7 Labop p. 63 Cwchp 109
Cleaning....13 Nederlands p. 10 Esperto c. 93 Olovsk p. 107
IMPORTANT INSTRUCTIONS READ ALL INSTRUCTIONS BEFORE USING.
This owner's guide and any additional inserts are considered part of the product. They contain important information about safety, use, and disposal. Before using the product, please familiarize yourself with all operating and safety instructions. Please keep all documents for future reference and pass these documents on, together with the product, to any future owner. Please refer to our website for the most current version of our owner's guide.
The following Warning messages are throughout this owners guide:
DANGER
Indicates a hazard with a HIGH level of risk which, if not avoided, will result in death or serious injury. Please pay special attention to any instructions given to avoid this threateningly dangerous risk.
WARNING
Indicates a hazard with a MEDIUM level of risk which, if not avoided, could result in death, serious injury, minor or moderate injury or potential property damage.
IMPORTANT INSTRUCTIONS
Indicates additional information that will assist in the care of handling of the device.
4 English
INTENDED USE: This product is intended to circulate the air in indoor living spaces only. This product is not intended for commercial or industrial uses.
The manufacturer assumes no responsibility for damage caused by failure to follow these instructions or improper product use. Any such actions will invalidate the product warranty.
WARNING When using electrical appliances, basic precautions should always be followed to reduce the risk of fire, electric shock and injury to persons, including the following:
WARNING
Risk from Unintended Use and Handling. Please take care to follow these guidelines to avoid risks to people or property.
Do Not use this product outdoors or directly exposed to weather. Do Not use this device in tropical humid climates. If the product is brought in from the cold to a warm area (e.g., during transport, condensation can occur within the unit. Let the device reach room temperature, before using it.
Do Not use this product on wet surfaces. Do not use this product in a bathtub, shower or locate product where it may fall into a bathtub, laundry, swimming pool or other water containers.
Do Not increase this product in water or allow water to drop into the motor housing.
Do Not use near furnaces, fireplaces, stoves or other high-temperature heat sources.
Do Not position this product too close to diapers or other loose fabrics as they may be drawn into the product, cutting off airflow and
damaging the motor
Do Not carry this product by the cord, or use the cord as a handle as it can damage internal wiring. Do not unplug product by pulling on cord or place the cord under strain. To unplug, grasp the plug, not the power comp.
Do Not run cord under carpeting. Do not cover cord with throw rugs, nurses, or similar coverings. Do not route cord under furniture or appliances. Arrange cord away from traffic area and where it will not be tripped over. To avoid a tripping hazard, safely coil/ator the power cord.
ELECTRICAL CONNECTION: Only a proper 230V -50Hz AC outlet may be used to connect to public power supply.
DANGER
Risk from Electrical Shock. Contact with wires or components that are under voltage could be potentially fatal!
Do Not touch the product with we or camp hands.
Do Not operate any product with a damaged cord or plug or after the product malfunctions, has been dropped or damaged in any manner. Discard product, or return to authorized service facility for examination and/or repair in order to avoid a hazard.
If the supply cord is damaged, it must be replaced by the
manufacturer or its service agent or a similarly qualified person in order to avoid a hazard.
Do Not stretch the power cord or put the cord under strain. Do not insert or allow foreign objects to enter any input or output opening as they may cause risk of electric shock or fire, or damage the product.
▶ Turn off all controls before unplugging. Unplug from wall outlet: if not
in use for extended periods of time.
Do Not open appliance housing. To avoid risk of shock, all service and/or repairs must be done by a Vomaco Authorized Service Center. Only original replacement parts may be used.
For safety reasons, always unplug the unit in the event of a thunderstorm.
WARNING
Risk from Improper Installation. Please take care to follow these guidelines to avoid risks to people or property.
- Ensure that wall power outlet is easily accessible so unit can be discontinued during an emergency.
To reduce the risk of line or electrical shock, do not use this product with any external (solid state) space control device.
To reduce the risk of line or electric shock and injury to persons, do not use in a window.
WARNING
Risk to Children and Other at Risk Groups of People.
This appliance can be used by children aged from 5 years and above and persons with reduced physical, sensory or mental capabilities or lack of experience and knowledge if they have been given supervision or instruction concerning use of the appliance in a safe way and understand the hazards involved.
Children shall not play with the appliance. Cleaning and user maintenance shall not be made by children without supervision.
IMPORTANT INSTRUCTIONS READ ALL INSTRUCTIONS BEFORE USING.
This product, and its packaging material are not toys and should be kept out of reach of children.
Information Regarding the EC Declaration of Conformity
This product conforms with all relevant and necessary EC
irectives, including
Low Voltage Directive (LVD)
- Electromagnetic Compatibility Directive (EMC)
- Energy Related Product Directive (ErP)
- Restriction of Hazardous Substances Directive (RoHSI)
Registration, Evaluation, Authorisation, and Restriction of
Chemicals :REACH
The complete Declaration of Conformity is registered and can be obtained from the Importer.


PACKAGE RECYCLING: The packaging protects the appliance from transport damage. The packaging materials are selected from the point of view of their environmental friendliness and disposal technology and are therefore recyclable.
Dispose of all packaging materials in an environmentally responsible manner.
6 English

WEEE Recycling
Waste Electrical and Electronic Equipment Disposal: This marking indicates that this product should not be disposed with other household wastes throughout the FU. To prevent possible harm to the environment or human health from uncontrolled waste disposal, recycle it responsibly to promote the sustainable reuse of material resources. To return your used device, please use the return and collection systems or contact the retailer where the product was purchased. They can take this product for environmental safe recycling.

Battery Recycling
BATTERY DISPOSAL - Batteries must be disposed of separately from the product and not included in domestic waste. Dispose of all types of batteries through an approved disposal centre or at your community waste facility. Observe the current applicable regulations. In case of doubt, please contact your waste disposal centre.
Every consumer is legally obliged to all batteries and accumulators, regardless of whether they contain harmful substances* or not, to submit to a collection point of the city or of the tracks, so that they can be disposed of in an environmentally sound disposal method.
*Identification Cd - cadmium; Hg - mercury; Pb - lead
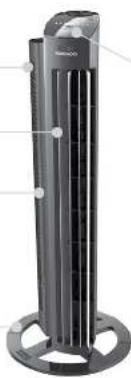
FEATURES
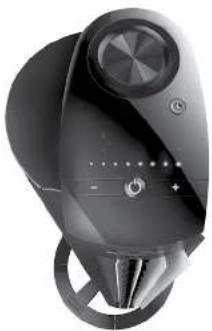
REMOVABLE INLET GRILL For easy cleaning.
VERSA-FLOW™ ADJUSTABLE ANGLE AIRFLOW OUTLET
FINGER-FRIENDLY DESIGN Resists curious fingers.
TOOL-FREE ASSEMBLY Signature assembly for easy selup.
SILICON FEET Non-marking feet added for stability.
natural_image
Exterior view of a tall cylindrical electronic device with internal components and mounting base (no visible text or symbols)TOUCH-SENSITIVE CONTROLS
ENERGY-SAVING TIMER 1-8 hour timer.
MULTIPLE SPEEDS 5 speed settings for every comfort level.
REMOTE CONTROL Convenience at your finger tips.
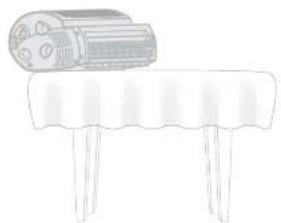
GETTING STARTED
BASE ASSEMBLY
-
Place tower circulator horizontally on a table with soft cloth underneath to avoid scratches. Allow base to extend over edge of table.
-
Insert one leg into any of four recesses underneath the tower. Push leg until it locks into place.
Note: To avoid damage, DO NOT FORCE legs into recessed areas — they should easily click into place.
natural_image
Simple line drawing of a cylindrical object placed on a round table with three legs (no text or symbols)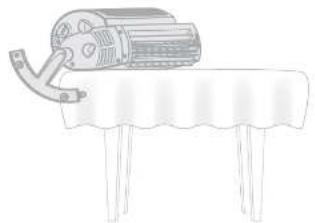
natural_image
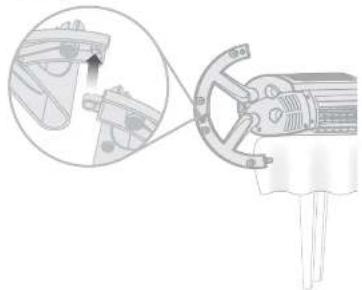
Simple line drawing of a mechanical device on a table with a curved handle (no text or symbols)- Next to previously installed leg, partially insert another leg into a recess on the base. Just before looking into place, connect both legs. Repeat for remaining legs.
Note: You may need to flex the legs to get the last of the legs to interlock.
natural_image
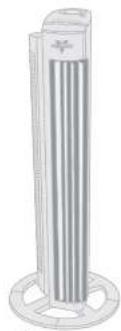
Technical illustration of a mechanical clamp or bracket assembly with an inset close-up showing internal components (no text or symbols)- Base assembly is complete. Position tower circulator upright to begin use
natural_image
Illustration of a vertical cylindrical device with a base, showing internal vertical bars and a small cross symbol (no text or labels)8 English
Fngid- 9
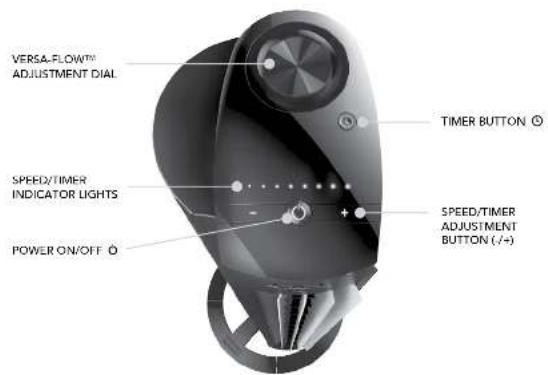
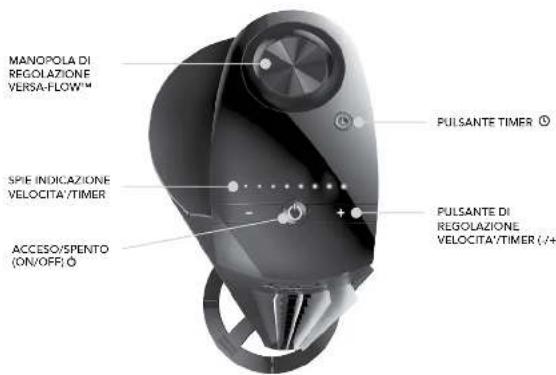
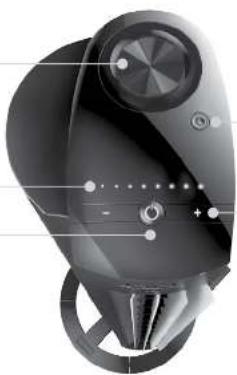
CONTROLS
10 Fugles
HOW TO USE
Before use, check appliance for visible damage. DO NOT USE THIS TOWER if there is evidence of damage. If any damage is found, refer to back page for your Authorized Service Center.
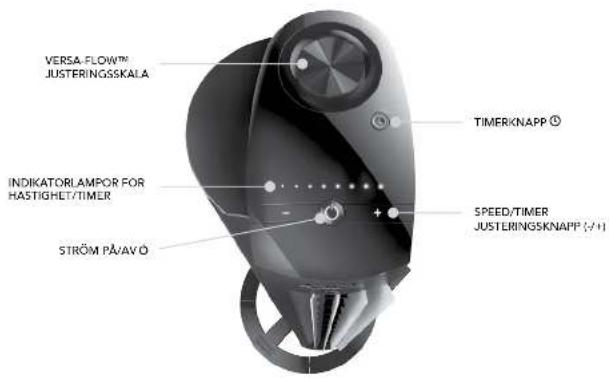
- Touch Ⓧ to power on.
- Select desired speed by pressing -1. Speed is indicated by number of lights illuminated:
Note: The display will dim after 3 seconds of inactivity.
- Rotate Verse-Flow Adjustment Knob in either direction to adjust angle of airflow.
- Press Ⓐ to activate timer. The Ⓐ and Indicator Lights will turn orange to indicate timer adjustment mode. While in this mode, select amount of time in one-hour intervals by pressing Ⓐ OR /+. After a few seconds, the flashing orange
natural_image
Close-up of a modern, sleek, black electronic device with circular ports and a central knob (no visible text or symbols)Indicator Lights will turn white, indicating you have left timer adjustment mode.
Note: The display will dim after 3 seconds of inactivity.
The ⑨ will continue to glow orange to indicate the timer is set. Touch the ⑨ to quickly tell you how many hours are remaining on the timer.
5. To adjust timer, press until indicator lights flash orange. Then press OR /+ to select new timer setting.
6. To cancel timer, press and hold for 4 seconds or press until all eight indicators lights are illuminated, then press once more. All the lights will illuminate white, indicating the timer is off.
English 11
REMOTE CONTROL
Screwdriver required.

Your tower circulator remote includes (1) coin style 3V CR2032 battery. Battery comes pre-installed. Remove battery pull tab before first use.
-
For battery replacement, the remote requires one coin style 3V CR2032 battery. Always use the correct size and grade of battery for this product.
-
To replace battery, open battery door on the back side of the remote control (you will need to loosen the small screw on door using a 41 Phillips screwdriver). If necessary, clean the battery contacts and also those of the device prior to battery installation. Remove any plastic protection from the battery and place it in the remote with the side facing out. Ensure the battery is installed correctly with regard to polarity. Replace the battery door and screw.
Note: Remove battery from the remote control when not in use for an extended period of time and always remove dead battery immediately and replace with fresh. Do not store dead battery in remote.
12 English
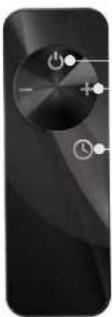
POWER
SPEED/TIMER
ADJUSTMENT -/+
The remote control functions are the same as the control panel on the tower.
The remote requires a line-of-sight path to allow for the signal to be received by the tower. Position the tower so the receiver lens inside the Vornado "V" ogol is visible from the remote control.
TIMER
CLEANING
Because your tower moves a substantial amount of air, it will need regular cleaning. Never clean the products in any manner other than instructed in this owner's guide. If service is required, refer to back page for your Authorized Service Center.
WARNING
Observe the following safety information to avoid risks and property damage.
To reduce the risk of electrical shock and injury to persons, unplug the tower before cleaning.
REGULAR CLEANING
-
Unplug tower before cleaning.
-
Use the brush attachment on your household vacuum cleaner to vacuum any accumulated dust off the tower.
-
Wipe down the entire tower with a soft cloth.
Note: Do not use gasoline, thinners, solvents or other chemicals for cleaning. The motor is permanently lubricated and requires no oiling.
INTENSIVE CLEANING
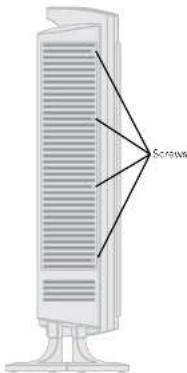
AIR INLET GRILL REMOVAL
Screwdriver required. You may remove the Air Inlet Grill to vacuum any dust off the fan blade by following these instructions:
-
Unplug tower before cleaning
-
Use a Phillips screwdriver to loosen the 4 screws located along front edge of grill.
- Rotate from edge of grill backward until grill is removed.
- Use the brush attachment on vacuum cleaner to remove any accumulated dust off the fan blade.
- Replace Air Inlet Grill and tighten screws.
TROUBLESHOOTING
POSSIBLE CAUSE AND SOLUTIONPROBLEM
| The unit fails to power on. | Unit is not plugged in. Plug Power Cord into electrical outlet.Ensure unit fan speed setting is selected.Unit is damaged or in need of repair. Cause usage and unplug. Contact Consumer Service for assistance.The outlet is worn or damaged. Try another outlet or contact a qualified electrician. |
| Airflow is weak or slow. | Unit set to a low speed setting. Adjust to a higher speed setting.Airflow is blocked. Remove obstruction.Adjust direction of airflow toward the user. |
| GFCI has tripped. | Under certain conditions, it is possible for a reset (Ground Fault Circuit interrupter) GFCI outlet to trip when the user is changing speeds on a Vornado circulator. In this event, change to an outlet that is not connected to a GFCI device. It could also indicate a weak or defective GFCI outlet. Contact a qualified electrician to check the GFCI outlets. |
| Remote control is not working. | The battery is closed. Replace with now 3 volt CR2032 battery. (Refer to REMOFT CONTROL.)The remote requires a line of sight path to allow for the signal to be received by the unit. Position the unit so the receiver lens (inside the Vornado "V" logo) is visible from the remote control. |
14 English
PRODUCT INFORMATION
| Modeled | RUI (100 x 24) | C-45 X1 | ||
| Descriptor Symbol Unit Value Value | ||||
| Input Voltage v 220 240 220 240 | ||||
| Main Voltage Precipation = 50 50 | ||||
| Protection Class | Class | H/11X2 | H/13X2 | |
| Dimensions | W × H×D × Max | 27.8 × 27.9v × 12.6 | 13.6 × 53.6v × 10.2 | |
| Weight | Ampson, (g) | 4,037 | 4,627 | |
| Fan Power Input | F | Watts (W) | 57.72 | |
| Maximum Fan Power Rate | F | mV/m | 10.21 | 16.79 |
| Service Value | SV | m^3/min (W) | 0.2 | 0.23 |
| Standby Power Consumption | R_in | Watts (W) | 0.39 | 0.36 |
| Limited Sound Level | L_max | dJ/Al | 59.97 | 61.31 |
| Maximum Air Volatility | c | m/scc | 3.43 | 3.81 |
| Measurement Standards For Service Value | IFC 63879: 1986 cm(1992)GQI 110909 2073 | |||
| Contact Details For Obtaining More information | Vornado Air LLC415 Lost U9 StreetArrow, KS 67602 USA | |||

WARRANTY
We expect this product to be perfect. If you're not satisfied with this product, let us know.
Warranty and repair terms and conditions
You will receive a voluntary five-year manufacture me's warranty from close of purchase on materials and workmanship of the product.
The manufacturer assumes no responsibility for damage caused by failure to follow these instructions or improper product use. Any such actions will invalidate the product warranty.
This warranty does not apply to defects resulting from abuse of the Product, modification, alteration, repair or service of the Product by anyone other. Than Vomucan or an Authorized Service Care at mid-reading, improper maintenance commercial use of the Product, damages which occur in shipment or are at that level to act of God.
Any unauthorized product modification, repair by unauthorized repair center, or use of non-approved replacement parts is not recommended and any consequences will not be covered by support services or product warranties.
Exclusions are damages through inappropriate use or use of the product. not according to the manual. For example, but not limited to: If the product
is exposed to wetness, extreme temperatures, environmental conditions, corrosion, oxidation, if liquids are spilled over the device, if chemical substances impact the product or through other incidents that are not within the reasonable range of influence of the manufacturer.
Fremecruiile for processing in the service department is the submission of a receipt or an invoice.
All technical information, data and instructions for the installation, connection and operation contained in these instructions for use correspond to the latest available information at true of printing.
The contents of this manual may differ slightly from the actual product. Observe any additional supplements.
All company names and product names are trademarks of their respective owners. All rights reserved.
Refer to Warranty Certificate and back page for Importer Information and your Authorized Service Center.

Designed, engineered and supportive in USA
© 2016 Vermont Air LLC Avenue, KS 6/2022 U.S. Patent pending specifications subject to change without notice. Vermont is a trademark case by Vermont, NJ LLC.
16 Fugles
- Low Voltage Directive (LVD)
natural_image
Exterior view of a tall cylindrical electronic device with radial slots and a base (no visible text or symbols)BERÜHRUNGSEMPFINDLICHE BEDIENELEMENTE
natural_image
Simple line drawing of a table with a cylindrical object on top (no text or symbols)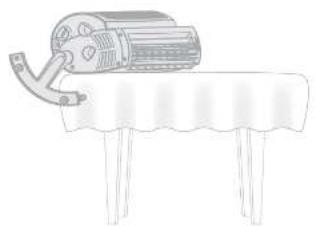
natural_image
Line drawing of a mechanical device on a table with a curved handle (no text or symbols)natural_image
Mechanical assembly diagram showing a cam and lever mechanism with a magnified inset view (no text or symbols)natural_image
Illustration of a vertical cylindrical object with a base, resembling a stylized lamp or stand (no text or symbols visible)Deutsch25Deals
STEUERUNG
natural_image
Modern black and white electronic device with circular ports and a speaker grille (no visible text or symbols)natural_image
Diagram of a vertical cylindrical device with internal ventilation slots and a base, showing no text or symbols.INTENSIVE REINIGUNG
natural_image
Simple line drawing of a table with a cylindrical object on top (no text or symbols)
natural_image
Line drawing of a mechanical device on a table with a curved handle (no text or symbols)natural_image
Mechanical assembly diagram showing a lever mechanism with a magnified inset view of the component (no text or symbols present)natural_image
Illustration of a vertical cylindrical object with three circular bases and a central top, resembling a stylized lamp or stand (no text or symbols visible)40
Furigale 41
COMMANDES
42 Барсат
UTILISATION
natural_image
Modern black and white device with circular top and circular base, no visible text or symbolsCAUSE POSSIBLE ET SOLUTIONPROBLÈME
| Modulator: | ||||
| Description | Symbols | Unit Value | EUR Value | |
| Lention date V | 220.240 | 28.240 | ||
| Proportion of the source | Hz | 50.20 | ||
| Classie de protect or class | 11/1P/O | 1/P/O | ||
| Dimensions | Wx 1 x 5 -m | 37.9 x 37.9 x 37.6 | 136.0 x 136.0 x 107.3 | |
| Putte Approx. (g) | 4.037 | 4.627 | ||
| Amplitude of current conductivity | F | Watts (W) | 52.72 | |
| Erducture and pressure decrease | F | mV/m | 0.21 | 16.79 |
| Values of conductivity | SV | C/mW/W | 0.2 | 0.23 |
| Concentration during a mass ratio | F_sc | Watts (W) | 0.30 | 0.36 |
| Niveau sensor limits | L_sc | dJ/V | 29.07 | 61.31 |
| Vacuum mass-solicular fluid | c | molar | 3.43 | 3.61 |
Figure 47

GARANTIE
Identificate Cd-cadmium; Hg-kwK; Pb-lood
EIGENSCHAPPEN

natural_image
Simple line drawing of a cylindrical object placed on a table with three legs (no text or symbols)
natural_image
Line drawing of a mechanical device on a table with a curved handle (no text or symbols)natural_image
Technical diagram of a mechanical clamp or bracket assembly with an inset showing a close-up view of the component (no text or symbols present)natural_image
Illustration of a vertical cylindrical device with a base, no text or symbols visibleKonzernic 547-160
BEDIENINGSELEMENTEN
GEBRUIK
natural_image
Modern black and white electronic device with a circular top and control panel (no visible text or symbols)natural_image
Diagram of a vertical cylindrical device with internal grating and a base, showing no text or symbols.INTENSIEVE REINIGING
natural_image
Simple line drawing of a table with a cylindrical object on top (no text or symbols)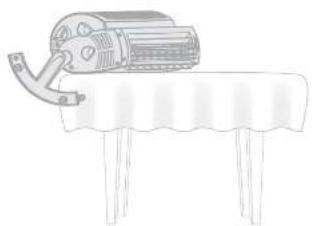
natural_image
Simple line drawing of a mechanical device on a table with a curved handle (no text or symbols)[Unreadable]
natural_image
Diagram showing a mechanical component being inserted into a housing, with an inset close-up highlighting the detail (no text or symbols present)natural_image
Illustration of a tall cylindrical object with vertical stripes and a circular base (no text or symbols)COMANDI
taisem721tion
COME UTILIZZARE
natural_image
Black and white photo of a modern vacuum cleaner with circular head and control knob (no visible text or symbols)PULIZIA INTENSIVA
I know the progress when we have been going to USA
- Low Voltage Directive (LVO)
- Electromagnetic Compatibility Directive (EMC)
- Energy Related Product Directive [LIP]
- Restriction of Hazardous Substances Directive (RoHS) - Registration, Evaluation, Authorisation, and Restriction of Chemicals (REACH)
Portugain 24 Forting
natural_image
Simple line drawing of a table with a rolled-up cylindrical object on top (no text or symbols)
natural_image
Line drawing of a mechanical device on a table with a curved handle (no text or symbols)natural_image
Technical illustration of a mechanical clamp or bracket assembly with an inset close-up showing internal components (no text or symbols)natural_image
Illustration of a vertical cylindrical device with a base, showing internal vertical bars and a circular top (no text or symbols)Portuguese
CONTROLES

COMO USAR
natural_image
Modern black and white device with circular head and circular base, no visible text or symbolsnatural_image
Diagram of a vertical computer tower with ventilation grilles and a base, showing no text or symbols.Parafusos
LIMPEZA PESADA
CAUSA POSSÍVEL E SOLUÇÃO PROBLEMA
The Ground Truth image displays a single, solid horizontal line. According to Rule 2 (UNDERSCORE & LINE RULES), this is a stylistic or background line, not a placeholder underscore. Therefore, the OCR result must ignore it and output nothing or only meaningful text. The provided OCR content is "____", which consists of four underscores. This is an incorrect interpretation of the line as a placeholder, violating the rule that stylistic lines must be ignored. The OCR has hallucinated placeholder underscores where none exist in the GT. Hence, the OCR result is inconsistent with the Ground Truth.
ADVERTENCIA
natural_image
Simple line drawing of a cylindrical object placed on a table with three legs (no text or symbols)102 Square

natural_image
Line drawing of a mechanical device on a table with a curved handle (no text or symbols)natural_image
Technical illustration of a mechanical device with a close-up inset showing internal components (no text or symbols)natural_image
Illustration of a vertical cylindrical object with a base, resembling a stylized tower or lamp (no text or symbols visible)Eqw:100
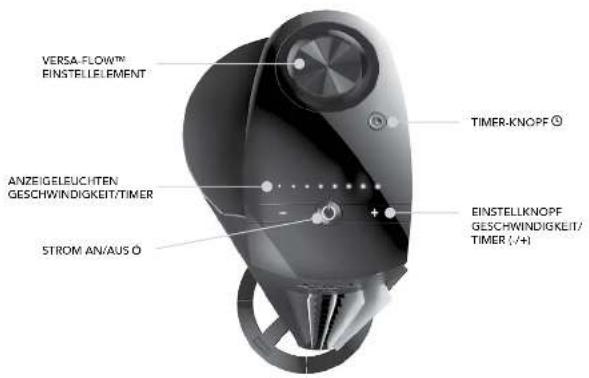
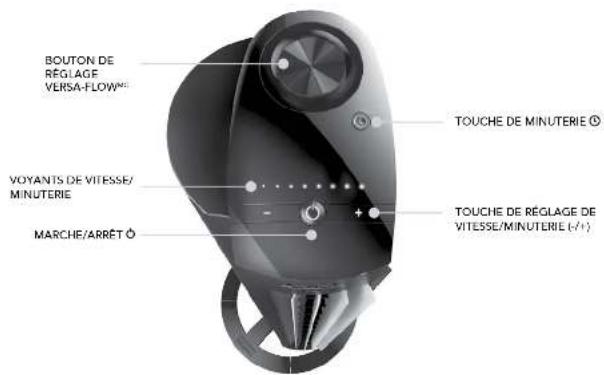
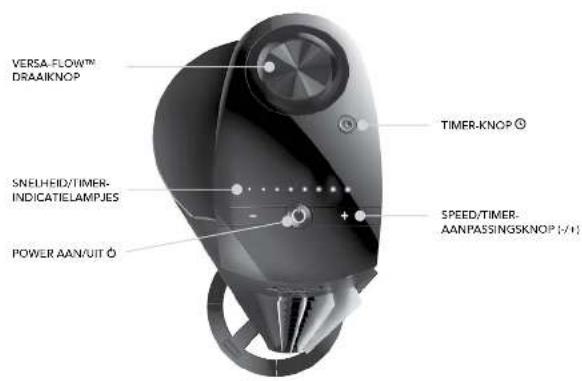
CONTROLES
DIAL DE AJUSTE VERSA-FLOW™
LUCES INDICADORAS DE VELOCIDAD/TEMPORIZADOR
ENCENDIDO/APAGADO
natural_image
Close-up of a black, futuristic electronic device with no visible text or symbolsBOTÓN TEMPORIZADOR
natural_image
Modern black and white device with circular ports and a speaker icon (no visible text or symbols)natural_image
Two simple line drawings of a motor on a table, one with a roller and the other with a handle (no text or symbols)Cnch1162Cnch
natural_image
Mechanical assembly diagram showing a clamp mechanism with a magnified inset view (no text or symbols)natural_image
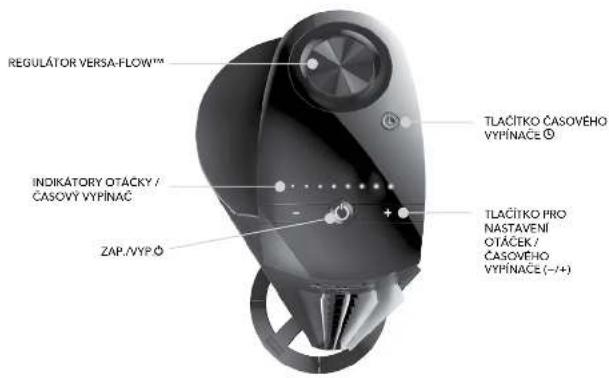
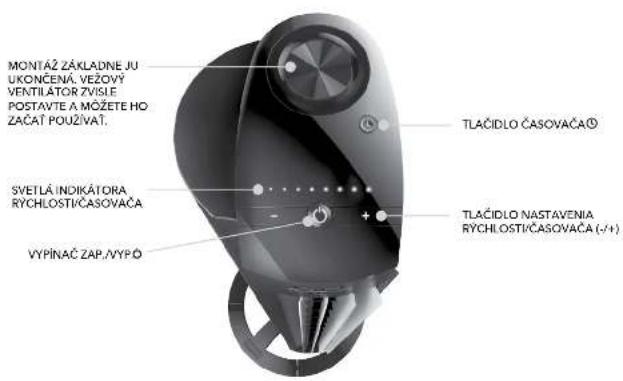
Illustration of a tall cylindrical object with vertical stripes and a flanged base (no text or symbols)OVLÁDACÍ PRVKY
Cnch1104Ch
ZPŮSOB POUŽÍVÁNÍ
natural_image
Top-down view of a black handheld device with circular ports and a plus button, no visible text or symbols.INFORMACE O PRODUKTECH
natural_image
Simple line drawing of a cylindrical object placed on a flat table with three legs (no text or symbols)
natural_image
Line drawing of a mechanical device on a table with a curved handle (no text or symbols)natural_image
Technical illustration of a mechanical clamp or bracket assembly with an inset close-up showing internal components (no text or symbols)natural_image
Illustration of a vertical cylindrical device with a base, showing internal vertical bars and a circular top (no text or symbols)Iamid 1325000
KONTROLLER
ANVÄNDNING
natural_image
Close-up of a modern black handheld device with circular head and control knob (no visible text or symbols)natural_image
Illustration of a tall vertical tower with horizontal slats and a base, showing internal structure without any text or symbols.Skruvarra
KRAFTIG RENGÖRING
Jawshad, berzerwered as underhalten USA.
© 2016 Vornado Air LLC and/or, KS 64020 J.S. patentakti. Specializations bar: anders utan (oregjende medde kinde. Vornado® Arct ser umöhe som Siga av Vornado Air LLC.
očakávame, že tento produkt je DOKONALÝ
natural_image
Exterior view of a tall cylindrical electronic device with mounting base (no visible text or symbols)OVLÁDANIE CITLIVÉ NA DOTYK
ČASOVAČ ŠETRIACI ENERGIU
natural_image
Simple line drawing of a table with a cylindrical object on top (no text or symbols)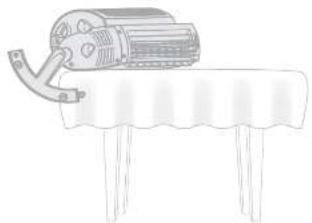
natural_image
Simple line drawing of a motor on a table with a curved handle (no text or symbols)Swedien1497kmok
natural_image
Technical illustration of a mechanical clamp or bracket assembly with an inset close-up showing a component detail (no text or symbols present)natural_image
Illustration of a tall cylindrical object with vertical stripes and a circular base (no text or symbols)OVLÁDACIE PRVKY
Svensien1486lmsk
POUŽÍVANIE
natural_image
Close-up of a modern, sleek mechanical device with circular and ring features (no visible text or symbols)natural_image
Illustration of a vertical computer tower with ventilation grilles and a base, showing no text or symbols.INTENZÍVNE ČISTENIE
INFORMÁCIE O PRODUKTE
| MauliKg | 50.000 € | 90.482 € | ||
| Cysis Syblos, antecosia Handan | Hormate | |||
| Vapere napole | ¥ 220 | 40 229 240 | ||
| Frostrucia aculechna napalu | -16.50 | |||
| Triadne noreg | Class II | 1 PBO 17800 | ||
| Roznaya | Wk+D m | 79,4 27,5 - 60,3 | 33,0 x 35,0 x 29,3 | |
| Himostat | Apurna (p) | 4.027 | 4.627 | |
| Vapere cytoe sanitilosis | P | Wata (W) | 57,72 | |
| Maximary pialeni | P | m/min | 10,31 | 15,72 |
| Austria megacchi podiatu | SV | m/min/W | 0,2 | 0,23 |
| Sodnala perovomem varie | Pa | Wata (W) | 0,39 | 0,36 |
| Handin cypanenella truda | Lce | 20(A) | 29,07 | 61,31 |
| Maximaria spichka/veduha | c.m.p.s. | 3,4 | 3,3 | |
| Vermes na metapachony, macrobiologii edilmert | IPC 66870, 1084 cm (1997) SBU 72336 2007 | |||
| Kontazinal daje na zastane accrobeplich informati | Vernado Air LLC 410 Last 12th Street Aldwier, KS 67302 USA | |||

ZÁRUKA
- WHOLE ROOM TOWER CIRCULATOR OWNER'S GUIDE
- we expect this product to be PERFECT
- if it's not, WE will make it right
- CONTENTS
- IMPORTANT INSTRUCTIONS READ ALL INSTRUCTIONS BEFORE USING.
- DANGER
- WARNING
- IMPORTANT INSTRUCTIONS
- Information Regarding the EC Declaration of Conformity
- WEEE Recycling
- Battery Recycling
- FEATURES
- GETTING STARTED
- BASE ASSEMBLY
- CONTROLS
- HOW TO USE
- REMOTE CONTROL
- CLEANING
- REGULAR CLEANING
- INTENSIVE CLEANING
- AIR INLET GRILL REMOVAL
- TROUBLESHOOTING
- PRODUCT INFORMATION
- WARRANTY
- STEUERUNG
- INTENSIVE REINIGUNG
- COMMANDES
- UTILISATION
- GARANTIE
- EIGENSCHAPPEN
- GEBRUIK
- INTENSIEVE REINIGING
- COMANDI
- COME UTILIZZARE
- PULIZIA INTENSIVA
- CONTROLES
- COMO USAR
- LIMPEZA PESADA
- CAUSA POSSÍVEL E SOLUÇÃO PROBLEMA
- ADVERTENCIA
- OVLÁDACÍ PRVKY
- ZPŮSOB POUŽÍVÁNÍ
- INFORMACE O PRODUKTECH
- KONTROLLER
- ANVÄNDNING
- KRAFTIG RENGÖRING
- OVLÁDACIE PRVKY
- POUŽÍVANIE
- INTENZÍVNE ČISTENIE
- INFORMÁCIE O PRODUKTE
- ZÁRUKA
Brand : Vornado
Model : Tower M NGT335
Category : Fan