
ETM1005 - Electric stapler Ferm - Free user manual and instructions
Find the device manual for free ETM1005 Ferm in PDF.

| Product type | Cordless electric stapler |
| Brand | Ferm |
| Model | ETM1005 |
| Power supply | Li-ion battery 3.6 V, 1.5 Ah |
| Charger | Input 100-240 V~50/60 Hz, output 5 V DC 1 A |
| Charging time | 1 hour |
| Firing rate | 30 shots per minute |
| Compatible staples | Type 530, length 6-12 mm |
| Weight | 0.79 kg |
| Sound pressure (Lpa) | 80.73 dB(A), uncertainty 3 dB |
| Sound power (Lwa) | 91.73 dB(A), uncertainty 3 dB |
| Vibration level | 2.628 m/s² |
| Intended use | Fastening fabrics, wood, cardboard, wire mesh, leather; upholstery, packaging, shoe repair |
| Safety instructions | Do not point at yourself or others, always assume the tool is loaded, disconnect before clearing jams, do not use in rain, wear safety glasses |
| Maintenance and cleaning | Clean the housing with a soft cloth and soapy water; do not use solvents |
| Repairability | Repairs by a qualified technician; spare parts available via customer service |
| Warranty | Conditions according to the provided warranty certificate |
| Package contents | Stapler, charger, user manual, safety instructions, warranty card |
| Environmental information | Do not dispose of with household waste; recycle according to WEEE directive |
Frequently Asked Questions - ETM1005 Ferm
User questions about ETM1005 Ferm
0 question about this device. Answer the ones you know or ask your own.
Ask a new question about this device
Download the instructions for your Electric stapler in PDF format for free! Find your manual ETM1005 - Ferm and take your electronic device back in hand. On this page are published all the documents necessary for the use of your device. ETM1005 by Ferm.
USER MANUAL ETM1005 Ferm
Thank you for buying this Ferm product.
By doing so you now have an excellent product, delivered by one of Europe's leading suppliers. All products delivered to you by Ferm are manufactured according to the highest standards of performance and safety. As part of our philosophy we also provide an excellent customer service, backed by our comprehensive Warranty. We hope you will enjoy using this product for many years to come.
The numbers in the text refer to the diagrams on page 2.

Read the operating instructions carefully before using this device. Familiarize yourself with its functions and basic operation. Service the device as per the instructions to ensure that it always functions properly. The operating instructions and the accompanying documentation must be kept in the vicinity of the device.
Introduction
The tacker enables you to fasten various materials, such as fabric, wood, gauze, cardboard and leather. Therefore, the tool is suitable to upholstery furniture, to wrap objects or to repair shoes.
Contents
1.Machinedata
2.Safetyinstructions
3.Use
4.Maintenance
1. MACHINE DATA
Technical specifications
| Charger | ETA1011 |
| Input of charger 100-240V~ 50/60Hz 0.2A | |
| Output of charger 5V DC 1A | |
| Rechargeable battery 3,6 V Li-ion 1.5 Ah | |
| Battery charging time 1 hour | |
| Number of staples 30/min. | |
| Staples U type 530 6-12mm | |
| Weight 0.79 kg | |
| Lpa (sound pressure) 80.73+3 dB(A) | |
| Lwa (sound power) 91.73+3 dB(A) | |
| Vibration value 2.628+1,5 m/s | |
Vibration level
The vibration emission level stated in this instruction manual has been measured in accordance with a standardised test given in EN 60745; it may be used to compare one tool with another and as a preliminary assessment of exposure to vibration when using the tool for the applications mentioned
- using the tool for different applications, or with different or poorly maintained accessories, may significantly increase the exposure level
- the times when the tool is switched off or when it is running but not actually doing the job, may significantly reduce the exposure level
Protect yourself against the effects of vibration by maintaining the tool and its accessories, keeping your hands warm, and organizing your work patterns
Lithium-Ion technology
The batteries provided with this machine have Lithium-Ion technology.

One advantage of using Lithium-lon batteries is that, until the battery is almost empty, hardly power fading is noticeable. The machine can be used until you start noticing that the power of the drill is elapsed. The battery is discharged now and needs to be charged.

Another advantage is that Lithium-1on batteries have no memory effect.
Therefore they can be charged at any moment without degrading, independent of the charging state of the battery.
Contents of packing
1Tacker
1Manual
1Guaranteecard
1 Charger
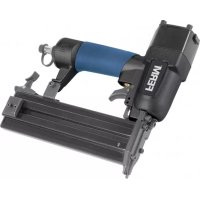
Features
Fig. 1
1On/offswitch
2Slide
3Cartridgesgaft
4Triggerswitch
2. SAFETY INSTRUCTIONS
Explanation of the symbols

Read the user manual.

Denotes risk of personal injury, loss of life or damage to the tool in case of non-observation of the instructions in this manual.

Risk of electric shock

Do not use in rain

Indoor use only

Class II machine - Double insulation - You don't need any earthed plug.

Do not dispose of the product in unsuitable containers.

Separate collection for Li-ion battery.

The product is in accordance with the applicable safety standards in the European directives.
Specific safety instructions
Battery tool use and care
a) Recharge only with the charger specified by the manufacturer. A charger that is suitable for one type of battery pack may create a risk of fire when used with another battery pack.
b) Use power tools only with specifically designated battery packs. Use of any other battery packs may create a risk of injury and fire.
c) When battery pack is not in use, keep it away from other metal objects, like paper clips, coins, keys, nails, screws or other small metal objects, that can make a connection from one terminal to another. Shorting the battery terminals together may cause burns or a fire.
d) Under abusive conditions, liquid may be ejected from the battery; avoid contact. If contact accidentally occurs, flush with water. If liquid contacts eyes, additionally seek medical help. Liquid ejected from the battery may cause irritation or burns.
Service
a) Have your power tool serviced by a qualified repair person using only identical replacement parts. This will ensure that the safety of the power tool is maintained.
For the charger
Intended use
Charge only 3.6V max.1.5Ah Li-ion type rechargeable battery packs. Other types of batteries may burst causing personal injury and damage.
a) The appliance is not to be used by persons (including children) with reduced physical, sensory or mental capabilities, or lack of
experience and knowledge, unless they have been given supervision or instruction
b) Children being supervised not to play with the appliance
c) Do not recharging non-rechargeable batteries!
d) During charging, batteries must be placed in the well ventilated area!
Before using the tacker
Always wear eye protection when using the tool.
- Maintain the tool with care.
- Check for misalignment or binding of moving parts, breakage of parts, and any other condition that may affect the tools operation. If damaged, have the tool serviced before using.
- Check if the slide cartridge has been fastened properly.
- Do not use the tool in a humid environment.
- Do not use the tool on materials containing asbestos.
Using the tool
- Do not use the tool if the switch does not turn it "ON" or "OFF".
Replacing cables or plugs
Immediately throw away old cables or plugs when they have been replaced by new ones. It is dangerous to insert the plug of a loose cable in the wall outlet.

Remove all staples from the magazine after each use
3. USE

The machine must be charged before first use.
Charging the machine (with the charger adaptor)
Fig.B
The machine can be charged by the charger adapter or by your USB mobile phone charger.
If needed, connect the USB cable to the charger adaptor by pushing its USB plug in the charger adaptor's USB socket.
Plug the small cable plug into the machine's
charging socket.
- Plug the charger into an electrical outlet and wait for a while. The LED indicator on the machine will lighten up and show the charging status.
Charging the machine (on a USB socket) Fig. C
If needed, remove the USB cable from the charger adaptor by pulling it out of the USB socket.
Plug the small cable plug into the machine's charging socket.
Plug the cable USB plug into USB device (for example on your mobile phone charger).
Make sure the USB device is powered or switched on.
- Check charging status by checking if the charging indicator light on the machine is burning.
Charging indication light
Fig.A
The machine has a charging indication light which indicates the status of the charging process:
| LED color Status | |
| Red Battery | charging in progress |
| Green Battery | charging finished, battery fully charged |
After the battery is fully charged remove the charger plug from the outlet and remove the cable from the machine.

Lithium-Ion cells can be stored for a long period without losing much of their charge. When the machine is not being used over a longer period of time it is best to store the battery in charged condition.
Application
Fig. 2
For this tool, use one of the following types staples:
U Type 530:6-12 mm
Loading the tacker

Before opening the tool, make sure the tool is switched off.
To load the tacker
Fig. 3-4
- Carefully remove the staple from the tool with a thin object (for example a knife).

Repairs and servicing should only be carried out by a qualified technician or service firm.
Replacing staples
- Press the slide unlock (2) to unlock the slide.
Pull the slide out of the machine - Place the staples (fig. 4) in the cartridge
- Push the slide back in the machine.
- Lock the slide by sliding the slide forward until it locks into place.
Cleaning
Regularly clean the device's casing with a soft cloth, preferably after each use. Keep the fan slits free of dust and dirt. Remove tough dirt using a soft cloth, dampened with soapy water. Do not use solvents such as benzene, alcohol, ammonia, etc., which might damage the plastic parts.
Using the tacker
- Press the On/Off switch (1) to switch the machine on
- Press the On/Off switch (1) to switch the machine off.
- Place the tool on workpiece at the spot where the staple should be located.
Press the tool down firmly.
Press the switch (4).
Defects
If a defect appears due to a part wearing out, please contact the service center on the warranty card. At the end of these instructions there is an exploded view of the parts that can be ordered.

The tool will cause a re bound because of the force it operates with. Keep this in mind.
4. MAINTENANCE

Make sure that the machine is not live when carrying out maintenance work on the motor.
This machine has been designed to operate over a long period of time with a minimum of maintenance. Continuous satisfactory operation depends upon proper machine care and regular cleaning.
Malfunction
Should the machine fail to function correctly, a number of possible causes and the appropriate solutions are given below:
In case a staple is jammed in the tool, follow the procedure below
- Switch off the tool
ENVIRONMENT
To prevent damage during transport, the appliance is delivered in a solid packaging which consists largely of reusable material. Therefore please make use of options for recycling the packaging.

Damaged and/or disposed of electrical or electronic devices must be dropped off at recycling stations intended for that purpose.
Only for EC countries
Do not dispose of power tools into domestic waste. According to the European Guideline 2012/19/EU for Waste Electrical and Electronic Equipment and its implementation into national right, power tools that are no longer usable must be collected separately and disposed of in an environmentally friendly way.
WARRANTY
Read the warranty conditions on the separately supplied warranty card.
Our company policy is aimed at the constant improvement of our products and we reserve the right to change the product specification without prior notification.
3.6V ELEKTRO TACKER ETM1005
- Thank you for buying this Ferm product.
- The numbers in the text refer to the diagrams on page 2.
- Introduction
- Contents
- MACHINE DATA
- Technical specifications
- Vibration level
- Lithium-Ion technology
- Contents of packing
- Features
- SAFETY INSTRUCTIONS
- Explanation of the symbols
- Specific safety instructions
- Battery tool use and care
- Service
- For the charger
- Intended use
- Before using the tacker
- Using the tool
- Replacing cables or plugs
- Remove all staples from the magazine after each use
- USE
- The machine must be charged before first use.
- Charging the machine (with the charger adaptor)
- Fig.B
- Charging the machine (on a USB socket) Fig. C
- Charging indication light
- Fig.A
- Application
- Fig. 2
- Loading the tacker
- To load the tacker
- Fig. 3-4
- Replacing staples
- Cleaning
- Using the tacker
- Defects
- MAINTENANCE
- Malfunction
- ENVIRONMENT
- Only for EC countries
- WARRANTY
- 3.6V ELEKTRO TACKER ETM1005
Brand : Ferm
Model : ETM1005
Category : Electric stapler