
ATM1044 - Electric stapler Ferm - Free user manual and instructions
Find the device manual for free ATM1044 Ferm in PDF.

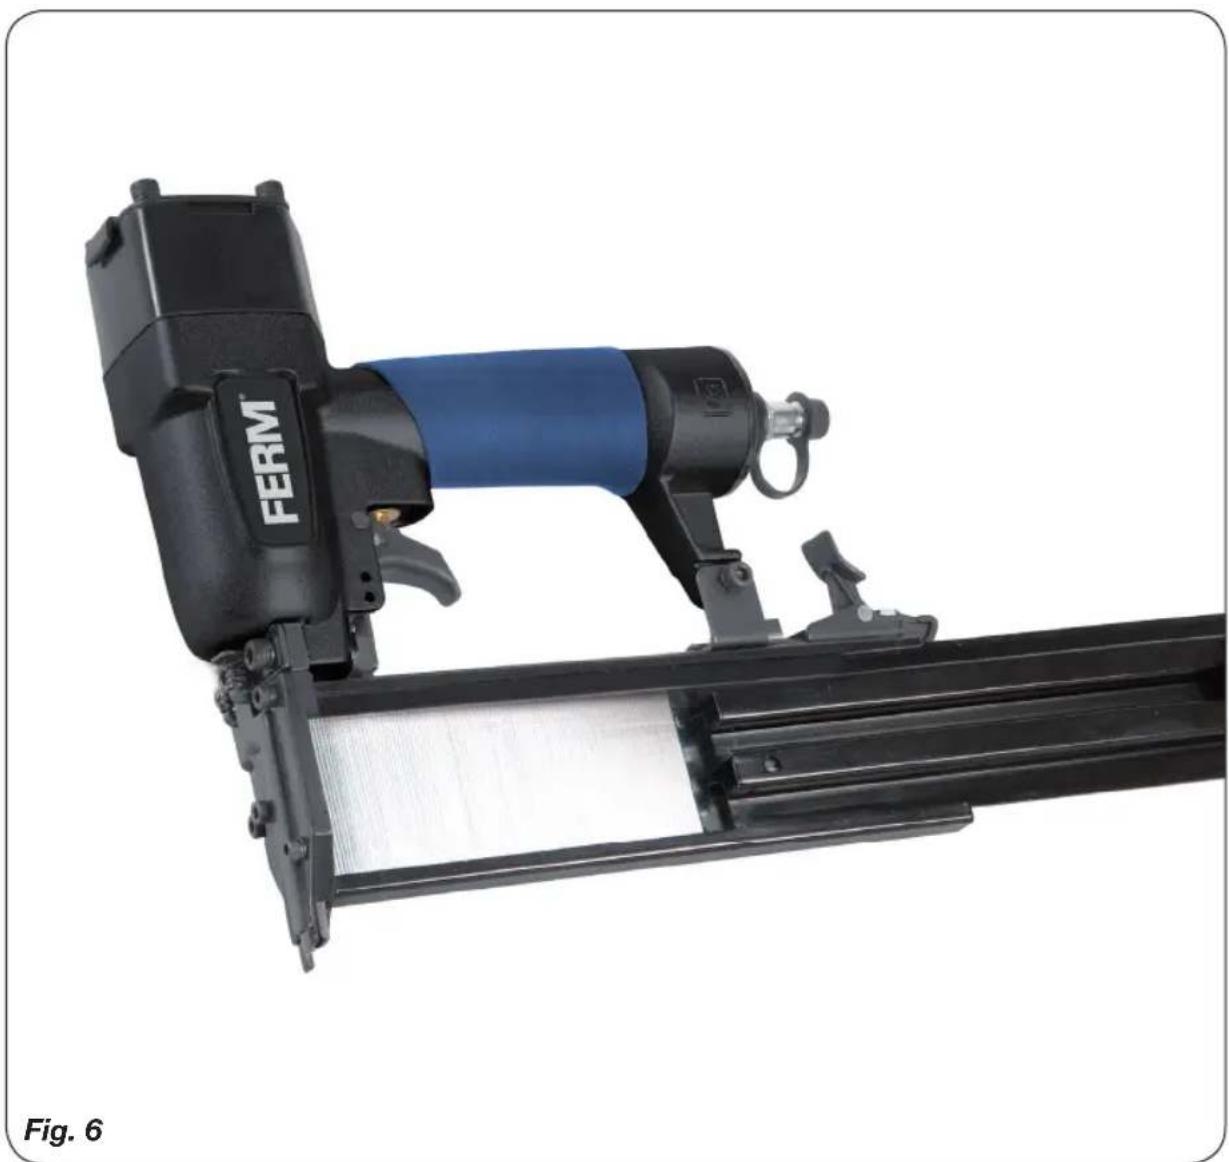
| Product type | Pneumatic stapler |
| Brand | Ferm |
| Model | ATM1044 |
| Use | Fastening assemblies (nails and staples) |
| Operating pressure | 4-7 bar (60-100 psi) |
| Maximum assembly size | 1.25 x 1.05 x 50 mm |
| Sound pressure level (Lpa) | 88+3 dB(A) |
| Sound power level (Lwa) | 101+3 dB(A) |
| Vibration value | 3.7+1.5 m/s² |
| Power supply | Compressed air (do not use oxygen or flammable gas) |
| Lubrication | Pneumatic tool oil (Mobil Velocite #10 or equivalent) |
| Maintenance | Clean and lubricate regularly, check O-rings |
| Safety | Wear safety glasses, disconnect air before maintenance, do not point at people |
| Package contents | 1 stapler, 1 oil bottle, fasteners 20/30/50 mm, 1 DIN fitting, manual, warranty card |
| Weight | Approximately 1.2 kg |
| Dimensions (L x W x H) | Approximately 250 x 200 x 80 mm |
| Connection type | QD fitting (quick detachable) |
| Operating temperature | Do not exceed 25°C continuously, avoid frost |
| Warranty | See enclosed warranty card |
Frequently Asked Questions - ATM1044 Ferm
User questions about ATM1044 Ferm
0 question about this device. Answer the ones you know or ask your own.
Ask a new question about this device
Download the instructions for your Electric stapler in PDF format for free! Find your manual ATM1044 - Ferm and take your electronic device back in hand. On this page are published all the documents necessary for the use of your device. ATM1044 by Ferm.
USER MANUAL ATM1044 Ferm
natural_image
Fermis(Ferm) airship with blue internal component and black housing (no visible text or symbols)ATM1044
EN Original instructions 04
DE Übersetzung der Originalbetriebsanleitung 10
NL Vertaling van de oorspronkelijke gebruiksaanwijzing 17
FR Traduction de la notice originale 23
HU Eredeti használati utasítás fordítása 29
CS Tłumaczenie instrukcji oryginalnej 35
LT Originalios instrukcijos vertimas 42
LV Instrukciju tulkojums no oriğinälvalodas 48
natural_image
Fermis® nitrated machine with blue internal component, labeled FERM, shown in black and white (no text or symbols on the device itself)AIR NAILER, 50mm
Thank you for buying this Ferm product.
By doing so you now have an excellent product, delivered by one of Europe's leading suppliers. All products delivered to you by Ferm are manufactured according to the highest standards of performance and safety. As part of our philosophy we also provide an excellent customer service, backed by our comprehensive 3 Year Warranty. We hope you will enjoy using this product for many years to come.
The numbers in the following text correspond with the pictures at pages 2-3

Read this manual carefully, before using the machine. Ensure that you know how the machine works, and how it should be operated. Maintain the machine in accordance with the instructions, and make certain that the machine functions correctly. Store this manual and other enclosed documentation with the machine.
Contents
- Technical specifications
- Safety instructions
- Air supply and connections
- Loading the air nailer
- Operating the air nailer
- Maintaining the air nailer
1. TECHNICAL SPECIFICATIONS
Air pressure 4-7 bar (60-100 psi)
Max. nail size 1.25x1.05x50 mm
Lpa (sound pressure level) 88+3 dB(A)
Lwa (sound power level) 101+3 dB(A)
Vibration value 3.7+1,5 m/s2
Protect yourself against the effects of vibration by maintaining the tool and its accessories, keeping your hands warm, and organizing your work patterns
Package contents
1 Air nailer
1 Bottle machine oil
1 Strip fasteners 20 mm
1 Strip fasteners 30 mm
1 Strip fasteners 50 mm
1 Instructions for Use
1 Warranty card
2. SAFETY INSTRUCTIONS
Explanation of the symbols

Indicates potential for bodily harm, fatality or risk of damaging the machine, in the event that the instructions in this operator's guide are ignored.

Always disconnect the air hose when carrying out maintenance work.

Wear ear and eye protection

Lubricate the appliance
Note carefully the following supplementary points for safe operation of the air nailer, as well as the other cautions in these instructions for use.
- Use the air nailer solely for the purpose for which it was intended.
- Never use the air nailer in a way that could lead to a fastener being fired at the user or bystanders.
- Do not use the air nailer as a hammer.
- The air nailer should only be carried by the handgrip. Never carry the air nailer by the air hose.
- Never make any unauthorised changes or modifications to the design or the function of the air nailer.
- At all times, be aware that incorrect use can lead to serious injury to yourself and others.
- Never leave the air nailer unattended with a connected air hose.
- Never use the air nailer whenever there is no legible warning label affixed to the appliance.
Special safety instructions for air tools and compressors
- For proper operation of the machine with a full continuous load under maximum operating pressure, please make sure that the temperature of the working environment in an enclosed area is not more than +25°C.
- It is recommended to use the compressor with a maximum operation of 70% in one hour under full load, to allow for proper operation of the product over time.
- Check that the tank is fully decompressed before connections with the tank are unscrewed.
- It is prohibited to make holes in, or welds to, or purposely to distort the compressed air tank.
- Do not perform any actions on the compressor without first having taken the plug out of the plug socket.
- Do not aim water jets or jets of flammable liquids at the compressor.
- Do not place flammable objects near the compressor.
- Switch the pressure regulator to the "0" position (OFF) during dwell time.
- Never aim the air jet at persons or animals.
- Do not transport the compressor with the tank pressurised.
- N.B.: some parts of the compressor such as the head and the feed-through pipes may reach high temperatures. Do not touch these parts to avoid burns. Transport the compressor by lifting it or by using the special grips or handles.
- Children and animals should be kept far away from the area of operation of the machine.
- If you use the compressor to spray paint:
a) Do not work in enclosed spaces or near naked flames.
b) Make sure that the environment in which you will be working has dedicated ventilation.
c) Protect your nose and mouth with a dedicated mask. - Do not use the compressor when the electrical cable or the plug is damaged, and instruct an authorised Support Service to replace them with an original part.
- When the compressor is placed on a surface higher than the floor, it should be secured to prevent it from falling down during operation.
- Do not put objects or your hands in the
protective covers to avoid physical damage and damage to the compressor.
- Do not use the compressor as a blunt instrument against persons, objects or animals in order to prevent serious damage.
- If the compressor is no longer in use, always take the plug out of the plug socket.
- Always make sure that compressed-air hoses are used for compressed air and which are characterised by a maximum pressure adjusted to that of the compressor. Do not try to repair the hose if it is damaged.
3. AIR SUPPLY AND CONNECTIONS

Never use any oxygen, inflammable gases or compressed air from gas bottles to supply pressure to this appliance, due to the hazard of explosion and the potential for serious injury.
Quick-detachable couplings
Connect an air hose to the appliance using a QD (quick-detachable) coupling. The QD coupling also disengages the air pressure from the tool when it is disconnected.
Air hoses
Air hoses should be able to sustain a working pressure of at least 10 Bar. The air supply hose should be equipped with a QD coupling to enable “quick uncoupling” from the air nailer.
Compressed air
Only use clean, regulated compressed air for this tool.
Pressure regulator
For safe operation of the air nailer, a pressure regulator with an operating range of 4-7 Bar is required for regulation of the working pressure. Do not connect the air nailer to an air pressure that might possibly exceed 10 Bar, as this may cause damage to the air nailer, and could also result in injuries.
Operating pressure
Never exceed the recommended maximum pressure, as this will cause a substantial increase
in the rate of wear. The air supply must be sufficient to maintain the appliance's working pressure. Should the pressure diminish, the driving power of the air nailer will be reduced. See "TECHNICAL SPECIFICATIONS" for the correct working pressure of the air nailer.
Oil and water separator
Dirt and water in the air supply are the main cause of wear on pneumatic tools. An oil and water separator will help to ensure clean air pressure for the best performance and least wear on the air nailer. The oil and water separator must be regularly tapped off, in order to function effectively in supplying clean air pressure to the tool.
Consult the manufacturer's instructions for the correct maintenance of the oil and water separator. A contaminated and blocked filter will cause a reduction in the pressure, which will negatively influence the performance of the air nailer.
4. LOADING THE AIR NAILER

When in use, always wear eye protection that meets the ANSI specifications, and offers protection both in front and at the sides from flying objects when loading, operating and maintaining the air nailer. Flying fasteners and splinters can cause severe injury.
Remark: Glasses without side shield and face protector do not offer sufficient protection.
Loading with fasteners
Fig.5
- Disconnect the air hose.
- Release the fastener latch and withdraw this along the fastener guide unit.
- Insert 1 fastener strip into the magazine.
- Press the fastener guide unit back into the magazine, and lock the fastener latch.
- Reconnect the air hose to the air nailer.
When in use, always wear eye protection that meets the ANSI specifications, and offers protection both in front and at the sides from flying objects when loading, operating and maintaining the air nailer. Flying fasteners and splinters can cause severe injury.
Before using the air nailer
- Read the general safety instructions and warnings in these instructions for use carefully.
- Refer to the specifications earlier in these instructions for the correct operating conditions for the air nailer.

Make sure the nailer is lubricated properly before using it the first time.
Basic operation of the air nailer
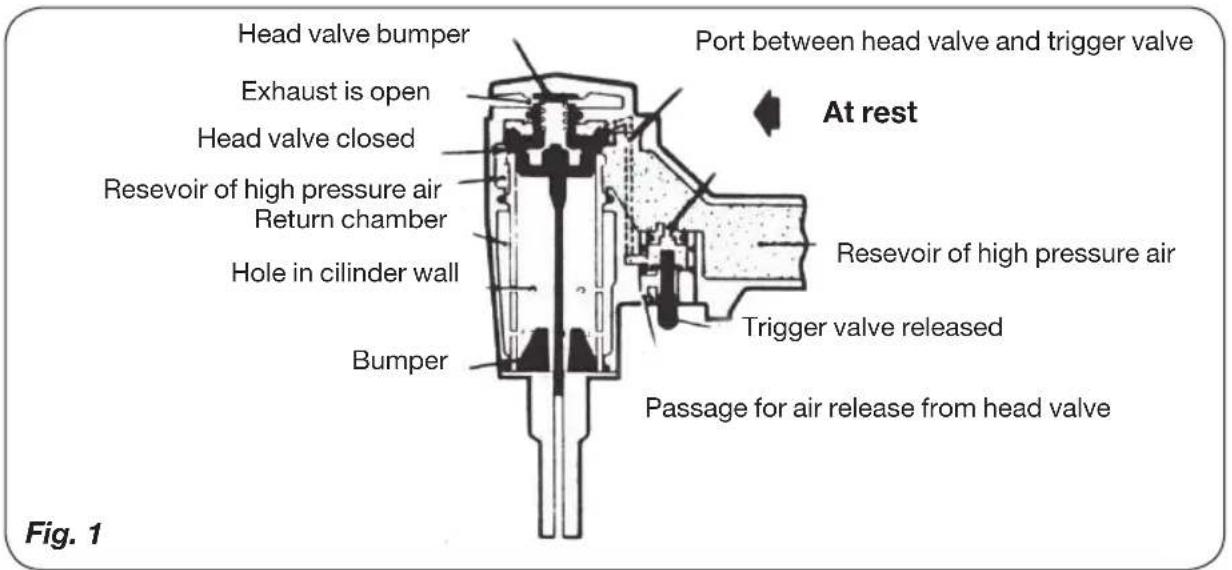
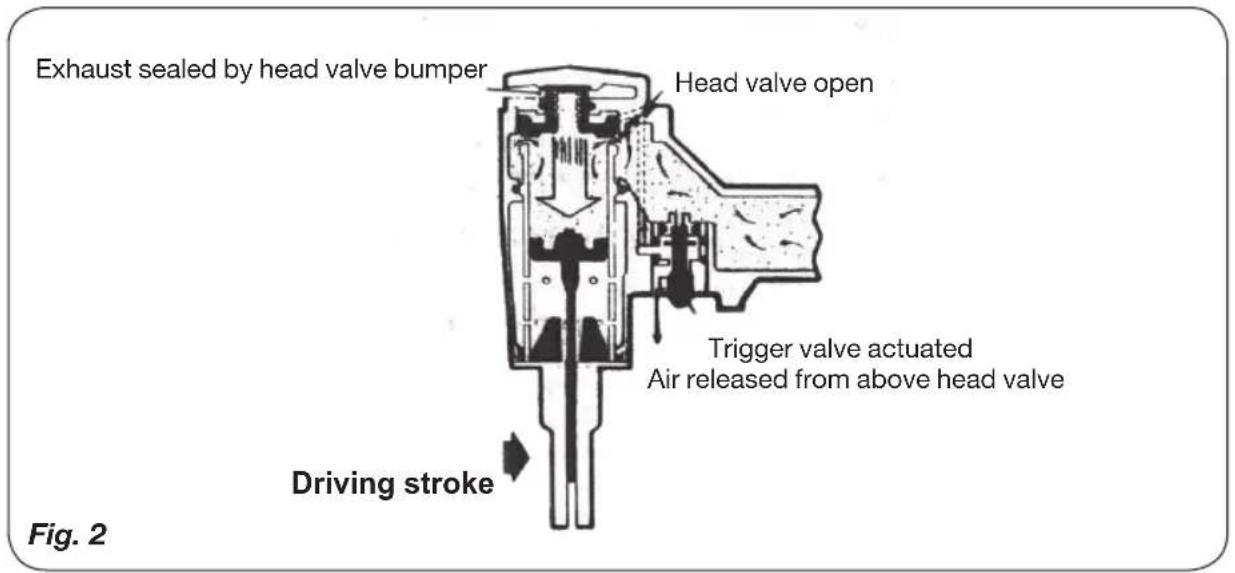
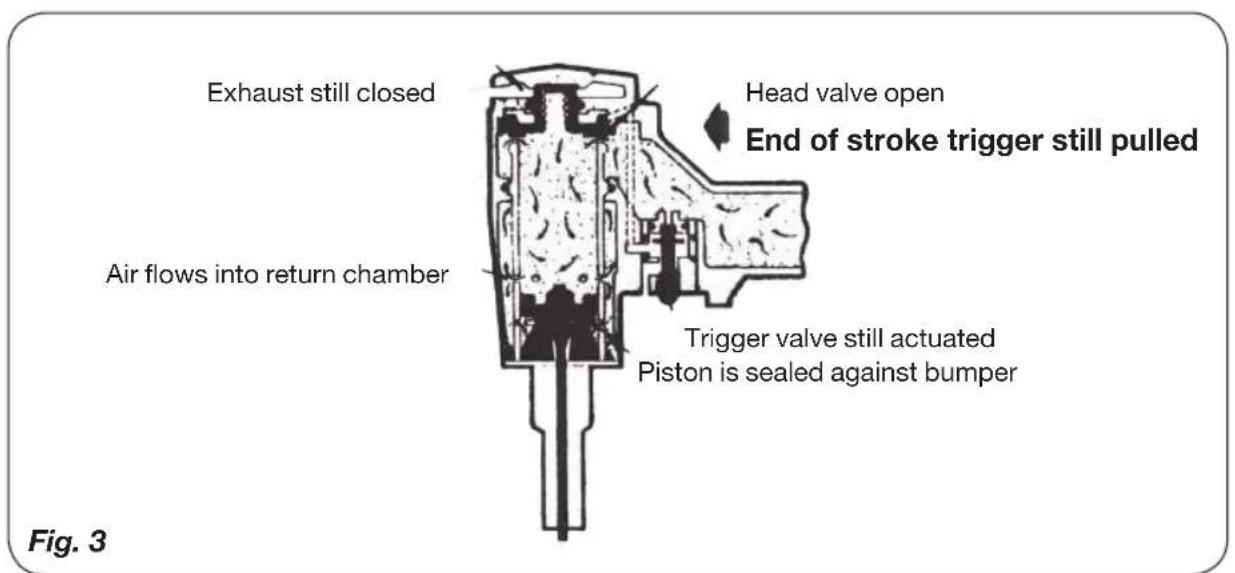
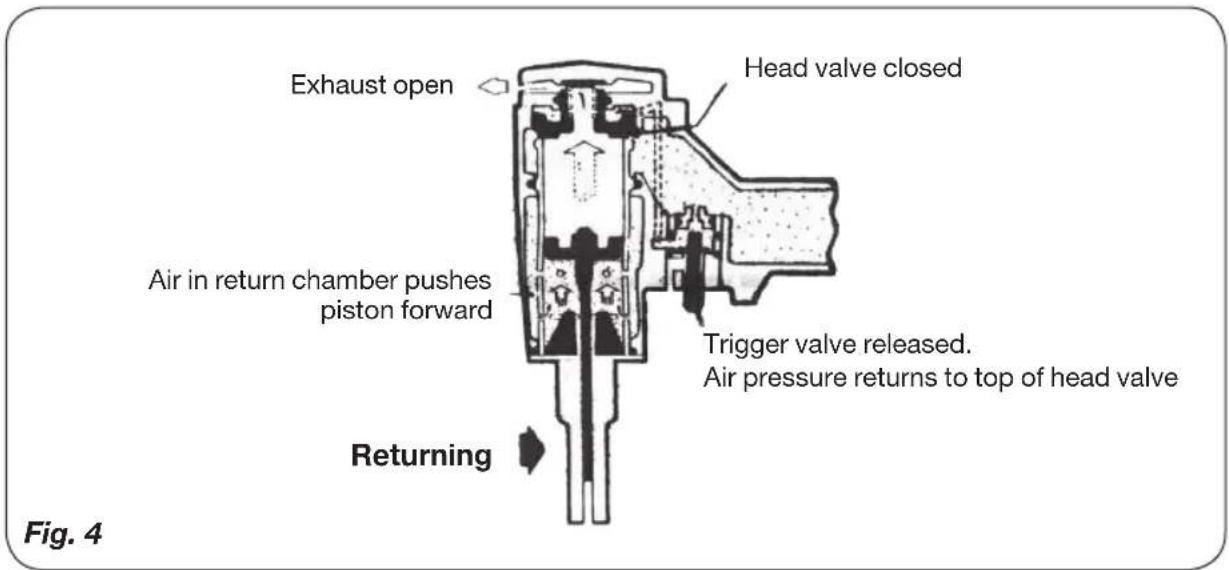
Fig.1 - 4
A piston powered by compressed air drives the air nailer. Illustrations 1-4 on page 2 + 3 show how the air nailer works.
Operating
Activated by a trigger
Pressing the trigger activates the air nailer. Every time the trigger is pressed, the air nailer will drive a fastener into the workpiece.

Keep your hands well clear of the fastener head. On no account should you point the air nailer at any person or animal.
Removing blocked nails

Before attempting to clear a jammed nail, make sure that the air nail gun is disconnected from the air supply.
To clear a jammed nail, proceed as follows.
- Follow the compressor procedure to switch off and release the air pressure.
- Disconnect the air supply hose.
- Press and hold the magazine release lever.
- Slide the magazine cover back and remove the nails in the magazine.
- The jammed nail should then release.
If the jammed nail does not release, proceed as follows.
- With the magazine cover open, loosen the three hexagonal headed screws (A).
Do not remove them!
Slide the striker cover forward and remove from the front of the air nail gun.
- Pull the jammed nail out with a pair of pliers or similar tool, if necessary.
- Replace the striker cover, slide it back and tighten the hexagonal headed screws on the front of the driver housing.
Checking operation of the air nailer

Remove all fasteners from the air nailer before you perform a check.
- Hold the tool firmly by the handgrip, without your finger on the trigger.
- Set the fastener head of the tool against the work surface.
- Press the trigger so that the hammer pin emerges. Release the trigger and the cycle is complete.

Every time the trigger is pressed, the air nailer will make a complete cycle.
6. MAINTAINING THE AIR NAILER

Whenever performing maintenance on the air nailer, pay attention to the warnings given in these instructions for use, and be extra cautious when troubleshooting problems with the air nailer.
Replacing parts
Original parts are recommended when replacement of parts is necessary. Do not use any alternative parts that cannot perform as well as the original parts in the appliance.
Troubleshooting
-
Trigger valve housing leaking air.
-
O-ring cracked or broken.
-ReplaceO-ring. -
Trigger valve pin leaking air.
-
O-ring or seals cracked or broken.
-ReplaceO-ring/seals. -
Frame, fastener head leaking air.
-
Loosen the screws in the fastener head.
• Re-tighten and check again. - O-ring cracked or broken.
-ReplaceO-ring. -
Pistoncracked/worn.
-Replacepiston. -
Frame, head leaking air.
-
Crackedgasket.
-Replacegasket. - Cracked/worn piston head valve.
-Replacepiston. -
Loosen the screws in the head.
• Re-tighten and check again. -
Nailer fails to drive fasteners.
-
Driving pin does not fully return to rest position.
-
Squirt a little light oil (WD-40 /sewing machine oil) into the air input connector of the nailer. Fire the nailer a few times with an unloaded magazine. The driving pin will now run freely and the problem is solved.
-
The air nailer is "dead".
• Air supply insufficient.
- Check the mains air supply /compressor.
• Machine is dry, insufficient lubrication.
- Apply lubricating oil for pneumatic tools.
- Worn O-rings in head valve.
-ReplaceO-rings.
• Broken cylinder spring.
- Replace cylinder spring.
• Head valve stuck in head.
•Disassemble/Check/Lubricate.
- Lack of driving power.
• Machine is dry, insufficient lubrication.
- Apply lubricating oil for pneumatic tools.
- Broken spring in cylinder head.
- Replace head spring.
- O-ring or seals cracked or broken.
-ReplaceO-ring/seals. - Jammed fastener head.
- Check the piston, head valve spring.
- Trigger assembly worn/leaky.
- Replace trigger assembly.
- Dirt and grease accumulated in drive assembly.
- Disassemble fastener head/drive assembly and clean it.
- Cylinder case not correctly mounted on lower piston.
• Disassemble, and reassemble correctly. - Head valve dry.
• Disassemble and lubricate.
• Insufficient working pressure.
- Check the mains air supply / compressor.
8. Skipping nails, intermittent feed.
•Wornpiston.
-Replacepiston.
- Dirt and grease accumulated in drive assembly.
- Disassemble fastener head/ drive assembly and clean it.
- Restricted air supply, insufficient airflow through coupling.
- Replace the quick-detachable the quick-detachable coupling.
- Worn piston O-ring.
- Replace O-ring, check drive assembly.
• Machine is dry, insufficient lubrication.
- Apply lubricating oil for pneumatic tools.
• Damaged magazine feed pressure spring.
- Replacespring.
- Low air pressure.
- Check air supply to the tool.
- Fasteners too short for this tool.
- Only use specified fasteners.
•Bentfasteners.
- Cease using these fasteners.
- Incorrect size fasteners.
- Only use specified fasteners.
- Leaky head gasket.
- Tighten the screws / replace the gasket.
- Trigger valve O-ring cracked/worn.
-ReplaceO-ring. - Broken drive pin.
- Replace the drive pin (check piston O-ring).
- Dry, dirty magazine.
• Clean, lubricate using oil for pneumatic
tools.
•Wornmagazine.
- Replace the magazine.
- Fastener guide worn.
- Replace the magazine.
- Incorrect size fasteners.
- Only use specified fasteners of the correct size.
•Bentfasteners.
- Cease using these fasteners.
- Broken drive pin.
- Replace the drive pin.
Working practice when preforming maintenance
Whenever you are repairing the air nailer, take care to clean and lubricate the internal parts. Use Parker "O-Lube" or similar on all O-rings. Coat all O-rings with O-Lube before reassembling.
Apply oil lightly to all moving surfaces and pins. Finally, following complete assembly, squirt a few drops of pneumatic tool lubricant into the air input fitting, before commencing testing.
Air pressure and volume
Air volume is just as important as air pressure. The air volume that is delivered to the air nailer may be insufficient due to defective couplings and crimped hoses, or through the effect of contamination and water in the system.
The consequence of a restricted airflow is that the air nailer receives an inadequate air volume, even though the air pressure reading is high. This will lead to defective operation, through reduced driving power. Before you begin with troubleshooting, you should first inspect the path from compressor to air nailer for restricted connections, twisted hoses and anything else that might prevent sufficient air from flowing to the appliance.
Lubrication
Frequent, but not excessive, lubrication is essential for optimum functioning. Oil injected from an oil mist lubricator will lubricate the internal parts continuously. Use a lubricant for pneumatic tools, Mobil Velocite #10, or equivalent. Use no cleaning oil or additives, as these lubricants can cause accelerated wear of seals and edges in the appliance, resulting in a poor performance and frequent maintenance of the tool.

Please use Airline Lubricating Oil into the air inlet on the handle of the Airnailer.
When there is no oil mist lubricator available, add oil via the QD coupling once or twice a day, while using. Just a few droplets of oil each time is sufficient. Excessive oil will simply accumulate in the appliance, which will become noticeable when tacking.
Use during cold weather
With operation during cold weather, close to or below freezing point, moisture in the air pipeline can freeze, making use of the appliance impossible. We recommend the use of a special winter lubricant for pneumatic tools, or the permanent use of antifreeze (glycol) as lubricant when the temperatures are low.
Avoid storing the tool in a cold environment, to prevent frost or ice formation on the operating valves and mechanisms, which might cause malfunction of the appliance.
Remark: Some commercial dehydrating fluids for air pipelines are harmful to O-rings and seals. Do not use these desiccants for low temperatures without being certain of compatibility.
ENVIRONMENT
To prevent damage in transit, the machine is delivered in sturdy protective packaging. The packaging is, as much as possible, made from recycled materials. Therefore, take every possible step to recycle the packaging.
WARRANTY
For the conditions of warranty, please refer to the separately provided warranty card.
DRUCKLUFT-Nagelmaschine, 50mm
CE
DECLARATION OF CONFORMITY ATM1044 - PNEUMATIC TACKER
(EN) We declare under our sole responsibility that this product is in conformity with directive 2011/65/EU of the European parliament and of the council of 9 June on the restriction of the use of certain hazardous substances in electrical and electronic equipment is in conformity and accordance with the following standards and regulations:
(DE) Der Hersteller erklärt eigenverantwortlich, dass dieses Produkt der Direktive 2011/65/EU des Europäischen Parlaments und des Rats vom 8. Juni 2011 über die Einschränkung der Anwendung von bestimmten gefährlichen Stoffen in elektrischen und elektronischen Geräten entspricht, den folgenden Standards und Vorschriften entspricht:
(NL) Wij verklaren onder onze volledige verantwoordelijkheid dat dit product voldoet aan de conform Richtlijn 2011/65/EU van het Europees Parlement en de Raad van 8 juni 2011 betreffende beperking van het gebruik van bepaalde gevaarlijke stoffen in elektrische en elektronische apparatuur en in overeenstem ming is met de volgende standaarden en reguleringen:
(FR) Nous déclarons sous notre seule responsabilité que ce produit est conforme aux standards et directives suivants: est conforme à la Directive 2011/65/EU du Parlement Européen et du Conseil du 8 juin 2011 concernant la limitation d'usage de certaines substances dangereuses dans l'équipement électrique et électronique.
(ES) Declaramos bajo nuestra exclusiva responsabilidad que este producto cumple con las siguientes normas y estándares de funcionamiento: se encuentra conforme con la Directiva 2011/65/UE del Parlamento Europeo y del Consejo de 8 de junio de 2011 sobre la restricción del uso de determinadas sustancias peligrosas en los equipos eléctricos y electrónicos.
(PT) Declaramos por nossa total responsabilidade de que este produto está em conformidade e cumpre as normas e regulamentações que se seguem: está em conformidade com a Directiva 2011/65/EU do Parlamento Europeu e com o Conselho de 8 de Junho de 2011 no que respeita à restrição de utilização de determinadas substâncias perigosas existentes em equipamento eléctrico e electrónico.
(IT) Dichiariamo, sotto la nostra responsabilità, che questo prodotto è conforme alle normative e ai regolamenti seguenti: è conforme alla Direttiva 2011/65/UE del Parlamento Europeo e del Consiglio dell'8 giugno 2011 sulla limitazione dell'uso di determinate sostanze pericolose nelle apparecchiature elettriche ed elettroniche.
(SV) Vi garanterar på eget ansvar att denna produkt uppfyller och följer följande standarder och bestämmelser: uppfyller direktiv 2011/65/EU från Europeiska parlamentet och EG-rådet från den 8 juni 2011 om begränsningen av användning av farliga substanser i elektrisk och elektronisk utrustning.
(FI) Vakuutamme yksinomaan omalla vastuullamme, että tämä tuote täyttää seuraavat standardit ja säädökset: täyttää Euroopan parlamentin ja neuvoston 8. kesäkuuta 2011 päivätyn direktiivin 2011/65/EU vaatimukset koskien vaarallisten aineiden käytön rajoitusta sähkö- ja elektronisissa laitteissa.
(NO) Vi erklærer under vårt eget ansvar at dette produktet er i samsvar med følgende standarder og regler: er i samsvar med EU-direktivet 2011/65/EU fra Europa-parlamentet og Europa-rådet, pr. 8 juni 2011, om begrensning i bruken av visse farlige stoffer i elektrisk og elektronisk utstyr.
(DA) Vi erklærer under eget ansvar, at dette produkt er i overensstemmelse med følgende standarder og bestemmelser: er i overensstemmelse med direktiv 2011/65/EU fra Europa-Parlamentet og Rådet af 8. juni 2011 om begrænsning af anvendelsen af visse farlige stoffer i elektrisk og elektronisk udstyr.
(HU) Felelősségünk teljes tudatában kijelentjük, hogy ez a termék teljes mértékben megfelel az alábbi szabványoknak és előírásoknak: je v souladu se směrnící 2011/65/EU Evropského parlamentu a Rady EU ze dne 8. června 2011, která se týká omezení použití určitých nebezpečných lálek v elektrických a elektronických zařízeních.
(CS) Na naši vlastní zodpovědnost prohlašujeme, že je tento výrobek v souladu s následujícími standardy a normami: Je v súlade s normou 2011/65/EÚ Európskeho parlamentu a Rady z 8. júna 2011 týkajúcej sa obmedzenia používania určitých nebezpečných látok v elektrickom a elektronickom vybavení.

- ATM1044
- AIR NAILER, 50mm
- Thank you for buying this Ferm product.
- The numbers in the following text correspond with the pictures at pages 2-3
- Contents
- TECHNICAL SPECIFICATIONS
- Package contents
- SAFETY INSTRUCTIONS
- Explanation of the symbols
- Special safety instructions for air tools and compressors
- AIR SUPPLY AND CONNECTIONS
- Quick-detachable couplings
- Air hoses
- Compressed air
- Pressure regulator
- Operating pressure
- Oil and water separator
- LOADING THE AIR NAILER
- Loading with fasteners
- Fig.5
- Before using the air nailer
- Basic operation of the air nailer
- Fig.1 - 4
- Operating
- Activated by a trigger
- Removing blocked nails
- Do not remove them!
- Checking operation of the air nailer
- MAINTAINING THE AIR NAILER
- Replacing parts
- Troubleshooting
- Skipping nails, intermittent feed.
- Working practice when preforming maintenance
- Air pressure and volume
- Lubrication
- Use during cold weather
- ENVIRONMENT
- WARRANTY
- DRUCKLUFT-Nagelmaschine, 50mm
- CE
- DECLARATION OF CONFORMITY ATM1044 - PNEUMATIC TACKER
Brand : Ferm
Model : ATM1044
Category : Electric stapler