
Control 150 M - Paint spray WAGNER - Free user manual and instructions
Find the device manual for free Control 150 M WAGNER in PDF.


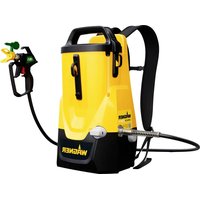
| Product type | Airless paint sprayer |
| Brand | WAGNER |
| Model | Control 150 M |
| Power supply | 230 V, 50 Hz |
| Power consumption | 350 W |
| Maximum pressure | 110 bar (11 MPa) |
| Flow rate at 69 bar | 0.9 l/min |
| Tank volume | 5.5 L |
| Weight (empty) | 4.1 kg |
| Hose length | 7.5 m |
| Max. nozzle size | 515 HEA |
| Max. material temperature | 43 °C |
| Sound level | 78 dB(A) |
| Vibration | 3.8 m/s² |
| Protection class | I |
| Pump system | Piston pump |
| Usable materials | Wall paints, varnishes, stains (water-based or solvent-based) |
| Non-usable materials | Abrasive products, acids, alkalis, products containing acetone |
| Safety | Trigger lock, pressure relief valve, anti-injection protection |
| Maintenance | Regular cleaning of filters, nozzle and valves; lubrication |
| Warranty | 3 years + 1 year with online registration |
| Spare parts | Available: nozzles, filters, valves, seals, hose |
Frequently Asked Questions - Control 150 M WAGNER
User questions about Control 150 M WAGNER
0 question about this device. Answer the ones you know or ask your own.
Ask a new question about this device
Download the instructions for your Paint spray in PDF format for free! Find your manual Control 150 M - WAGNER and take your electronic device back in hand. On this page are published all the documents necessary for the use of your device. Control 150 M by WAGNER.
USER MANUAL Control 150 M WAGNER
Translation of the original operating instructions
Warning!
Attention: Danger of injury by injection! Airless units develop extremely high spraying pressures.

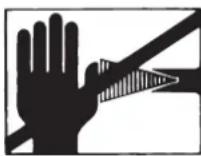
Danger

Never put your fingers, hands or any other parts of the body into the spray jet!
Never point the spray gun at yourself, other persons or animals. Never use the spray gun without safety guard.
Do not treat a spraying injury as a harmless cut. In case of injury to the skin through coating materials or solvents, consult a doctor immediately for quick and expert treatment. Inform the doctor about the coating material or solvent used.

The operating instructions state that the following points must always be observed before starting up:
- Faulty units must not be used.
- Secure spray gun using the safety catch on the trigger.
- Ensure that the unit is properly earthed. The connection must take place through a correctly earthed two-pole and earth socket outlet.
- Check allowable operating pressure of high-pressure hose and spray gun.
- Check all connections for leaks.

The instructions regarding regular cleaning and maintenance of the unit must be strictly observed.
Before any work is done on the unit or for every break in work the following rules must be observed:
- Release the pressure from spray gun and hose.
- Secure the spray gun using the safety catch on the trigger.
- Switch off unit.
Be safety-conscious!
Congratulations for the purchase of your WAGNER Airless high pressure spray gun.
Read this manual carefully before the initial use of this equipment and observe the safety instructions. Keep manual and safety instructions carefully stored.
You have purchased a quality product which requires careful maintenance and care in order to function perfectly.
Important! After each use, the equipment should be cleaned.
Not cleaning the equipment leads to malfunctioning! For faults caused by crud, no guarantee claim will be granted. In case of malfunctioning, check the cleaned equipment once again prior to sending it in to the service department.
Explanation of symbols used
| Danger | Indicates an immediate danger. Unless avoided, death or serious injuries will result. |
| i | Indicates tips for use and other particularly useful information. |
| Wear suitable ear protection when working. | |
| Wear suitable respiratory equipment when working. | |
| Wear suitable safety gloves when working. |
General Safety Instructions
Warning!

Read all safety notifications and instructions. Failure to comply with the safety notifications and instructions provided may result in electric shock, fire and/or serious injury. The term "power tool" used below covers both mains-operated power tools (with mains lead) and accumulator-operated power tools (without mains lead).
1. Work area safety
a) Keep work area clean and well lit. Cluttered or dark areas invite accidents.
b) Do not operate power tools in explosive atmospheres, such as in the presence of flammable liquids, gases or dust. Power tools create sparks which may ignite the dust or fumes.
c) Keep children and bystanders away while operating a power tool. Distractions can cause you to lose control.
2. Electrical Safety
a) Power tool plugs must match the outlet. Never modify the plug in any way. Do not use any adapter
plugs with earthed (grounded) power tools. Unmodified plugs and matching outlets will reduce risk of electric shock.
b) Avoid body contact with earthed or grounded surfaces, such as pipes, radiators, ranges and refrigerators. There is an increased risk of electric shock if your body is earthed or grounded.
c) Do not expose power tools to rain or wet conditions. Water entering a power tool will increase the risk of electric shock.
d) Do not abuse the cord. Never use the cord for carrying, pulling or unplugging the power tool. Keep cord away from heat, oil, sharp edges or moving parts. Damaged or entangled cords increase the risk of electric shock.
e) When operating a power tool outdoors, use an extension cord suitable for outdoor use. Use of a cord suitable for outdoor use reduces the risk of electric shock.
f) If operating a power tool in a damp location is unavoidable, use a residual current device (RCD) protected supply. Use of an RCD reduces the risk of electric shock.
3. Personal safety
a) Stay alert, watch what you are doing and use common sense when operating a power tool. Do not use a power tool while you are tired or under the influence of drugs, alcohol or medication. A moment of inattention while operating power tools may result in serious personal injury.
b) Use personal protective equipment. Always wear eye protection. Protective equipment such as dust mask, non-skid safety shoes, hard hat, or hearing protection used for appropriate conditions will reduce personal injuries.
c) Prevent unintentional starting. Ensure the switch is in the off-position before connecting to power source and/or battery pack, picking up or carrying the tool. Carrying power tools with your finger on the switch or energising power tools that have the switch on invites accidents.
d) Remove any adjusting key or wrench before turning the power tool on. A wrench or a key left attached to a rotating part of the power tool may result in personal injury.
e) Do not overreach. Keep proper footing and balance at all times. This enables better control of the power tool in unexpected situations.
f) Dress properly. Do not wear loose clothing or jewellery. Keep your hair, clothing and gloves away from moving parts. Loose clothes, jewellery or long hair can be caught in moving parts.
g) This appliance is not intended for use by persons (including children) with reduced physical, sensory or mental capabilities, or lack of experience and knowledge, unless they have been given supervision or instruction concerning use of the appliance by a person responsible for their safety. Children should be supervised to ensure that they do not play with the appliance.
h) Do not lull yourself into a false sense of security and do not think yourself above the safety rules for electric tools, even if you are familiar with the electric tool following extensive practical experience. Careless use can lead to serious injuries in fractions of a second.
4. Power tool use and care
a) Do not force the power tool. Use correct power tool for your application. The correct power tool will do the job better and safer at the rate for which it was designed.
b) Do not use the power tool if the switch does not turn it on and off. Any power tool that cannot be controlled with the switch is dangerous and must be repaired.
c) Disconnect the plug from the power source and/or the battery pack from the power tool before making any adjustments, changing accessories, or storing power tools. Such preventive safety measures reduce the risk of starting the power tool accidentally.
d) Store idle power tools out of reach of children and do not allow persons unfamiliar with the power tool or these instructions to operate the power tool. Power tools are dangerous in the hands of untrained users.
e) Maintain power tools. Check for misalignment or binding of moving parts, breakage of parts and any other condition that may affect the power tool's operation. If damaged, have the power tool repaired before use. Many accidents are caused by poorly maintained power tools.
f) Use the power tool, accessories and tool bits etc. in accordance with these instructions, taking into account the working conditions and the work to be performed. Use of the power tool for operations different from those intended could result in a hazardous situation.
g) Keep the handles and grip surfaces dry, clean and free of oil and grease. Slippery handles and grip surfaces hamper safe operation and control of the electric tool in unforeseen situations.
5. Service
a) Have your power tool serviced by a qualified repair person using only identical replacement parts. This will ensure that the safety of the power tool is maintained.
b) If the supply cord is damaged, it must be replaced by the manufacturer or it's service agent or a similarly qualified person in order to avoid a safety hazard.
Health protection

Danger
Caution! Wear breathing equipment: Paint mist and solvent vapors are damaging to health. Always wear breathing equipment and only work in well ventilated rooms or using supplementary ventilating equipment. It is advisable to wear working clothing, safety glasses, ear protection and gloves
Flammable materials

Danger
Do not use the spray guns to spray flammable substances.
Explosion protection

Danger
Do not use the unit in work places which are covered to the explosion protection regulations.
Danger of explosion and fire through sources of flame during spraying work

Danger
There may be no sources of flame such as, for example, open fires, smoking of cigarettes, cigars or tobacco pipes, sparks, glowing wires, hot surfaces, etc. in the vicinity.
Electrostatic charging (formation of sparks or flame)

Danger
Under certain circumstances, electrostatic charging can occur on the unit due to the rate of flow of the coating material when spraying. On discharging this can result in the emergence of sparks or fire. It is therefore necessary that the unit is always earthed through the electrical installation. The connection must take place through a correctly earthed two-pole-and-earth socket outlet.
Ventilation
Good natural or artificial ventilation must be ensured in order to avoid the risk of explosion or fire and damage to health during spray work.
Secure device and spray gun
All hoses, fittings, and filter parts must be secured before operating spray pump. Unsecured parts can eject at great force or leak a high pressure fluid stream causing severe injury.
Always secure the spray gun when mounting or dismounting the nozzle and in case of interruption to work.
Recoil of spray gun

In case of high operating pressure, pulling the trigger can effect a recoil force of up to 15 N.
If you are not prepared for this, your hand can be thrust backwards or your balance lost. This can lead to injury. Continuous stress from this recoil can cause permanent damage to health.
Max. operating pressure
Max. permissible operating pressure for spray gun, spray gun accessories and high-pressure hose may not fall short of the maximum operating pressure of 110 bar (11 MPa) stated on the unit.
Coating substance
Caution against dangers that can arise from the sprayed substance and observe the text and information on the containers or the specifications given by the substance manufacturer.
Do not spray any liquid of unknown hazard potential.
High-pressure hose (safety note)

Attention, danger of injury by injection! Wear and tear and kinks as well as usage that is not appropriate to the purpose of the device can cause leakages to form in the high-pressure hose. Liquid can be injected into the skin through a leakage.
High-pressure hoses must be checked thoroughly before they are used.
Replace any damaged high-pressure hose immediately.
Never repair defective high-pressure hoses yourself!
Avoid sharp bends and folds: the smallest bending radius is about 20~cm
Do not drive over the high-pressure hose. Protect against sharp objects and edges.
Never pull on the high-pressure hose to move the device.
Do not twist the high-pressure hose.
Do not put the high-pressure hose into solvents. Use only a wet cloth to wipe down the outside of the hose.
Lay the high-pressure hose in such a way as to ensure that it cannot be tripped over.
Electrostatic charging of spray guns and the high-pressure hose is discharged through the high-pressure hose. For this reason the electric resistance between the connections of the high-pressure hose must be equal or lower than 197k /m (60k /ft)

For reasons of function, safety and durability, only use genuine WAGNER high-pressure hoses and spray nozzles. For overview see "Spare parts lists".

The risk of damage rises with the age of the high-pressure hose.
Wagner recommends replacing high-pressure hoses after 6 years.
Connecting the device
A properly earthed socket outlet with earthing contact must be used for connection. The connection must be equipped with a residual current protective device with INF ≤ 30mA .
Setting up the unit

When working indoors:
Vapors containing solvents may not be allowed to build up in the area of the device.
Setting up the unit on the side a way from the sprayed object.
A minimum distance of 5m between the unit and spray gun is to be maintained. When working outdoors:
Vapors containing solvents may not be allowed to blow toward the unit.
Note the direction of the wind.
Set the unit up in such a way that vapors containing solvents do not reach the unit and build up there.
A minimum distance of 5m between the unit and spray gun is to be maintained.
Maintenance and repairs

Before carrying out any work on the device, relieve the pressure and unplug the power plug from the socket.
Cleaning the unit

Danger of short circuit through penetrating water!
Never spray down the unit with high-pressure or high-pressure steam cleaners.
Cleaning units with solvents

When cleaning the unit with solvents, the solvent should never be sprayed or pumped back into a container with a small opening (bunghole). An explosive gas/air mixture can be produced. The container must be earthed.
Do not use flammable materials for cleaning purposes.
Earthing of the object
The object to be coated must be earthed.

If liquids collect in the area underneath the outlet valve, this could be due to a leak in the set of pistons. If operations continue, the liquid can leak and dirt might get under the device.
Usabel materials
- Dispersion and latex paints for interior use.
Water-based and solvent-containing lacquers and glazes. Paints, oils, release agents, synthetic enamels, PVC lacquers, undercoats, base coats, fillers and anti-rust paints.
Unsuitable materials
- Materials that contain highly abrasive components, facade paint, caustic solutions and acidic coating substances.
- Flammable materials, materials containing acetone or cellulose thinner
Field of application
Coating of interior walls as well as small and medium-sized objects outdoors (e.g. garden fences, garage doors, etc.).
Industrial use is excluded.
| Technical data | |
| Voltage 230 V, 50 Hz | |
| Power consumption 350 W | |
| Protection class I | |
| Maximum pressure 11 MPa (110 bar) | |
| Flow rate at 69 bar (0 bar) 0.9 l/min (20 l/min) | |
| Maximum temperature of coating material | 43°C |
| Sound pressure level* Uncertainty | 78 dBA K=4 db |
| Sound pressure output* Uncertainty | 91 dBA K=4 db |
| Oscillation level** Uncertainty | 3.8 m/s² K = 1.5 m/s² |
| Maximum ambient temperature 40°C | |
| Pump system piston pump | |
| volume upper container, max. 5.5 l | |
| Max. nozzle size 515 HEA | |
| Max. hose length 22.5 m | |
| Empty weight (pump, hose, gun) 4.1 kg | |
- Measured in accordance with EN 50580
** Measured in accordance with EN 60745-1
Information about the oscillation level
The specified oscillation level has been measured according to a standard test procedure and can be used to compare against electric tools.
The oscillation level is also for determining an initial assessment of the vibrational strain.
Attention! The vibration emission value can differ from the specified value when the electric tool is actually in use, depending on how the electric tool is being used. It is necessary to specify safety measures to protect the operating personnel. These measures are based on an estimated shutdown during the actual conditions of use (all parts of the operating cycle are taken into consideration here, for example periods when the electric tool is switched off, and, when it is switched on but running without any load).
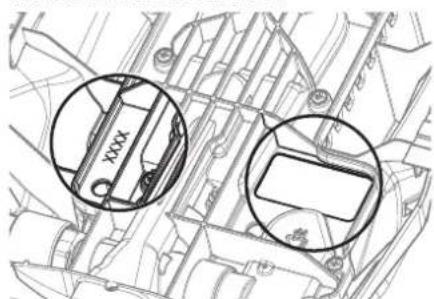
The rating plate and production code are located on the underside of the device.
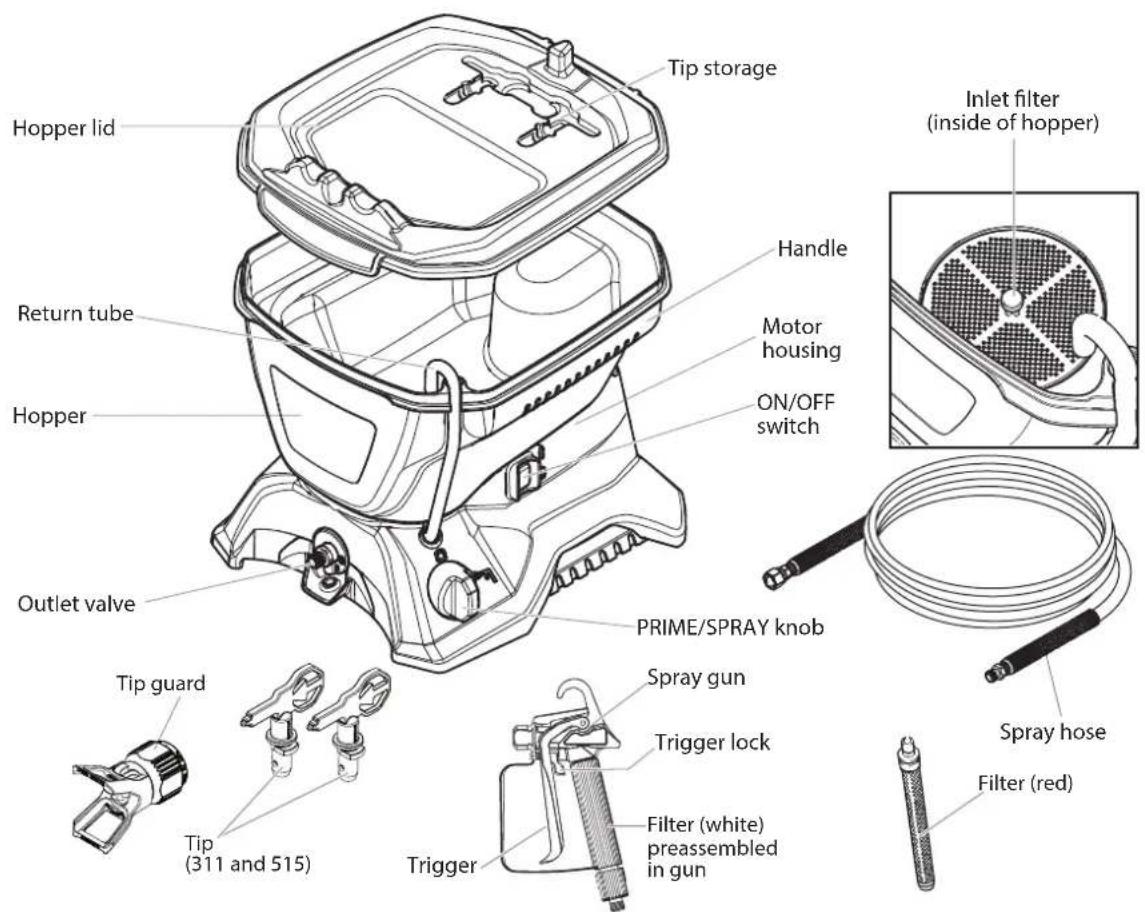
Components
Spray gun with filter
- Spray tip assembly
7.5 mtr.long
Tools needed for assembly
- Two adjustable wrenches.
WARNING
Do not plug in the unit until setup is complete.
Controls and functions
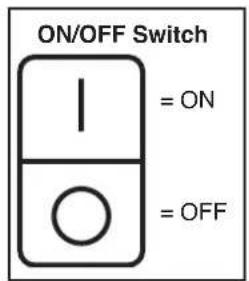
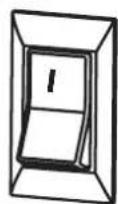
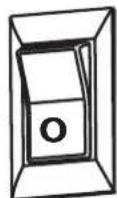
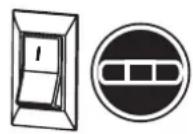
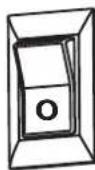
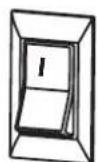
ON/OFF switch The ON/OFF switch turns the unit on and off (O = OFF,I = ON)
Spray Gun The spray gun controls the delivery of the fluid being pumped.
Spray Hose The spray hose connects the gun to the pump.
Return Tube Fluid is sent back out through the return tube to the hopper when priming.
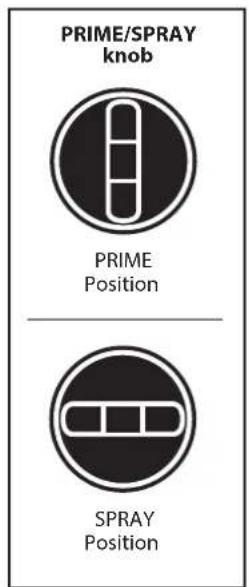
PRIME/SPRAY knob The PRIME/SPRAY knob directs fluid to the spray hose when set to SPRAY, or the return tube when set to PRIME.
Assembly
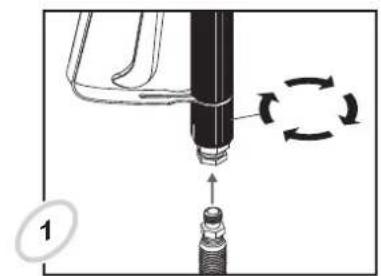
Place the spray gun against the tapered end of the hose and twist the gun onto the hose. Firmly tighten the thread using a wrench
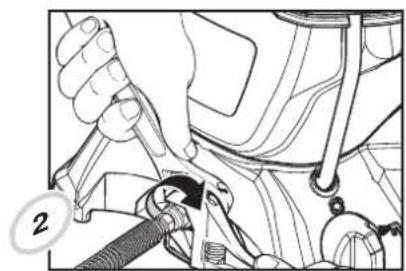
Twist the thread at the other end of the hose onto the hose connection. Using a wrench, hold the hose connection firmly and tighten the hose with another wrench.
Paint straining
It is recommended that in order to avoid premature tip and filter clogging you should strain your paint before spraying. Follow manufacturer's recommendations.
Select tip and gun filter
Use the proper gun filter based on the tip size being used.
Tip Size Paint Filter
311 For thin materials like acrylic Red paints, primers, stains...
515 For thick materials like white internal emulsions, latex paints, hollow-space sealants... ...
Locking and unlocking the gun

WARNING

Always lock the trigger off when attaching the spray tip or when the spray gun is not in use.
Locking the gun
The gun is secured when the trigger lock is at a 90^ angle (perpendicular) to the trigger in either direction.
Unlocking the gun
To unlock the gun, turn the trigger lock to be in line with the trigger.
Plugging in the sprayer
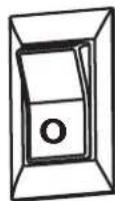
1) Check that the ON/OFF switch is in the OFF position.
2) The connection must be made by correctly grounded plug socket.
Pressure relief procedure
WARNING
Be sure to follow the pressure relief procedure when shutting the unit off FOR ANY PURPOSE. This procedure is used to relieve pressure from the spray hose.
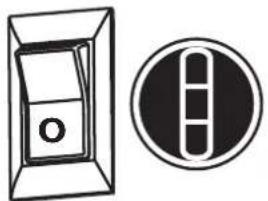
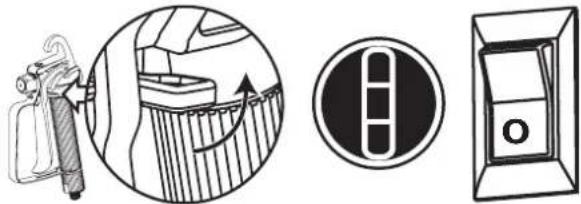
1) Lock the spray gun off and flip the ON/OFF switch to the OFF position.
2) Turn the PRIME/SPRAY knob to PRIME.
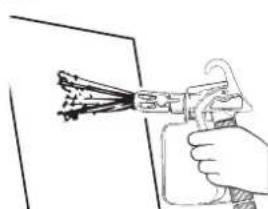
3) Unlock the spray gun and then trigger it onto a scrap piece of wood or cardboard.
4) Lock the spray gun.
Make pump ready for operation
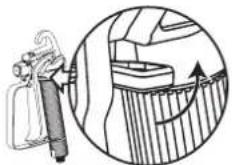
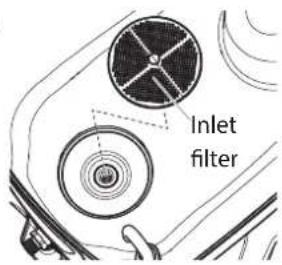
1) Make sure the inlet filter is in place inside the hopper. If it is not, snap in place as shown.
2) Press down the button on the filter once. This will ensure proper operation of the inlet valve.
3) Turn the PRIME/SPRAY knob to PRIME.
4) Plug in the sprayer, and move the ON/OFF switch to the ON position.
5) Switch the pump to OFF.
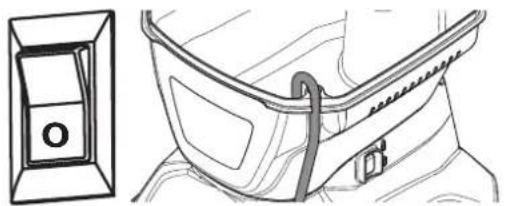
We recommend performing the following steps with water first of all, in order to check that the system and all connections are watertight.
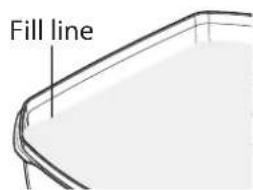
6) Fill your hopper with the material you plan to spray. Do not exceed the fill line as shown. Replace the hopper lid.
7) Leave the PRIME/SPRAY knob on PRIME and switch your unit ON once more and make sure that material is flowing from the return tube.
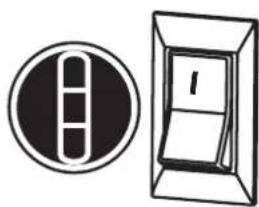

Mount the cover during operation. The cover does not close airtight. Therefore, do not tilt the device when filled.
Suck in material
Perform the following steps, without the spray tip mounted to the gun.
1) Unlock the spray gun and turn the PRIME/SPRAY knob to PRIME.

2) Trigger and HOLD the spray gun into a waste container.
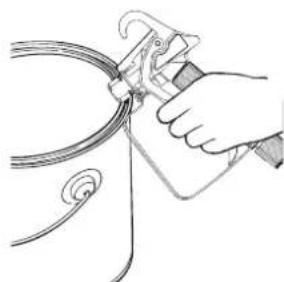
3) Switch the pump on.

WARNING

Keep hands clear from fluid stream.
4) While holding the trigger, turn the PRIME/SPRAY knob to SPRAY. Hold the trigger until all air, water, or solvent is purged from the spray hose and paint is flowing freely.
5) Release trigger, turn the PRIME/SPRAY knob to PRIME and turn pump OFF.


6) Trigger the gun into the waste container once more to be sure that no pressure is left in the hose.
7) Lock the spray gun off.
8) Thread the spray tip assembly onto the gun. Tighten by hand.
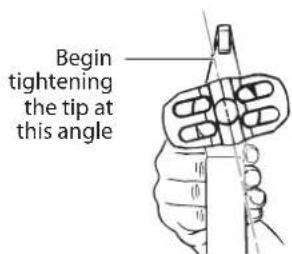
to achieve the desired spray angle when tight.
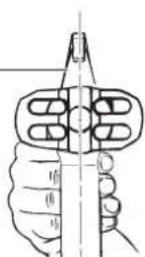
9) Insert spray tip (tip pointing in the spray direction).
Your device is now ready for operation.
Practice
CAUTION
Be sure that the paint hose is free of kinks and clear of objects with sharp cutting edges.
1) Switch the pump ON and turn the PRIME/SPRAY knob to SPRAY.
2) When the motor shuts off, unlock the spray gun and spray a test area to check the spray pattern.
When enough pressure has built up in the hose, the motor will shut off automatically. The motor will cycle on and off automatically as it needs pressure.
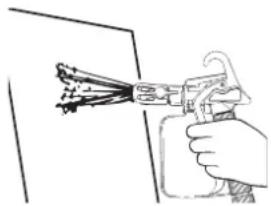

Good spray pattern

Bad spray pattern (tailing)
If your pattern is tailing, your spray tip might have an obstruction, your spray gun filter might be clogged or your spray tip might be worn or color is diluted too few. Refer to Spraying Troubleshooting on the next page.
Spraying technique
The key to a good paint job is an even coating over the entire surface. This is done by using even strokes. Follow the TIPS, below.
TIP: Keep your arm moving at a constant speed and keep the spray gun at a constant distance from the surface. The best spraying distance is 25 to 30cm between the spray tip and the surface.
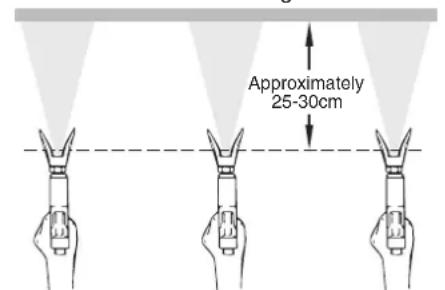
Even coat throughout
Keep stroke smooth and at an even speed.
TIP: Keep the spray gun perpendicular to the surface, otherwise one end of the pattern will be thicker than the other.
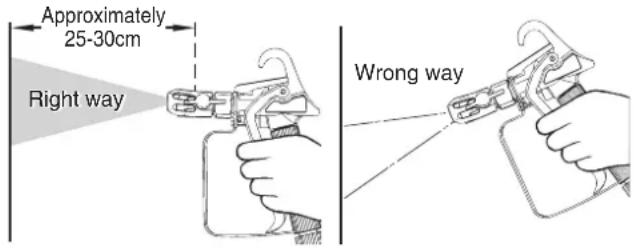
TIP: Keep the spray gun at right angles to the surface. This means moving your entire arm back and forth rather than just flexing your wrist.
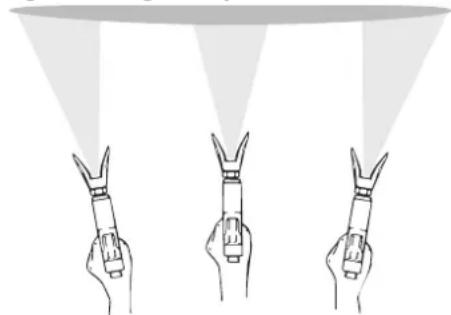
Light Coat LightHeavy Coat
Do not flex wrist while spraying.
TIP: The spray gun should be triggered by turning it on and off with each stroke. Do not trigger the gun during the middle of a stroke. This will result in an uneven spray and splotchy coverage.
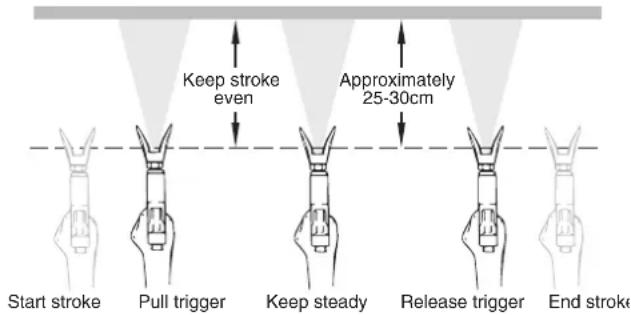
Proper way to trigger the spray gun
ADDITIONAL TIPS
Overlap each stroke by about 30% . This will ensure an even coating.
When you stop painting, follow PRESSURE RELIEF PROCEDURE and unplug electrical cord.
Keep the hopper lid placed on the hopper during spraying.
This will prevent debris from falling into your spray material.
IF YOU EXPECT TO BE AWAY FROM YOUR SPRAYER FOR MORE THAN ONE HOUR, FOLLOW THE SHORT-TERM STORAGE PROCEDURE DESCRIBED IN THE STORAGE SECTION OF THIS MANUAL (page 31).
The following is a short list of minor difficulties you might encounter while spraying. If any of these occur, it will reduce the flow of material, making your spray pattern poor, or material will fail to spray from the gun.
Follow the guidelines on this page to correct any one of these problems.
Unclogging the spray tip

WARNING

Do not attempt to unclog or clean the tip with your finger.
CAUTION
Do not use a needle or other sharp pointed instrument to clean the tip. The hard tungsten carbide can chip.
If the spray pattern becomes distorted or stops completely while the gun is triggered, follow these steps:
1) Turn the pump off, and release the trigger and lock the gun off.
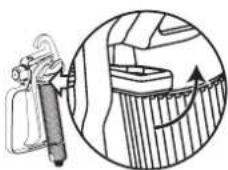
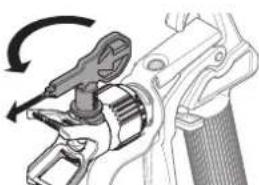
2) Rotate the reversible tip arrow 180^ so that the point of the arrow is toward the rear of the gun.
Under pressure, the spray tip may be very difficult to turn. Turn the PRIME/SPRAY knob to PRIME and trigger the gun. This will relieve pressure and the tip will turn more easily.
3) Turn the PRIME/SPRAY knob to SPRAY.

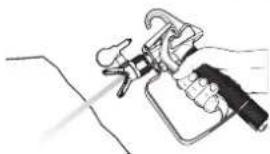
4) Unlock the gun and squeeze the trigger, pointing the gun at a scrap piece of wood or cardboard. This allows pressure in the spray hose to blow out the obstruction. When the nozzle is clean, paint will come out in a high pressure stream.
If paint still will not spray from the spray tip, follow the steps on the next column.
5) Release the trigger and lock the gun off.
6) Reverse the tip so the arrow points foward again (SPRAY position).
7) Unlock the gun and resume spraying.
Unclogging the spray gun filter
This filter must be cleaned every time you use your sprayer. When using thicker paints, the filter might need to be cleaned more often.
1) Perform Pressure Relief Procedure (page 25).
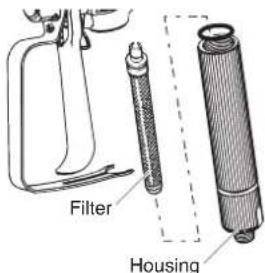
2) Unclip the trigger guard from the filter housing by pulling outward from the filter housing. Unscrew the housing.
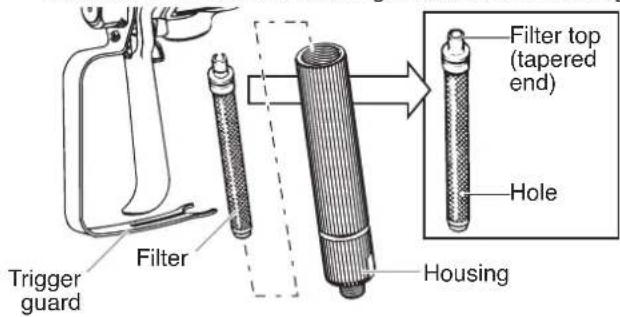
3) Remove the filter from the spray gun housing and clean with the appropriate cleaning solution (warm, soapy water)
When cleaning filter, look for sediments in the spraying material you are using. Refer to Paint Straining, (page 25).
4) Inspect the filter for holes (see Hole picture, above). Replace if holes are found.
CAUTION
NEVER POKE THE FILTER WITH A SHARP INSTRUMENT!
5) Replace the cleaned filter, tapered end first, into the gun housing.
The tapered end of the filter must be loaded properly into the gun. Improper assembly will result in a plugged tip or no flow from the gun.
6) Replace the housing and spring and snap the trigger guard back into the housing.
Unclogging the inlet filter
1) Perform Pressure Relief Procedure, (page 25).
2) Empty the hopper of all spraying material (see Emptying the Hopper, page 29).
3) Remove the inlet filter from the hopper. You may need to use a screwdriver to pry the filter loose.
4) Clean the inlet filter using the appropriate cleaning solution (warm, soapy water).
5) Replace filter.
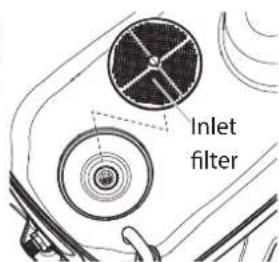
If after having completed all of the steps on this page you are still experiencing problems spraying, refer to the TROUBLESHOOTING page (page 33)
Important cleaning notes
READ THESE NOTES AND WARNINGS BEFORE YOU START TO CLEAN YOUR SPRAYER!
Thorough cleaning and lubrication of the sprayer is the most important step you can take to ensure proper operation after storage.
- Clean the spray device and components with a suitable cleaning agent (e.g. warm soapy water for water-soluble spray materials).
Make sure to dispose cleaning solution properly when finished cleaning your sprayer.
Emptying the hopper
1) Perform all the steps of the Pressure Relief Procedure (page 25).
2) Remove the lid from the hopper.
3) Hold the device by the two handles on the left and right.
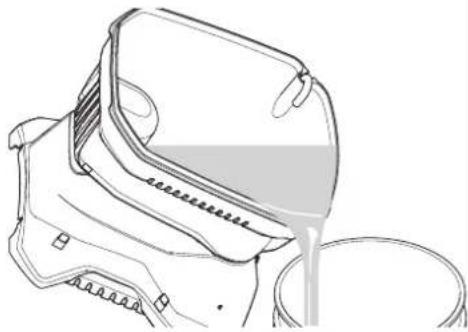
4) Lift and tilt the sprayer so that material will pour from one of the front corners of the hopper and into its original container.
WARNING
The unit, when filled with spraying material, can be heavy. Make sure to lift with your legs and not your back in order to reduce the risk of injury.
CAUTION
Make sure your floors and furnishings are protected with drop cloths to avoid property damage.
Purging the paint hose
These steps will allow you to recover excess paint left over in the paint hose.
1) Lock the gun, remove spray tip assembly, and turn the PRIME/SPRAY knob to PRIME.
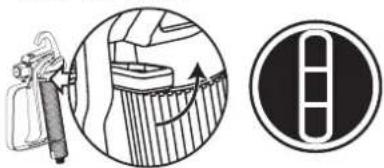
2) Fill the hopper with the appropriate cleaning solution.
3) Hold the spray gun against the side of the paint can and hold the trigger.
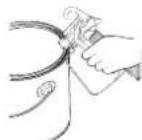
4) While holding the trigger, turn the pump ON, and turn the PRIME/ SPRAY knob to SPRAY.
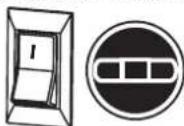
Let the pump run until all paint is purged from the hose and cleaning solution is coming out of the gun.
5) Release the trigger and turn the PRIME/SPRAY knob to PRIME.
6) Hold the spray gun against the side of a separate container and hold the trigger.
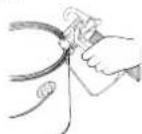
7) Turn the PRIME/SPRAY knob to SPRAY and trigger the gun until the fluid coming out of the gun is clear.
You might need to add more cleaning solution to the hopper.
8) Turn the PRIME/SPRAY knob to PRIME and trigger gun once more to relieve pressure.
Rinsing the hopper
1) Thoroughly rinse out the hopper using the appropriate cleaning solution.
Make sure you do not drip any cleaning solution into the motor housing.
2) Remove the inlet filter from the bottom of the hopper and clean. You may need to use a screwdriver to pry the filter loose.
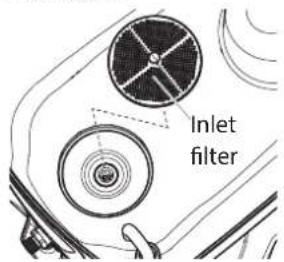
3) Replace the filter and properly dispose of the cleaning solution.
Flushing the sprayer
1) Fill the hopper with NEW cleaning solution.
2) Turn the PRIME/SPRAY knob to PRIME, turn the pump to ON.
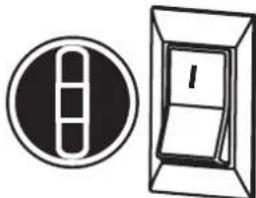
3) Let the pump circulate the cleaning solution out the return tube for 2-3 minutes.
4) Turn the pump OFF.
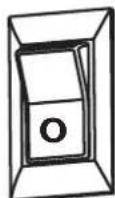
5) Properly dispose of cleaning solution and move on to Cleaning the Spray Gun Components, next page.
Cleaning the spray gun components
1) Perform Pressure Relief Procedure, page 25.
2) Remove spray gun from the paint hose using adjustable wrenches.
3) Remove filter from spray gun (refer to Unclogging the Spray Gun Filter, page 28).
4) Remove spray tip from spray guard assembly.
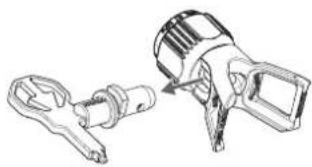
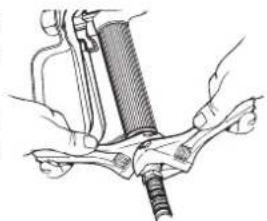
5) Clean spray tip and filter with a soft-bristled brush and the appropriate cleaning solution. Be sure to remove and clean the washer and saddle seat located in the rear of the spray tip assembly.
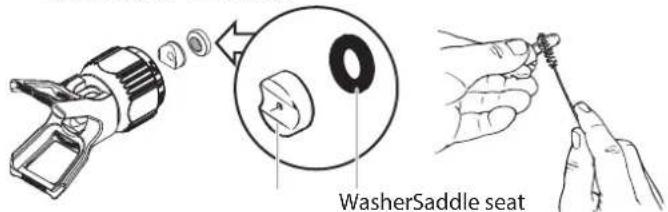
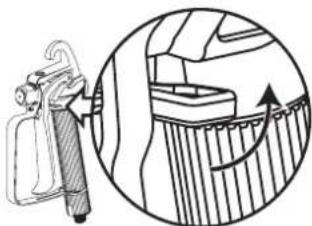
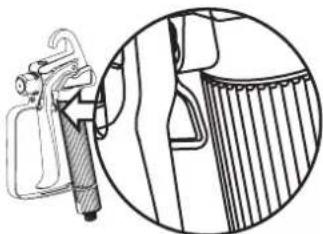
6) Pour a few drops of household oil inside the gun housing (see area indicated below by arrow).
7) Reassemble spray gun:
- Insert gun filter with the tapered end first and screw down closure with spring.
Install spray tip, saddle seat and washer, and replace spray guard assembly.
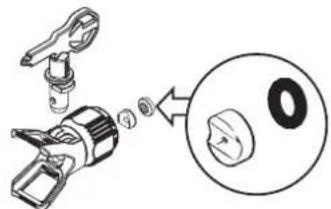
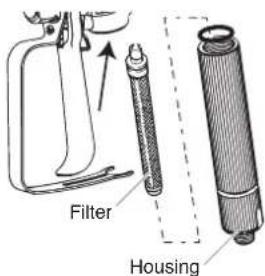
8) Thread the paint hose back onto the spray gun. Tighten with a wrench.
IMPORTANT!
If you cleaned your pump, it is recommended that you flush the pump again using warm, soapy water to prepare it for storage. Repeat Flushing the Pump instructions.
Cleaning the inlet valve
Cleaning or servicing the inlet valve may be required if the unit has priming problems. This may be caused by improper cleaning and/or storage.
1) Remove the inlet filter from the bottom of the hopper.
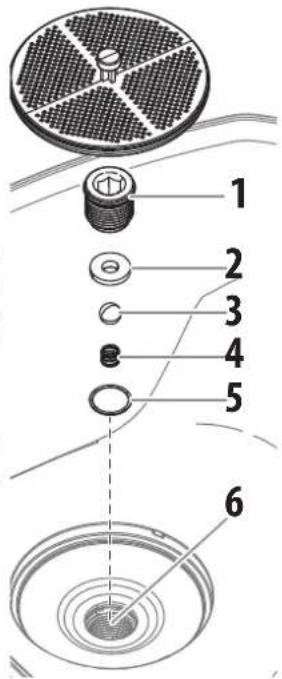
2) Loosen and remove the inlet valve housing (1) with an Allen key (8mm)
3) Remove the valve seat (2), ball (3), spring (4) and O-ring seal (5) with a suitable tool (e.g. needle-nose pliers, tweezers).
Tip: alternatively, turn the device upside down with the cover on and release the parts by tapping on the underside of the device.
4) Check all parts and the valve area (6) in the container and clean thoroughly. Replace damaged parts.
5) Ensure the O-ring seal on the inlet valve housing (1) is well lubricated.
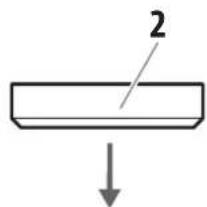
6) Replace all parts as shown in the illustration. The conical side of the inlet valve seat (2) must point downwards.
7) Securely re-tighten the inlet valve housing (1) with an Allen key (8mm)
Replacing the outlet valve
Replacement of the outlet valve may be necessary if your spray performance remains poor after having performed all the steps contained in the Spraying Troubleshooting section of this manual.
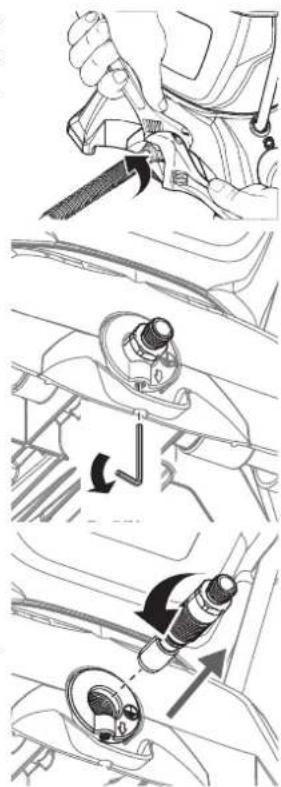
1) Remove the high-pressure hose from the outlet valve using two spanners.
2) Loosen the screw (2.5 mm Allen key) on the bottom of the outlet valve, but do not remove it.
3) Remove the outlet valve from the base unit using a spanner.
4) Check the outlet valve and clean thoroughly (especially the ball seat on the back). Replace if necessary.
5) Inspect the inside of the outlet valve housing. Remove any accumulated paint.
6) Reinsert the new or cleaned outlet valve (tighten into outlet valve housing with an adjustable wrench).
7) Re-tighten the screw.
WARNING
Securely tighten the screw to ensure grounding of the hose and gun.
Short-term storage (up to 8 hours)
Shutdown
1) Perform all the steps of the PRESSURE RELIEF PROCEDURE (page 25).
2) Pour 1/2 cup water slowly on top of the paint to prevent it from drying. Replace the hopper lid.
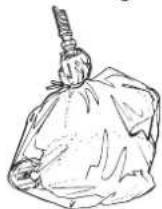
3) Wrap the spray gun assembly in a damp cloth and place it in a plastic bag. Seal the bag shut.
4) Unplug the sprayer.
5) Place the sprayer in a safe place out of the sun for shortterm storage.
Startup
1) Remove the gun from the plastic bag and stir the water into the paint.
2) Check to be sure the PRIME/ SPRAY knob is set to PRIME.
3) Plug sprayer in and turn the switch to ON.
4) Turn the PRIME/SPRAY knob to SPRAY.
5) Test the sprayer on a practice piece and begin spraying.


Preparing the sprayer for longterm storage
1) Make sure you have already completed the Cleanup steps on pages 29-30.
2) Remove the inlet filter. You may need to use a screwdriver to pry it loose.
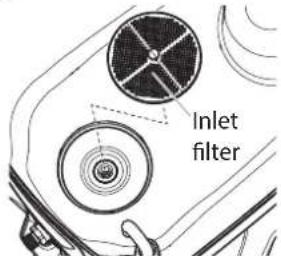
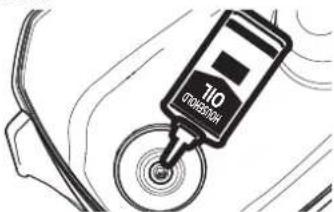
3) Pour approximately 60ml of light household oil into the inlet valve.
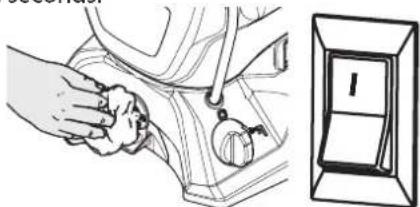
4) Remove hose from outlet valve, place a rag over the outlet valve, and turn the switch ON. Let the unit run for five seconds.
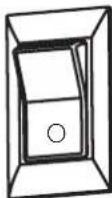
5) Switch the pump OFF.
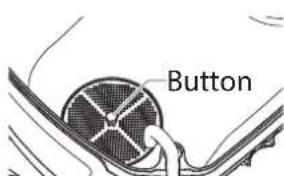
6) Reinstall the inlet filter and press the button on the filter.
7) Wipe the entire unit, hose and gun with a damp cloth to remove accumulated paint.
8) Replace the high pressure hose to the outlet valve and replace the hopper lid.
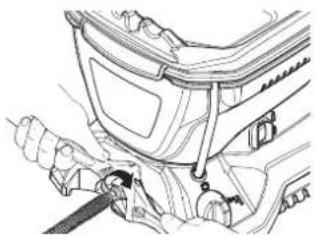
Storage/Conservation of the gun
1) Unclip the trigger guard from the filter housing by pulling outward from the filter housing.
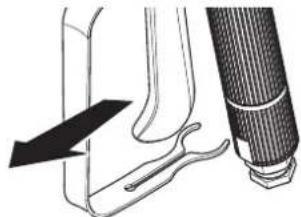
2) Unscrew the housing.
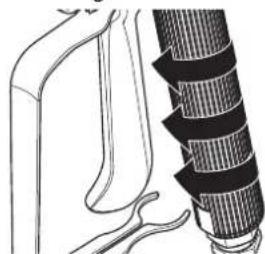
3) Turn the gun over and fill with a few drops of oil.
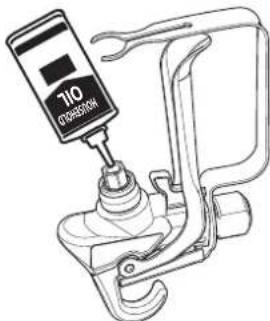
4) Reassemble the gun.
WARNING
Before servicing, always release system pressure by following PRESSURE RELIEF PROCEDURE (page 25).
PROBLEM CAUSE SOLUTION
| A. The sprayer does not start. 1) The sprayer is not plugged in. 2) The ON/OFF switch is set to OFF. 3) The sprayer shuts off while still under pressure. 4) No voltage is coming from the wall plug. 5) The extension cord is damaged or has too low a capacity. 6) There is a problem with the motor. | 1) Plug the sprayer in. 2) Turn the ON/OFF switch to ON. 3) Motor will cycle ON and OFF while spraying as it needs pressure. This is normal. Resume painting. 4) Properly test the power supply voltage. 5) Replace the extension cord. |
| B. The sprayer starts but does not draw in paint when the PRIME/SPRAY knob is set to PRIME. | 6) Take sprayer to Wagner Authorized Service Center. 1) Try to prime the unit again. 2) Refill the hopper. 3) Relocate unit to level ground. 4) Clean the inlet filter. 5) Clean the inlet and outlet valves and replace any worn parts. Inlet may be stuck from old paint. Push inlet filter tab to release. 6) Replace the inlet valve. 7) Take sprayer to Wagner Authorized Service Center. 1) Replace the spray tip with a new tip. 2) Clean the inlet filter. 3) Clean or replace the proper filter. Always keep extra filters on hand. 4) Thin or strain the paint. 5) Clean or replace the outlet valve assembly. 6) Replace the inlet valve. |
| C. The sprayer draws up paint but the pressure drops when the gun is triggered. | 1) The spray tip is worn. 2) The inlet filter is clogged. 3) The gun or spray tip filter is plugged. 4) The paint is too heavy or coarse. 5) The outlet valve assembly is dirty or worn. 6) The inlet valve assembly is damaged or worn. |
| D. The PRIME/SPRAY valve is on SPRAY and there is flow through the return tube. | 1) The PRIME/SPRAY valve is dirty or worn. 1) Take sprayer to Wagner Authorized Service Center. 1) Take the sprayer to a Wagner Authorized Service Center. 1) Check the tip assembly and assemble properly. 2) Replace the seal. 1) Clean the spray tip or gun filter. Review Unclogging the Spray Tip. 2) Put the tip in the SPRAY position. 3) PRIME/SPRAY knob not set on SPRAY. 4) Clean the filters and strain the paint. 2) Replace the spray tip. 3) Thin the paint. 4) Refer to Causes and Solutions for problem C. |
| E. The spray gun leaks. | 1) Internal parts of the gun are worn or dirty. |
| F. The tip assembly leaks. | 1) The tip was assembled incorrectly. |
| G. The spray gun will not spray. | 2) A seal is worn. |
| H. The paint pattern is tailing. 1) The gun, the tip, or the inlet filter is plugged. | 2) The spray tip is in the CLEAN position. 3) PRIME/SPRAY knob not set on SPRAY. |
| I. The paint pattern is tailing. 2) The tip is worn. | 3) The paint is too thick. 4) Pressure loss. |
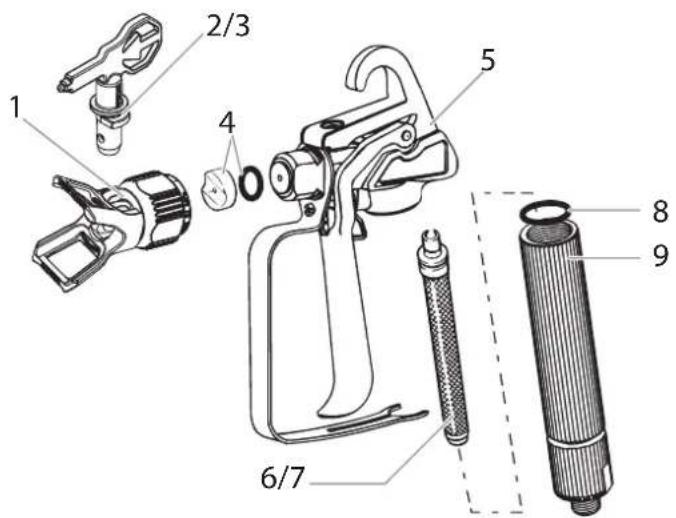
SPRAY GUN
Item Part # Description Quantity
10517200 Guard Assembly 1
2* 0517 311 Tip 311 (for thick materials) 1
3* 0517 515 Tip 515 (for thin materials) 1
4* 0517 900 Saddle seat and washer 1
5* 2399 788 Complete gun assembly (incl pos. 1,7,8,9)
60418711Filterred2
7* 0418 713 Filter white 2
8* 2337 235 Seal
9 2337 245 Filter housing 1
- Wear parts: Not covered by guarantee

If using another nozzle, the right filter must also be used.
Tip 311 Filter red
Tip 515 Filter white
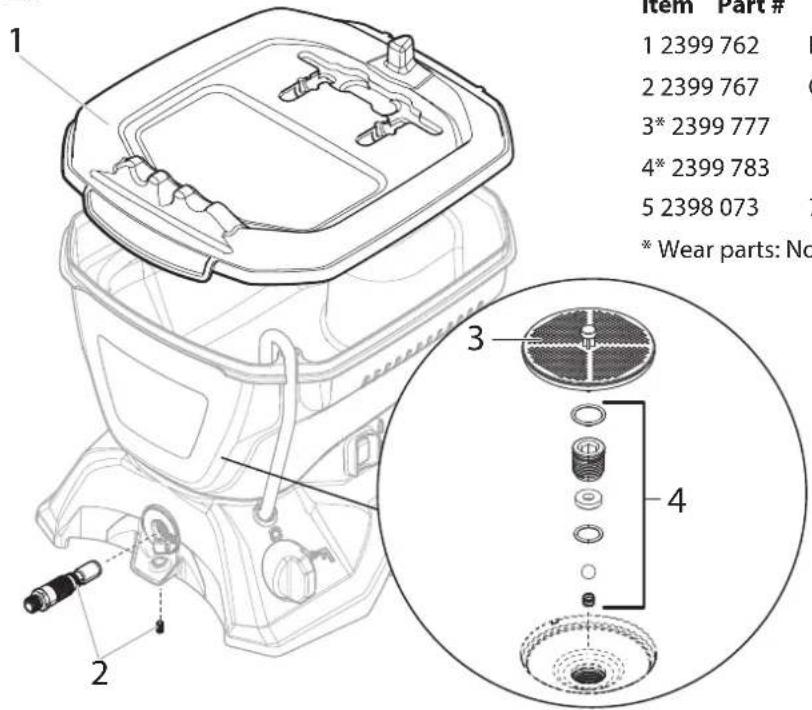
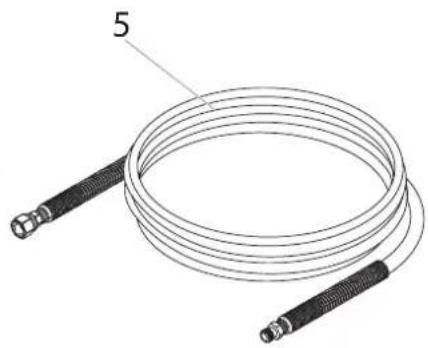
SPRAYER
Item Part # Description Quantity
12399762 Hopper lid 1
2 2399767 Outlet valve kit 1
3* 2399777 Inlet filter 1
4* 2399783 Inlet valve kit 1
- Wear parts: Not covered by guarantee
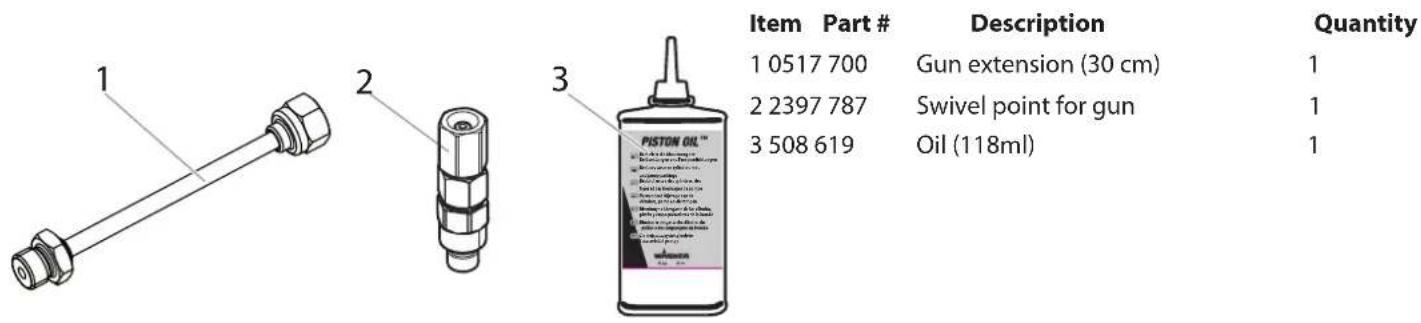
Accessories (not included in the delivery)
3+1 years guarantee
The guarantee runs for three years, counting from the date of sale (sales slip). The guarantee is extended by a further 12 months if the device is registered online within 4 weeks of the purchase at www.wagner-group.com/3plus1. Registration is only possible if the buyer is in agreement with the data being stored that is entered during registration. The guarantee covers and is restricted to free-of-charge rectification of faults which are demonstrably attributable to the use of faulty materials in manufacture, or assembly errors; or free-of-charge replacement of the defective parts. The guarantee does not cover incorrect use or commissioning or fitting or repair work which is not stated in our operating instructions. Wearing parts are also excluded from the guarantee. The guarantee excludes commercial use. We expressly reserve the right to fulfil the guarantee. The guarantee expires if the tool is opened up by persons other than WAGNER service personnel. Transport damage, maintenance work and loss and damage due to faulty maintenance work are not covered by the guarantee. Under any guarantee claim, there must be proof of purchase of the tool through submission of the original receipt. Wherever legally possible, we exclude all liability for injury, damage or consequential loss, especially if the tool has been used for a purpose other than that stated in the operating instructions, commissioned or repaired other than in accordance with our operating instructions or if repairs are performed by someone who is unqualified. We reserve the right to perform any repairs in excess of those stated in our operating instructions. In case of guarantee or repair, please refer to your point of sale.
Environmental protection

The device and all accessories and packaging have to be re-used in an environmentally friendly manner. Do not dispose of the appliance with household waste. Support environmental protection by taking the appliance to a local collection point or obtain information from a specialist retailer.
Leftover paint and solvents may not be emptied into drains, the sewage system or disposed of as household rubbish. It has to be disposed of separately as special waste. Please pay special attention to the instructions on the product packaging.
Important Note regarding Product Liability!
According to an EU directive, the manufacturer is only liable without limitation for faults in the product if all parts come from the manufacturer or have been approved by the manufacturer and have been mounted to the device and are operated properly. If third-party accessories or spare parts are used, the manufacturer is exonerated wholly or partly from his/her liability if use of the third-party accessories or spare parts have caused a defect in the product.
EU Declaration of conformity
We declare under sole responsibility that this product conforms to the following relevant stipulations:
2006/42/EC, 2014/30/EU, 2011/65/EU, 2012/19/EU
Applied harmonised norms:
EN 12100, EN 1953, EN 62841-1, EN 55014-1, EN 55014-2, EN 61000-3-2, EN 61000-3-3, EN 62233
The EU declaration of conformity is enclosed with the product.
If required, it can be re-ordered using order number 2396006.
Warning
If the supply cord of this appliance is damaged, it must only be replaced by a repair shop appointed by the manufacturer, because special purpose tools are required.
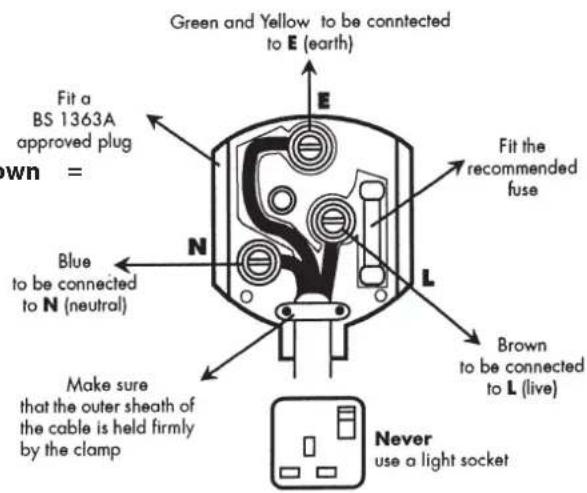
The wires in this mains lead are coloured in accordance with the following code:
green/yellow = earth blue = neutral live
As the colours of the wires in the mains lead of this appliance may not correspond with the coloured markings identifying the terminals in your plug, proceed as follows:
- The wire which is coloured green and yellow must be connected to the terminal in the plug which is marked with the letter E or by the earth symbol or coloured green or green and yellow.
The wire which is coloured blue must be connected to the terminal which is marked with the letter N or coloured black. - The wire which is coloured brown must be connected to the terminal which is marked with the letter L or coloured brown
- Should the moulded plug have to be replaced, never re-use the defective plug or attempt to plug it into a different 13 A socket. This could result in an electric shock.
- Should it be necessary to exchange the fuse in the plug only use fuses approved by ASTA in accordance with BS 1362. Only 13 Amp fuses may be used.
To ensure that the fuse and fuse carrier are correctly mounted please observe the provided markings or colour coding in the plug. - After changing the fuse, always make sure that the fuse carrier is correctly inserted. With out the fuse carrier, it is not permissible to use the plug.
- The correct fuses and fuse carriers are available from your local electrical supplies stockist.
situation inattendue.
PROBLEM CAUSE SOLUTION
PROBLEM OORZAAK OPLOSSING
41-605 Swietochlowice
T+48/32/346 3700
F+48/32/3463713
S ORKLA HOUSE CARE AB
Box 133
564 23 Bankeryd
Sweden
T+46(0)36376300

ROMIB S.R.L.

- Warning!
- Be safety-conscious!
- Congratulations for the purchase of your WAGNER Airless high pressure spray gun.
- Important! After each use, the equipment should be cleaned.
- General Safety Instructions
- Work area safety
- Electrical Safety
- Personal safety
- Power tool use and care
- Service
- Health protection
- Flammable materials
- Explosion protection
- Danger of explosion and fire through sources of flame during spraying work
- Electrostatic charging (formation of sparks or flame)
- Ventilation
- Secure device and spray gun
- Recoil of spray gun
- Max. operating pressure
- Coating substance
- High-pressure hose (safety note)
- Connecting the device
- Setting up the unit
- Maintenance and repairs
- Cleaning the unit
- Cleaning units with solvents
- Earthing of the object
- Usabel materials
- Unsuitable materials
- Field of application
- Information about the oscillation level
- Components
- Tools needed for assembly
- WARNING
- Controls and functions
- Assembly
- Paint straining
- Select tip and gun filter
- Tip Size Paint Filter
- Locking and unlocking the gun
- Locking the gun
- Unlocking the gun
- Plugging in the sprayer
- Pressure relief procedure
- Make pump ready for operation
- We recommend performing the following steps with water first of all, in order to check that the system and all connections are watertight.
- Suck in material
- Perform the following steps, without the spray tip mounted to the gun.
- Keep hands clear from fluid stream.
- Practice
- CAUTION
- Spraying technique
- ADDITIONAL TIPS
- Unclogging the spray tip
- Do not use a needle or other sharp pointed instrument to clean the tip. The hard tungsten carbide can chip.
- If paint still will not spray from the spray tip, follow the steps on the next column.
- Unclogging the spray gun filter
- NEVER POKE THE FILTER WITH A SHARP INSTRUMENT!
- Unclogging the inlet filter
- Important cleaning notes
- Emptying the hopper
- Purging the paint hose
- Rinsing the hopper
- Flushing the sprayer
- Cleaning the spray gun components
- IMPORTANT!
- Cleaning the inlet valve
- Replacing the outlet valve
- Short-term storage (up to 8 hours)
- Shutdown
- Startup
- Preparing the sprayer for longterm storage
- Storage/Conservation of the gun
- PROBLEM CAUSE SOLUTION
- Item Part # Description Quantity
- 3+1 years guarantee
- Environmental protection
- Important Note regarding Product Liability!
- EU Declaration of conformity
- PROBLEM OORZAAK OPLOSSING
Brand : WAGNER
Model : Control 150 M
Category : Paint spray