ERGY50 - Shaver PANASONIC - Free user manual and instructions
Find the device manual for free ERGY50 PANASONIC in PDF.

| Product Type | Rechargeable electric body shaver |
| Brand | Panasonic |
| Model | ERGY50 |
| Dimensions (approx.) | 5,6 cm × 6,3 cm × 8,3 cm |
| Weight | 190 g |
| Power supply | Rechargeable via mains charger (RE9-48/RE9-51), motor 1.2 V DC, automatic voltage conversion |
| Charging time | 8 hours (first charge 16h) |
| Battery life | About 4 shaves of 7 minutes |
| Usage | Wet (in the shower) or dry |
| Waterproof rating | Can be used in the bath or shower |
| Main functions | Body shaving, flip-down trimmer (long hair), trimming combs (3/6/9 mm), adjustable beard trimmer (ER-GY50, 9 steps from 2.0 to 14.0 mm in 1.5 mm increments) |
| Telescopic handle | Yes, extends from 37.5 to 75 mm, tilts up to 15° |
| Charge indicator | Indicator light on while charging |
| Cleaning | Under running water or with the provided brush; use soapy water, no solvents |
| Lubrication | Provided oil to apply on the foil, flip-down trimmer and beard trimmer before/after each use |
| Replacement parts | Outer foil: 1 year; inner blade: 2 years |
| Battery | Built-in rechargeable NiMH (removable for disposal) |
| Safety | Do not use if foil is damaged; do not disassemble; do not use for face; keep out of reach of children |
| Included accessories | Charger, cleaning brush, oil, 3/6/9 mm combs, beard comb (ER-GY50) |
| Noise level | 67 dB(A) in shaver mode, 68 dB(A) in trimmer mode |
| Domestic use | Yes |
| Environment | Recycling of battery and appliance according to EU directives |
Frequently Asked Questions - ERGY50 PANASONIC
User questions about ERGY50 PANASONIC
0 question about this device. Answer the ones you know or ask your own.
Ask a new question about this device
Download the instructions for your Shaver in PDF format for free! Find your manual ERGY50 - PANASONIC and take your electronic device back in hand. On this page are published all the documents necessary for the use of your device. ERGY50 by PANASONIC.
USER MANUAL ERGY50 PANASONIC
Operating Instructions
(Household) Rechargeable body shaver
Model No. ER-GY50/ER-GY30
English 2 Dansk 49 Česky 95
natural_image
Line drawing of a handheld electronic device with no visible text or symbolsBefore operating this unit, please read these instructions completely and save them for future use.
Important
▶ Before use
This WET/DRY body shaver can be used for wet shaving with soap lather or for dry shaving. Use the watertight shaver in the shower and clean it in water. The following is the symbol of Wet body shaver. The symbol means that the hand-held part may be used in a bath or shower.

Our research has shown that you can enjoy closer and smoother shaves with the sharp blades. And our pop-up trimmer will be able to cut longer hairs with ease.
▶ Using the shaver
Caution - The outer foil is very thin and can be damaged if not used correctly.
- Check that the outer foil is not damaged before using the shaver. Do not use the shaver if the outer foil is damaged because you will cut your skin.
- Be sure to lubricate the outer foil or the blades before using the shaver. Failure to do so may cause the shaver to pull your hairs or damage to skin.
- Do not apply strong pressure to the skin, repeatedly rub over the same area, hold in one spot on the skin, or apply in a jabbing motion when using the shaver. Doing so may cause damage to skin, inflammation or increased pain.
- Do not use for facial shaving.
▶ Charging the shaver
• Dry the shaver completely before charging it.
- Do not attempt to use a charger other than the included one which is specifically designed for this model. Use only the included charger.
- Keep the charger away from water and handle it only with dry hands.
- The shaver may become warm during use and charging. However, this is not a malfunction.
- Hold the adaptor when disconnecting it from the household outlet. If you tug on the supply cord, you may damage it. The supply cord cannot be replaced. If the cord is damaged, the appliance should be scrapped.
- Do not charge the shaver where the temperature is below 5 °C or above 35 °C, where it will be exposed to direct sunlight or a heat source, or where there is a lot of moisture.
- Charge the shaver for at least 16 hours when charging it for the first time or when it has not been used for more than 6 months.
▶ Cleaning the shaver
- When you clean the shaver with water, do not use salt water or hot water. Wipe it with a cloth dampened with soapy water. Do not use thinner, benzine or alcohol.
▶ Storing the shaver
- This appliance is not intended for use by persons (including children) with reduced physical, sensory or mental capabilities, or lack of experience and knowledge, unless they have been given supervision or instruction concerning use of the appliance by a person responsible for their safety. Children should be supervised to ensure that they do not play with the appliance.
- Store the charger in a dry area where it is protected from damage.
- Do not disassemble the appliance. Take it to a qualified service person when service or repair is required.
SPECIFICATIONS
Power source: See the name plate on the product.
(Automatic voltage conversion)
Motor voltage: 1.2 V DC
Charging time: 8 hours
This product is intended for household use only.
Airborne Acoustical Noise:
ER-GY30 67 (dB (A) re 1 pW)
ER-GY50 In shaving mode: 67 (dB (A) re 1 pW)
In trimmer mode: 68 (dB (A) re 1 pW)
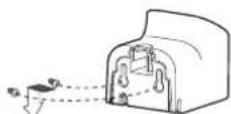
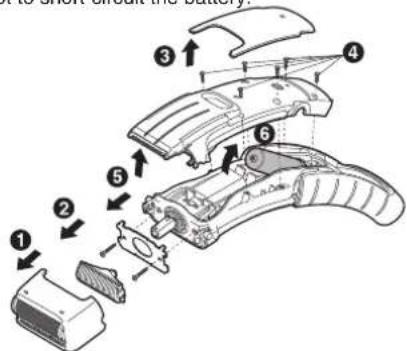
Parts identification
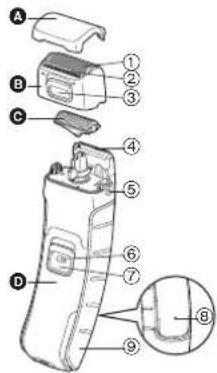

A Protective cap
B Foil frame
① Outer foil
② Pop-up trimmer
③ Pop-up trimmer switch
c Inner blade
D Main body
④ Trimmer for beards (for ER-GY50 only)
⑤ Foil frame release buttons
⑥ Switch lock button
⑦ OFF/ON switch
⑧ Charge indicator lamp
⑨ Handle
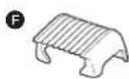
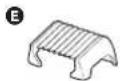
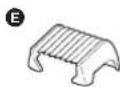
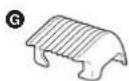
E 3 mm comb attachment
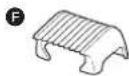
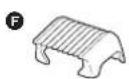
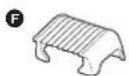
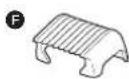
F 6 mm comb attachment
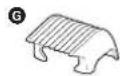
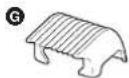
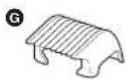
G 9 mm comb attachment
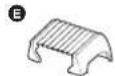
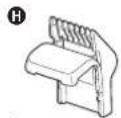
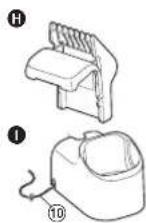
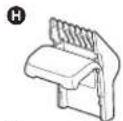
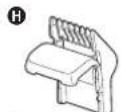
H Comb attachment for beards (for ER-GY50 only)
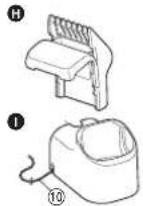
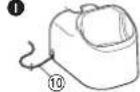
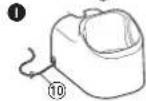
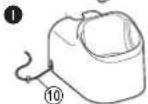
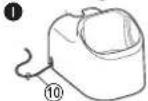
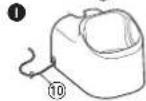
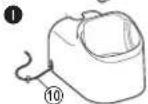
① Charger (RE9-48, RE9-51 for United Kingdom)
⑩ Power cord
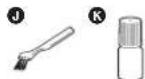
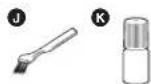
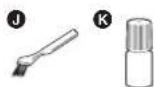
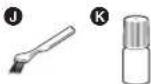
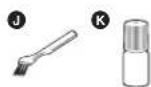
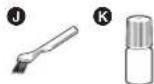
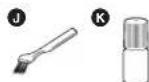
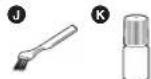
J Cleaning brush
K Oil
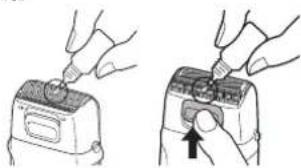
Charge
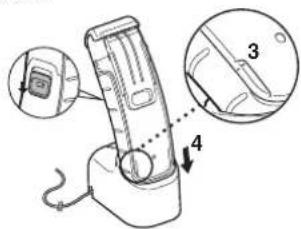
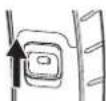
Charging the shaver
Place the shaver on the charger to charge it.
You can charge the shaver in 8 hours.
1 Turn off the shaver.
2 Plug the power cord into a household outlet and place the charger on a flat surface.
3 Ensure that the marks of the handle and the main body are aligned with each other.
4 Insert it in the charger as illustrated.
- The charge indicator lamp lights and stays on until the shaver is removed from the charger.
- A full charge will supply enough power for approx. 4 shaves of 7 minutes each.
English
▶ Fixing the charger to the wall
- Attach two screws to the wall as illustrated.
- Screws are sold separately.
- Hook the charger onto these screws.
- Plug the power cord into a household outlet.
→
Shave
Using the shaver
Trim your hair using the pop-up trimmer if it is longer than 5 mm.
Wet/foam shaving
Shaving with soap lather makes the skin slippery for a closer shave. Do not use shaving cream, skin cream or skin lotion as it will clog the blades.
1 Wet your skin and remove the protective cap.
2 Wet the outer foil and place a small quantity of liquid body soap on the outer foil.
3 While pressing the switch lock button, slide the OFF/ON switch upwards.
4 Press gently so that the whole of the outer foil is in close contact with the skin.
5 Apply the shaver to your skin and press gently while moving it slowly against the direction the hair grows.
Underarm Legs Arms
Hold your arm up enough to stretch the skin and shave back and forth.
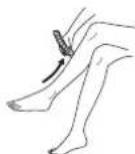
Move the shaver from ankle to knee.
Move the shaver from outside to inside.
For the best results
Pull the skin taut where the area is prone to sagging (on the inside of the knees and elbows).
Dry shaving
You can also shave without wetting your skin or the outer foil.
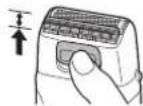
Using the pop-up trimmer
- Slide the pop-up trimmer switch upwards.
- Slide the OFF/ON switch upwards.
- Apply the shaver to your skin and press gently while moving it slowly.
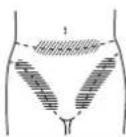
For bikini-line
Use the pop-up trimmer for bikini-line.
Using the comb attachments
- Select the attachment and attach it onto the shaver.
- Slide the pop-up trimmer switch upwards.
- Slide the OFF/ON switch upwards.
- Apply the shaver to your skin and press gently while moving it slowly against the direction the hair grows.
- Trim slowly and with care to avoid hairs being caught in the comb attachment.
- Clean the shaver when it is no longer shaving well or when it is clogged.

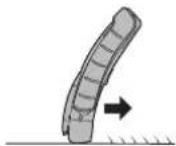
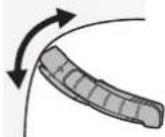
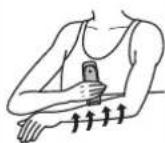
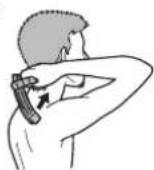
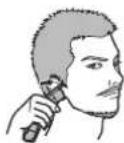
Using the handle
▶ Shaving hard-to-reach areas (calves, backs, etc.)
- Turn off the shaver.
- Handle movement will be stiff if switch is left ON.
- Extend the handle by sliding it until it clicks.
- Adjustable to either 37.5 mm or 75 mm.
- Bend the handle when it is fully extended.
- Adjustable by 15^ in total of 6 steps.

-
Slide the OFF/ON switch upwards.
-
Apply the shaver to hard-to-reach areas and slide it gently.

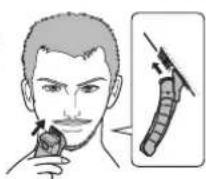
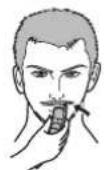
Using the trimmer for beards ER-GY50
Comb your beard or sideburns before trimming them.
- Do not wet beard with shaving foam or similar products. A wet beard will form bunches and will make it difficult to maintain an even length.
▶ Trimming your moustache
- Attach the comb attachment for beards and slide the trimmer for beards upwards.
- Grasp the sides of the comb attachment for beards and move it to the desired trimming length.
- Adjustable by 1.5 mm from 2.0 mm to 14.0 mm in 9 steps.
- Slide the OFF/ON switch upwards.
- Move the shaver upwards with the OFF/ON switch facing upwards as illustrated.
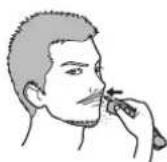
▶ Shaping your moustache
- Slide the trimmer for beards upwards and turn on the shaver.
- Trim around your moustache.
- If you wish to have a rounded line, hold the shaver on its side.
▶ Shaping your sideburns
- Slide the trimmer for beards upwards and turn on the shaver.
- Cut your sideburns.
Clean
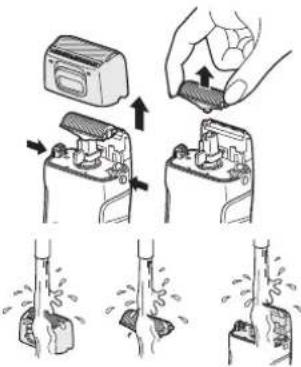
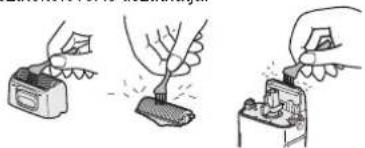
Cleaning the shaver
- Press the foil frame release buttons to remove the foil frame.
-
Remove the inner blade by grasping it firmly at both ends and pulling straight away from the shaver.
-
Clean with running water.
- Wipe off any drops of water with a dry cloth.
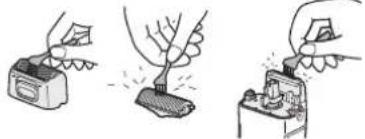
▶ Cleaning with brush
You can also clean the shaver with the cleaning brush.
natural_image
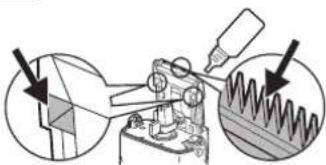
Three-step illustration showing a hand using a power tool to remove a device, then applying material to a switch (no text or symbols present)Lubrication
Apply the oil to the outer foil, the pop-up trimmer, and the trimmer for beards before and after each use.
▶ Outer foil and pop-up trimmer
- Apply a drop of oil to the outer foil.
- Raise the pop-up trimmer and apply a drop of oil.
- Turn on the shaver, and run it for a few seconds.
natural_image
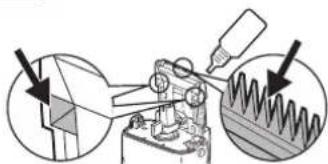
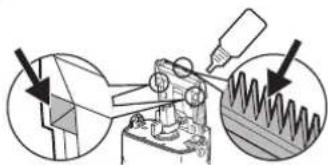
Illustration of two hands operating a device with a close-up view showing the switch (no text or symbols present)▶ Trimmer for beards ER-GY50
- Remove the inner blade and slide the pop-up trimmer switch upwards.
- Apply one or two drops of oil to the points indicated by arrows.
natural_image
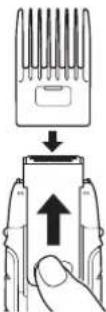
Mechanical assembly diagram showing a microscope and spiral-patterned component (no text or symbols)Replacing the outer foil and the inner blade
| outer foil once every year |
| inner blade once every two years |
English
Never remove the outer foil at any time other than when replacing it.
- Press the foil frame release buttons to remove the foil frame.
- Squeeze the front and the back side of the foil frame and lift up one of the two knobs on the outer foil.
- Slip the outer foil into the frame and guide the plastic edges onto the hooks in the foil frame until it clicks into the shaver.
natural_image
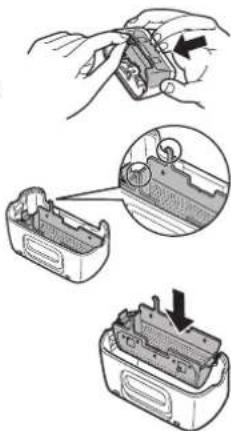
Illustration of a battery pack being processed with a close-up view showing internal components (no text or symbols)▶ Replacing the inner blade
- Press the foil frame release buttons to remove the foil frame.
- Remove the inner blade by grasping it firmly at both ends and pulling straight away from the shaver.
- To insert the new inner blade, hold the blade at both ends and press downward until it snaps into the shaver.
Removing the built-in rechargeable battery
Remove the built-in rechargeable battery before disposing of the shaver. Do not dismantle or replace the battery. Otherwise you can't use the shaver again. This could cause fire or an electric shock. Replace them at an authorized service center. Remove the battery as illustrated.
- Discharge the battery completely before removing it.
- Please take care not to short-circuit the battery.
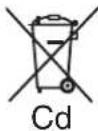
Important notice regarding environmental protection
The built-in rechargeable Nickel-Metal Hydride battery contains substances that may be environmentally harmful. Please remove the battery before discarding your shaver.
For environmental protection and recycling materials
This shaver contains Nickel-Metal Hydride battery.
Please make sure that the battery is disposed of at an officially designated location if there is one in your area.
Information for Users on Collection and Disposal of Old Equipment and used Batteries

These symbols on the products, packaging, and/or accompanying documents mean that used electrical and electronic products and batteries should not be mixed with general household waste. For proper treatment, recovery and recycling of old products and used batteries, please take them to applicable collection points, in accordance with your national legislation and the Directives 2002/96/EC and 2006/66/EC.

By disposing of these products and batteries correctly, you will help to save valuable resources and prevent any potential negative effects on human health and the environment which could otherwise arise from inappropriate waste handling.
For more information about collection and recycling of old products and batteries, please contact your local municipality, your waste disposal service or the point of sale where you purchased the items. Penalties may be applicable for incorrect disposal of this waste, in accordance with national legislation.
Cd For business users in the European Union
If you wish to discard electrical and electronic equipment, please contact your dealer or supplier for
further information.
[Information on Disposal in other Countries outside the European Union]
These symbols are only valid in the European Union. If you wish to discard these items, please contact your local authorities or dealer and ask for the correct method of disposal.
Note for the battery symbol (bottom two symbol examples):
This symbol might be used in combination with a chemical symbol. In this case it complies with the requirement set by the Directive for the chemical involved.
Wichtig


A Schutzkappe
B Folienrahmen
① Äußere Scherfolie
② Ausziehbarer
Langhaarschneider
Rasur
natural_image
Illustration of a hand inserting a component into an electrical switch (no text or symbols present)natural_image
Three-step illustration showing a hand holding a small object with motion lines indicating movement (no text or symbols)natural_image
Illustration of three hands using a tool to adjust a small object, no text or symbols presentEinölen
natural_image
Illustration of two hands using a tool to adjust or install a device (no text or symbols visible)
natural_image
Illustration of hands assembling a battery pack with an inset close-up showing internal components (no text or symbols)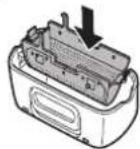


Rasage
natural_image
Three-step illustration showing a person performing a manual push-up with a bag, no text or symbols presentnatural_image
Illustration of three hands using different tools to adjust a tree (no text or symbols present)Lubrification
natural_image
Illustration of two hands using a tool to adjust or install a device (no text or symbols visible)▶ Tondeuse à barbe ER-GY50
natural_image
Illustration of a hand holding a small electronic component with an arrow pointing to it, and a close-up of the internal structure (no text or symbols)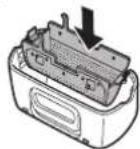
▶ Remplacement de la lame interne


natural_image
Illustration of a person applying a toothpaste to their mouth, showing two different actions (no text or symbols present)natural_image
Three-step illustration showing a bag being compressed by strings, with no text or symbols present.natural_image
Illustration of three hands using a power tool to adjust a tree (no text or symbols present)Italiano
Lubrificazione
natural_image
Illustration of two hands using a device to adjust or install a component (no text or symbols visible)
▶ Trimmer per barba ER-GY50
natural_image
Mechanical assembly diagram showing a cutting tool and spring mechanism (no text or labels)natural_image
Illustration of three-step battery pack assembly process showing hand positioning, internal components, and final assembly (no text or symbols)


A Beschermkap
B Scheerbladhouder
① Buitenste scheerblad
② Uitklapbare trimmer
natural_image
Illustration of a person applying a toothpaste to their mouth, showing two different actions (no text or symbols present)natural_image
Three-step illustration showing a person opening a pipe with a bag, then holding a container and another pouring liquid (no text or symbols)natural_image
Illustration of three hand-drawn steps showing a device, a tree, and a switch (no text or symbols)Smering
natural_image
Illustration of two hands using a tool to adjust or install a device component (no text or symbols visible)natural_image
Mechanical assembly diagram showing a tool interacting with a spring-like component, with two circular insets highlighting the components (no text or symbols present)
natural_image
Illustration of a battery pack being processed with a tool, showing internal components and a close-up view (no text or symbols)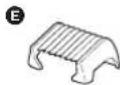


A Tapa protectora
Español
natural_image
Three-step illustration showing a bag being compressed by a stick, with no text or symbols present.natural_image
Three-step diagram showing hands using a tool to remove a small object, one being cut and the other holding a switch (no text or symbols)Lubricación
natural_image
Illustration of two hands using a tool to adjust or install a component, showing a device with a knob and a magnified view (no text or symbols)natural_image
Mechanical assembly diagram showing a microscope with two circular insets highlighting different components (no text or labels)
Barbering
natural_image
Three sequential illustrations showing a person performing a manual push-up with a bag, no text or symbols present.natural_image
Three-step illustration showing hands using different tools to adjust or install a device (no text or symbols present)Smøring
natural_image
Illustration of two hands using a device to adjust a component (no text or symbols visible)▶ Trimmer til skæg ER-GY50
- Fjern det indre blad og glid kontakten til pop-up trimmeren opad.
- Påfør en eller to dråber olie på de med pilene anviste steder.
natural_image
Mechanical assembly diagram showing a tool interacting with a spring-like component, with two circular insets highlighting the components (no text or symbols present)natural_image
Illustration of a hand holding a device with three views of the internal components (no text or symbols present)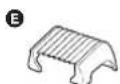
A Tampa protectora

▶ Fixar o carregador à parede
Rapar
natural_image
Three-step illustration showing a hand holding a small object with motion lines indicating movement (no text or symbols)natural_image
Three-step illustration showing hands using a power tool to adjust a small electronic component (no text or symbols present)Lubrificação
natural_image
Illustration of hands using a tool to adjust or install a device (no text or symbols present)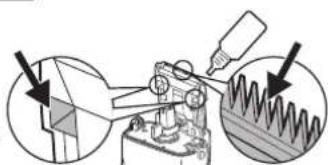
natural_image
Mechanical assembly diagram showing a cutting tool interacting with a spring-loaded component, with two circular insets highlighting the components (no text or labels)Português
Motorspenning: 1,2 V likestrøm
Ladetid: 8 timer
Dette produktet er kun ment til husholdningsbruk.
Akustisk støy:
ER-GY30 67 (dB (A) re 1 pW)
ER-GY50 Under barbering: 67 (dB (A) re 1 pW)
Under trimming: 68 (dB (A) re 1 pW)

natural_image
Three-step illustration showing a person performing a manual lift or lift motion, with no text or symbols present.natural_image
Illustration of three different hand tools: a power tool, a tree growing from a surface, and a switch with a handle (no text or symbols present)Smøring
natural_image
Illustration of two hands using a device to adjust or install a component (no text or symbols visible)
▶ Trimmer for skjegg ER-GY50
natural_image
Mechanical assembly diagram showing a cutting tool interacting with a workpiece, with two circular insets highlighting the process (no text or symbols present)natural_image
Illustration of a hand holding a battery with an arrow pointing to its component, and a close-up of the internal structure (no text or symbols)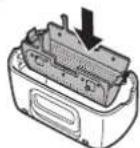
Norsk
70
ER-GY50 EU. indb 70 2010/01/15 19:20:03

▶ Bytte innerbladet

A Skyddshuva
B Bladram
① Ytterfolie
② Popup trimmer
③ Popup trimmer-omkopplare
© Innerblad
D Huvudenhet
natural_image
Three-step illustration of a mechanical or fluidic device with droplets and blocks, no text or symbols present.natural_image
Illustration of three hands performing manual tasks: cutting a battery, tree pruning, and using a switch (no text or symbols)Smörjning
natural_image
Illustration of two hands using a device to press or adjust a component (no text or symbols visible)▶ Skäggtrimmer ER-GY50
natural_image
Mechanical assembly diagram showing a cutting tool interacting with a spring-like component, with two circular insets highlighting the components (no text or labels)natural_image
Illustration of a battery pack being handled with a tool, showing internal components and a close-up view (no text or symbols)▶ Byta innerbladet
The image contains no discernible text or characters.
The image contains no discernible text or characters.
The image contains no discernible text or characters.
The image contains no discernible text or characters.
The image contains no discernible text or characters.
The image contains no discernible text or characters.
The image contains no discernible text or characters.
The image contains no discernible text or characters.
④
The image contains no discernible text or characters.
The image contains no discernible text or characters.
The image contains no discernible text or characters.
The image contains no discernible text or characters.
The Ground Truth image displays a single, solid horizontal line. According to Rule 2 (UNDERSCORE & LINE RULES), this is a stylistic or background line, not a placeholder underscore. Therefore, the OCR result must ignore it and output nothing or only meaningful text. The provided OCR content is "____", which consists of four underscores. This is an incorrect interpretation of the line as a placeholder, violating the rule that stylistic lines must be ignored. The OCR has hallucinated placeholder underscores where none exist in the GT. Hence, the OCR result is inconsistent with the Ground Truth.
The Ground Truth image displays a single, solid horizontal line. According to Rule 2 (UNDERSCORE & LINE RULES), this is a stylistic or background line, not a placeholder underscore. Therefore, the OCR result must ignore it and output nothing or only meaningful text. The provided OCR content is "____", which consists of four underscores. This is an incorrect interpretation of the line as a placeholder, violating the rule that stylistic lines must be ignored. The OCR has hallucinated placeholder underscores where none exist in the GT. Hence, the OCR result is inconsistent with the Ground Truth.
The Ground Truth image displays a single, solid horizontal line. According to Rule 2 (UNDERSCORE & LINE RULES), this is a stylistic or background line, not a placeholder underscore. Therefore, the OCR result must ignore it and output nothing or only meaningful text. The provided OCR content is "____", which consists of four underscores. This is an incorrect interpretation of the line as a placeholder, violating the rule that stylistic lines must be ignored. The OCR has hallucinated placeholder underscores where none exist in the GT. Hence, the OCR result is inconsistent with the Ground Truth.
The Ground Truth image displays a single, solid horizontal line. According to Rule 2 (UNDERSCORE & LINE RULES), this is a stylistic or background line, not a placeholder underscore. Therefore, the OCR result must ignore it and output nothing or only meaningful text. The provided OCR content is "____", which consists of four underscores. This is an incorrect interpretation of the line as a placeholder, violating the rule that stylistic lines must be ignored. The OCR has hallucinated placeholder underscores where none exist in the GT. Hence, the OCR result is inconsistent with the Ground Truth.
The Ground Truth image displays a single, solid horizontal line. According to Rule 2 (UNDERSCORE & LINE RULES), this is a stylistic or background line, not a placeholder underscore. Therefore, the OCR result must ignore it and output nothing or only meaningful text. The provided OCR content is "____", which consists of four underscores. This is an incorrect interpretation of the line as a placeholder, violating the rule that stylistic lines must be ignored. The OCR has hallucinated placeholder underscores where none exist in the GT. Hence, the OCR result is inconsistent with the Ground Truth.

The Ground Truth image displays a single, solid horizontal line. According to Rule 2 (UNDERSCORE & LINE RULES), this is a stylistic or background line, not a placeholder underscore. Therefore, the OCR result must ignore it and output nothing or only meaningful text. The provided OCR content is "____", which consists of four underscores. This is an incorrect interpretation of the line as a placeholder, violating the rule that stylistic lines must be ignored. The OCR has hallucinated placeholder underscores where none exist in the GT. Hence, the OCR result is inconsistent with the Ground Truth.
The Ground Truth image displays a single, solid horizontal line. According to Rule 2 (UNDERSCORE & LINE RULES), this is a stylistic or background line, not a placeholder underscore. Therefore, the OCR result must ignore it and output nothing or only meaningful text. The provided OCR content is "____", which consists of four underscores. This is an incorrect interpretation of the line as a placeholder, violating the rule that stylistic lines must be ignored. The OCR has hallucinated placeholder underscores where none exist in the GT. Hence, the OCR result is inconsistent with the Ground Truth.
The Ground Truth image displays a single, solid horizontal line. According to Rule 2 (UNDERSCORE & LINE RULES), this is a stylistic or background line, not a placeholder underscore. Therefore, the OCR result must ignore it and output nothing or only meaningful text. The provided OCR content is "____", which consists of four underscores. This is an incorrect interpretation of the line as a placeholder, violating the rule that stylistic lines must be ignored. The OCR has hallucinated placeholder underscores where none exist in the GT. Hence, the OCR result is inconsistent with the Ground Truth.
The Ground Truth image displays a single, solid horizontal line. According to Rule 2 (UNDERSCORE & LINE RULES), this is a stylistic or background line, not a placeholder underscore. Therefore, the OCR result must ignore it and output nothing or only meaningful text. The provided OCR content is "____", which consists of four underscores. This is an incorrect interpretation of the line as a placeholder, violating the rule that stylistic lines must be ignored. The OCR has hallucinated placeholder underscores where none exist in the GT. Hence, the OCR result is inconsistent with the Ground Truth.
The Ground Truth image displays a single, solid horizontal line. According to Rule 2 (UNDERSCORE & LINE RULES), this is a stylistic or background line, not a placeholder underscore. Therefore, the OCR result must ignore it and output nothing or only meaningful text. The provided OCR content is "____", which consists of four underscores. This is an incorrect interpretation of the line as a placeholder, violating the rule that stylistic lines must be ignored. The OCR has hallucinated placeholder underscores where none exist in the GT. Hence, the OCR result is inconsistent with the Ground Truth.
The Ground Truth image displays a single, solid horizontal line. According to Rule 2 (UNDERSCORE & LINE RULES), this is a stylistic or background line, not a placeholder underscore. Therefore, the OCR result must ignore it and output nothing or only meaningful text. The provided OCR content is "____", which consists of four underscores. This is an incorrect interpretation of the line as a placeholder, violating the rule that stylistic lines must be ignored. The OCR has hallucinated placeholder underscores where none exist in the GT. Hence, the OCR result is inconsistent with the Ground Truth.
The Ground Truth image displays a single, solid horizontal line. According to Rule 2 (UNDERSCORE & LINE RULES), this is a stylistic or background line, not a placeholder underscore. Therefore, the OCR result must ignore it and output nothing or only meaningful text. The provided OCR content is "____", which consists of four underscores. This is an incorrect interpretation of the line as a placeholder, violating the rule that stylistic lines must be ignored. The OCR has hallucinated placeholder underscores where none exist in the GT. Hence, the OCR result is inconsistent with the Ground Truth.
The Ground Truth image displays a single, solid horizontal line. According to Rule 2 (UNDERSCORE & LINE RULES), this is a stylistic or background line, not a placeholder underscore. Therefore, the OCR result must ignore it and output nothing or only meaningful text. The provided OCR content is "____", which consists of four underscores. This is an incorrect interpretation of the line as a placeholder, violating the rule that stylistic lines must be ignored. The OCR has hallucinated placeholder underscores where none exist in the GT. Hence, the OCR result is inconsistent with the Ground Truth.
The Ground Truth image displays a single, solid horizontal line. According to Rule 2 (UNDERSCORE & LINE RULES), this is a stylistic or background line, not a placeholder underscore. Therefore, the OCR result must ignore it and output nothing or only meaningful text. The provided OCR content is "____", which consists of four underscores. This is an incorrect interpretation of the line as a placeholder, violating the rule that stylistic lines must be ignored. The OCR has hallucinated placeholder underscores where none exist in the GT. Hence, the OCR result is inconsistent with the Ground Truth.
The Ground Truth image displays a single, solid horizontal line. According to Rule 2 (UNDERSCORE & LINE RULES), this is a stylistic or background line, not a placeholder underscore. Therefore, the OCR result must ignore it and output nothing or only meaningful text. The provided OCR content is "____", which consists of four underscores. This is an incorrect interpretation of the line as a placeholder, violating the rule that stylistic lines must be ignored. The OCR has hallucinated placeholder underscores where none exist in the GT. Hence, the OCR result is inconsistent with the Ground Truth.
The Ground Truth image displays a single, solid horizontal line. According to Rule 2 (UNDERSCORE & LINE RULES), this is a stylistic or background line, not a placeholder underscore. Therefore, the OCR result must ignore it and output nothing or only meaningful text. The provided OCR content is "____", which consists of four underscores. This is an incorrect interpretation of the line as a placeholder, violating the rule that stylistic lines must be ignored. The OCR has hallucinated placeholder underscores where none exist in the GT. Hence, the OCR result is inconsistent with the Ground Truth.
The Ground Truth image displays a single, solid horizontal line. According to Rule 2 (UNDERSCORE & LINE RULES), this is a stylistic or background line, not a placeholder underscore. Therefore, the OCR result must ignore it and output nothing or only meaningful text. The provided OCR content is "____", which consists of four underscores. This is an incorrect interpretation of the line as a placeholder, violating the rule that stylistic lines must be ignored. The OCR has hallucinated placeholder underscores where none exist in the GT. Hence, the OCR result is inconsistent with the Ground Truth.
The image contains no discernible text or characters.
The Ground Truth image displays a single, solid horizontal line. According to Rule 2 (UNDERSCORE & LINE RULES), this is a stylistic or background line, not a placeholder underscore. Therefore, the OCR result must ignore it and output nothing or only meaningful text. The provided OCR content is "____", which consists of four underscores. This is an incorrect interpretation of the line as a placeholder, violating the rule that stylistic lines must be ignored. The OCR has hallucinated placeholder underscores where none exist in the GT. Hence, the OCR result is inconsistent with the Ground Truth.
The Ground Truth image displays a single, solid horizontal line. According to Rule 2 (UNDERSCORE & LINE RULES), this is a stylistic or background line, not a placeholder underscore. Therefore, the OCR result must ignore it and output nothing or only meaningful text. The provided OCR content is "____", which consists of four underscores. This is an incorrect interpretation of the line as a placeholder, violating the rule that stylistic lines must be ignored. The OCR has hallucinated placeholder underscores where none exist in the GT. Hence, the OCR result is inconsistent with the Ground Truth.
The Ground Truth image displays a single, solid horizontal line. According to Rule 2 (UNDERSCORE & LINE RULES), this is a stylistic or background line, not a placeholder underscore. Therefore, the OCR result must ignore it and output nothing or only meaningful text. The provided OCR content is "____", which consists of four underscores. This is an incorrect interpretation of the line as a placeholder, violating the rule that stylistic lines must be ignored. The OCR has hallucinated placeholder underscores where none exist in the GT. Hence, the OCR result is inconsistent with the Ground Truth.
—
.
| |
.
[Non-Text]
[Non-Text]
[Non-Text]
[Non-Text]
[Non-Text]
[Non-Text]
[Non-Text]
[Non-Text]
[Non-Text]
[Non-Text]
[Non-Text]
[Non-Text]
[Non-Text]
[Non-Text]
[Non-Text]
[Non-Text]
[Non-Text]
[Non-Text]
[Non-Text]
[Non-Text]
[Non-Text]
[Non-Text]
[Non-Text]
[Non-Text]
[Non-Text]
[Non-Text]
Tärkeää
Suomi


Koneen käyttö
natural_image
Three-step illustration showing a person performing a manual push-up on a tree branch, with no text or symbols present.▶ Puhdistus harjalla
natural_image
Three-step illustration showing hands using a power tool to clean or install an electrical component (no text or symbols present)Voiteleminen
natural_image
Illustration of two hands using a device to press or install a keyboard (no text or symbols visible)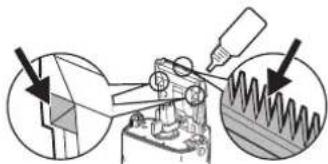
natural_image
Mechanical assembly diagram showing a tool interacting with a component, with two circular insets highlighting the components (no text or symbols present)

A Nakładka ochronna
B Ramka folii
natural_image
Three sequential illustrations showing a person performing a manual valve or grip operation (no text or symbols present)natural_image
Three-step diagram showing hands using a power tool to adjust a tree on a switch, with no text or symbols present.Smarowanie
natural_image
Illustration of two hands using a tool to adjust or install a device (no text or symbols visible)▶ Końcówka do brody ER-GY50
natural_image
Illustration of a hand holding a small electronic device with three views of internal components (no text or symbols visible)


A Ochranné víčko
B Rám fólie
① Vnější fólie
natural_image
Three sequential illustrations showing a person performing a manual valve or grip operation (no text or symbols present)natural_image
Three-step illustration showing hands using different tools to generate a tree (no text or symbols present)Mazání
natural_image
Illustration of two hands using a tool to adjust or install a device (no text or symbols visible)
natural_image
Mechanical assembly diagram showing a cutting tool and spring mechanism (no text or symbols)natural_image
Illustration of a battery pack being processed with a tool, showing internal components and a close-up view (no text or symbols)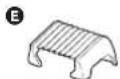


A Ochranný kryt
B Hlava s planžetou
- Kontrolka nabíjania sa rozsvieti a svieti až dovtedy, kým sa holiaci strojček nevyberie z nabíjačky.
- Plné nabitie poskytne dostatok energie približne na 4 holenia, každé s tryaním 7 minút.
▶ Pripevnenie nabijačky na stenu
natural_image
Three-step diagram showing a hand using a power tool to clean a small electronic component, with no text or symbols present.Mazanie
natural_image
Two-step illustration showing hands using a tool to adjust or install a component, with no visible text or symbols.▶ Zastrihovač na brady ER-GY50


A Védősapka
B A szita váza
① Külső szita
② Kipattanó nyíró


natural_image
Three-step diagram showing hands using a power tool to remove a leaf from a battery, then removing it into a circuit board (no text or symbols present)Kenés
natural_image
Illustration of two hands using a device to adjust a component (no text or symbols present)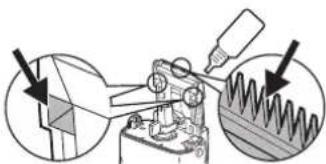
natural_image
Mechanical assembly diagram showing a cutting tool interacting with a workpiece, with two circular insets highlighting the components (no text or labels)natural_image
Illustration of a hand holding a battery pack, with close-up insets showing internal components (no text or symbols)


Aparat de ras
natural_image
Three-step diagram showing hand holding a device, tree growing from a base, and circuit switch (no text or symbols)
Lubrifiere
natural_image
Illustration of two hands using a device to adjust a component (no text or symbols present)