
EuroPhone free - Phone Hagenuk - Free user manual and instructions
Find the device manual for free EuroPhone free Hagenuk in PDF.
| Product type | Cordless deskphone |
| Brand | Hagenuk |
| Model | EuroPhone free |
| Dimensions | 252 × 65 × 211 mm |
| Weight | Approximately 1000 g |
| Power supply | Power adapter 220/230 V (supplied) |
| Power consumption | ≤ 3.4 VA |
| Display | 2 lines of 24 characters with status symbols |
| Keypad | Numeric with 10 programmable destination keys (20 memories) |
| Main functions | Handset-free listening, hands-free, last number redial, mute function, ring volume adjustment, keypad lock |
| Base station | Compatible with multiple bases (up to 4), required for operation |
| Setup | Connect the handset and power adapter, follow the cable guide |
| Housing material | Shock-resistant and antistatic ABS |
| Maintenance and cleaning | Slightly damp or antistatic cloth, no detergent |
| Safety | Use only the supplied power adapter, keep away from heat sources |
| Compliance | CE (0188 X) |
| Warranty | Compliance with European directives |
Frequently Asked Questions - EuroPhone free Hagenuk
User questions about EuroPhone free Hagenuk
0 question about this device. Answer the ones you know or ask your own.
Ask a new question about this device
Download the instructions for your Phone in PDF format for free! Find your manual EuroPhone free - Hagenuk and take your electronic device back in hand. On this page are published all the documents necessary for the use of your device. EuroPhone free by Hagenuk.
USER MANUAL EuroPhone free Hagenuk
Operating instructions
Rufnummer Service-Center: (0431) 8 00 00 55
Faxnummer Service-Center: (0431) 8818-52 45
E-Mail Service-Center: service@hagenuk.de
Table of contents
1 Starting up 4
1.1 Start up: overview 4
1.2 Connecting the telephone 4
2 Operating 6
2.1 Displays and tones 6
2.2 Selecting functions from the menu.. 7
2.3 Local menu and system menu 8
2.4 Muting 8
2.5 Handset volume 9
2.6 Open listening and hands-free operation 9
2.7 Number radial 10
2.8 Ringer 10
2.9 Name keys 10
2.9.1 Entering characters 11
2.10 Barring 12
3 Setup / "Set up" 12
3.1 Resetting 12
Appendix
Notes
Use of TC-System
Location selection
Ate DcDd-Deskpattonendacnmeetdtffefof fesystoestations. Plesse refer to the corresponding product information for details on which unit it is.
- The telephone can be used alternately at up to 7 TC-System stations.
- It cannot, however, be operated without a TC-System.
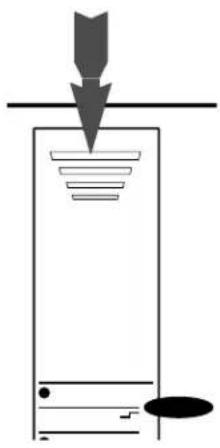
The DECT-Deskphone must be located within transmission range of the TC-System. To assist finding the right location, you can use the telephone to perform a field strength measurement.
Avoid installing the unit in the direct vicinity of other electronic equipment, such as, hi-fi systems, office or microwave equipment, to exclude mutual interference.
e.g. radiators.
Place the unit on a non-slip mat so that the plastic feet of the unit are not damaged by the furniture coating, leaving undesirable marks on the furniture surface. For obvious reasons, the manufacturer cannot be held responsible for such damage.
The best base station
To assist you in selecting a (possibly changed) site for the telephone, you can perform a field strength measurement. Here, the reception quality to a selected TC-system is displayed.
Field strength is displayed:


"......" = no system, "......" = poor connection quality (acoustic warning of communication breakdown) to "......" = excellent connection quality. The field strength displays under "KE1" and "KE2" only occur in conjunction with several channel elements, according to the system used.
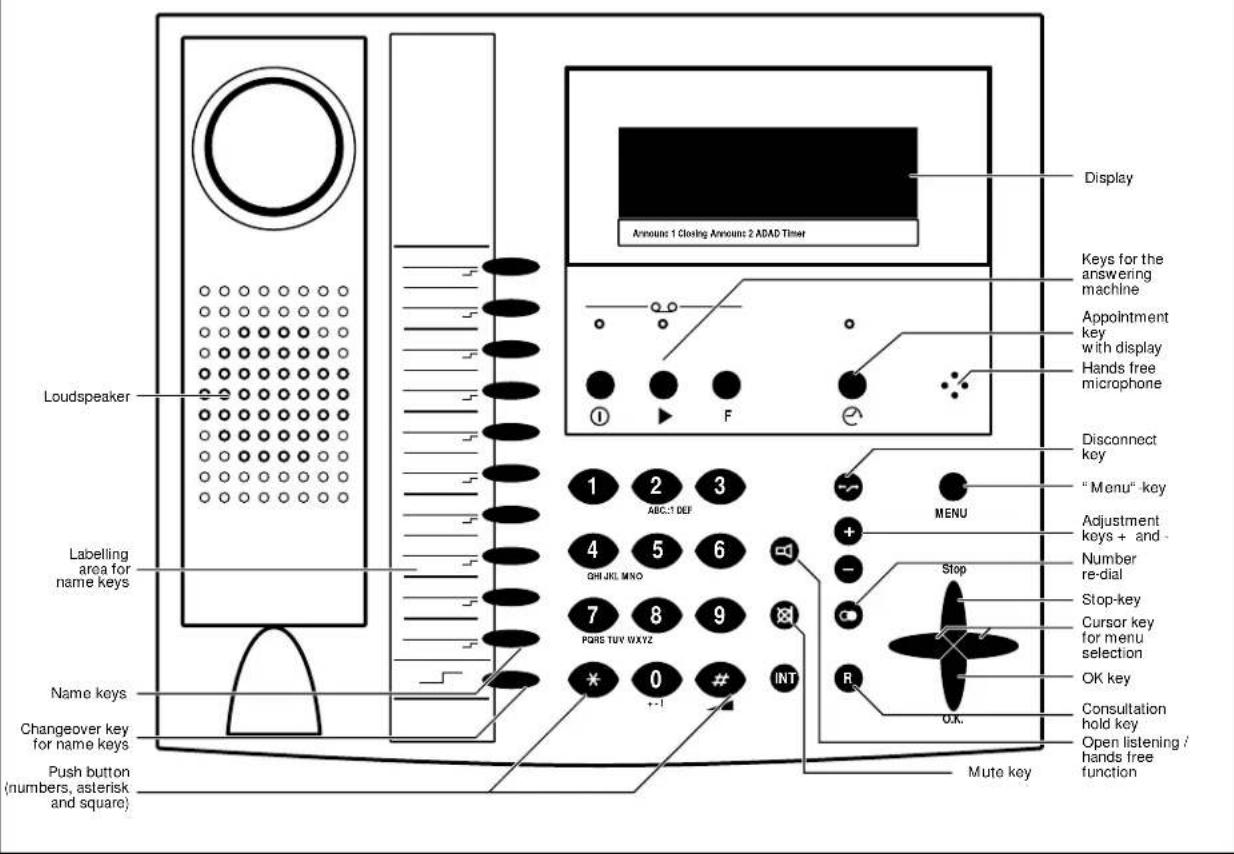
Controls
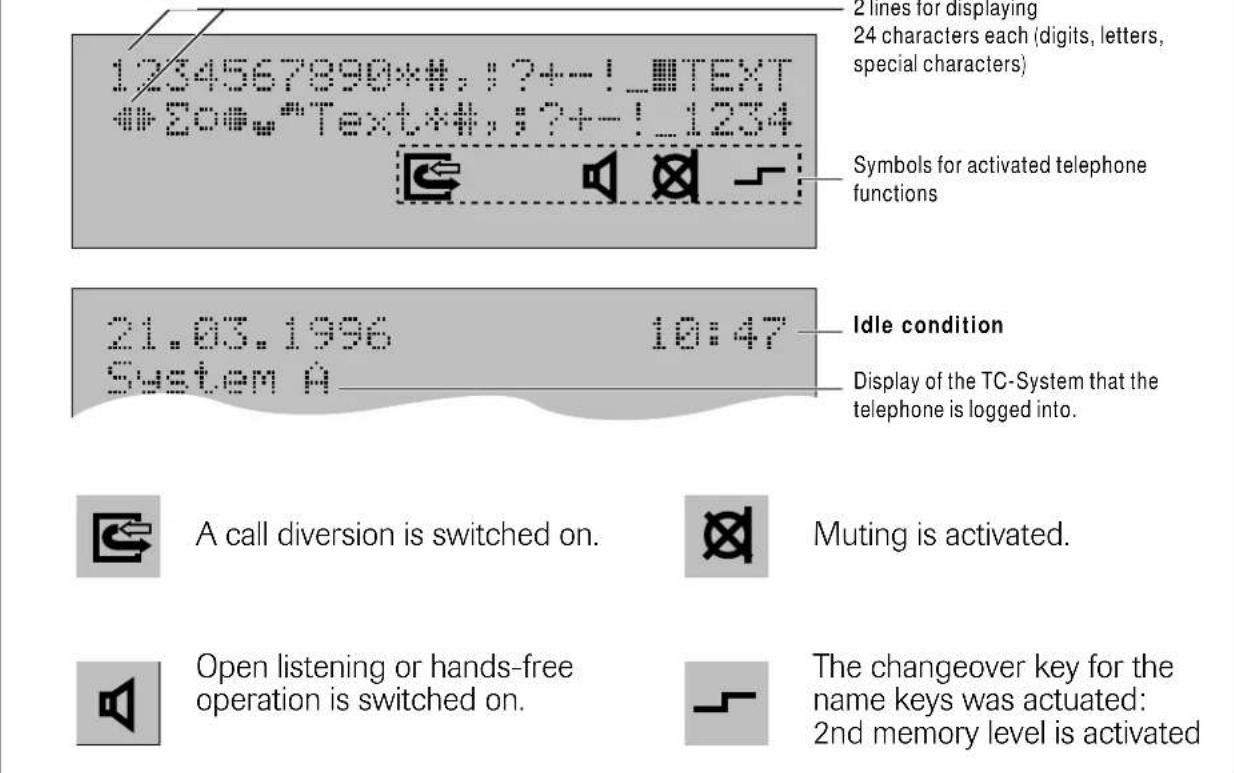
Display
Menu control / The Display
The functions of the unit are collected together in a menu. They are offered in "plain text" in the display:
About this User's Guide
This User's Guide explains the local functions of the cordless digital desk telephone.
Range of features when operating the DECT-Deskphone at a TC-System
Local Functions of DECT-Deskphone
This User's Guide informs you about these functions.
Usable functions of the system
Additional functions which are provided by the respective base. A separate guide gives you information about these functions.
- The TC-system functions extend the range of features of DECT-Deskphone.
- The local functions are independent of the type of TC-System.
Thus the User's Guides for the system and for complement each other. You should therefore use the guides together.
Pictogram in the User's Guide

Handset is on hook

Lift handset

Replace handset


Keyboard input
During a call
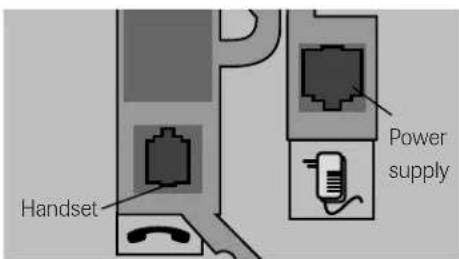
Plugging-in is performed for all three sockets in the same way:
- Insert the plug into the socket so that the locking catch points in the direction of the corresponding cut-out in the socket.
- Push the plug into the socket until it locks.
You will find the handset and the spiral cable in the packaging.
- Connect the plug of the cable end with the longer straight piece with the socket on the underside of the telephone (refer to sketch on previous page).
- Connect the other plug of the cable with the
- Route cable through the cable guide.
Now insert the appropriate plug of the plug-in power supply unit into the corresponding socket (see sketch on previous page). For safety reasons, the telephone must only be operated using the plug-in power supply unit supplied with it. Insert the plug-in power supply unit into the 220 / 230 volt socket.
Caution: Your telephone will not operate if the plug-in power supply is not inserted or in the case of a power failure.
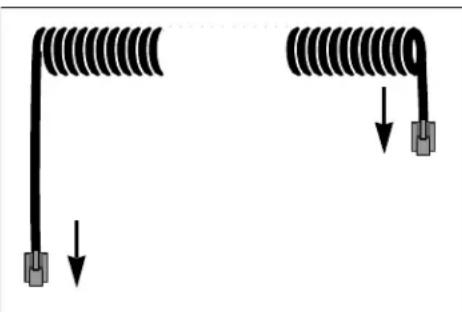
Once you have established the plug-in connections, you must route the cable through the accompanying cable guides.
This ensures a correct setting up of the telephone. Carefully press the cable into the recesses (refer to sketch).
First of all, pull the supply unit out of the power socket.
Releasing a plug-in connection:
Press the locking catch towards the plug.
Pull out the plug, holding it on both sides (keep the locking catch depressed!).
2 Operating overview
2.1 Displays and tones
The handset is on hook, open
listening / Hands-free operation is
not switched on. There is no actual call. In the bottom line the TC-system at which the telephone is currently being operated is displayed.
The display gives you information on date and time in the top line. If possible, the display is controlled by the ISDN network. Date and time are synchronized after the first outgoing call you make with the telephone and then kept by the telephone. The displays are aligned with the data of the exchange at every external outgoing call. (also set of time and desk via menu)
If no key is pressed for 60 seconds during an operating sequence, the unit returns to the idle condition with almost all operations!
Handset was lifted or the function open listening/hands-free operation switched on. The telephone is ready to dial a telephone number.
The telephone is located outside the transmitting range of the selected TC-System or is not logged in.
The display contrast can be altered in the idle condition of the telephone using the adjustment keys (^ + ^ and "-^ ) in 4 levels. To increase the contrast, press the ^ + ^ key, to decrease it, the "-^ key.
0.6s
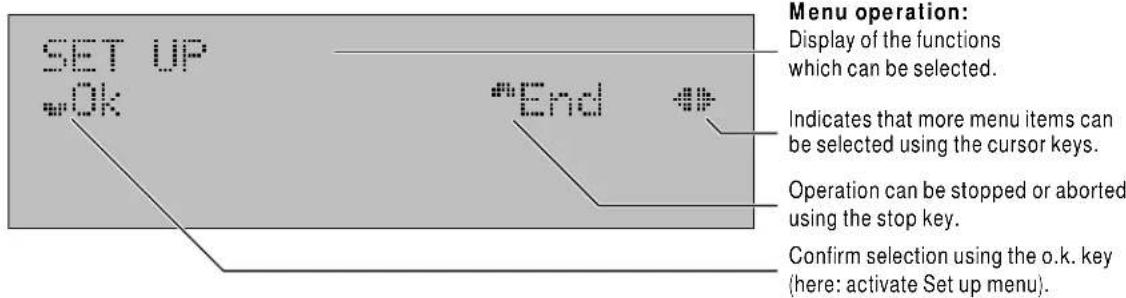
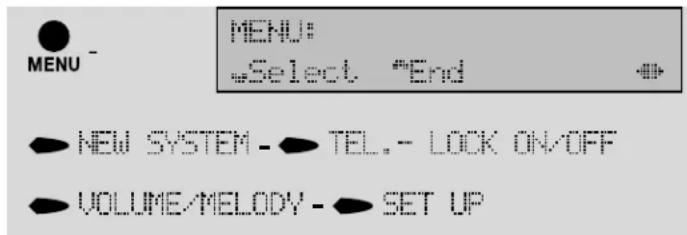
2.2 Selecting functions from the menu

During operation, you are assisted by the operator guidance with display messages:
Press the "menu" key, to start selection from the menu. You can now select functions. These are displayed to you in the top menu line. By pressing the "menu" key again, you can exit the function menu.
4 keys are used for menu control:

Stop key: End operation or abort. You can return to the previous menu level by pressing the key once or, by repeated pressing, back to the idle condition.

Cursor keys: Select from the menu. You can "page" forwards (right) or backwards (left) through the menu. Using the left cursor key, you can also delete letters and digits. The right cursor key an generate blanks.

O.K. key: Confirmation of a selection or setting
Depiction of operating sequences
In the User's Guide, the selection of a menu item is depicted in simplified form:


VOLUME/PELICY

This corresponds to the sequence:
- Press the "menu" key, to start selection from the menu.
- Using the cursor keys, select the menu item "VOLUME/TELOD".
- Press the O.K. key, to confirm the selection.
See User's Guide of theTC-System!

Currently usable functions of the TC-System (2nd display line)
In the 2nd line, the currently usable functions of the TC-System art offered.With some TC-Systems, the "call list" may be activated.
These function are dependent on the type of TC-System and on the mode of the telephone (e.g. programming). They do not belong to the functions of the functions menu.
If several such functions are available, the symbol for selection using the cursor keys is displayed (▶). The desired function can thus be selected using the cursor keys.
The functions offered are each activated using the O.K. key.
2.3 Local menu and system menu
The DECT-Deskphone can be operated at different TC-System stations. The functions of the respective TC-System extend the range of features of the telephone. They are described in an additional User's Guide.
The local functions are, however, independent of the type of TC-System.
Calling up the menu in idle condition: Local menu
In idle condition there is no radio connection to the base. Only the local functions of the unit are available.
Local Functions in idle condition
Manu after setting up the radio connection: Local + system menu
A radio connection to the TC-System is set up once the handset is lifted or open listening/hands-free operation is switched on. Its functions are then also available to you in the menu = "System menu".
Functions with radio connection
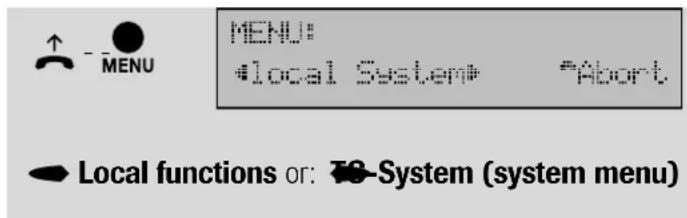
Irrespective of which menu you began selection in using the cursor keys, the last function of previous menu is always followed by the first function of the next menu. This means that you "page" through the menus in a "loop": ... System menu - Local menu - System menu ...
2.4 Muting
The handset or hands-free microphone can be switched off during a telephone call using the mute key. The other party cannot hear you any more: Press the mute key. The symbol appears in the display. You can then talk to someone else without the party on the telephone being able to hear what you are saying.
Switch on the microphone again: Press the mute key again
2.5 Handset volume
Symbol:

MENU

The handset volume can be switched from "normal" to "loud".
The same procedure, you can switch from "loud" back to "normal". Press the "menu" key followed by the "#" key. You use the same procedure to switch back to normal volume.
2.6 Open listening and hands-free operation
Open listening: You hear the other party via the loudspeaker. Hands-free operation: You talk using the microphone of the telephone and hear the other party via the loudspeaker.
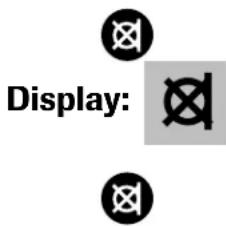
Display:

You can make calls using open listening and hands-free operation. You can also just switch on the open listening function, so that others can listen as well. Tell the other party what you are doing.
Open listening and hands-free operation are possible at any time. For this reason, no special mention will be made of this when explaining individual functions. The sequence used when lifting the handset is always described.
Accepting calls and ending with open listening / hands-free operation
Accept


Press key for open listening/hands-free operation. This corresponds to lifting the handset. The symbol appears in the display. The volume can be set using the adjustment keys (^ + ^ = louder, ^ - ^ = quieter) .
End
Press key for open listening/hands-free operation again. This corresponds to replacing the handset.
Switching on open listening during a call
The call is made using the handset. It should also be able to be heard via the loudspeaker.
Switch on open listening: Press key for open listening/hands-free operation.
You continue to talk using the handset.
Switch off open listening again: Press key for open listening again.
Switching on hands-free operation during a call
The call is made using the handset. You wish to continue the call using hands-free operation:
Press key for open listening/hands-free operation and keep it pressed.
With the key depressed: Replace handset Hands-free operation is switched on. You can now release the key.
Continuing a call using the handset

The call is being made using hands-free operation and is to be continued using the handset: Lift handset


2.7 Number radial
Using the number radial function, the last three (manually) dialed telephone numbers are stored automatically = history function. The telephone number dialed last overwrites the oldest entry in the repeat dial memory.
Telephone in read-to-dial condition:

Keep pressing the number radial key, until the desired telephone number is selected.
Digits can be deleted using the left cursor key.
You can enter digits using the keyboard.
The telephone number is dialed once you have pressed the O.K. key.
Alternative
The telephone number can also be selected in idle condition by pressing the number radial key. Dialing is performed after lifting the handset.
2.8 Ringer
The ringer signals call. Melody and volume can be changed
Changing melody

Changing volume
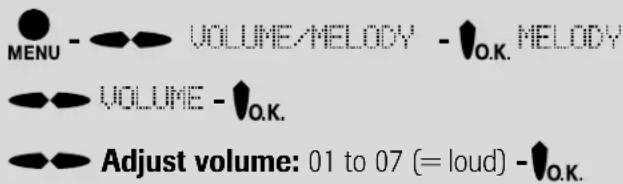
See User's Guide for the TC-System!
2.9 Name keys
The telephone has 10 name keys. Two memory allocations are available per key. These 20 memories can have telephone numbers and the accompanying names allocated to them.
You can find information on programming of keys in the User's Guide for the TC-System. With operation at some systems, you can program the name keys as function keys. The upper 4 name keys can have special functions allocated to them.

3 "Set up" menu
Settings for operation of the telephone are collected together in the "set up" menu. this DECT-Deskphone.
3.1 Resetting
You can reset all local DECT-Deskphone settings to the default status on delivery. Memory contents, such as telephone numbers, are also deleted

Settings on delivery
The telephone is supplied with the following basic settings:
Ringer: volume 5, melody: 2
- Display contrast: Level 3
AD memory: none
Technical data
Housing: ABS, shock-proof, anti-static
Dimensions: 252 × 65 × 211 ~mm (
Weight: approx. 1000 g
Power consumption: ≤ 3.4 VA
CE label
The product corresponds to the basic requirements of all applicable regulations of the Council of the European Union. The prescribed conformity evaluation procedures have been implemented (CE 0188 X).
Cleaning
Simply wipe off the unit with slightly damp cloth or with an antistatic cloth; please do not use a completely dry cloth. Please avoid the use of cleaning and scouring agents.
Table des matieres
23, avenue René Duguay Trouin
F-78960 Voisins-Le-Bretonneux
Tel.: +33-1-39 44 63 30s
Fax: +33-1-30 57 00 29
Belgique:
- Table of contents
- Starting up 4
- Operating 6
- Setup / "Set up" 12
- Appendix
- Notes
- Use of TC-System
- Location selection
- The best base station
- Field strength is displayed:
- Menu control / The Display
- About this User's Guide
- Range of features when operating the DECT-Deskphone at a TC-System
- Local Functions of DECT-Deskphone
- Usable functions of the system
- Thus the User's Guides for the system and for complement each other. You should therefore use the guides together.
- Pictogram in the User's Guide
- Caution: Your telephone will not operate if the plug-in power supply is not inserted or in the case of a power failure.
- Operating overview
- Displays and tones
- Selecting functions from the menu
- keys are used for menu control:
- Depiction of operating sequences
- This corresponds to the sequence:
- See User's Guide of theTC-System!
- Currently usable functions of the TC-System (2nd display line)
- Local menu and system menu
- Calling up the menu in idle condition: Local menu
- Local Functions in idle condition
- Manu after setting up the radio connection: Local + system menu
- Functions with radio connection
- Muting
- Handset volume
- Symbol:
- Open listening and hands-free operation
- Display:
- Accepting calls and ending with open listening / hands-free operation
- Accept
- End
- Switching on open listening during a call
- Switching on hands-free operation during a call
- Continuing a call using the handset
- Number radial
- Telephone in read-to-dial condition:
- Alternative
- Ringer
- Changing melody
- Changing volume
- See User's Guide for the TC-System!
- Name keys
- "Set up" menu
- Resetting
- Settings on delivery
- Technical data
- CE label
- Cleaning
- Table des matieres
- Belgique:
Brand : Hagenuk
Model : EuroPhone free
Category : Phone