Classico - Telephone Hagenuk - Free user manual and instructions
Find the device manual for free Classico Hagenuk in PDF.


| Product Type | Cordless DECT Telephone |
| Brand | Hagenuk |
| Model | Classico |
| Frequency | DECT (1880-1900 MHz) |
| Number of Handsets Supported | Up to 4 |
| Handset Dimensions | 140 x 35 x 25 mm |
| Base Station Dimensions | 130 mm diameter, 30 mm height |
| Power Supply | Base: 230V AC/50Hz, 9V AC/300mA adapter; Charger: 9V AC/300mA adapter |
| Battery Type | 2 x AAA NiMH 1.2V 400mAh per handset |
| Talk Time | Up to 8 hours |
| Standby Time | Up to 130 hours |
| Range (Outdoor) | Up to 300 m |
| Range (Indoor) | Up to 50 m |
| Display | Alphanumeric dot-matrix with blue backlight (3 text lines + 1 symbol line) |
| Phonebook Capacity | Up to 50 entries (max 32 digits, 20 characters per entry) |
| Caller ID (CLIP) | Yes, with log for up to 20 numbers |
| Redial Memory | Last 10 dialed numbers |
| Dialing Modes | Tone (DTMF) and Pulse |
| Key Functions | Speakerphone, mute, intercom, paging, redial, flash, conference |
| Baby Mode | Yes |
| Ringer Melodies | 6 selectable melodies for handset and base |
| Ringer Volume Levels | 3 levels + off for handset and base |
| Operating Temperature | +5°C to +35°C |
| Relative Humidity | 25% to 85% |
| Compliance | CE, GAP standard |
Frequently Asked Questions - Classico Hagenuk
User questions about Classico Hagenuk
0 question about this device. Answer the ones you know or ask your own.
Ask a new question about this device
Download the instructions for your Telephone in PDF format for free! Find your manual Classico - Hagenuk and take your electronic device back in hand. On this page are published all the documents necessary for the use of your device. Classico by Hagenuk.
USER MANUAL Classico Hagenuk
User Manual
and Safety Precautions
Cordless DECT - telephone with caller ID
10/04 hj
Quick reference for the handset
| Function input at the keypad | |
| Turn handset ON / OFF | ON: ⏻ OFF: ⏻ hold for 2 s |
| Turn keypad lock ON / OFF | ON: ⏻ hold 1 s OFF: ⏻ hold 1 s |
| Make an external call | or or |
| Make an internal call INT hold 3 s, | down + |
| Redial a number | ○, + select entry, |
| Store telephone number to the phonebook | Menu, OK, ◎, OK, ◎, OK |
| Copy telephone number from call log to phonebook | ✕ + Simult. until the name ap- pears, ◎, OK |
| Dialing from the phonebook | ✕ + select entry, |
| Calling from call log | ✕ + select entry, |
| Speaker phone ON / OFF | ON: 2x √ OFF: 1x √ |
| Set the handset volume | + |
| Set the speaker phone volume | 2x, + |
| Transfer call to another handset INT | Hold 3 s, hang up when the other user answers |
Table of Contents
Quick reference for the handset 2
Handset diagram 6
Base station overview 7
Legend 8
Default settings 8
Menu structure....9
Congratulations 11
Safety precautions.... 11
Contents of the package 12
Features 12
Maintenance 13
Recycling 13
LC - Display (LCD) (symbols line) 14
INSTALLING THE TELEPHONE....15
Installing and connecting the base station 15
Setting up the handset 15
Replacement of the batteries.... 16
Out of range 17
Registering the handset with the base 17
Registering the handset to the Classico base.... 17
Registering the handset with another DECT - base (compatible with GAP) 18
De-registering the handset 18
HANDSET SETTING .... 19
Turning the handset on and off 19
Automatic return to standby 19
Keypad locking 19
Setting the handset's ringer volume 20
Choosing the handset's ringer melody 20
Setting the handset's volume 20
Turning keypad beeps on and off 21
Turning battery low beep on and off 21
Choosing the language 22
Turning automatic answer on and off 22
Returning the handset's setting to the default 23
Modifying the personal code (PIN) of the handset 23
Baby mode 24
Modifying the name of the handset 25
BASE SETTING.... 26
Ringer volume at the base 26
Ringer melody at the base 27
Setting the date and the time 27
Returning the base's settings to the defaults 28
Changing the dialing mode.... 28
Setting the Flash-time.... 29
Modifying the PIN-code of the base.... 30
MAKING CALLS....31
Answering an external call.... 31
Answering an internal call 31
Speaker phone calling 31
Setting the volume for speaker phone calling 32
Calling Outside 32
Making intercom calls 32
Dialing preparation 33
Redial 33
Dialing a number from the phonebook 34
CALL CONTROL ....34
Call timer 34
Total call duration 34
Last call duration 35
Reset call duration.... 35
Setting the call limitation 35
Setting number barring 36
Freeing barred numbers 36
Saving emergency numbers 37
Transfer of a communication to another handset.... 37
EXTERNAL COMFORT FUNCTIONS....38
Waiting call and toggling 38
Consultation and toggling 38
Conference call with three people.... 39
INTERNAL COMFORT FUNCTIONS 40
Waiting call during an internal call....40
Consultation and toggling 40
Conference call with three people.... 40
Paging the handsets....41
Reading the call duration 41
Turning the microphone off (Mute) 41
PHONEBOOK....42
Add phonebook entry 42
Dialing from the phonebook 42
Editing numbers in the phonebook 43
Deleting numbers from the phonebook 43
Deleting the whole phonebook 44
CID LIST (CALLER LOG)......44
Opening the CID list 45
Dialing from the CID-list.... 45
Editing numbers in the CID-list 46
Copying a number from the CID-list to the phonebook 46
APPENDICES 47
Troubleshooting 47
Warranty 48
Technical data 49
INDEX 50
Handset diagram

Base station overview

Classico base station, connections on the bottom of the base

Legend
1 Loudspeaker
2 Display
3 Open caller log, scroll menu up
4 MENU - key, turn off microphone (Mute)
5 Scroll menu left
6 Talk key / speaker phone / OK - key
7 Open phonebook; scroll menu down
8 Alphanumeric keypad
9 Star key
10 Flash - key
11 Redial; scroll menu right
12 End the call; handset ON / OFF; clear
13 # - key (pound key); internal connection
14 Microphone
15 Charging contacts handset
16 Charging contacts base
17 Paging key
18 LED indicating communication
19 Power supply unit jack
20 Telephone jack
Default settings (depending on your country's version)
1 handset at the basis registered
2 handsets at the base registered (DUO - model)
Dialing mode tone dialing
Ringer volume 3 (handset and base)
Ringer melody 3 (handset and base)
Handset volume (level) 2
Speaker phone volume (level) 3
Keypad beeps ON
Battery low beep ON
Auto Talk OFF
SYSTEM PIN handset and base 0000
Baby mode OFF
Rechargeable batteries enclosed, not installed
MENU Structure
![graph TD A["MENU"] --> B["PHONEBOOK-"] B --> C["KEYPAD LOCK"] C --> D["INTERNAL CALL"] D --> E["SETTING"] A --> F["SELECTION PHONEBOOK-"] F --> G["PHONEBOOK-ADD ENTRY"] G --> H["PHONEBOOK EDIT ENTRY"] H --> I["PHONEBOOK DELETE ENTRY"] I --> J["PHONEBOOK DELETE ALL"] J --> K["INT CALL HANDSET _"] K -…](/content/2026/05/869397/images/0fc739edb37429634193aca2a511f1ff03b08d4cce2f08fe03086a6f03f7f835.jpg)
![graph TD A["BASE SETTING"] --> B["RINGER VOLUME"] B --> C["SELECT VOLUME"] C --> D["LEVEL 0-3"] A --> E["ACOUSTIC SETTING"] E --> F["RINGER MELODY"] F --> G["SELECT MELDOY"] G --> H["MELODY 1-6"] A --> I["TIME & DAY SETTING"] I --> J["SET TIME SET"] J --> K["DAY"] A --> L["DEFAULT SETTING"] L --> M[…](/content/2026/05/869397/images/30bc6d916935268ddad821bbba4698b7e5284faba38456874e98e783443dde5a.jpg)
Congratulations
Thanks for purchasing this DECT - telephone!
In order to be able using your phone in full comfort, we advise to read this manual completely, so you will be familiar with its possibilities.
Safety precautions

Do not place the set in the proximity of heat sources and don't expose is to direct sun rays, dust or vibrations.

Fit only the recommended rechargeable battery!

Insert the rechargeable batteries ensuring correct polarity.

Do not use any other type of battery or a non-rechargeable battery, as this could damage health and cause personal injury.

Do not place the base station in a moist room, such as bathroom or shower. The ideal temperature range is between +5° and +35° C and the humidity between 25 % and 85 %.

Do not use the phone in environment subject to explosion hazard e.g. auto paint booths.

Read these instructions carefully, and make sure that they accompany the Classico, when you give it to others to use.

The operation of medical appliances may be affected. Be aware of the technical conditions within the particular environment (e.g. doctor's practice).

Dispose of the battery and phone in accordance with environmental regulations!
Contents of the package
- 1 base station
• 1 charger with power supply (only DUO)
• 1 or 2 handsets (depending on the set)
• 2-4 rechargeable batteries (depending on the set) - 1 power supply
• 1 telephone line-cord/plug depending on your country's version - 1 user manual

Important instruction:
This user manual serves as an information. Its contents is no part of the contract. All technical data refer only to the normal values. Described execution and options can be different, depending on the local requirements of your country. We reserve the right to technical modifications.
Features
■ DECT - telephone according with the GAP - standard
■ Speaker phone, mute, pause, intercom
■ Up to four handsets can be registered with one base station
- Caller ID (CLIP) with a maximum of 20 telephone numbers in the log
■ Alphanumeric DOT-matrix-display with blue backlight, 3 text lines and one line for the symbols
■ Block dialing
■ Re-dialing the last 10 numbers dialed
■ Phonebook with a maximum of 50 different telephone numbers (max. 32 digits and 20 letters)
■ Keypad locking
■ Tone or pulse dialing
■ Announcement of calls on the handset, 6 ringer melodies at choice
■ Volume of the handset ringer selectable in three levels, or turned OFF
■ Up to eight hours of autonomy in communication
■ Up to 130 hours of autonomy in standby
■ Indoors range up to 50 m, outdoors up to 300 m.
■ Handset paging
■ Volume of the handset adaptable in three levels
■ Volume for speaker phone calling adaptable in three levels
■ Transferring external - internal - internal
■ Conference call external - internal - internal
■ Baby mode
■ Display of the call duration
Base Classico
■ Ringer adaptable in three levels or turned OFF
■ Ringer melody adaptable, 6 melodies at choice
■ Status display
■ Memory for maximum four emergency numbers
■ Flash time adaptable 80 / 100 / 300 ms
Maintenance
Clean the base station and the handset with a moist cloth or with an antistatic cloth. Never use dry cloth! There is a danger of statical charge!
Recycling
When your telephone is taken out of service, dispose the batteries and the appliance in an environmentally friendly way!
LC - Display (LCD) (symbols line)

1 Antenna ON: communication is possible flashing: out of range, no communication between handset and base
2 Internal ON: internal communication busy flashing: internal communication is started
3 Speaker phone ON: handset in mode speaker phone
4 Connection ON: communication busy flashing: incoming communication
5 Caller log ON: calls in the caller log flashing: new calls in the caller log
6 Phonebook ON: menu phonebook open
7 Charging status ☐ battery 100% charged ☐ battery 66% charged ☐ battery 33% charged ☐ flashing: battery low
During charging of the handset batteries on the base or on the charger, the symbols below alternate on the right utmost position of the symbols line.

INSTALLING THE TELEPHONE
Installing and connecting the base station
Connect the base station at a central place in the home. Avoid a position close to a television set or radio transmitters, monitors or PC's. Please consider that reception and range are highly dependant from the architectural data. In a free space, the range is 300 m maximum, inside buildings this range can be reduced to 50 m.
At the first installation, the batteries should be charged for at least 14 hours, before using the telephone set.
- Connect the small plug at the power supply cable in the power jack (19) on the bottom of the base.
- Plug in the power supply into the wall outlet (230 V). Plug in the power supply of the charger (230V, only DUO set) into the wall outlet.
- Connect the small plug of the telephone cable to the jack (20) on the bottom of the base.
- Plug in the telephone cord into the telephone jack.

When you purchase another cable in a retail store, take care to buy one with correctly connected wires!
Setting up the handset
- The screen is protected with a synthetic film, remove it.
- Open the battery compartment by turning the lid until the arrows on the lid and on the handset match.
- Place the batteries in the battery compartment, check the polarity!
- Close the battery compartment, place the lid back with the arrows matching, and turn the lid to the right.
- Place the handset on the base station to charge the batteries completely. The charging indication appears.
- The handset is automatically registered with the base station.
Replacement of the batteries
fig. 1 fig.2 fig.3

opening and closing the batteries placing the battery compartment removed batteries Match the arrows on lid handset by turning the lid
- Open the lid of the battery compartment (fig.1)
- Remove the used batteries (fig.2)
- Place new batteries in the battery compartment. Check the polarity!
- Close the battery compartment (fig.1)

Dispose of the used batteries in respect with the environment. Do not throw them in the normal wastebasket! Batteries are dangerous, chemical waste.
Out of range
- When the handset is mover too far away from the base, the symbol "antenna" ⚙ starts flashing.
- Return to a position closer to the base station.
- As soon as the antenna symbol ⚙ remains constantly on the screen, the contact between basis and handset is reestablished.
Registering the handset with the base
It is possible to register up to 4 handsets with one base. The handset can also be registered with another DECT - base, on condition that it is compatible with the GAP"- system.
Registering the handset to the Classico base
- Press the MENU key.
- Press the scroll down key (7) three times.
- On the screen appears "SETTING", press the OK key.
- On the screen appears "HANDSET SETTING", press the OK key.
- On the screen appears "ACOUSTIC SETTING", press the scroll down key four times.
- On the screen appears "REGISTER", confirm with the OK key.
- On the screen appears "ENTER BASE PIN _.
- Input the base's PIN - code (0000 at delivery), press the OK key to confirm. On the screen flashes "REGISTER IN PROGRESS".
- Press the key "Paging" (17) and hold it for about 6 seconds, until a signal tone is heard.
- On the screen appears "REGISTERED" and the symbol "antenna" stops flashing. When the error code "NOT REGISTERED" is shown, the procedure must be repeated, on the screen reappears "REGISTER", and you can start over again.
Registering the handset with another DECT - base (compatible with GAP)
- The handset is in mode standby (no dialing tone)
- Read the instruction manual of your base, to know how to bring it in the mode "REGISTER".
- Continue as described on page 17 (registering the handset).
De-registering the handset
A handset can be de-registered from a base, e.g. in case a defective handset is to be replaced by another one.
- Press the key "MENU".
- Press the scroll down key (7) three times. On the screen appears "SETTING".
- Press the OK key and then once on scroll down menu (7). On the screen appears "BASE SETTING", press the OK key again.
- Press the scroll down key (7) four times. On the screen appears "DEREGISTER", confirm with the OK key.
- On the screen appears "HANDSET _". Select the number of the handset that must be de-registered with the scroll down and up keys.
- Confirm your choice with the OK key, on the screen appears "DE-REGISTER DONE".
HANDSET SETTING
Turning the handset on and off
Turn on the handset by pressing the key ⏻ (12).
The first time the handset is turned ON, the following image comes up on the display screen.
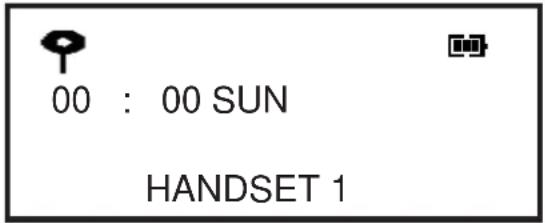
- 1st line for symbols, symbol antenna and battery status
•2nd line for the hour and the day of the week
•3rd line for the telephone number
•4th line for displaying the name and number of the handset
To turn OFF the handset, hold the key φ for approximately 2 sec.
Automatic return to standby
When, during setting or programming, no key is activated for 20 sec, the handset returns to stand by mode.
It also returns to stand by, as soon as it is put on the base or on the charger.
Keypad locking
There are two ways to activate the keypad lock.
- Hold the key ⏻ during approximately 1 sec, on the screen appears "KEYPAD LOCKED".
- Press the key "MENU" and then once on the key scroll menu down (7). On the screen appears "KEYPAD LOCK". Confirm with the OK key, the keypad is being locked. On the screen remains the text "KEYPAD LOCKED". When in this status, each activation of a key (except key 12) results in an error beep.
To cancel the keypad lock, just hold the key ⏻ during approximately 1 sec.
Setting the handset's ringer volume
The ringer volume can be set in three levels (1-3) and it can also be switched off (level 0).
The default setting is level 3.
- Press the key MENU, and then three times on the scroll down key. On the screen appears "SETTING". Confirm with OK, on the screen appears "HANDSET SETTING". By pressing once more on the OK key, you arrive in the menu "ACOUSTIC SETTING".
- Press OK, on the screen appears "RINGER VOLUME". Confirm with OK, the melody actually set is heard with the set volume.
- With the scroll down key, the setting can be changed (LEVEL 0-3), at each change, the ringer is heard with the set volume.
- To store your choice, press OK. A confirmation beep is heard and the setting is stored.
Choosing the handset's ringer melody
You have the choice from six different melodies for the ringer.
The default setting is melody 3.
- Press the key MENU, and then three times on the scroll down key. On the screen appears "SETTING". Confirm with OK, on the screen appears "HANDSET SETTING". By pressing once more on OK, you arrive in the menu "ACOUSTIC SETTING".
- Press OK and then scroll down, on the screen appears "RINGER MELODY". Confirm with OK, the melody actually set is heard with the set volume.
- With the scroll down key, you can change the setting (MELODY 1-6), at each modification, you hear the melody with the set volume.
- To store your choice, press OK. A confirmation beep is heard and the setting is stored.
Setting the handset's volume
The volume of the earpiece can be set in three different levels.
The default setting is level 2.
- Press the key MENU, and then three times on the scroll down key. On the screen appears "SETTING". Confirm with OK, on the screen
appears "HANDSET SETTING". By pressing OK once more, you reach the menu "ACOUSTIC SETTING".
- Press OK and then two times scroll down, on the screen appears "EARPIECE VOLUME". Confirm with OK and use the keys scroll up and down to make your choice from the three levels (LEVEL 1 - 3).
- To store your choice, press OK. A confirmation beep is heard and the setting is stored.
Turning keypad beeps on and off
Each time you press a key, you can hear a beep. If you want to, you can turn these beeps off.
The default setting is ON.
- Press the key MENU, and then three times on the scroll down key. On the screen appears "SETTING". Confirm with OK, on the screen appears "HANDSET SETTING". By pressing OK once more, you reach the menu "ACOUSTIC SETTING".
- Press OK and then three times scroll down, on the screen appears "KEY BEEP". Confirm with OK and use the keys scroll up and down to make your choice (ON / OFF).
- To store your choice, press OK. A confirmation beep is heard and the setting is stored.
Turning battery low beep on and off
When the batteries are almost empty, you hear a warning signal. This signal can be switched on or off.
The default setting is ON.
-
Press the key MENU, and then three times on the scroll down key. On the screen appears "SETTING". Confirm with OK, on the screen appears "HANDSET SETTING". By pressing OK once more, you reach the menu "ACOUSTIC SETTING".
-
Press OK and then four times scroll down, on the screen appears "BATTERY LOW TONE". Confirm with OK and use the keys scroll up and down to make your choice (ON / OFF).
-
To store your choice, press OK. A confirmation beep is heard and the setting is stored.
Choosing the language
There is a choice of four languages available for the screen menus:
• DEUTSCH (German)
- ENGLISH
• NEDERLANDS (Dutch)
• FRANCAIS (French)
- Press the key MENU, and then three times on the scroll down key. On the screen appears "SETTING". Confirm with OK, on the screen appears "HANDSET SETTING".
- Press OK and then scroll down once, on the screen appears "LANGUAGE". Confirm with OK and use the keys scroll up and down to make your choice.
- To store your choice, press OK. A confirmation beep is heard and the setting is stored.
Turning automatic answer on and off
When you choose for automatic answer, at an incoming call, the handset automatically opens the line when you lift the handset out of the base or charger. You may no longer press the talk key (OK). The default setting is OFF.
- Press the key MENU, and then three times on the scroll down key. On the screen appears "SETTING". Confirm with OK, on the screen appears "HANDSET SETTING".
- Press OK and then scroll down twice, on the screen appears "AUTOMATIC ANSWER". Confirm with OK and use the keys scroll up and down to make your choice between ON and OFF.
- To store your choice, press OK. A confirmation beep is heard and the setting is stored.
Returning the handset's setting to the default
When you reset the handset settings, all settings return to the default values, as they were at delivery (see page 8 "Default settings").
- Press the key MENU, and then three times on the scroll down key. On the screen appears "SETTING". Confirm with OK, on the screen appears "HANDSET SETTING".
- Press OK and then scroll down three times, on the screen appears "DEFAULT SETTING". Confirm with OK, on the screen appears "CONFIRM DEFAULT SETTING?".
- To confirm that you want to reset the settings, press OK, a confirmation tone sounds and the screen shows "DEFAULT SETTING DONE" for five seconds.
Modifying the personal code (PIN) of the handset
Each handset has his own PIN (Personal Identification Number). At the factory, all the PIN codes for all the bases and handsets are set to 0000. You can change this number to each combination of four digits. When the PIN has been changed, no setting can be changed without having input the PIN first.
- Press the key MENU, and then three times on the scroll down key. On the screen appears "SETTING". Confirm with OK, on the screen appears "HANDSET SETTING".
- Press OK and then scroll down five times, on the screen appears "CHANGE PIN". Confirm with OK, on the screen appears "ENTER NEW PIN".
- Input the four digits of your new PIN and confirm with OK.
- The screen requests "CONFIRM NEW PIN". Input the new PIN a second time and press OK to confirm.
- When both codes are identical, you will hear a confirmation signal and the new PIN is being stored.
Baby mode
When the function "baby mode" is activated, one activation of a random key on the handset (except the MENU key), is enough to start the handset dialing a preprogrammed number. When baby mode is activated, emergency calls are no longer possible, except when the emergency telephone number is programmed as baby mode number. A standard call is not possible either, as long as baby mode is activated.
- Press the key MENU, and then three times on the scroll down key. On the screen appears "SETTING". Confirm with OK, on the screen appears "HANDSET SETTING".
- Press OK and then scroll down six times, on the screen appears "BABY MODE". Confirm with OK, and use the scroll up/down keys to choose ON or OFF.
- To confirm your choice, press OK, a confirmation tone sounds and the setting is stored if the choice was "OFF".
When your choice was "ON", and a number is stored in the memory for baby mode, than you hear the confirmation tone and your setting is stored also. - If, however, you have chosen "ON", and the memory for the baby mode number is empty, you get the question to store a number now: "ENTER BABY NUMBER". Input the desired number and confirm with the OK key. A confirmation tone sounds and on the screen "BABY MODE" is displayed.
- To change or delete the number from the baby mode memory, follow the procedure described in point 1 above. You press OK and then eight times scroll down, on the screen appears "BABY CALL NUMBER". Press the OK key again.
- The screen asks you to input the baby call number with the text "ENTER BABY NUMBER" and the number actually in memory followed by a flashing cursor. If no number is stored, you only see the flashing star. With the clear key (12), you can erase the digits behind the cursor. With the scroll left and right keys, you can bring the cursor to the desired position. The changed number is stored by pressing the OK key.
Modifying the name of the handset
The handsets can be named arbitrarily. The name can be 10 characters long. This name is displayed on the screen, followed by the number of the handset (1-4) when the handset is in stand by. During an internal communication with another handset, this name appears on the screen of the other handset. The standard name, set in the factory, is simply "HANDSET" followed by its number (1 - 4).
- Press the key MENU, and then three times on the scroll down key. On the screen appears "SETTING". Confirm with OK, on the screen appears "HANDSET SETTING".
- Press OK and then once scroll up, on the screen appears "HANDSET NAME". Confirm with OK and the name that is actually set is displayed, followed by a flashing star, the cursor. Clear the old name with the clear key (12) and input the new name. Press OK to store the new name, you hear the confirmation signal and the name is being stored. From now on, the new name will be displayed on the bottom line of the screen.
BASE SETTING
Follow the procedure below to reach the menu "BASE SETTING":
-
Press the key MENU, and then three times on the scroll down key. The screen displays "SETTING". Confirm with OK and press the scroll down key once more, on the screen appears "BASE SETTING".
-
Press OK once more, on the screen appears "ENTER BASE PIN". When the base PIN is still the original one (0000), set at the factory, this step is skipped. When you have changed the PIN, you must input it and confirm it with OK.
Remarks:
i
- When you input a wrong PIN, the screen displays "WRONG PIN ENTERED" during five seconds.
- The settings remain stored in memory, even after having removed and replaced the batteries.
- To leave a menu point and go back to the preceding point, just press the clear key X (12)
- To return immediately to stand by mode, from an arbitrary menu point, hold the clear key X (12) during some time.
- When no key is pressed during 30 seconds, the handset returns automatically to the stand by mode.
- When you replace the handset on the base station or on the charger, it also returns to stand by mode automatically.
Ringer volume at the base
The ringer volume can be set at three different levels (1-3) and it can also be switched off (level 0).
The default is level 3.
-
Press the key MENU, and then three times on the scroll down key. The screen displays "SETTING". Confirm with OK and press the scroll down key once more, on the screen appears "BASE SETTING". By pressing once more on the OK key, you reach the menu "ACOUSTIC SETTING".
-
Press OK, on the screen appears "RINGER VOLUME". Confirm with OK, the chosen melody sounds with the set volume.
-
With the scroll down key, one can change the setting now (LEVEL 0-3), and at each modification the set volume is heard.
- To store your choice, press OK. A confirmation beep is heard and the setting is stored.
Ringer melody at the base
Six melodies are available to be chosen from.
The default is melody 3.
- Press the key MENU, and then three times on the scroll down key. The screen displays "SETTING". Confirm with OK and press the scroll down key once more, on the screen appears "BASE SETTING". By pressing once more on the OK key, you reach the menu "ACOUSTIC SETTING".
- Press OK and then scroll down, on the screen appears "RINGER MELODY". Confirm with OK, the chosen melody is heard with the set volume.
- With the scroll down key you can change the setting (MELODY 1-6), and at each modification, the chosen melody is heard.
- To store your choice, press OK. A confirmation beep is heard and the setting is stored.
Setting the date and the time
The day of the week and the hour are always on display.
- Press the key MENU, and then three times on the scroll down key. The screen displays "SETTING". Confirm with OK and press the scroll down key once more, on the screen appears "BASE SETTING".
- Confirm with OK and press scroll down once, on the screen appears "TIME & DAY SETTING". Press OK once more, on the screen appears "SET TIME".

- Input the first digit, the second starts flashing, etc.
e.g.: to set the clock as shown above, the following input must be entered: 1, 2, 4, 5 in this order.
Press OK to store the hour, on the screen appears "SET DAY" followed by the day that is actually stored.
- With the scroll down key, the choice is made for the actual day and you confirm with the OK key. A confirmation beep is heard and the setting is stored.
Returning the base's settings to the defaults
By resetting the base's settings, all settings return to the values they were set to, when the unit left the factory (see page 8 "Default settings").
-
Press the key MENU, and then three times on the scroll down key. The screen displays "SETTING". Confirm with OK and press the scroll down key once more, on the screen appears "BASE SETTING".
-
Press OK and then scroll down twice, on the screen appears "DEFAULT SETTING". Press OK and on the screen is displayed the question to confirm: "CONFIRM DEFAULT SETTING?".
-
To store your choice, press OK. A confirmation beep is heard, the setting is stored and on the screen appears "DEFAULT SETTING DONE" during five seconds.
Changing the dialing mode
Two dialing modes are available:
- tone - presently the standard
-
pulse - only needed for old installations
-
Press the key MENU, and then three times on the scroll down key.
-
The screen displays "SETTING". Confirm with OK.
-
Press the scroll down key once more, on the screen appears "BASE SETTING". Press OK and three times scroll down.
-
On the screen appears "LINE SET", with the actual setting below this text, standard: TONE and 300 MS.
Press OK, on the display appears "DIALING MODE". Press OK once more, the actual dialing system is shown on the screen, and with the scroll up / down keys you can swap between "TONE" and "PULSE". To store your choice, press OK. A confirmation beep is heard and the setting is stored.
Setting the Flash-time
The flash key "R" (10) can be loaded with three different flash-times (80/100/300 ms). The flash-time to be used depends on the installation, on which your unit is connected
- connected to the public telephone network with comfort functions. (the flash-time to be set is usually 300 ms)
or
- connected to a PBX with similar functions (the flash-time to be set is usually 100 ms).
The comfort functions: waiting call, toggling, second call, conference call with three must be ordered and payed for with your local telephone network dealer.
Your dealer will also be able to tell you which flash-time has to be used on his installation.
When the unit is connected to a personal branch exchange (PBX), its supplier, or the delivered instruction manual will be able to inform you.
-
Proceed as described in points 1 to 3 in the description about changing the dialing system above.
-
On the screen appears "LINE SET", with the actual setting below this text, standard: TONE and 300 MS. Press OK and scroll down once, the screen displays "FLASH TIME" and the actual flash-time is displayed on the bottom line. Press OK once more, on the screen appears "SET FLASH TIME" and with the scroll down and scroll up keys, you can swap between "80 MS", "100 MS" and "300 MS". After having pressed the OK key once more to confirm, you hear a confirmation signal and the value is stored.
Modifying the PIN-code of the base
The base has his own PIN (Personnel Identification Number). At the factory this PIN is set to 0000. You can change this number to every possible combination of four digits.
- Press the key MENU, and then three times on the scroll down key. The screen displays "SETTING". Confirm with OK and press the scroll down key once more, on the screen appears "BASE SETTING".
- Press OK and then five times the scroll down key, on the screen appears "CHANGE PIN". Confirm with OK, on the screen appears "ENTER NEW PIN".
- On the bottom line of the display appears a cursor (flashing underscore). Input the four digits of your new PIN and confirm with OK.
- The screen requests "CONFIRM NEW PIN". Input the new PIN a second time and press OK to confirm.
- When the two input codes are not identical, you will hear an error signal. On the screen appears the text "WRONG PIN ENTERED" during five seconds. The old code remains valid and you can start all over again by pressing OK. The system then asks you to enter the new PIN with the text: "ENTER NEW PIN _". Continue as described from point 3.
- When both codes are identical, you will hear a confirmation signal and the new PIN is being stored. The handset returns to stand by mode.
MAKING CALLS
Answering an external call
- All handsets, registered with the base station, start ringing.
- On the screen appears "CALL", The screen displays the number of the caller (when the network provider delivers it) and the name of the caller (when the delivered number is stored in the phonebook).
- Press the talk key (6).
- On the screen appears "ONLINE" and the symbol CONNECTION.
- The duration of the call is displayed immediately after the connection is opened.
- You can have your conversation. To end, you press the end key X (12) or you put the handset on the base or on the charger. "CALL END" appears.
Answering an internal call
- One handset is ringing, on the screen appears "INTERNAL CALL FROM x" (x = number of the handset) and the symbol intercom is flashing.
- Press the talk key (6).
- The symbol intercom remains lit constantly, you can make your call.
- To end, you press the end key X (12) or you put the handset on the base or on the charger. "CALL END" appears.
Speaker phone calling
This function allows you to have a telephone conversation without having to hold the handset. You can use this function to make the connection, but also activate it during the call.
- Press the talk key (6) again during the call, to activate the speaker phone function. To stop, one presses again on the talk key. On the screen appears: "SPEAKER PHONE ON/OFF").
-
To use this function during the realization of a connection, you press the talk key (6) twice. You hear the dialing tone.
-
Input the desired number, it is dialed automatically.
- You can have your conversation. To end, you press the end key X (12) or you put the handset on the base or on the charger. "CALL END" appears.
Setting the volume for speaker phone calling
- Press the talk key (6) twice, to activate the mode speaker phone.
- Press scroll up or down key (3 or 7). "SPEAKER VOLUME" appears on the screen. With the keys 3+7 you can choose level 1, 2 or 3.
- The chosen level is stored in memory.
Calling Outside
External calls are calls to the public telephone network.
- Press the talk key (6), you hear the dialing tone.
- Input the desired number.
- The number is dialed automatically.
- You can have your conversation. To end, you press the end key X (12) or you put the handset on the base or on the charger. "CALL END" appears.
Making intercom calls
Internal calls are calls between two handsets, registered with the same basis. These calls are free of charge.
- Hold the key "INT" (13), until "INTERNAL CALL" is displayed.
- Press the scroll down key, to choose the wanted handset (1-4). On the screen appears "INTERNAL CALL WITH x" (x = number of the handset).
- Press the talk key (6), the other handset rings.
- Press the talk key (6) of the other handset.
- You can have your conversation. To end, you press the end key X (12) or you put the handset on the base or on the charger. "CALL END" appears.
Dialing preparation
- This stands for inputting the desired telephone number (max. 30 digits) in standby, before pressing the talk key. When you input a wrong digit, you can correct it with the scroll, delete and number keys.
- The input number remains on display, press the talk key (6).
- The number is dialed automatically.
- You can have your conversation. To end, you press the end key X (12) or you put the handset on the base or on the charger. "CALL END" appears.
Redial
Your set has a memory for the last 10 numbers you called. It is possible to redial a number from this memory. To redial the very last number, just press the redial key (11), the screen displays this number with the text "REDIAL #01".
When you press the talk key (6) now, the number is dialed automatically.
To redial one of the other numbers from the redial list, proceed as follows:
- Press the redial key (11), the screen displays the last dialed number with the text "REDIAL #01".
-
With the scroll keys up and down (3 + 7) , you can now scroll through the last ten dialed numbers.
These numbers are preceded by the text "REDIAL #xx", with xx: a number from 01 to 10.
They can also be edited with the scroll keys, the delete key and the numeral keys. -
Press the talk key (6). The number is dialed automatically.
-
You can have your conversation. To end, you press the end key X (12) or you put the handset on the base or on the charger. "CALL END" appears.
Dialing a number from the phonebook
- Press the key 📄 in stand by.
- Press several times ion the key 📄 until the desired number appears on the screen, or input the first letter of the name and scroll through the list, starting with the first name (alphabetically) that begins with this letter.
- When you have found the desired number (or name), you press the talk key ↗ (6) to make the connection.
CALL CONTROL
Under the menu point "CALL CONTROL" you can find different informations and settings. On one hand, the call duration and on the other hand, the limitation of (a) specific telephone number(s).
Call timer
The duration of the last made call or the total duration of all the calls made since reset can be requested. Furthermore, the displayed durations can be reset to zero.
Total call duration
- Press the MENU key, and then three times on the scroll down key.
- The screen displays "SETTING". Confirm with OK and press the scroll down key once more, on the screen appears "BASE SETTING".
- Press OK again, on the screen appears "ACOUSTIC SETTING".
- By pressing once on the scroll up key, you reach the menu point "CALL CONTROL". Confirm with OK and the screen displays "CALL TIMER".
- Confirm again with OK and now the screen displays "TOTAL CALL DURATION".
- When you confirm again with OK, the total duration of all calls since reset appears on the screen in hours, minutes and seconds, e.g. 01:46:35 = 1 hour, 46 minutes and 35 seconds.
Last call duration
Points 1-4 as above
-
Press OK and scroll down once, on the screen appears "LAST CALL DURATION".
-
Confirm with OK, the duration of the last call in hours, minutes and seconds appears on the screen.
Reset call duration
Points 1-4 as above
- Press OK and scroll down twice, on the screen appears "RESET CALL DURATION"
- Confirm with OK, on the screen appears "CONFIRM RESET?".
- When you confirm with OK, you hear a confirmation signal and the counters are reset to zero.
Setting the call limitation
The use of the telephone can be limited. You can determine, which groups of numbers have to be blocked.
- GLOBAL = all numbers are possible
• NATIONAL = only national telephone numbers are allowed -
INTERNAL = only internal communications are possible
-
Press the MENU key, and then three times scroll down.
- Press OK and scroll down once. On the screen appears "BASE SETTING".
- Press OK, the screen displays "ACOUSTIC SETTING".
- Press the scroll up key once and the screen displays "CALL CONTROL". Confirm with OK, "CALL TIMER" appears on the screen.
- Press the scroll down key once, on the screen appears "CALL LIMIT".
-
Confirm with OK, with the text "SELECT H/S x" (x = num.handset 1-4) the system asks for which handset the limitation must be set. Choose 1-4 with the scroll down key.
-
Confirm with OK, on the screen appears "CALL LIMIT HANDSET GLOBAL".
- Now you can choose between GLOBAL / NATIONAL / INTERNAL with the scroll down key. You confirm the choice with OK and hear a confirmation signal.
Setting number barring
Points 1-4 as above
- Press the scroll down key twice, on the screen appears "CALL BARRING".
- Confirm with OK, the text "SELECT H/S .. HANDSET x" (x = num handset 1-4) appears.
- Press OK, on the screen appears "BARRING MODE".
- Press the scroll down key, "BARRING NUMBER" appears.
- Confirm your choice with OK, on the screen appears "SELECT BARRING NO BARR NUM x" (1 - 3). Select 1-3 with scroll key down.
- Press OK, on the screen appears BARR NUM (1-3) with the cursor below (flashing underscore). Input the number that you want to block.
- Press OK, you hear a confirmation tone and the number is barred from now on. Use the same procedure for the 2 other numbers.
Freeing barred numbers
Of course, you can free the barred numbers again afterwards. Therefore you set the baring to "OFF". To bar the saved numbers again, turn the barring "ON" again.
Points 1-4 as above
- Press scroll down twice, on the screen appears "CALL BARRING".
- Confirm with OK, the text "SELECT H/S HANDSET x" (x = num.handset 1-4) appears.
- Press OK, on the screen appears "BARRING MODE".
-
Press OK, "SET BARR MODE" appears, with the actual status on the bottom line (ON or OFF).
-
Select between ON and OFF with the scroll down key.
- Press OK, you hear a confirmation signal and the setting is being stored.
Saving emergency numbers
The set has a memory for four SOS numbers, which are always available, even when the handset is blocked with the limitation "internal calls only". The emergency numbers 110 and 112 are preprogrammed.
Points 1-4 as above
- Press the scroll down key three times, on the screen appears "EMERGENCY NUMBER".
- Press OK, on the bottom line of the screen appears "SOS NUM_". The scroll down key allows you to choose between 1 through to 4.
- Press OK again, on the screen appears "ENTER SOS NUM x" with the telephone number underneath, e.g. 110. Behind the last digit, the cursor is flashing. Each digit to the left of the cursor can be deleted with the delete key X. The cursor can be moved with the scroll left and right keys, you can then delete the old and input a new number.
- Input the number with the numeral keypad.
- Press OK, you hear a confirmation signal and the setting is being stored. Use the same procedure for the 3 other numbers.
Transfer of a communication to another handset
- You are in conversation with an external partner and wants to transfer this communication further.
- Hold the key INT(ERCOM) for 3 s.
- Press the key 📄 as often as needed to find the desired handset.
- When the internal call is answered, press the talk key ⬇ (11) to end the communication with the external partner, and carry out the transfer.
- When your call isn't answered, then press the key INT(ERCOM) once more, to return to the external conversation partner.
EXTERNAL COMFORT FUNCTIONS
The comfort functions: waiting call, toggling, second call, conference call with three must be ordered and payed for with your local telephone network provider.
Your provider will also be able to tell you which flash-time has to be used on his installation (please also read the chapter on "Flash time" (page 29).
When the unit is connected to a personal branch exchange (PBX), its supplier, or the delivered instruction manual will be able to inform you.
Waiting call and toggling
You have the necessary subscription at your telephone network provider. While you are having a telephone conversation, you hear a tone, i.e. a signal that indicates that another user "knocks" (signal second call).
Use the R - key to put the actual conversation on hold. You hear the extra dialing tone. By pressing "2" you can answer the second call. When you want to return to the first conversation partner, You press the R - key again and dial "2" again. You are now connected to the first conversation partner, and the second caller is put on hold. This action (called toggling) can be repeated as often as you wish, until one of the parties hangs up.
When you use your set on a PBX, you must use the "R" - key to toggle instead of 2.
Consultation and toggling
With the function consultation / toggling, you can talk to two different callers, without one hearing what you discuss with the other. You can accept an incoming call or call another participant yourself. This function also creates the base for a conference call with three people. You are calling with somebody and wishes to retrieve information with another participant (internal or external).
Herefore you press the "R" - key to park the first communication. You hear the extra dialing tone. Dial the number of the other participant and have your conversation. When you press the "R" - key again, you can park the second communication. Press 2, and you return to the first conversation partner. Now you can toggle between both conversation partners. When you wish to
end your call after the consultation, use the R - key and press 1. The connection with the second conversation partner is broken.
When you use your set on a PBX, you must use the "R" - key to toggle, instead of 2. When you hang up, the two communications are ended.
Conference call with three people
This function allows you to talk with two conversation partners simultaneously, each of the three parties is participating simultaneously, and hears both other participants all the time. The connection between the three partners is built up as described above.
When you want to set up a conference call, again you press the "R" - key. The active conversation is parked and you hear an extra dialing tone. Now press 3. The conference with 3 people is now activated.
When one of the conversation partners hangs up, the communication with the other partner can continue.
When you hang -up yourself, the conference call is ended.
When you use your set on a PBX, please consult the manual of the PBX.
INTERNAL COMFORT FUNCTIONS
Waiting call during an internal call
- An external waiting call is signaled in both handsets that are communicating with each other (second call signal). Press the R - key, to end the internal communication, or
- Hold the key INT(ERCOM) for approximately 2 s to connect you to the external caller.
- To end, press the hang up key X (12) or place the handset back on the base or on the charger.
Consultation and toggling
You can toggle between an external conversation partner and an internally called number.
- You are connected to an external caller.
- Hold the key INT during approximately 1 s, the external caller is set on hold and the screen displays "INTERNAL CALL".
- Press the scroll down key, on the screen appears "INTERNAL CALL WITH 2". Press OK, the other handset rings.
- Hold the key INT for approximately 1 second, each time you want to toggle between the two conversation partners. The screen swaps between "ONLINE" or "INTERNAL CALL WITH 2". Hang up to end the connection.
Conference call with three people
You can have a simultaneous conversation with two other people, of which one is internal and one external.
- You are connected to an external caller.
- Hold the key INT during approximately 1 s, the external caller is set on hold and the screen displays "INTERNAL CALL".
- Press the scroll down key, on the screen appears "INTERNAL CALL WITH 2". Press OK, the other handset rings.
-
To start the conference, you hold the star key (9) until "CONFERENCE" appears. The conference is realized.
-
The conference call ends when one of the conversation partners hangs up. The connection between the other two continues.
Paging the handsets
This function helps you to retrieve a lost handset. You launch a call to all handsets, which start ringing all of them.
- You can't seem to find your handset.
- Press the key "Paging" •)) (17).
- All handsets are ringing.
- You can hear your handset ringing.
- To stop the call, just press a random key.
Reading the call duration
As soon as you press the talk key (6), the duration in minutes and seconds 00:00 is shown on the display. At the end of the conversation, this duration remains on the screen during 10 seconds.
Turning the microphone off (Mute)
The microphone can be turned off temporarily. This allows you to talk to people in your direct environment, without the conversation partner overhearing it.
- You are making a call, on the screen, the symbol 📞 is lit.
- Press the key "Mute" (4) to turn off the microphone.
- "MICROPHONE OFF" is displayed.
- Now, you can talk to the people around you. Your conversation partner at the other side of the line can't hear what is said.
- To continue the call, press the mute key (4) again, to switch on the microphone.
- "MICROPHONE ON" is displayed.
- You can continue the call.
PHONEBOOK
Your set allows you to store 50 telephone numbers in a phonebook. Each entry can consist of 32 digits and 20 letters. For certain functions alphanumeric input is necessary. In that case, the keypad automatically switches to alphanumeric mode.
By pressing several times on the suitable key, all letters, numbers and special signs are possible. When the next sign must be input with the same key as the previous, wait until the cursor has moved to the next position before pressing the key again.
example:
PRIVAT 1xkey 7-pause-3xkey 7-pause-3xkey 4-3xkey 8-1xkey 2-1xkey 8
Add phonebook entry
To store a number in the phonebook, proceed as follows:
- Press the MENU key, on the screen appears "PHONEBOOK".
- Press the OK key. Before the first entry in the phonebook, the screen will display "PHONEBOOK EMPTY". Press MENU again, on the screen appears "PHONEBOOK ADD ENTRY". Press OK, "ENTER NAME_" and the blinking cursor appear on the screen.
- Input the name with the alphanumeric keypad and confirm with OK. Now the system asks to input the telephone number with the text: "ENTER NUMBER _".
- Input the number and confirm with the OK key. On the screen appears "STORED". When the entry already exists, the following question is displayed: "ENTRY EXISTS OVERWRITE?". If you want to overwrite the existing entry, press OK.
Dialing from the phonebook
- Press, in standby, on the phonebook key
- Press several times on the phonebook key 📄, until the desired number is found. You can also input the first letter of the searched name and scroll through the list, starting from the first name beginning with that letter.
- When you have found the desired number, it can be dialed automatically by pressing the talk key (6).

Editing numbers in the phonebook
- With the handset in standby, press the MENU key, on the screen appears "PHONEBOOK".
- Press the key OK, the first number in the phonebook appears.
- Press the scroll down key to select the number that you want to edit.
- Press MENU again, on the screen appears "PHONEBOOK ADD ENTRY". Press the scroll down key once and on the screen appears "PHONEBOOK EDIT ENTRY".
- Press the OK key. The next screen allows you to edit the name: "EDIT NAME" is displayed, with the actual name below it, followed by the blinking cursor.
- Each character to the left of the cursor can be deleted with the delete key X. You can move the cursor with the scroll keys, delete and input a new name.
- To store the modification, press OK again.
- Now "EDIT NUMBER" is displayed, with the actual number and the blinking cursor on the bottom line.
- Each digit to the left of the cursor can be deleted with the delete key X. You can move the cursor with the scroll keys, delete and input a new number.
- To store the modification, press OK again. The announcement "STORED" is displayed while a confirmation signal sounds.
Deleting numbers from the phonebook
- With the handset in standby, press the MENU key, on the screen appears "PHONEBOOK".
- Press the key OK, the first number in the phonebook appears.
- Press the scroll down key to select the number that you want to delete.
- Press MENU again, on the screen appears "PHONEBOOK ADD ENTRY". Press the scroll down key twice and on the screen appears "PHONEBOOK DELETE ENTRY".
-
"DELETE?" is displayed, confirm deletion with OK.
-
The announcement "DELETED" is displayed. The set jumps to the next position in memory, and when during ten seconds no key is pressed, it returns to standby.
Deleting the whole phonebook
- With the handset in standby, press the MENU key, on the screen appears "PHONEBOOK".
- Press the key OK, the first number in the phonebook appears.
- Press MENU again, on the screen appears "PHONEBOOK ADD ENTRY". Press the scroll down key three times and on the screen appears "PHONEBOOK DELETE ALL".
- You are requested to input the handset PIN - code: "ENTER H/S PIN_", to make sure that you are qualified to erase the whole memory, and that you are sure that you really want to do so.
- Input the four PIN digits (0000 at delivery).
- Press OK, on the screen appears "PHONEBOOK ALL DELETED" and you hear a confirmation signal.
CID LIST (CALLER LOG)
Your DECT - set shows the number of the incoming call, as well as the day and the hour. This is only the case when the provider also delivers date and hour. Furthermore, you must subscribe to the necessary service offered by your provider.
When the caller number also exists as an entry in your phonebook, the name of the caller is displayed. If you don't answer this call, e.g. because you are not at home, this information is stored in the caller log.
The caller log (or CID list) can contain the information of the last twenty calls. When new calls come in, the symbol ☒ starts blinking.
This function only works when the caller has not blocked the sending of this information (CLIR).
i
- Your telephone network provider can inform you in detail.
Opening the CID list
- Press, in standby, CID key ☒ (3).
- You can see the information of the last incoming call on the screen:
1st line: CALL and the number of the call in memory
2nd line: telephone number
example: CALL 11
By pressing the pound key #, The screen switches to the display of the hour and day that the call came in. This function only works when you have set the time and day correctly in the settings, as described in this manual. When the list is empty, "CID LIST EMPTY" is displayed.
When the number is longer than 20 digits, you only see the first 19 digits and the others are displayed by pressing the scroll right key (11).
When the number is stored as an entry in the phonebook, the name corresponding with that telephone number is displayed. The pound key # toggles the display between the name, the number and the time of the call.
- With the scroll up and down keys (3) and (7) you can scroll through the complete list.
i
- It is not possible to display a caller number during a communication. - When the list is full, the newest number replaces the oldest one.
Dialing from the CID-list
- Press, in standby, on the phonebook key ☒ (3).
- You can see the information of the last incoming call on the screen. When the list is empty, "CID LIST EMPTY" is displayed.
- You can select the desired number by pressing the scroll up and down keys (3) and (7).
- Press the talk key ↗ (6), the selected number is dialed automatically.
- The symbol lights up on the screen and the duration of the call is registered.
Editing numbers in the CID-list
- Press, in standby, on the CID key ☒ (3).
- You can see the information of the last incoming call on the screen. When the list is empty, "CID LIST EMPTY" is displayed.
- You can select the desired number by pressing the scroll up and down keys (3) and (7).
- Press the MENU key (4). On the screen appears "EDIT CALL xx" and the selected number.
- The cursor stands just behind the last digit. Each digit to the left of the cursor can be deleted with the delete key X. You can move the cursor with the scroll keys, delete digits with the delete key X and input a new digit with the keypad.
When you hold the delete key X (12) pressed a bit longer, the whole telephone number is deleted at once.
Copying a number from the CID-list to the phonebook
- Press, in standby, on the CID key ☒ (3).
- You can see the information of the last incoming call on the screen. When the list is empty, "CID LIST EMPTY" is displayed. You can select the desired number by pressing the scroll up and down keys (3) and (7).
- Hold the phonebook key 📄 until the question for the name, with which the number must be stored in the phonebook, appears on the screen: "ENTER NAME". The symbol ✉ is lit.
- Input the name with the alphanumeric keypad and confirm your input with the key OK (6).
- The entered name and the telephone number from the CID - list are stored in the phonebook.
APPENDICES
Troubleshooting
No display
Check if the batteries are correctly placed.
Put the handset in the base or charger to load the batteries.
Remove the batteries from the handset, and place them back carefully.
The batteries are empty
Check if the batteries are correctly placed.
Clean the charging contacts of handset and base. Charge the batteries.
The display shows a limited charge of the batteries and the handset gives a warning signal:
Load the batteries of the handset. Replace the batteries when the autonomy becomes too short.
The handset does not find the base
You are out of range, stand closer to the base.
Check the power supply of the base.
Register the handset as described in this manual.
Remove the batteries from the handset, and place them back carefully.
Pull the base's power supply plug, and plug it in again.
No dialing tone
Check if the telephone cable is well connected to the base and to the wall plug.
Use the delivered cable.
Adjust the volume of the handset to a higher level.
Dialing a number impossible
The chosen telephone number is blocked.
The keypad is locked.
Reset the settings of the handset back to the defaults.
Warranty
Please check with your local dealer to know what kind of warranty this appliance carries, according to your country's laws and to the local practice.
The warranty period starts from the first acquisition of the appliance. In order to prove the date of purchase, we advise you to keep the purchase receipt. Repairs to an appliance that has been sent back, which is not accompanied by the purchase receipt, will always be charged.
This will also be the case for badly packed appliances. During the warranty period, all deficiencies, caused by material or production flaws, will be executed free of charge.
The manufacturer reserves his right to repair or replace, at his own discretion. The length of the warranty period will never be prolonged by a possible reparation nor in case of replacement. The original warranty period continues and takes a definitive end at the normal date, depending on the purchase date and the original length of the warranty period.
The manufacturer can never be held responsible for any damage or costs, incidental, caused or indirectly brought about by a defect. From warranty are also excluded the damages caused by abnormal use, wear, interventions by third parties or violence. The spare parts, subject to wear (batteries, rechargeable batteries, packing etc.) are excluded from the warranty, as well as the possible deficiencies that only slightly influence the meant use and the possibilities of the appliance.
During the warranty period you should bring your defective appliance back to the sales point where you bought it, which will make sure that it is repaired or replaced as soon as possible.
It goes without saying that your sales point will always be at you disposal, even after the warranty period. For each reparation that is not covered by the guarantee, the sales point will first make a proposition.
Technical data
System analogue DECT - telephone
Power supply of the base power adapter 230VAC/50Hz/35mA;
exit voltage 9V AC / 300mA
Extension charger power adapter 230VAC/50Hz/35mA;
exit voltage 9V AC / 300mA
Handset 2 individual batteries, type 2/3 AAA NiMH
1,2V/ 400mAh
Room temperature +5°C to +35°C;
Relative air humidity 25% to 85%
Temperature during storage -10°C to +50°C
Range up to 300m outdoors
up to 50m indoors
Dialing system tone or pulse
Function flash-key flash-time 80ms, 100ms and 300ms
Dimensions:
Base 130 mm ∅, 30 mm high
Handset 140 x 35 x 25 mm
Packing Classico 229 x 172 x 56 mm
Packing Classico Duo 262 x 162 x 87 mm
Cable lengths
Telephone cord ca. 3m
Power supply cable ca. 3m
We reserve our right to technical modifications!
Index
A
ACOUSTIC SETTING 26, 27, 35
add phonebook entry 42
AUTOMATIC ANSWER 22
B
BABY CALL NUMBER 24
BABY MODE 24
BARRING MODE 36
BARRING NUMBER 36
base melody 27
BASE SETTING 26, 27, 28, 30, 34
base volume 26
battery low beep 21
BATTERY LOW TONE 21
C
CALL 31
CALL BARRING 36
CALL CONTROL 34, 35
call duration 41
CALL END 31, 32, 33
CALL LIMIT 35
CALL TIMER 34
call timer 34
CALLER LOG 44
CHANGE PIN 23, 30
choosing handset melody 20
choosing language 22
CID LIST 44
CID LIST EMPTY 45, 46
CID list, opening 45
CID-list, copy to phonebook 46
CID-list, dialing 45
CID-list, editing numbers 46
CLIR 44
communication transfer 37
CONFERENCE 40
conference call with three 29, 38, 39, 40
CONFIRM DEFAULT SETTING? 23, 28
CONFIRM NEW PIN 23, 30
CONFIRM RESET? 35
consultation 38, 40
copy number CID to phonebook 46
D
DAY 27, 28
DEFAULT SETTING 23, 28
DEFAULT SETTING DONE 23, 28
DELETE? 43
DELETED 44
deleting numbers from phonebook 43
dialing from CID-list 45
dialing from phonebook 34, 42
DIALING MODE 29
E
EARPIECE VOLUME 21
EDIT CALL xx 46
EDIT NAME 43
EDIT NUMBER 43
editing numbers in CID-list 46
editing numbers ion phonebook 43
EMERGENCY NUMBER 37
ENTER BABY NUMBER 24
ENTER BASE PIN 26
ENTER H/S PIN_ 44
ENTER NAME 46
ENTER NAME 42
ENTER NEW PIN 23, 30
ENTER NUMBER 42
ENTER SOS NUM x 37
ENTRY EXISTS OVERWRITE? 42
entry in phonebook 42
external call 31
EXTERNAL COMFORT FUNCTIONS 38
F
FLASH TIME 29
G
GLOBAL 35
H
HANDSET NAME 25
HANDSET SETTING
19, 20, 21, 22, 23, 24, 25
|
INTERNAL 35
INTERNAL CALL 32, 40 internal call 31 INTERNAL CALL FROM 31 INTERNAL CALL WITH 40 INTERNAL COMFORT FUNCTIONS 40
K
KEY BEEP 21 keypad beeps 21 KEYPAD LOCK 19 KEYPAD LOCKED 19
L
LANGUAGE 22 language 22 LAST CALL DURATION 35 LEVEL 0-3 27 LINE SET 29 locking the keypad 19
M
MELODY 1-6 20, 27 MICROPHONE OFF 41 MICROPHONE ON 41 modifying base PIN-code 30 modifying handset's name 25 modifying PIN-code 23 Mute 41
N
name of the handset 25 NATIONAL 35
O
ONLINE 31, 40 opening CID list 45
P
paging 41 personal code 23 PHONEBOOK 42, 43 PHONEBOOK ADD ENTRY 42, 43 PHONEBOOK ALL DELETED 44 PHONEBOOK DELETE ALL 44 PHONEBOOK DELETE ENTRY 43 phonebook, deleting 44 phonebook dialing 42 PHONEBOOK EDIT ENTRY 43 PHONEBOOK EMPTY 42
phonebook: dialing 34 PIN 23, 30 PIN-code of the base 30 PULSE 29
R
Redial 33 REDIAL #01 33 RESET CALL DURATION 35 RINGER MELODY 20, 27 ringer melody base 27 ringer melody handset 20 RINGER VOLUME 20, 26 ringer volume base 26 ringer volume handset 20
S
second call 29, 38 SELECT BARRING 36 SELECT H/S .. HANDSET x 36 SET BARR MODE 36 set date and time 27 SET DAY 28 SET FLASH TIME 29 SET TIME 27 SETTING 20, 27, 30 setting handset volume 20 setting number barring 36 settings to defaults 28 SOS NUM_ 37 SPEAKER PHONE ON/OFF 31 SPEAKER VOLUME 32 speakerphone calling 31 STORED 43
T
technical data 49 TIME 27 TIME & DAY SETTING 27 toggling 29, 38, 40 TONE 29 TOTAL CALL DURATION 34 transferring a communication 37 troubleshooting 47 turn off the microphone 41 turning handset on / off 19
W
waiting call 29, 38, 40 WRONG PIN ENTERED 26, 30
CE Declaration
Your set is adapted to be used in the country where buying it. It has homologation for connection to the public telephone network, only for using it in private homes and shops.
It can be connected to a normal plug and be used by anyone. Other use will be considered as inappropriate and not conform to the prescriptions.
Any alteration or modification, being not described in this manual, is prohibited.
Hereby we, ITM Technology AG, state that this appliance corresponds with the prescriptions and directives applicable, and with all the other arrests connected to the directive EC 1999/5/EG.
The original statement of conformity can be read on the internet, on the site:
www.hagenuk-itm.de
C€
Environmental Protection
Discarded electric appliances are recyclable and should not be discarded in the domestic waste! Please actively support us in conserving resources and protecting the environment by returning this appliance to the collectioncentres (if available).


- USER MANUAL
- CORDLESS DECT - TELEPHONE WITH CALLER ID
- QUICK REFERENCE FOR THE HANDSET
- TABLE OF CONTENTS
- INSTALLING THE TELEPHONE....15
- HANDSET SETTING .... 19
- BASE SETTING.... 26
- MAKING CALLS....31
- CALL CONTROL ....34
- EXTERNAL COMFORT FUNCTIONS....38
- INTERNAL COMFORT FUNCTIONS 40
- PHONEBOOK....42
- CID LIST (CALLER LOG)......44
- APPENDICES 47
- INDEX 50
- HANDSET DIAGRAM
- BASE STATION OVERVIEW
- LEGEND
- DEFAULT SETTINGS (DEPENDING ON YOUR COUNTRY'S VERSION)
- CONGRATULATIONS
- SAFETY PRECAUTIONS
- CONTENTS OF THE PACKAGE
- IMPORTANT INSTRUCTION
- FEATURES
- BASE CLASSICO
- MAINTENANCE
- RECYCLING
- LC - DISPLAY (LCD) (SYMBOLS LINE)
- INSTALLING THE TELEPHONE
- INSTALLING AND CONNECTING THE BASE STATION
- SETTING UP THE HANDSET
- REPLACEMENT OF THE BATTERIES
- OUT OF RANGE
- REGISTERING THE HANDSET WITH THE BASE
- REGISTERING THE HANDSET TO THE CLASSICO BASE
- REGISTERING THE HANDSET WITH ANOTHER DECT - BASE (COMPATIBLE WITH GAP)
- DE-REGISTERING THE HANDSET
- HANDSET SETTING
- TURNING THE HANDSET ON AND OFF
- AUTOMATIC RETURN TO STANDBY
- KEYPAD LOCKING
- SETTING THE HANDSET'S RINGER VOLUME
- CHOOSING THE HANDSET'S RINGER MELODY
- SETTING THE HANDSET'S VOLUME
- TURNING KEYPAD BEEPS ON AND OFF
- TURNING BATTERY LOW BEEP ON AND OFF
- CHOOSING THE LANGUAGE
- TURNING AUTOMATIC ANSWER ON AND OFF
- RETURNING THE HANDSET'S SETTING TO THE DEFAULT
- MODIFYING THE PERSONAL CODE (PIN) OF THE HANDSET
- BABY MODE
- MODIFYING THE NAME OF THE HANDSET
- BASE SETTING
- RINGER VOLUME AT THE BASE
- RINGER MELODY AT THE BASE
- SETTING THE DATE AND THE TIME
- RETURNING THE BASE'S SETTINGS TO THE DEFAULTS
- CHANGING THE DIALING MODE
- SETTING THE FLASH-TIME
- MODIFYING THE PIN-CODE OF THE BASE
- MAKING CALLS
- ANSWERING AN EXTERNAL CALL
- ANSWERING AN INTERNAL CALL
- SPEAKER PHONE CALLING
- SETTING THE VOLUME FOR SPEAKER PHONE CALLING
- CALLING OUTSIDE
- MAKING INTERCOM CALLS
- DIALING PREPARATION
- REDIAL
- DIALING A NUMBER FROM THE PHONEBOOK
- CALL CONTROL
- CALL TIMER
- TOTAL CALL DURATION
- LAST CALL DURATION
- POINTS 1-4 AS ABOVE
- RESET CALL DURATION
- SETTING THE CALL LIMITATION
- SETTING NUMBER BARRING
- FREEING BARRED NUMBERS
- SAVING EMERGENCY NUMBERS
- TRANSFER OF A COMMUNICATION TO ANOTHER HANDSET
- EXTERNAL COMFORT FUNCTIONS
- WAITING CALL AND TOGGLING
- CONSULTATION AND TOGGLING
- CONFERENCE CALL WITH THREE PEOPLE
- INTERNAL COMFORT FUNCTIONS
- WAITING CALL DURING AN INTERNAL CALL
- PAGING THE HANDSETS
- READING THE CALL DURATION
- TURNING THE MICROPHONE OFF (MUTE)
- PHONEBOOK
- ADD PHONEBOOK ENTRY
- DIALING FROM THE PHONEBOOK
- EDITING NUMBERS IN THE PHONEBOOK
- DELETING NUMBERS FROM THE PHONEBOOK
- DELETING THE WHOLE PHONEBOOK
- CID LIST (CALLER LOG)
- OPENING THE CID LIST
- DIALING FROM THE CID-LIST
- EDITING NUMBERS IN THE CID-LIST
- COPYING A NUMBER FROM THE CID-LIST TO THE PHONEBOOK
- APPENDICES
- TROUBLESHOOTING
- NO DISPLAY
- THE BATTERIES ARE EMPTY
- THE HANDSET DOES NOT FIND THE BASE
- NO DIALING TONE
- DIALING A NUMBER IMPOSSIBLE
- WARRANTY
- TECHNICAL DATA
- INDEX
- A
- B
- C
- D
- E
- F
- G
- H
- K
- L
- M
- N
- O
- P
- R
- S
- T
- W
- CE DECLARATION
- ENVIRONMENTAL PROTECTION
Brand : Hagenuk
Model : Classico
Category : Telephone