EuroPhone Basic 20 - Phone Hagenuk - Free user manual and instructions
Find the device manual for free EuroPhone Basic 20 Hagenuk in PDF.

User questions about EuroPhone Basic 20 Hagenuk
0 question about this device. Answer the ones you know or ask your own.
Ask a new question about this device
Download the instructions for your Phone in PDF format for free! Find your manual EuroPhone Basic 20 - Hagenuk and take your electronic device back in hand. On this page are published all the documents necessary for the use of your device. EuroPhone Basic 20 by Hagenuk.
USER MANUAL EuroPhone Basic 20 Hagenuk
EuroPhone Basic 10/20
User's Guide
Contents
1 Introduction 5
2 General 6
2.1 About this user's guide 6
2.2 Scope of delivery 8
2.2.1 EuroPhone Basic 10 8
2.2.2 EuroPhone Basic 20 8
2.3 Operator controls and displays 9
2.4 Start up 10
2.5 Digit and character input, editing 12
2.6 Tones 13
3 Telephoning 14
3.1 Outgoing call 16
3.1.1 Dia
3.1.2 On-hook dialling 17
3.1.3 Changing your own MSN for dialling 18
3.1.4 Switching the identification on/off 18
3.1.5 Using a stored telephone number 19
(call list, telephone book, redial)
3.1.6 Chaining telephone numbers 21
3.1.7 Direct call 23
3.2 Incoming call 24
3.2.1 Accepting a call (with/without identification) 24
3.2.2 Not accepting/forwarding a call 25
3.2.3 Viewing the call list 25
3.3 During a call 26
3.3.1 Camp-on busy 26
3.3.2 Automatic callback on busy 27
3.3.2.1 Activating automatic callback 28
3.3.2.2 Clearing an activated callback 29
3.3.3 Three-party conference 29
3.3.4 Malicious caller identification 30
3.3.5 Hands free operation 31
3.3.6 Hold 32
3.3.7 Open listening 32
3.3.8 Switching the microphone on/off (muting) 33
3.3.9 DTMF/keypad signalling 33
3.3.10 Notebook 34
3.3.11 Parking a call (hot swapping) 34
3.3.12 Consultation/brokering 36
3.3.13 Placing a caller's telephone number in the 37 redial memory
3.3.14 Switching at the exchange 38
3.4 Further functions 39
3.4.1 Modifying or switching call diversion on/off 39
3.4.2 Switching direct call (baby call) on/off 40
3.4.3 Adjusting the display contrast 41
3.4.4 Displaying call charges 41
3.4.5 Adjusting the handset volume 42
3.4.6 Switching the telephone lock on/off 42
3.4.7 Tone ringing: adjusting the volume and tone 43
4 Programming 44
4.1 Default settings 44
4.2 Overview of programmable functions 45
4.3 Programming the exchange line code 46
4.4 Enabling/disabling camp-on busy 46
4.5 Call list: clearing entries 47
4.6 Call diversion: programming a call diversion destination 48
4.7 Automatic keypad switchover 49
4.8 Setting the date and time 49
4.9 Programming a direct call number (baby call) 50
4.10 Selecting the display language 51
4.11 Charges 51
4.11.1
4.12 Resetting the unit 53
4.13 Programming picking up a call/conversation
(Basic 20 only) 5
4.14 Programming the international prefix 54
4.15 Entering, modifying or clearing MSNs 55
4.16 Programming the national prefix 56
4.17 Network provider code scheme 57
4.18 Defining the local area code 59
4.19 Editing the PIN 59
4.20 Setting your identification 61
4.21 Defining barred numbers 61
4.22 Telephone book 63
4.22.1 Creating a new entry 63
4.22.2 Editing/clearing an existing entry 64
4.23 Disabling/enabling switching at the exchange 65
4.24 Clearing the redial memory 66
5 Emergency operation 67
5.1 Emergency operation switch 67
5.2 In an emergency 67
6 The analog port (EuroPhone Basic 20 only) 68
6.1 Setting up the analog port 68
6.2 Internal calls 69
6.2.1 Transferring a call internally 70
6.2.2 Picking up a call/conversation 70
6.3 Functions on the analog port 71
6.3.1 During a conversation 71
6.3.1.1 Pic
6.3.1.2 Consultation call, brokering 71
6.3.1.3 Automatic callback on busy 72
6.3.2 Set up functions 73
6.3.2.1 Setting up MSNs 73
6.3.2.2 Camp-on busy 73
6.3.2.3 Call diversion 74
6.3.2.4 Telephone lock 75
6.3.2.5 Connection without dialling 77
6.3.3 Emergency operation 77
7 Appendix 78
7.1 Approval and CE mark 78
7.2 Technical data 79
7.3 Cleaning and care 79
7.4 Summary of programming sequences 80
7.5 The key words 82
1 Introduction
With a telephone from the EuroPhone Basic family, you have decided in favour of a powerful ISDN telephone that gives you easy access to the special features of digital telephony.
This user's guide describes two different versions of the EuroPhone Basic:
EuroPhone Basic 10 Easy-to-operate high-convenience
ISDN telephone
EuroPhone Basic 20 Same as EuroPhone Basic 10, but also offering connection of an analog terminal
2 General
2.1 About this user's guide:
The chapter entitled "General" familiarises you with the features of your new telephone. You find out everything you need to know about keys, the display, tones, connections and commissioning.
In the chapter entitled "Telephoning", all operations before and during a telephone call are described and you find out how to accept a call and what happens if you do not accept it. Here, you will also find notes on how to use further functions that require previous programming.
The chapter entitled "Programming" describes the available possibilities of setting and programming the telephone.
In the chapter entitled "Emergency operation", you find out how the telephone reacts to power failures and how to make your telephone operate in an emergency.
The chapter entitled "The analog port" contains both details of configuration and operation of the analog terminal. This analog connection port is only provided on the EuroPhone Basic 20.
Operator control steps
Operator control steps are shown in the form of tables. Beginning with a certain initial state, the sequence is numbered consecutively.
If alternative selection possibilities are available in individual steps, these are indented and are preceded by a dotted line, and begin with "or" or "if necessary".
In words, the text column describes the activity to be carried out, and a swift overview is provided by an illustration of the appropriate key or symbol. The affiliated illustration of the display always shows the result of the operator control step described in the line concerned.
Example configuration
To improve understanding, this user's guide refers to a telephone that has an example configuration. You should not find it difficult to relate an "imaginary MSN" from this user's guide to your actual MSN.
Definition:
MSN is the common abbreviation for "Multiple Subscriber Number". For your ISDN connection, your network carrier has given you several of these numbers, and you can assign them to your telephone as follows:
EuroPhone Basic 10 - MSN 1 - 8
EuroPhone Basic 20 - MSN 1 - 4 for the ISDN telephone
MSN 5 - 8 for the analog port
The example configuration for this user's guide is programmed as follows:
MSN index MSN telephone number MSN name
MSN 1 4711 PRIVATE
MSN 2 4712 BUSINESS
MSN 3 4713
MSN 4 4714
MSN 5 4715 FAX
MSN 6 4716
MSN 7 4717
MSN 8 4718
Local area code 431 (Kiel)
Electronic telephone book
| !Fire | 999 |
| !Police | 999 |
| !Ambulance | 999 |
| Arthur | 123456 |
| Henning | 345678 |
| Xaver | 567890 |
2.2 Scope of delivery
2.2.1 EuroPhone Basic 10
1 EuroPhone Basic ISDN telephone
1 Telephone handset
1 Receiver cord
1 ISDN connecting cord
1 User's guide
2.2.2 EuroPhone Basic 20
Same as EuroPhone Basic 10
Additionally: 1 Adapter cable for an analog terminal
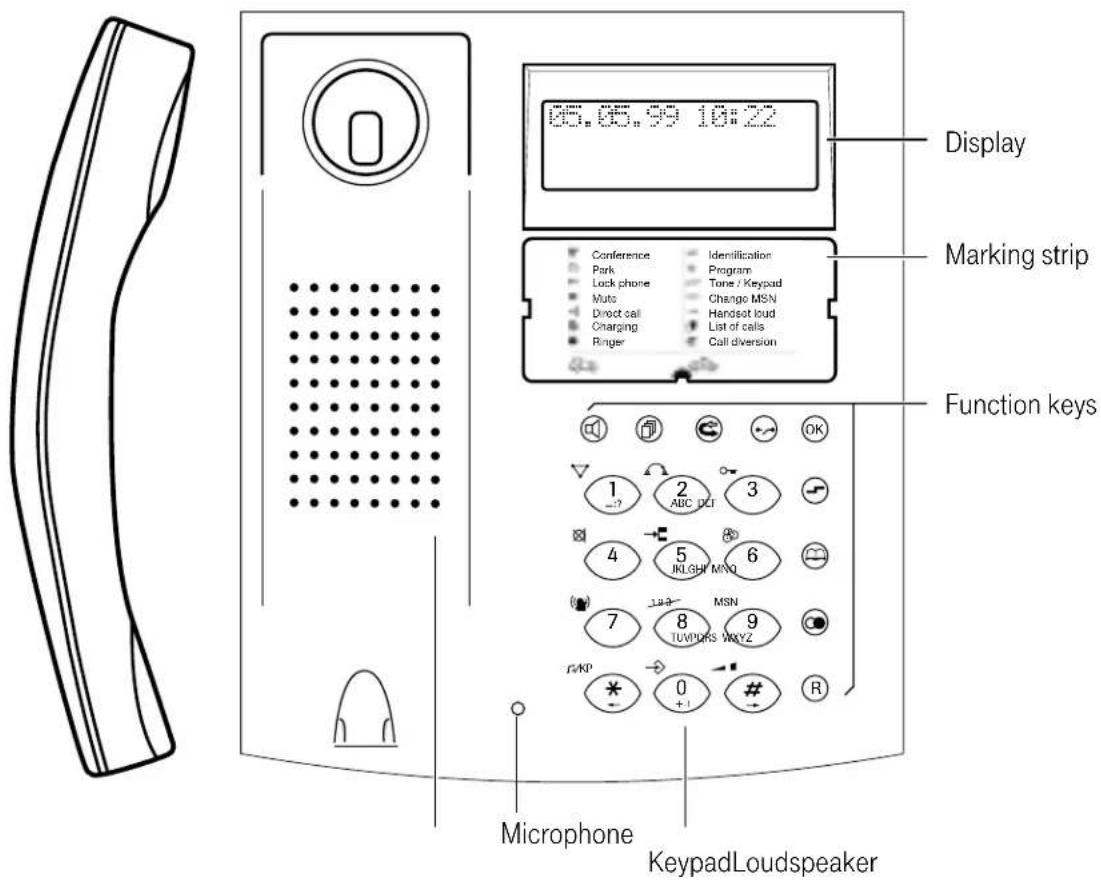
text_image
Display Marking strip Function keys Microphone KeypadLoudspeaker2.3 Operator controls and displays
Keypad
Digit keys 1 ... 0, *, #,
- For entering telephone numbers
- For entering names in telephone book entries (see 2.5)
- For entering control characters (MFV/keypad)
Hotkey functions (symbols next to each key):
① Three-party conference
2 Parking
3 Telephone lock
④ Muting (microphone on/off)
5 Hot line
6 Charges
⑦ Tone ringing and melody
Function keys
Hands free/open listening
Call list
Call diversion
Clear
ok ok key
Shift key
(change function level)
8 Number suppression
9 MSN switchover
DTMF/keypad switchover
- 0 Programming functions
Handset volume
→ ○ Activate callback
Telephone book
∞ Redial
® Signal key/edit key
* Scroll function, move cursor
Scroll function, move cursor
Display
Lines 1 and 2: Display of date and time, names and telephone numbers or programming
Line 3: Display of statuses by 10 pictograms
2nd function level active
→ Programming mode
Telephone book
Redial/
Callback programmed
1-2-3 Number suppression active
Hands free/open listening on
☒ Microphone off
Camp-on busy
P Call parked
Call diversion set up
2.4 Start up
The EuroPhone Basic is connected to an ISDN S 0 DSS1 point-to-multipoint connection or to a corresponding telecommunications system.
Note: Please note that the S_0 bus must be terminated on both ends with 2 x 100 Ohm.
Location
Avoid placing the telephone in the direct proximity of other electronic devices such as HiFi units, office machines or microwave units, thus ruling out mutual influences. Do not place the telephone close to heat sources such as radiators.
Today's furniture is coated with a vastly diverse amount of lacquers and plastics and is treated with diverse care agents. Therefore, it cannot be ruled out that some of these substances may contain components that will be aggressive to the telephone's plastic feet and will soften them with the result that they leave behind unpleasant traces.
Connecting
Connect the handset to the housing with the coiled handset cord. Insert the end with the shorter uncoiled portion in the socket on the handset. Then connect the telephone to the telephone network by means of the telephone connecting lead. The telephone starts with a display test, during which time all pixels and pictograms are displayed for about 10 seconds. You can now make telephone calls.
Connector for adapter cable (Basic 20 only)
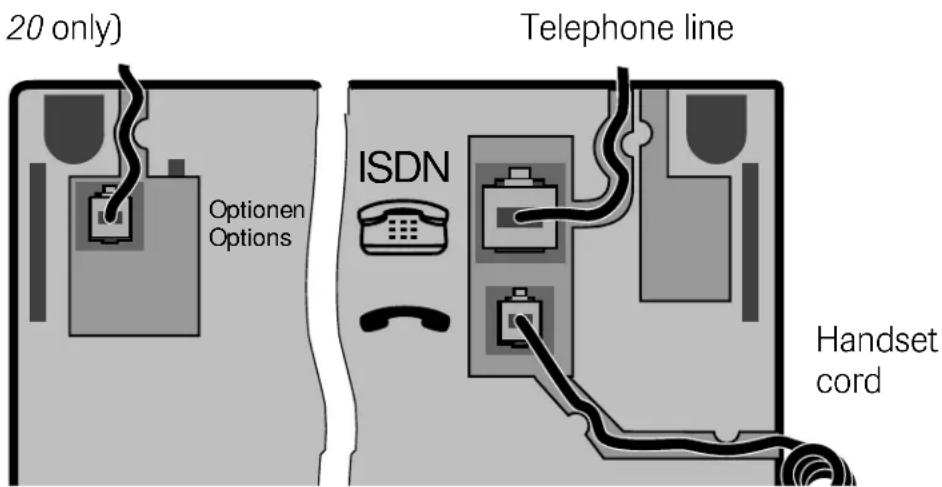
text_image
20 only) Optionen Options ISDN Telephone line Handset cordUnderside of EuroPhone Basic 10 / 20
Establishing and undoing a plugged connection
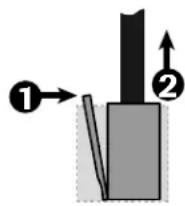
Insert the plug into the socket so that the locking catch points in the direction of the corresponding cut-out in the socket. Push the plug into the socket until it audibly locks.
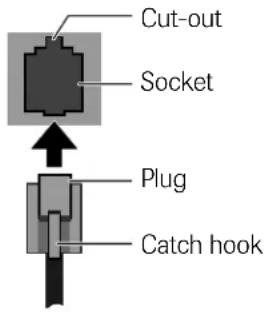
text_image
Cut-out Socket Plug Catch hookTo undo a plug-in connection, press the locking catch in the direction of the plug and pull out the plug at the same time.
Initial programming
Although your telephone is immediately operable after connection to the telephone network, you should first adapt it to your specific needs by programming.
• MSN input (see 4.15)
- Defining the local area code (see 4.18)
- Programming the national code (see 4.16)
- Programming the international code (see 4.14)
If required, you should then:
- Change the PIN (see 4.19)
- Define a charge factor (see 4
- Program an exchange line code (only if you operate the telephone on a telecommunications system - see 4.3)
- Define barred numbers (see 4.21)
- Set ringing tones (see 3.4.7)
- Program the telephone book (see 4.22).
2.5 Digit and character input, editing
The digit keys have a dual function. If the telephone expects you to enter a telephone number, then the digits printed on the keys apply. When you enter names in the telephone book, the keypad switches over automatically, with the result that the letters/characters on the keys also apply. The letters/characters printed on the keys are recalled by pressing the appropriate key several times. To display the letter "C", for example, you must press the key ② thrice. If the next letter you wish to enter is on a key other than the last one, the cursor automatically moves forward by one position. If it is on the same key, you can either move the cursor one position to the right by pressing the # key or you can wait until it moves automatically after about 1.5 seconds.
For example, you must press the following keys to enter the name OTTO:
text_image
6 6 6 8 # 8 6 6 60 T T # 0
In the editing mode, you can move the cursor to the left with the aid of Ⓞ and to the right with Ⓥ, in each case up to the end of the text.
No. Description Input
| 1 Moving the cursor | * or \# | |
| 2 | Enter the new required character, it is inserted at the cursor's position, characters on the right are moved forward to the right. | 0 9 |
| or | If the cursor is at the end of a line: Clears the last character | |
| or | If the cursor is over a character: Clears the character concerned and characters on the right are moved up to the left by one position | |
| or | Clears the complete line | - |
2.6 Tones
Acoustic signals when telephoning:
- You hear the dial tone when you lift the handset when the telephone is idle or when you press the hands free key.
- The ringing tone sounds when the called connection is available.
- The busy tone sounds when the connection you are ringing is busy.
- The camp-on busy tone advises you of another pending call during a conversation.
- Tone ringing signals calls with the preset melody and volume.
Acoustic signals during operation and programming:
- The positive acknowledgement tone confirms correct input.
- The negative acknowledgement tone indicates an incorrect operation.

text_image
Representation of the tones (Figures in seconds) tone pauseRinging tones
Calling an ISDN phone: (repeated)

Calling an analog port (Basic 20 only): (repeated)

Audible tones (through the handset or the loudspeaker when calling or programming)
Dial tone
Continuous tone
Ringing tone (repeated)

Busy tone (repeated)

Call waiting tone

Positive acknowledgement tone

Negative acknowledgement tone

3 Telephoning
You will find the following functions described in the specified order:
Outgoing call
- Dialling (with line seizure)
- On-hook dialling
- Changing your own MSN for dialling
- Switching number suppression on/off
- Using a stored telephone number (Call list, telephone book, redial)
- Chaining telephone numbers
- Direct call
Incoming call
- Accepting a call
- Not accepting/forwarding a call
- Viewing the call list
During a call
- Camp-on busy
• Automatic callback on busy - Activating automatic callback
- Deleting activated callback
- Three-party conference
- Malicious call identification
- Hands free operation
- Placing calls on hold
- Open listening
- Microphone on/off (muting)
• DTMF/keypad signalling
- Notepad
- Parking a call (hot swapping)
- Enquiry/brokering
• Transferring a caller's number to the redial memory
- Switching at the exchange
Further functions
- Activating call diversion
- Deactivating call diversion
- Adjusting the display contrast
- Displaying call charges
- Adjusting the handset volume
- Ringing tone adjustment
- Activating the telephone lock
3.1 Outgoing call
A call can be established with or without on-hook dialling. On-hook dialling is understood to consist of entering digits without seizing a line (the handset is on-hook and no dial tone can be heard). Here, you have a possibility of changing the telephone number because you have not yet sent the dialling information.
It is also possible to define the MSN to be used before dialling and to switch identification on or off. The latter is only possible, however, if this feature is available at the local connection.
Besides manual dialling, it goes without saying that stored telephone numbers from the call list, the telephone book or the redial memory can also be used, and these can also be combined (chained) and edited.
3.1.1 Dia
When you seize a line (♂ or Ⓞ), you can initiate dialling by manually entering digits or by retrieving a stored telephone number. In this case, it is not possible to modify entered digits. Incorrect dialling as the result of an incorrectly entered digit can only be corrected by ♡ or ⏻, i.e. the connection is cancelled.
It is only possible to change the MSN to be used (see 3.1.3) or to switch over the identification (see 3.1.4) before dialling the first digit.
Initial state: idle
Steps:
No. Description Input Display
| 1 | Lift the handset | ↑ | MSN1: PRIVATE |
| or | With the handset on-hook (hands free operation) | ◎ | MSN1: PRIVATE |
| 2 | If necessary, change the MSN (see 3.1.3) | 9 wxyz | MSN <1..8>: |
| 3 | If necessary, change calling line presentation | 810v | MSN1: PRIVATE123 |
| 4 | Manual telephone number input | MSN1: PRIVATE1234 | |
| or | Use a stored number (see 3.1.5) | MSN1: PRIVATE |
3.1.2 On-hook dialling
In many cases, it is better if you enter or put together the telephone number before you seize a line. In addition to the dialling methods mentioned above, you then also have a opportunity to edit or correct the telephone number. The dialling information is not sent until you either lift the handset ( ↑ ) or press the loudspeaker key ( Ⓞ ).
Initial state: idle
Steps:
No. Description Input Display
| 1 | If necessary, change the MSN (see 3.1.3) |  |  |
| 2 | If necessary, switch identification on/off |  |  123 123 |
| 3 | Manual telephone number input | [738] | [163Y]1234123 |
| or | Use a stored number (see 3.1.5) |  043188180123 043188180123 | |
| or | Chain numbers(see 3.1.6) | MSN1: PRIVATE043188180128 | |
| 4 | Dial telephonenumber | or | 123456128 |
3.1.3 Changing your own MSN for dialling
Before you dial the telephone number, you have a possibility of selecting your own multiple subscriber number (MSN) for the connection, e.g.
"Private" or "Business". The MSN you use can then be displayed on the destination subscriber's display. Incurred call charges are also assigned to this MSN.
Initial state: idle
Steps:
No. Description Input Display
| Change MSN1 | 9WX7 | MSN | |
| 2 | Select MSN (in this case "MSN 2") | 1...8TU | MSN2: BUSINESS |
| Enter the number3 | MSN2: BUSINESS043188180 |
3.1.4 Switching the identification on/off
Before making a call, you can decide whether or not you wish to send your telephone number to the called party. This can only be switched on or off before dialling the first digit. Prerequisites: the connection must support this feature and at least one MSN must be programmed.
Initial state: On-hook dialling/enquiry
Steps:
No. Description Input Display
| 1 | Number  |  |
| presentation on (if previously "off") | ||
| or | Number  |  |
| presentation off (if previously "on") |
3.1.5 Using a stored telephone number (call list, telephone book, redial)
A telephone number can be retrieved from various memories, edited and then dialled.
Initial state: idle
Steps:
No. Description Input Display
| 1 | Memory selection | RedialPress ⚙ until the required number is displayed | MSN1: PRIVATE765432 |
| or Telephone bookⓍ, choose the first letter of the name with Ⓞ ... 9(A...Z) ... ...or scroll in the telephone book with ⚙ or #until the required number is displayed. |  | ||
 |
Telephone book
or
Call list
Press Ⓥ until the required number is displayed.
1 123456
05.05.15:30 >2
| Confirm selection2 | OK | MSN1: PRIVATE043188180 | |
| If nec. | Edit telephone number | R, R,0 ... 9WXYZ | MSN1: PRIVATE043188281 |
| 3 | Dial displayed number | or | 043188281 |
The call list consists of 10 memory locations comprising 30 digits each. The entries in the call list are cleared automatically once you have retrieved the appropriate number. You can also clear each entry manually (see "4.5 Call list: editing or clearing entries").
The redial memory consists of 10 memory locations comprising 30 digits each.
The redial memory contains the ten telephone numbers dialled last (even when dialling out of the telephone book), and the number dialled last is in the first position.
If all memory locations are occupied, the oldest entry is cleared when a new entry is made.
3.1.6 Chaining telephone numbers
During the course of on-hook dialling telephone numbers from different sources (telephone book, call list, redial) can be combined with one another and/or with manually entered digits. Besides this, you can define the MSNs that are to belong to the dialling information and you can switch your identification on or off. You send the dialling information once you have set up everything according to your wishes.
Initial state: on-hook dialling
Steps:
No. Description Input Display
| 1 | Use a number from the telephone book |  |  |
| or | Use a number from the call list |  |  |
| or | Use a number from the redial memory |  |  |
| or | Enter a number manually |  |  |
| 2 | Append a number from the telephone book |  |  |
| or | Append a number from the call list |  |  |
| or | Append a number from the redial memory |  |  |
| or | Manually complete/edit a number, R deletes the number digit-by-digit from the right | MSN1: BUSINESS01018765987 | |
| If nec. | Choose a different MSN | 9 MSN 1 ... 8 | MSN2: BUSINESS01018765987 |
| If nec. | Change the identification | 8 | MSN2: BUSINESS01018765987 |
| 3 | Lift the handset, number is dialled | MSN2: BUSINESS01018765987 | |
| or | Press loudspeaker key, number is dialled | MSN2: BUSINESS01018765987 | |
| or | Press Disconnect key, on-hook dialling is cancelled | 04.05.99 10:09 |
3.1.7 Direct call
When direct call is activated, it is now only possible to automatically dial one single number. Every attempt at dialling establishes a connection to the programmed direct call number. With the exception of the ⏻ key, pressing the function keys after lifting the handset produces the same result. A direct call is not possible when the telephone is locked.
Initial state: direct call call on, idle
Steps:
No. Description Input Display
| 06.05. 10:40 DIRECT CALL! | ||
| Lift the handset1 | ↑ | 06.05. 10:40 DIRECT CALL! |
| 2 Press any key, direct number is dialled | ↓ | MSN1: PRIVATE 123456 |
3.2 Incoming call
3.2.1 Accepting a call (with/without identification)
When a call arrives, the caller's number is displayed to you, provided it is transmitted. In the second line, you can see which of your MSNs is being called. The tone ringing sequence set for this MSN also sounds. Your telephone number can also be transmitted to the caller. In this way, you "identify" yourself to a caller so that he/she can also recognise call diversion to a different number, for example. "Identification" can be temporarily activated or deactivated before lifting the handset or before activating the hands free function.
Please note that your connection has to support this feature.
Initial state: ringing tone
Steps:
No. Description Input Display
| You hear the ringing tone for a business call | 04318818-> BUSINESS | ||
| If nec. | Switch identification on/off (temporarily) | 8 | 04318818-> BUSINESS |
| Lift the handset1 | ↑ | 04318818 | |
| or | Activate hands free | ◎ | 04318818 |
3.2.2 Not accepting/forwarding a call
If an arriving call is not accepted, it is entered in the call list provided the caller's telephone number has been transmitted. For details of dialling from the call list, see 3.1.5 and 3.1.6.
You also have a possibility, however, of forwarding a call during ringing, i.e. of forwarding an incoming call to a different telephone number.
Please note that your connection has to support this feature.
Initial state: ringing tone
Steps:
No. Description Input Display
| You hear the ringing tone for a business call | 04318818-> BUSINESS | ||
| 1 | Press the "Call diversion" key | CALL DEFLECT. TO | |
| 2 | Enter the forwarding number (also from memory) | CALL DEFLECT. TO 556677 | |
| 3 | Confirm forwarding | OK | 04.05.99 10:09 |
3.2.3 Viewing the call list
The call list contains all numbers of callers who have tried in vain to reach you and whose telephone numbers have been transmitted. The list contains the telephone number or name (if there is an entry for the number in the telephone book), the date, and the time of the call. If several calls have been made from one connection, the total number of calls is displayed along with the time of the last attempt.
For details of dialling from the call list see 3.1.5 and 3.1.6.
Initial state: idle
Steps:
No. Description Input Display
| 05.05.99 16:25 >3 | ||
| 1 | Displaying the first (most recent) entry: e.g. call for MSN 1 by ARTHUR on 5.5. at 16.15 h for the second time | 1 ARTHUR05.05. 16:15 >2 |
| 2 | If necessary, dis-play further entries | 2 04318818005.05. 15:30 >1 |
3.3 During a call
3.3.1 Camp-on busy
During a call, you are informed of a second call by a special information tone in the handset and a display of the caller's telephone number or name (if transmitted, see also 3.2.1) as well as the flashing symbol ↗ on the display. This function is only available if you have enabled it in the set up menu (see 4.4 "Enabling/disabling camp-on busy").
Initial state: camp-on busy during a call
Steps:
No. Description Input Display
| 1 | Place the first connection on hold and accept the other call |  |  |
| or | End the first connection and accept the other call |  |  |
| or | End the first connection, in which case the camp-on busy call is signalled like a normal call and is accepted by lifting the handset |  |  |
| or | Reject the camp-on busy call |  |  |
3.3.2 Automatic callback on busy
The ISDN connection of a party you have called is busy. However, you want to urgently speak to this person. In this case, you activate the "Automatic callback on busy" function by pressing the redial key (_) after receiving the busy tone (pay attention to the acknowledgement tone) and by then hanging up. As soon as the busy connection is free again, the callback is signalled to you. When you lift your handset or press the loudspeaker key, the person who has now become free is called automatically.
Initiated calls back are placed in a callback list by the exchange. If a call-back is not possible within 45 minutes, the corresponding entry in the callback list is deleted automatically.
Note: "Callback on busy" may fail under the following conditions (negative acknowledgement note):
- The "Callback on busy" feature is not enabled for your connection
- The feature is not supported by all exchanges to the called connection
- At the called connection, a telecommunications system is connected that does not support the feature
- The feature is barred for its called connection (e.g. in the case of special telephone numbers)
3.3.2.1 Activating automatic callback
Initial state: called party is busy
Steps:
No. Description Input Display
| You hear the busy tone | 04318818 | ||
| 1 | Initiate automatic callback | ◎, positive acknowledgement tone | 04318818 |
Initial state: idle, flashing ● symbol indicates that callback is activated
Steps:
No. Description Input Display
| 1 | Called party hashung up, tonering sounds. | CALL BACK FROM:043188180 | ||
| 2 | The call back party is called; ringing tone in the handset or loud-speaker.You can conduct the call once the party has lifted the hand-set. | or | 04318818002'15 | 0 |
3.3.2.2 Clearing an activated callback
Initial state: idle, flashing ⬆ symbol indicates that callback is activated
Steps:
No. Description Input Display
| 1 | Display first callback,(scroll to the required entry) | [IMAGE](※ or #) | CLEAR CALL BACK043188180 | |
| Confirm clearing2 | OK, positive ac-knowledgement tone | 04.05.99 | 10:09 | |
3.3.3 Three-party conference
You conduct a simultaneous conversation with two parties and all three parties can hear each other.
Initial state: conversation
Steps:
No. Description Input Display
| Initiate consultation1 | R |  | |
| 2 | Establish consultation connection(state = brokering,see also 3.3.12) |  | |
| 3 | Activate three-party conference | 1 positive ac-knowledgement tone |  |
| 4 | Deactivate three-party conference(state = brokering) | 1 positive ac-knowledgement tone |  |
5
Clear both connections

04.05.99 18:09
Note: for details of targeted clearing of a connection during "brokering", see 3.3.12.
3.3.4 Malicious caller identification
If you are being molested by a caller, you can have his/her number stored = "Malicious caller identification". Malicious caller identification is possible up to 20 seconds after the connection. It is also possible in the case of analog callers or if the caller has activated calling line identification suppression. You must have previously requested this ISDN function from your network provider.
Initial state: call
Steps:
No. Description Input Display
| 1 | Activate malicious caller identification | →positive ac-knowledgement tone | TEL. NO. UNKNOWN |
Initial state: your telephone has rung
Steps:
No. Description Input Display
| 1 | Lift the handset, possibly busy tone | TEL. NO. UNKNOWN | |
| 2 | Activate malicious caller identification | positive ac-knowledgement tone | TEL. NO. UNKNOWN |
Your network provider informs you in writing of the caller's telephone number or of the location of the telephone booth from where the call came.
3.3.5 Hands free operation
"Hands free" means that you can conduct telephone calls without having to hold the handset in your hand. As in the idle state, the handset lies on the telephone.
Initial state: idle or conversation
Steps:
No. Description Input Display
| 1 | From the idle state,activate hands freeoperation. The lineis seized automatically and you hearthe dial tone. | MSN1: PRIVATE | |
| or | During a call,activate handsfree | Press 📋 and hold itdown, until the hand-set is on the hook | 8818123 |
| 2 | If necessary,alter the volume(9 levels) | If necessary, pressOKseveral times.The altered settingis stored | 8818123 |
| 3 | Deactivate handsfree operation, endthe call | 04.05.99 10:09 | |
| or | Deactivate handsfree operation andcontinue the callwith the handset | 8818123 |
3.3.6 Hold
You are conducting a conversation and you would like to place the connection "on hold" for a short time to conduct a consultation call with another person.
Initial state: conversation
Steps:
No. Description Input Display
| 1 | Hold the connection in the exchange | R | MSN1: PRIVATE |
| 2 | End the hold state and resume the conversation | R or ↻ | 043188180 |
| 3 | End the connection on hold | ↓ | 04.05.99 10:09 |
3.3.7 Open listening
Activate the "Open listening" function if you want somebody in the room to be able to listen in to the call.
Please tell your conversation partner that you have activated this function and that a third person or several persons is/are listening in.
Initial state: conversation
Steps:
No. Description Input Display
| 1 | "Open listening" can be switched on and off after lifting the handset | 043188180 |
2
The volume can be altered in nine steps
If necessary, press OK several times to store the modified setting
043188189
#
3.3.8 Switching the microphone on/off (muting)
Switch off the microphone if you want to talk to somebody in the room during a telephone conversation without wanting your telephone partner to listen in.
Initial state: conversation
Steps:
No. Description Input Display
| 1 | Switch the handset and hands free microphone on or off | 40H | 043188180 |
3.3.9 DTMF/keypad signalling
You can use dual tone multifrequency (DTMF) or the keypad method to control called computers. When you use the DTMF method, coded tones are sent and, when you use the keypad method, coded digital signals are sent. The method you choose depends on the chosen computer. Once you have sent the complete telephone number, or after establishment of a connection to an incoming call, the telephone switches over automatically to DTMF.
Initial state: conversation
Steps:
No. Description Input Display
| 1 | Switching between DTMF digits and keypad signals | 1234-K4711M4712 |
In the example, the telephone number 1234 has been dialled, followed by the transmission of 4711 as keypad data and 4712 as DTMF data.
3.3.10 Notebook
The electronic notebook was conceived for noting down a telephone number in the redial memory during a conversation. This telephone number can be copied to the electronic telephone book after the conversation (see 4.22.1). Optionally, you can modify an affiliated MSN and you can switch identification on or off.
Initial state: conversation
Steps:
No. Description Input Display
| 1 | Select the notebook function during a conversation | ◎ | NOTEBOOK |
| 2 | Edit digits: clear or enter | R | NOTEBOOK334455 |
| R | |||
| If nec. | Select the MSN | 9,1 ... 8 | MSN334455 |
| If nec. | Select identification | 8 | NOTEBOOK334455 |
| Store3 | OK | 043188180 |
3.3.11 Parking a call (hot swapping)
You would like to use a different socket during a conversation (e.g. if you want to take the unit to a different room). You must park the active call before you remove the plug from the telephone socket. You can resume the call later on from a different socket. To prevent another user from continuing the call, you can assign a two-digit code to the connection. You now have about 3 minutes* time to resume the call. After this time, the connection will be cleared automatically by the exchange.
* The available time depends on the exchange and differs depending on your network provider. Ask your network provider about the available parking time.
Note: a parked call can also be picked up from another telephone that is connected to the same S_0 bus.
Initial state: conversation
Steps: Parking a call
No. Description Input Display
| Park a call1 | 2 | PARK --- | |
| If nec. | Enter the two-digit code | PARK ** | |
| Confirm2 | OK | PLEASE HOOK ON | |
| 3 | The call is now parked | 04.05.99 10:09 |
Initial state: idle, a call is parked
Steps: Resuming a parked call
No. Description Input Display
| 1 | Handset is on the hook | 2 | PARK |
| If nec. | Enter the two-digit code that you entered when parking the callConfirm2 | OK | PARK **PLEASE HOOK OFF |
| 3 | Continue the call | or | 043188180 |
3.3.12 Consultation/brokering
You are in a conversation, you would like to put the active connection on hold and then you would like to establish a connection to a second external subscriber.
Initial state: conversation
Steps:
No. Description Input Display
| 1 | Initiate consultation | R | MSN1: PRIVATEP |
| 2 | Establish consultation call by entering a number | MSN1: PRIVATE 123456P | |
| 3 | You canbrokeras soon as the second party lifts the hand-set, i.e. you switch between the parties by pressing the R key. | R | 123456P |
| 4 | To clear the current connection, press the Disconnect key; the other connection continues | 345678 |
| or | To clear the connection on hold | 123456 |
| or | To clear both connections, replace the handset. | 06.05.99 10:40 |
3.3.13 Placing a caller's telephone number in the redial memory
You can place a caller's telephone number in the redial memory during a conversation or even during ringing, provided it is displayed.
Initial state: incoming call
Steps:
No. Description Input Display
| 1 | Place displayednumber of incomingcall in the redialmemory | (positive acknowledgement tone,only during thecall) | 043188180 |
3.3.14 Switching at the exchange
You are in the "Brokering" or "Three-party conference" mode and would like to connect both parties to one another without continuing in the conversation yourself. This function is only available if it has been enabled in the set up menu (see "4.23 Disabling/enabling switching at the exchange).
Even after switching, the charges to the parties to whom you have established the call are debited to your connection.
Prerequisite: this feature must be available on your connection.
Initial state: brokering or three-party conference
Steps:
No. Description Input Display
| Switch the call1 | OK | PLEASE HOOK ON |
3.4 Further functions
3.4.1 Modifying or switching call diversion on/off
An arriving call can be diverted to a different, previously defined connection, e.g. if you have temporarily moved to its location and you are expecting an important call. You can set up separate call diversion for each MSN in one of the following modes:
- U (unconditional): always - call diversion immediately becomes active when a call arrives
- B (on busy): call diversion is only active when your connection is busy
- N (no reply): after a time - call diversion is only activated after about 15 seconds
Initial state: idle
Steps:
No. Description Input Display
| 1 | Initiate programming |  | MSN <1..8>: |
| e | |||
| 2 | Select the MSN for which you wish to divert calls. |  ... 8 TUN ... 8 TUN | MSN1U: PRIVATE NUMBER? |
| e | |||
| 3 | If required: define the diversion mode:• U = unconditional• B = on busy• N = no reply (see also 4.6) |  | MSN1B: PRIVATE NUMBER? |
| e | |||
| 4 | If required: Change the MSN |  9 WXYZ MSN 9 WXYZ MSN | MSN2B: BUSINESS NUMBER? |
| e | |||
| 5or | Enter, modify or clear the diversion destinationUse a programmed destination(see also 4.6) |  [TTSZ] [TTSZ]  R R | MSN2B: BUSINESS 987654MSN2B: BUSINESS123456 |
| 6 | Activate diversion (next possible call diversion is offered) | OK | MSN2N: BUSINESSNUMBER? |
| 7 | If necessary, end programming | 06.05.99 10:40 |
3.4.2 Switching direct call (baby call) on/off
When the direct call function is activated, when any key is pressed (except ⏻) after lifting the handset, a connection is established automatically to the previously programmed telephone number. If you have already programmed the direct call number (see "4.9 Programming a direct call number"), you activate the direct call function as follows. You hear the negative acknowledgement tone if no number is programmed. If the direct call function is activated, you can deactivate it with this procedure.
Initial state: idle
Steps:
No. Description Input Display
| 1 | Direct call on or off.When you activate the direct call function, the direct call number is displayed briefly | 5JKL PIN | DIRECT CALL123456 |
The direct call function can only be activated when the telephone lock if off (see 3.4.7).
3.4.3 Adjusting the display contrast
The display contrast can be individually adjusted to optimise it under different lighting conditions.
Initial state:
idle
Steps:
No. Description Input Display
| 1 | Adjust display contrast in 11 levels | OK if nec. sev.times | 06.05.99 | 10:40 |
3.4.4 Displaying call charges
You can view the charges that have accumulated up to now. Charges can be displayed in units or amounts (see also "4.11 Clearing the call charge counter and defining the factor").
Initial state: idle
Steps:
No. Description Input Display
| 1 | Call up the charge displayMSN: display for each MSN (0...8, 0 = total for all MSNs)ALL: totalising counterLAST: single counter for the last call |  | 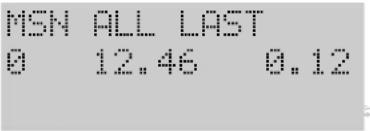 |
| 2 | Switch to the display of the next MSN | [K477] | 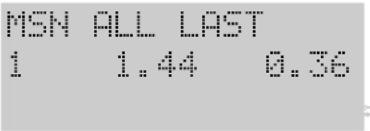 |
| Quit display3 | [TOWD]or OK, after the last MSN has been displayed | 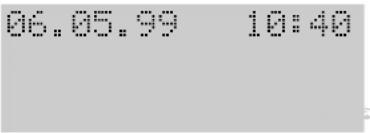 |
3.4.5 Adjusting the handset volume
You can adjust the volume of the handset to "normal" or "loud".
Initial state: idle or conversation
Steps:
No. Description Input Display
| 1 | Switch handset volume between "normal" and "loud" (approx. 1 s display) | # | 06.05.99 10:40 HANDSET LOUD |
3.4.6 Switching the telephone lock on/off
With the "telephone lock" function, you can lock the telephone call for outgoing calls. Emergency calls cannot be locked out. The emergency numbers must be stored in the telephone book and must feature a "!" at the start of the name.
Initial state: idle
Steps:
No. Description Input Display
| 1 | Switch telephone lock on or off | 3DEF | PIN | 06.05. 10:40EMERG. ONLY! |
The telephone lock can only be activated when the direct call function is off. Programming and "Malicious caller identification" are not possible when the telephone lock is on.
Refer to 4.21 for details of how to program barred numbers.
3.4.7 Tone ringing: adjusting the volume and tone
You can adjust a different melody and volume for each MSN. Thus, you can recognise by the sound of ringing for whom a call is intended (e.g. business or private). The display "VOL." stands for Volume and "FREQ." stands for the ringing melody (Frequency).
Initial state: idle
Steps:
No. Description Input Display
| 1 | Initiate programming | 7 | MSN RINGER: |
| 2 | Select the MSN | 1 ... 8 | MSN RINGER: 1VOL. 4 FREQ: 7 |
| 3 | Make settings; current setting sounds | Loud: 1 ... 6Tone: 7 ... # | MSN RINGER 1VOL. 2 FREQ: 0 |
| If nec. | Confirm setting4 | OK | MSN RINGER |
| Select a different MSN and make settings as described above | 1 ... 8 | MSN RINGER 2VOL. 6 FREQ: 7 |
4 Programming
This chapter describes all available programming functions. Beforehand, though, you are familiarised with the 'as-delivered' settings and the default settings that apply after the unit is reset.
Note: items marked “*” are described in Section 3.4.
4.1 Default settings
Feature 'As-delivered' After reset
Exchange line code No entry No entry
Camp-on busy On On
Call list No entry No entry
Automatic keypad switchover On Unchanged
Date/time 00.00.99/00:00 00.00.99/00:00
Direct call Off Off
Direct call number No entry Unchanged
Display contrast * Level 5 Level 5
Display language German Unchanged
@htaygdenfabtorged No entry No entry
Charge counter Cleared Unchanged
Call/conversation pick up
(Basic 20 only) Off Unchanged
Handset volume * Normal Normal
Open listening/hands free volume Level 4 Level 4
MSNs (number and name) No entry Unchanged
Network provider code scheme Preset Unchanged
Local area code No entry Unchanged
PIN 0000 Unchanged
Nenification, outpaced On On
Identification, incoming On On
Call diversion destinations preprogrammed No
Barred numbers No entry No entry
Telephone book No entry Unchanged
Telephone lock * Off Off
Tone ringing volume/tone * 4 / * 4 / *
Switching at the exchange Off Unchanged
Preprogrammed call diversion destinations
Prefix, national 0 0
Prefix, international No entry No entry
Redial No entry No entry
4.2 Overview of programmable functions
- Programming the exchange line code
- Enabling/disabling camp-on busy
- Call list: editing or clearing entries
- Call diversion: programming the call diversion destination
• Automatic keypad switchover - Date and time
- Programming the direct call number (baby call)
- Selecting the display language
- Charges: clearing the call charge counter and programming a factor
- Resetting the unit
- Programming call/conversation pick up (Basic 20 only)
- Programming the international prefix
- Entering, editing or clearing MSNs
- Programming the national prefix
• Network provider codes - Defining the local area code
- Editing the PIN
- Setting the identification
- Defining barred numbers
- Telephone book
- Creating a new entry
- Editing/clearing an existing entry
- Disabling/enabling switching at the exchange
- Clearing the redial memory
You can also access all menu items after entering ⏻ (entering the programming mode) by scrolling with the ✕ and # keys and, if necessary, by activating a lower programming level (e.g. settings) with OK.
You terminate programming of the relevant menu item by pressing OK. If programming was successful, you will hear the positive acknowledgement tone. Otherwise, you will hear the negative acknowledgement tone. You can cancel programming at any time by pressing the Disconnect key ↙.
To quit the menu, press the Disconnect key ⏻, if necessary several times.
4.3 Programming the exchange line code
If you operate your telephone on a telecommunications system with an internal S_0 bus, in most cases, you must dial a digit to seize an exchange line. You can enter this digit (e.g. "0") here. This makes sure that incoming calls are stored correctly in the call list. To make absolutely sure you are doing the right thing, also consult your telecommunications system's manual.
Initial state: idle
Steps:
No. Description Input Display
| 1 | Initiate programming | 0 0 6 | ACCESS CODE |
| 2 | Enter the exchange line code, max.4 digits | ACCESS CODE | |
| If nec. | Clear digits singly or completely | R or R | ACCESS CODE |
| Save the input3 | OK | ACCESS CODE | |
| OK #> | |||
4.4 Enabling/disabling camp-on busy
You can enable or disable indication of calls that arrive through your connection during a telephone call by means of a camp-on busy tone in the handset. Then, you can either accept the call, ignore it or reject it. The caller also hears the ringing tone. The busy tone is not activated until you reject the caller.
The response may deviate from the one described here if further telephones are connected to the same S_0 bus.
Note: Basic 10 – Setting applies to MSNs 1 ... 8
Basic 20 - Setting applies to MSNs 1 ... 4 (See 6.3.2.2 for MSNs 5...8)
Initial state: idle
Steps:
No. Description Input Display
| 1 | Initiate programming | 0 4 | CAMP O BUSY= ON# = OFF→ |
| 2 | Setting can be switched between "on" and "off" | # | CAMP O BUSY= OFF# = ON→ |
| 3 | Save the input | OK | CAMP O BUSY= ON<* OK #>→ |
| 4 | End programming or select a different menu item | * / # | 06.05.99 10:40 |
4.5 Call list: clearing entries
An entry in the call list is cleared automatically if you have retrieved the number concerned from the list. Entries are left unchanged if you manually dial a number from the call list. Every entry in the call list can also be cleared singly by means of a procedure.
Initial state: idle or conversation
Steps:
No. Description Input Display
| 1 | Select required entry | If necessary, press several times | 2 04318818004.05. 10:35 >2 |
| Clear entry2 | R | 05.05.99 10:09 |
4.6 Call diversion: programming a call diversion destination
For details of switching call diversion on or off, see "3.4.1 Modifying or switching call diversion on/off".
Initial state: idle or conversation
Steps:
No. Description Input Display
| 1 | Initiate programming | ←→0← | DEST. FORWARD U NO ENTRY→ |
| 2 | If required: Change the call div.mode: U - unconditional B - on busy N - after a time | ← | DEST. FORWARD N NO ENTRY→ |
| 3 | Enter the destination number | ← | DEST. FORWARD N 043188180→ |
| 4 | Save call diversion; programming the next call diversion is offered | OK | DEST. FORWARD N NO ENTRY→ |
4.7 Automatic keypad switchover
The automatic keypad switchover function serves to send telephone numbers that begin with “*” or “#” as keypad signals. This function is sometimes needed in telecommunications systems. Some telecommunications systems or switching computers can be controlled with keypad functions. Digits entered as keypad signals are sent to the exchange as digitally coded signals.
Initial state: idle
Steps:
No. Description Input Display
| 1 | Initiate programming | 0 0 5 | AUTOKEYPAD = OFF# = ON→ |
| 2 | Switch over the setting (ON or OFF) | AUTOKEYPAD = ON# = OFF → | |
| Save the input3 | OK | AUTOKEYPAD = ON<※ OK #>→ |
4.8 Setting the date and time
Normally, the date and time are updated by the exchange when you start a telephone conversation. You can make the settings manually if your exchange does not support this feature.
Initial state: idle
Steps:
No. Description Input Display
| 1 | Initiate programming | 0 1 | CHANGE DATE+TIME22.05.99 10:53→ |
| 2 | Clear individual digits or the complete display | R or → R | CHANGE DATE+TIME22.05.99 10:--→ |
| 3 | Enter the date and time | CHANGE DATE+TIME06.05.99 10:40→ | |
| Save the input4 | OK | CHANGE DATE+TIME<× OK #>→ |
4.9 Programming a direct call number (baby call)
When the direct call function is activated, a previously programmed telephone number is dialled if you press any key (except ⏻) after lifting the handset.
You need to know the PIN to be able to enter the direct call number.
The 'as-delivered' default is "0000".
For details of switching the direct call function on or off, see
"3.4.2 Switching direct call (baby call) on/off".
Initial state: idle or conversation
Steps:
No. Description Input Display
| 1 | Initiate programming | 05PIN | DIRECT CALL NO. PIN ? ---- |
| 2 | Enter or, if nec., edit the destination number | MSN2: BUSINESS 123456 | |
| 3 | If required: Change the MSN: | 9WXYZ | MSN 123456 |
| 4 | If required: Switch over identification | 810V | MSN1: PRIVATE 123456 |
| Save the input5 | OK | DIRECT CALL NO. OK #> |
4.10 Selecting the display language
Different languages are available for display of the texts.
Initial state: idle
Steps:
No. Description Input Display
| 1 | Initiate programming | 0 0 8 | SPRACHE | |
| Deutsch #> | ||||
| 2 | Select the required language | # or * | SPRACHE | |
| English #> | ||||
| Save the input3 | OK | LANGUAGE | ||
| OK #> | ||||
4.11 Charges
The telephone contains one call charge counter for each MSN and one totalising counter for all telephone numbers. Depending of your network provider, charge information can be transmitted during or at the end of a call if this feature has been enabled for your connection. Accordingly, the charges for the call conducted are displayed during or after the call.
If you make use of call-by-call connections, charges are not transmitted in every single case.
4.11.1
The call charge counter can display charge units and the corresponding cash amount. You can read off the charges accumulated for each MSN or as a total. If the charge information is sent to your ISDN connection in units, you should define the corresponding factor to make sure that the accumulated charges will be displayed to you during or after a call.
Note: if the charge information is presented in units and the factor is set to "0", the display appears in units, or otherwise as amounts. It goes without
saying that the counter at the exchange is the one that applies to your telephone bill. The factor setting does not function if charges are communicated as amounts.
Initial state: idle
Steps:
No. Description Input Display
| 1 | Initiate programming | 06 | CHARGING PIN ? ---- |
| Enter the PIN2 | 1 1.44 0.36 *Fact OK #> | ||
| 3 | Select the charge memory you wish to clear | # | 2 2.88 0.24 *Fact OK #> |
| If nec. | Clear the displayed memory | OK | CHARGING <* OK #> |
| or | Switch to setting of the factor, the current value is displayed | * | FACTOR = 0.12 * = . |
| If nec. | Clear digits in the dis- play or the complete display | R or R | FACTOR = 0.1 * = . |
| If nec. | Enter a new factor | (point with *) | FACTOR = 0.15 * = . |
| Save the input4 | OK | CHARGING <* OK #> |
4.12 Resetting the unit
When you reset the unit, the settings listed in Table "4.1 Default settings", under the section entitled "After reset" are established.
Initial state: idle
Steps:
No. Description Input Display
| 1 | Initiate programming |  | 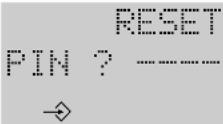 |
| 2 | Enter the PIN | [0x0x1] | 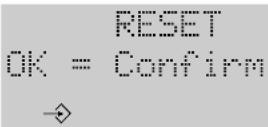 |
| Confirm reset3 |  |  |
Please note that the display only changes about 10 seconds after you have pressed OK. The top two lines are then displayed in black for about 10 seconds, while all pictograms are displayed in the 3rd line.
4.13 Programming picking up a call/conversation
(Basic 20 only)
You can program whether a connection can only be picked up during the ringing phase or also after a call has been accepted ("Line pick-up = on"). A practical example of "pick up during a call" is when an answering machine is connected to the analog port and you want to accept the call after the answering machine has already answered it.
Initial state: idle
Steps:
No. Description Input Display
| 1 | Initiate programming | 0 0 0 | LINE PICK-UP=OFF# = ON→ |
| 2 | Switch over the setting (ON or OFF) | LINE PICK-UP=ON# = OFF→ | |
| Save the input3 | OK | LINE PICK-UP=ON<※ OK #>→ |
4.14 Programming the international prefix
In certain circumstances, you must program the international prefix to ensure that international calls will be entered correctly in the call list.
The international prefix for international call connections in Germany is "00" (e.g. "0044" for Great Britain").
Initial state: idle
Steps:
No. Description Input Display
| 1 | Initiate programming | 0 0 2 | INTERNAT. CODE |
| 2 | Enter the international prefix code | INTERNAT. CODE | |
| If nec. | Clear digits singly or completely | R or R | INTERNAT. CODE |
| Save the input3 | OK | INTERNAT. CODE |
4.15 Entering, modifying or clearing MSNs
MSNs are the telephone numbers that your network provider has assigned to you for your connection. Up to 10 digits are at your disposal per MSN for programming.
If you wish to operate the telephone on the internal bus of a telecommunications system, you must select MSNs as the numbers that are provided for this bus. These may only consist of individual digits. Pay attention to your telecommunications system's manual.
In the case of the EuroPhone Basic 20, MSN 5 to MSN 8 are assigned to the analog port.
Initial state: idle
Steps:
No. Description Input Display
| 1 | Initiate programming | 09 | MSN PIN ?---- |
| 2 | Enter the PIN | MSN <1..8>: | |
| Select the MSN 3 | 1...8 | MSN2: NUMBER? NO ENTRY | |
| 4 | Enter or edit the number | MSN2: NUMBER? 4712 | |
| If nec. | Clear digits singly or completely | R or R | MSN2: NUMBER? 471 |
| Save the input5 | OK | MSN2: NAME? NO ENTRY | |
| If nec. | Enter the designation for the MSN (e.g. "PRIVATE" or "BUSINESS" | MSN2: NAME? BUSINESS → | |
| 6 | Save the input, the next MSN is offered | OK | MSN3: NUMBER? 4713 → |
| If nec. | Specifically select a different MSN | →9 1 ...8 | MSN6: NUMBER? 4716 → |
4.16 Programming the national prefix
It may be necessary to program the national prefix to ensure that telephone numbers will be stored correctly in the call list. The national prefix in Germany is "0" before the local area code (e.g. "0431" for Kiel).
Initial state: idle
Steps:
No. Description Input Display
| 1 | Initiate programming | 0 0 1 | NATIONAL CODE |
| 2 | Enter the national prefix code | NATIONAL CODE | |
| If nec. | Clear digits singly or complete | R or R | NATIONAL CODE |
| Save the input3 | OK | NATIONAL CODE |
4.17 Network provider code scheme
A network provider code is a special prefix that you dial before the actual telephone number when using the call-by-call method in order to conduct the call via a specific network provider.
The network provider code scheme stored in the EuroPhone Basic is similar to a mathematical formula and contains all possible codes.
This scheme is necessary for the telephone to be able to compare incoming calls against the telephone book (if the numbers in the telephone book are stored together with network provider codes). It is also important for the discriminator because barred numbers can otherwise be circumvented with network provider codes.
The network provider codes that are set by default for Germany (five and six digits) correspond to the state of affairs that applied when your telephone was delivered and are also not influenced by resetting the unit. In the event that a change should nevertheless be necessary, we give you an input example here which indicates how the network provider codes are composed:
5-digit codes are within the range from 01010 - 01099
| digits 1 - 3 penultimate digit last digit | |
| 010 1 - 9 0 - 9 | |
Uninterrupted input of the previous line: 0101-90-9
6-digit codes lie within the range from 010000 - 010099
| digits 1 - 4 penultimate digit last digit | ||
| 0100 0 - 9 0 - 9 | ||
Uninterrupted input of the previous line: 01000-90-9
A maximum of 30 characters including special characters is available.
Initial state: idle
Steps:
No. Description Input Display
| 1 | Initiate programming | 0 0 4 | PROVIDER CODE PIN ? ---- |
| Enter the PIN2 | PROVIDER CODE 0101-90-9 | ||
| 3 | Enter the code scheme with the digit keys | PROVIDER CODE 0101 | |
| If nec. | Enter a blank as a delimiter between several schemes | # | PROVIDER CODE 01019 010 |
| If nec. | Define ranges by entering a dash | * | PROVIDER CODE 0101-90-9 |
| If nec. | Clear digits singly or completely | R or R | PROVIDER CODE 0101-90- |
| Save the input4 | OK | PROVIDER CODE 0101-90- |
4.18 Defining the local area code
The local area code is the prefix without the national or international prefix ("0" or "00", see also 4.16). For Kiel, for example, the local area code is 431. The prefix must be entered to be able to compare incoming telephone numbers (always with the prefix) against the telephone book whenever telephone numbers in your own local area are stored without a prefix.
Initial state: idle
Steps:
No. Description Input Display
| 1 | Initiate programming | 0 0 7 | AREA CODENO ENTRY |
| 2 | Enter the local area code, up to 6 digits (prefix without "0") | AREA CODE431 | |
| If nec. | Clear digits singly or completely | R or R | AREA CODE43 |
| Save the input3 | OK | AREA CODE< * OK # > |
4.19 Editing the PIN
Before certain procedures, you must enter a 4-digit code number (PIN) that protects your telephone against unauthorised use/reprogramming. On delivery, this PIN is set to "0000". Change the PIN to set up effective protection, but also take a note of your modified PIN because otherwise you will no longer be able to use some of the functions.
If you have ever forgotten your PIN, it can only be reset by our after-sales service.
Initial state: idle
Steps:
No. Description Input Display
| 1 | Initiate programming | 0 3 | CHANGE PINPIN ? ----→ |
| Enter the old PIN2 | Old PIN1. ----→ | ||
| Enter the new PIN3 | New PIN2. ----→ | ||
| 4 | Re-enter the new PIN | CHANGE PINOK #→ |
The new PIN has only been accepted after the positive acknowledgement tone has sounded.
4.20 Setting your identification
With this programming, you can separately set the default identifications for outgoing and incoming calls. Contrary to these default settings, you can define a different setting at any time (see 3.1.4 and 3.2.1). Please note that your connection has to support this feature.
Initial state: idle
Steps:
No. Description Input Display
| 1 | Initiate programming | 08 | IDENT. OUT = ON *: ID. I → |
| 2 | Modify the default identification(outgoing) | IDENT. OUT = OFF *: ID. IN # = ON ↗ # = Q F F | |
| or | Change to setting the identification(incoming) | * | IDENT. IN = ON *: ID. OU → |
| and change the default identification(incoming) | # = O F F | IDENT. IN = ON *: ID. OU → | |
| Save the input4 | OK | IDENTIFICATION (* OK #) → T # = O F F |
4.21 Defining barred numbers
You can define barred numbers, which can then not be called from your telephone. An attempt to dial such a number ends with a "NO. BLOCKED" display and the negative acknowledgement tone.
A total of 30 characters (including special characters) can be entered.
Initial state: idle
Steps:
No. Description Input Display
| 1 | Initiate programming | 0 7 | BLOCKING PIN ? ----→ |
| Enter the PIN2 | BLOCK-NO. NO ENTRY→ | ||
| 3 | Enter the barred number(s), separating several barred numbers with # | BLOCK-NO. 0190 01805→ | |
| or | Define barred number ranges, entering the dash in the ranges with *e.g. 01901 - 8 = barred numbers from 01901 to 01908 | BLOCK-NO. 01901-8→ | |
| If nec. | Clear digits of the input or completely | R or R | BLOCK-NO. 019→ |
| Save the input4 | OK | BLOCKING OK #→ |
Please also make sure that the network provider codes are set correctly as otherwise the discriminator could be circumvented with such a code (see 4.17).
On delivery, the network provider codes have already been stored completely. They are also not influenced by resetting the telephone.
Switching the telephone lock on/off is described in 3.4.6.
4.22 Telephone book
A maximum of 200 entries with 30 characters each for telephone numbers and 14 characters each for names is available. Names that begin with "!" (!!" is assigned to the "0" key) can also be dialled when the telephone lock is on (emergency numbers). Please note that the MSN and the identification must also be stored besides the name and the telephone number.
4.22.1 Creating a new entry
Initial state: idle or conversation
Steps:
No. Description Input Display
| 1 | Initiate programming |  |  |
| 2 | Select "NEW" |  |  |
| → ≈ | |||
| 3 | Enter the name |  | |
| → ≈ | |||
| If nec. | Move the cursor to clear characters or names |  | |
| → ≈ | |||
| 4 | Complete name input, the name is saved |  | |
| → ≈ | |||
| 5 | Enter the telephone number, which can also be copied from the call list or from the redial memory. To delete digits: - singly - completely |  | |
| → ≈ | |||
| If nec. | Switch over the identification | 8 | MSN1: PRIVATE123456→ 123 |
| If nec. | Change the MSN | 9: 1 ... 8 | MSN2: BUSINESS123456→ 123 |
| 6 | Complete telephone number input, save the entry | OK | TELEPHONE BOOK<*NEW CHANGE#>→ |
4.22.2 Editing/clearing an existing entry
Initial state: idle or conversation
Steps:
No. Description Input Display
| 1 | Initiate programming | 0 | TELEPHONE BOOK<NEW CHANGE#>→ |
| Select "Change"2 | # | CHANGE TEL. BOOK< A..Z #>→ | |
| 3 | Enter the initial letters of the required name | 0 ... 9 | 1 ARTHUR123456→ |
| or | Scroll to the required entry | * or # | 3 XAVER567890→ |
| 4 | Confirm your selection. You can edit the entry | OK | NAME?ARTHUR→ |
| 5 | Move the cursor delete characters or names | * or #R or ¬R | NAME?ARTH→ |
| 6 | Complete name input, the name is saved | OK | MSN1: PRIVATE 123456→ |
| 7 | Enter the telephone number, which can also be copied from the call list or the redial memory.To clear digits:- singly- completely | 0 ... 9, *, #☐☐☐☐☐☐☐☐☐☐☐☐☐☐☐☐☐☐☐☐☐☐☐☐☐☐☐☐☐☐☐☐☐☐☐☐☐☐☐☐☐☐☐☐☐☐☐☐☐☐☐☐☐☐☐☐☐☐☐☐☐☐☐☐☐☐☐☐☐☐☐☐☐☐☐☐☐☐☐☐☐☐☐☐☐☐☐☐☐☐☐☐☐☐☐☐☐☐☐☐ ☐☐☐☐☐☐☐☐☐☐☐☐☐☐☐☐☐☐☐☐☐☐☐☐☐☐☐☐☐☐☐☐☐☐☐☐☐☐☐☐☐☐☐☐☐☐☐☐☐☐☐☐☐☐☐☐☐☐☐☐☐☐☐☐☐☐☐☐☐☐☐☐☐☐☐☐☐☐☐☐☐☐☐☐☐☐☐☐☐☐☐☐☐☐☐☐☐☐☐☐○ | |
| If nec. | Switch over the identification | 8 | MSN1: PRIVATE 123457→ |
| If nec. | Change the MSN | 9: 1...8 | MSN2: BUSINESS 123457→ |
| 8 | Complete telephone number input, save the entry | OK | TELEPHONE BOOK <*NEW CHANGE#>→ |
4.23 Disabling/enabling switching at the exchange
You are brokering or in a three-party conference. To connect the two other parties to one another, you use the "Switching at the exchange" function. However, pay attention to the fact that you still incur call charges after hanging up.
Make sure your connection supports this feature.
Initial state: idle
Steps:
No. Description Input Display
| 1 | Initiate programming | 0 2 | CALL TRANSF= OFF PIN ? ---- |
| 2 | Enter the PIN | CALL TRANSF= OFF # = ON | |
| 3 | The setting can be switched over between "on" and "off" | # | CALL TRANSF= ON # = OFF |
| Save the input4 | OK | CALL TRANSF= ON <* OK #> |
4.24 Clearing the redial memory
Initial state: idle
Steps:
No. Description Input Display
| 1 | Clear all redial memories | CLEAR REDIALOK = Confirm→ | |
| Confirm clearing2 | OK | CLEAR REDIALOK #→→ |
5 Emergency operation
5.1 Emergency operation switch
Emergency operation commences in the event of a power failure.
Connected to an NTBA in the emergency mode, the S_0 bus can only power a terminal that is capable of emergency operation. If you are operating several terminals on the bus, the emergency mode must only be activated on one of the terminals.
Switching to the emergency mode
Remove all plugs from the terminal.
Take a screw driver and turn the switch to position 1.
Mark this terminal as the emergency terminal
Note:
When delivered, your telephone is not set to emergency operation.
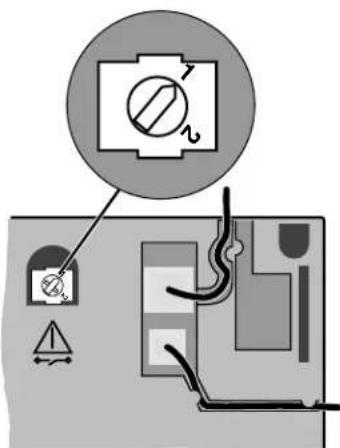
text_image
Diagram showing electrical circuit components with warning symbols and a circled component labeled 'Switch'Switch setting
1 Emergency operation possible
2 Emergency operation not possible
5.2 In an emergency
If the power supply on your NTBA should fail, only the terminal set to the emergency mode will operate on the bus. All calls for the bus will be signalled at this one telephone. When you are making telephone calls, the emergency mode is indicated by a "!" between the date and the time on the display.
EuroPhone Basic 20:
The analog port is not available during emergency operation.
6 The analog port (EuroPhone Basic 20 only)
The EuroPhone Basic 20 ISDN telephone has an internal analog interface.
This means that you can connect an analog terminal (a telephone, an answering machine or a fax machine) to this socket. The ISDN telephone performs the conversion to the digital ISDN network as well as the "switching functions" such as "...on what number (MSN) does the ISDN telephone ring and on what number does the analog terminal ring?". If the analog terminal is a telephone, free internal calls with the ISDN telephone are possible. Telephone number display of incoming calls for the analog terminal is supported; the ISDN telephone communicates the date, time and telephone number. Please only use the included adapter cable
TAE plug of terminal


Adapter cable
for connection. All special and set up functions are only available if the analog terminal is set to DTMF (dual tone multi-frequency dialling) and the flash key.
Assignments of the Western socket
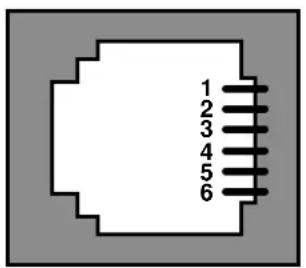
text_image
1 2 3 4 5 61...2 Not used
3 La
4 Lb
5...6 Not used
6.1 Setting up the analog port
The EuroPhone Basic 20 manages 8 multiple subscriber numbers (MSNs).
The following assignments apply:
MSN 1...4 ISDN telephone
MSN 5...8 Analog port
If no MSNs are set up, both the ISDN telephone and the analog terminal ring when calls arrive.
The following example shows you the advantages of assigning MSNs:
| ISDN telephone a/b terminal (EuroPhone Basic 20) on the analog port | |||||
| MSN index MSN entry Ringing tone tone | MSN index MSN entry Ringing | ||||
| MSN 1 | 47 11 | Ring. tone 1 | MSN 5 | 47 11 | depending on terminal |
| MSN 2 | 47 12 | Ring. tone 2 | MSN 6 | 47 12 | |
| MSN 3 | 47 13 | Ring. tone 3 | MSN 7 | 47 15 | |
| MSN 4 | 47 14 | Ring. tone 4 | MSN 8 | ||
| Called number Called terminal | |||||
| 47 11 | ISDN telephone rings with ringing tone 1 and a/b terminal rings | ||||
| 47 12 | ISDN telephone rings with ringing tone 2 and a/b terminal rings | ||||
| 47 13 | only ISDN telephone rings with ringing tone 3 | ||||
| 47 14 | only ISDN telephone rings with ringing tone 4 | ||||
| 47 15 | only a/b terminal rings | ||||
6.2 Internal calls
Free internal calls can be conducted if a telephone is connected to the analog port.
Initial state: handset lifted, dial tone
Steps:
No. Description Input
| 1 | Establish an internal call | R | * | INTERNAL CALL00'35 0 |
6.2.1 Transferring a call internally
You can internally transfer an external call.
Initial state: conversation with an external subscriber
Steps:
No. Description Input
| 1 | Initiate consultation call | R | MSN1: PRIVATE |
| 2 | Dial the internal user's number | R * | PLEASE HOOK ON |
| 3 | Transfer the exchange line connection | ↓ | 06.05.99 10:40 |
6.2.2 Picking up a call/conversation
On your telephone, you can pick up an existing call or exchange line conversation on the other terminal. To pick up an existing conversation, however, the appropriate class of service must be programmed (see 4.13).
Initial state: one telephone idle, ringing or connection on the other unit Steps:
No. Description Input
| 1 | Pick up ringing or conversation | R # | 123456 |
6.3 Functions on the analog port
6.3.1 During a conversation
6.3.1.1 Pic
While you are conducting a conversation, a second call arrives, indicated to you by a "knocking" tone. It is not possible to reject the camp-on busy call.
Initial state: conversation, you hear the special information tone Steps:
No. Description Input Display
| 1 | End the first conversation and accept the second one, | Depending on the terminal |
| or | Put the first connection "on hold" and accept the second one, | Depending on the terminal |
6.3.1.2 Consultation call, brokering
You are in a conversation and would like to consult another user. When this other user picks up the handset, you are in the brokering mode. You can now switch between both parties.
An external consultation call cannot be established during an internal connection
Initial state: conversation
Steps:
No. Description Input Display
| 1 | After pressing the key, wait for the dial tone | Depending on the terminal |
| 2 | External consultation: Enter the number | Depending on the terminal |
| 3 | When the second party lifts the handset, the telephone is in the "brokering" state. By pressing the key, you can switch between ("brokering") both parties. |
| Depending on the terminal |
6.3.1.3 Automatic callback on busy
When the called party is busy, you can also use the "callback on busy" feature from the analog terminal if the prerequisites (see 3.3.2) are met.
Activating automatic callback on busy
Initial state: called party is busy
Steps:
No. Description Input Display
| You hear the busy tone | Depending on the terminal | ||
| 1 | Initiate automatic callback | * 3 7 | Positive acknowledgement tone if the function has been activated, otherwise negative acknowledgement tone |
If the called party hangs up, first of all you and, once you have lifted the handset, the party who has become free are called again.
Clearing activated callback on busy
Initial state: automatic callback on busy activated
Steps:
No. Description Input Display
| Lift the handset1 | ↑ | Depending on the terminal | |
| 2 | Clear automatic callback | 37 | Positive acknowledgement tone if the function has been deactivated, otherwise negativ acknowledgement tone |
Note: only the party activated last is deactivated.
6.3.2 Set up functions
All functions (with the exception of "set up MSN") are realised on the analog terminal by "Lift handset" ( ), enter steps, "Replace handset" ( ).
6.3.2.1 Setting up MSNs
MSNs are set up on the ISDN telephone as described in 4.15
6.3.2.2 Camp-on busy
With this setting, you define whether calls arriving during an existing connection are permitted to camp-on busy. Please note that this setting applies jointly to MSNs 5...8.
Initial state: dial tone
Steps:
No. Description Input Display
| Enable camp-on busy 1 * 43 \# | Acknowledgement tone | |
| or | Disable camp-on busy \# 43 \# | Acknowledgement tone |
6.3.2.3 Call diversion
You can set up call diversion destinations for your analog terminal. You can use the following variants: Unconditional call diversion
Call diversion after a time
Call diversion on busy
You can also activate call diversion on the ISDN telephone for the analog terminal (see 3.4.1). In this case, settings can be made separately for each MSN. On the analog terminal, call diversion is set up jointly for MSNs 5...8.
Initial state: dial tone
Steps:
No. Description Input Display
| 1 | Activate unconditional call diversion | * 2 1 * Diversion destination no. \# | Acknowledgement tone |
| or | Check unconditional call diversion | * \# 2 1 \# | Pos. acknowl. tone=on Neg. acknowl. tone=off |
| or | Deactivate unconditional call diversion | \# 2 1 \# | Acknowledgement tone |
| or | Activate call diversion after a time | * 6 1 * Diversion destination no. \# | Acknowledgement tone |
| or | Check call diversion after a time | * \# 6 1 \# | Pos. acknowl. tone=on Neg. acknowl. tone=off |
| or | Deactivate call diversion after a time | \# 6 1 \# | Acknowledgement tone |
| or | Activate call diversion on busy | * 6 7 * Diversion destination no. \# | Acknowledgement tone |
| or | Check call diversion on busy | ※#67# | Pos. acknowl. tone=on Neg. acknowl. tone=off |
| or | Deactivate call diversion on busy | #67# | Acknowledgement tone |
6.3.2.4 Telephone lock
Use of the telephone lock is prevented by a secret code, which must not be confused with the "normal" PIN. When the telephone is delivered, the secret code setting is "0 0 0 0".
You can lock the telephone on the analog port in two different ways. When the full lock is on, no telephone numbers can be dialled or you apply the telephone number lock of the ISDN telephone to the analog port also.
Modifying the secret code for the lock on the analog terminal
C@IDestate: dial tone
Steps:
No. Description Input Display
| 1 | Select modification of the the old | *99* CODE | Acknowledgement tone | |
| 2 | Enter the new and confirm it by pressing the * Key | new | ||
| 3 | Repeat the new and confirm it by pressing the @Key | new CODE and enter | Pos. acknowledgement tone if input is correct, otherwise neg. acknowledgement tone | |
Selecting the telephone lock
Initial state: dial tone
Steps:
No. Description Input Display
| Select the full lock1 | * 3 3 * CODE * 1 \# | Acknowledgement tone | |
| or | Apply the ISDN telephone's lock | * 3 3 * CODE * 2 \# | Acknowledgement tone |
Switching the telephone lock for the analog terminal on/off or checking it
Initial state: dial tone
Steps:
No. Description Input Display
| Activate lock1 | * 3 3 * CODE \# | Acknowledgement tone | |
| or | Check lock | * \# 3 3 * CODE \# | Pos. acknowl. tone=on Neg. acknowl. tone=off |
| or | Deactivate the lock | \# 3 3 * CODE \# | Acknowledgement tone |
6.3.2.5 Connection without dialling
A previously defined telephone number is dialled automatically about 5 seconds after you lift the handset. The telephone number is entered while you activate this feature.
Initial state: dial tone
Steps:
No. Description Input Display
| 1 | Activate connection without dialling | * 5 3 * Destination No. \# | Acknowledgement tone |
| or | Check connection without dialling | * \# 5 3 \# Input within 5 seconds after lifting the handset | Pos. acknowl. tone=onNeg. acknowl. tone=off |
| or | Deactivate connec-tion without dialling | \# 5 3 \# Input within 5 seconds after lifting the handset | Acknowledgement tone |
6.3.3 Emergency operation
The analog terminal cannot be used during emergency operation.
7 Appendix
7.1 Approval and CE mark
The product meets the fundamental requirements of all applicable guidelines of the Council of the European Union. The specified conformity evaluation procedures have been followed.
This unit meets the requirements of the following EU guidelines:
• 89/336/EEC - EMC Guideline
– Guideline 89/336/EEC of the Council dated 3 May 1989 to harmonise the legal regulations of the member states regarding electromagnetic compatibility; amended by 91/263/EEC, 92/31/EEC, 93/68/EEC, 93/97/EEC.
• 73/23/EEC - Low-voltage Guideline
– Guideline 73/23/EEC of the Council dated 19 February 1973 to harmonise the legal regulations of the member states in relation to electrical equipment for use within certain voltage limits; amended by 92/31/EEC, 93/68/EEC.
• TTBR 3 / CTR 3 (97/346/EG) and Amendment 1(12/97)
- Commission ruling of 20 May 1997 in relation to a joint technical specification for the basic access to the Europe-wide Integrated Services Digital Network (ISDN).
• TBR 8 / CTR 8 (Version II) (1999/304/EG)
- Commission ruling of 12 April 1999 in relation to a joint technical specification for the Integrated Services Digital Network (ISDN); telephony at 3.1kHz , interfacing conditions (95) (HANSAE 0804 - Part 100 / 06.97)
The following EU standards were applied for conformity evaluation of EMC and the low-voltage guideline:
EN 50081 - 1 (01/92) (DIN VDE 0878 - Part 22 / 04.98)
- Electromagnetic compatibility (EMC): basic interference emission standard/Part 1
EN 50082 - 1 (01/92) (DIN VDE 0839 - Part 82 - 1 / 03.93)
- Electromagnetic compatibility (EMC): basic interference immunity standard/Part 1
EN 60950 - A4 (07/96) (DIN VDE 0805 - A4 / 11.97)
– Safety of information technology equipment including electrical office machines
EN 41003
- Special safety requirements for devices intended for connection to the telecommunications network
7.2 Technical data
ISDN
Connection: Euro ISDN point-to-multipoint connection
Dimensions: 162 x 80 x 206 mm (W x H x D)
Weight: approximately 700 g
For connection to telecommunications systems with an internal S_0 bus.
Analog port
Dialling method: Dual tone multifrequency (DTMF)
Pulse dialling
- Functions with * and # are not available
when using pulse dialling
R key: Flash (50 ms ... 350 ms)
Ringing voltage: 32 Vrms / 25 Hz to 0.85 μF + 1,800 Ohm
$$ (Z > 7, 7 0 0 \mathrm{Ohm}) $$
Supply voltage: ≥ 16 V
Supply voltage: ≥ 20 mA to max. 540 Ohm
Technical modifications reserved
7.3 Cleaning and care
Simply wipe your telephone with a slightly damp cloth or with an anti-static cloth; never use a completely dry cloth.
Please avoid the use of cleaning and scouring agents.
7.4 Summary of programming sequences
After entering ⏻0 (to enter the programming mode), you reach the menu items listed below either by scrolling with the (*) and (#) keys or by entering the appropriate code(s) after entering the programming mode.
Menu description „Hotkey“ Display
| Entering the programming mode | 0 | 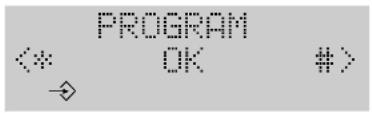 |
| Entering the date and time | 0 1 | 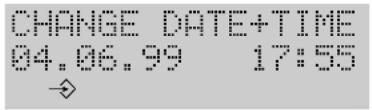 |
| Disabling/enabling switching at the exchange | 0 2 |  |
| Changing the PIN | 0 3 | 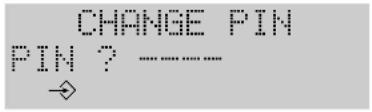 |
| Enabling/preventing camp-on busy | 0 4 | 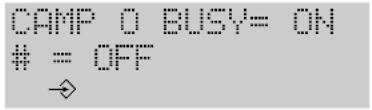 |
| Programming a hot line number | 0 5 | 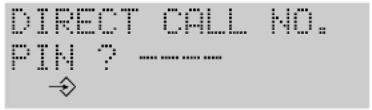 |
| Clearing the call charge counter and defining a factor | 0 6 |  |
| Defining barred numbers | 0 7 |  |
| Setting the identification | 0 8 | 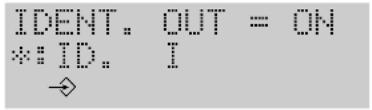 |
| Entering, modifying or deleting an MSN | 0 9 | 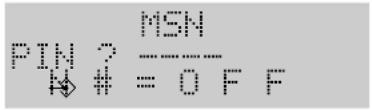 |
| Basic settings | 0 0 |  |
| Programming the national prefix | 0 0 1 |  |
Programming the international prefix
0 0 2
INTERNAT. CODE →
Network provider codes
0 0 4
PROVIDER CODE PIN ? ...... →
Automatic keypad switchover
0 0 5
AUTOKEYPAD = ON
= OFF
→
Programming the exchange line code
0 0 6
ACCESS CODE NO ENTRY
Defining the local area code
0 0 7
AREA CODE NO ENTRY →
Selecting the display language
0 0 8
LANGUAGE <* english #> →
Resetting the unit (Reset)
0 0 9
RESET PIN ? →
Programming call pick up (Basic 20 only)
0 0 0
LINE PICK-UP=OFF <* OK #>
Editing entries in the telephone book
0
TELEPHONE BOOK <*NEW CHANGE#> →
Clearing the redial memory
0
CLEAR REDIAL OK = Confirm →
Programming a call diversion destination
0
PREPARE FORWARD NO ENTRY →
Programming the relevant menu item is terminated by pressing OK. If programming was successful, the positive acknowledgement tone sounds. Programming can be cancelled at any time by pressing the Disconnect key ↗.
7.5 The key words
A
Accepting 53, 70, 72
Analog port 7, 53, 55, 67 f
Approval 79
'As-delivered' settings 44
Audible signals 13
B
Barred numbers 57, 61
Brokering 36, 38, 65, 71
C
Call back 27 ff, 73
Call charges 18, 41, 51, 65
Call diversion 25, 39 f, 48, 75
Call forwarding 25
Call forwarding 25
Call list 16, 19 ff, 25, 47
Call transfer 69,71
Camp-on busy 26, 46, 71, 74
Chaining telephone numbers 21
Charges 41,51
CODE 76
Conference 29, 38, 65
Connecting 10
Consultation call 36,71
D
Date and time 49
Dialling method 33, 68
Dialling 16
Digit key 12
Display contrast 41
Diversion 25, 39 f, 48, 75
E
Editing mode 12
Emergency operation 67, 78
Example configuration 7
Exchange line code 46
F
First programming settings 11
Forwarding 25
H
Hands free 31
Handset volume 42
Hold 32, 36
Direct call 23, 40, 50
Hot swapping 34
Hotline 85
|
Internal calls 69
International prefix 54
K
Keypad 33, 49
L
Language 51
Line seizure 16
Local area code 59
Location 10
Lock 42, 63, 76 f
M
Malicious caller identification 30, 43
Menu items 45,80
Microphone muted 33
MSN 7,11,14,16,18,24,
Muting 33
N
Name input 12
National prefix 56
Network provider code 57, 62
Notebook 34
Number communication 16, 18, 61
Number editing 17
Number identification 61
0
On-hook dialling 16 f, 21
Open listening 32
P
Parking 34 f
Pick up 53, 70
PIN 59,76
Plug-in connection 11
Power failure 67
Programming functions 44
Programming sequences 80
R
Redial 16, 19, 21
Redial memory 20, 34, 37, 66
Reset 44, 53, 57, 59, 62
Ringing tone 43,69
s
Switching 38,65
T
Telephone book 16, 19, 21, 63
Three-party conference 29, 38, 65
Tone ringing 43,69
Tones 13
V
Volume 42
CE
This unit meets the requirements of the EU guidelines:
89/336/EEC "Electromagnetic compatibility"
73/23/EEC "Electrical equipment for use within certain voltage limits"
The unit bears the CE mark in this respect.
Technical modifications reserved
Hagenuk GmbH EuroPhone Basic 10 / Basic 20
Westring 431 Mat.No. 3300.503
D 24118 Kiel Edition 11/99
Operating instructions