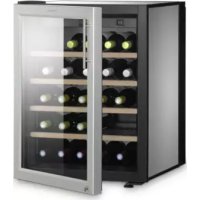
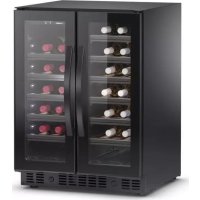
MaCave S117FG - Wine cellar DOMETIC - Free user manual and instructions
Find the device manual for free MaCave S117FG DOMETIC in PDF.

User questions about MaCave S117FG DOMETIC
0 question about this device. Answer the ones you know or ask your own.
Ask a new question about this device
Download the instructions for your Wine cellar in PDF format for free! Find your manual MaCave S117FG - DOMETIC and take your electronic device back in hand. On this page are published all the documents necessary for the use of your device. MaCave S117FG by DOMETIC.
USER MANUAL MaCave S117FG DOMETIC
natural_image
Black server rack cabinet with visible internal compartments (no text or labels)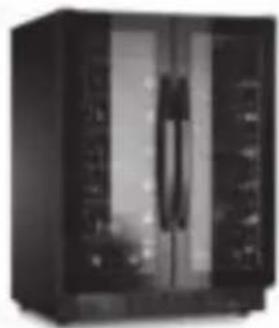
natural_image
Black industrial cabinet with vertical glass panels and a central handle (no visible text or symbols)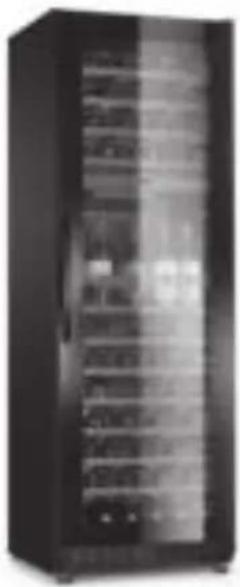
natural_image
Black server rack cabinet with multiple drive bays (no visible text or labels)S16FG, S40FGD, S117FG
EN Wine cabinet
Operating manual 8
text_image
S16FG S40FGD S117FG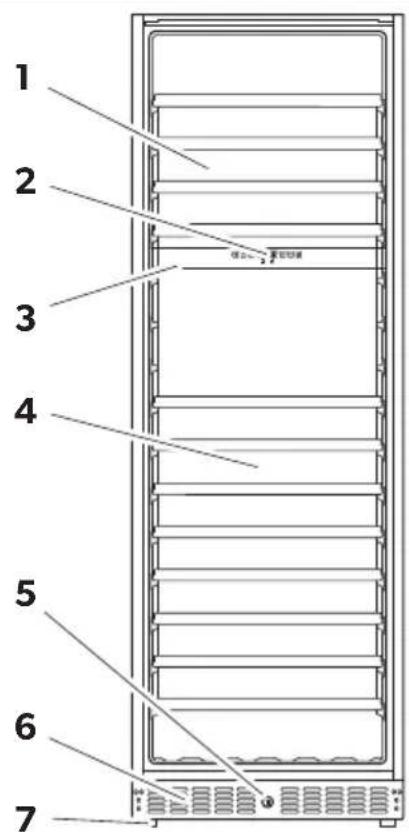
text_image
1 2 3 4 5 6 72
text_image
12345678 10 16 °C °FS16FG, S117FG
3
text_image
12345678 10 16 °C °FS40FGD
text_image
S16FG, S40FGD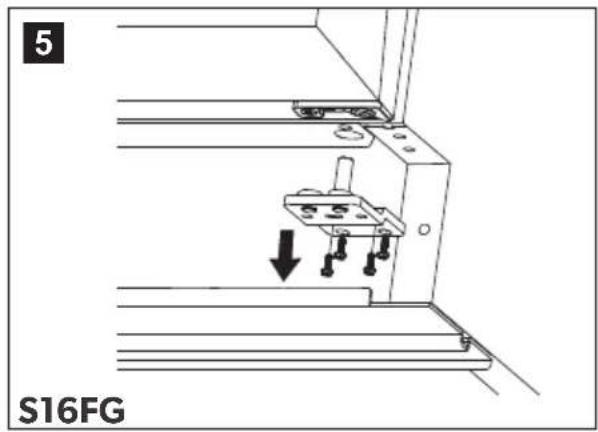
text_image
5 S16FG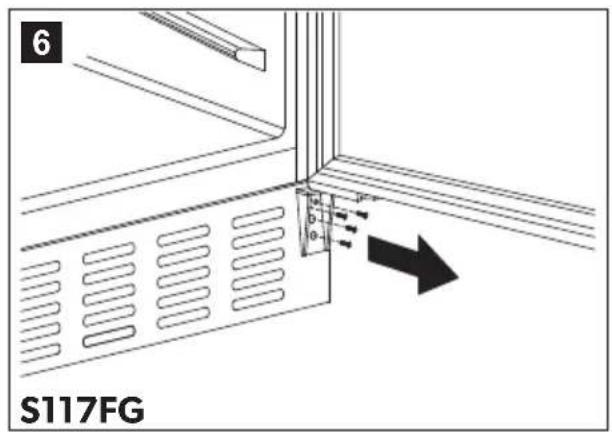
text_image
6 S117FG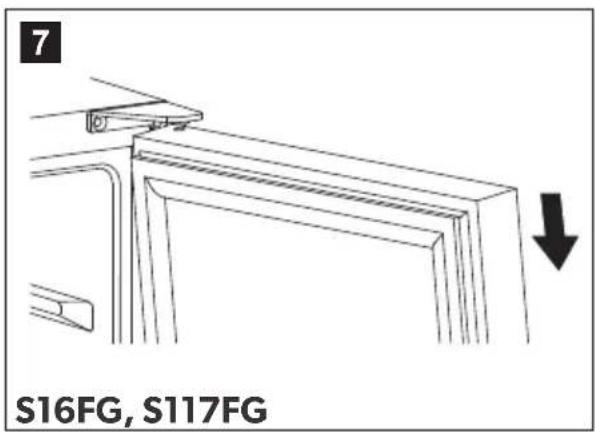
text_image
7 S16FG, S117FG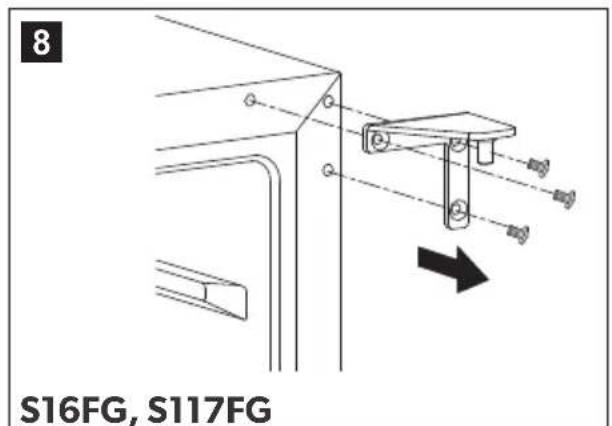
text_image
8 S16FG, S117FG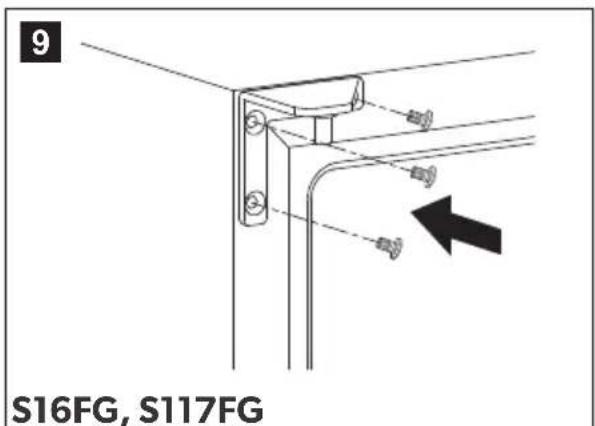
text_image
9 S16FG, S117FG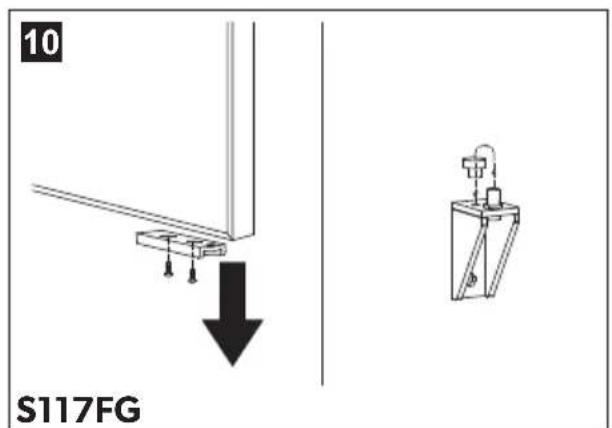
text_image
10 S117FG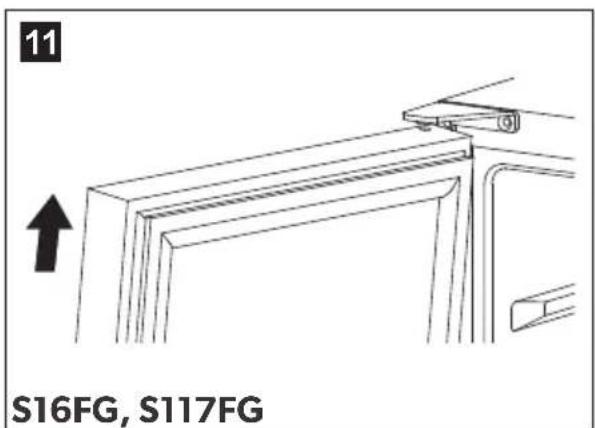
text_image
11 S16FG, S117FG
text_image
12 S16FG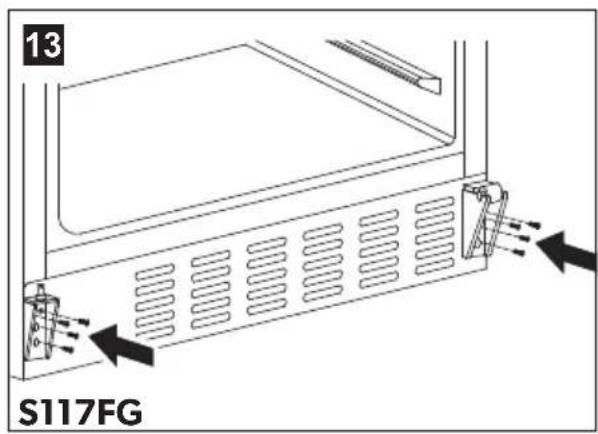
text_image
13 S117FG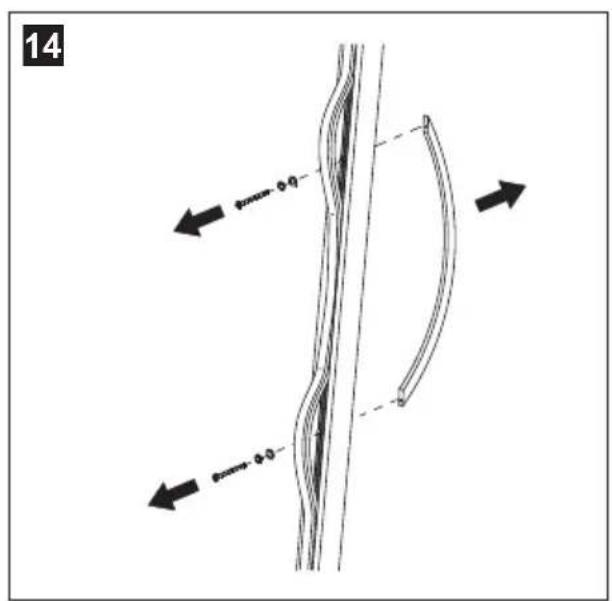
text_image
14 0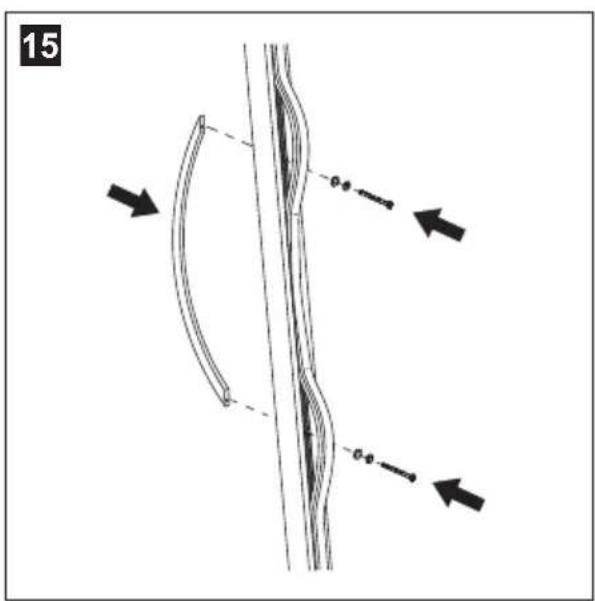
text_image
15 -0.0 -0.0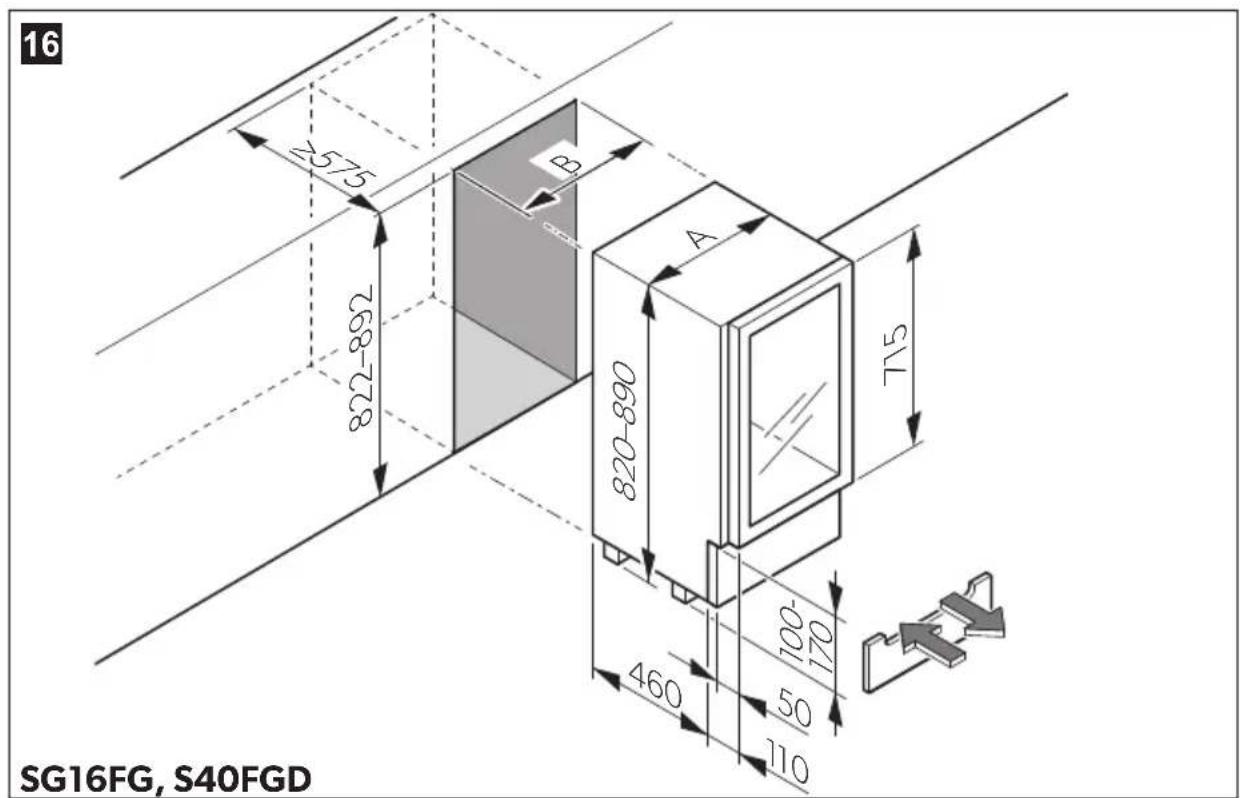
text_image
16 7575 822-892 768-728 B A 820-890 715 460 100- 170 50 110 SG16FG, S40FGD17
natural_image
Simple line drawing of two bottles with vertical lines indicating measurement or alignment (no text or symbols)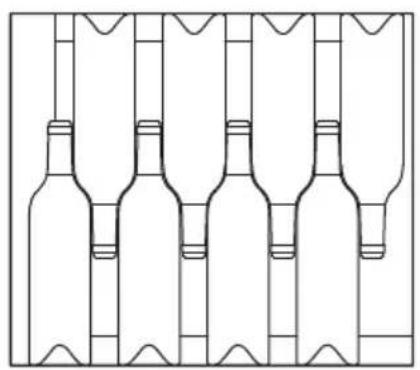
natural_image
Line drawing of five identical wine bottles arranged in a row (no text or symbols)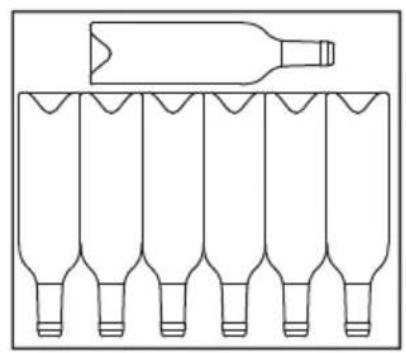
natural_image
Diagram of a bottle placed on top of six identical bottles arranged in rows (no text or symbols)18
A

natural_image
Front view of a vertical rack-mounted server unit with multiple circular compartments (no visible text or labels)B
natural_image
Front view of a vertical rack-mounted server unit with multiple circular compartments (no visible text or labels)19
A
natural_image
Front view of a dual-chamber refrigerator with circular compartments and ventilation grilles (no text or symbols visible)B
natural_image
Technical line drawing of a dual-chamber industrial machine with circular components on the front panel (no text or symbols)20
A
natural_image
Line drawing of a multi-level refrigerator with multiple bottles on the shelves (no text or symbols)B
natural_image
Technical line drawing of a multi-level refrigerator with circular compartments and storage tanks (no text or symbols)21
text_image
1 222
natural_image
Diagram of a refrigerator with a magnified view of its internal box on a platform (no text or symbols present)23
text_image
Technical diagram showing a device with internal grid pattern and circular component, annotated with directional arrows indicating rotation or flow.Please read this instruction manual carefully before first use, and store it in a safe place. If you pass on the product to another person, hand over this instruction manual along with it.
Table of contents
1 Explanation of symbols....9
2 Safety instructions....9
3 Scope of delivery 11
4 Accessories....11
5 Intended use ....12
6 Technical description....12
7 Setting up and connecting the appliance .....15
8 Using the appliance ....18
9 Troubleshooting 26
10 Maintaining and cleaning the appliance 28
11 Warranty 28
12 Disposal.... 29
13 Technical data 29
1 Explanation of symbols

WARNING!
Safety instruction: Failure to observe this instruction can cause fatal or serious injury.

CAUTION!
Safety instruction: Failure to observe this instruction can lead to injury.

NOTICE!
Failure to observe this instruction can cause material damage and impair the function of the product.

NOTE
Supplementary information for operating the product.
2 Safety instructions
The manufacturer accepts no liability for damage in the following cases:
- Faulty assembly or connection
- Damage to the product resulting from mechanical influences and excess voltage
• Alterations to the product without express permission from the manufacturer - Use for purposes other than those described in the operating manual
2.1 General safety

WARNING!
- Before you use the appliance for the first time, check that the operating voltage matches the mains voltage (see type plate).
- Do not operate the appliance if it is visibly damaged.
- This appliance may only be repaired by qualified personnel. Inadequate repairs may cause serious hazards.
Should your appliance need to be repaired, please contact customer services.
- This appliance can be used by children aged 8 years or over, as well as by persons with diminished physical, sensory or mental capacities or a lack of experience and knowledge, providing they are supervised or have been taught how to use the appliance safely and are aware of the resulting risks.
• Electrical appliance are not toys.
Always keep the appliance out of the reach of children.
- Children must be supervised to ensure that they do not play with the appliance.
- Keep the keys out of the reach of children.
- If this appliance's connection cable is damaged, it must be replaced by the manufacturer, customer service or a similarly qualified person in order to prevent safety hazards.
- Do not store any explosive substances, such as spray cans with propellants, in the appliance.

CAUTION!
- Disconnect the appliance from the mains - Before cleaning and maintenance - If you will not need to use it for some time
- The appliance should be moved and set up by at least two people. Otherwise this could lead to back or other injuries.
- Do not place the appliance in direct sunlight or in the vicinity of strong heat sources (heating appliances, ovens, etc.).

NOTICE!
- Never pull the plug out of the socket by the connection cable.
- Do not use accessories that have not been recommended by the manufacturer. This can lead to injury and material damage.
2.2 Operating the appliance safely

WARNING!
- Never use the appliance in rooms where flammable materials are stored or flammable gases have built up. Sparks from the motor could ignite them.
CAUTION!
- Do not use the appliance with wet hands.

NOTICE!
- Only use the appliance indoors, never outside.
- Never expose the appliance to moisture.
- Keep children and animals at a safe distance when operating the appliance.
- Do not place any electrical devices inside the cooler.
3 S c o p e o f d
Wine cabinet
- Water tank
• Key - Label set
- Door hinge (only S16FG, S117FG)
- Operating manual
4 A c c e s s o r i
Label Ref. number
S16FG S40FGD S117FG
Storage base 9103540117 9103540117 9103540119
| Presentation shelves (tilted) -- 9103540121 | |||
| Label set | 9103540116 | 9103540116 | 9103540116 |
| Active carbon filter | 9103500156 | 9103500156 | 9103500156 |
5 Intended use
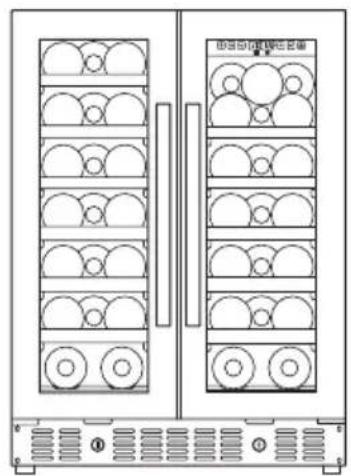
The appliance is a wine cabinet. It is intended for storing wine and has two separate adjustable temperature zones. A special beverage mod enables the storage and cooling of other drinks.
6 Technical description
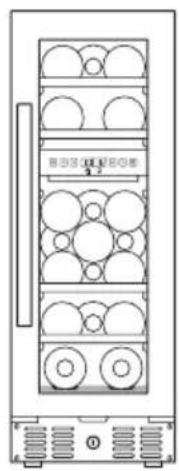
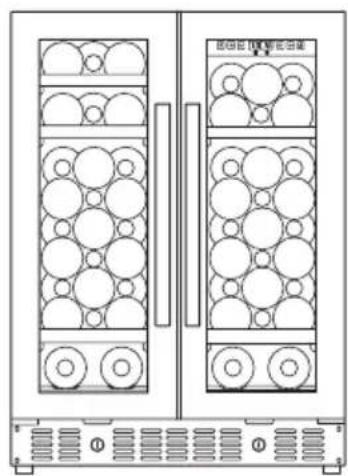
The wine cabinet comes in three models:
• S16FG: with capacity for 19 standard Bordeaux bottles
• S40FGD: with capacity for 52 standard Bordeaux bottles
• S117FG: with capacity for 141 standard Bordeaux bottles
Factory fitted with shelves.
You can increase the capacity by using the optional accessory of reinforced storage shelves.
You can find information on storage of bottles in chapter "Storing bottles" on page 18.
The appliance has two separate adjustable temperature zones.
S16FG, S117FG: The temperature zones are chilled or heated automatically to reach or maintain the temperature that is set.
S40FGD: The appliance has no heating function.
The temperature can be set in steps of 1^ C or 1^ F using sensor buttons.
The appliance has:
- Sensor buttons: Just touch slightly to select the required function
• automatic defrosting - a UV impervious door
-
An active carbon filter for improving the inner climate
-
a fan for maintaining a constant inner climate, such as in a wine cellar (dynamic cooling mode)
- a lockable glass door with a reversible door hinge
- detachable shelves for storing the bottles
- a Sabbath mode
• LED interior lighting with two operating modes - a temperature memory function: The set temperature is also saved when the unit is switched off.
- a temperature monitor: A warning signal sounds and the temperature display flashes if the interior temperature noticeably deviates from the one set
Overview
No. in fig. 1, Label page 2
1 S16FG, S117FG: Upper temperature zone S40FGD: Left temperature zone
2 Control panel
3 Cooling area divider
4 S16FG, S117FG: Lower temperature zone
S40FGD: Right temperature zone
5 L o c k
6 Ventilation slots
7 Height-adjustable feet
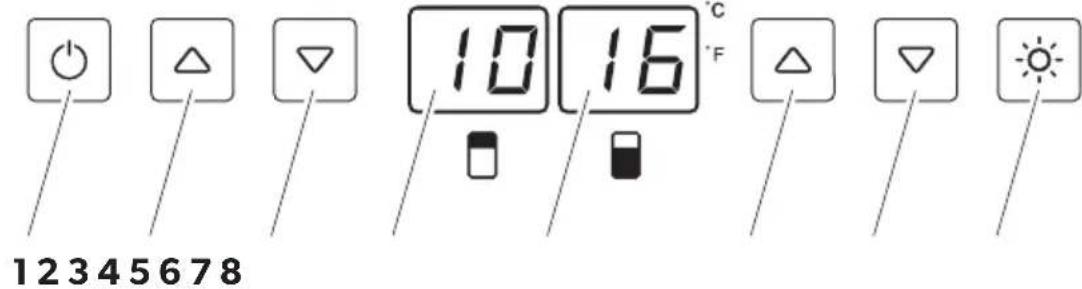
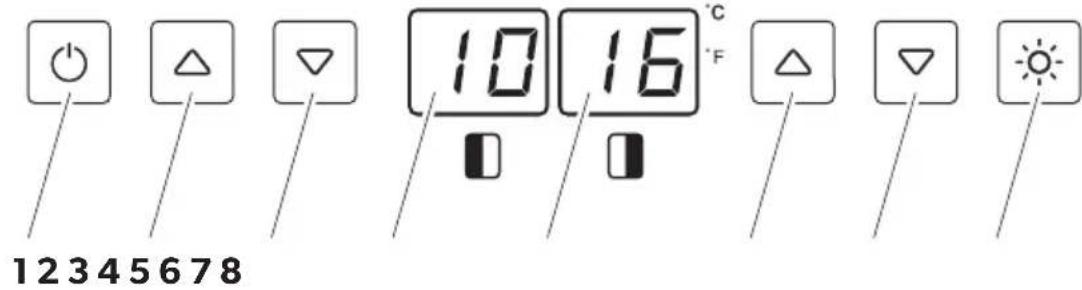
Controls
| No. in fig. 2, page 2 and Symbol Description fig. 3, page 2 | |
| 1 On/off switch | |
| 2 Increases the set temperature of the upper temperature zone by 1 °C or 1 °F | |
| 3 Reduces the set temperature of the upper temperature zone by 1 °C or 1 °F | |
| 4 | S16FG, S117FG: Display indicates the current temperature of the upper temperature zone |
| S40FGD: Display indicates the current temperature of the left temperature zone | |
| 5 | S16FG, S117FG: Display indicates the current temperature of the lower temperature zone |
| S40FGD: Display indicates the current temperature of the lower temperature zone | |
| 6 Increases the set temperature of the upper temperature zone by 1 °C or 1 °F | |
| 7 Reduces the set temperature of the lower temperature zone by 1 °C or 1 °F | |
| 8 Switches the interior light on or off | |
7 Setting up and connecting the appliance
7.1 Notes on setting up the appliance
All appliances can be installed on a free-standing basis.
When selecting the location, observe the following instructions:
- The ambient temperature should be in the range specified for your country in the supplementary “Country versions” booklet. Otherwise, it could mean that the inner temperature you set cannot be reached or maintained. This could also be the case if there are extreme fluctuations in the ambient temperature
- The appliance should stand in the coldest part of the room, away from heat sources (ovens, heating devices or radiators).
- The location must not be damp or wet.
- The appliance must not be exposed to direct sunlight. This can damage the acrylic coating and lead to higher power consumption.
- The ground must be level and sufficiently stable to bear the appliance at full capacity.
- The appliance must be sufficiently ventilated. The ventilation slots on the front of the appliance must not be obstructed.
- Note the information on the electrical connection, see chapter "Information on electrical connection" on page 17.
- Remove all the inner and outer packaging materials before setting up.
- Make sure the appliance is level by adjusting the feet.
7.2 Notes on installing the appliance

NOTICE!
- Ensure that the ventilation slots remain clear during the installation. Obstructed ventilation slots lead to increased power consumption and can damage the appliance.
- Waste heat produced by the appliance must be extracted via a ventilation shaft on the rear.
- The ventilation shaft must have cross-section of at least 200cm^2 .
- Ensure that the power cable is not jammed when pushing the appliance into place.
S16FG and S40FGD can be installed in a kitchen unit under the counter.
S117FG can be installed in a kitchen cabinet.
Installing S16FG and S40FGD (fig. 16, page 4)
▶ Observe the installation dimensions (in mm):
| Width Depth Height | |
| S16FG | 300 min. 575 822 – 892 |
| S40FGD | 600 min. 575 822 – 892 |
▶ When using skirting board:
Ensure that ventilation openings in the skirting board have a cross-section of at least 300 cm^2 .
Installing S117FG
▶ Observe the installation dimensions (in mm):
| Width Depth Height | ||||
| S117FG | 600 | min. | 575 | 1770 |
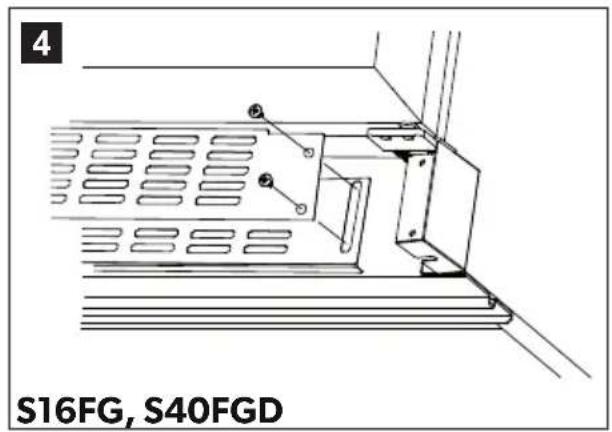
7.3 Reversing the door
You can also change the hinge of the door, so that it opens to the left rather than the right.
S16FG
▶ Change the door as described in fig. 4, page 3 to fig. 12, page 4.
▶ Turn the door by 180^ .
▶ Fit the door handle on the other side as described in fig. 14, page 4 to fig. 15, page 4.
S117FG
▶ Change the door as described in fig. 6, page 3 to fig. 13, page 4.
▶ Fit the door handle on the other side as described in fig. 14, page 4 to fig. 15, page 4.
7.4 Information on electrical connection

NOTICE!
Leave the appliance to stand upright for about 2 hours after transporting, before you connect it to the power supply.
Otherwise this could cause faults in the cooling system.
Observe the following when connecting the appliance:
- Connect the appliance to a circuit that is protected with 15 A.
- Check that the voltage specification on the type plate is the same as that of the power supply.
- If you use an extension cable, this must be approved for the same values as the appliance, see chapter “Technical data” on page 29.
- Do not use an extension cable or a multiple power socket that can be switched off with just one switch.
- The cable must rest securely behind the appliance and not be allowed to lie or hang unprotected.
8 Using the appliance
8.1 Storing bottles

NOTICE!
Be sure to use reinforced storage shelves (accessory) if you want to stack bottles.
Please note the following:
- Only store wine in unopened bottles.
- Do not overload the appliance.
- Do not cover the shelves with aluminium foil or any other objects, as this obstructs the air circulation.
- If the appliance has been empty for a long time, disconnect it from the power supply and clean it thoroughly. Leave the door open slightly to allow the air to circulate and prevent condensation, mould or odours from building up.
- After a power cut or if the appliance has been switched off, wait 3 to 5 minutes before switching on the appliance again.
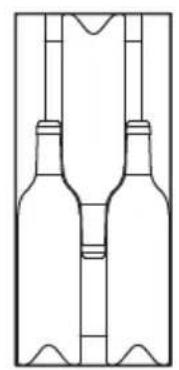
▶ Position the bottles as shown in fig. 17, page 5.
The following variants are possible:
• S16FG:
– with shelves (fig. 18 A, page 5)
– with storage shelves (accessory) (fig. 18 B, page 5)
• S40FGD:
– with shelves (fig. 19 A, page 5)
– with storage shelves (accessory) (fig. 19 B, page 5)
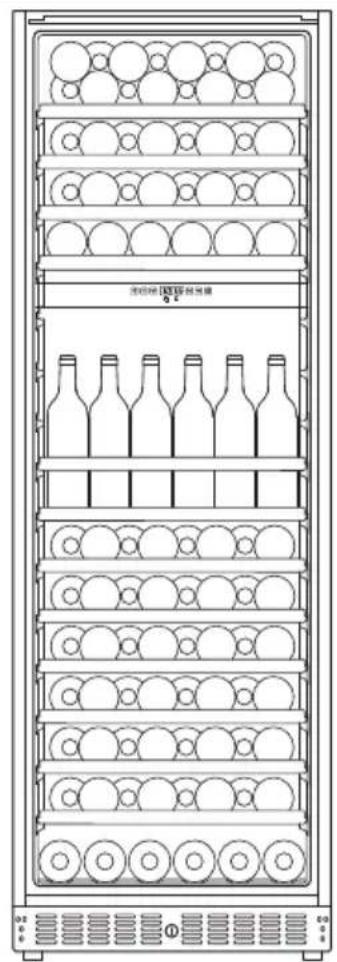
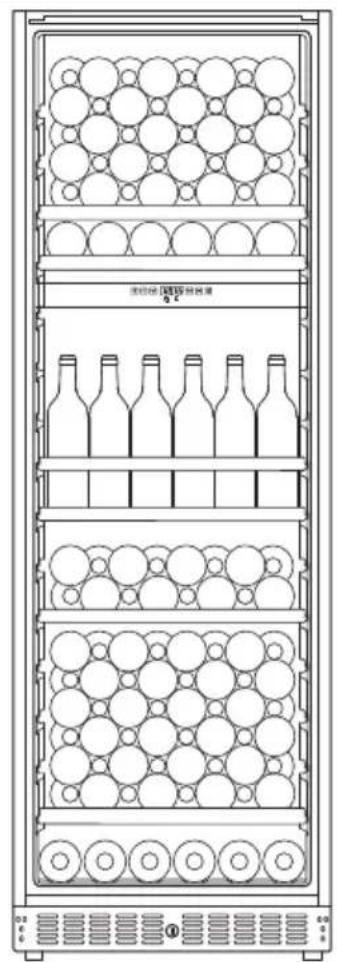
• S117FG:
– with shelves (fig. 20 A, page 6)
– with storage shelves (accessory) (fig. 20 B, page 6)
8.2 Energy saving tips
- Do not open the appliance more often than necessary.
- Do not leave the door open for longer than necessary.
- Clean dust and dirt from the condenser at regular intervals.
8.3 Using the appliance
Brief instructions
| Function Press the button | |
| Switch the appliance on | >1s |
| Switch the appliance off | >5s |
| Unlock the keypad | + 5s |
| Changes the unit (°C / °F) | >5s |
| Indicates the set temperature of the corresponding temperature zone | or 1s |
| Increase the temperature in the corresponding temperature zone by 1 °C or 1 °F | <1s |
| Decreases the temperature in the corresponding temperature zone by 1 °C or 1 °F | <1s |
| Switches off the fan (silent mode) | >5s |
| Switches on the fan (dynamic cooling) | >5s |
| Switches interior light on/off | <1s |
Sets the unit (°C or °F)
You can select whether the temperature is displayed in Fahrenheit or Celsius.
▶ To do this, press the button for 5 seconds.
√ The unit is converted and the display shows the temperature in the other unit.
Setting the temperature
S16FG, S40FGD and S117FG have two separate adjustable temperature zones. The temperature of each zone can be set between 5 °C and 20 °C (41 °F and 68 °F).
▶ Press the corresponding buttons △ or ▽ to set the temperature.
√ The display flashes while you make the setting.
√ Once you have set the temperature, the display shows the current temperature of the interior for the corresponding temperature zone.

NOTE
When using the appliance for the first time or if it has not been used for a long time, the inner temperature could differ from the one you have set. The temperature display flashes as long as this is the case.
Once the set temperature has been reached, the temperature display lights up constantly.
S16FG, S117FG:
The lower temperature zone is suitable for 13^ to 20^ (55°F to 68°F) ideal for storing white and red wines.
The upper temperature zone ☐ at a setting of 5 °C to 13 °C (41 °F to 55 °F) is suitable for storing sparkling wine and white wine.

NOTE
- The temperature for the lower temperature zone must always be just as high or higher than the upper temperature zone
- The appliance functions at its best if the difference in temperature between the two zones is at least 4^ (39°F).
Using beverage mode
The temperature range in beverage mod is between 2 °C and 6 °C (36 °F and 43 °F).
S16FG, ST117FG: Beverage mode is only possible in the upper temperature zone.
▶ Press the ⏻, △ and ▽ buttons simultaneously for at least 5 seconds for the lower temperature zone.
√ The temperature indicator flashes 5 times.
S40FGD: Beverage mode is only possible in the left temperature zone ☐.
▶ Press the ⏻, △ and ▽ buttons simultaneously for at least 5 seconds for the right temperature zone.
√ The temperature indicator flashes 5 times.
Checking the set temperature
This is how to display the set temperature:
▶ Press the or button briefly.
√ The set temperature is shown in the display for 5 seconds. Then the display shows the current inner temperature again.

NOTE
In the event of an interruption to the power supply (power failure, switch over) the unit saves the previous temperature settings.
Temperature monitoring
A warning signal sounds and the temperature display flashes:
- if the inner temperature of a zone deviates from the set temperature by more than 5^ .
• if the power supply has been disconnected for a long time. - if the door has not been shut properly.
- if the door is open for more than 60 seconds.
This prevents the temperature from falling or rising too much unnoticed, which could affect the quality of the wine.
Once the unit has reached the set temperature, the warning signal stops and the temperature display stops flashing.
To switch off the warning signal prematurely:
▶ Press the ⏻ button briefly.
√ The temperature display flashes until the set temperature is reached. The display is then illuminated constantly and indicates that the alarm system is active again.
Using the Sabbath mode
In this mode, the display, interior lighting and warning signal for the temperature monitor are deactivated. The refrigeration continues as usual.
To switch on the Sabbath mode:
▶ Press the ⏻ and ⚙️ buttons simultaneously for at least 5 seconds.
√ The temperature indicator flashes 4 times. The Sabbath mode is activated. The Sabbath mode switches off automatically after 96 hours.
To switch off the Sabbath mode:
▶ Press the ⏻ and ⚙️ buttons simultaneously for at least 5 seconds.
√ The temperature indicator flashes 4 times. The Sabbath mode is deactivated. The display, interior lighting and warning signal for the temperature monitor are activated.
Setting the LED interior lighting
The unit has two different modes for lighting:
- Standard mode: The interior is illuminated when the door is opened.
• Vitrine mode: The interior is illuminated constantly.
To switch between standard and vitrine modes:
▶ Press the ⚙️ buttons briefly.
Switching the fan on/off (dynamic cooling mode/silent mode)
The fan runs normally only when required (silent mode). In silent mode, the fan switches off when the set temperature is reached.
Switch the fan to dynamic cooling mode to create an homogeneous climate for the interior of a temperature zone. The fan runs permanently to regulate humidity and temperature.
This is how to switch on the fan (dynamic cooling mode):
▶ Press the button (> 5 seconds).
√ 5 acoustic signals are emitted.
The fan is switched on (dynamic cooling mode).
This is how to switch off the fan (silent mode):
▶ Press the button (> 5 seconds).
√ 3 acoustic signals are emitted.
The fan is switched off (silent mode).
Cabinet shelves
The shelves can be pulled out by a third so that you can reach the wine bottles easily. The shelves have a limit stop to prevent them from being pulled out too far.
▶ Make sure that the door is fully open when you pull out the shelves on roller-bearings. Otherwise the door seal can be damaged.
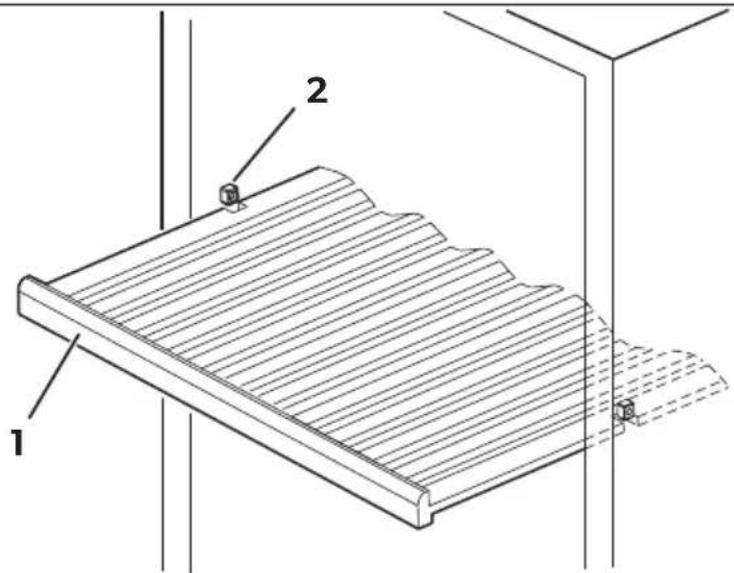
Proceed as follows to remove one of the shelves from the guide rail (fig. 21, page 6):
▶ Pull the shelf (1) exactly into the position at which shelf recesses are located precisely above the ledges (2) in the interior of the appliance.
▶ Remove the shelf.
Ensure that the recesses on the shelf fit over the ledges (2) when inserting the shelf.
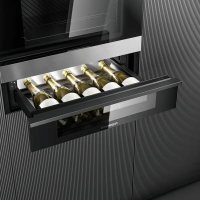
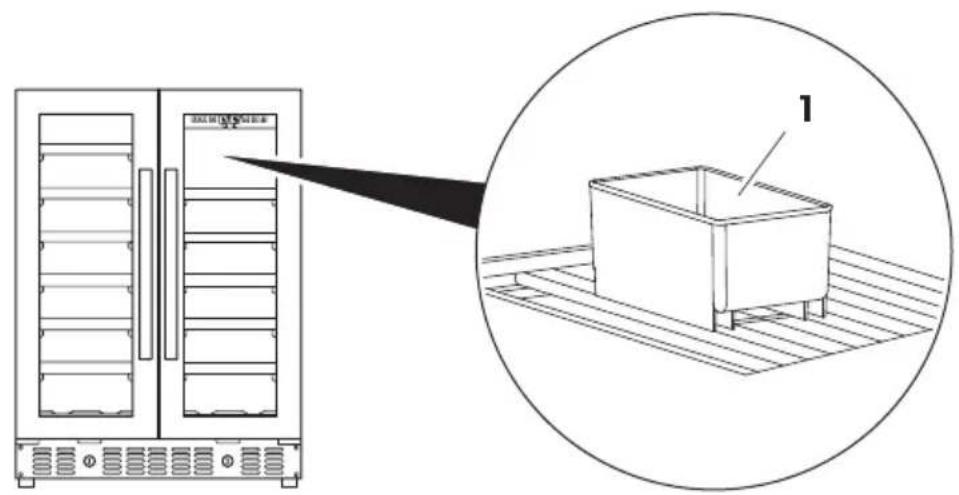
Checking the water level (humidity control)
▶ Regularly check the water level in the water tank (fig. 22 1, page 7) on the top shelf.
▶ Fill the water tank 34 full with water and place it on the grid on the top shelf. Make sure that the water tank is securely positioned on the grid so that it cannot tip over.
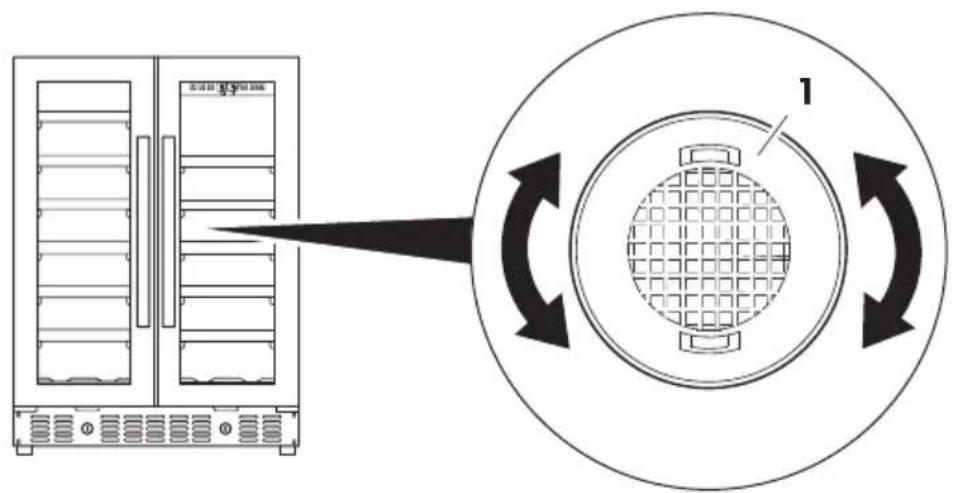
Replacing the active charcoal filter
Replace the active charcoal filter with a new one once a year.
▶ Turn the filter (fig. 23 1, page 7) by 90° clockwise or anti-clockwise and remove it.
▶ Insert a new filter.
▶ Turn the filter 90^ clockwise or anti-clockwise until it clicks into position.
8.4 Procedure in the event of a power failure or if absent
Power failure
A brief power failure will not unduly affect the inner temperature as long as you do not open the door too frequently.
If the power is off for a long time, carry out the appropriate action to protect the contents of your appliance.
Short periods of absence
Leave the appliance operating if you are absent for less than 3 weeks.
Long periods of absence
▶ If you leave the appliance unused for several months, remove the contents.
▶ Switch off the unit and disconnect it from the power supply.
▶ Clean and dry the insides thoroughly.
Leave the door ajar to prevent odours and mould from forming.
8.5 Moving the appliance
▶ Remove the contents.
▶ Tape down all the shelves.
▶ Turn the adjustable feet right back so that they are not damaged when moving.
▶ Tape the door closed.
▶ Only carry the appliance in an upright position.
Avoid tipping the appliance.
Protect the exterior of the appliance with a blanket or something similar.
9 Troubleshooting
If you are unable to solve a problem yourself, get in touch with customer services (see address list overleaf).
Fault Possible cause Remedy
| Appliance does not work | The appliance is not connected to a power supply | Connect the appliance |
| The appliance is switched off Switch the appliance on | ||
| Circuit breaker or fuse has blown | Switch on the circuit breaker; switch on or replace the fuse | |
| The appliance is not cold enough | Temperature is not set properly Check the set temperature | |
| The ambient temperature could require a higher temperature setting | Set a higher temperature | |
| Door was opened frequently Do not open the door more often than necessary | ||
| Door was not closed properly Close door properly | ||
| Door is not hermetically sealed Check the door seal and clean or replace | ||
| Appliance switches itself on and off | Room temperature is higher than average | Put the appliance in a cooler place |
| The cabinet was recently replenished with new bottles | Leave the appliance to work for a while until the set temperature has been reached | |
| Door was opened frequently Do not open the door more often than necessary | ||
| Door was not closed properly Close door properly | ||
| Door is not hermetically sealed Check the door seal and clean or replace | ||
Fault Possible cause Remedy
| The light does not work The appliance is not connected to a power supply | Connect the appliance | |
| Circuit breaker or fuse has blown | Switch on the circuit breaker; switch on or replace the fuse | |
| The light was switched off on the control panel | Switch on the light | |
| The appliance vibrates The appliance is not properly level | Level out the appliance with the adjustable feet | |
| The appliance seems to make a lot of noise | The noise is probably caused by the refrigerant, which is normal. At the end of each cycle, you will hear noises made by the flow of refrigerant.If temperature fluctuations occur, the contraction and expansion of the inner walls may cause popping and cracking noises | |
| The appliance is not properly level | Level out the appliance with the adjustable feet | |
| The door does not close properly | The appliance is not properly level | Level out the appliance with the adjustable feet |
| The door hinge was changed incorrectly | Check the door hinge and reassemble correctly | |
| The door seal is dirty Clean the door seal | ||
| The shelves are not fitted correctly | Check the shelves and refit correctly | |
| LED display shows E1, E2 or E7. | The temperature sensor for the air temperature inside the appli-ance shows an error | This can only be repaired by an authorised repair centre. |
10 Maintaining and cleaning the appliance

CAUTION!
Always disconnect the plug before you clean and service the appliance.

NOTICE!
- Never clean the appliance under running water or in dishwater. Do not use abrasive cleaning agents or hard objects during cleaning as these can damage the appliance.
- Make sure that the air inlet and outlet vents on the unit are free of any dirt, so that heat from the interior can be released and the unit is not damaged.
All the shelves can be removed for optimum cleaning, see chapter "Cabinet shelves" on page 24.
▶ Switch off the appliance and disconnect the plug.
▶ Wash the inside with a solution of warm water and baking powder. This should be about 2 tablespoons of baking powder to half a litre of water.
▶ Clean the shelves with mild detergent.
▶ Only wipe the control panel with a slightly damp cloth
▶ Wash the outside of the appliance with warm water and a mild detergent. Then wipe it down with clean water and dry the surface with a cloth.
11 Warranty
The statutory warranty period applies. If the product is defective, please contact your retailer or the manufacturer's branch in your country (see the back of the instruction manual for the addresses).
For repair and guarantee processing, please include the following documents when you send in the device:
• A copy of the receipt with purchasing date
- A reason for the claim or description of the fault
12 Disposal
Place the packaging material in the appropriate recycling waste bins wherever possible.
If you wish to finally dispose of the product, ask your local recycling centre or specialist dealer for details about how to do this in accordance with the applicable disposal regulations.
13 Technical data
| S16FG S40FGD S117FG | |||
| Voltage: | 220 – 240 V/50 Hz | ||
| Temperature range: | +5 °C to +20 °C /+41 °F to +68 °F | ||
| Temperature range in beverage mode: | +2 °C to +6 °C/+36 °F to +43 °F | ||
| Category: 2 | |||
| Energy efficiency class: A | |||
| Power consumption: | 139 kWh per year | 145 kWh per year | 225 kWh per year |
| Climate class: | ST(at ambient temperature:+16 °C to +38 °C/+61 °F to +100 °F) | ||
| Noise emission: | 39 dBA | 42 dBA | 46 dBA |
| Dimensions W x D x Hin mm / in inches(including handle): | 295 x 615 x 820/11.6 x 24.2 x 32.3 | 595 x 615 x 820/23.4 x 24.2 x 32.3 | 595 x 615 x 1768/23.4 x 24.2 x 71.3 |
| Capacity (standardBordeaux type bottles): | 16 | 40 | 117 |
| Weight: | 29 kg/64 lbs | 50 kg/110 lbs | 92 kg/203 lbs |
You can find information about the country versions in the supplementary booklet.
6 Description technique
Dometic Australia Pty. Ltd.
1 John Duncan Court
Varsity Lakes QLD 4227
1800 212121
+61755076001
Mail: sales@dometic.com.au
AUSTRIA
Dometic Austria GmbH
Neudorferstraße 108
A-2353 Guntramsdorf
+43 2236 908070
+43 2236 90807060
Mail: info@dometic.at
BENELUX
Dometic Branch Office Belgium
Zincstraat 3
B-1500 Halle
+32 2 3598040
+32 2 3598050
Mail: info@dometic.be
BRAZIL
Dometic DO Brasil LTDA
Avenida Paulista 1754, conj. 111
SP 01310-920 Sao Paulo
+551132513352
+551132513362
Dometic Group Asia Pacific
Suites 2207-11 · 22/F · Tower 1
The Gateway · 25 Canton Road,
Tsim Sha Tsui · Kowloon
+852 2 4611386
+852 2 4665553
Mail: info@waeco.com.hk
HUNGARY
Dometic Zrt. Sales Office
Kerékgyártó u. 5.
H-1147 Budapest
+3614684400
+3614684401
Dometic Italy S.r.l.
Via Virgilio, 3
I-47122 Forli (FC)
+39 0543 754901
+39 0543 754983
Mail: vendite@dometic.it
JAPAN
Dometic KK
Maekawa-Shibaura, Bldg. 2
2-13-9 Shibaura Minato-ku
Tokyo 108-0023
+81 3 5445 3333
+81 3 5445 3339
Mail: info@dometic.jp
MEXICO
Circuito Médicos No. 6 Local 1
Colonia Ciudad Satélite
CP 53100 Naucalpan de Juárez
Estado de México
+52 55 5374 4108
+52 55 5393 4683
Mail: info@dometic.com.mx
NETHERLANDS
Dometic Benelux B.V.
Ecustraat 3
NL-4879 NP Etten-Leur
+31765029000
+31 76 5029019
Mail: info@dometic.nl
NEW ZEALAND
Dometic New Zealand Ltd.
PO Box 12011
Penrose
Auckland 1642
+6496221490
+6496221573
Mail: customerservices@dometic.co.nz
NORWAY
Dometic Norway AS
∅sterøyveien 46
N-3232 Sandefjord
+47 33428450
+47 33428459
Mail: firmapost@dometic.no
POLAND
Dometic Poland Sp. z o.o.
Ul. Puławska 435A
PL-02-801 Warszawa
+48 22 414 3200
+48 22 414 3201
Mail: info@dometic.pl
PORTUGAL
Dometic Spain, S.L.
Komsomolskaya square 6-1
RU-107140 Moscow
+7 495 780 79 39
+7 495 916 56 53
Mail: info@dometic.ru
SINGAPORE
Dometic Pte Ltd
18 Boon Lay Way 06-140 Trade Hub 21
Singapore 609966
+65 6795 3177
+65 6862 6620
Mail: dometic@dometic.com.sg
SLOVAKIA
Dometic Slovakia s.r.o. Sales Office Bratislava
Nádražná 34/A
900 28 Ivánka pri Dunaji
+421 2 45 529 680
Mail: bratislava@dometic.com
SOUTH AFRICA
Dometic (Pty) Ltd.
Regional Office
South Africa & Sub-Saharan Africa
2 Avalon Road
West Lake View Ext 11
Modderfontein 1645
Johannesburg
+27114504978
+27114504976
Mail: info@dometic.co.za
SPAIN
Dometic Spain S.L.
Avda. Sierra del Guadarrama, 16
E-28691 Villanueva de la Cañada
Madrid
+34918336089
+34 900 100 245
Mail: info@dometic.es
SWEDEN
Dometic Scandinavia AB
Gustaf Melins gata 7
Dometic Switzerland AG
Riedackerstrasse 7a
CH-8153 Rümlang
+41 44 8187171
+41 44 8187191
Mail: info@dometic.ch
UNITED ARAB EMIRATES
Dometic Middle East FZCO
P.O.Box17860
S-D 6, Jebel Ali Freezone
Dubai
+97148833858
+97148833868
Mail: info@dometic.ae
UNITED KINGDOM
Dometic UK Ltd.
Dometic House, The Brewery
Blandford St. Mary
Dorset DT11 9LS
+44 344 626 0133
+44 344 626 0143
Mail: customerservices@dometic.co.uk
USA
Dometic RV Division
1120 North Main Street
Elkhart, IN 46515
+1574-264-2131