
ESWS24 - Epilator PANASONIC - Free user manual and instructions
Find the device manual for free ESWS24 PANASONIC in PDF.

| Product type | Home epilator |
| Brand | Panasonic |
| Model | ES-WS24 / ES-WS14 |
| Power supply | AC adapter (RE7-87), automatic voltage conversion, non-rechargeable, mains powered |
| Speeds | 2 speeds: low (1) and normal (2) |
| Included heads | Leg/arm epilation head, shaving head (ES-WS24), skin protector attachment, bikini comb |
| Retractable trimmer | Yes, integrated into the shaving head |
| Epilation areas | Legs, arms, underarms (with specific head), bikini line (with comb) |
| Noise level (epilation) | 71 dB (A) re 1 pW |
| Noise level (shaving) | 63 dB (A) re 1 pW |
| Maintenance | Clean with included brush; do not use alcohol, solvent or detergent; clean after each use |
| Replaceable parts | Outer foil (every 1 year) and inner blade (every 2 years) for shaving head |
| Safety | Do not use on irritated skin, during pregnancy/menstruation, on face, genitals, thighs; use at 90° to the skin |
| Warranty | Consult Panasonic website or authorized service center |
| Usage | Dry epilation only; do not immerse in water |
| Country of origin | Not specified |
Frequently Asked Questions - ESWS24 PANASONIC
User questions about ESWS24 PANASONIC
0 question about this device. Answer the ones you know or ask your own.
Ask a new question about this device
Download the instructions for your Epilator in PDF format for free! Find your manual ESWS24 - PANASONIC and take your electronic device back in hand. On this page are published all the documents necessary for the use of your device. ESWS24 by PANASONIC.
USER MANUAL ESWS24 PANASONIC
Operating Instructions
(Household) Epilator
Model No. ES-WS24/ES-WS14
natural_image
Panasonic winter brush tool with visible blade and base (no text or symbols on the device itself)CE
GB English 5 DK Dansk 87 CZ Česky 163
D Deutsch ..... 17 P Português ..... 99 SK Slovensky ..... 175
F Français .... 31 N Norsk .... 113 H Magyar .... 187
I Italiano .... 45 S Svenska .... 125 RO Română .... 201
NL Nederlands ..... 59 FIN Suomi ..... 137 TR Türkçe .....213
E Español .... 73 PL Polski .... 149
natural_image
Simple line drawing of an open book with a curved arrow indicating rotation or movement (no text or symbols)
flowchart
graph TD
    A["Component A"] --> B["Component B"]
    B --> C["Component C"]
    C --> D["Component D"]
    D --> E["Component E"]
    E --> F["Component F"]
    F --> G["Component G"]
    G --> H["Final Product H"]
Panasonic
Operating Instructions
(Household) Epilator
Model No. ES-WS24/ES-WS14
Contents
Safety precautions 8
Intended use 11
Quick steps for using....11
Parts identification ....12
Before use....12
How to use ....12
After use....14
Cleaning 14
Replacing the outer foil and the inner blade....14
Troubleshooting ....15
Guarantee....16
Specifications....16
Thank you for purchasing this Panasonic product.
Before operating this unit, please read these instructions completely and save them for future use.
Warning
- This appliance can be used by children aged from 8 years and above and persons with reduced physical, sensory or mental capabilities or lack of experience and knowledge if they have been given supervision or instruction concerning use of the appliance in a safe way and understand the hazards involved. Children shall not play with the appliance. Cleaning and user maintenance shall not be made by children without supervision.
- The supply cord cannot be replaced. If the cord is damaged, the AC adaptor should be scrapped.
- Do not use anything other than the supplied AC adaptor for any purpose.
Also, do not use any other product with the supplied AC adaptor. (See page 12.)
- The following symbol indicates that a specific detachable power supply unit is required for connecting the electrical appliance to the supply mains. The type reference of power supply unit is marked near the symbol.

- Keep the appliance dry.
Safety precautions
To reduce the risk of injury, loss of life, electric shock, fire, and damage to property, always observe the following safety precautions.
Explanation of symbols
The following symbols are used to classify and describe the level of hazard, injury, and property damage caused when the denotation is disregarded and improper use is performed.

WARNING
Denotes a potential hazard that could result in serious injury or death.

CAUTION
Denotes a hazard that could result in minor injury or property damage.
The following symbols are used to classify and describe the type of instructions to be observed.

This symbol is used to alert users to a specific operating procedure that must not be performed.

This symbol is used to alert users to a specific operating procedure that must be followed in order to operate the unit safely.

WARNING
This product
Never modify, disassemble, or repair.

- Doing so may cause ignition or injury due to abnormal operation.
Contact an authorized service centre for repair.
In case of an abnormality or malfunction Immediately stop using and remove the adaptor if there is an abnormality or malfunction.
- Failure to do so may cause fire, electric shock, or injury.
- The main unit, adaptor or cord is deformed or abnormally hot.
- The main unit, adaptor or cord smells of burning.
- There is abnormal sound during use of the main unit, adaptor or cord.
- Immediately request inspection or repair at an authorized service centre.
Preventing accidents
Do not place within reach of children or infants.

Do not let them use it.
- Doing so may cause an accident or injury due to accidental ingestion of the inner blade, brush, etc.
Do not immerse the appliance and AC adaptor in water or wash it with water.

Do not place the appliance and AC adaptor over or near water filled sink or bathtub.
- Doing so may cause electric shock or fire due to a short circuit.

WARNING
Power supply

Do not connect or disconnect the adaptor to a household outlet with a wet hand.
- Doing so may cause electric shock or injury.
Never use the appliance if the AC adaptor is damaged or if the power plug fits loosely in a household outlet.

Do not damage or modify, or forcefully bend, pull, or twist the cord. Also, do not place anything heavy on or pinch the cord.
- Doing so may cause electric shock or fire due to a short circuit.

Do not use in a way exceeding the rating of the household outlet or the wiring.
- Exceeding the rating by connecting too many plugs to one household outlet may cause fire due to overheating.

Always ensure the appliance is operated on an electric power source matched to the rated voltage indicated on the AC adaptor.
Fully insert the adaptor or appliance plug.
- Failure to do so may cause fire or electric shock.

Always unplug the adaptor from a household outlet when cleaning.
- Failure to do so may cause electric shock or injury.

Regularly clean the power plug and the appliance plug to prevent dust from accumulating.
- Failure to do so may cause fire due to insulation failure caused by humidity.
Disconnect the adaptor and wipe with a dry cloth.

CAUTION
To protect the skin
The following persons should not use this appliance:
- Persons suffering from atopic dermatitis or rashes and other skin diseases
- Persons with allergic diathesis or persons who are easily irritated by cosmetics, clothing, metals, etc.
- Persons who are easily suppurated
- Persons suffering from varicose veins, diabetes, hemophilia, etc.
- Persons who have trouble stopping bleeding
-Use in such cases may cause the skin to become sensitive or cause inflammation, bleeding, or increased pain.
Do not use in the following cases:
- During menstruation, pregnancy, or about one month after giving birth
- When you are not well or when you feel an abnormality in your skin or body
• After drinking alcohol or taking medicine, or when you are very tired
-Use in such cases may cause the skin to become sensitive or cause inflammation, bleeding, or increased pain.
Do not use in the following body area:
- Injury, rash, moles, bruises, warts, pimples, etc.
- On suntanned skin
- Doing so may cause injury, inflammation of the skin, or bleeding.

CAUTION

Do not use the epilation head for legs/arms to epilate your underarms and bikini-line.
- Doing so may cause injury or inflammation of the skin.

Do not press on the blade too strongly when using the shaver head.
- Doing so may cause damage which results in injury to the skin.

Do not touch the blade section (metallic section) of the inner blade when using the shaver head.
- Doing so may cause injury to your hands.

Do not turn ON the switch without the head attached.
- Doing so may cause finger injury or cause hair or clothing entanglement and damage.

Do not use with the frame removed.
- Doing so may cause finger injury or cause hair or clothing entanglement and damage.

Before using, check that the skin protector, disc, blade, frame are free from deformities, cracks, and damage.
- Failure to do so may cause injury to the skin.

The outer foil is easily deformed, so store with the protection cap attached.
-Failure to do so may result in deformation or damage to the outer foil which may cause injury to skin.

Apply the skin protector at a 90° angle to your skin with gentle force.
- Failure to do so may cause injury to the skin or cause hair or clothing entanglement and damage.
Note the following precautions

Do not share with your family or others.
- Doing so may cause infection or inflammation.

Do not allow metal objects or trash to adhere to the power plug or the appliance plug.
- Doing so may cause electric shock or fire due to a short circuit.

Do not wrap the cord around the adaptor when storing.
- Doing so may cause the wire in the cord to break with the load, and may cause fire due to a short circuit.

Do not drop or subject to shock.
- Doing so may cause injury.

Disconnect the adaptor from the household outlet when not using.
- Failure to do so may cause electric shock or fire due to electrical leakage resulting from insulation deterioration.

Disconnect the adaptor or the appliance plug by holding onto the adaptor or the appliance plug instead of the cord.
- Disconnecting by holding onto the cord may cause electric shock or injury.
About using the epilation/shaver head
Do not use in the following body area:
• Face, genitals and genital area, or thighs
- Inner side of the upper arms and areas such as elbows or knees which are prone to sagging
- Doing so may cause injury, inflammation of the skin, or bleeding.

CAUTION
The following persons should not use this appliance:

- Persons who have suffered skin problems (suppuration, inflammation, etc.) caused by epilation (plucking, depilation, waxing, etc.)
-Use in such cases may cause the skin to become sensitive or cause inflammation, bleeding, or increased pain.
Do not use epilation/shaver head in the following ways:
- Using just before swimming or sea bathing (use at least 2 days before such activities)
• Using just before bathing - Engaging in extreme sports or exercise right after epilation
- Doing so may cause infection or inflammation resulting from bacteria that enter the body through the pores.
Do not apply strong pressure to the skin, move repeatedly over the same area or move back and forth in one area. Also, do not use with a jabbing motion.
- Doing so may cause injury or inflammation of the skin, or increased pain.

If skin problems continue for 2 days or longer after treatment, stop using the unit and contact a dermatologist.
- Failure to do so may cause symptoms to worsen.
Intended use
- Do not use alcohol, nail polish remover, or detergent (ex. liquid hand soap), etc. to clean the appliance. Doing so may cause failure, cracking or discoloration of the main body. Wipe with a cloth soaked in soapy water and wrung tightly.
- Keep the appliance away from sinks, bathrooms or other high-humidity areas where it could be exposed to water and moisture after use.
- Keep the appliance away from where it will be exposed to high temperatures or direct sunlight.
- When storing the epilator, always attach the protection cap for the shaver head.
Quick steps for using

Selecting the head
(Page 12)

Setting up
(Page 12)

How to use
(Page 12)
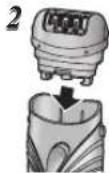
Parts identification
A Fast cap
B Gentle cap (→ Page 13)
① Skin protector
② Frame release ribs
③ Frame
© Epilation head for legs/arms
④ Epilation disc
D Bikini comb (Protection cap for shaver head)
ES-WS24
E Shaver head ES-WS24
⑤ Outer foil
⑥ Trimmer
⑦ Pop-up trimmer switch
⑧ Frame
⑨ Inner blade
⑩ Frame release button
F Main body
⑪ Head release button
⑫ Switch
0 = off
1 = low speed
2 = normal speed
⑬ Socket
© AC adaptor (RE7-87)
⑭ Adaptor
⑮ Power plug
⑯ Cord
⑰ Appliance plug
Accessory:
H Cleaning brush
Before use
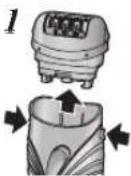
Selecting the head
1 Remove the head while pushing the head release button.
2 Push the head until it clicks.
Using the bikini comb ES-WS24
Place the bikini comb onto the shaver head and slide trimmer up.
- When the bikini comb is in place, make sure the comb is inclose contact with the skin.
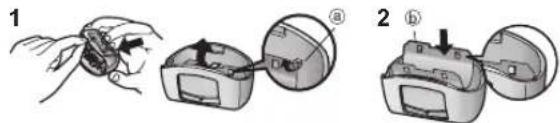
Setting up
This appliance can only be used for Dry Epilation and is not rechargeable. It must be plugged into a household outlet when in use.
Plug the AC adaptor into the epilator (a) and a household outlet (b).

flowchart
graph TD
    A["Device with top panel"] --> B["Add to monitor"]
    B --> C["Add battery"]

How to use
Epilation head
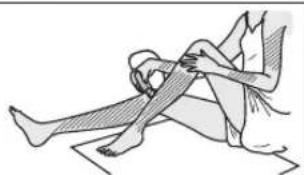
Areas suitable for epilation

The epilator can be used on the areas.
natural_image
Illustration of a person performing a seated leg stretch or exercise (no text or symbols present)- Using the epilator on areas other than those marked may cause pain or skin trouble.

Areas not suitable for epilation
The epilator should not be used on the inner side of the upper arms and areas such as elbows or knees which are prone to sagging.

natural_image
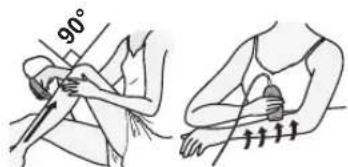
Illustration showing three stages of a human arm joint or stretch, with dotted lines indicating movement or positioning (no text or symbols present)Slide the switch [F12] to the 1 (low speed) or 2 (normal speed) position and carry out epilation.
- If you are concerned about pain during epilation, then please use with 1 (low speed) setting.
- Apply the epilator at 90^ to your skin and move it slowly so that it slides over your skin.
![PANASONIC ESWS24 - Slide the switch [F12] to the 1 (low speed) or 2 (normal speed) position and carry out epilation. - 1](/content/2026/03/448091/images/56edd16b8981f4b16f72ba7da3919f64846bc4641d3da77ba1b84f7f8e74defe.jpg)
Upwards from the bottom of the leg. Inwards from the outside of the arm.
Tips for best epilation results
The hair removal is not permanent, so after the 2nd use we recommend that you epilate the arms and legs about once every two weeks.
When epilating for the first time, or when using on sensitive skin, we recommend using the gentle cap. The gentle cap has a skin protector for gentler epilation, to remove hair by holding the skin down to reduce pain.
• We recommend warming the skin to soften the skin before use.
- We also recommend to use with 1 (low speed) setting. (→ This page)
1. Remove the fast cap [A].
2. Attach the gentle cap [B].
![PANASONIC ESWS24 - Attach the gentle cap [B]. - 1](/content/2026/03/448091/images/718526e02063c89987ecee70a16d3303350482aa05b3ee0b3a417cf6bce32b40.jpg)
natural_image
Illustration of a device being handled with hands, showing top and side views (no text or symbols)- Massaging with a body puff may help to prevent ingrown hairs.
- Reddening might appear after use. A cool towel will help if you feel pain or there is a rash.
- If your skin gets dry after epilation, we recommend applying a moisture lotion two days after epilation.
• Make sure skin is clean before and after use.
Trim your hair before epilating for the first time or if you have not epilated for a long time. Hair removal is easier and less painful when the hair is short.
Shaver head ES-WS24
Before shaving, wipe dry any moisture or sweat from the skin.
1 Attach the shaver head [E].
- Confirm the bikini comb [D] is detached.
2 Check that the outer foil is not deformed or damaged.
3 Slide the switch [F12] to the 1 (low speed) or 2 (normal speed) position and carry out shaving.
- Press gently so that the whole blade is in close contact with the skin and the surface of the blade does not move up and down.
After use
-
Slide the switch (F⑫) to the 0 position.
-
Remove the AC adaptor from the household outlet, and remove the appliance plug from the main body.
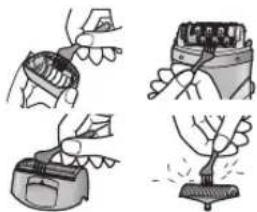
Cleaning
• Always clean the heads and caps after use to keep them in a hygienic state.
- Switch off and unplug the appliance before cleaning.
• Take care not to damage the skin protector, the frame, the fast cap and the gentle cap during cleaning.
- Lift fast/gentle caps upward while holding the frame release ribs [A B ②] or remove the frame by pushing the frame release button [B ⑩].
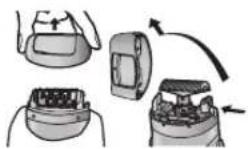
- Clean the gentle cap [B], the epilation head for legs/arms [C] and the shaver head [E] with the cleaning brush [H].
natural_image
Illustration of four different electrical circuit components: a switch, a battery pack, a fuse, and a power plug (no text or symbols present)Replacing the outer foil and the inner blade ES-WS24
We recommend replacing the outer foil [E⑤] every year and the inner blade [E⑨] every two years. Remove the outer foil of the shaver head [E] only when replacing it.
Replacing the outer foil
- While pushing the outer foil gently with the fingers, use a fingernail to release the plastic panel (on the blade from the hooks (on the inside of the frame.
- The new outer foil should be slightly bent and pushed in until it is hooked in the frame.
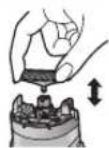
Replacing the inner blade
- Remove the inner blade by holding it at both ends and pulling straight away from the shaver.
- Insert the inner blade by holding it at both ends and press downward.
Troubleshooting
| Problem Possible cause Action | |||
| The appliance does not operate. | When epilating | The skin protector or disc is deformed, cracked, or damaged. | Request repair at an authorized service centre. |
| When epilating or shaving | Hair dust has accumulated. Clean the hair dust. | ||
| Cannot remove hair. | When epilating | The appliance is used on long hair. | Use on hair approximately 2 to 3 mm long. |
| The hair becomes stubble. | The way the unit is applied or moved is not correct. | Refer to page 13. | |
| The appliance stops during operation. | The appliance is pressed against skin too hard. | Contact to skin with gentle force. | |
| The appliance is not removing the hair as well as before. | Hair dust has accumulated. Clean the hair dust. | ||
| The skin protector or disc is deformed, cracked, or damaged. | Request repair at an authorized service centre. | ||
| The appliance is not cutting as well as before. | When shaving | Hair dust has accumulated. Clean the hair dust. | |
| The blade is deformed. | Replace the blade.Guidelines for replacement:Outer foil: Approximately 1 yearInner blade: Approximately 2 years | ||
| The blade is worn out. | |||
If the problems still cannot be solved, contact the store where you purchased the unit or a service centre authorized by Panasonic for repair.
Guarantee
Please visit Panasonic web site http://www.panasonic.com or contact an authorized service centre (You find its contact address in the pan european guarantee leaflet.) if you need information or if the epilator or the cord get damaged.
Specifications
| Power supply | See the name plate on the AC adaptor. (Automatic voltage conversion) |
| Airborne Acoustical Noise | Epilation head for legs/arms: 71 (dB (A) re 1 pW) Shaver head: 63 (dB (A) re 1 pW) |
This product is intended for household use only.
Disposal of Old Equipment
Only for European Union and countries with recycling systems
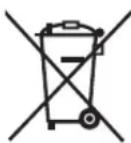

This symbol on the products, packaging, and/or accompanying documents means that used electrical and electronic products must not be mixed with general household waste.
For proper treatment, recovery and recycling of old products, please take them to applicable collection points in accordance with your national legislation.
By disposing of them correctly, you will help to save valuable resources and prevent any potential negative effects on human health and the environment.
For more information about collection and recycling, please contact your local municipality.
Penalties may be applicable for incorrect disposal of this waste, in accordance with national legislation.
Panasonic
Betriebsanleitung
flowchart
graph TD
    A["Device with top panel"] --> B["Device with bottom panel"]
    B --> C["Device with upper panel"]
    C --> D["Device with lower panel"]
Einstellen
Verwendungsweise
Epilieraufsatz
natural_image
Illustration of a person performing a seated leg stretch or exercise (no text or symbols present)natural_image
Illustration showing three stages of a human arm joint or stretch, with dotted lines indicating movement and shading (no text or symbols present)natural_image
Illustration of four different methods for using a tool, showing hand positioning and heating (no text or symbols present)Utilisation
Tête d'épilation
natural_image
Illustration of a person performing a seated leg stretch or exercise (no text or symbols present)natural_image
Illustration showing three different postures of a human arm joint, with no text or symbols present.natural_image
Illustration of three-step electrical circuit breakers: shunting, heating, and cooling (no text or symbols)Epilatore (Household)
© Adattatore CA (RE7-87)
flowchart
graph TD
    A["Step 1: Initial device"] --> B["Step 2: Processed device"]
    B --> C["Step 3: Final device"]
Impostazione
Come usare
Testina epilatrice
natural_image
Illustration of a person performing a seated leg stretch or massage (no text or symbols present)natural_image
Illustration showing three different postures of a human arm joint, with dotted lines indicating specific areas (no text or symbols present)natural_image
Illustration of four different electrical circuit components: a switch, a battery pack, a fuse, and a power plug (no text or symbols present)Specifications....71
Instellen
Bediening
Epileerkop
natural_image
Illustration of a person performing a seated leg stretch or massage (no text or symbols present)natural_image
Illustration showing three different postures of a knee joint, with dotted lines indicating movement or positioning (no text or symbols present)natural_image
Illustration of four different methods for using a tool, showing hand positioning and heating (no text or symbols)flowchart
graph TD
    A["Step 1: Initial device with heat sink"] --> B["Step 2: Process step with monitor"]
    B --> C["Step 3: Final device with wheels and directional arrows"]
Configuración
Modo de uso
natural_image
Illustration of a person performing a seated leg stretch or exercise (no text or symbols present)natural_image
Illustration showing three stages of a human leg contraction or compression technique (no text or symbols present)natural_image
Illustration of four different methods for using a tool, showing hand positioning and cutting process (no text or symbols)flowchart
graph TD
    A["Device with top panel"] --> B["Add component"]
    B --> C["Output"]
Klargøring
Anvendelse
Epileringshoved
natural_image
Illustration of a person performing a seated leg stretch or exercise (no text or symbols present)- Brug af epilatoren på andre områder end de markerede kan forårsage smerter eller hudproblemer.
natural_image
Illustration showing three stages of a human arm joint or stretch, with dotted lines indicating movement direction (no text or symbols present)natural_image
Illustration of four different electrical circuit components: a switch, battery pack, fuse, and plug (no text or symbols)Como utilizar
Cabeça de depilação
natural_image
Illustration of a person performing a seated leg stretch or exercise (no text or symbols present)natural_image
Illustration showing three different postures of a human arm joint, with no text or symbols present.natural_image
Four-panel illustration showing hands using different tools to adjust or install a device (no text or symbols present)2 Oppsett (→ Side 120)
3 Bruk (→Side 120)
© Vekselstrømsadapter (RE7-87)
⑭ Adapter
⑮ Støpsel
⑯ Strømkabel
⑰ Apparatplugg
Tilbehør:
H Rengjøringsbørste
Før bruk
Velge hode
Bruke bikinikammen ES-WS24
Bruk
Hårfjerningshode
Kroppsområder som härfjernen er egnet til

Hårfjerneren kan
brukes på områdene.

natural_image
Illustration of a person performing a seated leg stretch or exercise (no text or symbols present)natural_image
Illustration showing three different postures of a human arm joint, with no text or symbols present.natural_image
Illustration of four different electrical circuit components: a switch, battery pack, fuse, and lamp (no text or symbols present)© AC-adapter (RE7-87)
⑭ AC-adapter
⑮ Strömkontakt
⑯ Strömsladd
⑰ Apparatkontakt
Tillbehör:
H Rengöringsborste
Före användning
Välj huvud
Användning
Epilatorhuvud
natural_image
Illustration of a person performing a seated leg stretch or exercise (no text or symbols present)natural_image
Illustration showing three different postures of a human arm joint, with dotted lines indicating movement or positioning (no text or symbols present)natural_image
Four-step illustration showing hand positioning and heating process: cutting tool, holding test tube, working on test tube with steam rising (no text or symbols)Asentaminen
Käyttäminen
Epilointipää
natural_image
Illustration of a person performing a seated leg stretch or exercise (no text or symbols present)natural_image
Illustration of three different postures showing a knee joint, with dotted lines indicating measurement or positioning (no text or symbols present)natural_image
Illustration of four different hand tools or devices, including a device with a cloth and a brush, arranged in a row (no text or symbols present)Przygotowanie
Sposób użytkowania
Głowica depilacyjna
natural_image
Illustration of a person performing a seated leg stretch or exercise (no text or symbols present)natural_image
Illustration showing three stages of a knee joint technique (no text or symbols present)natural_image
Illustration of four different hand tools or devices, including a pen-like device and a mechanical device with a base (no text or symbols present)flowchart
graph TD
    A["Device with top panel"] --> B["Computer with monitor"]
    B --> C["Device with battery and arrow indicating transformation"]