Sjaan - Robot vacuum Zoef Robot - Free user manual and instructions
Find the device manual for free Sjaan Zoef Robot in PDF.
| Product type | Robot vacuum |
| Brand | Zoef Robot |
| Model | Sjaan (SR806W) |
| Dimensions | Diameter 340 mm, height 85 mm |
| Weight | 3.4 kg |
| Power supply | Li-ion battery 2150 mAh, 14.6 V |
| Charging time | 200 to 300 minutes |
| Operating time | 90 minutes |
| Dustbin capacity | 0.5 litre |
| Cleaning modes | Automatic, spot, edge, zigzag (Nod1-4) |
| Gyroscope | Yes, structured navigation |
| Mopping function | Yes, with water tank and removable mop |
| Control | Buttons on device, remote control, mobile app |
| Connectivity | Wi-Fi (Zoef Robot app) |
| Included accessories | Charging station, adapter, remote control (batteries not included), 2 HEPA filters, cleaning brush, 4 side brushes, manual |
| Virtual wall | Magnetic strip included |
| Sensors | Drop detection, infrared, bumper, dust |
| Maintenance | Clean brushes, dustbin and filters regularly; replace filters every 24 months maximum |
| Safety | Indoor use only; do not use on wet floors; keep away from children; do not vacuum flammable substances |
Frequently Asked Questions - Sjaan Zoef Robot
User questions about Sjaan Zoef Robot
0 question about this device. Answer the ones you know or ask your own.
Ask a new question about this device
Download the instructions for your Robot vacuum in PDF format for free! Find your manual Sjaan - Zoef Robot and take your electronic device back in hand. On this page are published all the documents necessary for the use of your device. Sjaan by Zoef Robot.
USER MANUAL Sjaan Zoef Robot
text_image
ZOEF ROBOTSJAAN
ROBOT STOFZUIGER
natural_image
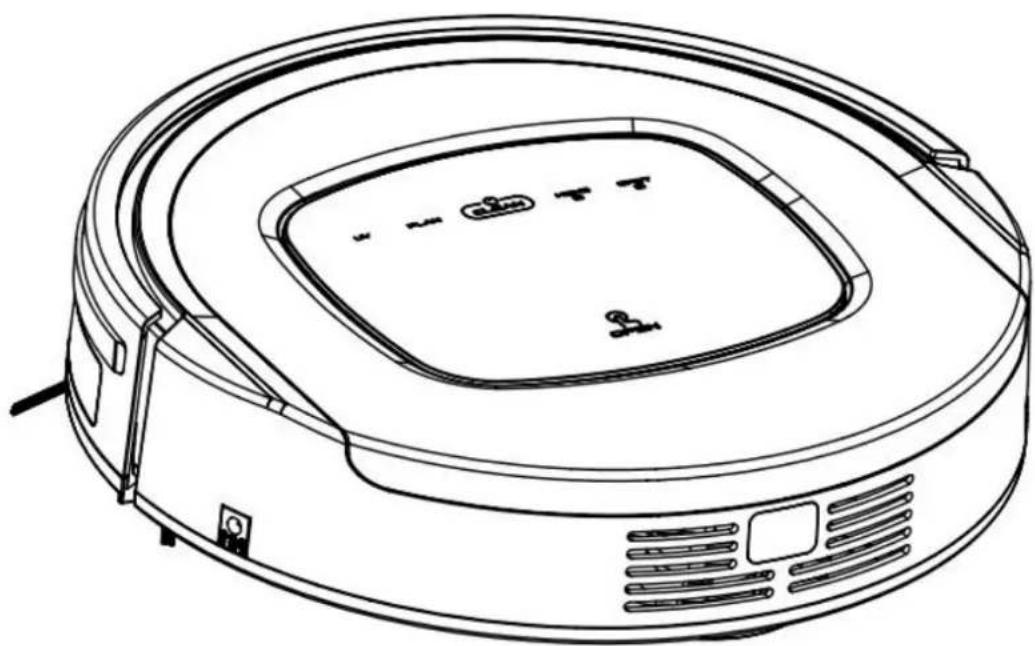
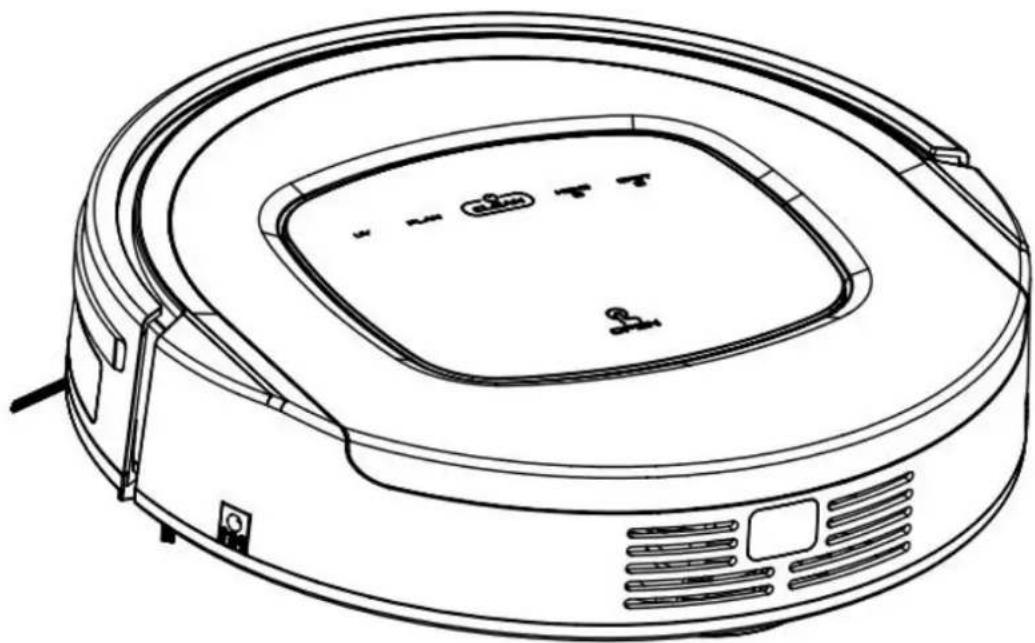
Line drawing of a vacuum cleaner with a circular housing and control panel (no text or symbols)MODEL SR806W SJAAN
GEBRUIKSAANWIJZING
BELANGRIJKE INSTRUCTIES – BEWAAR DEZE GOED
Your Robot Brand
Beste Klant,
natural_image
Line drawing of a robotic vacuum cleaner (no text or symbols)natural_image
Simple line drawing of a faucet opening into an open toolbox (no text or symbols)Product Kenmerken Verschillende Schoonmaak instellingen
natural_image
Pure technical diagram showing concentric spiral and circular components without any text or symbols2. Edge cleaning mode (Langs de plinten modus)
natural_image
Line drawing of a robotic vacuum cleaner inside a brick wall corner, with airflow arrows indicating movement (no text or symbols)3. Scheduling mode (Afspraken modus)
natural_image
Illustration of a robotic vacuum cleaner with signal waves and an analog alarm clock, set against a brick wall background (no text or symbols)Voorbereiding
Verpakking:
natural_image
Technical line drawing of a mechanical housing or enclosure component (no text or symbols)HEPA Filter
HEPA filter houder

natural_image
Line drawing of a robotic vacuum cleaner with attached circuit board (no text or symbols)Fig.b
Let op:
Gyrocoop (2D Mapping)
natural_image
Two technical diagrams showing a device's internal components, one with a funnel and handle, the other showing a close-up of internal circuitry (no text or symbols)Let op:
natural_image
Top-down schematic of a circular mechanical or electronic component with internal components and mounting holes (no text or symbols)natural_image
Line drawing of a portable electronic device with two earbuds and a flat top (no text or symbols)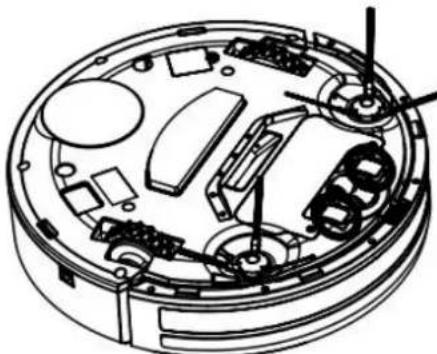
natural_image
Technical line drawing of a mechanical assembly with no visible text or symbolsnatural_image
Technical line drawing of a circular mechanical device with internal components and mounting brackets (no text or symbols)Let op:
text_image
Ben NL 11:21 82% ZOEF ROBOTROBOT STOFZUIGER APP
text_image
App Store 11:21 82% ZOEF ROBOTArea

text_image
Please choose China Mainland Asia America Europe
Confirm the password
6
Register
Please login if have account
text_image
ME Bini NL 30 09:11 ZOEF No joined Robot Please need it + Robot Visit OKStap 2: Druk op de " + " knop op de "Home Page" om de "Wifi Connecting Page" te openen.
text_image
App Store 11:39 76% Reset Robot (SR806W) 1. Turn on the machine power switch. 2. Wait for the machine to start and complete. 3. Press the refill button until the machine tip "is reset". Reset successfullytext_image
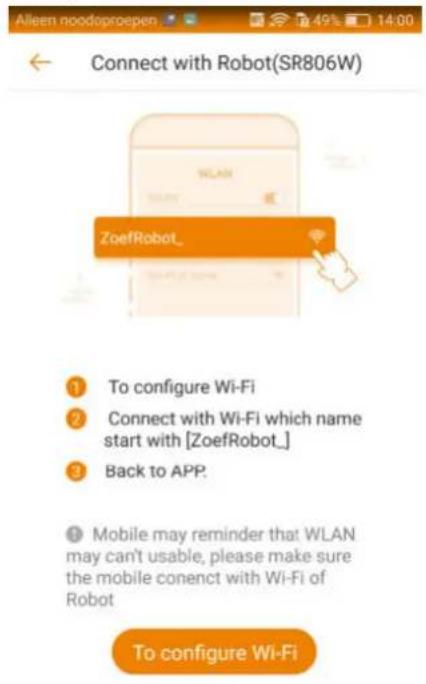
Connect with Robot(SR806W) ① To configure Wi-Fi ② Connect with Wi-Fi which name start with [ZoefRobot_] ③ Back to APP. ④ Mobile may reminder that WLAN may can't usable, please make sure the mobile connect with Wi-Fi of Robot To configure Wi-Fitext_image
Alleen noodoproepen 49% 14:00 Configure network Please configure the Wi-Fi what Robot will connect during working Uw Netwerk Uw Netwerk wachtwoord ① choose the family wifi you want the robot to connect. ② enter the family wifi's password Nexttext_image
ZOEF SR806W SR806W • Standfly Start Pause Re-charge • Current 0 1 Cleaving area/mm2 Clean duration/min • Last time 0 1Werking APP
text_image
10:36-9 SR806W 10% Standby 0 Cleaning area(m) 1 Clean duration/min Start Re- changetext_image
10:57 Option Clean mode > Clean reservation > Clean record > Voice control Robot name Robot model IP of Robot System upgrade > Error notice > Navigate Robot Delete my Robot >Robotic Vacuum Cleaner

natural_image
Line drawing of a robotic vacuum cleaner with control panel and sensor array (no text or symbols)MODEL SR806W SJAAN
USER MANUAL
IMPORTANT INSTRUCTION – SAVE THIS GOOD
Your Robot Brand
Table of Contents
Safety Instructions....1
Product Features....2
Product Components....4
Main Body and Accessories....4
Main Body Diagram/Dust bin....5
Charging Station/Remote Control....6
Display Panel....7
Product Operation....8
Battery Charging....9
Starting up/Standby/Sleeping/Power off....9
Scheduling....10
Cleaning Modes....11
Product Maintenance....12
Cleaning Side Brushes....12
Cleaning Dust Bin and Filters....12
Cleaning Sensors and Wheels 13
Cleaning Charging Poles....13
Cleaning Suction Passage and Dust Sensor....13
Troubleshooting....15
Battery Removal....17
Product Specification....17
Safety Instructions
Before using this product, please read the safety instructions and follow all those regular safety precautions.
- Only authorized technicians can disassemble the product. Users are not allowed to disassemble or repair the product.
- Only use the original battery and power adapter of the product for charging. Using an unmatched adapter may cause electric shock, fire or product damage.
- Do not touch the power cord, plug or adapter with wet hands.
- Do not use this product in wet or moist environment (any environment with liquid), e.g. bathroom or laundry.
- Do not have curtain, any kind of wrapping material or part of user's body wound in the drive wheels.
- Before use, clean floor environment (remove all fragile objects and cords, clothing, paper, loose cables, as well as make sure to lift curtains and drapes off the floor to avoid any possible accidents. In case a loose cable is tangled with the product, the cable might move around with
the product as it works and topple down table, chairs or cabinet and might cause hurt or property damage.)
- Make sure this product is not close to cigarette ends, lighters, matches or any flammables.
- Never use the product to clean combustible or highly volatile liquids, such as gasoline.
- Only use the product indoors; do not use it outdoors.
- If the product needs cleaning, clean it after it is fully charged.
- Do not over-bend or press the flexible cord with heavy or sharp objects.
- Do not sit on top of this product or attach an abject on the top of it. Beware of children or pets while the product is in operation.
- Do not place this product where it is easy to drop off (tables, chairs, etc.).
- Turn off the power switch during product transportation or when you don't need to use this product for a long time.
- Before charging, check whether the adapter and outlet are properly connected.
- To avoid tripping, inform all the people in the house when this product is working.
- When dust bin is full, empty it before use.
- Use this product in temperature from 0^ C to 40^ C.
- Do not use this product in high-temperature environment or under baking sunlight for a long time.
- The battery must be removed from the product before it is disposed of.
- The battery should be disposed of properly for safety sake.
- The adaptor must be removed from the socket-outlet before cleaning, maintaining the appliance or removing the battery.
Warning:
When the appliance is to be used by a child, the child must be of 8 years old and above. For persons with reduced physical, sensory or mental capabilities or lack of experience and knowledge, proper supervision or instruction should be given concerning use of the appliance in a safe way to help them understand the hazards involved. Children should not play with the appliance. Cleaning and user maintenance should not be made by children without supervision.
Product Features
Powerful Suction & Intelligent Suction Adjustment
Powerful Suction
Suction power of this product is strong enough to ensure that even tiny dust on the floor will be cleaned thoroughly!
Intelligent Suction Adjustment
This product is able to automatically adjust its suction power when different floor environments are detected. Not only does it make cleaning more efficient, but it also helps to save more power (up to 30%).
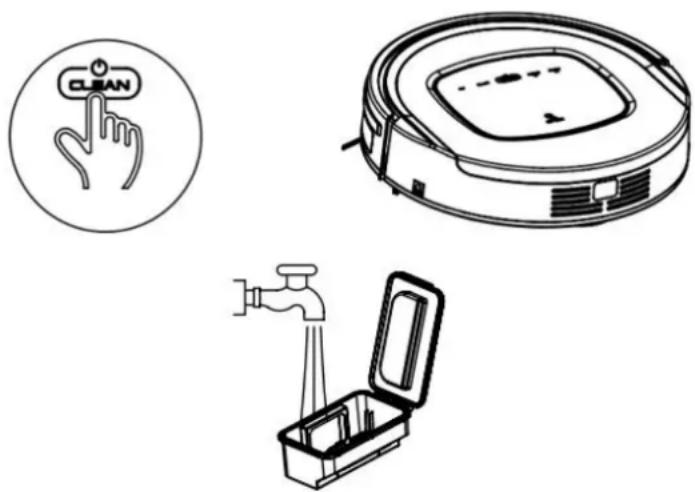
User Friendly Design
Operation is greatly simplified, Touch the CLEAN button, you could start the robot!
Washable dust bin
Wash dust bin and filters with water. Wash dust bin after every empty.
Various Cleaning Modes
Four cleaning modes are provided to meet your needs.
1. Auto cleaning mode
The robot will clean a room automatically and adjust its cleaning according to situation.
natural_image
Pure technical diagram showing concentric spiral and circular components without any text, numbers, or symbolsProduct Features
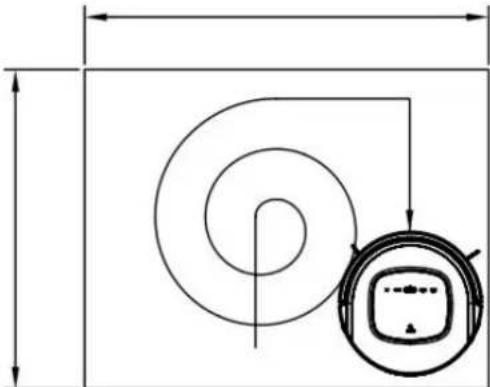
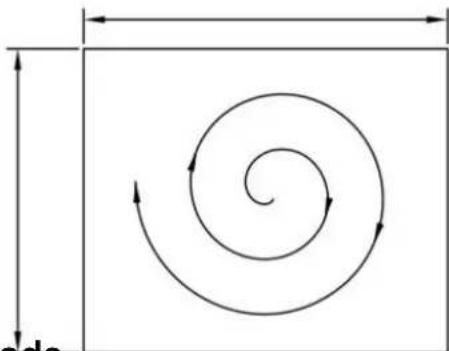
2. Spot cleaning mode
The robot will clean intensively in a spiral way when it detects a very dirty area.
natural_image
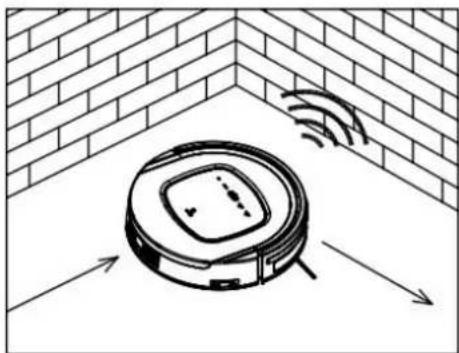
Pure spiral diagram with arrows indicating direction, no text or symbols presentIn this mode the robot will clean along the wall or obstacles.
natural_image
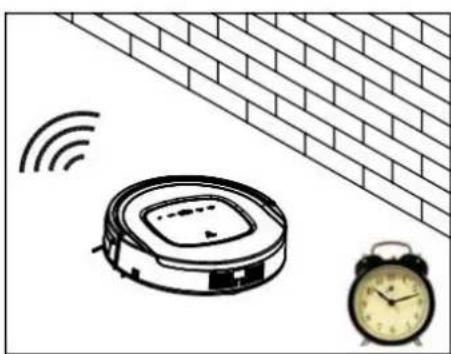
Illustration of a robotic vacuum cleaner inside a brick wall, with airflow arrows indicating movement (no text or symbols)4. Scheduling mode
After scheduled, the robot will leave charging station and start working at scheduled time.
natural_image
Illustration of a robotic vacuum cleaner with signal waves and an alarm clock nearby (no text or symbols)Product Components
Main body and accessories
| No. | Description | Quantity |
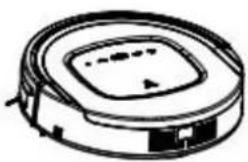
| 1 | Main Body | 1 |
| 2 | Charging Station | 1 |
| 3 | Adapter | 1 |
| 4 | Remote Control (battery not included) | 1 |
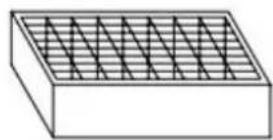
| 5 | HEPA Filter | 2 |
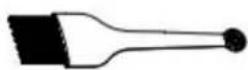
| 6 | Cleaning Brush | 1 |
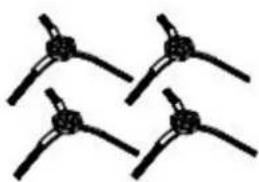
| 7 | Side Brushes *2 and Spare Brushes *2 | 4 |
| 8 | User Manual | 1 |
natural_image
Simple line drawing of a circular mechanical or electronic component with no text or symbols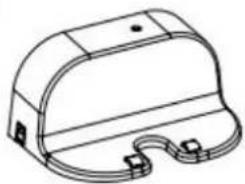
natural_image
Technical line drawing of a mechanical component with a curved top and flange (no text or symbols)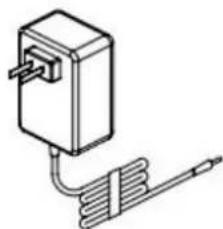
natural_image
Simple line drawing of a rectangular device connected to a coiled spring (no text or symbols)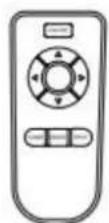
natural_image
Four identical black-and-white diagrams of a propeller blade with evenly spaced tips (no text or symbols)
Product Components
text_image
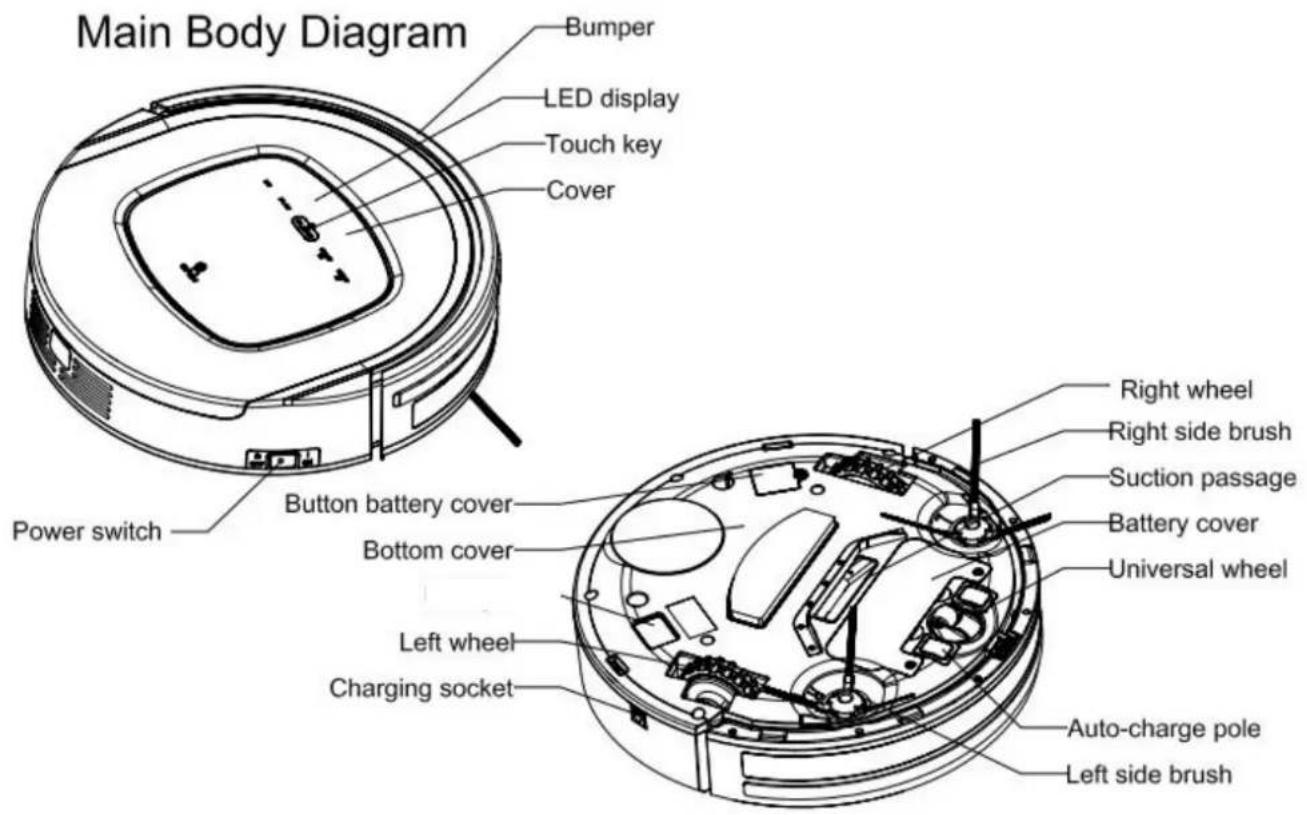
Main Body Diagram Bumper LED display Touch key Cover Power switch Button battery cover Bottom cover Left wheel Charging socket Right wheel Right side brush Suction passage Battery cover Universal wheel Auto-charge pole Left side brush
text_image
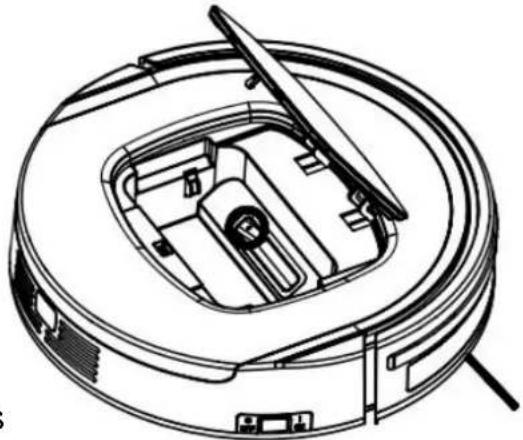
Cover Dust binDust Bin
text_image
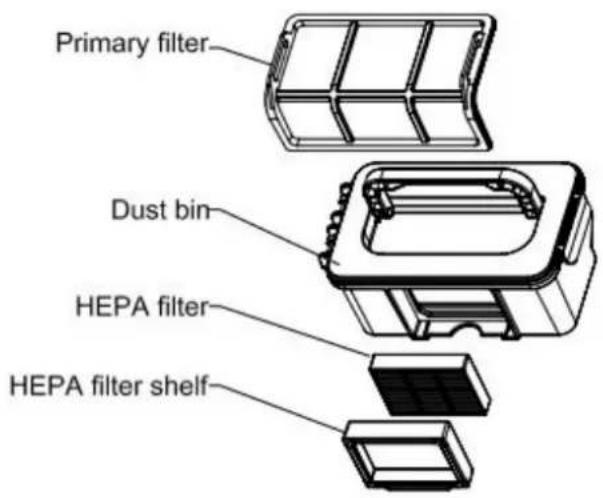
Primary filter Dust bin HEPA filter HEPA filter shelfProdu
text_image
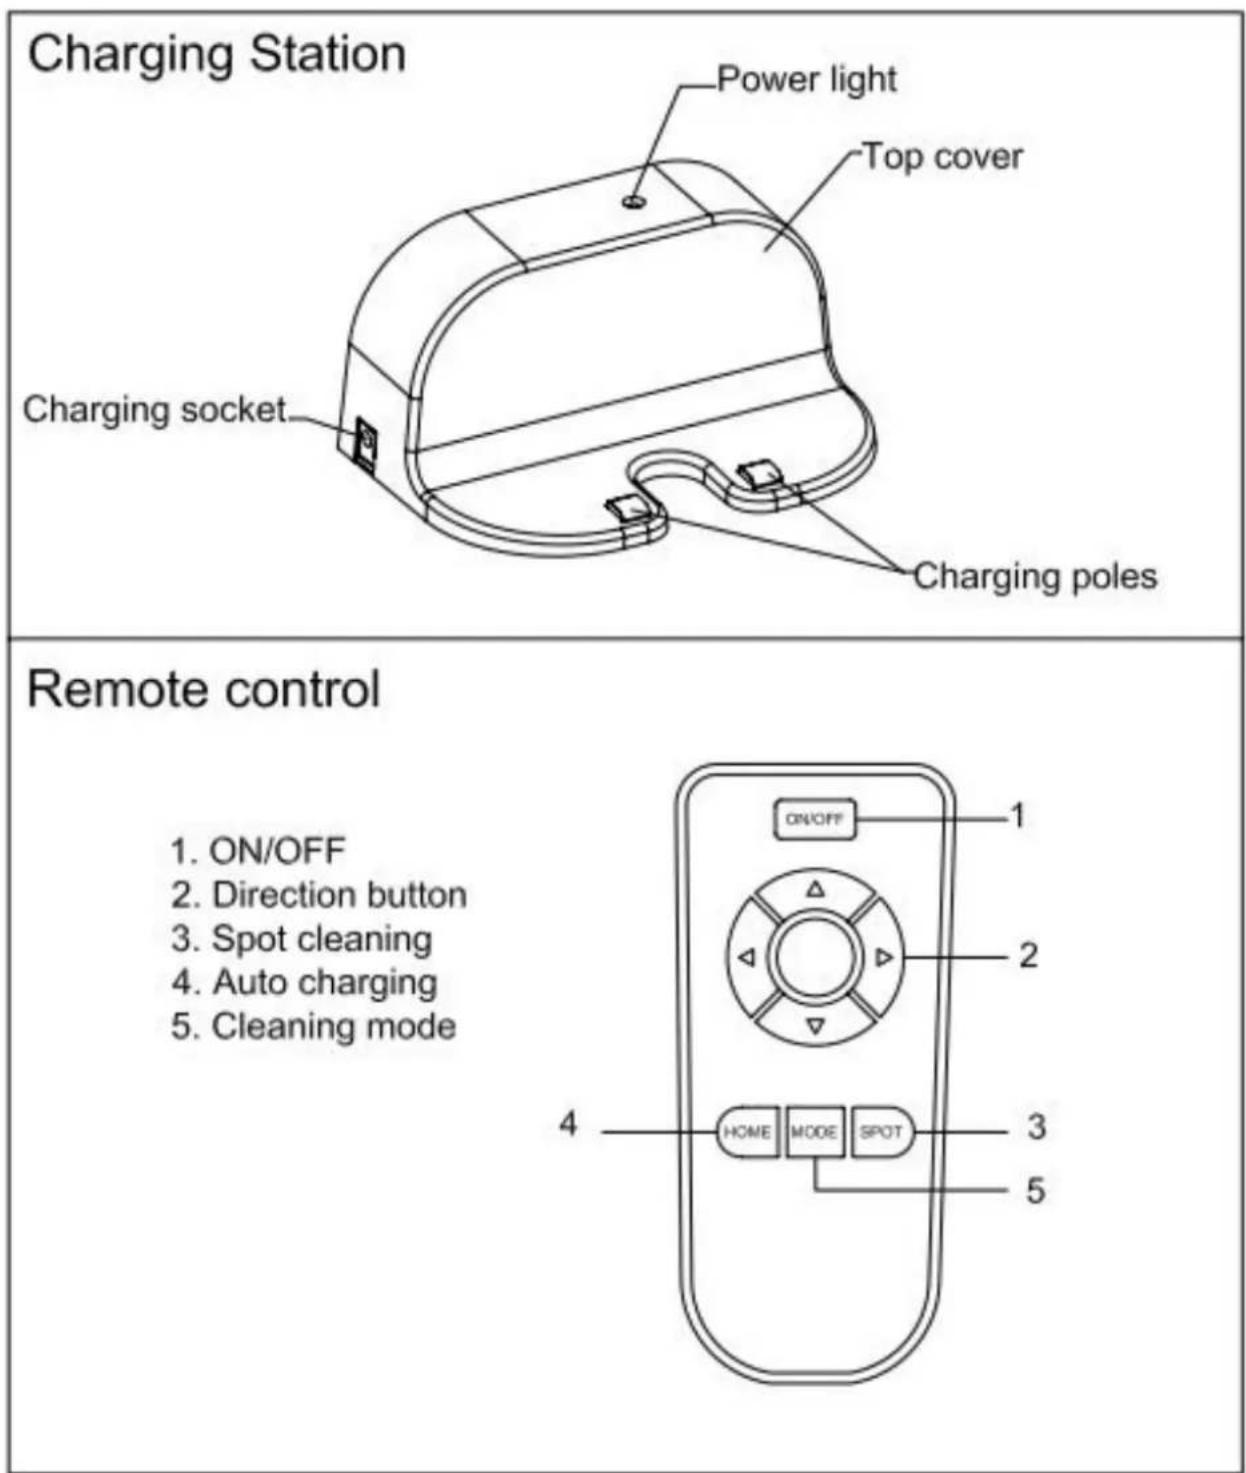
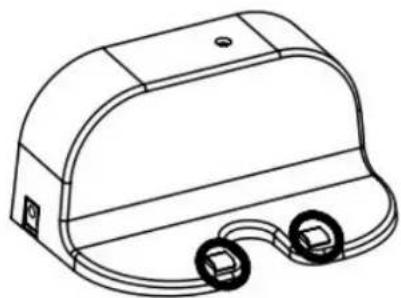
Charging Station Power light Top cover Charging socket Charging poles Remote control 1. ON/OFF 2. Direction button 3. Spot cleaning 4. Auto charging 5. Cleaning mode 4 HOME MODE SPOT 1 2 3 5Note:
A. Install two AAA type batteries into the remote before use.
B. Remove the batteries if the remote will be left unused for a long period.
C. If you use the remote near charging home base, the robot may not recognize command and may not work.
Product Components
Display Panel
text_image
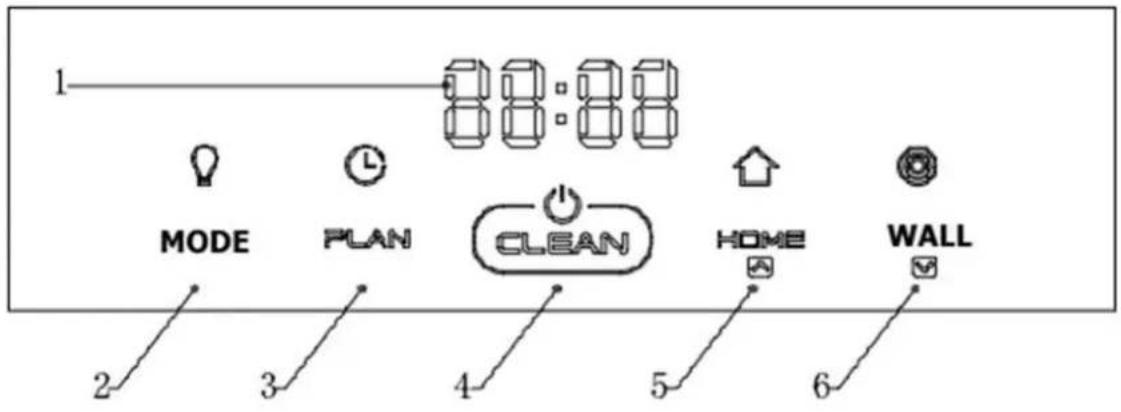
1 MODE PLAN CLEAN HOME WALL 2 3 4 5 6LED Panel
- “”: LED panel
Panel shows the time setting, charging status, and error codes by using numbers, letters or graph.
Buttons
- "MODE": Select the mode
Press, when Shaan must perform in specific task.
nod1: the robot goes 1x1 square meter through a zig-zag route.
nod2: the robot goes 2x2 square meters through a zig-zag route.
nod3: the robot goes 3x3 square meters through a zig-zag route.
nod4: the robot goes 1x1 square meter through a zig-zag route.
- "PLAN": Schedule button
In standby mode, press this button to enter/quit scheduling mode.
- “ Clean button”: Clean button
A. Press this button to change from sleeping mode to standby mode.
B. In standby mode, keep pressing this button for more than 3 seconds to go into sleep mode.
C. Confirm scheduling setting in scheduling mode.
D. Start cleaning in standby mode.
- "HOME": Auto homing / Number increment button
A. Press this button to increase number in scheduling mode.
B. In other mode, press this button to start auto-homing and charging mode.
- "WALL": Wall cleaning / Number decrement button
A. Press this button to decrease number in scheduling mode.
B. In other mode, press this button to start wall cleaning.
Product Operation
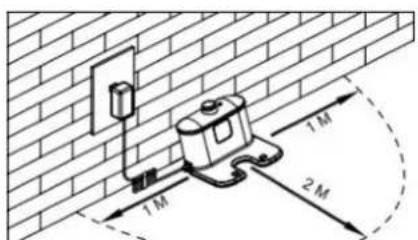
1. Battery charging
A. Positioning the charging station: Place the charging station against the wall and remove obstacles 1 meter on either side and about 2 meters front of the charging station, as shown in the image.
text_image
1M 1M 2MB. To charge, make sure the "ON/OFF" switch on the side of the robot is switched to "ON".
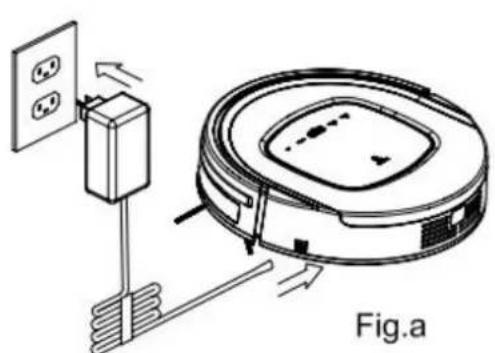
C. Charge the robot in one of the two ways as shown below:
a. Plug the adapter into the robot and the other end to the power socket as shown in Fig.a.
b. Press" HOME " on robot or "HOME" on remote control to operate the robot to go charging station for recharging as shown in Fig.b.
text_image
Fig.a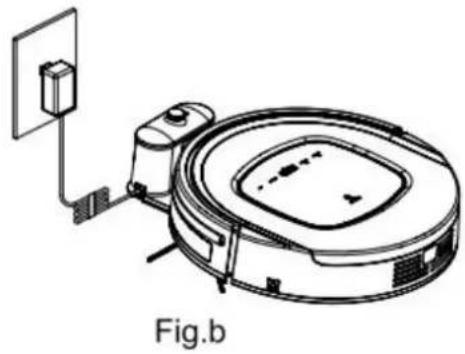
natural_image
Line drawing of a robotic vacuum cleaner with attached circuit board and sensor (no text or symbols)Note:
a. When robot is charging, LED panel will gradually show "11:11", from left to right.
b. Once charging is completed, LED panel will show "11:11".
c. In the standby status, the robot will broadcast voice "please charge" when battery power is low.
d. In the working status, the robot will return to charging station automatically when battery power is low.
To ensure optimum battery performance:
a. Before first use, charge the robot for 12 hours.
b. Charge the robot as soon as battery power is low.
c. The robot will return to charging station automatically when it has finished cleaning or if battery power is low.
d. If the robot is not to be used for a long time, fully charge the battery, turn the power switch off, remove and store it in a cool, dry place.
e. If the robot is not to be used for more than 3 months, charge the robot for 12 hours, turn the power switch off, remove and store it in a cool, dry place.
Product Operation
2. Starting up/ Standby/ Sleeping/ Power off
A. Starting up
a. Press the "ON/OFF" switch on the side of the robot to "ON".
b. Press (CLEAN) on main body or ON/OFF on remote control to start cleaning.
Note: If robot is in sleeping mode, press CUBAN n main body or ON/OFF on remote control to wake up the robot from sleeping mode, then press ag CUBAN the robot will start cleaning automatically.
B. Standby
Standby means the robot's main power is "ON", and the robot is ready to use. It can be changed to standby mode by below methods:
a. During robot cleaning, press on main body to enter standby mode.
b. During robot cleaning, press ON/OFF button on remote control to power off the robot.
C. Sleeping
In sleeping mode, the robot can only be waken up from button on main body or ON/OFF on remote control in order to save power. To turn robot into sleeping mode from standby mode:
a. Keep pressing on main body for 3 seconds.
b. Robot will automatically enter sleeping mode if there is no command received for more than 60 seconds.
D. Power off
a. Press the "ON/OFF" switch on the side of the robot to "OFF".
Product Operation
3. Scheduling
You can schedule the robot to make it start cleaning automatically at a certain time every day.
Scheduling by keys on the main body
Note: The robot can only be set when it's in Standby or Charging mode. If the robot is in sleep mode, press CLEAN on main body or ON/OFF button on remote control to wake up the robot. If the robot is in Cleaning mode, stop it before scheduling.
Schedule by the LED panel on robot
A. Setting Robot Clock
a. In standby or charging status, press PLAN to start the clock-setting. The LED panel will show the current system time.
b. Press to enter the hour-setting mode, the left two numbers on LED panel will flash.
Press to increase hour or “WALL” to decrease it.
c. Press 📄 again to enter the minute-setting mode, the right two numbers on LED panel will flash. Press HOME crease it or “WALL” to decrease it.
d. Press 📍 again to confirm the setting.
B. Setting the scheduling time
a. In standby or charging status, press PLAN for two times to start scheduling, LED panel will show previous scheduled time or "00:00" if there is no schedule settled before.
b. Press to enter hour-setting mode, the left two numbers on LED panel will flash. Press to increase hour or "WALL" to decrease it.
c. Press Clean again to enter the minute-setting mode and the right two numbers on LED panel will flash. Press to increase minute or "WALL" to decrease it.
d. Press 📄 again to confirm the scheduling.

C. Cancel the scheduling
a. Set the scheduling interval to 00:00.
b. Turn off the power switch on the right side of robot, and turn it on again after 3 seconds.
Note:
a. Before scheduling, please set the robot time to be the same with real time.
b. The robot will start cleaning at the schedule time of Robot Clock every day.
Use and Operation
Cleaning settings
Press the "CLEAN" button to have Sjaan vacuumed. The different cleaning settings can only be selected when Sjaan is vacuuming. Press the MODE button on the remote control to select a cleaning setting. The setting will appear on the LED screen as follows:
Press "MODE" when Sjaan has to perform a specific task.
Nod1: the robot will work on a 1 x 1 meter surface via a zigzag pattern.
Nod2: the robot will work on a surface of 2 x 2 meters via a zigzag pattern.
Nod3: the robot will work on a surface of 3 x 3 meters via a zigzag pattern.
Nod4: the robot will work on a 4 x 4 meter surface via a zigzag pattern.
Use metal strip
The metal strip acts as a virtual wall. For example, place the strip in a doorway and Sjaan will not enter the space behind the strip.
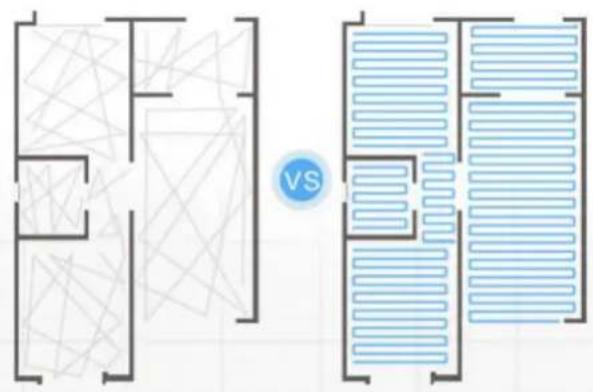
Gyroscope (2D Mapping)
Sjaan is equipped with a gyroscope. This effectively separates the different spaces instead of randomly. This ensures a better and faster cleaning result.
text_image
VSThanks to the Gyroscope, direct manual control, both on the App and with the remote control supplied, only works when Sjaan is in stand-by mode. Than the Fan is switched off.
Product Maintenance
1. Cleaning Side Brushes
Clean the side brush when it gets dirty and replace it if it's damaged. Max life span for side brush is 12 months.
Note: Before replacing side brushes, check and make sure the 'L' / 'R' mark on side brush match with the 'L' / 'R' mark on the bottom base of the robot.
2. Cleaning Dust Bin and Filters
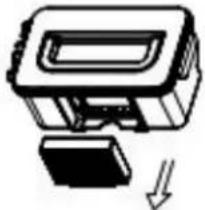
Empty and clean dust bin after each use following the steps as shown in the figures below:
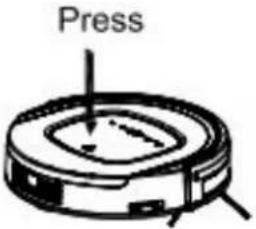  A. Press PUSH to open the cover. A. Press PUSH to open the cover. | 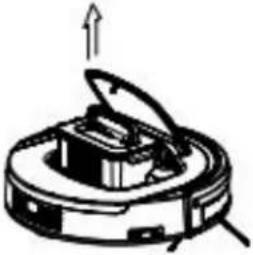 B. Take out the dust bin. B. Take out the dust bin. | ||
 C. Take out the HEPA. C. Take out the HEPA. | 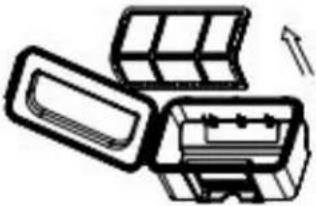 D. Open dust bin cover, take out primary filter. D. Open dust bin cover, take out primary filter. | 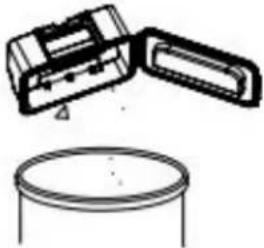 E. Empty the dust bin. E. Empty the dust bin. | |
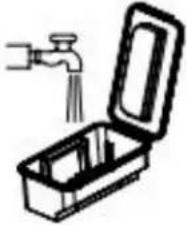  F. Wash dust bin and filter,clean the HEPA with brush. F. Wash dust bin and filter,clean the HEPA with brush. | 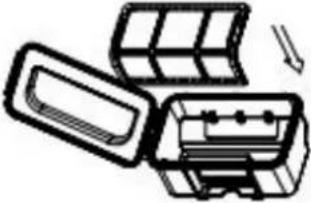 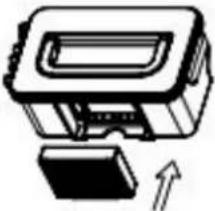 G. Install the primary filter and HEPA back into the dust bin. G. Install the primary filter and HEPA back into the dust bin. | ||
Notes:
a. Wash HEPA filter after 15\~30 days of use. Max life span for HEPA and filter is 24 months.
b. Reinstall the HEPA and primary filter after they are fully dry.
c. HEPA and primary filter could be replaced if needed.
d. Do not dry the filters under baking sunshine.
Product Maintenance
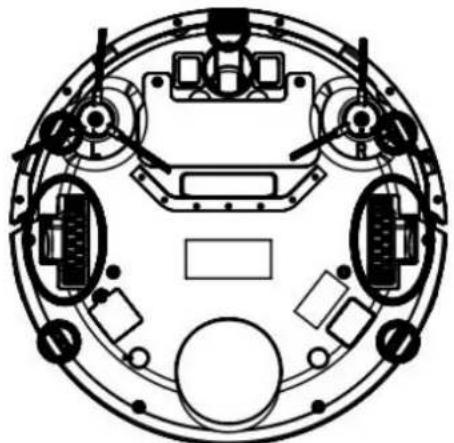
3. Cleaning Sensors and Wheels
Slightly wipe all the sensors and wheels, as marked in figure below, with soft cleaning cloth or tool.
natural_image
Top-down schematic of a circular mechanical or electrical component with multiple ports and mounting brackets (no text or symbols)4. Cleaning Charging Poles
Clean the charging poles, as marked in figure below, with soft cleaning cloth or tool.
natural_image
Line drawing of a portable electronic device with two earbuds and a dome-shaped top (no text or symbols)
natural_image
Technical line drawing of a mechanical assembly with no visible text or symbols5. Cleaning Suction Passage and Dust Sensor
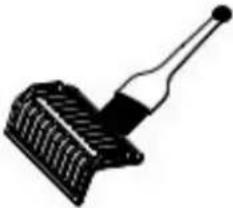
Take out the suction kit from robot, and then clean the suction passage and dust sensor, as marked in figure below, with soft cleaning cloth or tool.
natural_image
Technical line drawing of a circular mechanical device with internal components and mounting brackets (no text or symbols)Note:
Please don't let the s
Troubleshooting
Error Code for Sensors
| Error Code | Cause | Solution |
| AUBF | Suction passage blocked | Clean suction passage |
| AUBN | Dust bin not placed in position or robot without dust bin | Put back dust bin and place it in position |
| E1XX | Left collision switch fault | Check sensitivity of the front bumper |
| E2XX | Right collision switch fault | |
| E3XX | Left and right collision switches fault | |
| E4XX | Left wheel off the ground | Put robot on solid ground |
| E5XX | Left wheel off the ground, left collision switch fault | Put robot on solid ground and check sensitivity of the front bumper |
| E6XX | Left wheel off the ground, right collision switch fault | |
| E7XX | Left wheel off the ground, left and right collision switches fault | |
| E8XX | Right wheel off the ground | Put robot on solid ground |
| E9XX | Right wheel off the ground, left collision switch fault | Put robot on solid ground and check sensitivity of the front bumper |
| EAXX | Right wheel off the ground, right collision switch fault | |
| EBXX | Right wheel off the ground, left and right collision switches fault | |
| ECXX | Left and right wheel off the ground | Put robot on solid ground |
| EDXX | Left and right wheel off the ground, left collision switch fault | Put robot on solid ground and check sensitivity of the front bumper |
| EEXX | Left and right wheel off the ground, right collision switch fault | |
| EFXX | Left and right wheel off the ground, left an right collision switch fault | |
| EXX1 | Left anti-drop sensor detects cliff | Clean bottom anti-drop sensor |
| EXX2 | Front anti-drop sensor detects cliff | |
| EXX3 | Left and front anti-drop sensors detect cliff | Clean front sensor lens and bottom anti-drop sensor lens |
| EXX4 | Right anti-drop sensor detects cliff | Clean bottom anti-drop sensor |
| EXX5 | Left and right anti-drop sensors detect cliff | |
| E XX6 | Front and right anti-drop sensors detect cliff | Clean front sensor lens and bottom anti-drop sensor lens |
| EXX7 | Front, left and right anti-drop sensors detected cliff | |
| EXX8 | Front bumper right infrared sensors detect obstacle | Clean front bumper sensor lens |
Troubleshooting
Error Code for Sensors
| Error Code | Cause | Solution |
| EXX9 | Left anti-drop sensor detects cliff, front bumper right infrared sensor detects obstacle | Clean front sensor lens and bottom anti-drop sensor lens |
| EXXA | Front anti-drop sensor detects cliff, front bumper rig infrared sensor detects obstacle | |
| EXXB | Left and front anti-drop sensors detect cliff, front bumper right infrared sensor detects obstacle | |
| EXXC | Right anti-drop sensor detects cliff, front bumper rig infrared sensor detects obstacle | |
| EXXD | Left and right anti-drop sensors detect cliff, front bumper right infrared sensor detects obstacle | |
| EXXE | Right and front anti-drop sensors detect cliff, front bumper right infrared sensors detect obstacle | |
| EXXF | Front, left and right anti-drop sensors detect cliff, front bumper right infrared sensors detects obstacle | |
| EX1X | Front bumper left infrared sensor detects obstacle | Clean front bumper sensor lens |
| EX2X | Front bumper middle infrared sensor detects obstacle | |
| EX3X | Front bumper left and middle infrared sensors detect obstacle | |
| EX4X | Front bumper right infrared sensor detects obstacle | |
| EX5X | Front bumper left and right infrared sensors detect obstacle | |
| EX6X | Front bumper middle and right infrared sensors detect obstacle | |
| EX7X | Front bumper left, middle and right infrared sensors detect obstacle | |
| EX8X | Front bumper wall detection infrared sensor detects obstacle | |
| EX9X | Front bumper wall detection sensor and left infrared sensor detect obstacle | |
| EXAX | Front bumper wall detection sensor and middle infrared sensor detect obstacle | |
| EXBX | Front bumper wall detection sensor, left and middle infrared sensor detect obstacle | |
| EXCX | Front bumper wall detection sensors, right infrared sensor detect obstacle | |
| EXDX | Front bumper wall detection sensors, left and right infrared sensor detect obstacle | |
| EXEX | Front bumper wall detection sensors, right and middle infrared sensors detect obstacle | |
| EXFX | Front bumper wall detection sensors, left, right and middle infrared sensors detect obstacle |
Troubleshooting
Troubleshooting for Motors
| Error code | Cause | Solution |
| L01X | Fan overloaded | Check if fan is pressed, and clean dust bin |
| L0X1 | Left wheel overloaded | Check if it's stuck or wired by obstacles |
| L0X2 | Right wheel overloaded | |
| L0X3 | Left and right wheels overloaded | |
| L0X4 | Left side brush overloaded | |
| L0X5 | Left wheel and left side brush overloaded | |
| L0X6 | Right wheel and left side brush overloaded | |
| L0X7 | Left and right wheels, left side brush overloaded | |
| L0X8 | Right side brush overloaded | |
| L0X9 | Left wheel and right side brush overloaded | |
| L0XA | Right wheel and right side brush overloaded | |
| L0XB | Left and right wheels, right side brush overloaded | |
| L0XC | Left and right side brushes overloaded | |
| L0XD | Left wheel, left and right side brushes overloaded | |
| L0XE | Right wheel, left and right side brushes overloaded | |
| L0XF | Left and right wheels, left and right side brushes overloaded | |
| L02X | Roller brush overloaded |
Note:
- There is no problem for the robot when it displays L000
- X is the number or letter might appear on display for different fault
- If robot displays E001 or E004, please directly find the relative solution referred in troubleshooting
- If robot displays EC07, please find ECXX and EXXX for relative solution referred in troubleshooting.
- Like wise, if robot displays EE91, please find EXX1, EEXX and EX9X for relative solution referred in troubleshooting.
- If above solution does not work, please try below:
a. Reset the robot by switching off the unit and then turn it on, and check again.
b. If it still does not work after reset, contact the after sales.
- UV light might hurt your eyes, so please do not stare directly at the light when turned on.
Battery Removal
- Remove the screws on battery cover with a screw driver.
- Remove the battery cover.
- Grasp the insulating tape at two sides of the battery and lift the battery.
- Unplug the wire connector that links the battery and robot.
Note: Only use the original battery of the product, otherwise it may cause product damage.
Product specifications
| Classification | Item | Detail |
| Mechanical Specifications | Diameter | 340mm |
| Height | 85mm | |
| Weight | 3.4Kg | |
| Electrical Specifications | Power Rating | 14.4V |
| Battery Specifications | Li-ion 2150mAh | |
| Cleaning Specifications | Dust Bin Capacity | 0.5L |
| Charging Type | Auto Charging/ Manual Charging | |
| Cleaning Mode | One key to clean &remote control selection | |
| Charging Time | About 200~300 mins | |
| Cleaning Time | 90 minutes at maximum | |
| Main Body Button Type | Touch (LED display) | |
Note: Particular specifications are subjected to change without prior notice.

text_image
Ben NL 11:21 82% ZOEF ROBOTROBOT VACUUMCLEANER APP
APP User Manual
IMPORTANT INSTRUCTIONS
Your Robot Brand
| 1. Registreren. | ||
| Download the App in the Apple Store (Search by Zoef Robot) or on Google Play (Search by Zoef Robot)[IMAGE] | A. Select Europe and press Enter APP Area Area  | B. Create an account by filling in your email address and choosing a "Password". Touch Register to confirm and create. Or touch "Please login if you have account if you have previously created an account and want to use it.[IMAGE] |
| 2. Connect to your Robot Vacuum Cleaner. | ||
Step 1: Touch + to add a robot  | Step 2: Press the "+" button on the "Home Page" to open the "Wifi Connecting Page".Step 3: Turn on the Robot Vacuum Cleaner and press and hold the "Home" button on the Robot Vacuum Cleaner until the Robot Vacuum Cleaner beeps. (Refil = Home)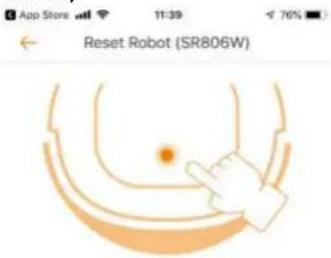  | |
Step 4: Make connection with the wifi network ZoefRobot .. Then go back to the APP
text_image
Connect with Robot(SR806W) ① To configure Wi-Fi ② Connect with Wi-Fi which name start with [ZoefRobot_] ③ Back to APP. ④ Mobile may reminder that WLAN may can't usable, please make sure the mobile connect with Wi-Fi of Robot To configure Wi-FiStep 5: Enter the details of your home Wifi network. Press Next.

text_image
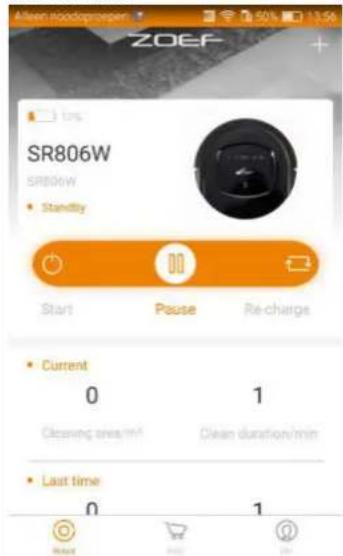
Alleen noodopropen Configure network Please configure the Wi-Fi what Robot will connect during working Uw Netwerk Uw Netwerk wachtwoord 1. choose the family wifi you want the robot to connect. 2. enter the family wifi's password. NextWhen the installation is finished, you will see the overview screen below.
Here you can turn the robot on and off or send it to the charging station. The status of the battery is also visible
text_image
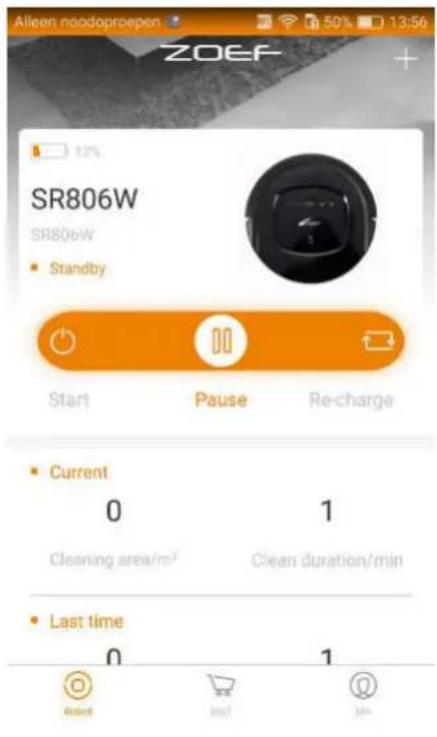
ZOEF 1ms SR806W SR806W • Standfly Start Pause Re-charge • Current 0 1 Cleaning area/m² Clean duration/min • Last time 0 1Operation APP
By pressing the picture or type number you go to the further settings.
text_image
Alleen noodoproepen 50% 13:56 ZOEF SR806W SR806W Standby Start Pause Re-charge Current 0 1 Cleaning area/m² Clean duration/min Last time 0 1 Reset Last JoinHere you can see the travelled distance of the robot. Start and Stop it and sent it to the charging station.
Press ⬇ to operate manually or choose different modes via ... (upper right corner.)
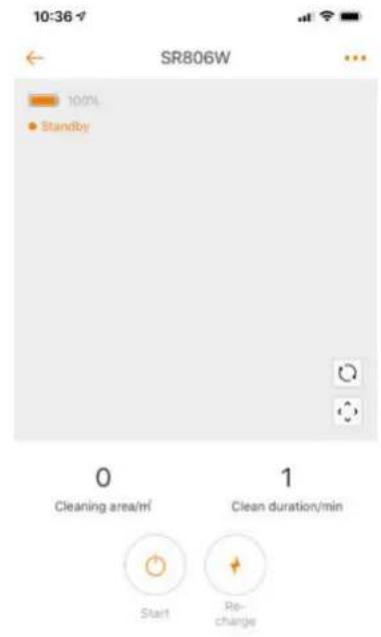
text_image
10:36 SR806W 100% Standby 0 Cleaning area/m² 1 Clean duration/min Start Re- changeWhen touched ....
You can also from here to planning (Clean Reservation), Clean Record (to see how much is vacuumed.) Or Error notice when something is wrong.
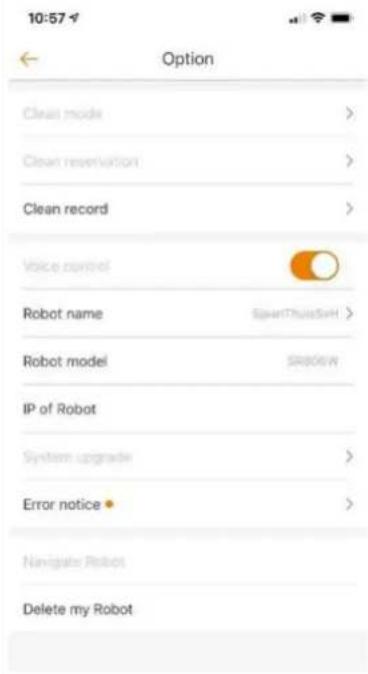
text_image
10:57 Option Clean mode > Clean reservation > Clean record > Voice control Robot name Robot model IP of Robot System upgrade > Error notice > Navigate Robot Delete my RobotThe Robot is equipped with a gyroscope. If the robot is programmed, it always uses this. TI means that if she has had everything back to the charging station. The duration of action is therefore determined by the size of the room.

text_image
ZOEF ROBOTSJAAN
STAUBSAUGERROBOTER
natural_image
Line drawing of a robotic vacuum cleaner with control panel and sensor array (no text or symbols)MODELL SR806W SJAAN
GEBRAUCHSANWEISUNG
natural_image
Line drawing of a robotic vacuum cleaner (no text or symbols)natural_image
Simple line drawing of a faucet opening a toolbox with internal components (no text or symbols)natural_image
Pure technical diagram showing concentric spiral and circular components with no text or symbolsnatural_image
Pure spiral diagram with directional arrows inside a square, no text or symbols presentnatural_image
Illustration of a robotic vacuum cleaner inside a brick wall, with airflow arrows indicating movement (no text or symbols)4. Scheduling mode (Termine-Modus)
natural_image
Illustration of a robotic vacuum cleaner with signal waves and an alarm clock, set against a brick wall background (no text or symbols)Vorbereitung
Verpackung:
text_image
1 88:88 UV PLAN CLEAN HOME SPOT 2 3 4 5 6natural_image
Line drawing of a robotic vacuum cleaner with attached power outlet (no text or symbols)Fig.b
Achtung:
text_image
Diagram illustrating a circular flow system with a robot, showing directional arrows and a sensor device in a brick wall.natural_image
Two technical diagrams showing a device's internal components, one with a funnel and sensor array, the other showing a close-up of internal circuitry (no text or symbols)Achtung:
natural_image
Top-down schematic of a circular mechanical or electronic component with internal components and no visible text or symbolsnatural_image
Line drawing of a portable electronic device with two cables and a base (no text or symbols)
natural_image
Technical line drawing of a mechanical assembly with no visible text or symbolsnatural_image
Technical line drawing of a robotic vacuum cleaner with internal components (no text or symbols)text_image
Ben NL 11:21 82% ZOEF ROBOTtext_image
App Store .ml 11:21 9.82% ZOEF ROBOT Area Please choose China Mainland Asia America Europe Enter APPtext_image
App Store 11:34 4.77% Welcome Email Password 6 Confirm the password 6 Register Please login if have accounttext_image
ZOEF No bounded Robot Please bind it +text_image
App Store 11:39 76% Reset Robot (SR806W) 1. Turn on the machine power switch. 2. Wait for the machine to start and complete. 3. Press the refill button until the machine tip "is reset". Reset successfullynatural_image
Line drawing of a robotic vacuum cleaner with control panel and sensor array (no text or symbols)MODELE SR806W SJAAN
MODE D'EMPLOI
INSTRUCTIONS IMPORTANTES – A CONSERVER
Your Robot Brand
Cher client,
natural_image
Line drawing of a robotic vacuum cleaner (no text or symbols)natural_image
Simple line drawing of a faucet opening into a toolbox (no text or symbols)natural_image
Pure technical diagram showing concentric and circular components with arrows, no text or symbols present2. Edge cleaning mode (mode le long des plinthes)
natural_image
Illustration of a robotic vacuum cleaner inside a brick wall, with airflow arrows indicating movement (no text or symbols)3. Scheduling mode (Mode programmé)
natural_image
Illustration of a robotic vacuum cleaner with signal waves and an alarm clock, set against a brick wall background (no text or symbols)Préparation
Emballage :
- “ 88:88”: Affichage LED
text_image
1 M 1 M 2 Mnatural_image
Line drawing of a robotic vacuum cleaner with attached circuit board (no text or symbols)Fig.b
Attention :
natural_image
Two technical diagrams showing a device's internal components, one with a funnel and handle, the other showing a close-up of internal circuitry (no text or symbols)Attention :
natural_image
Top-down schematic of a circular mechanical or electronic component with internal components and mounting holes (no text or symbols)natural_image
Technical line drawings of a device casing and its internal components (no text or symbols)natural_image
Technical line drawing of a circular mechanical device with internal components and mounting brackets (no text or symbols)Attention :
text_image
Ben NL 11:21 82% ZOEF ROBOT1. S'inscrire.
text_image
App Store 11:21 9.82% ZOEF ROBOT Area Please choose China Mainland Asia America Europe Enter APPtext_image
App Store 11:34 77% Welcome Email Password 6 Confirm the password 6 Register Please login if have accounttext_image
No binded Robot Please bind it(Refil=Home)