SWAW700 - Hi-Fi System SAMSUNG - Free user manual and instructions
Find the device manual for free SWAW700 SAMSUNG in PDF.
User questions about SWAW700 SAMSUNG
0 question about this device. Answer the ones you know or ask your own.
Ask a new question about this device
Download the instructions for your Hi-Fi System in PDF format for free! Find your manual SWAW700 - SAMSUNG and take your electronic device back in hand. On this page are published all the documents necessary for the use of your device. SWAW700 by SAMSUNG.
USER MANUAL SWAW700 SAMSUNG
Thank you for purchasing this product (SWA-W700).
 | CAUTIONRISK OF ELECTRIC SHOCK.DO NOT OPEN |  |
| This symbol indicates that high voltage is present inside. It is dangerous to make any kind of contact with any internal part of this product. | CAUTION: TO REDUCE THE RISK OF ELECTRIC SHOCK, DO NOT REMOVE THE COVER (OR BACK). THERE ARE NO USER SERVICEABLE PARTS INSIDE. REFER ALL SERVICING TO QUALIFIED PERSONNEL. | This symbol indicates that important literature concerning operation and maintenance has been included with this product. |
 | Class II product : This symbol indicates that it does not require a safety connection to electrical earth (ground). |
 | AC voltage : This symbol indicates that the rated voltage marked with the symbol is AC voltage. |
 | DC voltage : This symbol indicates that the rated voltage marked with the symbol is DC voltage. |
 | Caution, Consult instructions for use : This symbol instructs the user to consult the user manual for further safety related information. |
- The slots and openings in the cabinet and in the back or bottom are provided for necessary ventilation. To ensure reliable operation of this apparatus, and to protect it from overheating, these slots and openings must never be blocked or covered.
- Do not place this apparatus in a confined space, such as a bookcase, or built-in cabinet, unless proper ventilation is provided.
- Do not place this apparatus near or over a radiator or heat register, or where it is exposed to direct sunlight.
- Do not place vessels (vases etc.) containing water on this apparatus. A water spill can cause a fire or electric shock.
- Do not expose this apparatus to rain or place it near water (near a bathtub, washbowl, kitchen sink, or laundry tub, in a wet basement, or near a swimming pool, etc.). If this apparatus accidentally gets wet, unplug it and contact an authorized dealer immediately.
- Do not overload wall outlets, extension cords or adaptors beyond their capacity, since this can result in fire or electric shock.
- Route power-supply cords so that they are not likely to be walked on or pinched by items placed on or against them. Pay particular attention to cords at the plug end, at wall outlets, and the point where they exit from the apparatus.
- To protect this apparatus from a lightning storm, or when it is left unattended and unused for long periods of time, unplug it from the wall outlet and disconnect the antenna or cable system. This will prevent damage to the set due to lightning and power line surges.
- Before connecting the AC power cord to the DC adaptor outlet, make sure the voltage designation of the DC adaptor corresponds to the local electrical supply.
- Never insert anything metallic into the open parts of this apparatus. Doing so may create a danger of electric shock.
- To avoid electric shock, never touch the inside of this apparatus. Only a qualified technician should open this apparatus.
- Make sure to plug the power cord in until it is firmly seated. When unplugging the power cord from a wall outlet, always pull on the power cord's plug. Never unplug by pulling on the power cord. Do not touch the power cord with wet hands.
- If this apparatus does not operate normally - in particular, if there are any unusual sounds or smells coming from it - unplug it immediately and contact an authorized dealer or service centre.
- Maintenance of Cabinet.
- Before connecting other components to this product, be sure to turn them off.
- Be sure to pull the power plug out of the outlet if the product is to remain unused or if you are leaving the house for an extended period of time (especially when children, elderly, or disabled people will be left alone in the house).
- Accumulated dust can cause an electric shock, an electric leakage, or a fire by causing the power cord to generate sparks and heat or the insulation to deteriorate.
- Contact an authorized service centre for information if you intend to install your product in a location with heavy dust, high or low temperatures, high humidity, chemical substances, or where it will operate 24 hours a day such as in an airport, a train station, etc. Failing to do so may cause serious damage to your product.
- Use only a properly grounded plug and wall outlet.
- An improper ground may cause electric shock or equipment damage. (Class I Equipment only.)
- To turn this apparatus off completely, you must disconnect it from the wall outlet. Consequently, the wall outlet and power plug must be readily accessible at all times.
- Do not allow children to hang on the product.
-
Store the accessories (battery, etc.) in a location safely out of the reach of children.
-
Do not install the product in an unstable location such as a shaky self, a slanted floor, or a location exposed to vibration.
- Do not drop or strike the product. If the product is damaged, disconnect the power cord and contact a service centre.
- To clean this apparatus, unplug the power cord from the wall outlet, and then wipe the product using a soft, dry cloth. Do not use any chemicals such as wax, benzene, alcohol, thinners, insecticide, air fresheners, lubricants, or detergent. These chemicals can damage the appearance of the product or erase the printing on the product.
- Do not expose this apparatus to dripping or splashing. Do not put objects filled with liquids, such as vases, on the apparatus.
- Do not plug multiple electric devices into the same wall socket. Overloading a socket can cause it to overheat, resulting in a fire.
WARNING :
• TO PREVENT THE SPREAD OF FIRE, KEEP CANDLES AND OTHER ITEMS WITH OPEN FLAMES AWAY FROM THIS PRODUCT AT ALL TIMES.
- To reduce the risk of fire or electric shock, do not expose this appliance to rain or moisture.

Precautions
- Ensure that the AC or DC power supply in your house complies with the power requirements listed on the identification sticker located on the back of your product. Install your product horizontally, on a suitable base (furniture), with enough space around it for ventilation (7\~10 cm). Make sure the ventilation slots are not covered. Do not place the unit on amplifiers or other equipment which may become hot. This unit is designed for continuous use. To fully turn off the unit, disconnect the AC plug from the wall outlet.
- Do not expose the unit to direct sunlight or other heat sources. This could lead to overheating and cause the unit to malfunction.
- Unplug the Power cord from the AC wall socket if the unit malfunctions. Your product is not intended for industrial use. It is for personal use only. Condensation may occur if your product has been stored in cold temperatures. If transporting the unit during the winter, wait approximately 2 hours until the unit has reached room temperature before using it.
- If the electricity supplied to your home is rated at 240V AC, use a suitable plug adapter to connect this unit to your electrical outlets.
Important Safety Instructions
Read these operating instructions carefully before using the unit. Follow all the safety instructions listed below. Keep these operating instructions handy for future reference.
- Read these instructions.
- Keep these instructions.
- Heed all warnings.
- Follow all instructions.
- Do not use this apparatus near water.
- Clean only with a dry cloth.
- Do not block any ventilation openings. Install in accordance with the manufacturer's instructions.
-
Do not install near any heat sources such as radiators, heat registers, stoves, or other apparatus (including AV receivers) that produce heat.
-
Do not defeat the safety purpose of the polarized or grounding-type plug. A polarized plug has two blades with one wider than the other. A grounding type plug has two blades and a third grounding prong. The wide blade or the third prong are provided for your safety. If the provided plug does not fit into your outlet, consult an electrician for replacement of the obsolete outlet.
-
Protect the power cord from being walked on or pinched particularly at plugs, convenience receptacles, and the point where it exits the apparatus.
-
Only use attachments/accessories specified by the manufacturer.
-
Use only with the cart, stand, tripod, bracket, or table specified by the manufacturer, or sold with the apparatus. When a cart
is used, use caution when moving the cart/ apparatus combination to avoid injury from tip-over.
-
Unplug this apparatus during lightning storms or when you intend to leave it unused for long periods of time.
-
Refer all servicing to qualified service personnel. Servicing is required when the apparatus has been damaged in any way, such as when the power-supply cord or plug is damaged, liquid has been spilled or objects have fallen into the apparatus, the apparatus has been exposed to rain or moisture, does not operate normally, or has been dropped.
-
Protect the power cord from being walked on or pinched particularly at plugs, convenience receptacles, and the point where it exits the apparatus.
- Only use attachments/accessories specified by the manufacturer.
- Use only with the cart, stand, tripod, bracket, or table specified by the manufacturer, or sold with the apparatus. When a cart is used, use caution when moving the cart/ apparatus combination to avoid injury from tip-over.
- Unplug this apparatus during lightning storms or when you intend to leave it unused for long periods of time.
- Refer all servicing to qualified service personnel. Servicing is required when the apparatus has been damaged in any way, such as when the power-supply cord or plug is damaged, liquid has been spilled or objects have fallen into the apparatus, the apparatus has been exposed to rain or moisture, does not operate normally, or has been dropped.
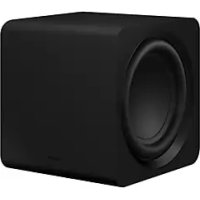
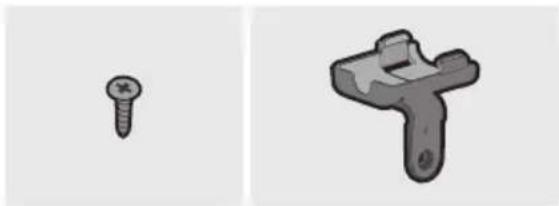
Checking the Components

natural_image
Exterior view of a gray rectangular speaker with a circular grille and mounting feet (no text or symbols visible)Soundbar Sound ^+ Subwoofer
natural_image
Simple black outline of a mechanical clip or bracket (no text or symbols)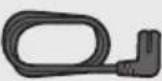
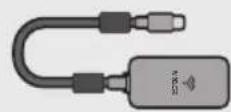
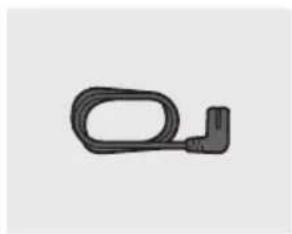
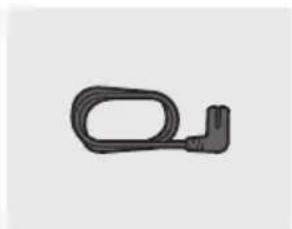
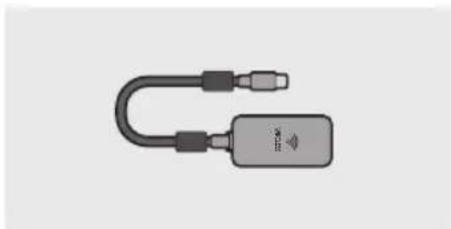
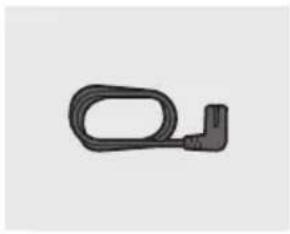
Power Cord Wireless Dongle (WHM520V)
natural_image
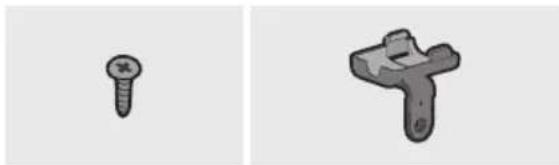
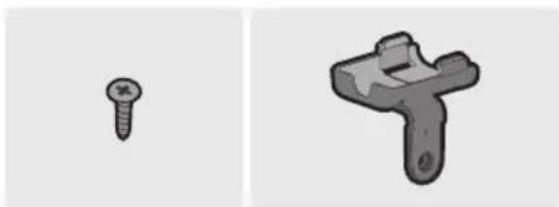
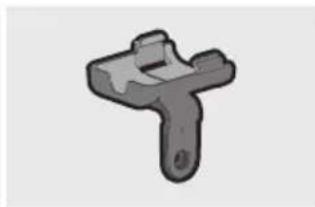
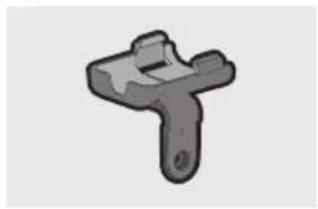
Two 3D-rendered screw and T-shaped object (no text or symbols)Screw (2 EA) Holder-Dongle
(Stand Type)

natural_image
Blank white image with no visible content, text, or symbols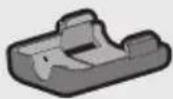
Holder-Dongle
(Wall mount Type / One Mount Type)
- The Wireless Dongle is only compatible with Samsung Soundbars. For a list of compatible Samsung Soundbars, see page 11. Do not connect the dongle to any other devices, such as smartphones, desk-top PCs, or notebook PCs.
Specifications
| Weight 14.6 kg | |
| Dimensions (W x H x D) 320.0 X 338.3 X 320.0 mm | |
| Operating Temperature Range +5°C to +35°C | |
| Operating Humidity Range 10% ~ 75% | |
| Speaker Subwoofer x 1, 254.0 mm, 4ohm | |
| Wireless device output power SRD max transmitter power 25mW at 5.725GHz – 5.825GHz | |
NOTES
– Samsung Electronics Co., Ltd reserves the right to change the specifications without notice.
- Weight and dimensions are approximate.
- For more information about the power supply and power consumption, refer to the label attached to the product.
- Design and specifications are subject to change without prior notice.
Open Source Licence Notice
- To send inquiries and requests regarding open sources, contact Samsung via Email (oss.request@samsung.com).
- This product uses some software programs which are distributed under the FreeRTOS Modified GPL. GPL Software : FreeRTOS
FreeRTOS Modified GPL License
http://www.freertos.org/license.txt
Important Note About Service
- An administration fee may be charged if either
(a) an engineer is called out at your request and there is no defect with the product (i.e. where the user manual has not been read).
(b) you bring the unit to a repair centre and there is no defect with the product (i.e. where the user manual has not been read).
- You will be informed of the administration fee amount before a technician visits.
Connecting the SWA-W700 to a Soundbar
1. Check the standby status after plugging into an electrical outlet
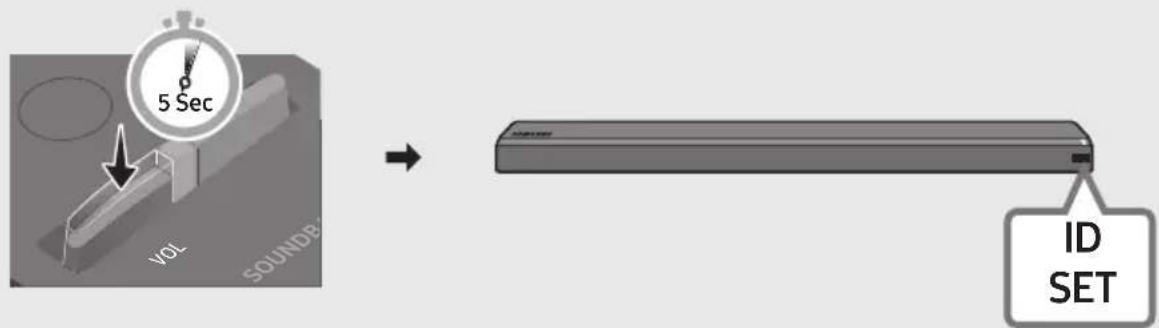
Plug the Wireless Subwoofer power cord into an electrical outlet and into the Wireless Subwoofer to turn on the Wireless Subwoofer. The LINK LED indicator (blue LED) on the Wireless Subwoofer blinks. If the LED does not blink, refer to step 7 on page 10.
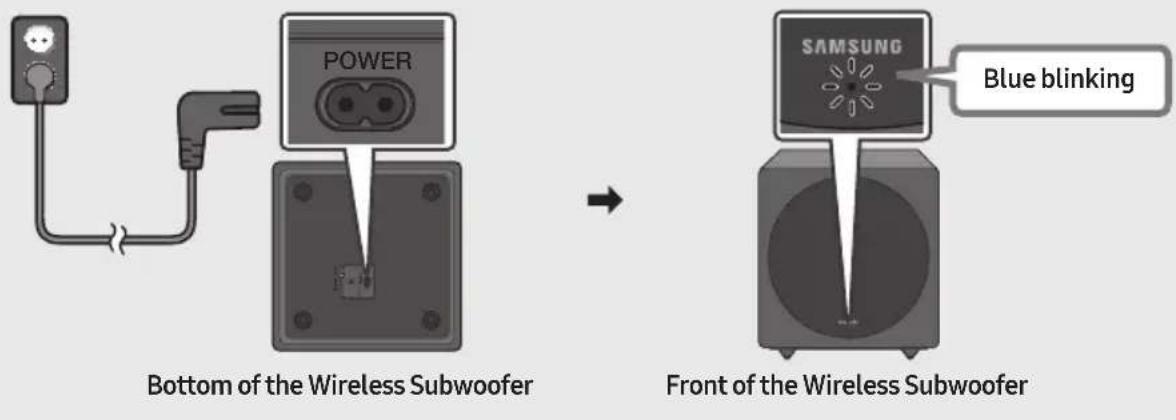
- The main unit is heavy. Be careful not to pinch your fingers when pressing the ID SET button or connecting the power cord on the bottom.
- The upper part of the subwoofer is prone to scratches. Handle it carefully.
Rear of the Wireless Subwoofer
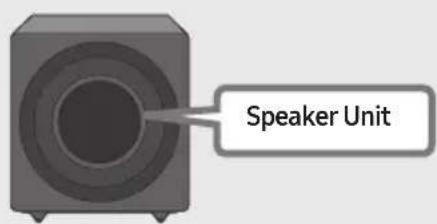
- Do not press on or strike the Speaker Unit on the rear of the body. You can deform or damage the speaker.
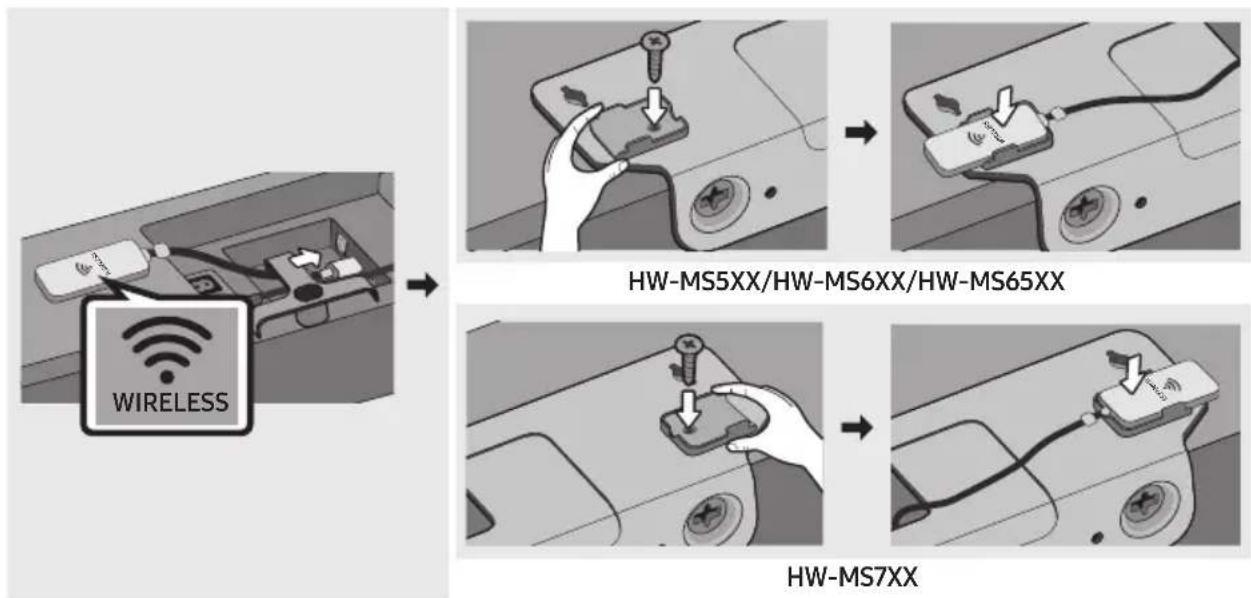
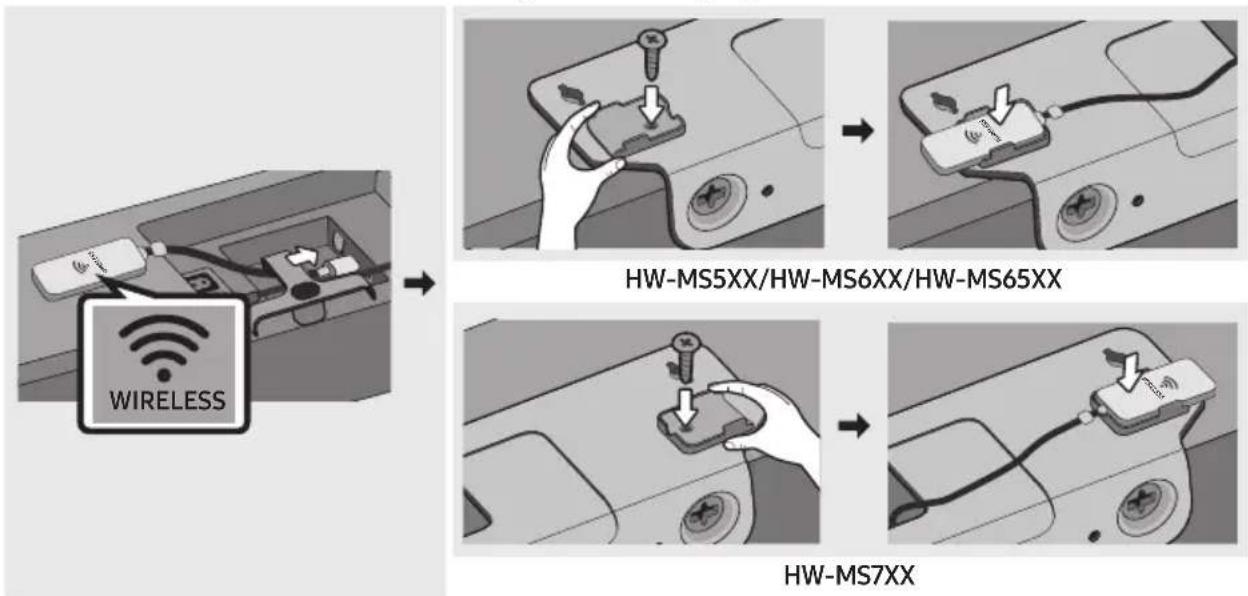
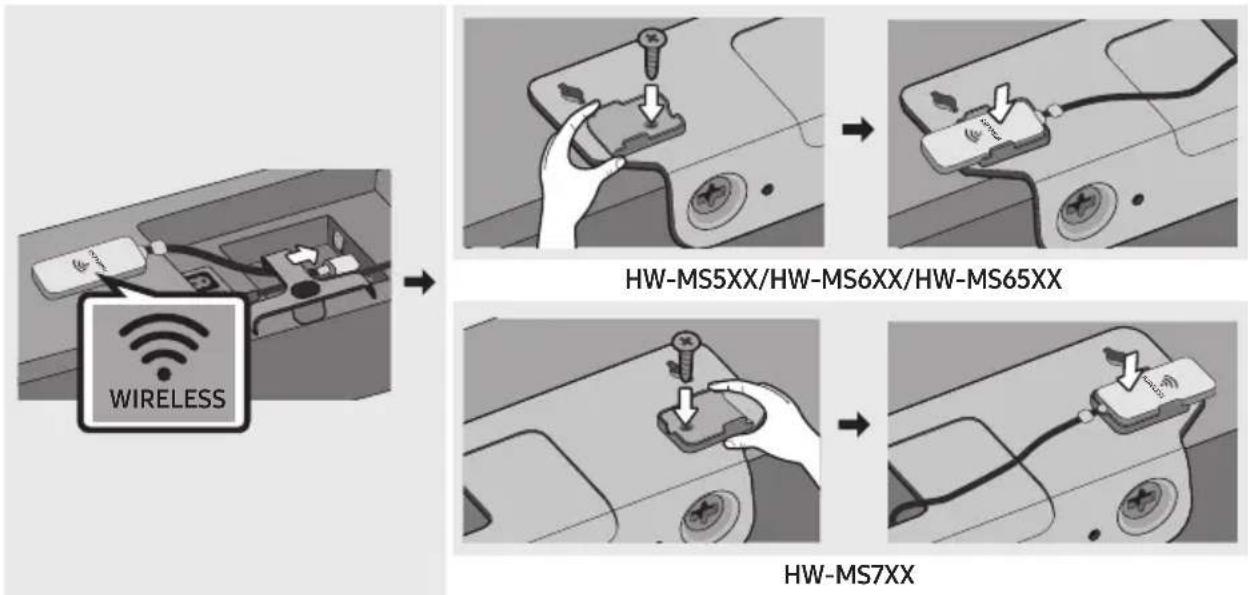
2. Connect the main unit of the Soundbar to the Wireless Dongle
Connect the wireless dongle to the "WIRELESS" port on the Soundbar main unit.
- When inserting the Wireless Dongle into the holder, make sure that the "WIRELESS" logo is facing up, as shown in the pictures below.
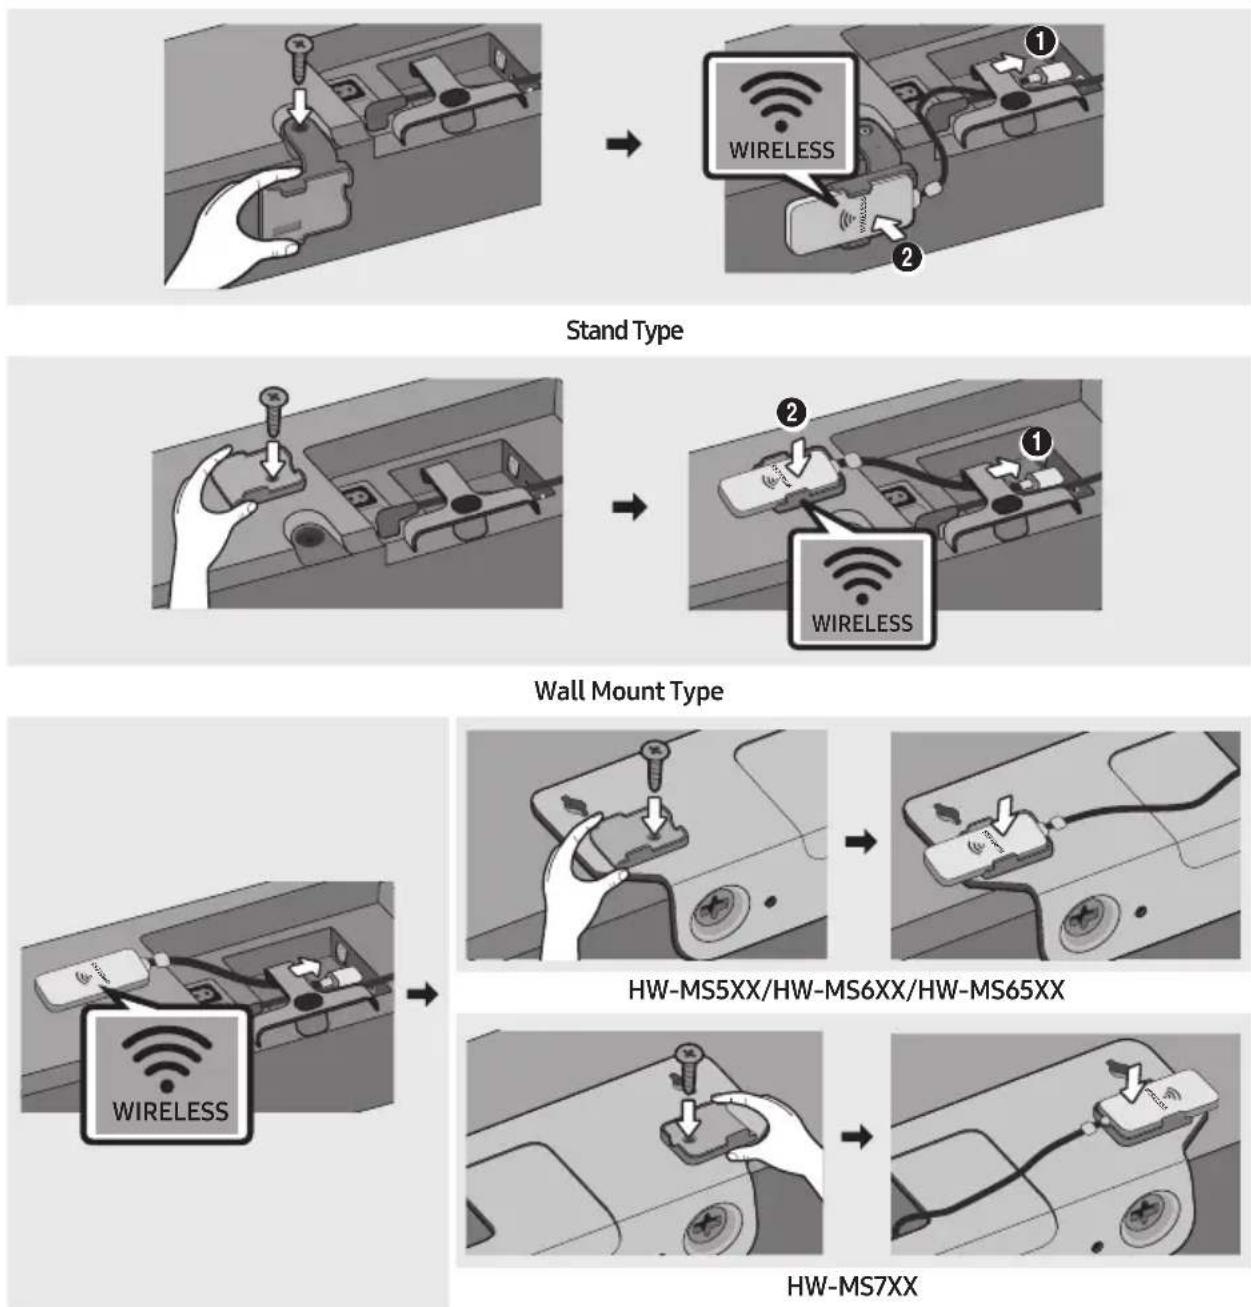
One Mount Type (WMN300SB, not supplied)
- Do not remove the wireless dongle from the main Soundbar. The wireless dongle that comes with the product can be used with the optional Wireless Rear Speaker Kit.
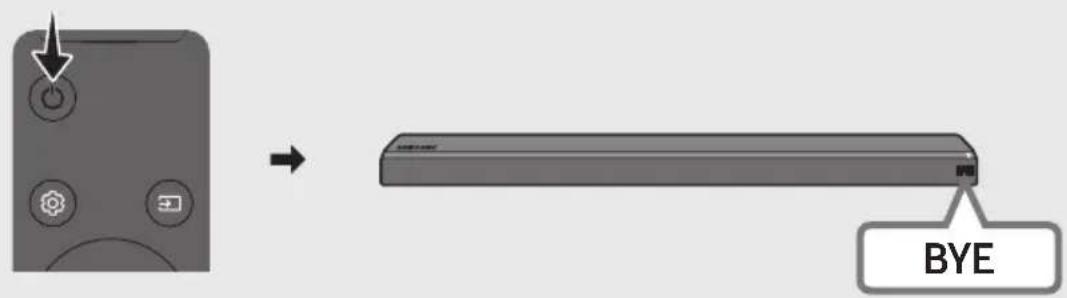
3. Turn off the Soundbar
Turn off the Soundbar using the Soundbar's remote control or by pressing the ⏻ (Power) button on the main Soundbar.
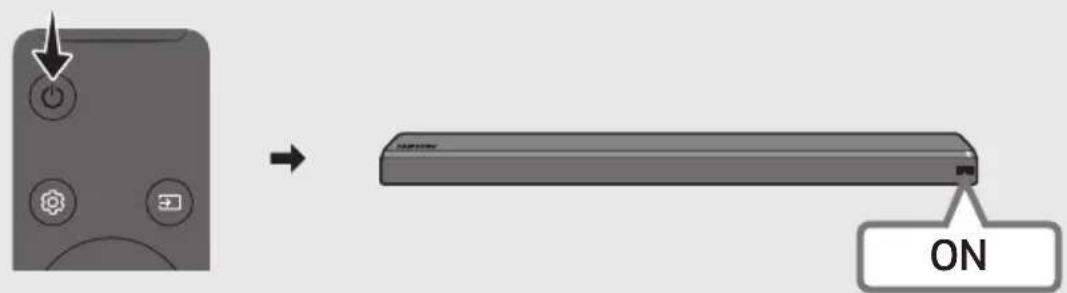
- The images of the Soundbar shown on this page may differ from your Soundbar, depending on the model.
4. Configure "ID SET" using the Soundbar's remote control
Press the VOL button on your remote control for 5\~6 seconds until the "ID SET" message appears on your Soundbar's display.
5. Turn on the Soundbar
Turn on the Soundbar using the Soundbar's remote control or by pressing the ⏻ (Power) button on the main Soundbar.
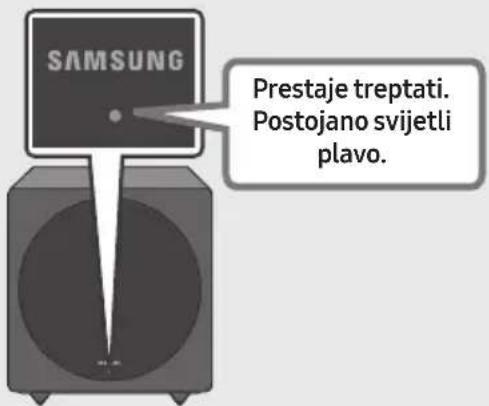
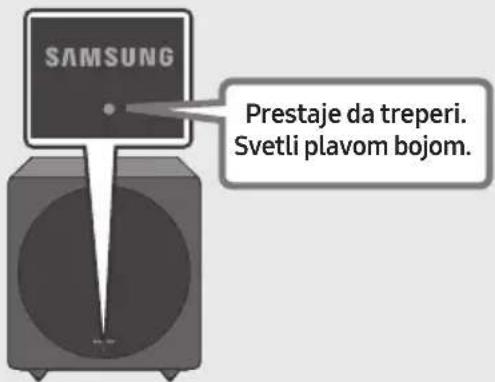
6. Check if the LINK LED is solid blue (connection complete)
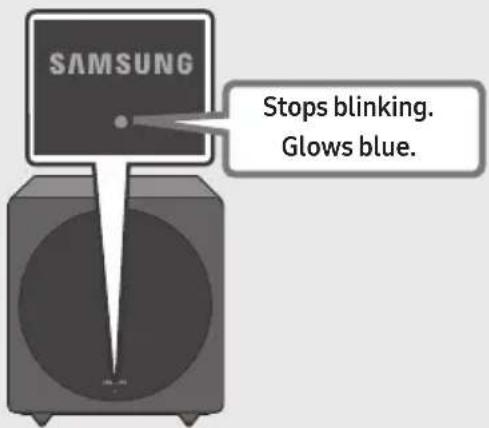
Front of the Wireless Subwoofer
The LINK LED indicator stops blinking and glows a solid blue when a connection is established between the Soundbar and the Wireless Subwoofer.
7. If the SWA-W700 does not connect, take the necessary steps according to the LED Indicator's status
| LED status Action | |||
| Blue | On | Connected with the Soundbar | - |
| Blinking | Connection standby status | Check if the Soundbar is turned on | |
| Repeat steps 3 through 6. | |||
| Red On Connection failure | Check if the Soundbar is turned on | ||
1. Press the ID SET button on the bottom of the Wireless Subwoofer with a pen tip for 5~6 seconds until the LINK LED indicator blinks (in Blue).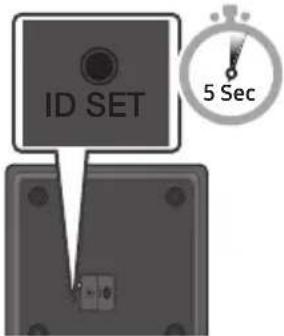 2. Repeat steps 3 through 6. 2. Repeat steps 3 through 6. | |||
| Others | - | Errors | Contact a Samsung Service Centre. |
Compatible Models
| HW-MS550 | HW-MS55C | HW-MS570 | HW-MS57C | HW-MS560 |
| HW-MS650 | HW-MS651 | HW-MS6500 | HW-MS6501 | HW-MS660 |
| HW-MS661 | HW-MS6510 | HW-MS6511 | HW-MS750 | HW-MS751 |
| HW-MS760 | HW-MS761 |
- The model list is subject to change without further notice.
Hereby, Samsung Electronics, declares that this equipment is in compliance with Directive 2014/53/EU.
The full text of the EU declaration of conformity is available at the following internet address: http://www.samsung.com go to Support > Search Product Support and enter the model name. This equipment may be operated in all EU countries.

Correct Disposal of This Product (Waste Electrical & Electronic Equipment)
(Applicable in countries with separate collection systems)
This marking on the product, accessories or literature indicates that the product and its electronic accessories (e.g. charger, headset, USB cable) should not be disposed of with other household waste at the end of their working life. To prevent possible harm to the environment or human health from uncontrolled waste disposal, please separate these items from other types of waste and recycle them responsibly to promote the sustainable reuse of material resources.
Household users should contact either the retailer where they purchased this product, or their local government office, for details of where and how they can take these items for environmentally safe recycling.
Business users should contact their supplier and check the terms and conditions of the purchase contract. This product and its electronic accessories should not be mixed with other commercial wastes for disposal.
For information on Samsung's environmental commitments and product specific regulatory obligations e.g. REACH visit: samsung.com/uk/aboutsamsung/samsungelectronics/corporatecitizenship/data_corner.html
natural_image
Exterior view of a modern black square speaker with a circular grille (no text or symbols visible)Субуфер Саундбар Sound +
natural_image
Simple black outline of a U-shaped connector or clamp (no text or symbols)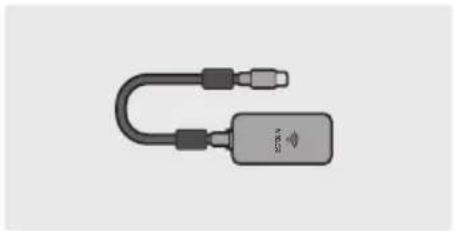
natural_image
Illustration of a U-shaped connector with connectors and a labeled component (no text or symbols)natural_image
Two grayscale illustrations: one showing a screw with a cross symbol, the other showing a mechanical component with a handle (no text or labels)natural_image
3D rendered mechanical part with a stepped base and cutout (no text or symbols)flowchart
graph TD
    A["Wireless"] --> B["HW-MS5XX/HW-MS6XX/HW-MS65XX"]
    B --> C["HW-MS7XX"]
| HW-MS550 | HW-MS55C | HW-MS570 | HW-MS57C | HW-MS560 |
| HW-MS650 | HW-MS651 | HW-MS6500 | HW-MS6501 | HW-MS660 |
| HW-MS661 | HW-MS6510 | HW-MS6511 | HW-MS750 | HW-MS751 |
| HW-MS760 | HW-MS761 |
samsung.com/uk/aboutsamsung/samsungelectronics/corporate citizenship/data_corner.html
natural_image
Exterior view of a modern black square speaker with a circular grille (no text or symbols visible)Subwoofer sustava Soundbar Sound+
natural_image
Black plastic clip with a loop handle and right-angle end (no text or symbols)Kabel za napajanje Hardverski ključ za bežičnu vezu (WHM520V)
natural_image
Illustration of a U-shaped connector with connectors and a labeled component (no text or symbols on the device itself)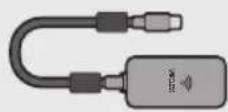
natural_image
Two 3D-rendered mechanical parts: a screw and a handle (no text or symbols)Vijak (2 kom.) Držač za hardverski ključ (Stojeći tip)

natural_image
3D rendered image of a mechanical component or bracket (no text or symbols visible)Držač za hardverski ključ (Zidni tip/Montažni tip)
- Hardverski ključ za bežičnu vezu kompatibilan je samo s uređajima Samsung Soundbar. Popis kompatibilnih uređaja Samsung Soundbar nalazi se na str. 11. Nemojte priključivati hardverski ključ u bilo koje druge uređaje, primjerice pametne telefone, stolna ili prijenosna računala.
Specifikacije
| Težina 14,6 kg | |
| Dimenzije (Š x V x D) 320,0 X 338,3 X 320,0 mm | |
| Raspon radne temperature +5°C do +35°C | |
| Raspon radne vlažnosti 10% ~ 75% | |
| Zvučnik Subwoofer x 1, 254,0 mm, 4 oma | |
| Izlazna snaga bežičnog uređaja Maks. snaga SRD odašiljača 25mW | pri 5,725GHz – 5,825GHz |
NAPOMENE
Zidni tip
flowchart
graph TD
    A["Wireless"] --> B["HW-MS5XX/HW-MS6XX/HW-MS65XX"]
    B --> C["HW-MS7XX"]
Montažni tip (WMN300SB, nije isporučen)
- Nemojte uklanjati hardverski ključ za bežičnu vezu s glavnog sustava Soundbar. Hardverski ključ za bežičnu vezu koji se isporučuje s proizvodom može se upotrebljavati s dodatnim kompletom bežičnog stražnjeg zvučnika.
6. Provjerite svijetli li indikator LINK LED postojano plavo (uspostavljanje veze dovršeno)
Prednja strana bežičnog subwoofera
Indikator LINK LED prestat će treptati i počet će postojano svijetliti plavo nakon uspostavljanja veze između sustava Soundbar i bežičnog subwoofera.
7. Ako uređaj SWA-W700 ne uspostavi vezu, poduzmite potrebne korake, ovisno o stanju LED indikatora
| Stanje LED indikatora Radnja | |||
| Plavo | Uključeno | Povezano sa sustavom Soundbar | - |
| Treperenje | Stanje čekanja na uspostavljanje veze | Provjerite je li Soundbar uključen. | |
| Ponovite korake od 3 do 6. | |||
| Crveno Uključeno | Neuspješno povezivanje | Provjerite je li sustav Soundbar uključen | |
1. Pritisnite gumb ID SET na donjoj strani bežičnog subwoofera vrhom olovke na 5~6 sekundi dok indikator LINK LED ne počne treptati (plavo). 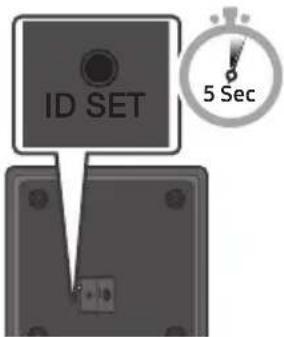 2. Ponovite korake od 3 do 6. 2. Ponovite korake od 3 do 6. | |||
| Drugo - Pogreške | U slučaju pogrešaka obratite se servisnom centru tvrtke Samsung. | ||
Kompatibilni modeli
| HW-MS550 | HW-MS55C | HW-MS570 | HW-MS57C | HW-MS560 |
| HW-MS650 | HW-MS651 | HW-MS6500 | HW-MS6501 | HW-MS660 |
| HW-MS661 | HW-MS6510 | HW-MS6511 | HW-MS750 | HW-MS751 |
| HW-MS760 | HW-MS761 |
samsung.com/uk/aboutsamsung/samsungelectronics/corporate citizenship/data_corner.html
Bezpečnostní Pokyny
natural_image
Exterior view of a modern gray audio speaker with a circular grille (no text or symbols visible)Subwoofer Soundbaru Sound ^+

natural_image
Simple black plastic clip with a loop handle, no text or symbols visiblenatural_image
Illustration of a U-shaped connector with connectors and a small icon, no text or symbols present.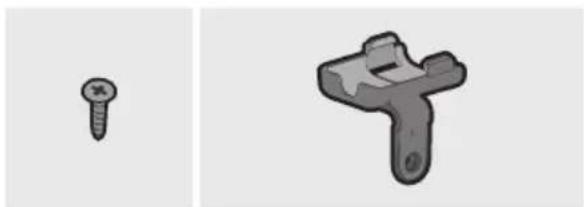
natural_image
Two grayscale 3D-rendered mechanical parts: a small screw and a larger handle (no text or symbols)natural_image
3D rendered mechanical component with a flanged base and cutout (no text or symbols)5. Zapněte Soundbar
| HW-MS550 | HW-MS55C | HW-MS570 | HW-MS57C | HW-MS560 |
| HW-MS650 | HW-MS651 | HW-MS6500 | HW-MS6501 | HW-MS660 |
| HW-MS661 | HW-MS6510 | HW-MS6511 | HW-MS750 | HW-MS751 |
| HW-MS760 | HW-MS761 |
samsung.com/uk/aboutsamsung/samsungelectronics/corporate citizenship/data_corner.html
natural_image
Three electronic devices: a speaker, a USB cable, and a U-shaped connector (no text or symbols visible)Soundbar Sound ^+ Subwoofer Stromkabel Drahtloser Dongle (WHM520V)

natural_image
Three grayscale 3D-rendered mechanical parts with different shapes, no text or symbols presentTyp Wandaufhängung
flowchart
graph TD
    A["Wireless"] --> B["HW-MS5XX/HW-MS6XX/HW-MS65XX"]
    B --> C["HW-MS7XX"]
| HW-MS550 | HW-MS55C | HW-MS570 | HW-MS57C | HW-MS560 |
| HW-MS650 | HW-MS651 | HW-MS6500 | HW-MS6501 | HW-MS660 |
| HW-MS661 | HW-MS6510 | HW-MS6511 | HW-MS750 | HW-MS751 |
| HW-MS760 | HW-MS761 |
samsung.com/uk/aboutsamsung/samsungelectronics/corporate citizenship/data_corner.html
Ohutusteave
Täname teid, et ostsite selle toote (SWA-W700).
natural_image
Three electronic devices: a speaker, a USB cable, and a plug device (no visible text or symbols)natural_image
Three grayscale 3D-rendered mechanical parts: a screw, a T-shaped bracket, and a flat base (no text or symbols)flowchart
graph TD
    A["Wireless"] --> B["Switch with Wi-Fi"]
    B --> C["Device with USB port"]
    C --> D["Switch with USB port"]
    D --> E["Device with USB port"]
    E --> F["Switch with USB port"]
    F --> G["Device with USB port"]
    G --> H["Switch with USB port"]
    H --> I["Device with USB port"]
5. Soundbari sisselülitamine
| HW-MS550 | HW-MS55C | HW-MS570 | HW-MS57C | HW-MS560 |
| HW-MS650 | HW-MS651 | HW-MS6500 | HW-MS6501 | HW-MS660 |
| HW-MS661 | HW-MS6510 | HW-MS6511 | HW-MS750 | HW-MS751 |
| HW-MS760 | HW-MS761 |
5. Allumer la Soundbar
| HW-MS550 | HW-MS55C | HW-MS570 | HW-MS57C | HW-MS560 |
| HW-MS650 | HW-MS651 | HW-MS6500 | HW-MS6501 | HW-MS660 |
| HW-MS661 | HW-MS6510 | HW-MS6511 | HW-MS750 | HW-MS751 |
| HW-MS760 | HW-MS761 |
flowchart
graph TD
    A["Wireless"] --> B["HW-MS5XX/HW-MS6XX/HW-MS65XX"]
    B --> C["HW-MS7XX"]
| HW-MS550 | HW-MS55C | HW-MS570 | HW-MS57C | HW-MS560 |
| HW-MS650 | HW-MS651 | HW-MS6500 | HW-MS6501 | HW-MS660 |
| HW-MS661 | HW-MS6510 | HW-MS6511 | HW-MS750 | HW-MS751 |
| HW-MS760 | HW-MS761 |
samsung.com/uk/aboutsamsung/samsungelectronics/corporate citizenship/data_corner.html
natural_image
Three electronic devices: a speaker, a USB cable, and a connected plug (no visible text or symbols)natural_image
Three grayscale 3D-rendered mechanical parts: a screw, a T-shaped bracket, and a flat base (no text or symbols)| HW-MS550 | HW-MS55C | HW-MS570 | HW-MS57C | HW-MS560 |
| HW-MS650 | HW-MS651 | HW-MS6500 | HW-MS6501 | HW-MS660 |
| HW-MS661 | HW-MS6510 | HW-MS6511 | HW-MS750 | HW-MS751 |
| HW-MS760 | HW-MS761 |
natural_image
Exterior view of a modern black square speaker with a circular grille (no text or symbols visible)Subwoofer Soundbar Sound +

natural_image
Simple black outline of a U-shaped connector or clamp (no text or symbols)natural_image
Illustration of a U-shaped connector with connectors and a labeled component (no text or symbols on the device itself)Dongle wireless (WHM520V)
natural_image
Two grayscale illustrations of screw and T-shaped metal components (no text or symbols)natural_image
3D rendered mechanical part with a flanged base and cutout (no text or symbols)flowchart
graph TD
    A["Wireless"] --> B["Switch with Wi-Fi"]
    B --> C["Device with USB cable"]
    C --> D["Switch with USB cable"]
    D --> E["Device with USB cable"]
    E --> F["Switch with USB cable"]
    F --> G["Device with USB cable"]
    G --> H["Switch with USB cable"]
    H --> I["Device with USB cable"]
5. Accendere la Soundbar
| HW-MS550 | HW-MS55C | HW-MS570 | HW-MS57C | HW-MS560 |
| HW-MS650 | HW-MS651 | HW-MS6500 | HW-MS6501 | HW-MS660 |
| HW-MS661 | HW-MS6510 | HW-MS6511 | HW-MS750 | HW-MS751 |
| HW-MS760 | HW-MS761 |
| HW-MS550 | HW-MS55C | HW-MS570 | HW-MS57C | HW-MS560 |
| HW-MS650 | HW-MS651 | HW-MS6500 | HW-MS6501 | HW-MS660 |
| HW-MS661 | HW-MS6510 | HW-MS6511 | HW-MS750 | HW-MS751 |
| HW-MS760 | HW-MS761 |
natural_image
Exterior view of a modern black square speaker with a circular grille (no text or symbols visible)natural_image
Simple black outline of a U-shaped connector or clamp (no text or symbols)natural_image
Illustration of a U-shaped connector with connectors and a central button (no text or symbols)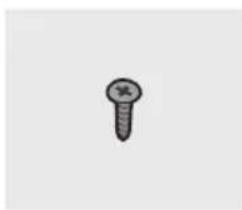
natural_image
Simple line drawing of a screw (no text or symbols)Varžtas (2 vnt.)
natural_image
Simple 3D-rendered mechanical component with no visible text or symbolsSaugumo rakto laikiklis (Stovo tipo)

natural_image
3D rendered mechanical part with a flanged base and cutout (no text or symbols)| HW-MS550 | HW-MS55C | HW-MS570 | HW-MS57C | HW-MS560 |
| HW-MS650 | HW-MS651 | HW-MS6500 | HW-MS6501 | HW-MS660 |
| HW-MS661 | HW-MS6510 | HW-MS6511 | HW-MS750 | HW-MS751 |
| HW-MS760 | HW-MS761 |
samsung.com/uk/aboutsamsung/samsungelectronics/corporate citizenship/data_corner.html
Montaż na ścianie
flowchart
graph TD
    A["Wireless"] --> B["HW-MS5XX/HW-MS6XX/HW-MS65XX"]
    B --> C["HW-MS7XX"]
| HW-MS550 | HW-MS55C | HW-MS570 | HW-MS57C | HW-MS560 |
| HW-MS650 | HW-MS651 | HW-MS6500 | HW-MS6501 | HW-MS660 |
| HW-MS661 | HW-MS6510 | HW-MS6511 | HW-MS750 | HW-MS751 |
| HW-MS760 | HW-MS761 |
samsung.com/uk/aboutsamsung/samsungelectronics/corporate citizenship/data_corner.html
flowchart
graph TD
    A["Wireless"] --> B["Switch with Wi-Fi"]
    B --> C["Device with USB port"]
    C --> D["Switch with USB port"]
    D --> E["Device with USB port"]
    E --> F["Switch with USB port"]
    F --> G["Device with USB port"]
    G --> H["Switch with USB port"]
    H --> I["Device with USB port"]
Tip un suport (WMN300SB, nefurnizat)
| HW-MS550 | HW-MS55C | HW-MS570 | HW-MS57C | HW-MS560 |
| HW-MS650 | HW-MS651 | HW-MS6500 | HW-MS6501 | HW-MS660 |
| HW-MS661 | HW-MS6510 | HW-MS6511 | HW-MS750 | HW-MS751 |
| HW-MS760 | HW-MS761 |
samsung.com/uk/aboutsamsung/samsungelectronics/corporate citizenship/data_corner.html
natural_image
Exterior view of a modern gray audio amplifier with a circular grille and supporting legs (no text or symbols visible)Sabvufer soundbar sistema Sound+
natural_image
Simple black outline of a U-shaped connector or clamp (no text or symbols)natural_image
Illustration of a U-shaped connector with connectors and a label (no text or symbols on the device itself)
natural_image
Simple line drawing of a screw (no text or symbols)Šrafovi (2 komada)
natural_image
Simple 3D-rendered mechanical part with no text or symbolsDržač za adapter (Tip postolja)

natural_image
3D rendered mechanical part with a stepped base and cutout (no text or symbols)flowchart
graph TD
    A["Wireless"] --> B["HW-MS5XX/HW-MS6XX/HW-MS65XX"]
    B --> C["HW-MS7XX"]
Sa jednom tačkom fiksiranja (WMN300SB, nije dostavljeno)
- Ne uklanjajte bežični dongl sa glavnog Soundbar uređaja.
Bežični dongl koji se isporučuje sa proizvodom se može koristiti sa kompletom bežičnih zadnjih zvučnika.
6. Proverite da li LED svetlo LINK neprekidno svetli (povezivanje je završeno)
Prednji deo bežičnog bas zvučnika
Indikator LINK LED prestaje da treperi i svetli tamnoplavom bojom kada se uspostavi veza između zvučnika Soundbar uređaja i bežičnog bas zvučnika.
7. Ukoliko se SWA-W700 ne poveže, preduzmite neophodne korake na osnovu statusa LED indikatora
| Status LED svetla Radnja | |||
| Plava | Uključeno | Povezano sa Soundbar uređajem | - |
| Treperi | Status pripravnosti veze | Proverite da li je Soundbar uređaj uključen | |
| Ponovite korake od 3 do 6. | |||
| Crvena Uključeno Veza nije uspostavljena | Proverite da li je Soundbar uključen | ||
1. Pritisnite dugme ID SET na donjoj strani bežičnog bas zvučnika vrhom olovke na 5–6 sekundi dok indikator LINK LED ne počne da treperi (plavom bojom).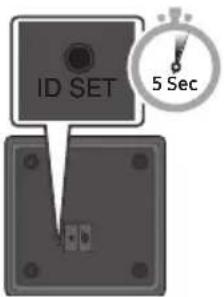 2. Ponovite korake od 3 do 6. 2. Ponovite korake od 3 do 6. | |||
| Ostalo - Greške | Kontaktirajte servisni centar kompanije Samsung. | ||
Kompatibilni modeli
| HW-MS550 | HW-MS55C | HW-MS570 | HW-MS57C | HW-MS560 |
| HW-MS650 | HW-MS651 | HW-MS6500 | HW-MS6501 | HW-MS660 |
| HW-MS661 | HW-MS6510 | HW-MS6511 | HW-MS750 | HW-MS751 |
| HW-MS760 | HW-MS761 |
- Lista modela je podložna promenama bez prethodne najave.
Ovim putem Samsung Electronics izjavljuje da je ova oprema u skladu sa direktivom 2014/53/EU. Kompletan sadržaj EU deklaracije o usaglašenosti je dostupan na sledećoj internet adresi: http://www.samsung.com; idite na Podrška > Pretraga podrške za proizvode i unesite naziv modela.
samsung.com/uk/aboutsamsung/samsungelectronics/corporate citizenship/data_corner.html
5. Zapnite zariadenie Soundbar
| HW-MS550 | HW-MS55C | HW-MS570 | HW-MS57C | HW-MS560 |
| HW-MS650 | HW-MS651 | HW-MS6500 | HW-MS6501 | HW-MS660 |
| HW-MS661 | HW-MS6510 | HW-MS6511 | HW-MS750 | HW-MS751 |
| HW-MS760 | HW-MS761 |
5. Vklopite zvočnik Soundbar
6. Preverite, ali kazalnik LINK LED sveti modro (povezava končana)

| HW-MS550 | HW-MS55C | HW-MS570 | HW-MS57C | HW-MS560 |
| HW-MS650 | HW-MS651 HW-MS6500 | HW-MS6501 HW-MS660 | ||
| HW-MS661 | HW-MS6510 | HW-MS6511 | HW-MS750 | HW-MS751 |
| HW-MS760 | HW-MS761 |
samsung.com/uk/aboutsamsung/samsungelectronics/corporate citizenship/data_corner.html.
© 2017 Samsung Electronics Co., Ltd. All rights reserved.
Contact SAMSUNG WORLD WIDE
If you have any questions or comments relating to Samsung products, please contact the SAMSUNG customer care Centre.
| Country Contact Centre | [IMAGE] | Web Site |
| ▪Europe | ||
| U.K 0330 SAMSUNG (7267864) | www.samsung.com/uk/support | |
| IRELAND (EIRE) 0818 717100 | www.samsung.com/ie/support | |
| GERMANY 06196 9340275 | www.samsung.com/de/support | |
| FRANCE 01 48 63 00 00 | www.samsung.com/fr/support | |
| ITALIA 800-SAMSUNG (800.7267864) | www.samsung.com/it/support | |
| SPAIN 34902172678 | www.samsung.com/es/support | |
| PORTUGAL 808 20 7267 | www.samsung.com/pt/support | |
| LUXEMBURG 261 03 710 | www.samsung.com/be_fr/support | |
| NETHERLANDS 088-9090100 (lokaal tarief) | www.samsung.com/nl/support | |
| BELGIUM 02-201-24-18 | www.samsung.com/be/support (Dutch)www.samsung.com/be_fr/support (French) | |
| NORWAY 815 56480 | www.samsung.com/no/support | |
| DENMARK 70 70 19 70 | www.samsung.com/dk/support | |
| FINLAND 030-6227 515 | www.samsung.com/fi/support | |
| SWEDEN 0771 726 786 | www.samsung.com/se/support | |
| POLAND | 801-172-678* lub +48 22 607-93-33 ** (koszt połączenia według taryfy operatora) | www.samsung.com/pl/support |
| HUNGARY | 0680SAMSUNG (0680-726-786)0680PREMIUM (0680-773-648) | www.samsung.com/hu/support |
| Country Contact Centre | Web Site | |
| AUSTRIA | 0800-SAMSUNG (0800-7267864) [Only for Premium HA] 0800-366661 [Only for Dealers] 0810-112233 | www.samsung.com/at/support |
| SWITZERLAND | 0800 726 78 64 (0800-SAMSUNG) | www.samsung.com/ch/support (German)www.samsung.com/ch_fr/support (French) |
| CZECH | 800 - SAMSUNG (800-726786) | www.samsung.com/cz/support |
| SLOVAKIA | 0800 - SAMSUNG (0800-726 786) | www.samsung.com/sk/support |
| CROATIA 072 726 786 | www.samsung.com/hr/support | |
| BOSNIA | 055 233 999 | www.samsung.com/support |
| MONTENEGRO | 020 405 888 | www.samsung.com/support |
| SLOVENIA | 080 697 267 (brezplačna številka) | www.samsung.com/si |
| SERBIA | 011 321 6899 | www.samsung.com/rs/support |
| BULGARIA | *3000 Цена в мрежата0800 111 31 , Безплатна телефонна линия | www.samsung.com/bg/support |
| ROMANIA | *8000 (apel in retea)08008-726-78-64 (08008-SAMSUNG)Apel GRATUIT | www.samsung.com/ro/support |
| CYPRUS | 8009 4000 only from landline, toll free | www.samsung.com/gr/support |
| GREECE | 80111-SAMSUNG (80111 726 7864) only from land line (+30) 210 6897691 from mobile and land line | |
| LITHUANIA 8-800-77777 | www.samsung.com/lt/support | |
| LAT VIA | 8000-7267 | www.samsung.com/lv/support |
| ESTONIA 800-7267 | www.samsung.com/ee/support | |