
SBCHC8410 - Hi-Fi System PHILIPS - Free user manual and instructions
Find the device manual for free SBCHC8410 PHILIPS in PDF.
| Product type | High-fidelity FM wireless audio system (headphones + transmitter) |
| Brand | Philips |
| Model | SBCHC8410 (transmitter HC8412, headphones HC8415) |
| Carrier frequency | 863.5 MHz (channel 1), 864.0 MHz (channel 2), 864.5 MHz (channel 3) |
| Transmission range | Up to 100 meters, omnidirectional (360°) |
| Modulation | FM (frequency modulation) |
| Radiated output power | <10 mW |
| Transmitter power supply | 12 V DC / 200 mA via mains adapter (SBC CS030/00) |
| Headphone power supply | 2 NiMH rechargeable batteries LR03/AAA (550 mAh) |
| Charging time | Approximately 16 hours for full charge |
| Audio frequency range (headphones) | 10 – 22,000 Hz |
| Signal-to-noise ratio | >60 dB (A-weighted) |
| Distortion | <0.5% THD |
| Channel separation | >30 dB |
| Main functions | Wireless transmission, mute, automatic on/off, automatic charging, manual tuning, 3 selectable channels |
| Audio inputs | 3.5 mm stereo audio input (headphones) and audio line input (RCA), use only one input at a time |
| Included accessories | Transmitter, headphones, mains adapter, 2 NiMH batteries, 2 m audio cable (3.5 mm stereo to 2 RCA), 3.5 mm to 6.3 mm adapter |
| Maintenance and cleaning | Clean with a slightly damp chamois cloth; do not use alcohol, thinner, or abrasive products |
| Safety | Do not expose to moisture, rain, sand, or excessive heat; use only the supplied adapter; do not use NiCd or alkaline batteries |
| Spare parts and repairability | Replaceable rechargeable batteries (NiMH LR03/AAA); transmitter and headphones not user-serviceable; contact dealer or customer service |
| General information | Complies with European R&TTE Directive 1999/5/EC; class 3 according to NET 300 445 |
Frequently Asked Questions - SBCHC8410 PHILIPS
User questions about SBCHC8410 PHILIPS
0 question about this device. Answer the ones you know or ask your own.
Ask a new question about this device
Download the instructions for your Hi-Fi System in PDF format for free! Find your manual SBCHC8410 - PHILIPS and take your electronic device back in hand. On this page are published all the documents necessary for the use of your device. SBCHC8410 by PHILIPS.
USER MANUAL SBCHC8410 PHILIPS
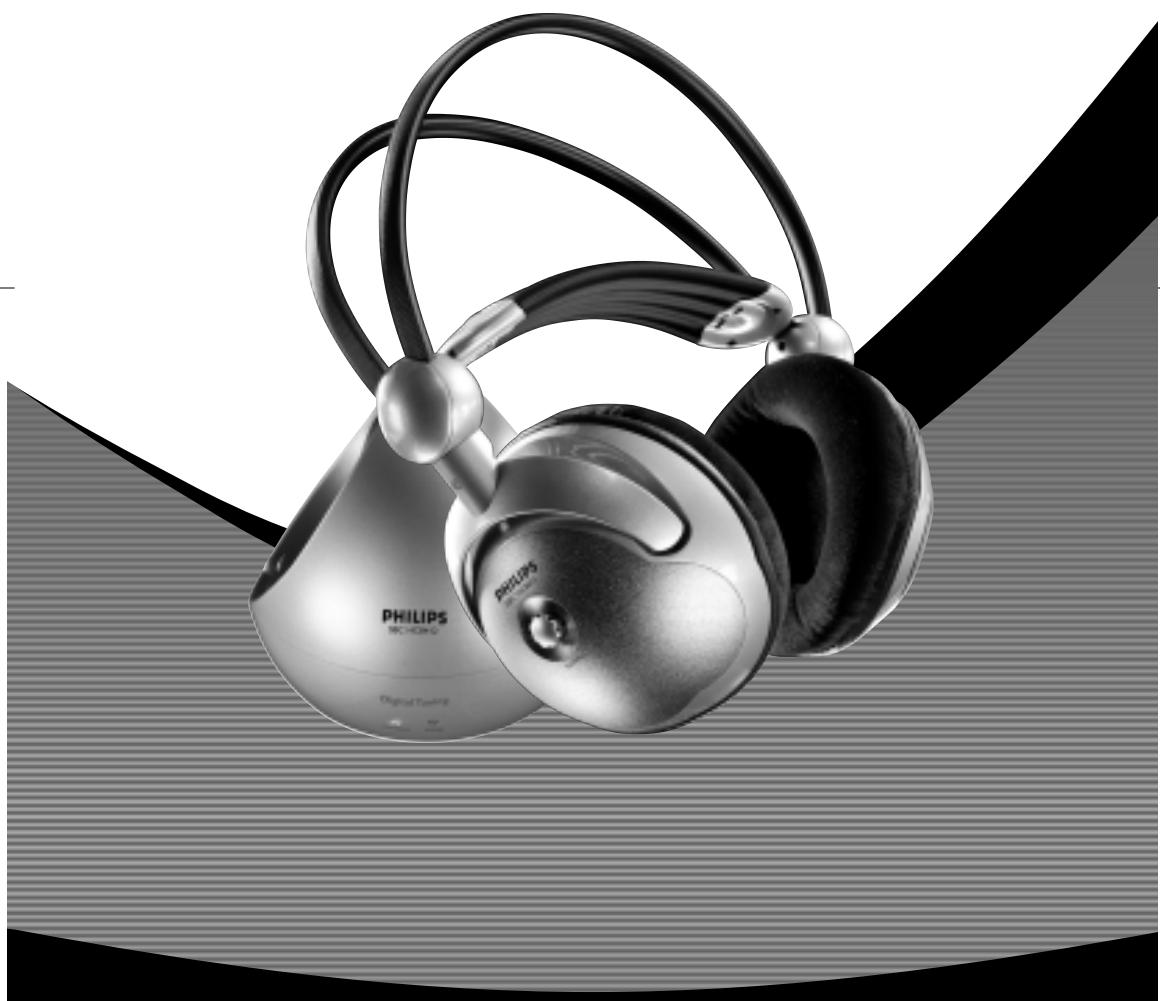
Wireless FM Stereo Headphone
Let's make things better.
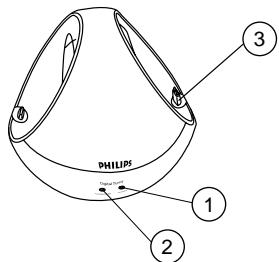
Figure 1
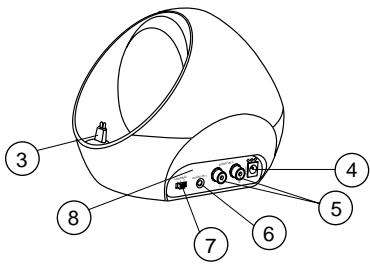

Figure 2
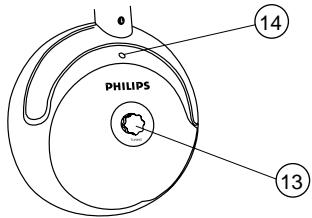
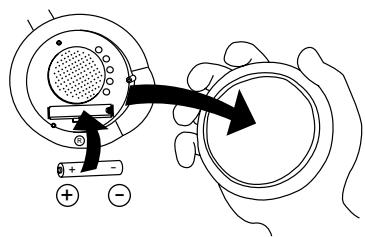
Figure 3

Index
| English | English-4 | Svenska-68 | Svenska |
| Français | Français-12 | Norge-76 | eGon |
| Espanol | Espanol-20 | Suomi-84 | Sonsi |
| Deutsch | Deutsch-28 | Russkii-92 | Polski |
| Nederlands | Nederlands-36 | Polski-100 | Polj |
| Italiano | Italiano-44 | Magyar-108 | Magyar |
| Portugues | Português-52 | Türkce-116 | Türkce |
| Dansk | Dansk-60 | Еλληνικá-124 | Еλνικá |
Introduction
General information
Congratulations!
You have just bought the most sophisticated FM wireless stereo sound system. This system uses the latest FM wireless technology, which gives you complete freedom of movement while enjoying your favorite music and movies. No more inconvenience from cables or headphone wires! To ensure you get the best performance from your FM wireless stereo sound system please read this manual carefully.
IMPORTANT
Read these instructions. All the safety and operating instructions should be read before using the wireless headphone system.
Check if the voltage indicated on the type plate of the adapter corresponds to the local mains voltage before connecting to the mains power supply.
Remove the batteries from the headphone's battery compartment and disconnect the adapter from the mains if the system is not in use for a long period.
Prevent fire or shock hazard: do not expose this equipment to humidity, rain, sand or excessive heat caused by heating equipment or direct sunlight.
Radio equipment for wireless audio applications is not protected against disturbance from other radio services.
IMPORTANT
Before using the FM headphone for the first time, please ensure that the batteries are fully charged for about 16 hours. This will guarantee a longer operating lifetime of the batteries.
Benefits of Philips latest RF/FM wireless technology
Wireless transmission
The FM transmitter transmits the stereo audio signal from your audio or video source to your FM headphone without wires.
Wide transmission range
Your FM headphone can receive signals up to 100 meters away.
High-frequency radio system
The FM headphone set uses a high radio frequency as the signal carrier, ensuring a very clear, sharp reception.
Mute function
Reduces the noise disturbance when the sound signal is too low or not available.
Automatic power on/off indicator
The FM transmitter automatically switches on and starts transmitting when audio signals are detected at the audio input (red LED). When no audio signals are detected the FM transmitter automatically switches off after a few minutes.
Automatic rechargeable system
The FM transmitter automatically recharges the headphone's built-in rechargeable LR03/AAA NiMH batteries. Just position the headphone on the transmitter and contact. The green LED lights up during charging.
Easy transmission
The FM headphone is able to receive signals from the transmitter, even through barriers such as doors, walls and windows.
Multiple headphones with one transmitter
An additional number of headphones and/or wireless speakers can be used with a single transmitter if they:
- operate in the 864 MHz band
- can detect a 19 kHz pilot tone
Please consult the appliance's electrical specification sheets for confirmation on compatibility.
Kit contents
This FM headphone system consists of the following accessories:
1 x SBC HC8412 FM transmitter
1xSBCHC8415FMheadphone
1 x SBC CS030/00 12Volt / 200mA AC/DC adapter (for UK: SBC CS030/05 12 Volt/ 200 mA AC/DC adapter)
2 x rechargeable batteries LR03/AAA (NiMH), 550 mAh
1 x 3.5 mm stereo plug to 2x RCA audio cable (2 m)
1 x 3.5 mm plug to 6.3 mm stereo adapter plug
Transmitter (figure 1)
1 Power indicator - lights up when audio signals are detected at the audio input.
2 Recharging indicator - lights up when headphone is replaced on the FM transmitter. Completely flat batteries will be fully charged after about 16 hours.
3 Recharging contact - make sure you align your headphone to this contact for recharging.
4 DC power - connect to the 12 Volt/ 200 mA AC/DC adapter
5 3.5 mm stereo headphone audio input - connects your FM transmitter to an audio source
6 Line audio input - alternative connection to an audio source.
IMPORTANT
Use only 1 of the audio inputs:
3.5 mm stereo headphone audio input OR the line audio input!
Using both audio inputs at the same time may damage your FM wireless system or your audio source!
7 Channel switch - select one of
3 channels for best reception. We advise you to select channel 1 as a first option.
8 Controls plate
Controls
Installation
Headphone (figure 2)
9 Power indication - lights up when in use. When batteries are low, the power indicator flashes, and you should recharge the headphone for about 16 hours before the next use.
10 Power On/Off - push the button to switch the headphone on/off.
11 Recharging contacts - align headphone to the transmitter, green recharging LED on the transmitter's front must switch on, indicating that the headphone is being recharged.
12 Volume - adjust volume to your desired listening level.
13 Tuning - Turn the tuning knob until the signal is at its clearest and the tuning indicator will light up.
14 Tuning indicator - lights up when receiving optimal transmission.
Transmitter power supply
IMPORTANT
Use only Philips SBC CS030/00
12 Volt/200 mA AC/DC adapter.
(For UK, use only Philips SBC CS030/05)
1 Make sure the adapter's rated voltage corresponds to the mains socket voltage.
2 Connect the DC connector of the AC/DC adapter to the 12 Volt DC power input connector located at the rear of the transmitter.
3 Connect the 12 Volt/200 mA AC/DC adapter to the mains socket. Always disconnect the AC/DC adapter if the transmitter is not to be used for a long period of time.
Headphone power supply
IMPORTANT
Use only rechargeable LR03/AAA NiMH batteries (preferably Philips). Do not use NiCd batteries or alkaline batteries as these may damage your FM wireless system!
1 Check if the power button of the FM headphone is in the on position.
2 When the red power indicator on the FM headphone starts flashing, it indicates that the batteries are running low.
3 To recharge the headphone's built-in rechargeable LR03/AAA NiMH batteries, position the headphone on the transmitter and contact.
Environmental Information
All redundant packing material has been omitted. We have done our best to make the packaging easily separable into two materials: cardboard and polyethylene
Your unit consists of materials which can be recycled if disassembled by a specialized company. Please observe the local regulations regarding the disposal of packing materials, exhausted batteries and old equipment.
Installation
Audio Connections
Notes:
Completely flat batteries need approximately 16 hours to recharge.
The FM headphone will switch off automatically during recharging.
Always remove the batteries if the headphone is not to be used for a long period of time.
Batteries contain chemical substances, so they should be disposed of properly.
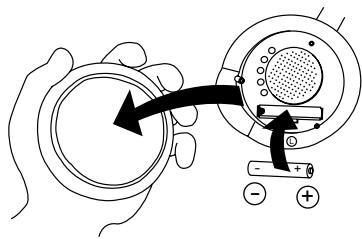
Headphone battery replacement (figure 3)
IMPORTANT
Use only rechargeable LR03/AAA NiMH batteries (preferably Philips).
Do not use NiCd batteries or alkaline batteries as these may damage your FM wireless system!
1 Remove the earcushions.
2 Take out the batteries and dispose of them properly.
3 Insert new batteries. Only use LR03/AAA NiMH batteries (preferably Philips).
4 Make sure the batteries are correctly inserted as indicated by the engraved symbols in the battery compartment.
5 Put the earcushions back on the earshells.
IMPORTANT
Before using the FM headphone for the first time, please ensure that the batteries are fully charged for about 16 hours. This will guarantee a longer operating lifetime of the batteries.
Audio Connections
IMPORTANT
Use only 1 of the audio inputs:
3.5 mm stereo headphone audio input OR the line audio input!
Using both audio inputs at the same time may damage your FM wireless system or your audio source!
Option 1 (figure 4)
Connecting the FM transmitter to a line output of an audio source, e.g. REC OUT, LINE OUT.
1 Connect the 3.5mm stereo plug of the stereo audio cable to the FM transmitter's 3.5mm headphone input.
2 Connect the 2 RCA plugs of the stereo audio cable to a line output (REC OUT or LINE OUT) of an audio source, e.g. TV, HiFi or PC:
- Check if the red RCA plug (right channel) is connected to the right channel (red) of the audio source.
- Check if the white RCA plug (left channel) is connected to the left channel (white) of the audio source.
3 Switch on your audio source. The red power indication LED of the transmitter lights up if receiving an audio signal.
4 In case the line output of the audio source has an adjustable output level, adjust the line output level of the audio source to the highest acceptable undistorted level.
5 Switch on the headphone. You may hear a hissing sound through the headphone if the headphone is not yet properly tuned to the transmitter.
6 To tune, turn the tuning knob until the signal is at its clearest and the tuning indicator will light up.
7 Adjust the volume to the desired level with the headphone volume control.
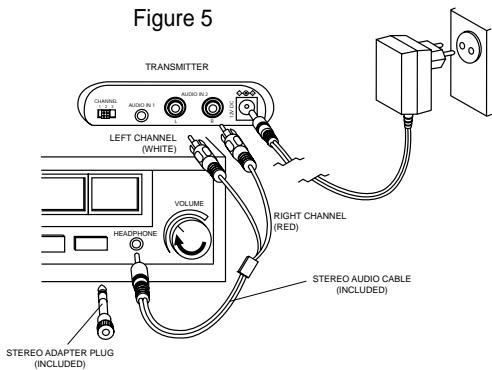
Option 2 (figure 5)
Connecting the FM transmitter to a headphone output of an audio source
IMPORTANT
Use only 1 of the audio inputs:
3.5 mm stereo headphone audio input
OR the line audio input!
Using both audio inputs at the same time may damage your FM wireless system or your audio source!
1 Connect the 2 RCA plugs of the stereo audio cable to the FM transmitter's audio input 2:
- Check if the red RCA plug (right channel) is connected to the right channel (red) of the FM transmitter's audio input 2.
- Check if the white RCA plug (left channel) is connected to the left channel (white) of the FM transmitter's audio input 2.
2 Connect the 3.5mm stereo plug of the stereo audio cable to the headphone output of an audio source, such as TV, HiFi or PC.
- In case your audio source has a 6.3mm headphone output, use the supplied 3.5mm to 6.3 mm stereo adapter plug.
3 Switch on your audio source and carefully increase the volume of the audio source. The red power indication LED of the transmitter lights up if receiving an audio signal.
4 Switch on the headphone. You may hear a hissing sound through the headphone if the headphone is not yet properly tuned to the transmitter.
5 To tune, turn the tuning knob until the signal is at its clearest and the tuning indicator will light up.
6 Adjust the volume to the desired level with the headphone volume control.
Basic operation
When the FM transmitter is connected to a:
- line output of an audio source, such as REC OUT or LINE OUT or
- headphone output of an audio source.
1 Switch on your audio source and carefully increase the volume of the audio source. The red power indication LED of the transmitter lights up if receiving an audio signal.
2 Switch on the headphone. You may hear a hissing sound through the headphone if the headphone is not yet properly tuned to the transmitter.
3 To tune, turn the tuning knob until the signal is at its clearest and the tuning indicator will light up.
4 Adjust the volume to the desired level with the headphone volume control.
Troubleshooting
If a fault occurs, first check the points listed below before taking the set for repair. If you are unable to remedy a problem by following these hints, consult your dealer or service centre.
WARNING: Under no circumstances should you try to repair the set yourself, as this would invalidate the warranty.
| Problem | Remedy |
| No sound | - Check if the AC/DC adapter is fully inserted into the AC outlet and that its DC connector is properly inserted into the 12 Volt DC input connector located at the rear of the transmitter.- Check if the headphone's on/off switch is in the on position.- Headphone batteries running low. Position the headphone on the transmitter and contact. (See Headphone power supply)- Check if the audio source is switched on and tuned to a channel with audio.- Volume not adjusted. Adjust the volume on the audio source/ headphone to a higher level.- Adjust the headphone's tuning frequency. Turn the tuning knob until the signal is at its clearest and the tuning indicator will light up.- Make use of the HC8412 transmitter. Some transmitters already built into other equipment may not be compatible with the HC8415 headphone because of the advanced technologies used in the HC8415 headphone. |
| Distorted sound | - Adjust the headphone's tuning frequency. Turn the tuning knob until the signal is at its clearest and the tuning indicator will light up.- Adjust the transmitter's frequency. Select any of the 3 channels of the transmitter. Next adjust the headphone's frequency by turning the tuning knob until the signal is at its clearest and the tuning indicator will light up.- Headphone batteries running low. Position the headphone on the transmitter and contact. (See Headphone power supply) |
Troubleshooting
| Distorted sound | - Check the volume on audio source/ headphone is not set at too high a level. Reduce the volume.- Distance from the transmitter is too large. Move closer to the transmitter.- Interference from fluorescent lamps/ other radio sources. Move transmitter or headphone elsewhere/ change the transmitter's channel.- Make use of the HC8412 transmitter. Some transmitters already built into other equipment may not be compatible with the HC8415 headphone because of the advanced technologies used in the HC8415 headphone. |
| Maintenance | - If the headphone will not be used for a long time, please remove the batteries to prevent leakage and corrosion.- Only replace the batteries with LR03/AAA NiMH batteries (preferably Phillips).- Do not leave the headphone near heat sources. Do not expose to direct sunlight, excessive dust, moisture, rain or any kind of mechanical shock.- Do not use alcohol, thinner or petroleum-based substances to clean the headphone or transmitter. Use a slightly dampened chamois cloth to clean the housing.- Do not use cleaning agents containing alcohol, spirits, ammonia or abrasives as these may harm the housing. |
Hearing Safety! Continuous use at a high volume may permanently damage your hearing.
Specifications
Regulations
| System: | Radio Frequency (RF) |
| Carrier Frequency: (Transmitter HC8412) | Channel 1: 863.5 MHz Channel 2: 864.0 MHz Channel 3: 864.5 MHz |
| Carrier Frequency: (Headphone HC8415) | 863.2 to 864.7 MHz (Manual tuning) |
| Modulation: | Frequency Modulation (FM) |
| Radiated Output Power: | <10m Watt |
| Effective Transmission Range: | up to100 meters, omni directional (360°) |
| Input level: | 500 mVrms (1 kHz sine wave) |
| Power supply – transmitter: | 12Volt / 200 mA DC, centre positive |
| Power supply – headphone: | 2 x LR03 (AAA) batteries (NiMH) |
| Frequency range (Headphone): | 10 – 22,000 Hz |
| Signal/Noise ratio: | >60 dB (1 kHz sine wave , A-weighted) |
| Distortion: | < 0.5% THD |
| Channel separation: | >30 dB |
European Regulations
This product has been designed, tested and manufactured according the European R&TTE Directive 1999/5/EC.
Following this Directive, this product can be brought into service in the following states:
R&TTE Directive 1999/5/EC
B

DK
E

GR X
F

IRL


L


A

P


S

N

D

CH
This product complies with class 3 requirements as set down in ETS 300 445.
Introduction
Specifications
Régulations
| B | ✓ | DK | ✓ | E | X | GR | X | F | ✓ |
| IRL | ✓ | I | X | L | ✓ | NL | ✓ | A | ✓ |
| P | ✓ | SU | ✓ | S | ✓ | UK | ✓ | N | ✓ |
| D | ✓ | CH | ✓ |
IRL√ I X L √ NL √ A √
P ✓ SU ✓ S ✓ UK ✓ N ✓
D V CHV
| B | ✓ | DK | ✓ | E | X | GR | X | F | ✓ |
| IRL | ✓ | I | X | L | ✓ | NL | ✓ | A | ✓ |
| P | ✓ | SU | ✓ | S | ✓ | UK | ✓ | N | ✓ |
| D | ✓ | CH | ✓ |
Stort transmissionsomrade
Transmitter (figur 1)
| B | ✓ | DK | ✓ | E | X | GR | X | F | ✓ |
| IRL | ✓ | I | X | L | ✓ | NL | ✓ | A | ✓ |
| P | ✓ | SU | ✓ | S | ✓ | UK | ✓ | N | ✓ |
| D | ✓ | CH | ✓ |
Dette produit overholder klasse 3 kravene, der er fastsat i ETS 300 445.
Inledning
Allman information
Grattis!
| B | ✓ | DK | ✓ | E | X | GR | X | F | ✓ |
| IRL | ✓ | I | X | L | ✓ | NL | ✓ | A | ✓ |
| P | ✓ | SU | ✓ | S | ✓ | UK | ✓ | N | ✓ |
| D | ✓ | CH | ✓ |
Dette Produktet er i overensstemmelse med kravene i classe 3 i henhold til ETS 300 445.
Onnittelumme!
| B | ✓ | DK | ✓ | E | X | GR | X | F | ✓ |
| IRL | ✓ | I | X | L | ✓ | NL | ✓ | A | ✓ |
| P | ✓ | SU | ✓ | S | ✓ | UK | ✓ | N | ✓ |
| D | ✓ | CH | ✓ |
AByTOMaTHUeCKn HAnKaTOp PHTaHnBkA
TpahcmntTep FM abTomatueckn
BkIOuAeTcN HauHnaeT nepeauy npn
NoCTyIaEHIN 3ByKObIX CnHaAOB Ha
3ByKOBOI BXoA (KpaChbl INDAKATOp).PpN
OTCYTCTBNN 3ByKObIX CNHaAOB
TpahcmntTep FM abTomatueckn
OTKIOuAeTcN Upe3 HeCKOaBKO MNHyT.
ABTomatnuecka cnCTema 3apAkn
TpahCMNTTep FM abTomatHueckn 3apjkaet BCTpoehhbie 6aTapeu LR03/AAA NiMH hayuHNIKOB. YcTaHOBInTe hayuHNIK Ha KOHTaKT TpaHCMNTepa.Bo Bpem3apJ4KN 6ydt TopeTb 3eAeHbI INHdIKaTOP.
Pnocta npeAaHa
Baun HayunKn FM MoryT noyatb cnHaIbOT TpaHcMNTTepa DaKe cKB03b TaKne IperpaDb, KaK DBePn, CTeHb N OKHa.
HeckoAboKoHayuHnKOB npn OaHOM TpaHcMntTepe
C OdHIM TpaHCMNTTepOM MOJHO
NCIOA3OBA Tb HECKoA bKO HayUHNIKOB I/ANI 6ecnpoBOAoADhIx DNHaMNIKOB, ECN OHN:
- pa60TaHOTB niooce 864 M
-MOYT PnHMaTb KOHTPOAbHbI CnHaA19 KfU
- IMeIOT IaEHTNCHIe IapaMeTpbl.
AIII pOBePKI COBMECTMIOCTN CM 3JIeKTPnueckne XapaKTepnCTNKYCTPOINCTBa.
CoCTaB KOMIIaEkTa
Baun HaynHK FM mMeOT cAeDyIOUne npHaAeXHOCtN
I x TpaHcmntTep SBC HC8412 FM
I x Hayshnki SBC HC8415 FM
I x aanTep SBC CS030/00 12 B/200 mA nepemeh/nocT
2xakmyaTOpHbie6aTapei LR03/AAA (NiMH),550mAh
IXIpeXOAnK3,5MMCTepeoHa2xRCA 3ByKOBoN Ka6eAb (2M)
IXepeoxoHNK3,5MMHa6,3MMCTepeo
TpaHcMMTTeP (pnc.1)
I NHANKATOP nHTaHn- 3aropaetc npi IIOyueHn 3ByKObblxCINHaIOB Ha 3ByKObOM BXOJe.
2 HAnKaTOp 3apAKn - 3aRopaTcnpu yCTaHOBKe HayUHINKOB Ha TpaHCmTTep. IIOHOCbIe CeBWe 6aTapeN 3apJXaOTcB TeueHne 16 YacOB.
3 3apAHybIKoHTaKT -AЯ 3apAaKIn y6eAHTecB B BblpaBnBaHmN 3TOrO KOHTaTc HayuHnKamn.
4Питанн eocToHHbIM TOKOM -noKIOHTe aAnTep 12 B/200 mA noCT/npeMeH ToKa
5 3BykoBoB BXoA Aa Ctepeo HayuHnKOB 3,5 MM -IOaKaIouaET TpaHCmTTep FM K 3ByKObOMy NCTOuyHnky
6 AnHeHbI 3ByKOBOB BxOa - AOIOAHHTeAIBHOe COeAnHEHne AAN 3ByKOBOI NCTOHHka.
BAXHOE 3AMEYAHNE
NcnoAbyTe ToAbyko OgnH 3ByKOBoB BXog: 3ByKOBoB BXog gA rCTepeo HayuHKnOB 3,5 MM HAn AHeHbI 3ByKOBoB BXog!
HcnoAb3OBAHHe 06Ohx 3ByKOBbIX BXogOB ogHOBpeMeHHo npHBegET K nobpeXgeHHIO 6ecnpoBOaOHou HCHCTeMbI FM HAN 3ByKOBORO HCTOuHHKa!
Hfopmaun no oxpae cpegb
ByaKOBke gannoro 60pygobHnO TcYCTbYeT H36bItoHybIMaTePnaA.Mbl oecneuHa AERKOCTb gA pa3geAehnMaTePnaAOB Ha gBe rpynnbl: KapTOH n noAn3THAEH.
Bawe yctpoictBO n3rOToBLaHo h3 MaTePhaAOB, KOtOpbIe MoXHO NOBtOpho nepepa6oTaTb KOMnAHnei, cneuaAHN3pHyUoSeiC8 gaHNo pa6oTa. Co6IoogaIte MeCTbIe npABHa no 36abAEHHIO OT 3THx MaTePhaAOB, HcNOAb3OBaHHbIX 6aTapeH n CTaporo 06opygobAHna.
Oprahbl ynpabAeHna
YctaHOBka
7 NepeKAIouaTeAb KaHaAOB - BbI6epiTe OINH 3 KaHaAOB ABy yAyUeHnI pInEMa. B KaueCTBe nepBoro BbI6opa peKoMeHdYem KaHaI I.
8 OpraHbI ynpabAeHnA
Hayushnkn (pnc.2)
9 INHAnKaTOp NHTaHn - TOPNT BO BpeM nCIOA3OBaHn. Pn CEBuNX 6aTapeAx INHAnKaTOp NTaHn MIRaET, N Bbl DOANKbI nepe3apn TB 6aTaepn B TeueHne He MeHee 16 yacob peed npoOAnKeHem nCIOA3OBaHn.
10ПитаннeВКA/BbIKA-нжMЛte3ТуKHOПИКУ
ДАВВКИОЧЕНЯ/BbIKAIOчЕнЯHayluHINIKOB
I KOnTaKbI AAnpe3apAKn - BbIOBHNrTe HayuHnIKN IN TpaHCmTTTep,Ha nepeAHe CTeHKe TpaHCmTTTepa DOAKeH 3aRopeTbC8 3eHbN INHAnkATOp, Yka3bIBaIOuN Ha IpoceC3apAKn HayuHnKOB.
12「Pomkoctb-OTpeympuYte ypoBeHb POMKOCTb DO HxKHO 3HaHeHn.
13 Hactpoika - noBepHnTe pyky NaCTPOKIN DO NOLUyeHnIy NCTOTO CnHaAn 3aTropaHnY INdNkATopa HactPOKI.
3aMeHa 6aTapeH HayuHHNKOB (pnc.3)
BAXHOE 3AMEYAHNE
HcnoAbyte ToAko
aKymyAToPbIe 6atapen LR03/AAA
NiMH (XeAaTeAho Philips).
He nCnoAbyTe 6aTapeu NiCd HAn IeauOHyIe, T.K. 3TO MoKet nobpeHtB Bawy 6ecnpobogHyIO cnCTemy FM!
CHIMMTEIOyUweKINAryuWe.
2 BbIbTe 6aTapeu N BbIb6pOcNte ux DOANKbIM O6pa3OM.
3 YcTaHOBnTe HOBbIe 6aTapeu. NcNoAByTe TOaBO LR03/AAA NiMH (KeAteHo Philips).
4 Y6eAnTeCb B TOM,чTo 6aTapei YCTaHOBAEHbI B COOTBECTBUN C BblrpaBNPOBaHHbIMHa OTCEKe DIA 6aTapei CMMBOAmN
5 YCTaHOBHTe IOndyUeKIN DAA yUeN Ha MecTo.
BAXHOE 3AMEYAHNE
Ipege hncnoAb3OBAHNem HauwhNKOB FM B nepBbni pa3 o6ecneneuBte nx noAHyIO 3apgky B TeueHne 16 yacob. 3To yBeAnuHbAet cpoK cayX6bl 6aTapei.
3ByKObbie coeAnHeHHa
BAXHOE 3AMEYAHNE
McnoAb3yIte ToAxbKO ogHH 3BykoBOB BXog: 3BykoBOB BXog gAra CTepeo HayuHKnOB 3,5 MM HAn AnHeiHbI 3BykoBOB BXog!
HcnoAb3OBAHHe 06Ohx 3ByKOBbIX BXogob ogHOBpeMeHHo npHBegET K NOBpeXgeHHIO 6ecnpoBOIoUHOH cHCTeMbI FM HAM 3ByKOBOrO HCTOuHHKa!
Bapnrt I (pnc.4)
ПоДКИОЧNTe TpaHcMnTTep FM K АнHeHOMY BbIXOy 3ByKOBOrO nCTOuHnKa, HaNP.. REC OUT, LINE OUT.
I OaKIOUHTe pa3bE M 3,5MM cTepeo 3ByKOBOrO Ka6eA KOBxOdy HayuHnKOB FM 3,5MM.
2 PoiKIOUHTe 2 pa3bEma RCA coeHNHTeAHorO Ka6eAa (20 cm) K HHeHOMy BbIXOdy (REC OUT nn LINE OUT) 3ByKOBOrO nCToUHnka,HaNP., TeAEBn3Opa, HiFi nn KomMbIoTepa:
- PpOBeBpTe npaBnIbHocTb IOkLIOUeHnKpaCHoro pa3bEma RCA (npaBbI KaHa)K BepHOMy KaHaLy (kpachbI) 3ByKOBOrO NCTOuHHka.
- PpOBeBpTe npaBnA hOcTb IOA KIAUOeHINr 6eIoro pa3bEma RCA (AeBbI KaHaI) (6eAbl 3ByKOBOrO nCTOCHNka).
3 BkIoUHTe 3ByKOBOINCTOCHNK.Ipn npIeMe 3ByKOBORo CnHHaAa 3arOpNTcKpaChbIn HAnKaTOp PntaHnCtAD TpaHCmTTepa.
4 Ecnn HnHeHbBbXoD 3ByKOBORO nCTOuHnKa NMeet peYnpyEmbBbXoD, OTpeYnpyTe NHeHbBbXoD aCaMOrO BbICOKOr HeNcKaJckEHHoro yPOBHA.
5 BkIoUHTe HayuHnKn. Bbl MoKeTe ycBlaWaTb ⅢIeHne,ecnHayuHnKne eJe He NOdCTPoeHbl K TpaHCmTTepy.
6 AЯ HacTpoiKIN NOBepHIne KHOIky HacTpoiKIN DO NOyueHnY NcTOrO CnHaHaN 3aTopaHn INdNkaTopa HacTpoiKn.
7 OtpereynpuIte ypoBeHbdo Heo6xOAMOTO 3HaueHnC PNOMOBIO KOHTPOAryPOBHNrPOMKOCTb HayUHNIKOB.
3ByKOBbIe COeAnHeHnA
BapnaHT 2 (pnc.5)
IopKAnOueHHe TpaHcMnTepa FM K BbIXoay HayuHHIOB 3ByKOBOrIOCTOuHHka
BAKHHOE 3AMEYAHNE
McnoAb3yIte ToAIBKO ogHH 3ByKOBOB BXog: 3ByKOBOB BXog gA rCTepeo HAYWHKOB 3,5 MM HAN ANHeHbI B3ByKOBOB BXog!
HcnoAb3OBAHHe 06Ohx 3ByKOBbIX BXogob ogHOBpeMeHHo npHBegET K NOBpeXgeHHIO 6ecnpoBOaOHNoCTeMbI FM HAN 3ByKOBOHO HcTOUHNka!
I POnAKnOuHTe 2 pa3bEma RCA coeAnHnTeBnHO Ka6eAa (20 cm) K AnHeiHomy BblXoDy (REC OUT nn LINE OUT) 3ByKOBOrO nCTOChNka,HaNP, TeLeBn3Opa, HiFi nn KomnbiOTepa:
- PpOBepbTe npaBnAhOcTb NIOKIAOChHn KaPacHOro pa3bEma RCA (npaBbI KaHaI) K BepHOMy KaHaLy (kpaChbI) 3ByKOBOrO nCTOuHHka.
- PpOBeBpTe npaBnA hOcTb NIOKIAOueHnRA 6eIoro pa3bEma RCA (AeBbI KaHaA) (6eBbI 3ByKOBOrO nCTOCHNka.
2 IoAikIOUHTe CTepeo pa3bE M 3,5MM CTepeo 3ByKOBOrO Ka6eAa (2M) K BblXOdy HayuHnKOB 3ByKOBOrO NCTOCHNka, HApP., TeAEBn3opa, HiFi nn KOMMbIoTepa.
- EcaBaa3BykoBoN HcToHnK NMeet BbIXoA DAra HayuHnKOB 6,3MM, NcnoAb3yIte nepexoAnHk 3,5MM Ha 6,3 MM.
3 YcTaHOBInTe NpeKIOUaTeA b BXOa TpaHCMnTTepa Ha 3 B.
4 BkAIOUHTe 3ByKOBOH NCTOCHNK INOCTepeHHo YBeAMyBte YpOBeHb.KpaChbINHAnKaTOp CNI, nITaHn TpaHCmTTepa 3aROPNTc, KOrda Ha Hero NoCTyINT CnHnA.
5 BkIoUHTe HayuHnKn. Bbl MoKeTe ycBbIwaTb IInneHne, ecn HayuHnKn eee He NOAcTPOeHbI K TpaHcMntTepy.
6 AHaHacTpoKn NOBepHnTe KHOIpKy HAcTPOkN DO NOLUyeHnY UcTOrO CnHaAa N3aTopaHn INDAHKaTOPa HAcTpoKn.
7 OtperyuynTe ypoBeHbdo Heo6xOAMoTO 3HaueHnC POMoIbIO KOHTPOA yPOBHa HayUHnKOB.
OchOBhble onepaunn
Korda TpaHcMMTTeP FM noKaHoueH K:
-ʌnHeɪHOMy BbIXOу 3ByKOBOrO nCTOuHnKa,
HaNP., REC OUT nn LINE OUT nn
- BbIXOу HayUHnKOB 3ByKOBOrO nCTOuHnKa.
BkAIOUHTe 3ByKOBOH NCTOCHNK INoCTeNEHHO yBeNHybTe yPoBeHb.KpaChbINHAnKaTOp CNI, nITaHn TpaHCmTTepa 3aROpNTcR, KOrDa Ha Hrero NoCTyNT CnHnA.
2 BkAIOHTe HayuHnKn. Bbl MOKeTe ycBbIwaTb HINHeHne,ecn HayuHnKne eJe He NOaCTPoeHbIK TpaHCmTTepy.
3 AHa HaCTpOKn NOBepHnTe KHOIpKy HaCTpOKn DO NOUyeHn YnCTOro CnHaHaN 3aTopaHn INDAkAToPa HaCTpOKn.
4 OtpereyIpyIte ypoBeHbdo Heo6xOAMORO 3HaueHnC IMOUbIO KOHTPOAryPOBHNrPOMKOCTb HayuHNIKOB.
YcTpaHHe HeNCnPaBHOCTe
Pn HncnpabHoctn nepeg TeM, KAc Hectu yctpoiCTBO B peMOHT ChaAAn npOBepbTe npBegehhbie Hxke nyHKtbl.
Ecan c nomoubIO 3THx yka3aHn Bam He ygaaoCb ycpaHntb HencnpabHocTb, CBXHTecc b BauHM gnaepom Hn OTgeAm pemOHTa.
PNEyIpyKAEHVE: Hn B Koem cayae He nbitaTecb peMOHTnoBaTb yctpoiCTBO CAMn, T.K. 3TO aHHyAnpye rapaTHIO.
YcTpaHHe HeNCnPaBHOCTeI
NcKaJeeHHbI 3ByK
- Y6eAInTeCb B TOM,чTo yPoBeHb 3ByKOBORO
NCTOHHa/ HayuHnKOB He yCTaHOBaeH CAnIJKOM BblCOKO.
YMeHbWnte yPoBeHb. - CAnIbKOM 6oAaOoe paCCTOAHne AO TpaHcMnTTepa.ymeHbNITE 3TO paCCTOAHne.
-Помени OT ФуорецHTьх Амп/ДугИХ ради Источников. ПеремecтITE Траимптети Нан hayшники.
-He ocTaBAAIe HauuHnKo OKOaTeNIO BbIX
HCTOCHNIKOB.He nOaBepraIe Te BO3eJcTBIO COAHeuHbIX
AyuEi, I36bIToUHOI PbIaN BlaIg,doXdYnn
MexAHnHeCKIM ydaPam. - IcnoAo3yTe TpaHCMnTep HC8412. HeKoTOpbIe BCTpoEHNbIe BdpyOe 6obopyoBaHnE TpaHCMnTepbMoTy 6bItb He CoBMeCTmMbI C HauShnKaMn HC8415 BCaDeCTBVe 60Aee COBpeMeHHoT ExHOAni, IcNoAo3OBaHHo B HauShnKax HC8415.
yxoA
- Ecn HayuHnKn He 6dyT nCNOa3ObaTbcra DOAroe Bpem, ydaNTe 6aTapen Any PpeoTbpaueHn Kopp0nnn npotequn.
- 3aMeHЯTe 6aTapeN ToAko Ha 6aTapeN LR03/AAA NiMH (XeAteAbo Philips).
-He ocTabaIyTe HayuHnKo OKOTo TeNIOBbIX NCTOCHIKOB.He nOaBepraTe BO3eJcTBIO COAHeYHBIX Ayei, H3bIToUHOI PbIaN BlaFIn, DOXdI IAM MexAHnHeCKIM yDaPam. - AЯ OUCNTKи HayuHnKOB IЯ TpaHcMHTTepa He IcnoA3yIte CInrP, paCTBOpNTeIIMI cy6ctaHcII N ha OCHOBe 6eH3Ha. IcnoA3yIte CJIeRka BlaJxHyIO MraKyIO TkaHb DЯ OUcNTKIpNyca.
- He nCnoλb3yIte aReHTOB, coDepeKαuixx amMnIAk, cNInPT, nnA6pa3Mbbl, yTO MOKeT IOBpeAHTb KOpNyc.
Бezonaacnoctb AЯ opraHOB cayxa! HenpepbIBHOe npocAunBaHne Ha BbICOKOM ypoBHe moKeT Heo6paTmO NOBnAryt b Ha Bauch cyx.
TexHnueckne xapaKTepeNCTnKN
PpaBnAa
R&TTE Directive 1999/5/EC
B √
DK
E X
GR X
F V
IRL
1x
NL
A √
P V
SU
s√
UK
N√
D V
CH√
AaHHe H3geAne cooTBecTBye Tpe6ObaHnM Kaacca 3 KaK yKa3aHO B ETS 300 445.
Gratulacja!
R&TTE Directive 1999/5/EC
| B | ✓ | DK | ✓ | E | X | GR | X | F | ✓ |
| IRL | ✓ | I | X | L | ✓ | NL | ✓ | A | ✓ |
| P | ✓ | SU | ✓ | S | ✓ | UK | ✓ | N | ✓ |
| D | ✓ | CH | ✓ |
R&TTE Directive 1999/5/EC
B√
DK
E X
GR X
F V
IRL
1x
L V
NL
A √
P V
SU
s√
UK
N√
D V
CH√
I x SBC HC8415 FM kulaklik
I × SBC CS030/00 12 Volt/200 mA AC/DC adaptor
2× sarj edilebilir piller LR03/AAA (NiMH), 550 mAh
1× 3,5 mm stereo fS 2× RCA ses kablosu (2 m)
1×3,5mmfis6,3mm stereo adaptör fisi
Iletici (sekil 1)
| B | ✓ | DK | ✓ | E | X | GR | X | F | ✓ |
| IRL | ✓ | I | X | L | ✓ | NL | ✓ | A | ✓ |
| P | ✓ | SU | ✓ | S | ✓ | UK | ✓ | N | ✓ |
| D | ✓ | CH | ✓ |
| B | ✓ | DK | ✓ | E | X | GR | X | F | ✓ |
| IRL | ✓ | I | X | L | ✓ | NL | ✓ | A | ✓ |
| P | ✓ | SU | ✓ | S | ✓ | UK | ✓ | N | ✓ |
| D | ✓ | CH | ✓ |
Autó to npoióv nnpoí tis anaiñóεiç Tg κaŋnyopiác 3 σπως éxouv kaθopioTei στο npórūno EYT 300 445.
- Index
- Introduction
- General information
- Congratulations!
- IMPORTANT
- Benefits of Philips latest RF/FM wireless technology
- Wireless transmission
- Wide transmission range
- High-frequency radio system
- Mute function
- Automatic power on/off indicator
- Automatic rechargeable system
- Easy transmission
- Multiple headphones with one transmitter
- Kit contents
- Transmitter (figure 1)
- Controls
- Installation
- Headphone (figure 2)
- Transmitter power supply
- Headphone power supply
- Environmental Information
- Audio Connections
- Headphone battery replacement (figure 3)
- Option 1 (figure 4)
- Option 2 (figure 5)
- mm stereo headphone audio input
- OR the line audio input!
- Basic operation
- Troubleshooting
- European Regulations
- Stort transmissionsomrade
- Transmitter (figur 1)
- Inledning
- Allman information
- Grattis!
- Onnittelumme!
- AByTOMaTHUeCKn HAnKaTOp PHTaHnBkA
- ABTomatnuecka cnCTema 3apAkn
- Pnocta npeAaHa
- HeckoAboKoHayuHnKOB npn OaHOM TpaHcMntTepe
- CoCTaB KOMIIaEkTa
- TpaHcMMTTeP (pnc.1)
- BAXHOE 3AMEYAHNE
- Hfopmaun no oxpae cpegb
- Oprahbl ynpabAeHna
- YctaHOBka
- 3aMeHa 6aTapeH HayuHHNKOB (pnc.3)
- 3ByKObbie coeAnHeHHa
- Bapnrt I (pnc.4)
- 3ByKOBbIe COeAnHeHnA
- BapnaHT 2 (pnc.5)
- BAKHHOE 3AMEYAHNE
- OchOBhble onepaunn
- YcTpaHHe HeNCnPaBHOCTe
- YcTpaHHe HeNCnPaBHOCTeI
- NcKaJeeHHbI 3ByK
- yxoA
- Gratulacja!
- Iletici (sekil 1)
Brand : PHILIPS
Model : SBCHC8410
Category : Hi-Fi System