iDX 120 iE - Earphones BEYERDYNAMIC - Free user manual and instructions
Find the device manual for free iDX 120 iE BEYERDYNAMIC in PDF.
| Product type | In-ear headphones |
| Brand | Beyerdynamic |
| Model | iDX 120 iE |
| Category | Headphone |
| Transducer type | Dynamic |
| Frequency response | 20 Hz – 20 kHz |
| Impedance | 32 Ω |
| Sensitivity | 105 dB SPL |
| Weight | Approx. 15 g |
| Cable length | Approx. 1.2 m |
| Connector | 3.5 mm jack plug |
| Control | 3-button remote with integrated microphone |
| Microphone | Integrated |
| Compatibility | Apple and compatible devices (via included extensions) |
| Ear tips included | 7 pairs of silicone ear tips in different sizes |
| Included accessories | 2 extensions (Apple and non-Apple), VoIP adapter, two-pair adapter, cable clip, soft case |
| Care | Clean ear tips with a soft damp cloth, do not use solvents |
| Safety | Set volume to minimum before insertion; do not use in public traffic; avoid sudden movements |
| Spare parts available | Ear tips, adapters, case (references in manual) |
| Warranty | Warranty void if unauthorized opening |
| Usage | Music listening, VoIP telephony |
Frequently Asked Questions - iDX 120 iE BEYERDYNAMIC
User questions about iDX 120 iE BEYERDYNAMIC
0 question about this device. Answer the ones you know or ask your own.
Ask a new question about this device
Download the instructions for your Earphones in PDF format for free! Find your manual iDX 120 iE - BEYERDYNAMIC and take your electronic device back in hand. On this page are published all the documents necessary for the use of your device. iDX 120 iE by BEYERDYNAMIC.
USER MANUAL iDX 120 iE BEYERDYNAMIC
Thank you for selecting the iDX 120 iE | iDX 160 iE in-ear headphone. Please take a few minutes to read these instructions carefully before using the product.
1. Safety Instructions
Warning: When connecting the in-ear headphone, make sure that you have
turned the volume down to the minimum. Adjust the volume only after the in-ear headphones are in place. To avoid any potential damage to your hearing, do not use the in-ear headphones at loud volumes for extended periods of time. As a rule of thumb, when you have the in-ear headphones on, set the volume to a level at which you can still hear your own voice when you speak at a normal volume while listening.
We would like to point out that listening at high volumes over a long period of time may damage your hearing irreversibly.
Make sure that the set volume is not too high. Rule of thumb: The higher the volume, the shorter the time of listening. According to employer's regulations for safety and health the noise exposure should not exceed 85 dB (low volume) when working with an allowed time of listening of 8 hours at maximum. If the volume is increased by 3 dB, the allowed time of listening is halved, i.e. with 88 dB the time of listening is 4 hours, with 91 dB 2 hours and so on.
Danger!
In-ear headphones dramatically reduce your ability to hear ambient noise. Using the in-ear headphones while in road traffic is potentially very dangerous and is therefore prohibited by law. Also, please make sure that you do not use your in-ear headphones when in the vicinity of possibly dangerous machines and tools.
Risk of injury!
When wearing wired in-ear headphones, avoid any sudden movements. You could seriously injure yourself, especially if you have any piercings or wear earrings or glasses, etc. that can get caught in the wire.
Altered auditory perception
Many people need some time to get used to wearing in-ear headphones. Your auditory perception of your own voice and body, and even the sounds in your inner ear while walking, are different from "normal" situations when you are not wearing an in-ear headphone. This strange sensation will usually abate after wearing in-ear headphones for a while.
2. Eartips
Selecting the right eartips
Your in-ear headphone is supplied with different sets of eartips made of silicone or foamed material.
Select the right size of eartips before using the in-ear headphone. You can find out which eartips fit best by trying on each of the different eartips one after another with the headphones, placing the eartips carefully inside your ear. The eartips are the right size if they do not fall out when you move your head moderately quickly and you can hear the low-frequency bass sounds clearly and ambient noises only slightly.
iDX 160 iE: When using the T-400 foam eartips from Comply™
- Roll the eartip attached to the in-ear headphone between your fingers into a tight cylinder.
- Pull the ear slightly upward with one hand and insert the rolled eartip deep into the ear canal with the other.
- Use a finger to hold the in-ear headphone in place until the eartip has expanded and in place until it has expanded and is in a secure and comfortable position.
Maintenance of the eartips
- Use a soft, damp cloth to clean the eartips of your in-ear phones regularly, drying them afterwards with a soft cloth.
- Never use chemical agents, such as solvent-based cleaner, to clean your eartips. Such agents can corrode the eartips.
- When you are not using the in-ear headphones, store them in the case provided.
How to change the eartips
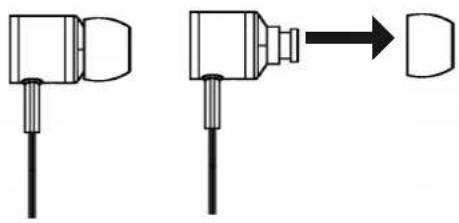
- Remove the eartip from the in-ear headphone.
- Clean the nozzle of the in-ear headphone of any debris by using a soft, damp cloth. Make sure that no liquid will enter the nozzle. Use a soft cloth to dry the nozzle.
- Attach the new eartip to the in-ear headphone.
- We recommend replacing the eartips after 3 months of regular use.
- For replacement of silicone eartips, please visit the spare parts store on the beyerdynamic website.
Visit us at http://shop.beyerdynamic.de/ersatzteile. Select your model from the list and complete your purchase online.
- iDX 160 iE: For replacement of foam eartips from Comply™, please visit www.complyfoam.com, where shops will be listed to order the eartips. Used types of the eartips: T-400
3. Connection
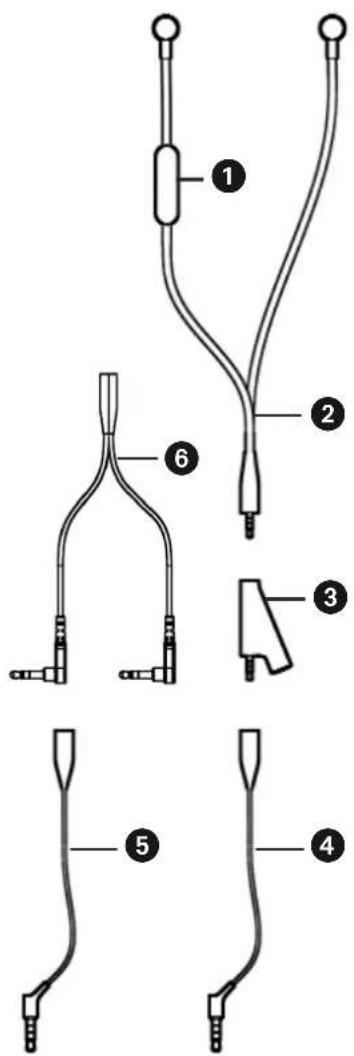
3按钮 controller
Connecting cable with jack plug
Adapter plug with jack sockets (top and bottom) and jack plug
4 Extension cable for Apple and compatible devices with jack socket (top) and jack plug with white isolation rings (bottom)
Extension cable for devices incompatible to Apple with jack socket (top) and jack plug with black isolation rings (bottom)
VolP adapter with jack socket (top) and two jack plugs (bottom)
How to connect to Apple and other compatible devices The connecting cable 2 of the in-ear headphone has a mini stereo jack plug to connect directly to your iPod, iPhone, iPad or compatible devices.
- If you would like to extend the connecting cable, connect the jack plug of the in-ear headphone to the jack socket of the supplied extension cable for Apple devices (jack plug with white isolation rings).
How to connect to devices incompatible to Apple
Depending on the device, use the extension cable ④ or ⑤ for a proper function. You can simply try out the cables without worrying that the player could be damaged.
How to connect the adapter plug for two in-ear headphones
By using the adapter plug 3 you can connect two in-ear headphones to one device.
- Connect the jack plug of the in-ear headphone to the upper jack socket of the adapter plug 3.
- Connect the appropriate extension cable 4 or 5 to the jack plug of the adapter plug 3.
- Connect another headphone to the lower jack socket of the adapter plug 3.
How to connect the VoIP adapter
If you would like to connect the in-ear headphone to a PC or laptop for phone calls over the internet, please use the supplied VoIP adapter 6.
- Connect the jack plug of the in-ear headphone to the jack socket of the supplied extension cable 4.
- Connect the jack plug of the extension cable 4 to the jack socket of the VoIP adapter 6.
- Connect the two jack plugs of the VoIP adapter 6 directly to your PC or laptop. The plugs for microphone and headphone are marked accordingly.
4. How to operate the 3-button controller with Apple devices
Via a 3-button controller with integrated microphone incorporated in the cable you can jump to selected titles or make phone calls with your Apple device while listening to music.

Music playback
- Press the middle button to stop the music. Press the middle button again to start the music.
- Press the middle button twice quickly to track forward.
- Press the middle button once quickly and hold it to fast forward.
- Press the middle button three times quickly to jump to the beginning of the title or to track backward.
- Press the middle button twice quickly and hold it to fast backward.
Incoming calls
- Press the middle button once quickly to answer an incoming call. Press the middle button once again to end the call.
- Press and hold the middle button for about 2 seconds to reject an incoming call.
- Press the middle button once to accept another incoming call. Press the middle button once again to return to the original call.
Increase volume
- Press the + button to increase the volume.
Reduce volume
- Press the - button to reduce the volume.
Note
- The remote and mic are supported only by iPhone 3GS or later, iPad, iPod touch (2nd generation or later), iPod classic (120GB, 160 GB), and iPod nano (4th generation or later). The remote is supported by iPod shuffle (3rd generation or later). Audio is supported by all iPad and iPod models.
5. How to operate the 3-button controller with devices incompatible to Apple
- For the function of the microphone select the appropriate extension cable ④ or ⑤
- The functionality of the middle button depends on the device you are using.
- The + button and - button do not work.
6. Service
If you require service, please contact qualified service personnel or directly: beyerdynamic Service- und Logistik Center
E-mail: service@beyerdynamic.de
Dismantling the in-ear headphone yourself will invalidate the guarantee.
7. Supplied accessories
- 2 × extension cables
- 1 x adapter for VoIP
- 1 x cable clip
- 1 x adapter plug for two in-ear headphones
- iDX 120 iE: Soft carry bag
- iDX 160 iE: Hard carry case
- 7 pairs of silicone eartips in different sizes
- iDX 160 iE: 1 pair of Comply™ T-400 foam eartips, size M, black
8. Spare parts
Adapter for VoIP. 908.452
Adapter plug for two in-ear headphones . Order # 912.786
Set of 2 extension cables . Order # 912.638
iDX 120 iE: Soft carry bag . Order # 914.045
iDX 160 iE: Hard carry case . Order # 914.207
Set of 7 pairs of silicone eartips and cable clip. . . . . Order # 912.611
ComplyTM T-400 eartips .www.complyfoam.com
9. Disposal
This symbol on the product, in the instructions or on the packaging means that your electrical and electronic equipment should be disposed at the end of its life separately from your household waste.
There are separate collection systems for recycling in the EU. For more information, please contact the local authority or your retailer where you purchased the product.
10. Technical specifications
You will find the technical specifications for this product on the packaging or internet at www.beyerdynamic.com.
1011
enll
Bocnpon3BeedeHne My3bikalhblx npoun3BeedeHH
- Haxmnte ceHtpaIbHyIO KhoNky, yTo6bl OCTaHOBnTB BOCnpOu3BeDeHne. IobTOpho Haxmnte ceHTpaIbHyIO KhoNky, yTo6bl BO3ObHOBnTB BOCnpOu3BeDeHne.
-ДвждынжмITEцentpaNBHyO KHONky, He ydepxnBaay ee, YTO6bl nepeynK cnedyuOseKOMN03nU. - Дя порokрууновая Впебед одн pa3 бioc tro НжмITE цentpaalbHyю KhoIGNky
- удахивайе ee нахатои.
- Tpnxdkbl 6bictpo haxmnte uehtpaIbHyIO KhoNky, yTo6bl npeeyTN K haay npOnrpbIbAemO nn K npdeIduyueKOMNo3nU.
- Дя порокуниня назад дыбьбьбьсро habKMITE ueHTpaIbHyIO KhoNky udepxuBaTe ee HaxaToi.
Bbl3OBbl
- Haxmnte ceHTpaIbHyIO KONky, yTO6bl npHnTb BXOJaun Bbl3OB. NobTOpHO haxmTe ceHTpaIbHyIO KONky, yTO6bl 3aBepwnTb Bbl3OB.
- YdepxnBaIte ueHTpaIbHyIO KHOKNy HaxaToB TeueHne npm. 2 cekyn, yTO6bl OTKNO-HNTb BXOJaun Bbl3OB.
- Haxmnte uehtpaIbHyIO KhoNky OINH pa3, TTo6bl npn BxOJaIeM BblOBe dpyoro yuct-Hnka npnHaTb erO. NobTOpHO haxmnte ueHTpaIbHyIO KhoNky, TTo6bl nepeKluOHTbcr N npoDoJXHTb nepBbI pa3roBOp.
YBeJIuYeHne rPOMKoCTn
HaXMMTe KHOKNy + ,YTO6bl yBENuHTb rPOMKoCTb.
UmeHbWeHne rpomKoCTn
HaXMMTe KHONKy «-», YTO6bl yMeHbWntb rPOMKOCTb.
Yka3aHne
- IpeeklouateIb n Mnkpofoh noDepxNBAOTc Tolbko iPhone 3GS nnn 6oJee no3dHmNBercnAm, iPad, iPod touch (2 noKoJIeHne nn 6oJee no3dHne Bercn), iPod classic (120GB, 160GB) n iPod nano (4 noKoJIeHne nn 6oJee no3dHne Bercn). IpeeklouateIb noDepxNBAETc iPod shuffle (3 noKoJIeHne nn 6oJee no3dHne Bercn). FyHKcun aydno noDepxNBAOTc BCem moJeMa iPad n iPod.
5. Yka3aHnI NO nCNoB3OBaHnIO 3-x KHONoUHOro BbIKNoUaTeIa IyCTpoiCTB, He-COBMeCTnMbIX c Apple
-ДяИСПОЛБЗOBAHЯ MнКрофОна ВьбepиTe COOTBETCTByUOиуДиHHTeJIb 4 ИИ 5.
Ha3haeHne ceHTpaIbHOK HONKn 3aBNCIT OT COOTBeTCTBYIOeYOcTPOINCTBa.
KHOKNKn «+» n «-» He nCNoJIb3yIOCTc.
6.ObcnyxmbaHne
Ipn Heo6xoJIMOCn TexHueckoro 6cnyXuBaHHaNcJeDyET 6paataBcK aBTOp3nPOBaH-HOMy TexHueckOMy CneuaJIncTy IIN HENOCpeCTBeHHO B:
Tekepe-epexoHnK IyBx BCTaBbIX HayuHkoB 912.786
Ha6op ydlnHnteJe c 2 Ka6eJMaMn .No 3aKa3a 912.638
iDX 120 iE: mrgkn yTnp. No 3aka3a 914.045
iDX 160 iE: TbepyTlaP .No 3aKa3a 914.207
KoIJIeKT n3 7 nap cnIIIOHOBbIX BkJaIbIwei
Ka6eIbHoro 3aXIma No 3aKa3a 912.611
BklaDbIuN ComplyT-400 .www.complyfoam.com
9. Ytulna
IIO 3aBepWeHn EKcNpyatauH NTo H3dEIne He yTuHn3npyeTc BMeCTe C O6bIHyBIM 6bITOBbIM MyCOPOM, a CdaetcYpe3 NyHK Tc6opa OTcLyXHBwero 3JeK-TPnuEcKO r N 3JeKTPoHHOrO 06OpyDObAHn dIra BTOpUHOrO NCNoJIb3OBaHn. Ha 3To yKa3bIBaET CmBOJ Ha N3dEHN, pyKOBODCTBe IIO 3KcNpyaTaunn nn ypaKOBke.
10. TexHnueckne daHHbIe
Texnueckne daHHbI npBedeHbI Ha ynaKOBke; nx taKxe MOxHO haHTN B cETn INTepHET no aDpecy:
www.beyerdynamic.com.
in-01Ih IeHJnJnJnJnJnJnJnJnJnJnJnJnJnJnJnJnJnJnJnJnJnJnJnJnJnJnJnJnJnJnJnJnJnJnJnJnJnJnJnJnJnJnJnJnJnJnJnJnJnJnJ n J n J n J n J n J n J n J n J n J n J n J n J n J n J n J n J n J n J n J n J n J n J n J n J n J n J n J n J n J n J n J n J n J n J n J n J n J n J n J n J n J n J n J n J n J n J n J n J n J n J n
2. 册哭01
上
in-0|Ie IeFosn is selirk and sfoi jatil of ferer giz kifoe i netw hagc qngd. niD.
iPad, iPhone, iPod, iPod classic, iPod nano, iPod shuffle, and iPod touch are trademarks of Apple Inc., registered in the U.S. and other countries.
beyerdynamic GmbH & Co. KG
Theresienstr. 8174072 Heilbronn - Germany
Tel. +49 (0) 7131 / 617 - 0 | Fax +49 (0) 7131 / 617 - 204
info@beyerdynamic.de | www.beyerdynamic.com
For further distributors worldwide, please go to www.beyerdynamic.com