304950 - Power bank Brandson - Free user manual and instructions
Find the device manual for free 304950 Brandson in PDF.
| Product type | Programmable timer for DIN rail |
| Brand | Brandson |
| Model | 304950 |
| Input voltage | 230 V AC, 50 Hz |
| Maximum load | 16 A (resistive), 2 A (inductive), 3680 W |
| Protection type | IP20 |
| Protection class | II |
| Overvoltage category | 4 kV |
| Operating temperature | -10 °C to +40 °C |
| Backup battery | NiMH 1.2 V, autonomy >100 hours |
| Number of programs | 10 ON/OFF cycles |
| Day combinations | 16 combinations (individual days or blocks) |
| Display | 12/24 hours, daylight saving time, status LED |
| Functions | ON/AUTO/OFF modes, reset, manual programming |
| Use | Indoors only, DIN rail mounting |
| Maintenance | Disconnect and wipe with a dry cloth |
| Safety | Do not use with heating elements, do not immerse |
| Dimensions (approx.) | Standard for DIN rail (approx. 36 x 90 x 60 mm) |
| Weight | Approximately 150 g |
| Package contents | Programmable timer, instruction manual |
Frequently Asked Questions - 304950 Brandson
User questions about 304950 Brandson
0 question about this device. Answer the ones you know or ask your own.
Ask a new question about this device
Download the instructions for your Power bank in PDF format for free! Find your manual 304950 - Brandson and take your electronic device back in hand. On this page are published all the documents necessary for the use of your device. 304950 by Brandson.
USER MANUAL 304950 Brandson
ENG: Latest information, drivers, user manuals and data sheets can be found at www.ganzeinfach.de in our download area.
Thank you for choosing a Brandon product. Please read the following user manual carefully so as to get the most from the product you have purchased. Before using the product, first check that the delivered item is complete, accurate and undamaged.
1. Scope of delivery
DIN rail timer
- User manual
2. Technical data
| Input voltage 230 V AC 50 Hz | |
| Maximum load 16 (2) A, 3680W μ | |
| Operating temperature -10°C to +40°C | |
| Backup battery NiMH 1.2 V (> 100 hours) | |
| Min setting time 1 minute | |
| Protection class II | |
| Protection category IP20 | |
| Degree of soiling 2 | |
| Creep resistance PTI 175 | |
| Overvoltage category | 4kV |
3. Important tips
Do not connect any devices, where the current of 16 (2) A is exceeded. If you need to clean the product, first disconnect the timer completely from the mains, remove it from the rail and wipe the device using a dry cloth. Never immerse the timer in water or other liquids! Heaters and similar devices should never be left unattended during operation. The manufacturer recommends not connecting any such devices to the timer.

- Only for use in dry interiors
- Do not insert / connect in series
- Disconnected only when the plug is removed
-
Do not use with heating elements (e.g., heaters, irons, kitchen appliances, etc.)
-
Do not connect any devices whose load exceed the rated capacity.
- Make sure that you disconnect the circuit before connecting the device.
- The device should only be installed and connected by qualified technicians!
3.1 Intended use
The timer is mounted on a DIN rail and is provided as a timer switch for electrical devices with 230 V AC (alternating voltage). The timer has 20 programmable switching times (10 ON and 10 OFF times).
The maximum input current of a connected device should not exceed a resistive load of 16 A and an inductive load of 2A. The device is suitable for DIN rails only. It should only be used in dry, closed rooms. Avoid contact with moisture under all circumstances.
Do not reconfigure or modify the product in any way for safety reasons. The device may be damaged if you use the product for any other purpose than that described above. Improper use can also result in hazards such as short circuits, fire or electric shock. Read the user manual carefully and keep it in a safe place. Please include the user manual if you pass the product onto others.
4. Functional overview
The timer provides the following functions and setting options:
10 ON/OFF programs
Output LED display
ON / AUTO /OFF function
12/24 hour display
- Summer time function
16 combinations of days or blocks of days
The individual days of the week are shown in the timer LC display in the form of English abbreviations. The following table shows the abbreviations and the corresponding day of the week:
The above table shows an overview of the combinations that can be selected for the respective days of the week.
4.1 Operating elements
| Mo | Monday |
| Tu | Tuesday |
| We | Wednesday |
| Th | Thursday |
| Fr Friday | |
| Sa | Saturday |
| Su | Sunday |
| No. | Weekdays No. Weekdays | ||
| 1 Mo | 9 Mo, Tu, We, Th, Fr | ||
| 2 Tu | 10 Sa, Su | ||
| 3 We | 11 Mo, Tu, We, Th, Fr, Sa | ||
| 4 Th | 12 Mo, We, Fr | ||
| 5 Fr | 13 Tu, Th, Sa | ||
| 6 Sa | 14 Mo, Tu, We | ||
| 7 Su | 15 Th, Fr, Sa | ||
| 8 Mo, Tu, We, Th, Fr, Sa, Su 16 Mo, We, | Fr, Su | ||
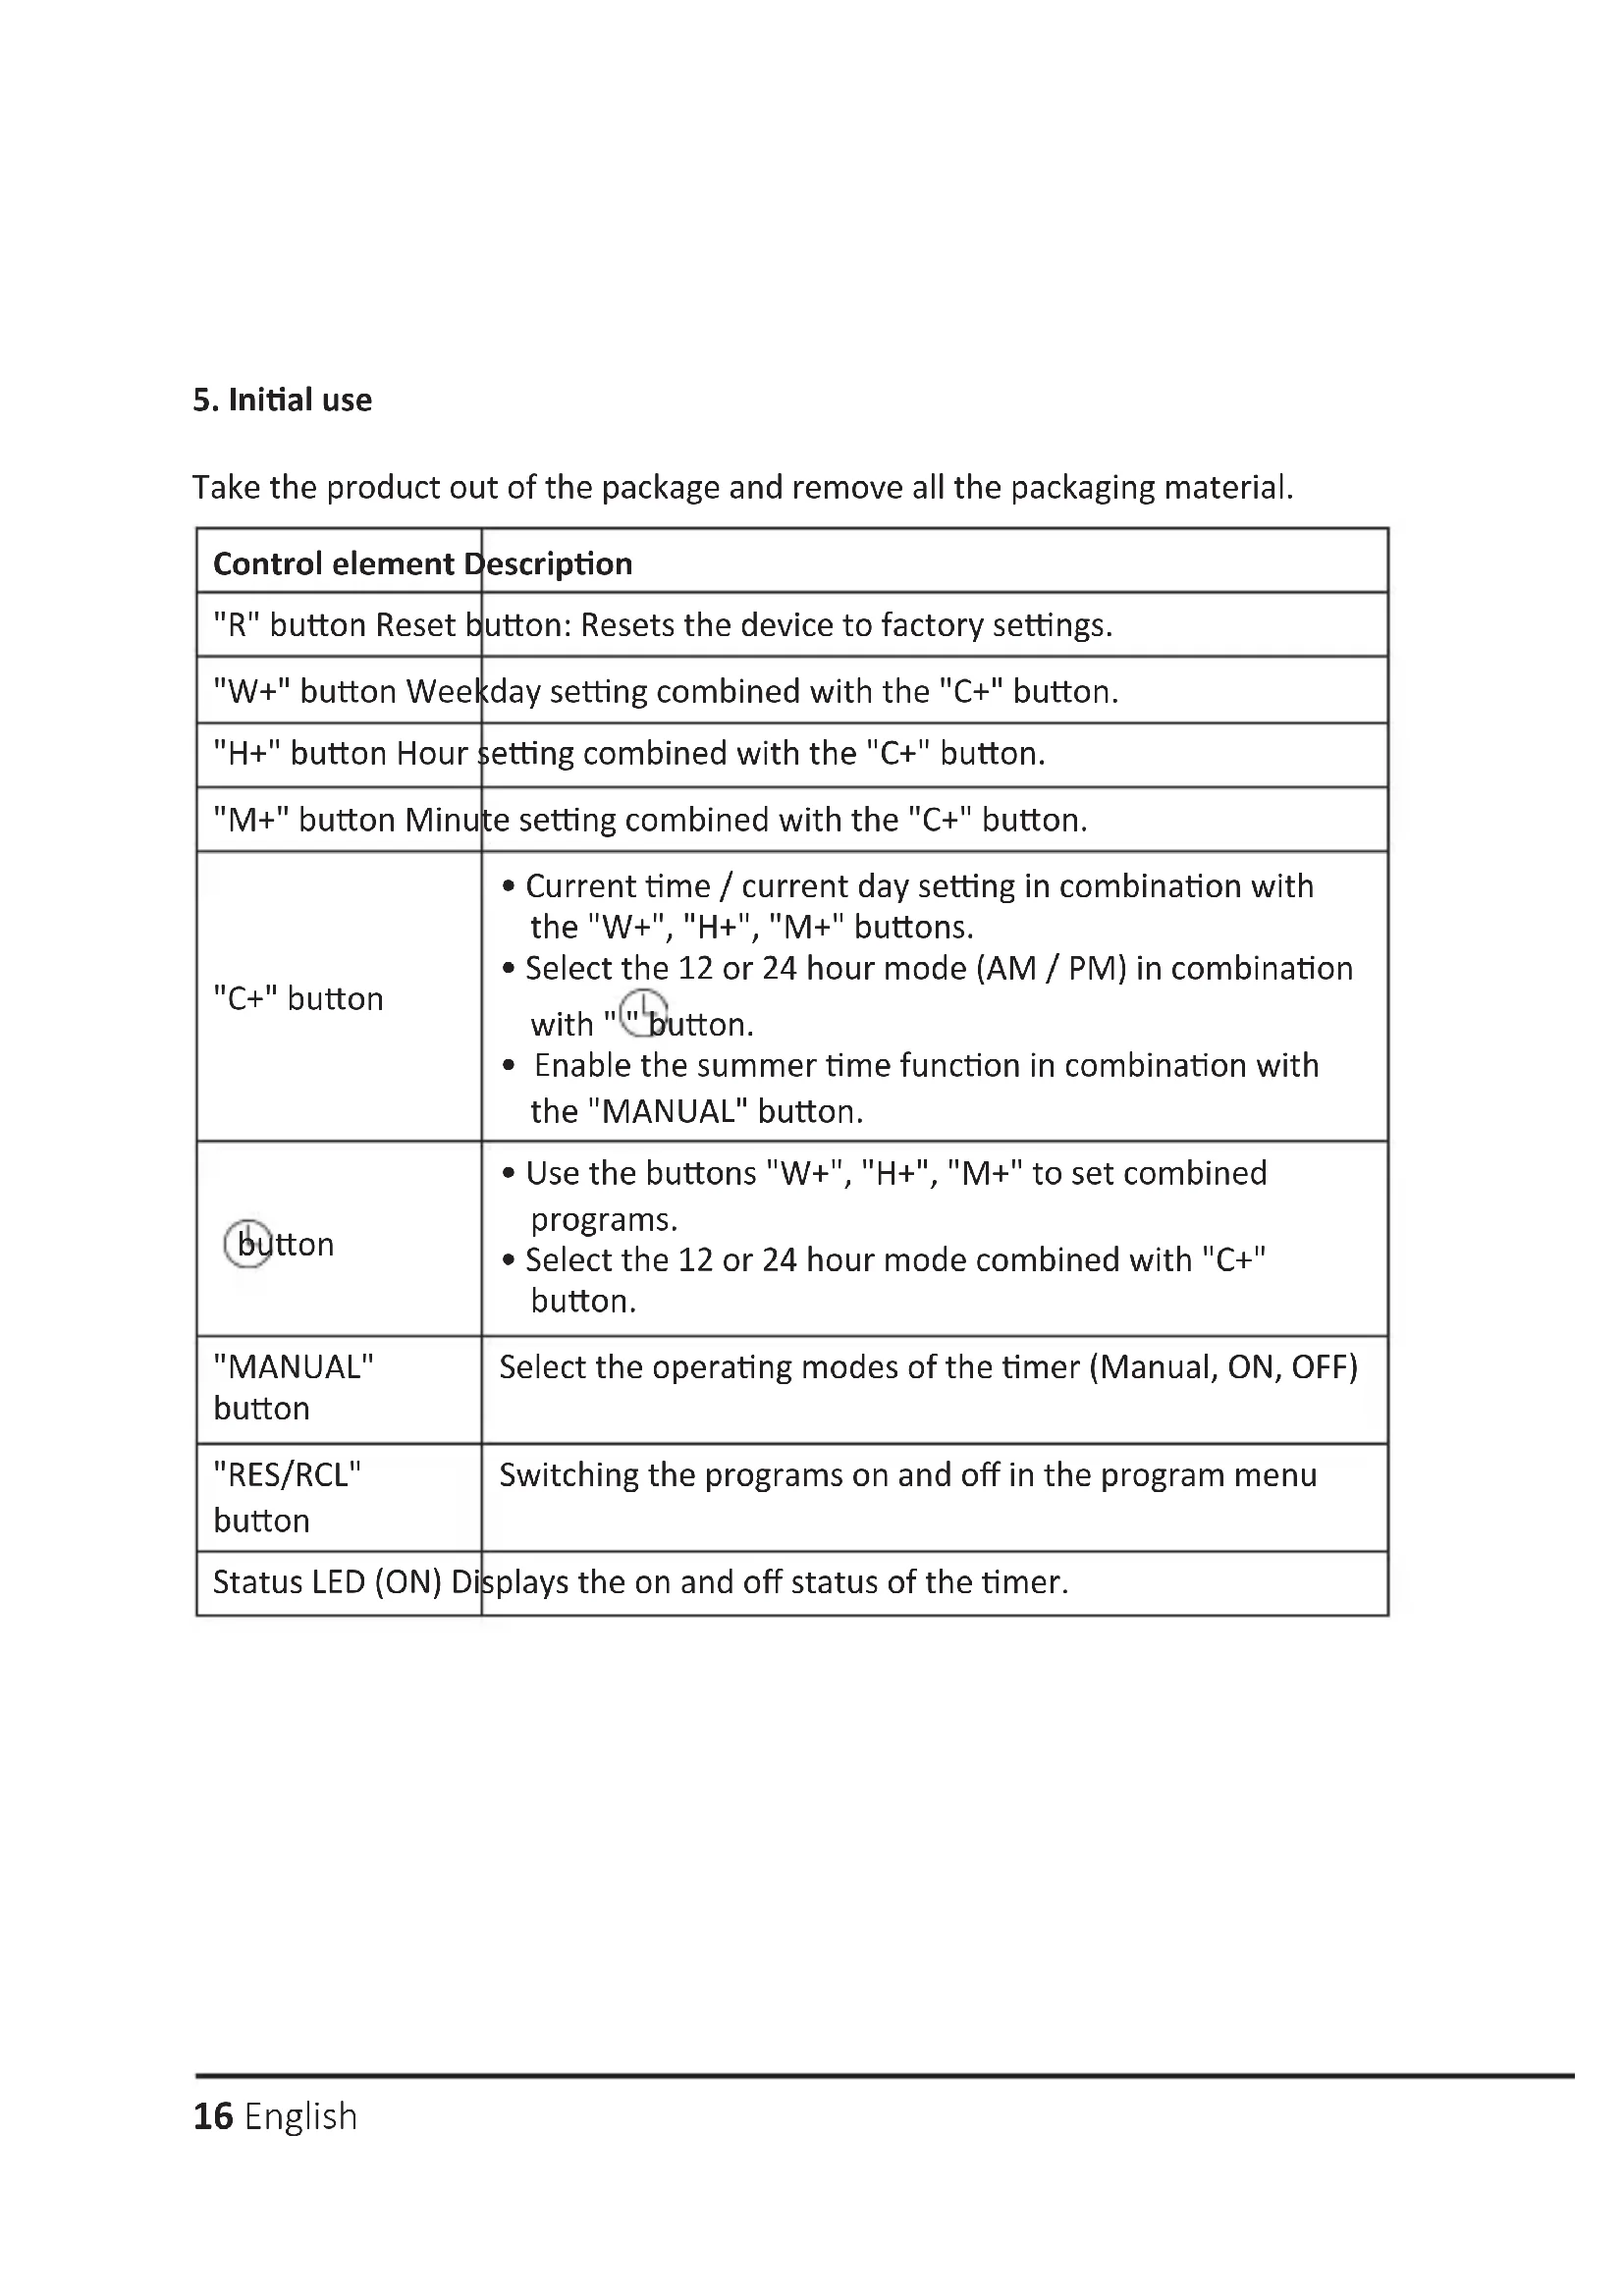
The following table shows and describes the operating elements.
5. Initial use
Take the product out of the package and remove all the packaging material.
| Control element Description | |
| "R" button Reset button: Resets the device to factory settings. | |
| "W+" button Weekday setting combined with the "C+" button. | |
| "H+" button Hour setting combined with the "C+" button. | |
| "M+" button Minute setting combined with the "C+" button. | |
| "C+" button | • Current time / current day setting in combination with the "W+, "H+, "M+" buttons. • Select the 12 or 24 hour mode (AM / PM) in combination with"L" button. • Enable the summer time function in combination with the "MANUAL" button. |
| button | • Use the buttons "W+", "H+", "M+" to set combined programs. • Select the 12 or 24 hour mode combined with "C+" button. |
| "MANUAL" button | Select the operating modes of the timer (Manual, ON, OFF) |
| "RES/RCL" button | Switching the programs on and off in the program menu |
| Status LED (ON) Displays the on and off status of the timer. | |
- Connect the timer according to the circuit diagram shown in the following figure to a normal 230-volt socket and switch on the power. Leave the timer for about 1 hour to charge the storage battery.

-
After charging, clear all the current information by pressing the "R" button (reset) using a pointed object such as a pen or pencil.
-
The timer is now ready for use.
The device is then ready for use. The following sections of this manual describe how to make the individual settings.
6. Setting the current time
- Press and hold the "C+" button. Press the "W+" button repeatedly at the same time. The current day in the timer display changes every time the button is pressed. Keep pressing the "W+" button until the current day is displayed.
- Continue by pressing the button "H+" or "M+" until the current hour or minute is displayed. The "W+","H+" or "M+" buttons can be pressed and held during setting for incrementing quickly.
- Release both the buttons to stop the setting.
- To reset any incorrect entry, repeat the above steps.
7. Setting the timer programs

Note: Check your programs to ensure that the settings do not overlap, especially when using the block option. If the program settings overlap, then the Timer ON or OFF is executed based on the program time and not the program number.
OFF Program always has priority over ON program.
- Press the button once and release. LCD shows 1 ON --:--. The first ON setting can now be setup.
- Press the "W+" button to set the day or block of days. Set the time by pressing the "H+" or "M+" button.
- Press the button once again to complete the first ON setting and to adjust the first OFF setting. The LCD display shows 1_OFF . Repeat step 2 to complete the first OFF setting.
-
Press the button once again to complete the first OFF setting and to adjust the second ON setting.
-
Repeat step 2 and 3 to program the other settings. Press and hold the button for 2 seconds to scroll through the programs quickly.
- After completing the settings, press the "C+" button to return to the Time mode.
Example
Switching the timer on every day of the week at 17:15 hrs and switching it off at 22:30 hrs.
Programming the on-time (17:15 hrs)
- Press the button once and release it. The LCD display shows 1
- Press the "W+?" button till the LCD display shows "MO, TU, WE, TH, FR, SA, SU" above the time.
- Press "H+" till the LCD display shows "5:00 pm" or "17:00" (depending on whether you have enabled the 12 or 24-hour display).
- Press "M+" till the LCD display shows "5:15 PM" or "17:15".
- Press the button again and release the button. The LCD shows 1 OFF
Programming the on-time (22:30 hrs)
- Press the button again and release the button. The LCD shows 1
- Press the "W+" button till the LCD display shows "MO, TU, WE, TH, FR, SA, SU" above the time.
- Press "H+" till the LCD display shows "10:00PM" or "22:00" (depending on whether you have enabled the 12 or 24-hour display).
- Press "M+" till the LCD display shows "10:30PM" or "22:30".
8. Switching on and off manually
You can manually switch on and switch off the device connected to the timer using the ON/AUTO/OFF mode or enable the automatic control according to the configured timer programs again.
Press the "MANUAL" button briefly to change between the different modes. The display changes between "AUTO", "ON" and "OFF".
Please note that when changing from "ON" or "OFF" to "AUTO", the last timer state is retained until one of the configured timer programmes triggers a change.
"ON" - the connected device remains switched on.
"OFF" - the connected device remains switched off.
"AUTO" - the connected device follows the timer settings that you programmed.
9. Summer time and 12/24 hour display
To switch between summer and winter time, press the buttons "C+" and "MANUAL" simultaneously. If summer time is set, then the summer symbol ("S") is shown in the timer display. The clock is advanced in case of summer time by one hour.
Press the "C+" and the buttons simultaneously to toggle between the 12 and 24 hour display. "AM" is shown in the display as soon as the 12-hour display is enabled.

10. Safety instructions and disclaimer
Never try to open the device to repair or make modifications. Avoid contact with the mains voltage. Do not short-circuit the product. The device is not approved for outdoor use. Therefore please use it only in dry surroundings. Protect it from high humidity, water and snow. Do not expose the device to high temperatures. Do not expose the device to sudden changes in temperature or strong vibrations, as this could damage the electronic components. Check the device for any damage before using it.
The device should not be used if it was subject to impact or has been damaged in some other manner. Please comply with the local regulations and restrictions. Do not use the device for purposes other than those described in the user manual. This product is not a toy. Keep it out of the reach of children or mentally disabled persons. Any repair or modification to the device, which is not carried out by the original supplier, will void any warranty and guarantee claims. The device should only be used by those who have read and understood this user manual. The specifications of the device may be changed without any special prior notification.

11. Disposal instructions
In line with the European WEEE directive, electrical and electronic devices should not be disposed of along with domestic waste. Their components have to be separately sent for recycling or disposal, because improper disposal of toxic and dangerous components may permanently damage the environment.
According to the electrical and electronic equipment act (ElektroG), you are obliged (as a consumer) to return (free of charge) electrical and electronic devices to the manufacturer, the point of sale or public collection points at the end of their service life. The relevant local laws regulate the details in this regard. The symbol displayed on the product, in the user manual or/and on the packaging refers to these regulations. With this manner of sorting, recycling and disposal of used devices, you make an important contribution towards protecting our environment.

12. Instructions for battery disposal
In conjunction with the sale of batteries along with the supply of devices that include batteries, the supplier is obliged to point out the following to the customer: The customer is legally obliged to return used batteries. He can return used batteries which the supplier offers or has offered as new batteries in his assortment free of charge to the supplier's dispatch warehouse (shipping address). The symbols shown on the batteries indicate the following: Pb = battery contains more than 0.004 percent lead by weight, Cd = battery contains more than 0.002 percent cadmium by weight, Hg = battery contains more than 0.0005 percent mercury by weight.
The symbol of the crossed-out dustbin means that the battery should not be disposed of in household waste.

WEEE directive 2012/19/EU WEEE Register no.: DE 67896761
The company WD Plus GmbH hereby certifies that the device 304950/20200903NB022 complies with the fundamental requirements and all other relevant stipulations. A complete conformity statement can be obtained from: WD Plus GmbH, Wohlenbergstraße 16, 30179 Hannover
Con性和 speed are important factors in designing the program. Conducibility is a key factor that is used to determine the performance of a program. It is important to understand that the performance of a program depends on the number of instructions and on the complexity of the program.
Pulse el botón «MANUAL» brevamente para Cambiar entre losDistinctos modelos. La pantalla cambia entre «AUTO», «ON» y «OFF».