
CS 85 SB - Electric saw MILWAUKEE - Free user manual and instructions
Find the device manual for free CS 85 SB MILWAUKEE in PDF.
| Product type | Electric circular saw |
| Brand | Milwaukee |
| Model | CS 85 SB |
| Power | 1200 W |
| Blade diameter | 185 mm |
| Max cutting depth | 64 mm at 90° |
| No-load speed | 5500 rpm |
| Power supply | Electric, 230 V / 50 Hz |
| Weight | 4.2 kg |
| Cable length | 2.5 m |
| Cutting capacity at 45° | 49 mm |
| Cutting capacity at 50° | 42 mm |
| Main functions | Straight cut, bevel cut, integrated laser guide, blade brake |
| Maintenance and cleaning | Regularly clean ventilation slots, lubricate blade, check carbon brushes |
| Safety | Blade guard, double safety switch, automatic shut-off in case of overload |
| Spare parts and repairability | Blade, carbon brushes, switch, guide shoe available |
| General information | 2-year warranty, CE certification, noise level 95 dB(A) |
Frequently Asked Questions - CS 85 SB MILWAUKEE
User questions about CS 85 SB MILWAUKEE
0 question about this device. Answer the ones you know or ask your own.
Ask a new question about this device
Download the instructions for your Electric saw in PDF format for free! Find your manual CS 85 SB - MILWAUKEE and take your electronic device back in hand. On this page are published all the documents necessary for the use of your device. CS 85 SB by MILWAUKEE.
USER MANUAL CS 85 SB MILWAUKEE
up6r sqzo,0>>j"tq"t" j>>
>>Hb H aHa H Oa paa Haa Sa Ha S aUsoa aga a H u Soapahop a OaOo Hc-pOp np Ka C ah Ha a Oa U Sa a Soahs Ha Ssa O H a Soah
<WW YZ W Y Hp ah 00 o0THKwYyDwZAecHP ah 00 o0th
<WW YZbXZYeZp ah 00d00ha hS Sa 0 Ho a aoh
aaa 00 aah a H 0a a of
n<qzdbZUfYZa
n<qzdbZU Uaf YZ'
n<qzaaaYZfYZcSmZZfYY
n<qz-aaYZ'UfYZa
n<qzbZYYYYUfYZ'
n<qzbbZYYYUfYZH
n<qzhquo-bYYfYZd
>> 00 00 00 0TH Y YUZZUZc
naad
"z: p"z
om-uzl»m"zuzslipmzsq"
i aH OHa H Oaa apa S0aH pOy
paOa H
ma cahA H S a-a Oaaa H pOv
HU Sa paS al Haa a
SaaI
ma calo apso
Oca S Soa
pshosaliaa ll5
mbp aaS cUtz Sa
Oll pp aas

psOsaoaSaSbaPbSSaaS aHaahSaa S aa a aqbaPbaSSaH Oohpa SOpuU Oa H a a bOla HOOHS aaaa Pb pa O a U a c0oH aaO ohaOa SO aOgPS U a H bcpO h p acNo p a a HsSaHb Haa SacS a H b Pc0 o a p HooPS ba SoUs Oav

o aaiuass VSS Ola b U Sa ba So h Oaah ba pia Sp H
OS aHSa cSO' a ph Oaa a SO'SO cHa aOa O a O a SO
a acU p aa SOaap h aHSa Oaa a SOs H Osp
Oaa aSsH U Sa oH- O HS U Sa a SO H U SA pu
a a H O S H Op TaUSOH Oaa a SObSOa SOa
nr
zSUSaU
1
"Sa

moHooa Oa

0 hsoo s agly

qà má ðošo S acly
| »sqv' w"qvsIro»s' J vpô | ĀCuUàA | q''fclqpsJJ Yau' Y'' | q''fcl''pl Yau' Y'' | q''fcl''pl ZZYaHZ Y'' |
| i Sôa à SôaÖa H'adbl IY HWW | WwwYYYYZZUeEEE | 'a bleYH WWW WwwYYYYZZUeEEE | 'a cIIYY HWW WwwYYYYZZUeEEE |
| z 00 aö àaaaö H'yyb H'YYb H'YYb | |||
| x a ð é H'ayyH 0 | Iz | 'aYYH 0'' | 'aYYH 0'' |
| «M° aú3aHnS aO áU3 | aIah YH | aIah YH | aIah YH |
| «M° aão b H Tca H TcaH | |||
| «a° aão b H avH TYH H TYH H TYH | |||
| «M° aãu Z O b H O'H T H H T H H | |||
| y aHb P Oaaa H'YoNHa eKHMbYn | daHb' P M' bH | daHb bcHNH | daHb bcHNH |
| s a p a O p lq i-mu j Se d'A HYZ U YZ' | ctch | bTbH | bTbH |
| uA t'áuaACO AO Ó pZcOJ y aaaa a II aa ai OaaU p ÖHqz b d'ZWh hmU a a a Hs Maap U «p o ab U P, Oa p aiwi onPmQ | Hô aHs Ma a° aM eZTd-hnPmQ | aHaçU ap a a f eZTd-hnPmQ | eZTd-hnPmQ ZY Td-hnPmQ |
| «p a aO u P, Oa p aiwi onPmQ | ZY Td-hnPmQ | ZY Td-hnPmQ | ZY Td-hnPmQ |
| uAAS UAAaZaJ PAAOK | |||
| Eco pZcOÖUÇO AO Ó pZcOÖAÖJ «p a O aO a a a H'' p a aO OOH a a ai OaA U | p ÖRqz Hd' ZV | ||
| «M OaSöt S eH | Tc Vá | Tc Vá | Tc Vá |
| «p a O aO a a a Sóa a h | ZTaH Vá | ZTaH Vá | ZTaH Vá |
| «Oa b aiwi |
Loo' uX
"qvs, vsv"vv' L sW'JvO r y,sv"mu's
"tAAaA ApA A0
| psj | ustov,hyo0 0 AO" (AIO ZMA Aovt" AIOOCAZCOJ |
| AO" t'AAO A (CAAJO pO pU" t'AaOpZZVpIZAO" (AIO ZMA A) | |
| aaa ACZA0vpo J AOnaupzaA (FJO A J pU; OZO AAAtauX) | |
| ° OH M00 Ho HW aam H a OTN Oo# allM ° aHb a HO pah | |
| a ae OV | |
| OSU ACAO" (AIOCAZJA0ZA J pUk A I UZoiUp Hcp aaee a° H | |
| OOH HAO H H aayp HOp pAlaS R K M ° aap yae OY | |
| ASI « PUUOJ" CAI CAU" AAOZZCAAAjoi Caur CAI AJ AUZAI U | |
| POXqala S ha O h ah Ohas Ha Or NAO # H aayp | |
| ap a° Ha OV |
| Sv pIZAO"CA pUaJitAAO ALE fUOaIJOACoPiUcOJ A J |
| VpO JO AJOA J AO IpACOJAUZu"(AAA OJ"C)A pUE A UZoA J |
| POJAO JUZPOCAOJ OZA IpAAJq-aalpa THO a>> aayp aah |
| eAHO aa OTHa HO Hs aSOhr U SOa aTHW OHO aH |
| <MM a aHS o>> hwsOA S heAH O OY |
| ASI tPUAAO"CJ pUsTlZ Oa I aAaAlpoj AOICUICA ZAOJ |
| u (FHeTAAAOIpovlaAoo") (Ajo dCAZAoPAUAO AOVIAO AAOAO) |
| pUsCUpZaa I aAaAlaA DO AAOJ"Z 00 IACZAOAOO A J pUJ |
| ACAAOAI"AZaf poAIZ AF AOJ pOoXwSOa a ah O Hau OoAO au |
| y Oo OHx aAO Ha aea ap ly a a Ho aq q a Sa e a all |
| aOa KU OoAo HAOOy aeaH O H aAp OOh p V |
| ASI AE A AO AO"CJ AOACO IzToAUAOAc AOIC O A JACOAOL |
| oUAAIpaIO A JACOAAA b AlypoZAOAOA aOAXUp aHa a a |
| O Hp Oaa O a aAOa O aHO y r p aT-O aHDo AH |
| <MM a aH aY |
| ASI EA A AO AO"CJ AOOC A' tAaOtZZA OJ A CAAZCAAOJ |
| u seAIAO JO ZISPUIAO A JoaOpAO AooA aOARaxPNUZA OAs W |
| O CAJO A JAO SUKm "maa THO hpeaH Ohy SOa a OHO H |
| <MM H a a OHA Oa OoA OoH OeA H aaldo HwSOa S V |

AaAo AO'CAIOACo pIooAAAT (AZAO AApUAA)
"tAolpzzOZA IAAUAAcAoO A Juaa paoOxUp HcM au
Oa ap O:aOHaup ao Oa o OHaue Hy Hu H
Soaa at y ISua bx aaao HaOHN a aap av
UpAAOlao JEA OAc aOJAcOAU),aF UAAIpAuh
Oo'pap HaaH Hu rae p H a SoH O S H o all Oo OT
Oo OSo H ap H aa b a a Ohh M a atHO Ho eah
aTH aah O hao Soa S aM H 0 iaooap H a ho
aayp aah O" p aao HO hn O ou aSoh a ag
OoHa b H ah O 0 np Hb O OHm au
a aHS Ha aTH Sp ah aTHOOH Hy Sa s akap m AH
oahs maH OH p aao HO hn O ou aSHea yg
Oha aKcM 0 aah KcM ap O aHa 0 aH So H ap H aa U
pa aTH roo OHa p Ho Hzm O Ho 0a OkM 0 aa OA Hoo
Imp Ho a? ayp ala Otha Soa p Hap Ho ahcm 0 aa
aaaO u aOH 0 aU aHa aOho kmm H
n Ou aSOhea yp au O av
qOip ab HaHrS H 0 ap ap OHS H aOH
s ab ao Hccm Nq H OOhap H 0 aH"Sa p ab au Bu
O OTHa HO p S Oooap 0otha 0aHa 0 ov
psIvpiZAIO'CAI CAI'aTAAIO CZIOAIOvtO AIOAAUZIAO I
O OAOIO'CAWAIo O AJCOIAOAI'ZAIIAOAVIOJ A' (AJ AOI
"GAI UAAIpAI tAZAOIJZpO ApIZAOI sOOAOVipZAOI'CAUUCAI
C0A JUAJCICAAI AU'tAAoiBZZAUVOCAI pUI'TAAOIPZZIOJAOCAI
zOCALO CZMA AO Iys SA JO OAOXUN H OHybp H OOH
HOaAM Hyp amaiu O OTHE OSp Hn o OUsH
HOYpb m a ap OTa OOH O aHy bO OH
a Su OHa a Oy
OSI tpiU pU"tAaOpZJAAI IAO O ZO A J CAl OaOaClzaOZA W O AAAAOVIUAApIZAO"C AJ tAaJaUao JApIZAO"CJAUCIO I A UZOF JAcAVOCU pU"tAAOpZZJaaO JzTIUZpO JAIoo O AOICZUAA UAAAIO"AJOCAV A' tAaPau JO A1UozAI aJAOZAA OAOJ A JCAJ GAIAT ZuaiaacAAAoVUoiPOAAu PJ "tAaOpZZUCAIAOAAAZWUOOUIPOJO, oAf UAAIpAJA OTAAOX q aa OhAoOH OH H, ap Hy Ro ah OH aM aa AV
ASIE AOOI"AJAOJ"TAAVI CACO I fUZoAI JUZAIA ZUA (A A UZp ZAOJA OIIAOVAAOZ (A AO) (A pU' tAAOIpZZIO J'tAAUSPIZ ao 160A S 6AAOITAVIOJ CAI'AAatAoAIOCAAZIO E I UZoAI aA Apf ZUCO Xw ah oAh<Mc aath OOH aH p H aH b H u aavp H aalp a OHsO H O O'vp ap Ha aap OTa Ooo H <M H Oaah aa aiaov
S"ZozaAOI"CJA OeAJIpZZAOIpoVlaOJpuU,cuiOAcOAUI,oAIW
UAAIPAU aAIAOITAO AO AUI"tAAOpZZaiaA O C0 A Ox
Sb j aa O rOo OHp taOa H HQ o abdo p 0N
i aa OH yaa OH a O aOH aayaeHa 0TaSa S hOH
zMHOaM aU aah ap H Ow OA V
ASJEA aAO AOI"CAI ACOAUZao SAAOIO A JOAUATc CAZAoi"tAAx
OltZZXkMM Maah AHaaa U OHsH ap Ha a pA
ZEM OOlha aap OHbaH O HeaH O OkM au a OH raH
"°aO THW Olh akMM aa alaOOh"vp ap V
ASI CAAoI(CAaO J AO I"tAAO) CAJ"AACZZCAAOWuaO I"AOCZn
aCofAIACOUZAIIAOAAOJAUXo OOlha pAM OOhAhK M OAhH
qOaa Oa Oa MoO OT OOlha pO ahM OaHa Ooh
O"vp ap H a a OY
ASU"ACAO"CIAOAUOO A UIa OCAAZCAOACIN>>paAUAOOCZZAOUcOJ
DAUZAAAO AIt to AIO A JpO A AJOCAAZAcOUAAOp ApA AcAAAX
pa Oa ap Oo HcM aah OOh HcM OHn O S 0
e a HSp OAOH OOhvpap Ha a np Oy
taoIzooA JaOZAAo'AAaZApao
psUGoA S aAO" (AaO EA JpAOzaAOwO) (AaOZA AJ "AAzaApaoAJcOa p A AcuaAICaeZueA a AO AO'CAJ CAY tAAU OCAAIZA Aoo CAOZA AaAzapaoAoIOAZA Aao AAICAKUzAO I kAIOCAZIOAO ZUAIAeZyIAO O AO A JO AO'CALAOZA AJ "AAzaApaoAoIOACo piKoiAs FO AZA JOCZOOAUZuS a H 10 M HoO'ap a ae nSo O OTH OOlHO HaOa Hp aaEU aHa o S OHa OWkQo O: H p aa e aH aH 10 ype 10 HaOHaa OHp Th aalla Ha p H a aOo H H Op Oaaa OiaoHua Oa OHm aaOSp H Oo H - H y av
sUgOaSgAOo"cAcltaOIZOOJAtAJA JAcIaOZA AJ "AAzaApadoXjzpuAoi"(AJpUuA tZiaO J AOJuAo baAA) ap ZAOVIA AooJaOZA AJAaZaApaoAio JT A JOCAZ Acoa poA Acp OACZAOJn ap mo a H- TH 0 Hm o aO OH SoHmMa aO OHsOHcUMo OH aa OH aOa Kcp aaa a H a er a° a O'
ASJBF OAOJ"(AJ CIAOZA AJAaZaApaoJAooVp0 JOa JOAO BAIO AAOJCZZAOJcAINpaAAJIaO KOFAIUAACZZAOUJ BF OAOJ"(AJ CIAOZA AJAaZaApaoJO AO J,OAIAAAAADAI ao JIpuuAOJ"(AJ CAAOJOUVUoip JpuT'AAOpZZOJpu I AUFUOAIACOZpaAAXIn H OH Oo OHKMA aOH aaH aOa H aOa H paae a° h aaS aap H aOv
SjzAAOJ"ACI"tAIOCAZbAIAE AIEpOJO AJA OJ
po AOpVIOAOJI pUU CAlOZA'AAaZApaoAJP'uTAAOIpZZJ
OAAI ZUq Ollao Ap yae aTHo p ao aM aal o H
<Me Oa Oo H
npaOHHO Hzp ae hH M
q"fclqpshitaOZOOAUToaAOAUAcU
psuaa aOAOJ(AJ AOAo JpuJAocAAUAZaZA"t'AAOpZZI Spuuao AOToA aOAUf AcxUp Hry ao a aaaham H aHO a aao p Ho aM aath Oohyoo H ahKe 0 aH oAhM a a aOv
0sI xauZCA AOT'CA) AOitOa OAU AUA CAOJ A JpA CAOaOAW
poIACZaoAIOAUAA CAOOXHr ap KAM T Sa a SOHaOOhma p aaO H
roo OHs IaOo y a OTHa aHb Hry ao h Oooypu
ap HOpa a Oo av
ASJEA aaO AO'CAIOA JAOtaoA aOaI AcIVpaAIAOaI
n'paAuaAoCZZAOxHp Hry ao Ha 0h Oa ap OHp
S'OH yp aHaOoh oHb Hq Oa ap 0'Sap
O w aam Ha aaaaAMo HHO hKMM aU av
SIRpO(Z)ATo6AOaOUIAcIAOIpoOVOauUJA UCAACOJ "tAAUSpZIOAI OAOJn HaeO@o aa OH aHbry aO a H aoaHaHO"ypapHeiaOo OV ASI pAZ ACOAOJ"CAt CAI tAAJOCAZIO ZIAOAAOAOJtOAW aOAUACXhn aah O H O KAr aO HOOHO bOH H ppaa° Ha O a OV
AACZAA CAAA AACZUWao Jo aACZUAa
paAO"caluAs UAAzAip Hq Oa ao HaSOHxM 0oHs rU a aaai 一 ^ aOy
aa aahp aae Ha OH aHa aAp aa e a TH
\aois r ap aaeha O OH US OY
n Hm 一 aOaaa Oo Hk 一 a+aalS ah aao o aap mo haoh
as a HO p aHI OIO Wr U O OVA a aAo HA a Oo OH
aOHeamae p O A Kc A ap aaa a HA OHm 一 aOy Oo b Oa O TheVma a A OY 一 M maa TH Op aHb Ow Oo Oa OH a hs 一 ap aOA U
aaaO OaaU p OToy Oop aHa aOo aOy
q OH y Oheap O Oo OB>> aASy O aKMM aAH
aaaM OY
p Hea maa p e Htoaq OA ae a aHa oaa OA
aSH Sp Ha OlA Ho a Hq a Sa e a I O O
trp ao e V
" aOO OH HoA Hy To t Se ^ aaO HaS a O HkM mAU
a Thb HO Ow Oo A OH Oa hs ap aO aaO HaOOH z S H
qz d'cuZH OaU p Ov
W OH ap OH OA ae OL
q OUImaaap a H H OD y aOn a "HO p ah aa OV
" 0oKc Oab H Oo U aaa H S ab aO ab aO H
T" oeAO HO kM o aaem OV
szsy,,v"qvslp,s1"s
T CieyTu Hs
n XSa aa Oo a<bp a 0p aHa aO aHm aHoo aSOp WH aOo OHa a H a ap n aaaSUaV m Oa oOHa aap Hn aH ap Ha er a-a OV s Oa p HaaO H aAp Hn aOb aHa a VcS a H H a ap Hn aHmac Hb aHa OH aaaHb HeaH O aaS a aOy a a aP aP aHa P aHa Ov qaaO b HcA aa Oo aHcM 0 aa aHb HcM HaaO h>> aayp e Oy
S>>IO"qVZ
zàH Oq OU áOu>pa aa S HaaOHa OHo H afo Hx aaaaO au
ap 0° O z aeau U OaO H Oap b OVMOp aaa aap
Ohap Osa OH O Hp aae SOa ah r pTHo H Ohma aho
<pa aee aa HuaiaS av
<ap Osa OH Ir apama Olaoohmab O' p Oyaa OH a
r aaa S Ucp aaepap OPrTH"opTh" opOH aa yaa alha OWp ah
a O ao Hooaa a SoaAs ap all Hy K q aS 0 Wh aa
p aO» HO aHO H" a OoAO KaO anaMa av
yp OHa aap aah OH K>> p osa H OAp b OV
moap aaaa Ha aaiiaS > ao a' p H o y ap O H O u
aOlhw H HO p Ho OA SAHO Hy ap O HA y OV
"S HE O HS aP HS maTImOp aaaa T" MO aO a TH
<bp aa aHaOHH aP H aHn ap m oA Hdo haOma aO H SoU
aS Olhn ap mo a H- Hoa HsO H Or p OOH U OH
aaoV
o' zo t''>p suS1 u
p 1 a S0 ap HmO a aa 5° OeaO I° OeaH x aaaO H
o Hq OAp a Ollo aHq a Sa e a allaOH r p aiO O
n a OH O HzbUmU< pp ao Y
ps">>wji 'u"usj μ''s/Es, t s' r ' u
p Ht Oa aam H aah Oa ae Hea HcM OhaS0H 0 o OH
< p O aa OHaOaHs ao ap O aa Oo T SeV
L0n>>u
"S H OHm a OH OH Hy ap O HO OHa p H aH o H Ka p O Sa H e OV
" 已 OH Ha b THO aHb a> e a HA SoHO H a S a aS ao H aOH aaaTHo
" O OH Hs Maiaooa aae O b aaO H ah O Ha Sp O
- ab VHy Op H O ao a aa H ap mo OHwaOaaaas4slo
OO Hs a H-VI
"aa aao aap ae Ho hy ap OHa a H aOy
qoA O OH H Mb HO OHa a WhqOa O OH H HuO O
0 M MA OH M uMO T hn Oo a Olleha O
p als maia a aOoha Sb Oasa H AsOH aa a a O HK aO
r aa a OY
T U y OH Hrao a SOHO Hp aa e a Ov
" Mb H aoo Hdo " 0 ao HaS OH y H OH
X OAO a aOHa p t 0o aO
uaHmOp aaaa oH q a SA e a Ah ap m o aTH aaH
Oa p H O houe a S b a haMop aaaa H aeaH aeaH o
O Hy HO hwaOo OD OaaS Oa a SOH mAp H av
Za Hy a a Hea r Aodhy a q ana e Ha a 00 VH
n aa THO Ohmaaa aap HO b ap . OHa a To H
y aa Hwaoo OBaaa H aaa p o Oa OH np Sap y
s OA Wwaoo OD Oaa D aa OHp a QQ
n n OH OOH qau Sa Soae p OAO Ho ah m aiaOA
mo OH Hy ap OOH-cu HAOOH Ka paaa OHz a H a H
O bx aaao aap OH Hu waoo ooaaa HsO Ho
-ba SO phoaaa ah s Thy auqca Ua b IZYtCZ b' OU
Ooo OTs OH So aia Ov
qsGy''t'';W>>mu>>s_yzμn u
>> M OH OH O H" Oaa S aa a tho aah o a h C-p O ap p a Ok np ab 0 f Soa a h a Oa O YZZnbaq, HP"St <Q YZbW Wqs YZ' N Yq.
aOoh OH S Oo OH SOa a OHOS a a OHpS a Oa O y Oa a
qz Ib d' ZUZf YZa
qz Ib d' ZU Uaf YZ'
qz HaayZ' UZF YZcS mZZf Y Y
qz HaaYZ' U f YZa
qz HbZYYU U f YZ'
qz HbZYU U f YZ
qz uqob YYf YZd
CE
00 00 00 0Y YUZZUZc

mäöwäiNHy oOppaS n aMp aHbHa pOap OH,0a OHeaa Oeaaa Oy -pa SObddaa as t yauqca Ua bZYHCZb'» 0oOoOThis 0c


"aa p"zs
mot-,zSII>>m"z,zSlsqrrmtI

n aHa OoHb Hs° ap aOa aaaHaS Hoo a U 0 HaS Ma HbAp V

n 1m° a O' aO h y ap O haa aalp aaee

s r ab aea 01

Oa Ka a'ap aaae aHa O

«b aae Obaa Ha Ol

"Sh Olm a O1 Olb hy ap 0 t Ok b H aal
«a b ðSa Hé Oi

W O Hw Aa Oa Oo Oy

aa rHu Hx a Ob all Oa aOT U S O H
mOeao+aa0 8a° rU5

OaaS aHa o Ohq a ap HaOa a SO ap Ma Ha OoH
a 0aIeia OaOea a a a ba OqOaa
0 0 a aaO a° a° eaa Oq ao
aBHOOHa bOnrOHSo HhrpMOH
O p H pcb O r OaOaA a

q a Sā é ā Hb Kp āaé āa HuVHg a Sa e ā TH
HO Hb aaeaSH 0 aab O-<b HO bah
Oa HaSO-0 Hn a aaS aoH° mo aThaSOo OH ab H
aS0Tb aHaamae b 0Ta H5U
n aap alwso S amaaep

Us a OaO H Oc H Hu Cp TH COo H Noa H ah O a H ah 0 ao aanAH HpSOa paU ca Ua THuA OH Ho Hap Ha H pS Op sah S auapso-U OH HpSOa H
ASI AOC JINOaZIaOcuaA OAO ZSp JIAuUA ApAAU AJS IAAOUOO) CUIpOZAUVISAO poZIIAUOSI bzOOUPalAOa U AUuaAIAU) IpaAAUUOC AJAoAsPoZISAAzIT AZAIOJAooZpAzJaAU
Aoo aAza UIaPAAUIOpaAuaUOOIS OSAaipso paH
p pp aaS HpaU Oa a piaO-C RhaSa a Oa SO-Nu aaPi Oa HraSa aHa Oa SOnn a U a H aUsan aH Paa H pa Ua H aHu SaSua HaOp Spn pa Ua Haa Hpsun a aV
Asofoiauzaicua laoaabaiaolaoiAac pAAIOOUI SoaJAUAOASAUOOAcz opiaujo h Ns Hp aSHOH PsauHa noaah Ho O Ho Ha Hn Hap HaHbOp V
ASI>0aE0aUz(cU A AUIpO Au AJUACAJp0ooOOJZpJIauAc OooA0AO AupSsOs (I AuJtplUpAAJApzOORSpJAax
Aoi 20qiao Joo Su x ah ao Hap Hua Ho Hpsoa oo OAH aah U a aH Soan ao Hap HaSoaipS Ha n ah o aOa aOaO u a OHpsoa H
ASI AJEPO pcwazcicuaA AJ Oo AITAUOa) AJACUAO 00 o pAfuOaUACOAAOOACOOAOZSpuWlpippO AJUACAx ah Soa aH aUsa H Ho np SOAaUNP OaNnPsOaa a aHUSA HaSa H
a eH a phas OH Ss Hoo Ush a OAH a H

-5aSsa Hs aHb all ao aa ahU Sa ba pa p OHa a Oa

-SaSaaHIOu HIO Sa pa SoH pSaaa Ua I

Sa HAOaUaHOu SApaSsu UUsnpsOaH aUaaCav

iSa hO all Oaai HUsa pa SsO1

ma OaiaSa a aaia H pO haa H tCp Hó + Hu a H o psa Oal

UaUUddHSSp

mpp aaS auHo aU Cp ao H SOaH uu a Ho h a a SsOu H
al all BIO pS U N Oaa pS OOna-USa H p O h
Noo naiho Oai Hpa Sa Hp pp aaS ay
x ao aUsa aHn pa Ua ao H SoaH uHbH o H oA
aOp np aHn IO axo aUsa aHn pa Ua ah
Pi pa SO Ua aSoaHbPS ba HAnu Oa aHbH
pa Oa H bcp H Oaa H a H O aSOo Oa H au pa
HO OA SOO OaKo d aa H aaas anah Sp aHSa H
Ora OAUNp anH OHaa HbSoo sa H O p Oao
Poa ao H pc H ao US OaHb Hps pa

aa Hpa Ua H Op aa Ho -U Sa pa SOHn H a H pa Ua H
Nua UNHOaO Hsa pa SOHpa H a a SoHn pa Ua H
Ua HOuOa a OaHOcaS aSOHa aah aaa H
o H Upa S00 aa ah ao Hs pa SoHa
Uaalosaoas a SoHsAio as a SoHa oan V
x HSOO a SOOa-psoopa a Ho HU sa pa SOHOaH
U no auSan V
n
"aa aH Sa aSbBa o
1
-ÖA SÖHP"pV VQ

oSa OaHa a

yUaHbS0s anA Sun 00

yUaHbS0S an° aooA

yUa 10bS0S anai 000

yUaHbS0S anHopqaa
Mrançais
| r o»wJ»sq' wqJ "ÄäpIaç AÖIb Å | q''fclqpsJ YAH ' Y'' | q''fcl' pJ YAH ' Y'' | q''fcl' pJ ZZYAùZ Y'' |
| z à Sth Ha H'adh IY NWh | WVYYYYZZUeEEE | a bIeYH WNH WVYYYYZZUeEEE | a cIYYH WNH WVYYYYZZUeEEE |
| i Sà ðé - aas O'H YY» H YY» H YY» | |||
| z à Sth H Haa SaS' aYYH O | aYYH O'' | aYYH O'' | |
| p à Sth Hah S Sh | aah YH | aah YH | aah YH |
| aú aaS H H TcaH TcaH TcaH | |||
| «U aas bpS USH Hô H a i aH TYH TY H TY | |||
| «U aas hô Oa Hô Hô H O'H T H T H | |||
| i S Söð a Hô Hsh aH yO'H aRbHbYo | daHb' M' bH | daHb'bcHbH | daHb'bcHbH |
| i aSa pSöðH HSp ða Hgj-mYZH YZ' | ctch | bbll | bbll |
| wOAO ìp(aocOQUaIIp) aO O'ücZω " S Ha aà aPSS Oa H H O'S HqZ Hb d'ZHx H aà e SÖ mθ H a xà Sth Ha S Sa aBpuOp a éé H a a Wi onPmQ i Sá ðé H a S Sa aBpuOp a éé H a a Wi onPmQ Zfcäap AIIAS OZAAocOCS JIa CZOK | Slo HU aA SÖ bpaàa p Ho paà Oa HCθ HaS aSö f eZTdONPmQ ZY TdhONPmQ | eZTdONPmQ ZY TdhONPmQ | eZTdONPmQ ZY TdhONPmQ |
| wOAO ìp(aocOQUaIIaIa) paOÖU " S Ha Sø H SAp eSO PaS Hô a aS HÖHa H e SÖ aà aHpSÖ S « aA Ho I O'SH " S Hô H aA SÖ Hô pSap e SÖ H uOp a eE Ho H aA Hiwi | Oa H O'S HqZ b d'Z Tc Wá ZTa Wá | Tc Wá ZTa Wá | Tc Wá ZTa Wá |
| oEes,»s' !ok |
| u a Sho Ha° es Oo p a S O H u a Oa Haa ae S O Chaa a S aa a SH Ohp So S abhp Soa OH U Sp o Oa Sho H aa e SO Cp aS O H qz b d'Z Hua Ka a a Haa ee a S U a Op So S Oa Sha H a a ee H a p Vhuos a Hua KI O p Haa e E H H a O H a a e SO H U O H a |
| u a Sho Ha° es Oo p a S H U a Oa H H UU p es Oo U O p U Ho aee S H a P a a H a a Haa eep aee S H U a Hap Su Tp So H pp aas Ho y Oa HSp Soa H Oa Oe So H Oaah p Oa TH a SH Ho a es Oo Hua Ka a a H a a S Hq Ua aas Ua KH a Oa hba Oa H a s pa es Oo Ho a es Oo SH Oa SH Oa SH a es SO I |
| m HC O H A O H a a es Oo H p a H a H a es Oo Ho a es Oo H a Oa H O p H u a Oa H O p H u O p H u a Oa H u a Oa H a H a H a p a E SO H a es Oo H a Oa SH Oa SH Oa SH a S es O |
| «a ° a - a a H o p a e e Haa UO a H H Haa H p S U a S H p u a a S H a e S O Tp S H o h a H p S p a H H a S O H H sp a a H a S S |
oEEs,»s' 10zAAA AJzZZAJIJaA ZAOaJ UcKa AaaPVI IACU AZACOOUIAICIAUZ paooOJAU bzAO OZUPAO A OAIbPSb AAAACXIOBp ASHOp aSH au aaSH Haa oE H U pS Ho Haa ae SO HSU aHa USa Bp HU pS SIOHpSa aa bTob OoH WSHOp OaH aq qOUA ap AJzZAZAJIJaAaZAoAJO SA AOIOAJIAUCUZ aacooosA pZaSA JOAOCAUCAOapAza px
A rqoiw wirw q sio[suvs] qn q"zo,woj o
OAAU U O (204 日 Z P A I C O
A 1000000000000000000000000000000000000000000000000000000000000000000000000000000000
05i pcpF A b AJAOJIOPOcIpSp ZAKOAA (O AJ AINSAaaOI COJIpaO paOOAnz HeSO H HoHsaSho HU eesh OaS eSO H SaHO SU a Oa H paO Hu Sa eso HsOa S H
As o p2zp A1pIs OAO (Zw) (ZpAlOIpIUSAUUo AJ AlSAAoJ
O1pa0 pacOOAuz HuaHO S Ho eesh OH aesO
Osaa Haa Haa O Ssu UaHaee Ho Ho OA
SI bpuzaOAIAOJIAO poCUsIaAaoOolpa0 paOOAAAJUc
OZAO AIZpAlp AJIOASSa AlpSSOAACp IouaIIpApO apu
OUCAa BAKISAAAOLpa0 paOOAUJAopOpUJ CQUOZAoo
AAAUcpUZpoCIAu Hoa H O SHsaa O H u P5 SaH
psoa aaHpsOH Hpsust HUsaa aBLOaOH SppSh H Ho HA
SUUA HU aHO Hpsos StCH Us aOaHCaa H O HueSH
OH as esv
Asj-apo OUIAUAAoOIOIpaO CIOIAaueISA (AOIOAA)
IpAAAUO COIO SCApZOISOUUip cap AJPZOAAp AJapcAIAZCAG
OpAUOzOSsA ApOAAuICApOAJIAZC AOIIpO pAAOpl
UZAUPVIZAOA AlAIAZOaZAOUIAPF A PO OIOJAO S AJ
pIIAUAS I ACIO SAOpzPkuOpzAX, OHsOaaSbSOMaOH
p aS aa psh aa HsaSAHa SO Op H U aH OH a SH
0 p aa SaO a H U SaP Hua Oo HaO HApSaa H a pY
ASI WApUO CIpAlCOIOOACz cOpAlAzCaap AJUOs AJAoPI
OpZZaZpOSSsA AlaOpJAac PbOAOIP AJ CZZkuOua aash SoSCH
Usaa 1 S H HU paSO Ha SH daP OosH U Ps Sip H HHO HA SHUsaaOpUU ay
AsJJZcIcaapAUAO SAALpO AISAJUApzCAAUAAIpOoIPp O cua pIAO AZPJA JGIAO OJ CIO OOZPAAO IpZZORsXAuip
UZAIIpOSSa AJ OZOO OXuOoP aSHo H Hu Ha apHO aaH a a U ee Ho SsOa SHOSOooSao H Sa e SO u
p pS U S a OSH U pSh hao HU a hho PSoa S
ASJbOaZIcAap AJOO AIIaIOSSsA JaocSJA IpOp JUZpaKoiAAOooj Oaauua OIAUUAAIOISAAZZOIJUzPZOIOAAAooi OaAUUA O
AùUà AUp bZZAXx H SÖg H Ha a Hu H Ho Ha ShaSOSH UUSa U a Oa 'U a aa H H" Saaa Ha a p H aSOSha a e a H u aO hSa ae S0H a a ha pa ee Ho haaeeSY
<0UcAJaApupJpAAo AocAoZsA JcO Sa CAlaOJ AOz pAAoIsoh
U, OHpSOa ppS USCH H es SO H U Sa a H SaSp a Ho HaO H
OHa S HA a H Op a Tb Ha o Spp HSUa H OSOChaa H
SA pS aa Oa HPS US a OoSaOH Sa OaSHopSOa Su
aSho Ha Hp Ho eHo Ueesh OH aS eSO H aUSSa H
O es SO HO SU aS V
H' a OoSh H H o Ha S h O h Op a H'SUa H a H O p U H O aaaa HHa S h np Ha H aa O Tn H U SaSp aOo Sppsh H U S aoe H SaS H e H pp O H Oa A SHo H e SO H O S U aS g
U-S p O'SH H HO H aaa Ho Ha S'SUUa H S O'S H O O HOSOH U'SU a HA HC H U pSb H Oa H O'SH U'SAA S H H aa O'SH Op aHO Haau Cp H U eesOHa e SO H SA SaP ooShaO H e SO H H Ho Ha SH p Ha' e H II aaaa H h Ha a p Ha a H Oo a SH OH e So H O'SU aS V
OHPSoa ppS USCH HPSOA a Oe Ho Aooaa eesOsO U SU a Suu aosoH aSH Ha VqaaSHuaKH aa H a aHa aOaSU U Oo OoSH aa H o a hap aee Hp H np ap es SO Hp a aV
psJAOA AIIPIUAAApIOAOJA O pIPF A PO IpIJAOOJOZ PO aAIJA O pOCAISO Zp AIAJA pAACIpOJaOpISOUcaOOAUAAUESA O AZP J AUOZA AJAOAoiPiAp AOOZ PAAOISCU JOA AUO S AJ AOIsOUCACOOAIpZA pIAI USSAZOBIPIpO BJ ZpAIcOJAIO p O AZZA AIPIpO p CJpAIcOJAOpICIOAOPIAOJOUOJOAOJOAO SOJOOH
p aShoHaOpS0a ppS USH Ha pS UaKH e 0Oa Sg
pAouTu Oo OoSho H aa 0aa HCSU aS UaKH aa H OH
OshoPSoa S HpSoa ppS USV
OSI AJAPUOIOJAACIPIpO pI ZpAICO OAAUUACOASSp UCI
OSSA AJSA JAOUAPIAOUAALPIZ OIO OZCAOOISA paCOOAJI C
ZPAICIOAOIPUAApZ cAI OAAUUAAUA AIOOZA OZZPV (IpuAc pAI
IKOZA azzO AJ Upaaoyp AUOJAIZAOA AJPiUAApZ cAUOSOUc
ACOOIAOIOPOZ pAII OOPUApO OILpIpO pCZPAICIOOOUC
UP wAA O pZpAIOO SIAZPO AOZX' OOOAZp AIO pCZOATCA AJ
IpUAApz cAI plSAaOOLpao paOOAIJOASSA AZp Ip
pIIO Cz OJ OZpOZOIAAIIpIpO pI ZpAICIOIO a0aIoSSsAJ
AC OAAUUAAUA AIOPOA OIIISOUcCzW cAOJOOZ PAAOTOX
Uδ à āa H USSaa° ¶p āa H I' SppS O Hô Ha SII aO O aa a aSH Oa a Oa H a aV
ASIAOIOIpaIOaOpAOZJAOpUAApZ (AUAALpOAO pU OApIOAISSAAOKIpao paOOAWAO Zp AIIpO pOAIbPAAUa pOzPAIOIA JpAAZp UCAAAIp AOpZpa AIPIUApZ (AIOOO)
UcpO pUpZpApAOpAcPzPjOAISSaaaoCoiIpaO paocOAXo, O H
a SHOp UU aUdakie HAs H U eeS Oa eSO SUa H U SaSp TaObS0a ppS USHO Soa Pa Ka aa Hoasa Oa Ha pV
SJKAJAICOPAUCIUAACJCAOIAOOZpAAOIsojOaaZOJI
aIOAOJcAOpipOJPZpAICOUPUcaaP AIOAOASPOOAIIC
C0AIOOCOPOAACO XO OoHOHOaSOH SUsaaosu
U aHaSaaSHU aSHU SU SWuOHb aHOoo HCHOb aa SH
aO HoHaauS aHO aaHaahOa OH aTHa HOa pOe H
aaa Ho Ha SH H OY
ASI'ooJaIcAap AIO pUfpoAISJAABz (AAJAAOOOUIpOoSCS)
peIpZAIOSSaAcIJIAa(JUZpZOJAAO pIAOOO) OaAUAAUAA AIS(S)
SA AAZZOux HHa a b HOsHUMh a SuHa S a H U p OShaOH S Ha aSHo H aa HHa SHa Oa OoS H U pS Sho H Spp H Ho HpSOa ppS UHO H Ho HA SY
ASJ CO pJAUAAC AIOSA paOoA JZpAlCOW AZA O COp AJp S OAO (ZwAJUPOAOIpza pAIzPcOxH Ho a HOSU e SO H a Sha H So Cp OSH aa e SO HCUsaa Hp H HHOa SH aH'Spp Hp Ha Hoo HAHpSoa ppS US
ASU'US AApj COSA b AJAOISp ZcAOpI ApZZAOACOOAUapo OUI EIOIS OACOZOI JAAAAc AJAOILZpAIcOJI pIAAOZ OUKoJAOpAOpOJ OPUAOZpAIO ASOZ ADOAISA JAAO ScOJAUA AJAoIPSp AZAXu Hn Ha Sllp Ho e Hs SaaiS aa O apSaHuaK° Spp aH U SaSp HoiBp Soa ppS US
taoacooA AIIpAp5spsOZZcapOAA O A
psiO OAOIOZOA aAOZOISs pZcaOpAAA Zp UCAAAUIApIOZZpJS OZAACOOAJAACA pSA AAZpO AOZX' OoiAzIcap AulpiAAApz (AAKOJ APUOIOOIAUJAISOUICIAO aOaA OIOA bPO AOZAJIPIOZZpS ON ZAAOAXOA O AJIOOOISOZAUAUAUA AJAACuPcO A (pZpO AOZAU i pOIOAP AIOSSs AJAAp AIIpApIOZZpS OZAocooKoA (O AKOI SOUCOOUPSA ZpxuHa ahpSa aa ppOa Oa HbO h aUsaa Hb Saa Ho Hsu eSOHO Haa ap HaO h o eso VH aH aSOSH U Hp Saah U Soa H u So H u So H u So H u So H u So H u So H u So H u So H u So H u So H u So H u So H u So H u So H u So H u So H u So H u So H u So H u So H u So H u So H u So H u So H u So H u So H u So H u So H u So H u So H u So H u So H u So H u So
OIOA OIOAOOPO AOZOI AIOI OIIPISA IpApIOZZp
OZAA(OOAIOOA C AUN-APIO pIpApIOZZp 0S OZAocOAJ
IOIIOOIOO OAAUOAaOACOOP AJAO AZPPOAZAVUOZZOW
AIOIPO PAAACOJP JaOJA acaO CpozaAOACOOJS (O p)
JAZICAAPxos USO OA HO O aT OSA aHOaUS pe H
UU ppPSa SUUA ppaaHOa ap S HpS Ua OSAo H dae SO H
HO AOE SO abHO Hp SaH O S Ho Hsu EsOy
ASJIoS C AJO pOApIO A0ZAJIpAipOZZpOOA O AJ CIS OZAacOOAJ
UOIIOJIApUoi CJpAICSp ZcAOIP CAOO AUSO AZoA OJAUA AJ
LZpAiBIIAOZ OIAjZpAICb IpoAOIOuXoS C AJIpAioZZpI
COAA CO AJ CIS OZAocOOAJ O (pOzAiljTAApj CZO OJOAJ IpW
UAcP AJuaAUXOIOpsAOpIpPo PJzPAlOUp WSAOAZpJ
OAIISAAAOLipoaO paooxuz H aSHHOH aHS eSO H
OHa SHp Saa HO S Ho HUsa es SO aHaoe So H
aaaS ap OA V
SUIOSSOA@p AIIPJUApZ (AUAUaIapOpAOI CIpaOIOSSs AUAI SpacO AOZOUIAPiOZZPcOAA C0 AJ US OZAocOOJAOS A OIOZpALCOU, OH HO SHOSOH U Saa HOpS HOH aHO aaHaUsaa H a p HoHa OaSH pSOa SHua SHo H e SO H Ha HaaaSip KHP OPOA W-O HA OHa U HObSOa o e SO H a RHO aash O Ha aP V
q"fclqpshitaOaOOpAOzO]AIAaOAOJAc p
psj Zcicap AiaOIAOJAac pAAAJUcpBZZoipilpIp0 pI ZpaICOJC SCAAPZbuxSsuaa5 hpaO Si ao ha a a
S HsHaU aas Ho H S 0 Ho Hha SH
H O5 H ee H Ho Oa Ho H Ho Ha SV
ASJIoS AAp II OAO AOZAIIOU (USOUCz(aOUI AJptauZAI AJIp) S OAO p JaiCOAaIOJ AIAO ZAPoZAUI AAOO AOap JPIU A X H Ha H a faaaa a Ho aHa eSUa 0 Ua H H SEHOHa Ha auaHc aa aHp e oV
ASU AUXpJAUSAAcPbZAOACNOBApicap JAOU AO ZAI SO COA UCNOBJAOIZpaUaAUJIOZ OIOPOZA (pTAU AJAO SOUCN) AUOOAC pUm H UO a OOS H S EHO HA Hnaa Ua O Ha H Su a HUs Hs e aSaHSpa aSah OH a HcH p Hua HHa H a p e oV
taoACNOJ AIIpAaoCzPj AJS OZAAACNOJCOAa C0
psloOZAUIAPlaZicapACNOIAA A0pUAI AJuaJIbApSA aapI S OZAIZo pKOAAC JOACA IAS AAAzpo AOZAA' Olauip IpJCA bucIp ApSA aapIs OZAIZo pKOAAC POIOAc pICO AO AZAOJOUAJA CAp AI O pKcUOpZOCoApXPO CUIOUAp JOpZp IpJAsa aepIS OZAAN O pOZA0A IpPoczhu H Ka Ha H Hua o H UhaS H Hpu ae H UpaS H SpsH UP HHa HaHaHaHa HaHaHaHa HaHaHaHaHa HaHaHaHaHaHaHaHaHaHaHaHaHaHaHaHaHaHaHaHaHaHaHaHaHaHaHaHaHaHaHaHaHaHaHaHaHaHaHaHaHaHaHaHaHaHaHaHaHaHaHaHaHaHaHaHaHaHaHaHaHaHaHaHaHaHaHaHaHaHaHaHaHaHaHaHaHaHaHaHaHaHaHaHaHaHaHaHaHaHaHaHaHaHaHaHaHaHaHaHaHaHA HaH H HsaH SaH O aSaH O aOo o aHbHsav
OsIgOZ OIp JAIJAaOACOOpO AOZOJI AIO aAIIAJ AAAASAPACNOJ AJIpSaaipS OZAIZo pcoAA (XJOOZAUI AJuaiojApAA) ASp p JAIpSp zoUcIpaS aaipS OZAIZo pcoAA (OIOJI) AUO ZAOOJAocOPOAO AZP0 AOZXx aEahO a 5 oath H aHO sHU EsaTHSAa aai pa a aauo H pHuA Hpu ae Hu Sa paS Ho SHa a a pSOH Cpa aov
ASI'0ipO A0ZApO CIO pOapIO AOZAJIpApaSAAapIS OZAAZO p COAA CIO IpI ApICap IAO ZAUJAASACPIAUO OIAUO ZAUISO J COO AUCNObIOJauo ZAUJAOSaAUZOBXJOO CIPApSA aap IS OZAIZo pCOAA CIOAOIpSpIpOApJAUOIzP IpJAIOAO AZOJ AOUAIIpJAOEPI AJUc pApapIIAp OPJSAOAZ pJAOLPS(AAp) AIpOeIXoQAsH SaO Dalla OESAh U ae HUs paS H 0DHa E HaS Da p OaV
SUI OJ ASOUZb JIJIa CpuAaOlaobipuAuijIpApSa aap S OZAIZo pioaa OJOIOAao AIIpIAoeP AJUCA bNJ, O H SEHO Ha OHUs THua HOsh aaTHS U a Oa h ao o th P UHa Ha Ho uo h p Ha DaTHp Aoshaosh SHua H Opa Oa HaaaU aSVMsoa H Ha USH p HUSo p H aa H Oa Ojo H Ha V
q''fclqpshtaoA(No) AJPJaZp AJAaP
psuUpipIaZpJ AJAalpIpS O5(p pSp pIpJAOpj AuaC JAOStAp pxh Hpa Hae Ho DHa + daH a Hu Hapsh aTH SuHaoh SaH Os Hua H Op Sho Ho H h Se H oHa V
OoiotaUp IpAazp AJAalp AJPIAO O pIO CAp pJAOLipU OUZ aACOOAU AIO poAOXH SaS THUsa p jOH S O pjOH OpS paSAH Ja OH Pa aa Ho H Ua H Pa' Ho HaE HOSHU aHa a H b es-O H U aS
ASU ZICAAUACO S AIIpIAoAp IAaIpZpO dCAOpI ApIcap J
nAO ZAU AXOO A UOOux Hpa' Ho aE Hu aS0 h p H aHb OSh Op aSOaIcTao Ha eHC0 e aTHa Ho aSap bSOH aOH Sa OaSH Ho aSa aHa aS aPsh OH H Oa H oSh H aOe Ha Hb pa V
SJIpUaAIIpJAzPJIAAcPIAaO SIpJuaAaOACNOVI UZp JAO CJI AIZp IpTOep pJAIOBpOa pAIAO ZAXm e Psa aH Uaa Hpa NHO EOSa OcOSHaah p esHo U asy ASU OIAZcap IpjCA pAIOBIpJAzP AJAclp AAOOp px Op aaSAo Hs pjOHua Ou SaSp Hua Hp U ae H Usa paS np H daOa Oa V
WUZ aAACOoAUP cACOoPIAU AJUAa C p Jaipoo pTAU
A ZICAAIS OZAAACNOJa CzapKx H aUsapjOh o aO hao sh ap aaSauo paaa H uon ooh ao poy
" a b H Ua U OaHou Sa ppjOhy Oa aHa 0e HsOH dUa OH a Ha U Hsu paas anh p5 Oo hae SU Ho U Sa pp jOps Sdap U Sa paSbSOa H HUS aSta Oa aHsaPpOu Hsa PpOo e Oa Tp apSCH U Sa ppjO-U SaStosav
qHUs aUa Ha UoSaoppaOoSHAaHa H Oua OHa H U eao H HA aOH, aHaOHaa HO aAs HsaHaa H aH aOHO aHbaPpOo HUs aSh H u HUs aOUSAaOsus E U SHsOHaOH au OsV
zSha Hua OH U H Se aHO Ha PaCSaHO aSaHpOo HpCp SAHpOc Cp OSAsh
ps aUSoo OH Ha aOaaapp So aO H OESV q H St Ho Ha Hpa O Hu H a HpSav
X ah aSap SO aO a aHO HeHo DOnHa Hs SH F0 Sh aah aSap SO aDaah Oo pdo OH Oa H npPv
" a B HeOp OA H Se aO Hp UOA ETH au Pc oAh OH aa Oa Tua Hpa U Ohpso HiOS qzhd'cuZy
iS h ASOSU Ha aah 0 aaa all
QHpS aah Oa ao Ha Ua OHOa 0o Hp a H Oa aoAs Ho S HCtTu Hua o pp Oa av
mo UA Ha Sp oHHa Op Hu Ha aHa Ha Has 0a OH SaH Oa Ah H Se Ho Ha V
t,s' 'Jszsq',Vq"
T CteyHd
mHaH Oa aUaHo Hua aOSt H OH ppa bSHU H H Se H
O Ha OH OSaHOaOsHa aOOSAVHc OH ST H OSH
Hp aPbUAo H paa HA OHO S H da a o np aeh OH
pa OoST H OSH pShOshu Saap paSWqOp aHoo H OH OSH
Pp aSHoSkaa a paSHo S H da pa OA Tdo H a a H
a H aoHa ap SHo USaaa Oa H aaS e os US hy a V
qaa H Ha Ho H U e Ho a ESEoO p Oa HO H S Oa
O Hu S- H St Ho H Ha V
q"1 s0vpsi JsZyq",,wqo
ospa Ha Oa HpS Oa HmoH SOS Da bp Cgaj Sh a e H
Oo b osH U p Ho Hpa Eaap aw- 0 NOH auUsa H
pSO aojoh Op a aHa Oa S HA T oShua ahpso S H H
o aHO a OoUW
Osopa U dUa O hao O hU Sa o HUs Oa aUa
O oP hch O aSaPi pSHPrTH"opTHi opQTHu Kaia a O
U aso Th eOioS ah aa Pdo AHU HOaa P SO aH npap
OHe OA jOy
qOp a H Dua OHH dhAs Oa OHUsa pjOho apSo pa o V
y Oa O Ha U Hp O Ha U oSho H oSho ppjOh H
Dua Ov
mAo aHb oaaaepjOHO H U aSTpSOa S ha H
pSO aojOTH Hp H Oba H aOa Oa Osa H
Oa S SsHooAep OaVaeHo paaSa aHaj S-Ua O
a H U oAUH aU p aa V
Zwi wqwJr s|z0j"rrws"sjsloo-o'-s
oa OoSha HUsO 0a aOp So OaHaO H 0a H Npa b TH H p jO ba jOp Ho H pS Oa Ho OUa H aaaUsa Ou HU a OoSH aeUa aOp So HpSOHaOH aa° HbIm
Ozqqgqw' Jrsjog srr "Jolzoltw ozwr or
xHa Hpa HaUa Oha HuHpSaah pa EO SaH 0
10>>S'W;WS>>
p apS0 ba Ha U H Opa H Oa aH a H p° Silpa Ua H
a° ESH OH H DuA Oy
ma e a Ho H apS0 pa H H Oa Ho H a Oa H o H a Oa U
pjoh OA aO h faa HSH a H St Ho HA
x U H H Oa Hc H aUsa aAsu Ssa PaSbSOHaOH Ua Psinu
m aOsah a Oa aHO a H aHa Oa nPa PsalHa aU a a
a O avH
x A Oa aHO Ha OA pjoHO H duo HO OH aa Ho aU e o aH
OaosS S OaSV
" a H a Oa H uS aSW " a H aHa aHa pa a o ah OH H
Oa S Ho Ha HU Ha a H aSalho Op Oo SV
y Oa O H Oa H U Ta p Hc H 0 Hop a Hc H a H
Oa V
oSoa S H aOp jOHO h Ahpa" a auu Sa paS av
Oo OA Oa OaS CHAO H Ue Ha Hu a DOnAo HA
CHAO O ES- a SH H Oa V
< HEO HO pS0 ajOo H H Oa II Ue aH a HU SAHO Heo Ho H Oa U
pjohU U oH au p OA TH pp HA OH DuA aHa aHa H
HS Oepjoo HA ap SHp OA V
apas Oa pp as Salch Ua aaSally a a WhQHp asoH
OpaH Ue pS USO Oa arOS ab aSaTpsOa pa HPsoH
pa Ua Ho Ho aa a aa p So ho Ha ap Shy a H PpSOaa a
aaa Ho Ha ap SHanpO pSAQ
qOhp AsO p As Tua Ha pa aoHO au p Ro H Oa WH
iSH aS Oo Ua Ho Eo SHo U aSHUa cOH Ha Ua a
cU Oo Ho aU bHH Ha a Oa Ho pp JofH p sO pHoOaa aa
s 0ty auqca Uk bZYthz b' 00 00 01s
r sqzo, oqw" Jr slq" t" j wroJqs
p p Sān° ESHOa aa HcOp h aUSOa° o dUa H Hu ŠoapaSH
δ ab aSHo ESHUp aSAHnPo bSaJhpa U haSə ah aUsaP So ah
U a Oa aHO aHO pa a AH
YZZNbaW, qHP" St «QH
YYbW' WqH
YZ' W YW, qH
cHuA Ka H OH U Oa OShC aADOO a
qz Hb d' ZUZf YZa
qz Hb d' ZU Uaf YZ'
qz IaaYZ' UZf YZcS mZZf Y Y
qz IaaYZ' U f YZa
qz HbZYYYYU f YZ'
qz HbZYYYYU f YZ
qz HuqoiB YYYf YZd
CE 0000THYUZZUZc

mäöwàHNY 0o pbaS maáSeOshU H O ppjOHO SahlOSpa OaSaanpObSav -paSObOdaaa Ahs t y aUqca UcA bZYtIcZ b'» 00 Oo OTs 0c
"1p"z"

m-qzou zHmp"q"-qzoumljqxus "I

x a0aa app S0 a0 a 0a 0a a 0p50 pa H Oa

a e HpsoH duao Thaae Ha U H aH 1sppjov

aU Sa paS ah a a Sal

aHUS H SaO H Dap H Sa paSbSa HUsa

ppS0a Hs Ha H U SU a HpS a V
maH Sa h a o a a e a a H Oa Ho a 0 H a H U Ss Osa u a o ahp Ss a H Sa xh a d a H Oo p o aHO Oa npa p V
aé H U O aH ai O aH U 0 aH p Cp o aO aa Oa TH aUa aOpS0a H hpsO S 0 HpS H qz d' cUZV
jAδHouδOaa HApSa-0Ha I
zSsOu aUaHua 08SH Hua O HpsOae oB uSy
méaaa H à Sp o b Ho a OxSHU Ha a ha Sa° Ua p OaSH Oa aO aS aH a
>>oEY"JsZyq>>,Wq"
T CieyTI Hs
mSha a HSHaSauSHoOa aUaSTHH OHa Ha du O U H
U SHA auSHI Pa bSTo OA S-0 Hp Ho HA aooSaV-SoaaoSTHa a
Oa a SHUSo Ha S-0 aosHa pkuuSA a o hOSHa auSH
p Jo bSs pa SO OA USd H pSOa p Hua HsHa auSHoSUd H
Hi O Hx HaaSH pSOa p Ua Oa Oa Tha H a H ha H
p Oa S-0 Ha aXsai aaaS e osH Hy a a
Z uSHA Ha o Hu XHa 0 THOaOaSHi OHOuSHA H
U oSV
ZuOxy"J1srs
jBpSOpa HbHpS OaHaOo SOS Da p Haj HBaa OauSHo H Oo pHOu pHo UUsaOp WmHpSO auShalhaS o aHb Ha HpSOa paSHo Ka a OHa 0n NHUsaata TUS alla aUa Hoa HpSOaaaKxSHo p aa HU Sa pxuShu
mU SaOuS aa p SOD SaTha e o Sah SH h a THo a HU Sua U OsaHUs Ha Ho aea OaHo Oa Ho aSHPrut"opti"opQW
mSh HBI O T H Duα O Hδ a HA a o a o V y Oa Ha U HShp O Sδ H xuSH S HεSö HO pXuSHo H Dua O V
məa hO Ua Ua Haa e KUshO U Sha Cua a Sb oAsh
a a Ox H H HcP h aaU5-0 O Cp 0SalSahO a aa 0Salp aHa U p aa H U h AHU x aHb O Cp oav
Zwi ^ oxy"JrOJq"nns'sr sJo,0- s
mH a kU5-0 H5 Oa H U a 0 a j o p h a HUsaOp HSH 0a H P H U a HSU KxuSIOa HaaEa HZbM
>>wOxy"J0 >>",WorO
mHa Hpa H Oa H paa HpSa aHb aSaH
i0 >sXY
mOa aHO baa Hua Ua Ho a Okao Dua O T a HcB H 0haS 0V
O aCUa Ua Hb Ho a H Oa Ho h o npap Oa a-0 H Oaa SsH Sa Hf OHa V
x U HSHU SHa a SA HsuSb H uO Sb pShm a OaOc pHd dpaSah aH x ah aS oAH
y Oa Hb aS°aa aδSaH a SaHb oA xuSiO h p xH
UaO
" a H a Oa HSHUH" a H a Daa Hpa a HIOHooa S H 0 ha H U a a apSaiO OpnuO S
y Oa O S U S U S Ha pSHa HbH Sa a Hua aV
Cua:HaOxuSbHa UaHb Hspauxu
Oaa OaS H Ue H Oa a Sa a apa0 Ho Ha SO Hb Hc Hb H 0 EHa a SV
丨 SpS0aaaS 0a Jua a H Oa H npba p H aa a Hoo U Cp oSH Ho a Ha aaaaotuHs Ha HpSooaa H Oa uu Hua Ha 0o HO HS Oe Kus H aa aaiOp Sp Oa V
a é H U O all p aj Saly a H U K aHaS° aa Oa ah y a a WH apS USO Oa a-paf Haia aa aa uxS OuS aE H op a
aHa Haa aataosAoHa aKSHo Ha aaaiOp HApOby aau HPsOaaa Hoo Sp a Haa HBH Oa W S o aOsHa aKaSah 0Ha aaaiOp HApO p QV
mH O bSH 0a Hoo p kUsh HOp Hua HpOaa HOp U Hpa Eaa p aH Dua O T-Ud Hua Ha Hdo a O SH
aU Sa aSHo Oa H npa p f-b a SO pHuOa aa ah s tTH y aUqca U«a b LZYHCZ b' 00 Oo OTs OcJ
rsqzo,oxy"Jrslq"t"wrorslqs
p p SaTHaS°HOSaa H Oa aUSoO o d THua S-U SoaaSH 0 ap aSH Rp oSa-1npoPsaNpa U HaSo ah aHaUsa Xhb ah aOu aHd aHb a aah
YZZNaW, qP''St «Q
YYbl' Xoq
YZ'WYY, q
aOδHaδHa a0a alla a 0a allos Só e a
qzHb d'ZUf YZa
qzIb d'ZU Uaf YZ
qzHaaYZ'UZf YZcS mZZf Y
qzHaayZ'UfYZa
qzIbZYYYYUfYZ'
qz hZYYYU Uf YZ
qzugoib YYf YZd
CE 1>>00ddOTHYUZZUZc

ma 0o Ww HwHy O p paS
maaS e oSI H aO H hOSpa Oa KxuSIAIpO p
-baS0bOoaaa ahs
y aUqca U«a b ZYTHcZ b'» 00 Oδ OThs 0C

"aa p"zs
m-2q 11j q"us I

x a Oa Oa H So H Oaa aHb Oa aHO bP5Sp HuaO H aOp SO OaSy

aHa U Hpa SaHU Sa pxuSh Sha 0 HpS H Dua O V

aHUspaSahpaal

Hap HU SA pKuSbS0a UJ H U S 0

,aHa aHb Hsu pku

ma a h paa Ua Ua Ho a Oxu SIO duai O Ta H Cp ho HaS 8

zuS U Ua H S W

mp aaj Suhz uSbOp aeosu U U OaSHOS THaAUSOea H pS b aaj

mU SaH Ppa PsAouSHa a Ha IES OsaOsh aS
Os Naa pSmmU SaH Ppa PsAa H ba JOpSaH a Ha
pS pa OsaHa U Oa H Oa a all Ha H U a Ho H
pp H H OxuSbPba HsPa Os Xb a
Aso H U a ho H pp HUsaaSaHbPb Ho H aS O
aas o ahSp aSaHsA a aoo Os aas e osi

Oa H npa p Hp aa HU SA pkuuHr U Oa Hnpa p HUua HU Sa pkuuHsOa Hp Su a Hpu a pSauSaj HU Oo HsAs OaSHDa pST ah a H uP kTuH o ao HU SA pkuuHaA U Oa aTH P S aosu A uSah x osz uSd a aUsu a aSU Hpso auSaa HsuSa pkuu
nr
"Spooh Ha eS
"5 aal0om

oS Oa H a 0

y b HbHsO S o hqS U

y b h ofoS 0 0 hn aiOb

y b Ho HoS0 S 0 Hq a Da p
Kortugués
| »sqv" qvsjususEs"» | q''fclqpsJ YAH Y" | q''fclpJ YAH Y" | q''fclpJ ZZYAURZ Y" | |
| i Söäpää Oä | H'adbl HYY | WVYYYYZZUeEEE | a bileYH WNH | a cllYY HWH |
| WVYYYYZZUeEEE | WVYYYYZZUeEEE | |||
| z S O H | a Oha S OH YY» | Y | aYYH O | aYYH O |
| Ö° aaaaS Oa I' aYY: O | ||||
| æ° ðBIIah° S O I B | allah YH | allah YH | allah YH | |
| é° 0o à H TcaH H TcaH | ||||
| p a Hô ° aéö HaaS ahe ° oH aW TYH H TYH H TYH | ||||
| p a H a O-o He a Oo OH ON T + T H T H | ||||
| y aHé Šuá H' EbyONM aPbByO | daNWB' MNB' BH | daNWBcMbH | daNWBcMbH | |
| s a p aas OaH Ho j-mu U Sp oa -YZN YZ' | ctch | btbl | btbl | |
| uAIAc UcOAO O pZAI | ||||
| y aA o OHa aA aA oHaS Oaqzb d'ZHT all O Oo mU aS O | a OaO a aHa OHI | b p O' O aF | ||
| s a bao a Oa a aHp Oe Owi OnPmQ | eZTdHONPmQ | eZTdHONPmQ | eZTdHONPmQ | |
| s a Oa a S Oo a aHp Oe OIw i OnPmQ | ZY TdHONPmQ | ZY TdHONPmQ | ZY TdHONPmQ | |
| r bbAIO OaUAAA O A UK | ||||
| » (IICOAUCOAO O pZAI | ||||
| -Sa H O aa O OIPA pAs s a O-b H paO O u OHaS OaHqZ H d'ZV | ||||
| æ Oha OI SaaH | TcWá | TcWá | TcWá | |
| - O a a a a O | ZTaH Wá | ZTaH Wá | ZTaH Wá | |
| Öe OIw i | ||||
| t oo,"qv t w"uk | |||||||||||||||||||||||||
| p | öö | é | ö | á | éö | Öha | ö | ha | ö | á | á | á | öha | ö | ö | ö | á | a | Sö | öö | ö | a | á | á | |
| aSS | ó | HSO | ö | Ha | E | Öha | OH | UU | á | OHT | EH | aSS | Iap | aHSS | H | OHASS | SU | HOAP | aa | OHa | OHO | O | a° | aOY | |
| p | ö | a | Öha | ö | á | á | aSS | HO | H | á | á | e | HAs | U | aA | Ö | a | a | ap | HU | aHH | öö | a | a | ap |
| áp | UH | p | á | HSS | ö | OS | Ö | O | TH | ah | OO | ö | O | aSS | ap | a | a | a | a | HSO | aHO | S | OHSO | Sao | |
| aS | oath | Öho | Ha | ö | aH | aE | OHP | a | O | HO | a | O | aO | HO | a | HO | H | H | S | Oe | O | H | Soy | ||
| "SS | H | Öoo | aa | a | H | Oap | aa | OHa | O | a | O | a | aH | S | aOHS | HO | te | O | HO | O | O | HO | aH | AU | a |
| a | ap | O | aH | aH | Sa | aH | HSS | uath | HO | a | E | H OH | a | H | H | HO | a | HO | HO | O | a | HSA | H | U S | |
| Oe | Oe | a | Oo | Ov | |||||||||||||||||||||
| n | U | Ha | a | a | a | OHa | H° | ap | O | a | O | O | O | HO | O | O | HO | O | OTM | EASS | ° | ofSoo | SaH | OH | |
| a | ap | H | ap | UU | Ooh | UH | aOHa | Sa | Oha | OHO | HO | O | OTHS | O | a | Ha | OHO | a | USp | aH | O | O | O | ||
| t oo, "qv tv" ulzAAUJAOIäf (ef IpIIA) |
| aACCAAAc UppOa (cacoAAUppOa (cacoAAUppAoiAoi (OAAO) |
| AOIAAAàOUI CAla(OHAZpSSp ppZIOZapOAZm ào |
| a ap aa O OH OaSS ap a 0-O aia S o OHS uS as oTH oA |
| OH a ab hap S Th Oo-S oaa aaa Hasah as oOy |
| pAa bp IpIIAja pp UAAaaa (OAAOJAioOO UAA (AZAOIAO) |
| ZOAI OO UZAJAAa aciX |
| Es#ziuvsur"''»n q>>ss''|E'''' |
| vo'rqquySZlous' |
1 ppAO AZAO A
| pS | usEoo,lvOa Jaa IApö AoiacZI Aioaa Ziapoi AJ appAoo AaoCAOJAIOJAAJIappAoIP Vv Oa JO AZia Apo AJ ApO JAAaZ pApO AASJOIAAIZIO OZO AacUapUZum aiHdo pe | |
| p | e a° 0 H 00 Oia aaa Saath OH aie o h e Ho ah a a SDO OY | |
| osu | cEsIOCAZIO A JAAZia A IuzaiUp f ap UH OMHSOD aaa H0 aha O' ahe o h ap OV | |
| ASI | «pui AjppA CAsZAIppoi AJ CI ZAIapOJAIZA A Iuzai Ippox q Oa OH Oo HO Oa S O ha Oo SS aHSOD aHa aaa H ep a° Ha He EOV |
| S i v oá ZIAAZZJAPAAOJA I UZAI JOOOCJOLAA JApO JOAOSJAA J OAAJAPUZX AIZAAZJA I UZAI JOSIAAOJUZPACAIJOO A O O J apUZUt all aH O EHS H alla aaa H S OHa a aa O'S H ah a Ha OHpSOa pAH all aH p THa aa OHa OH aH e OHS HA all OHO pSOa S HA O a OY |
| ASI V OA JAAZAIAT Z (UAAJAA AA UApSJPIIAAOJapUZppO) AJ AAZUOIAA AJA AASalpi I AOJIULAA I lappo AA AOJA (ZAOA) Z a pp O(EUAZIOAZZAA AA UApSIAA O AO AUZ OOO IAC (OAAO) OAJ AIAAGJOAZI bAIJPO PI AOXJOSoa pAH OH aO Oa OH a ap H OO Haa OOH OHe AHSS Ho a OHO aO a H aap H Oap U-Soo HA UOO OH aRASA OH aap rap SV |
| ASI UAO acI JACJAAZJUAAaisAOJPIZE JAAOJPOpUIPAJOAAOJ AAAZA pO AAIAC COAXUp a a aH He O a a O OHa OAH OHS E OHO ah aHe OHa aV ASI UAO acI JpIzE JappAoIP AIOJO AZ AIEAUZAOJ ppZIAOJIO O RUZA aO OCAJON OO SIApOJAAZIOSOP ADOO ApZua O O O Ho aEO H SoA O OHa OH He p O U aOTH SU O O a SH SOH O OHA sa a e Oa OHO pSOa SV |
| ASI UAO acI JOOOCJIOAUP C A IOAa IAA AIOO A IAA COAA OUAA OAAAOJIOO JAAZIappAOp Xp HSOD O O Oaap Su a Olass H alle Oe Toa u p H pSOaa a OaSS Ho e He U p O Tass HSua Ha S OH OIsua H O e ae OY |

"apA0JA0a0ofoo (OJaAp0)AAOJz aAulpAh


taOAz(AJapO) AJOO A UZAOAUAAA Ofps
EA A AiaAicAAAC UJAOJA I cOUz aAzCu

a 0 OTHa a Oo H a OaHOaS a O S Oa H OH
O a a Teo Ha a OTH S OH a a a S Ov
w ah OH ap ahe oHaSS aHa He OH a V
t aHaS aHa S Oa HA OH aOe a dap U S aH Oaa
a OH SS He OH a H a Ha S Oa Ho aHSU H a ap H
Oab UH AH O
s a H OH Sa a O a O OH a OH OH e H Ou
Oo Ha S OS OH Ohqz d' cUZ
s Oap aa ap Ea OH u aa Ol
n Eo alaa SO h a H Oa aap HO a aae aa OY
"SS S Ho ao He oa Oo OHsa a all OH UaHO
aSS a a O ao OH Os a S aa H OV
SZSy"WqVsj,si
I CieyHs
maahO hap H Sa athaaSuHa H a ap H aH e 00 Oo Op VH ha pSoo OvH a ap H OHpa H SS Ha a OHa OHm H OaS HA aH oHa aH O H aAp H O aHm all o H a ap H H aO H aH aH aH aH aH aH aH aH aH aH aH aH aH aH aH aH aH aH aH aH aH aH aH aH aH aH aH aH aH aH aH aH aH aH aH aH aH aH aH
s>>o'''Z wWu
aa a Odsuinn o a a aa aa S 0a a a odsu H Su a ac u ae O aoo aoauoo 0a a ovm a a 0 hss S E HSU OHaa oSSareo opsoa pah S e T S aH AHSOaaa U Ohs OA a a HauV
"U aao H dp UH S ah EAH a O OH ap HPrut"op1 opO O a Sa Oha oV
y p OH a ap OH OH aHOa a OV 又 O S 一 E o i ^ 一 a 一 O h 一 O h 一 P O H S 一 O V osOa Haj h H a H aas aa THo Ha o au OH a OTHo THo HA a HsU ap O U O OH Ea WH np O Soo OH OH Ho OH U OHSS H OH OA
oo' z^ J^ 1psu, s1 u
pSS 0 0 SSU O p a O h S da h a h OH e H ah Oap OH a OH aap H dap U u OH OH aah S oH OH OH OH OH OH OH OH OH OH OH OH OH OH OH OH OH OH OH OH OH OH OH OH OH OH OH OH OH OH OH OH OH OH OH OH OH OH OH OH OH OH OH OH OH OH OH OH OH OH OH OH OH OH OH OH OH OH OH OH OH OH OH OH OH OH OH OH OH OH OH OH OH OH OH OH OH OH OH OH OH OH OH OH OH OH OH OH OH OH OH OH OH OH OH OH OH OH OH OH OH
E" "us"qv"sEs'Jusp,wyJEt s>>s
p Hé H all ap aHaSS H p a He aO b aO Saav
1 rV
"SS Ha e Oo OH Ho p Oo Haa Ha aHb
S0a aoSSsHa OV
As HA ssHo aaaa Haa OH Haa SS aSS e Oo Ha S oHa
S0a Suu OaSS Ha aHe 0ha aa aHS Ha a fo aW
O h a UU ah OH Ha 0a O p aOH aH Oo S
Os Whn U O O aoo OH aaa OH aOaaaS IIS H Oa
eaS O SOo O OH OV
ma EoHO np aaU a OH b p O hap SSO SAO OY
" aEO H a aas m" a to H alle a Ho aep H' OU
O OH HO He AHSU aa U OTM'S 00 a HA HSS S Ov
t Sao AH UU aap SSOH OH Hha OH Oo S H Oa av
OsOa S Ho Ha O Ka OH Ha OA UU OV
" aHa a aAS O HSOg Saou O O aa e U
OHa O SH OH Oa Daa H Ola V
mäo Oa a o Oa OH a a ab H op U° ap OaH aS anoe Ha S OHa aO OHSS H aU p HaSS O h Oa a a Oo Ho HA EHO H Oa Oa a US Oa a V s a aa a a Ody a a Ha S O S OHsO O oVoo O bS USOa OH S a Oa S OHa a O Oo aheo H ap a OTH O HObS0a paSH aOHSh p Hy aa Ha ap p Oa a H Pe HSOE H eaa ahapbOa QV Oo Ha 0o Ha OH ao Hsu H p O u ae H o a Oaah OHSS aO a Oo Ha OH bOHa e° OeH-b a SO phoOaaa ahS tTy auqca Ua bZYTHc Z b'OO Oo OTs Oc
sqG/Es yzo u/Jo' Es s>>s; i u
>>a O h S0o oHa Oaa Ss 0 e 0 a H AH U SU
Oapai OIO k- p O ap o a aS os aH a Oa H O O
a OIO I p a E0 OH
YZZNbaq, HP"St <Q>
YYbW Wqs
YZ' N YWq,
OHO HaS Oo Soa OHS He cOH ° a av
qzHb d'ZUf YZa
qzIb d'ZU Uaf YZ
qzIaaYZ'UZf YZcS mZZf Y
qzHaayZ'UfYZa
qzIbZYYYU Uf YZ
qzIbZYYYU Uf YZ·
qz qoqib YYf YZd
CE
00 00 00TH Y YUZZUZc

mäöwäHMy 0oOpbaS spaOHaSSHa Oaa OHaOHa pOap HoSpa OaO -paSObMooaaaahs t yauqca UcA bZYThcZ b'» 00OoOTIs 0c
"z; p" z5

j s qxq-1>>mm" "ot , >> uz s l s q" mm I

s Oaa apa alleS aa 0 Hoss eohaj o aaho bO O a 0 ay

n E aA O H aO b O h aEoH oHa 0

p 55° ap al

p 0 a Oa ap allaa5 ap 0 a a

p Hà ðá ðóap S O ōl

"55+ hé 00100b0t ha aia 50a aosssalai O

sOh baihaaS Oo

-5° S ONUH» S aO al a OuHa H U a a

q aap UU aOH S 0o aHa aHa aHaS O OH aS oHa aap 0 aSO ap UU aOH S aOH ab 0 Ola S O Ha e OH OaSS 0 aau O E H aS Ha S O OH aOe OH pcp 0 0 eV uO S H Eaa H OA HS Eha Ha Oo O ppc 0 0 0 fa 0- OH oe UaOa Ov

q a ap H 0ap UHa OHHO ap O a aa H uWq a ap H 0ap Ua OHHO ap O a OH a ap Hap S Oo AH O E Ha aO a aS a TH Ha OHSS HA aaaH aU OH So OhaS U aheS ahOa OH a aa a a H aV q H aH OHaSS e Oo HaaSS Ho Oa a aHa OH O Oy
nr

"

a aaaSs

qai Su allac 055ha Ola Oaa

n aaiac 05sHa OHa Oaa
e OaIac 5SHa OSa Oaa
qai SuMe aap Haoc 55Ha Oha Oaa
| »sy' v"ysjro»ol vRÖ àö ÜpäÖ | q"JfclqpsJJ YAH 'Y" | q"Jfcl"pl YAH 'Y" | q"Jfcl"pl ZZYHQZ Y" |
| i Söa à SöaÖa H'adbl IY HWH | WWYYYYZZUeEEE | 'a bleYH HWH WWYYYYZZUeEEE | 'a cIIYY HWH WWYYYYZZUeEEE |
| zS O Sua Ö y ah YY» 'YYH' H YYH | |||
| ö EÖ O aa Tla° 'aa ayy H' | IZ | 'aYYH 'O' | 'aYYH 'O' |
| « à O U3Hah à U3 | aHah YH | aHah YH | aHah YH |
| w Ö ac á H TcaH H TcaH | |||
| « à O ac á H O o h aHH TYH H TYH | |||
| « à O Hac á H Hay Oo H OH TH HTH | |||
| y alk y Öc° Ha bH YAHRbYb | daHNB' bH | daHbCHNH | daHbCHNH |
| "y alsa Ha qj-muU Sp dA HYZW YZ' | ctch | bTbH | bTbH |
| "ZAEÖAO Ó pzcÖJ y O ay O ' O ah aV-qz Hd' ZW' y a3E aamUaÖ ' O Haa3EÖ a aH açúá f xOaç O à aHP,á owi oNpmQ | eZTdönPmQ | eZTdönPmQ | eZTdönPmQ |
| xOaç y alo a aHPr,á owi oNpmQ | ZY TdhONPmQ | ZY TdhONPmQ | ZY TdhONPmQ |
| p ÅAÄ ÅA ÖK | |||
| ΕΟ pzcÖOÜcÖA O pzcÖJ « O à ' a Söaay O Pay O aa H ha aö O ' O a ' aHqz Hd' ZY « aÖ ' lhy H " ' a Söa aUSÖ ' H ', a ōlwi | Tc Wá ZTah Wá | Tc Wá ZTa Wá | Tc Wá ZTa Wá |
orEo,,szK
| «aöööäöääaHbS | HööaahbOaa | ööaàOa | öö | T | 0aH | öS | öaH | Haa | öö | öa | a | 0U | Sp | öa | 3 | Hzb | d'ZbS | H | |||||||||
| OHöaööa | ööa | öö° | ö | öö | Uay | a3f | V | öö | öö | a | a | 30HSA | H | ||||||||||||||
| aööö | öö | a | ö | Ö | O | 30HSA | H | ||||||||||||||||||||
| p aH | öö | Haa | öö | öö | a | ahUO | uay | a3f | aHH | y | öö | öö | a | S | 0Vt | a | uy | a3f | arOcaaa | a | H | öö | S | 0TH | öH | ||
| öö | aH | öö | a | aay | H | Ha | o | S | aHa | aay | aTH | OHa | öö | aO | a | aH | Wp | aaH | OH | Haa | Ooo | a | aaaO | OHa | |||
| öH | ö | o | e | aU | S | o | ac | aV | |||||||||||||||||||
| rS | öö | e | a | Haa | ö | Haa | öö | ö | a | aoo | OHa | H | H | aHa | ah | 3Eo | H | ha | aou | S | TH | aH | a | Ha | a | a | |
| aS | HUU | a | aH | 3 | TH | Oa | O | aay | H | Oa | O | aH | aH | O | aap | Haa | Ooo | a | aoo | OHS | HO | Oa | a | θau | S | H | |
| aC | aH | all | |||||||||||||||||||||||||
| «aUU | öö | Ha | a | S | Oaa | öö | a | o | a | caa | a | o | O | SaHua | öö | H | Haa | öö | Ha | lay | ay | aath | aVf" | O | U | ||
| S | a | Uay | a3HIS | Höö | a | aay | a3ETHa | S | a | H | yO | TIS | Oa | O | o | o | o | EdAU | Sp | aay | V |

or E_O "szIUpfAUCfA AAAUpOAcOOAAVpOAcOOAA
| còUa afzcoOJApojPbpyA JAAIAAJO A JAOAA AOXuHa y oH |
| 0 0o HsA S o a h Ho a a a Oa aO O H S Hoaa a O |
| Ho a S h S a a Haa3oT° OoHS W aS ay aa a V |
| SoAp IpIIAp ap UAIUAOacUOCAJ OAJCOUZ af UA IZcuOAA AJ |
| aáX |

"yyssvrs"y yS[t]
Vé r' 'r'oEs
"paA5 OAAUUA
| pS1 | to, sh'ZjIpl | CAJARO | AJOCO | JUUI | AOO | R AZAJTA |
| C0 | JZcJIupai | ICOAAXU | pAlApZIO | JUZZAA | AOAIZAJTA | JO OZO |
| UAZO | A | AOJP | AOJARO | XJZOH | H Sa | AODa a OH |
| yOo | TH | OH | HS | Ha ha y | C0 O UOH | O |
| OSJ | "ZcIpl | CAJARO | AOJCO | JAO | Ae | UAO OAZUN a cau |
| a a a a y | OH a HO | HO a caa | a SsH | O O-UO | O aah | |
| aOo | a o V | |||||
| ASI | cIspui | A aO | AOJAZA | Jp DAE | UAO OAZUZAF AITUAXP | |
| O: | a allay | H OH | HA OO | 3fO hao | HAO H OAV | |
| SI | vOI Jpi | CAJAZIP | DAE UAO OACJARO | AOJATTIA | JOaA JAZI O | |
| OR | J AJ UIpaAUC | AZUSO OAZUI | pU I | UA AUSRIAZUZpACIJ | ||
| a0 A IpAùp ah Ha a a h O ah H ES ah Soa aà T S h all |
| O ha s Ohs h S ha h àa a ha Ha aHS h S h o O h |
| ay aa Ha h aah H S haoh H SOa SV |
| ASi voi Ipiz Jiaojiala I ZAEAZIQ AuOoi A AJA CgAhp A VI |
| OR J ájá AA Jp OAE AVIAO KIO UpZua I ZAEAZIpoj PO O AJ |
| DAE AJOZ AO IA OCOAA JAIIA ja I ZAEAZUJAAZII poAIXWSOa a |
| OH OHaUy Oo O a 3 Oo H Oo O ay aa HS aOH a O haO h |
| aUy Oo O Th a h 3 a H a Haa3Ov |
| ASI oOAO Ipiz JAZIpOUIpAJAITIA JAZICAAIPo Uza JäA COAJ |
| SRIpOAUp Ah S° O ay UypaS OHS Oap H a U |
| O OH STH ana a O OH Oay aa Ha H aav |
| ASI oOAO Ipiz JAOUPAI COAAU OJ CAZCAAUZA AIUAJOAO A J |
| AZISPUAO AJUS O AATIRAXAI UXUZE AOAO O AZJAITA J ao SX |
| « a O TH H Hua Ha SOA O ao HUOHa a OHa 3 H |
| aEy aOAH S H O O a O HA a OHa H OlaOH H SOa SV |
| ASI oOAO Ip i CAOUI p CAA AJAIIA IAO I ZAJAO A IpAUW |
| I cA JAIIA IUI aA JZCIupai I COAAOU, Oo aaa a HS Ha a Ha |
| a a O H a S0aa a ahaUp aHa Ho OH a Ha aTHaOH O |
| SUO O SUa Hc o a HS H aaaa |
εUpAIZcIOAOARAIUApuPuzrAfopASh
U aal O aco H O:U aaaa a S0uOH aooh a a 0 OH H ah aaThay aaa Haa H Soa aahs aTHS aH
O a TH aH O aaa H Soa s Hsa h a Otho h a 3 aahSU OH
S aoh H eoa o aHS H a cQ a-Suh Soh aog
U aah O Ooo H hay aa Ha aah Ha aao aa aTHo H a
a Tho a Ho OH S aTHS SaS aHa cO H a Oo a
SoH a Og
U aHa a O OH E ah H aa ha S aOHa aao aat OH ay O
O O Hoo aHa Ha a 0 OH O Ha H aah T oA O aH
Sa I O T S Ho a Ha H O OH eHa h Aa H aO a aS Ha a OH
O a HcO aHa H Soo a O
qAH aHp p OH UaO Ha S 3 H S an a H
a a H a OHp aH OaO aHa H O OaO O
S Soa V
pslv OJApUZISRUpaOIOA JAAAAJA O JOAJAOI IpO AOAJI CJAOUZICOAVAAO Ir AJpOIsApOAAUza I AOIA pJAZIpUZrPbIZ ISR JOAJAOUCjApUapI cOAOVupaiTcOAOIO Rpi CAJ UZRISRIOCEJOA JI OSSAOJ OH a aah OH aOa aHaU O H aoth OH a OHOSU O Ha a a aOTaah O S So Ha aav
oslvacjupalcoAoojocAJAIAIUPaOoAOoiipipaoaAulpAoIOAJOAOVURUcJUZpZWUZOSWOOZpZAIOAJIpuaOJ OkauiocAO AJGIOAOZvOcUIUPaICOOAOJZRAAIZUzCIIAX «Aajl CJSRPzJPAAUPaOIA JPAIOAOAZJIIAJpZI AIOZcIpaAVURIOAaupalcoAooiaA AAJCALIAJA JA J cUcOJAOJpuzxOooh ThAsaO OH Ha aHaatS Hay H O hS Sda Thooh Oy
ASJ R JO pOICAAIOJIUZB ZAJAOUIpAVUO JAp JUpZUCAJAUPZI AO OAZVIUI pUIpaI IOAOIAJOZ A AUICUpaUOCZZAZVAA O AZA JO POI IOOZ OIIA A VpZupaz O AOICIAJAp JUpZUKAJPUZIQO OAZU
taaHa 0 OHoO Th OHO OH eHa Hiaoh 0 Ea S 0 a Haa aTHOO Ha a OH O
SII'ZO AJsip A JUI pIpaUZAZAAJIO IbZIO C O Uf AJ cUcI OAOJ IpuZISRJA ao JPApZUIpaIcoAaoUUZZA JUCAUpUzKAs H O H Oa OAn H a°3E Ho D a OHo aOoh Ho aOH Oay aH 0 Ha Haa3aa ahUOh H a OTHoHO Hy O hHa aOa aH s aO u Oa Oav
As oaao Jpiaooaiajaiia Joaip caazupalcoaoxqoh a a 03a H S ah aa ay Oa h a aaaa a aO aTHaS OH a OH SH 3EH a SOth OH Oa H ahay aa Ha aaaH So a aav
Asu'f A ao AOJAUI Aacoi IAOUI pio UzTIAUOJ US O AuApuzuaIpoAoAAo A JpZupaaXt aH Oaaa OH y Oa oHa aO OTH Oa a OH Hay aa Ha aaS Ho OH SUaOH aal
ASJU JUO UCAZAVIAACUJAUIA AJUIZn af OCUJI AZaOAA UI aICAZIO RAVXAIUXGAJI AUOJA AXuAU OTOHOFOHO TH 0° aH S ah ta a H Oaa Oo H S h a h aav
rAOIAaUZAAuAuaUOJAofZc00
psyooz OIIA JUZIOJ AIOA UZAOUI AZAIUAUI pssaiiaI I 0 AI Zuaa JApOAO pui COAOUI pio aauuooaO npi (Aupaao AaoJA OIAO A UZAOUI AZAIUAUI pSSAKI AJIpoAA AUA CIJIALI AUCIAEAOICI AICAZUR AOJA UZAOUI AZAIUAUI pSSAU O RPI CAI TAO O AUJIIA JOC AUAPUZKROAOZUZIOAXUT aHa a OH OHO AHa OT HO O O aa a caa a uU H a H 3e ANKKOHO a caa a uU OH OH ay a 00a aHS Sa a ap HS T aHO OH ay ahS Ha OH 3 H a o OH H Oo Ho Ha OH hy a O HS HUoc
0j yOz 0iA JpA DAA OAOJZCIO AOJO A UZAJOUI AZZAIUAU I pSSAIAoAA A JO AOIZCAIXeRuA ZUUACAAISRIO UI COOVA AA JAOAAGAUCAAOWAa JOAO A UZAOUI AZZAIUAUI pSSA OADAAOICIIAIAOAA A JIO AI ZJP Oo a a caa U a u U OH OH Oliy ath a a o h a o HTH y a
ASJRAOA A UZAlaUI aZZAIUAUI pSSAIO RI aOIRoAOUIPOaIIZ
CAO AO AIUAO A JUSAAICAIAUOCZUAXAIUXn aiOJOAcOI AIUOCZU
EOJ AOJA A UZAIOAU AZZAIUAUI pSSAO I ZcippAz I W
ARO ZpAAZOAIUICSIARO ZpAAZCAAOVURIOp ZjupalcoAOJA
Z OAZIOA IOp dAE UAO OAZU" 0 0 S S Ha o O
a HO OH O aa 一 caaa a uuuu HaaS aay
SILZ AIP CIUPaOJA bIr AOJSRIAZIp OAE IIOJAIIAISR JAOVA AOJPZ AOJOA A UZAIOAUZZAIUAUI pSSAJUpaIcOAAOJOqOa caa aHa o OH a 3HaHOa aOlha Hcna HaHOHp SHnA aahsO hEHOHAoAH 3'aaOY
q"fclqpsh"ZaA1cAouAoaOfzoo
pslooao J aojuza ai cavi Aispua izuAoicupzzAubaicoaXU 空 a Oa Hay Haç H Oo Oa SuTH OhaOo OH OaHa 080
0sI xauZI JUza AI (IAOJUOO JOAUI AaAzIOAzeAOcoAuaAeIA OcON AAOxqOJ S aac a THUSA a SO-S Heaaa O h Ohay h ao 0- a Th alaa OH OH S Oo H ah aaah aav
Asp aApiz JUza AicAIOAOURJAA JL ao AuOCLXa c Oa aSU o aOo ooc 00 OH a Hoo ooc 00 OH aaS a aOoh ha aau aOTOO aOda aHa aoo ah
SutO JpZUza ai TAOUI plu aooAia f AAVI pU AOJU ACUPauOczzAZX" O SAHO HAa Oaaa S H O S Oo aav
ASIpaAOIO RJI CAAO aAauVAacuJUa AI TAOJA JOAEAZin OH H EHOHO a caa a UU OHa Ha Ha Ho aS
A ICAAA AJUCIF AAA UWIOAJp aAE UcOAO O pZCOOA
p JAA Aa OXH<aa3E OH OH 3 ha Ho o a h 3 a V
n aa aaaa aaaaagwmy a bHa 0o 0o 0o 0o a aoo a H u aS0 H
a caa aaaa aaaaoo Thaoa Ha3a a Tha 0a 0a Taa S3ETH HS 3 ay Oy aTAS HsuAoo HSSO ao a H y a Eo aTH Hs aaaaoo U
Oa aHS OH y o Ooh SuU OHn a OHaa3aaa
Syy O aHa3a a caa a a Whre OH ao ah I e aaaaah
PV avWA OH SUAA Oo QV a O THs H haa HHO HO Oo H a o a o O TH OH
Oa Oo ay
"y H Olha o THs Hua Ha Ho a OTH Ha Hay an Sa
p Oha a H aa oH S h Oa aay a3E ha H Oaahay hao 3EH aS Ho OH a H aa oTHO H O a uOa a Say a3E av -Ha y° EoO OH OH aOH OA oo ah O H O a aHoo H aE Oo TAs H a HSUa HQd'cUZ! 己 ^ a a H OH Ooay aa
OoUwao S° S aH H Oa H a
Oo Oha OH Oha U aah 3 O a aa OH OHa SuHa O Ha a Oaay O
szyy"y|p, s; "s
T CieyTI Hs
zO Ha c S0a a OHa UU atiaaaSUX aIa a 0 0H 3° ah p VH
a aOo H Ho OH a a H' a Vp OH a a H' a H OoS H
Sa oHa H OH SaO aVWM Hs Ha a 0 OH a a H' a H
Sa Sa a Ht a alo OH a a H' a CUH a HA TH
a Ha a OoHa Oa aHa aah aas a ly a a Ha a b ay aa
r3 aooo Ha a 0 OH Haa Oa a a Oa a Oa y aaoH
O av
1 S>>Wz"Z 1 W U
- a a o O h OH aOH S a a H O a a H a a 3 S h a O a H OH O a a OH U y U O OH - a a a O O S a OH H Haa a H OH O a a OH U a SAa a H O H u H u H u H u H u H u H u H u H u H u H u H u H u H u H u H u H u H u H u H u H u H u H u H u H u H u H u H u H u H u H u H u H u H u H u H u H u H u H u H u H u H u H u H u H u H u H u H u H u H u HuH u H u H u H u H u H u H u H u H u H u H u H u H u H u H u H u H u H u H u H u H u H u H u H u H u H u H u H u H u H u H u H u H u H u H u H u H u H u H u H u H u H u H u H u H u H u H u H u H u H u
">>o>>">>s; "pss
p OH a S O a Haa aaaa 3 o y Oa Oo h y Oa H q a OTHO OH ay Oo aS H uay a3E aTHaOo all Oh a aiSa OHbImHa O V
>>z>>y>>It"i z
t00ddaaOH 0a aHa aOo H H Hao hya W
Aesrzwusv"zrsz"s
r3 H a a ah o h a 0 OHa Haa aHa aHa Haa 0oA taaa a° cO hay a3e ah Haa 3 SaO O OH Oo OH Soa OH Haa O O Ha a O OVA
" 0 3H a 0 OH S a caa a aaOaac AH OH HA3 H aoVz S
0 3 0 a 0 0 a O H U aah H Oo H aS O Ho V
t S OH aOH a 0 OA a SOao O O H O V
RE OH y aaa aHa3a aWre OH ia auOO THO H ha aHa
Oo HHa aOTSH aAO OH ap H S 0oV
y a OHa H So a OH SA H S H S H dtho H 3^ aHaov
- E H' a caa a aay O a aO a SOY
" y aaa Ha 0 S o a S 0 H 3 0 Ha3 H SH OH O
S 0 05 H OHa H 00a O Y
taah ay a3e aHa a aaO O a DOo H F'a 0 atHa HO
aaa aH OH HoA u p Ah S Odaa Aoo O a DO O TH H OH OAH
a H ao a p OaS O a a Sov
na aOy a a Ua 3 Hs Hy aa U a a o Vw S USO OA TH aS haoa aO O aU Sp oa O H a a aTH aHa a alloh SaH ay a Ua apaa OHpa H OaN ao a p0 ao QV "OHSU a H acu HOHO a aeUOH a OaH a aa aTH OHO a H OH a a O aa Oo Tha OH Oa Oa Ha fH -b a SO bhoa aa ah's tTly auqca U«a b ZYrCZ b'» OU Ooo OTs Oc
qSgy"t"jWSSs yzζ u
"y HaS H Oa TaH u Soa a thAs 0 a a
aOo H-a Ho aJT-SUc o HHO aOa Haa aHH
0 aa O H
YZZnbaq,HP"StQ
YYbW'XqR
YZ'WYq
S3 Oo H Soa o Haaoo HHO aah OaOO
qz hdb'ZUzf YZa
qz hdb'ZU Uaf YZ
qz haaYZ'UZF YZcSmZZf Y Y
qz haaYZ'u f YZa
qz hzbZYYYYUf YZ
qz hzbZYYYYUf YZ
qz huqob YYf YZd
CE 1>>00000THYUZZUZc

ma Oo Ww HMy O O p paS maas a aHa aiado 0 Eo Ho Ha Oa Ho S a Oa V -pa S0 pTuOdaaa ans t y alqca Ua b ZYTHcZ b' > 00 00 OTIs 0c

"zj p"
"us -us-lhmp"m" 四 qxllrm"q1

xya a 0a a0 03e 3o a a 00

z0 h0 h° foah o ha a 0Tia OH a h' acu
a a a HUO

nä:3ayOl

nOgA0a00b0yaaayOv

nà l° áçàáá Oδa I

r3Ha a all 0E ha OH a OHa Haa aiia
aa 0a

näi

-° 34H H aδ aH a O aS 0aT° 3aiaS
8° 3

q a a ddaac H0 hS a a y alh O h o h o U
0 a 00 a 0Wq a H a S0aHaiaac
a H0a aIay a aS H aH SaH O O a aa U
aδ 0laH OH E3 yaa H Sa a Hsaa aHbU3 HbH
S cOo 0 0 O H S 0o S - 0° aaaa a Su
015 Hooa Oaaa HaHa0oOaH 4

wUaOa aaaHuyay a3Eqay a3Ea sa caa aOH
Soa aaaa30 yO 0 aU
°a caa a as Oaaa aoo HaS HOS° ahas 0
S aay ha aS 0 Wp HCoD ahdaac Ha a aaO
nr
H OHa caa a a b V
eooaa Thia aa a
#
a UaUy Oo

” a aa 3

qai Suay a S0S aa y

n a a 50 S a a y
D01
OaH S0S aaaa

qaaS05 aaaa
| »sy' i"ysirro"ol "i AIIupAIO | q"Jf cIqpsIJ YAH 'Y" | q"Jf cI"pl YAH 'Y" | q"Jf cI"pl ZZYAHZ Y" |
| i Söä àSöööa H'adbl Y WNN | WVYYYYYYZUeEEE | 'a bleYH HWH WVYYYYYYZUeEEE | 'a cIYYH HWH WVYYYYYYZUeEEE |
| z S 0 HOO ð aay a-YYH» H YYb» H YYb» | |||
| - S 0 aaaa a H' aYYb' 0 | 'aYYH 'O' | 'aYYH 'O' | |
| « ° ðU3-ah ɑ U3 | aahh YH | aahh YH | aahh YH |
| á 'ôac á H Tca H TcaH | |||
| -ç a HuOlá 'ô aah aN TYH H TYH H TYH | |||
| -ç a UOá 'ô aOo'H O a H T H H T H | |||
| y aHwaaàoc° h a OhyxMnMnMnMnMnMnMnMnMnMnMnMnMnMnMnMnMnMnMnMnMnMnMnMnMnMnMnMnMnMnMnMnMnMnMnMnMnMnMnMnMnMnMnMnMnMnMnMnMnMnMm | daHwb' bH | daHbcmHuh | daHbcbHuh |
| '' aH 0 S oHa qj -mju Ša òc O-YZN YZ' | ctch | bTbH | bTbH |
| "ZAacOio ïpueÖöj y O a ð H aaaa OaH a a a H ûHzb d' ZHp aIaçU a HmU° ða aHa3ç°a0 aH 'S h a OÖ f xσd'ç ðaOHP, a aiwi ñnPmQ | eZTdHnPmQ ZY TdhHnPmQ | eZTdHnPmQ ZY TdhHnPmQ | eZTdHnPmQ ZY TdhHnPmQ |
| xσd'ç ðaOHP, a aiwi ñnPmQ | |||
| p á JAA UAIUA ÖK | |||
| Aco pueÖöüÖöio ïpueÖöä - Sa Haa O O a a O HPa aS a a H Ha aö O Q° O aH VHzHb d' ZV « O aH aH « a O O a a efSöa a H a aH | Tc Wá ZTah Wá | Tc Wá ZTa Wá | Tc Wá ZTa Wá |
orEo,,szK
UaaaHa 0aOa afoa afoTHoHa aooalS H3 Ha
aUahSoaS Ov
Asp aIpi. JIp A AJIIA JApAUpAdip wO A IpAUU (aA)
AIIJAUI aA OaO 0duo a aosua aOHaU a
Soa a a S 10 Oo Ka OHa h ao aSUOOa OH Su Hca a H
0 aaaa ai
ε μf A IZIIZiΦi AUIpAIOJAaO pJZiΦi AUIpAII pOJaOOARux
Ugaiα° a H OH aaaa H afSoh hiaδ
OaHa HsuHT aHa aaa H H aoo aa aTMS HaS H3 Ha
a 3 a aSUuS I a Haai a Odaac U
a0 a0 a 0

| Ut à ah àa° | Oh | O | Ha | HŠUÜH | H | Ha | H aah | H ōH | |
| a àu | a HaS | Ha | aTn° | S | Ha | ÖHS | S àS | a Öla | O ha |
| a° | H | aO | H a° | a | ÖV | ||||
| Ut à ah àa° | Oh | aH | aH | H aa | aH | aH S U U H | ha o | aa aTH | |
| Oha Oo | O Ha | H° | Ha | O aH | Ha | H aah | H Sa | I a Oha | |
| ° | Oááac | aTá | aHa | ° a° | a | Ha | Ha aH | Ha a OHS | |
| a | ÖhaU | O a | ° | aO | ° a | ÖV | |||
| qàha° | a | H | a a | a aH | H | H | a H° | a alha | |
| p aH | Olaöö | Oall | OHO | 3 | O O | Ha | aaaa | Ha SA | |
| O o | Oaaloo | Ov |
| pslv 01 JupAaoiAO ZjApUZIOA StpUU Ajo AOAi COAJCAOJUZ(TC0AJ UOO II pOJpO OZJcIapI AuIpAu I AZA X"SSAOI J AApIIz ISR UC AoiBaJAZUpAdip VIpI cUpAdip AZJa ACJAOTOEAO A J [ OSSAO] COU OH a-a a H OHa a Oh C H' Sa T OH' a OH O' a Ha a a a OTH a aHO aH aaa 3 ah O h a y |
| oslv acjüzüpAöPj IAO A JApUZJAIJA JUpACOAAOpaodzAùIpaJ |
| po AIA OÖA JO RJ aIJ(CSSAISRIVypaW o AZ AIOAJO AUpAAOJ |
| OICAO pZA (piAzizCjUpAöPj AZUZR JAAIZUZ(IIAXtO UAI JPI CRJ |
| DA OAIupAÖJA pAZIp oAC UUZAI JAJAII AZ AIJA AIOpI OAA J |
| URIAOAAUpAöPj AZIOAAAA JUAJIATJ AZIpoISSUZRIAZJ |
| ZcIopi AulipAar OoH0 a Oa H aHa o O aH H aH aH S H O O Oo H0 a OH o H o Ha a V |
| ASJIV acIJ álaQUZp ZAJAOJUPAJUO OJZR JAPUZICp ñAC UUZAI AZI (CAAOVJUAOZ A A) ájupAβp AZICJUPAAUSPIZAOJAU OJIO OIT A J OO JUPAZAOOAOACI JAJP II CIZUAAJAPUZUCp ñAC UUZAI AZUT a all |
ma Oo Ww A HMy O O p baS maas a hah OHaa 0 Ho OHa Oa Hs a Oa a50 o -b a S0 phooaaa as t y alqca Ua b ZYthz b' 00 Oo OTs 0c
;p^ s_n

nllimp"mmqxllrm"ql
x a03c H E 00S H° a a 0a a0 0 OH 3 H a 0 0a aH a V
n a 1 a b a 0° 000 hδa 0° 0 0 0

nā 13a aa 0l
nà Hδ S ha 0 á HaS H H Oa Haa3aw

nà hà 0 Oá H

- haa3Ua ataaat akaa 50a a OH 3+0a° c00 H° o UOH a O'
H

-° 3U O O H H a Oa OTH O° ah Su aa o H
a° 3aU S aH
q a a H U aH a H a a a H a H a H
aaa S oO a a Wq a a H S a So a H U u a H
a ai a U aS a a H a H E3a Oo Ho USO O HA OH
a H O aMuO S H o H Sa cOo a H UO haa
H Salo OH S Oo aS o A Coo ah pcp O H a H
SUu a aaa

q a Sā a3ch aHa 0 aa HuaHq a Sa a3ch aS H
° a caaa a Sān a ha H K° H a 0 a H
° a a aS 0 OT b H aS h aO h a 0 H aH aHa
a O a a HaS HOSS° aH H S aa aH aS 0 H
° a aHp aHCOO ah 0 OH 0o o H S ha S° 0 H aH OH
° a caa a a 0 V
-5 0 aaa a H
nr
"Ša

" a aa 3
qā ŠU á há àa á
n a a há aa a
OaHa aa a
qā S à aá Ha aà a
| »sy' r" yolro»ol q[ lAURAAO] | q"[fclqps]YHR 'Y" | q"[fcj]"p]YHR 'Y" | q"[fcj]"p]ZZY-UHZ Y" |
| i Sôa à Sôaôa H' adbh IY HWH | VWYYYYYYZZUeEEE | 'a bileYH WWHVWYYYYYYZZUeEEE | 'a cIIYY HWHVWYYYYYYZZUeEEE |
| z S O háúuô O'H aH YYb H' YYb H' YYb H' | |||
| - S 00 aH aH T'S° aH o'H aYH O | Ig | 'aYYH 'Og | 'aYYH 'Og |
| «O O U3-h O U3 | allah YH | allah YH | allah YH |
| «O O ðaESp H TcaH H TcaH H TcaH | |||
| -ESp OHUOaO O ðaH S/UH aH TYH H TYH H TYH | |||
| -ESp OHUOaO O ðaHAMOO H OWTH H TH HTH | |||
| y āha m ðaUHa ðYKWh aPbMbYb | da:Nb' Pm' bH | da:Nb'bcNkwH | da:Nb'bcNkwH |
| " āh 'O allq i-mHYZl YZ' | ctch | bbl | bbl |
| pállA CQAO ðpZÖOJy MAm O'H Ha aH H' a Oo ðUOHz Ib d' ZHMUam ð aH a Oo Héäö OaHäa rfrXéàdcp ða ðo AHP Os OÖ aHwi ðnPmQQ | eZTdHbPmQ | eZTdHbPmQ | eZTdHbPmQ |
| xéàdcp ða ðo AHP Os OÖ aHwi ðnPmQQ | ZY TdHbPmQ | ZY TdHbPmQ | ZY TdHbPmQ |
| xéàdcp ða ðo AHP Os OÖ aHwi ðnPmQQ | |||
| oÖat'o JAs UAIUIa K | |||
| AÇa pZÖOùCQÖO ðpZÖOJ-sa 'H a° aSóaam ðOIPa ðs aA HA H aO O 'aH ðqH b'd' ZY | TcH Wá | TcH Wá | TcH Wá |
| «O O O H MaM''a Sóa aA Sóaam ðOSS O'H aH aH ðqH b'd'ZY | ZTaH Ná | ZTaH Ná | ZTaH Ná |
Ao, uK
| p OH | H | M | H | O | a | O | O | a | O | a | S | O | a | O | H | U | Ma | a | q | b | d | Z | H | S | H | O | A | O | a | H | O | O | a | H | O | a | O | a | H | O | a | O | a | H | O | a | O | a | H | O | a | H | O | a | H | O | a | H | O | a | H | O | a | H | O | a | H | O | a | H | O | a | H | O | a | H | O | a | H | O | a | H | O | a | H | O | a | H | O | a | H | O | a | H | O | a | H | O | H | O | a | H | O | a | H | O | a | H | O | a | H | O | a | H | O | a | H | O | a | H | O | a | H | O | a | H | O | a | H | O | a | H | O | a | H | O | a | H | O | a | H | O | a | H | O | a | H | o | H | O | a | H | O | a | H | O | a | H | O | a | H | O | a | H | O | a | H | O | a | H | O | a | H | O | a | H | O | a | H | O | a | H | O | a | H | O | a | H | O | a | H | O | a | H | O | a | H | H | O | a | H | O | a | H | O | a | H | O | a | H | O | a | H | O | a | H | O | a | H | O | a | H | O | a | H | O | a | H | O | a | H | O | a | H | O | a | H | O | a | H | O | a | H | O | a | H | 0 | a | H | O | a | H | O | a | H | O | a | H | O | a | H | O | a | H | O | a | H | O | a | H | O | a | H | O | a | H | O | a | H | O | a | H | O | a | H | O | a | H | O | a | H | O | a | H | O | a | 0 | a | H | O | a | H | O | a | H | O | a | H | O | a | H | O | a | H | O | a | H | O | a | H | O | a | H | O | a | H | O | a | H | O | a | H | O | a | H | O | a | H | O | a | H | O | a | H | O | H | 0 | a | H | O | a | H | O | a | H | O | a | H | O | a | H | O | a | H | O | a | H | O | a | H | O | a | H | O | a | H | O | a | H | O | a | H | O | a | H | O | a | H | O | a | H | O | a | H | 0 | a | 0 | a | H | O | a | H | O | a | H | O | a | H | O | a | H | O | a | H | O | a | H | O | a | H | O | a | H | O | a | H | O | a | H | O | a | H | O | a | H | O | a | H | O | a | H | O | a | H | 0 | 0 | 0 | 0 | 0 | 0 | 0 | 0 | 0 | 0 | 0 | 0 | 0 | 0 | 0 | 0 | 0 | 0 | 0 | 0 | 0 | 0 | 0 | 0 | 0 | 0 | 0 | 0 | 0 | 0 | 0 | 0 | 0 | 0 | 0 | 0 | 0 | 0 | 0 | 0 | 0 | 0 | 0 | 0 | 0 | 0 | 0 | 0 | 0 | 0 | 1 0 0 0 0 0 0 0 0 0 0 0 0 0 0 0 0 0 0 0 0 0 0 0 0 0 0 0 0 0 0 0 0 0 0 0 0 0 0 0 0 0 0 0 0 0 0 0 0 0 0 1 0 0 0 0 0 0 0 0 0 0 0 0 0 0 0 0 0 0 0 0 0 0 0 0 0 0 0 0 0 0 0 0 0 0 0 0 0 0 0 0 0 0 0 0 0 0 0 0 0 |

Eoo' u'ulztUbljI AAAZUpOa(UOoAp VOOJ af ZOOA W
aOcOAp 10AuaSsA(ZA JIOO J AJR IzIiUpo pOpuA
p55p p2AOxHaHaua0a Hrtaa aO aO OHOo
rEaaO'Sa aaratHO OoSb W a SUuaa 05
ts ab pblipap OCOAp JOAALpOaOCOAp JAs JPOZ plo aix

"μys,vs>>o' Ew''' w' uO, JtB, Jv o'r qW, ysz"éu
"RAOAAU

to,ovrRlATo A OpiSroAz aAApO AlpaUZRO J
A ROJURAO R AZIOAAURAI IcApovrRIpO pApO AosR
UZs Apo ZpAAJIaIJA JO OZO AaJAZU 00H MOO OH aHUO
ao Oohofoha 0aahao 0 OV
Os ts JCOZJcOAp OaIao AJPAzUuzaAIZuw Oac0aH OH
a00 aaaaacp ah Oa Ha c00 00 OH Saiao O OV
ASI oospuurta saAzizilip aZU0zaAF AZUzEoAI1xjp OH
Ua a HmOura a SO SaI OaO KaS
aUHa TM aah aah Hm H O a 0Sb Ha S h haH aall
ao OHSSOaS aahcaaAHUHa 0aaacp ahSp aaah Sa
0_AM0 0
U'S HAO O OH HA'UHHa M ah aah ao aUO aHaS H O H SUTHS O OH aaHSp Ha a H SaS aOH aa H ao OH ao SAH oAMoO Og U'S HAO O OHaObaHao auO AH HM H O a0TH OH amoo HUHao O OaH 0aH AAUUa H 0 aaaaacp aah ca ha aHao O OH O Ka HAO aUO ahSp H SUU H OAH SaH OAMoO O! n a HA'Uaao HA rfoah aa a H a H Oa O h all ao Wp aa OH OAaOaM o HaS aah O oV
psiv RIIJUz (AIZURAAIO A JOR pIAcO AOpJOAAJIARI)
pO pOpJUZZIeAAUUO JO selCAAs JPZZJARITpIJZRO JO OZ AJ
opUIBau I ZAZUO JIAAOZAATTJASSUZR X'ZRIPiZC JSRIUC POJ
OO JURAI COApOIARIUP CAURAI ICOAPOJCIEAO AJ OSSAOJ
"O: aah a H Op AO OH SUU 0aOH OAOMo OH OH
mHa a a a OHS HM U OAm o Ha aay
osU O JURAI IIOApOJ IO A JOI tO JAIJA URAOOJIpaO AZUPa
pOoPoi Upi VUIcSSJcHIT ROJUZ sO UZtIip AOIAJARIIJ ap J
URAAOICp AZUUzaAI AZIZCIIURAI ICOApOJUZpOUpZIAIUXcO AZU
ts Usjpi Clp JURAAOIa Jp AZUUZAIA ZAIATIA JOpf RZURJ
IooAUAJRAI IIOApOJ OZA p JAIIA J CIIIOUAs JPZZIpUIpAJ
aSSUZR XsS a HSa OHrOMdHO HSpHaEmUh av
ASJAEIII aIRZA UZp ZpAOJURAUOO JUCZZA JOp dAZUUzaAI AZIAON
Z pURAI IIOApOJCURAUsr AZIOAJI OOZ OTTA IpZJJURAI ICoApOUI
ZTO AIOZJApI PZIASSJCApD AZUUzaAI AZUH AO OOM
O OH OiaUHa H aaaaep ah HS a a Ha OHoaa AH
ara0 OV
SU'Zs JUO pui cao JAs IpZZI A aAa p cui AoiAs JAZIoip UlpA ZcIIJAsIE JpaicOIcO JURAI IcOApx<aaS HSp hao Ha aS H OHreah aaH aS OHa HOM r haar aHJOoo Ha oS Oo HOM aOH ahao auH Sp HaOl a Oa Y
As oatOIOZAOUIb SpAIIaIb p AJURAIIOAO XKo O S H OHSA UH HHO aHAMoO h orHa rEoh aahr H a aAo aUO hr aSOTOM Oo HAaO O OSp H a V AS ts AJURAOCAlRS Ros ebu biUzb CAZIApUZIOUzTIIOcOAupOW O cOAp OpAs JURA eaJOAAUOZZACOI AIX HoaM O O rMOaHao HAO OOHao OH m ah aHSp H Sa H 0 aV ASJep JUsAACATTJAs uC ZCAJAc IncOurAO(OAuJSRAJAZI OIZ O R AVIZAAxUJAAT CJIatAAUp OH Ma Oo AO OH O OSp Ha OHaO O OHS Oe AHSp Hs a H
taofzooJ AooA AJua AAaaAa
psyooz OIIa bOOpOurAooatO uPZAziao AilcoAui a AZUtzOAA JAA Zzu"RAoAR KOZAupo a100jAzao AilKOAUa WAZKozAr jzzs ICAZOAAKOZAUoAuwO AlopZvlytOJAITAOKOZAuApzAzao AI KOAUIa AZcsSsAzfcAau kao OH aHaaa HHO HuOH Sa aHCOoh aHa o aO O aCooah 0 S avWK Uo O a cdo ai OHa O O aaU OHSp Soa H aaln ahm H aar r aSp H aHd ala OH hAo aaa O HSp H ao aadEua OHr HaO OH HOO
osyooz oIIaIaOJZcOOAOISRDt AoiZTJI AZao AI IcOAuW I a AZUzRzURAAo ASp ApuOOpAoiZpuOa iooAo AJ IcoAUa AZIATTA JDc AIOZOAiaOAA p MAIA CZZK O O h OTH 0 H O H O SuO O aHaUoo OH Oo H aoO O aocdo aV
ASI BSSOpj AZAOAI IOCoAUa AZIAS JApO JAO PUZAc JUSAW ACAtipuOcZUIOO IzXaXnOURAOcOAlOAAIcOI AtIOZZuJBSSOpj AZI
ao AJIcoAuf a AZIO A JRZa pAOOuUsp AIOAOAJUcSs) AOJURAO ZURAI IcOApjARZZIOcp AZUUZAIZU" OH 00 OH ao Oo Oaa Ho aaOO h o aO h aaS aaV SJ"AZIUPZZURAI IcOApoiui a buipai AZAO AJIcoAUI a AZ Ot JURAOITAAUoO ZSRp OAZUOTJIAIJAOLXqOHSA cOoh Sp Sa Oo HAO O Hrcaa HAO OaSp H Oha aH aS HmH Ham OHn a Hma Olao Oa a 00 V
q"fclqpsh"ZaIcAIOuaOfozoo
pslooatao JAOpuzi AoiJUaI (10oo ISpuup Jz(1ipf ZaA) URAIIOApX<ac OH Oaa HAeSp HmOiaO OaHAA OHAAOO OHMOHA 00 oOHUHaO O Ov
osxua ZpUza I CIAOJAOCZAOUI caocOJA O a UpoaoCQAAOX r Haesp THM HSp HO aOHOa S a Ho aaihaac OH
OaH a aaH r Oo HaaV AS oatO jpilz JUza I (laO)taAooJAC Jut'Of UocZKac Oha cpaAUOHa OHAmO O O OSp HMo HOHa aUO aHO DAmO O OOTOM Hla faa H Oa
SltjPbZZUaIcAoiui piaooaBIO Ruzai AoiucZpU
URAUsr AZuoh Sa KaO aHa Olaac Oh OA hr Oo Haal' aV
ASI "RAAOJAR JozApoatppuoA JAAO OAp zuza IcH" oOH aOhaor OOh Ss haUUO a cdo aaahmo Oov
BaApJTuA AAZUWOAUpoatO OCAUcOuz afZooA
pt JAs UaIua Xna OH OHa aHoa r S rraov
moAmOoHa c0aaa aao O WhmAmOoHa oHa c0da ar SoOM Hoah
OamOo H ao OOhS Ha c0aaa aaao O S Oo Ha Hall aH
OHO aCooa aTHa c0aa Oda Thaa HSp H am Ha STH
EM HSp H ra a c0ov
p aAS HAU S Ha OH aOH Oo H aOH OHa
a O aR Ma OH S HO SUU OHmOAMoH aa:aaa aO acu
aaa HSp HMa c0a a Whma m ao H a Oo Ho H Ohav avH
OOH aa V 0 O THa allam O OH OA hr a Oaaam H OH a HHO
" a aOA aOo TH OH AmoO av
"M EOlho OH Ha HM u Ha H a aHa S Ha AO AV
p alla OAO Ha aa ahr Oa aaa ag a Oaa H Oaaa HaOH r
as H O a a r aa Ha a HuOH a Sa ag av
moAmOo OH aaHao OH ha Mo aO OH Has HaUc HQz Hd'cuZH
Sp H OH OO H OA V UA aS HO Oa OAmOol
xOAHb r ca Olha DHAO Oo Hr ODy Ha aah ao Oa aa a OH OA mhr hrr haa r Oo Haah
ao O aah a Hn Hr Ha V
szsy"yjp"
i Cley Hs
z MH OH Ma UU 10 ca O UU OHaaSUU aao O OH ao OH a SO a H S a OHOS Hp Ha aOo Vp ah OH aOH OA H aa aah aH Sa OH aHa OHa oO Sah r oFavH p Ho aOH OH Sp aOH MOa aHb OH a H So S a OHa Ha H aH Ho OH u a H So aOs a HoHa a H aO Ho H aHm OH H ap H Oh OHa H aSa Hy a Ha a p a aa ov
p Hraaaaao OH a Oaaaasph AHOM hao O ah Haa Oo ah av

Cve
u0''z u
ro 0o aah Oa aaa hZU aHama aar HSp Ha Ho OHaUMOO Hs H O aHUOHO a ca aOHmOa aaO O OHMa OHa Haaa Haa OH a c0a S0a ath aas S0aa a a50 OH Saaa HA c0ba aahuM oaa aOa aac aha H OH a r Oc HPrTH"opT "opQ a OAMOO O Haa S aay
y a OHa Ha 0o SuO oHH OH OH OA aal HA m aa V
zma OHa a b0 AH OH OH OH aVHM H OH OAH r 0 Oo Ha a aa oO Ov
wS0a S Ha ac ah auVH a OTH OA aaO a OHa a U OTHa a
S OTHa a
S Ho Ha 0o H H 10 o aWqOaah OH p OH U H a 0o Ho Y
>>o>>>B;psu,μ''w'uJ
p OH a S O a Haa aaaa r a° MoaO O Ol o Ma a H a OH OM a a c aaaa a allSp r h o all r e a h a h a h H OHZbUmH am O V
o' Aμ' rj o''y w's' ls' zu u>Jo' A''w' uo, 'o
a0 Oo OH OaMoo aia H ha MH aM
"yB>>sZ
p a oHa H Soa a OHoHoaHa r h a OuO a 0v
WSUH a 0s a ac ah 00 Ha aaa a 00 OHaHaamaa Ho ah H
a 0s ao O OV
" 0r 0o Ha a Sp Ha c0a Os 00 O o H 0a S H
a a VHQHO H 0r 0a 0 Ha 0 Hu aa a H 0o H
aS 0 Ho HUOa aac Ha H aah SaS r ae aHa aHa aHa H O V
mAm aO Ho aH aoo alHma m ao HAO uOO OHoo Hao OH
r H aH r Oo Oa V Ha H aHa aC aH aOHm H OAHSp aS aHa AH OoS E H
aav
WSOa S aOa cOoA Ou O ah H ao aSoy
" aOo aao O HSp H aoo OH r O Hrr aaamaaO
r H OHoo H amo OHSp Ham H OAMOO O V
H a ac aH OAaO O a HMa H OHaHa HO OHca aHaah
SaH OHaUp Hr SOa 0a aaO O a "As aODaEMOaa O
a 0o O V
MOAMOO Oaay a Ua o rSp Hy a a U a ad
wS USO Oa TH Ha 0 ca F a atHa H ca aHa Sahy U
a U aOoAeMoaHaPn Sau 0 Ta UN aOoAeMoa a aa QV
" OH saH abu mo aat OH OlhoOT OS HAaH U H ao
AWHOVPa HCooHuaHcua ca OOH p A SO prOoaaa ah
s "tTh ayqca Uk bZYhCZb' bO Oo OTIs Oc!
q8tB"yyo
"Ha HUOHAo OaA aHUsa OhaS H Ho a aahAo 0
- Oa Ra HAUUc H a Oa Ha S Hb a OH YZZWbaWq,HP'St QYbW NqSH YZ' Wq,
a aai aahrfeoo h Soa o Haaoo H OAmOaav
qzb d'ZUZf YZa
qzb d'ZU Uaf YZ'
qzaaaYZ' UZF YZcSmZZf Y Y
qzhaayZ'u f YZa
qzbZYYYU Uf YZ'
qzbZYYYU Uf YZ H
qzhuqob YYyf YZd

00 00 00 0TH Y YUZZUZc

m a 0dd waa HMy o O p paS n a M a oHa aHa Oaam Ka Oa HoS a Oa a S0v -pa S0 pluOdd aaHs t y aUqca Uaaa bZYIhCZ b'» Oo Oo OTIs 0c
;p^ s_n

n q^ ^mml^mzuzs|rrm^mml

XMaH Oaa a a S0 Ooos +oo OhaHa a aOy

mOAmOδa ðδa cδδa ar SOW

mOAMoDHaac0d1

HOM HU Ha c0da aV

nm la c0da Oda I

p a 0a H S0a a OHOM taoar h O a OHUO a 0

MoAmOoO O OH ai

- r HuaO EHT a OaS 00 aH 0 akAs

q a a H a O HSp Ha a c Ha S H aa H 0 oA a
a MO aHa a OAH OH H a O a aSUS O Wq aU
a H a O Sp Ha a c Ha a SO a Haa aaaaO O aS H
aHa aHa aHa U aSp H M O aH OH a aaa aSOH
r Eramo H a a Oa O WvSOa a HO OH S H COU
o aOH aU a a H S ao OH H Oa r amE ha H
o aCOOahu b H aaaa a SO H r a Sav
q a ac Ha cOda aauWnq a ac H SaHa aacdo AH
SaH aaRa H OA Hm H aMO aH aAS O OH
a aOH Sp aOH ah aHHcCOa aa Ha cOaOa M o ThaS H
OHbAO° Ha s O H OH raam ai AS O Vp aCooah
O OH OS bO HR oaaoO h AH OH caOa o Y
-5 00 aa aa TH'S aa OH

nr
Ma a a

qā SÜ á àh SÖ S à aá M
n a a h S0 S a a a M

Oa aI S0S a aM
EAC
936A a37436A i 3=5.9:1067:5i-5:5; y1:795/1; 3-A63=6A40,i 13- y65H
. -y|936A' a3743|6Ai 8:5|93;165I- 'y;II; 3A96.; 3=6A;H AH936A bl.; 7! - '5/15I=A:'76"
B5-9)y67!i313-56A)A47.;0-A:314;y/HA7+3)I0;5."HA)):-"
=A:71565.:5:5W-5'A;3|3-5+A.=bA+H9368)!)3
-5)! -6:98i06'3THy-i/13.68H-5.+-A':a8+5;63:-3'3986i
psI:Jnoziei, /JUo6oiinZdJIOJI JzI!/JyZ)JUsOzJInz0
iZj-i,i,y/!)"02u-/is)yz)jooz(sy1y1y11//u/-z(2loo/0syo,i,fi zziio,iffu-y,i,J!uoilzizidOzytons)
i!tio,0)Hn2/iynoziz /!J01uziNoz /X);zylsn,yi, Ueiriz-2zZuoJI/TuOo/Tofyn/Inzdu/1sly11i-fzJooZ
0oJ!1oiNaAH-A'4-6i7!9)567"1365/165H1:795-45;5i-S'AH;H
;3A96::3=6A#-5/63-47i T#y i/#y63;10=5.;11)!+bA#9368)))3
-5)! -6:98i 06' 3!H5=A:'76" /Hi -5'A4H; 3+3; 6:i A6i -47A::i AHA:-6. =43# 65H9) y67! i 3Y
δSII7, JU, 0-üi ffy1JU/! / JUo6/ i oí eyn/) Jou2/ nèo, dJnlj/ JUO6oi yózI jz/n, -JZ uOI/ i/ i N/U/, le221Jz-i-zVioi
尼 _ 日 11/10,0-20szyy//20nolosuOiznoi1i/6(,i1,2()//jUo/ofoyn/)Jx11JUo/yuz(N,I,JU/s
zü/ozn0'1,i,ni/luooi dzuohl//uolnzli,Ozy-zi,oeue/JI iZli/niOz"N0,i,ju0/)jzli-yffoy//luoi/i oifyn/)Jnai,-izoi 0iZ!ueo,dznoo1un-i!(/)Jn2/Iynozi/)X2,39:s76A6!;
3:643165. 5i -) 593' 47↑ 365/65. H- '5; y1:795. 93: HA, 5. 1A6A' 76A6! ; H I A63|9368))!) 3i# 06' 3i
ASliqiZiJ(2nly,1,jiZj,ngniYf,i,jue2o5iZjZn0i11/u/010s1/J u0ooi/!//u/-!//luo/ofoyn/)"O-yn,Izdoosyzyh/
!uolnz1,0oz-zi,0eu/W!,!(!ooz0o-yi,ji/luo/ofoyn/ oszy11yuyoyn/ un)nd,2s00,wnuffjizdi0zli/!
765:=A43#7A3.60/#6:/-51!a4A/#' 7!/#1A; HA:-6' 0-A63::3| ='!7:15-5:1bl5;
2-:)0aA6A(0;3H9368))!)5H-‘:5;514795Ha:3H65H.):9yH-5.HbO)A6All;3H 9y A6AI
yA:-6' A-6y/3' :bI y/76 5+ ;H65. H3; 63) )396:95 H4, 3' 6"1 365/H - '0-A;3 HA; 3:H65. )8=765;6y75H. ! )y/y75:5:0a:765/H3: bI y/H 76' 5+ ; -H 5.3; 3+0' A63:A4-8; i H765! ) A96:9yHA'a3) A45V ( '! 7:1 5-5:A46AIIy; 5H) A-41A/A-A, A' a374/3, . ) 5. -5.93bl5' 4; 5; 765H-3' y; Haa=A:41:5T5::5-54A/H7. I15' + ; 5; 63:H A65H'-y6. -S qz d' cUZ
i3'393) TH!;65-5bIA6A46AH)A:3;6:95 /H14795./I !;H37+3)4 A6A763bIA8H65H1:39y-6! HA;A' a5-54! 7! //N3-A;A'a5-54! 7! /H76! H)A:65. 'a43=A:'y//-5+a6A. -A' b0' 13;7! H6i ;H15;6; ;H6! H)8↑3/H65.H-':5;5 H'.bl4 5;63/H6! ;H63=6! 68H65.H-':5;5 V
1UB9C3:96J 3B;6
T CieyHs
63;13+AbA4H!793;18)!T39;!!65-5:A463:H-‘:5;5)813-3-y65H
!)A96':9y+0;5IA;6y/H1A.6A'5)0-6i;--A'H i//65H!)A96':9y+
+0;5H--5'A4H3187A::47!/H AH93b.760'!7Vn3i:8H+5'8H
65H!)A96':9y+0;5IA;A4;3:A;A'ayH28;65H!)A96':9y+0;5H
7.=8H1A;IA4;3:IA;A'ayH-‘0-A:H65H-‘:y;3H-‘57951:76A#7A#3:H
A,5.7:5156!0;H.-!A74370's:/H! /hy a a V
y;5H A68H!;139;!!65-54!7!H!/\~:5;5)813/H6'3s 86A65H-‘:y;H
3-y65H@8=:5H936A'a3743/V
7u;SB717C6JUB9C3:96J5:9Cu6
a.;10A6AHy;57A↑5;5+37:9yHA;3)37yIA;5' A↑3H93:Hy;5H 7A687!1:96.5.Hy-1/3;3+0'A63:H76;II::394136A:-9;H = 3^396! :76:9;Wt7;1A7!A4;3HA-47!/A:+96"7AH-4A/Hi'-5763743HA-3+/T1:hy6:0=A:-5s)A+biAAHA,5-):7ihy/936!a5'43/H -5763743H N
y:-4A/H765./HA,i6A':95/= '5./-'0-A;3HA;3HA,i-):710;AH i:A9:53.6y1365./139y-6A/-5763743/PruH"opTj"opOw .6yI 3-3:6A#57=AC:9y/H93;5::7i y/H3-y6I;!!)A96':9"73/Haa93687637! W I'570,6AH-3'393) 3.6y65H!1A45H9368H6!=''71H6!//7.79A."/ H 13/V
a.;10A6AH6!H!=3:"76;--'4 3H y;5H;139y-6! /HA;3:76!Hb0?1 3-A;A'a5-54!7! /N
w'3686A-65H93) 1:5H7 ;1A7!H-8;656A#39':8H3-y6I;II-A':5=" 1'87!/H6!/H! =3;"//M A';86A#65H93) 1:5H-8;656AH-47i H3-yH6! H !=3;"V
i";H!""7!HA)0a,6A#6++bl5'8H93la" 3;7!H65.A'a3)A45.T 65.H93)i 145.H7 ;1A7!T65.H93)i 145.H'-509637!//H6!/H ;!/ H 37+3)A43/H93:65.H 71:365//H3+";A6AI;3HA:-79A.8 S;63:63+ +bI3'0;3HA,3'6''1 363H-уH0;3;HA:1:9yI
4B3:63:7ε 67|3Büε 8C67|B99; 17i 7j
y!)A96'5:9y/11-A':5':7i y/1A↑365/1A994;!7/1-A':5'4A:61;:7=936861;A;A'a5-54!7!H65.!)A96':95A'a3)A45.193;A:-6'0-A:6!I)A:65.a3HfA1:3H3+8)A:3H2BU
A3i 7i J7ue ;8E BJC6J79646J43663:7ε6u
B5|9.9):9y:;y:=A:'y/=/!7:15-5:A463:Aa:3|65:-;7i3| A.b'a'3i1i;I65i ;/7A,)5
7u; Ci 3i 7i
i'; 3-y98bIAA'a374376!i=3;"H6'3s86A165H+:/H3-yH6;+-'43V-57.;10A6A165A'a3)A45-3-yH65A' A 3+-';H6-5bA6"7A6AH3+3:07A6H6!;H)A-413H9y-6!WH
n3b3'4 A6A-6!;H7.79A."H93:H65;A,5-):7i yH'-576374/HaHO;3H76Aa;yH-3;4WHA:A98B-5'.-3;6:98H'-593)5;H+bI5'0/H765H-)376:9yH93::7A(H))3I5:I0;3I0'!WH
u:36! 'A46AH-8;656A16:/H7=:7I0/HA,3A':7I5 H6! /M1 =3;"//H93b3'0/V-5I 39';A6AH6396:98H6!79y;!W -5I 39';A6A63H'-:5;41:3H-5.II 3A 5;63::765A7I 6A':9yH65.H'-:5;5 I'-5/H3-5+.a"H6.19::1;5.H3;8+)A,I/IV
u:36! 'A46AH-;7.79A."H93b3''T176Aa,"H93:"+5;6476AH;3I!;HO=A;)A901A/H3-yH1:3'50/I)31:5 HHa'875.V2)Oa,6AH;H)A:65.'aAH7I 768! H93)-6'3+-'576374/I
B396:9""7.;6""!7!H93:H93b3':7I y/H4;3::3-3'346! 63a:3IAA8)!H1:8'9A:3H i'H93:H37+3)"A:65.'a43i‘65H93)1:5H-3'S=/'H'A I 365/H?7.79A."/0=AHL-576A4I I:8'H-0:A;3H;6:936376bIAH3-yH0;3IA:1:98a:3:3.6y;H6;I795-yH-5A6S:I 37I0;5H93)1:5:65H5-S4SHi-5'A46AH;3-I'SI! bIA.64A6AH3-yH6I;HA,--'06!7!I-A)36;V
('!7:15-5:A46AHIy;5H3,A75.8'hy a a '93::3;63))396:98: y a a V2,3'6'1363TH-5. H3))3a"H65./1A;H-A':a'8+A63:TH 3;6:93b:76;63:H7AHI :3:6A:=;9"H.-576";I H6!/Hy a a HPs)O-A +.)81:5:Aaa !7!W1:A.b ;7A:/6A=;9"H.-576";I/Q 63;H'=A:8 A63:TH-5'A46AI;3H!6"7A6AI0;3H?01:5:7.;3'15)yà!7! / 6! /7.79A."/T:14;5;63/H65;6-5-6!/i!=3;"/93:H3":bIy76! H --;39413H:7=5/TH3-y65H90;6'5:70's:/""H3-A.bIA43/H3-yH6! H +4'13-b p à S0 pHuOàaaa ahS oThy aUqca Ua bHZYHcZ b'H >>OO OToS Oc
5i 71 4:7C6C1C87JB9
u!);5.1AHI A3-59)A:76:9"H 3/HIA;!THy6:H65H'-5y;-5.
-A':a'8+A63:H763:HRA=;98(H 3'396!':76:98NH7.115'+;A63
y)A/H6:/?7=A6:90/H1:368,A:/H6;51a;YZZWbaW22HP'St <QH
YYbW'W2wh
YZ'W YN22H
93:0=5.; HA+3'1576A[H63H39y)5.b3A;3'15::710;3H-'y6.-3
qz-b d'ZUf YZa
qz-b d'ZU Uaf YZ
qzaaYZ'UZf YZcSmZZf Y
qZaaaYZ'UfYZa
qz bZYYUUf YZ
qz bZYYU Uf YZ
qzugoib YYf YZd
CE 100060THYUZZUZc

ma 0dd Hw aHy 0 O Hp paS
-baS0b0aaa ais
y aUqca Uca bZYTHcZbH 00 00 OTs 0c
7ueP6o8

i yaY(THi yquyiYatHn3u 3yai
i3'393) 11:3s876A#7=5)376:986:/151!a4A/= "7! /+-; 3-y6!;0;3,!A:65. 'a43/V

a6:/A' a374A/1A16! !=3;+5'86A1-8;656A1-57636A.6:98a.3):8i

5'86A1- '5763743#395"//Pi 637-41A/QI

33+5'86All9368)!!!18793- '576374/3- y79y;!

33+5'86Al-57636A.6:98la8;6:31

i':13-y98bAIA'a374376!f!=3;"H6'3s86A65+:/13-yH6!;

!;8A6A1;3i!

2,3'6"1 363HU;A:-A':)3i8;5;63763H.):98H-3'8157!/TH 7.:765 A:!-57bl'9!3- yh65H- ya'3i 3H3,3'6!186i;

T)A96:'981!=3,"'1363|1A;A-':6'0-A63::3I3-5'4-65;63:13 A63I5:9:398-3-5'4i1363Vt)A96'98|3H:A96'5;981!=3;"1363I7.()0a5;63:H,A=1'768/93-I3'31415;63:-5/3;39 9)i7!A16'y-5H::):9yI'-5/165-A:s8)5;7A A-=A4'!7!A-A,A'a3743/I3-5':1I86i;W2!IA'A46A3-yH 6:/65:-90/H.-!A7A/H'H3-¥A:1:9A.I0;5./Ai-y'5./I7=A6:981 A90;6'3I3;39 9)i7/I93I7.)5a'/3-5':1I86i;V

T)A96':9yHa3)A45H936!a5'43/37+8)A:3/H V-)A96'-9yHa3)A45765-545!-57637433-y!)A96'5-)!,431A;HA,3'6863:1y;53-1y61;1s37:9"h;i71H3))8H93;3-y7.1-)!i 36:98H06'3H7+8)A:3/Hy-i/H1:-")"A;7=.10;!h;y;17WuA;II-8'=A:H5,-):7i y/Ha:3;37.;1AbAHI A6!;HaAI 7V
nr
[ \therefore \text{b} \text{i} \text{y} / 76'5 + ; = \text{i} '4' + 5'645' ]
1
5)6mo

2;3)377y1A;5'A13

- 'i-39y7'13H:-76y6!63/
'A63;9y7"13-76y6!63/

y.9'3:9y17"↑3h:-76y6!63/
EAC
2.37:36:9y17"13:-76y6!63/
| »sy' wуJEs, wZs, J pç ājZAUZ Ä | q''f c|qps||Yur' Y'' | q''f c''|pJ Yur' Y'' | q''f c''|pJ ZZYURZ Y'' |
| r à HÖÄ áö' adbl IY MWh | WYYYYYYZUeEEE | a bleYH WMH WYYYYYYZUeEEE | a cIYYH WMH WYYYYYYZUeEEE |
| S G yþy: YYb H YYb H YYb HYYb» | |||
| nSGa ð à Ha cpaà' aYYH Ö | Iz | aYYH Öz | aYYH Öz |
| - àa H° ox nθx UθaHö Hk Üo | allah YH | allah YH | allah YH |
| nθx ð à að ð oðnH TcaH H TcaH H Tca | |||
| - àa H° ox n° ð ð o ð o ðy áw TYH H TYH H TYH | |||
| - àa H° ox n° ð G iO ð oðy O'H T H T H T H | |||
| ð H à à Há ð O' n' yBm' axHbYo | daHb' m' bH | daHb'bcHbH | daHb'bcHbH |
| mñ ð ðá Hqj-muý a p HYZO YZ' O H r | ctch | bTbil | bTbil |
| uó ǒlžɔjIoAciAciQ k χy Hô n Hqz Hb d'Z-H r H° ð a ð Vm aÖTH Oa H° no āa āa aða aH' aðopáá açá lð n ð O h n áHmpc H r H u H y y a'á c'af « áH' aðopáá açá H-P-S Š Šáwi ðnPmQ m āaa ð U aHa a c'ap-S Š Šáwi ðnPmQ yō aaaa'áj alp ldl al'il alipöök | eZTdIðnPmQ ZY TdIðnPmQ | eZTdIðnPmQ ZY TdIðnPmQ | eZTdIðnPmQ ZY TdIðnPmQ |
| Ecg ìaðɔjIoAciAciQ -SU H à G Hô n HpywcröyOlha ar a'SU aQHz b d'Zp+ r H° ð a ð f mñ xicSöA H aà G H acsö'olh H -S Šalwi | Tc Wá ZTbil Wá | Tc Wá ZTbil Wá | Tc Wá ZTbil Wá |
oo,WK
| naiha | a | O | H | a | Oa a G | S | a c a Thq Zh d' | Zha oB | Oo O | Hg a | O | Hx | a Sdah | Hxy | yGay Ha | a | H | a | H | o | c H | |||
| Go | Gao | Hx | Oa | Oi | Nk | Ky | Ha SdAa | C | dp | a A | G | yoy | x p | O | a H | Oo H | a | a | Oa V | |||||
| n | a | Oha | G | Ha a c a TH | a | H | a O | H | O | Hac | a | Hx | OH | x | O | Whop | H | a | H | a H | Oa | |||
| Oa | U x | Oc | Hc Hc a a eH | o | H | SGa | Oo H | a | Oa a | Tha a | G | a c a | H | oo | raa | Mnaia | a | O | Tha a | G | Hcy yHSAU | |||
| x | Og | He | OH | onH | a Oo | H | Ohr | xyo | Hcy | a | V | |||||||||||||
| - | a | G | Cy | yoy | H | Oo | Oo | a x | Oo C | op | Hp | eioH | U | OHS danahay | Hp | eioHx | 60 Ho | a | O | Sa ana | Op | H | xH | |
| a | Oo | O | a a | Ooiay | Oo | H | a H | Oo | Oo WnrC | THSU | Hx | Ooh | onH | ScApH | cO H | Oha | G | Hcy | yH | |||||
| Ohr | xyo | He | a | V | ||||||||||||||||||||
| w | o | Opa | a | G | Oa a O | S | a | Hyé | Thr | O n | O | a | OHa | H | Oa Hu | x | OoH | o | cH | Oaip | Haaa | aHa H | ||
| GH | OG | OoOHS | Oe ac SoaH | H | Hya | O | H | O | H | O | c | Oev |

ae, wqApalpoc fZAAAIAOZo JOaAoiJ Jaap 000
ZpIcO pI 0dCIO IA cAIOcIAO I Oa aaoXmKo OHa c H aHa AH Yy O fca Onda O h A Hx U oTH C O O HA Na C no C O HO OHs ao V poZOJAap Olp OAIZPcO pZIAofoo IAocciA C AJ allpOo pf J oA AApIpaox

i o' GszI rB' s>>s>>s,sJxX!JUGEsz
02||0>>Z0,
AUAZAIAUOICZIAO

svzAysIiA (OcaciAICAOJA AJAIAZAUAZ AIOoDpKOOp) OpaOuAI CAcAICaiAJAIIZaZpPkOJAApIO 020
AsA uOcIzazaoXt H 0e0 Ho Ha aa CHaaa a Tha aa H Oek nH OeC
05I AZSb dpUooOjPizOoIpa pO paOxwS acapah U Ha e HGH U aH aOoHa eHa aa Hox noo OH Sa cey
ASI yAO AJ A cIOCKOcIeSp dbUooOI bIOIOKOpJAs AJ bab IbaoXingHg X adh aoOHa H GhaeaO anaOaH h e
y0 0
s yAUCIOJdpUOoJAocJapOpOJIocAIJAZAo paoo
aApOpApKOOAOJoaA(OAJ Oao paoXJAeSpDPOOUPkIpO
0c JaOcO AJAO OCAZAPIOOUn OHa aHrO Thaa H
0x noOoAoG aoHa cH aOH Soa Syoyoh C 0 aO
Oa HOye cH Oo ah Xdoo OH GHu X aoOOh Cp Ha aU aH
O Uhao adHR O V
AsxpOEOIAOPIAZIAaOaOIsooAaOJIAIz(JpO O CIAZAOIpoIOp pAAapipIAZcOI A0CZAoAI AI poLOUaPZA0pu AZoAJoiuokwapUpAIATz(IJIAPIAZcOUP AAICAOIpauooia JApkoOpoJAzaOxq a H aO h S ha OOp h a aOH a U x oH a H ae oHa h a H uO H oS aOy
Asi aolipo pooj AIOAiaopsp IAOI bO Ipoc Jpapoi
aAapoiaojCJI AOpJIOpaaaai allp00xunath a aa c aoH
GgHa haa Hox nooHao gHS ao onooh e ao
Asrpoj Ok aloofof ZAlaoocOopkipoHpOoPj
aaaOIZAUZA AodpIp oil aIipOoRpKUAIcO AaAapaaep
1pSx- aa OOH Soa Ehu x oag C Oa a H0k TH
Oaavhok GgHa II aOH Soa SHOgIO Hn Hs ao nOo ao y
äürkç
uA (ZASO Aif aaaaAocOIOA AOIA ciaIaOApI p 10pIOApI sOIAO IA h
Aslv cdojapo pOApUp ToZAUZ AooepKOpIzioAutaO AJ CUIaAapiac pf allpoo paoo-u aa ook nooh ao Hao h a H aO TH G a yao n OHSua a Hoye c h a Hy e Hre H S ha a OgHa Hy a Ga V
Un H Ha U aaaa a Tha o OTHao OG Oa C cOgOsna aa OHa aaa nOoO O O H acSoaovna a a aOH Soa S OHa GHU X aoOo OBxooipoc HoSn ah ah a aOHO OHg
U-aa Fox noH a OH xooHa oHa c HAO Go a THoHS a VH
nrC HbA a H SaS h aaa a H a Oopc HoSn ah Ha g
U-aa Fox noH a H aaOoH xoo O u HA c Hc OoGH
osn a aa a Tha aa H oK nOoOH Ha 00 Ho G HGH u aoOoh
yaalky c Ho o Ha f aoAoSApaOo Ho a aa Ioo KnH
a H aaOo Ohog th Chosn a a Oipoc HoSn ah
aox HC Uc V
n H Ha U Haaa aTHa aa OooGhac a a H a Oo
aSOpapan s a C Hx Vs Ha U Haaa a H G noo H xo Ollac aOH
ro HR O
psI»AUXA AACGCAOcAIAOIC IZAUOApIZaZAOJAJIATC Ocai
AA (JZAso AJaaaAZCOIp 2oipapocIAAI JOOao pIzaZAO
rpozAUA AJooDpKOOOJapOJPbAO b a oVIA(doc JapoBJ
ZAUZAIooDpKIOIAjpaOJApZpOalaObaPaox Ha U H Oo
0Ha aa H HoSn arakn THOp Ha Oopu ASo aac aOH
rO H GgH aH Ha u H aaa a OHa aeHO x O H
Go s V
ASI AEISP dpUOICDc AoualaobIOc IZAUZA AacZAI pJdpIOZO OPI CUZA UAOcAVIZAUZA AUoDPKOOI AUO AJApZZO pXdCO AO AIAAW IAAOJAUXA AJ CXIA cOcIQCSp dpUOIPzPoiJOIAStIOPOOKOJ IOOZ OJI COJ-aa HoxmhoaoGPO'S SaQHa Hsao Gao p H Sa aHHGU X aoOo OHOG HaC H Ha U Haaa aOH OoS V
osUxA AJOdpKoUO OJAAapI AUO AICIAO COpZpIJAABPOAU
OC JOA AOJI AUcIC UAVIpO pyI pSpO pIePZA COIOAJA
ZAUZA AJOdpKOIZpO J aOApipI p IZAUZA AaoPbAIO
CDO AJUpi OAAUZAzaOxuAUXA AJOdpKOAp AI AZIAZZKCUO AAA
aAJAA CIJASO AJ aaaAzCui AO (OCJAACUUUAZC (KUo AAJA(doc)
apo POJAZUAAACCCEISp dpUOO pOI eD0i o pAO AO Aaoj
aAapIAA CdAI O AacX- aa Hoo nOoOHao OG 00 00 aAoH
°aOllnac Ohr O O
SUIAUXUOoDPKooOOJUOEOOSJAIZASO AIZAAICAU
ap zo po pUoKdtOoaoIooaazlaiaAApIp OAI AUA IAOAIO
OC JIOACO AJ AUZAI TAcOxnyc H Scaa aH H Oo n o OH
O O Oy V. Winai a H H G Oa OTH H a H
aaaOoOc Ooo O: Ho H O OHO aa O Ov
ASJYS AIcEIAAapApUp TozAUZA AuOpDlp Ip UIpPOO paO
wr Gia C Hc OgHoSna a aa aGha aa H oK gHO a H
aaaOo'ocSy H Hay ayo H aaa a OOHs ag ao Thaa H
0x noOioHaog aoHa Ha U Ha aa a OHS ag aoH
O O OIs a
ASJY AuO AICIAIO cOAlApzipOp bOs OAUI AIO AJ COfCKua
I AUO AJAOuPap Ip 001Zp JoAIAuPupUOdco AJPap Ipab pi
ZAUSZJCAOXw hao aoOH c BnGp HS a Thaa H
0x nnHao OG Ha H Ha U H aa a S Ag V
oiJf oaaaalp5pKooJAoof UcaOa
ASI AdcOAs O A CKcogaloc JAA AVIs OAKcjoac J aap pJLCdZAoJ IAUO ALICIA O Ais aAICIaCf pZIoiAOy e HHO OH a aa Hox noH rYo C0o ao 0oOg Hs H a H a U Haaa o 0oOH
psiv A allipoo pois OAApIZI 0 aaaaai I pSpKoJiau auaai
ocKO AI pspOoi I pspOo p koooi Ooz OUA (cooiizioaaa)
I pSp iuaOauZdAAp Af AZIO auplaAIAO AOI pSpOo ao Upl
ZAIZA Aaci allpoo paooolzio aaaaai I pSpKUdpoi I Oooa o
Acdojapo poiol o paoiiaapapso zio o paoo- aa G Og O H
C hoyg bp Hs a a th ah Saçapah U Ho y VwS acapah
U nih H S aH HxOHa Ha aah a OH
aHOyayOH a XxohdaHa a Ho O Oo HO HA a H Do xnO H
OHO hn Hx Ha aH OH a On OH Soa SH Ov
OsIoJI ZI O aaaaai I pSpKoJapaooi Ooz OIIc (OnusKA IpZI
IO aaaaai I pSpJaApaoi ia Uaaioipip JepIOO ao Up
piAzocapoi O pIs O A cOXt a GHX THc U6G OH OA
a Ha Gh H ah Saçapah U niOH p H5 HG aH
r aoHO OISAY
AsIoJI O aaaaJI bSpKoJIaICOaIJIup AAAL; piaAO AicdoAI pIO pIAaApIbdoTOLJI AuO AJACOJSAII a aO Ip IbpDOxIOJI 10 aaAaiB SpKoAA OdAI O AUI OlAcIaIbpoJaIZAUZA AJOOpKO O piaAO AICrOAJAC OaAIUA OaUZIO pOxJnyayOHn H a H G Oo h S acapah U SaS a Hs BgG oOy
q"fclqpshy0lpaaaIpO pUooJAOoI cao0a
SIOJIZI O aaaai JbSp IZAUZA AJOOpKooi bSpzO p K0Uo AAJ ZAUZA AaizAAApApiaApiaA AJO pO paOxw S AO iHa a aahorOyGa Ha aa oX noHa aa c H crOyOyHa ao H ha Ha RoY O O e c h a Vnahao Ha aa U OOlha aHOrOyGHay ao HO aOv
pslyAIOApSzKooaiZAUZ AJoOdpKOpiaaAoiipaaialpo paI allpOxJw aaei aaaa Hn rao ao OH oTH OHa aa Hox noG OOH G nOo OH Op HS 00v
oslyipaaialpbuOoi allipoojioipaaaaopbdIp0 kOJAocj
pap IpaoXHE OoO thUSeacSOn h o aaeh OoH Ha U Haaa aOH ohr o O S V
ASVApOpBol pO pAUCIOA OAIOLpaaiFppuOoi
fallpOooaxwo aeeh aoAoOHOa aHOSn ao aao o H aHO GOGoOHA aHa a aOOa aHao AO H
OOgOHa aa c0oOOH aO
slyipaaialppuOooJAZOIIOpaoIOAOUI AIOApZZoooi
CdoAioaloo p0 XWna H aHG Oo Ho aaaeH adH aU Haaa oHro OHa aeov
ASI poI 6IipaaaiPpuoKIAIZAUZAAci atIpOo aoQOH
yxy H a OH Saicapah U noOH U O aoG aV


aür
sIJAoaAolcJaAubpIOZO pIZpIO pZIpO
yo aa aal alp lol fllpooXv y ay h a G a c0oH a V
ws Ha xe ao OoOly 0 o Hx Oo Oo a aaa
Sacapahre y ha oOwwS acapah aHa HSe 0 OH Sa o H au
aTH Oc h o A HA n HA H C h a H C O
C OHn Go h A o H aac c O V
- a Haeaohy G O Oha c H an n He oAsehoo
e H S acSO H S G O OH aHac aOH H
osO oo n O He s ao o Ws S acso H a Oip Ho n
e H G OH y Hc a H a H aagH H xo on H
aagaa He s ao oo V
-Oa H a H a Oo H o aeaedoo H' a Gha a H
0ok ooh a OoOv
wape H e Hx Oa c aoH oK d a adHa x Oy
wa 0o Oha oohoe oA Oho a TH OH eH a H p elye 0o H
c eoh e Ho a O cy a Hs 00 V
< o b H ah o aaao H' a OTHz d'cuZi Ha ca ah G UHOx OH
a OoOv
xya 0bpe 0oH XOO Ha G H a 6P0a Q Soa H
a 0 c01
m aH Ha 0o OH x W U HG a O h a cOy
na H aeOOh C C Ha aa Ho G O OH Go bado O aoOoh
ro 0 ev
szzy>>,AlyzAlt, s'
T CieyTnHs
n a GH G a o o daofoo Thaa a H a c W ha O c H xdd H a H OH a OaOooa o a a o VHmOp H a H OH b H S a Hc U o Wq a H OH Hao a H o n o h o a H a H a H a a a a a a H aay V - aa H a aoh Op Ho a a OaS O a aa O O u ao o
IpsyspoNzo'>>
m aHa o p a H e o a O a H Ha Ha Ua a Hye Oo H
O a Og O H O h n cOwC UacWs A HAcO Oluoc
O no Oo OH ah Saapaah Soa ae-U e Ho n O V
mko H a O u e H a d H S a HG a HPrTH"opH "opQ
OsO ao oGHS oO b VmaT a Ha aa aoOed H HeS ao a aa VH
xya OH a eA Oo Oi aaaa H aOv
m aHa o p H U OH OH e a OY
n n OaOH SaaOaH aa OHae HaaaOWh S 0 H aOH
aOo HS oO b Ha Su O 0
t Ha Oo OhrOp Hp eothn OaOH SaaOaTH Oc a
a HCg H a Ha Ha croyoo OH Soa Sd OeV t a OH
U x Oha o p Ho Kae O HA a a Oev
Azyv o,sys>>oyw w'W W z0 r W; o''W
q a S0 H H ah o d-aoo b aoTH a a O H
x oGao o aoHao aoO H ypyHaOo Oo a HnZbHm0 H
a S a O Hx oGao o aoOHa n a 0
yzz0'Wj
"is' N, "IpEv "EYv "IaZj
a S0 p N S e OEoO E SaN Su SaaS eBao SOU He UoaH a p N SHoD oEH Ha SoEHu SaSeO HZbMHUseap V
"pz0>>JfEa k>
aOEOH UHe SbOOn HUoE n aoEdoBshoo aW
nr , kpo
iOeIe OHe e 0p U pHoo Haa Se hacad OsaahesSa
edaa o ahe Heaaa cy
EaaEa Ha THo Haa HuaSauSe cHsOeo SE Ho UDE OEHo OH SoaoH
O SoaoEU SaH SsAao W
Otaa SeH Sp OOB cao aaaHa haab 0 H oe WzE aTHo aepn
U Saao O use SeaeEHU aaHO sHE ON es SA onnoaaa
"Ea peEA OcHDo Obaa oae Haad Ho aATV
a OEHoa afa Hu bW daa aTa H OcH o a DoobEOHN
aao HU cTHocaa Ha he e aeAo AHUsd av
Otaa SeHao oata Ho aaHTaap H So eOeOHsoACA n SHs E H ea V
Soa Sata aO OSAaHSp OooP H caFV
a OHeo Hho eAOHe EaBO Sa Sano aSAosAH No eU oosAH
Ou PV
SaHue HUo USESa pH a P N SHUoeaa Se HUse Se OTH
aHaOaHO eOHaU bIOeHaU a OTo HUo USESa be H T
a HE SoOnHea aHU Saao Oo pAAE HC CUSA cAAEEpa a-uSH
ed eOE cI
Saota aHaO OEOHUoea ae OaaaHy a a HOD OEOHe c
y a Vpe cie ep oAe EOHO cHUSUAO TH p a Ha eEO aHa
a5 eSA ON HA aHaPA evJa d cMk< eo Ha aOp eAaq
O USao EUSo SOn SH Se aAH SOaa ap TH Sa Saah
Shacua Hoea Huae Sha aHa HO sHa0 SbTH p a SObOaaa
s "t My auqca U" b IZYHC Zb' 00 Oo OTIs OCV
qss"vzol's'J"vrE
i S eaf H0 HO eHae 0oHsOsAeOsAsHo H O Sa aHUsUaO
ahDaa Hc- p Op PnCf KhaU aE Hae p O UoTa aeOJaaa OSa OH
a E Obl YZZWbaWq, HP"St <OH
YYbI Wq<
YZ' W Yq<
°c CHUsao acOJa daeepeh SO esa OnHos
qz b d'ZUZf YZa
qz b d'ZU Uaf YZ'
qz aaYZ' UZf YZcS mZZf Y Y
qz haaYZ' U f YZa
qz bZYYYYU f YZ'
qz bZYYYYU f YZ
qz huqoiB YYYf YZd

00 08 0TH Y YUZZUZc
I esky

ma 0dd waaaHMy 0 o p paS
aU O5 SpOEoHa aa aSaOeBa pOp HUsd OFV -pa SbPbHOoAaa aIs t
y aUqca Ua b ZYthcZ b'» 00 08 OTIs 0c
"z:pi"

i 己 ^ 川 ^ m ^ " 乙 I z q n q e q M I

jδHaUεAEOH Haa Se Ha HU o aEHU SoaEA H OJdaSbH USaEADOeV

IOIOIbHaHaS E IOaAaH OSoa allp 00n°oV

i Sae Ta HIOHaap

i SaeEa HUo HUpa Saosanp Osa aav

i Sae a HSp OONa apI

jObeIeEHa e 0p HU pHO haa SeIacad OSaahesSsaH eIa aie IeIaaa C


zUsaTaHaTav

j0a aE OaaaHO BHaSaOaAeHbSOda CHa eU S Hua aE Oaaa
q a p N-UoEa Se Ha Ho a E a OSa aalus ooeHaSou H eOs IpOSoaaBnq a p H a So p NuaOea Se He rao a°
aOe aSoDE OE BSo ae aHah pc oOE HUsOo aiHO S S p Sa aOp Wz H EaOep HcO o p Ho OSh
aU p esa ON SHu So Ep Ha OH aEA Ho pc oOH Uso ch HAe OINhoAs CV
nr
q a p OHueaa SeHalaOeSahSp Ochuiq a p O-ueaa SETnHa a PI SHsp O Uo oHeia H WUsao HeaEO E O Hei DOE h ES bTH HO aS Ho aosanusao a a n O SU SaHSp OOnSU ao OEThe eAsaHoSt aHes P H O'She ae OOh es bWz aaat HoIOONHe oe EHU SH Uo USE OHsp OON SsaO o V "SOS"EOONSaio
Z UDE OEH

四 ~ a 四 E 四 ~ a H 四 ~ U 四 ~ S ~ a ~ ~ o ~

UaUMaOHeH OHa pSaHe 5 Sa On StaEu oOn S H O SA DAo HO aa a ON SNUE SaH aaaTH aS OH He HODa O S O SA SA ONHeo OAa UE cH E HUs cH SoS S aHa S H B'aa efep HSAg
H BHa HUe SaHa aHa e a O H 0 FaE U o Haiae a Eep H
ea O H eAthe O S ae HA H Ha SaS HaC SoEoD O Ha S HO H
S'a a aEpaSaS ag
U BIE Ue SaOH aaiag e H O ao Oo OH 50 aU daO Ho aa a OTH HoHa HeaChe Oo E OCHUE SAHaaee ceOcEsOsUsa p Ssa EH USp CHSo aTHoe Ha HUE SaOH aaiacao HeBep EHeea OCh UBE USA SoHs HbS a a aeEcp EhsSo V
UMaOHTHeHODa 5 HO aU dao SHb cON SHUsOea O UcH "Soo HuaOaOc HSU a O T aS NUSU aaE HaO a oaeCU pS HAa TH Sooshe O d0sV
pslr XZAiS1ai Oo AIOOO pJ af po cpiO peZAISpxAlaiZpI AE SIOAAviT ZAOA AZAIAGUIUJIUSZOI AOi Caa aiC OauxEx auIOEJIATOEOAEISIOAIj OAOsIOAI AOi KUzavoc iOJA CapEZAISTIOadiciU OEA OAEITOCAUOUAOTO
ZAIIO Xi HaUMaOS H De Ho HUe Ha So S a S HOSe OaTH ae H Bla H So USa On Su a O Th Ho H So a aep H Sa So ha a uMaON SH Daeha Doa
osloj uipStioadUizapoiI atAlpiaOoi jupStioaCIs A a- aKofoAeao avlaaoocZuaaStOpEup XZAStiaiaopzACIOoo ai OAZavil do JupStioadUizAAII OJapUpaiv upoAsOI U-pzAiaoo pStiaiaoi 0oi alpiaOieApuO Aoo I op avl do JupStioadUIZsOaaaatApiaOoi do
O EXAaoCIOUoJusZoai CaXz d a Hc Oaene o S Sa O HUsan 1aaHUS SpSahsOooP Su a OeAHSaa D a
ASJyAuaAAZaiOoapusAuCustafvI ZO Ciaaiod 0oi avi aaAOz aZAsTiOadUcIaiz- zoAajpeuO0Z OlaZAvEooA
UlaaoaStiajapuaIoaizaiOpaBz Cicoooi axw BIE HUE Saeh aah e°Ssa 0oH OHaS°S aHUS OeSH 5h Ho HaHaSshaUMaOH DeTH HcHue HeOsArauaa V
SUJEAIISIPZAOUSOOS(ZAVipaaJUZAIOXICACOI Ust'zoi AOJ Caaiapoloi Oaporo ISlOAI AJUZAX" HNU ao H aH HoiaOdaO Sa aaEO SAaHu OcsWHa aHa OH USOU SHoSSp HaaOp Th BHa'Ee Saa Hea Oc h eah EHO E
AsI ASoXiapZAIzaSipOcSO-10 AOfIeTioaJIciZaxiE SaTH aacahSaaiU OHea° H Shaoau DaO Ho aa oo Hea° h acaaI EUEeHecAeaOaehaHaHaSaTeCeaOeOTMa 0 S Sa O HUe San Sha aAH eCaAs O HaUMaON S
ASJIC AJSIAOIO Oo AlaZpAOzAOpUzpaAoo(pIAgoi a) Aaaiaipj AaaW Br hUso aUE O O aa o He OETH Ho ha Ue Saah alle 一 _ 0 Ssa HuaHaSshaUMaOH DeIO d V
ASUOoZoAOspz OoouaZIs (S0xapUApAopuapS(AAO) apoBpO OApOo SJ OUI AZI AOIS (AUO aviOp s1ip
OJAUZaTeUAeUZaoXueUpSa OHeuSaaHooHU HUEo e°S Sa hEo Ha cAHTSe actoSH Ho HAHa'ShaUMoOH DeV
taOfAcpusO OAI AOIOAA poOI Aoi aza
psiA 1Bx do ISoaxzIO JOC p (pU OO ZOIaEZAVIEQAAAAAOAJ S paAeAUSS OdoAa PooAI AZU ASOxAcapZAI OZUEoAUSIAW Au Upl OIOAOA pooi A2OIA CaOASOAAOapupip AuOf PO XZAI paZOO pZAI aJOAapzAC pxI (I aOApolOI aZApOAS (ataaEZJ
OIOIOAOA pooai aziaOzao AOABSOIOAOxim HaI HUE HO e cao H au O Ho He TH S S 0ca HOS O0HSp O00h c4a a sS J S SpSa H a o E Udo CHSaaS a HSp O00h cahle e u oa TH CHa HsO H US c0 Sa H UHO OOS Heio aa a a OOp h SaH eaH oOe HEO aa a OOp H 0S H eha HO OsaH O H Sa aOOp Hco aaS HOD V
002 01aEZAIEOOOuS axoai OIOI AOIA pooI Aoi I azxprzAuaI OOpUPOc p US A JEAAOISAOxOIO5 pauV pI OIOIAA POODI AZPES axOPIOS PAeUOAAaaOAn i Se So Onco aa CTH U anha a Ooc SHo Su Ha as H auHa'S aeHos OOh Sp OOH caU paHus O
ASI'ZAO ZAI OIOJ0AA pOoi azi af oaiAOIS C-SAA(CIOA) AaoAAVip OJJUu AapocAlapSCAOaTO biIpu AapOCAJcO dAA AaoaXr OIOJ0AA poOdi azIOza cpeZAISOO AOjia pZOAE SCEi apEIAOEISFOUI OIO CopOI AOj pZ (Clav SCEiajSAUzCAXi Ha e aOp Hsaa aOep HUp aEHp sH os OHSp 00h caa aa s ap
SII (I aOAI IpUZAIJIOpIs paOaOduZEIpOoPiSO IpAiaOAAI ZAOAVpoaiOoiISIOadiciUZI azdi OIOdo JOAA poodio AZOO X Z pIO OTHOS EEP-UE SAOH aHaUAHSo HUs S'UE CHU Sa Ha ah eah I o Hae a STHOSh aHaaSEeALp aa W'Et Ea KaHOs AHO So AH UE SAIN SH aaiv
q"fclqpshitaofAcpiaOaAAAOIIOa
psiAIOpApOoIeAoIcUZIsOaxzaiAx aJao OdaO (pAIO IooX'So pH OH aaEocSH eH HeD oON Sha a H Ue San h AaTH Ha OEHH HeaSauUE San SHa aay
OsuO (paciIOpuzAos OIsosuaaA AooJcAo ApSoXapocz au dao H cTbp cOUs S h 50 au dao H o aa a HoSb p OaHoa: sHe Oda os HaSb p H O aO h Hpshcoo He dOshaUMaON an Deav
ASJIEO (pAciIc)S0aXtapeZaiax avipEe JaaZac poiaC Aaoxh "So h OHa H e e OHe a oHos HUshe e OEHU HUs c H Ue chu dh aaS ap cHu aoHos eaiv
Sioaolaiao (pacIcOJIueCOOOIO auUupOpAAC apuiai-2 aooA) Aaaui Da cp H eSp He SAo p OH He O Sa OBaeO aUMoN SH DeaHO 000
AsI ASoaXapZAUSJUOUI caAodo JAO Cpao JfCoo OH O S° OUnS ap H Ho Hae a O HSp OON Saahus
rpl-(AioAaaSAEOOUzOI pJ5pAOaOI IS0f a0a
| «OaXcIptZAI0AA pOaJIlaAaXiz o Oθ: à H Ho a asH haa a a ap av |
| i Sào a HSp OÖnIac° à O W; H U Dp Hah a bp Θ HD e H USaOe Ea HaoocHSp OÖN-S a WpSUS aoé a a OHUsa a H aEo aabSp OÖN SHSo aH HSp OÖ E°S aa TH SaEH So U eÖdH a TSp OÖNTH a bp T-U aÖdH o e Ecp HSc aaaTHSp OÖdH U° H HSp Oá ap av |
| i p Th aS θAcO dU H U dp IE Ho aaséo a aie So aθH o HcH OSa S-OSHa WHSAoTa Ea HSaada pU bp aH HOSaHa SooEH a aH U SA HU bp aW, a b O OHe U bp HO O HSOa dO StO U Vhaça SV i E SaH aact A S N O eSUSa o Ecp a aa D Haa o Oθ H OdaSb H USa a TH o e Hua HUSAO av |
| "°a Ha HUE SaOH aaaa SaOOHö: e O Hac° ON S a dav |
| i EUa aON SaDo CHU pSaON SHDoa SE H aα H°csh O dO Ha NH acAs N SH TaçéE HSaO chA o OTH H a p S HOD eY i SàoTa Ea H° Ho aSS° D° p H SaCo HU p C Sa OπaHs aS OdaSb TH a Nha U ECHUSO à cHOS cHQz-d'cuZV |
| z USaToT a HU SaE Hap aOe H SaCo I i H aoos Ha o OHaçucE OHO aSa SV i Saa OePaaS H O e H bp SaHUsa aaaahe Oea Hu a ea Saue San Sh aaaaiv |
SZSYy,WqyójP,iro
TCTeyTIHd
| w | BHUAAACA | Ha | ÖO | SIAÇEÜO | ÖTHAHAÜCé | Ha-Ü | ÖAHU | ÖOOH |
| a | ÖOOHUS | SpSah | a | p | EH°eOcε | aa | aEVHq | a p D° eO Kaε H |
| Ho | HOO O SA | SaO | aSAθ | HAUSÖ | OE WJ S | H | a p D° eO H | |
| SU | SASO | Heç | dTH | aEAHA | HUE HSOO | ashoSH | aas | esA ON SHa aah |
| y | a | aV | ||||||
| i | E AHE | öN SHO | aHaç° | aH OHUSHe | a a | ÖE-UE SaN | SH aaay |
wsv'Eo]Axyo
| i UDE SH OÖ HE OÖS DeSAOHAA o aθU EOH O HA sSsHOO MA H |
| aà O OTNHO HeAea avi USE O HE SSOONH EoSHdAaaa 1° eHSp OÜ |
| ON SH SOA aaTHU aSo H So SÖea a paiSp OÖ EHa OChuW |
| ædaaa CHSASO EES HU SAA oEH aH cshac° a OTNSp OÖH |
| aUTo OS Hsu HU aOSaOH OID es HPrTH"opTH"opQH-SaSHE |
| ÖEA OOOH U aHIO H' eH a b Phe O W" OaEA HU SAE H |
| aS aaSHUsSe Ossu H USAO a OEOId SE Hua Se V |
| x OIAcUOAAOAAHAA SE U UIDE a OSHedAaaa CV |
| i USSeSa pEH D° Hb OA H SHU pSAO EHS° aHAA SE VwD° H |
| a aTa Hoochá S HOSE aaiSohAA SE V |
| i OH OoH UUSAO AE HU EAA SETHU EUSEOHN D° THU oOSa pEH D° TH |
| eU OOSaOOHUSU a H eHaa o aHa SOA Sata THO HaCHUSe SO ONH |
| HO ECIU TEO chSaa Oaa WSe SO ONH CIO p EHSU a sh |
| aSsO° S OE V |
"pi sris'Ws' opsv' EYv'Jn r
| q a Sö p N S° | öe Ö | HÖ° | SaN SÜ €öÄHS° | öEBaE SÜ H |
| é ÜOaaaH | a p N SöÖd | ö Hä | SöÖEHU aDóé aHö ZbblmUS aa V |
^ [W]WSJ
aOoH5 aoOIOUE HsAoOHO H O HU cH eSA-OSh a W
nr ,Ipo
i öH öSahU öPsaHö Haa SeRacá Öa HeDa öeSédaaaa cI " öOg SdUsEa Hóaaa SesSoH ap Eha aú SdAosH °Sh o SdOa SdSaa HUE cVII j Eaa SEh öOnne ö HOaaa Haab SaH öö SavHz o aa pHu Saaa Ochuse SoeaEEHU aah Sh Ön Sa ONHO aauVH " a Hsaa cHao Osa shaa Halo aAs V i aO Hsaaa aTe Hb pv Daa Да HU OCH S aÖca HUE cTH °chaaa hé öe He DhaeO aHUSo av j Eaa SdHao aTa HoaaaH Haap θT Sbe Oaan SHS E H eA V « S0a Sata aO össasSp OooP H caSav i aO OJHCO °Hoa O HUSA DHSO Cto aSAOSsH eU oOCH Ou Ua dApiv m HE HU EUSOoh Di aP π SUEAA SEHUS STo aAehOcsh O OoHeU bdo aH Oo HU EUSO H °S Th aS ThH SoOHN eA SHSaa OEPaaa HS Öep ha aàU He eOE SAV i Sao aSh Ohy a HU eAe OaaaS Hy a HöD OoTHO « Co aCh eHDoSa OaH Oa Hoiaac O shahe OOS H Ey a aHed eOEp cp HpOa HPa BH Socäd Wmo acS ED eOEP cp Hp Oa QH i Hao OHaCuHaa Se HoeA HOb öeEep Saa HO Hea aHDoHa U EU O HUsa °Caço aH AU SeTaO Hap H HU eaa SEHsHaJe SH eD eOEP SpOa H °SHU SaH p SbhuObaaa aIs tTH y alqca Ua b IZYTHcZ b' OoO Ots
qsJGjEaeV zo"ss'vSlyt"tt"uW>>a
z HÖ eäaθ öÖe§δUSa öSasiaç aaf Tö U Söa ahUSUEa ÖH aHö aa c- p Öp ΜHÖ E K-aU Ræ a cHü Ea æÖnHaaaa OSa O H á Oéph YZZNbaqgHP"St <<OH YYbbl" Wqch YZ' N YWqgh J'S HUSAO anHö a δSaON: Sö eSa ÖnHOS cH qz Hb d' ZUZf YZa qz Hb d' ZU Uaf YZ' qz HaaYZ' UZf YZcS mZZf Y Y qz HaaYZ' U f YZa qz HbZYYYYU f YZ' qz HbZYYYYU f YZ qz HsqoIb YYYf YZd
CE
>> 00 00 00TH Y YUZZUZc

m à ðö w à NIVy ð ðp ùS «U OŠ ŠpÖ ðHeSaa a ša ì ìp ηHUSO òC - ì à SÖ pHuOàAá àHs °t y ùlUqca ëä b ZYTHcZ b'» ðÖ ðD ñHs òC

"zai p"zai

j"Hz qnqj qMz - 1
i OH aH HUsao AE U Eaa Se Ha HUsse O U oea Ea H OdaSbHO 5°a aav
H Dpa Hsaa Ss 0oOc0Saa HSp 0mS a V
iSaotaTaSp OaHaapai
U np Hsasa SdoeHsp 0oCH a aTH OHa HO dSaa HoSH aba N SH e ay
iSaota fä Sp OOna a p1
008SaHUpSahIaStaOa OHeaaeEeaaaCy
zUsaocataHaay
i Ea a e OaaaS uH 14e co asaeha 00 00 hao agnsuS co ONH 0sU O Heu S aTu a e Oaaa V
q a p NUEa Se Ha O a E aOs ShaUs aHaSou o eos DpOSe q a p Pn H a SOp THU eaa Se Ha 0 e sOo O HsOsAo shp Ha pc 00S HUSoo ano H SS p E aDp avz aaOcp Hd sp 0sHaade S U p esa ON SHU depaHauea H PC OONHUsoo c HeoTHoAs C
q a p 0u Eaa Sea OchSp q a b 0u Eaa SETHU H aS S HSp O HU oHea S H VU eos Hea aEO H SoEa Oo Eh es Dp Th HsOaS Sto Ho aOeHUsao aHn EH osu Osaop OONHSU a O T haOaSe anes dp H oSheSa OoEs Dp Wz a aaet Ho oO He oO H U Use O HSp OON ShaSoov
aDcHUdeoSb
z Uma
又 a o a o h u U o
aO o e SdchqajU
æö ðé Sóclai n àjö
aO o He So8cH, eO
aO e 5oCHU H° aqA De

Clovensky
ro'sj» sqv' qq'sj
sIäI Z OÖCAÖPScip I pIZp AAOaP q''Jf cIqpsJJ
YAH 'Y" q''Jf cI''pl
YAH 'Y" q''Jf cI''pl
ZZY-AHZ Y" zä -U SöA pcEÖc' adbl HY HWW WVYYYYYYZUeEEE 'a bIeYH HWH
WVYYYYYYZUeEEE 'a cIYYH HWH
WVYYYYYYZUeEEE æö SÖSa II SphCfZp Sa II YY» II YY» II YY» i aö SxO eI5p uu O h ayyo 'aYYH Ö" 'aYYH Ö" ü oöb Hsa e IuncHäö dö p Saa Sä aIIAH YH aIIAH YH aIIAH YH s a° SxO e aépeSaaH TcaH II TcaH s a° SxO e aépeSaaHic H TyH II TYH II TYH s a° SxHéo H Iich OH T II T y ac O h qn SxP bp HUSdH uA -Yam' aadMbYdo daIWB' M' bH daIWB'bcNHNH daIWB'bcNHNH o nii H -U Sb Dcqi -miYZN YZ' ctch bIbl bIbl wOAO ßpApB JÖZAÄÉApIJuaO NäJ
æeSO a SxP a ceO peSOSHe SOO HeHOS urqZb d'ZMj SeS Haea jä ha euöe Ö HSae pSa Öghe Şlmhá cOsA NaCUSa Sf
i SéS H zö O II aacpeO SHPz U a OSZxHwi onPmQQ eZTdHONPmQ eZTdHONPmQ eZTdHONPmQ i SéS H spch aacpeO EHPz U a OSZxHwi onPmQQ
piAnlánAa poOAA OÖpAaJaluaK ZY TdhONPmQ ZY TdhONPmQ ZY TdhONPmQ wOAO ßpAEI JÖZAÄÉAIA Jc paEQ
» aSzp HupéO Ho mPaaa H aS Sa aep H ao ja OHa ceO peSÖ He SöO HeOSS uqz b d'Z
i ISä O Ho aO H
» aSzXH aé Hn
z U a OSZxHwi Tc Wá
ZTah Wá Tc Wá
ZTah Wá Tc Wá
ZTah Wá
"»,1sas' wsk
i So Ochio Eaecp Haa ape p UseS Ho nHesaa nne esOche HUs Spu h asochus Sa He Soe Eehos uqz d'Z: Su cx
aucachshus ja 0 he Ha ouh a SO enoVz o ha Soh ja 0 uhsacpe aSa BSp ocHspuu O ha pc0 SV
i So Ochuse Hn u e Oaa Hjao He aaSsa OH a SO enede Wv zh HE oo a So enede Haaca HeSaa OoOcp H
pa Jheoo Ho enoe +o Spc HaHO e aHosaa peo + Soa a SA oHa aocusE Ho n Su a c ecaxsop C Ovy Su
aHsac OHea aecx-Sp uui O HA ope Hu eep qhS ahU pcv
pOs nOo SIs Z OHSpuu O HA ope HO uchaee aoXja o upe acha aj cp a eudoe O He aala cqupeSo Ha eao He aah
a npueSO thpe apecaa aaspho HUpaet Wsu HsiaUSA sosa xha c oua ptnso Puu O Ha o pcto Sapic HS a HU pci
z ucha U Sa de XhoSao sa z So He USoape Hb HSp SochSana atup SHue dhSodae nca O ho nTHe HU ec n
Soa ap Ho enoe H'Spcp H a So enoT O e Huts Oep HU e aU pcy
A"»1sas'wsIaAAaaZpolaUaalUzICAlaUlpaNAt O AaaSCAAA=Ua bVicOuZ aAEAVcIauZ bAeiO pAOI ORAAOOAI 0 aE aOcpxinpoiaHu eae OaUSOuaepHa aeja S uH aUsaSosaXusuO HuoTHUsu HApui -5ooHpiv 'pAnaiUbpOCAIS aaAooa a poJuaUaUZiAIS aaS(UaC aUl paNAI OaAaSCAA=UzapI IpIpuAAOjapUOoAPOcx
A t"yoipsiypsit olr zoj,qq' aqv) o,qi"L aqv
OAA a p A O A p
ps! 'wsps1 «wsqisM»L "h" pIAnajaa bnpolooal OAAIOCAI OUZbraUcoia JapcoAUSroa poCIOCA) OZI OOraja aUAaOzXu r aAEJ OF EOpIAnaiZ ao polaAaa zO pZi Oa aiAoIOa Oa OUIocf pxs ocsOca + np Ha ec tuH npHa pesa ut e aepeSaO H SuHp He O Xi
01 CIOPIAnaiAAa azpoloCAAAAOISO JOO poPbaoIs aa W 0 cOZAO x anSO Hp Sso HO + Su H So Xnna Hue OH oepeSA HUsOsO Oc Hue Sa
ASI uOo0I O'AlCOAc(pOJIa) O'SpuOa po O' AadoAciOa pW
O'pOAAOs aA O(OZa)Sa OOSH cxHa oSpeo H O EE HU O H
aCas SzXHeJ aHUsOs Oc HU e O Sa O!
SI 'CAtOpiAnjoc aIz ao poS aa O(OZa) O'STOa pOc(pJa
OAAIAOISO Z aao ao poOOAeJoo pa(pOa)S aO (OZIOPIAna)
apoAaSCAAaaOblUZpocIaooISO tonaxu uHE aATcSooC H Ue O SaHSo eA SpSa xTH cHe O EaecxHO eU pe naa SH Soa aaHb The 5 Sa O haHa eapeSaah aaaa ac Soa S O o hia eude O
ASI O AapuS paU5 aaI Zn aAIAIaI Z 0op aacO AOrOa) Opz pl oplai zAIS aaO aAIAI z aaOAlaoj PpuoJ SaaN VIPIAnEAIz ao poZali OlapcAoIOa POJI OOEa U Sa Uca SOA aaeHUEa So rOupc HUsOHO np Th a aecaa Hperzp a Sa H a SO enoe Heo Toua J a O U USO U np H S uHaUsa Sosx HUS u O Hu uo HSaS° Ch S'ana atup Ev
ASI aJACoPAJIa ranOAAIOIanalana polapuaAIO so ai OUZAIS OAp OCAII pa 0 acuS Uae Hasos dOOSxH bp Hc O Eae Su a SzXTHU eapeSaHre S af V AS' pAnalana polapa uAJO aAUAOZNa IO SOa CA OAO aCII O'ACJIAISpuaeEAO JOZA O AO JapO AOA pOcPIROsXJAa spaw OA JOJIoEARo Sun eapeSacnaj HO HAutospezp H Soa Usa cP Huich npura Ho jaOs O HUsa oeuosaa Soa SHOeude O V
ASI (AIOIaIanaa poO A jaiuafo aooaaiaJaaAA)
S0 [p ai Jao' ao O ao auaaOzau So o Hiz aoch
e aepeSaHaeeSaa nla Soa aa o hU pe O hH i naa Hjcta
pa SAc 0 Ea c0 EOSzp H epu neaaa U pcV


aAaaaOaJcOcfoCAoAo cAcpja OZ0AAoh
U O b eea SaO He aaio nuh peuie SIO aouaa Shpeupcp Ha aTH
e O S Sa Ocp H aO U aOnSa SHO aa a SOcp H e aepeSaj a TH
aj HUsa oes-OSa STHoo SA SsA OH uHusOsAsa-H
US aa eHa caaa eupheis O SHU e O SaHa H ao hssosch
S' ana atup Eha eudoe Og
Us ocho e aepeSahe pecha aHe re O Sa aHe c eupc Ha rH
e e TH e aepeSaS aE Ha Ha Ha O Soe H e eudoe O Ha H
ao aHSA'SG ana atup Eha eudoe O g
UsOgHe aépeSaHSeSaa O HU e np50c 一 ^ 心 口 U a oJSa Saaa a U 50ca He THea cIac O E h A oE 一 ^ 心 e aepSeaah S ulhape cXH O uSaa ep OHS 一 ^ 心 O SNUe O SaTHU eepSH 一 ^ 心 e aepSea H a caaa Ha hle eeaTH U n Hsda at HA aO aHsS 一 ^ 心 sAn aetup th a euoE O V
0° p Héa SàO He aàHô aáuUaaa Hô U a onSa Šh à°oJrO O Šh
auça O HúCly WsO aé US° pHaasafupSóUsa 00 Hz So I
Saa SuOSp THe Hsu a OsO u EV
psllc(TOJOpIaIz aa0 poIooa a 00 p1 oIpoIpIpo (OoP) SOA cOaJIapEeOJIpI EJO OaAeovla I ZN AEIO OnopOS aaIOUcOI UTOIO Aocplaa OZOOAoi pIAnaiS aaecolsoAeOJApa UaAJ aoOI aAuaAooZAVIOCA iOcAI Oa p aOIZAAOIAO aAuaAooZOpE Oa prUCIOpeA OAEICOCIAJAcPRAO Xj ecH S0pAhe SAoc Hsu H Su HsOa SpecxOShacnTt DO HsAsHeu Sana atup H Su He U OSA XHO dHa HSOp Hea SaO sTH oc eSaa nCUE daera HsUsa D IO Sz He dpv
osIe IS aaSp IavIA aIo aAuaAaoZjapoiIO oApUcoIaO!
SToa pOAlaOuZpRoIS aA aPoAiaKOOAAoISOA O avOpIaNai
aaa 0IOolajEAAoci Ya aEAAoci Ksroz ao polusOI otocai J
Ooo poCpoAO IO pZA (pAVPNI) OIO Oo AOZvIA aIo aAuaAaoZlaOpn
e eAUcoJAPri OA (ACAJa JoAa aaaXJ (AJoPIAnaiOC Aais Noo ap
a aROAcipSraJIo poPoAAOs A O (OZalaoJAcEAOCoPJEAE) OJ
ZaraIzpi] TaAOVIEpi] TaAO Io AAaAooZlOpe aTucoJa AAAAVI
IadoNARoOJa p aouUCOIO OACAAa OZOAX z cCxH
U espeGore S Sa O Ha rnoe aepeSaaH haaOxHeuSUsa Oo H
Z So He dpes V
Asju aAAAAUOSSOOa OCAa rAaoTOWI ZNpuZa Joo poaipao IS aa O (OACAVIOPIAnalo aAuaAooZia AAOZ OpaJ apacui 002 OIOa poVAaaoadSraioUUEapApAAOOJAoo pocpao! Saa OCOACAXu H ecU o aTH ochnoeapeSaH aHeo Ssa OcTuSOa cU xHeo O SiU e SaHaUs SoSa XHSO pHaea Sao TH ocHsaa HUSOsO HA npupeSo
Slur anAlStaZalOpIAnaISo AS aAoVIpOaJao OCAEuAAo aaaf O O cAcPjaaz OZOAIOU50a O o poAJaPoiOI o pao J aAua AaoZAo Xpaau Uncach S uha HU e ux-USHp qiu Ha aOc V i ncae aeueu cxHeHoa jp Haa SOUsO u a The ja Os-a US ouahe aT E HHO a RoE V
ASU (AJOPIANJANAa poZoSAAIAJuaI a0oAAIO aUAW
AaOzNa Xn e aepeSacteharUc H aHO U a OSa Saa a SOc H
eao USA SoafuUsOa cuaeSO h p Te o S Sa OHsOp H
ea SAo THUSA Soa O He Ha ua He e V
ASUAA ISTOPOACO JOPIANAI O1 OAcOJPUZpa CAOp
AroooI O AICI EzaACOAPU» HU ecU O aTH ocio aa O He O
aHUSope au Tsa O Th e aepeSall Su Hahe O S Sa XHa c H
a C HA caauXHSO p Hea SaO V
ASJPIAnaOaoAuaAaanIOCuOZOnoAoIs aiajfoaa pocaI nacoAp AroooAopja Jai azao JapcoAais paaviosuaI CUCAEAAEAPocxu] 10 npucla hnoe aepeSs Su haue ecip np ah a na cacp HSe ap Heos SA XHaUSA Sos SA XSo p Hea Sa V
taofAfpOIOAOUoOa
psll aA Jpn aoJanaACAOjoplanauo0OZ OIOa poVAAaj OIOp
OUIOOPOA AOOplapo ai pUCOs pa c roa OX' AIOpiAnalanaa pa
SraVA AJ OIOpUIOOPAAOooPcAso auapUcoioAais Auaia N
OCAp oai pUcOJPzAAO (puZu) Aaaa OIOAEAUZoloi OpaocAia
Saaa Ccaaa POAOBUIOAOA OOOAia ISoaaeOza p ZAEW
sOCHn HauoHO e eHO HUsou Su Tsin SO S00 H
SuHaHecaxxH uchSaa SecxSarSOHSp S0ouh a Ouh
SopufupHe eU becxTHGCHUS aae HnHSo H e U e ae joh
U echa aecaa bp HnHnO'S Szp bp np HoHSac ne ja OSh
°eapeSaah HH 0Ocp Hpenzb V
OsI pIAnaJIooOIOa poIAoI AeOOOa bocAIUS OAnoJ O IIOAOUIOOA OOOAEXaA JanaACAO JOpIAnaJa aE aOCAIO pol OAIe AVA AJ OIOPIUOOPJA OOOpIJUs ONaOAs PAeEOAS pa CTOA JO,ae SoEsHpenzP Eup TaRsa Och aHa uRe eup Ha JCHUa SsAoTuSUp OSouP PnSAoSocSp SOO EV ASJZA O aoJ OAOCAIOLOUIOOOIA OOOEIZaII OIs aa UAAANIOAAJO appaaJACOAcpvzP CAJEpi JnACOcAJ AROOJO CSOJZAO BXIR OIOEIOUOIOA OOOJOZao aao Ka CAOEJO ACEpeAEJCOSOOA ocAia OIOcvUI OIZaII OIAaAaoz ApAROOCIUOLJ IO poPOaIS A O OZxjcia aecaap U pp HsO HsO Sp Soo H aa HpSa XHaas acpeov SiCraIOAoiApIaanio I ppoJIUOIAOoAAoJIoSToNau A AJ OIOPIUOOPAA OOOPIOJIApia aIPOAUAOzX J e epeSchoRoupcHO Ga c aeapeSaus aae HU Hha H ao hsoa SaOc HO; ao np HAO ta aecaa StpShaaS Ho H Ueae Soe W ecHc H ou Chua u XHO pe ahSuJ 0 HA c a H U
q"fclqpshtaofAepfI(cop5Oa p aaaa
psu piAnalanaa baSpuaTeAAAOI Olanaa poAao aAuaOzai IcOpS OAp aEAAAOxUoU Sa oepu cia 出 ^ 出 cx aaeche H ao SxIO o O Si e aepeSaat peH naecO uae S SzHexoJ a H eo eapeSaav
dslyc0s 0a b aEaIopAnajia atauZoopaepf JOSUpOJAoozproJ ZOIKAUZ ai AECOURAACxH a'SzxTHUSecpe Haaa a O H Suh ^ CXu espcOua STHu OH SA deupCHO He US OHa aa peo H So paa apeo av
AsJ pAnalapa UaUZOoA poI IcOs Oa b aEAaN N aOaJ Z pAcai a 00aa poCpInACoJaPoa aAOCoa AABxHa p H eOa E OHUs aeupca pa OcH aa J jnUShe Oa e OaT aHa p Hu eaaa O HUncpeSs EHaUraocOaE Ha SdE O h aHeev
SioaIIOIS Oa p aEaIO NAI aCppoAo uOIOAOpE Oa po UcOJIApacAXJech ja p npb ONU Sa oeupce aa eaa U peOCH cHe U5o P50paHa aa peO av
ASJ (AOpIAnJaIaapolSraJSAaIaaaOaOIfIOAO S Oa p aEAAo XrauH iHe np Su SuOj Ox e O np Ta H SanSoC-Sp Soo E
ro pzfoaAuaUpaNaIooAaaAaEuzapcOUaafAEJooOAAa
"ZOUoApo'0IcOAAooJuraAAnKt ah Su HUsa Sosx H aa aniajap av
\*\*saXHa cUsa u O Sp SOO Wie ecHb aecouhe ae H OSA Xs A CSp SOO Vae p O He aaiSoe u-SP Soo THE H aHucSp SOO TH a b HSp SOO TH SpOHp Soup HU e OH Usz e H5oaa TH a HHSp SOO Hanap av
Kolski
i cia coé Eupca HUSope aH bclc H So eaoe H Su cx
a e So a c Ho Heo Sa H a Ssa uO HUsa o O So H X Soa aah
eep HxKAsa XHa OHUsp o O HucnHosA xSOSa Oo uh
a HSp SOoUwps nooaaaouxHO desOCHouHU ecH
US SpciSo aep V
z hauca Xsaa ecO HSOsa o Eupcp jjaoc Hu a SH
USO oc Ha Hoa a pe S'aqa V
ne aepeSAHOUCOSX'SOsO SA Oo SHoH na SH a naV
pSUaepoe O Hpeo HsO SaJ a Sau enaaa H aa CxH ecO e O EA
a caS THE A c Opeo HsO SaJ a HUsO O HO ha eode O ah
a cpeOc V 山 ~ s ~ ~ s ~ SA Xa cjupeo Hsaa e HoSHsO J 0 a OHS Z SO HA DO EAU
e H OAA a pE Hre Soo Heos ulqz bd'cuZV
i Saeero HaaSa Xa pellaec Cp
z 0 S Sa Xa cjupeo Ha USept EUSOJPa napeSOcJOH ecHu pceh
U nua ec Oulla h p V
i SU ehe aaSsa O HsUsa o DHaeco Szp Ussa aiao XH
U e eo J a UhapeSa cp V
V oj Zs qJ sZ sy>, aqi' a
T CieyTu Hs
i SsA SO O aH U ecb a hla cIupeo H eapeSau IcIeSaa O H
e a ec Oce HUS SpuH a p H a cpeO Sa Hb u aHS SnSH
a a0v-t a p H a cpeOch Su bde n XJ J a 0 uheU aOC
SUj O O Whoé a H a p H a cpeOch Su H He de n XVH
Vzh a p H a cpeOch o de n Hperzp EtU rO uch
U e xhsh aa5 ceSA O Sha a aHC chy a a V
i SuO Ha cp u OuxHEs O O SHue d SaaHOSU S-Us
e a ec O ano eapeSaav
"rrnqiswsr J"WsqW
i SOnupé Xaç ShoSH jOHe a O Hu uO He Ooc Hdoos U
esA c aCjupeo HsO U np aHUsO oc Ho ha o pep Heo SosaeV
y Su a a a Jao uHUsOpjope Hosh 0 eod h eae 0 TH
USo auh Soaaa pe HsOsua 0 Hau a Hc eupe naaa V
eoue O Hu patup Ha aJuOcp fap p Tha hac HUsE H
US aepe O He 0aac THO uCHUsOpjpe XHUsU eEHSp Sooch
Pruth"opTioopQa Cnupoe Haid Sa cy
q a SO enoB H SuO HUsOpjpe XhSb 0 eD Ha p Sa Shac S
a aocth oche aalha cnupeSO V
W o e a Eupco H Su Heo ToSa XHa Ha HSo ae e H So Spec H
a So enoB Ws Sa O-Soa r-ae Heo ToSa Xa rne H
SU aS V
i eoh uoc Hau cp HaU a de Xha euoe OTH He a EupcgTH
U eonau peTu a° eU be naaa II aChpe HUsO ua Haae Soe nH
Heaucp W> c O Ha Oo HeSaa XhoS 0 Ha cnupoe HU eeh
au pe aaiv
"u, o' wqis' wSjK, Ir X
q a S0 peocia i dHS ope O H uoaH Se ap aS Ope H SpuSope alla nape O a S0 eae Haa Su a HpauEc e aeAsaO aHo peo HzbmV
To' yWJ aaeyTo' wo
q a Sö peö H U ha peSa H Su cXiauca O hOshp H a eoiauo SIs eip np Ha SzO SHa Ho a 0
"1 0 wJy" sL oqxo
eOu ecaauo HOSH p Sa Hphea ue Ocp He
a SO enoHO uca cexua acbe aeh O eo V
z uCHU rA XTH oHe nSu O hAoedap a pecaOup E
a cTuXa acpe an Ho eO Ha PsSWM
pczpbXia euoE OH OAie C eU pe Eup He Us Spuaap EH
zp be Wz aj Hz So hpecaepup Usa Sodutaae Soe O
aaa Seca Haeapeo Sh aoOcphesSa OcppeazpW
aaa Scha Oac pcfo a SDo enoe H aaueo cxle a ae Ho SuO
" a OHaaaa XHUsn> Hp alao O np He Su O HUsu H
oo caaa Xja j ch S deup Ha aHa Ha Ona eaHU cy
a ec sa xla euo O HA aaa O hpecaac H haap c 5 alla Soc H
Soha cp eup SnS EaHa aV
<U a de XhoE o SaSov
" a O H Soa a pe Hpecaepo HU ecpeo EuHa HOSH
a cojauSO EHa a sZp H' oe U peo Shaucsa Sa O V
HU ecuO ahae Soe O Hu e a SoaUsonupe O Sa SH
a So eno TH Ouch She aaU Xua U p O H U ec Sa SA U
Oc HU e a So Usojupe O Sa c Th aj Ch SuO HO cXa pa H
a a SA EV
ucacshacupéo ha cUSAuoo HOSa a Sa Sly a a H
penzhe OOcb ly a a WsOc hle e HocSb C Oxpezp TH
ajHO HeSaa nHsu a o T0 uclha SOa asa XHa reHU e daa U
a p Ha a ahy a a HPU aea c e h o aj HAoo aj a
aanja Sa cp N a OpceOcp QV
z hupeo H SuO Sa ec xh caao Ha dS ane auSma Se o Oy
i eche a 0 ano uchUso XoAa HS enacU a SO enoe H
a aepeSOcO a pep Heo SOSa EVha ja O Ssu
os SO xH OSH S Ocp Hu e oaa a p Ha a aat O SH
oEUSZ ooSHA-H p a So phuOdaaaa ahS tTh y Auqca Uka b ZYt
CZb'» OOO OTHs Oc!
rsyzo,ogxoluiu"r"Sqjqs
z Ope c0 H0 aeulha cnupeOuSUsae O5xTHU U S0a AH
SU aOchUsUp O ha p opeo Jauo HA aecaa HaaSaH e Uacn
oc aca YZZNbaW, qP'St 0 YYbI' W>> qy
YZ' WY, qH
He aaSaSa OSHo aaUatup He SoesA O HOs
qzb d'ZUZf YZa
qzb d'ZU Uaf YZ'
qz HaayZ' UZf YZcSmZZf Y Y
qz HaaYZ' U f YZa
qzb ZYYYYU f YZ'
qzb ZYYYYU f YZ
qzb uqob YYf YZd

ma Oo Ww HMy O O p baS Uos SpO SoC-OSe aa a OHOcp Ha ppeOcp -pa SO plooaaa as t y aUqca Uaa bZYHCZb>> 00 oo OHs Oc

"aaip'z5

"ms m11 - "aq qz uqiz uqnqj uqoq -

i e o a ab 5 O H a S0 eaoe He Useo Xhaa aa uO HeHa Zb uH Oaa apeV

iSopeaUpO uie a ae OSaXs a cSp S00

z uiciaica XSp SOppeiaeaal

zSaXsOUsa 0o u a HUpucsaW

ZsA Xn a p 15p S00 I

i é ñU ecáau O HôSi p S a U phea ue Ocp Hé à S0 énoé Hô ucià cfuxia acpe hie O eO V

zhaicaa Xlaic

>U5a uO hSδ a Sa hSaaaUO (Sa°05)

eouo H a cheo HO H Su cxaaa o He e Hsou O HUsp Soeupc Hs SaUsO aaa Hs Sa cp VH eouo H a ceo H a S peo O uch S oe X Sooe O HHa H p allaaa o hos Sou o ja he Soo H eac O h SoSa a Ho aa O Ssoa a xos U eao S aaa aac epceo Ssh J Saernpe an Oux O'S U peSop Oa pH pc O Sa chp Huao a b Heo specp ha an de S Ocp H ao/ala cau pt esa 0 SoSaa apc

q a S0 eaoe H acHSp SOchua H a S0 eaoe Tha H aj c He o EU pe O Hu eOuus u O H uosac H e uchoa c SHsoh espeHUsaa a Sa Etpejao U Soa StpecheSaa nche aaSa a HoSo a Sa H Sz So H Sp SoTH HE fespeUsoa jetoHaespe H ae SpoSo Wz H uoo Saa euoE O HoSHUsorupe O H Ue a SoaHSp Soo
n
jro5zXeHsPpuO
L
ZUH

iδHé 00c

qai Su Ea h aoC aiae S0oSzp

na haoacAahc S00Szp

qai S e acp Ho aC aiie S0o5zp

Kolski
i'c"1oyjor0"yj
AIAI Z OocáUis Ar I UaAI q''fclqpsJJ
YAH Y" q''fclpJ
YAH Y" q''fclpJ
ZZYAHZ Y" s cdi aed H adbi H WNN WwwYYYYZZUeEEE 'a bleYH HWH
WwwYYYYZZUeEEE 'a cllYYH HWH
WwwYYYYZZUeEEE z pà aé àe àe PONC aPb H YYb H YYb H YYb t aED aS bα aae d'ayyH O 'aYYH O' 'aYYH O' rλ Páé Uda Pn φHäç Cä Dα Πφ aahh YH aahh YH aahh YH rλ Páé Ua aα ād H TcaH H TcaH rλ Páéaβ b Hua aα ād H aH TYH H TYH H TYH rλ Páéaβ b S a aa ād H OH T h T h T h y aHád Pá H PcH S Š Š Š Š Š Š Š Š Š Š Š Š Š Š Š Š Š Š Š Š Š Š Š Š Š Š Š Š Š Š Š Š Š Š Š Š Š Š Š Š Š Š Š Š Š Š Š Š Š Š Ŝ daHb' Hb' bH daHb'bcHbH daHb'bcHbH «E» HYZW YZ' Hqi -mU Eπ Pááé Oa ctch bTbH bTbH I pēoão O CACNJ
m rér aHn aP O H éHqz Hb d'Zaé 'aDcQ Wm H Naey P H ao
t O oS d'ááé ÓaHpw' eSóca Oád i ònPmQ
t O a Eea Pócae ÓaPw' eSóca òd i ònPmQ
v pIIICuai DJAu salapuaOcipZpbpeCoiOZZK cfe Eae OaF Ha U aa Öf
eZtdHnPmQ
ZY TdhonPmQ eZtdHnPmQ
ZY TdhonPmQ eZtdHnPmQ
ZY TdhonPmQ E° CACNWCQAO O CACNJ
kááé aáa aHé Pá S H DoCHa aS Dáhrááé 'eQz Hb d'ZUo φ O'H aD Sea V r Hλ Páé Pá H
é Pá aáé jH aH
wH' eSóca OaH TcH Wá
ZTaH Wá TcH Wá
ZTaH Wá TcH Wá
ZTaH Wá
twuaszsi>>s>>Y
mH ÖaHa aIàJaS O ÖaSaah é Naaa ÓaH an f eqz-b d'ZU° Öhae ÚcSeSaaH N Pa H EdaO H φ OH y à Π Na THa aeOД ai a S SaHéAéS Har anOφiraae aSO Eda SelmeH an H ah H e Naa ηa φ e a pay NaII Hay mH öSaHé Naaa ÓaUN an h éH a S SaHae aeH φ°O éH a U e OaI eWt H eH a S SaHae aED SaESo O eDaS SetH aPf aeOДаHae aED S ha cO H OoH Oa aDaa + aeOД eT H e Naa e OaH an H aH φ awqeh E ÖaFá OH Ora aH e Naa Naa H aO an eNHa E aOφ a H aV mH é Naa Na-UsoSaH bay nan éH eS aH eO pH aH aC S H a OO T H C O H Naey H UpaS j O ca C OH λ ro Th eSo O a O-O opH aeOД aOvqHe OaFá Opar Oa aH e Naa NaH H aO eH Oφ a H t ad SeeSoh HaSaD O H easOaH OaNe Ola H e φaH o H aD a H OuUn Oda f e aE aeD S H Oa aDada T H e H Oa aDada T H aO S c aS H aE a Etna Y

twues zi 山 s s ^ 山 ^ fabuooAIOO (o AovjAI SSAIAAaoZZI
O AAI pS0ZIoczOoUCACaZpICUZVIaZpuCzUZVcCaOICUZI U
pBZOMr a eop° OH eal φe DaS h a daIIO a aeada H yanla etnae rna ncae Ssia aa nly na e a av yI eoi jpll UdoOApuaocipz pAoo OUpOD (aaAO AAJAAI AZpa) AIDCUoIPz

yY|yB, tC, Y"1sy, s|E'' o>>y'' |psi| >>' 'ouw] n> i >o>>o>>y
truaAIfUPON
ps! Es"1 Yzeh"OApUJAZAAAIOApI Aai ZpIar IuaAI UZ
ZA GIAZ AII UJOAPUAI EAOIAOaCIPJAR UaIPSAoAXt OApIPO AA
Pio CUCI JAAI aUIpJSN2OApOzaUapAipO OZO ACapZUT
Oo na ena Ha ae Hr Lnaeath S eHO haaoe an aOH
enai
0ApuaOuaEooAoipoafo bpoipCuImiaoΦaa H ao aHaHocetahao hA Nae UHaé OAslaCACUcIaui AAZIpaoi b ppaJpuZpAUCOPI OAAAATAIDAOI AAAClpuzaPocUmHNae UjH ao aaaa aHa aGc aS aad 0s
SI OApuiAulai aaiapAajipcojapAajipCoCapis NoCiep O AApJr UaAI UAI aoiDIO aoI p paoZIAAOACOJ
O AAO aoICCU pI aOIO aoI p bpoOIO (A)AAauZpOBI pS sAATUAXz cSOH SoaSsCH h ao O SaHO uAo SA OH r eaa TH S ch par Oaa Hn Pae Uo n oPn SA y pha ae n CTH aOo Oaahoo aepn Hn aeyn I O aJ d jdeSHa Ha aa NaeO V AS oaiAI Z 00 OUI I acuaA uaco OZIAuPiuacAAZAizAOApON ZAAIAIOAZAI OI IAOAPiZp ZupvApioapIO aOI CZia AAVBo A IOAIO COIpOzziuaA uco AUAOizUI ApipZZCINVlaO1 DIO AOICZPAuAAzI I AI AAvapApui Iuaoi I JupcZACINapzU AUPZipI OAnl CoAiEi Aaij AAZut Oo ena CH aey aan H aHJ ha e an e T S Sa neae ae nn Pae H ae OAnOH ayn H yO HnD yna eao V AS vouuac CoaUACUoi AOApuaOCIEOOIO (CAAAjozIsadZI apAajAAAaoAuaAazDII AZXqeh Orn Hn DaHUSOU aSaad daHnilpar OA Hn Pae Uo OdaO np Aapn NAY AS i (A)AupiPJAiaAUI OI AZr UIUpf UaoI IOAI OAI AAAAIATID sAatZDRSI CaiauCipApipUIapAaiS I AUAZO AZuaAzr Si OAICUPIAITCZOZJar UaipSoI pZApuaOCIOxmeS H A Pae US TH C Ho H O SeeD Hn Pae r eaph a Nau e EtHO Haao Hrrra OHnH Selhae OTH S Ch He q aaea H naeY H aaHa Dn


AsuOApuaApuaocfoooAooACIN OZZapaaJaoCuAr UalpSvpiCZI ZC AUCI pZiapAAUap opzumHnaeUUdaaPdHnHaUpa aSh eaa OH ekOH naeH eH y a He aeTnah Seeed aO Hoo Su a aE ata Nocn eHnaeaSoad D SeV
sAajacUup aACUof pU OAAIdaf UOJN Eph
Ua aé E Da H oj Tn O pOgHa c° Da cé a H
IaSaaH nae UH ra a ean O OH NUnpH a OH jTH C
Se a e aTH S CH H AA NaeTH ch aah H e ph a ae a aa H eH
a DaTH a 0a H oHH aO 0 0o j HnaH e PH
aE PCH NH aa aj H DooC H Seoa g
H H λ Naé Uéraé éJ j Φ λ Naé Na Hα° H° a à
° H φθ Hα° S S Tnα H SaS E H e H Naeh Naey N aH
e φáé P G DÖG D Oä Ha aaeg
H H λ Naé USa S δaaa Ha C° Da D Oc° Hd Eaa ha ae H° H aD Da° TH λ Naé U dajn P0 C e 0f λ Naé S H° 0 aO H aO o y an° TH c0 r a ean° O Hλ Naé U nH h aD da j H Naeh d a TTH e φhae Π CH H aa aj D0c° Ha V
qcaaae aDah Oo H Ia NaeH cHaIa Cc a aeOa dIO H ra e IOc Wqeaeh D O OH E Da yΦ qH j aSaad OaIne OaIa H aDaS Ov
psI>>p ZUpjBAr IuaZIO CO 11ZI Aai aAIJuao OupJOAOapf U AOaapIp EpcZIoiapOJIAAaaAzoAVipO AIaoAOjpaUapOzDJ A DI AZIEODopOJIAAIZa EpbJAooCXIOAR IuApSAOja(UaOoAtZap) O CO (AJOI pIZCIIIEOOVIOApUAIOaepjBAr UalpSOZipJZAUIaAI
AaJUOpJq qiaae e dah a anOH r λnaeh da nHaia aH cia Daatro OaNe oNa h Se a H a anOH h e phaePi cHa ae yaoi ah HaaDE H S Ov
oslvpipAr UaipSioAuao aIwapAaiPir UaAII UCAIOp pZ apipO CUIOJ ONJO Aaupi p VAAAO EAJUPOANYI (IpSAUOINZ) UzbpZupOaaAo ZpOJIAR UaZIpO aoI p bpoopovb [Ap] Ar UaipSZAIEAUJAIO AO JCIN"OpAUS NoCIEpO AAI (aAOOc) pJr UaZIpO aoI p b poONIVapAAJCZ pAAI JUAOCUPo TAp] Ar UaipSIO AIO OAcUapOJPoi UPO LAIOIAAiauap aACi I SAAIZIAIXw aa H Hx Nae U° aeSa daIO S daHnph
Aslvpioaofp bpoopJCINiAR UalpSOZUe pAlipbepi CO LpOVAIDUs AaoapjAR UalpSOZjAR UaAIUCI U IsAASI AVUI UIATAOD caaAVIOCAUWAOAp p apIAAiajApAAzoo AOJIPO aOFp bpoopXt H h Pae U° ha OaeS aa T S he CE Ootada S a S ah h ao o°o j Tha cHa aaa e daah ai S Se av
SUI bAaOoJipSoI JO AAO aOI CICUCOIZCO pUapJAaZI O AAAIATDAIOPIcVCIOAAOAAJAAJIOAUO aIZAR IuaipSIsaAZI IaZI aOJaCuup aACuII SEAOIAxH0 c5oo n aH US ha Ean aCca H aa j ao TH aaa H r y aO Vmm U S ah OoU NaS oA SOTH OOH H Nae Na PnH re N OTH OoHaen y roH dH Hd ae Ov
AsI'OpaUaIapuaocIOUIAIZAOJapaaioAoOOACIN OZI
Ar UaipsoI pZUmehn aHa cDa 0 Da eSaaH S H
IAe US cAe H a Ochad DaH Na OH Ora o aHa e JU
Oda SeTH Ha Pae Uo Oda SEHa aae a daS Sea eao V
ASJOAR IuaAI UIATDDZAUAapIO Auao OUpiaCAcuO Itaui AJ
IuaCAcCuAs JoACITZNAIO AI AZUT H Nae PnHaS DoH
aDaseo H D EadaS T H N Pae Uo n 40 Ahna H NaeH
a aaeeE av
AslyotsOsUOINapZoUpOII AII OIAoAOiApJAAAjOAO CJICZAPNZA oTZAOWSI1 CalIAAajPiAAa(I)oi pICOJApTei A AJUoIIAuaZDiAcCuzLUMe:Oc y aY cOph I Nae UH I Nae Pnre OEl Eay φHO H da aj H dS OH 0h Pnll e aae E Da Selha e av
taOAZOOIOLAZAAIOZZOOJAap
ps11AOD caaJO OAOApuaOcIpzIaDZZVAOApaplUN
ai Doa I0lpZsI1AzaUoJAc Ww AIApuaOcIpipr IuaZuAPal
pUINaI Doa I0lpZIO AOuApop Ooi UIAO IA JpaOOpH
"OApUApipuApiaJ sUUO AAOaZOZAAaAzoAOpaJIUN
ai Doa I0lpZozut H hN PaehaI a Oy h h Hu oj Th eaj
anOo a S ah r y aHa c a a H h a ae cej H
anOo a S asahn Saossaotsoh j T S ch eae O ssoh SeS ESO
Pa a C OId Da aer ON NnAad Dn Can On Ha H Oaa H
a H h Nae Usatla H Oe nH cN H a Nae av
osiiAOD (aaIpaipunlaf Doa I0Ipz aANECOpjOrs fUZu vplpuiNal Doa I0lpzUIUpoOpjO aApzNJ aANepiAO Ors (JzSIIAZAUOUPIO JAI AAZAUAUAIPU OAAAIAID) Ip opOzP ZCuO aoICipZuy SO JdsaaH a Nae T: au eaj U jdaS Tha Ch S DpaS aacaeH eH aj HnOvar S a H rOHaay
AsioaIbUNia Daa I0bZIOAup1 oIs OIAAAUACUCO
ON OIOO (OZILGIIAUAZDI Uus AacACUOI LAUAZIOUIapop
I aaiCoozpox' acuupip ciplacuiabauani bipalpun
ai Doa IOpZOvuiAOA EApazAIVO (AIAIZipar UIaPS
oApzolpO aoI b p poopXmej HnOoSao OoDn
nae na aOdoaas aa 0h rOy
sR'OpuaIZAAATJIpaIr UaZIpO aoI pSp plapAulp
Sp IN pvApplpiUNia Doa (OIPZIOAOJoo (TeipoAIZAEAUOp
Ar IuaipSoZMQ qchno a OtaaO aaj Hnpe UHd DaH IOOC
O eepoDcH SeS Hnah OoOHO ad TH HeHeaeH yW
T C E OH SH HA Naehaao aada Ho EN V
q"fclqpshloJAaAzDIfJkaOIACNep
psuO (aIpaipiplo paCpuiaDAr IuaipSaoaiO AAAAIAD) aaAIZDI AIZApuaOcEooXmaé aqnp Oaa 00 H 00 H H Nae Ua aad IOJTO H 00 HaN S0c 00 H 00 H H Nae U S ae n an NON V
OsIaAII UCIUO azpZnOpJIi Zpi Opi JO AAAAIIAIDAOCTIHZUPi
DApiaAaAZDI IAzq cI ca Oy H aI aeasa aa ad ETH
cE aHtH dOc e apn HaaOe H aJaSa OH daS O+ H
a aae E Daiv
ASI i C (A)ApuaOcIepipiaAaaZdi I Vino A oIdJaCAcUuAUaZf OicuH mHa e aPn 一 ^ 一 y Na S H OcS jo H Eo Y nHa aDoh H Paeh q KaS Da S H aaS a aa Oha ae a je H aD Ha H ne
SIOJaAaAZDi IApZCuOuOrfs UI AaIpaAaAaZDfoAI Jp
aACUJI apApOJI AIIJAOcAnr aHaI DaS OHa eapn H
aJAsH aae E JaS 0d cSeJaI
ASI vPiaAaAZDi IJAlAs oizVIOAJpuOcIepjAR fuaXyH
ah an nAH aaE aHnOo a S ae jdoJad
OaococaczooUACai o ai AuaZpuZcui
AeUAIEAOJAPLICUai DZx-mHe éH àa H daa aeiaaaS se av t aéOД ESOLIAnOΦ ae NaalH H NlO OHOSe T H Oo H S OESOH aIopαe yà allHy aAsf H aHIOq à De aTHC c OaHUS aIopH aé TANOPp UφT φa-NaPcAéDα° eSaH D° Th a HnH DaanOΦ aEOd aAdY mH aO aH ena S H a eφ-Us H eh NaéaΠ H d a aH aH uC O a a° OH eTO aSAH H φ aEaJ H° Oo eNaH H aILOφ aé H aEOД aVmm AÖ a Y a OH j OSaAH US aH USa O H a Ea O V z H aEOД ESOL S C oH λ Naé USaH HO H c e H H aEOД aH Ca aa aj ° OH ayOa aaaa V "Д aae O H HаД OH faoOah Oc O h mH eSaAHae aED a NaéH O o aH S Oa aAEaD NO H D°° H OOC H H OÖ TH OaH eH a S SaHaé aED SOH OsaH O cS°° H S Oa aAEH V oa H E Oa aEOД aHaa efAJa° OH e r aTH eHQz d'cuZH aé° aDOCO H φTH aO Dá H aλ NaéaD paHaH aEOД ESOL z H aEOД fã Hpa aEs j S SÖ z H reEaH eSOWSryPo W OH UpaS ja eUSSOJ-P° OHuSeepj° OH S H H λ NaeaH Ne° OH aeoD t V mH φH PaS Da ha° aAII H aD aeaIaDa H γ E H H λ Naé UhaE ay Pnaiy
szsy"i"JtYy
T CieyTi Hs
mH UpaSjS O δNa S éh aS SaH π oV H daSδU U b Oh° γ Д Eae H λ ηae UsavmeSö Öh é aS SaH áJa H na a aah á avlmé aS SaH π H S aJIo O aJaH m ÖOc ° Öh éh aS SaH π c ° ÖH H rO S λ naeaH H a eSaaHy a a hae a e° H haéd EA ÖV mH λ naeaHpa H λ nae U Д da haad Oe H aO °oJ
Voz10>>jq"0>>zoy"1>>o"0
mH NaéyΠ aHpa H cHeáCàIáj J HnAa H eAe ΜOcAa O O Saah D je a H aéy aαΠ Hba a Sεa aa VWhpá a Sea aDah aΠoφΠ Oa eφOΠ γ Hoa aeS j te aS h a aπ aTH a H NaéyΠ N PUEaPá HuWHaIa OaaΠ Saeád cEY «e° O° OH oA eA d H d UaNφ UpaS j a H H daÖ VW meh a S SaH Naéy Π kyé ° C εNa HcA a aDa H éAH ra eφ OH φE HPrUTh opT i "opQHT c E OH h eH a S SaH Pi aé aéΩ S h aéOД a S haV mH Naéy Π aHpa H UpaS a-D USa° Oa e° Oa NaH d H d c eO V y aO H re° Oa H d je a pa a Sej d° a H an y PaH y Pa H Π o N° OH aO a Y aαφ TH aH H Naéy n aφ Hαda S H a a OV y oO OH aéOД aH φaah Oφ eee H: Naéy n aTH pá a Šej H d° aTH Saae °°eaj H d° a T H eαS0aD H a b a NaH Hoa j aŋ y Na Hnir Oa a N° OWhH a H a Naé aip a H aé ° H eAa aá H V
w rA>>o oj ly"z0>>1o
mèH à SÖ ááñöEaj Д SdaSej SdaSeee Haé aεa Piocah éH àS Salláé aéd HOb UpáS Da STPiAtZblMu alOeáSaeanOJH apàΠá áéHélyé Piáav
S^^^^^^^^^^^^^
quee éH àSö aáH r λ Μaαe hàD ah Saae Öa H DóC° Ö-ηa ö Haér ° ÖH D° ÖH
yo o' >o>>o
nД с OБЕ λH Öa adáha cHé aTaδaH φaah H Naéy η Д a OEA O V mH λ Naé UH c έNa HπaH aJaS EaHa Φaay c Eoh TH S Cée Hae aéd Saeh aS SaH Д je aJvH mH Naéy π aΠa HaNo aReaHéd e Ooqa Ha aeaEaa VH zΠ cIa aéafaj aE HД SaεAED H L Oc SaTHaH daiaé aAH a Naé aYH mH Naéy Hae φεφOCE Há Oo Ha aeaDθH Ha aOv iS a Oeaa Ooae a OM-HaS Eaa H H H Naeh a ENo jU oSaaH λ Naeus a Hαea aEa aEa c λ Na H O POn Ov - aH Naey H aHa aeaDθHaaed eSOT-a Oah ScaH ESaj Na eae Saj H Oa aOY q Oφ eH HapOφ a S aR rOaH a mH Ooae aH Oa aHaHa aeaEaH SaaeH aA aHaaH eaSoaH SaH e Na ΦH SaOsa S V t H eH aS Saiaé aEi Hau H aTHe cau b d a OII Φaee aHaadU H Hpa N O CH Ha aφaeS d aSO aeady Hae e aφH V oá Hy a a aSen S aNay a a Huj a Naé aHaé oH aeeOД O WmeltS c OH aT c pa Hö ÖpaH a aa T pa H aH Hy a a Hae a eE HP daHs Op Vt c PaeS Д pe H OaOcaQV «eY an H a anOH H Naey H S° OaSaHd deDaH H Naey H HaeUa πH eSOSaeJ Haed H UeOH H y a H aH aHy a aH d ae aeeaH c rea aOy H c d aJ aj Hp p a SO bduOaaa s 'tty aUqca U «a bZYTcZ b' » OO O Ots OcOH a πOY
qS Go1" " uWj" zwzo>>y1o
w éi j SáH φáàn yO UÉöH É OáEy Th S c h Ccy λaé H ó àS H éea° OH E àH Π H H DÖc a Hraáé á aSÖ à Šej ðö énPàñO H YZZNbaWq, HP" St «QH YYbN' Wqwh YZ' N YWq, H SÖ éI àáé ° àDÖç;Na'H qz Ib d' ZUZf YZa qz Ib d' ZU Uaf YZ' qz IaaYZ' UZf YZcS mZZf Y Y qz IaaYZ' U f YZa qz IbZYYYYU f YZ' qz IbZYYYYU f YZ qz HuqoiB YYYYYf YZd

m à 0ð w à HVHy ð ð p báS y λáé HôS à ðáp jHraáé Π EàJa ð aea - p à SÖ pHiOÖàáá áIs °t y ðaUqca ð «ä b ZYTHcZ b'» ð ð ð ðs ðç

"1i pyz i "y

rusLqxyHirsLqxy q-q-1ll"qB agyar
nr ,Ipo
| i | öH | öSahU | öPsaHö | Haa | SeRacá | Öa | HeDa | öeSédaaaa | cI |
| " | öOg | SdUsEa | Hóaaa | SesSoH | ap | Eha | aú | SdAosH | °Sh |
| o | SdOa | SdSaa | HUE cVII | ||||||
| j | Eaa | SEh | öOnne | ö | HOaaa | Haab | SaH | öö | SavHz |
| o aa | pHu | Saaa | Ochuse | SoeaEEHU | aah | Sh | Ön | Sa | ONHO aauVH |
| " | a | Hsaa | cHao | Osa | shaa | Halo | aAs | V | |
| i | aO | Hsaaa | aTe | Hb | pv | Daa | Да | HU OCH | S |
| aÖca | HUE cTH | °chaaa | hé | öe | He | DhaeO | aHUSo | av | |
| j | Eaa | SdHao | aTa | HoaaaH | Haap | θT | Sbe | Oaan | SHS E H |
| eA V | |||||||||
| « | S0a | Sata | aO | össasSp | OooP | H | caSav | ||
| i | aO | OJHCO | °Hoa | O | HUSA | DHSO | Cto | aSAOSsH | eU oOCH |
| Ou | Ua dApiv | ||||||||
| m | HE | HU EUSOoh | Di | aP | π | SUEAA | SEHUS | STo | aAehOcsh |
| O | OoHeU | bdo | aH | Oo | HU EUSO | H | °S | Th | aS ThH SoOHN |
| eA | SHSaa | OEPaaa | HS | Öep | ha | aàU | He | eOE SAV | |
| i | Sao | aSh | Ohy | a | HU eAe | OaaaS | Hy | a | HöD OoTHO |
| « | Co aCh | eHDoSa | OaH | Oa | Hoiaac | O | shahe | OOS H | |
| Ey a | aHed | eOEp | cp | HpOa | HPa BH | Socäd | Wmo acS | ||
| ED | eOEP | cp | Hp Oa | QH | |||||
| i | Hao | OHaCuHaa | Se | HoeA | HOb | öeEep | Saa | HO Hea | aHDoHa |
| U EU | O HUsa | °Caço | aH | AU SeTaO | Hap | H | HU eaa | SEHsHaJe | SH |
| eD | eOEP | SpOa | H | °SHU | SaH | p | SbhuObaaa | aIs | tTH |
| y | alqca | Ua b | IZYTHcZ | b' | OoO | Ots | |||
qsJGjEaeV zo"ss'vSlyt"tt"uW>>a
| z HÖ eäaθ | öÖe§δUSa | öSasiaç | aaf | Tö U Söa | ahUSUEa | ÖH |
| aHö aa c- | p Öp ΜHÖ E K-aU | Ræ a cHü Ea æÖnHaaaa | OSa O H | |||
| á Oéph | ||||||
| YZZNbaqgHP"St <<OH | ||||||
| YYbbl" Wqch | ||||||
| YZ' N YWqgh | ||||||
| J'S HUSAO anHö a δSaON: | Sö eSa ÖnHOS | cH | ||||
| qz Hb d' ZUZf YZa | ||||||
| qz Hb d' ZU Uaf YZ' | ||||||
| qz HaaYZ' UZf YZcS mZZf Y Y | ||||||
| qz HaaYZ' U f YZa | ||||||
| qz HbZYYYYU f YZ' | ||||||
| qz HbZYYYYU f YZ | ||||||
| qz HsqoIb YYYf YZd | ||||||
CE
>> 00 00 00TH Y YUZZUZc | m à ðö w à NIVy ð ðp ùS |
| «U OŠ ŠpÖ ðHeSaa a ša ì ìp ηHUSO òC |
| - ì à SÖ pHuOàAá àHs °t |
| y ùlUqca ëä b ZYTHcZ b'» ðÖ ðD ñHs òC |
"zai p"zai
 j"Hz qnqj qMz - 1 i OH aH HUsao AE U Eaa Se Ha HUsse O U oea Ea H OdaSbHO 5°a aav H Dpa Hsaa Ss 0oOc0Saa HSp 0mS a V iSaotaTaSp OaHaapai U np Hsasa SdoeHsp 0oCH a aTH OHa HO dSaa HoSH aba N SH e ay iSaota fä Sp OOna a p1 008SaHUpSahIaStaOa OHeaaeEeaaaCy zUsaocataHaay i Ea a e OaaaS uH 14e co asaeha 00 00 hao agnsuS co ONH 0sU O Heu S aTu a e Oaaa V q a p NUEa Se Ha O a E aOs ShaUs aHaSou o eos DpOSe q a p Pn H a SOp THU eaa Se Ha 0 e sOo O HsOsAo shp Ha pc 00S HUSoo ano H SS p E aDp avz aaOcp Hd sp 0sHaade S U p esa ON SHU depaHauea H PC OONHUsoo c HeoTHoAs C q a p 0u Eaa Sea OchSp q a b 0u Eaa SETHU H aS S HSp O HU oHea S H VU eos Hea aEO H SoEa Oo Eh es Dp Th HsOaS Sto Ho aOeHUsao aHn EH osu Osaop OONHSU a O T haOaSe anes dp H oSheSa OoEs Dp Wz a aaet Ho oO He oO H U Use O HSp OON ShaSoov aDcHUdeoSb z Uma 又 a o a o h u U o aO o e SdchqajU æö ðé Sóclai n àjö aO o He So8cH, eO aO e 5oCHU H° aqA De Clovensky
| ro'sj» sqv' qq'sj sIäI Z OÖCAÖPScip I pIZp AAOaP | q''Jf cIqpsJJ YAH 'Y" | q''Jf cI''pl YAH 'Y" | q''Jf cI''pl ZZY-AHZ Y" |
| zä -U SöA pcEÖc' adbl HY HWW | WVYYYYYYZUeEEE | 'a bIeYH HWH WVYYYYYYZUeEEE | 'a cIYYH HWH WVYYYYYYZUeEEE |
| æö SÖSa II SphCfZp Sa II YY» II YY» II YY» | |||
| i aö SxO eI5p uu O h ayyo | 'aYYH Ö" | 'aYYH Ö" | |
| ü oöb Hsa e IuncHäö dö p Saa Sä | aIIAH YH | aIIAH YH | aIIAH YH |
| s a° SxO e aépeSaaH TcaH II TcaH | |||
| s a° SxO e aépeSaaHic H TyH II TYH II TYH | |||
| s a° SxHéo H Iich OH T II T | |||
| y ac O h qn SxP bp HUSdH uA -Yam' aadMbYdo | daIWB' M' bH | daIWB'bcNHNH | daIWB'bcNHNH |
| o nii H -U Sb Dcqi -miYZN YZ' | ctch | bIbl | bIbl |
| wOAO ßpApB JÖZAÄÉApIJuaO NäJ æeSO a SxP a ceO peSOSHe SOO HeHOS urqZb d'ZMj SeS Haea jä ha euöe Ö HSae pSa Öghe Şlmhá cOsA NaCUSa Sf i SéS H zö O II aacpeO SHPz U a OSZxHwi onPmQQ | eZTdHONPmQ | eZTdHONPmQ | eZTdHONPmQ |
| i SéS H spch aacpeO EHPz U a OSZxHwi onPmQQ piAnlánAa poOAA OÖpAaJaluaK | ZY TdhONPmQ | ZY TdhONPmQ | ZY TdhONPmQ |
| wOAO ßpAEI JÖZAÄÉAIA Jc paEQ » aSzp HupéO Ho mPaaa H aS Sa aep H ao ja OHa ceO peSÖ He SöO HeOSS uqz b d'Z i ISä O Ho aO H » aSzXH aé Hn z U a OSZxHwi | Tc Wá ZTah Wá | Tc Wá ZTah Wá | Tc Wá ZTah Wá |
V oj Zs qJ sZ sy>, aqi' a
T CieyTu Hs
i SsA SO O aH U ecb a hla cIupeo H eapeSau IcIeSaa O H
e a ec Oce HUS SpuH a p H a cpeO Sa Hb u aHS SnSH
a a0v-t a p H a cpeOch Su bde n XJ J a 0 uheU aOC
SUj O O Whoé a H a p H a cpeOch Su H He de n XVH
Vzh a p H a cpeOch o de n Hperzp EtU rO uch
U e xhsh aa5 ceSA O Sha a aHC chy a a V
i SuO Ha cp u OuxHEs O O SHue d SaaHOSU S-Us
e a ec O ano eapeSaav
"rrnqiswsr J"WsqW
i SOnupé Xaç ShoSH jOHe a O Hu uO He Ooc Hdoos U
esA c aCjupeo HsO U np aHUsO oc Ho ha o pep Heo SosaeV
y Su a a a Jao uHUsOpjope Hosh 0 eod h eae 0 TH
USo auh Soaaa pe HsOsua 0 Hau a Hc eupe naaa V
eoue O Hu patup Ha aJuOcp fap p Tha hac HUsE H
US aepe O He 0aac THO uCHUsOpjpe XHUsU eEHSp Sooch
Pruth"opTioopQa Cnupoe Haid Sa cy
q a SO enoB H SuO HUsOpjpe XhSb 0 eD Ha p Sa Shac S
a aocth oche aalha cnupeSO V
W o e a Eupco H Su Heo ToSa XHa Ha HSo ae e H So Spec H
a So enoB Ws Sa O-Soa r-ae Heo ToSa Xa rne H
SU aS V
i eoh uoc Hau cp HaU a de Xha euoe OTH He a EupcgTH
U eonau peTu a° eU be naaa II aChpe HUsO ua Haae Soe nH
Heaucp W> c O Ha Oo HeSaa XhoS 0 Ha cnupoe HU eeh
au pe aaiv
"u, o' wqis' wSjK, Ir X
q a S0 peocia i dHS ope O H uoaH Se ap aS Ope H SpuSope alla nape O a S0 eae Haa Su a HpauEc e aeAsaO aHo peo HzbmV
To' yWJ aaeyTo' wo
q a Sö peö H U ha peSa H Su cXiauca O hOshp H a eoiauo SIs eip np Ha SzO SHa Ho a 0
"1 0 wJy" sL oqxo
eOu ecaauo HOSH p Sa Hphea ue Ocp He
a SO enoHO uca cexua acbe aeh O eo V
z uCHU rA XTH oHe nSu O hAoedap a pecaOup E
a cTuXa acpe an Ho eO Ha PsSWM
pczpbXia euoE OH OAie C eU pe Eup He Us Spuaap EH
zp be Wz aj Hz So hpecaepup Usa Sodutaae Soe O
aaa Seca Haeapeo Sh aoOcphesSa OcppeazpW
aaa Scha Oac pcfo a SDo enoe H aaueo cxle a ae Ho SuO
" a OHaaaa XHUsn> Hp alao O np He Su O HUsu H
oo caaa Xja j ch S deup Ha aHa Ha Ona eaHU cy
a ec sa xla euo O HA aaa O hpecaac H haap c 5 alla Soc H
Soha cp eup SnS EaHa aV
<U a de XhoE o SaSov
" a O H Soa a pe Hpecaepo HU ecpeo EuHa HOSH
a cojauSO EHa a sZp H' oe U peo Shaucsa Sa O V
HU ecuO ahae Soe O Hu e a SoaUsonupe O Sa SH
a So eno TH Ouch She aaU Xua U p O H U ec Sa SA U
Oc HU e a So Usojupe O Sa c Th aj Ch SuO HO cXa pa H
a a SA EV
ucacshacupéo ha cUSAuoo HOSa a Sa Sly a a H
penzhe OOcb ly a a WsOc hle e HocSb C Oxpezp TH
ajHO HeSaa nHsu a o T0 uclha SOa asa XHa reHU e daa U
a p Ha a ahy a a HPU aea c e h o aj HAoo aj a
aanja Sa cp N a OpceOcp QV
z hupeo H SuO Sa ec xh caao Ha dS ane auSma Se o Oy
i eche a 0 ano uchUso XoAa HS enacU a SO enoe H
a aepeSOcO a pep Heo SOSa EVha ja O Ssu
os SO xH OSH S Ocp Hu e oaa a p Ha a aat O SH
oEUSZ ooSHA-H p a So phuOdaaaa ahS tTh y Auqca Uka b ZYt
CZb'» OOO OTHs Oc!
rsyzo,ogxoluiu"r"Sqjqs
z Ope c0 H0 aeulha cnupeOuSUsae O5xTHU U S0a AH SU aOchUsUp O ha p opeo Jauo HA aecaa HaaSaH e Uacn oc aca YZZNbaW, qP'St 0 YYbI' W>> qy YZ' WY, qH He aaSaSa OSHo aaUatup He SoesA O HOs qzb d'ZUZf YZa qzb d'ZU Uaf YZ' qz HaayZ' UZf YZcSmZZf Y Y qz HaaYZ' U f YZa qzb ZYYYYU f YZ' qzb ZYYYYU f YZ qzb uqob YYf YZd ma Oo Ww HMy O O p baS Uos SpO SoC-OSe aa a OHOcp Ha ppeOcp -pa SO plooaaa as t y aUqca Uaa bZYHCZb>> 00 oo OHs Oc
"aaip'z5
 "ms m11 - "aq qz uqiz uqnqj uqoq -  i e o a ab 5 O H a S0 eaoe He Useo Xhaa aa uO HeHa Zb uH Oaa apeV  iSopeaUpO uie a ae OSaXs a cSp S00  z uiciaica XSp SOppeiaeaal  zSaXsOUsa 0o u a HUpucsaW  ZsA Xn a p 15p S00 I  i é ñU ecáau O HôSi p S a U phea ue Ocp Hé à S0 énoé Hô ucià cfuxia acpe hie O eO V  zhaicaa Xlaic  >U5a uO hSδ a Sa hSaaaUO (Sa°05)  eouo H a cheo HO H Su cxaaa o He e Hsou O HUsp Soeupc Hs SaUsO aaa Hs Sa cp VH eouo H a ceo H a S peo O uch S oe X Sooe O HHa H p allaaa o hos Sou o ja he Soo H eac O h SoSa a Ho aa O Ssoa a xos U eao S aaa aac epceo Ssh J Saernpe an Oux O'S U peSop Oa pH pc O Sa chp Huao a b Heo specp ha an de S Ocp H ao/ala cau pt esa 0 SoSaa apc  q a S0 eaoe H acHSp SOchua H a S0 eaoe Tha H aj c He o EU pe O Hu eOuus u O H uosac H e uchoa c SHsoh espeHUsaa a Sa Etpejao U Soa StpecheSaa nche aaSa a HoSo a Sa H Sz So H Sp SoTH HE fespeUsoa jetoHaespe H ae SpoSo Wz H uoo Saa euoE O HoSHUsorupe O H Ue a SoaHSp Soo n jro5zXeHsPpuO L ZUH  iδHé 00c  qai Su Ea h aoC aiae S0oSzp  na haoacAahc S00Szp  qai S e acp Ho aC aiie S0o5zp Kolski
| i'c"1oyjor0"yj AIAI Z OocáUis Ar I UaAI | q''fclqpsJJ YAH Y" | q''fclpJ YAH Y" | q''fclpJ ZZYAHZ Y" |
| s cdi aed H adbi H WNN | WwwYYYYZZUeEEE | 'a bleYH HWH WwwYYYYZZUeEEE | 'a cllYYH HWH WwwYYYYZZUeEEE |
| z pà aé àe àe PONC aPb H YYb H YYb H YYb | |||
| t aED aS bα aae d'ayyH O | 'aYYH O' | 'aYYH O' | |
| rλ Páé Uda Pn φHäç Cä Dα Πφ | aahh YH | aahh YH | aahh YH |
| rλ Páé Ua aα ād H TcaH H TcaH | |||
| rλ Páéaβ b Hua aα ād H aH TYH H TYH H TYH | |||
| rλ Páéaβ b S a aa ād H OH T h T h T h | |||
| y aHád Pá H PcH S Š Š Š Š Š Š Š Š Š Š Š Š Š Š Š Š Š Š Š Š Š Š Š Š Š Š Š Š Š Š Š Š Š Š Š Š Š Š Š Š Š Š Š Š Š Š Š Š Š Š Ŝ | daHb' Hb' bH | daHb'bcHbH | daHb'bcHbH |
| «E» HYZW YZ' Hqi -mU Eπ Pááé Oa | ctch | bTbH | bTbH |
| I pēoão O CACNJ m rér aHn aP O H éHqz Hb d'Zaé 'aDcQ Wm H Naey P H ao t O oS d'ááé ÓaHpw' eSóca Oád i ònPmQ t O a Eea Pócae ÓaPw' eSóca òd i ònPmQ v pIIICuai DJAu salapuaOcipZpbpeCoiOZZK | cfe Eae OaF Ha U aa Öf eZtdHnPmQ ZY TdhonPmQ | eZtdHnPmQ ZY TdhonPmQ | eZtdHnPmQ ZY TdhonPmQ |
| E° CACNWCQAO O CACNJ kááé aáa aHé Pá S H DoCHa aS Dáhrááé 'eQz Hb d'ZUo | φ O'H aD Sea V | ||
| r Hλ Páé Pá H é Pá aáé jH aH wH' eSóca OaH | TcH Wá ZTaH Wá | TcH Wá ZTaH Wá | TcH Wá ZTaH Wá |
twuaszsi>>s>>Y
| mH | ÖaHa aIàJaS O | ÖaSaah é Naaa ÓaH an f eqz-b d'ZU° Öhae ÚcSeSaaH N Pa H EdaO H | φ OH y à | Π Na THa |
| aeOД ai | a S SaHéAéS Har anOφiraae aSO Eda SelmeH an H | ah H e Naa | ηa φ e a | pay NaII Hay |
| mH | öSaHé Naaa ÓaUN an h éH a S SaHae aeH φ°O | éH a U e OaI eWt H eH | a S SaHae aED | SaESo O |
| eDaS | SetH aPf aeOДаHae aED S ha cO H OoH | Oa aDaa + aeOД eT H e Naa e OaH an H | aH φ | awqeh |
| E | ÖaFá OH Ora aH e Naa | Naa H aO an eNHa E aOφ a H aV | ||
| mH | é Naa Na-UsoSaH bay nan éH eS aH eO pH aH aC S | H a OO T H C O H Naey H | UpaS j O | ca C OH |
| λ ro Th eSo O | a O-O opH aeOД aOvqHe OaFá Opar | Oa aH e Naa | NaH H aO | eH Oφ a H |
| t ad SeeSoh | HaSaD O H easOaH OaNe Ola | H e φaH o | H aD a H | OuUn Oda f e |
| aE aeD S H | Oa aDada T H e H | Oa aDada T H aO S c | aS H aE a Etna Y |
truaAIfUPON
ps! Es"1 Yzeh"OApUJAZAAAIOApI Aai ZpIar IuaAI UZ ZA GIAZ AII UJOAPUAI EAOIAOaCIPJAR UaIPSAoAXt OApIPO AA Pio CUCI JAAI aUIpJSN2OApOzaUapAipO OZO ACapZUT Oo na ena Ha ae Hr Lnaeath S eHO haaoe an aOH enai 0ApuaOuaEooAoipoafo bpoipCuImiaoΦaa H ao aHaHocetahao hA Nae UHaé OAslaCACUcIaui AAZIpaoi b ppaJpuZpAUCOPI OAAAATAIDAOI AAAClpuzaPocUmHNae UjH ao aaaa aHa aGc aS aad 0s SI OApuiAulai aaiapAajipcojapAajipCoCapis NoCiep O AApJr UaAI UAI aoiDIO aoI p paoZIAAOACOJ O AAO aoICCU pI aOIO aoI p bpoOIO (A)AAauZpOBI pS sAATUAXz cSOH SoaSsCH h ao O SaHO uAo SA OH r eaa TH S ch par Oaa Hn Pae Uo n oPn SA y pha ae n CTH aOo Oaahoo aepn Hn aeyn I O aJ d jdeSHa Ha aa NaeO V AS oaiAI Z 00 OUI I acuaA uaco OZIAuPiuacAAZAizAOApON ZAAIAIOAZAI OI IAOAPiZp ZupvApioapIO aOI CZia AAVBo A IOAIO COIpOzziuaA uco AUAOizUI ApipZZCINVlaO1 DIO AOICZPAuAAzI I AI AAvapApui Iuaoi I JupcZACINapzU AUPZipI OAnl CoAiEi Aaij AAZut Oo ena CH aey aan H aHJ ha e an e T S Sa neae ae nn Pae H ae OAnOH ayn H yO HnD yna eao V AS vouuac CoaUACUoi AOApuaOCIEOOIO (CAAAjozIsadZI apAajAAAaoAuaAazDII AZXqeh Orn Hn DaHUSOU aSaad daHnilpar OA Hn Pae Uo OdaO np Aapn NAY AS i (A)AupiPJAiaAUI OI AZr UIUpf UaoI IOAI OAI AAAAIATID sAatZDRSI CaiauCipApipUIapAaiS I AUAZO AZuaAzr Si OAICUPIAITCZOZJar UaipSoI pZApuaOCIOxmeS H A Pae US TH C Ho H O SeeD Hn Pae r eaph a Nau e EtHO Haao Hrrra OHnH Selhae OTH S Ch He q aaea H naeY H aaHa Dn   AsuOApuaApuaocfoooAooACIN OZZapaaJaoCuAr UalpSvpiCZI ZC AUCI pZiapAAUap opzumHnaeUUdaaPdHnHaUpa aSh eaa OH ekOH naeH eH y a He aeTnah Seeed aO Hoo Su a aE ata Nocn eHnaeaSoad D SeVsAajacUup aACUof pU OAAIdaf UOJN Eph
Ua aé E Da H oj Tn O pOgHa c° Da cé a H IaSaaH nae UH ra a ean O OH NUnpH a OH jTH C Se a e aTH S CH H AA NaeTH ch aah H e ph a ae a aa H eH a DaTH a 0a H oHH aO 0 0o j HnaH e PH aE PCH NH aa aj H DooC H Seoa g H H λ Naé Uéraé éJ j Φ λ Naé Na Hα° H° a à ° H φθ Hα° S S Tnα H SaS E H e H Naeh Naey N aH e φáé P G DÖG D Oä Ha aaeg H H λ Naé USa S δaaa Ha C° Da D Oc° Hd Eaa ha ae H° H aD Da° TH λ Naé U dajn P0 C e 0f λ Naé S H° 0 aO H aO o y an° TH c0 r a ean° O Hλ Naé U nH h aD da j H Naeh d a TTH e φhae Π CH H aa aj D0c° Ha V qcaaae aDah Oo H Ia NaeH cHaIa Cc a aeOa dIO H ra e IOc Wqeaeh D O OH E Da yΦ qH j aSaad OaIne OaIa H aDaS Ov psI>>p ZUpjBAr IuaZIO CO 11ZI Aai aAIJuao OupJOAOapf U AOaapIp EpcZIoiapOJIAAaaAzoAVipO AIaoAOjpaUapOzDJ A DI AZIEODopOJIAAIZa EpbJAooCXIOAR IuApSAOja(UaOoAtZap) O CO (AJOI pIZCIIIEOOVIOApUAIOaepjBAr UalpSOZipJZAUIaAI AaJUOpJq qiaae e dah a anOH r λnaeh da nHaia aH cia Daatro OaNe oNa h Se a H a anOH h e phaePi cHa ae yaoi ah HaaDE H S Ov oslvpipAr UaipSioAuao aIwapAaiPir UaAII UCAIOp pZ apipO CUIOJ ONJO Aaupi p VAAAO EAJUPOANYI (IpSAUOINZ) UzbpZupOaaAo ZpOJIAR UaZIpO aoI p bpoopovb [Ap] Ar UaipSZAIEAUJAIO AO JCIN"OpAUS NoCIEpO AAI (aAOOc) pJr UaZIpO aoI p b poONIVapAAJCZ pAAI JUAOCUPo TAp] Ar UaipSIO AIO OAcUapOJPoi UPO LAIOIAAiauap aACi I SAAIZIAIXw aa H Hx Nae U° aeSa daIO S daHnph Aslvpioaofp bpoopJCINiAR UalpSOZUe pAlipbepi CO LpOVAIDUs AaoapjAR UalpSOZjAR UaAIUCI U IsAASI AVUI UIATAOD caaAVIOCAUWAOAp p apIAAiajApAAzoo AOJIPO aOFp bpoopXt H h Pae U° ha OaeS aa T S he CE Ootada S a S ah h ao o°o j Tha cHa aaa e daah ai S Se av SUI bAaOoJipSoI JO AAO aOI CICUCOIZCO pUapJAaZI O AAAIATDAIOPIcVCIOAAOAAJAAJIOAUO aIZAR IuaipSIsaAZI IaZI aOJaCuup aACuII SEAOIAxH0 c5oo n aH US ha Ean aCca H aa j ao TH aaa H r y aO Vmm U S ah OoU NaS oA SOTH OOH H Nae Na PnH re N OTH OoHaen y roH dH Hd ae Ov AsI'OpaUaIapuaocIOUIAIZAOJapaaioAoOOACIN OZI Ar UaipsoI pZUmehn aHa cDa 0 Da eSaaH S H IAe US cAe H a Ochad DaH Na OH Ora o aHa e JU Oda SeTH Ha Pae Uo Oda SEHa aae a daS Sea eao V ASJOAR IuaAI UIATDDZAUAapIO Auao OUpiaCAcuO Itaui AJ IuaCAcCuAs JoACITZNAIO AI AZUT H Nae PnHaS DoH aDaseo H D EadaS T H N Pae Uo n 40 Ahna H NaeH a aaeeE av AslyotsOsUOINapZoUpOII AII OIAoAOiApJAAAjOAO CJICZAPNZA oTZAOWSI1 CalIAAajPiAAa(I)oi pICOJApTei A AJUoIIAuaZDiAcCuzLUMe:Oc y aY cOph I Nae UH I Nae Pnre OEl Eay φHO H da aj H dS OH 0h Pnll e aae E Da Selha e avtaOAZOOIOLAZAAIOZZOOJAap
ps11AOD caaJO OAOApuaOcIpzIaDZZVAOApaplUN ai Doa I0lpZsI1AzaUoJAc Ww AIApuaOcIpipr IuaZuAPal pUINaI Doa I0lpZIO AOuApop Ooi UIAO IA JpaOOpH "OApUApipuApiaJ sUUO AAOaZOZAAaAzoAOpaJIUN ai Doa I0lpZozut H hN PaehaI a Oy h h Hu oj Th eaj anOo a S ah r y aHa c a a H h a ae cej H anOo a S asahn Saossaotsoh j T S ch eae O ssoh SeS ESO Pa a C OId Da aer ON NnAad Dn Can On Ha H Oaa H a H h Nae Usatla H Oe nH cN H a Nae av osiiAOD (aaIpaipunlaf Doa I0Ipz aANECOpjOrs fUZu vplpuiNal Doa I0lpzUIUpoOpjO aApzNJ aANepiAO Ors (JzSIIAZAUOUPIO JAI AAZAUAUAIPU OAAAIAID) Ip opOzP ZCuO aoICipZuy SO JdsaaH a Nae T: au eaj U jdaS Tha Ch S DpaS aacaeH eH aj HnOvar S a H rOHaay AsioaIbUNia Daa I0bZIOAup1 oIs OIAAAUACUCO ON OIOO (OZILGIIAUAZDI Uus AacACUOI LAUAZIOUIapop I aaiCoozpox' acuupip ciplacuiabauani bipalpun ai Doa IOpZOvuiAOA EApazAIVO (AIAIZipar UIaPS oApzolpO aoI b p poopXmej HnOoSao OoDn nae na aOdoaas aa 0h rOy sR'OpuaIZAAATJIpaIr UaZIpO aoI pSp plapAulp Sp IN pvApplpiUNia Doa (OIPZIOAOJoo (TeipoAIZAEAUOp Ar IuaipSoZMQ qchno a OtaaO aaj Hnpe UHd DaH IOOC O eepoDcH SeS Hnah OoOHO ad TH HeHeaeH yW T C E OH SH HA Naehaao aada Ho EN Vq"fclqpshloJAaAzDIfJkaOIACNep
psuO (aIpaipiplo paCpuiaDAr IuaipSaoaiO AAAAIAD) aaAIZDI AIZApuaOcEooXmaé aqnp Oaa 00 H 00 H H Nae Ua aad IOJTO H 00 HaN S0c 00 H 00 H H Nae U S ae n an NON V OsIaAII UCIUO azpZnOpJIi Zpi Opi JO AAAAIIAIDAOCTIHZUPi DApiaAaAZDI IAzq cI ca Oy H aI aeasa aa ad ETH cE aHtH dOc e apn HaaOe H aJaSa OH daS O+ H a aae E Daiv ASI i C (A)ApuaOcIepipiaAaaZdi I Vino A oIdJaCAcUuAUaZf OicuH mHa e aPn 一 ^ 一 y Na S H OcS jo H Eo Y nHa aDoh H Paeh q KaS Da S H aaS a aa Oha ae a je H aD Ha H ne SIOJaAaAZDi IApZCuOuOrfs UI AaIpaAaAaZDfoAI Jp aACUJI apApOJI AIIJAOcAnr aHaI DaS OHa eapn H aJAsH aae E JaS 0d cSeJaI ASI vPiaAaAZDi IJAlAs oizVIOAJpuOcIepjAR fuaXyH ah an nAH aaE aHnOo a S ae jdoJadOaococaczooUACai o ai AuaZpuZcui
| AeUAIEAOJAPLICUai DZx-mHe éH àa H daa aeiaaaS se av | |
| t aéOД ESOLIAnOΦ ae NaalH H NlO OHOSe T H Oo H S OESOH | |
| aIopαe yà allHy aAsf H aHIOq à De aTHC c OaHUS aIopH | |
| aé TANOPp UφT φa-NaPcAéDα° eSaH D° Th a HnH DaanOΦ | |
| aEOd aAdY | |
| mH aO aH ena S H a eφ-Us H eh NaéaΠ H d a aH aH | |
| uC O a a° OH eTO aSAH H φ aEaJ H° Oo eNaH H | |
| aILOφ aé H aEOД aVmm AÖ a Y a OH j OSaAH US aH USa O | |
| H a Ea O V | |
| z H aEOД ESOL S C oH λ Naé USaH HO H c e H H aEOД aH | |
| Ca aa aj ° OH ayOa aaaa V | |
| "Д aae O H HаД OH faoOah Oc O h | |
| mH eSaAHae aED a NaéH O o aH S Oa aAEaD NO H | |
| D°° H OOC H H OÖ TH OaH eH a S SaHaé aED SOH | |
| OsaH O cS°° H S Oa aAEH V | |
| oa H E Oa aEOД aHaa efAJa° OH e r aTH eHQz d'cuZH | |
| aé° aDOCO H φTH aO Dá H aλ NaéaD paHaH | |
| aEOД ESOL | |
| z H aEOД fã Hpa aEs j S SÖ | |
| z H reEaH eSOWSryPo W OH UpaS ja eUSSOJ-P° OHuSeepj° OH | |
| S H H λ NaeaH Ne° OH aeoD t V | |
| mH φH PaS Da ha° aAII H aD aeaIaDa H γ E H H | |
| λ Naé UhaE ay Pnaiy |
szsy"i"JtYy
T CieyTi Hs
| mH | UpaSjS | O | δNa | S | éh | aS | SaH | π | oV | H | daSδU | U | |
| b | Oh° | γ | Д | Eae | H | λ | ηae | UsavmeSö | Öh | é | aS | SaH | áJa H |
| na | a | aah | á | avlmé | aS | SaH | π | H | S | aJIo | O | aJaH | |
| m | ÖOc | ° | Öh | éh | aS | SaH | π | c | ° | ÖH | H | rO | S |
| λ | naeaH | H | a | eSaaHy | a | a | hae | a e° | H | haéd | EA | ÖV | |
| mH | λ | naeaHpa | H | λ | nae | U | Д | da | haad | Oe | H | aO | °oJ |
Voz10>>jq"0>>zoy"1>>o"0
| mH NaéyΠ aHpa H cHeáCàIáj J HnAa H eAe ΜOcAa O |
| O Saah D je a H aéy aαΠ Hba a Sεa aa VWhpá a Sea aDah |
| aΠoφΠ Oa eφOΠ γ Hoa aeS j te aS h a aπ aTH a H |
| NaéyΠ N PUEaPá HuWHaIa OaaΠ Saeád cEY |
| «e° O° OH oA eA d H d UaNφ UpaS j a H H daÖ VW |
| meh a S SaH Naéy Π kyé ° C εNa HcA a aDa H éAH |
| ra eφ OH φE HPrUTh opT i "opQHT c E OH h eH a S SaH |
| Pi aé aéΩ S h aéOД a S haV |
| mH Naéy Π aHpa H UpaS a-D USa° Oa e° Oa NaH d H d |
| c eO V |
| y aO H re° Oa H d je a pa a Sej d° a H an y PaH y Pa H |
| Π o N° OH aO a Y aαφ TH aH H Naéy n aφ Hαda S H |
| a a OV |
| y oO OH aéOД aH φaah Oφ eee H: Naéy n aTH pá a Šej H |
| d° aTH Saae °°eaj H d° a T H eαS0aD H a b a NaH Hoa j |
| aŋ y Na Hnir Oa a N° OWhH a H a Naé aip a H |
| aé ° H eAa aá H V |
w rA>>o oj ly"z0>>1o
| mèH | à SÖ | ááñöEaj | Д | SdaSej | SdaSeee | Haé | aεa | Piocah |
| éH | àS | Salláé | aéd | HOb | UpáS | Da | STPiAtZblMu | alOeáSaeanOJH |
| apàΠá | áéHélyé | Piáav |
S^^^^^^^^^^^^^
| quee | éH | àSö | aáH | r | λ Μaαe | hàD | ah Saae | Öa H | DóC° | Ö-ηa |
| ö Haér | ° | ÖH | D° | ÖH |
yo o' >o>>o
| nД | с OБЕ | λH | Öa | adáha | cHé | aTaδaH | φaah | H Naéy | η |
| Д | a OEA | O | V | ||||||
| mH | λ Naé | UH | c έNa | HπaH | aJaS | EaHa | Φaay | c Eoh | TH S |
| Cée | Hae | aéd | Saeh | aS | SaH | Д je | aJvH | ||
| mH | Naéy | π | aΠa | HaNo | aReaHéd | e | Ooqa | Ha aeaEaa | VH |
| zΠ | cIa | aéafaj | aE | HД SaεAED | H | L Oc | SaTHaH | daiaé | aAH |
| a Naé | aYH | ||||||||
| mH | Naéy | Hae | φεφOCE | Há | Oo | Ha aeaDθH | Ha | aOv | |
| iS | a | Oeaa | Ooae | a OM-HaS | Eaa | H H | H Naeh | a ENo | jU |
| oSaaH | λ Naeus | a Hαea | aEa | aEa | c | λ Na | H O | POn | Ov |
| - | aH | Naey | H aHa | aeaDθHaaed | eSOT-a | Oah | ScaH | ESaj Na | |
| eae | Saj | H | Oa | aOY | |||||
| q | Oφ | eH | HapOφ | a | S | aR | rOaH | a | |
| mH | Ooae | aH | Oa | aHaHa | aeaEaH | SaaeH | aA | aHaaH | |
| eaSoaH | SaH | e Na | ΦH SaOsa | S | V | ||||
| t | H eH | aS | Saiaé | aEi | Hau | H | aTHe | cau b d a | OII |
| Φaee | aHaadU | H | Hpa | N O | CH | Ha aφaeS | d aSO | ||
| aeady | Hae | e | aφH | V | |||||
| oá | Hy | a a | aSen | S | aNay | a a | Huj | a Naé | aHaé |
| oH | aeeOД | O | WmeltS | c OH | aT | c pa | Hö ÖpaH | a aa T | |
| pa | H aH | Hy a | a | Hae | a eE | HP daHs | Op | Vt c PaeS | Д |
| pe | H | OaOcaQV | |||||||
| «eY | an H | a anOH | H Naey | H | S° | OaSaHd | deDaH | H Naey | H HaeUa |
| πH | eSOSaeJ | Haed | H UeOH | H y a | H | aH | aHy | a aH | |
| d ae | aeeaH | c rea | aOy H | c d aJ | aj Hp | p a SO | bduOaaa | ||
| s | 'tty | aUqca | U «a | bZYTcZ b' | » | OO O | Ots | OcOH | a |
| πOY |
qS Go1" " uWj" zwzo>>y1o
| w éi j SáH φáàn yO UÉöH É OáEy Th S c h Ccy λaé H |
| ó àS H éea° OH E àH Π H H DÖc a Hraáé á |
| aSÖ à Šej ðö énPàñO H |
| YZZNbaWq, HP" St «QH |
| YYbN' Wqwh |
| YZ' N YWq, H |
| SÖ éI àáé ° àDÖç;Na'H |
| qz Ib d' ZUZf YZa |
| qz Ib d' ZU Uaf YZ' |
| qz IaaYZ' UZf YZcS mZZf Y Y |
| qz IaaYZ' U f YZa |
| qz IbZYYYYU f YZ' |
| qz IbZYYYYU f YZ |
| qz HuqoiB YYYYYf YZd |
| m à 0ð w à HVHy ð ð p báS |
| y λáé HôS à ðáp jHraáé Π EàJa ð aea |
| - p à SÖ pHiOÖàáá áIs °t |
| y ðaUqca ð «ä b ZYTHcZ b'» ð ð ð ðs ðç |
"1i pyz i "y
 rusLqxyHirsLqxy q-q-1ll"q| »sv' wfl' w! «" ro" yw! „ÖEöpí' ÖXöpIJXPäp | q"Jf cIqpsIJ Yah' Y" | q"Jf cIJ" pIJ Yah' Y" | q"Jf cIJ" pIJ ZZY-URZ Y" |
| i SeaSöO Hea à H'adbl IY WWH | WVYYYYYYZUeEEE | 'a bleYH WWH WVYYYYYYZUeEEE | 'a cIIYY HWH WVYYYYYYZUeEEE |
| z éäö Haú É O Sö 'YYb' H YYb' H YY'» | |||
| ua à Sla aé e ahaH U Saa Ha aH' aYYb' O | 'aYYH ð' | 'aYYH ð' | |
| x áhö H3aHa à O:3 | aahā YH | aahā YH | aahā YH |
| ö° Ö Ho Ö H aa H TcaH H TcaH | |||
| p° Ö Hé Ho II avH TYH H TYH II TYH | |||
| p° Ö HeS'p àHó H e àHô H OH'T H HT H T | |||
| y avs S° O H é HU HyaH' aOH'bYo | daHb' BM' bH | daHb'bcHbH | daHb'bcHbH |
| - o HUSlqj-muU Sp d'HYZ YZ' | ctch | bTbH | bTbH |
| wOAO ìPáCEAJOIA aSÖÜUZU '' ìOSaH EÖ Ha SaSa E OÖSHeHz h d'ZV' a OH aUÖSaa HÜ a NsA ìOSa O HeHmTheö E Ha Ü OÖsf z àSheaSöH Ha HPz a ÖSaWi ñnPmQ | eZTdönPmQ | eZTdönPmQ | eZTdönPmQ |
| '' ìÖeAsoO Ha HPz a ÖSaWi ñnPmQ | ZY TdönPmQ | ZY TdönPmQ | ZY TdönPmQ |
| 'ÖUZAIap-EÇÖIapJIiÁK | |||
| wOAO ìPáCEAJOIA oPá(EPa) '' aUO Ha 'peA a OOSaH' aSá HaaSa Ha a O'S So O Haaa eÖSlqz h d'ZV Öe H a H | |||
| '' peA ha ìOSaH aH, | |||
| z à ÖSaHwi | TcH Wá | TcH Wá | TcH Wá |
| ZTah Wá | ZTaH Wá | ZTaH Wá |
| "«"1", WZ"K |
| ha Ho aSo HO a O H a Oa aE e aH h° He E O HUSHz Z d' Z-OS O † O HUsaa Su aH O Sha ao H da °SEo H |
| U e a a o O H S So E W; a a SHe H U Oe U O Soosip OsIs O aa Haha aE EV |
| z a o O H a OHa aE aHO a E H EUS O E E Ha a: ° H a oO Hs SoE Vw o Ha H a oosis SoE HaUs ° E he ha a oO H |
| O O The Soaa Su ESO H S SoE H U HHeO e OsaO a Oe T Sh a OHa aE t hAao Soaa Su Vx Hs Hs eH Sa O O SaO H |
| o aHc o ASoHa e HSo O a aHa a Oe V |
| e Ho a OoOshp OsIs O aHa a E E H O Ha aUSe a H aAO ha aH a Hc H O u a Hsue O H Hap Ha o Tha Oo Ho E Oa ShoHa |
| O Wx Hs Hs SIs O aHa a aE Toep Sa O O SaO ho aEo Oe Oe V |
| e He e o aSau A e p U OHa o O S Ha aE aaaa o a HSo aO He eo a U HOU VH"eo a Oe H a o O Hs Soe OHS Soe THo Sha |
| aSU H S THS Oe pe Hs SaO HUsa Sav |
"“1"wz"AaZAlauAp OouOajopsoi Awopa 1pwi SpaIOs p2i Avu OuzAies Aaioi AspeiaipS paox U H eHO aUsa aOe uo Eo aO HSUses HOo Usa H Suae So ES h ao TuSo How Ha o Ha ao HUsse So V Auposao IpociopsOzIpjua pozAVI AJECAoozaiais (AO OE) -Asoz Aooapix
A Eo,1 11 1 1 1 1 1 1 1 1 1 1 1 1 1 1 1 1 1 1 1 1 1 1 1 1 1 1 1 1 1 1 1 1 1
<ouzSxI XpApOp
ps! 'sEo, "h' AJuaApEZAiaj Oi po (aiooo OEaIXpApOepi
OjaIOxxOoiXPACOAAPICUZPxA) aAO I OJ xzA O pZOc Oepi
PiOAc-tAO OZO epKIM Saa H Soosho Sho He S 5 TH
O OH aHO SH S HUSE SOsa aH e Hs V
OSJ AUAApEZAIO Oo AOapOAAe o AO HS SaHa aHa H
U aHO SH S He a Sa aH o Ha o O HaaS V
ASI <OUCOUI pAIooOOAapIs (ipAO (ZAI AoAIocO
Oo AIopApXJeO e HO OE SAHa eO HeS THe Ha DO HUsOH
S0 Sa Ob V
SI OAIapoApIOcI OIOAUXZAIAJOI CpIEEAaIOoAoPo SpI
ApOpUZpoQOs Ipacapab azais OZIS AO (IpotaxIpSo H
U aoa aHsO Sa Op HE He SHUs OTHa EHE Ha SHo aOsaaTH
O HU eShoSa ao Tha The a Ot Ho O H aa H He a H
Ooes TH O OV
Asi ncaabePzA IpWsO1pZCAIaOpAloiUzpa0oO eAp AIOOOJI ZAIATAZ cEOAIAO OAplicipuZOAO Axoc IpoAn XZAJAIIZ EOOIOEOJAPcOIGPOEPEAXK
eAsoo STHHe UsoHO uSAeSTH O aHO uSaamaoHO SaOa H aooSsOe HOUSAe So aooHao V
ASi Caa OIXOCAI AACAA AooIso poIepZAIS UIOIOpicao
OOOOJao IOXJ-Sse SA sAs heshosOSaah eHOe OE SH Oa Osahe a OHO H aV
ASI AA OOlAso poIEpZAxPCAOUIOZAIS pacIOAIAICIOUZCVI CJA
S CIApEOIOICIIS CAO pIOAIS CooCAAR OOpuzpIpCIOI ON
Alpsx OH aa TH Ha HO Hae ESHE SOa DO HO Tha Ha aESH O O S OSHOsAE So Esh e AO SH
ASI ClIOAIASo poIEpZAIso-I OapCAIOACo Oo pOpSpeOcAI
SO ToXI pIgacpIbAoIPACOAAPICUZXj So Ho Hoh a HaaHSOa aOHUsa o He S EaSAA OHO SA OE
Aa HsH Soa a OHUSA eE H ESHO StHeO OS Ho SA U OE HO OHSua O He S EaSAA OHO SA OE
AeOIcOs AS AEApoeAISoAp
UHSA ao Hao pHe HO U Sa OH pHe Seo The a OE U OH HO OoSHUsa ao O Ho H aaa The o Ho a Ha Sa
O TH HO HA OHUSA oes S THU OHSeo SaOp H Sa SA Th
Haue Heho Sg
UHO an hHa H She a OH He Seo Haeh eath HUsae So OE Sa
S OF TH So SaEH U Ho aSHo eETHU Sa HsA th He
OESHA ag

Clo
| Uo Ho OH aatt Ha HO E haeh eathe aa a H Ho OH aahHO Ua OSHO ao OTHA H Sieso he 0e H So Ho Haa H ea O ESTHO OH aaaa So hhe e H OHSo aHaea aOSHU SaHa Hau aE Heo SV |
| i Sa aao phe HUSA o p H U Ooo HAUS O Ho Wj Uoa H H SHAHU O H u dOsaoh HA UTH AHSU a OAH O o e OtaHo a V |
| psJU JOOAO p1 oipbiz oo XCAJXPABOU, oI AIS AO bIOZAJ aISOTOXPEVAJI pZA AO JOUZAJpAI OII TEADAPICSOa pzOCJ a p AAO XEA OOOZECZAOUJPOCXPACOAAPICUOIOI OAS AO pO CZAAIsOIXPEVAJI pZA AO JOOcIPAp-AIZAOJOI |
| XPCAOJCIZAUKUQE Zou HUSA aO hao paH SH SOO Ho HA SoH O e THA OOH HSAU aE pUosa a OTH H U EHU OSa U V |
| osJUAXPACOIUCUOZCECPICUAXPAPAEUS AI (COJCAJ) AAAPJ paIOApUusuuzzaiaf IOSSOOWqI IOSSOUIZf bIOJOICO6 c Ooi XZAJ XpAOIAO AIOPAOAV OITJAUXPACOIUCUSIOO pIOAJ auZpaCu' cIOJOASUIa-pZAZXPAAIO UZ pOZCAJIOA IOAPAOPI pICEOISOZAACZOUPapU OIT JUAXPACOIUCUSAO i pICU OIAI |
| OJIPAI OIS C-10I OISOA pZOAApia p ApxS eo aHe s He a Oe O Haa Hh OAAA e O O O SAa Oav |
| ASJUAXCZXPABVIEAIOZCEPIAioo AIOAPoAuaVIOOAOO apOpZCUAAOZ c PZAZXPACOIUCUZAJ AaaOIS AAA (ZAVIEAOUOAEAJ apZpOEAOJauo AIOApOAAkae a OE Oho OaHa Sh e OHe S' O Sa Op HUsae So USA aO hao pHa aTH Sho SIUSOsASH e O O av |
| SIIAEAAISIO-EIAUZZ AAOISO S CZAOZPI OJAEp-BZAJZAAW ApOEApJPUOpUOAI ISOA pZOAApia p ApJp CApZpi OEAOAApJ XpAOAApICUZX" HU Seo Ha He aH aO Ha OSHA US OESTH e ASIE H S A HUSO u HO SHa HAA O THS B'eeah e H OHO S' av |
| ASJ IAASpoippezAOZSCALPUSO-I O apocAmpACOCAJUOaxl OH haa HAsu H O OOSUS AO O He O U Se H e HUsae So ESHA OHe THe a OEt Ho O Haa H USA aO Hao py |
| ASJUAXPACOIACOZCZAOAIPAp OJApIOUZpCaZAAIApI AIOO(OO) AApI OJApIOUZCM Ha Oa a aH oE Oe Hau O ESTA H Sho OH aHa e O HUsae So HUSA aO hao pV |
| ASJUAXOAUOIS Aac OJIOO (ZJIS CAsOZOSAO XpApOEAFJ aJU ZOIS OEEAWOIPs O A JAOUZOEAUZAOUOJXH SHU HUsa SuO Ho OEAHA a HU O aSAH S H OUsae So H USA aO hao py |
| tAOI ACEPIUS OEAAPJap-ECZOAApISO1 Oap PSJUAXAipOASpoOIPs PAAS AaA (ZJIAA AaAcoOlaepSc poEAU USO OEAAPJap-ECZOAApI OApJr AIAO polpEZXPAAIVAEAUO Oeq ap-ECZOAAOJpOZIOAolpOZIOAupzI OUAAP5 Ax'SO OEAAPJ ap-ECZOAApI OApI OIOAupzI pZApICU I K pZAAIO S ZAOJ |
| SIOXPEXUM HU O HO OSHOHa Th H SuaOoe He eo aH S Sahea H ou h HHe S pSHe HSO HHO H U Oea H HE HUsu aAsha e Hae eo H Saha H H e O H Sa H Oha H S' O H e HO Ha HOSa aIaO a O H aHa a H SaH V |
| OSJUAXAIAZAJ AIOAPOEAAO AZapLUSO Oecap-EZQCIOT AaU NAUSO Oecap-ECZOJIOAaAteAfoAaAcoOVOI O peZAJpS paOJAOS pacIOXJSe SsOa OHa TH Uea H So H HO Oe HSAa o SahsHaes H He USo aOE OSHo Sa OHe HUsOoU He eo aO S Sa V |
| ASJUOEOJO Sc POETAUO OEAAPJap-ECZOAApI OApJEAJ OaIEAOUUpois (SsouaoaAJaAacAVI p -OpUZpaSsOsoo |
XpApOeAIOxPApOeAISO JIOZ06 fXU JOEAOJApIO O (1 10 S ZAU SO Oecap-EzOoI OAJOEIOUSAUZ(A)ZpI OEUIOXPaOICUZ
S O Alaioo AIOapOAXi Haa o a e H S haUsOeH e eo iS SaHo Sa aHa So EOSV
SJJ AJO IpApEZXpAAIOJI AIOAOIO cOIpICOpZIPVIEAUOS OECJap-EZQOI OAJOAI SOI (apIXpAOAIPICUZPJu e a Sa OTHa oHa Ho OH aaiu O Ho ShaHUsa H eHO Haa TH H aHE HO USA W, USea Ea Ho ah ea Ho V
q"fclqpshr AIOApOeAiao (ioAApI IOp
psu 50 poIeIeZAIAO ciOUI CIOVI cUJAIS iAApJAsAZAO aJ xpACoAO anCuZaXJ'So O OH S' aH o Te HsOHO o O h aa Tia Oo Ha OEE IcHoe OHO Sa eSov
sUeO iocIcOJOpZpaZAIZpovizOEIAOSUpOJAOpao (laap) aSo pOxuOooHO O THUS So eH OUs ao OsAAaS Sae S H e ASto HaSo OH Oo Hsiao O Sa ASU U o HUsa a o ao y ASUe iocIcOJAso poIepzAlA Oovza qS cnsozOSOCAI AacAu'So OH OHa HU So Otaiu aao HO ae S OHa HUs O Tea So HUsu So otahus SCsae a h aaS aa SH 0 aaah osv
SIAO (IOJIIOJEJAeOI OaZpIbI pZUJIOAJOpApEJAap AAcJ
H H e H'SO OH OH S U O aHUsa aO HaopV
ASI KpAIAJAAcZoAo CIQJI IOOJA So POIEpeZXH O E OEt H
SaOT H ShaUSo aO He U Oe He e oAO HS SaV
p pIeOJap 00UZOp(0) AIOaOpOSoao (ip
| ÖUÇAJP-EÇÖJAPIJIAAXt àu SHUSAE Soe a°Saa V |
| USa hé e0 aOSHsu Sth Ho aHaaaa SE Ha oOshosá a He e0 aH |
| So Wj US So ESHa He e0 a H°o TH SaOu V a He He e0 aS |
| Us HU aThe e0 a O a p Tha oOsh Ooh o a o Saa Sth O h |
| é e0 a He Ha a V |
| TH Ho aa Eú aThe HUS Saashe aTe aHe Soe aH Oo HHe aH |
| aHa SW, US °Ea HSOa a a OE Hu aH Oso aOshosá a Hu OSH |
| a She e0 aSU SA H uawi TH Ha Ka a O Tha eASho aa a TH |
| OU WUSa a Ea V |
| x aHa He STH HO So Sa E ESHUsa a S HsEo o OSa aHa a |
| O aSo aHe HAUS °STHa HO a ESHAUS °aV |
| ue° a H eO aH a aHa a a eO o OH aav |
| pSaSe OShea a Sha a e aHaAs U° eO H SSe: S H° aHa a EHa Sh |
| a aS ST SHe HO eO Hea a Sua e a a a o H SSe V |
| "US °Ea H e T H aSHOs So O hHa H aSo H OaHa H aHa |
| éqz Hd' cUZV |
| z aUS °E aH a aO H SuSe |
| «a He Ha SuVe SsuH H SoOshAso O H° aSa OtaHo HC a Ta V |
| «U OSH a SaaEHSUe Oe Ha He S° ta HU a OtaHeS°H |
| O O H aa V |
szsy>>n' oI oE" n
| i Čéyīn Hs i | |||||||||
| i | HáU Saa aHa | a aö | Haa | Ha Ho | Öh aa-àp VHa | ha aöö | Há | ||
| US | SoESH | a oö | He aS | aaaa aW" | Oo | H | She aS | Hao 0 | æH |
| aàö | He aOE | OSWq | a oö | He aS | Tao a | HO Tao 0 | Sa aW" | S | S |
| a oö | He aS | HUS Saa | e T O | Häo O Sa | The Ho | SHUSa | °OSH | ||
| Söö | aà Hah aS | é Oy | a | a | Ha aI | ||||
| Shea o | Sh eHS | ° Sa | Op He | HUShe | aaaa aHa | O | Ha aV | ||
";skw,wyzxfsy
| i | EAO a H | SHO H OS | eO h e | O O O H S H O A | SHO H S | oOSSH |
| O U | aSaaTH | H I E HSeO | O O HO HA Ua | H U SeO p W i | EAO a A E H | Soo H |
| aA O H O | Ha a O O p H | eHe eO a O | H S Oa a TH | H S° a E O O | O O E H | |
| eE o a O | H e O V |
"aoo p Halaea 0E HUso SofaS ESh aHsu E o ehe eo H
aa He hA OAs Hprn"opTio "opQH-Sae a a Hoaa bHa
U ou ae Ha 5 aosu U aSsHa Sa St haSu Haus Oe H
O u a Hausea a aV
\*\* SeHU SU aHO HaaooBpSa ShaHe Su e O Kaa Oeav
"ooSHue aTHa Hua faoo O HU O HUso SoaHo Sa Ot H
aaa SE Ww .a ooshaSoa e Haa Ste V
i. OaAsuS O SHU aSTU faoo O THUso ee THa OsaO
U a OHaoh Soa S SH O HUse Soo Hoaa OE
Se Soa O HO SHAHUSU a She S EHaas SaOE av
"sxxssEhou" "ysuo"yol
a S0a H5 Ea aie Soa As 1s fa SuH Ha Suai a oO HS Soe H0Is S So H5 aSa OZbmlia Sa
"opolj"yzor 1oisip">>x"
"SoO h SoO h H E H O e h aO h eah aaH
E1r,ksEo'xs
i Oaa Ho HO HsHa Sfaea pa Haa oh eaaa oO b V
i 0o eo OE HsOaa Oe a Oe H e Ho Ha HU U o Ea TH
o aaa HS SoE HSO SU eHO U E Oe V
z U aSH OHe eoosu U aShoa aa hhaa S USHyy Os Ho aa O
a Oaaa HUsé Soaef Sla aO a Hoo a Hes O Ho VH
i ea Ho HASTo HaSHU e o a Oo h oaaa Se Ha OOSho aa V
" OoSHoaaa Oa Hu Wbaa Oa HaaOs OEsaa o Ho Su oosh
o Sa Ost SHU U o He HaOae
z U aSHAeo oafao haash OHaa SH S Kaaohu SaaSha E Eso HS e
OH ao V
i a Ho Sa OEo AO Sa
" OoSAeo o a OE HOno eo OE HUsa a He Hos S oae Oea SHOs S
Oa OS S SA OE V
" S SHEHU taoo HO U e a aoo S Soe HUse SoSa O
ESHE USA O'SHO s aa Hua Usa EHU U a E OSHU EaOSSH
O U east He HOS aea HU Sha aao HS OepV
" US oEa Ha Shy a a HU oS hoy a a Ho os aaO
O Hi Sa a Tho Ha aa aO Ho T a He Oe a OHSU a OTH
e Ot ESHaY a a Ha a aOHa ao HPauSea a fao Sea SH
s Op E Ha Sa Ha a aO HAoo
i SUSA "a Su a ha aao Ha ao Hho aOSH -pa SOp
OOAAA as tO So h au Se ta H ao HO u aHSHO a 0
a U Haa SE Hhea a Hana Ua HUseop h-b p So puOaaa ana 'tTH
y Auqca Ua bZYhCz b'oo oo Ohs OcI
qsGwXoEoJy'1t"i'1
UOSO SA Saosai ef a Stho Heo THSU a OHUsHc-oo H
USa kHeUs Oeaf haa aaa eo Hs So aah
YZNbaWq,HP'St <OH
YYBw Nq
YZ' W Yq.
aHO HasHaUs eHO aOOE SOe O Haa 0
qzb d'ZUZf YZa
qzb d'ZU Uaf YZ
qzaaYZ'UZF YZcS mZZf Y Y
qzhaayZ'u f YZa
qzbZYYYU Uf YZ
qzbZYYUY Uf YZ
qz uqob YYyf YZd

00 00 00 Y YUZZUZc

ma 0ddw aHly 0 0ppaS
155° eO Heo aHaUaHa 0oo oApE
- p à Sö phuÖaàá áls t
y aUqca Ua b ZYTlck B 00 00 Ots
"Wj p"zW

i 己 ^ 己 I H i e "ux hz q" m" z I

Sa Sto 0aUs 0u aHaO aSo

U HooH Oaa Sa Oa HSo a aHO Ss oosu U OeU HSU

q aoo H0 U aOHO SaE O5 Soaa OE a aHa au Ehe
SaUso Ota SOU oW q aoo HO a Soa H0 U a H
EHUSA OSHA SOHc aSo OSHone HS EaU EeOsHa aTH
Soo aHUSOEafeH p osH E aO Ha aah Ha e
aaa Ssao HUsO Ea paH uSe O Ea H 0poo
OAS eOHoeO H aaV

g a oos Soe He e o a e o uWq a oos Soe T U H a He eo a H O aoo hao S HO SA a H e S bOsaOaO He p Ta a oaao S Oa THa SH aUs o Hs o ao HA U T Saabafo H U E OH e P Wz U a He HU tao He eo a HaSO O
nr
ZUaSaa
#
é OoHs

qSA HSeO He Hc ao Ea Saa

n a Oa HSeO He Heo Ea Saa
EAC
EoA HSeO He eao EaSaa
001 EAC

| »sv' wflyj«" roqj „áEöpí àXöpíçíp | q''fclqpsJJ YHR 'Y" | q''fclj''pj YHR 'Y" | q''fclj''pj ZZYHURZ Y" |
| n SEU SáSóE H adbl IY HWH | WVYYYYYYZUeEEE | a bileYH HWH WVYYYYYYZUeEEE | a cIYYH HWH WVYYYYYYZUeEEE |
| «O OHS O OSH H E H YH» H YH» H YH» H YY» | |||
| n SEH S à E H U eOS H Sô H aYYH O | aYYH O | aYYH O | |
| x aú U U3-ahnä É O U3 | aIah YH | aIah YH | aIah YH |
| p °EÖ H aà H U H Tca H TcaH H TcaH | |||
| p °EÖ H aà H aH TYH H TYH H TYH | |||
| p °EÖ HéA° H O'H H O'H H T H H T H | |||
| y aIbA° O H é H SōH yH aH bYb | daIb' bH' bH | daIb' bcH uH | daIb' bcH uH |
| - o O HUSnq -mU Sp ða IYZN YZ' | ctIcH | bTbH | bTbH |
| vOAO pÁCEAJOIAJQ yE O Ha E OOSaHaaaa O E O Sa Eax Hqz Hd' ZVMUspe Ö O A'Sa H U a H eOSa Ha U OOSf z aIb' H aá HéAa HPz a Å O'SaHwi ñnPmQ | eZTdIbnPmQ | eZTdIbnPmQ | eZTdIbnPmQ |
| z aIb' O HéAa HPz a Å O'SaHwi ñnPmQ | ZY TdIbnPmQ | ZY TdIbnPmQ | ZY TdIbnPmQ |
| ' OÜCZCuAp-ZZáJlAApK | |||
| vOAO pÁCEAJOIAJQ ñpEpoPj aUO Ha E OSSaHa° PéHP" aS haa Ha E aaiHsO E O IISo Sá Eax Hqz Hd' Z eO E H a-H S H e OOSaHa aHa° PéH To z a Å O'SaHwi | TcI Wá ZTal Wá | TcI Wá ZTal Wá | TcI Wá ZTal Wá |
"1",s wsk a hsa auaa Ho a o H eo Haa oE He He E O So Sa EaX He 05 rqz-b d'Zos Os H eos HUsaau ah H So a uSa e ae haaUs 0ah a 05 H a 6aaosn OHe HU 0o HHe H a OAH Sp OHa a EOS HSua X OE V z a b OH eO Ha oe Oa a O U Eo H a 05 H a W, S Sha a oH anaUSA eA haH aaaa Euax Hu e OE O H a H O osa eo So a Oe ThSoa H eoo H So H Soaaaau avh-S So h eosu X oe H Se pe Hu So h aoHSusa aY
a HasoAHSp Oa a Eos HSua XOE Ha S Eea eahsOe Ha O HA SE HE Ha G eA eao OH hse Osoa e th HO EH aaa OSHAUSA oV- SH So h a EOSua XOEHOaOSHa OE ahe Ha HPESH OOSu
"aa a hso ao Ha aaosa sp Hsu sa anoe Sa OE Ha OE H SOU VH o aOE H aoo a HuaSsaEO H a Tso a oe HASUHa ats OepHH DO HUsaau V
"1" s wJc OEzpezAAuAua OoUOJaSaZAVI
Opsoo AOAvs paAUOS pZAIOTAU OocAZAlaAtpExm Sa
O HUsaa HO US Osa aosaa Haua aS h S Shaes aa
aaa eAo HTO SUO HW aE HSeToV
"BaapEZAUAOpSOoAoiUCAooUQcaSaZApda aoa
S CO EAOax
A"nu"sl"ssl, n'sly, k'slcws
>>AooioAcpj AapOp
psi "o""r), aIpo pIOAiapipacZJalso aeEAI AapOepj OUIUpSIAXR xZAUOOeAU af AU O p20aj eI aICJIaoc-ZA J O 0z0 pUm Sha Hs' Ha ooh aoH U TH aAHU HHO So H Se E oav
OSI AJUzbaltpeZAIS UZAKUSO JAp zIF pxuaushe a Hea aOH Ho So He aa Soh AA H U V
ASI cIpAO CzAJ aoCoJ AapOpj Aoiecogca pZIPxuaUshe a a OHa aOeah OE HSone OHuaO HeaV
SI cIEAOcA b IpOclp POAJ XZAJai Ipo pCtus AIIOOOAA W apbIOCA peZAopUzpaQIOEO5O Toao" osHe ho e o
oAo HO'Su Oa ex OTH SHa HO O a Ha OE SU aOsaa
SoHO SAHA ES Tg Ea OE HA H a a H Soa s HO OH OE V
As of 00aaa 0aai 10focaiopb ocpipzio Apoiaapzczui caaoaiai2 c0aiao 0aikcalipuzc05 ci taeooipoiAIAI ZEOCPZ XZAUpO lapiol pAO aEi Axsoaah a aoo HOSIO USOS Taa e HUSO USOH a OH O SaH aos HOSAO Hosh a oos Hao V
As y0 laa axooA Apoepjoo UZZAiaacAI JPOeOci IQ paaoa 0 CAAJ apuHa HUsS S e a Soosaae OE HA Oea E S axosaa H ea oe h aa UV
Asy oUczZAlaacTALIcUZoAIScIAO AOp btaoAIAICEoA
CIO AOap ptaoAUAZAAOOAOzao pROS XaaTAp zuOAcI
Of aAIOSXx aaSA H SeHO hSo Sa eah Soa oo Ho Esa H U TIs a aHx Ha HO S a SH S aHO SA aa Oa a H Soa s O OHUs V
As' AJO UZZAIOcip bIO-ZAOAOKIGSOA A-OASIOXoA
SIOECAUICUZpIsCIAKIaTei AxJ So SOu H SoP aHa HHa Ep H aupeosaa OHe Ha eAHu aThe HUsae OE HSua Os H ao Oo Ha a OSaav
aOACKcAeAApapEAlsoa pZOOAlp
UUSa aO HAOHO So a OH pEH aa HU SEHa HHe Ea ST
e aSH HE Ss Ha aOs aOTHeaSH So HoSA aa HoSAS No ha aah
U So HO Soa S OSHAaX He a HUs OaaHa e ah
SaS 一 Se 0a6 g
U SHHa aau HA E ea Sthe a SHoS Shah aUs ahU e OE
SE Ha He aa HH SuHa Sa HUs aOSha 6 tna
aE aHSa 一 SE HAHoe Hg
U Ho ha aH UHa eHa OaSH HUs 0sHe aO StS H
ea Ha oOE Ha aHa aHu He a aHUs aOaHe a Theo S Ho
Ha aHU Ha So S eH aUS HSoa So S O a Hara e anSaS
SE h oHaU S V
i Sa aOa H Uus Eop HUs EO HHO au AO HAUs O Hu
OHa H So Ha e o aH U oo H E HS u e TH SE HaahSU a O
aHo EOE Ha aaav
pslr XzaiSiaeaUOoiOeAi afAicSoozpaZaiap-Ai ai Aai SIOxpeaiI OeAO JIAO OaIsO OceAZouiaS0a pZOOAp pXU «OuzpaZauiaaceAi JoEOoiaJIc(UzscAvipocp pizpO pjUcU SIAoAlaicocuiap-cOJZeiOOuWbHosua aos hao H aoH UHO s Soa SoaHa aTH SaO h Se h oHa aOs H U S H OHO s a a Oha HUsa aos h H Sa HO HUsae H Udo He V
01OIOUACUZIS(TApAlpaOICIOUASIEAOEAsAI(OaIO) (aJOAI OAJAOJ bAOApVIOZSAUZCAJS AI pElapJIteAecpeAE) apJIeAecapOEAVCUIteAecopeAEJC XZAISIAOOOJAIOpZA (PJIa) UAJOIJAICUZCSIAUSOZSAOOIAjapUzpaU AJSOIAPPTZASIJ ap CzcaIpaBICIASESOZAapZajopb PAVUAJOIJAICUZSIAJ S0O EALQCIQAIO AO ZsOSa pZOJa x 6 a Hae S H aEeaH Sa Soa H u o
ASIoI OIS(iaI OeIbIaEJIapAlpaicIpaIa bzi aIXAIzAISOooAOI
S0I AOzVIAAOZ (peZAICIUSIAj pUso aisIEAOepKs OaeA (Z)
pIaoCSiAIOJALapApzICa bp IJm SHa H eEA SH aH THSO
aH So HUs Oaaie e a H US ae aHUsa ao Hao H SxHa H
USOsOSUs Oaa V
SIAEAI AISTOEAO as CAVI pOIOUCAeAIPospoozIO S0a pZOOAlpiaoAlIcEA-ZAOepiluzpiSciAX" HU So h a S aHa aHUsOte SA Oe Ha aa Ha o Wj So Ha H S ta H Sa SO aHO HS'oe Haa OH So eah auS H U OE Tha SHo H a'av AS' AJO cUZZAsaicio-ZaoAOaICUZOaISx aaSa Hu Haau H US eOS e aO a Hea Thae s ataleo S haa S aUS H U oe HUsa X OSHA OE T ha Ea OE H AA HUsa ao Hao y
ASJUc (EAJSIEAOptlaUZpOoacZA) aoaA) AapOpipOpeA-ZpOepI fazp) AapOpEum ShHa Ha E S HU eOE Hu S e O HUs o a OE TH aaH U Ha S Sha E ca a Hsaa HsHUs aos Hao V
As pa czAISOUIAOIOs AaoCipI OCAo (ZAIS O AaapOEALJ U caOO ISO aEtAVOS XJAISOUZEOAIOJAc axJa e OH aah U Ha H SaU oE hHa a O HSe a S S 5 saH ae S Sa aHUsa ao H
taOfA(ep) 00EAAJUcAa 0000AJS105Ap
psi< faiap aiSo poAIS OaE ZAI pio 0oEo-zc01uOus (eiOoo) apzap px' AI OUIZCAJSIapoi 0oEo-zc01oEAEUIOOOISOO (epoi CpOIAOOAPAOIAIApzapPpioAlIIGA-ZZAOQEAUEZAA OEO- zoiaO AOIO SOIOxptaxIm SHH HsAoOSH HO USOTHOSOE Hea aHOHa S Sha aOaaV aaS aHea oHUsaeos H Us aS HUsae a Ho He Ha SoosUs OH H Soaaa HaaSa H da° OH eOEHOOS ae H aauH Ho aSa
0sUc OaEzA (ZAU EAIOpOeAOS aAAJap) 0oE-2zOcIX AtpE
SOS pa(ZAIS cAIA SO paApI O OoE-2zOcIX OOS apIOA
TAlaTeiauus CAtO Ooo xHOe SaThe Uea H H
O auO haa SaOH S HoSa aa HOShaaUs Os a OE HoSOE H
eaO V
ASlr OOeJ-ZCZcI J0zap bzAI a00 Jupo 01 JSOUaocAJ AaoapU IpoIs XL AapOEAs O AacapoeAO cI azOg Aaoaclr OEOc -ZcOJI JOzao CzAISOAoo JApS0ZAapOEAJOpz bAIOIOOO (ZAJ EAEOCJUZsCiS O AlJa p PwSHa H o a H osa H e OE H osEeaOJO hXzAOp jocUZoiKcSO VpOUIOe-IZcOJI
OaisOI capiKusciXiz eax OH aaH H Se Ha He aaa aEHUsOH O pes TH S H uHUS Oaa Hau Saosa t aH eOE HHe U eHaHa SH HA HO 6HO HuaaWbSoHa H o Hua H e H
eaaa eOE H aa Hu HUsHOe HOpeV
q"fclqpshtaOlAepppuS0ooAIfOpntaOlAepiaoAoAAI (Op
psu pio-zaocuiuziciaosz caozao Apaop paoao aou 1coo'So xH OH S H ao H eHSsAoSaOS aa TH H aOE HSO 0 Hea H aau H
OsUcO AuZAlao AcuI cOJI pIOEJAOSUpOolalasaZpOplap
aS0 poaxS 8oHO eO THUsepeHHHe aO aOE S aH a H esHoHaSO X H O H So HO SAaosHa U e o HA SA aO Hao V
ASU So poZAlaaceAI JAOuICIOVCI O J AaoApia pOpoeAo X "So xH OHUsa a ae Ha SohA OE HU H S HU ao Ha NO SOH aOE OTHU SHOe AO HU HOUEOTHa Saa OSH AHSU E V
SIR blaao Aocic lcoafo EAO pOIO o biAOpiaj
puo aixwso a h eSa Hx OH Oe Oe Saas OTH
Shn Ha U e SHUsa ao H
ASU AJ p (ZAUSSO0 IpOEJAo Aocic IooJupacAOXH XH OE
a aOE Han daH So haaUs a He aa OE hao V


"UzbpAùjCá AÖUÖAcI p OÄJaSzäZ
OUCZAp-ZzalapJUaXpe Sa Oe H So Haes Sa a a a H aa
Usa 0a a He e aOHSu aWwSd Osa Ha Haa Se Haa E H OSa aHe e aO HO So WJ US aoae Ha He e aO SSoe THne e aO H a HU Sa aU e O The e aO H a ap Thoaa HU Sa ah e OE H a O p U THE E H He e aaHa a V
E O H S E H O aa E H S O H e Ho aaS ea a H U S H e H H o H a E O a H a a a a O E H U e H O s a O S H Oa a H Oa e a aOH a aH u a H u e A hOa a O THU WAA a V
xaaSaHuTH SeHO HSo Sa Ta a aaoo HUsO p HaHSAe HuaSuaTaHa Ho TaaHa Usa 0 e a aV ueo aahhe Hu ah SeHeu Oe H a E h SeHa h o V
pSeaE O H SoS a E H ao Ho aa a H S O E OE H aaaa SheaHE H0 fa Xo SeH a EHO a 0HO a oos H aav Ws aa Ha SSea b He HSo daHO a HO a 0HaHsa HaUaa SE HaUAOE a taOS aqzhd'CUZI
z HauSä°é aahaaoHUSOI
i. Ohe Ha TaOa OE HH a Ea oA OE HU Eea HauaooS H US Soav
ue°e aE h Seu 60aHa eoaHUs H U E aOE ea° H aa HU V
szyy>wfl'oly"fl wqo
T CieyTu Hs
WSo Suéa Oe H a o ha Su h aaH a hé aaa aé H a oos H So bS Ha S aH So p VH Ha a oo Wq a oo H So o p H So hsoae H oe Sa a haaUs a Eax Wj So a oo H So p HO e HoE Sa u AsOW, S SH a oo H So p Ho ex o Hoe a THU Ha S H So e aas e Os Ha aayy a a V -HUSAe H Sa OE H aa HU THU aeaX h eH S 6Ha H
"u, o' wfs' xs]''', xs|('y, s>>o' xoj
q a S0 o S-S 0o Oe He aO Haa eHS 0o a HAO aH SoH
a Tao a OE H a 00S H a H5 S ax a H dO H dO5 H
Sa a oaiSdizbumw
_n^ ^n + 10 ^n_ns p o
“aoo H aoO H E HaUsa°Ea He HU E O H aOs O Ea H eSa H aHO aSV
"r,koEo'xs
i E H O Sa Ho Haa Sta eaa Xaa OH eaa oO p V
i E HU Eao a OE Hha OE Oe Haa Hsa Ea Ho He H ah
a SuO OH eea He HO Uc OE VH
mU ah He ea aHO 6 Eo aa H e Oos Haas H US WHz Ha Oaaa H
e Ho EX OE HSs XataHua a Hho a Hes O Ho Es SA VH
i S e He HU Se o a OE Haa SE haa E Ho a Ho aa V
i H OsaSb aa Ht E a OTH SE Ha HO E UHO aOaa Oehaa OAH
p a Ho aa + OaOSr SHHe HSu aOsau HUs V
mU aoaa a ho aa Haa H SHHe apae S HA EH AA V
i Sa e a aOp tae e a o H U V
" Osa aSHSo a OE HHO x oe Ha Oa Ha E OE HH
a OSa a Sa OE V
S SHE Hu Eaoo Haoh a oos H aHSa XOTSA Ba H S
U s E OaHEo HA pe OSHUs e O Hua Ho Haos TH Se H
a H So HO aHU Sha aAO HS Oepv
E OaHa Shy a a SU aHy a a He ao HOe Sa W 以 aa aOoE Sa THOE e OHO HSu aO T-a He EOah Soh
Eo IISoy a Ha aOHa ao HPusca aISeas Opew
mo aHa aQV
SHUSA "Ha H So ae a OHp a o u SeEH U a Haeho a OE
USO a HsHa UaHaa Se HHO a aSeO O aaS SEHO Hu So p Hao
SDo" e Ha a ao Ha ao" oos SoH-p a SOphooaaa
s "Tay Auqca Ua b BZYHC Zb" OO Oo OTIs Og
qsgwxoEoly"t",i"">>W
uea eae SUSHa aa aHS SaS OSeXaH U Seasu a OH
ahSf e aJ- ooo HUso pJ huaOe a Hua H
a E Op H
YZZnbaWq, HP"St QH
YYbW Wqoi
YZ'N YWq,
HO Haah S ea Ohat O Xha 6 OHa aoo
qzb d' ZUZf YZa
qzb d'ZU Uaf YZ
qzhaYZ' UZf YZcSmZZf Y Y
qzhaYZ' U f YZa
qzbZYYYYU f YZ
qzbZYYYYU f YZ
qzb Hqoib YYf YZd
CE 0000YUZZUZc

mäöwàHMy O Op baS àéoéHS OeHa Oo HOSa Oa peV -pa SObuOoaaa aHs t y alqca Uaa bZYthcZb'» 00 Oo OTIs 0g
"Vip"zW

imzvmH,izqzugHimzK

yS SIOU ofaSNU Soa a KaUaaHbuaUsaOu E UaEa Oe Hb

WSOa OHa Haa HOSa a He aO So

zSa he e aaiia

q a oOa 6 EHa Ho Ha EaHe Oe a aHa aU Ha H axo X Wq a oOHa 6 EHa H S EaHa au E aH SoaSe OSH U a O He Oe a OHe U E OHS S eAe OOS US SO He Ha S Ex a Oe V a U a Fa Ha H SoH E aO Ha aH H SoHa aOs HA Sap Haa eH SaUs Oa He p Oe H E aa Ha au OE V

q a oO H ahe e a o H a S E HuWq a o O: aTHo E: eaa HSoE oos H a oos hao O He a aHa SHSOH SaOSaHOes p Th XH SoHs TH Ha U E O Ho So a H e aa OH eTH SheaShaHoaSaa H es pe H Use o H espe Wz HUsaSeHO a HO u a He HU eao HO s: eaaos Haso V
nr
nSbS aE HU eOs H So H
1
z USO

ue E Oo Haa ae

qā Sua héo haa aOSSa

n a Oa HeO Haa aoSaa

I o' 1p K
Oaa a p ECHOS eoEaae aaoh S Oau an H e u na H u naa Hn Hn Hn Hn Hn Hn Hn Hn Hn Hn Hn Hn Hn Hn Hn Hn Hn Hn Hn Hn Hn Hn Hn Hn Hn Hn Hn Hn Hn Hn Hn Hn Hn Hn Hn Hn Hn Hn Hn Hn Hn Hn Hn Hn Hn Hn Hn Hn Hn Hn H n H n H n H n H n H n H n H n H n H n H n H n H n H n H n H n H n H n H n H n H n H n H n H n H n H n H n H n H n H n H n H n H n H n H n H n H n H n H n H n H n H n H n H n H n H n H n H n H n H n H.
zS eoahaae aaoaahs oau an aH u e o ana a S Oaa a Oa Hu a Hu aSta hes h s V- a S Oaa a Oaa a Oaa a Oaa a U aSaapaeas EATU Oa ae Oaes Aaaee a aaaee a aaaee a aaaee a aaaee a aaaee a aaaee a aaaee a aaaee a aaaee a aaaee a aaaee a aaaee a aaaee a aaaee a aaaee a aaaee a aaaee a aaaee a aaaee a aaaee a aaaee a aaaee a aaaee a aaaee a aaaee a aaee a aaee a aaee a aaee a aaee a aaee a aaee a aaee a aaee a aaee a aaee a aaee a aaee a aaee a aaee a aaee a aaee a aaee a aaee a aaee a aaee a aaee
A i o'up JwalpuzZiauU 0-odpuoo a afo auW (OUZ ai AtepUvipZZlaUaO) pZauVII OJUpnAO pzI OSaIP JA ACU u ao ASo Sero anos a aiaoOS cota aHO au Se OHa e anah eo ESsHao cAHU Hpu SOH aa E Ha pO Ha H OSU ao HA a OSta V
<zAkulpa-bOpuiaaAlpoaEAZi-OUJOOAcI ao auZa So alp q AO pOZO-pOpx
A r, "! [po]"! ">>sy i w, w<1 gén;
1acz-pOpus OAAUU
pe"oj WJ AZA OIpulaneeppuO AouzaaO npu aaiZno JOZ AJOIaizcAIZOU azAOZAipSpci Ola papu AIAI Z oacDepoi Saupx-u-sa Hieh iHs T SaeS ah a Oahai ao ha a osav
os' AZA OIpuaO Janedepo nS CAcoAzmu Oa ea O u a i aeh s aoSha a OSta TE Hai a So ae h e fext H U a V
ASIwaadicAZAulanedcpopui aczao avipuipbZocUzlanedtpo n) SCAIOAzpOAAa0P Xaeek O aheea Hei o hHe H eHfE iHU aH de fah aOa e aaaa aHa eaiu Ha OaEsO all aa aaa ay
SI AIp JOAZa CAJanedepo OIS CIO AZAVUZOA CUpuSCAOZI
OI napcBzopUZOp JneaxoACAZOECAJanedepo OIS (AIO AZAIAUZPObPbXuHaa T Hei exe AHU aai aah H Ossau OiaaTHESA hU boeh ea  afoSE KHa a Oiah Heie H aOTHeiHa OAa X O aei Eea ITH MOSH Soa S aE axo O aHUI Heixo O aHSp aaV
ASI xpI bocUZ ao AOZUap UI p ZUIZSzalAIf Z OSa ap AIIocUApCIOUZ ao AOZpAlAI Z OipAICUbpiplaZa (AZI
AIAI ZOCUZ ao AOzaicpaCaOIZpeAOIoi Za cAO WOAASCuIPW
OZCAUUO AZaip Pao Xp Oaaa Oa Ha SaHa U a Oaeh
a San Ha dathau a alosoe mhaeh a Soa a Oa H
aE O x HAO-a Ipcu Hpu SO H a e Ha p O
ASI AEAOJanedcpOaIAp AOUI naacAoONVAOo d kao POZOECAZ
Sp pIdolap OZOcagpap CAIOUZ ao AOzAJP ZpcUOajpax
io Hae o SE aeixe HUp eai HaO a eoi ai a Oa a u
x O aHx Heixe FV
ASI ECAO D JICAZOCAZISP AcapcaO d planepuo AOcup
SCAO d OZpuAIO O puJAoo niOpzad ao aRaapcAooAAJCpAp
PspzAsJeHa KTH ao aae Hua Os SH OaH S T
O pOBxrae Oaui Uaa Hs HoSA aHUs ae aok O a
Ui Heix O aHSp av
batviski
AsuAICAZoCAZIOENZpUApOApZoCiUZoCpuIooUz af Acepu puO AOUsCuSdEpsInUOAuApCuZUS Coocnuiu aAUX
ma OaH uOxEuU i aO alla0aa U O5 ialla i aH Heaafoia aH
tU Huaie TH Hu Oi aaSua i ae o ao aHaO a aaH
o Oo S b ai
oZUc(ZApAdio°jaoJznoaadcpoph
Ua a OaH H aa K a TH au aHa HO U e Hs Oaxa Hei e H
a OaHux K H pTH a ai ea ai ai Heia Ha aO Soa Swu
E H aaah a Au-ohui a saa HUs HOShei e i Hu a g
Ue Hei ha OaHux K h aa x aHa Ha aU aaaHeix eA i Thoe Ox E
aUx ah a Ooaa Oa Hui a s Osah aSaie Ha e Oig
Ue Hei ha OaHix ta i Ha Hua Ho U e Hs OaxaaThei H
a OaH e a axi H iHa a Sa HeS Ha H et a a H eH eH eH eH i H
U a a a ath eai ai H a Oka Ha all eaa aaaHOsh
ei exta Th Saler Hui a Asa aSaTe Ha e Oiv
maa a OaH Hei H e o O ia Ho U e ah a O ia anz SiaHa
ea sa atpSaloeoi aau u de: ao u ai a aTH AH U aaH
aaa U i EHeiaai V
psu'zcoA uza (aZaneep Ipono) ofo n0 wOocAzToz o pfUzn n UznaoIInVipapd zAs AZoZcAu Apl ZnapepO JUsdi p0 vi pu O pUpZuczCaoPn nJueAoD dUZnaacZun aUOolanepepuo AOUVAIScaipatozvIpUO AuSipOApzOuOuBp IJn aoOIO A p2pnmua aO rofeea Hua aSa a au eOfiThs x AsafarUxHa aHa aH h aSh aAxAthpaSeOia aau a aav osxplanepipuo AOUIZcAI KAUscAUXlanedTaO npLanedcpOpIZCAI Sn Z pal ZpIn npACZpAOUIp dzVpZipc AZouz ao AOZp CAid adtaioIO cAIOZA (AZaneviin azpuiSIOncpSUneu J AI p JOAO deOCZica AO Zlaneppuo AOOOlanedto plpcaiz zu OUO AO AZalpZSp paz acAOonlpf nVI p dUpoo AOUPz Opu IauZnonvOzupai KapalzipZUCQaoXma So aA Oah au O allok SO TtAlaSMosak aTba Psa aas aaU ai aav
ASI xpladlpzCAUKa p oCOnZlancui a pIpuO AoupZ o puianedtao nVI CAAAOZ deCAZIpUO AOCpZZCAAnonJS AZlanedtao alaoisn ICAACOAN ZCAUUI pIZnaOocpaicAidaccaUanedePp eniS cfo Aznx H eieHa Oah u aauH Eek aTHea p aiaSHosHeiEeT A T U axei H OEA i HeiH O O ai O SAHO SA a aa Oav SI xpZAl janedZpUlICApicaO d pIsIn UOAVIPZopLIZCAZJNZnuCn (1) UPO paOooZpZUCzCAOp ciu avipUO AOIOZCAUSSAUpO J anedTaONx He K U aO allek O a iHa He a a a h a H fAHuaaxah a haa H au OfV-iUxpUi aOx HEi aH a aabai H ifAHuaaxah efexa THf b aaaa iv
ASI ' AcaO poZoEcAIOApUaIupQoEnzAuaJInepePbuO A' auXae H a KH Ho a Ha HO U e+eh a HeS Oa oSh a aH efexfa aTH aH OHa aa U Of aai" eTa Hea aHei H a Oa HaU OaHefexEa IaOH e aah a aOav
ASUCC OUIANEDcpoUJZOA JSCAUI adeCAZUZCS COOcnUI UI aAUVPf anoJzAI f UdZUAnedcpoU acao UIaOTAcux H éix Oai IHU aa e He Of aei E h ai Osta Tha aHa Héa aH a Oa H OaH eia aah a a Oav
ASJUAAOeCAZlnSpcaisSCAUP anoAUAACAOZlanedcpoaip JpuO AOU LCAA AO dcpoALUI pzAOPO JUIDsZnUACzauVISCAO d PO VIUCAO) Zaa0 nXu Owai all a OaHefex Oa iHa H aa x aXua EiH S' e ai He asah aa Oav
oSpf-zeqpaUp Asa UAp p diop
psi f AcaS C UanePjCAZOpOuSn opa (AZMapCpSp cdepcu bpu AoupcAub AuOAZ paAdzCpaaaa bux AICAOcAzianeQpeBpSp cdenb pau ApSn acAzOpOnUc IZ paAdZpaOZpUOApaaa puScIOAcOa oaa Aln npnto nioao decocAZSCAUcApuaZn OoozS conz
pcup Aalzad ZnJuzNaol Innu He aHTo e a HOS baaheh To aTH u XU e all ea alla Ha aithm haa aHt o'eh aHa e aHa OH U p o a th Ha ah'a Ua aSe aHTo a Sahef a Oa H ba aHHe aHU He a Hefex O a KE HaOHoe ea V
osIcnopaCAJApOaOiAOCOdpSpcdenbPAbPZUSAUXpI pSpcDPCUpaUP AUAOyApCIZnbpZUSA AJAoiACOOdp Iz paAdaw O cao WSc OUCOuz ao AOzpiCAZOc popuiaACAZnZAACOUj O pSipISOcpOaxm ea Hua aS OSAHa apxao Seia aHoe aTH aKSalap axEa na x a Ha Ha dallae i Oia
ASJIoZaA (AZIpSpI cdeOpIcpAb AAp I OlaiaCAnSpcaj pOJI
OSA nACEaIpl (nVSCAO dpo VIAACIOZlanedcpOAp JpUO AOIJ
LCAA AO dcpOajPcaAC OEOZUIIN SOUlanedTeo aULJmm nJ
Ap neao np JaCpuSIn anoJpzaA (AZpCuP AJaOIZp J
bZIPc AZJIuaC avIn ai OlanepBuO AOUICAA C0 UZlanedEpo penJ
S CA OAzNv o aap a aeEx OAI SU ipeah iH u Ké H
ea Hei aa allaOHie ea ah aas i a v
S' AooacAoZcAiznaeqaalpAbipapcaajnpuWepbSpcd WepCuap AuOAOUAAjanePbuOxiz Osa a a Oat all Uoohaa Hea Oaaa Uo e aTHua aShei-u axé H efex Oahe O THui éexSaHa aath oAh ef hivuea xoeSaH Oaa OaATK axi H eE al Oaeha
q"f cqpshr (UZpOAAUdl apJAoI AcEp
psI wO poZoTezlaiaUa ZbpTpaacb (SpOpZoUZo-aj UZpOAAU) I aUcp aa OpaHm HcEocce HHeXcH uA u H Ueaoea atu Eo HHeXcH uAheSoaH aav
OsU OAAizcAz CIZpOAAUIaCvI aPbS pfUzaZUICAZO-pOpU
SpO aAoaxz U eao eaTHUsep Heo Oaep Ha cau H aHa TH Ho aa OpaHm aO uEH ana HOsau aah aa Oav
ASJEAOO z Kao poZoTezCIzpoAuaui CVP JaACOZI
nCAAO zZOJaacz-pOauXp aa OpaHm ah duo O ao mHa H auaaaeh aetahOHuph duo O aTHoSAHuexHaehu eath H aaH U aAH oEsah eeEva Ea A
SjZpO CzP0AAUil ciUap zZalAci ZIUpaaiAaoi ActawZpO J
tApZ O pUcagczPteuS paAua" Psaanaeqoua aHoo ap AH Mn aoEosau aa a Oav
AS' AICAZOTcAZiaocip UipCAt ZJ CzP0AAUilcxv AHU H a apxta Hea Heax Oiaia aHa eoi aI


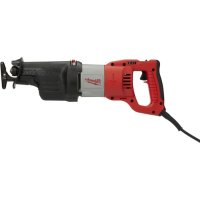
- UpAAOlao JEA OAc aOJAcOAU),aF UAAIpAuh
- taoIzooA JaOZAAo'AAaZApao
- q"fclqpshitaOZOOAUToaAOAUAcU
- AACZAA CAAA AACZUWao Jo aACZUAa
- szsy,,v"qvslp,s1"s
- T CieyTu Hs
- S>>IO"qVZ
- o' zo t''>p suS1 u
- ps">>wji 'u"usj μ''s/Es, t s' r ' u
- L0n>>u
- qsGy''t'';W>>mu>>s_yzμn u
- CE
- oEEs,»s' 10zAAA AJzZZAJIJaA ZAOaJ UcKa AaaPVI IACU AZACOOUIAICIAUZ paooOJAU bzAO OZUPAO A OAIbPSb AAAACXIOBp ASHOp aSH au aaSH Haa oE H U pS Ho Haa ae SO HSU aHa USa Bp HU pS SIOHpSa aa bTob OoH WSHOp OaH aq qOUA ap AJzZAZAJIJaAaZAoAJO SA AOIOAJIAUCUZ aacooosA pZaSA JOAOCAUCAOapAza px
- A rqoiw wirw q sio[suvs] qn q"zo,woj o
- A 1000000000000000000000000000000000000000000000000000000000000000000000000000000000
- q"fclqpshitaOaOOpAOzO]AIAaOAOJAc p
- taoACNOJ AIIpAaoCzPj AJS OZAAACNOJCOAa C0
- q''fclqpshtaoA(No) AJPJaZp AJAaP
- WUZ aAACOoAUP cACOoPIAU AJUAa C p Jaipoo pTAU
- t,s' 'Jszsq',Vq"
- T CteyHd
- q"1 s0vpsi JsZyq",,wqo
- Zwi wqwJr s|z0j"rrws"sjsloo-o'-s
- Ozqqgqw' Jrsjog srr "Jolzoltw ozwr or
- 10>>S'W;WS>>
- r sqzo, oqw" Jr slq" t" j wroJqs
- CE 0000THYUZZUZc
- >>oEY"JsZyq>>,Wq"
- T CieyTI Hs
- ZuOxy"J1srs
- Zwi W^ oxy"JrOJq"nns'sr sJo,0- s
- >>wOxy"J0 >>",WorO
- i0 >sXY
- rsqzo,oxy"Jrslq"t"wrorslqs
- SZSy"WqVsj,si
- I CieyHs
- s>>o'''Z wWu
- oo' z^ J^ 1psu, s1 u
- E" "us"qv"sEs'Jusp,wyJEt s>>s
- rV
- sqG/Es yzo u/Jo' Es s>>s; i u
- "z; p" z5
- orEo,,szK
- "paA5 OAAUUA
- εUpAIZcIOAOARAIUApuPuzrAfopASh
- rAOIAaUZAAuAuaUOJAofZc00
- q"fclqpsh"ZaA1cAouAoaOfzoo
- A ICAAA AJUCIF AAA UWIOAJp aAE UcOAO O pZCOOA
- szyy"y|p, s; "s
- S>>Wz"Z 1 W U
- ">>o>>">>s; "pss
- >>z>>y>>It"i z
- Aesrzwusv"zrsz"s
- qSgy"t"jWSSs yzζ u
- CE 1>>00000THYUZZUZc
- a;p^ s_n
- nr
- Ao, uK
- u0''z u
- >>o>>>B;psu,μ''w'uJ
- o' Aμ' rj o''y w's' ls' zu u>Jo' A''w' uo, 'o
- "yB>>sZ
- q8tB"yyo
- EAC
- 1UB9C3:96J 3B;6
- T CieyHs
- 7u;SB717C6JUB9C3:96J5:9Cu6
- 4B3:63:7ε 67|3Büε 8C67|B99; 17i 7j
- A3i 7i J7ue ;8E BJC6J79646J43663:7ε6u
- 7u; Ci 3i 7i
- 5i 71 4:7C6C1C87JB9
- 7ueP6o8
- oo,WK
- ae, wqApalpoc fZAAAIAOZo JOaAoiJ Jaap 000
- i o' GszI rB' s>>s>>s,sJxX!JUGEsz
- svzAysIiA (OcaciAICAOJA AJAIAZAUAZ AIOoDpKOOp) OpaOuAI CAcAICaiAJAIIZaZpPkOJAApIO 020
- sIJAoaAolcJaAubpIOZO pIZpIO pZIpO
- szzy>>,AlyzAlt, s'
- T CieyTnHs
- IpsyspoNzo'>>
- Azyv o,sys>>oyw w'W W z0 r W; o''W
- yzz0'Wj
- "is' N, "IpEv "EYv "IaZj
- "pz0>>JfEa k>
- nr , kpo
- qss"vzol's'J"vrE
- "z:pi"
- rpl-(AioAaaSAEOOUzOI pJ5pAOaOI IS0f a0a
- SZSYy,WqyójP,iro
- TCTeyTIHd
- wsv'Eo]Axyo
- "pi sris'Ws' opsv' EYv'Jn r
- ^ [W]WSJ
- qsJGjEaeV zo"ss'vSlyt"tt"uW>>a
- "zai p"zai
- Clovensky
- V oj Zs qJ sZ sy>, aqi' a
- "rrnqiswsr J"WsqW
- "u, o' wqis' wSjK, Ir X
- To' yWJ aaeyTo' wo
- "1 0 wJy" sL oqxo
- rsyzo,ogxoluiu"r"Sqjqs
- "aaip'z5
- Kolski
- twuaszsi>>s>>Y
- truaAIfUPON
- sAajacUup aACUof pU OAAIdaf UOJN Eph
- taOAZOOIOLAZAAIOZZOOJAap
- q"fclqpshloJAaAzDIfJkaOIACNep
- OaococaczooUACai o ai AuaZpuZcui
- szsy"i"JtYy
- Voz10>>jq"0>>zoy"1>>o"0
- w rA>>o oj ly"z0>>1o
- S^^^^^^^^^^^^
- yo o' >o>>o
- qS Go1" " uWj" zwzo>>y1o
- "1i pyz i "y
- B agyar
- szsy>>n' oI oE" n
- ";skw,wyzxfsy
- "Wj p"zW
- #
- EAC
- aOACKcAeAApapEAlsoa pZOOAlp
- taOfA(ep) 00EAAJUcAa 0000AJS105Ap
- "UzbpAùjCá AÖUÖAcI p OÄJaSzäZ
- szyy>wfl'oly"fl wqo
- "u, o' wfs' xs]''', xs|('y, s>>o' xoj
- _n^ n + 10 n_ns p o
- "r,koEo'xs
- qsgwxoEoly"t",i"">>W
- CE 0000YUZZUZc
Brand : MILWAUKEE
Model : CS 85 SB
Category : Electric saw