PDB1850 - DVD player Soundmaster - Free user manual and instructions
Find the device manual for free PDB1850 Soundmaster in PDF.

| Brand | Soundmaster |
| Model | PDB1850 |
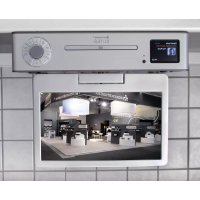
| Product type | Portable DVD player |
| Power supply | 12 V mains adapter (included), 12 V car adapter (included), built-in rechargeable battery |
| Disc drive | DVD, CD, MP3, JPEG, DivX (does not support Blu-Ray) |
| File formats | MP3, JPEG, DivX (max resolution 720p) |
| Additional support | USB port and SD card reader (max capacity 32 GB) |
| Screen | Built-in LCD screen (not specified, estimated 7 inches) |
| Outputs | AV output (3.5 mm jack to RCA), 3.5 mm headphone jack |
| Remote control | Infrared remote control (range 5 m, angle 30°) |
| Main functions | DVD, USB, card playback; zoom (x2, x3, x4, 1/2, 1/3); A-B repeat; subtitles; slow motion; frame-by-frame navigation; audio/video settings (PAL/NTSC, brightness, contrast, saturation, hue) |
| Maintenance and cleaning | Clean with a dry cloth. Do not use detergents or abrasive cloths. |
| Safety | Class 1 laser – do not open the housing. Risk of electric shock. Use only in dry indoor environments. Do not expose to moisture, heat, or open flames. Button cell batteries: danger of ingestion – keep out of reach of children. |
| Repairability | Have any repairs carried out by qualified personnel. Unauthorized opening voids warranty. |
| Package contents | Main unit, slave monitor, mains adapter, car adapter, 2 headphones, AV cable, 2 headrest mounts, remote control, instruction manual |
| Dimensions | Not specified (estimated: approx. 25 × 18 × 4 cm) |
| Weight | Not specified (estimated: approx. 1 kg) |
Frequently Asked Questions - PDB1850 Soundmaster
User questions about PDB1850 Soundmaster
0 question about this device. Answer the ones you know or ask your own.
Ask a new question about this device
Download the instructions for your DVD player in PDF format for free! Find your manual PDB1850 - Soundmaster and take your electronic device back in hand. On this page are published all the documents necessary for the use of your device. PDB1850 by Soundmaster.
USER MANUAL PDB1850 Soundmaster
natural_image
Two black-and-white photos of a soundmaster tablet displaying a scenic mountain landscape, with a remote control and menu button visible (no text or symbols on the devices themselves)DEUTSCH
ENGLISH
FRANÇAIS
NEDERLANDS
ITALIANO
ČEŠTINA
SLOVENSKÝ
Hersteller
text_image
Diagram of an open CD driver with numbered parts and cable connection, showing internal components and cable routing.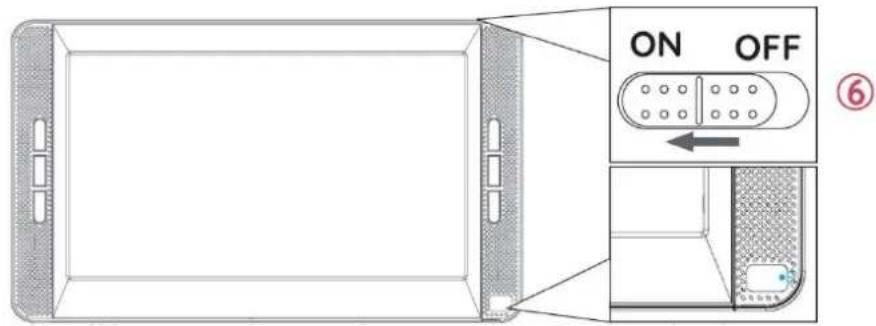
text_image
ON OFF ⑥HAUPTGERÄT
text_image
A B C D E F GZUSÄTZLICHER MONITOR
text_image
A B C D E F Gnatural_image
Technical line drawing of a mechanical assembly with no visible text or symbolsFERNBEDIENUNG
PICTURE; VOLUME; OPTION; SYSTEM
Do not dispose of this product with the normal household waste at the end of its life cycle. Return it to a collection point for the recycling of electrical and electronic devices. This is indicated by the symbol on the product, user manual or packaging
The materials are recyclable according to their labeling. By reusing materials or other forms of recycling old devices and packaging, you are making an important contribution to protecting our environment. If necessary, remove batteries and personal data before disposal free of charge and ask your local authority about the responsible disposal point

WARNING
Risk of electric shock Do not open!

Caution: To reduce the risk of electric shock, do not remove the cover (or back). There are no user serviceable parts inside. Refer servicing to qualified service personnel.

This symbol indicates the presence of dangerous voltage inside the enclosure, sufficient enough to cause electric shock.

This symbol indicates the presence of important operating and maintenance instructions for the device
Used batteries are hazardous waste and NOT to be disposed of with the household waste! As a consumer you are legally obligated to return all batteries for environmentally responsible recycling – no matter whether or not the batteries contain harmful substances*)
Return batteries free of charge to public collection points in your community or shops selling batteries of the respective kind.
Only return fully discharged batteries ^* ) marked Cd = cadmium, Hg = mercury, Pb = lead
- Only use mercury and cadmium-free batteries.
- Used batteries are hazardous waste and NOT to be disposed of with the household waste!!!
- Keep batteries away from children. Children might swallow batteries.
- Contact a physician immediately if a battery was swallowed.
- Check your batteries regularly to avoid battery leakage.
- Batteries shall not be exposed to excessive heat such as sunshine, fire or the like.
- CAUTION: Danger of explosion if battery is incorrectly replaced
- Replace only with the same or equivalent type

WARNING
DO NOT INGEST BATTERY, CHEMICAL BURN HAZARD
This product contains a coin/button cell battery. If the coin/button cell battery is swallowed, it can cause severe internal burns in just 2 hours and can lead to death.
Keep new and used batteries away from children. If the battery compartment does not close securely, stop using the product and keep it away from children.
If you think batteries might have been swallowed or placed inside any part of the body, seek immediate medical attention.
CAUTION - INVISIBLE LASER RADIATION WHEN OPENING THE COVER OR PRESSING THE SAFETY INTERLOCK. AVOID EXPOSURE TO THE LASER BEAM.
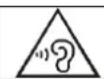
To prevent possible hearing damage, do not listen at high volume levels for long periods
Safety, Environmental and Setup Instructions
- Use the device in dry indoor environments only.
- Protect the device from humidity.
- This apparatus is for moderate climates areas use, not suitable for use in tropical climates countries.
- No objects filled with liquids, such as vases, shall be placed on the apparatus.
- The mains plug or an appliance coupler is used as the disconnect device, the disconnect devices shall remain readily operable.
- Connect this device to a properly installed and earthed wall outlet only. Make sure the mains voltage corresponds with the specifications on the rating plate.
- Make sure the mains cable stays dry during operation. Do not pinch or damage the mains cable in any way.
- A damaged mains cable or plug must immediately be replaced by an authorized service center.
- In case of lightning, immediately disconnect the device from the mains supply.
- Children should be supervised by parents when using the device.
- Clean the device with a dry cloth only.
- Do NOT use CLEANING AGENTS or ABRASIVE CLOTHS!
- Do not expose the device to direct sunlight or other heat sources.
• Install the device at a location with sufficient ventilation in order to prevent heat accumulation.
- Do not cover the ventilation openings!
- Install the device at a safe and vibration-free location.
- Install the device as far away as possible from computers and microwave units; otherwise radio reception may be disturbed.
- Do not open or repair the enclosure. It is not safe to do so and will void your warranty. Repairs only by authorized service/ customer center.
- No naked flame sources, such as lighted candles, should be placed on the unit.
- When you are necessary to ship the unit store it in its original package. Save the package for this purpose.
- In case of malfunction due to electrostatic discharge or fast transient (burst), remove and reconnect the power supply.
- If the unit is not using for a long period of time, disconnect it from the power supply by unplugging the power plug. This is to avoid the risk of fire.
- The device is equipped with a "Class 1 Laser". Avoid exposure to the laser beam as this could cause eye injuries.
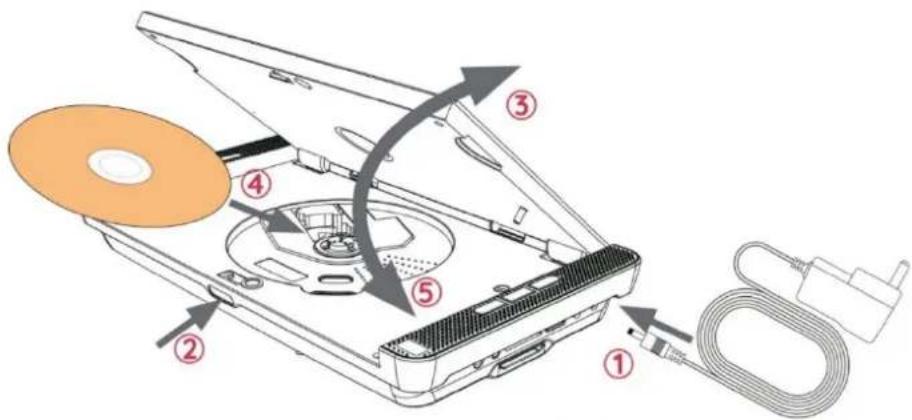
QUICK START GUIDE
1 Connect the power source
2 Press the "OPEN" button
3 Open the disc cover
4 Insert the disc
5 Close the disc cover
6 Move the "ON/OFF" button in on position The player is reading the disc. Waiting for reading completed. The disc will be played successfully.
text_image
Diagram of an open CD or DVD drive with numbered components and cable connection
text_image
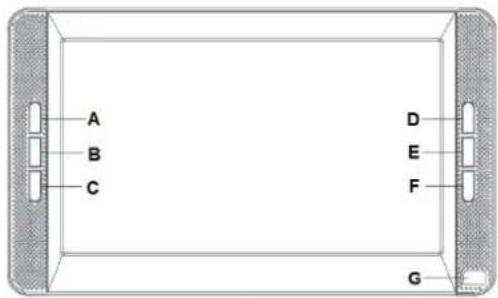
ON OFF ⑥MAIN UNIT
A VOL+
B VOL-
C ■
D
E
F
G Operating, charging indicator and remote control sensor
text_image
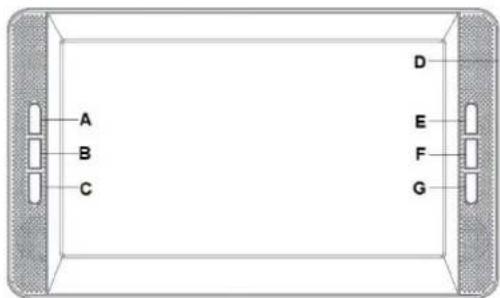
A B C D E F GSLAVE MONITOR
A VOL+
B VOL-
C MUTE Switch the speaker off/on
D OFF/ON OFF/ON Switch
E → Select menu options
F MENU Open the setting menu
G ← Select menu options
text_image
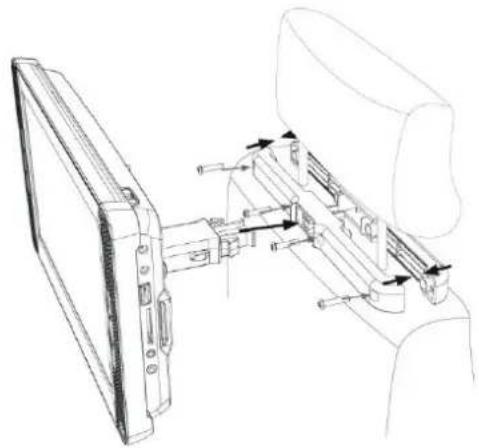
A B C D E F GINSTALL THE BRACKET ON THE CAR HEADREST
1 Install the bracket on the screw hole on the back of the DVD player
2 Loosen the screws on the side of the bracket and fasten the bracket to the two pillars under the headrest.
3 Adjust the machine angle if required
natural_image
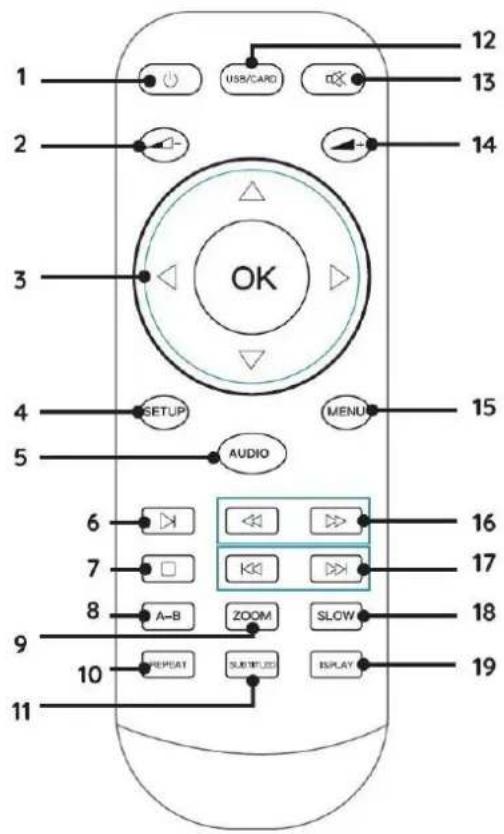
Technical line drawing of a mechanical assembly with two components, no visible text or symbolsREMOTE CONTROL
1 On / Standby
2 Volume down
3 Selection/Enter frame-by -frame
To select press ▲; ▼; ◀; ▶; and press OK
Frame forward/backward in pause press ◀ / ▶
4 SETUP open setup menu (except in AV mode)
5 AUDIO switching left right channel
6 ▶ Play or pause in audio or video playback
7 ■ Stop audio, video or photo playback
8 A-B set point A and B for loop playback
9 ZOOM press repeatedly for 2x, 3x, 4x, 1/2, 1/3 zoom
10 REPEAT repeat the loaded disc
11 SUBTITLE enable subtitle
12 USB/CARD selection of DVD; USB and card mode
13 ✉ Mute the sound
14 + Volume up
15 MENU open the main menu of DVD
16 Fast for-/backward
17 Play previous next chapter/title/track
18 SLOW press repeatedly for 1/2, 1/4; 1/8 or 1/16 playback
19 DISPLAY turn on or off the main LCD screen
text_image
1 2 3 4 5 6 7 8 9 10 11 12 13 14 OK SETUP AUDIO MENU 15 16 17 18 19 USB/CARD ZOOM SLOW REPEAT SUBTITLED DISPLAYBATTERY INSTALLATION
- Remove the battery compartment cover on the back side of the remote control.
- Insert two AAA batteries with the correct polarity into the battery compartment (see illustration in the battery compartment).
- Close the battery cover again.
CONTENT OF DELIVERY
➢ Main unit & slave unit
AC adapter
2 x Headphones
AV/DC connection cable
2 x Headrest bracket
Remote control
Car 12V adapter
Audio-/video cable
Instruction manual
BASIC OPERATION
Use only the supplied power adapter /car adapter!
Make sure that the mains voltage corresponds to that on the rating label of the AC adapter.
Connect the AC adapter to the right side of the device and to an electrical outlet.
The charging indicator on the device lights up:
Red LED on: The batterie is charging.
Green LED on: The batterie is fully charged
Connect the slave monitor as shown in the picture.
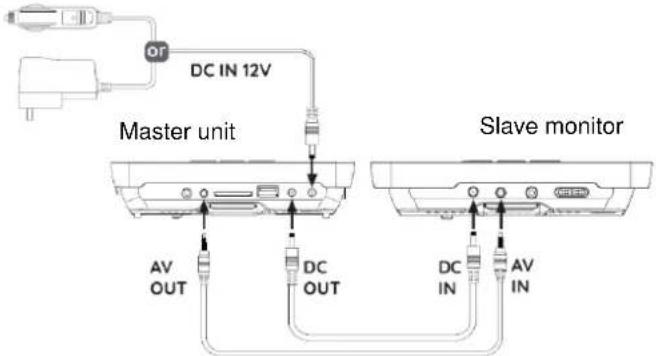
text_image
DC IN 12V Master unit AV OUT DC OUT Slave monitor DC IN AV INSWITCH ON/OFF
Switch the main unit with the "ON / OFF" switch on the top side and the slave monitor with the "OFF/ON" switch on the right side ON.
To prevent accidental discharge of the built-in battery, please slide the "ON / OFF" switch to the OFF position when the device is not in use.
ERP power management
The device automatically switches to standby after 20 minutes if no playback takes place.
To turn the device back on, turn the power off and on again.
SOURCE SELECTION
Install disc, USB or card correctly in the main unit.
Press "USB/CARD" to select DVD; USB or card function, wait for read in and start the playback with ▶II
VOLUME ADJUSTMENT
Press the "VOL -" / "VOL +" button on unit or the "◀- / ▲+" on remote control to adjust the volume.
MUTE
Press the “*” button to switch off the volume. Press the button again to switch on the volume.
DVD SETUP MENU
In DVD mode, press "SETUP" button to enter the setup menu.
Use cursor buttons “▲▼◀▶” to select the preferred item. Press “OK” for confirm
After finishing settings, press "SETUP" again to go back to normal display. The following menu items can be changed:
GENERAL SETUP PAGE
AUDIO SETUP PAGE
➢ PANEL QUALITY SETUP PAGE
PREFERENCE PAGE
GENERAL SETUP PAGE
TV DISPLAY: Adjustment of the display format (4:3 Normal PS, 4:3 Normal LB or 16:9 Wide).
ANGLE MARK: You can choose different camera angles when the movie is supporting this feature.
OSD LANG: Selection of the preferred screen display language
SCREEN SAVER When set to ON the screen saver appear after some time in PAUSE or STOP mode.
LAST MEMORY When set to ON the unit memorize the last play duration. The unit will start play from the last play position again.
MP3 LYRIC If you want to show the lyrics of a song, please load lyrics and music as the same name in a USB or Memory card before performing this function. Choose MP3 file. Download the corresponding lyrics with the extension ".Ire" from the Internet or create it with lyric file editor (not included). Rename the lyrics file. Make sure that the lyrics filename is the same as the music file name.
AUDIO SETUP PAGE
The audio menu allows you to change the audio setup of the DVD.
DOWN MIX Set down mix to LT/RT, Stereo.
DUAL MONO Set to Stereo, L-Mono, R-Mono or Mix-Mono.
DYNAMIC Full 3/4, 1/2, 1/4, OFF
PANEL QUALITY SETUP PAGE
The video menu allows you to change the display properties of the DVD.
SHARPNESS Adjusts the screen sharpness.
BRIGHTNESS Adjusts the screen brightness.
CONTRAST Adjusts the screen contrast.
SATURATION Adjusts the screen saturation.
HUE Adjusts the screen hue.
ASPECT RATIO Setup panel display to 16:9 or 4:3
PREFERENCE PAGE (The setting is only available when no media is inside the unit.)
The preference menu option allows you to adjust the default DVD disc setting.
TV TYPE Set TV Type to PAL, AUTO, or NTSC.
AUDIO Set the default audio language. [Subtitle] Set the subtitle language.
SUBTITLE Switching Subtitle function on / off
DISC MENU Set the disc menu language.
DEFAULT Return the portable DVD to factory default beyond the maximum output of the speaker in sound effects processing.)
SLAVE MONITOR SETTINGS
Press "MENU" on the slave unit to open the menu.
Press "MENU" repeatedly to toggle: PICTURE; VOLUME; OPTION; SYSTEM
Following options can be changed with the “⇐ / ⇒” buttons:
PICTURE: BRIGHT; CONTRAST; COLOR; LANGUAGE
Picture bright; contrast, color language
VOLUME: default Volume
Volume default volume
OPTION: RESET; ZOOM
Option reset; picture format
SYSTEM: S-ROLOC
System colour system
The values can be change with "VOL -" or "VOL +" when needed.
AV OUT
You can connect the device to an external device (such as TV, projector, etc.) to view content on the device.
-
Insert the jack plug of the enclosed AV cable into the "AV-OUT" socket of the device and the 3 RCA plugs of the cable into the external device. If the device does not have these connections, you will find corresponding adapters in the specialized trade.
-
Switch the connected device to the corresponding input and start playback on the device.
HEADPHONE
You have the possibility to connect headphones to the device. Plug the headphones into the 3.5 mm headphone jack on the right side of the unit.
The sound via the built-in speakers is switched off.

To prevent possible hearing damage, do not listen at high volume levels for long periods.
TROUBLESHOOTING
WARNING: Before requesting after-sales service, please check this possible resolution. Risk of electric shock. Never remove the casing of the product. To keep the warranty valid, never try to repair the product yourself.
| No reaction to the remote control | Insert the batteries correctly.Point the remote control at the IR sensor located on the front panel of this product. (operate within 5 meters and 30 degrees)Put new batteries into the remote control. |
| No picture/sound | Make sure the connection is in good condition; volume is not too low; audio receiver or TV work normally; audio setting is proper. |
| No picture on AV connection | If this player is connected to an unauthorized display device with an AV cable, the audio/video signal may not be displayedCheck if the AV cable is faulty. If faulty or damaged, replace the AV cable. |
| Audio signal not playing on the TV | Ensure that the audio cables are connected to the audio input of the TVAssign the audio input of the TV to the corresponding video input. See the TV user manual for details. |
| Disc cannot be played | Please clean the laser and the discs with alcoholOur DVD player doesn't support Blu- Ray, pirated. |
| Data Files cannot be played or read | Ensure that the data file was recorded in the standard UDF, ISO9660 or JOLIET format.Ensure that the JPEG file extension are jpg, JPG, jpeg or JPEG.Make sure your USB drive or SD card does not have a storage capacity greater than 32GB.Make sure the video resolution does not exceed 720p. |
The current instruction manual can be downloaded from www.soundmaster.de
Technical changes and misprints reserved.
Copyright by Woerlein GmbH, 90556 Cadolzburg, www.soundmaster.de
Duplication only with the permission of Woerlein GmbH


PROTECTION DE L'ENVIRONNEMENT

text_image
Diagram of an open CD or DVD drive with numbered components and cable connection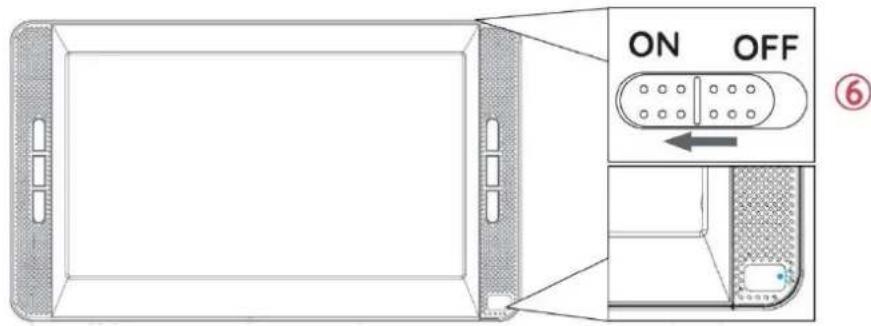
text_image
ON OFF ⑥Unité principale
text_image
A B C D E F GMONITEUR ESCLAVE
text_image
A B C D E F GINSTALLATION DU SUPPORT SUR L'APPUIE-TÊTE DE LA VOITURE
natural_image
Technical line drawing of a mechanical assembly with no visible text or symbolsTÉLÉCOMMANDE
text_image
Diagram of an open CD or DVD drive with numbered components and cable connection
text_image
ON OFF ⑥HOOFDEENHEID
text_image
A B C D E F GSLAVE-MONITOR
text_image
A B C D E F GDE BEUGEL AAN DE HOOFDSTEUN IN DE AUTO INSTALLEREN
natural_image
Technical line drawing of a mechanical assembly with no visible text or symbolsAFSTANDSBEDIENING
text_image
Diagram of an open CD driver with labeled parts including power cord, cable, and fan assembly
text_image
ON OFF ⑥UNITÀ PRINCIPALE
A VOL +
B VOL -
C ■
D
E
F
G
text_image
A B C D E F GMONITOR SECONDARIO
A VOL +
B VOL -
C MUTE
D OFF/ON
E →
F MENU
G ←
text_image
A B C D E F Gnatural_image
Technical line drawing of a mechanical assembly with no visible text or symbolsTELECOMANDO
text_image
Diagram of an open CD or DVD drive with labeled components and cable connection
text_image
ON OFF ⑥HLAVNÍ JEDNOTKA
text_image
A B C D E F GVEDLEJŠÍ MONITOR
text_image
A B C D E F GMONTÁŽ RÁMU NA HLAVOVOU OPĚRKU V AUTĚ
natural_image
Technical line drawing of a mechanical assembly with no visible text or symbolsDÁLKOVÝ OVLADAČ
VOLUME: Default Volume
text_image
Diagram of an open CD driver with labeled parts and cable connection, showing internal components and cable routing.
text_image
ON OFF ⑥HLAVNÁ JEDNOTKA
A VOL+
B VOL-
C ■
D
E
F ▶II
text_image
A B C D E F GPOMOCNÝ MONITOR
A VOL+
B VOL-
C MUTE Vypnutie/zapnutie reproduktora
D OFF/ON Prepínač OFF/ON
E →
F MENU
G ←
text_image
A B C D E F GINŠTALÁCIA DRŽIAKA NA OPIERKU HLAVY VOZIDLA
natural_image
Technical line drawing of a mechanical assembly with no visible text or symbolsDIAL'KOVÝ OVLÁDAČ
D 90556 Cadolzburg, Germany
Hereby, Wörlein GmbH declares that this device is in compliance with the essential requirements and other relevant provisions of Directive 2014/30/EU;2014/35/EU;2009/125/EC;2011/65/EU. A copy of the declaration of conformity can be obtained from the above address.