Keiler2 - Binoculars LIEMKE - Free user manual and instructions
Find the device manual for free Keiler2 LIEMKE in PDF.
| Product type | Thermal binoculars (thermal imaging) |
| Brand | Liemke |
| Model | Keiler2 |
| Reference | 13545 |
| Dimensions (L × W × H) | 163 × 75 × 47 mm |
| Weight (with battery) | 510 g |
| Detector | Uncooled microbolometer, resolution 384×288 pixels, pixel pitch 12 μm |
| Thermal sensitivity (NETD) | 40 mK |
| Lens | 50 mm, aperture f/1.1 |
| Field of view | 15.4 × 12.3 m at 100 m (8.8° × 7.0°) |
| Magnification | 2.7× to 14.0× (digital zoom) |
| Display | OLED 1024×768 pixels |
| Detection range | 2500 m |
| Frame rate | 50 Hz |
| Power supply | Li‑Ion battery 3.7 V / 4800 mAh (model BP-K) |
| Battery life | Up to 10 hours |
| Charging | USB‑C 5 V / 4 A; duration ≈ 4 h (device off) |
| Internal memory | 32 GB (JPG / MP4 formats) |
| Connectivity | WiFi 2.4 GHz, range 5 m |
| Waterproof rating | IP67 |
| Operating temperature | −20 °C to +50 °C |
| Color modes | White Hot, Black Hot, Extra Dark, Red Hot, Rainbow |
| Package contents | Camera, hand strap, BP-K battery, shoulder strap, neoprene case, tripod plate, power adapter, USB‑C cable, cleaning cloth, user manual |
| Warranty | Up to 3 years |
| Spare parts | BP‑K battery (ref. 80412223), CHARGER‑K charger (optional) |
Frequently Asked Questions - Keiler2 LIEMKE
User questions about Keiler2 LIEMKE
0 question about this device. Answer the ones you know or ask your own.
Ask a new question about this device
Download the instructions for your Binoculars in PDF format for free! Find your manual Keiler2 - LIEMKE and take your electronic device back in hand. On this page are published all the documents necessary for the use of your device. Keiler2 by LIEMKE.
USER MANUAL Keiler2 LIEMKE

L I E M K E
KEILER-1 / KEILER-2 / KEILER-25.1

BEDIENUNGSANLEITUNG·OPERATINGMANUAL·
MANUAL DE INSTRUCCIONES · MODE D'EMPLOI
ISTRUZIONE PER L'USO·INSTRUKCJA OBSLUGI
INNOVATION. QUALITY. SERVICE.
by LIEMKE
Our mission to always offer you optical thermal imaging devices that are at the forefront of technology and quality means that you will find products with state-of-the-art technology and outstanding performance parameters in our new range.
With our service promise to return your optical devices you have sent in to you within ten working days, as well as a guarantee on our products of up to three years, we would like to thank you for your trust and wish you good hunting!
Your LIEMKE team
CONTENT
EN
- COMPONENTS AND CONTROLS 38
- SCOPE OF SUPPLY 40
- TECHNICAL DATA 40
04.SAFETYINSTRUCTIONS42 - DESIGN AND USE 45
- POWER SUPPLY 50
- CHARGING THE BATTERY 51
- INPUT MODES 53
09.ZOOMFUNCTION55 - MENU FUNCTIONS 55
- TAKING PICTURES AND VIDEOS 62
- INTERNAL MEMORY 63
13.WIFI CONNECTION 63 - CLEANING AND CARE
- TROUBLESHOOTING
16.DISPOSAL - DECLARATION OF CONFORMITY
64
64
66
67
KEILER-1 / KEILER-2 / KEILER-25.1 · Operating manual 06 / 2023
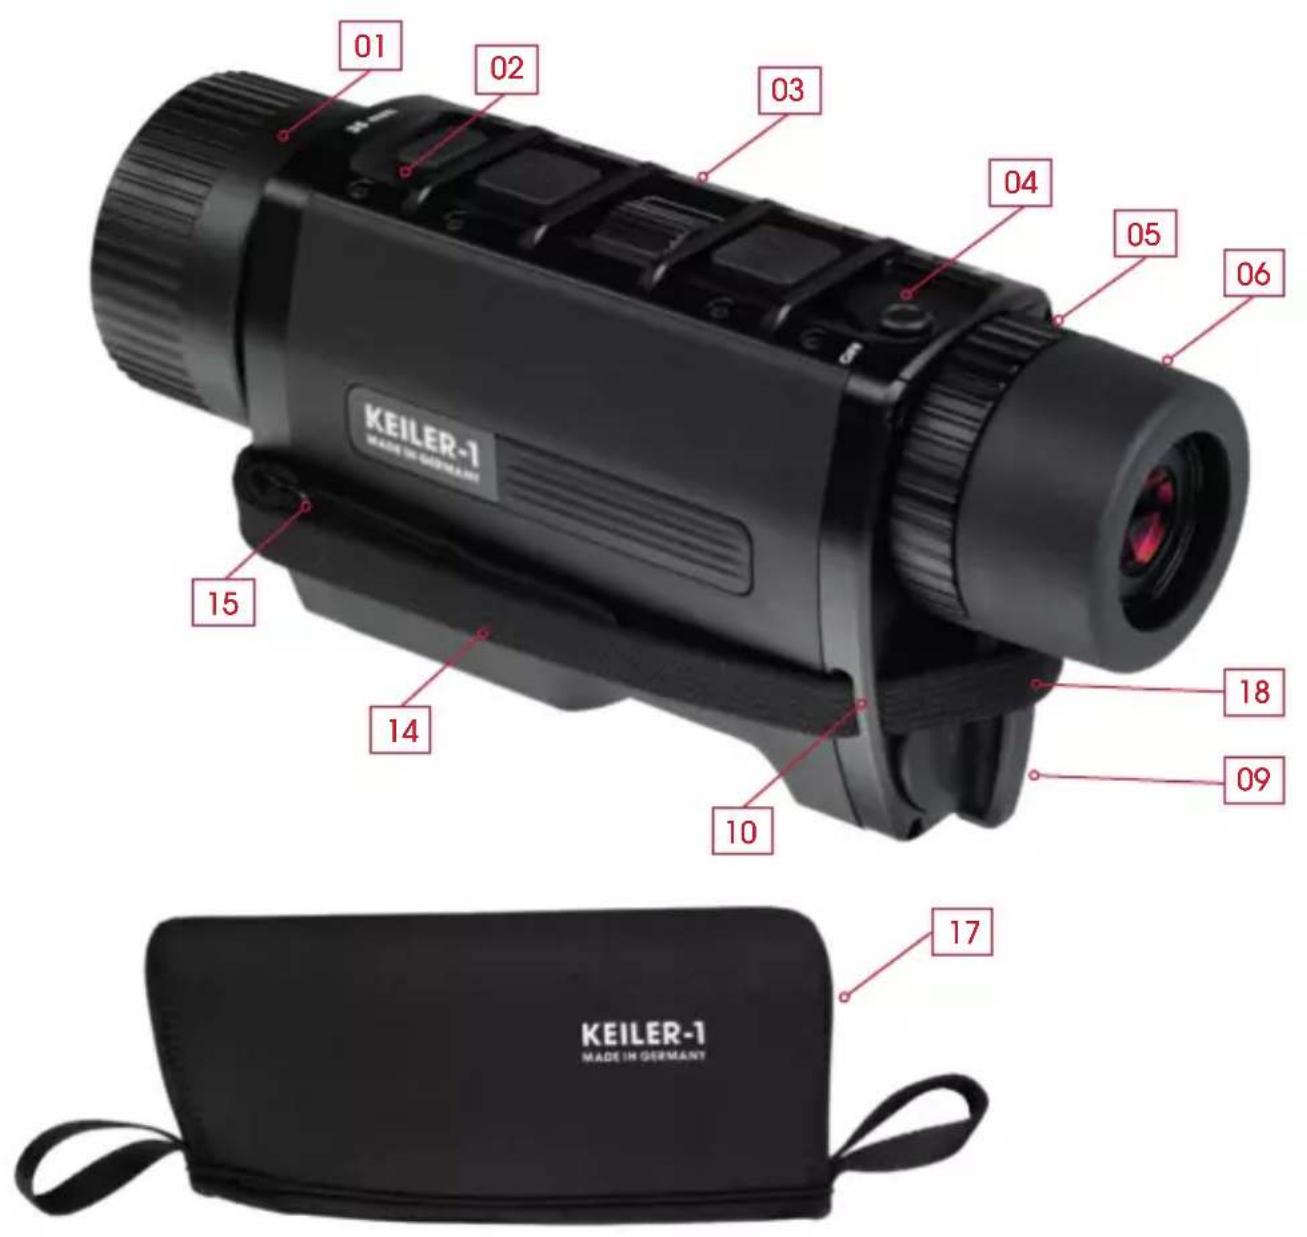
01. COMPONENTS AND CONTROLS

- Lens with focussing ring
02.StatusLED - Control panel
- Three-position switch (ON/ Standby/OFF)
- Dioptré adjustment
- Eyecup, can be rotated
- Socket for tripod adapter
- USB-C connector with rubber cover
- LIEMKE BP-K Li-ion battery with bayonet lock
- Eyelets (four) for attaching the hand strap
- Tripod adapter plate
- Mounting screws (two) for the adapter plate
- Offset wrench
- Hand strap
- Belt adjuster
- Adapter for LIEMKE carrying strap
- Neoprene cover
- Attachment loop for carrying strap
- Carrying strap
- Carabiner
- Securing buckle 38
- Upper and lower stop
02. SCOPE OF SUPPLY
-
LIEMKE KEILER thermal imaging camera, with:
-
Hand strap
1 LIEMKE BP-K Li-Ion rechargeable battery -
Neck strap Slim
- Neoprene cover
- Tripod adapter plate with screws and offset wrench
Power supply unit with USB-C connection and 4 plug adapters - Cable USB-C to USB-A
- Lens cleaning cloth
- Instruction manual
-
Adapter for LIEMKE carrying strap (art. no. 80409753; not included in delivery)
-
TECHNICAL DATA
| Model | KEILER-1 KEILER-2 KEILER-25.1 | ||
| Item number | 80111556801 | 3545 80114764 | |
| Detector and optics | |||
| Resolution and type | 640×512 VOx 384×288 microbolometer, uncooled | ||
| Pitch detector | 12 μm | ||
| Pixel field of view | 0.34 mrad 0.19 mrad 0.48 mrad | ||
| Detection range | 1750 m 2500 m 1250 m | ||
| Spectral range | 8-14 μm | ||
| Frame rate | 50 Hz | ||
| NETD | 50 mK 40 mK | ||
| Objective lens | 35 mm f/1.0 | 50 mm f/1.1 | 25 mm f/1.0 |
| Field of vision | 22.0×17.6 m / 100 m - 12.5°×10.0° | 15.4×12.3 m / 100 m - 8.8°×7.0° | 18.5×13.9 m / 100 m - 10.5°×7.9° |
| Magnification | 1.9× to 10× | 2.7× to 14.0× | 2.4× to 10× |
| Display | 1024×768 OLED | ||
| Close focus | <1 m | ||
| Diopetre adjustment | ±5 dpt | ||
| Functions and media | |||
| Range estimation | stadiometric, zoomable | ||
| Colour modes | White Hot, Black Hot, Extra Dark, Red Hot, Rainbow | ||
| WiFi frequency range | 2400 to 2483.5 MHz | ||
| Model | KEILER-1 KE | LER-2 KEILER-25.1 |
| WiFi transmission performance | ≤20 dBm | |
| WiFi signal range | 5 m | |
| Internal memory | 32 GB | |
| Media format | JPG/MP4 | |
| Physical and environmental characteristics | |||
| Weight | 465 g | 450 g | |
| incl. battery | |||
| Size | 158×72×47 mm | 163×75×47 mm | 148×72×47 mm |
| Water resistance | IP67 | ||
| Operating/ storage temperature | -20 °C to +50 °C/ -40 °C to +70 °C | ||
| Power supply | |
| External power supply | USB-C, 5 V / max. 4 A |
| Battery life | up to 9 h* up to 10 h* |
- depending on environmental conditions, settings and media functions.
The design the software and technical parameters of the product are subject to change without prior notice.
Battery BP-K
| Model BP-K | |
| Item no. 80412223 | |
| Type Replaceable protected lithium-ion battery pack | |
| Power 3.7 V; 4800 mAh | |
| Lifetime approx. 800 charging cycles* | |
| Weight 90 g | |
| Size 30 | ×95 mm |
| Operating conditions | -5 °C to +50 °C, non-condensing humidity |
| Charging conditions | optimal: 15 °C to 25 °C; permissible: 0 °C to 37 °C |
| Materials Electronic components, plastic, rubber, Lithium-ion battery | |
| * Indicative value. The actual number of cycles during the working life depends largely on the conditions of use. The available power depends on the ambient temperature. | |
04. SAFETY INSTRUCTIONS

Read and observe these operating instructions and especially the safety instructions before using the appliance.
The recommended temperature for use is -10^ to +50^ . If the temperature is too high, the KEILER thermal imager will enter the high-temperature protection state, and will automatically shut down.
Do not use the unit for an extended period in a high-temperature environment.
Damage to the unit due to moisture penetration!
The device is protected against external moisture only if the battery is correctly inserted and the USB-C rubber cover is firmly closed.
When the unit is used in humid environments such as in rainy weather, make sure the USB interface cover on the left side of the unit is tightly closed.
Make sure that the battery is inserted correctly and the bayonet catch is locked.
Damage to the electronic components of the unit when subjected to intensive energy sources!
Damage resulting from non-compliance with the operating instructions is not covered by the warranty claims.
Do not point the lens of the unit towards intense energy sources (such as laser devices, the sun).
Safe handling of the battery
The battery is not a toy.
Keep the battery away from children.
Improper use of the battery can lead to considerable damage and even explosions.
Check the battery for damage before each use and each charging process.
Signs of a defective battery are deformation, melted points on the plastic housing, discolouration, odour, intense heat development.
In the event of damage to the battery, contact LIEMKE customer service. Contact details: see back page.
Risk of injury from explosion!
Do not use the battery if the jacket or other components are damaged.
Risk of injury from corrosive substances!
Corrosive substances can escape from a damaged battery.
Avoid skin and eye contact with the substances that have leaked out.
Do not inhale vapours.
If you find your health is affected, consult a doctor.
Risk of injury from fire and explosion!
Do not ship a damaged battery.
Dispose of a damaged battery at any of the local hazardous materials collection points.
Damage to the battery in the event of deep discharge!
Deep discharge can cause irreparable damage to the battery.
Charge a fully discharged ("deeply discharged") battery immediately.
Damage to the battery and unit due to overheating!
External heat sources can damage the battery and the device in which the battery is inserted.
Do not use the battery and the device for an extended period in an environment with high temperatures.
Protect the battery from direct sunlight and other sources of heat.
Store the battery in a dry and cool place.
Do not throw the battery into a fire. Do not incinerate the battery.
Damage to the battery due to improper handling!
Do not open the battery jacket.
Protect the battery from mechanical damage.
Do not short-circuit the contacts of the battery.
When storing the battery, make sure that there is no direct connection between its four contacts.
Safe charging of the battery
The optimum ambient temperature for charging is between 15^ and 25^ . The permissible ambient temperature is between 0^ and 37^ .
Risk of injury from fire and explosion!
Incorrect charging can cause the battery, chargers and other components to catch fire or explode.
Do not use chargers designed for a different type of battery.
Use only chargers suitable for this battery, such as the LIEMKE CHARGER-K or the KEILER thermal imager.
Use only undamaged cables and chargers for charging.
During charging, ensure that the ambient temperature is neither greater than the permissible upper limit nor less than the permissible lower limit.
Make sure that the ambient air does not condense during the charging process.
Make sure that the battery does not heat up abnormally during charging. The battery should not become more than lukewarm when charging.
Do not leave the battery unattended while charging.
Make sure that the battery is not covered during charging.
Do not leave the battery in the charger longer than necessary.
Transport
The transport regulations for hazardous goods apply to the shipment of intact lithium-ion batteries.
Observe the relevant locally applicable regulations.
05. DESIGN AND USE
Before use
A technical check is recommended before the unit is put into operation.
Check the external appearance of the device: There should be no cracks in the casing.
Check the condition of the lens and eyepiece: Both components should be clean and undamaged.
Check the condition of the battery: The battery should be charged if necessary. The contacts should be clean and exhibit no oxidised spots. The sealing ring must be clean and free of damage.
Check the USB-C connector with rubber cover (08): The contacts should be clean and exhibit no oxidised spots. The rubber cover should be tightly closed to protect against ingress of moisture.
Attaching the hand strap
The scope of supply includes a hand strap that you can attach to the unit according to
your personal preference.
Right-handed user: Start at the eyelet (10) to the right of the lens.
- Left-handed user: Start on the left side.
Remove the belt adjuster (15).
(A) Pull the open end of the hand strap (14) through the eyelet towards the lens until the sewn end blocks the eyelet.
(B-C) Thread the open end in turn through the two eyelets on the eyepiece.
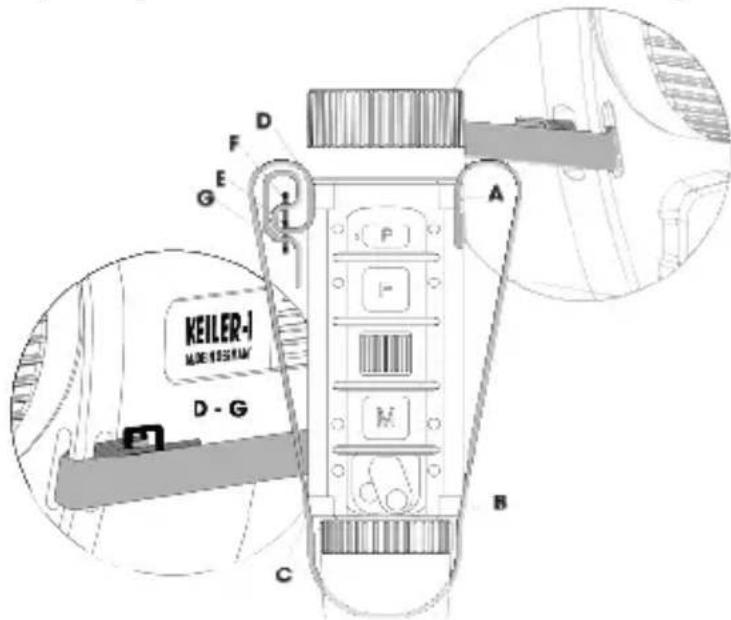
(D) Thread the hand strap into the last eyelet (10) from the lens side as shown in the illustration.
(E-G) Take the belt adjuster (15) and thread the open end of the hand strap through the belt adjuster 3 times as shown in steps E-G.
Adjust the length of the hand strap so that you can hold the device comfortably without feeling constricted.
Attaching the carrying sling
The carrying strap allows you to comfortably carry the device with you and still have your hands free.
Hook the carrying strap (19) with the carabiner (20) into the part of the hand strap in front of the battery of the unit.
Note the three adjustable lengths of the carrying strap. Here you can quickly and easily switch between different belt lengths.
Normal carrying position: secured by the fixing buckle (21)
- Close carrying position: pulled up to the upper stop (22). This is very helpful if you want to prevent the unit swaying back and forth as you climb over obstacles.
- Extended range of movement: unlocked and pulled open to the lower stop (22).
Using the neoprene cover
The neoprene cover (17) is designed to optimally protect the unit from accidental damage and at the same time ensure the greatest possible readiness for use.
Attach the eyepiece side attachment loop (18) to the carabiner (20) of the carrying strap.
Mounting the tripod adapter
The adapter plate (11) supplied allows use of a tripod for hands-free observation.
Place the adapter plate supplied on the underside of the unit so that the tripod thread rests on the product label of the unit.
Insert the supplied fixing screws (12) and tighten them to a maximum torque of 0.5 Nm.
Insert battery
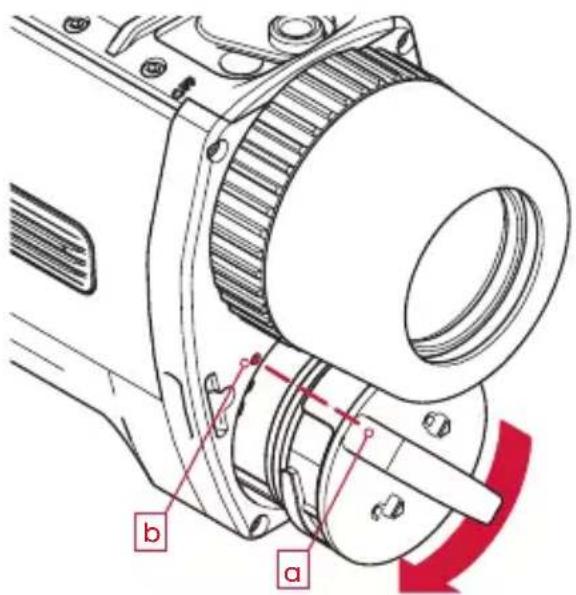
Align the guide rail of the battery body to the guide groove of the unit housing and push the battery (09) in as far as it will go.
The grip on the battery (a) must point towards the small orientation point (b) on the housing.
Turn the bayonet lock of the battery approx. 45^ clockwise so that the cover locks into place.
If the bayonet lock of the battery has been turned after the last removal from the unit or from the charger:
Turn the bayonet catch back to that position before reinserting it.
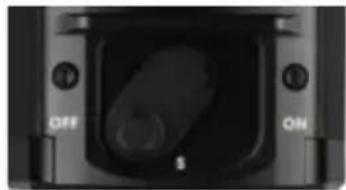
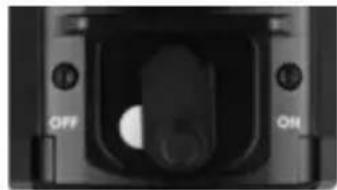
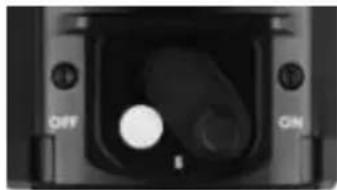
Using the three-position lever
The white dot under the lever is partially visible in standby mode and fully visible when the unit is ON, so you can easily see the current status of the unit in low light conditions. In standby mode, the display is turned off and Wi-Fi transmission is interrupted to save battery power and reduce light emission from the unit.
The unit takes 5 seconds to power up from the OFF state to the ON state until the image is displayed. After booting up (scene is visible), it takes 10 seconds until the recording function is ready. When the unit is switched on from standby mode, the picture is displayed immediately and the unit can be used straight away.
Move the lever to the desired position:
OFF: Switching off
- middle position: Standby mode
ON: Switching on
Adjusting the eye cup
The screw-in eyecup already offers full viewing comfort to users who wear glasses. For users who do not wear glasses: Move the eyecup outwards by turning it approx. 90^ anticlockwise to increase your viewing comfort.
Setting the dioptre values
To ensure fatigue-free viewing, the first step is to focus the display on your eyes. Activate the menu and view the icons with the lens covered. Adjust the dioptre compensation (05) until you can see the symbols sharply.
Using the lens focus ring
Important: You do not need to adjust the dioptre setting (see above) in this step. Adjust the focus of the objective lens to different distances by turning the focus ring until the image is sharp.
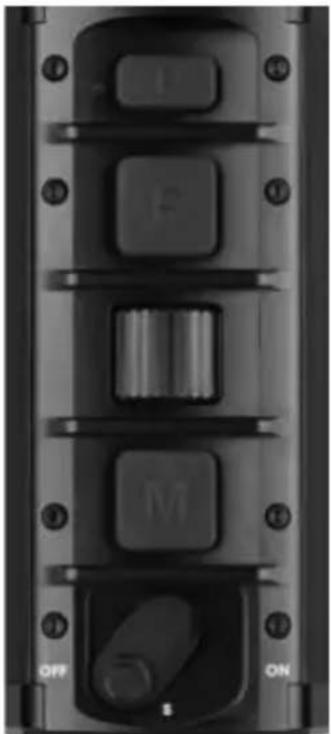
Control panel
On the top of the unit is a control panel with three buttons (P, F and M) and a scroll wheel.
Key functions
- The P button starts taking photos and videos or stops video recording.
- The F key performs individual picture settings (picture mode and calibration) and can be used in combination with the scroll wheel for advanced quick settings. You can use the complex menu items to select and deselect the individual settings.
- The M button calls up the menu. You can exit an item again within the menu structure.
- The scroll wheel is used to quickly switch between favourite display modes during observation. Within the menu structure you can switch between different menu items.
There are two different input options for each key:
- Click (short press and immediate release)
- Long press (hold for approx. 2 seconds)
Standard display
During normal observation, icons for the battery charge level, calibration mode (A, M, S), time and the currently selected actual magnification appear in the status bar at the bottom of the screen. The Wi-Fi icon is displayed only when the Wi-Fi connection is active.

Menu navigation
Call up the menu with a click or long press on the M button.
The menu at the top of the display consists of the menu icons and an information text for the selected menu item.

Turn the scroll wheel to move to the desired menu item.
Confirm the selection by clicking on the M button.
- If there are further submenus, they are displayed below the current icons.
- In complex submenus, use the F key to activate items.
- Press the M button to exit the relevant menu level of the submenu.
Click on the M button to save the settings and return to the previous menu item.
You can also exit the active menu item with a long press on the M button.
If you continue to hold down the M button, you will exit the menu altogether and return to the standard display.
06. POWER SUPPLY
Normally you operate the unit with the battery inserted. Operation with an external power source is available as an option (see section "Operating KEILER with Power Bank").
Before each use
Check the external condition of the battery before each use.
- There must be no cracks, deformations or other damage visible on the battery.
- The sealing ring must be clean and must exhibit no damage.
- The electrical contacts must be clean and exhibit no oxidised spots.
Before using the unit, make sure that the battery is sufficiently charged. In the status bar, you can see the battery's state of charge as a percentage.
Operating KEILER with a rechargeable battery
Insert battery
Insert the battery into the unit (see „Insert battery" on page 47).
Now you can switch the unit on and use it.
Removing the battery
Switch the device off.
To remove the battery from the unit, proceed in reverse order to that for insertion.
Operating the KEILER with Power Bank
You can also operate the unit with an external power source (power bank). The power bank must provide at least 10 W (5 V/2 A). Otherwise operational malfunctions may occur. During this operating mode, the battery in the unit is charged. The charge level reached is shown as a percentage on the display.
Operation without the battery inserted is feasible, but is expressly highlighted as inadvisable.

NOTICE! Ingress of moisture can lead to damage to the unit.
Make sure the battery is correctly inserted and locked.
Follow the operating instructions for the external power source.
Connect the external power source to the USB-C port (08) on the unit.
07. CHARGING THE BATTERY
You can charge the LIEMKE BP-K in the device KEILER or in the CHARGER-K charger, which is available separately.
Refer to the CHARGER-K operating instructions for charging the battery.
Deep discharging the battery
Avoid deep discharging the battery so as not to shorten the service life of the battery unnecessarily. If the battery is discharged completely, charging will take significantly longer, as very little charging current flows initially in order to not damage the battery.
Before charging the battery
Always check the external condition of the battery before charging it.
- There must be no cracks, deformations or other damage visible on the battery.
- The sealing ring must be clean and must exhibit no damage.
- The electrical contacts must be clean and exhibit no oxidised spots.
Charging the battery in the KEILER
1. Prepare the plug-in power supply unit
The power supply unit is supplied with 4 plug adapters that you can replace as required.
Press the safety button ("PUSH") and at the same time slide the plug adapter to be removed from the power supply unit.
Insert the plug adapter suitable for your region and push it in until you hear the locking button click into place.
Europe Commonwealth America Australia


2. Charging the battery in the unit
When the unit is switched off, a normal charging process takes about 4 hours. If you want to use the unit during charging, you must allow approx. 8 hours for this.
During the charging process, the status LED (03) lights up red. When charging is complete, the status LED lights up green.
Follow the operating instructions for the battery.
Make sure that the battery is correctly inserted into the unit.
Connect the USB-C cable attached to the USB power supply to the USB socket (08) on the unit. The charging process starts automatically.
After the charging process is complete: Disconnect the USB-C cable from the unit and carefully close the USB socket (08) with the rubber cover.
Charging the battery externally
You can also charge the battery in the CHARGER-K external charger, available separately.
Please refer to the operating instructions of the external charger.
To remove the battery, turn the bayonet lock of the battery approx. 45^ anticlockwise and pull the battery out.
Use the mains adapter supplied to charge the battery.
08. INPUT MODES
The unit has 3 different input modes with specific functions that can be accessed directly by a click (press and release) or a long press (hold for approx. 2 seconds) of the respective button. The input modes and function assignments can be changed in the menu item "Input mode".
The scroll wheel can be assigned a second function.
Call up the second function: First click the F key and then move the scroll wheel.
Confirm the selected setting by clicking on the F key or wait 3 seconds and return to the first function level of the scroll wheel.
Standard mode
The standard mode is the preset mode that is suitable for most applications. Functions that cannot be changed directly via the buttons can be adjusted via the respective menu item.
Basic mode
Basic mode consists of a simplified input interface for users who do not want to change their settings frequently.
Functions that cannot be changed directly via the buttons can be adjusted via the respective menu item.
Basic mode provides the highest level of protection against accidental changes and conserves battery power by disabling media functions.
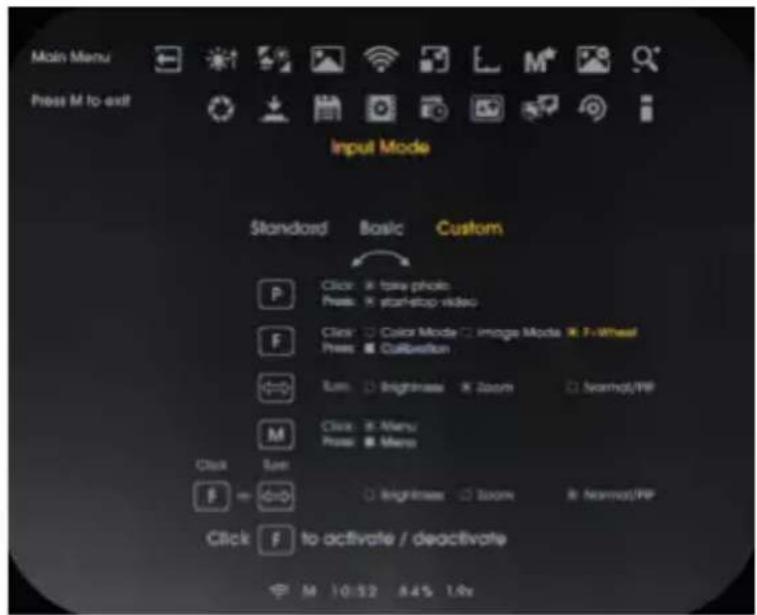
User-defined mode (Custom mode)
In custom mode you can assign the keys in almost any combination to suit your personal needs.
Notice: For information on setting the various key assignments, see the chapter "Menu functions", section "Input mode".
Notice: The combination of function button and scroll wheel can be used if the F button (click) is set to "Function button for scroll wheel".
| Button Standard mode Basic mode Custom mode | |||
| P button | Click: Take a picture | - Click: Take photo / no setting | |
| Long press: Video recording start/stop | Long press: Video recording start/stop / no setting | ||
| F button | Click: Picture mode | Long press: Calibration | Click: Picture mode / colour mode / function button for scroll wheel / no setting |
| Long press: Calibration | Long press: Calibration | ||
| Scroll wheel | Turn: Zoom Turn: | Brightness | Turn: Zoom / Normal PiP / Brightness / no setting |
| F Scroll wheel 2nd function | -- Turn: Zoom / Normal PiP / | Brightness | |
| Click: Menu | Long press: Menu | Click: Menu / no setting | |
| Long press: Menu | Long press: Menu | ||
| M button | Click: Menu | Long press: Menu | Click: Menu / no setting |
| Long press: Menu | Long press: Menu | ||
09. ZOOM FUNCTION
To better assess a detail, use the graduated zoom function.
Alternatively, you can use the picture-in-picture (PiP) function, which magnifies a small central area. The PiP function can be activated in the menu or switched on via the scroll wheel during normal operation.
Full control over the zoom levels is given by pre-selecting available levels in a submenu of the advanced settings. For information on this, see chapter "Advanced settings", section "3. Zoom steps".
10. MENU FUNCTIONS
In the normal view
| M button Click | Call up the menu |
| Long press | |
| In a menu with simple selection | |
| Scroll wheel | Turn Move through the menu (moving the highlighted item) |
| M button Click Edit menu item or save setting | |
| Exit the menu and return to the menu above | |
| Long press Save and exit menu completely | |
| In a menu with multiple selection | |
| Scroll wheel | Turn Move through the menu (moving the highlighted item) |
| M button Click Save the setting, exit the menu and return to the menu above | |
| F button Click Select or deselect the highlighted entry | |
Exit

As an alternative to pressing the M button for a long time, you can also exit the menu by selecting the Exit symbol, which is always placed on the far left, and confirming with a click on the M button.
Brightness

When changing via the menu item Brightness, the brightness can be increased or decreased, stopping at 1 or 10 respectively. Brightness is the first menu item, so this setting is quickly accessible.
Picture mode

Select the Sun or Rain mode.
A mode is selected based on the scene at hand and your preferences.
- In Sun mode, a soft and natural looking image is displayed. This setting is suitable for scenes or image areas with strong contrasts.
- In Rain mode, a very low-contrast scene is processed so that the slight differences are clearly shown.
Colour mode

The colour modes can be deactivated selectively in the submenu of the advanced settings labelled "Colour mode active/inactive". Deactivated colour modes will no longer appear in this menu, so you will only scroll through the colour modes you find helpful. The available colour modes are:
- WH - White Hot: For precise identification, well suited for use at night due to the darker background
- BH - Black Hot: Provides a more realistic visual impression with a dark target against a lighter background
-
ED - Extra Dark: Based on White Hot mode, with lower general brightness and a warm hue, ideally suited for protecting the eye's natural night vision function
-
RH - Red Hot: For the quick detection of heat sources
- RB - Rainbow: For displaying small temperature differences
The descriptions of the use cases are only a guide.
Scroll through the activated colour modes.
Select the colour mode you like best.
If individual colour representations seem irrelevant to you, you can hide them. For information on this, see chapter "Advanced settings", section "2. colour mode active/inactive".
WiFi

A WiFi icon is displayed in the status bar when the WiFi function is activated.
Activate/deactivate the Wi-Fi connection and save your selection by clicking on the M button.
If you need more information about the app and more details on how to connect the unit to your mobile phone or tablet PC, please visit the website:
https://liemke.com/medien
Picture-in-Picture (PIP)

If you prefer to observe using the widest possible field of view, but still don't want to miss out on details, you can use PiP mode.
Here you can see all the details at 1.9x magnification (best field of view) in the area around the bearing mark at 3x magnification.
The PiP display cannot be used if other zoom levels are being used.
The direction finding mark has an extension of 1m / 100m and a free inner area of 50cm / 100m .
Activate/deactivate the PIP function and save your selection by clicking on the M button.
Ranging Bracket

Activate/deactivate the comparison markers for ranging bracket and save your selection by clicking on the M button.
You can display markers to help you estimate the range. These marks have a length of 1m / 100m each and are divided into 50~cm sections.
If you use the graduated zoom function, the comparison marks are scaled to give you a more accurate estimate.
Advanced settings

Notice: In submenus with multiple selection, you can select and deselect the entry by clicking on the F key. You can save the settings by clicking on the M button.
1. Quick Menu items active/inactive

Here you can define which menu items should appear in the quick menu. This allows you to adapt the navigation in the field even more closely to your individual preferences.
Notice: At least one entry must be selected.
Use the scroll wheel to change the point to be edited
Select or deselect the entry with a click on the F key.
Save the settings and return to the menu above by clicking on the M button.
2. Colour mode active/inactive

Here you define which colour modes you want to be offered for selection in the first menu level ("Colour mode" menu item).
Disabled colour modes will not appear in the colour mode menu or when selecting with a button, so you only need to cycle through the colour modes to identify those you find useful.
Notice: At least 2 entries must be selected. If there are only 2 entries left, the selection boxes are greyed out.
Use the scroll wheel to change the point to be edited.
Select or deselect the entry with a click on the F key.
Save the settings and return to the menu above by clicking on the M button.
3. Zoom Settings

Those zoom levels that you find useful in daily use can be selected here from one of three predefined packages.
Select the combination that suits you with the scroll wheel and save the change by clicking on the M button.
4. Calibration mode

In this menu item you can select the calibration mode.
A - Automatic calibration every 2 minutes
- M - Manual calibration triggered by the user by a long press on the F key.
- S - Silent calibration triggered by the user by a long press on the F key.
During use, the image quality gradually decreases due to the changing background temperature of the sensor. This is compensated for by calibrating the sensor at regular intervals. For this purpose, an internal aperture is closed for a short time and the remaining signal is subsequently subtracted from the image signal as background noise.
You will recognise the calibration process by a quiet clicking sound and you will see the last image signal as a still image during this time. When the unit is switched on, several calibrations are automatically performed in the first few seconds, regardless of the calibration mode selected.
- In M mode, you determine the timing of the calibration with the internal shutter yourself. Perform a manual calibration if you notice a deterioration in picture quality that manifests itself in the form of increased picture grain or streaking.
- You trigger the S mode in the same way as the M mode. However, the internal shutter is not used, so this process is completely silent.
Notice: Cover the front lens during the calibration process. Otherwise you will see a superimposed "ghost image".
5. Input mode

Input mode allows you to select which functions are controlled directly by a click or a long press on a button, so that you do not have to call up the menu first.
For more information, see the chapter "Input Modes" with details on the setting options in each mode.
In the main menu, navigate to the "Input mode" menu and confirm the selection by clicking on the M button.
Select the configuration of the function keys that suits you with
the scroll wheel and confirm the selection ("Standard", "Basic" or "Custom") by clicking on the M button.
If you want to adjust the settings for "User-defined", do not press the M key but the F key.
Use the scroll wheel to change the active point.
Select or deselect the item by clicking on the F key.
If an entry is fixed, a greyed-out selection field appears.
When you have adjusted all the desired entries, save and exit this level by clicking on the M button.
Notice: You can use the combination of function button and scroll wheel when the F button (click) is set to "Function button for scroll wheel".
6. Internal memory

In the "Display" area, you can view how much memory space you still have available for photos and video recordings.
In the "Format" selection, you can completely clear the entire occupied memory.
Notice: Formatting irretrievably deletes all photos and videos.
Notice: If at that time the KEILER is connected to a computer via a USB cable, the format function will not work.
7. Choose Recording Output

Here you can set whether you want to save only image information in your files or whether any menus that appear should also be displayed.
Select "Scene image only" or "Including menu info" and confirm the selection by clicking the M button.
8. Set Date and Time

You set the internal time so that the file details of your pictures and videos can be provided with appropriate details.
Use the scroll wheel to select between time and date.
Start the setting by clicking on the F key.
Change the value with the scroll wheel.
Save the displayed value with a click on the F key and jump to the next entry.
Save the settings and return to the menu above by clicking on the M button.
9. Defect Pixel Repair

If pixels that remain permanently bright ("hot pixels") appear during use and do not disappear after calibration, you can correct these pixels by performing the defective pixel repair function.
Notice: Cover the front lens when performing this function.
Confirm the operation by clicking on the F key.
A countdown is displayed. A green tick then appears to confirm the successful pixel repair.
If the result is still not perfect, repeat the process.
10. Language

You can select English or German as the menu language.
The date, time, language selection and all saved files are retained when resetting.
Select (J) and confirm the selection by clicking on the F button to restore the factory default settings.
12. Device Info

The serial number and the installed firmware version are displayed here.
11. TAKING PICTURES AND VIDEOS
Saving a photo
Save a photo to the internal memory of the device by clicking on the P button.
A corresponding symbol appears briefly on the display to indicate successful recording.
Recording videos
Photo and video recording can be performed 20 seconds after the unit is switched on.
No photo can be taken during a video recording.
- In basic mode, photo and video recording is disabled.
- In custom mode, the photo and video functions can be enabled or disabled according to your preferences.
Start video recording with a long press on the P button.
A recording symbol and the elapsed recording time are shown in the display.
End the video recording with another long press on the P button.
12. INTERNAL MEMORY
The unit has an internal 32 GB memory and can be connected to a computer.
Connect the device to your computer using the USB-C cable included in the delivery.
The unit is displayed on the computer as a camera and allows access to the stored photo and video files.
For file display on computers with the operating system
"MacOS" you need an additional utility.
We recommend "Android File Transfer" from Google.

Laden im
Mac App Store
13. WIFI CONNECTION
Notice: The WiFi function can be activated only once approx. 20 seconds have elapsed after the unit was switched on.
The WiFi icon is displayed in the status bar when the WiFi function is activated.
To establish a WiFi connection to your mobile phone or tablet PC, activate the WiFi function in the "WiFi" menu.
The device is then displayed in the list of WiFi networks on your mobile phone or tablet PC as "KEILER_XXXXXXXX". The preset password for establishing a WiFi connection to the KEILER is "12345678".
If you have forgotten your self-selected password, you can restore the default password by "Resetting to factory settings".
Connect your end device to the KEILER WiFi network. The live connection is then available in the Liemke app.
Please note the information on the Liemke app, which can be found on the website: www.liemke.com/APP
14. CLEANING AND CARE
KEILER
Perform cleaning twice a year.
Wipe the external surfaces of metal and plastic parts free of dust and dirt with a cotton cloth.
Check the glass surfaces of the eyepiece and the lens. If necessary, remove dust and sand from the lenses (preferably using a non-contact method).
Battery
Perform cleaning twice a year.
Do not use electrically conductive materials for cleaning.
Wipe the external surfaces of metal and plastic parts free of dust and dirt with a cotton cloth.
Storing the battery
When not in use, remove the battery from the KEILER or the charger.
Store the battery in a dry place, protected from light and frost.
To avoid unnecessarily shortening the life of the battery, when the battery is not in use for an extended period of time make sure the charge level is approx. 80% .
Check the charge level every 6 months.
15. TROUBLESHOOTING
This overview contains a list of the most common problems that may occur when using the unit.
Carry out all recommended checks as described in the table.
If an error occurs that is not listed in the table or if you cannot rectify an error yourself, please contact Liamke Service. Contact details: see back page
KEILER
| Malfunction Possible reason | Remedy | |
| The thermal imager cannot be switched on. In the starting process, the KEILER switches off again after the start logo has been displayed. | The battery is not sufficiently charged. | Charge the battery for half an hour before switching the unit on again. |
| The device cannot be powered by an external power source. | The external power source is not strong enough. | Use an external power source with a min. charging current of 5 V / 2 A. |
| The USB cable is damaged. | Replace the USB cable. | |
| The battery is very slow to charge. | Using a power supply unit with insufficient power. | Use only the power supply unit supplied. |
| The device is not switched off. | Switch the device off (OFF) so that charging works reliably. | |
| The battery is deeply discharged. | Charging takes a significantly longer time for deeply discharged batteries. | |
| The image is blurred, with thin vertical lines or shadows. | Calibration needed. Perform an image calibration. | |
| After calibration, a "ghost image" can be seen super-imposed on the scene. | Calibration mode S was selected and the front lens was not covered during calibration. | Perform a repeat calibration with the front lens covered. |
| Low image quality / reduced detection range. | These problems can occur under adverse weather conditions (high humidity, snowfall, rain, fog, etc.).During long periods of constant weather conditions without sunshine, and especially in rainy weather, the observed objects converge to approximately the same temperature, so that the temperature difference is considerably reduced, and the image quality suffers as a result. This circumstance is due to physical causes and is not a defect of the thermal imager. | |
| Photo or video recording does not work. | 20 seconds have not elapsed after the unit was booted up. | Wait 20 seconds after switching on the unit before you start taking photos or videos. |
| Some defective pixels cannot be permanently deleted. | The defective pixel is not recognised by the unit. | Switch the calibration to M mode and wait until the pixel is very clearly visible. Then carry out the error pixel correction ("Advanced settings" menu). Then switch back to A mode. |
| The LIEMKE app does not connect to the unit. | WiFi is not activated. Activate the WiFi of the unit in the menu. | |
| The mobile terminal is not connected to the KEILER-WiFi. | Connect your mobile end device to the WiFi of KEILER. | |
Battery
| Malfunction Possible reason | Remedy | |
| The battery charges very slowly or not at all. | Using a power supply unit with insufficient power. | Use a suitable power supply unit as specified in the operating instructions for the KEILER or CHARGER-K. |
| The battery is deeply discharged. | Charging takes a significantly longer time for deeply discharged batteries. |
16. DISPOSAL

Do not dispose of waste electrical equipment and batteries in the household waste. Hand in used electrical appliances and batteries at the local recycling collection point. Batteries should be fully discharged when disposed of.
interseroh
We are participating in INTERSEROH+ Verbund. The device components can be taken to plastic and metal recycling for disposal.
Disposing of the battery
Before disposing of the battery, make sure it is fully discharged.
17. DECLARATION OF CONFORMITY
CE marking: The devices are in conformity with the EU directives:

EMV-Directive 2014/30/EU
RED-Directive 2014/53/EU
RoHS-Directive 2011/65/EU
Low Voltage Directive 2014/35/EU

Electromagnetic Compatibility SI 2016 No. 1091
RED SI 2017 No. 1206
RoHs SI 2012 No.3032
Low Voltage SI 2016 No. 1101

The Blaser Group GmbH hereby declares that the radio equipment type KEILER complies with the Directive 2014/53/EU. The declarations of conformity are available at the following internet addresses:
liemke.com/CE_KEILER_1
liemke.com/CE KEILER_2
liemke.com/CE_KEILER_25-1
liemke.com/UKCA_KEILER_1
liemke.com/UKCA KEILER_2
liemke.com/UKCA KEILER_25-1
Directive RoHS 2011/65/UE
RoHs SI 2012 No.3032
Dostepe netryby barw to:
LIEMKE · KEILER-1 / KEILER-2 / KEILER-25.1 · Operating manual · Revision: 06/2023 Please note the legal terms of purchase and use for thermal imaging optics in your country or federal state. Changes in design, technical implementation, scope of delivery and prices reserved. For the latest version of this operating manual visit: https://liemke.com/medien
Contact technical service
Contactez le service technique
INNOVATION. QUALITY. SERVICE.
by LIEMKE