
CAMCOLMS2 - Microscope VELLEMAN - Free user manual and instructions
Find the device manual for free CAMCOLMS2 VELLEMAN in PDF.
| Product type | Digital microscope with HDMI screen and USB connection |
| Brand | Velleman |
| Model | CAMCOLMS2 |
| Image sensor | 3 megapixels (actual resolution) |
| Magnification | 10x to 200x |
| Focus | Manual, from 0 to 35 mm |
| Lighting | 6 white LEDs with adjustable intensity |
| Photo resolution (HDMI) | 14M, 8M, 5M, 3M, 2M, WVGA |
| Video resolution (HDMI) | 1920 x 1080 (direct), 1280 x 720 (720P), 640 x 480 (VGA) |
| File formats | JPEG/BMP (photo), AVI (video) |
| Video output | HDMI (monitor) and USB 2.0 (PC) |
| Recording | On microSD card (max 32 GB) or on computer via software |
| Included software | Portable Capture HD (Windows and Mac) |
| System requirements | Windows XP/Vista/7/8/10 or Mac OS 10.7 or higher |
| Power supply | 5 VDC via USB port |
| Microscope dimensions | 154 mm (height) x 42 mm (diameter) |
| Stand dimensions | 170 x 120 x 12 mm |
| Total weight | 595 g |
| Maintenance and cleaning | Clean with a damp cloth; do not use solvents or harsh detergents |
| Safety | Do not look directly at the white LEDs; keep out of reach of children |
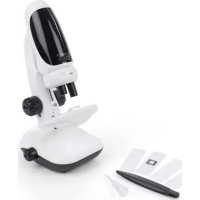
| Package contents | Microscope, stand, USB cable, HDMI cable, CD-ROM with software, calibration ruler |
Frequently Asked Questions - CAMCOLMS2 VELLEMAN
User questions about CAMCOLMS2 VELLEMAN
0 question about this device. Answer the ones you know or ask your own.
Ask a new question about this device
Download the instructions for your Microscope in PDF format for free! Find your manual CAMCOLMS2 - VELLEMAN and take your electronic device back in hand. On this page are published all the documents necessary for the use of your device. CAMCOLMS2 by VELLEMAN.
USER MANUAL CAMCOLMS2 VELLEMAN
3 MP HDMI DIGITAL MICROSCOPE
3 MP DIGITALE MICROSCOOP-HDMI
MICROSCOPE NUMÉRIQUE 3 MP - HDMI
MICROSCOPIO DIGITAL - 3 MP - HDMI
DIGITALES MIKROSKOP - 3 MP - HDMI
MIKROSKOP CYFROWY HDMI 3 MEGAPIKSELE
MICROSCÓPIO DIGITAL HDMI DE 3 MEGAPIXEIS

USER MANUAL 5
HANDLEIDING 15
MODE D'EMPLOI 25
MANUAL DEL USUARIO 35
To all residents of the European Union
Important environmental information about this product

This symbol on the device or the package indicates that disposal of the device after its lifecycle could harm the environment. Do not dispose of the unit (or batteries) as unsorted municipal waste; it should be taken to a specialized company for recycling. This device should be returned to your distributor or to a local recycling service. Respect the local environmental rules.

If in doubt, contact your local waste disposal authorities.
Thank you for choosing Velleman! Please read the manual thoroughly before bringing this device into service. If the device was damaged in transit, do not install or use it and contact your dealer.
2. Safety Instructions
| ! | Keep this device away from children and unauthorized users. |
| ! | This appliance is not intended for use by persons (including children) with reduced physical, sensory or mental capabilities, or lack of experience and knowledge, unless they have been given supervision or instruction concerning use of the appliance by a person responsible for their safety. Children shall be supervised to ensure that they do not play with the appliance. |
| ! | The white LEDs, which illuminate the microscope target field, are very bright. Do not stare directly into these LEDs as it may damage your eyes. |
3. General Guidelines
Refer to the Velleman® Service and Quality Warranty on the last pages of this manual.
| Keep this device away from dust and extreme temperatures. | |
| Protect this device from shocks and abuse. Avoid brute force when operating the device. |
Familiarise yourself with the functions of the device before actually using it.
- All modifications of the device are forbidden for safety reasons. Damage caused by user modifications to the device is not covered by the warranty.
- Only use the device for its intended purpose. Using the device in an unauthorised way will void the warranty.
- Damage caused by disregard of certain guidelines in this manual is not covered by the warranty and the dealer will not accept responsibility for any ensuing defects or problems.
- Do not switch the device on immediately after it has been exposed to changes in temperature. Protect the device against damage by leaving it switched off until it has reached room temperature.
- Keep this manual for future reference.
4. Features
- ideal for checking PCBs, plants, insects, rocks, minerals...
- adjustable focus and magnification
- white LEDs with adjustable intensity
- 2 operation modes
HDMI monitor: via HDMI output, video can be recorded on microSD card (up to 32GB)
o computer: via USB connector, video can be recorded on the computer
- comes with PC software: Portable Capture HD
CAMCOLMS2
5. Overview
Refer to the illustrations on page 2 of this manual.
| 1 | 5 VDC + USB port |
| 2 | HDMI port |
| 3 | microSD slot |
| 4 | LED dimmer |
| 5 | on-off |
| 6 | mode |
| 7 | menu |
| 8 | capture/OK |
| 9 | down |
| 10 | LEDs |
| 11 | fine focus wheel |
| 12 | magnification ruler |
| 13 | locking screw |
| 14 | locking screw |
| 15 | coarse focus wheel |
| 16 | coarse focus wheel |
| 17 | locking screw |
6. Installation
Refer to the illustrations on page 3 of this manual.
- Put the base on a flat and stable non-slippery surface. Slide the frame into the base hole and tighten with the nut (see fig. I1).
- Slide the microscope into the frame and tighten the screw (see fig. I2).
- Adjust the height of the microscope to the desired height (see fig. I3).
7. Adjusting the Focus
Refer to the illustrations on page 4 of this manual.
- Rotate the coarse focus wheel to get the first focus (see fig. F1).
- Rotate the fine focus wheel to refine the focus (see fig. F2).
- Fix the microscope with the locking wheel (see fig. F3).
8. Using the Microscope
8.1 Connection
- Connect the microscope to a powered USB port.
- Connect the microscope to the TV set or monitor using the HDMI cable.
- Switch on the TV set or monitor and select the HDMI setting.
- Switch on the microscope
8.2 Taking a Picture
- Insert a microSD card (max. 32 GB SDHC) into the microscope.
- Place an object under the lens. Turn the focus wheel to focus the image of the object to its best.
- Press the capture button to take the picture and save it onto the microSD card.
8.3Playback
- Make sure the microscope is loaded with a microSD card.
- Press the mode button to switch to the playback mode.
- Press the down button to view the previous picture; press the mode button to return to the preview mode.
8.4 Storing
You can store all your pictures on a microSD card or on your computer. To do so, connect the microscope to the computer and transfer the pictures from the microSD card to the computer.
9. Menu
Press the menu button to enter main menu I.


Press the menu button once more to enter main menu II.


Select the menu item with the down button and confirm with the capture button.
9.1 Resolution
Select a resolution between WVGA, 2M, 3M, 5M, 8M and 14M.
9.2 Time-Lapse Capture
Lapse Num: Select the number of frames to be automatically captured during the set lapse time.
Lapse Time: Select the lapse time during which the microscope will automatically take a number of pictures.
- Press the capture button to confirm your selection and press the menu button to return to the preview status.
- Start the automatic capture with the capture button. When all pictures are taken, the microscope will return to normal preview.
9.3 Quality
Select a quality between Fine, Normal and Economy.
9.4 Sharpness
Select a value between Strong, Normal and Soft.
9.5 Exposure
Select a brightness value between +2/3 , +0.0 and -1/3 .
CAMCOLMS2
9.6 Date Stamp
Select whether to display the date or not.
9.7 Date/Time
Set the date and time in this window.
9.8 Auto Power-Off
Set the automatic power-off time between Off, 3M, 10M and 30M.
9.9 Language
Select your desired menu language.
9.10 TV Mode
Set the encoding mode between NTSC and PAL.
9.11 Frequency
Select the frequency between 50Hz and 60Hz.
9.12 Format
Choose this menu to format your microSD card.
Note that all the recorded files on the card will be permanently deleted.
9.13 Default Setting
Choose this menu to go back to the default factory settings.
9.14 Version
Enter this menu to display the current software version.
10. Software
10.1 Installation
Insert the CD-ROM into the CD-ROM drive of your computer. Install the software and follow the instructions on your screen. Also, make sure the microscope is connected to your computer.
10.2 Starting the Software
Launch the software and connect the microscope to the computer. The main screen is displayed.

Note
Remove the SD card before connecting the microscope to the computer and insert only after connection.
This will avoid that the computer will recognized the microscope as a mass storage device.
CAMCOLMS2
10.3 Functions
Calibration
It is recommended to calibrate the microscope before use. First, load the XY guide onto the display.

Place the calibration ruler on the stage and fix with the stage clips. Focus the image until the picture is clear. Take a picture when the ruler lines are parallel to the XY guide.

Double-click on the picture to enter the measurement interface.

CAMCOLMS2
Click the calibration icon and move the cursor to the picture.

Click the start and end points across a known value. Enter the exact measurement values in the dialogue window.

The software will automatically calibrate the magnification rate. Click OK; the adjusted magnification rate will show in the upper right corner.
Click on the angle line icon to measure the values again. The microscope is calibrated if these last values correspond (or differ slightly) to the values entered before.

CAMCOLMS2
Modifying Calibration
Click the calibration icon and go to Reset Magnification > Reset Picture Magnification. Reset the calibration as described above.

Change the magnification rate and capture several pictures. Double-click on the picture to enter the measurement interface.
Click the calibration icon and go to Set Magnification > Set Picture Magnification.

Enter the magnification rate and confirm with OK.

To use the same magnification rate to capture pictures, click the calibration icon and go to Set Magnification > Set Capture Magnification. Now, all pictures will use the same magnification rate and you can start measuring directly.
CAMCOLMS2

Measuring
Double-click on the picture to enter the measurement interface. Click the measurement icon and select the desired measurement option:
Any Angle Line
Continuous Line
圆 Radius Circle
Diameter Circle
Three-Points Angle
Drawing and Writing
Click the pen or text tool and choose your desired options.


Taking a Picture
Click the picture shortcut icon or go to Capture > Photo.

CAMCOLMS2
Capturing Video
Click the video shortcut icon or go to Capture > Video. Click once more to stop recording.
Timer
Click the timer icon in the menu bar.

Set the picture and/or video options and confirm with Start.
Note
Video file size is quite large. Please consider the available memory space on your storage device.
10.4 Interface Icons

CAMCOLMS2

Copy to clipboard
Copy file

Measurement
Calibration
11. Cleaning and Maintenance
Occasionally wipe with a damp cloth to keep it looking new. Do not use harsh chemicals, cleaning solvents or strong detergents.
12. Technical Specifications
| image sensor............3 megapixel (true resolution) | |
| input interface..........USB 2.0 | |
| magnification rate.........10 - 200 x | |
| live video to monitor.........1920 x 1080 | |
| white balance..........automatic | |
| focus range..........manual focus from 0 to 35 mm | |
| iris aperture..........AES | |
| white LEDs..........6 LEDs (adjustable by control wheel) | |
| picture format..........JPEG/BMP | |
| video format..........AVI | |
| resolution | |
| still captures..........14M, 8M, 5M, 3M, 2M, WVGA (on HDMI monitor only) | |
| video captures..........1280 x 720 (720P), 640 x 480 (VGA) / on PC | |
| power supply..........5 VDC via USB | |
| system requirements | |
| Windows® XP - Vista - 7 - 8 - 10 | |
| Mac® OS 10.7 or higher | |
| dimensions | |
| microscope..........154 mm x 0 42 mm | |
| stand..........170 x 120 x 12 mm | |
| weight..........595 g | |
Use this device with original accessories only. Velleman nv cannot be held responsible in the event of damage or injury resulting from (incorrect) use of this device. For more info concerning this product and the latest version of this manual, please visit our website www.velleman.eu. The information in this manual is subject to change without prior notice.
All registered trademarks and trade names are properties of their respective owners and are used only for the clarification of the compatibility of our products with the products of the different manufacturers. Windows, Windows XP, Windows 2000, Windows Vista, Windows Aero, Windows 7, Windows 8, Windows 10, Windows Mobile, Windows Server are registered trademarks of Microsoft Corporation in the United States and other countries. iPad, iPod, iPod touch, iPhone, Mac, iMac, MacBook, PowerBook, Power Mac, Mac OS are trademarks of Apple Inc., registered in the U.S. and other countries.
© COPYRIGHT NOTICE
The copyright to this manual is owned by Velleman nv. All worldwide rights reserved. No part of this manual may be copied, reproduced, translated or reduced to any electronic medium or otherwise without the prior written consent of the copyright holder.
HANDLEIDING
1. Inleiding
Any Angle Line
Continuous Line
圆 Radius Circle
Diameter Circle
Three-Points Angle
Tekenen en Tekst
Any Angle Line
Continuous Line
圆 Radius Circle
Diameter Circle
Three-Points Angle
Dessin et Texte
12. Specifications techniques
9.12 Format (formatear)
Any Angle Line
Continuous Line
- Radius Circle
Diameter Circle
Three-Points Angle
Dibujaryescribir
9.3 Quality (Qualität)
9.4 Sharpness (Scharfe)
Any Angle Line
Continuous Line
Radius Circle
Diameter Circle
Three-Points Angle
8.2 Wykonywanie zdjeć
Velleman® Service and Quality Warranty
Since its foundation in 1972, Velleman® acquired extensive experience in the electronics world and currently distributes its products in over 85 countries.
All our products fulfil strict quality requirements and legal stipulations in the EU. In order to ensure the quality, our products regularly go through an extra quality check, both by an internal quality department and by specialized external organisations. If, all precautionary measures notwithstanding, problems should occur, please make appeal to our warranty (see guarantee conditions).
General Warranty Conditions Concerning Consumer Products (for EU):
-
All consumer products are subject to a 24-month warranty on production flaws and defective material as from the original date of purchase.
-
Velleman® can decide to replace an article with an equivalent article, or to refund the retail value totally or partially when the complaint is valid and a free repair or replacement of the article is impossible, or if the expenses are out of proportion.
You will be delivered a replacing article or a refund at the value of 100% of the purchase price in case of a flaw occurred in the first year after the date of purchase and delivery, or a replacing article at 50% of the purchase price or a refund at the value of 50% of the retail value in case of a flaw occurred in the second year after the date of purchase and delivery.
Not covered by warranty:
-
all direct or indirect damage caused after delivery to the article (e.g. by oxidation, shocks, falls, dust, dirt, humidity...), and by the article, as well as its contents (e.g. data loss), compensation for loss of profits;
-
consumable goods, parts or accessories that are subject to an aging process during normal use, such as batteries (rechargeable, non-rechargeable, built-in or replaceable), lamps, rubber parts, drive belts... (unlimited list);
-
flaws resulting from fire, water damage, lightning, accident, natural disaster, etc....;
-
flaws caused deliberately, negligently or resulting from improper handling, negligent maintenance, abusive use or use contrary to the manufacturer's instructions;
-
damage caused by a commercial, professional or collective use of the article (the warranty validity will be reduced to six (6) months when the article is used professionally);
-
damage resulting from an inappropriate packing and shipping of the article;
-
all damage caused by modification, repair or alteration performed by a third party without written permission by Velleman®.
-
Articles to be repaired must be delivered to your Velleman® dealer, solidly packed (preferably in the original packaging), and be completed with the original receipt of purchase and a clear flaw description.
-
Hint: In order to save on cost and time, please reread the manual and check if the flaw is caused by obvious causes prior to presenting the article for repair. Note that returning a non-defective article can also involve handling costs.
-
Repairs occurring after warranty expiration are subject to shipping costs.
-
The above conditions are without prejudice to all commercial warranties.
The above enumeration is subject to modification according to the article (see article's manual).
NL
- To all residents of the European Union
- Important environmental information about this product
- Safety Instructions
- General Guidelines
- Features
- CAMCOLMS2
- Overview
- Installation
- Adjusting the Focus
- Using the Microscope
- Connection
- Taking a Picture
- 8.3Playback
- Storing
- Menu
- Resolution
- Time-Lapse Capture
- Quality
- Sharpness
- Exposure
- Date Stamp
- Date/Time
- Auto Power-Off
- Language
- TV Mode
- Frequency
- Format
- Default Setting
- Version
- Software
- Installation
- Starting the Software
- Note
- Functions
- Calibration
- Modifying Calibration
- Measuring
- Drawing and Writing
- Taking a Picture
- Capturing Video
- Timer
- Interface Icons
- Cleaning and Maintenance
- Technical Specifications
- © COPYRIGHT NOTICE
- HANDLEIDING
- Inleiding
- Tekenen en Tekst
- Dessin et Texte
- Specifications techniques
- Format (formatear)
- Dibujaryescribir
- Quality (Qualität)
- Sharpness (Scharfe)
- Wykonywanie zdjeć
- Velleman® Service and Quality Warranty
- General Warranty Conditions Concerning Consumer Products (for EU):
- Not covered by warranty:
- NL
Brand : VELLEMAN
Model : CAMCOLMS2
Category : Microscope