
101864 - Food Processor BARTSCHER - Free user manual and instructions
Find the device manual for free 101864 BARTSCHER in PDF.
| Product Type | Professional Spiral Kneader |
| Brand | Bartscher |
| Model | 101864 |
| Dough Capacity per Cycle | 12 kg |
| Power Supply | 230 V, 50 Hz, single-phase |
| Power | 0.75 kW (1 HP) |
| Dimensions (W × D × H) | 450 × 700 × 870 mm |
| Net Weight | 58 kg |
| Weight with Packaging | 65 kg |
| Noise Level | < 70 dB(A) |
| Number of Speeds | 2 speeds |
| Bowl Material | Stainless steel |
| Structure Coating | Scratch-resistant paint |
| Safety Devices | Lid microswitch, head microswitch (CNS-FN models), bowl sensor (CNS models), anti-restart relay |
| Control Type | Start/Stop buttons, optional electronic timer |
| Intended Use | Bakeries, pizzerias, soft doughs (bread, pizza) |
| Removable Bowl | Yes (CNS models) |
| Bowl Cleaning | Hand wash or dishwasher safe |
| Operating Conditions | Temperature 0 to 35 °C, max humidity 80% at 20 °C |
| Spare Parts | Available from authorized dealer |
Frequently Asked Questions - 101864 BARTSCHER
User questions about 101864 BARTSCHER
0 question about this device. Answer the ones you know or ask your own.
Ask a new question about this device
Download the instructions for your Food Processor in PDF format for free! Find your manual 101864 - BARTSCHER and take your electronic device back in hand. On this page are published all the documents necessary for the use of your device. 101864 by BARTSCHER.
USER MANUAL 101864 BARTSCHER
Purpose of this manual. 4
Manufacturer and machine Identification 4
Kneader description. 5
Specifications 5
Instructions - "Digital control" (optional) 5
Overall dimensions. 6
Safety devices 6
Safety information. 6
2 INSTALLATION
Packing and unpacking 7
Installation area 7
Electric connection 7
3 OPERATION AND CLEANING
Control descriptions. 8
Kneader Operation 8
Operation tips. 8
End-day cleaning. 9
Removal of the removable parts mod."CNS"... 9
Long periods of inactivity 9
4 TROUBLESHOOTING
Foreword. 9
Troubles, causes and remedies. 9
ANNEXES
Disposal and recycling
Spare parts catalogue
Electrical wiring diagram
Purpose of this manual
This manual has been written by the Manufacturer to make an integral part of the machine standard equipment. During the design and construction phases, special care has been devoted to any aspects which might endanger the safety and health of the people interacting with the machine. In addition to the applicable safety legislation, all "good construction practice" rules have been adopted. The purpose of these information notes is to make machine users aware that special care should be applied to prevent any risks. The biggest asset to this end, however, is precaution. Safety is also the responsibility of all the operators who interact with the machine. Keep this manual in a suitable place, where it can be conveniently reached for consultation. In order to highlight some parts of the text, the following symbols have been used:

DANGER - CAUTION: it indicates hazards likely to cause severe injury; caution is requested.

INFORMATION: technical indications of special interest.
This manual comes with the following annexes:
- a guarantee certificate containing the guarantee conditions prescribed by the Manufacturer.
- documents certifying compliance with the applicable safety and personal health legislation in force.
To request After-sales service, submit inquiries or dorder spare parts, contact your Authorised dealer.
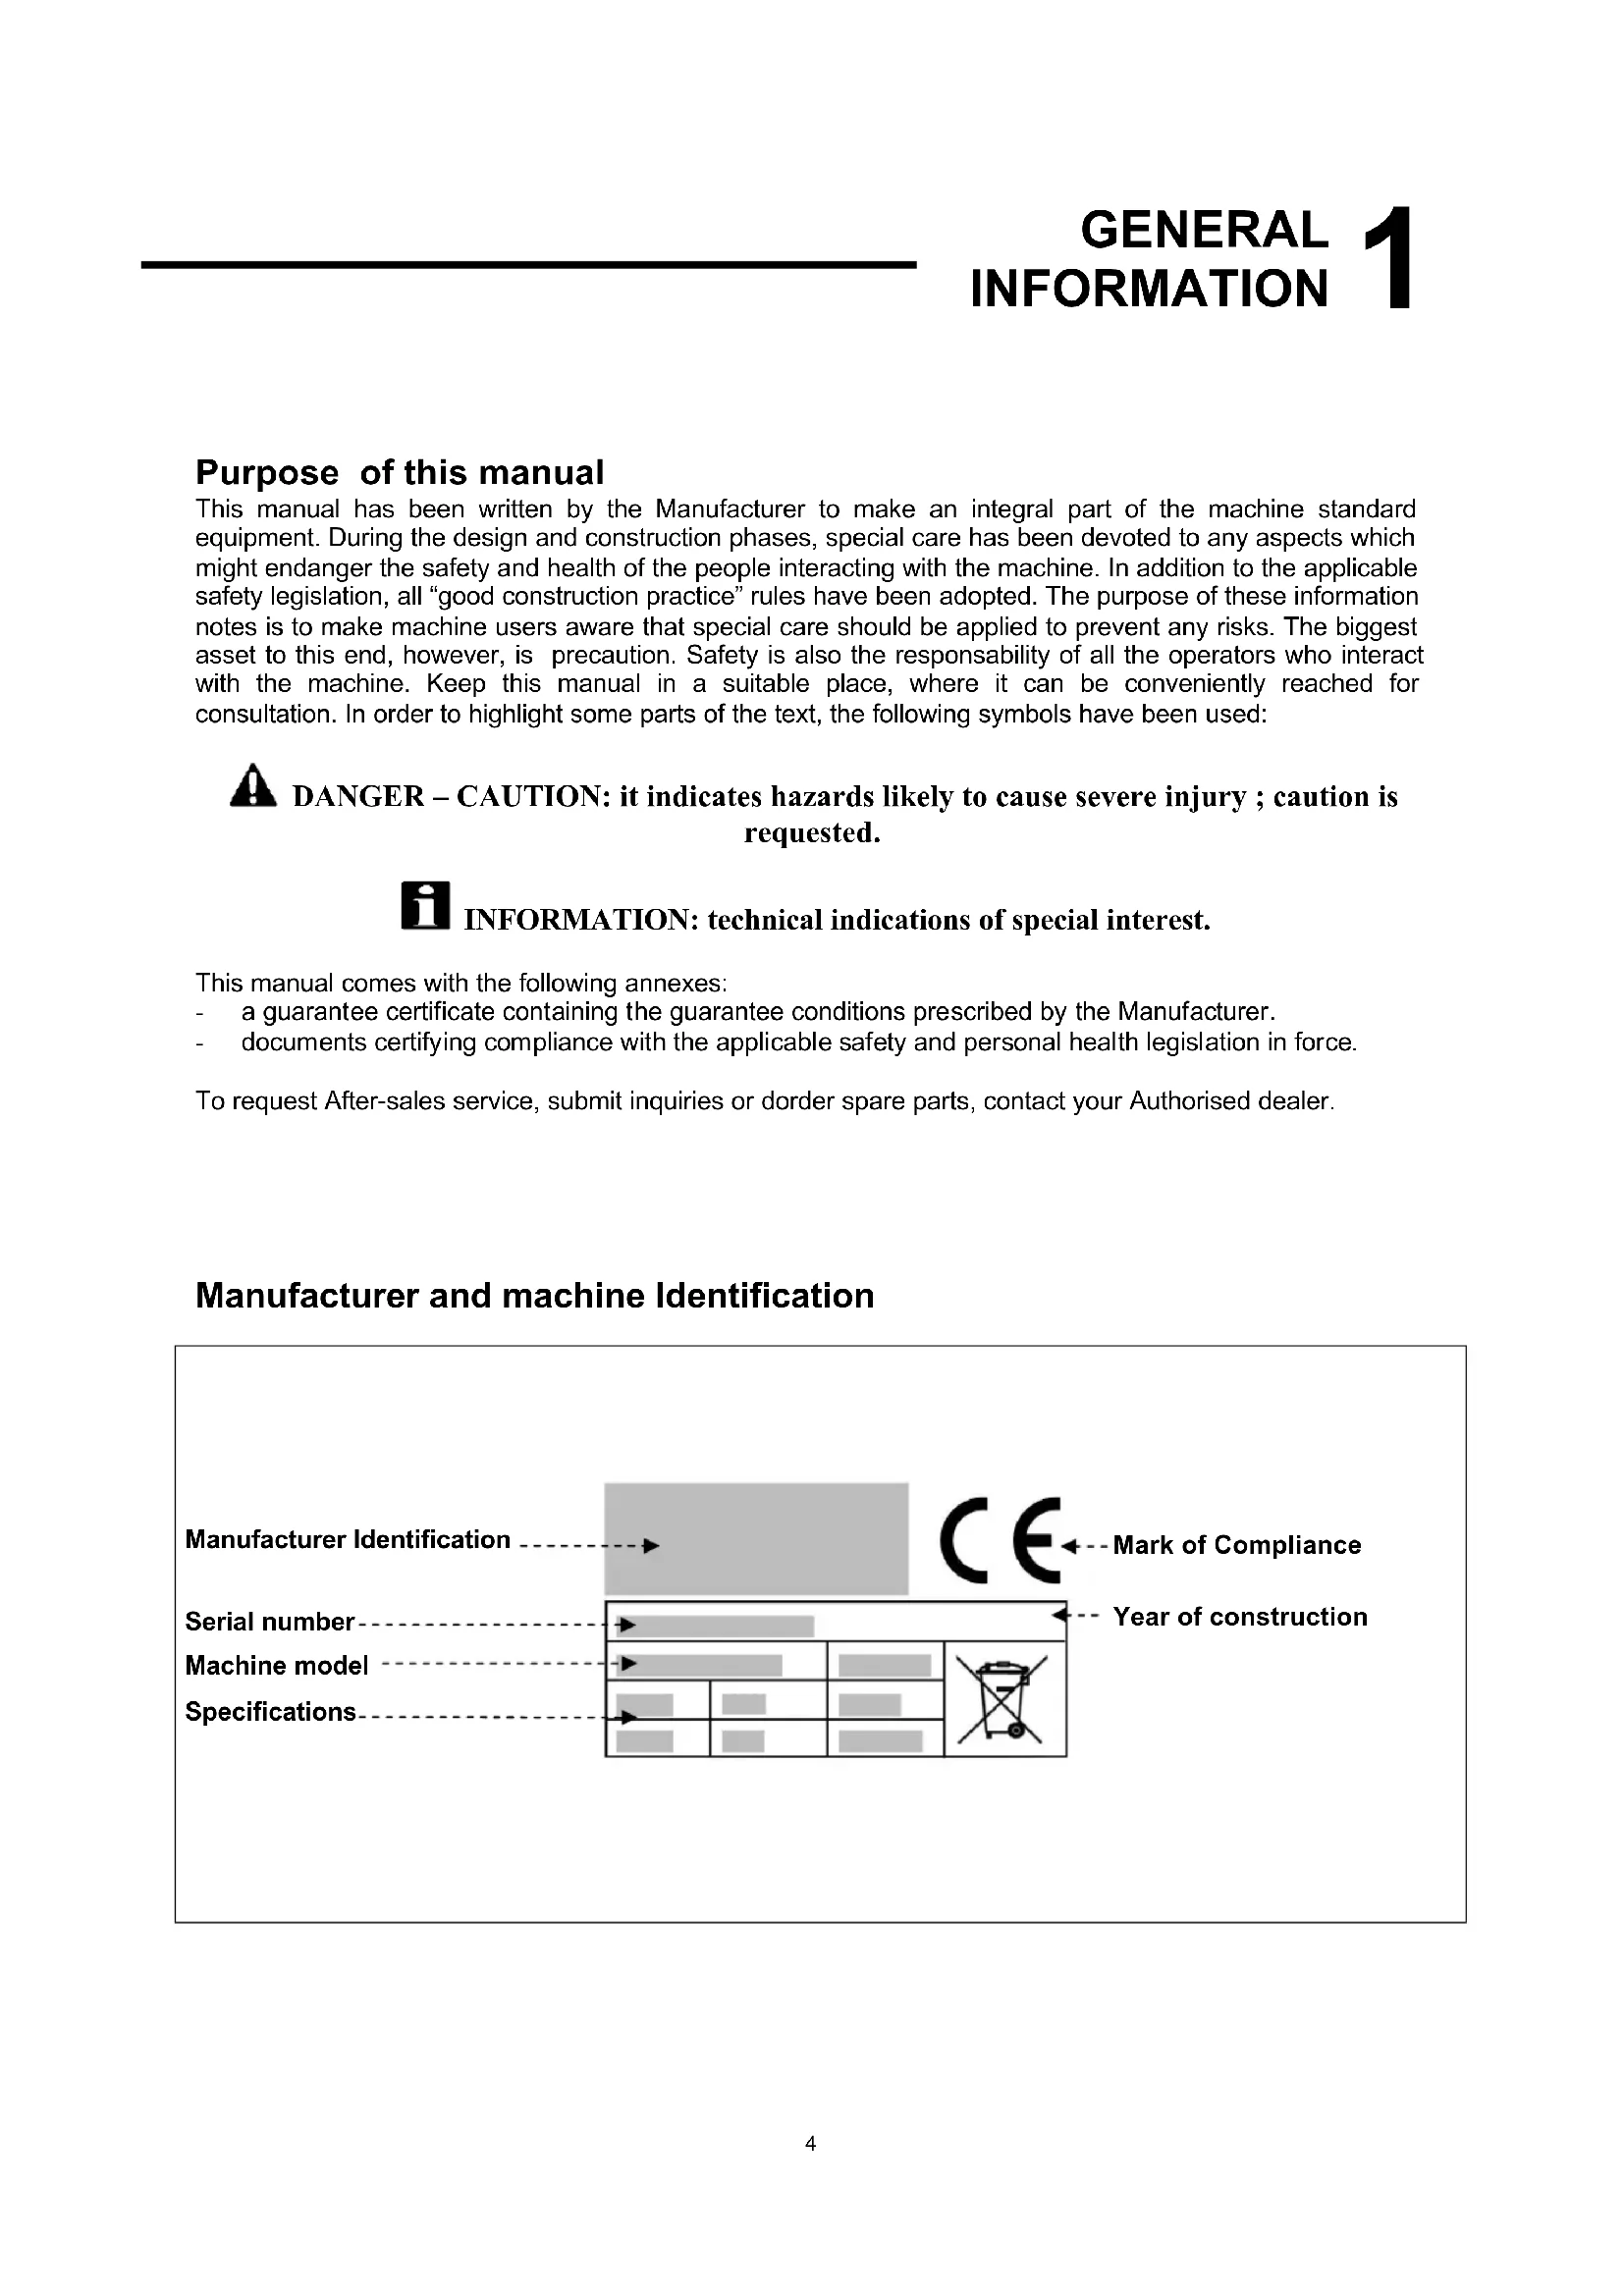
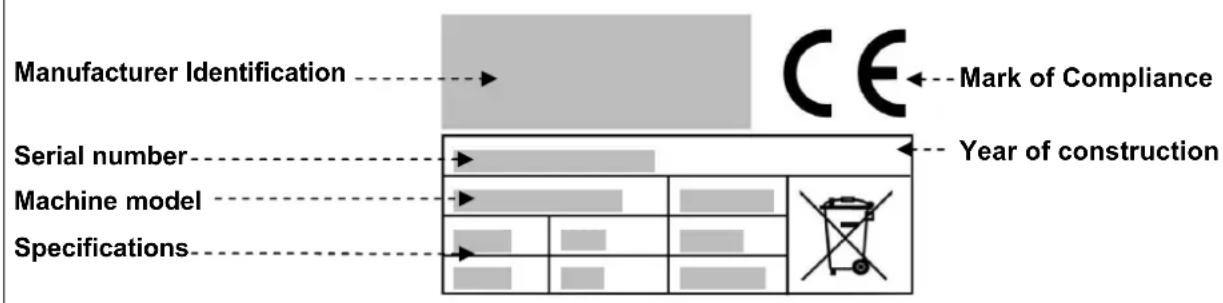
Manufacturer and machine Identification
Kneader description
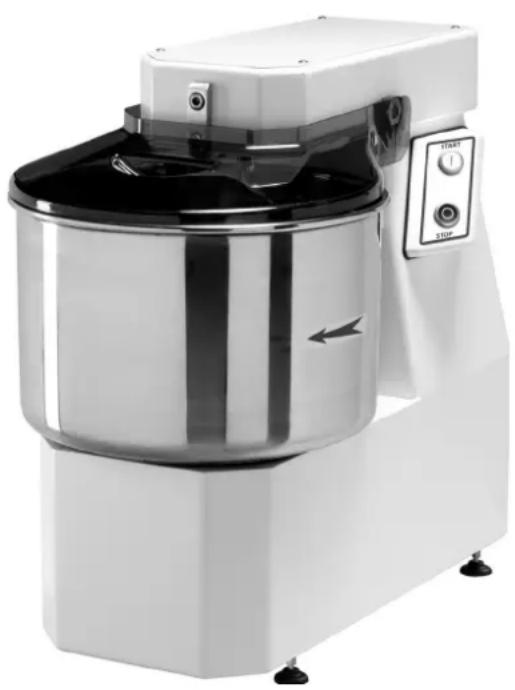
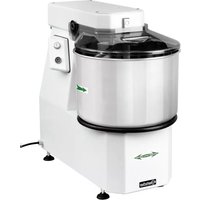
The spiral kneader is a machine meant for professional use by bread bakers and pizzerias.
The different versions of the machine (7-12-18-25-38-50 Kg. of kneaded product) cater for a vast range of production needs, allowing various types of dough to be obtained (suitable above all for soft dough for pizza and bread).
The machine structure has a scratch-proof painted finish which makes for it easy to clean.
It has safety features compliant with the applicable European Directives.
There are 3 kneader models:
Mod."SN-FN-CNS":
7/SN (7 Kg. mix capacity)
12/SN - 12/FN - 12/CNS (12 Kg. mix capacity)
18/SN - 18/FN - 18/CNS (18 Kg. mix capacity)
25/SN - 25/FN - 25/CNS (25 Kg. mix capacity)
38/SN - 38/FN - 38/CNS (38 Kg. mix capacity)
50/SN - 50/FN - 50/CNS (50 Kg. mix capacity)
The bowl is removable to allow it to be washed in hot running water or a dishwater.
Specifications
| Description Unit of measur e | 7/SN | 12/SN | 18/SN | 25/SN | 38/SN | 50/SN | |
| Electric power input V | Hz Ph | 230V 50Hz 1Ph230/400V 50Hz 3Ph | 230/400V50Hz 3Ph | ||||
| Power kW (HP) 0.37(0.5) 0.75 (1) 0.75 (1) 1.5 (2) 1.5 (2) 2.2 (3) | |||||||
| Dough per batch | kg | 7 | 12 | 18 | 25 | 38 | 50 |
| Net weight | kg | 39 | 58 | 59 | 93 | 105 | 175 |
| Packaged weight | kg | 46 | 65 | 66 | 100 | 112 | 195 |
| Description | Unità di misura | 12/CNS-FN | 18/CNS-FN | 25/CNS-FN | 38/CNS-FN | 50/CNS-FN | |
| Electric power input V | Hz Ph | 230V 50Hz 1Ph230/400V 50Hz 3Ph | 230/400V50Hz 3Ph | ||||
| Power | kW (HP) | 0.75 (1) | 0.75 (1) | 1.5 (2) | 1.5 (2) | 2.2 (3) | |
| Dough per batch | kg | 12 | 18 | 25 | 38 | 50 | |
| Net weight | kg | 65 | 66 | 103 | 115 | 206 | |
| Packaged weight | kg | 72 | 73 | 112 | 127 | 230 | |
| Noise | < 70 dB(A) | ||||||
| Installation | On the floor | ||||||
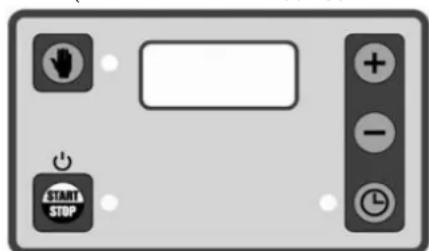
Instructions - "Digital control" (optional)
Make sure the plug is inserted correctly in the power outlet and press the "START/STOP" key. The machine will turn on and is ready to use (the LED next to the key will come on).
To start the machine in "timer" mode, press the key with the clock symbol twice in succession (the LED next to it will come on) and set the desired mixing time using the +/- keys.
After setting the desired mixing time (shown on the display) and making sure that the pot's lid has been lowered down, press the "START/STOP" key to start the machine. The display will show the countdown of
the time set earlier.
If you want to stop the machine to add some ingredients or for any other reason, before lifting the pot's lid, put the machine in standby by pressing the "START/STOP" key again. This will also stop the timer, which will resume together with the machine only by first lowering the lid and then pressing the "START/STOP" button again.
Before lifting the pot's lid, put the machine in standby, otherwise the timer will continue the countdown even if the machine is in standby. When the time is over, the machine will stop.
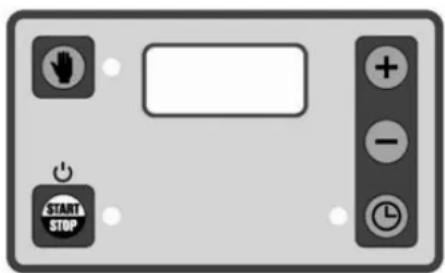
If you want to work without the timer, press the key with the "hand" symbol (manual) twice. The LED next to it will come on (it excludes the timer) and by pressing the "START/STOP" key the machine will start in manual mode.
Once the cycle has ended, press the "START/STOP" key and the machine will stop.
To turn off the display completely, press the "START/STOP" key and hold it for about 3 seconds.
Overall dimensions
| mm | A | B | C |
| 7 | 450 | 700 | 720 |
| 12 | 450 | 700 | 870 |
| 18 | 450 | 700 | 870 |
| 25 | 550 | 850 | 970 |
| 38 | 550 | 850 | 970 |
| 50 | 600 | 950 | 1150 |
Safety devices

Safety information
It is of the greatest importance to carefully read this manual before carrying out installation and use operations. Consistent compliance with the instructions contained in this manual will guarantee personal and machine safety.
- Do not tamper with the safety devices for any reason.
We recommend that industrial safety regulations issued nationally by the appointed organisms be strictly respected.
The manufacturer declines all responsibility for injures to persons or damages to property, resulting from failure to comply with these safety rules.
- Correct machine setting, lighting and workshop cleanness are pre-conditions for personal safety.
- Do not expose the machine to atmospheric agents.
- The machine connection and start-up should only be executed by skilled engineers.
- Check that the plant mains ratings correspond to the specifications printed on the machine data plate.
- Make sure that the machine is connected to a grounding system.
- The work area around the machine should always be kept clean and dry.
- Wear the work attire prescribed by the industrial accident-prevention regulations.
This machine should always be used for its recommended uses; any other use is deemed improper and therefore dangerous.
- Check the suitability and weight of the products to work ; do not overload the machine to exceed its capacity.
- It is forbidden to introduce any objects, tools or hands in the dangerous parts.
- Keep the machine out of children's reach.
- Unplug the machine from the mains when not in use.
In the event of breakdowns and/or malfunctioning, do not carry out any repair yourselves, apply to your Authorised dealer.
- Order original spare parts only.
- Before carrying out machine cleaning, unplug it from the power mains.
- Do not clean with high-pressure water jets.
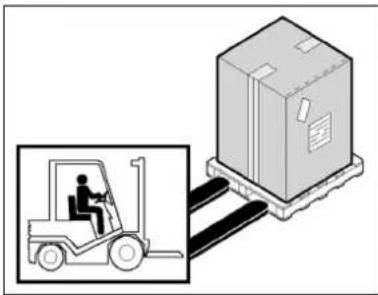
Packing and unpacking
The machine will come packaged in a carton with foamed polyester inserts to guarantee perfect safety during transport.
- Handle the carton in compliance with the instructions.
- Open the carton and make sure that all components are intact. Keep the carton for any future machine removal.
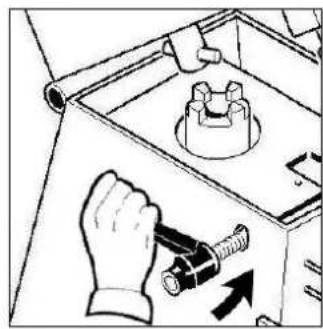
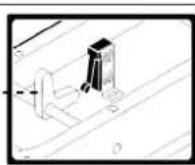
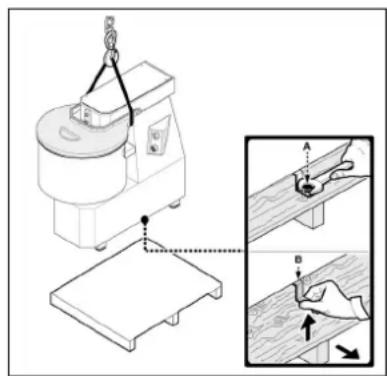
- Remove screws A and lift machine from pallet.
- Remove bars B.
- Lift the machine according to the instructions and place it in its selected setting for installation.

Installation area
The selected machine work setting must be sufficiently lit and have an electric power outlet. The worktop must be sufficiently large, perfectly level and dry. The machine should be installed in non-explosive environments. In any case, installation should be carried out by taking into account any applicable industrial safety regulations in force.
Environmental Condition Table
| Descriptions | Values |
| Working temperature 0÷35 °C (32÷95 °F) | |
| Storage temperature -15 to +65 °C (from -6.8 to +149 °F) | |
| Relative humidity | Maximum 80% at an ambient temperature of 20 °CMaximum 50% at an ambient temperature of 20+60 °C |
| Ambient dust Lower than 0.03 g/m3 | |
Electric connection

DANGER - CAUTION: Electric connection to the power mains should be executed by skilled engineers.
Check for the perfect efficiency of the plant grounding system. Make sure that the line voltage (V) and frequency (Hz) correspond to the machine ratings (refer to the machine identification plate and wiring diagram). The machine comes equipped with an electric cable to which a multipolar plug should be connected. Plug the machine into a main wall switch with differential.
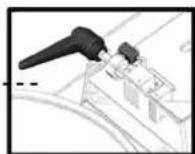
Three-phase connection
Start the machine for just a few seconds and check that the beater turns in the right direction. If this is not the case, disconnect power and exchange two of the three phase wires in the plug.

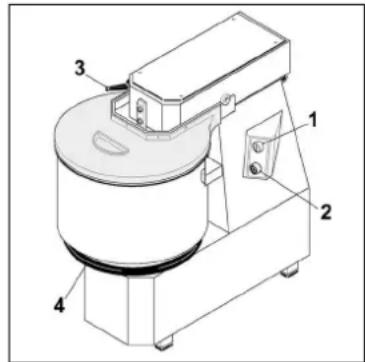
Control descriptions
1) Start button "I"
Press this button to start the machine. The start button will only be enabled when the lid is down and the pan is in place.
2) Stop button "0"
Press this button to stop the machine.
3) Locking hand lever for the head (only mod.CNS-FN)
Rotate the hand lever to lift the head (clockwise) or to block it (anticlockwise). The start button will only be enabled when the head is down and blocked.
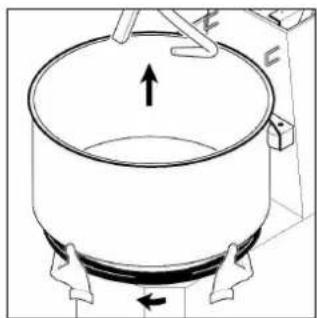
4) Locking flange for the pan (only mod.CNS)
Rotate the flange to lock the pan (anti-clockwise) or to release it (clockwise).

Kneader Operation
- Lift the pan lid and put the required mix ingredients into the pan.
- Close the pan lid.
- Tighten the locking hand lever of the head for mod.CNS-FN.
- Lock the pan by means of the flange below for mod.CNS.
- Start the machine by pressing the start button "I"; machine start can only be controlled if the lid is down and if the pot is blocked on the flange.
After operation completion, press the stop button "0". - Lift the lid to empty it of the processed product.
After any operation cycle has been completed, wash the pan and spiral by hot water and soap. - Wipe inner face of the lid with a damp sponge.
2-speed version
- Lift the pan lid and put the required mix ingredients into the pan.
- Close the pan lid.
- Tighten the locking hand lever of the head for mod.CNS-FN.
- Lock the pan by means of the flange below for mod.CNS.
- Rotate the speed selector to position 2.
- Start the machine by pressing the start button "I"; machine start can only be controlled if the lid is down and if the pot is blocked on the flange.
- When the dough becomes a rather compact mixture (about 5 minutes later) stop the machine by pressing the stop button "0" and rotate the speed selector to position 1.
- Restart the machine by pressing the start button "I", until the required consistency is achieved.
After operation completion, press the stop button "0". - Lift the lid to empty it of the processed product.
After any operation cycle has been completed, wash the pan and spiral by hot water and soap. - Wipe inner face of the lid with a damp sponge.
Operation tips
Every litre of the water used for the mix requires about 2Kg of the flour. The exact quantities will depend on the type of product to be obtained and the flour being used. The water should always be poured into the pan before the flour is added.
Capacity production:
Mod.7/5N: Pour 2.5 litres of water into the pan and add 2Kg of flour
After 1-2 minutes of kneading, add another 2.5Kg of flour.
Mod.12/SN-12/CNS-12/FN: Pour 4 litres of water into the pan and add 4Kg of flour
After 1-2 minutes of kneading, add another 4Kg of flour.
Mod.18/SN-18/CNS-18/FN: Pour 6 litres of water into the pan and add 6Kg of flour
After 1-2 minutes of kneading, add another 6Kg of flour.
Mod.25/SN-25/CNS-25/FN: Pour 8 litres of water into the pan and add 8Kg of flour
After 1-2 minutes of kneading, add another 9Kg of flour.
Mod.38/SN-38/CNS-38/FN: Pour 13 litres of water into the pan and add 12Kg of flour
After 1-2 minutes of kneading, add another 13Kg of flour.
Mod.50/SN-50/CNS-50/FN: Pour 17 litres of water into the pan and add 16Kg of flour
After 1-2 minutes of kneading, add another 17Kg of flour.
End-day cleaning
- At the end of a work day, unplug the machine from the power mains.
- Thoroughly clean the machine using neutral detergents.
- Wipe the machine outer parts with a damp sponge.
- Do not use steel wool or abrasive cleaning products.
Removal of the removable parts mod."CN"
Lift the head by rotating anti-clockwise the hand lever (mod.CNS-FN).
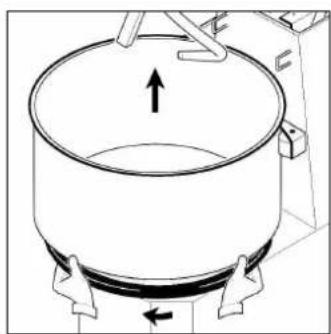
For removing the pan rotate the lower flange clockwise and lift the pan upwards (mod.CNS).
INFORMATION: Before every operating cycle always check that the removable parts are well locked to the machine. Lock the pan by rotating anti-clockwise the lower flange.
Long periods of inactivity
If the machine is to be left idle for long periods of time, turn off the main wall switch, thoroughly clean the machine and cover it with a sheet to protect it from dust.
TROUBLESHOOTING

Foreword
In the event of breakdowns or malfunctioning, turn off the main wall switch and contact your local Dealer's After-sales service. Do not disassemble any internal machine parts.
The Manufacturer declines all responsibility for any tampering!
Troubles, causes and remedies
| Trouble | Cause | Remedy |
| The machine will not start | Main switch is off | Turn the main switch on to "1" |
| No voltage input to power line | Apply to your local Dealer's After-sale service | |
| Logic board protective fuse is blown | Apply to your local Dealer's After-sale service |
7-12-18-25-38-50/SN
12-18-25-38-50/FN
12-18-25-38-50/CNS
Hnctpykznn "znpboBOrO ynpabNeHHa
(ФakyltaTINBHO) 5
Tabaipntbl. 6
UcTpoIcTb6e3oNaChOCTu. 6
HnΦopMaun no 6e30nacHOCTn. 6
2 INΦOPMAÇU NIO YCTAHOBKE
UnaKOBka npacnaKOBka. 7
3OHa yCTaHOBKn. 7
3NeKtpueeckoe noDcoeHHeHne. 7
3 INHOPMAUINIIONCIOJIb3OBAHNIO N OCHCTKA
OnncanHeKoMaHd. 8
PpimHeHne MeCnIbHO MaunHbl. 8
CobetbI no npimHeHHIO 8
OuNTKa B KOHcpe pa6oery Dn.. 9
I3BneueHme BbIHMaIOUxxCaTeTanei MoN."CN".... 9
DJIroE HenCnOJb3OBaHne MaunHbl 9
4 NOK HENCPABHOCTE
Bveidenne.
Henoanki, npuHbI, ncpaBneHn. 9
9
PINIOXEHNA
YHHTOKeHne I NOBTOpHOe NcNoJIb3OBaHHe
Katajior 3anuactei
3JIeKtpuecka cxema
Cebb HctpyKu
DahHbIe IHCTpyKUIN, ABAJIIOUINCEcH HeOTDeJIIMoJ cactbIO MaUNHBI, BbIIOJIHeHbI N3rTOBHTeMe, YTObI IpeIOJHeCTNI HeO6XODMMyIO INHOpMaUINIO BcEM, IMEIOUIM pa3peWSeHne Ha paBOTy C MaUNHOH Na BeCB NepNOd eE DeIcTBNIA: NOKyNaTeN, IpoeKTIPOBUsIKN UCTAHOBKN, NOlb3OBATeN, ONbITbIE ONEpAToPbI N CNEuJaIN3IPoBaHHbIe TEXNkN. POMMO TOrO, YTO DOnJKA H 6bITb IprimeHEna Xopo7aJr TexNka NcONb3OBAHnR, NOnyHaTeN INHOpMaUIN DOJxHbIBHMATEJBHO IPOHTaTb IN X 6e3OTKa3HO pImeHtB. ZeNB DaHHbIX INHCTpyKUIN - 3TO npINBteB OC6OE BVHMAnHe Ha npedOTBaAsHene IIOBOrO pNcKa. OctopoxKHOCTb HNKOrDa He 3aMeHmAb. Be30nacHOCTb HaxOHTcB B pykax OEPaTOpOB, IMeEOUIN DeIO C MaUNHOJ. XpaHNT BaHNbIe INHCTpyKUIN Ha BCEM IpoTaeHm Pa6OTcNOco6HOCTM MaUNHBi B 3HaKOMOM MeCTe IN CBO6OHDIO DocTyPHOM, YTObI BcerTa IMeTb erO nOd pyKOJ dIra KOHCyLTaUIN. YTObI BByJeNTb HEKOTOpBIE qACTN TEKCTA OC6OBI BAXHOCTN INI YTObI yKa3aTb HekOTOpBIE BaxHbIe CNEuΦNkaUIN, 6blIn IpnHrTBI CIMBOJI, 3HAChEHIe KOTOpBX DaJIee ONICAOH:

OIIACHOCTb-BHIMAHHE: yKa3bIbAeT cHTyaUHH cNJIbHOJ OIIaCHOCTH, KOTOpbIe, ecJIN He 3aMeHeBb BOBpeM; Heo6XoIHMo IIpHJaTb 0c06oe BHHMaHHe.

HHΦOPMAIINH:TexHHueckne yKa3aHHn oO6oB BaXHoCTn.
KHACTOUIIM INHCTpyKUINM PpInnaeraTcA:
- Ceptnikat rapaHTn, B KOTOPOM yka3aHbI BCE rapaHTnHbIe ycIOBnI, IpOdkTOBaHHbIe IV3rTOBUTeJIem.
IokymHeTbI,IOITBePxDaioune COOTBETCTBNE DeiCTByIOUIM 3aKOHAM IO TEXHnke 6e3ONaCHOCTN I 3dOpOBbIO Ha pa6oHm MeCtax.
IIO IIO6Omy BOpocy TexHnuecko nmoUu, INHcpMaun 3aKa3OB 3aHaCTe - o6paTITbC K PpOaBcy, HMeIoUeMy pa3peSeHne.
IeHTnФнkaци N3rotOBNTeIЯ MaunHbI

Oncahne MecnIbHOB MaunHbI
MecilbHa MaunHa -3TO MaunHa IINI pOceccIOHaJIbHO IOIIOJIb3OBaHnI IINBteHybx LEXOB INIUEpIM.
Maunha B CBOx DByx BapnHax (7-12-18-25-38-50 K TecTa) OTBeaET CaBIM pa3NHybIM Tpe6oBaHmI pON3BOJCTBa, PO3BOJRA BblONHHTb pa3NHybIE TINbI TecTa (OCO6o IpeHa3HaHeHa dIra MAnKOrO TIna TecTa, KaHApMep, IJIr NLIuBi I XJIe6a).
MaHnHa BbIIOJIHeHa I3 KOHCTpyKUIN,POKpbITOn He LApapanOJIeNc KpackoJ,JeKO OHIIaEMOI.
Cha6keHa yctpoiCTBaMn 6e3oNaCHocTn B COOTBcTCTBN C EbponeckIMN DInpeKTHBaMn. CyIeCTbYIO T 3 MoJeN MecuNbHbIX MaUINH:
Mod"SN-FN-CNS":
7/SN (7 Kr Tecta)
12/SN-12/FN-12/CNS (12KT Tecta)
18/SN-18/FN-18/CNS (18KTecTa)
25/SN-25/FN-25/CNS (25KT Tecta)
38/SN-38/FN-38/CNS (38KTecta)
50/SN-50/FN-50/CNS (50KTecTa)
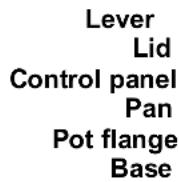
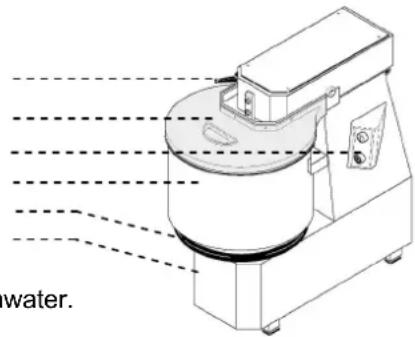
Pbivar
KpbIkwka
UytynpaBneHn
Kacrtpon
Дерхаель деки
OCHOBAHHe

PIMMEHEHNE BbIHMaHHa:KACTPHIN N03BONReT POMbIKy 3TNX DeTanei RopRcN BOIOI Wn JKe BMOeHNO MaUNHe.
TexHnueckne xapaKTepcntuKn
| Описаня | Ед. Измерения | 7/SN | 12/SN | 18/SN | 25/SN | 38/SN | 50/SN |
| Питуни электооргий | Вт Г汞 | 230ВТ 50Г汞 1Ф 230/400ВТ 50Г汞 3Ф | 230/400ВТ 50Г汞 3Ф | ||||
| Мошисть | К Вольт (HP) | 0.37(0.5) | 0.75 (1) | 0.75 (1) | 1.5 | 2) 1.5 (2) | 2.2 (3) |
| Тechа на ц replen | КГ | 7 | 12 | 18 | 25 | 38 | |
| Чinctы Вес | КГ | 39 | 58 | 59 | 93 | 105 | 175 |
| Вес с уразков的基础上 | КГ | 46 | 65 | 66 | 100 | 112 | 195 |
| Описаня | Ед. Измерения | 12/CNS-FN | 18/CNS-FN | 25/CNS-FN | 38/CNS-FN | 50/CNS-FN | |
| Питуни электооргий | Вт Г汞 | 230ВТ 50Г汞 1Ф 230/400ВТ 50Г汞 3Ф | 230/400ВТ 50Г汞 3Ф | ||||
| Мошисть | К Вольт (HP) | 0.75 (1) | 0.75 (1) | 1.5 (2) | 1.5 (2) | 2.2 (3) | |
| Тechа на ц replen | КГ | 12 | 18 | 25 | 38 | 50 | |
| Чinctы Вес | КГ | 65 | 66 | 103 | 115 | 206 | |
| Вес с уразков的基础上 | КГ | 72 | 73 | 112 | 127 | 230 | |
| Уровеньшуma | Ноже 70 дВ(A) | ||||||
| Установka | На землиe | ||||||
Hnctpykun "ufoBoro ynpaBneHna" (kaKyIbTaTnBHO)
PpOBepntb, yTO wTeKKepe nTahnna npabunbHO yCTaHOBJIeH B pa3bE MNeKTponNTAHn HxKaTb Ha KONKy "START/STOP"; MaunHa BKIOHaeTcra I rOToBa K 3KcnNyaTaunn (3axnraeTcra CBeToNDpIOM C KONKOJ). 3aynyBaB Pexime TaMep", HxKaTb 2 p3a NOpDpa KONky C Yacamu (BKNIOHTbcrCBETODNO
PraDM C KHOKo) N yCTaHOBnTb Tpe6yeMOe BpEMc NOMOu bKO KHONOK+/.. Pocne toro, kak yctaHOBnEHO Tpe6yeMOe BpEMr (Noka3aHHe Ha DnCnIee), n Bbyy6eINncb YTO KpbUkka OnyueHa, HaxKaTb Ha KHOKy "START/STOP", YTO6bI 3aNyCTnTb MaUHHy BDbXKeHHe, Ha DnCnIee NOBnTCr o6paTHbI OTCqET yCTaHOBnEHNO BpEmHn.
Ecn Heo6xOIMO OCTaHOBnTb MaunHy, YTO6bl IO6abNTb INHrpNIneHTbl, nnn no IIO60IpyroI npuHne, nepeI TeM, KaN OINHrTb KpbIuKy DeKIn, yCTaHOBnTb MaunHy Ha nay3y, NOBtOPHo HAKIMaHa KHONky
"START/STOP", B 3TOM peKIMe oCtAHaBnBaETc TaMep n TOnbKO nocne TORO, KaK KpbIka OnyueHa n HaxKaTa KNHOKA "START/STOP",
Ipepe meM, KaK npohnMb KpbuKy deXu, ycmaHOBum MaunHy Ha nay3y, npomueHom cnuyae, maUMep byem npodonkamb omcuE, daXe ecnu MauHa ycmaHOBneHa. Nocne mo2o, kaK epem ucmekno, muaHa ocmaHaBnaemcra.
EcnI daTpa6oTbHe Tpe6yeTc TaMep, HaxaTb 2 pa3a NpOprdKn KHOKNy co 3NaHcKOM pykn (pyHOn peXIM),
BKNIOHTCBAETOIOID PAnOM C KHOKON (OTKNOUaETc TaIMep) HnAHHMa HA KHOKNY "START/STOP", MaunHa 3anyckaetc B pyHOM pexime. Nocne TORo, KaK 3aKOHueu cIKKn, HnKaTa b HA KHOKNY "START/STOP" mMaunHa OCTaHabJIINBaETc. YTo6bI NOJHoCTbIO BKIOHTb DInCnJe, DePkaTb HaxaToN KHOKNY "START/STOP" OKONO 3 ceKyHd.
Ta6apNTbI
| mm | A | B | C |
| 7 | 450 | 700 | 720 |
| 12 | 450 | 700 | 870 |
| 18 | 450 | 700 | 870 |
| 25 | 550 | 850 | 970 |
| 38 | 550 | 850 | 970 |
| 50 | 600 | 950 | 1150 |
UcTpoIcTbA 6e3OnaChOCTn
MnKpoBbIKHouaTeNb: ocTaHaBnBaET MaHInHy, KOrda NOpHnMaEtcra KpbIuKa KaCTpOJIN. Ppi nocNeJeYooIeM 3aKpbIBAHIN KpbIuKi, 3aNyctNtB MaHInHy, HAKIMMA KHONKy I

TeneBkiouateIb: B Cnyuae cnuyaiHoro npepbBaHnnoaHn ToKa, Tpe6yET nobTOPHO 3anycka MaunHbI
MnKpObblKnHouaTeNb:OctHaBnBaet MaWHy, KOrDaNODHMaETCrONOBKa. Pn nocneJyIOeM 3aKpbBaHNrONOBKn,3aNyCTNTb MaWHy,HaxmMaJ kHOnKyI(TonbKO Moi.CNS-FN)
DatnK:He donyckaet 3anyck MaunHbI ecn He o6hapyeHa deka (TolbKO Mo..) CNS)
HhopmaunnoTexnke6e3onacchoctn
Oco6oB BaxKHOCTbIO RaIReTcKOHCyIbTaUIN DaHHbIX INHCTpyKuIN NpeTeM, KAK npNCTynNTb K Oepaunm yCTaHOBKn INCNOJb30BaHnIO. NocToHnOE nCNoJIHeHne yKa3AHn, CoedePkaunxcB D aHHbIX INHCTpyKuINx, rapaHTnpyET 6e3OnacHOCTb YeNoBEky MauuHne.
He n3MeHrTb, no HnKakOn npuHne, ycTpoCTBa 6e3oNaCHOCTN.
- PeKOMeHnyeTc r Ctporoe BbINOJIHeHne HOpM 6e3OaHocTn Ha pa6oHx MecTx, BblNyUeHHbIX COOTBeTCTByIOUIMN OprHaAMN KAKDOrO OTdJIbHorO TocyapCTBa.
- I3ROTOBNTJIb OTKNOHReT JIO6yO OTBecTBHeHOCtB 3a IOBpeKdEHHaN JIOJAM NIN BeUaM, NOIyueHHbIM B pe3yIbTaTe He BbIePKNBaHn HOpM 6e30NaChOCTn.
- PpaBnIbHoe paCnoJIOKeHne MaunHbI, OCBeJeHne n YnCTota OkpykaIoUe Cpebl - 3TO BaXHbI yCNoBnI dIy 6e3ONaCHOCTn YeNoBaKa Ha pa6oYem MecTe.
He noDBepraTb MaunHy atmocephblm areHTam.
- POnCoeDInHeHne N BBeJeHne B 3KcIpyatauMo MaunHb I OJXHb I 6bITb BBIOJIHeHbI TOJbKO CneuaJIaNIm3IpOBaHHbIM TexHnueckn nepcoHaIOM.
- PpOBepntb, yTo6bI xapaKTepeNCTnKN yCTaHOBKn, rDe 6yDet paCNoJoxeHa MaunHa, COOTBeTcBOBaJIIN DaHHbIM, BBIHeceHHbIM Ha Ta6NJuKe.
- Y6eINbC, TTO6bl MaunHa 6bJa NpOcEInHeHa K yCTaHOBKe 3a3eMJIeHnA.
30Ha pa6oTb BOKpyMaunHbdoJnxHa Bcerda coepkaTbcya nctoi cyxoi.
- IcnoIb3OBaTb npedymoTpeHHyH OhopMaMn TexHnKn 6e3onachoctn oJekny.
3Ta MaunHa DoJnKa 6bItb NcOnJb3ObaHa TOnbKO No Ha3HaueHIO; KaKdoe DpyRoE Ha3HaueHne CHTaETcH He npabInbHbIM, a 3HaHT, OAnChbIM.
- PpOBepntb COOTBeTCTBnE n BEc npOyKToB dIa o6pa6oTK; He nepeRpykaTb MaunHy cbex e cnoCo6HocTei.
3anpeaetcBBOIDnTB npedMeTb, INHCTpyMeHTb, pykn nnDpyro BHytpb onachbx DeTaei.
CoepKaTaMaunHbBHe DoCTynHOCTnTeT.
OTKIOUaTb OT NITAHNA TOKOM, KOrda MaUNHa He NCIOJIb3yETcA.
B cnlyuae HenolaoK n/nn HencnpaBHOCTe npn nCNOJb3ObaHn, He nCnpaBnTb camm, Ho obaaTbcra K PpOabUy, mEHOSeMy Ha 3To pa3peHHe.
3anpaunbaTb BcERda TOJbKO opnHaHbHbe 3aNactn.
- Ppexde, yem npctyntb K oucTke MaunHbl, OTKIOHTb 3neKTponTaHne, BbiHmra WTeNCenb N3 po3eTK.
- ONUCTKHe NOJb3OBAtbc8 BOJHOH CTpyEe BbICOKO DaBJIeHnA.
YnakOBka npacnaKOBka
MaunHa ynaKOBaHa B KapTOHe C BCTaBkAmn n3 NOINcTepa, YTo6bl rapaHTnpoBaTb NOJHOe COxpaHHeHne BO Bpemr TpaHCnOpTnpoBKn.
- IepemEuTaB ynaKOBky, BbIeApXnBaY INHCTpyKcN.
- OtkpbItb ynaKOBky n npOBepntb ceIocTHOCtB Bcex KOMnHOHeHToB. CoXpaHnTb ynaKOBky dnyux nepeBO30K.
Pa3BnHTnBnHTbA nNoDnHrTb MaunHy C noDnHa. - YdaNTb CTaKKn B.
- POnHnTb MaunHy, KaK yKa3aHo n paCnoJoxKntb eE B 3OHe, npEdycmOTpeHHo dIy yCTaHOBKn.

3oHa yCTaHOBKn
PpeDyCMOTpeHHa 30Ha DOnJXHa 6bITb COOTBeCTByIOue OCBeUeHa N DoJXHa IMeTb TOHKo pacnPpeJeHnra 3NeKtpNueCKOrTo ToKa. MeCTo paCNoIoxKeHn DaJNXHO 6bITb 3HaUnTeNbHO uNpOKm, POBbIM n CyxM. YcTaHOBka DoJXHa npOxCxoUHTb B CpeDe c HeB3pbIBHO aTMocΦepoB. B IIObOM cIyuae, DOJXHa 6bITb BblONHeHa, yuNTbBaR daEChByIOUne HopMbI TexHKn 6e3ONaCHOCTn Ha pa6OuNX MecTax.
Tabuca ycnobu cpebI
1) Khonka CTapTa "I"
HaxaTb KhONka, YTo6bl 3anyCTnTB MaunHy. NyCK dOnyckaeTcR ToIbKO npN OnyuHHO KnBkke.
2) Khonka cton "0"
HaxaTb KHONKy, YTO6bl OCTaHOBnTb MaunHy
3) Pbyar 6JOKIPOBKn roJOBKn (ToJIbKO MoJ.CNS-FN)
IObepHyb pbUar, yTo6bl nOdHtB (npoTnB YacOBo CTepeKn) nnN 6NoKnpoBaTb(no yacOBo cTpeNke) roNoBky. 3anyck dOnyckaetcra TOnbko npn onuueHHo n 6NoKnpoBaHHo rOnOBKe.
4) ΦηαHEu 6LOKnOBKn KAcTpHJN (ToIbKO MoJ.CNS)
IObepHyb pbHar, yTo6bl 6JIOKIpOBaTb (npOTNB YacOBOn CTpeKN) nn pa36JNOKIpOBaTb KAcTpHJIIO (no YacOBOn CTpeNKe).
PpIMMeHHe MeCNbHOJ MaUNHbI
- PoiHrTa KpbIuKy KaCTpOJIu, YTO6bl NOnoXHTb BCE Heo6xOuMbIe 3JeMeHTbl dIa CMEcN.
3aKpbIb KpbIuKy KaCTpOJN.
3aTAYt bpyar 6JIOKnpOBKn roJIOBkn dJa Moi.CNS-FN. - BLOKINPOBaTb KAcTpIOHIO NocpeIcTBOM HIXKepaCNoIOXeHHOrO fnaHca dnn MoI.CNS.
3anyctntb MaunHy Haxmam Ha KHONky "I"; TOnbko ecn onyueHa KpbiUka n Deka 6noknpoBaHa Ha depKaTeNe, npOxCxOuNT 3anyck. - Ito OKOHuaHnpo pa60tby OCTaHOBnTB MaunHy, Haxmam KhoNky OCTaHOBKn "0".
- OTkpbItb KpbIuKy I BbIHyTb 6pa6oTaHHbI npOdyKT.
- IIO OKOHaHIO pa60Tb BBIMbITb KAcTpHO u CNIPAb TROPuey BODou MOIOUcM CpeiCTBOM.
OuHCTbBnaxHOIy6KoBHyTpEHHOUacTb KpbIiKn.
DByxckopocTha Bepcn
- PoiHrTa KpbIiKy KaCTpOJIu, YTO6bl NOnoXHTb BCE Heo6xOIMMbIe 3JeMeHTbl dna CMEcN.
3aKpbbTb KpbIuKy KaCTpOJN.
3aTMyTb pbUar 6JIOKInpOBKn rOJOBKn dJa MoJ.CNS-FN.
BIOKINPOBaTb KAcTpIOHIO NocpeIcTBOM HIXKepaCNOJoxeHHOrO fnaHca InMaM.D.CNS. - Повернтуб селектор ckopocTeB в поицю 2.
3anyctntb MaunHy Haxmam Ha KHONKy "I"; TOnbko ecn onyueHa Kpbuoka n deka 6loKnpoBaHa Ha depkaTeNe, npOxCoxoNT 3anyck.
B MOMENT, KORda TECTO npIMET BND DOCTaTOH NIOTHOH Maccbl (Pn6JIN3NTeJIbHO uepe3 5 MNHyT), OCTaHOBTb MaunHy HaxatneM KHONKn CTona "0" n NOBepHyTB CENEKTOP CKOPoCTN B NO3nHIO 1.
BknHcyTb MaunHy HaxaTneM KhoKn PycKa "I" n npoOnkntb 3amec do Tex nop, noka Tecto He npimET HxKHO KOHCNCTeHcnn. - Ito OKOHuaHnO pa6oTbIOCTaHOBnTb MaunHy, Haxmam KhoNkOCTaHOBKn "0".
- OTKpbItb KpbIuKy N BbHytb 6pa6oTaHHbI npOdyKT.
- IIO OKOHaHHO pa60Tb BBIMbITb KAcTphJIO n CnnpaJIb rOpJyEe BODoI MOIOUm CpeDCTBOM.
OuHCTbBnaxKHOIy6KoBHyTpEHHIOUacTb KpbIiKn.
CobetbI no npMHeHIO
Ha KaJdbI NITp BODbl Tpe6yETcO KOIO 2 Kr MyKn, Heo6xOIMMo TaKke peryNIpOBaTbCk KaJdbI pa3 Ha OCHOBAHm CMEcN, KOtOpYIO JeJaTe NOnyHTb N 3aBnCMocTn OT npImeHReMo MyKn. PeKomeHdyETc HAnBaTb BceRda Bhauane BoDy Ha dHO KAcTp6JI.
Pon3BODHTeJIbHocTb:
7/SN:HaJIHTB B KAcTpIIOH 2,5 NITpa BObbl 3aTeM 2 Kr.MyKIn
Yepe3 1-2 MNHyTbI pa6oTbI do6aBnTb euee 2,5 Kr. Mykn.
12/SN-12/CNS-12/FN:HaJIntbB KacTpoJIIO 4IITpa BOdBi N3aTeM 4Kr.MyKIn
Yepe3 1-2 MNHyTbI pa6oTbI do6aBnTb eue 4 Kr. Mykn.
18/SN-18/CNS-18/FN:HaJIITbB KAcTpOJIIO6JIITpa BOIby 3aTeM 6Kr.MyKIN
Yepe3 1-2 MInHyTbI pa6oTbI Do6aBnTb eue 6 Kr. Mykn.
25/SN-25/CNS-25/FN:HaJIbB KacTpOJIIO 8IITpa BObln 3aTeM 8Kr.MyKIn
Yepe3 1-2 MNHyTb pa6oTb Do6aBnTb eue9Kr. Mykn.
38/SN-38/CNS-38/FN:HaJIHTbB KacTpHIO 13 NITpa BOdbI 3aTeM 12 Kr.MyK
Yepe3 1-2 MmHyTbI pa60Tb Ido6aBnTb euee 13 Kr. Myk
50/SN-50/CNS-50/FN:HaJIITbB KacTpIOJIIO 17 NITpa BOdIy n 3aTeM 16 Kr.MyKn
Upe3 1-2 MNHyTbI pa6oTbI do6aBntb e
OuNTka B KOHcE dHa
B KOHcpe pa6oeryo Dnry OTKJIOHTb 3JeKToPoeHepnIO.
- BbINOHNHTb aKKypaTHyO OHcTky HeINTpabHBIM npOdyKTAMN.
OuHCTnTB BHeUHHe DeTaIN MaUNHbI BnaXHOI r6KoI.
He noIb3OBaTbca MeTaIIuueCKIMU uEeKAMn n a6pa3NBbIMn cpeCTBaMn.
N3BneHHe BbIHMaIOxxCa DeTaJe
IOnHЯTb rOJOBky, noBopaunBaB pyUar 6nokupOBKn npOTNB yacoboi CTpeJIKN (MoD.CNS).
YTO6bI BByHytB KaTPOJIO NOBEPHyTb NO YacBOO CTpeNKe HxKHi N PhaHeu INoDnHTb KAcTPOJIO BBepx (MoJ.CNS).

HnHΦOPMAIIH: IepeI KaKbIM IIHKJOM pa60Tb IIpoBeprB, TTo6bI BbIHMaEMbIe DeTaJIH 6blJIN 3aKpeJIeHbI IIOTHO K MaIIHHe. 3aKpbITb KAcTpIO.IIO, HOBopaHBAI IpOTHB YacobOI cTpeJIKN HIXHHI _江 HeII.
ДЛNTeJIbHoe npOCTaNBaHne MaunHbI
Ecnn npndetcraocTabnHa doJnoe Bpem MaunHy 6e3 DeaTeNbHOCTN, OTKIOHTb rnaBbIy BbIKNoCuTeNb Ha CteHe, PPOU3BecTN oOuOCHKy MaunHbI N NOKpbITb eE NOJIOTHOM BO n36exAHIN nonadaHn nn.
ПОИСК ИЗПAPВАХOTЕN
4
BVeDeHne
B clyuae Heonolaok Hn HncnpaBHOCTe, OTKIOHTb 6UIN BbIKHOaTeHb Ha CTeHe N BbIBaTb CepBNC TexHnecko IomOuBaWero PpOabua. N36eRaTb DEMOHTax BHyTpEHNX DetanEn MaunHbl.
N3ROTOBNTeJIb OTKJIOHReT JIO6yIO OTBETCTBEHHOCtB 3a BO3MOXHOE BMeJAteJIbCTBO 6e3 pa3peWeHn!


- INSTALLATION
- OPERATION AND CLEANING
- TROUBLESHOOTING
- ANNEXES
- Purpose of this manual
- Manufacturer and machine Identification
- Kneader description
- Instructions - "Digital control" (optional)
- Overall dimensions
- Safety devices
- Safety information
- Packing and unpacking
- Installation area
- Electric connection
- DANGER - CAUTION: Electric connection to the power mains should be executed by skilled engineers.
- Three-phase connection
- Control descriptions
- 1) Start button "I"
- 2) Stop button "0"
- 3) Locking hand lever for the head (only mod.CNS-FN)
- 4) Locking flange for the pan (only mod.CNS)
- Kneader Operation
- 2-speed version
- Operation tips
- Capacity production:
- End-day cleaning
- Removal of the removable parts mod."CN"
- Long periods of inactivity
- TROUBLESHOOTING
- Foreword
- Troubles, causes and remedies
- 7-12-18-25-38-50/SN
- 12-18-25-38-50/FN
- 12-18-25-38-50/CNS
- INΦOPMAÇU NIO YCTAHOBKE
- INHOPMAUINIIONCIOJIb3OBAHNIO N OCHCTKA
- NOK HENCPABHOCTE
- PINIOXEHNA
- Cebb HctpyKu
- IeHTnФнkaци N3rotOBNTeIЯ MaunHbI
- Oncahne MecnIbHOB MaunHbI
- Hnctpykun "ufoBoro ynpaBneHna" (kaKyIbTaTnBHO)
- UcTpoIcTbA 6e3OnaChOCTn
- HhopmaunnoTexnke6e3onacchoctn
- YnakOBka npacnaKOBka
- 3oHa yCTaHOBKn
- 1) Khonka CTapTa "I"
- 2) Khonka cton "0"
- 3) Pbyar 6JOKIPOBKn roJOBKn (ToJIbKO MoJ.CNS-FN)
- 4) ΦηαHEu 6LOKnOBKn KAcTpHJN (ToIbKO MoJ.CNS)
- PpIMMeHHe MeCNbHOJ MaUNHbI
- DByxckopocTha Bepcn
- CobetbI no npMHeHIO
- Pon3BODHTeJIbHocTb:
- OuNTka B KOHcE dHa
- N3BneHHe BbIHMaIOxxCa DeTaJe
- ДЛNTeJIbHoe npOCTaNBaHne MaunHbI
- ПОИСК ИЗПAPВАХOTЕN
- BVeDeHne
Brand : BARTSCHER
Model : 101864
Category : Food Processor