14150106L - LED Lighting Livarno Lux - Free user manual and instructions
Find the device manual for free 14150106L Livarno Lux in PDF.
| Technical specifications | Details not available |
|---|---|
| Usage | Details not available |
| Maintenance and repair | Details not available |
| Safety | Details not available |
| General information | Details not available |
Frequently Asked Questions - 14150106L Livarno Lux
Download the instructions for your LED Lighting in PDF format for free! Find your manual 14150106L - Livarno Lux and take your electronic device back in hand. On this page are published all the documents necessary for the use of your device. 14150106L by Livarno Lux.
USER MANUAL 14150106L Livarno Lux
Assembly, operating and safety instructions
Dispose of the packaging and product in an environ- mentally-friendly manner!
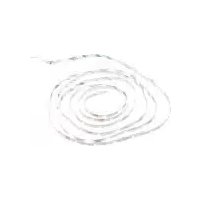
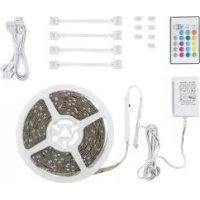
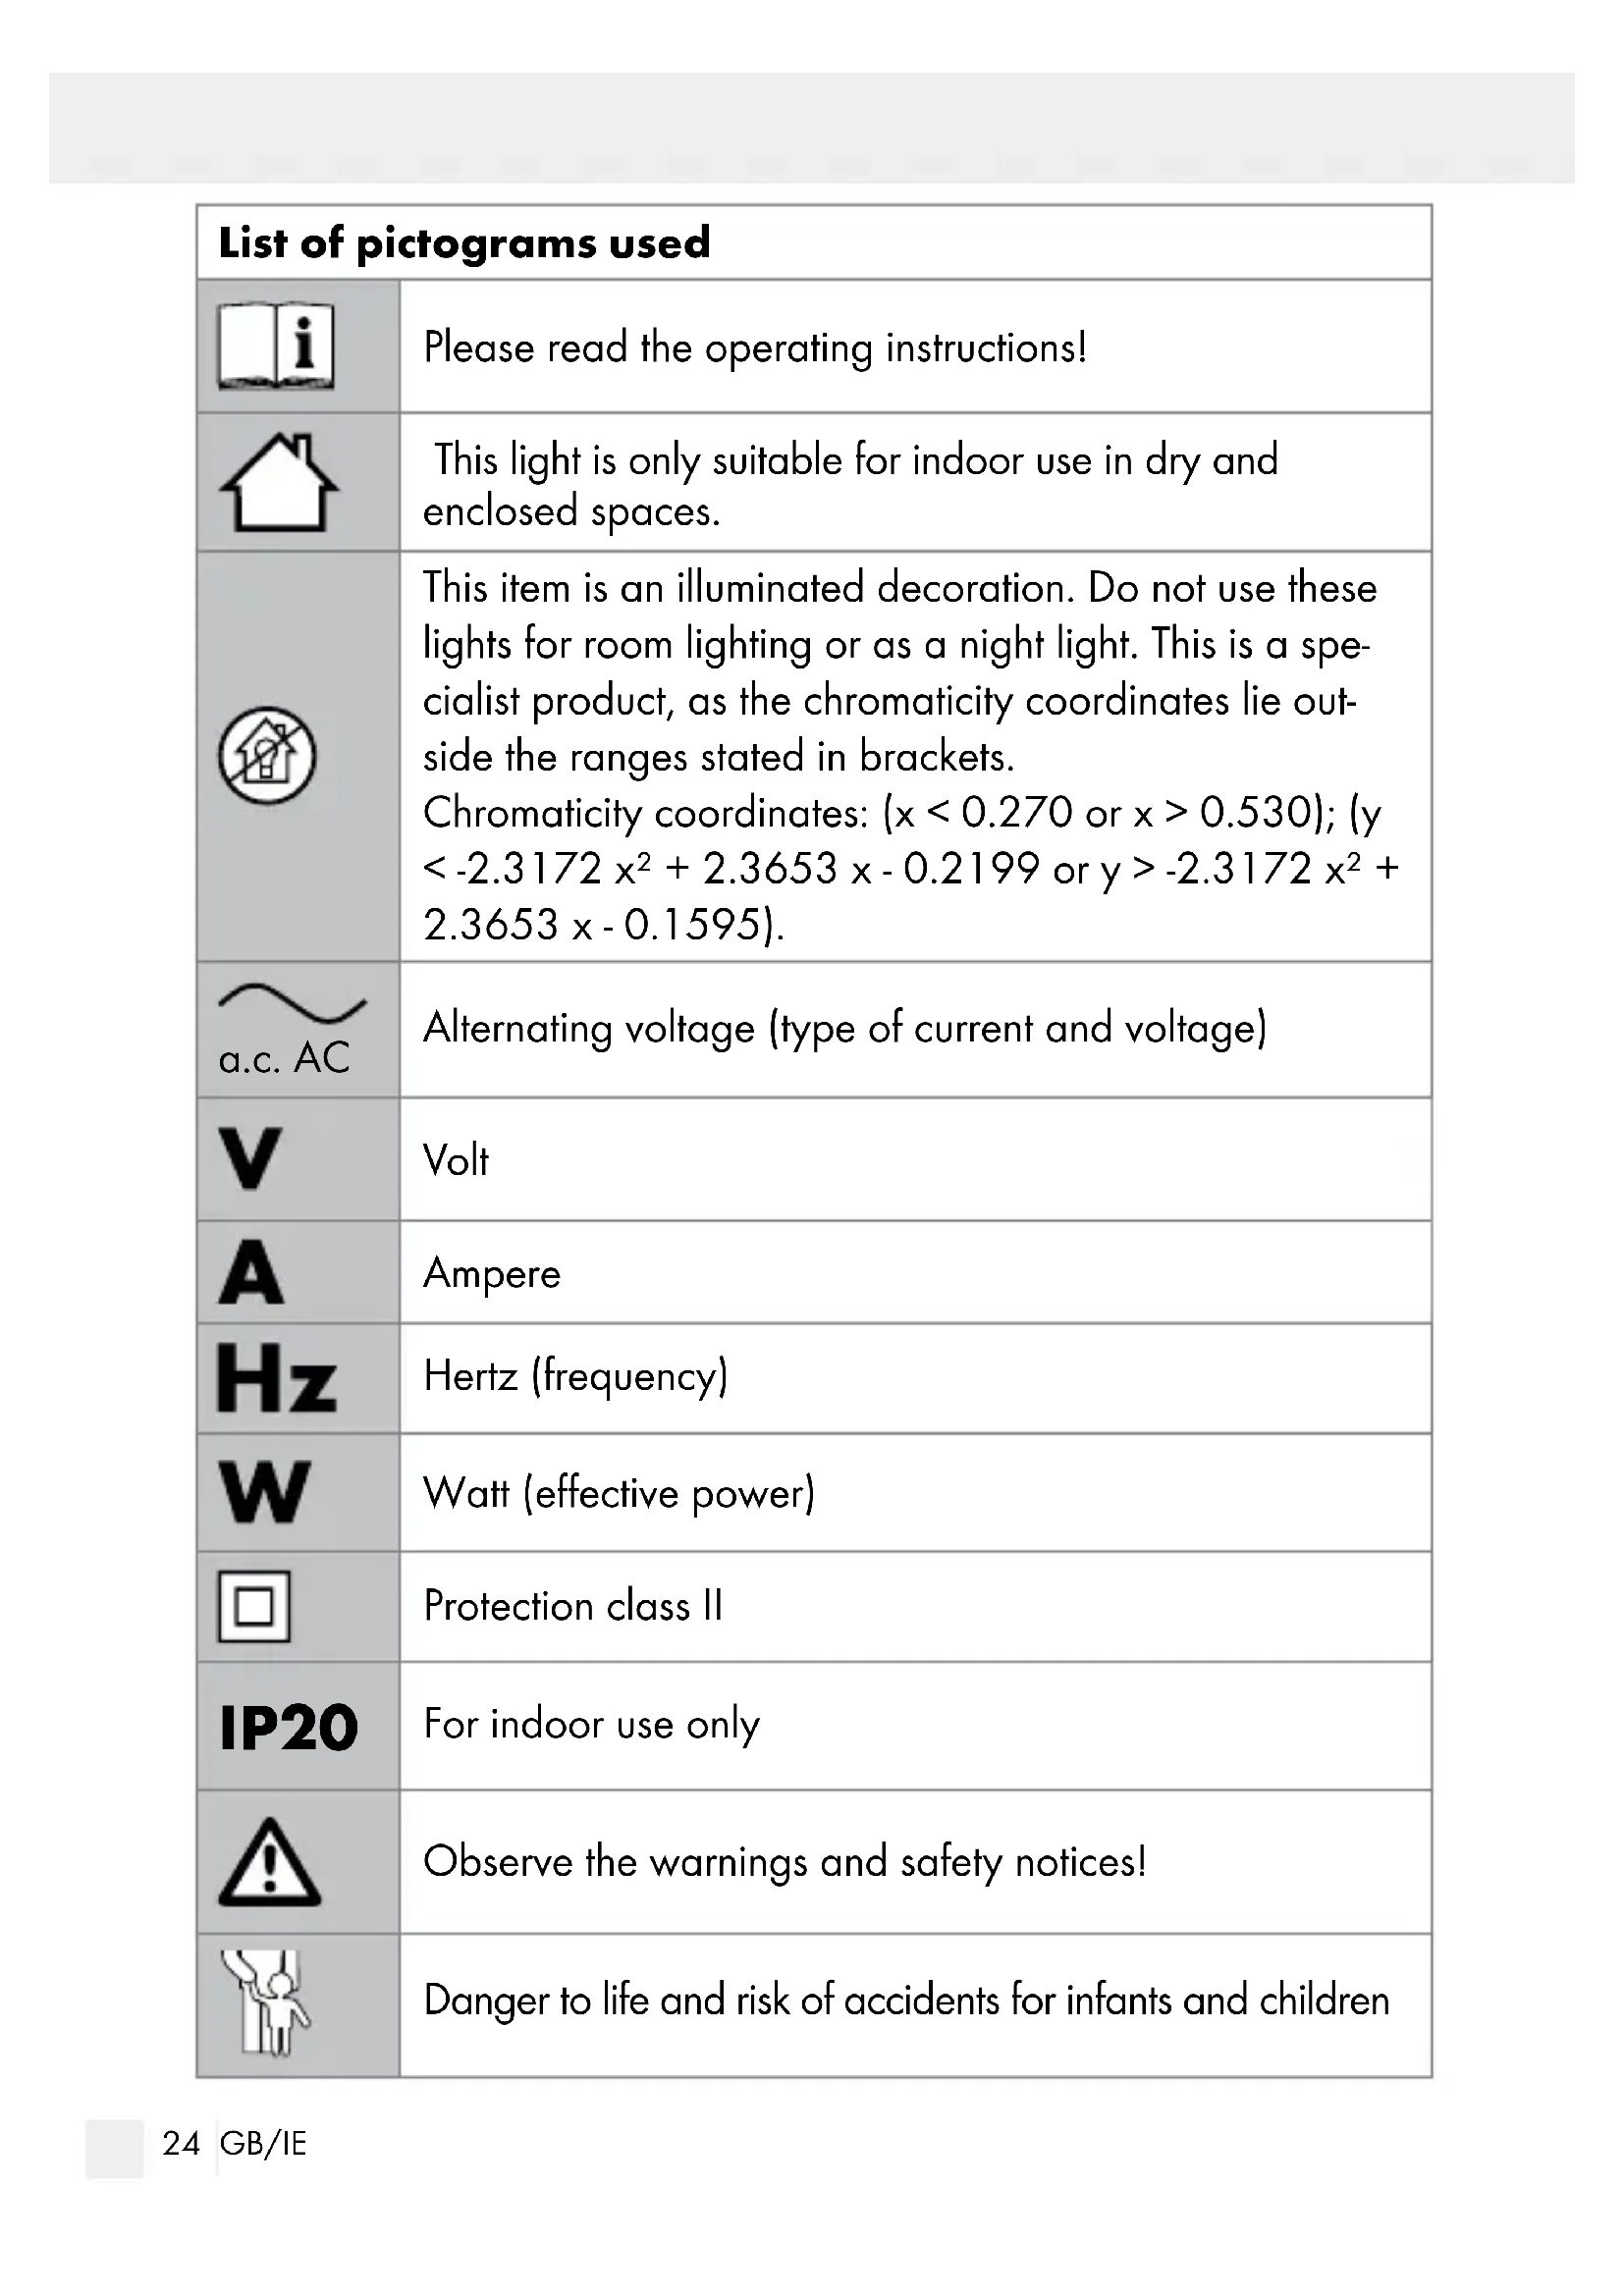
Ambient temperature26 GB/IE List of pictograms used tc. Housing temperature at stated point Warning! Risk of electric shock Keep batteries out of the reach of children! The packaging is made from 100 % recycled paper. LED Strip, 5 m Introduction Please be sure to carefully read the complete instructions for use. These instructions are part of the product and con- tain important information on setup and handling. Always follow all safety instructions. Before using this product for the first time verify the correct voltage and that all parts are properly installed. If you have any questions or you are unsure about operating the product, please contact the distributor or service centre. Please keep these instructions in a safe place and pass them on to third parties if necessary. Intended use This luminaire is only suitable for indoor use, in dry and en- closed rooms. This device is only intended for use in a private domestic environment, not for commercial use. Any use other than that described above is prohibited and will result in product27 GB/IE damage. It is further associated with dangers, e.g. short circuit, fire, electric shock, etc. This product is intended for normal operation. This product is an illuminated decoration. Do not use these lights for room lighting or as a night light. This is a special product, as the colour value amounts are beyond the ranges listed in the brackets. Chromaticity coordinates: (x < 0.270 or x > 0.530); (y < -2.3172 x² + 2.3653 x - 0.2199 or y > -2.3172 x² + 2.3653 x - 0.1595). Scope of delivery Check immediately after unpacking that the parts are complete and that the product is in proper condition. 1 LED strip, model 14150106L 1 Mains adapter 1 Receiver 2 Screws (receiver) 4 Connectors 8 End caps for the connectors 1 Cable holder 1 Adhesive strip (receiver) 3 Adhesive strips 1 4-way divider 4 End caps for the 4-way divider 1 Remote control 1 Set of assembly instructions and instructions for use Parts description
Adhesive strip (receiver)
50 / 60 Hz Output current: 12 V , 2.0 A, 24 W Protection class: II / IP rating: IP20 Battery for remote control: Type: CR 2025 Safety Safety instructions Damage due to failure to comply with these instructions for use will void the warranty! We assume no liability for consequential damages!29 GB/IE We assume no liability for property damage or personal injury due to improper handling or failure to comply with the safety instructions!
RISK OF FATAL INJURY AND
ACCIDENT HAZARD FOR TODDLERS AND
SMALL CHILDREN! Never leave children unsupervised with the packaging material. The packaging material poses a suffocation hazard. Children frequently underestimate the dangers. Please always keep the product out of the reach of children. This device may be used by children aged 8 years and up, as well as by persons with reduced physical, sensory or mental capacities, or lacking experience and/or knowledge, so long as they are su- pervised or instructed in the safe use of the device and understand the associated risks. Do not allow children to play with the prod- uct. Cleaning and user maintenance must not be performed by children without supervision. Avoid the risk of fatal injury from electric shock Check the LED strip for damage before every use. Never use the LED strip if any damage is detected. A damaged mains cable poses a risk of fatal injury from electrical shock. In the case of damage, repairs or other problems, please contact the service centre or a qualified electrician. The supply ca- ble of this appliance cannot be replaced. If the cable is damaged, the appliance must be disposed of. The appliance contains no parts which may be serviced by the consumer. Make sure before use that the available supply voltage corresponds to the required operating voltage of the item (see “Technical data“).30 GB/IE Never allow the live power leads and contacts to come into con- tact with water or other liquids. Never open any of the components of the electrical equipment or insert any objects into the same components. This will pose a risk of fatal injury from electric shock. The lamp's illuminant is not replaceable. The entire lamp needs to be replaced if the illuminant reaches the end of its service life. Do not use the LED strip if it is covered with objects or is inlaid into a surface. Do not install the lamp on damp or conductive surfaces. This LED strip must not be connected electronically with other LED strips. Do not secure with sharp staples or nails. Always unplug the mains plug from the socket before assembly, disassembly or cleaning. Never catch hold of the mains plug or the LED strip with wet hands. Only use the individual parts supplied, otherwise all warranty claims will become invalid. Do not connect this rope light to another manufacturer´s product. Interconnection shall be made only by the use of the supplied con- nectors. Any open ends must be sealed-off before use. Do not use the rope light when covered or crecessed into a surface. Never connect the LED strip to the power supply while it is in the packaging. Lay out the item completely before you connect it to the power supply. Lay out the item completely before you connect it to the power supply. For some people, this can lead to epileptic seizures or distur- bances of consciousness if they are exposed to certain flashes or light effects. Immediately visit a doctor if you experience epileptic symptoms.31 GB/IE Prevent fire and injury hazards This product does not contain any parts that can be serviced by the user. The LEDs cannot be replaced. If the LEDs cease to function at the end of their operational life, the entire item must be replaced. This light is not suitable for external dimmers or electronic switches. Do not look into the LED from a close distance during operation. Do not look at the LED with an optical instrument (e.g. magnifier). Safe working Install the light so that it is protected from dirt and excessive heating. Always be attentive! Always pay attention to what you are doing and use common sense. Never use the LED strip if you are having difficulty concentrating or do not feel well. Before use, familiarise yourself with all the instructions and diagrams in these instructions, as well as with the LED strip itself. To completely disconnect the LED strip from the power supply, the mains adapter must be removed from the mains socket.32 GB/IE Safety instructions for batteries / rechargeable batteries KEEP BATTERIES OUT OF THE REACH OF CHILDREN! Swallowing batteries can cause chemical burns, perforation of soft tissue, and death. Severe burns may occur within 2 hours of swal- lowing batteries. Seek immediate medical attention. DANGER TO LIFE! Keep batteries / rechargeable batteries out of reach of children. If accidentally swallowed seek immediate medical attention. DANGER OF EXPLOSION!
Never recharge non-rechargeable batteries. Do not short-circuit batteries / rechargeable batteries and / or open them. Overheat- ing, fire or bursting can be the result. Never throw batteries / rechargeable batteries into fire or water. Do not exert mechanical loads to batteries / rechargeable batteries. Risk of leakage of batteries / rechargeable batteries Avoid extreme environmental conditions and temperatures, which could affect batteries / rechargeable batteries, e.g. radiators / direct sunlight. If batteries / rechargeable batteries have leaked, avoid contact with skin, eyes and mucous membranes with the chemicals! Flush immediately the affected areas with fresh water and seek medical attention!33 GB/IE WEAR PROTECTIVE GLOVES!
Leaked or damaged batteries / rechargeable batteries can cause burns on contact with the skin. Wear suitable protective gloves at all times if such an event occurs. In the event of a leakage of batteries / rechargeable batteries, immediately remove them from the product to prevent damage. Only use the same type of batteries / rechargeable batteries. Do not mix used and new batteries / rechargeable batteries. Remove batteries / rechargeable batteries if the product will not be used for a longer period. Risk of damage of the product Only use the specified type of battery / rechargeable battery! Insert batteries / rechargeable batteries according to polarity marks (+) and (-) on the battery / rechargeable battery and the product. Clean the contacts on the battery / rechargeable battery and in the battery compartment before inserting! Remove exhausted batteries / rechargeable batteries from the product immediately. Initial use Remove all packaging materials before first use. Never connect the LED strip to the mains power supply while it is in the packaging and rolled up. Note: Ensure that a plug socket is located in close proximity to the installation area.34 GB/IE Replacing / Inserting batteries (see Fig. A) Note: Before first use, pull the insulating strip
out of the bat- tery compartment
If the range of the remote control
reduces, the battery
needs to be replaced. To do so, slide the battery compartment out of the remote control
. Remove the old battery
and insert a new one. Note: The correct polarity is indicated on the reverse side of the remote control
Slide the battery compartment
back into the remote control
Trimming / connecting the LED tape The LED tape may be trimmed to size or connected. DANGER TO LIFE BY ELECTRIC SHOCK! Disconnect the lights from the power supply before performing any work on the LED strip
from the socket to do so. Choose the desired LED strip length. Note: Ensure that you trim the LED strip at the right place. The cutting point is exactly in the middle of the poles and is marked with a black line (+ 12 V DC, DI, GND, GND) (see Fig. C). Trim the LED strip
using a pair of scissors. Then press both ends of the LED strip
onto the displacement contact of the plug connection
(see Fig. C). When connecting the LED strips
, pay attention to the correct polarity of the con- nector (+12 V DC, DI, GND, GND) and to the arrow markings on the LED strip
. The imprinted arrows must point in one direction (see Fig. C). Then press one end cap
at a time onto the ends of the plug connection
(see Fig. C).35 GB/IE Check the correct positioning. You may also connect the LED strip
with the 4-way divider
To do this, repeat the steps in the chapter “Trimming / connecting the LED tape“. Please note Figure F for this purpose. Be sure to cover the open end of the LED tape
with the adhe- sive strip
if you do not wish to connect the end after trimming the tape (see Fig. G). Installing the LED strip Note: Ensure that the installation area is clean, grease-free and dry. Otherwise the functionality of the adhesive strip may be impaired. Note: Ensure that a plug socket is located in close proximity to the installation area. Choose a suitable installation area. Using the plug
directly to the so- cket
(see Fig. A). Now connect the LED strip
. Pay attention to the arrow marking and the polarity (+12 V DC) on the LED strip
(see partial view in Fig. A). Remove the protective film from the reverse side of the LED strip
(see Fig. B). Stick the LED strip
onto the installation area using the adhesive strip and press it on firmly (see Fig. B). Remove the protective film from both sides of the adhesive strip (re- ceiver)
and stick this to the back of the receiver
(see Fig. E). Stick the receiver
to the desired location. Screw down the receiver
Remove the protective film
from the reverse side of the cable holder
(see Fig. D).36 GB/IE Stick the cable holder
to the desired location and then clamp the sensor
into the plug socket. Your light is now ready to use. Switching the LED strip on / off Press the ON / OFF button on the remote control
to switch the LED strip
is only suitable to temporarily switch off the LED strip
from the plug socket to switch off the LED strip
permanently. Note: The LED strip
has a memory function. This saves the last programme that was set. For a comprehensive overview of all 166 programmes, please scan the QR code. Maintenance and cleaning DANGER TO LIFE BY ELECTRIC SHOCK! Disconnect the lights from the power supply before performing any work on the LED strip
from the socket to do so. Do not use solvents, benzene or similar substances. They could damage the light. Use a dry, lint-free cloth to clean the LED strip
.37 GB/IE Disposal The packaging is made entirely of recyclable materials, which you may dispose of at local recycling facilities.
Observe the marking of the packaging materials for waste separation, which are marked with abbreviations (a) and numbers (b) with following meaning: 1–7: plastics / 20–22: paper and fibreboard / 80–98: composite materials. The product and packaging materials are recyclable, dis- pose of it separately for better waste treatment. The Triman logo is valid in France only. To help protect the environment, please dispose of the prod- uct properly when it has reached the end of its useful life and not in the household waste. Information on collection points and their opening hours can be obtained from your local authority. Faulty or used batteries / rechargeable batteries must be recycled in accordance with Directive 2006/66/EC and its amendments. Please return the batteries / rechargeable batteries and / or the product to the available collection points. Environmental damage through incorrect dis- posal of the batteries / rechargeable batteries! Batteries / rechargeable batteries may not be disposed of with the usual domestic waste. They may contain toxic heavy metals and are subject to hazardous waste treatment rules and regulations. The chemi- cal symbols for heavy metals are as follows: Cd = cadmium, Hg =38 GB/IE mercury, Pb = lead. That is why you should dispose of used batter- ies / rechargeable batteries at a local collection point. Warranty and service Warranty You receive a 36 month warranty on this product, valid from the date of purchase. The appliance has been carefully produced under strict quality control. Within the warranty period we shall rectify without charge all material and manufacturing defects. In the event a defect arises during the warranty period, please send the device to the listed service centre address, specifying the following model number: 14150106L. Wear parts (such as bulbs) and damage caused by improper handling, non-observance of the operating instructions or unauthorised interfer- ence are excluded from the warranty. The performance of services under the warranty does not extend or renew the warranty period. Service address Briloner Leuchten GmbH & Co. KG Im Kissen 2 59929 Brilon GERMANY Tel.: +49 29 61 / 97 12–800 Fax: +49 29 61 / 97 12–199 E-Mail: kundenservice@briloner.com www.briloner.com39 GB/IE Free service number: Tel.: 00800 / 27456637 IAN 345123_2004 Please have your receipt and the product number (e.g. IAN 123456_7890) available for all queries as proof of purchase. Declaration of conformity This product fulfils the requirements of the applicable European and national directives. Conformity has been demonstrated. The relevant declarations and documents are held by the manufacturer. Manufacturer Briloner Leuchten GmbH & Co. KG Im Kissen 2 59929 Brilon