KR130 - Radio Auna - Free user manual and instructions
Find the device manual for free KR130 Auna in PDF.
| Product Type | Digital alarm clock with Bluetooth and FM radio |
| Brand | Auna |
| Model | KR130 |
| Dimensions (approx.) | 180 x 120 x 80 mm |
| Weight (approx.) | 0.5 kg |
| Power supply | AC adapter 100-240 V ~ 50/60 Hz, output 5 V / 1.5 A |
| Audio power | 2 x 2 W RMS |
| FM receiver | 87.5-108 MHz, 40 station presets |
| Bluetooth | Profiles A2DP, AVRCP, HSP; range ~10 m |
| Main functions | FM radio, Bluetooth, dual alarm (buzzer or radio), timer, LED light, hands-free function, snooze, gradual wake-up |
| Care and cleaning | Clean with a dry, soft cloth. Do not use liquids or abrasive products. |
| Safety | Do not expose to water, do not block ventilation openings, do not open the device. Keep out of reach of children. |
| Spare parts and repairability | Button cell LR44/CR2032 for time backup. Do not open, no user-serviceable internal parts. |
| Box contents | Alarm clock radio, AC adapter, FM antenna cable, user manual |
| Warranty | 2 years (statutory warranty) |
Frequently Asked Questions - KR130 Auna
User questions about KR130 Auna
0 question about this device. Answer the ones you know or ask your own.
Ask a new question about this device
Download the instructions for your Radio in PDF format for free! Find your manual KR130 - Auna and take your electronic device back in hand. On this page are published all the documents necessary for the use of your device. KR130 by Auna.
USER MANUAL KR130 Auna
INHALTSVERZEICHNIS
Technische Daten 4
BT Gerätekopplung
natural_image
Illustration of hands using a tool to adjust or install a metal bracket component (no text or symbols visible)

natural_image
Diagram of a hand interacting with a 3D object on a surface, showing arrows and small components (no text or symbols)
natural_image
Diagram of a device with two black components and an upper panel, no visible text or symbols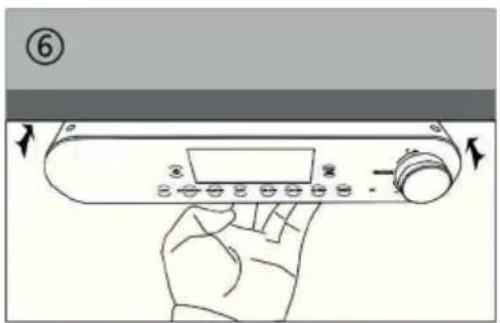

natural_image
Line drawing of a kitchen control panel with buttons and a door (no text or symbols)Member of Berlin Brands Group
Handwerkerstr. 11
15366 Dahlwitz-Hoppegarten
Deutschland
natural_image
Symbol of a trash bin crossed out by a diagonal line, with no text or labels present.Congratulations on purchasing this device. Please read the following instructions carefully and follow them to prevent possible damages. We assume no liability for damage caused by disregard of the instructions and improper use. Scan the QR code to get access to the latest user manual and more product information.

CONTENTS
Technical Data 22
Safety Instructions 23
Product Description 24
Operation 26
Radio Functions 28
BT Functions 30
Reset the Device 33
Installation 34
Troubleshooting 35
Disposal Considerations 36
Declaration of Conformity 36
TECHNICAL DATA
| Item number 10031854, 10031855 | |
| Power supply | |
| Input 100-240 V ~ 50-60 Hz | |
| Output 5 V / 1.5 A | |
| Audio | |
| Output Power 2 W (RMS) x 2 (4 Ohm) | |
| Freq. Responses 80-16.000 Hz | |
| FM Radio | |
| Tuning Range 87,5-108 MHz | |
| Preset Memory 40 stations | |
| BT | |
| Supported Profile A2DP, AVRCP, HSP | |
| BT frequency 2402-2480 MHz | |
| BT radio-frequency power (max.) 5 dBm | |
SAFETY INSTRUCTIONS
- This product is not intended for use by young children. Young children should be properly supervised.
- This product is intended for household use only and not for commercial or industrial use.
- Do not expose to dripping or splashing.
- No naked flame sources, such as lighted candles, should be placed on the product.
- Ventilation should not be impeded by covering ventilation openings with items such as newspapers, table cloths, curtains and the like.
- Make sure the unit is adjusted to a stable position. Damage caused by using this product in an unstable position or by failure to follow any other warning or precaution contained within this user manual will not be covered by warranty.
- Use only the AC-DC Power Adapter / Power Supply listed in this User Manual.
- Do not place naked flames, such as lighted candles on or near the product.
- Do not place objects filled with liquids, such as vases on or near the product.
- Do not use or store this product in a place where it is subject to direct sunlight, heat, excessive dust or vibration.
- Do not keep or store this product in wet conditions for long period.
- Do not clean this product with water or other liquids.
- Do not block or cover the slots and holes in the product.
- Do not push foreign objects into the slots or holes in the product.
- Do not attempt to open this product yourself. There are no user serviceable parts inside.
- Do not allow children access to plastic bags.
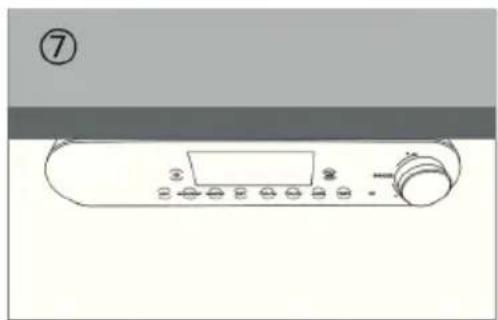
PRODUCT DESCRIPTION
Front and Rear
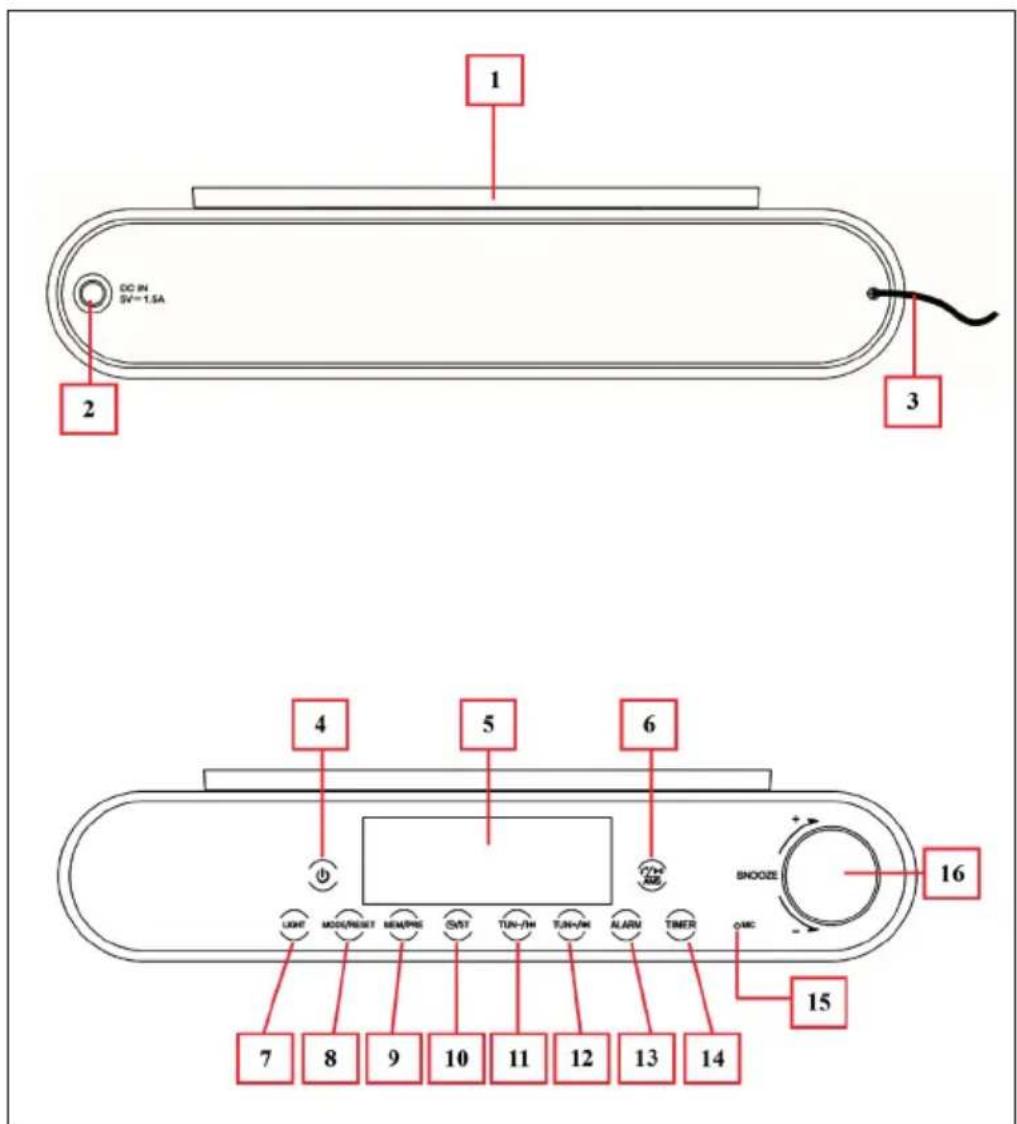
| 1 Bracket Mounting Slot 9 PRE/MEM Button | |
| 2 DC INPUT Socket 10 Clock/ST Button | |
| 3 FM Wire Antenna 11 TUN- Button | |
| 4 POWER Button (Power ON/OFF) 12 TUN+ | |
| 5 LED Segments Display 13 ALARM Button | |
| 6 Phone, Play/Pause, AMS Button 14 TIMER Button | |
| 7 LIGHT Button (Light On/Off) 15 MIC Position (for hand-free) | |
| 8 RESET/MODE Button 16 Adjustment Button (+/-, Enter, Sooze) |
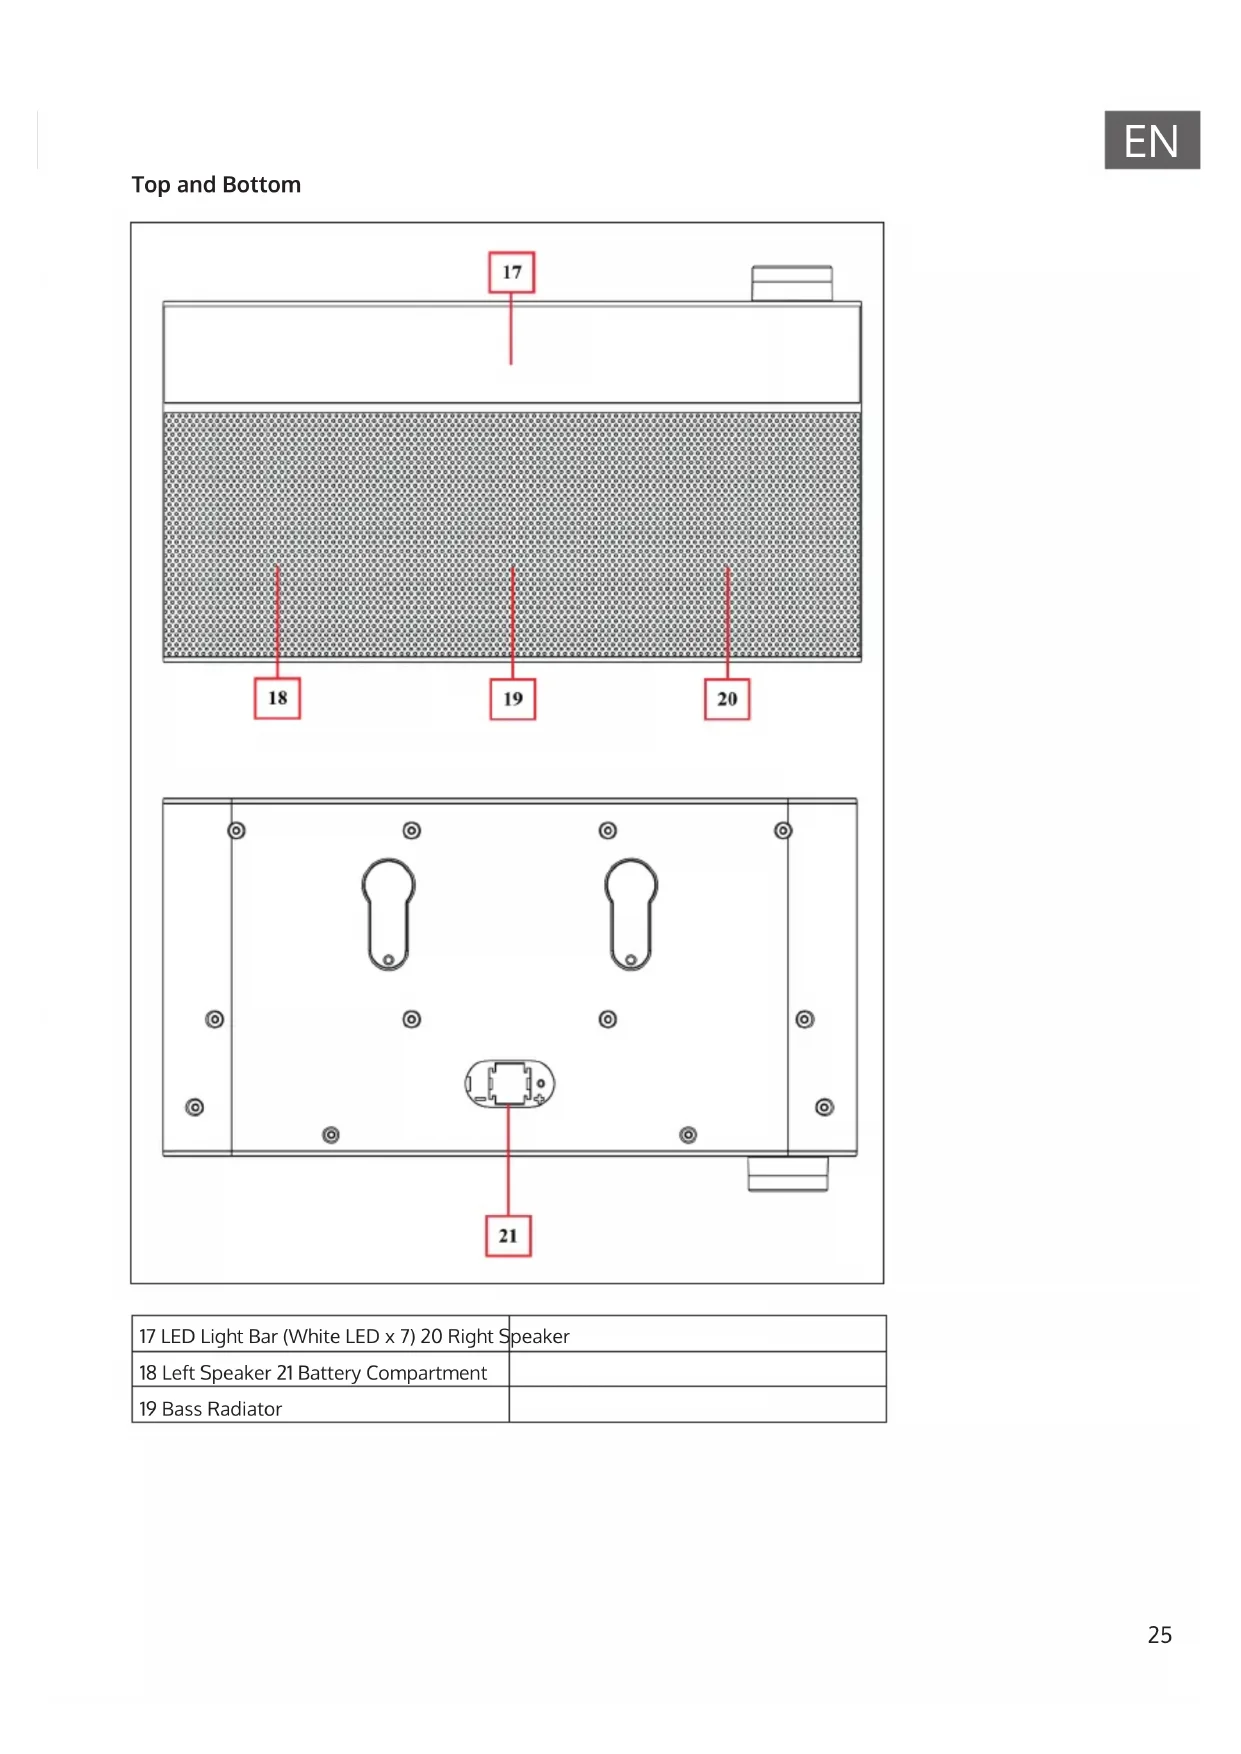
Top and Bottom
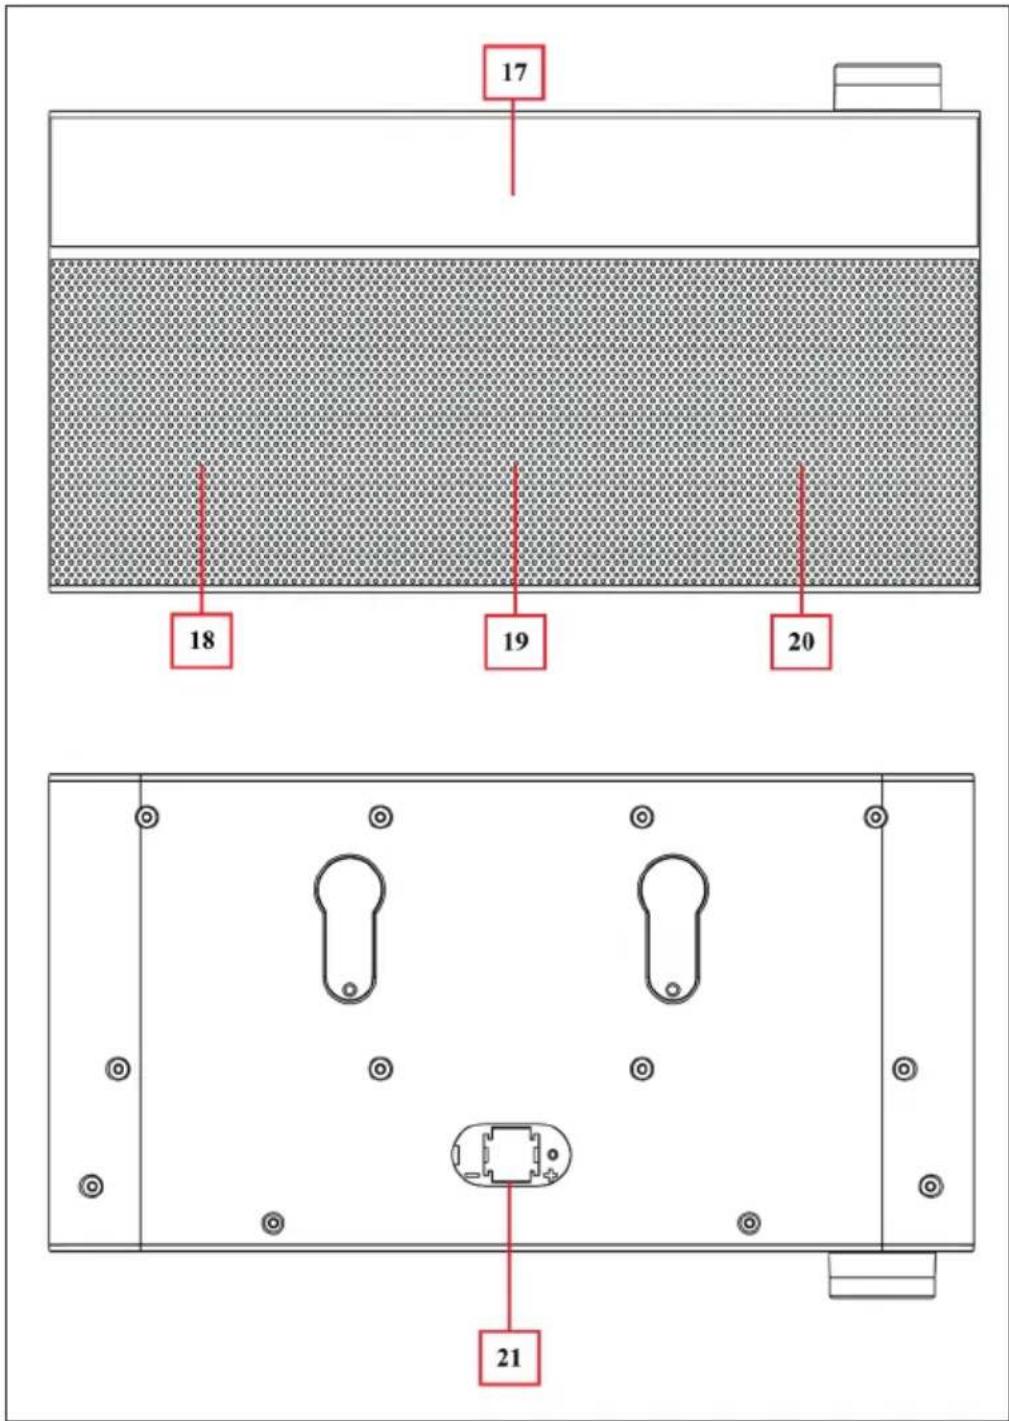
| 17 LED Light Bar (White LED x 7) 20 Right Speaker | |
| 18 Left Speaker 21 Battery Compartment | |
| 19 Bass Radiator |
OPERATION
Plug the 5.5 mm DC plug of provided AC to DC power adapter into "DC INPUT Socket (3)" which located on back of BT Kitchen clock device.
Clock setting
1 When first time plug the power adaptor, the clock should show "00:00" on the display, then manual clock time adjustment is required.
2 Short press the "Clock/ST (10)" button to entry time format set.
3 The LED display will show blinking "24H" or "12H" for 6 seconds (factory defaulted is "24H").
4 Rotates the "Adjustment (16)" button to [+] or [-] for selects the desired time format:

5 Short press the "Adjustment (16)" button to confirm the time format set and go for hour set, the number of hour will blinking;
6 Rotates again the "Adjustment (16)" button to [+] or [-] for selects the hour time as current time;
7 Short press again the "Adjustment (16)" button to confirm the hour time set and go for Minute set. The number of minute will blinking;
8 Rotates again the "Adjustment (16)" button to [+] or [-] for selects the minute time as current time and short press the "Adjustment (16)" button to confirm the minute time set.
9 The clock set adjustment is completed and clock time is showing on LED display.
Note: Since the device has a AG13(LR44) button cell which will ensure the time is maintained even during power outage. The clock time will not be maintained if the backup battery runs out. In this case the clock should show "00:00", a new cell is needed to replace. Then manual clock time adjustment is required.
Set Alarm

1 Short press the "ALARM (13)" button to entry the set alarm function, first the Alarm 1 symbol will blinking.
2 Then short press the "ALARM (13)" button again can switch to Alarm 2 when you want; (Short press this button can switch in between Alarm 1 and Alarm 2 repeatedly).
3 Set Alarm 1 for example: Short press the "ALARM (13)" button to choose.
4 Then short press the "Adjustment (16)" button to confirm and go for set alarm's hour, and the number of alarm hour will blinking.
5 Rotates the "Adjustment (16)" button to "-" or "+" for selects the desired hour of Alarm 1. Short press the "Adjustment (16)" button to confirm and go for set minute of Alarm 1. The number of minute will blinking;
6 Then again, rotates the "Adjustment (16)" button to "-" or "+" for selects the desired minute of Alarm 1 and short press the "Adjustment (16)" button to confirm and go for choose wake-up source. The "bU" letter will blinking on LED segments display. Rotates the "Adjustment (16)" button to position "-" or "+" for choose "bU" or "tU" which as want:
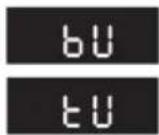
Buzzer (Beeps)
Tuner (FM Radio)
7 Short press the "Adjustment (16)" button to confirm once "bU" or "tU" is selected.
8 The Alarm 1 settings are completed and icon is showing on LED display.
Wake-up Source
- Wake to Buzz: At the selected Alarm time, the wake-up beeps will turn on for 5 minutes. To stop the Alarm, short press the "Alarm (13)" button.
- Wake to Radio: At the selected Alarm time, the FM radio will automatically turn on itself. To stop the FM radio, short press the "POWER (4)" button to turn off the device.
Dual Alarm Time Set
Repeat the above mentioned set Alarm 1 methods to set Alarm 2 for dual alarm function if you want.
Use Snooze
At the time of wake-up beeps in sound, you can short press the "Adjustment (16)" button for approximately 9 minutes extra for sleep if you want. The "Zz" icon will appear as identify. And this snooze function can repeat 3 times if you use it. When turn on the device by POWER button will disable the snooze function if snooze is in using.
Disable Alarm 1 and or Alarm 2
1 Short press the "ALARM (13)" button to call alarm function, the Alarm 1 symbol will blinking.
2 Short press "ALARM (13)" button again to choose which alarm to disable.
3 In Alarm 1 or Alarm 2 blinking status, long press the "ALARM (13)" button to disable the chosen Alarm.
Set Cooking Timer

4 Short press the "Timer (14)" button to entry the countdown timer mode, the LED display switch from current mode to timer display mode, the timer symbol will blinking and show "05" minutes on LED display; (5 minutes is system default running time when timer is chosen).
5 Then rotates the "Adjustment (16)" button to "-" or "+" for set your desired time for cooking timer (01 \~ 300 minutes can be set).
6 Short press the "Timer (14)" or "Adjustment (16)" button to confirm and the display will switch back to previous current mode screen. The Timer symbol is appearing for indication, the Cooking Timer is activated.
7 The last 30 seconds of setting time will be counted down on display with beep sound until time's up.
8 Then long press the "Timer (14)" button to disable function and the symbol will disappear on LED screen.
Kitchen Light ON/OFF
Short press the "Light (7)" button to turn on the kitchen light bar when necessary. Short press the "Light (7)" button again to turn off the kitchen light bar.
RADIO FUNCTIONS
- Press the POWER button (4) to turn on the unit and radio. Press the POWER button again to turn the unit off.
- When you enter FM mode for the first time, the LED display shows the memory number "P01".
Using FM Radio
- Make sure that the FM antenna is well adjusted and fixed in a good position. This will improve radio reception.
- Turn the knob (16) towards [-] to reduce the volume.
- Turn the knob (16) towards [+] to increase the volume.
FM Mute
- If you wish to mute the radio, press the PHONE button (6) briefly. The sound is muted and the FM radio frequency flashes to indicate this.
- Press the TELEPHONE button (6) again to cancel the mute.
AMS - Automatic station search and storage
- Long press the AMS button (6) to enter AMS mode.
- The FM radio switches to AMS mode and searches for radio stations. Sufficiently strong FM broadcast frequencies are stored in the station memory.
- When the automatic station search is finished, use the TUN+/TUN-buttons to select the desired station.
Note: No frequencies are displayed, only the preset numbers of the radio stations.
Turning the FM stereo function on and off
- In some cases, the receiving FM radio station may be noisy due to poor reception or strong interference.
- Turn off the FM stereo function to remedy this problem.
- When the receiving FM radio station is broadcast in FM stereo, the "ST" indicator should appear on the top line of the display
- To switch off the FM stereo function, briefly press the clock/ST button (5) and the "ST" symbol disappears.
- Press the button again to switch the FM stereo function back on. The "ST" symbol will appear in the display again after 2 seconds.
BT FUNCTIONS
Switch in-between BT and FM mode
• Power on the device, or in FM radio mode;
- Short press the "MODE (8)" button to change from FM to BT mode, the screen will switch to BT mode and the "BT" icon appears.
- Short press the "MODE (8)" button can switch in-between from BT and FM mode at any time as your desired.

BT device Pairing
- When switched to BT mode, the device will goes for reconnect/pairing mode automatically.
- Then, activate the BT function in your BT device (such as Mobile Phone or Personal Computer). the device will enter to BT searching mode automatically, if not, taps the related selection to manually enter to searching mode. (refer to your device's manual when necessary)
- Your mobile device should show "KR-130" in BT list, and then select it for pairing. Waiting for some seconds and will see connected message as shown on your mobile device. (For some BT devices. You may need to input "0000" as pairing password)
- If pairing is successful, a beep will sound, the "BT" icon light change to solid from blinking.
- Now, you can start to music play from the mobile device by its music player program.
Disconnect from paired device
- To disconnect with paired device and for better result.
- Long press the "PHONE (6)" button to disconnect directly and a series of tones will sound as identify.
- Or, you can choose "Disconnect" from BT paired device list on your mobile device.
- In this case, the BT Kitchen Clock Speaker will turn back into "Searching/Pairing" mode in seconds, a series of tones will sound and the "BT" icon will turn to blinking again from solid.
- Now, you can process for new mobile device pair or power Off the BT Speaker if you wanted.
Searcing for last paired device
• Every time you turn On the device and switch to BT mode.
- it will firstly search for the mobile device which has been paired previously and still in record.
- The device will reconnect this mobile device as priority if it's in BT searching device mode and in connection range.
- If no device found in some seconds, the device will automatically turn into pairing mode.
- Now you can process for new mobile device pair.
Switch to new pairing from connected mode
- In BT connected mode, you can switch the Device into BT searching mode for paring with the new device at any time you desired;
- Long press the "PHONE (6)" button to disconnect directly, a series of tones will sound as identify and the "BT" icon turn to blinking from solid.
- Now you can process for new mobile device pair.
BT Music Playing Controls
On your Mobile Device
- Switch to music player menu and choose a music to start the play from playlist or by using "TUN+/TUN-" button. Play/Pause the playing music by using "Play/Pause" button.
- Adjust the volume level by using the device's volume control or "Down/Up" button on your BT device. (Refer to your mobile device user's manual when necessary.)
On BT Speaker
- In playing music, press the "PHONE (6)" button to pause the playing music. To resume the music press it again.
- Rotates the "Adjustment (16)" button to "-" for decreases volume.
- Rotates the "Adjustment (16)" button to "+" for increases volume.
- The volume controls range can be used from "U00" minimum to "U30" maximum.
- Press the "TUN-(11)" button to play previous music.
- Press the "TUN+ (12)" button to play next music.
Hand Free Function
- When there is an incoming call during BT music playing mode.
- The ringing sound will up and the playing music will pause automatically.
- Long press the "PHONE (6)" button to reject the call if you want.
- Short press the "PHONE (6)" button to pick up the call.
- Now you are in hand free function with the BT Kitchen Clock Speaker.
- Short press the "PHONE (6)" button again to hang up the call when finished. And the paused music will resume automatically.
Note: speak to the "MIC (15)" hole direct with distance in 30-60cm to get the best speakerphone performance when necessary.
Redial Last Call Function
To redial for last called number by the BT Kitchen Clock Speaker, even it is in BT music playing mode:
- Short press the "PHONE (6)" button twice to enter into redial function, the playing music will pause and switch to hand free function for redial.
- Short press the "PHONE (6)" button again can hang up the calling.
Note: Make sure that your mobile phone has have last dial call used, if not, the redial for last call function cannot be activated.
RESET THE DEVICE
In some circumstances the device's function may hanging and need to reset. To reset the device:
- Long press the "RESET/MODE (8)" button for 8 seconds to reset the device.
- The LED segments display will show "F001 (example)" as identify and the device is in reset process, all previous setup will be erased and back to factory default.
- Then, the device will be turned back to clock time display mode, it will show "00:00", Then manual clock time adjustment is required.
- All previous setup will be erased and back to factory default. Including all previous preset FM stations are clean-up too, use AMS function to regenerate the preset station list.
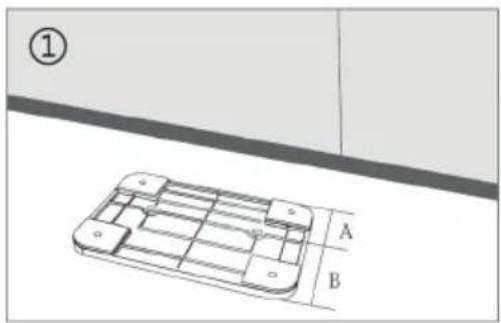
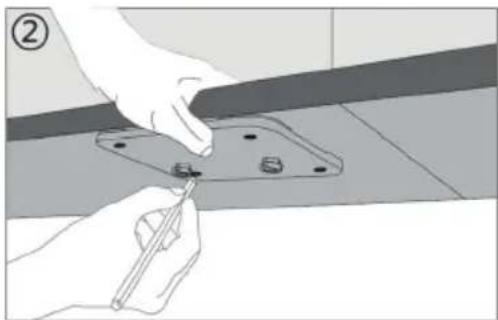
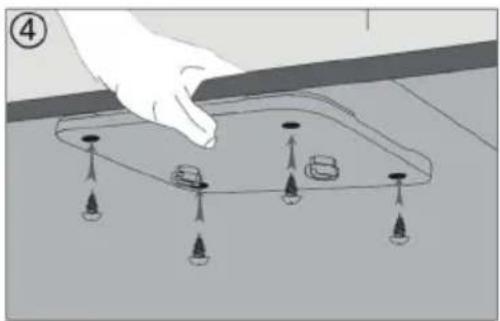
INSTALLATION
natural_image
Illustration of a hand using a tool to adjust or install a metal bracket component (no text or symbols visible)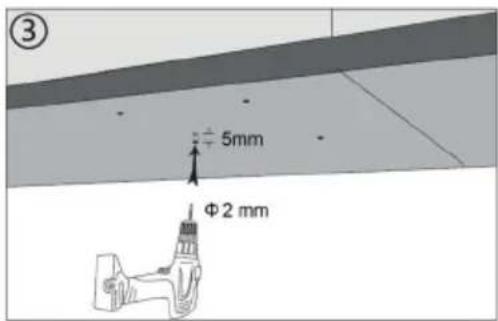

natural_image
Diagram of a hand interacting with a 3D object on a surface, showing arrows and dots (no text or symbols)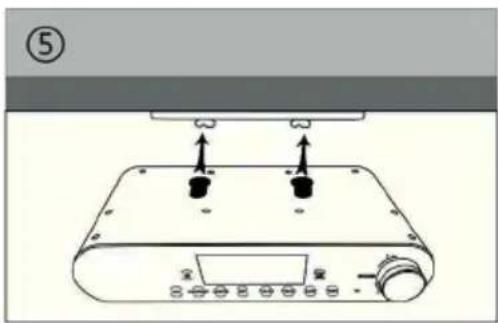
natural_image
Diagram of a device with two black components and an upper panel, no text or symbols present

natural_image
Line drawing of a kitchen air conditioner unit with control buttons and a door (no text or symbols)TROUBLESHOOTING
| No power • Check | whether DC plug of AC to DC adaptor is it firmly plugged into DC jack of main unit.• Check whether the AC to DC power adaptor is it firmly plugged into AC outlet.. |
| No sound • Check | whether volume level is in lower position on your main unit or and mobile device.• Check if you have selected the correct mode source.• Make sure that your BT device is within the effective operation range.• Check whether the BT device is paired on your mobile device.• Check whether the BT device show connected on your mobile device. |
| No radio station • | Check wheater the FM antenna is well adjusted and fixed correctly. |
| No response from speaker | • Restart the speaker by power Off and On. |
DISPOSAL CONSIDERATIONS

natural_image
Symbol of a trash bin crossed out by a diagonal line, with no text or labels present.If there is a legal regulation for the disposal of electrical and electronic devices in your country, this symbol on the product or on the packaging indicates that this product must not be disposed of with household waste. Instead, it must be taken to a collection point for the recycling of electrical and electronic equipment. By disposing of it in accordance with the rules, you are protecting the environment and the health of your fellow human beings from negative consequences. For information about the recycling and disposal of this product, please contact your local authority or your household waste disposal service.
This product contains batteries. If there is a legal regulation for the disposal of batteries in your country, the batteries must not be disposed of with household waste. Find out about local regulations for disposing of batteries. By disposing of them in accordance with the rules, you are protecting the environment and the health of your fellow human beings from negative consequences.
DECLARATION OF CONFORMITY

Manufacturer:
Chal-Tec GmbH, Wallstrasse 16, 10179 Berlin, Germany.
Importer for Great Britain:
Berlin Brands Group UK Ltd
PO Box 1145
Oxford, OX1 9UW
United Kingdom
Hereby, Chal-Tec GmbH declares that the radio equipment type KR-130 is in compliance with Directive 2014/53/EU. The full text of the EU declaration of conformity is available at the following internet address: use.berlin/10031854
For Great Britain: Hereby, Chal-Tec GmbH declares that the radio equipment type KR-130 is in compliance with the relevant statutory requirements. The full text of the declaration of conformity is available at the following internet address: use.berlin/10031854
Estimado cliente:
ÍNDICE DE CONTENIDOS
Datos técnicos 38
Acoplar dispositivos con BT
natural_image
Illustration of hands using a tool to adjust or install a metal bracket component (no text or symbols visible)
natural_image
Diagram of a hand interacting with a 3D object on a surface, showing arrows and small components (no text or symbols)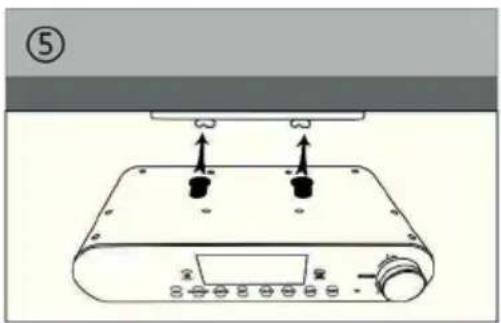
natural_image
Diagram of a device with two black components and an upper panel, no visible text or symbols
natural_image
Hand holding a portable electronic device with control buttons and a screen (no visible text or symbols)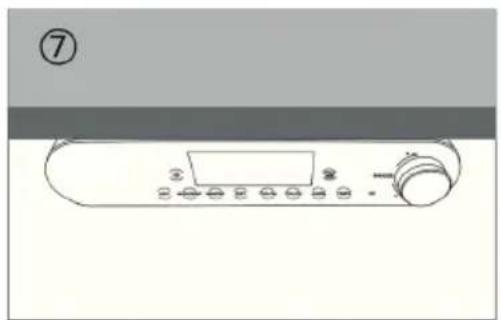
natural_image
Line drawing of a kitchen control panel with buttons and a door (no text or symbols)natural_image
Symbol of a trash bin crossed out by a diagonal line, with no text or labels present.Berlin Brands Group UK Ltd
PO Box 1145
Oxford, OX1 9UW
United Kingdom
SOMMAIRE
Fiche technique 54
natural_image
Illustration of a hand using a tool to adjust or install a metal bracket component (no text or symbols visible)

natural_image
Diagram of a hand interacting with a 3D object on a surface, showing arrows and dots (no text or symbols)
natural_image
Diagram of a device with two black components and an upper panel, no text or symbols present

natural_image
Line drawing of a kitchen air conditioner unit with control buttons and a door (no text or symbols)DÉPANNAGE
natural_image
Symbol of a trash bin crossed out by a diagonal line, with no text or labels present.DÉCLARATION DE CONFORMITÉ

Fabricant :
Chal-Tec GmbH, Wallstraße 16, 10179 Berlin, Allemagne.
Berlin Brands Group UK Ltd
PO Box 1145
Oxford, OX1 9UW
United Kingdom
INDICE
Dati tecnici 70
natural_image
Illustration of hands using a tool to adjust or install a metal bracket component (no text or symbols visible)

natural_image
Diagram of a hand interacting with a 3D object on a surface, showing arrows and small components (no text or symbols)
natural_image
Diagram of a device with two black components and an upper panel, no text or symbols present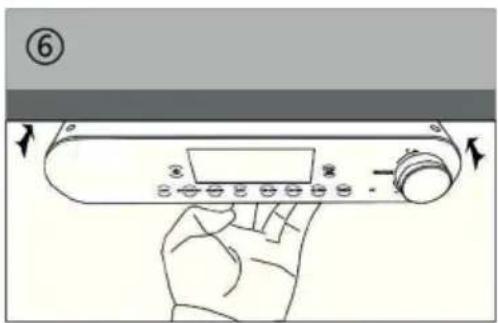
natural_image
Hand holding a portable electronic device with control buttons and a screen (no visible text or symbols)
natural_image
Line drawing of a kitchen control panel with buttons and a door (no text or symbols)natural_image
Symbol of a trash bin crossed with a diagonal line, representing no waste or discharge (no text or labels)Berlin Brands Group UK Ltd
PO Box 1145
Oxford, OX1 9UW
United Kingdom
INNEHÅLLSFÖRTECKNING
Tekniska data 86
natural_image
Illustration of a hand using a tool to adjust or install a metal bracket component (no text or symbols visible)

natural_image
Diagram of a hand interacting with a 3D object on a surface, showing arrows and dots (no text or symbols)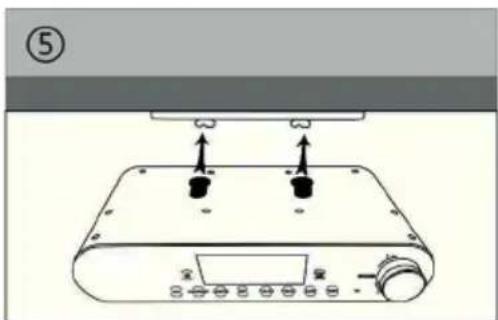
natural_image
Diagram of a digital audio workstation with two speakers and a control panel (no text or symbols)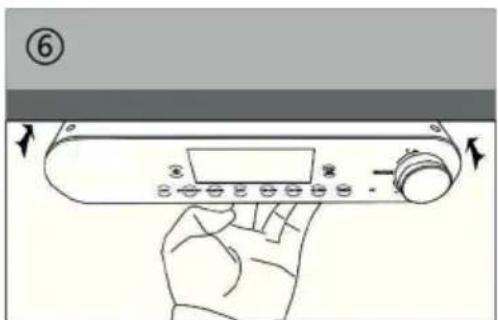
natural_image
Line drawing of a kitchen air conditioner unit with control buttons and a door (no text or symbols)FELSÖKNING OCH PROBLEMLÖSNING
natural_image
Symbol of a trash bin crossed with a diagonal line, representing no waste or discharge (no text or labels)Berlin Brands Group UK Ltd
PO Box 1145
Oxford, OX1 9UW
United Kingdom