
Columbia - Radio Auna - Free user manual and instructions
Find the device manual for free Columbia Auna in PDF.

| Brand | Auna |
| Model | Columbia |
| Product type | Radio alarm clock with CD, USB and Bluetooth player |
| Power supply | 100-240 V~ 50/60 Hz |
| Radio bands | FM 87.5-108 MHz, DAB Band III 174-240 MHz |
| Bluetooth | Version not specified, band 2402-2480 MHz, max power 4 dBm |
| Connections | AUX IN (L/R), USB, headphone jack, external antenna |
| CD player | Plays audio CDs and MP3, programming up to 99 tracks (20 on CD) |
| USB port | 5V 1000 mA, MP3/WMA playback, recording from DAB/CD/BT |
| Speakers | Not specified (probably stereo) |
| Output power | Not specified |
| Dimensions | Not specified |
| Weight | Not specified |
| Special features | Alarm, programmable timer, equalizer (Flat/Pop/Classic/Rock/Jazz), USB recording |
| Remote control | Infrared, requires 2 AAA batteries (LR03) |
| Safety | Do not immerse, do not open, keep away from liquids and flames |
| Maintenance | Clean with a dry cloth, do not use abrasive products |
| Repairability | Repairs by a professional only, no user-serviceable parts |
| Recycling | Do not dispose with household waste, take to a collection point |
| Package contents | Radio, remote control, power cable, user manual |
Frequently Asked Questions - Columbia Auna
User questions about Columbia Auna
0 question about this device. Answer the ones you know or ask your own.
Ask a new question about this device
Download the instructions for your Radio in PDF format for free! Find your manual Columbia - Auna and take your electronic device back in hand. On this page are published all the documents necessary for the use of your device. Columbia by Auna.
USER MANUAL Columbia Auna
INHALT
Technische Daten 4
natural_image
Simple line drawing of a string and cord assembly with a pointed tip (no text or symbols)
natural_image
Symbol of a trash bin crossed with a diagonal line, no text or labels presentBerlin Brands Group UK Limited PO Box 42 272 Kensington High Street London, W8 6ND United Kingdom
Congratulations on purchasing this equipment. Please read this manual carefully and take care of the following hints to avoid damages. Any failure caused by ignoring the items and cautions mentioned in the instruction manual are not covered by our warranty and any liability. Scan the QR code to get access to the latest user manual and other information about the product.
CONTENTS
Technical Data 20
Safety Instructions 20
Device Description 22
Getting started and Operation 24
FM Radio 25
DAB Radio 26
CD Player 27
USB Operation 28
BT Setup 28
Digital Recording to USB 29
AUX IN 30
Disposal Considerations 31
Declaration of Conformity 31
TECHNICAL DATA
| Item number 10037436 | |
| Power supply 100-240 V~ 50/60 | Hz |
| FM Radio 87,5 - 108 MHz | |
| DAB Radio Band III : 174–240 MHz | |
| BT specificationsFrequency bandMaximum radio-frequency power | 2402–2480 MHz4 dBm |
| Connections AUX IN, BT, USB |
SAFETY INSTRUCTIONS
Please read this instruction manual thoroughly before using this appliance! Follow all the safety instructions to avoid damage cause by improper use. Keep the instruction manual for future reference.
- Keep the instruction manual for future reference .Should this appliance
be given to a third party, then this instruction manual must also be handed over. - Use this appliance solely for it intended purpose.
• This appliance is intended for household use only. - Use this appliance indoors or outdoors.
- Danger of electroshock! Do not immerse the appliance, adapter or power plug in water or in other liquids.
- Do not place the appliance in the direct vicinity of liquids – e.g. bathtubs and sinks, in a damp basement or close to a swimming pool.
- Do not start up the appliance with damp hands or if you are standing on a wet floor. Never grasp the power plug with damp or wet hands.
- The manufacturer assumes no liability for possible damages that may have been caused by incorrect usage or mishandling of the appliance.
- This appliance is not intended for use by young children or infirm persons unless they have been adequately supervised by a responsible person to ensure that they can use the appliance safely.
- Young children should be supervised to ensure that they don't play with the appliance.
- Keep the appliance away from all hot surfaces and naked flames.
- Do not place any object on the appliance. Don't put objects with naked
flames(such as candles) on or next to the appliance. Never put items containing liquid(such as vases) on or next to the appliance.
- Do not expose the appliance to direct sunlight.
- Do not use the appliance if it is damaged. To avoid hazards, defective components must only be replaced by the manufacturer, his customer service or similar qualified persons.
- Do not dismantle and repair the appliance by yourself.
- Do not insert any foreign objects into the housing.
- Do not cover the appliance while in use.
- This appliance should be only operated with the type of power source indicated on the marking label.
- Always turn the power off before plugging the appliance into the power outlet or unplugging it.
- Prevent damage to the power cord by not squeezing, bending or rubbing it on sharp edges. Keep the cord away from hot surfaces and open flames.
- Always pull the plug, not the power cord when disconnecting the appliance from a power outlet.
- Plug the appliance into a easily accessible socket, so that you can disconnect it quickly from the mains, in the event of an emergency. Unplug the appliance from the power socket to switch it off completely. Use the mains plug as a disconnecting appliance.
- If the appliance malfunctions due to electrostatic discharge or short-term overvoltage, disconnect it from the power supply and connect it once again.
- Unplug the appliance during lightning storms or when unused for a long period of time..
DEVICE DESCRIPTION

1 Display
2 FUNCTION /POWER STANDBY
3 USB/charging
4 MENU/PRGO
5 REC/DELETE
6 REPEAT/INFO
7 SCAN/PLAY/PAUSE
8 SKIP-BUTTON/FAST FORWARD
BUTTON
9 SKIP+ BUTTON/REWIND BUTTON
10 ENTER/STOP
11 PRESET
12 OPEN /CLOSE
13 VOLUME
14 Earphone jack
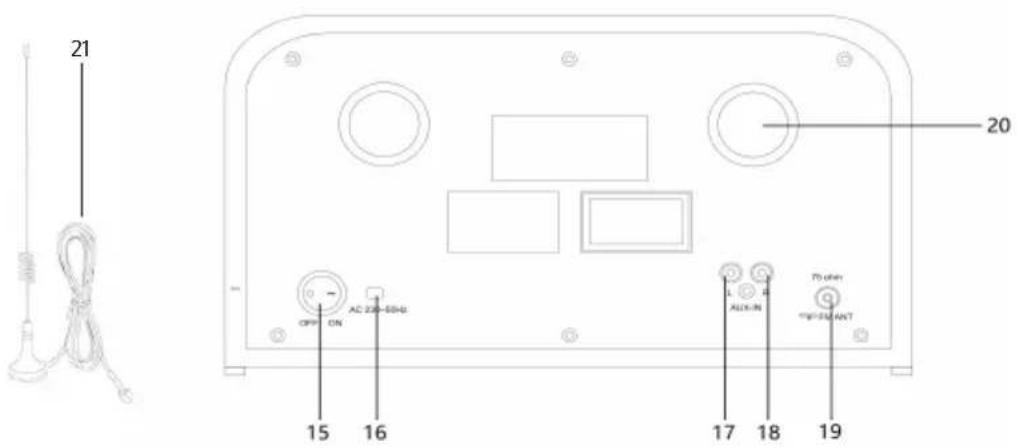
15 POWER SWITCH
16 AC cord
17 AUX IN (L)
18 AUX IN (R)
19 DAB/FM ANT
20 Reverse phase hols
21 External antenna
Remote control
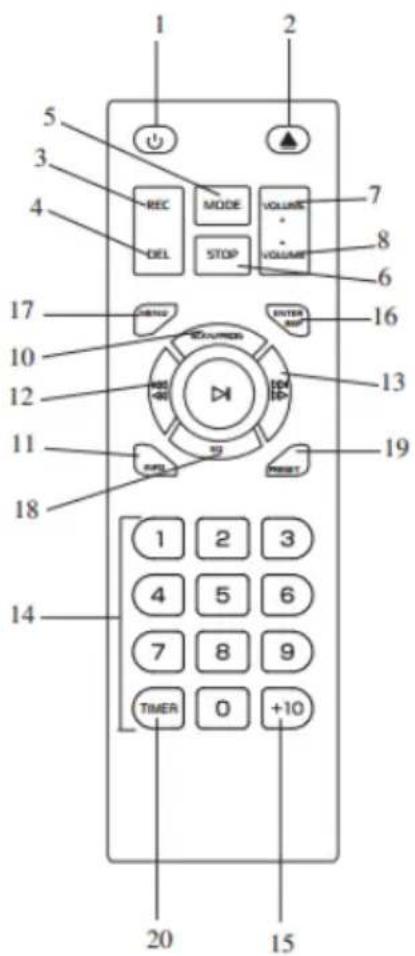
1 POWER ON/OFF
2 CD DOOR OPEN/CLOSE button
3 RECORD button
4 DELETE button
5 MODE button
6 STOP button
7 VOLUME UP button
8 VOLUME DOWN button
9 PLAY/PAUSE button
10 DAB SCAN /PROGRAM button
11 INFO
12 SKIP- button/FAST FORWARD button
13 SKIP+ BUTTON/REWIND button
14 NUMER KEYBOARD
15 +10
16 (DAB/FM) ENTER/REPEAT button
17 (DAB/FM) MENU
18 EQ
19 (DAB/FM) PRESET
20 TIMER
GETTING STARTED AND OPERATION
REMOTE BATTERY INSTALLATION
The infrared remote control requires 2 PCS UM-4 R03, AAA (3V) Battery.
CONNECTING TO POWER
Before switching on make sure that the voltage of your electricity supply is the same as that indicated on the rating plate.
For your own safety read the following instructions carefully before attempting to connect this unit to the mains.
Press the POWER SWITCH to ON position (15) then press the standby knob. The unit is power on.
This unit is designed to operate on AC 100 V - 250 V 50 Hz/60 Hz .current only. Connecting it to other power sources may damage the unit.
Caution: to prevent electric shock disconnect from the mains before removing cover. No user serviceable parts inside. Refer servicing to qualified service personnel. Remove the stereo carefully from the box, retaining the packaging for future use.
SETTING THE DISPLAY MENU LANGUAGE
Operation
- Switch ON the POWER ON/OFF BUTTON (15).press standby button The Display (1) will light up.
- Press the MENU BUTTON (4) then press skip+ and skip- KNOB the until select "SYSTEM".
- Press skip+ and skip- KONB the until select LANGUAGE, then press the enter to confirm.
SETTING THE DISPLAY TIME AND DATE
Operation
- Switch ON the POWER ON/OFF BUTTON (15).press standby button(2) The Display (1) will light up.
- Press the MENU BUTTON (4) then press skip+ and skip- KNOB the until select "SYSTEM".
- Press hold stop key(10) until select TIME, then press the stop KNOB to confirm.
- Press hold stop key(10) until select TIME and select SET 12/24 HOURS. Press skip+ and skip- KNOB and press stop KNOB to confirm.
- Repeat the above operation 2-4 and select one of the following options: SET TIME/DATE or AUTO UPDATE.
- If selected SET TIME/DATE, use the skip+ and skip- KNOB to set Hour &
Minutes, then press the stop KNOB to confirm the operation.
- To set the Auto-Updating, follow the above procedure 2-6 and select AUTO UPDATE. From this menu, move the to select one of the following skip+ and skip- KNOB options: FROM ANY / FROM DAB / FROM FM / NO UPDATE.
The operation is complete and the display show the DATE and TIME
SETTING THE ALARM
In STANDBY mode:
- Press and hold TIME(20 on remote).the hour digits will flash on the display. press skip+/- (12/13on remote) repeatedly to set the correct hour. press TIMER again to confirm.
- The minute digits will flash on the display. press SKIP+/-(12/13 on remote) repeatedly to set the correct minute .press TIMER again to confirm.
- Press SKIP+/-(12/13 on remote) repeatedly to choose the alarm mode: DAB/FM/CD/USB. press TIMER again to confirm.
- Press TIMER(20 on remote) to active the alarm. the alarm icon will appear on display. once the alarm hour is reached the unit will start playing in the choose mode.
- Press TIMER(20 on remote) in standby mode to deactivate the alarm. the alarm icon will disappear from the display.
SLEEP
- This function enables you to go sleep listening to the radio
- While listening to music. press TIMER (20 on remote) repeatedly to select between off/15/30/45/60/90.
- The radio turns on and will turn off automatically after the selected sleep time.
FM RADIO
For FM and DAB reception there is an antenna socket at the rear of the unit (75 ohms), Connect an antenna and move around to obtain the best reception signal.
Operation
- Press the standby (2) The Display (1) will light up. 2. turn sequentially the source BUTTON (2) to select the FM mode.
- MANUAL TUNING Press hold skip+ and skip- knob. Frenquency will be show the number run up on display.
AUTOMATIC TUNING
- During FM working mode, press the MENU BUTTON (4), then press skip+ and skip- knob until select the "SCAN SETTING"
- Press the SCAN BUTTON (7) and the unit will scan all of the FM stations.
- RADIO DATA SYSTEM INFORMATIONS
- During FM working mode, press the INFO BUTTON (6) to display the following informations: PROGRAM TYPE/PROGRAM NO/AUDIO BITRATE/TIME/DATE.
FM & FM-Stereo Reception
Stereo reception is possible when the tuned FM station is broadcasting in stereo.
Press the MENU BUTTON (4) until select "AUDIO SETTING", then press the skip+ and skip- knob and t select between FORCED MONO or STEREO ALLOWED.
DAB RADIO
- Turn the source BUTTON (2) to select DAB mode.
- Extend the DAB antenna at the back of the unit.
AUTOMATIC TUNING
- Press the MENU BUTTON(4), then press skip+ and skip- knob to select FULL SCAN.
- Press the enter to start searching the DAB / DAB+ station.
MANUAL TUNING
- Press the MENU BUTTON (4), then press skip+ and skip- knob to select MANUAL TUNE.
- Press the skip+ and skip- knob to tune manually the desired station.
- When tuned a DAB stereo station, the "stereo" will show on the LCD.
- During DAB reception, press the INFO BUTTON (6) to see the information of the playing DAB station on the display, i.e Program Type / Program No. / Frenquency /Range / Signal Strength / Time / Date.
PRESET MEMORY DAB / DAB+
- When selected the desired station, press and hold the PRESET BUT-TON (11) for 2 seconds.
- The display show "Preset Store 1: (Empty)". Press the skip+ and skip-knob, then press the skip+ and skip- knob store the station
CD PLAYER
To start
- Turn the source knob (2) to select "CD" mode.
- Press "open/close" button (12) to open the CD door.
- Place a CD with the printed side facing up inside the tray & then close the co door.
- Focus search is performing, the first track will start playback.
- To interrupt, press the STOP BUTTON (10) once, the total number of tracks compare on the LCD display (1). Press again PLAY/PAUSE BUTTON (7) to resume normal playback.
Skip/search mode (skip/search up / skip/search down)
During play or pause mode, if SKIP UP BUTTON (9) is pressed. it will go to next track and display the track no. and then remain the play or pause mode.
During play or pause mode, if SKIP DOWN BUTTON (8) is pressed. it will go back to the beginning of the track, original track number is display and remain the play or pause mode.
After step 2, press SKIP DOWN BUTTON (8) again will go to the previous track and remain the play or pause mode.
If press and hold the SKIP UP BUTTON (9)/SKIP DOWN BUTTON (9) during cd/mp3 playback, the playing track will go fast forward or backward until the button being released.
To skip 10 tracks UP or DOWN press the TRACK +10 or TRACK -10 button on Remote Control.
REPEAT/RANDOM MODE
Press the PLAY rep/info BUTTON (6) to activate this function. All the tracks can be played in difference mode as follow:
Repeat play: you can listen the desired tracks or folder repeatedly by this function.
Random play: you can listen all the tracks or folder in a random order by this function
CD DISC PROGRAMMING
Up to 99 tacks can be programmed for mp3 (20 in CD) and play in any order. before use, be sure the system is at stop mode before programming:
-
In CD mode and stop the cd playback.(2). Moreover, it will indicate program no. and digits for track no. to be programmed.
-
Select a desired track by pressing SKIP UP/DOWN BUTTONS (8)/(9).
-
Press the PROGRAM BUTTON (4) to store the trace into memory.
-
Repeat steps 3 and 4 to enter additional tracks into the memory if necessary.
-
When all the desired tracks have been programmed, press PLAY/PAUSE BUTTON (7) to play the disc in assigned order.
-
To cancel the programmed file, press STOP button(10).
USB OPERATION
PLAYBACK OF MP3/WMA SONG VIA USB STORAGE MEDIA
The system is able to decode and playback all mp3 /wma file which stored in the memory media with USB connecting port.
- Turn the source knob (2) to select "USB" mode.
- Plug-in the USB plug with the face up & make sure it going into completely.
- The system will start reading the storage media automatically after connecting, and LCD display (1) will show the total number of mp3/wma files
- Repeat the same playback procedure as playing cd/mp3 disc as above.
REMARKS:
The system can detect and read the file under mp3 and wma format only though the USB port.
If connect the system to mp3 player via the USB socket, due to variances in mp3 encoding format, some mp3 player may not be able to play via the USB socket. this is not a maul-function BT of the system.
Connecting the USB upside down or backwards could damage the audio system or the storage media (USB thumb drive). Check to be sure the direction is correct before connection.
BT SETUP
- Turn the source knob (2), select to the BT mode..
- Select from your portable device (Smartphone, Tablet...) the ID BT tagged as 200-7, then confirm connection
- Now you can transfer the music to the ENV-1513 and all operations can only be operated from your mobile device.
DIGITAL RECORDING TO USB
ENCODING FROM DAB
Plug USB Disk into USB socket. During DAB playing mode, press hold on the REC/DEL BUTTON (5) one time, the "USB" on the display will flash after 5 seconds and the recording is starting. Press the PLAY/PAUSE BUTTON (7) one time to stop the recording and "USB" will not flash; press the PLAY/PAUSE BUTTON (7) again to resume to record and "USB" will flash again.
ENCODING FROM CD
Plug USB Disk into USB socket. During CD playing mode, press hold on the REC/DEL (5) one time, "REC-ONE" will show on the display: press the REC/DEL BUTTON (5) secondly to record the playing track; or press the SKIP UP BUTTON (9) one time to choose to record whole file in the CD and "REC-ALL" will show on the display.
ENCODING FROM CD-MP3
Plug USB Disk into USB socket. During MP3 playing mode press the REC/DEL BUTTON (5) one time, "REC-ONE" will show on the display; then press the REC/DEL BUTTON (5) secondly to confirm, "REC"" will flash and start to record after 5 seconds; or press the SKIP UP BUTTON (9) one time to choose to record all the file in the playing folder and "REC-ONE" will show on the display; or press the SKIP UP BUTTON (9) twice to record the file in the whole playing MP3 disc and "REC-ALL" will show on the display.
ENCODING FROM BT
Plug USB Disk into USB socket. During BT playing mode, press hold on the REC/DEL BUTTON (5) one time, "USB" will show on the display, then press the DEC/DEL BUTTON (5) secondly to confirm, "USB" will flash and start to record after 5 second's; press the PLAY/PAUSE BUT-TON (7) one time to stop the recording and "USB" will not flash; press the PLAY/PAUSE BUTTON (7) again to resume to record and "USB" will not flash again. NOTE: Press the STOP button to stop recording when you finish recording.
DELETE USB
- During USB mode, press REC/DEL BUTTON (5), "DEL-ONE" will show on the display. You can delete the playing track.
- Press SKIP UP BUTTON (9). The playing file and "DEL-ALL" will show on the display. You can delete the current playing folder.
- Press SKIP UP BUTTON (9). "DEL-ALL" will show on the display. You can delete all of the tracks into the playing USB.
- Finally press REC/DEL BUTTON (5) again once confirmed to choose
EQ OPERATION
During playing mode, press the remote handset the EQ key(18) one time, the sound will not be heard from the speakers and "show on the display; During playing mode, press the EQ BUTTON (remote handset 18) to choose from different sound effect among FLAT/POP/CLASSIC/ROCK/JAZZ.
USB CHARGING
Turn the source knob (2), the unit power on, then the USB port(3) will be output 5 V 1000 mA in charging.
But the USB with music document will be playing in USB MODE, then in charging is automatically stop.
AUX IN
Turn the source knob (2) select to the aux mode, put in 300-800 mV signal for aux L/R channel socket, you may turn volume knob (13) playing music.
DISPOSAL CONSIDERATIONS

natural_image
Simple line drawing of a trash bin with crossed x- and y-axes, no text or symbols present.If there is a legal regulation for the disposal of electrical and electronic devices in your country, this symbol on the product or on the packaging indicates that this product must not be disposed of with household waste. Instead, it must be taken to a collection point for the recycling of electrical and electronic equipment. By disposing of it in accordance with the rules, you are protecting the environment and the health of your fellow human beings from negative consequences. For information about the recycling and disposal of this product, please contact your local authority or your household waste disposal service.
This product contains batteries. If there is a legal regulation for the disposal of batteries in your country, the batteries must not be disposed of with household waste. Find out about local regulations for disposing of batteries. By disposing of them in accordance with the rules, you are protecting the environment and the health of your fellow human beings from negative consequences.
DECLARATION OF CONFORMITY

Manufacturer:
Chal-Tec GmbH, Wallstrasse 16, 10179 Berlin, Germany.
Importer for Great Britain:
Berlin Brands Group UK Limited PO Box 42 272 Kensington High Street London, W8 6ND United Kingdom
Hereby, Chal-Tec GmbH declares that the radio equipment type Columbia is in compliance with Directive 2014/53/EU. The full text of the EU declaration of conformity is available at the following internet address: use.berlin/10037436
For Great Britain: Hereby, Chal-Tec GmbH declares that the radio equipment type Columbia is in compliance with the relevant statutory requirements. The full text of the declaration of conformity is available at the following internet address: use.berlin/10037436

Chère cliente, cher client,
SOMMAIRE
Fiche technique 34
natural_image
Simple line drawing of a medical or laboratory device with a bulb, rope, and ruler (no text or symbols)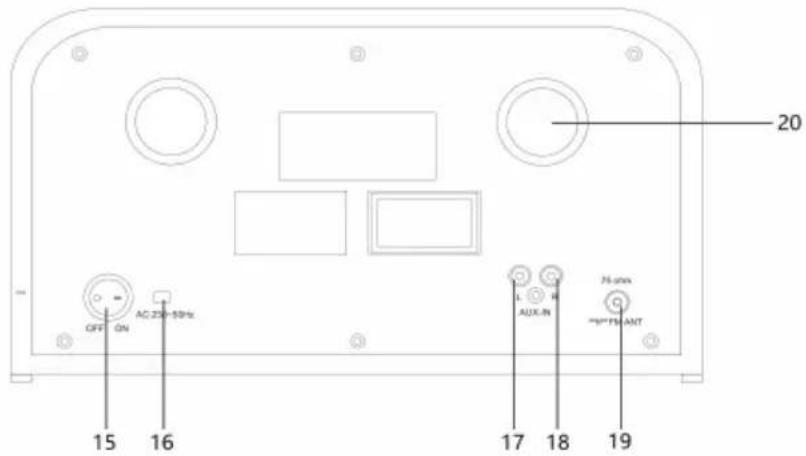
natural_image
Symbol of a trash bin crossed with a diagonal line, no text or numbers presentDÉCLARATION DE CONFORMITÉ

Fabricant :
Chal-Tec GmbH, Wallstraße 16, 10179 Berlin, Allemagne.
Berlin Brands Group UK Limited PO Box 42 272 Kensington High Street London, W8 6ND United Kingdom
ÍNDICE
Datos técnicos 48
natural_image
Simple line drawing of a rope tied with a string, no text or symbols present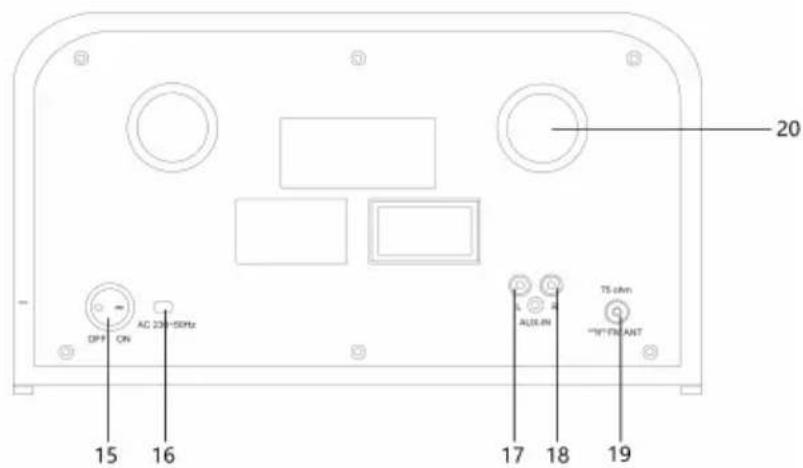
15 Interruptor on/off
16 Cable de corriente alterna
17 AUX in (l)
18 AUX in (r)
natural_image
Symbol of a trash bin crossed with a diagonal line, no text or labels presentBerlin Brands Group UK Limited
PO Box 42
272 Kensington High Street
London, W8 6ND
United Kingdom
INDICE
Dati tecnici 62
natural_image
Simple line drawing of a string and rope setup with a bulb (no text or symbols)
15 Interruttore On/Off
16 Cavo corrente alternata
17 AUX in (l)
18 AUX in (r)
natural_image
Symbol of a trash bin crossed with a diagonal line, no text or numbers presentBerlin Brands Group UK Limited PO Box 42 272 Kensington High Street London, W8 6ND United Kingdom
natural_image
Abstract white logo design on dark background, resembling stylized letter 'S' or wave form (no text or symbols)


- INHALT
- CONTENTS
- TECHNICAL DATA
- SAFETY INSTRUCTIONS
- DEVICE DESCRIPTION
- BUTTON
- Remote control
- GETTING STARTED AND OPERATION
- REMOTE BATTERY INSTALLATION
- CONNECTING TO POWER
- SETTING THE DISPLAY MENU LANGUAGE
- Operation
- SETTING THE DISPLAY TIME AND DATE
- SETTING THE ALARM
- In STANDBY mode:
- SLEEP
- FM RADIO
- AUTOMATIC TUNING
- FM & FM-Stereo Reception
- DAB RADIO
- MANUAL TUNING
- PRESET MEMORY DAB / DAB+
- CD PLAYER
- To start
- Skip/search mode (skip/search up / skip/search down)
- REPEAT/RANDOM MODE
- CD DISC PROGRAMMING
- USB OPERATION
- PLAYBACK OF MP3/WMA SONG VIA USB STORAGE MEDIA
- REMARKS:
- BT SETUP
- DIGITAL RECORDING TO USB
- ENCODING FROM DAB
- ENCODING FROM CD
- ENCODING FROM CD-MP3
- ENCODING FROM BT
- DELETE USB
- EQ OPERATION
- USB CHARGING
- AUX IN
- DISPOSAL CONSIDERATIONS
- DECLARATION OF CONFORMITY
- Manufacturer:
- Importer for Great Britain:
- SOMMAIRE
- DÉCLARATION DE CONFORMITÉ
- Fabricant :
- ÍNDICE
- INDICE
Brand : Auna
Model : Columbia
Category : Radio