
TYWK42PR4 - TV PANASONIC - Free user manual and instructions
Find the device manual for free TYWK42PR4 PANASONIC in PDF.

| Product Type | Wall mount for plasma TV |
| Brand | Panasonic |
| Model | TYWK42PR4 |
| Weight of wall plate | Approximately 10 kg |
| Adjustable tilt angle | From 0 degrees to 20 degrees in 5-degree increments |
| Number of screws provided | 6 screws (M5x35, M8x60, M8x32) and hex key |
| Insulating spacers provided | 4 |
| Fan washers provided | 4 |
| Compatibility | Panasonic plasma TVs (check maximum weight in TV manual) |
| Recommended wall material | Wood, steel structure, concrete (screw diameter 6 mm) |
| Number of fixing points | 6 mandatory (16 holes possible) |
| Torque for bolts | 11-13 N·m |
| Torque for hex screws | 3-4 N·m |
| Torque for fixing screws | 1.2-1.5 N·m |
| Maintenance and cleaning | Soft dry cloth; avoid solvents, thinners, wax |
| Safety precautions | Installation by professional, do not block ventilation slots, 10 cm free space around |
Frequently Asked Questions - TYWK42PR4 PANASONIC
User questions about TYWK42PR4 PANASONIC
0 question about this device. Answer the ones you know or ask your own.
Ask a new question about this device
Download the instructions for your TV in PDF format for free! Find your manual TYWK42PR4 - PANASONIC and take your electronic device back in hand. On this page are published all the documents necessary for the use of your device. TYWK42PR4 by PANASONIC.
USER MANUAL TYWK42PR4 PANASONIC
Ensure that the installation location is strong enough to support long-term use.
- If its strength becomes insufficient over the course of long-term use, the plasma TV may drop, possibly causing injury.
Fitting work and connection equipment expansion should never be done by any other than a qualified installation specialist.
- Incorrect fitting may cause equipment to fall, resulting in injury.
Include a safety factor when considering the strength of the proposed fitting location.
- If strength is not sufficient the equipment may fall, resulting in injury.
Do not fit at a location that cannot bear the load.
- If the fitting location lacks sufficient strength the equipment may fall.
Do not disassemble or modify the wall-hanging bracket.
- Otherwise the unit may be dropped and become damaged, and personal injury may result.
CAUTION
Do not use any television and displays other than those given in the catalogue.
- Otherwise the unit may be dropped and become damaged, and personal injury may result.
Do not fit at any locations subject to humidity, dust, smoke, steam or heat.
- This may have an adverse effect on the plasma TV and cause fire or electric shock.
The work of fitting or removing the plasma TV must be performed by at least two people.
The plasma TV may fall and cause injury.
Do not fit facing upwards, sideways or upside down.
- This may cause heat to build up inside the plasma TV unit, resulting in a fire.
Provide spacing around the plasma TV of at least 10cm to the top, the side and the bottom, leave a clearance between the rear panel and the wall.
- The plasma TV unit has air blow holes on the top, and air suction holes on the bottom and rear. Covering these may result in a fire.
Install the plasma TV by taking only the steps which are specified in these instructions: Do not install it in any other way.
- Otherwise the unit may be dropped and become damaged, and personal injury may result.
Install the mounting screws and power cable in such a way that they will not make contact with the inside parts of the wall.
- Electric shocks may result from contact with any metal objects inside the wall.
For installation, use the special-purpose constituent parts.
- Otherwise, the plasma TV may fall off the wall, possibly causing injury.
Remove the product that will not be used any longer.
- Otherwise the product may fall down and personal injury may result.
Requests regarding handling
1) Exercise care when selecting the location for the TV because it may discolor or deform due to light or heat if it is placed where it is exposed to direct sunlight, or near a heater.
2) For cleaning, wipe the display using a soft dry cloth (made of cotton or flannel). If the unit is particularly dirty, clean it using a cloth soaked with water to which a small amount of neutral detergent has been added, and then wipe with a dry cloth. Do not use products such as solvents, thinner or household wax for cleaning, as they can damage the surface coating. (If using a chemically-treated cloth, follow the instructions supplied with the cloth.)
3) Do not affix adhesive tape or stickers to the product. Doing so may dirty the surface of the wall-hanging bracket. Do not allow long-term contact with rubber, vinyl products or the like. (Doing so will cause deterioration.)
4) Take care during installation as shocks can cause 'panel cracks' to the plasma television unit.
Caution:
This bracket is intended for only Panasonic plasma TV models (See page 46-50).
Use with other apparatus is capable of resulting in instability causing possible injury.
PROFESSIONAL INSTALLATION IS REQUIRED.
PANASONIC DISCLAIMS ANY PROPERTY DAMAGE AND/OR SERIOUS INJURY, INCLUDING DEATH
RESULTING FROM IMPROPER INSTALLATION OR INCORRECT HANDLING.
TY-WK42PR4W Wall-hanging bracket (Adjustable angle type)
| A Wal-hanging bracket (1) | D Allen wrench (included tool) (1) | |
| E Unit fastening screws (2) M5x35 | ||
| B Insulation spacers (4) | C Dished toothed washers (4) | F Allen head countersunk screws (4) M8x60 |
| G Allen head countersunk screws (4) M8x32 | ||
Precautions for wall-hanging bracket fitting
Installation and removal work must be carried out only by a qualified technician.
If the unit is installed or removed improperly, the display may fall down and personal injury may result.
The wall-hanging bracket is for use in attaching a plasma TV unit to a vertical wall for viewing. Do not fit to any surface other than a vertical wall.
To ensure correct plasma TV performance and prevent trouble, do not fit at any of the following locations.
- Near sprinklers or fire/smoke detectors
- Where there is a risk of exposure to vibration or impact
- Near high-voltage wires or dynamic power supplies
Near sources of magnetism, heat, water vapor or soot - Locations exposed to air blown from heating equipment
- Where droplets of condensation from an air conditioner or other unit may form.
Fit using techniques suited to the structure and materials of the fitting location.
Use commercially available screws with a nominal diameter of 6mm that are suited to the wall material (wood, steel frame, concrete etc.) you are fitting the bracket to.
For the TV power supply plug, use a power supply outlet that can be reached easily.
Ensure good air flow so that the equipment ambient temperature does not exceed 40^ . Failure to do this may cause heat to build up inside the plasma TV, resulting in malfunction.
Spread a soft blanket or cloth over the floor so that the plasma TV and floor will not be marked or scratched during the assembly and installation work.
When screwing down the parts, ensure that the screws are neither insufficiently tightened nor over tightened.
Take sufficient care to ensure safety around you when performing the assembly and installation work or while moving about during the course of the work.
Do not install the Plasma TV underneath ceiling lamps (spotlights, halogen lamps, etc.). Otherwise, the cabinet may be bent or damaged by high heat.
Fitting procedure
[ Never use any other method than specified to install.]
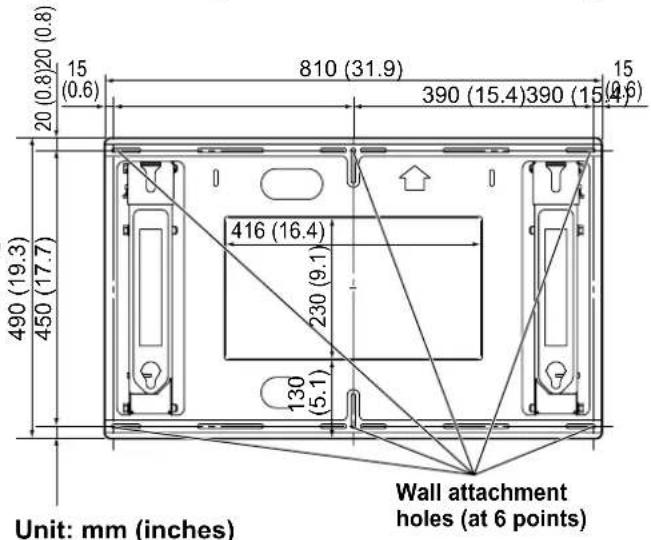
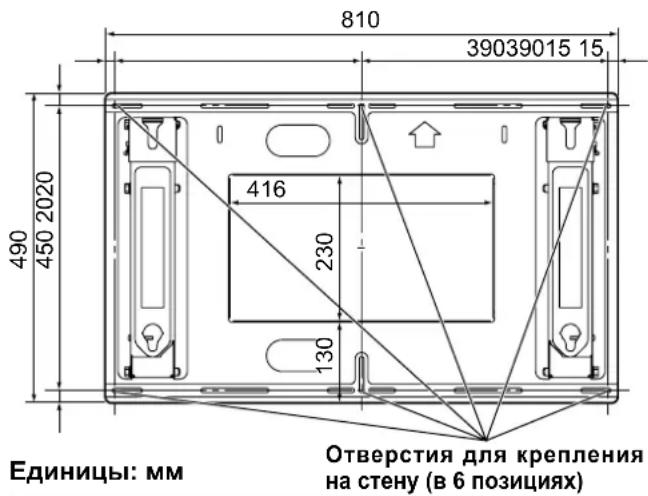
1. Confirm the strength of the proposed fitting location.
(1) The weight of the wall-hanging bracket is approximately 10kg (22.0 lbs). For the weight of the plasma TV attached to the wall-hanging bracket, please see manual for the plasma TV.
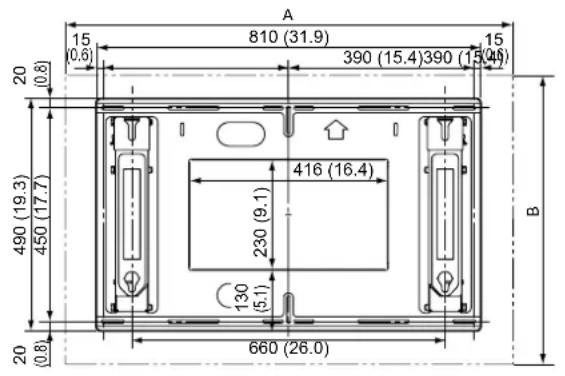
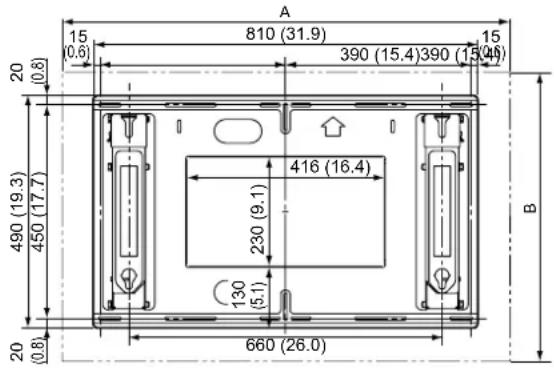
(2) Check the wall strength at the 6 attachment locations by referring to the dimension drawing of the wall-hanging bracket (given at right), and provide adequate reinforcement if strength is not sufficient.
Notes
- There are 16 holes in the wall-hanging bracket. If the wall material is wood, and adequate attachment strength cannot be ensured by fastening at the 6 points at right, use as many spare holes as necessary. However, exercise care because some wall materials may crack if screws are located too close together.
- For detailed dimensions for attaching the plasma TV, refer to the separate External Dimension Drawing (page 46-50).
- Do not attach or place anything other than the plasma TV on the bracket.
* Be sure to fit screws and tighten securely.
2. Fit wall-hanging bracket to wall.
(1) Fit so that the arrow marks on the wall-hanging bracket point upward.
(2) Fasten the screw at the top center hole (A) first.
(3) Using a level, correct any bracket inclination, and then fasten screws at the remaining 5 locations.
Notes
- If the wall consists of a material such as concrete, and bolts or nuts must be embedded beforehand, determine the hole positions using the actual wall-hanging bracket, or calculate hole positions based on the dimension drawing and then embed bolts or nuts with a nominal diameter of 6mm . When embedding bolts, locate so that the bolts protrude from the wall by 10 to 15mm (25/64 to 19/32 inches).
- Use commercially available screws with a nominal diameter of 6mm that are suited to the wall material you are fitting the bracket to.
Always fix firmly more than 6 places with a screw.
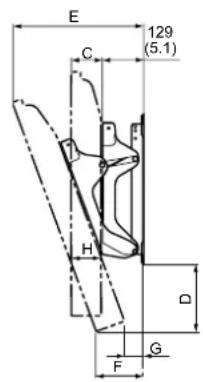
3. Angle adjustment of wall-hanging bracket.
The angle of the wall-hanging bracket can be adjusted from "no incline" to 20^ incline in 5 settings at intervals of 5^ .
The bracket is set to 5^ before shipment from the factory.
To change the angle, move the attachment position of the strap.
Note
- The strap is not required for the 'no incline' setting. Store the strap and the attaching screws in a safe place (as they will be needed for the inclined settings.)
The bolt should be securely tightened to the torque given below.
(11-13 N·m)
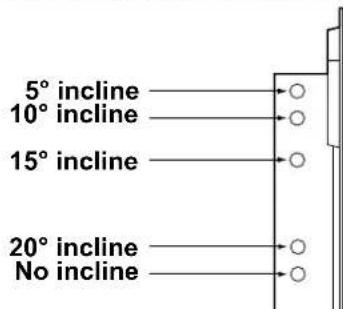
Angle adjustment hole positions

At 5^ incline
At 15^ incline
No incline
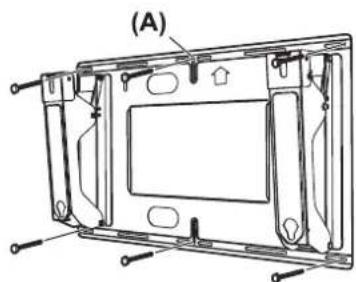
4. Fit the insulation spacers to the plasma TV.
(1) Place the plasma TV unit face down on a blanket or other soft cloth that is clean and free of debris, and follow the procedure below.
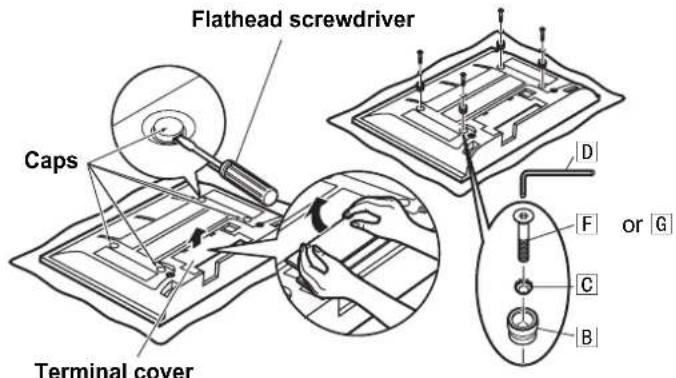
(2) Remove terminal covers (if fitted) from the plasma TV.
(3) Using a flathead screwdriver, remove the four caps from the plasma TV.
Note
- Carefully retain the removed terminal cover and caps in a safe place. (They will be needed again later should it be required to use the special-purpose stand or standalone stand.)
(4) Using the included Allen wrench [D], fit the included Allen head countersunk screws F or G, dashed toothed washers C and insulation spacers B (4 sets) into the holes from where the caps were removed. (See the diagram at right.) Refer to the page 46-50 for type selection of allen head countersunk screws F, G.
The bolt should be securely tightened to the torque given below.
(3-4 N·m)
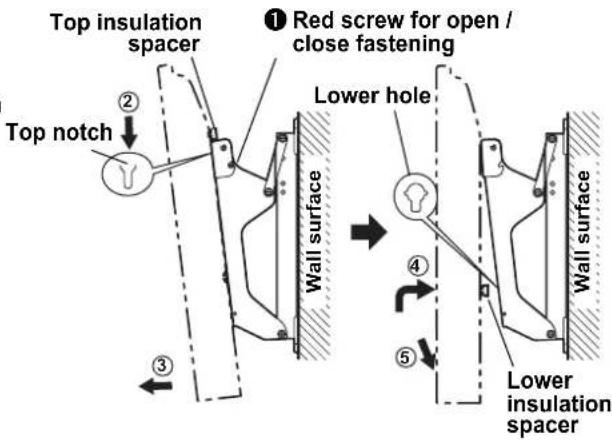
5. Attaching the plasma TV to the wall-hanging bracket and connecting the wiring.
(1) Remove the red screws for open/close fastening (one each on the left and right) ①
(2) Hook the insulation spacers on the top of the plasma TV over the notches on the bracket, and allow the TV to hang from the bracket.
(3) Pull the plasma TV body forward, as shown in the diagram at right, and connect the wiring.
(4) After wiring is finished, slightly raise the plasma TV and insert the insulation spacers at the lower back into the holes at the base of the wall-hanging bracket.
(5) Lower the plasma TV into place.
Caution
- If the plasma TV is raised too far, there is a risk it may become unhooked from the top of the bracket.
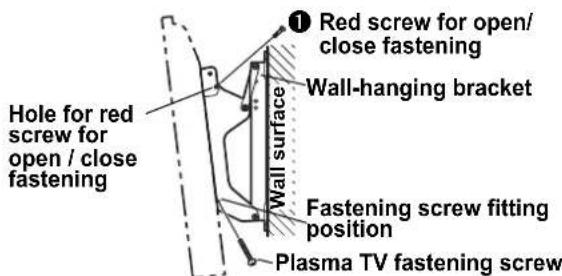
6. Fastening the plasma TV.
(1) Fit the included fastening screws in the indicated holes at the sides of the wall-hanging bracket (left and right).
(2) Securely refit the red screws for open/close fastening (one each on the left and right) 1 in the indicated holes on the sides of the wall-hanging bracket.
The bolt should be securely tightened to the torque given below. (1.2 - 1.5 N·m)
Note
- Be sure to fit the fastening screws on the left keep lifting upward and right to keep the plasma TV from falling off the wall-hanging bracket.
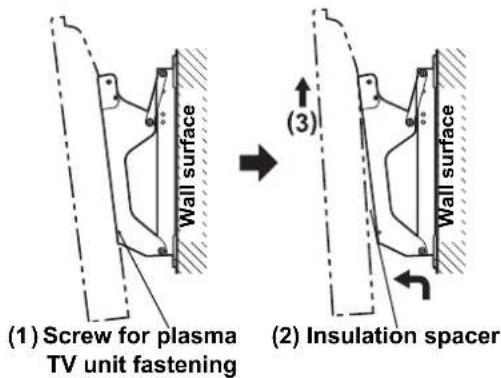
7. Removal of plasma TV unit.
(1) Remove the screws for unit fastening (1 each on the left and right) that are fitted to the wallhanging bracket sides.
(2) While lifting the bottom of the plasma TV unit, pull it towards yourself.
(3) When the lower insulation spacers are freed, keep lifting upward.
Warning
MepbI ppeOCTOpOXHOCTH
PPEyPExKDeHne
Y6eHNTecb B TOM, YTO MECTo yCTaHOBKn DOCTaTOUHO IpOuHOe, YTO6bl BBIDepKaTb NPOdoJXHTeJIbHOe HcNoJIb3OBAHne.
- Ecnn B pe3ynbTaTe npoOnkntelbHoro nCnoJb3ObaHn npouHocTb cTaHET HeIOCTaTOHoi, nCnne MoKet ONpOKnHyTcR, YTO MOKET pNBEcT N TpaBME.
He donyckaTe BbINOJIHEnH yCTaHOBOUHbIX pa60n ydINHeHNoIcOeINHeHHoro 6OpdyoBaHnJNcaMn, He YBJIHOUIMNcK BaIIHnHcnpOBaHHbIMn CneuaHnCTaMn NO yCTaHOBKe.
- HenpaBnIbHna yCTaHObKa moKet npuBeCTn K opPOKnIbHaHHO o6OpyIOBaHn, YTO MOKeT npuBecTn K TpaBMe.
Pn yueTe npoHocTn PpeIaraeMoN No3uyn ycTaHOBKn PpHHMaIte BO BHMaHHe KO3ΦΦuYeHTbHaDEKHOCTN.
HeIOCTaTOUHnIPOuHOCTb npNBecTn K ONpOKnDbIBaHnO O6OpyIDoBaHn, YTO MOxET pNBEcTn K TpaBMe.
He BbINOJIHnIe yCTaHOBky B MeCTax, KOTOpbIe He cnOcO6Hb I BbIePxNBA Tb Harpy3Ky.
- Ecnn npouhoctb B mce Te yCTaHOKn cTahet HeIOCTaTOHOn, o6OpyObaHne MoKet ynaTb.
He pa36npaTne HnepeDJIbIaNTe KPOHHTeIN dJN KpenNeHH Ha cTeHy.
- 3TO MOKET BbI3BaTb NIOLOMKy IIN NaeHne DnCnpe, a TaKKe npNBecTN K TpaBMam.
ПРЕДОCTЕРЖЕНЕ
He nCnoNb3yIte TeIeBn3OpbI IN DCnJIen, OTNIuAIOUneCe r OT npBBeHbIX B KaTajore.
B npotnbHom cnyae annapat MOxet ynaCTb IN NOBpeDnTbcra, n 3TO MOxET pINBeCTN K TpaBMe.
He BbINONHnYe yCTaHOBky B MeCTax, NOBBePKeHHbIX BO3DeIeCTBnIO BJIIn, NJIIn, NJI, HArpeBaHN.
- 3TO MOKET OKa3aTb OTpucaTeJbHoe BnHHe Ha PJIa3MeHHbI TeJeBn3Op I npNBecTN K BO3ropaHIO INN NopaxKeHIO 3JIeKTpUYeCKIM TOKOM.
Pa60tbo no yctaHOBke u ydaJIeHIO nIa3MeHHoro TeJeBu3Opa DoJXHb I BbINOnHrTbcR, no KpaHeMpe, BdBOeM.
YcTaHOBnTe Nla3MeHHoro TeJeBn3Opa, BbINOJIHNB TOJbKO Te WaRn, KOToPbIe yKa3aHbI B 3ToI INcHTpyKcHn: He ycTaHabnBaIte TeJeBn3Op Hkakm dpyrM cNoC6oM.
- 3TO MOKET BbI3BaTb He6IaROpnpyrTHoe BO3JeCTBne Ha cyHKUHOHPOBaHne IJa3MeHHORO DnCIIeR, YTO MOKET PpNBecTn K NoXapy NIN NopaxeHIO 3JIeKtpuYeCKM TOKOM.
YcTaHOBnTe KpeNexKhIe BnHTbI uHyp NITaHn TaKIM 6pa3OM, YTO6bl OHn He KOHTaKTnpOBaJIu C BHyTpeHHmM qactAmCtHebl.
Bpe3yIbTaTe KOHTaTc KaKIMN-Jn6o MetaJIHueCKMn PpeDMeTam BHyTpN CTeHb MOKeT npOn3OHTn NopaxHe 3neKTPuHueCKM TOKOM.
IyBbINONHeHn yCTaHOBKn nCNoJb3yTe CneuaJIbHbIe KOMNOHEHTbl.
B npotubnom cIyae nna3MeHHoro TeJIeBN3Opa MoKet yNactb CO CTHebl, YTO BO3MOXHO pINBeTeK TtpaMe.
YdAnnte n3dennie, Kotopoe 6oIbwe He 6ydet nCnonb3ObaTbcra.
B npotnbHom cnlyae n3dene moKet ynaCTb, n 3TO MOKET npNBecTn K TpaBMam.
ПравILA образецния
1)При Вьборе месда ДЯ телевизера Heo6xOДМо Co6HODaTb OCTOPOXHOCTB, NOTOMYчTO OH MOKET n3MeHHTb CBET NJIДeФОмРИрOBaTBcI 3-3a BO3dEICTBnCBeTa NJI NTeNJa, eCJN OH paCNoIOXeH NOДnpMlbIM COJIHeHbIM CBEtOM NJI OKOLO O6OrpeBaTeNJa.
2) 3aŋpər3HeH, OOCTnTe erC nOMoUbI To KαHn, CMOeHHoB BoDor, B KOtOpuy Do6abNeHO He6oNbIooe KoJIuYeCTBO HeTpaJIbHOrO MoUoUero CpeCDTa, a 3aTeM npoTpnte cyxO TkaHbO. He nCOnb3yIte TaKne BeIeCTBa, KaK pactBopnteIb, pa36aBHTeIb IIN 6bITOBa BAKCa dIy NcTKn, TAK KaK OH MOrTy NOBpeNTb NOKpbITHe NOBepXHoCTn. (Ppr nCNoB3ObaHm XIMnueckn Obpa6oTaHHo TKaHn CneDyIte INHCTpyKun, NoCTabJREMoC cTKaHbIO.)
3) He npKpeTnIe Ha n3dJIeNKe KneKyIO neHTy IINn HAcKeKn. TaKne DeIcTBnM OryrnpBecT N 3aRpa3HeHIO NOBepxHOCTn KPOHsTeHa dIg KpeIeHnHa cTeHy. He DOnyckaiTe dIITeJIbHbIK KOHTAKT C pe3Hoi, n3dEHNMA m3 BInHnA nnC qEm-TO noo6hBM. (TaKne DeIcTBn pnpBeDyT K nobpeXKeHIO.)
4) Co6nOdaTe ocToPOxHOCtB Bo BpeM yCTaHOBKn, TAK KaK yIapbIMoRyT npNBecrN K 'pactpeckBaHHo naHei' Kopnyca nla3MeHHoro TeJIeBu3opa.
PPEyPExKDEHNE
3TOT KPOHHTeIN PpeHa3HaueH TOnbKO IJRA MoJeIe NpA3MeHHbIX TeNeBu3OpOB Panasonic (Cm. cTp. 51-55). IVcnoJIb3OBAHHe C dpyHMn annapaTaMn MOKeT npJBecTN K HeYCToNHBOCTN, YTO BO3MOXHO npNBedet K TpaBMe.
TPE6BYETCIIPOΦECCNOHAJIbHAR YCTAHOBKA. KOMIaHnI PANASONIC HE HECET OTBETCTBEHOCTH N 3A KAKOI UJIEP6 N/INI CEPbE3HbIE TPABMbI, BKIOUcA r CMEPTb, IPOUN3OJEIDINE BCJIEDCTBNE HENPABUNbHOYUCTAHOBKN INI HENPABUNbHOrO O5PAUeHnI.
KpoHsTeH dIy KpeIeHnHa cTeHy TY-WK42PR4W (MoIeIb c peruInpyembl yrnom)
EduHnCbI:MM
* 0683aTeBHo npaBnIbHo BCTaBnIte HnHaDexKHO 3aBnHnBnBaIte BNHTbl.
He BCTaHOBNIouTe Bnpi6 y Micux, HenpndaTHnx dIy BNtpmMyBaHHHaBaHTaxeHb.
- Jkso Micce dIy MoTaxy HeoCTaTHbO Miue, Bpi6 MoKe Bnactn.
He po3bnpaIte i He moNphiKyIte HactiHHn KPOHHTeH.
- Lé Moxe npn3BecTn Do nooKoJxHHe a6o naiHn H dncIe I OTPMaHn BHaCnIOK bOro TpaBMn.
3ACTEPEXEHH
BukopncToByte Jnwe Ti TeJebi3Op Ta dncnnei,aki Habeeni y kataNo3i.
- IhaKue Bnpi6 MoKe Bnacti i N0uOIOHTscra, BOHOnAc CnpNUnHJouH pN3NK OTpMaHH TpaBM.
He BCTaHOBnIOte Bnip6 y Micx i3 NiDbNueHO BOIoricTHO, CkynpeHHM Nnny, DmOM, BoJHO npoIO a60 BnCOKO TeMnepaTyPOIO.
Li uHHuMoKyTb HeaTnBHO BnNbaTu Ha po6Oy nla3MOBOro TeNeBi3opa, a TAKOX CTaTI npuHIO IOKexi YpaxKeHH eJekTpnuHm CTpyMOM.
Yci po60tn 3i BCTAHOBJIeHHra Ta demoHTaxy PIIa3MOBOro TeNeBi3opa MaOTb BnKOHyBaTHcra OHaHMeHwe DbOMa IIOdbMn.
- IhaKSe Bnpi6 MoKe Bnactu i 3aBdaTu TpaBMN.
He BCTaHOBIOHTe Pna3MOBn DnCnIe NmUBoOo CTOPOHO BROPy, Ha 6oCi a6o HxNHBoO CTOPHO DOropu.
- Lé MoXE cπpùnHHTN CkynHEnH Tcπla BcepeuHni TeNeBizopa, BHacπiδOK YOrO MoXE BnHnKHyTn NoXeKa.
BcTaHOBIOHou BVpi6, 3aJIuTe HABKOJO HbOro BInbHm npocTip: oHaMeHwe 10 cm 3rop Ta cnpaba, 10 cm 3 JIBORo 6OKy, 10 cm 3HN3y, 3aJIuTe BInbHm npocTip MIX 3aDHBO O naHeNIO Ta CTiHO.
Demontyte Bnpi6, KOTpni Haadi He BNKOpNCTOBYBaTHMeTbca.
- IhaKuIe Bnpi6 MoKe BnactTu 3aBdAtu TpaBM.
PekomeHdaцii cTocOBHO NOBODXeHHa
1) Ybaxho Bn6paTte Micce dIy BCTaHOBnHn TeneBi3opa, OckInbKn BHaCniDok iI CBiTna a6o TeNla (y pa3i po3miueHHn NOBn3y HarpBaIbHNx npJiaID b6o NiD npRMM COHcHMM IpOMIHnM) BiH MOKe BTPaTNTKoJIip qN DeOpMyBaTncb.
2) YnctiB nncnne 3a Donomoro 1o M'koI cyxoi raHupkn (6abOBHHOI afo oJhaHeNeBOI). Pn CTIKOMy 3a6pydHeHHO uNCTITb Ioro raHupKOIO, 3MOeHOIO y BOi 3 He3HaHNO IO dbaKBOIO HeItpaJIbHOr 3acOby dIg MTTA, a NOTIM npOTpiB npunad cyxio raHupKOIO. He BnKOpNCTOByte dIy quHenn HPOuHNHnKn afo no6yTOBI ac606n dIy qHHeHn Ha OCHOBIO BOCKy, OCKJIbKn BOHn MOxyTB NOWKODNTN NOKPNTT KOPnyCa. (Pp IN BnKOpNCtAHHi xIMiHo 6bp6JeHOI raHupKn DotpmyTeCb DOaHOI Do He IHCTpykui.)
3) He npinkinjnte Jnky cTiy Hn Hnkn Do Bnpo6y. Lc MoKe npns3Bectn Do 3a6pydHeHH NoBepxHn HactiHoro KponuTeHa. 3anobiraTe TpnaBnomy KOHTaKTy npncToHO 3 rymOBmN, BiHIOBmN Ta noDihmN Bnpo6amn. (Lc npns3BeDe do noripweHn BnactnbocTe npncToPO.)
4) Bynde o6epeKHMn niD yac BCTaHOBneHHra Bnpo6y, OckiNbKn CTpycn MOkyTb CnpuHHTn NOBy Tpiun H a nnaa3MOBOMy Dncnnei.
3ACTEPEXEHH
Ley hactiHnn kpoHtTeH np3HaueHn IWe dIy pna3MOBx dinCnneIB Panasonic (dVB. ct. 51-55) BnkopncTaHH 3 iHIMM npicTpOraM MoKe np3BecTn Do HeaDiIHOi φikcaii, 0o MoKe cnpuHNHTn pn3NK OTPmuHn TpaBM.
MOHTAXIIOBUNHEH BIKOHYBATNC BIELJIAJICTAMN. KOMNAHIR PANASONIC HE HECE BIDIOBIAJIbHOCTI 3A BUYB-RAI NOLKOJXEHNR BNACHOCTI TA/ABO CEPNO3HI TPABMI, BKJIOUCAIOCH CMEPTb, IIO E HACNIKOM HEBIDIOIBHOHO MOHTAXY ABO HENPABINbHOrO O6CJyTOBVAHHJ.
HactiHHn KpoHwTeH TY-WK42PR4W
Wall-hanging bracket (Adjustable angle type) External dimensions drawing
Wandhalterung (Typ mit einstellbarem Winkel)
Muurbestigingssteun (met verstelbare montagehoek)
Staffa di montaggio alla parete (con angolazione regolabile)
Applique de fixation au mur (type à angle régable)
Soporte para montaje en pared ( Tipo de ángulo ajustable)
Abbildung mit externen Abmessungen Tekening met buitenafmetingen Schema delle dimensioni esterne Plan des dimensions extérieures Dibujo de dimensiones externas
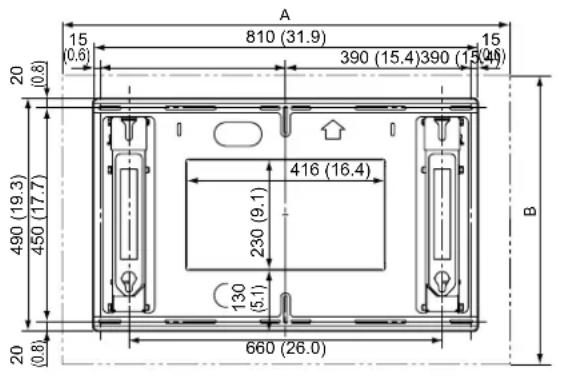
(Unit: mm (inches))
(Einheit.mm)
(Eenheid: mm)
(Unit: mm)
(Unité : mm)
(Unidad.mm)
External dimensions table
Wall-hanging bracket (Adjustable angle type) External dimensions drawing
Wandhalterung (Typ mit einstellbarem Winkel)
Muurbestigingssteun (met verstelbare montagehoek)
Staffa di montaggio alla parete (con angolazione regolabile)
Applique de fixation au mur (type à angle régable)
Soporte para colgar en pared ( Tipo de ángulo ajustable)
Abbildung mit externen Abmessungen Tekening met buitenafmetingen Schema delle dimensioni esterne Plan des dimensions extérieures Dibujo de dimensiones externas

(Unit: mm (inches))
(Einheit.mm)
(Eenheid: mm)
(Unit: mm)
(Unité : mm)
(Unidad.mm)
External dimensions table
Wall-hanging bracket (Adjustable angle type) External dimensions drawing
Wandhalterung (Typ mit einstellbarem Winkel)
Muurbestigingssteun (met verstelbare montagehoek)
Staffa di montaggio alla parete (con angolazione regolabile)
Applique de fixation au mur (type à angle régable)
Soporte para montaje en pared ( Tipo de ángulo ajustable)
Abbildung mit externen Abmessungen Tekening met buitenafmetingen Schema delle dimensioni esterne Plan des dimensions extérieures Dibujo de dimensiones externas

(Unit: mm (inches))
(Einheit.mm)
(Eenheid: mm)
(Unit: mm)
(Unite: mm)
(Unidad: mm)
External dimensions table
HactHHN KpoHHTeH (DnA MOHTaKy i3 MoXnBicTOp peryIIOBaHHa KyTa HaxNy)
壁挂式框架(角度可调型)
Matsushita Electric Industrial Co., Ltd.
Web Site: http://panasonic.net