
RXA2080 - Home cinema amp YAMAHA - Free user manual and instructions
Find the device manual for free RXA2080 YAMAHA in PDF.
| Features | Details |
|---|---|
| Product Type | AV Receiver |
| Output Power | 140 W per channel (8 ohms) |
| Number of Channels | 9.2 channels |
| Connectivity | Wi-Fi, Bluetooth, AirPlay 2, Ethernet |
| Supported Audio Formats | DTS:X, Dolby Atmos, Dolby TrueHD, DTS-HD Master Audio |
| HDMI Inputs | 7 HDMI inputs (4K compatible) |
| Video Outputs | 2 HDMI outputs with ARC support |
| Calibration Features | YPAO (Yamaha Parametric room Acoustic Optimizer) |
| Dimensions (W x H x D) | 435 x 171 x 380 mm |
| Weight | 11.5 kg |
| Power Consumption | 0.1 W in standby mode, 400 W in operation |
| Warranty | 2 years |
| Included Accessories | Remote control, calibration microphone, user manual |
Frequently Asked Questions - RXA2080 YAMAHA
User questions about RXA2080 YAMAHA
0 question about this device. Answer the ones you know or ask your own.
Ask a new question about this device
Download the instructions for your Home cinema amp in PDF format for free! Find your manual RXA2080 - YAMAHA and take your electronic device back in hand. On this page are published all the documents necessary for the use of your device. RXA2080 by YAMAHA.
USER MANUAL RXA2080 YAMAHA
Precautions 2
Preparations. 8
Playback 19
English
Précautions d'usage 28
Preparations 34
Lecture. 45
Français
The precautions listed below are to prevent risk of harm to the user and others, as well as to prevent property damage, and to help the user use this unit properly and safely. Be sure to follow these instructions.
After reading this manual, be sure to keep it in a safe place where it can be referenced at any time.
- Be sure to request inspections or repairs from the dealer where you purchased the unit or from qualified Yamaha service personnel.
- Yamaha cannot be held responsible for injury to you or damage of the products caused by improper use or modifications to the unit, or data that is lost or destroyed.
- This product is for ordinary homes. Do not use for applications requiring high reliability, such as managing lives, health care or high-value assets.

WARNING
This content indicates "risk of serious injury or death."
Power supply/power cord
-
Do not do anything that could damage the power cord.
-
Do not place it near a heater.
- Do not bend it excessively or alter it.
- Do not scratch it.
- Do not place it under a heavy object.
Using the power cord/adaptor with the core of the cord exposed could cause electric shocks or a fire.
- Do not touch the power plug or cord if there is a chance of lightning. Failure to observe this may cause electric shocks.
-
Use this unit with the power supply voltage printed on it. Failure to connect to an appropriate AC outlet may cause a fire, electric shocks, or malfunctions.
-
Be sure to use the power cord. Also, do not use the supplied power cord for other units. Failure to observe the above may cause a fire, burns, or malfunctions.
- Check the electric plug periodically and remove any dirt or dust which may have accumulated on it. Failure to observe this may cause a fire or electric shocks.
- When setting up the unit, make sure that the AC outlet you are using is easily accessible. If some trouble or malfunction occurs, immediately turn off the power switch and disconnect the plug from the AC outlet. Even when the power switch is turned off, as long as the power cord is not unplugged from the wall AC outlet, the unit will not be disconnected from the power source.
- If you hear thunder or suspect approaching lightning, quickly turn off the power switch and pull the power plug from the AC outlet. Failure to observe this may cause a fire or malfunctions.
- If not using the unit for long periods of time, be sure to pull the power plug from the AC outlet. Failure to observe this may cause a fire or malfunctions.
Do not disassemble
- Do not disassemble or modify this unit. Failure to observe this may cause a fire, electric shocks, injury, or malfunctions. If you notice any irregularities, be sure to request an inspection or repair from the dealer where you purchased the unit or from qualified Yamaha service personnel.
Water warning
- Do not expose the unit to rain, use it near water or in damp or wet conditions, or place on it any containers (such as vases, bottles or glasses) containing liquids which might spill Into any openings or places where water may drop. A liquid such as water getting into the unit may cause a fire, electric shocks, or malfunctions. If any liquid such as water seeps into the device, turn off the power immediately and unplug the power cord from the AC outlet. Then, request an inspection from the dealer where you purchased the unit or from qualified Yamaha service personnel.
- Never insert or remove an electric plug with wet hands. Do not handle this unit with wet hands. Failure to observe this may cause electric shocks or malfunctions.
Fire warning
- Do not place any burning items or open flames near the unit, since they may cause a fire.
Maintenance and care
- Do not use aerosols or spray-type chemicals that contain combustible gas for cleaning or lubrication. The combustible gas will remain inside the unit, which may cause explosion or fire.
Battery use
- Do not disassemble a battery. If the contents of the battery get on your hands or in your eyes, it can cause blindness or chemical burns.
-
Do not dispose of batteries in fire. Doing so may result in the battery bursting, causing a fire or injury.
-
Do not expose a battery to high temperatures, such as direct sunlight or a fire. The battery may burst, causing a fire or injury.
- Do not attempt to recharge batteries that are not intended to be charged. Charging could cause the battery to burst or leak, which can cause blindness, chemical burns, or injury.
- If the batteries do leak, avoid contact with the leaked fluid. If the battery fluid should come in contact with your eyes, mouth, or skin, wash immediately with water and consult a doctor. Battery fluid is corrosive and may possibly cause loss of sight or chemical burns.
Wireless unit
- Do not use this unit near medical devices or inside medical facilities. Radio waves from this unit may affect electro-medical devices.
- Do not use this unit within 15cm (6 in) of persons with a heart pacemaker implant or a defibrillator implant. Radio waves from this unit may affect electro-medical devices, such as a heart pacemaker implant or defibrillator implant.
If you notice any abnormality
-
If any of the following abnormalities occur, immediately turn off the power and disconnect the power plug. If any of the following abnormalities occur, immediately turn off any amplifiers and receivers.
-
The power cord/plug is damaged.
- An unusual smell or smoke is emitted from the unit.
- Foreign material gets into the interior of the unit.
-
There is a loss of sound during use.
-
There is a crack or damage in the unit.
Continued use could cause electric shocks, a fire, or malfunctions. Immediately request an inspection or repair from the dealer where you purchased the unit or from qualified Yamaha service personnel.
- Be careful not to drop or apply strong impact to this unit. If you suspect the unit may have been damaged due to dropping or Impact, immediately turn off the power and pull the power plug from the AC outlet. Failure to observe this may cause electric shocks, a fire, or malfunctions. Immediately request an inspection from the dealer where you purchased the unit or from qualified Yamaha service personnel.

CAUTION
This content indicates "risk of injury."
Power supply/power cord
- Do not use an AC outlet where the power plug fits loosely when inserted. Failure to observe this may cause a fire, electric shocks, or burns.
- When removing the electric plug from the unit or an AC outlet, always hold the plug itself and not the cord. Pulling by the cord can damage it and cause electric shocks or a fire.
- Insert the power plug firmly all the way into the AC outlet. Using the unit when it is not
plugged in sufficiently can cause dust to accumulate on the plug, causing a fire or burns.
Installation
- Do not place the unit in an unstable position where it might accidentally drop or fall over and cause injuries.
- Do not block this unit's ventilation holes (cooling slits). This unit has ventilation holes on the top/side/bottom to prevent the internal temperature from becoming too high. Failure to observe this may trap heat inside the unit, causing a fire or malfunctions.
-
When installing this unit:
-
Do not cover it with any cloth.
- Do not install it on a carpet or rug.
- Make sure the top surface faces up; do not install on its sides or upside down.
- Do not use the device in a confined, poorly-ventilated location.
Failure to observe the above may trap heat inside the unit, causing a fire or malfunctions. Ensure that there is adequate space around the unit: at least 30~cm (11-3/4 in) on top, 20~cm (7-7/8 in) on the sides, and 20~cm (7-7/8 in) on the rear.
- Do not install the unit in places where it may come into contact with corrosive gases or salt air. Doing so may result in malfunction.
- Avoid being near the unit during a disaster, such as an earthquake. Since the unit may turn over or fall and cause injury, quickly move away from the unit and go to a safe place.
- Before moving this unit, be sure to turn off the power switch and disconnect all connection cables. Failure to observe this may damage the cables or cause you or someone else to trip and fall.
- When transporting or moving the unit always use two or more people. Attempting to lift the unit by yourself may damage your back, result in other injury, or cause damage to the unit itself.
- For proper installation of the outdoor antenna, make sure to have it done by the dealer from where you purchased the unit or by qualified service personnel. Failure to observe this may cause the installation to fall and result in injury. Installation requires special skills and experience.
Hearing loss
- Do not use the unit/speakers or headphones for a long period of time at a high or uncomfortable volume level, since this can cause permanent hearing loss. If you experience any hearing loss or ringing in the ears, consult a physician.
- Before connecting the unit to other devices, turn off the power for all devices. Also, before turning the power of all devices on or off, make sure that all volume levels are set to the minimum. Failing to do so may result in hearing loss, electric shock, or device damage.
- When tuming on the AC power in your audio system, always turn on the amplifier or receiver LAST, to avoid hearing loss and speaker damage. When turning the power off, the amplifier or receiver should be turned off FIRST for the same reason. Failure to observe the above may cause hearing impairment or speaker damage.
Maintenance
- Remove the power plug from the AC outlet before cleaning the unit. Failure to observe this may cause electric shocks.

Handling caution

-
Do not touch the surface having this label. Doing so may cause burns. The label on the device indicates that the surface to which the label is attached may become hot during operation.
-
Do not insert your hand or fingers into the ventilation holes of this unit. Failure to observe this may cause Injury.
-
Do not insert foreign materials such as metal or paper into the ventilation holes of this unit. Failure to observe this may cause a fire, electric shocks, or malfunctions. If foreign material gets into the unit, immediately shut off the power and pull the power plug from the AC outlet and request an inspection from the dealer where you purchased the unit or from qualified Yamaha service personnel.
Do not do the following: -
put heavy items on top of the equipment.
- place the equipment in a stack.
-
apply unreasonable force to buttons, switches, input/output terminals, etc.
-
Avoid pulling the connected cables to prevent injuries or damage to the unit by causing it to fall.
Battery use
- Always replace all batteries at the same time. Do not use new batteries together with old ones. Using new ones with old ones could cause a fire, burns, or inflammation due to fluid leaks.
- Do not use batteries other than specified batteries. Doing so cause fire, burns, or inflammation due to leakage.
- Do not mix battery types, such as alkaline batteries with manganese batteries, or batteries from different makers, or different types of batteries from the same maker, since this can cause a fire, burns, or inflammation due to fluid leaks.
- Keep batteries away from children. A child could accidentally swallow a battery. Failure to observe this may also cause inflammation due to battery fluid leaks.
- Do not put in a pocket or bag, carry, or store batteries together with pieces of metal. The battery could short, burst, or leak, causing a fire or injury.
- Always make sure all batteries are inserted in conformity with the +/- polarity markings. Failure to do so might result in a fire, burns, or inflammation due to fluid leaks.
- When the batteries run out, or if the unit is not to be used for a long time remove the batteries from the remote control to prevent possible leakage of the battery fluid.
- Whon storing or discarding batteries, insulate the terminal area by applying tape, or some other protection. Mixing them with other batteries or metal objects can cause a fire, burns, or inflammation due to fluid.
Notice
Indicates points that you must observe in order to prevent product failure, damage or malfunction and data loss.
Power supply/power cord
- If not using the unit for a long period of time, be sure to pull the power plug from the outlet. Even if the (Standby/On) switch has been turned off (the screen display is off), a minute current is still flowing.
Installation
- Do not use this unit in the vicinity of other electronic equipment, such as a TV, radio, or mobile phone. Failure to observe this may cause this unit or the TV or radio to produce noise.
- Do not use this unit in a location that is exposed to direct sunlight, that becomes extremely hot, such as near a heater, or extremely cold, or that is subject to excessive dust or vibration. Failure to observe this may cause the unit's panel to become deformed, the internal components to malfunction, or for operation to become unstable.
- Install this unit as far away from other electronic equipment as possible. Digital signals from this unit may interfere with other electronic equipment.
- If using a wireless function, avoid installing this unit near metal walls or desks, microwave ovens, or other wireless network devices. Obstructions could shorten the transmission distance.
Connections
- If connecting external units, be sure to thoroughly read the manual for each unit and connect them in accordance with the instructions.
Failure to properly handle a unit in accordance with the instructions could cause malfunctions. - Do not connect this unit to industrial units.
Digital audio interface standards for consumer use and industrial use are different. This unit has been designed to connect to a consumer-use digital audio interface. Connections to an industrial-use digital audio interface could not only cause this unit to malfunction, but could also damage the speakers.
Handling
- Do not place vinyl, plastic, or rubber products on this unit. Failure to observe this may cause discoloration or deformation in the panel of this unit.
- If the ambient temperature changes drastically (such as during unit transportation or under rapid heating or cooling) and there is a chance condensation may have formed in the unit, leave the unit for several hours without turning on the power until it is completely dry before use. Using the unit while there is condensation can cause malfunctions.
Maintenance
- When cleaning the unit, use a dry, soft cloth. Using chemicals such as benzine or thinner, cleaning agents, or chemical scrubbing cloths can cause discoloration or deformation.
Batteries
- Be sure to discard used batteries in accordance with local regulations.
Information
About content in this manual
The illustrations and screens in this manual are for instructional purposes only.
- The company names and product names in this manual are the trademarks or registered trademarks of their respective companies.
Software may be revised and updated without prior notice.
Wireless communication functions [U.K. and Europe models]
Bluetooth
Radio Frequency (Operational Frequency): 2402 MHz to 2480 MHz
Maximum Output Power (EIRP): 7.27 dBm
Wi-Fi (2.4 GHz)
Radio Frequency (Operational Frequency): 2412 MHz to 2472 MHz
Maximum Output Power (EIRP): 19.98 dBm
Wi-Fi (5 GHz)
Radio Frequency (Operational Frequency), Maximum Output Power (EIRP):
5170 to 5250MHz, 22.30 dBm
5250 to 5330MHz, 22.27 dBm
5490 to 5710MHz, 24.56 dBm
5735 to 5835MHz, 13.96 dBm
- Wireless devices transmitting over a 5 GHz frequency band can only be used indoors. Use of such devices outdoors is prohibited by law.
Information for users on collection and disposal of old equipment and used batteries:
These symbols on the products, packaging, and/or accompanying documents mean that used electrical and electronic products and batteries should not be mixed with general household waste.
For proper treatment, recovery and recycling of old products and used batteries, please take them to applicable collection points, in accordance with your national legislation.

By disposing of these products and batteries correctly, you will help to save valuable resources and prevent any potential negative effects on human health and the environment which could otherwise arise from inappropriate waste handling.
For more information about collection and recycling of old products and batteries, please contact your local municipality, your waste disposal service or the point of sale where you purchased the items.

Pb
For business users in the European Union:
If you wish to discard electrical and electronic equipment, please contact your dealer or supplier for further information.
Information on Disposal in other Countries outside the European Union: These symbols are only valid in the European Union. If you wish to discard these items, please contact your local authorities or dealer and ask for the correct method of disposal.
Note for the battery symbol (bottom two symbol examples):
This symbol might be used in combination with a chemical symbol. In this case it complies with the requirement set by the EU Battery Directive for the chemical involved.
(weee_battery_eu_en_02)

Introduction
- This unit is a product for enjoying music and video at home.
- This document explains basic speaker system setup and unit configuration, followed by step-by-step instructions. Basic operations, such as playing Blu-ray Discs, DVDs, and radio content, are also explained.
- In this document, the RX-A3080 is used for illustration purposes. Some parts or components, such as jacks, may vary by specific model. Such differences are indicated as required.
The unit is equipped with a number of other functions not described in this document. For more information about this product, refer to the Owner's Manual on the Yamaha website.
Follow one of the methods described below to view the latest Owner's Manual.
In HTML format
- Scan the QR code found on the front cover of this document.
- Visit the following website.
http://avpro.global.yamaha.com/manual/avr/rxa3080/
In PDF format
- Visit the following website.
http://download.yamaha.com/
[For U.S. customers only]
Visit the following website for additional information, FAQ's, downloads such
as "Owner's Manual" and product updates.
http://usa.yamaha.com/support/
Trademarks and trade names used in this document are those of their respective owners. See the Owner's Manual for more information.
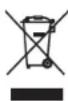
Opening and closing the front panel door
Press the bottom of the door gently to open it when using controls or jacks behind the front panel door. Keep the door closed when controls or jacks behind the front panel door are not in use. (Be careful not to trap your fingers.)
Features
The unit is also capable of the following, which are not described in this document. See the Owner's Manual to help you get the most out of the unit.
- Playing music files stored on a media server (PC or NAS)
- Playing iTunes music or iPhone/iPad/iPod touch music over a network (AirPlay)
- Playing music in multiple rooms (Zone function)
- Configuring the advanced settings (ADVANCED SETUP menu)
For more information, see "What you can do with the unit" in the Owner's Manual.

AV SETUP GUIDE
AV SETUP GUIDE is an app that guides you through the process of connecting a TV or playback device, such as a BD/DVD or CD player, and speakers to the AV receiver. Search "AV SETUP GUIDE" on the App Store or Google Play for details.
1
Preparation
Confirming package contents
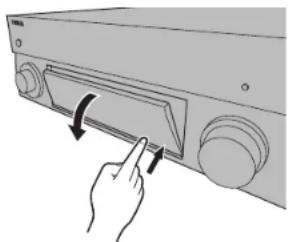
Remote control
Batteries (AAA, LR03, UM-4) (x2)
AM antenna
(Except for Australia, U.K., Europe, Russia, and Middle East models)
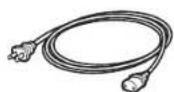
Power cable
The supplied power cable varies depending on the region of purchase.

FM antenna
(Except for Australia, U.K., Europe, Russia, and Middle East models)
One of the above is supplied depending on the region of purchase.

DAB/FM antenna
(Australia, U.K., Europe, Russia, and Middle East models)
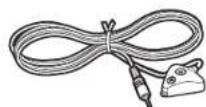
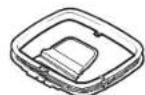
YPAO microphone
Microphone base
Use to measure angle/height during YPAO.
Quick Start Guide (this booklet)
Preparing cables
The following cables (not supplied) are required to build the system described in this document.
- Speaker cables (depending on the number of speakers)
Audio pin cable (x1)
HDMI cables (x3)
Network cable (x1) (when connecting to a router via a network cable)
2
Connecting speakers/subwoofer
Positioning speakers
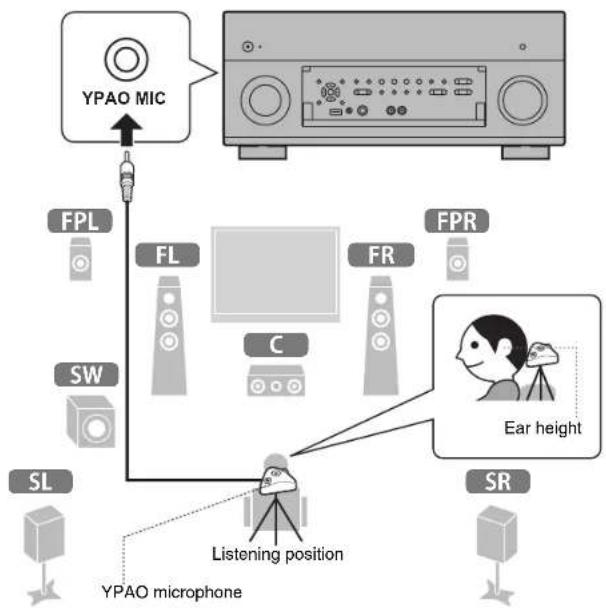
Use the diagram as a reference for positioning speakers.
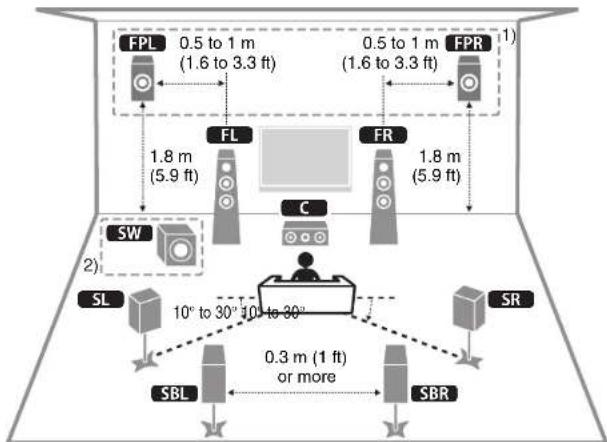
FL
FR Front speaker (L/R)
Center speaker
SL / SR Surround speaker (L/R)
SBL / SBR Surround back speaker (L/R)
EPL / EPR Front presence speaker (L/R) 1
SW Subwoofer 2)
1)For 7.1.2-channel system
(2) Up to two subwoofer can be connected.
When connecting 6-ohm speakers
Set the unit's speaker impedance to "6 Ω MIN". For details, see "Setting the speaker impedance" under "Connecting speakers" in the Owner's Manual.
Precautions for connecting speaker cables
- Be sure that the unit and subwoofer are turned off.
- Prepare speaker cables in a place away from the unit, to avoid accidentally dropping wire strands into the unit's interior which could result in a short circuit or malfunction of the unit.
-
Improper connection of speaker cables could cause a short circuit resulting in damage to, or malfunctioning of, the unit or speakers.
-
Carefully remove approximately 10mm (3/8^) of insulation from the speakerconnection ends of the cables, and twist the bare wires of each speaker cable together firmly.
-
Do not allow the bare wires of separate speaker cables to come into contact with one another.
-
Do not allow speaker cable bare wires to come into contact with metal parts on the unit (rear panel and screws).


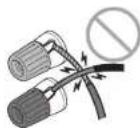
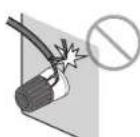
If "Check SP Wires" is shown on the front display when the unit is turned on, turn off the unit and be sure that speaker cables have not caused a short circuit.

3
Connecting external devices
4
Connecting the radio antennas
FM/AM antennas
(Except for Australia, U.K., Europe, Russia, and Middle East models)
DAB/FM antenna
(Australia, U.K., Europe, Russia, and Middle East models)
5
Preparing a network connection
Prepare a wired or wireless network connection in accordance with your network environment.
Note
The wireless antenna must be raised if the unit will be connected to a Bluetooth device.
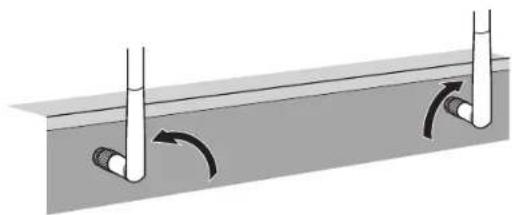
Wireless network connection
Raise the wireless antenna so that it is standing up straight. (Procedures for connecting the unit to a wireless router are described in step 8.)
Notice
Do not apply excessive force on the antenna. Doing so may damage it.
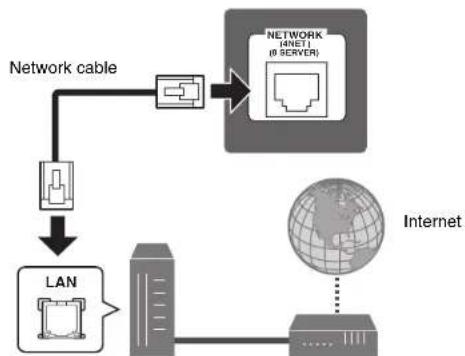
Wired network connection
Router Modem
6
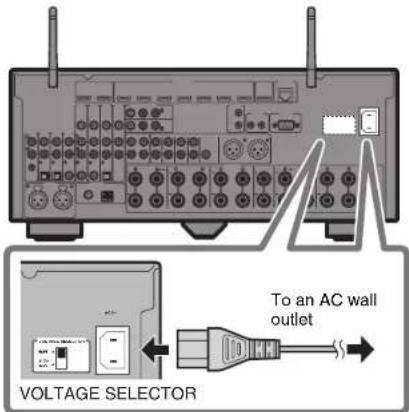
Connecting the power cable to an AC wall outlet, and turning on the unit

Warning
Before connecting the power cable (Taiwan, Brazil, and Central and South America models only)
Set the switch position of VOLTAGE
SELECTOR according to your local voltage.
Voltages are AC 110-120/220-240 V, 50/60 Hz.
1 Plug the power cable into an AC wall outlet.
2 Press (receiver power) to turn on the unit.
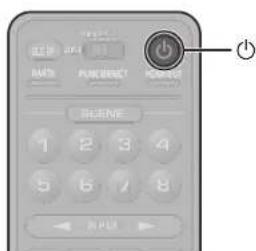
3 Turn on the TV and switch the TV input to display video from the unit (HDMI OUT jack).
The Network Setup screen shown below will be displayed on the TV when the unit is turned on for the first time after purchase. It may take several tens of seconds for the screen to be displayed (WAC: Wireless Accessory Configuration).
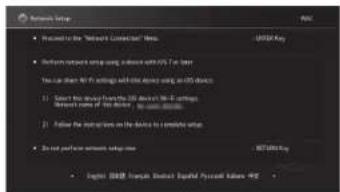
See "Sharing the iOS device setting" under "Connecting to a network wirelessly" in the Owner's Manual when using this function to connect the unit to a network. This document explains wireless connection using the MusicCast CONTROLLER app installed on your mobile device. Follow the procedure described under "8 Setting MusicCast" (p. 17).
Note
This screen will not be displayed if the unit is connected to a router via its NETWORK jack (wired connection).
7
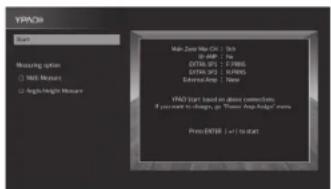
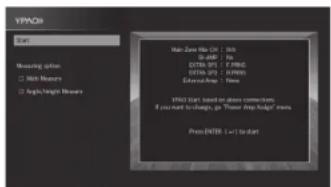
Optimizing the speaker settings automatically (YPAO)
The Yama h t i t, and then automatically optimizes the speaker settings, such as volume balance and acoustic parameters, to suit your room.
Note the following regarding
YPAO measurement
Test tones are output at high volume and may surprise or frighten small children.
Test tone volume cannot be adjusted.
- Keep the room as quiet as possible.
- Stay in a corner of the room behind the listening position so that you do not become an obstacle between speakers and the YPAO microphone.
- Do not connect headphones.

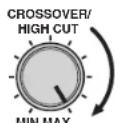
1 Turn on the subwoofer and set the volume to half.
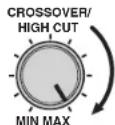
If the crossover frequency is adjustable, set it to maximum.
2 Place the YPAO microphone at your listening position and connect it to the YPAO MIC jack on the front panel.
The screen below appears on the TV.
Note
Place the YPAO microphone at your listening position (same height as your ears). We recommend the use of a tripod as a microphone stand. You can use the tripod screws to stabilize the microphone.
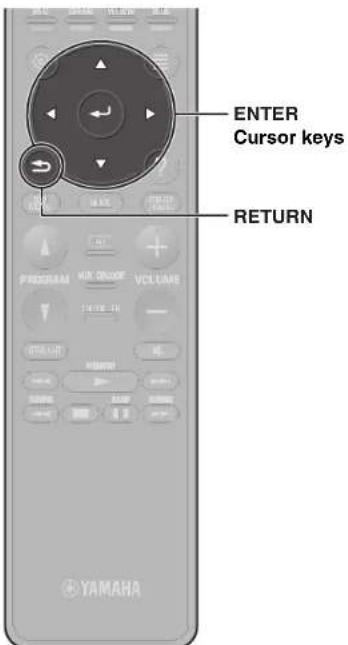
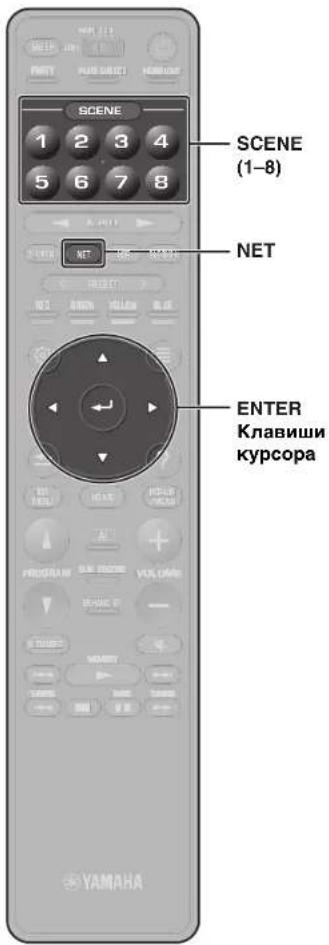
3 Use the cursor keys to select "Start" and press ENTER.
The measurement will start in 10 seconds.
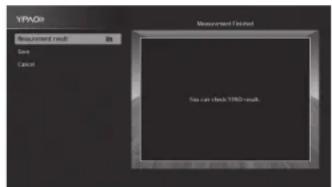
It takes about 5 minutes to measure.
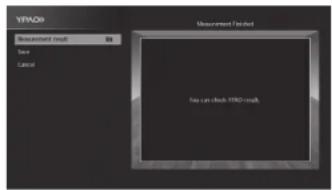
The screen below appears on the TV when the measurement finishes.
Note
If an error message (such as ERROR 1) or warning message (such as WARNING 2) appears, see "Optimizing the speaker settings automatically (YPAO)" in the Owner's Manual.
4 Select "Measurement result" and press ENTER to display the result.
After confirming the result, press RETURN to return to the "Measurement Finished" screen.
5 Use the cursor keys to select "Save" and press ENTER.
6 Disconnect the YPAO microphone from the unit.
This completes optimization of the speaker settings.

Setting MusicCast
What is MusicCast
MusicCast is a brand new wireless musical solution from Yamaha, allowing you to share music among all of your rooms with a variety of devices. You can enjoy music from your smartphone, PC, NAS drive and music streaming service anywhere in your house with one easy-to-use app. For more details and a lineup of MusicCast compatible products, refer to the following site: http://www.yamaha.com/musiccast/
- Seamlessly control all MusicCast compatible devices with the dedicated app "MusicCast CONTROLLER".
- Play back music from music streaming services. (The compatible music streaming services may differ depending on your region and product.)
- Configure wireless network settings of MusicCast compatible devices.
Note
See the Owner's Manual for information on other wireless connection methods if the MusicCast CONTROLLER app will not be used.
Using MusicCast CONTROLLER
To use the network features on the MusicCast compatible device, you need the dedicated app "MusicCast CONTROLLER" for the operation. Search for the free app "MusicCast CONTROLLER" on the App Store or Google Play and install it to your device.
Adding the unit to the MusicCast network
Perform the following procedure to add the unit to the MusicCast network. You can also configure the unit's wireless network settings at once.
Note
The SSID and security key for your network will be needed.
1 Tap the "MusicCast CONTROLLER" app your mobile device and tap "Setup".
Note
If you have already connected other MusicCast compatible devices to the network, tap "Settings" and then "Add New Device".
2 Follow the app's on-screen instructions.
3 Press and hold the CONNECT button on the front panel of the unit for 5 seconds, as instructed by the app.

4 Follow the app's on-screen instructions to configure network settings.
When a connection has been established, "Completed" will be displayed in the front display of the unit.
Network connection with the MusicCast CONTROLLER app is now complete, and the unit has been registered as a MusicCast-enabled device.
Playback
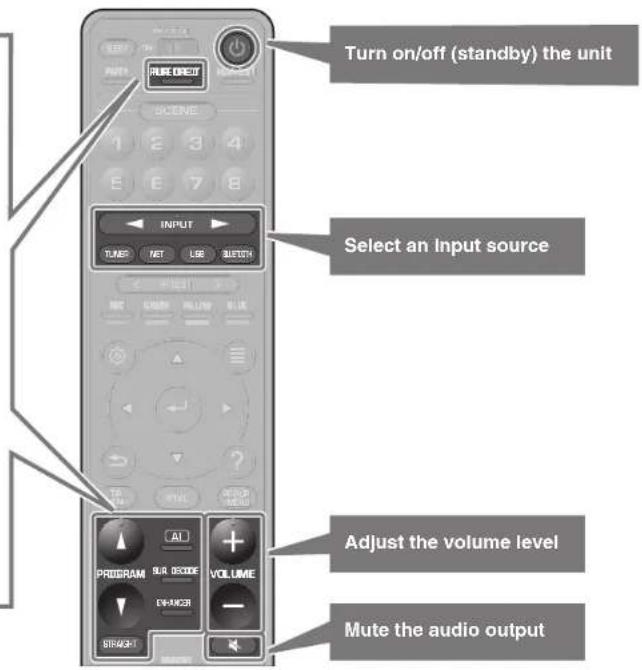
This section describes basic operations such as playing Blu-ray Discs and DVDs, and tuning into radio stations. Most operations can be performed using the remote control.
Basic playback functions
The unit is equipped with a variety of sound programs and surround decoders that allow you to enjoy playback sources in your favorite sound mode.
PURE DIRECT: When PURE DIRECT is pressed and the direct playback mode is enabled, the unit plays back the selected source with the least circuitry. It allows you to enjoy Hi-Fi sound quality.
PROGRAM ( / ) : Sound programs suitable for movies, music and unprocessed playback can be selected.
STRAIGHT: Input sources will be played without any sound field effects.
AI (SURROUND: AI): This function instantly analyzes content, focusing on sound elements such as dialog, background music, ambient sounds and sound effects, and optimizes the surround effect in real time. This creates a compelling sense of realism with expressive power beyond that of conventional sound field effects.
SUR. DECODE*: The surround decoder enables unprocessed multichannel playback from 2-channel sources.
ENHANCER: Compressed music stored on a Bluetooth device or USB storage device will be played with additional depth and breadth.
* We recommend Dolby Surround while network streaming is Dolby contents.
Playing a BD/DVD
We recommend playing back multichannel audio (5.1-channel or more) to feel surround sound produced by the unit.
1 Turn on the BD/DVD player.
2 Press INPUT (< / >) repeatedly to select "AV 1".
The name of the connected device such as "BD player" may be displayed.

Input source Device name
3 Start playback on the BD/DVD player.
4 Press STRAIGHT to select "STRAIGHT".
Note
When "STRAIGHT" (straight decode) is enabled, each speaker produces each channel audio signal directly (without sound field processing).
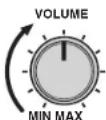
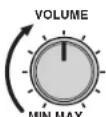
5 Press VOLUME to adjust the volume.
Note
When sound is not heard, or no sound is output from a specific speaker, see "Troubleshooting".
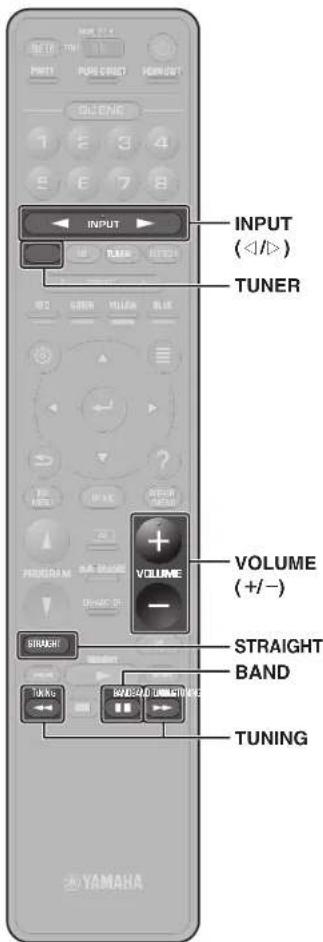
Listening to FM/AM radio
(Except for Australia, U.K., Europe, Russia, and Middle East models)
1 Press TUNER to select "TUNER" as the input source.
2 Press BAND to select FM or AM.
3 Press TUNING to set a frequency.
Hold down the key for about a second to search stations automatically.

"TUNED" lights up when the unit is receiving an FM/AM radio station signal.
"STEREO" lights up when the unit is receiving a stereo FM radio signal.
Setting the frequency steps
(Asia, Taiwan, Brazil, General, and Central and South America models only)
At the factory, the frequency step setting is set to 50kHz for FM and 9kHz for AM.
Depending on your country or region, set the frequency steps to 100kHz for FM and 10kHz for AM.
1 Set the unit to standby mode.
2 Hold down STRAIGHT on the front panel and press MAIN ZONE
3 Press PROGRAM on the front panel repeatedly to select "TUNER FRQ STEP".

4 Press STRAIGHT on the front panel to select "FM100/AM10".
5 Press MAIN ZONE to set the unit to standby mode and turn it on again.
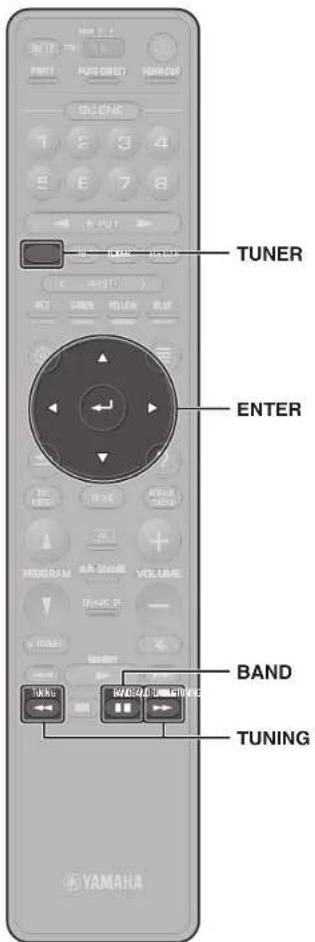
Listening to DAB radio
(Australia, U.K., Europe, Russia, and Middle East models)
1 Press TUNER to select "TUNER" as the input source.
2 Press BAND to select the DAB band.
The following message appears on the front panel if you have not performed an initial scan yet.

3 Press ENTER to start an initial scan.

When the initial scan finishes, the unit automatically tunes into the first DAB radio station as stored in station order.

4 Press TUNING repeatedly to select a DAB radio station.
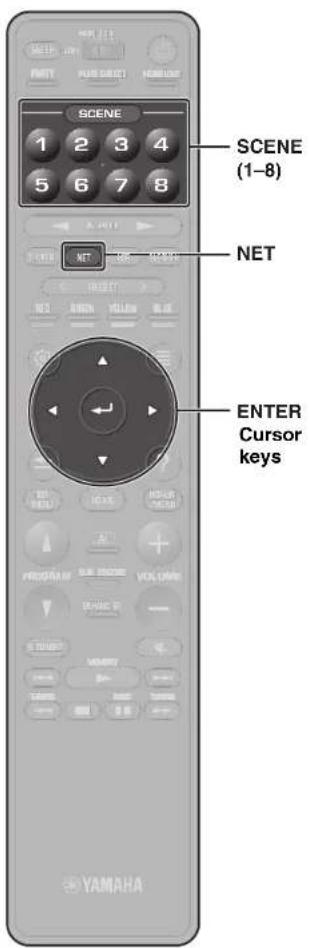
Listening to Internet radio
1 Press NET repeatedly to select "NET RADIO" as the input source.
The browse screen is displayed on the TV.
2 Use the cursor keys to select an item and press ENTER.
When an Internet radio station is selected, playback starts and the playback screen is displayed.
Note
Internet radio stations can also be selected using the MusicCast CONTROLLER app installed on your mobile device.
Listening to music from streaming services
The MusicCast CONTROLLER app installed on your mobile device can be used to receive streaming services.
1 Select a streaming service on the MusicCast CONTROLLER app screen.
2 Select a station.
Note
The following may be required, depending upon the streaming service used.
Install the streaming service app on your mobile device
- Register a streaming service account
Notes on streaming services
- Streaming services may be changed or discontinued without notice.
- Supported streaming services may vary by the country or region of use.
SCENE function
Unit input sources and settings that have been assigned to SCENE (1-8) keys can be selected with a single touch (SCENE function). When a SCENE (1-8) key is pressed, the unit turns on automatically if it is in standby mode.
By default, the following input sources have been assigned to each SCENE (1-8) key.
SCENE key SCENE name Input
| 1 | Movie Viewing AV 1 |
| 2 | Radio Listening TUNER |
| 3 | Music Listening AUDIO 2 |
| 4 | NET Audio Listening NET RADIO |
| 5 | STB Viewing AV 2 |
| 6 | Game Playing AV 3 |
| 7 | TV Viewing AUDIO 1 |
| 8 | Madia Server Listening SERVER |
Registering a scene
The settings assigned to each SCENE (1-8) key by default can be changed to suit individual preferences.
- Play an input source.
- Apply settings for functions such as Sound programs and Compressed Music Enhancer.
- Press and hold a SCENE (1-8) key until "SET Complete" appears on the front display.

Playing music stored on a Bluetooth® device
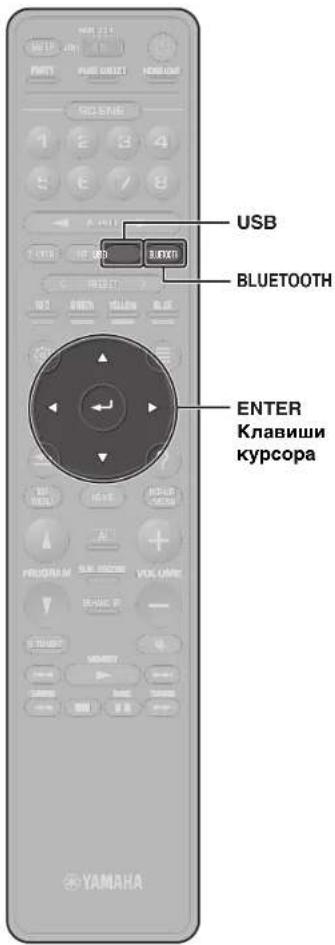
1 Press BLUETOOTH to select "Bluetooth" as the input source.
2 Select the unit (network name of the unit) from the available device list on the Bluetooth device.
If the passkey is required, enter the number "0000". When the connection is established, the indicator will glow in the front display.
3 Select a song and start playback on the Bluetooth device.
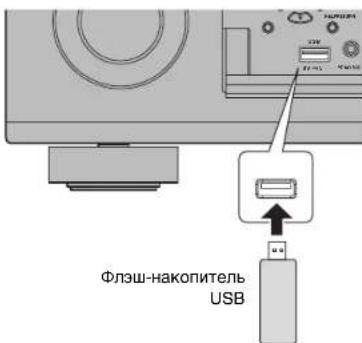
Playing music stored on a USB flash drive
1 Connect the USB flash drive to the USB jack.
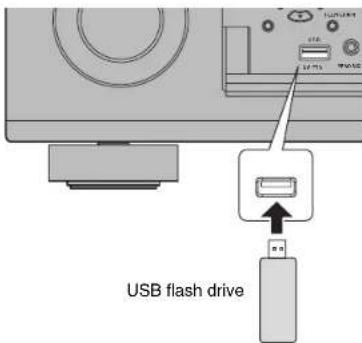
Note
Connect the USB flash drive directly to the USB jack. Do not use an extension cable.
2 Press USB to select "USB" as the input source.
The browse screen is displayed on the TV.
3 Use the cursor keys to select an item and press ENTER.
When a song is selected, playback starts and the playback screen is displayed.
Basic operation of the Option menu
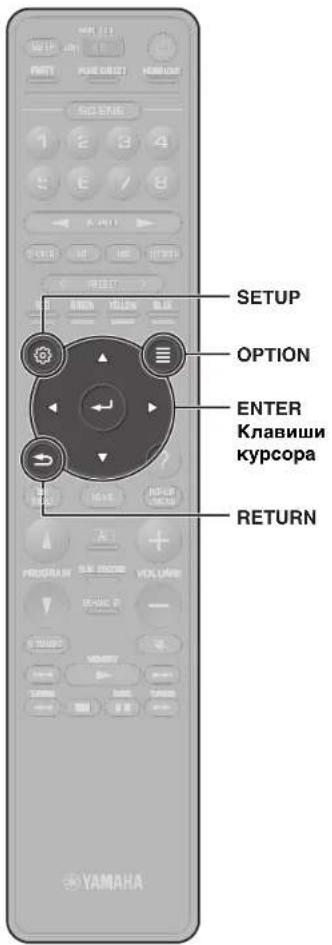
This section explains basic operation of the Option menu. The Option menu can be used to configure the unit's playback functions according to the input source.
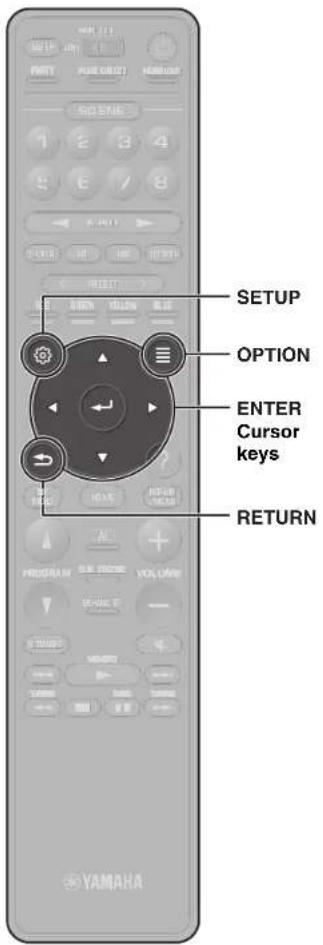
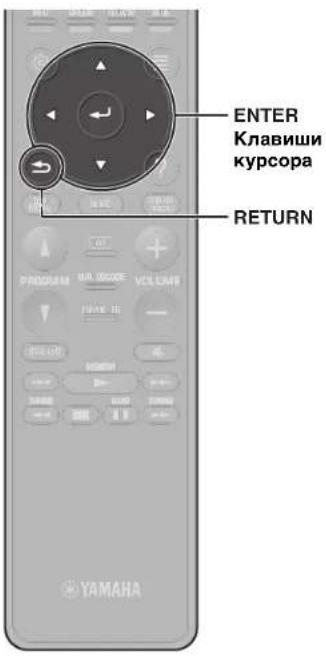
1 Press OPTION.

The Option menu is also displayed on the TV screen.
2 Use the cursor keys to select an item and press ENTER.
To return to the previous screen during menu operations, press RETURN.
3 Use the cursor keys to select a setting.
4 Press OPTION.
For more information, see "Configuring playback settings for different playback sources (Option menu)" in the Owner's Manual.
Basic operation of the Setup menu
This section explains basic operation of the Setup menu. The setup menu can be used to configure the unit's functions in detail.
1 Press SETUP.
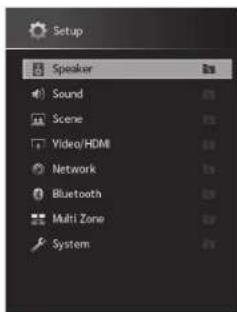
2 Use the cursor keys to select a menu and press ENTER.
To return to the previous screen during menu operations, press RETURN.
3 Use the cursor keys to select an item and press ENTER.
4 Use the cursor keys to select a setting.
5 Press SETUP.
For more information, see "Configuring various functions (Setup menu)" in the Owner's Manual.
Troubleshooting
If trouble occurs, first check the following:
Make sure of the following when the unit does not function properly.
The power cables of the unit, TV and playback devices (such as BD/DVD players) are connected to AC wall outlets securely.
The unit, subwoofer, TV and playback devices (such as BD/DVD players) are turned on.
- The connectors of each cable are securely inserted in to jacks on each device.
If there is no problem with the power and cables, refer to the instructions shown in the table below.
If the problem you are experiencing is not listed or if the instructions do not help, turn off the unit, disconnect the power cable, and contact the nearest authorized Yamaha dealer or service center.
| Problem Cause Remedy | ||
| The power does not turn on. The protection circuitry has been activated three times consecutively.When the unit is in this condition, the standby indicator on the unit's front panel blinks if you try to turn on the power. | As a safety precaution, capability to turn on the power is disabled. Contact your nearest Yamaha dealer or service center to request repair. | |
| The power turns off (standby mode) Immediately. | The unit was turned on while a speaker cable was shorted. | Twist the bare wires of each speaker cable firmly and reconnect to the unit and speakers (p. 9). |
| The unit is not reacting. The internal microcomputer is frozen, due to an external electric shock (such as lightning or excessive static electricity) or to a drop in the power supply voltage. | Hold down MAIN ZONE (1) on the unit's front panel for more than 15 seconds to initialize and reboot the unit. (If the problem persists, disconnect the power cable from the AC wall outlet and plug it again.) | |
| No sound. | Another input source is selected. | Select an appropriate input source with the input selection keys. |
| Signals that the unit cannot reproduce are being input. | Some digital audio formats cannot be played back on the unit. To check the audio format of the input signal, use "Information" under "Sound" in the "Setup" menu (p. 24). | |
| No sound is coming from a specific speaker. | The playback source does not contain a signal for the channel. | Use "Information" under "Sound" in the "Setup" menu (p. 24) to check the audio signal. |
| The currently selected sound program/decoder does not use the speaker. | Use "Test Tone" in the "Setup" menu (p. 24) to check the speaker output. | |
| Audio output of the speaker is disabled. Perform YPAO (p. 15). | ||
| Use "Configuration" in the "Setup" menu to change the speaker settings (p. 24). | ||
| Problem Cause Remedy | ||
| No sound is coming from the subwoofer. | The playback source does not contain LFE or low-frequency signals. | To check if the subwoofer is working properly, use "Test Tone" in the "Setup" menu (p. 24). |
| Subwoofer output is disabled. Perform YPAO (p. 15). | ||
| Set "Subwoofer" in the "Setup" menu to "Use" (p. 24). | ||
| No video. | Another input source is selected on the unit. | Select an appropriate input source with the input selection keys. |
| Another input source is selected on the TV. Switch the TV | Input to display the video from the unit. | |
| No video from the playback device connected to the unit with HDMI. | The input video signal (resolution) is not supported by the unit. | To check the information about the current video signal (resolution), see "Information" under "Video/HDMI" in the "Setup" menu (p. 24). For information about video signals supported by the unit, see "HDMI signal compatibility" in the Owner's Manual. |
| The TV does not support HDCP (High-bandwidth Digital Content Protection). | Refer to the instruction manuals for the TV and check the TV's specifications. If you want to play back contents that require HDCP 2.2-compatible devices, both the TV and playback device must support HDCP 2.2. | |
| Cannot make the connection settings on MusicCast CONTROLLER. | The mobile device is not connected to the wireless router at your home. | Connect the mobile device to the wireless router and use MusicCast CONTROLLER. |
| It takes time for the app to detect the unit. | Wait a moment while making sure that your mobile device will not be in the sleep mode. | |
| Access to the network is restricted by the firewall settings of the wireless router (access point). | Check the firewall setting and the MAC address filter of the wireless router (access point). | |
Specifications
| Bluetooth | |
| Supported profile A2DP, AVRCP | |
| Supported codec SBC, AAC | |
| Bluetooth version Ver. 4.2 | |
| Wireless output Bluetooth Class 2 | |
| Maximum communication distance 10 m (33 ft) without interference | |
| Supported content protection method | SCMS-T |
| Network | ||
| Wi-Fi function Radio Freq. | ency Band 2.4 GHz, 5 GHz band | |
| Wireless LAN Standards: IEEE 802.11 a/b/g/n/ac*20 MHz channel bandwidth only | ||
| Security Method: WEP, WPA2-PSK (AES), Mixed Mode | ||
| Capable of WPS by PIN Method and Push-Button-Method | ||
| Capable of sharing with iOS devices by wireless connection | ||
| Tuner | ||
| FM/AM Tuning Range U.S. | A. and Canada models [FM] 87.5 MHz | to 107.9 MHz [AM] 530 kHz to 1710 kHz |
| Asia, Taiwan, Brazil, General, and Central and South America models | [FM] 87.5/87.50 MHz to 108.0/ 108.00 MHz [AM] 530/531 kHz to 1710/ 1611 kHz | |
| China and Korea models [FM] 87.50 MHz | MHz to 108.00 MHz [AM] 531 kHz to 1611 kHz | |
| DAB/FM Tuning Range Australia, U.K., Europe, Russia, and Middle East models | [DAB] 174 MHz to 240 MHz (Band III) [FM] 87.50 MHz to 108.00 MHz | |
| General | ||
| Power Supply U.S.A. and | Canada models AC 120 V, 60 Hz | |
| Taiwan model AC110 to 120 V, | 50/60 Hz | |
| Brazil, and Central and South America models | AC110 to 120/220 to 240 V, 50/60 Hz | |
| China model | AC 220 V, 50 Hz | |
| Korea model | AC 220 V, 60 Hz | |
| Australia model | AC 240 V, 50 Hz | |
| General | |||
| Power Supply U.K., Europe | Russia, and Middle East models | AC 230 V, 50 Hz | |
| Asia and General models | AC 220 to 240 V, 50/60 Hz | ||
| Power Consumption | 490 W | ||
| Standby Power Consumption | HDMI Control Off/Standby Through Off/Network Standby OFF | 0.1 W | |
| HDMI Control On/Standby Through On/Network Standby OFF | 1.4 W | ||
| Input: AV 1 (HDMI no signal) | |||
| HDMI Control OFF/Standby Through OFF/Network Standby ON/Bluetooth Standby OFF | Wired | 1.4 W | |
| Wireless (Wi-Fi) | 1.7 W | ||
| HDMI Control OFF/Standby Through Off/Network Standby ON (Wired)/Bluetooth Standby ON | 1.5 W | ||
| HDMI Control ON/Standby Through ON/Network Standby ON (Wi-Fi)/Bluetooth Standby ON | 2.5 W | ||
| Maximum Power Consumption | Asia, Taiwan, Brazil, General, and Central and South America models only | 1210 W | |
| Dimensions (W x H x D) | 435 x 192 x 474 mm (17-1/8" x 7-1/2" x 18-5/8") | ||
| Reference Dimensions (with wireless antenna upright) * Including legs and protrusions | 435 x 269 x 474 mm (17-1/8" x 10-5/8" x 18-5/8") | ||
| Weight RX-A3080 | China, Australia, U | K, Europe, Middle East, and Russia models | 19.6 kg (43.2 lbs) |
| Other models | 18.1 kg (39.9 lbs) | ||
| RX-A2080 | 17.0 kg (37.5 lbs) | ||
The contents of this manual apply to the latest specifications as of the publishing date. Refer to the Owner's Manual on the Yamaha website to confirm specifications other than described above and obtain the latest information of the unit.
PRECAUTIONS D'USAGE
LISEZ ATTENTIVEMENT AVANT DE PROCEEDER A Toute UTILISATION. VEILLEZ A SUIVRE CES INSTRUCTIONS.
(weee_battery_eu(es_02)

Introduccion
(weee_batery_eu_ct_02a)

Introdução
Moylb6ecnpoBDOHNOcB3N
He HcnoIb3yIe annapat OKOJI MEniHcKHX NpI6OBu IN MeiHcHcKHX yUpeKJdHKe. PaHIOBnJIbOT OaHIOHAnnapaTa MOrT Bo3JeCTBOBaTb Ha 3NEKtPmEckneM EMeIHcNcKHeYCTPOH
He nnonbayte annapat 6nke, cem B 15 cm ot JIOe C mnnnantnpoBaHHbIM
kapnOCTMmNITOPOM NIN DnDnBnIITNtOPOM.PaMDOBnHb,roHOppyoMbIe DaHHBM annapatom,MOrT NOBnITb Ha paOby TEkTNpHECKHX MeIMUNCHKXyCTPOITCB, napHPMe BxKNBENHbIX KaNPOTcMNTMPTONPOM INN DEpMnRITNtPOB.
HeWtathbIe cHTyaun
PnB03HKnHOBeHmNIO6oN3yka3aHHbIXHnKpeNpObIeHMeEJIeHHOOTKIOHTe NITAHHeNOTcOeAINHTeKa6eJIbNTAHnO TJIeKTPOCetNI. PnpB03HKnHOBeHmNAKKO106oN3nepeuCnEHHbIXHapUeHMeHMeJNeHHo BkIKIOHTe BcYcUNTTeN IN NPDMEHNKK.
-NoBpeXdeHnKa6eNnTuTaHn nnWtencen.
-13annapataNCXOHTHeo6bHb3aIaxnnDbIM.
-BHtpb annapata nonan nocToPOHHn npEdMeT.
-BoBpEMRaPbOToI npOnaJaet 3ByK.
- Ha annapate IMeIOrTa TpeunHb NIOBpeKDeHNr.
PpOJIOXHEHNEIPOJI3B03BANHMOKETBb3BaTbNopAeXHEHIEJIaKTPNUcCKHM TOKOM, KAPoN HIN pINBecTeN K HEMCnPaBHOCTH. HeaMeIINTeBHo 06MaTHeBcI IINOCMToP a anapata B M ETO erpoIPOpEeHTmN IN B cepBNCHI ueHr P YamaH
He poHnIte H He noBepraTe annapa TcNbHomy Fm3neckOmy Bo3eCTBIO.EcnI cyueCTBeT BepoTHOCb TOrTO, YTo annapa5bN NOpeBeknE B p3yBntSta naehn IIN PnH3NECKOBO3EETBTHN, HEmeJNeHOOTKNOHIE NTENHME I NTOCNIHTHE WTeNCBt OTpo3eKn NEpemEHNO TOKA. HecobIOJeHMe 3TOr OYka3AHn MOeKt npuBcTkn OnpaKeHNIO 3NEKTpueeckm TokOM, nOxAp4y INI HEnCPaBHOCTM. He3aMeJNTeNsBO o6paTInTeCb DnA OcmoTa annapata B MecTo npno6peTeHHN INI B CepBCHbIeHTP Yahama.

BHUMAHNE
Daanha HOpmaa npedynpeKdaet o pncke noIyehna TpaBMbl.
IcToHmNnTaHmN Ka6Enb nTaHm
HeHCnObl3yIePo3eTKNepemEnHoroTOKA,BKToPbIX WTeNCelB depXnTCa HeNAEHEKHO.HeoCNoHeMe3TOPO yka3aHmNOKeT pINBeCTN K NOxApY,npaxHeHIO 3NEKTpHeCKM TOKOM NIM OKOFAM.
BbHIMaCeTeByO UntencelN3 yCTpoIcTba Nn po3eTK npeMeHHoro TOKa,
depKntecb 3a cam Untencel. HnKorDa HE TAnHe 3a UHyp. 3To MOxET npINBOCTK
noBpeXeHNIO KaEJIr N CTaNb PnHHoN IopaeHn 3NeKTPueeCKM TokOM NnN NOxapa.
BctabnIte wntencnb B po3eTky nepemehHoro ToKa IIOTHo I do ynopa.
Vncnbsbnahe yctpoiCTBa, wntencnb KOTOPORHO HeOCTaTOHNO TNOTHO BCTABNEHa B
po3eTKy, MoKET Bbl3BaTb HAKONNEHe qACTNU bIIN HA WtENCeN e CTaTb pNHHOH
NoXkapa nII NKOKA.
YCTaHOBka
He octabnaine annapat B noctoytshOB MNOLOKohno Annapat MOOCT CNyauHHO ynaftb NINPHNHTB TPABM.
He 3akpbIaBe THE BENTHNIIOHOHBE OTEBPCTO (OXXJKAIOIOpePNO) ANAPATA.
DAnHHN AnapAT OCSAONB BENTHNIIOHOHBMTOBETPCHBNBPOPYB6Qy/B6KNYDnR npeoTbpauHMA CINIKOM CNbHORO NOBbHEHNA TEMnpaTyBI HByTPn. Heco6IOHeH NToYkAA3HMOxET PnBcNTK HApuyEHNHO OTOBaO TENa OTAnpATA. 3To MOKET CTat pNPHNIO NKpAKI INHOCNPABHOCTe.
BoBpMa yCTaHObKn annpaTa:
-HeHaKpbBaTe annapaT KaHbIO;
-HeCTaBbTe anNaPaT Ha KOBPKN NIN KOBPbI;
- 8eDaiTeBc, YTOBEXHnANaHEb HnAPaJIHeBa BEXx I TOO annapat He yCTaHOBEN B nepebepyHTOM NOXKeHNI INI hO6O?
- HONJb3yIeBc 1nnapATOM B TcEBHx, IIOXo npOBpTBAaBMxN OMOuEHINx.
HHeCb0nDHeM pNpBeDEHHx BByUk EKAAHNN MOKET pNpBCTN K HAPUeHNIO OTBoAaT ENTLA OYCTPOECTBA. 3TO MOKET CTbT pNmuHNO NOKaja INH eHNcpBaHOCTe.
YBeMeTbC B NaHmN DOctAOTHORBO CBODoHNO pOcTpAHCTBA BOKpyr Annapata: no KApHAne Mepe 30 CM CBEXPY, 20 CM NO6aAM N 20 CM ca3dAm.
IcnoJb3ObaHne 6aTapeek
Bcerda 3aemeHne BCE 6aTapeKeKn OHOBpeMeHNo. He nOIOb3yIe HObile 6aTapeKeKn BMEcTe CO CTapbIMN. INCNOb3BOAHGE HObIX bTapeEOK MBOCTe CO CTapbIMN MOXET CtB pUCHNO Hxopapa, KOXOFB INM BOOCNAmaleHHeN 13-3a IPOTEKAHN JNEKTPOITNA.
IcnoIb3yIe 6 batapreHn ToIbKo yka3aHHOr TnHa, Heco5NIOeHHe 3TOr Tpe6oBaHnMoKOT cTb IpNHyHO nOka, OxKorOB INBocJIaMeHHeIN H3-3 aPtoEKAHMR6 batapreKn.
He IcnoIb3yIte Bmecte batapeKn pa3hIx TnOB, HanpMme, eioNoHbE batapeKn Bmecte C m4rAUEBbIMN, INIbatapeKn pa3hIX pNO3B0DInTeNe, INo6O batapeKn pa3hIX TnIOB OndHOPO npON3BOIDTeN, NOCKOLBY KTO MOKET CTaTb npMHHO NOKApaa, OOKOB INN BOCNNAmeHEHn-3-3a PTOKEAHNEJIEKTPONTHa.
XpaHHTe 6aTepeKIN B MeCTax, HeoocTyNbIX dIraTeT. Pe6EHOK MOKET cnyauHo npOrnIOHTb 6aTepeKIN. HecOboJeHne 3TOrO yKa3aHaM ROKET npMBecTu K OKOYr H3-3a YTEuKN 3NOkTPOnITa 6aTaKeN.
- Ho nomenaite batapeky B kapman n nnaket, Hocnte n Hxpanhto batapeky pdam c metanlneckmnn pdeametamn. Pnp kopoTcK 3amblkAHn daapeka MOket B3opbaTcR IIO BO n Hee moKet npoteH 3nEKTponIT, CTab npnuHno noKapa n nn TpaBMn.
063aTeBNo yctahABnMBAte 6aTapeKn B COOTBeTCTBN C OTMeTKAMH+/-, ykaBaIaOIMN NIOHPCHTe. HecbIoNEHe 3TOr Yka3AHm MOKe T pINBECTN K OKOram INB O30rpaHIO BcNECTAny TEYeKm 3NkPTONITA.
EcnI 6bataeKn paarKKBHn HIN cCN annapat nITnelbHO BPMAH He 6yDat IcNIOB3OaBtCB,TO BO 36EgAnHH Bo3MOKHOY TEEKN 3NEKTPOJNTA 3BNEKHTe 6BaTaeKn N3 NynbA DCTAHUONHO YpnaBHeNIA. - Pn xpaHEnHH mnn yTmN3aunbatapeek N3OmpyTe ObnaCTb NOHOCB C NMOUBo KNEIKo JnHTb nIpyrOg MaTePma. KOtAKc T dpyrMM bataeKAMM nn MeTALNNecCKHMn PnepDMaTM MoKet npBcETn KNOxApy, OXORAM mN B03rOpAHIO H3- 3a nPoTEKAHN 3eKTPONITHa.
yBeOmJeHne
Yka3aHn, KOtOpbIe Heo6xOdHMo co6JIOdaTb BO n36ekaHne HEnCnpaBHOCTN, NOBpeKJeHn HIn HapUWeHn pa60TbI n3DeHn, a TAKKe NOTepn daHHbIX.
NCTOCHNK NHTAHN Ka6eJIb NITAHNA
- Ecn annapat He 6ydt Hcnoh308aBc B TeueHHe dInTeIbHoro BpeMeH,OTcoeHNHT Wtncenb OT pO3eKn npeMeHHOro ToKa. DaKe eCn BlKIOHcTbe (OxNAnAHne/ BkIOHcHHe) BkIOHcH (3KpaH BkIOHcH), He3NaHTeINbHbIK TOK 6ydt npDoONKaTb npToekTab.
YctaHOBka
He HcnoIb3yTe daHHb annapa pTOM C dpyrMM 3AekTOHbIM o60pOBAHMeH, HanpIMeP, TeneBn3OpOM, pADIO INM MOINbHM TeneFOHOM. Heo6NODeHne 3toro yka3AnHO MOKTe CTaTb PnHHOn WmOB, CO3daBaembIX TeneBn3OpOM IN PAIDNPMEMHKOM
He IcnoIb3yTe 3OT Ananapar B MeCe, KOTopoe NOpBepKHO Bo3JeCTBIO npHMOrO HeNCHyoC BcTa, KOTopoE MOKET CnLbKO HArpeTcH (HarpHMeP, PAnOM C 6o0RpeBaTeMe) INN OXJIaDITcB JINIO KO TOpOe NOBepKHO CnLbKO HCMBOH BO3JeCTBIO HbIN INN BHpaUIN.3TO MOKET PnBECTN K DeOpMaun NAnEHIN abPaTa, Bb3BaTb HcNpTaBHOCTN BHTpEHHX KOMIOHEHTOB INN CTaTb PnHNOH HeCTAbIBHO paBoTb.
- Uctahabnnae annapaT kak MOxHO daIbne O TpyrO 3NEKtpOHoro o6pOboAHNA. LIOPOBae CmHbI OT annapaTA MOrTy Co3daBaTb NOMEXI dApyrO 3NEKtpOHoro o6OpDobAHNA.
- Pnpncnolb3oAHmBecnpoBOHOcTeHs3eRaTe yCTaHOBKn daHHoro aHnapata prdOM cMTaJIYNECKMn CTeAHM INI CTOnAMN, MmKpOBoHOBbIMn neAAMn INI dpyHMn BecnpoBOHbIMn CeTEbIMn ycTpOcTBAMn. PnpnrCTBmMoryT cokpatNTb paCtONHe npeJdAn.
IopKnIOueHn
PnnoDNOKIOHNNBNEHINXyCTPOHCTbOBa3aTeJbHO BHNMAToJIbHO npOHTAHTe pyKOBOCTBO DnI KAKDOYcTPOHCTBaN NOKnIOHNTBX BCOOTCTBNC HnCTPKUIMM.
HenpabnHbNoe Ndo KIOUHO Hne AnnapaTa, HApuOoOee HNCTpyKUn, MoKET PnBECTN Kero HnpabnHbHn paboTe.
He npknohane 30T annapa K npmbuHneHHbmy ycTPOyCTBAM. DnBbTOBO rnpmbuHneHHO nCNOB3OBAHN npmEHOHTc pa3bHBe cIpPBOBE ayDIOHOHTpeFoebl. 3OT annapa ppeNaH3eHne DaNOKIOHOH K BbTOBOMy UdpoBOMy ayDIOHOHTpeFoeCy. NpKIOHOHE K npmbuHneHHOMy UdpoBOMy ayDIOHOHTpeFoeCMoKET He TOIbKO npINBecTN K HNCnPABHOCTH annapata, HO INOBPeINTb DnHAMNK.
PykoBOCTBO NOb30BaTeJI npn
NCN0JIb3OBaHHN 3TOI CyHKUIN DIA
NOKIOUeHn annapaTa K cTeN.
B daHHOM dOKyMeHTe npuBeDeHo onncaHne
becnpoBODHOro NOdkIoueHNc NOMOsbIO
npnnoxKeHna MusicCast CONTROLLER
yCTaHOBNEHHORHaMOOBnIbHOM yCTpOINCTBe.
BbInnonHHe npoeDpy, onncaHHyB 8
Hacipponka MusicCast (c. 121).
PpmeaHne
3TOT 3KpHn HE 6yET OTo6PbAaBcB, eCnI aIIapar pNkNIOHn K MapuPyTaAtopy Hpe3rHe3do NETWORK (npOboHoe npoknOe-Hne).
7
ABTOMATNUECKaONTNMn3aunHaCTpoeK KOJOhok (YPAO)
Yama h Aotm n o n n n n n n n n n n n n n n n n n n n n n n n n n n n n n n n n n n n n n n n n n n n n n n n n n n .

PnMMTE BO BHIMAHNE CNeDyIOUne 3aMeCHAHN OTHOCHTeBHO N3MepeHNI YPAO
TecToBbE CnHbblBbIOBcTcBbIOBCOKOITPMKOCtBIO MOrYCTaTbHEoXnDaHHBMnHNNHanyraTb MaHehKHX DeTei.
- FpOMKoCTb TcTeOBbIX CnHAnOB He perynnpyeTCA.
BoBpMaN3MepeHnA coXpaHHTe B KOMHate MAKCImaNbHyO TmHIny.
BoBpMaH3MepeHnCJeDyET HxOaHTbCR B yTnyNOMeueHnno3aNDNOONKeHnnpocnyuBaHn,YTO6bIHeCO3DaBaTb npenrTcBmMekdyKoONHKAMNI MKNpOFOHOM YPAO.
He noKnIOauTe K annapaTy HayuHNKn.

1 BkHouHte ca6Byfeep n yCTaHOBHTe erO rPOMKoCTb Ha NOJOBHNy.
YCTaHOBtMe MaKcMaIbHyIO YactOTy KpOCCOBepa (ecn OHa perynpyetca).
2 YcTaHOBnte MmKpofoH YPAO B noLoXKeHne npocLyuWBaHH N NOkIIOHTe ero K rHe3dy YPAO MIC Ha nepeDne naHei.
Ha 3KpaHe TeneBn3opa NOBNTcN KOKa3aHHoe HIXe N3o6paXeHMe.
PnmuMeaHne
VctahOBtBE MkPOFOH YPAO B NOJOKHeN IpOCnyuBnAHn (Ha yPObHE yuei). B KaHeCTBe NoCTABKN DnMkPOFOHa peKoMeHyTeCnONb30aB tUtaTH. MkPOFOHO KAKPNETB BVHTAMN UITATIBA.
3 C nOMOsbIO KJIaBNI Kypcopa BbI6epnTe "Nyck" m Haxmnte ENTER.
N3mepHHe NaHHeTc4 Yepe3 10 cekyHd.
N3mepHHe npOJOnJaTe TpNMePHO 5 MnHyTbI.
IO OKOHaHH N3mepHHe Ha 3KpaHe TeLEBn3Op NoRbNTc
nOKa3HaHn Hxke INHΦopMaHr.
PpmeaHne
Ecnn noBantc coo6eHne 6 ooi6ke (HanpMep, ERROR 1) nnn npdynpkjaedHe (HanpMep, WARNING 2), cm. pa3dene "AbTomatueckaar OTNMMIaHactpoek KOHONOK (YPQA)" B INHTpyKmUO nKcNnyatauM.
4 BbI6epnte "Pe3yIbTaT n3MepeHn" n HaxMnTe ENTER dIra oTo6paXeHn pe3yIbTaTata.
Iocne npOBepK pe3yNbTaTahxMnTe RETURN nH B03Bpata K 3kpahe "N3mpeHHe 3aBpeHo"
5 C nOMOuBIO KnaBnKypcopa BbI6epnte "CoXpaHtB" n HaxMnTe ENTER.
6 OTKIIOHTe MKNpOfoH YPAO oT annapata.
Ha 3TOM ONTIMM3aUNHAcTPOEK KOLOHOK 3aBepueHa.

Hac tropona MusicCast
4To Takoe MusicCast
MusicCast npedctabnert coboh HOBeIwee 6ecnpoBOHOoe My3bikalhopeweHne OT YamaHa, no3Bolnoooee NcNoIb3ObaTb My3bIKy BO BCEXKOMHaTAC c NMOOsbIO pa3NnuHbIX yCTPOBCTB. Bbl MOKeTe HacLnJaTaBcMy3bIKo co CMAPrFOHa, PI, npBODa NAS u ycnyr nOTOKOBn nepeDaMy3bIKB NIOoB ToQKe Doma C NMOUBo OOnHO rPoCTOROBnCNOB3OBAHN pInNoXeHn. IINr NOnyuHHe 6Oone nOpboHoINHOFopMaHH INCNCKA MusicCast-coBMeCTMbx INdEIN CM. cNeDyOuHmBe6-caIT:
http://www.yamaha.com/musiccast/
Jlerko ynpabnTe BcemM MusicCast-coBmecTmbmU yctpoiCTbAMn C nomoosbu cneuaJIbHoro npIIOxejHn "MusicCast CONTROLLER".
Bocpoa3oDnTe My3bky C yCnyr nOTOKOBoN nepeDaH My3bIK. (CBMeCTMlbE ycLyTn nOTOKOBoN nepeDaH My3bIK MOryT OTnUaTbcR B 3aBNCIOCTN OT perHOHa N3dEJIIN.)
- BbIopJIHnTe KOHpyrauio 6ecnpoBOHOcTn MusicCast-coBmecTmblx yCTPOINCTB.
PpmeHne
Cm. RykoDbTRO noIbToBaeTn nnnoYhen HIOpOmaaOn OdyRTH CNoOc0x6 BecrpoAoHoro noNkIo-ueHH, eonn pinoKoeHe MusicCAST CONTROLLER he 6yder ncoIbToBaTcb.
Испобзовке MusicCast CONTROLLER
Длн Испьзоваим сеетьх Функши Ha MusicCast-coBmecTHMOM yctpoiCTBE He6xOdHMo cneuaJIbHoe npINOJoxHeHne "MusicCast CONTROLLER" Дл pa60ы. БылOLHnTE NOIck npINOJoxHeHn "MusicCast CONTROLLER" Ha App Store ИИн Google Play nycTaHOBITE erо ha yctpoiCTBE.
2 CneyuTe HnctpyKzHM Ha 3kpaHe nporpamMbI.
3 HaKMTe n yDepkNBAIte 5 ckyHd KhoNky CONNECTHa nepeDne NaHeJn annapata corlacho HnCTpyKuIN npNJIOxEHn.

4 CneIyIe 3KpaHHbIM HhCTpyKcIaM npIIOXeHn IHO HAcTpoIke CeTeBbIX NapaMeTpOB.
Iocne yctaHOBNeHn noKnIOueHn Ha nncnnee nepeDneH naHenn annapata nonBttca coo6eHne «Completed».
HactpoKa cTeBOrO noKJIOUeHnC nOMoubI npINOKeHn MusicCast CONTROLLER 3aBepWeHa, n annapat 3apeRcTpnpoBaH kAc yCTpOcTBO C noDpeKkOi MusicCast.
Bocnpon3VepeHne
B 3TOM pa3dene OINcBbAeTc8 OCHOBHbE ONEpaMn, TAKHe KAK BOCPON3BeDeHne DnCKOB Blu-ray, DVD-DnCKOB n HacTpOJa Ha paAnocTaMn. BoIbHnHCTBO OpeaMHo MOnHO BbIOJIHHTb C NOMOJIbHO NyIbTa Dv.
OchOBhble yHKuB Bocnpn3BeHnA
Annapat ochaueh pa3nHbIMN 3ByKObIMN nporpaMMH N deKoepaMn Okpykaioe 3ByaHn, no3BOJIOUIMN npocnyuBaTb 3Byk C BOCnpOn3BODaHx yctpoCTB n PpeNoHTaEMOM peXmme 3ByaHn.
PURE DIRECT:Пинхаши PMURE DIRECTИ вькioчehи ржима henocpeIcTBEHNO BOCpno3BdHnA daHnB annapat 6ydet BOCpOuN3BODHTb bIbpaHnH NCTOHNK CINHNA NO MHHMAHbON cXeMe.3TO no3BOnNET HacnaKaTaBC3ByaHnEM B kaueCTBe Hi-Fi.
PROGRAM ( × ) : MoxHO Bb6pab 38yKOBbIe nporpAMMbI, nOdoJnne IaBmMbO, MybIKN BOCPON3BeEHHRA Heo6pa0TAnHOr cHnHa.
STRAIGHT: IcToUHnK BxOJHO rHana 6yDyT BocnpoN3BOuNTbC8e3 kaKoro-n6o3ΦΦeKaT3ByKOBOrO nonI.
Cledyouee coooheme OtoobpaxaetcHa nepeedne naehn,ecn Hauahbhoe cKaHApOBaHe eue He BblonHeNo.

3 HaKmTe ENTER, yTo6bHaayaTa b HaayalbHoe cKaHnpoBaHne.

Pocne 3aBepueHn HcXoDHorO cKaHPOBaHN annapat aBtOMaTneckn HAcTpOnTcHa nepByo DAB-CTaHnIO, coxpaehHHyOB nepehye CTaHm.

4 HaxmaTe TUNING ⅡBbIbopa hyxHOn DAB-paNoctaun.
EcnBbIbpaHa INTEPHT-paIOCTAHUN. HauHTeCae Ee BOCpON3BeDEHeH NIOBNTc 3KpaH BOCN3BeDEHN.
PpmeaHne
INHTepR-PaIIOCTAUMI MOX HO TAKKE BbBpBaTc B c NOMOZIO bPONIXHOY MusicCASI CONTROLLER, YCTAOHOBIHORO HOB MOLMOHBNCTOYPCOTCBTE.
IpocnyuBaHne ycnyr notokobn nepeaun My3bIKN
PnpnoxHHe MusicCast CONTROLLER, yctahOBnHEHOH BA WbEM MoBnIbHOM yCTPOCTBE, MOKHO McNtlo3oBaT dna nOlyeHHaYcTyr TNOTOKOB NpeDyAH.
1 Bäbepine ycnyry tnoKoboi nepeaunHa h 3kpahe npnOxehnA MusicCast CONTROLLER.
2Bb6epntcTahuio.
PpmeaHne
B BABCMOCTA CT ENOMALYEMOY CYNRNYTOKOBKOB NPERDAHMOKET NOPTe60BATBCHCNEVIOUWUE.
• YctahOBaHE Na MObInbHOM yCTpOCTBe pRnIOXeHBe
yCynIg NTOKOBOP NepaDeu
-3aperntcnpyteyehtHy2a1ncb ycnynnnotokobny nepedaqu
PpmeaHnno ycnyram notokobon nepedaun
- UyTNI NOTOKOBI NEpeaM OMYT 6bITb OTKNIOHcBb 663 yBDOMDNIHA.
PnDaeKxCyNrNOTOKOBNepeDAHMOKcT 3aBNCbTbOTCTpaHnPERHOA,BKOTOPbIX INoN0yETCRDaHHOEYCTPOCTBO.
Функця SCENE
NCTOCHNI BxODHORO CIRHaI aannapaT a N HAcTPOKNI, HA3NaueHHbIe KnaBnAm SCENE (1-8),MOXHO BB6pTaB ODNIM KacAHmE (fYHKUN SCENE).Pnp Haxatnn KhoNk SCENE (1-8) annapat ABTOMATueckn BKIOHTcR,ecn OH bIN B pEXMNE OKKnDAHA.
IyomnHaHKnONkamSCENE(1-8)Ha3NaHehBcneDyIOUeNCTOCHNKBBOda.
Khonka SCENE Ha3BaHne SCENE Bxo
| 1 | Movie Viewing AV 1 |
| 2 | Radio Listening TUNER |
| 3 | Music Listening AUDIO 2 |
| 4 | NET Audio Listening NET RADIO |
| 5 | STB Viewing AV 2 |
| 6 | Game Playing AV 3 |
| 7 | TV Viewing AUDIO 1 |
| 8 | Madia Server Listening SERVER |
CoxpaHeHne cueHbI
HaTPOKnH,HA3HaEHHHie KKaD0KnAaBnIe SCENIE(1-8)noYMOnAHNO,MOrY 6bItbN3MeHeHBCOOTBCTBmC INHINBDyALBHIMM pEpNDHTeHBM.
- Bocnpon3BeDnTE nCTOCHNK BXoHORO CnHaJa.
2.ПриименITE NaCTPoiKINДЯФунКUIM,нанример,ЗуковыnporpamM n Compressed Music Enhancer. - Haxmte y depknae knabny SCENE (1-8) do noBnene "SET Complete" Ha nncnee nepedn naehn.
Bocnpon3BeDeHne My3bIKN, COxpaHeHHoHa yctpOncTbe Bluetooth®
1 HaXmTe BLUETOOTH, YTo6bI BbI6paTb B KaueCTBe NcTOHnKa BXoDHorO cnHaJa "Bluetooth".
2 Ha yctpoicTBe Bluetooth B cnncke doCTyHbIX ycTPOcTB Bbl6epnte annapat (ceTeBOE mMa annpapaTa).
Ecni noTpe6yETc npoB, BBeDnte "0000". Iocne yCTaHOBENHa NOKIOUeHnHa DnCnIee nepeHei NaHEn 3arOpNTc HnDKKaTOp
3 Ha yctpoicTbe Bluetooth BbI6epnte NecHIO HAuHNTe BOCpOIN3BeDeHne.
Bocnpon3BeJeHne My3bIKN,coXpaHeHHoH Na Флэш-нakОпNTeIe USB
1 NpoknHounte pJ3u-HaKoNtEnb USB K rHe3dy USB.
PpmeaHne
Φn3H-NAKONITe USB CneDyET NOKINOHTb HENOCpeCTBeHHo K rHe3dy USB.He nCnOJIb3yTe ydNHNITeB.
2 HaxMnte USB, yTo6bI Bbl6paTb KauecTBe nCTouHnKa BXoDHoro CnrHana "USB".
HaTeBnOpe OTo6pa3ntcAkpan npocMOTpa.
3 Khonkamn Kypcopa BbIbepnte HxHbI 3JIeMeHT n HaXMMTe ENTER.
PbBbOpe PeCHN HauHcTcEe BocpOnB3eDeHHe NnOBHTcKpAH BOCpONB3eDEHnA.
OCHOBhbie Oepaunm MeHIO Onu
B 3TOM pa3dene npmbedeHcO nncahne oCHOBbIX onepaun MeHO OnuMn. MeHO OOnu MoKHO nCNOJb30BaT bIaN HAcTpOKn FyHKuN BOCpON3BeHcH annapata B COOTBETBn C nCTOHNKOM BXoDHorO cRHaJa.
1 HaKmTe KJIabNuy OPTION.

Meho Onu TaKke oTo6paKaetcHa 3kpaHe TeneBn3opa.
2 KhoNkamn Kypcopa BbI6epnte HxHbI 3JIeMeHT n HaxMnTe ENTER.
YTo6bI BepHyTbCk npdeBdyuemy 3KpaHMy MeHIO, HaxMNTe RETURN.
3 BbI6epnte HacTpoKy c NOMOuBIO KnaBnKypcopa.
4 Haxmte KnaBnuy OPTION.
IINONYEHN DONOLHNTeBHO INHOPMAuIN CM. "HaCTpoiKa npaAMETPOB BOCPON3BeDEHn IIN pa3NIHbIX NCTOCHNKOB BOCPON3BeDEHn (MeHO OnuR) B DOKymeTe PyKOBODCTBO NOnb3OBaTeN.
OchOBhble onepaunmeho HacTpoKa
B 3TOM pa3dene npnbedeHo onncahme ochOBhix onepaun MeHO HacTpoKa. MeHO HactpoKa moxHO nCOnb3oBaT bIa IIOpO6Hoi HAcTPOKn fynKcui annapata.
1 Haxmnte KlaBnuy SETUP.

2 C NOMOJIbIO KJIaBNI Kypcopa BbIbepNTe MeHIO HauKMnTe ENTER.
Yro6bI BepHyTbcK npdeblDyMeMy 3KpaHy MeHIO, HaxmTe RETURN.
3 KhoNkamn Kypcopa BbI6epnte HxHbI 3JIeMeHT n HaxMnTe ENTER.
4 BbI6epnte HacTpoKy c NOMOuBIO KnaBnKypcopa.
5 Haxmte KnaBnuy SETUP.
HAcTPOKa pa3NHybX cyHKuM (MeHO HAcTPOKa) B DOKyMente PyKOBoDCTBO NOB3OBaTeR.
Понск и устараенье несправност
PnB03HKnHOBeHH npo6JIembl CHaHaJ npOBepbTe cJeDyUooee:
Ecn annnapat dyHKuHpyeT HnpaBnblHo, npOBepbTe cneDy
KaBEnI NITaHnA annapata, TeneBn3opa n Bocnpou3BOdaux yctpoiCTB (taKnx, KaB BD/DVD-npOurpbIbATEu) HAdExHO NOdkNoeHbI K HaCTeHHbIM p03eTKAM NepemEHORo TOka;
-annapat,ca6bypep,TeIeBn3Op IN BocpnOn3B0aJne yCtpoNCTBa (Takne,kaK BD/DVD-nponrpBaTei) BKIOueHb;
- WTekepbKaKdOro Ka6eNaHaDeXHo BCTaBHeHb BrHe3da KaKdOrO yCToPocTBA.
PnO TcYrTbHn npo6nem C nHTaHnEM N Ka6enm CM. HNCTpyKu, npNBedeHHBc B Ta6nue HnKe.
Ecn HecnpabHocb He yka3aHa B Ta6nue nnn Hnctpykun He nomor, BbKIOHTe annapat, OTOeHNITE Ka6eN NtAHIN 6bnxaiy ATOPn30BaHOMy Dnepy nB cepBnchb ueHtp Yama.
Important Notice: Guarantee Information for customers in EEA* and Switzerland
English
For detailed guarantee information about this Yamaha product, and Pan-LEA* and Switzerland warranty service, please either visit the website address below (Printable file is available at our website) or contact the Yamaha representative office for your country. * LEA: European Economic Area
Manual Development Group
© 2018 Yamaha Corporation
Published 05/2018 KS-A0
YAMAHA CORPORATION
10-1 Nakazawa-cho, Naka-ku, Hamamatsu, 430-8650 Japan
ZZ99490


