AH 670 - Humidifier MEDISANA - Free user manual and instructions
Find the device manual for free AH 670 MEDISANA in PDF.
| Product type | Ultrasonic air humidifier |
| Brand | Medisana |
| Model | AH 670 |
| Dimensions (L × W × H) | 18 × 18 × 30.3 cm |
| Weight | 1.3 kg |
| Power supply | 220-240 V~, 50/60 Hz |
| Power | 35 W |
| Tank capacity | Approx. 1.8 liters |
| Maximum mist output | 200 ml/h |
| Max operating time | 9 hours (depending on level) |
| Power cord length | Approx. 150 cm |
| Technology | Silent ultrasonic |
| Functions | Nebulizer with 2 power levels + off, nebulizer timer (1/2/4 h), LED lighting with 3 intensities + off, lighting timer (1/2/4 h), remote control, aromatic essence drawer, automatic shut-off when water is insufficient |
| Mist direction | Adjustable by rotating the nebulizer opening |
| Cleaning and maintenance | Clean every 3 days; descaling with citric acid; removable filter rinseable with hot water |
| Protection class | II |
| Included accessories | 1 AH 670 humidifier, 1 remote control (CR2025 battery included), 1 instruction manual |
| Available spare parts | Replacement filter (ref. 60057, EAN 4015588600579) |
| Warranty | 3 years |
| Product reference | 60054 |
| EAN code | 40 15588 60054 8 |
Frequently Asked Questions - AH 670 MEDISANA
User questions about AH 670 MEDISANA
0 question about this device. Answer the ones you know or ask your own.
Ask a new question about this device
Download the instructions for your Humidifier in PDF format for free! Find your manual AH 670 - MEDISANA and take your electronic device back in hand. On this page are published all the documents necessary for the use of your device. AH 670 by MEDISANA.
USER MANUAL AH 670 MEDISANA
Please read carefully!
A fire attentivement s.v.p!.
1 Safety Information. 12
2 Useful Information. 15
3 Operating 16
4 Miscellaneous. 19
5 Warranty 22
FR Mode d'emploi
GB ① Turnable vent opening
Plastic cover
Water tank
Tank cover with valve
5 Mains cord
Air vent
Tank chamber
Aroma compartment
Filter
10 LED lighting
1 Base
3 buttons: / / L
Infrared sensor
14 Infrared LED
15 Select atomiser level
16 Lighting: Switch on/off or dim
17 Select switch off time for atomiser
18 Select switch off time for lighting
Switch the appliance on/off
20 Ultrasonic transducer
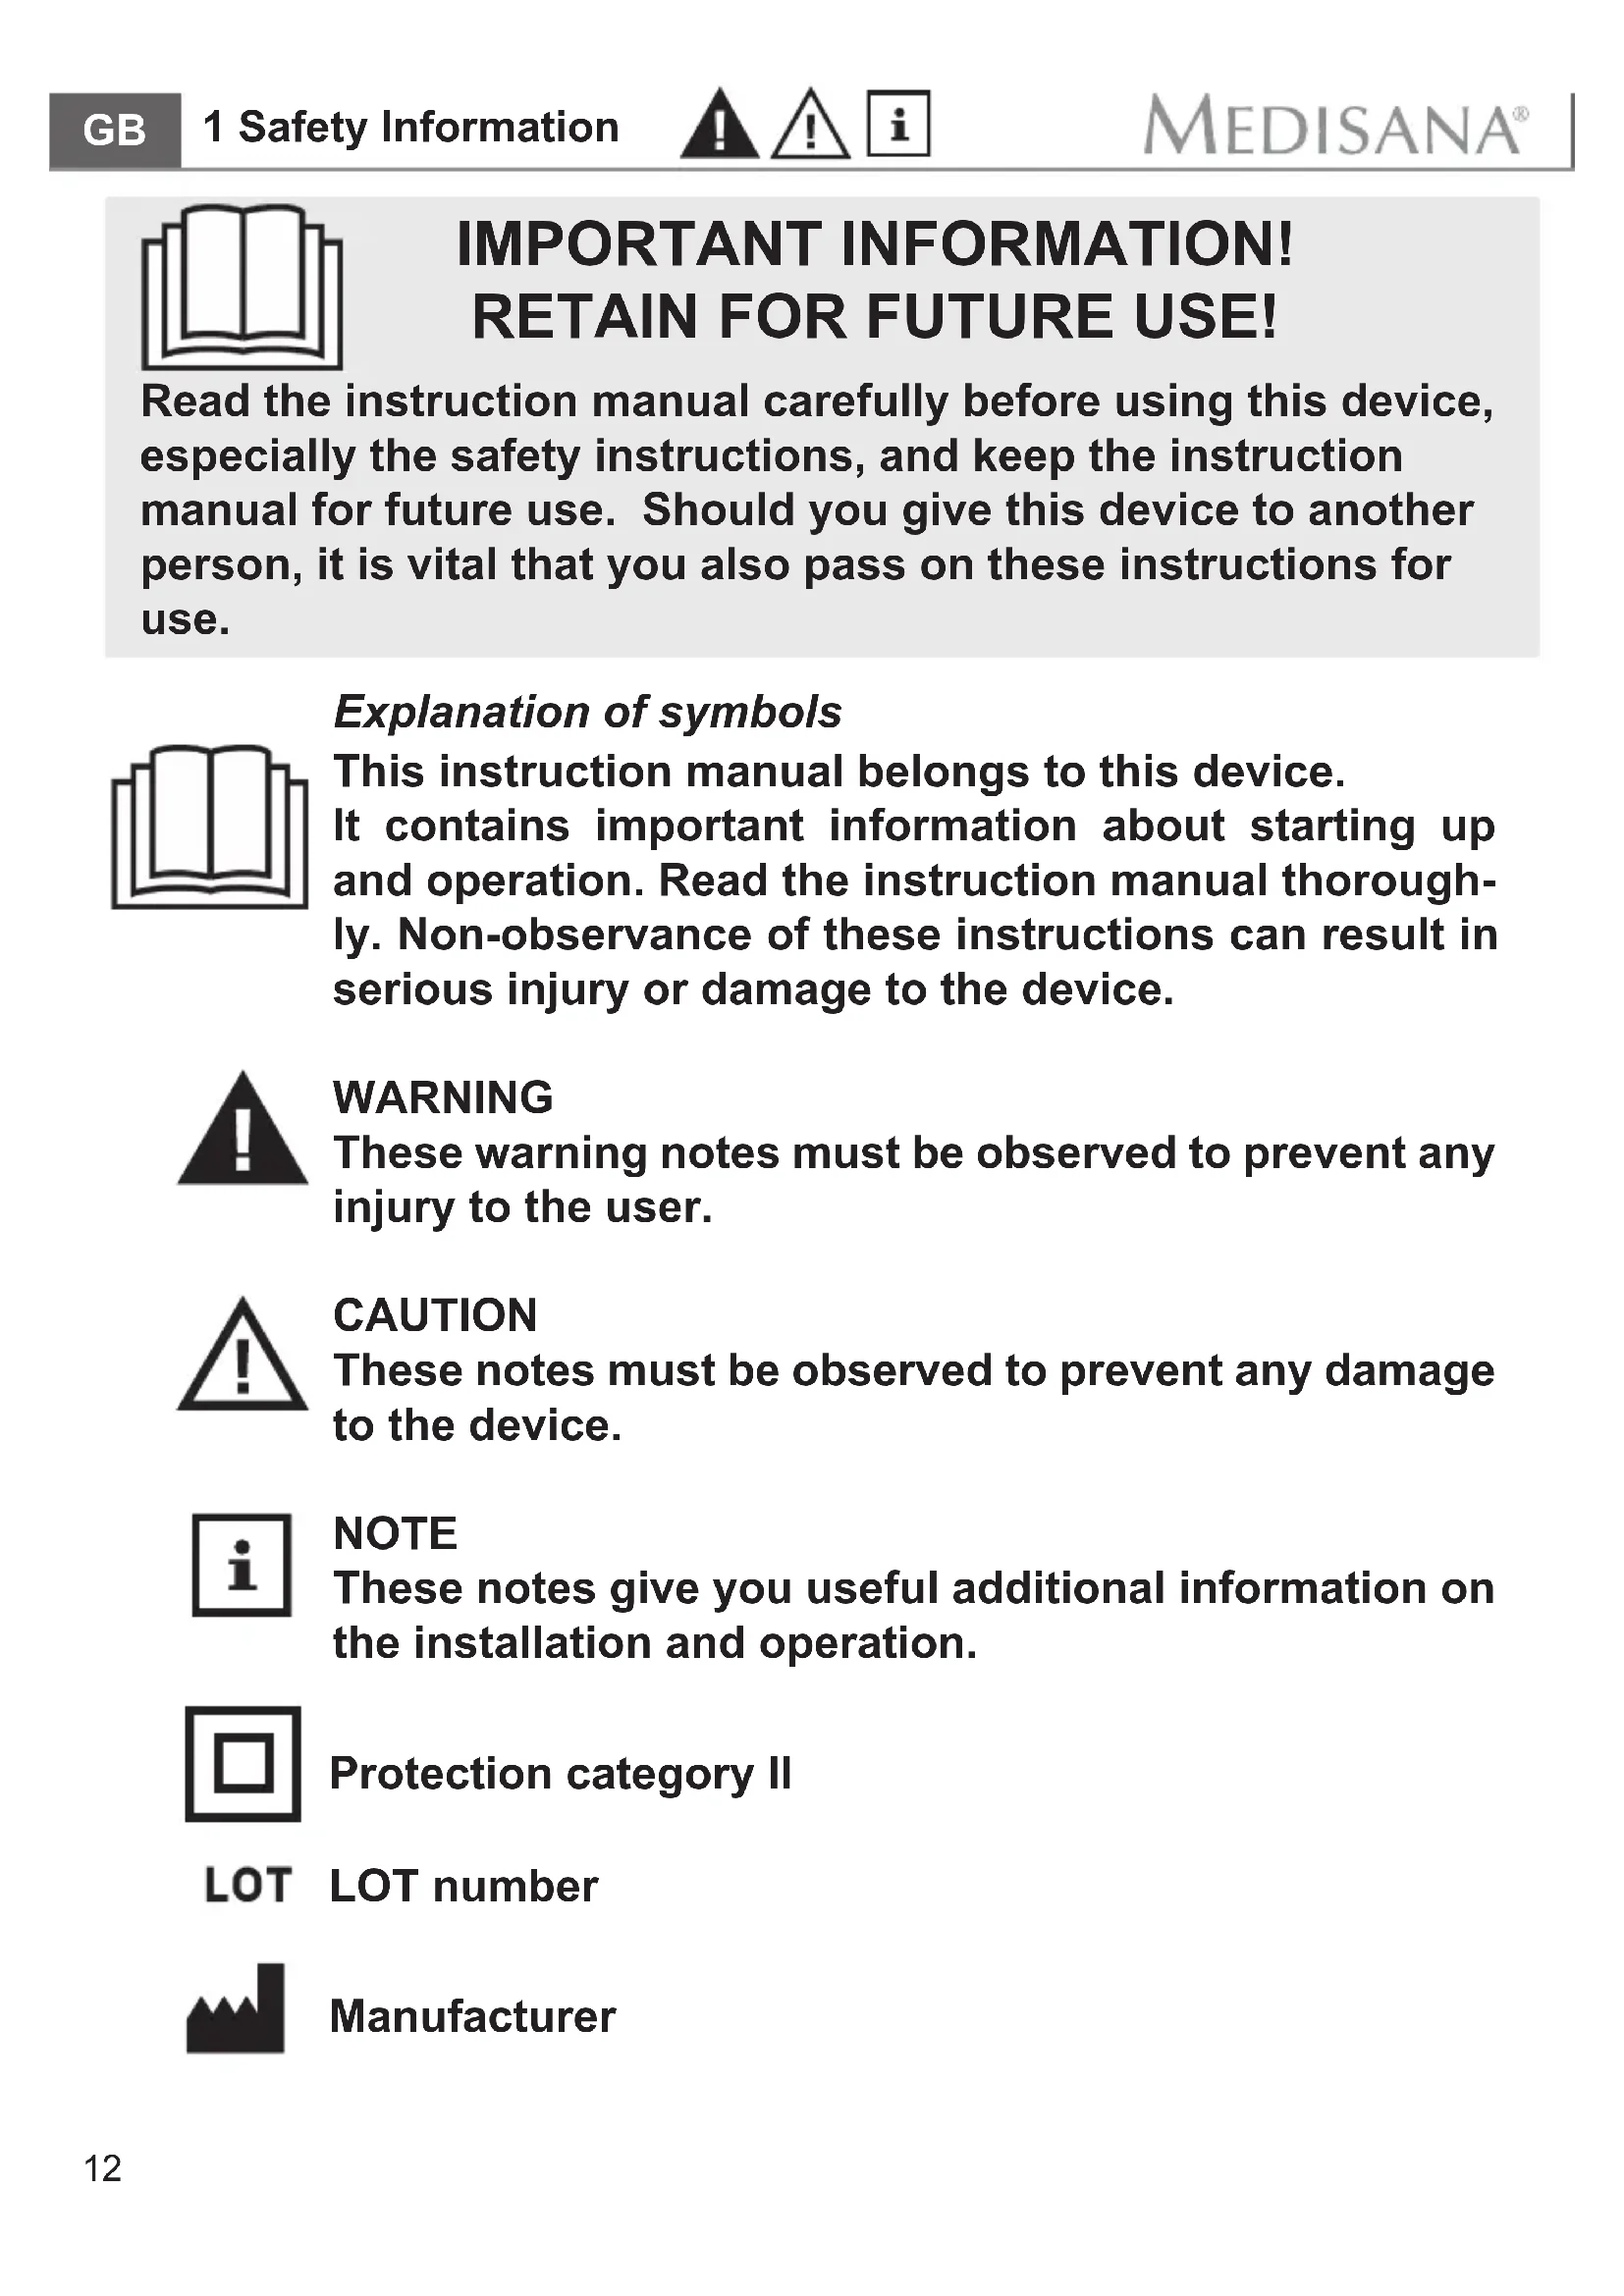
Read the instruction manual carefully before using this device, especially the safety instructions, and keep the instruction manual for future use. Should you give this device to another person, it is vital that you also pass on these instructions for use.

Explanation of symbols
This instruction manual belongs to this device. It contains important information about starting up and operation. Read the instruction manual thoroughly. Non-observation of these instructions can result in serious injury or damage to the device.

WARNING
These warning notes must be observed to prevent any injury to the user.
CAUTION
These notes must be observed to prevent any damage to the device.

NOTE
These notes give you useful additional information on the installation and operation.

Protection category II
LOT LOT number

Manufacturer
Power supply
- Before connecting the device to your power supply, please ensure that the supply voltage stated on the rating plate is compatible with your mains supply.
- Only connect the mains plug to the wall socket when the device is switched off.
- Never carry, pull or turn the device by the electricity cable and do not squeeze the cable.
- Position the mains cable so as to avoid the danger of falling.
- Do not touch the mains plug when you are standing in water and always take hold of the plug with dry hands.
- If the mains cable of this device is damaged, it needs to be replaced by a special mains cable, which is available from the manufacturer or its customer service.
For special people
- This appliance can be used by children aged from 8 years and above and persons with reduced physical, sensory or mental capabilities or lack of experience and knowledge if they have been given supervision or instruction concerning use of the appliance in a safe way and understand the hazards involved.
Children shall not play with the appliance. - In the event of an allergic respiratory problem, consult your doctor before using the appliance.
- Should you experience medical complaints during use talk to your doctor. Should this be the case, stop using the device immediately.
Please note the following in particular concerning electrical equipment:

Only use the unit in enclosed spaces!
- Do not use the device if it or the power supply cable is damaged, if it does not work properly or if it has been dropped or fallen into water.
-
Keep the device and its power cable away from hot surfaces.
-
If the power supply cable is damaged, it may only be replaced by MEDISANA, an authorised dealer or by qualified personnel. In order to prevent hazards, always send the unit in to the service centre.
Operating the device
- The device is not determined for commercial use.
- Only use the device for its intended use as in the instruction manual. If misused, all guarantee rights shall become null and void.
- Keep pets away from the device.
- Place the device on a firm, floor area which is insensitive to moisture when in use so that it cannot tip over.
- Place the appliance at least 2 meters away from TV or radio devices to avoid interferences.
- Do not take hold of a device if it falls into water. Unplug the mains cable immediately.
- Do not use the device if the water tank is empty or does not contain enough liquid. The water inside the tank must not be frozen or hot.
- Never block the mist or the air outlet.
- Never block the air inlet on the underside of the device.
- Always make sure that the device is switched off and unplugged from the socket when transporting, filling and emptying the water tank.
- Never insert metallic objekts into the appliance.
- Switch off all functions after use and remove the plug from the mains supply.
Maintenance and cleaning
- You may only clean the device yourself. If the device malfunctions do not repair it yourself as this leads to the automatic expiry of all guarantee rights. Ask your specialist dealer and have repairs carried out by the MEDISANA service.
- Cleaning and user maintenance shall not be made by children without supervision.
- Do not disassemble the device - there is danger of eletric shock and fire.
- Do not scratch the ultrasonic transducer 20 when cleaning.
- Do not immerse the device in water or other fluids.
- If, nonetheless, liquid should penetrate the device, unplug the mains cable immediately.
- Store the unit in a dry place.
- If the water is not renewed and the water tank is not thoroughly cleaned on a regularly base, microorganisms may breed inside the water tank and may get into the ambient air, which is a serious health risk.
2 Useful Information
2.1 Scope of delivery and packaging
Please check first of all that the device is complete and is not damaged in any way. In case of doubt, do not use the appliance and contact your supplier or your service centre.
The following parts are included:
1 MEDISANA air humidifier AH 670 incl. remote control
- 1 instruction manual

The packaging can be reused or recycled. Please dispose properly of any packaging material no longer required. If you notice any transport damage during unpacking, please contact your supplier without delay.

WARNING
Please ensure that the polythene packing is kept away from the reach of children! Risk of suffocation!
2.2 Ultra-sound technology
Very dry air increases susceptibility to infection and respiratory diseases and leads to fatigue and lack of concentration. Healthy air should have a relative atmospheric humidity of 40 to 55% . The quiet, energy-saving ultrasound technology of the personal humidifier uses oscillation to convert water into a fine mist that increases the moisture level of the air. This improves the air quality and prevents the mucous membranes and skin from drying out.

CAUTION
Over-intensive operation can result in saturating the room with moisture, which can affect the walls, windows and objects in the room. Therefore, use a hygrometer at regular intervals to check that the level of relative air humidity does not exceed 55% .
3 Operating
CAUTION
Make sure that the MEDISANA air humidifier is operated on a surface which is resistant to water, and that it cannot tip over. In particular, when operated with mineralised water, condensation / residues may be produced. Make sure that the mist being issued is not directed towards electronic appliances, furniture or walls.
3.1 Filling the water tank
Before you switch on the device for the first time, leave it for half an hour at room temperature.
- Remove the plastic cover 2 and the water tank 3 from the base 11.
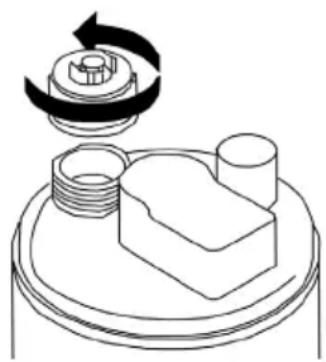
- Turn the watertank ③ upside down and unscrew the tank cover ④ anticlockwise and remove.
- Fill the watertank 3 with fresh drinking water or distilled water. Maximum capacity approx. 1.8 l.
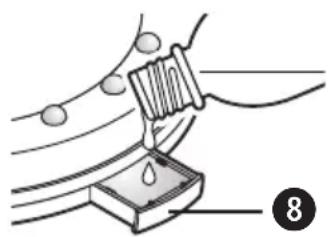
- If you wish to use a water-soluble aroma essence, add 5 drops of the essence to the fully filled water tank ③ or onto the fleece in the aroma compartment ⑧ . If you add the aroma essence to the water tank, sediment may form around the
device during use. Aroma essences are commercially available. Follow the manufacturers instructions.
3.1 Filling the water tank
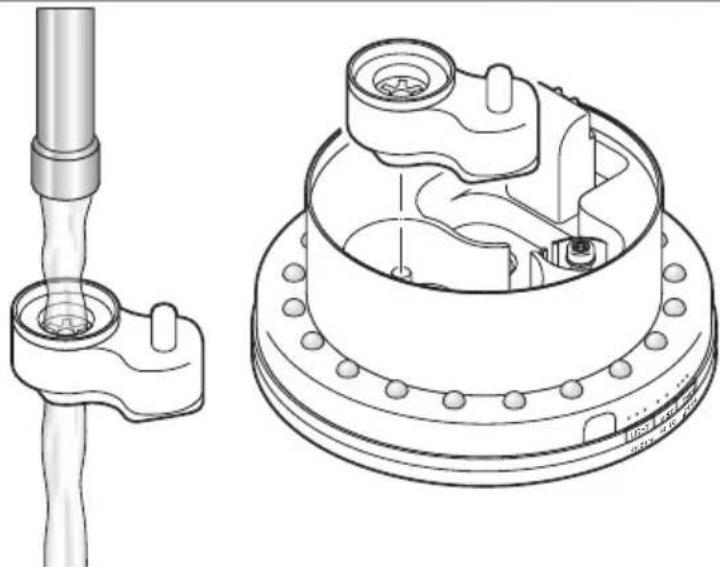
- Screw the tank cover 4 back onto the thread and place the water tank 3 on the appliance. As soon as the tank is correctly positioned, the pin will push the valve in the tank cover upwards.
- The tank chamber now fills with water. Place the plastic cover over the water tank on the base. Insert the mains plug into a wall socket.
3.2 Changing the battery (remote control)
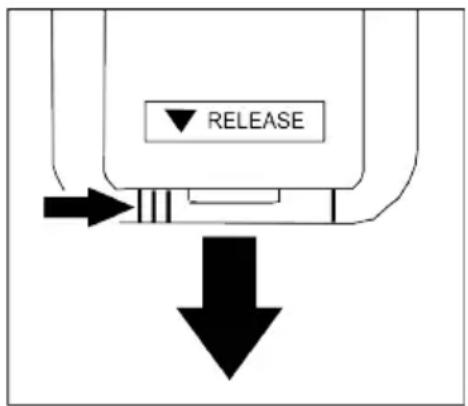
Before you can use the device, you need to remove the insulation foil from the battery compartment of the remote control. If the air humidifier no longer responds to the remote control, the battery needs to be replaced. Press the locking tab in the direction of the arrow and pull out the battery holder.
Replace the used battery with a new one (CR 2025 lithium battery). Make sure, that the polarity is correct ("+") facing upwards). Slide the battery holder all the way back in, until it clicks into place.

WARNING - BATTERY SAFETY INFORMATION
- Do not disassemble batteries!
- Clean the battery and device contacts if necessary before putting in the battery!
- Remove discharged batteries from the device immediately!
- Increased risk of leakage, avoid contact with skin, eyes and mucous membranes! If battery acid comes in contact with any of this parts, rinse the affected area with copious amounts of fresh water and seek medical attention immediately!
- If a battery has been swallowed seek medical attention immediately!
- Only replace with a battery of the same type!
- Insert the battery correctly, observing the polarity!
- Keep the battery compartment well sealed!
- Remove the battery from the device if it is not going to be used for an extended period!
- Keep batteries out of children's reach!
- Do not attempt to recharge batteries! There is a danger of explosion!
- Do not short circuit! There is a danger of explosion!
- Do not throw into a fire!
There is a danger of explosion!
- Keep unused batteries in their packaging away from metal objects in order to prevent short circuiting!
3.3 Use
-
Briefly press the button 19, to switch on the atomiser and the light-ing. The lighting and atomiser will switch on at the highest power level.
-
Change the position of the vent opening in the outer or inner circle to set or adjust the direction and height of the mist output.
-
The button on the appliance resp. the button on the remote control have the following function:
press 1x: high atomiser level (HI indicator light lights up) = produces a lot of mist / atomiser in constant operation.
press 2x: low atomiser level (LO indicator light lights up) = produces a little mist / atomiser in constant operation.
press 3x: switch off atomiser.
-
During atomisation, briefly press the 1 button 12 on the appliance resp. the MIST Timer button 17 on the remote control in order to have the atomiser switch off after a certain amount of time (1, 2 or 4 hours) automatically.
-
Briefly press the button 12 on the appliance resp. the LED Light button 16 on the remote control in order to switch on the LED lighting:
press 1x: bright light
press 2x: medium brightness
press 3x:soft light
press 4x: switch off lighting
-
During active LED lighting, press the LED LIGHT TIMER button 18 on the remote control as many times as necessary in order to have the lighting switch off automatically after a certain amount of time (1, 2 or 4 hours).
-
Briefly press the button again to switch off the atomiser and the lighting.
3.4
After use
-
Remove the mains plug from the socket.
-
Remove the plastic cover ② and the water tank ③. Pour out any remaining water. Rinse out the tank with fresh water.
-
Dry the water tank and plastic cover if necessary with a soft, absorbent cloth.
-
If you do not intend to use the appliance for a prolonged period: Also pour away any remaining water in the base ① by tipping it over a wash basin.
CAUTION! Water must not get into the air vent ⑥ ! You can use a soft, absorbent cloth to remove any moisture left inside.
3.5 Faults and Fault Remedying
- The appliance beeps repeatedly when switched on and during use: Fill water tank.
Unusual smell: Polluted or stagnant water, clean the tank and fill up with fresh water. - Unusual noise: Insufficient water in the tank, fill up with water/device is not on a solid surface, place on a stable and level surface.
If a fault cannot be remedied using the described method, please contact your service centre.
4 Miscellaneous
4.1 Cleaning and maintenance
- During everyday use it is advisable to give the device a thorough cleaning at least every three days. Also clean device before and after long storage periods.
- Before cleaning the device, make sure that it is turned off and the mains plug is removed from the socket.
- Remove the water tank from the device and empty it.
- Clean the outside of the unit with a soft, damp cloth.
- Please do not use any aggressive substances for cleaning, such as scouring cream or other detergents, as these may damage the surfaces and reduce the atomisation effect.
- You can rinse out the water tank with hot water (>65^) or an alcohol of at least 75% vol. The atomiser chamber should be cleaned using an alcoholsoaked cloth and cotton bud. Take care to ensure that no water gets inside the humidifier.
- The ultrasonic transducer 20 is the most sensitive component in the device. It is important for it to be kept clean and handled with care. Use e.g. a cleaning brush to remove all the residue and dirt particles. Never clean the ultrasound generator using metal objects.
- If you do not intend to use the unit for an extended period of time, empty any remaining water from the tank and dry off the unit.
- Store the unit in a cool, dry place, preferably in its original packaging.
- Remove cap from underside of the water tank and store separately to prevent sleeve gasket from sticking.
4.2 1. Rinse out the filter 9 Cleaning under warm, running the filter water.
- Then dry it carefully and re-insert it into the base.
4.3 Any limescale residue may be removed using a descaler (citric acid) :
De- 1. Remove the filter 9
scaling 2. Use the descaler according to the manufacturer's instructions.
-
Pour a small amount into the tank chamber 7 and leave for a few minutes to take effect.
-
Pour out the descaler and rinse several times with clear water. CAUTION! Water must not get into the air vent ⑥ ! Take care that there is no more descaler left inside the appliance.
4.4 This product must not be disposed of together with domestic waste. All Disposal users are obliged to hand in all electrical or electronic devices, regardless of whether or not they contain toxic substances, at a municipal or commercial collection point so that they can be disposed of in an environmentally acceptable manner. Consult your municipal authority or your dealer for information about disposal.
Please remove the battery before disposing of the device/unit. Do not dispose of old batteries with your household waste, but at a battery collection station at a recycling site or in a shop.
| 4.5 Technical specifications | Name and model | : MEDISANA Air humidifier AH 670 |
| Power supply | : 220-240V~ 50/60Hz | |
| Output | : 35 W | |
| Tank contents | : approx. 1,800 ml | |
| Atomizer capacity | : max. approx. 200 ml/h | |
| Duration | : max. approx. 9 hours | |
| Dimensions | : approx. 18 x 18 x 30.3 cm | |
| Weight | : approx. 1.3 kg | |
| Connection cable length | : approx. 150 cm | |
| Storage conditions | : clean and dry, at +10°C to +40°C | |
| Item number | : 60054 | |
| EAN number | : 40 15588 60054 8 | |
| Accessory parts | : Replacement filter, item number 60057 |

EAN 40 15588 60057 9
In accordance with our policy of continual product improvement, we reserve the right for technical and design changes without notice.
The current version of this instruction manual can be found under www.medisana.com
Warranty and repair terms
Please contact your supplier or the service centre in case of a claim under the warranty. If you have to return the unit, please enclose a copy of your receipt and state what the defect is.
The following warranty terms apply:
- The warranty period for MEDISANA products is three years from date of purchase. In case of a warranty claim, the date of purchase has to be proven by means of the sales receipt or invoice.
- Defects in material or workmanship will be corrected free of charge within the warranty period.
- Repairs under warranty do not extend the warranty period either for the unit or for the replacement parts.
- The following is excluded under the warranty:
a. All damage which has arisen due to improper treatment, e.g. non-observation of the user instructions.
b. All damage which is due to repairs or tampering by the customer or unauthorised third parties.
c. Damage which has arisen during transport from the manufacturer to the consumer or during transport to the service centre.
d. Accessories which are subject to normal wear and tear.
- Liability for direct or indirect consequential losses caused by the unit are excluded even if the damage to the unit is accepted as a warranty claim.

MEDISANA AG
Jagenbergstraße 19
41468 NEUSS
Germany
The service centre address is shown on the attached leaflet.