
Sonicare ProtectiveClean 4500 - Electric toothbrush PHILIPS - Free user manual and instructions
Find the device manual for free Sonicare ProtectiveClean 4500 PHILIPS in PDF.

 FR
FR
 AZ
AZ
 BG
BG
 CS
CS
 DA
DA
 DE
DE
 EL
EL
 EN
EN
 ES
ES
 ET
ET
 FI
FI
 HE
HE
 HU
HU
 HY
HY
 IT
IT
 KA
KA
 KK
KK
 KY
KY
 LT
LT
 LV
LV
 MK
MK
 NL
NL
 NO
NO
 PL
PL
 PT
PT
 RO
RO
 RU
RU
 SK
SK
 SL
SL
 SQ
SQ
 SV
SV
 TG
TG
 TK
TK
 UK
UK
 UZ
UZ
| Product Type | Electric Toothbrush |
| Brand | Philips |
| Model | Sonicare ProtectiveClean 4500 |
| Brushing Technology | Sonic (fluid movements) |
| Brushing Modes | 3 modes: Clean, White, Gum Care |
| Built-in Timer | QuadPacer (4 segments of 30s) and Smartimer (2-minute cycle, automatic stop) |
| Pressure Sensor | Yes, orange flashing and vibration change in case of excessive pressure |
| BrushSync Technology | Brush head replacement reminder based on actual wear |
| EasyStart | Gradual power increase during first 14 brushings (activated by default) |
| Battery Life | Up to 28 2-minute brushings (14 days of use twice a day) |
| Charging Time | Up to 24 hours for a full charge |
| Power Supply | Rechargeable lithium-ion battery; charger with removable power adapter (TCBxxxx, HX6100, HX6110, HX6160, WAAxxxx) |
| Included Brush Head | 1 smart brush head (BrushSync technology) |
| UV Sanitizer | Optional depending on model, cleans brush head after use |
| Travel Case | Included depending on model |
| Handle Material | Plastic with sealing joint |
| Safe Use | Splash-proof; do not immerse; use under supervision for children |
| Warranty | International Philips warranty (duration indicated on leaflet) |
| Support | www.philips.com/support |
| Number of pages in manual | 810 pages (multilingual) |
Frequently Asked Questions - Sonicare ProtectiveClean 4500 PHILIPS
User questions about Sonicare ProtectiveClean 4500 PHILIPS
0 question about this device. Answer the ones you know or ask your own.
Ask a new question about this device
Download the instructions for your Electric toothbrush in PDF format for free! Find your manual Sonicare ProtectiveClean 4500 - PHILIPS and take your electronic device back in hand. On this page are published all the documents necessary for the use of your device. Sonicare ProtectiveClean 4500 by PHILIPS.
USER MANUAL Sonicare ProtectiveClean 4500 PHILIPS
English 6
Azerbaijani 26
Czech 47
Danish 67
German 87
Estonian 112
Spanish 132
French 154
Croatian 176
Italian 197
Latvian 219
Lithuanian 239
Hungarian 261
Dutch 283
Norwegian 305
O'zbek 325
Polski 346
Português 369
Română 391
Shqip 412
Slovenščina 433
Slovensky 453
Srpski 474
Suomi 494
Svenska 515
Türkmençe 536
Ελληνικά 557
Български 580
Кыргызча 604
Македонски 627
Russian 649
Tajik 673
Ukrainian 696
Kazakh 718
Ruijtntu 740
phosphorus 764
788
Introduction
Welcome to the Philips Sonicare family!
This toothbrush enables you to obtain superior plaque removal, whiter teeth and healthier gums. Using
Sonicare's combination of gentle sonic technology and clinically developed and proven features, you can be confident that you're getting the very best clean, every time.
Further support and product registration are available to you at: www.philips.com/support
Important safety information
Only use the product for its intended purpose. Read this important information carefully before you use the product and its batteries and accessories, and save it for future reference. Misuse can lead to hazards or serious injuries.
Warnings
- Keep the charger, travel case, and UV sanitizer away from water.
- After cleaning, make sure the charger, travel case, and UV sanitizer are completely dry before you connect these to the wall socket.
- This appliance can be used by children and persons with reduced physical, sensory or mental capabilities or lack of experience and knowledge if they have been given supervision or instruction concerning use of the appliance in a safe way and understand the hazards involved. Cleaning and user maintenance shall not be made by children without supervision.
- Children shall not play with the appliance.
- Only use original Philips accessories or consumables. If supplied, only use the original USB cable and USB power supply unit.
- This appliance contains no user-serviceable parts. If the appliance is damaged, stop using it and contact the Consumer Care Center in your country (see 'Warranty and support').
- If the USB cable or USB power supply unit is damaged, stop using it.
- Do not use the charger, travel case, and/or UV sanitizer outdoors or near heated surfaces.
- Do not clean any part of the product in the dishwasher.
- This appliance has only been designed for cleaning teeth, gums and tongue.
- Keep the UV sanitizer out of the reach of children at all times.
- Stop using the UV sanitizer if the UV LED/Bulb remains on when the UV sanitizer is open. UV light can be harmful to the human eye and skin.
- Only operate the sanitizer with the protective screen in place.
- Do not touch the UV sanitizer's UV light bulb when it is hot.
- Stop using a brush head with crushed or bent bristles. Replace the brush head every 3 months or sooner if signs of wear appear.
- Avoid direct contact with products that contain essential oils or coconut oil. Contact may result in bristles dislodging.
- The maximum altitude of use is 4500 meters.
MEDICAL WARNINGS
- Stop using the appliance and consult your dentist/doctor if excessive bleeding occurs after use, if bleeding continues to occur after 1 week of use or if you experience discomfort or pain.
- If you have had oral or gum surgery in the previous 2 months, consult your dentist before you use this appliance.
- If you have a pacemaker or other implanted device, contact your doctor or the manufacturer of the implanted device prior to use.
- If you have medical concerns, consult your doctor before you use this appliance.
- This appliance is a personal care device and is not intended for use on multiple patients in a dental practice or institution.
Battery safety instructions
- This appliance contains batteries that are only to be removed by skilled persons.
- Only use the product for its intended purpose. Read this information carefully before you use the product and its batteries and accessories, and save it for future reference. Misuse can lead to hazards or serious injuries. Accessories supplied may vary for different products.
- Only use original Philips accessories and consumables. Only use detachable supply unit TCBxxxx (input ratings: 100 - 240V~; 50/60Hz; 1.5W), HX6100 (input ratings: 100 - 240V~; 50/60Hz; 1.4W), HX6110 (input ratings: 100 - 240V~; 50/60Hz; 1.5W), HX6160 (input ratings: 100 - 240V~; 50/60Hz; 6W), WAAxxxx (input ratings: 100 - 240V~; 50/60Hz; 3.5W).
- Keep product and batteries away from fire and do not expose them to direct sunlight or high temperatures.
- If the product becomes abnormally hot or smelly, changes color or if charging takes longer than usual, stop using and charging the product and contact Philips.
- Do not place products and their batteries in microwave ovens or on induction cookers.
- Do not open, modify, pierce, damage or dismantle the product or battery to prevent batteries from heating up or releasing toxic or hazardous substances. Do not short-circuit, overcharge or reverse charge batteries.
- This appliance contains batteries that are non-replaceable. When the battery is at end of life, the appliance shall be properly disposed of, see section on recycling.
- If batteries are damaged or leaking, avoid contact with the skin or eyes. If this occurs, immediately rinse well with water and seek medical care.
- When you handle batteries, make sure that your hands, the product and the batteries are dry.
- Charge and use the product at a temperature between 0 °C and 40 °C (32°F and 104 °F).
- To avoid accidental short-circuiting of batteries after removal, do not let battery terminals come into contact with metal object (e.g. coins, hairpins, rings). Do not wrap batteries in aluminium foil. Tape battery terminals or put batteries in a plastic bag before you discard them.
- This appliance contains a Lithium-ion rechargeable cell. MUST BE RECYCLED OR DISPOSED OF PROPERLY.
Storage and transportation conditions
Temperature -10°C to 60°C (14 °F to 140 °F).
Electromagnetic fields (EMF)
This Philips appliance complies with all applicable standards and regulations regarding exposure to electromagnetic fields.
Radio Equipment Directive
Hereby, Philips declares that electric toothbrushes with radio equipment type (Bluetooth, NFC) are in compliance with Directive 2014/53/EU.
- The Bluetooth radio frequency interface in applicable products operates at 2.4 GHz.
- The maximum output power by the Bluetooth appliance is 3 dBm.
- The NFC radio frequency interface in applicable products operates at 13.56 MHz.
- The maximum RF power transmitted by the appliance is 30.16 dBm.
The full text of the EU declaration of conformity is available at the following internet address:
www.philips.com/support
Note: The features of different models may vary. Some models may not be equipped with Bluetooth or NFC.
Detachable Power Supply Part: The "xxxxxx" indicates the model number of the approved chargers to be used. (TCBxxxx, HX6100, HX6110, HX6160 or WAAxxxx)


This symbol means read the instructions for use before using the appliance.
Intended use
ProtectiveClean power toothbrushes are intended to remove adherent plaque and food debris from the teeth to reduce tooth decay and improve and maintain oral health. ProtectiveClean power toothbrushes are intended for personal use. Use by children should be with adult supervision.
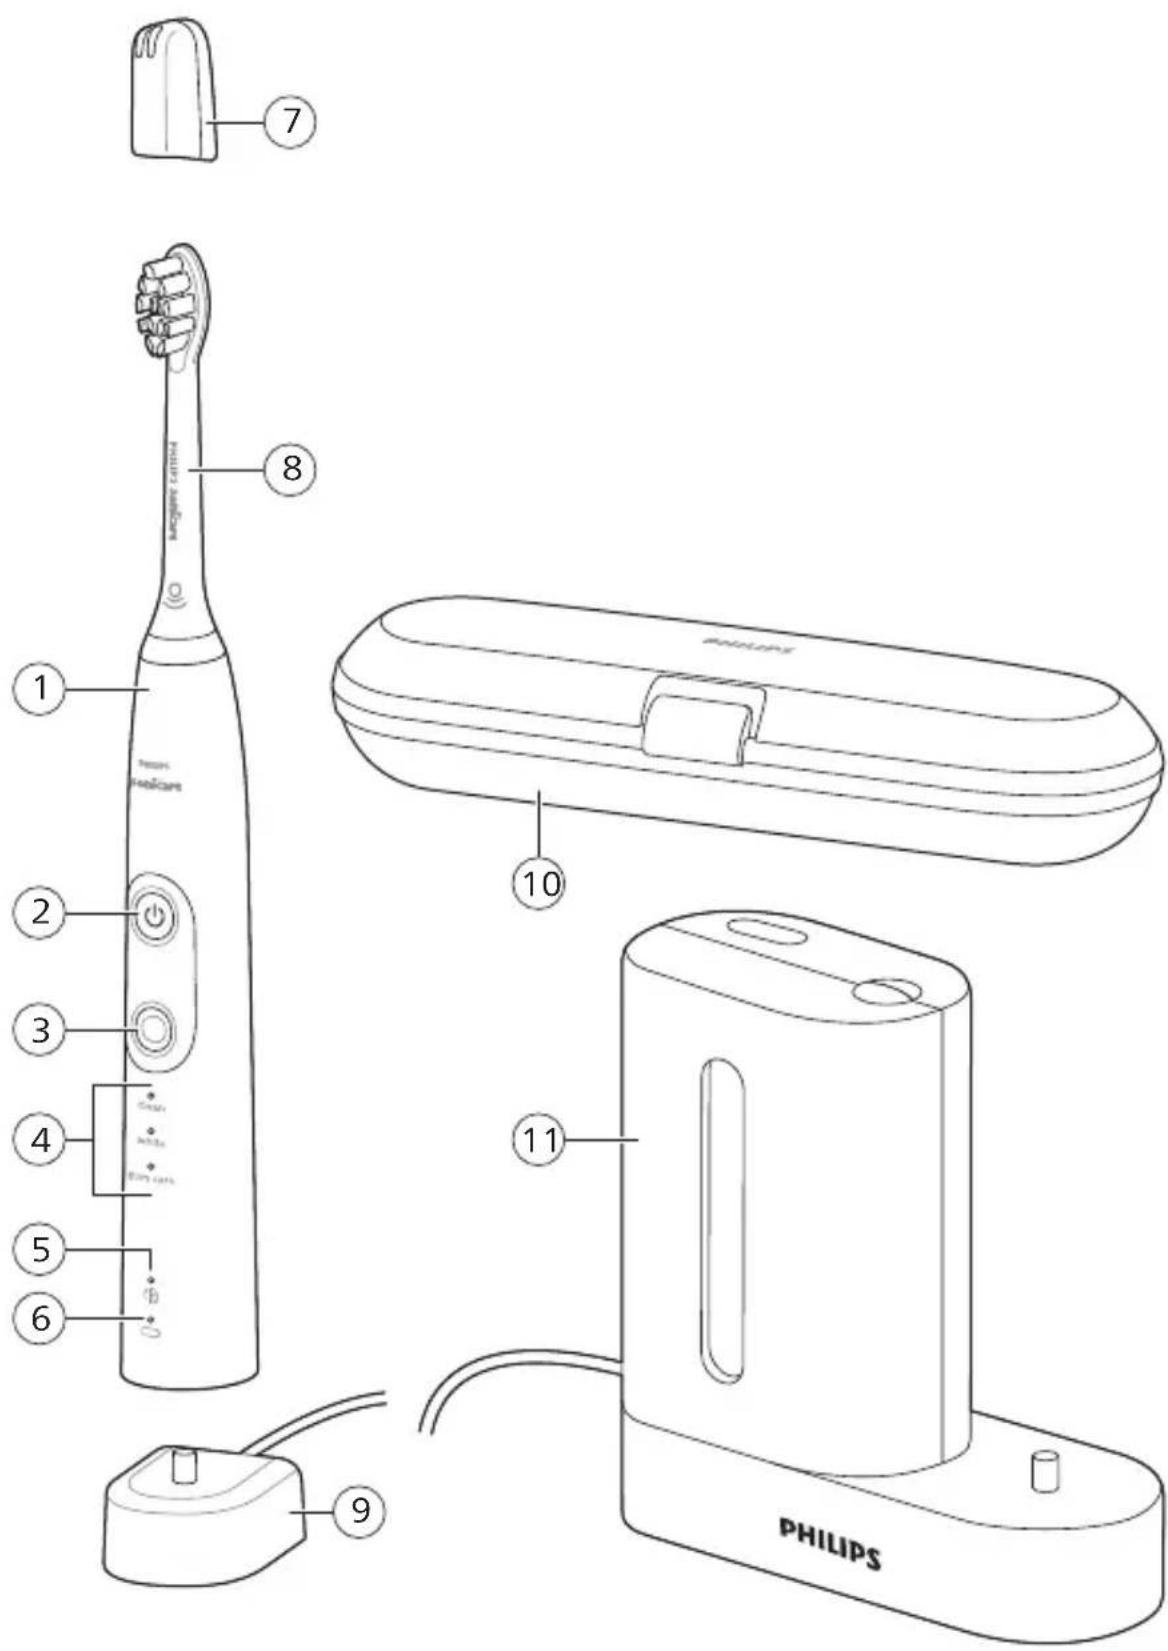
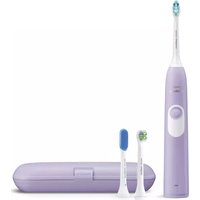
Your Philips Sonicare (Fig 1.)
1 Handle 2 Power on/off button 3 Mode button 4 Mode indicator 5 Brush Head Replacement Reminder 6 Battery indicator
Accessories:
7 Brush head cap 8 Smart brush head(s) 9 Charging base 10 Travel case 11 UV sanitizer and charger
Note: Accessories included may vary based on the model purchased.
Getting started
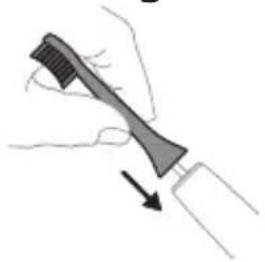
1 Align the brush head so the bristles point in the same direction as the front of the handle.
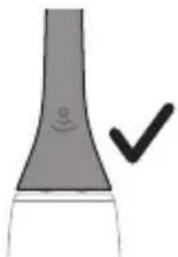
2 Firmly press the brush head down onto the metal shaft until it will not go any further.
Note: It is normal to see a slight gap between the brush head and the handle.
Using your Philips Sonicare toothbrush
If you are using your Sonicare toothbrush for the first time, it is normal to feel more vibration than when using a non-electric toothbrush. It is common for first-time users to apply too much pressure. Only apply gentle pressure and let the toothbrush do the brushing for you. Please follow the brushing instructions below for the best experience. To help you transition to your new Sonicare power toothbrush, it comes with the EasyStart feature activated. This feature gently increases the power over the first 14 brushings to help you adapt to brushing with a Philips Sonicare toothbrush.
Brushing instructions
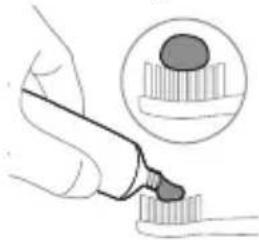
1 Wet the bristles and apply a small amount of toothpaste.
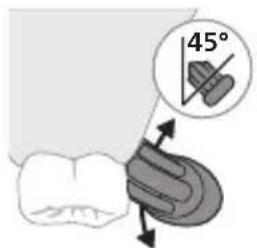
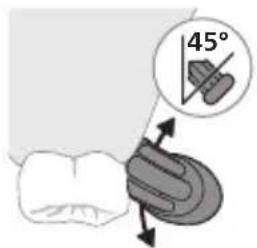
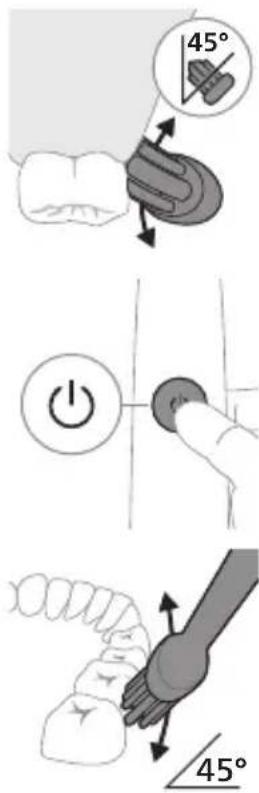
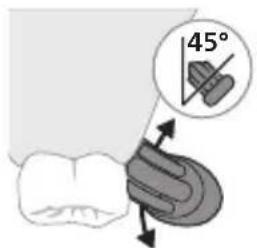
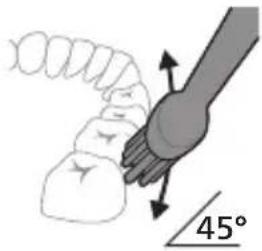
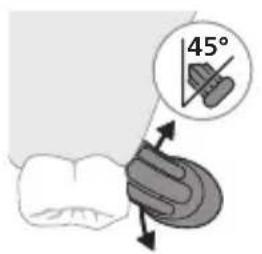
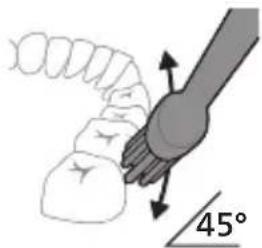
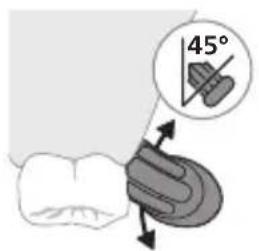
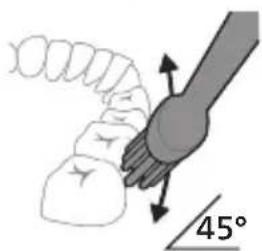
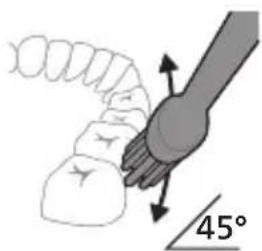
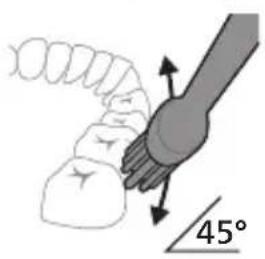
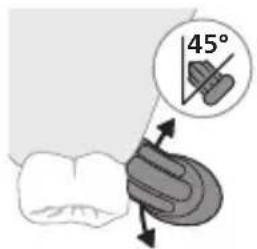
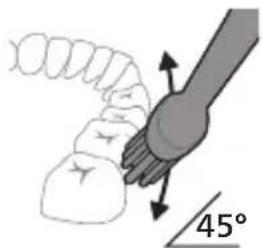
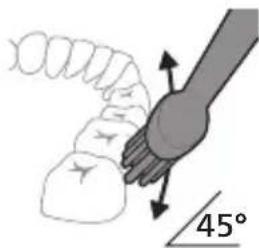
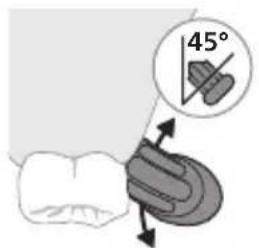
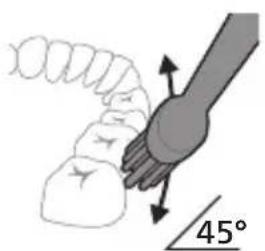
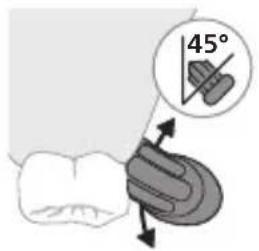
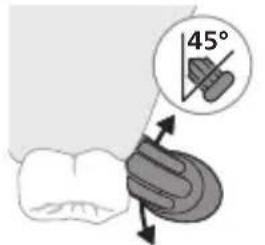
2 Place the toothbrush bristles against the teeth at a slight angle (45 degrees), pressing firmly to make the bristles reach the gumline or slightly beneath the gumline.
Note: Keep the center of the brush in contact with the teeth at all times.
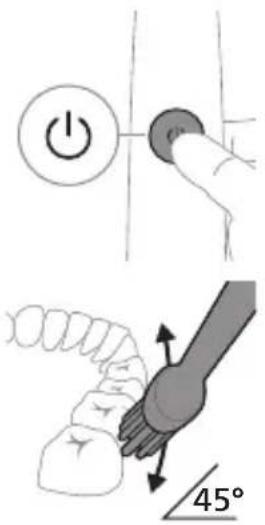
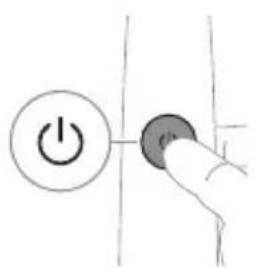
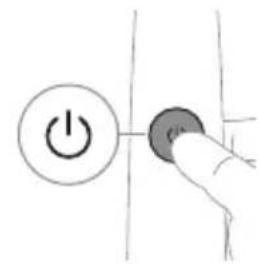
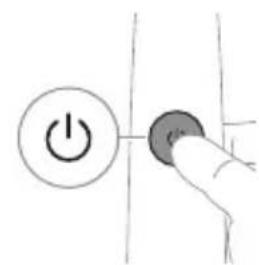
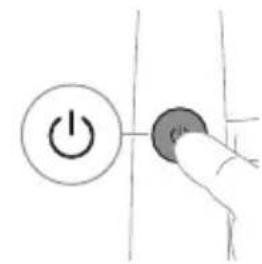
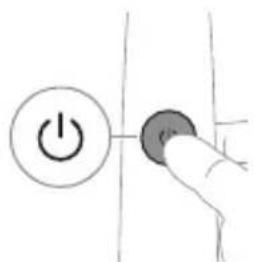
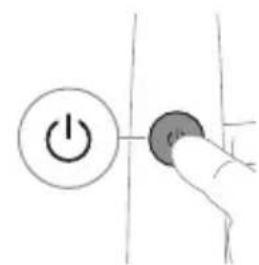
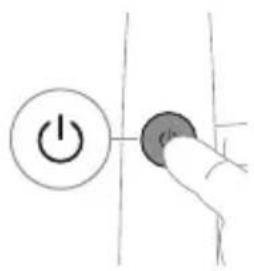
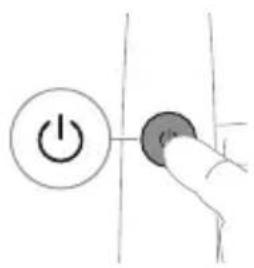
3 Press the power on/off button to switch on the Philips Sonicare.
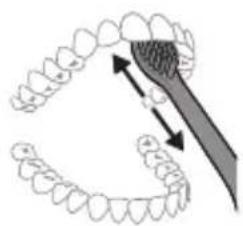
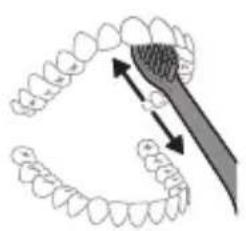
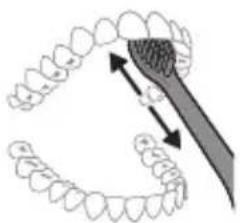
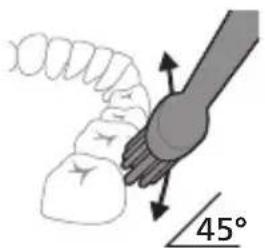
4 Gently keep the bristles placed on the teeth and in the gumline. Brush your teeth with small back and forth motion so the bristles reach between the teeth. Continue this motion throughout your brushing cycle.
Note: The bristles should slightly flare. It is not recommended to scrub as you would with a manual toothbrush.
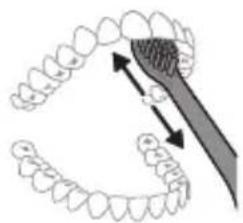
Note: If you apply too much pressure, you will be alerted by a change in vibration of the handle and the brush head replacement reminder flashing amber.
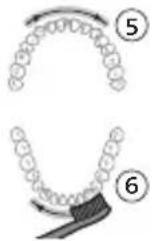
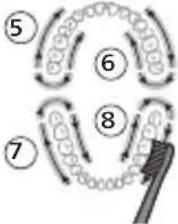
5 To clean the inside surfaces of the front teeth, tilt the brush handle semi-upright and make several vertical overlapping brushing strokes on each tooth.
6 After you have completed the brushing cycle, you can spend additional time brushing the chewing surfaces of your teeth and areas where staining occurs. You can also brush your tongue, with the toothbrush switched on or off, as you prefer.
Note: Your Philips Sonicare toothbrush is safe to use on braces (brush heads wear out sooner when used on braces) and dental restorations (fillings, crowns, veneers) if they are properly adhered and not compromised.
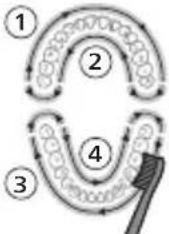
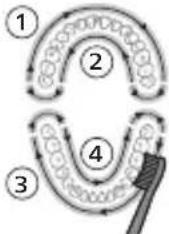
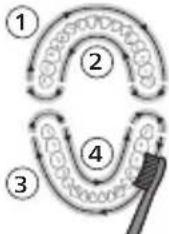
QuadPacer
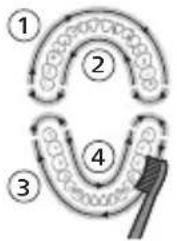
![graph TD A["①"] --> B["②"] B --> C["③"] C --> D["④"] D --> E["④"] style A fill:#f9f,stroke:#333 style B fill:#f9f,stroke:#333 style C fill:#f9f,stroke:#333 style D fill:#f9f,stroke:#333 style E fill:#f9f,stroke:#333](/content/2026/03/439098/images/4e82d50c79872b3b856296bfa46d3e955749fb6788ea0905b022381398ea2605.jpg)
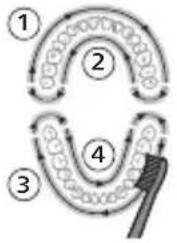
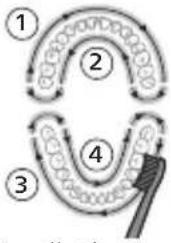
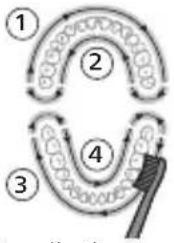
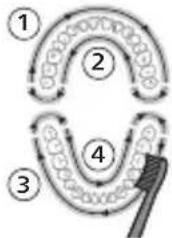
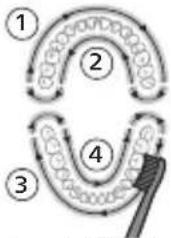
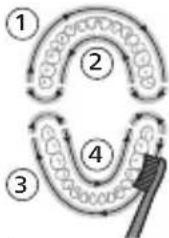
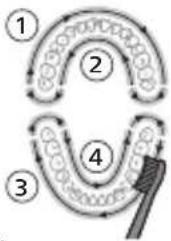
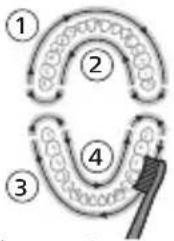
To make sure you brush evenly throughout the mouth, divide your mouth into 4 sections using the QuadPacer feature. The QuadPacer divides the brushing time into 4 equal segments and indicates when you should move to the next area. The segments are indicated with a brief pause in vibration. The toothbrush automatically stops at the end of the brushing session.
Note: Additional time may be added when you use the White or Gum Care Modes.
Modes
Your power toothbrush is equipped with up to 3 modes: Clean, White and Gum Care (specific models only). To change modes, press the mode button while the toothbrush is powered off.
Clean White Gum Care
| Benefit For exceptional everyday clean | Removes surface stains | Gently massages gums | |
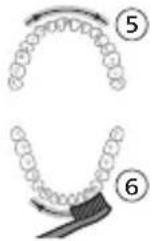
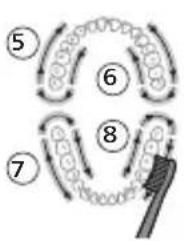
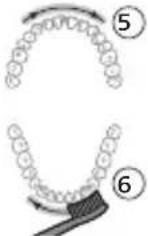
| Total brushing time | 2 minutes 2 minutes and 30 seconds | 3 minutes | |
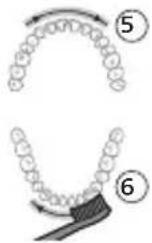
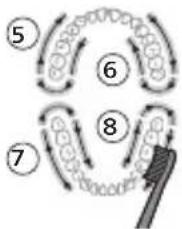
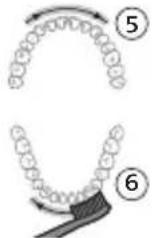
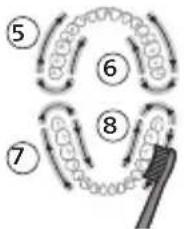
| How to brush Brush each segment for 30 seconds. | Brush each segment for 30 seconds | Brush each segment for 30 seconds | |
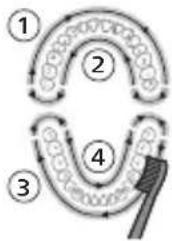 | 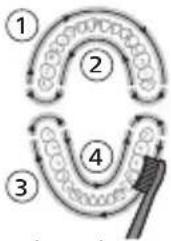 | 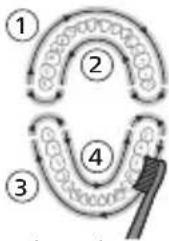 | |
| then brush segments 5 and 6 for 15 seconds each to brighten and polish front teeth. | then brush segments 5, 6, 7 and 8 for 15 seconds each to gently stimulate and massage your gums. | ||
 | 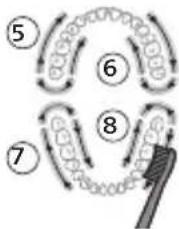 | ||
BrushSync technology
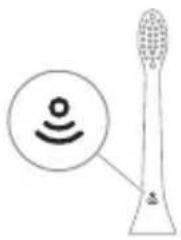
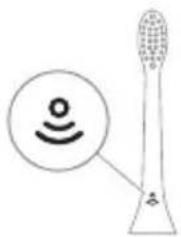
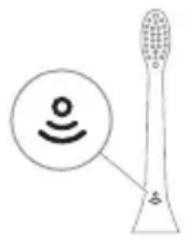
BrushSync technology enables your brush head to communicate with your handle using a microchip. The symbol at the bottom of the brush head indicates that the brush head is equipped with this technology.
BrushSync technology enables:
- Brush Head Replacement Reminder Philips Sonicare offers a wide range of smart brush heads, equipped with BrushSync technology. To explore our full range of toothbrush brush heads, and find the brush head that is best for you, go to
www.philips.com/toothbrush-heads for more information.
Features
- Pressure Sensor Feedback
- Quadpacer
- Brush head Replacement Reminder
- EasyStart
- SmarTimer
Pressure Sensor Feedback

Your Sonicare toothbrush measures the pressure you apply while brushing, to protect your gums and teeth from damage.
If you apply excess pressure, the handle changes its vibration and the brush head replacement reminder icon flashes amber until you reduce the pressure.
Note: Your product comes with the Pressure Sensor activated. To deactivate this feature (see 'Activating or deactivating features').
Quadpacer
The QuadPacer is an interval timer that helps you to brush evenly through the mouth by dividing your mouth into 4 sections. (see 'Brushing instructions')
Brush Head Replacement Reminder
Your Philips Sonicare is equipped with BrushSync technology that tracks the wear of your brush head.
Note: This feature only works with Philips Sonicare smart brush heads with BrushSync technology.
1 When you attach a new smart brush head for the first time, the handle recognizes that you have a Philips brush head with BrushSync technology and begins tracking brush head wear. 2 Over time, based on the pressure you apply and the total time the brush head has been used, the handle tracks brush head wear in order to determine the optimal time to replace your brush head. This feature guarantees the best cleaning and care of your teeth.
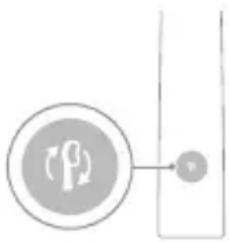
3 When the brush head replacement reminder indicator lights up amber, you should replace your brush head.
All smart brush heads come with the brush head replacement reminder feature activated. To deactivate the brush head replacement reminder, see 'Activating or deactivating features'.
EasyStart
This Philips Sonicare model comes with the EasyStart feature activated. The EasyStart feature gently increases the power over the first 14 brushings to help you get used to brushing with the Philips Sonicare.
Disclaimer
When the Philips Sonicare toothbrush is used in clinical studies, it must be used in clean mode at high intensity with the handle fully charged and the EasyStart feature deactivated.
To deactivate EasyStart, see 'Activating or deactivating features'.
SmarTimer
The SmarTimer indicates that your brushing cycle is complete by automatically switching off the toothbrush at the end of the brushing cycle.
Dental professionals recommend brushing no less than 2 minutes twice a day.
Note: If you press the power on/off button after you started the brushing cycle, the toothbrush pauses. After a pause of 30 seconds, the SmarTimer resets.
Activating or deactivating features
You can activate or deactivate the following features of your toothbrush:
- EasyStart
- Brush Head Replacement Reminder
- Pressure Sensor Feedback
Note: You can only activate or deactivate the brush head replacement reminder when a smart brush head is on the handle.
Step 1: Place the handle on the plugged-in charging stand.
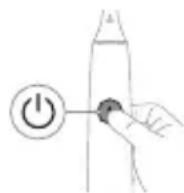
Step 2: Press and hold the power on/off button for:
EasyStart Brush head replacement reminder Pressure Sensor Feedback
Up to 3 seconds Up to 5 seconds Up to 7 seconds
Step 3: Let go of the power on/off button when you hear:
1 beep 1 beep and then 2 beeps 1 beep, 2 beeps and then 3 beeps
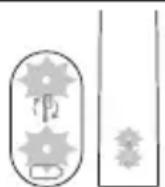
If you see the battery indicator and the brush head replacement reminder light flash green 2 times and hear 3 tones from low to high, then the feature has been activated.
OR
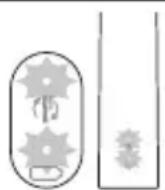
If you see the battery indicator and brush head replacement reminder light flash amber 1 time and hear 3 tones high to low, then the feature has been deactivated.
UV sanitizer
Note: Accessories included may vary based on the model purchased.
With the UV sanitizer you can clean your brush head after every use.
Unplug the sanitizer, discontinue use and call Consumer Care if:
- The UV light bulb remains on when the door is open.
- The window is broken or missing from the sanitizer.
- The sanitizer gives off smoke or a burning smell while it is operating.
Note: UV light can be harmful to the human eye and skin. This device should be kept out of reach of children at all times.
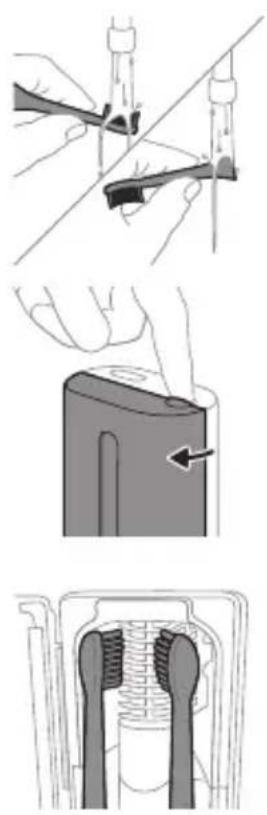
1 After brushing, rinse the brush head and shake off excess water.
Warning: Make sure that the brush head cap is not on the brush head when the brush head is being cleaned in the sanitizer.
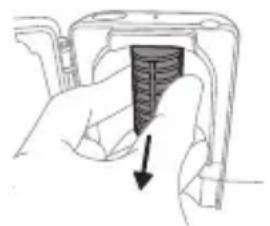
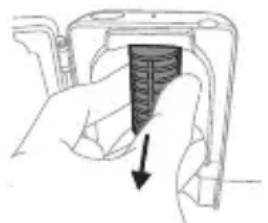
2 Place your finger in the door recess on top of the sanitizer and pull open the door.
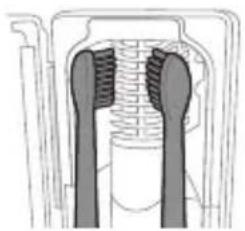
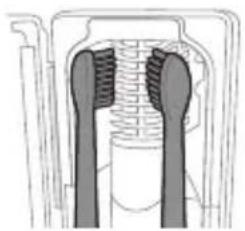
3 Place the brush head on one of the 2 pegs in the sanitizer with the bristles facing the light bulb.
Note: Only clean Philips Sonicare snap-on brush heads in the sanitizer.
Note: Do not clean Philips Sonicare for Kids brush heads in the sanitizer.
4 Make sure the sanitizer is plugged into a live outlet of appropriate voltage.
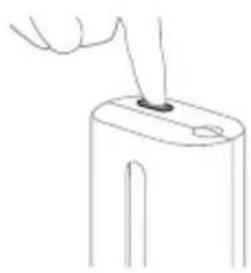
5 Close the door and press the green power on/off button once to select the UV clean cycle.
Note: You can only switch on the sanitizer if the door is properly closed.
Note: The sanitizer stops operating if you open the door during the sanitizer cycle.
Note: The sanitizer cycle takes approximately 10 minutes and then switches off automatically.
The sanitizer is in operation when the light glows through the window.
Charging and battery status
This Philips Sonicare toothbrush is designed to provide at least 28 brushing sessions, each session lasting 2 minutes (14 days if used twice per day) on a fully charged battery. The battery indicator shows the battery status when you complete the 2-minute brushing session, when you pause the toothbrush, or while it is charging.
Note: It can take up to 24 hours to fully charge the battery before first use, but you can use the Philips Sonicare toothbrush before it is fully charged.
Charging
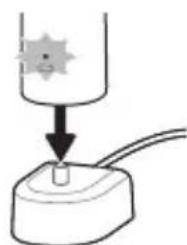
Charging on charger or UV Sanitizer
1 Plug the charger or sanitizer into an electrical outlet. 2 Place the handle on the charger or sanitizer.
- The handle emits 2 short beeps to confirm that the handle is placed properly.
- The flashing light of the battery indicator shows that the toothbrush is charging.
- When the handle is fully charged on the charger, the battery indicator lights up green for 30 seconds and then switches off.
Battery status
Battery status (handle on plugged-in charger)
When the handle is placed on the charger, the battery indicator shows the battery level.
Battery status Battery indicator
| Charging Flashes green |
| Full Solid green for 30 seconds and then switches off |
Battery status (when handle is not placed on charger)
When the toothbrush is awake, the battery indicator at the bottom of the handle shows the battery level.
Battery status Battery indicator Sound
| Full Solid green - | |
| Partially full Flashes green - | |
| Low Flashes amber The handle emits 3 | beeps after brushing |
| Empty Flashes amber The handle emits 2 sets | of 5 beeps after brushing |
Note: To save energy, the battery indicator will switch off when not in use.
Note: When the battery is completely empty, the toothbrush switches off. Place the toothbrush on the charger to charge it.
Note: To keep the battery fully charged at all times, you may keep your toothbrush on the charger when not in use.
Cleaning
Toothbrush handle
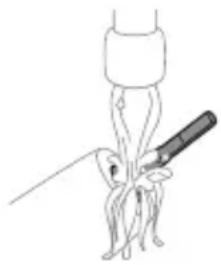
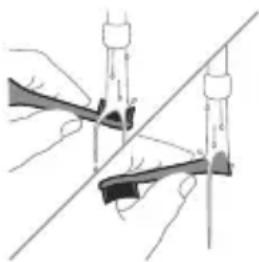
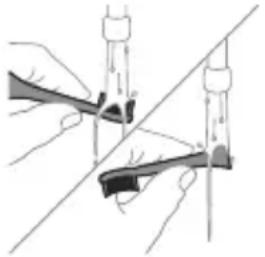
1 Remove the brush head and rinse the metal shaft area with warm water. Make sure you remove any residual toothpaste.
Caution: Do not push on the rubber seal on the metal shaft with sharp objects, as this may cause damage.
2 Wipe the entire surface of the handle with a damp cloth.
Note: Do not tap the handle on the sink to remove excess water.
Brush head
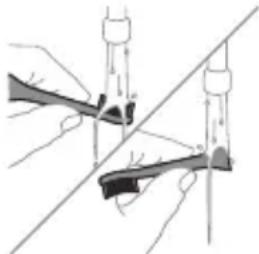
1 Rinse the brush head and bristles after each use.
2 Remove the brush head from the handle and rinse the brush head connection with warm water at least once a week. Rinse the travel cap as often as needed.
Charger
1 Unplug the charger before you clean it. 2 Wipe the surface of the charger with a damp cloth.
Travel case
Rinse with warm water and use a damp cloth to clean inside of travel case.
Cleaning the Sanitizer
Warning: Do not immerse the sanitizer in water or rinse it under the faucet.
Warning: Do not clean the sanitizer when the UV light bulb is hot.
For optimal effectiveness, it is recommended to clean your sanitizer weekly.
1 Unplug the sanitizer.
English
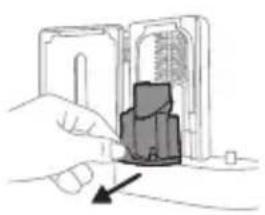
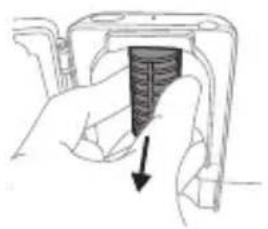
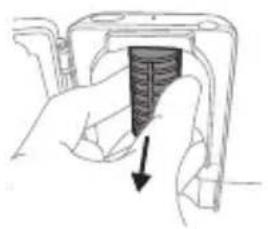
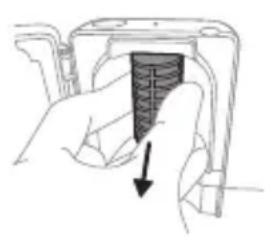
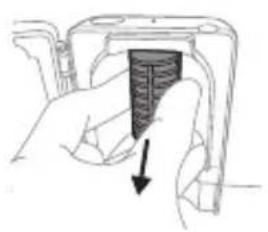
2 Pull the drip tray straight out. Rinse the drip tray and wipe it clean with a damp cloth.
3 Clean all interior surfaces with a damp cloth.
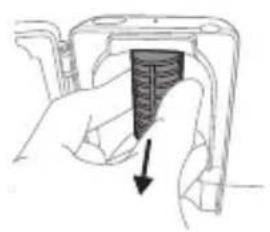
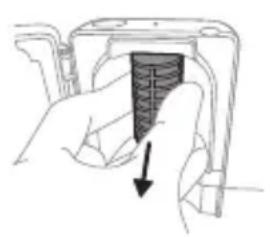
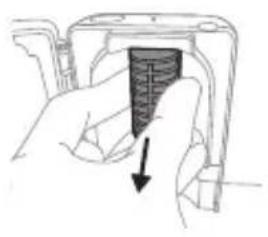
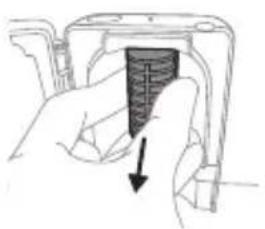
4 Remove the protective screen in front of the UV light bulb.
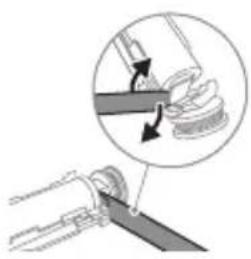
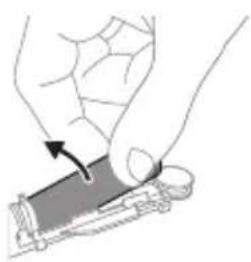
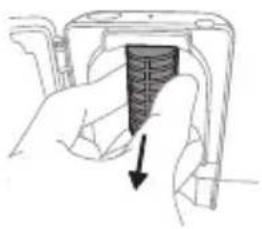
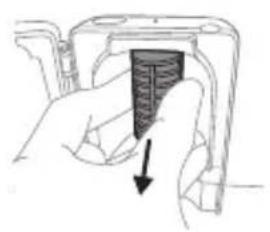
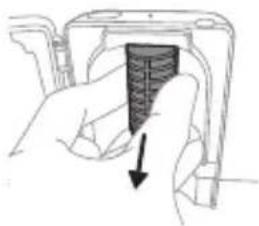
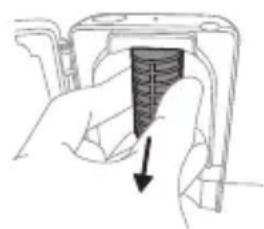
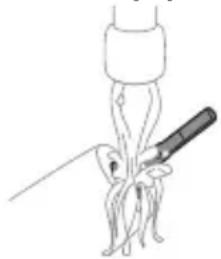
To remove the screen, grasp the edges next to the snaps, gently squeeze and pull out the protective screen.
5 Remove the UV light bulb.
To remove the light bulb, grasp it and pull it out of the metal clasp.
6 Clean the protective screen and the UV light bulb with a damp cloth.
7 Reinsert the UV light bulb.
To reinsert the light bulb, align the bottom of the light bulb with the metal clasp and push the bulb into the clasp.
8 Reinsert the protective screen.
To reinsert the screen, align the pegs on the screen with the slots on the reflective surface near the UV light bulb. Push the screen straight into the slots on the sanitizer.
9 Place the drip tray back in the UV sanitizer.
10 After cleaning, make sure the sanitizer is completely dry before you connect it to the mains.
Storage
If you are not going to use the product for an extended period of time, unplug it from the electrical outlet, clean it and store it in a cool and dry place away from direct sunlight.
Replacement
Replace Philips Sonicare brush heads every 3 months to achieve optimal results. Use only Philips Sonicare replacement brush heads.
Locating the model number
Look on the bottom of the Philips Sonicare toothbrush handle for the model number (HX64XX, HX68XX).
Warranty and support
If you need information or support, please visit www.philips.com/support or read the international warranty leaflet.
Warranty exclusions
What is not covered under warranty:
- In-mouth attachments including brush heads and nozzles.
- Damage caused by use of unauthorized replacement parts or unauthorized brush heads.
- Damage caused by misuse, abuse, neglect, alterations or unauthorized repair.
- Normal wear and tear, including chips, scratches, abrasions, discoloration or fading.
- UV light bulb.
Recycling
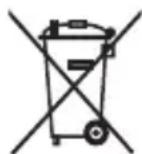
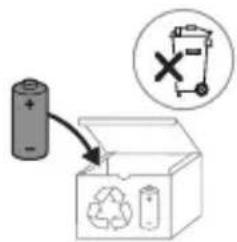
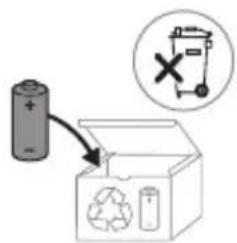
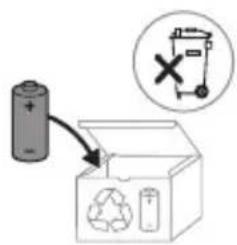
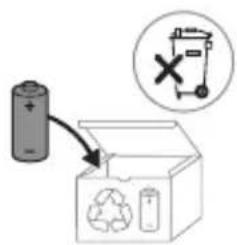
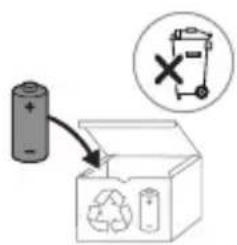
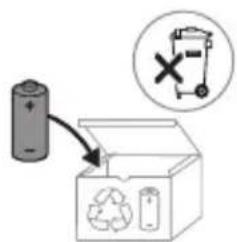
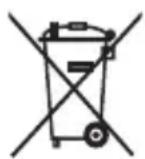
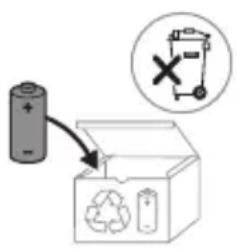
- This symbol means that electrical products and batteries shall not be disposed of with normal household waste.
- Follow your country's rules for the separate collection of electrical products and batteries.
- The UV light bulb of the sanitizer contains mercury. Do not throw the UV light bulb away with the normal household waste at the end of its life. Hand it in at an official collection point for recycling.
- Information on REACH substances, contained in Philips products, can be found on www.philips.com/REACH
Removing the rechargeable battery
The built-in rechargeable battery must be removed by a qualified professional when the product is discarded.
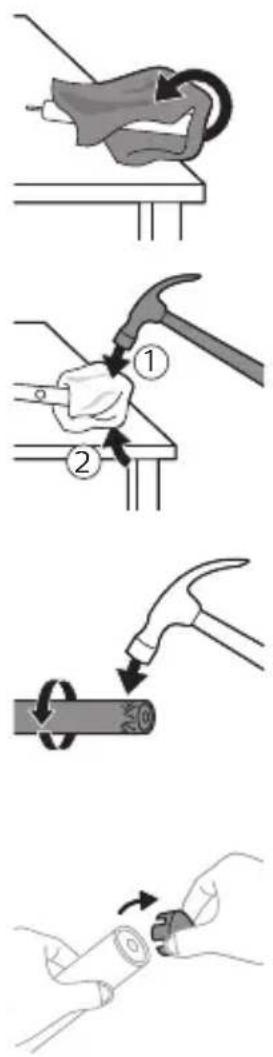
Instructions for removal of built-in rechargeable batteries can be found on www.philips.com/support.
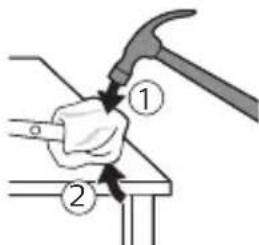
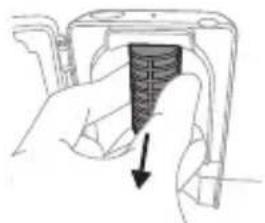
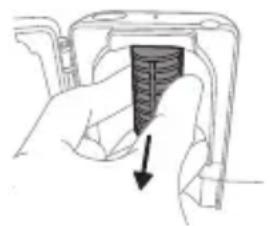
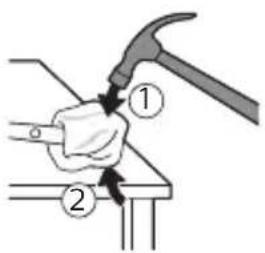
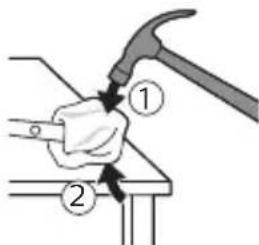
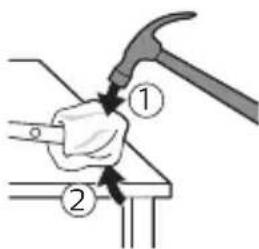
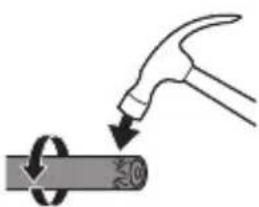
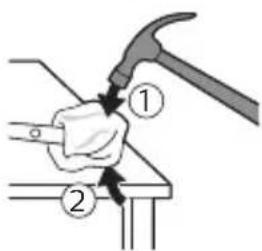
To remove the rechargeable battery, you need a towel or cloth, a hammer, and a flat-head (standard) screwdriver. Observe basic safety precautions when you follow the procedure outlined below.
1. To deplete the rechargeable battery of any charge, remove the handle from the charger, turn on the toothbrush, and let it run until it stops. Repeat this step until you can no longer turn on the toothbrush.
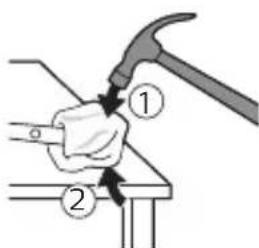
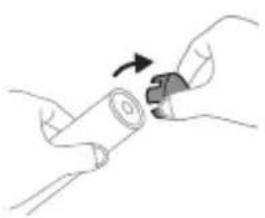
2. Remove and discard the brush head. Cover the entire handle with a towel or cloth.
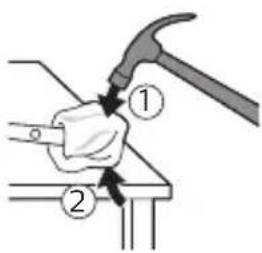
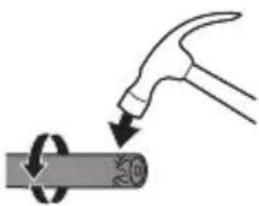
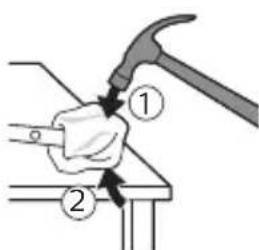
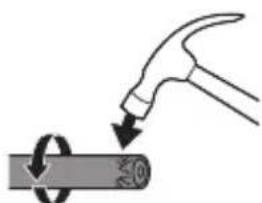
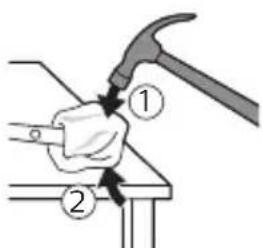
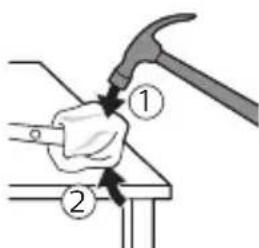
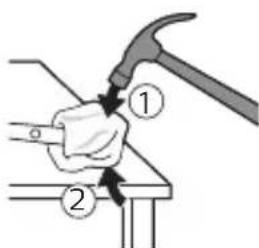
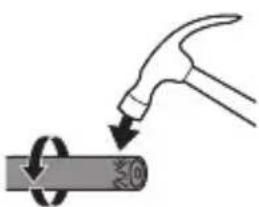
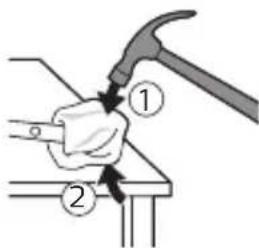
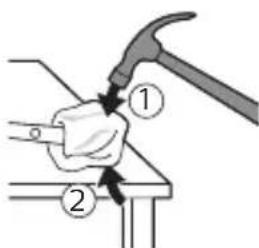
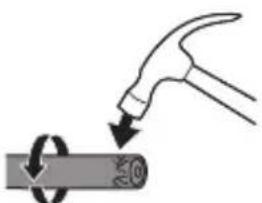
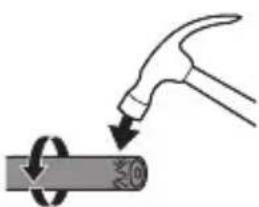
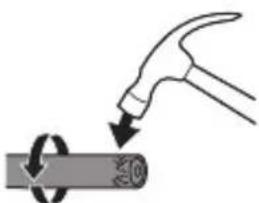
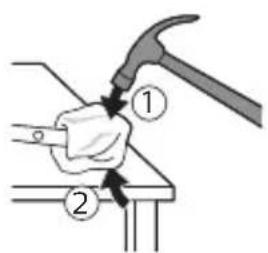
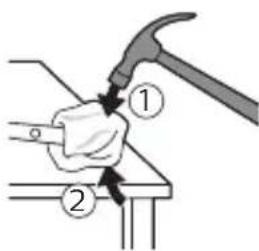
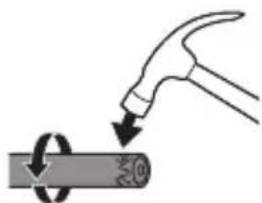
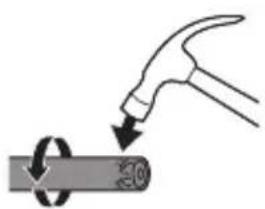
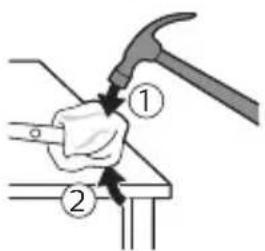
3. Hold the top of the handle with one hand and strike the handle housing 0.5 inch above the bottom end. Strike firmly with a hammer on all 4 sides to eject the end cap.
Note: You may have to hit on the end several times to break the internal snap connections.
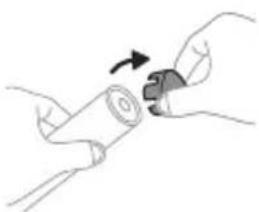
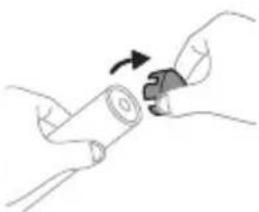
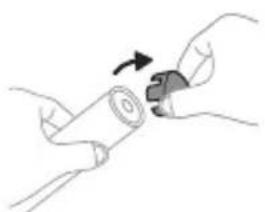
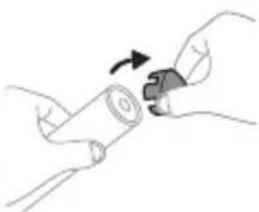
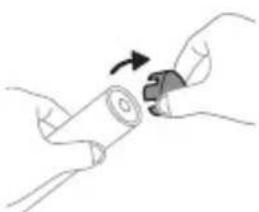
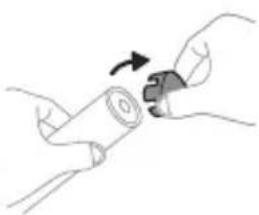
4. Remove the end cap from the toothbrush handle. If the end cap does not release easily from the housing, repeat step 3 until the end cap is released.
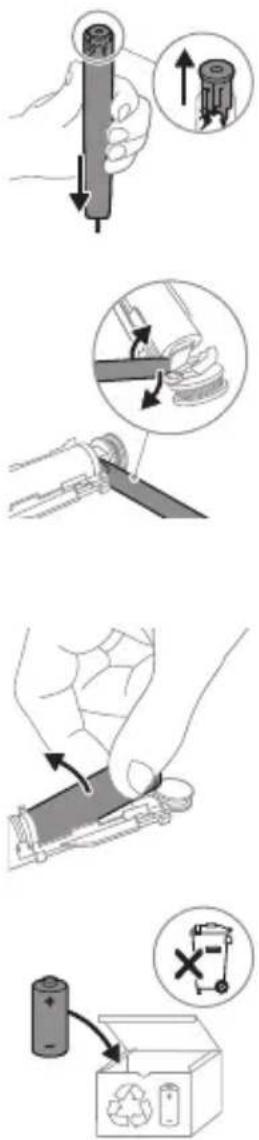
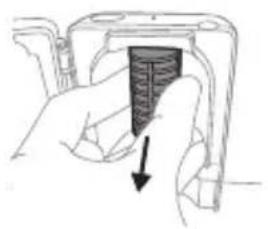
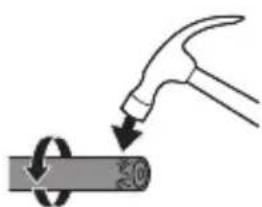
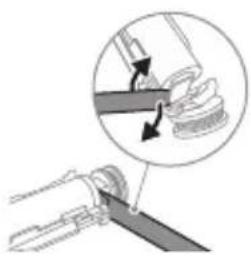
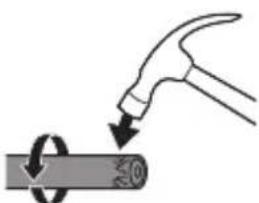
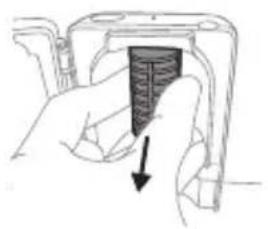
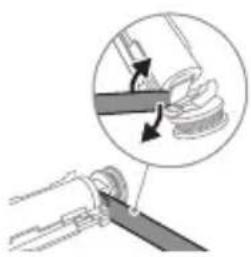
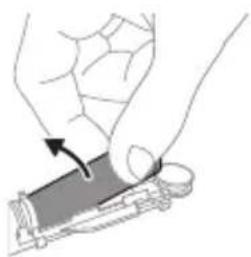
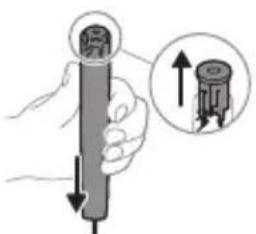
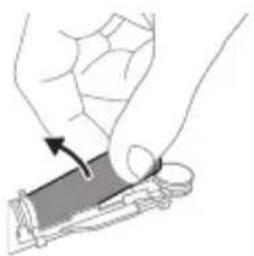
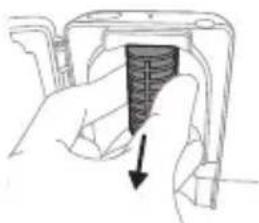
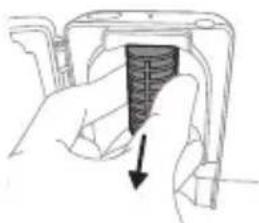
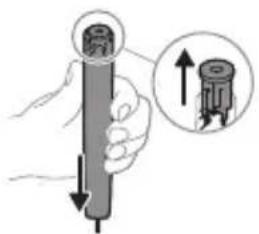
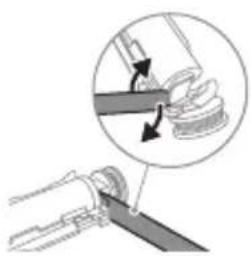
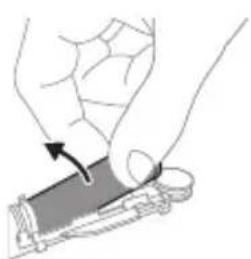
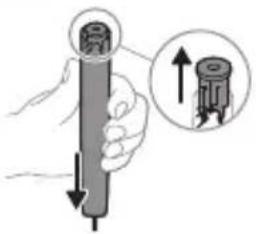
5. Holding the handle upside down, press the shaft down on a hard surface. If the internal components do not easily release from the housing, repeat step 3 until the internal components are released. 6. Wedge the screwdriver between the battery and the black frame at the bottom of the internal components. Then pry the screwdriver away from the battery to break the bottom of the black frame. 7. Insert the screwdriver between the bottom of the battery and the black frame to break the metal tab connecting the battery to the green printed circuit board. This will release the bottom end of the battery from the frame. 8. Grab the battery and pull it away from the internal components to break the second metal battery tab.
Caution: Be aware of the sharp edges of the battery tabs so as to avoid injury to your fingers.
9. Cover the battery contacts with tape to prevent any electrical short from residual battery charge.
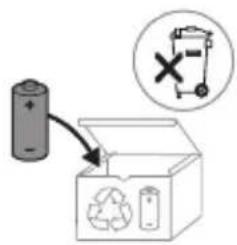
The rechargeable battery can now be recycled and the rest of the product discarded appropriately.
Note: Do not throw away the appliance with the normal household waste at the end of its life, but hand it in at an official collection point for recycling. By doing this, you help to preserve the environment.
Introduction
www.philips.com/support
www.philips.com/support
Clean White Gum Care
www.philips.com/support
Clean White Gum Care
Charging on charger or UV sanitizer
www.philips.com/support
Clean White Gum Care
www.philips.com/toothbrush-heads.
Product features
MEDICAL WARNINGS
QuadPacer
![graph TD A["Step 1"] --> B["Step 2"] B --> C["Step 3"] C --> D["Step 4"] D --> E["Brush"]](/content/2026/03/439098/images/c2f8328860470b7b8af3aaf13723bcefa990ea49ccda5143f67f8c830c6ff5d7.jpg)
Clean White Gum Care
www.philips.com/toothbrush-heads.
Features
Clean White Gum Care
1 Wet the brush bristles and apply a small amount of toothpaste.
5 To clean the inside surfaces of the front teeth, tilt the brush handle semi-upright and make several vertical overlapping strokes on each tooth.
Clean White Gum Care
| Prednost Za odličnosvakodnevnočišćenje | Uklanjanjepovršinskih mrlja | Nježno masiradesni | |
| Ukupno vrijemečetkanja | 2 minute 2 minute i30 sekundi | 3 minute | |
| Kako četkati Četkajte svakisegment30 sekundi. | četkajte svakisegment30 sekundi | četkajte svakisegment30 sekundi | |
 |  |  | |
| zatim četkajtesegmente 5 i 6,svakog po 15sekundi, zaposvjetljivanje ipoliranje prednjihzuba. | zatim četkajtesegmente 5, 6, 7 i8, svakog po 15sekundi, zanježnustimulaciju imasažu desni. | ||
 |  | ||
BrushSync technology
EasyStart
1 After brushing, rinse the brush head and shake off excess water.
Warning: When cleaning the brush head in the sanitizer, make sure the brush head cap is not on the brush.
2 Place your finger in the groove of the door at the top of the sanitizer and open the door.
3 Place the brush head on one of the two attachments in the sanitizer so that the bristles face the lamp.
Charging on the charger or in the UV sanitizer
1 Plug the charger or sanitizer into an electrical outlet. 2 Place the handle on the charger or sanitizer. - The handle will emit two short beeps to confirm that the handle is properly placed. - The blinking battery indicator shows that the brush is charging. - When the handle is fully charged on the charger, the battery indicator lights up green for 30 seconds before turning off.
Battery status
Battery status (handle on connected charger)
When the handle is placed on the charger, the battery indicator shows the battery charge level.
Battery status Battery indicator
| punjenje Treperi zeleno |
| puna Neprestano svijetli u zelenoj boji 30sekundi, a zatim se isključuje |
1 Remove the brush head and rinse the metal shaft with warm water. Make sure to remove all remaining toothpaste.
Caution: Do not use sharp objects to push the rubber seal onto the metal shaft as this may cause damage.
2 Wipe the entire surface of the handle with a damp cloth.
Note: Do not tap the handle on the sink to remove excess water.
Brush head
To remove the protective cap, grip the edges of the cap next to the bracket, gently press, and then pull the cap off.
www.philips.com/support
Clean White Gum Care
EasyStart
212 Italiano
www.philips.com/support
1 Rinse the brush head and apply a little toothpaste.
Clean White Gum Care
EasyStart
www.philips.com/support
www.philips.com/support
Clean White Gum Care
www.philips.com/support
Clean White Gum Care
Charging on charger or UV cleaner
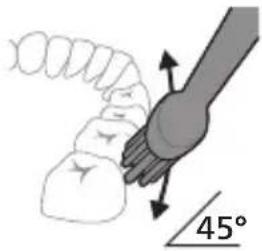
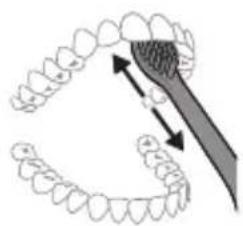
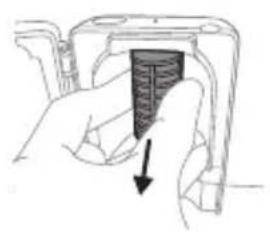
Clean White Gum Care
Charging in charger or UV cleaner
1 Remove the brush head and rinse the metal shaft in warm water. Make sure you have removed all toothpaste residue. Caution: Do not use sharp objects against the rubber seal on the metal shaft. It can be damaged. 2 Dry the entire surface of the handle with a damp cloth.
1 Align the brush head so that the bristles are in the same direction as the front part of the handle. 2 Press the brush head firmly onto the metal shaft until it stops.
Note: A small gap between the brush head and the handle is normal.
Using your Philips Sonicare toothpaste
If you are using Sonicare toothpaste for the first time, it is normal to feel more vibration than with a non-electric toothbrush. First-time users often apply too much pressure. Press gently and let the toothbrush do the cleaning for you. For the best experience, follow the brushing instructions. To help you transition to your new Sonicare power toothbrush, the EasyStart feature is activated
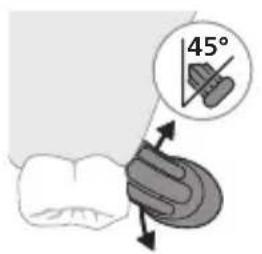
1 Wet the brush and apply a small amount of toothpaste.
2 Hold the toothbrush at a small (45-degree) angle against the teeth and press firmly so the bristles reach the gum line or just below it.
Note: Keep the center of the brush in full contact with the teeth at all times.
3 Press the on/off button to turn on the Philips Sonicare device.
4 Hold the brush gently against the teeth and gum line. Clean your teeth by moving the brush head back and forth in small motions so the bristles can reach between the teeth. Continue these motions until your brushing cycle is complete.
Clean White Gum Care
| Foydasi Maxsus kundalik tozalah uchun | Yuzadagi dog'larni ketkazadi | Milklarni ohista massaj qiladi | |
| Jami tish tozalah vaqti | 2 daqiga 2 daqiga va 30 soniya | 3 daqiga | |
| Tozalah usuli Har bir segmentni 30 soniyadan tozalg. | Har bir segmentni 30 soniyadan tozalg | Har bir segmentni 30 soniyadan tozalg | |
 |  |  | |
| keyin old tishlarni oqartirish va jilolash uchun 5-va 6-segmentlarning har birini 15 soniyadan tozalg. | keyin milklaringizni ohista stimullash va massaj qilish uchun 5, 6, 7 va 8-segmentlarning har birini 15 soniyadan tozalg. | ||
 |  | ||
BrushSync technology
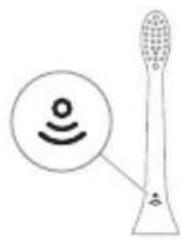
BrushSync technology enables the brush head to communicate with the handle via a microchip.
The symbol on the underside of the brush head indicates that the brush head is equipped with this technology.
BrushSync technology activates the following:
- Brush head replacement reminder
Philips Sonicare offers a wide range of smart brush heads with BrushSync technology. To explore the full range of toothbrush heads and find the one that suits you best, visit www.philips.com/toothbrush-heads.
Features
- Pressure sensor indicator
- QuadPacer
- Brush head replacement reminder
- EasyStart
- SmarTimer
1 After brushing, rinse the brush head and shake off excess water.

Warning: When cleaning the brush head in the sanitizer, make sure the brush head cap is not on the brush head.
3 Place the brush head on one of the 2 hooks in the sanitizer with the bristles facing the light.
Note: Only clean Philips Sonicare attachable brush heads in the sanitizer.
Note: Do not clean Philips Sonicare for Kids brush heads in the sanitizer.
4 Make sure the sanitizer is plugged into an outlet with the matching voltage.
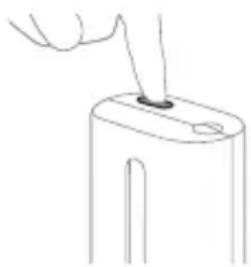
5 Close the door and press the green power on/off button once to select the ultraviolet light cleaning cycle.
Charging with the charger or ultraviolet sanitizer
1 Connect the charger or sanitizer to a power source. 2 Place the handle on the charger or in the sanitizer.
- Two short beeps confirm that the handle is correctly placed on the charging device.
- The blinking battery indicator indicates that the toothbrush is charging.
- When the handle on the charger is fully charged, the battery indicator lights up green for 30 seconds and then turns off.
Battery status
Battery status (handle on connected charger)
When the handle is placed on the charger, the battery indicator reflects the battery level.
Battery status Battery indicator
| Quvvatlash Yashil rangda miltillaydi |
| To’lgan 30 soniya yaxlit yashil rangda yonibturadi va keyin o’chadi |
Battery status (when not placed on the charger)
When the toothbrush is active, the battery indicator on the handle shows the battery level.
Battery status Battery indicator Sound
| To’lgan Yaxlit yashil - | |
| Qisman to’lgan Yashil rangda miltillaydi - | |
| Kam Sariq rangda miltillaydi Tish tozalanganidan | keyin dastadan 3 ta qisqa signal jaranglaydi |
| Bo’sh Sariq rangda miltillaydi Tish tozalanganidan | keyin dastadan 5 tadan 2 ta qisqa signal jamlanmasi jaranglaydi |
| Izoh: Energiya tejash uchun batareya indikatori ishlatilmayotganida o’chadi. | |
| Izoh: Batareya to’liq bo’shlig’ida tish cho’tkasi o’chadi. Tish cho’tkasini quvvatlash uchun uni quvvatlagichga joylang. | |
| Izoh: Batareyani har doim to’liq quvvatlagan holda saqlash uchun tish cho’tkasidan foydalanmayotgan paytda uni quvvatlagichda saqlashingiz mumkin. | |
Cleaning
Toothbrush handle
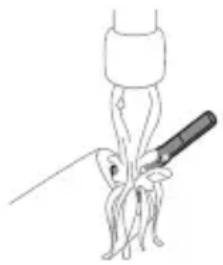
1 Remove the brush head and rinse the metal shaft area with warm water. Check that you have removed any toothpaste residue. Warning: Do not press the rubber seal on the metal shaft with sharp objects, as this may cause damage. 2 Wipe the entire surface of the handle with a damp cloth.
Note: Do not tap the handle against the sink to remove excess water.
Brush head
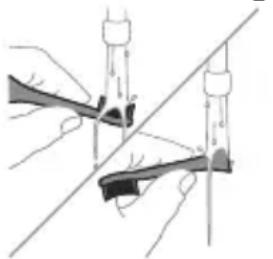
1 Rinse the brush head and brush after each use. 2 Remove the brush head from the handle and rinse the brush head connection part with warm water at least once a week. Rinse the travel cap as often as necessary.
Charging device
1 Before cleaning, unplug the charger from the power outlet. 2 Wipe the entire surface of the charging device with a damp cloth.
Travel case
Rinse with warm water and use a damp cloth to clean the inside of the travel case.
Cleaning the sanitizer
Warning: Do not immerse the sanitizer in water or rinse it under the tap.
Warning: Do not clean the sanitizer in the heat of the sanitizer's ultraviolet lamp.
It is recommended to clean your sanitizer weekly for optimal performance.
1 Unplug the sanitizer from the power outlet.
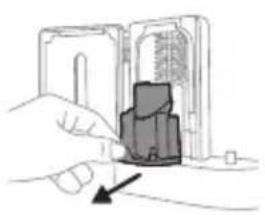
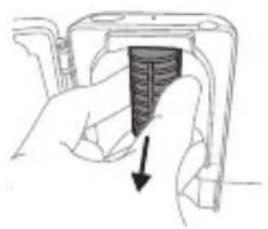
2 Pull the drip tray straight out. Rinse the drip tray and wipe it clean with a damp cloth. 3 Clean all interior surfaces with a damp cloth. 4 Remove the protective film from the ultraviolet lamp.
To remove the film, hold the edges near the clips and pull the protective film off.
5 Remove the ultraviolet lamp. To remove the lamp, hold it and pull it out of the metal clip.
6 Clean the protective film and the ultraviolet lamp with a damp cloth.
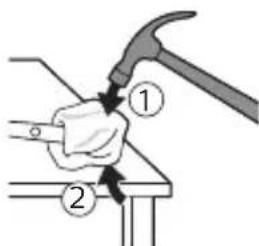
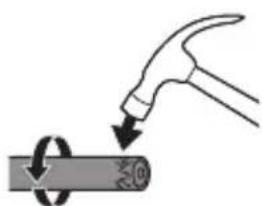
3 Hold the top of the handle with one hand and tap the bottom of the housing 0.5 inches (1.3 cm) upward. Use a hammer to firmly tap all 4 sides to remove the end cap.
Note: You may need to tap the end of the device several times to disconnect the connectors with internal fixators.
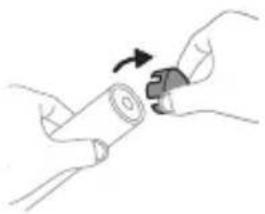
4 Remove the cap from the end of the toothbrush handle. If the end cap does not come off easily, repeat step 3 until the cap comes off.
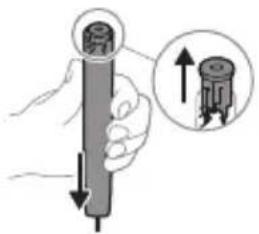
6 Insert the screwdriver between the battery and the black housing under the internal components. Then twist the screwdriver away from the battery to break the part under the black housing.
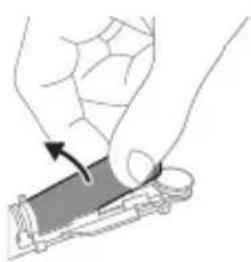
7 Insert the screwdriver between the battery and the black housing to break the metal tab connecting the battery to the green circuit board. This will release the bottom end of the battery from the housing.
8 To break the second metal tab, grasp the battery and pull it away from the internal components.
Warning: Be careful of the sharp edges of the battery tab to avoid cutting your finger.
www.philips.com/support
Clean White Gum Care
www.philips.com/support
Clean White Gum Care
www.philips.com/support
www.philips.com/support
Clean White Gum Care
www.philips.com/support

Clean White Gum Care
3 Turn on the Philips Sonicare toothbrush by pressing the on/off button.

Clean White Gum Care
5 Close the door and press the green on/off button once to select the UV cleaning cycle.
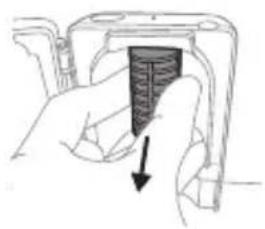
2 Pull out the drip tray. Rinse it and wipe it clean with a damp cloth. 3 Clean all inner surfaces with a damp cloth. 4 Remove the protective shield in front of the UV bulb.
5 Hold the handle upside down and press the shaft against a hard surface. If the inner components do not easily come out of the housing, repeat step 3 until they do.
www.philips.com/support
1 Align the brush head so that the bristles are facing the same direction as the front of the handle.
2 Firmly press the brush head onto the metal shaft until it stops.
1 Wet the bristles and apply a small amount of toothpaste.
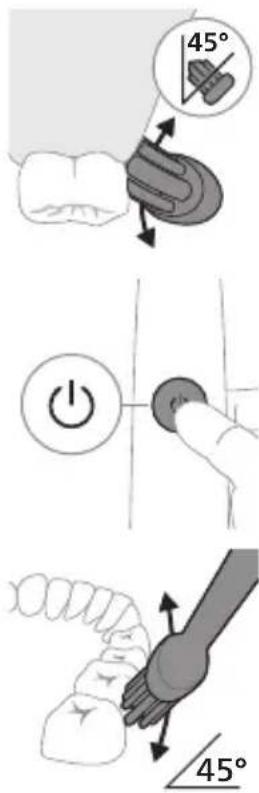
2 Place the toothbrush bristles against the teeth at a slight angle (45 degrees) and press firmly so the bristles reach the gum line or slightly below it.
5 To clean the inside surface of the front teeth, tilt the brush handle to a semi-upright position and move the brush vertically over each tooth so that the strokes overlap.
Clean White Gum Care
| Pogodnost Za izvanredno svakodnevno pranje | Uklanja mrlje sa površina | Nežno masira desni | |
| Ukupno vreme pranja zuba | 2 minuta 2 minuta i 30 sekundi | 3 minuta | |
| Kako se pere Perite svaki segment 30 sekundi. | perite svaki segment 30 sekundi | perite svaki segment 30 sekundi | |
| 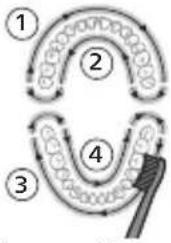 | 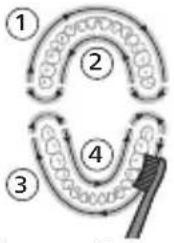 | |
| zatim perite segmente 5 i 6, svaki u trajanju od 15 sekundi, da biste izbeleli i ispolirali prednje zube. | zatim perite segmente 5, 6, 7 i 8, svaki u trajanju od 15 sekundi, za nežno stimulisanje i masiranje desni. | ||
| | ||
BrushSync technology
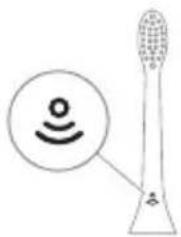
BrushSync technology enables communication between the brush head and the handle using a microchip. The symbol on the underside of the brush head indicates that the brush head contains this technology.
BrushSync technology enables: - Replacement reminder for the brush head Philips Sonicare has a wide range of smart brush heads with BrushSync technology. For more information about our full range of toothbrush heads, visit
www.philips.com/toothbrush-heads and find the brush head that suits you best.
Features
The Sonicare toothbrush measures the pressure you use while brushing to protect your gums and teeth from damage.
3 When the replacement reminder indicator lights up yellow-orange, you should replace the brush head.
All smart brush heads have the replacement reminder function activated. To deactivate the replacement reminder, see the section "Activating or deactivating functions".
EasyStart
This Philips Sonicare toothbrush model is delivered with the EasyStart function activated. The EasyStart function gently increases power during the first 14 brushings to help you get used to brushing with the Philips Sonicare toothbrush.
Disclaimer
When the Philips Sonicare toothbrush is used in clinical studies, it must be used in Clean mode at high intensity while the handle is fully charged, and the EasyStart function must be deactivated.
To deactivate EasyStart (see 'Activating or deactivating functions').
SmarTimer
1 After brushing, rinse the brush head and shake off excess water.
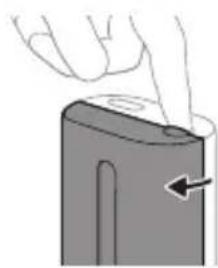
2 Place your finger in the slot on the top of the sanitizer and open the lid.
3 Place the brush head on one of the 2 pegs in the sanitizer so that the bristles face the lamp.
Note: Only clean Philips Sonicare brush heads for easy placement in the sanitizer.
Note: Do not clean Philips Sonicare for Kids brush heads in the sanitizer.
4 The sanitizer must be plugged into a functional outlet or with the appropriate voltage.
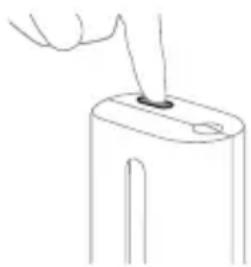
5 Close the lid and press the green power button once to select the UV cleaning cycle.
Charging on the charger or on the UV sanitizer
1 Remove the brush head and rinse the area around the metal shaft with warm water. Make sure to remove all toothpaste residue.
Caution: Do not push the rubber seal on the metal shaft with sharp objects as this may cause damage.
2 Wipe the entire surface of the handle with a damp cloth.
Note: Do not tap the handle against the sink to remove excess water.
Brush head
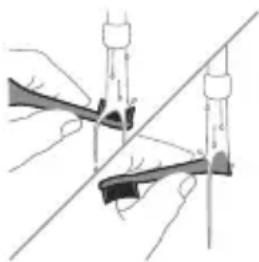
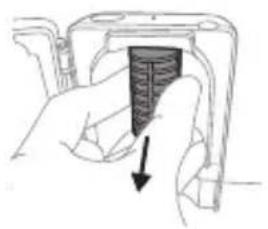
2 Pull out the liquid collection container. Rinse the liquid collection container and wipe it with a damp cloth. 3 Clean all internal surfaces with a damp cloth. 4 Remove the protective film located in front of the UV lamp.
www.philips.com/support
www.philips.com/support
Clean White Gum Care
EasyStart
Clean White Gum Care
EasyStart
www.philips.com/support
Note: Different models may have different features. Some models may not be equipped with Bluetooth or NFC.
Attached power supply block: "xxxxxx" indicates the model number of the approved chargers for use. (TCBxxxx, HX6100, HX6110, HX6160 or WAAxxxx)


This symbol means that you should read the user instructions before using the device.
Intended use
1 Align the attachment so that the bristles face the same direction as the front of the handle.
2 Press the brush head onto the handle until it clicks into place.
1 Rinse the bristles and apply a small amount of toothpaste.
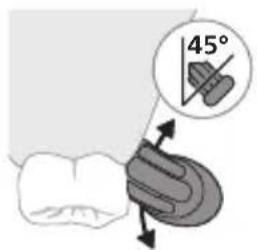
2 Place the bristles of the toothbrush against the teeth at a slight angle (45 degrees) and press gently so the bristles reach the gum line or slightly below it.
Clean White Gum Care
| Yeñillik Her gün | çendenasa arassalamak üçin | Üst tegmiller aýyrýar | Diş etlerini emaý bilen massaž edýär |
| Jemi çotgalama wagty | 2 minut 2 minut we 30 sekunt | 3 minut | |
| Çotgalaýys usuly | Her segmenti 30 sekunt çotgalaň. | Her segmenti 30 sekunt çotgalaň | Her segmenti 30 sekunt çotgalaň |
 |  |  | |
| soňra 5-nji we 6-nji bölekleriň her birini 15 sekunt çotgalap, öndäki dişleri ýagtyldyň we lowurdadyň. | soňra 5, 6, 7 we 8-nji bölekleriň her birini 15 sekunt çotgalap, diş etleriňizi emaý bilen stimulirlaň we massaž ediň. | ||
 |  | ||
2 Over time, based on the pressure you apply and the total time you use the brush head, the handle tracks wear to determine the optimal time to replace the brush head. This feature ensures the best cleaning and care for your teeth. 3 When the brush head replacement reminder light glows yellow, you need to replace the brush head.
Warning: Do not attach the brush head cap while the brush head is being cleaned in a disinfectant.
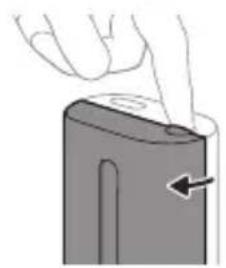
2 Place your finger in the groove on the cap of the cleaner and push to open the cap.
Charging in the charger or in the UV sanitizer
1 Rinse the brush head and bristles after each use. 2 At least once a week, remove the brush head from the handle and rinse the connection with warm water. Rinse the travel cap as often as necessary.
Charger
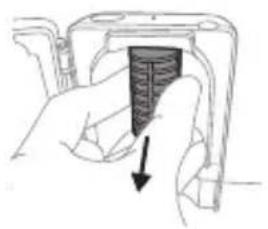
2 Pull the drip tray straight out. Rinse the drip tray and wipe it clean with a damp cloth.
www.philips.com/support
EasyStart

www.philips.com/support
Your power toothbrush is equipped with up to 3 modes: Clean, White and Gum Care (specific models only). To change modes, press the mode button while the toothbrush is powered off.
Clean White Gum Care
EasyStart
Step 1: Place the handle on the plugged-in charging stand.
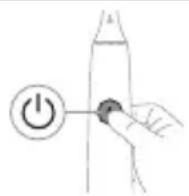
Step 2: Press and hold the power on/off button for:
EasyStart Brush head replacement reminder Pressure Sensor Feedback
Up to 3 seconds Up to 5 seconds Up to 7 seconds

Step 3: Let go of the power on/off button when you hear:
1 beep 1 beep and then 2 beeps
1 beep, 2 beeps and then 3 beeps

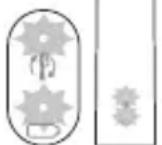
If you see the battery indicator and the brush head replacement reminder light flash green 2 times and hear 3 tones from low to high, then the feature has been activated.
OR
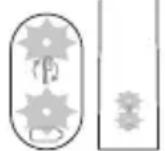
If you see the battery indicator and brush head replacement reminder light flash amber 1 time and hear 3 tones high to low, then the feature has been deactivated.
Charging on charger or UV Sanitizer
www.philips.com/support
Clean White Gum Care
Clean White Gum Care

3 To activate the Philips Sonicare, press the on/off button.
Clean White Gum Care
Your Sonicare toothbrush measures the pressure you apply while brushing to protect your gums and teeth from damage. If you apply too much pressure, the handle will change its vibration and the brush head replacement reminder light will flash blue until you reduce the pressure.
Note: Your product is supplied with the pressure sensor activated. To deactivate this feature (see 'Activating or deactivating features').
QuadPacer
Note: Do not clean the Philips Sonicare for Kids brush heads in the dishwasher.
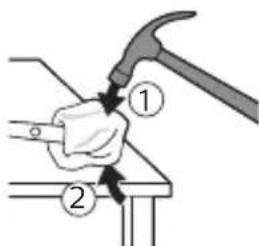
6 Insert the screwdriver between the battery and the black frame at the bottom of the internal components. Then, pry the screwdriver upward from the battery to open the bottom of the black frame.
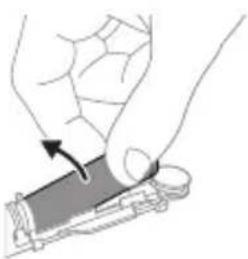
7 Place the screwdriver between the bottom of the battery and the black frame to break the metal tab that connects the battery to the green printed circuit board. This releases the bottom end of the battery from the frame.
Clean White Gum Care
1. Remove the brush head from the handle and rinse it under running water for a few seconds. 2. Place the brush head back on the handle and ensure it is securely attached. 3. For optimal cleaning, replace the brush head every 3 months or sooner if bristles are frayed.
2. Using your Philips Sonicare toothbrush
To get the most out of your Sonicare toothbrush, follow the instructions below. Make sure the brush head is firmly attached to the handle. The brush head should be replaced every 3 months for best results. Your Sonicare toothbrush is designed to be safe and effective. It features a built-in timer to help you brush for the recommended 2 minutes. The EasyStart feature gradually increases the power over the first 14 brushings to help you adapt to the Sonicare experience.
Using your Philips Sonicare toothbrush:
Brushing instructions

1. Apply a small amount of toothpaste to the brush head and place it against your teeth at a 45-degree angle.
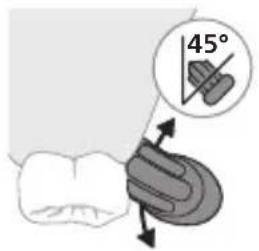
2. Turn on the toothbrush and gently move the brush head in a slow, circular motion over the teeth and gumline. Continue brushing for 2 minutes (the timer will beep every 30 seconds to indicate it's time to move to the next quadrant).
3. After brushing, rinse the brush head and the handle thoroughly with water.
4. Press the power button to turn off the toothbrush. Rinse the brush head and the handle again and shake off excess water. Do not immerse the handle in water.
5. To clean the brush head, remove it from the handle and rinse it under running water. Wipe the handle with a damp cloth. Do not use harsh chemicals or abrasive cleaners.
6. Replace the brush head every 3 months or sooner if the bristles are frayed. Using a worn brush head may reduce cleaning effectiveness.
7. If you have any questions or concerns, visit www.philips.com/support for more information.
5 Ungluh wunwutph utnuh uwwytnunyputnp uwpntini hwuwipetptp hunqwuwlyh pnuwyn yhuwninhn nhnpnyu u uh pwuh ninnwhwjwg uwpnnn 2wndniutp ywinwntp jninwpwuynin winwuh ynw: 6 Uwpntihi yhniù wùwnuntiŋg htunn lqwnn tpr lnwgnighs dwúwǔwly hwnlywgǔtì wunwùtph δwúnn úwyltnlunijæutpn úwpnti niù u wju hwunluwòutphù, nnuntn wnzgwùniú 5 pòwùnniú: Uwpnn tpr üwu úwpnti ltaqiù hunqwùwyn wwhtinj úhwgúwò ywú wùgwùnwò, hùswu üwhuŋuunnniú tpr:
L2niú 2tn Philips Sonicare winwúh hunquùwǔn wùyúnwùq t winwúutnh pntytunutnh (hunquùwǔh qihuhyn 2niun t úw2úniú pntytunutnh ynw) u winwúutnp ytpnwlywùqūnn hwnúwnwùpútph (ignùnuiutn, 2wwhlyutn, ytúhnutn) oqnwnqnòúwù ntiwpniú, tiāi nnwùp wwwn2wǎ tǔ oqnwnqnòuniú u stǔ huwhunuǐniú:
QuadPacer
![graph TD A["①"] --> B["②"] B --> C["③"] C --> D["④"] D --> E["④"] style A fill:#f9f,stroke:#333 style B fill:#f9f,stroke:#333 style C fill:#f9f,stroke:#333 style D fill:#f9f,stroke:#333 style E fill:#f9f,stroke:#333](/content/2026/03/439098/images/6868fe5caf12cb8a48c69c53868746b2a47716daed67baed4e00707722fe6b6e.jpg)
Зwinqultini hwiwn, np hwiuwunwzwih tpr uwpnniú wupnng ptnwùn, ptnwùn 4 uwhp pudwutap oqunwqnòtlnj QuadPacer qnpòwnnijan: QuadPacer unthuünqhwù hunqwùwlyiwù dwúwùwlyn pudwūnui § 4 hwiuwwn uwhu l u wqnwu2wùniú §, pat tnp § hwnlwwyn wuguti hwgnn hwnuwòhù: Zwinluwòutnh wqnwu2wùniún untnh § niútuniú panpangh ywnǎwnu nwnwnh uhongnu: Unwuh hunqwùwlyu wulnniúwun ltpwnu wugwnylniú § hunqwùwyltni utuhwjh wlpwnnhù:
L2niu' White yuw Gum Care nduhutn u oqunwannotjhu ywnnn h wultwgutl inwgnighs dwuwuuyl:
Ntchutn
Eğluynwlywù hunqwùwlyù niùh úhùzì 3 nădhúutn. Clean, White u Gum Care (úhwjù npn2wlyh ünnbùtptniú): Nădhúutpù yhnhutlni hwúwn hunqwùwlyù wùgwunułwò yhǎwlynú utnútip nădhúh ynǎwlyn:
Clean White Gum Care
| Unwultinjəjnìu | Fwgwnhlywúbùonjuwwpnúwúhwúwn | 3tnwgùniú ʒúwlytnunijahpòtnp | huwijnnpwnútnuniú ʒiúntn |
| lunqwùwyltǐnìnǔnhwùníndwiúwùwlp | 2 nnwú 2 nnwú, 30 | 4wynljuwù | 3 nnwú |
| rùzwtuhunqwùwyltǐ | 3nīnwpwùyŋnìnhwnljuwònhunqwùwyltp 304wjnlyjwù: | 3nīnwpwùyŋnìnhwnljuwònhunqwùwyltp 304wjnlyjwù | 3nīnwpwùyŋnìnhwnljuwònhunqwùwyltp 304wjnlyjwù |
 |  |  | |
| - | wwwhunqwùwyltp 5 16 hwnljuwòutnp‘jnīnwpwùyŋnìŋ15 4wjnlyjwùhn‘upawgpniú’wnzghwnnwùutnp‘hwujtgùtini luwultih wwwjðwn7wnàutínihwúwn: | wwwhunqwùwyltp 5,6,7 1 8hwnljuwòutnp‘jnīnwpwùyŋnìŋ15 4wjnlyjwùhn‘upawgpniú ătnp‘untnpħu‘wijnnpwnħpuwùtini luútnutíni hwúwn: | |
 |  |
BrushSync unthuünqhw
BrushSync unthuünqhwù àtn hunqwùwlyh qjhuhyhu panyl t unwlhu hwnnnnwulgut prùwlyh htun uhlynnzhwh oqūnipāwúp: lunqwùwlyh qjhuhyh uunnphù hwnulwǒniú qunùlnn 22wùn gnjg t unwlhu, nn hunqwùwlyh qjhuhyù wwwhnluyuò t wju unthuünqhwynú: BrushSync unthuünqhwù wwwhnluniú t. - lunqwùwlyh qjhuhyh yhnhuwnhàuwù hh2tigniú Philips Sonicare-ù wwngwuplniú t BrushSync ( lunqwùwlyhUhùpnnüwgniú) unthuünqhwynú hutlwgh hunqwùwlyh qjhuhytph lwjù untuwlywùh: lunqwùwlyutph qjhuhytph útn wúpnng untuwlywùniú δwiùnpawuwini u àtiq wútiuwhwúwwwnuwuhuiu qjhuhyn qunútini u jnwgnighz untntylnipajniúutph hwúwn wjgtltp www.philips.com/toothbrush-heads:
9nρδωνηγρεύτη
- ǒu2úwù utùunnh wnàwqwùp
- Quadpacer
- lunqwùwlyh qlhuhlyh yhnhuwnhùuìwù hh2tigniù
- EasyStart
- SmarTimer
The Sonicare toothbrush has a Smartimer feature that helps you brush for the recommended two minutes. The Smartimer indicates the brushing cycle with a short beep and may turn off the brush automatically.
The Smartimer is set to the professional cleaning mode by default. This mode is indicated by the "Professional" or "Clean" setting on the handle.
Quadpacer
The Quadpacer is a feature that helps you brush all four quadrants of your mouth evenly. It beeps every 30 seconds to remind you to move to the next quadrant.
Brush head replacement reminder
Your Philips Sonicare toothbrush has a BrushSync (brush head replacement reminder) feature that reminds you to replace your brush head every 3 months.
The BrushSync feature is available on select Philips Sonicare brush heads. It uses a chip in the brush head to track usage and remind you when it's time to replace it.
1. If you use your brush head longer than the recommended 3 months, the BrushSync feature will remind you to replace it. 2. The brush head replacement reminder is based on the actual usage of the brush head, not just the time since it was first used. This ensures that you get the most out of your brush head and maintain optimal cleaning performance. 3. The brush head replacement reminder is activated by a short beep and a flashing light on the handle.
![graph TD A["P"] --> B["Terminal Node"]](/content/2026/03/439098/images/659fa49f0e7cdc54a9d42d1194a35d377aff27c6e0f46967da984cffb29c2e5b.jpg)
The brush head replacement reminder is a feature that helps you maintain your brush head. To check the status of your brush head, refer to the "BrushSync" or "Replacement" indicator on the handle.
EasyStart
Your Philips Sonicare toothbrush comes with the EasyStart feature. EasyStart gradually increases the power of your toothbrush over the first 14 uses, helping you get used to the brushing sensation.
Getting started
When you use your Philips Sonicare toothbrush for the first time,
it will operate at a lower power level for the first few uses. After that, the EasyStart feature will automatically increase the power to the full setting.
SmarTimer
SmarTimer is a device that allows you to control the operation of electrical appliances according to a set schedule. It is designed for use with household appliances and can be programmed for up to 2 different time periods. With its help, you can automate the switching on and off of electrical appliances, making your home more comfortable. The SmarTimer can be programmed for a period of 30 days.
Programmable and non-programmable operation
This device is intended for use with household appliances and similar applications.
The device must be installed by a qualified electrician in accordance with the safety regulations.
The device must not be used in environments with high humidity or in places where it may come into contact with water.
Before installation, ensure that the power supply is disconnected and that the device is not damaged.
The device should be protected from direct sunlight and heat sources.
Do not install the device near flammable materials.
- The device is designed for indoor use only and should not be used outdoors.
- The device should be installed at a height of at least 5 meters from the ground.
- The device must be connected to the power supply through a circuit breaker with a rating of 30 amperes, and the connection must be made by a qualified electrician.
Installation instructions
Installation instructions (for qualified electricians only)
The product is intended for use in accordance with the instructions provided in this manual, and any other use is considered improper.
Intended use Instructions for use
| Lhgpwwlnnniú @wnjæniú 5 ywùwz lnijunú | |
| Lhpù 5 30 ywjnlyjwù ywnzlniú 5 | hwwnwnnniú ywùwz lnijunú, wwwwùgwwnlniú 5 |
The device is intended for use (see figure 5) The device is intended for use by medical professionals only, in accordance with the instructions provided in this manual and the intended use.
Intended use
Instructions for use Figure
Figure 1 Unit -
Figure 2 Device -
Intended use Instructions for use Figure
| Ph2 5 Ownpaniú 5 ntnhù qnìjùnǔ | hunqwùwlyúwù wùwnunhg htùnn pnùwùln 3 wùqwú ðwjùwjhù wqŋwùzwiù 5 wnàwūlniú |
| Twnwny 5 Ownpaniú 5 ntnhù qnìjùnǔ | hunqwùwlyúwù wùwnunhg htùnn pnùwùln 5 ðwjùwjhù wqŋwùzwiùtph 2 lnwùwquí 5 wnàwūlniú |
| L2niú Eùtnqhw hùwjtānì hwiúwn ùwnunlyngh gnighṣn lwwùgwunuh, tnp wju sh oqunwqnndúlniú: | |
| L2niú tnp ùwnunlyngh lhgp n lhnuhù nwnwny 5, winnwúh hunqwùwylǜ wùgwunlu niú 5: Lhgpwulnntānì hwiúwn winnwúh hunqwùwyn ntānwntāp lhgpwulnnhsh lpnu: | |
| L2niú Uwnunlyngn wúpnngnuḥu lhgpwulnnu lwaδ wjuhtīnì hwiúwn lwwnn tpr winnwúh hunqwùwyn lhgpwulnnhsh lpnu wjuhtī, tnp wju sh oqunwqnndúlniú: |
Description
The device is intended for use
1. Read the instructions carefully before use and keep them for future reference. Follow the instructions to ensure safe operation.
Warning: Do not use the device if it is damaged or if the packaging is damaged, as this may indicate a potential safety issue.
2. The device should be used only with the accessories specified in this manual.
1 Note: The device is intended for use by medical professionals only. The instructions must be followed.
intended use
1 3nɪnwpwɪʒnɪn oqunwɑnnðniʊhg htɪnn ljuwgtip hunqwɪwʊlɪh qɪhʊln u úwəqhʊtɪŋn: 2 3tinwqntp hunqwùwuh qlnihn prùwuhg u wnùluwqù 2wpwren útyi luwgtp hunqwùwuh qlhuhu unwp qnnú: Luwgtp āwúhhnnnwlywù ywhwnhʒù wjùpwù hwǎwhu, nnpwù wùhnwdt2un ʃ:
Lhgpwqnnhz
1 Uugwuntp lhgpwulnnhyn` uwhupwu wju uwpntln: 2 Lhgpwylnnhzh úwlytntun úwpntp hunúwwu qnnóluwópnú:
Eynwùn hǎnwǔtīnì huòuàn pùúp lùnnph δωjntn, ǔnpnptù utnútp u ǐnnīnu huàtp wùw2nwwùhş Eynwùn:
5 3tnwgntp niunnwuwuni2wlywqnju lnjuh lwuwyn: Lwuwn hwutni hwuwn pnutp wju u nninu pw2tp utunwnjw onwuhg:
6 Uwpntip yww2nwwwuhz tynwun u niynnwuwunizwlywnjü lnjuh lwwiwn hunüwwu 2nnnu:
7 Unphg untwnntp niunnwuwuni2wlywqnju Injuh luwwn: Luwwn Unphg untwnntni hwuwn luwwh utnplh suwn hwulwuwntgntp utinwnwlywu onwlyh utg u luwwn untp onwlyh utg:
8 Unphg untwnntp w2nwwuhs tynwun: Unphg untwnntni hwiwn tynwuh ygnnnutnp hwluwwuntgntp nyunnwuwuni2wlywnjy lnjuh lwuwuh unun qunuyn wnnwgnnn uwlptntuh wugptnh htun: 3ntp tynwun ninhn whunwhwuhsh wugptnh utg:
9 4wphwjhù uyniuttnp unhg nntp niunnwúwúnizwlywqnyù whuunwhuúhsh útg:
10 Uwpntinig htunn, hwúnqutp, nn whunwhuhyn lhnuhu znn t, uwhupwù wju hnuwùph lwptnhù uhwutin:
اللهمني
tpat stp wwnnwnwnlnw tnlywn dwuwuw oqunwqnndt uwnpn, wugwntp wju htlywnnwutniguwu lwnnwlyhg, uwpntp wju u wuhtp qnul u znn untnniw' wnluh ninhh dwnwqwprutnhg htrni:
Φnħuħphħuni
Φnhuwnhùtp Philips Sonicare hunquùwlyh qjhuhyuttnù wútu 3 wúhun útyì` owunhúwīl wnnjniúpūtn wwwwnhultni hwúwùn: Oqunwqqnnòtp úhwju Philips Sonicare-h uhnhuwnhùuunn qjhuhyuttnn:
hùwǒu qúnǔl únntǐh huòwùn
Philips Sonicare protectiveClean 5100 rechargeable toothbrush (HX64XX, HX68XX):
Introduction
Congratulations on your purchase and welcome to Philips! To fully benefit from the support that Philips offers, register your product at www.philips.com/support.
Important safety information
Read this user manual carefully before you use the appliance and save it for future reference.
- Danger: Keep the charger away from water. Do not place or store it over or near water contained in a bathtub, washbasin, or sink.
- Warning: Do not use the charger outdoors or near heated surfaces. Do not use the appliance if it is damaged or has a broken brush head.
- This device is intended for use in hospitals, clinics, and other medical facilities, as well as for professional use by trained personnel.
- The device is not intended for use in emergency situations, nor for use in the presence of flammable anesthetics, nor for use in oxygen-rich environments.
- Read the instructions carefully before use.
Warning
- The device must be used in accordance with the instructions provided in this manual and with the safety precautions listed. Failure to do so may result in injury or damage.
- The device should be operated only by qualified personnel who have read and understood the instructions in this manual.
- The device is intended for use by healthcare professionals. It is not intended for use by the general public. If you are not a healthcare professional, do not use this device. Contact your healthcare provider for assistance.
For more information, visit the Philips website at www.philips.com/REACH.
Translation: The device is intended for use in a domestic environment. It is not intended for use in a professional environment. The device is not intended for use by children or persons with reduced physical, sensory or mental capabilities, or lack of experience and knowledge, unless they have been given supervision or instruction concerning use of the appliance by a person responsible for their safety.
www.philips.com/support §2:
The device is intended for use in a domestic environment. It is not intended for use in a professional environment. The device is not intended for use by children or persons with reduced physical, sensory or mental capabilities, or lack of experience and knowledge, unless they have been given supervision or instruction concerning use of the appliance by a person responsible for their safety.
3. The device is intended for use in a domestic environment. It is not intended for use in a professional environment. The device is not intended for use by children or persons with reduced physical, sensory or mental capabilities, or lack of experience and knowledge, unless they have been given supervision or instruction concerning use of the appliance by a person responsible for their safety.
12. The device is intended for use in a domestic environment. It is not intended for use in a professional environment. The device is not intended for use by children or persons with reduced physical, sensory or mental capabilities, or lack of experience and knowledge, unless they have been given supervision or instruction concerning use of the appliance by a person responsible for their safety.
4. The device is intended for use in a domestic environment. It is not intended for use in a professional environment. The device is not intended for use by children or persons with reduced physical, sensory or mental capabilities, or lack of experience and knowledge, unless they have been given supervision or instruction concerning use of the appliance by a person responsible for their safety.
5. The device is intended for use in a domestic environment. It is not intended for use in a professional environment. The device is not intended for use by children or persons with reduced physical, sensory or mental capabilities, or lack of experience and knowledge, unless they have been given supervision or instruction concerning use of the appliance by a person responsible for their safety.
6. The device is intended for use in a domestic environment. It is not intended for use in a professional environment. The device is not intended for use by children or persons with reduced physical, sensory or mental capabilities, or lack of experience and knowledge, unless they have been given supervision or instruction concerning use of the appliance by a person responsible for their safety.
7. The device is intended for use in a domestic environment. It is not intended for use in a professional environment. The device is not intended for use by children or persons with reduced physical, sensory or mental capabilities, or lack of experience and knowledge, unless they have been given supervision or instruction concerning use of the appliance by a person responsible for their safety.
8. The device is intended for use in a domestic environment. It is not intended for use in a professional environment. The device is not intended for use by children or persons with reduced physical, sensory or mental capabilities, or lack of experience and knowledge, unless they have been given supervision or instruction concerning use of the appliance by a person responsible for their safety.
9. The device is intended for use in a domestic environment. It is not intended for use in a professional environment. The device is not intended for use by children or persons with reduced physical, sensory or mental capabilities, or lack of experience and knowledge, unless they have been given supervision or instruction concerning use of the appliance by a person responsible for their safety.
The device is intended for use in a domestic environment. It is not intended for use in a professional environment. The device is not intended for use by children or persons with reduced physical, sensory or mental capabilities, or lack of experience and knowledge, unless they have been given supervision or instruction concerning use of the appliance by a person responsible for their safety.
12. The device is intended for use in a domestic environment. It is not intended for use in a professional environment. The device is not intended for use by children or persons with reduced physical, sensory or mental capabilities, or lack of experience and knowledge, unless they have been given supervision or instruction concerning use of the appliance by a person responsible for their safety.
Welcome to Philips Sonicare! Thank you for your purchase and welcome to the Philips Sonicare family! To get the full benefit of Sonicare's advanced technology, please read this user manual carefully. This Sonicare toothbrush is intended for personal use and comes with a two-year warranty. For support, visit www.philips.com/support
www.philips.com/support
Clean White Gum Care
BrushSync technology detects your brush head type and wear, so you always get the best cleaning and gum care. The brush head replacement reminder lets you know when it's time to replace your brush head. BrushSync technology detects: - Your brush head type and pairs it with the optimal brushing mode for your Philips Sonicare handle. To purchase replacement brush heads, visit www.philips.com/toothbrush-heads.
To get the most out of your Sonicare toothbrush, follow the instructions in this manual. The toothbrush is designed for personal oral care. If you have any questions, contact our customer service. Note: Do not use the toothbrush if the charger or charging base is damaged.
Quadpacer
| EasyStart 5s3m0n1b0s3s3n1s3dmb3mn1s3g1s6bd3gbl6bd2s | 86mm0n1s3g3s6bd0n1s3b6lmm0n | ||
| 3 6s3s4cg 5 6s3s4cg 7 6s3s4cg | |||
| ↓ ↓ ↓ | |||
| 6s0ntn 3: s0d3nn bgm0n hsm0z5/3sdm0n3n5 mnms3n, hm3s gngmbgdom: | |||
| 1 1ng6s0nn 1 1ng6s0nn cs0dbd0j3 jnmj3 2 1ng6s0nn | 1 1ng6s0nn, 2 1ng6s0nn cs0 dbd0j3 jnmj3 3 1ng6s0nn | ||
| ↓ ↓ ↓ | |||
 |  | 0y qsn6sbszn, fmd dsfu6m0nl dsbn6bd0j0nn cs ts3m0n1b0s3s3n1s3s3s3m0ndn1s3dbd0j6bd0j0nn bsmyfns 2-tgm y3nd3nd0s ds3s6gm cs gngmbgdom 3, csds0nn fm6n0s6 dsmm0n3g6 dm6s3m0g bd5, dsdn6, gy6dju0s gssdf0ny6d0j0nn. | |
| s6 | |||
 |  | 0y qsn6sbszn, fmd dsfu6m0nl dsbn6bd0j0nn cs ts3m0n1b0s3s3n1s3s3s3m0ndn1s3nd0s smn6m0n cs gngmbgdom 3, dsms0nn fm6n0s6 csds0n3g6 dm6s3m0g bd5, dsdn6, gy6dju0s gy6df0ny6d0j0nn. | |
UV sanitizer
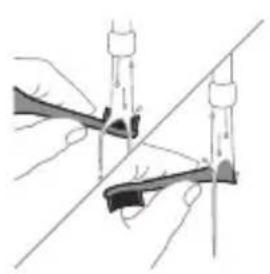
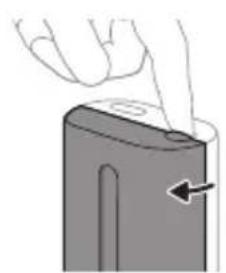
Note: Do not immerse the handle in water or any other liquid. Do not place the handle in the dishwasher. The UV sanitizer may emit a slight odor during use. Note: Keep the sanitizer away from heat sources and direct sunlight. Do not operate the sanitizer without the lid closed.
Battery status: The battery indicator light shows the charging status. When the battery is low, the indicator will blink.
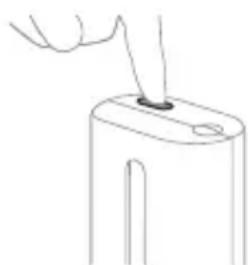
Modification of the first step in a program, which is not possible to be completed.
Modification of the following text:
www.philips.com/support
1
2
BrushSync
website www.philips.com/toothbrush-heads
3
1
un
.הכלה 1
4
www.philips.com/Sonicare
©2024 Koninklijke Philips N.V. (KPNV). All rights reserved. Philips and the Philips shield are trademarks of KPNV. Sonicare and the Sonicare logo are trademarks of Philips Oral Healthcare, LLC and/or KPNV.
300008527982 (20/08/2024)



- INTRODUCTION
- IMPORTANT SAFETY INFORMATION
- WARNINGS
- MEDICAL WARNINGS
- BATTERY SAFETY INSTRUCTIONS
- STORAGE AND TRANSPORTATION CONDITIONS
- ELECTROMAGNETIC FIELDS (EMF)
- RADIO EQUIPMENT DIRECTIVE
- WWW.PHILIPS.COM/SUPPORT
- INTENDED USE
- YOUR PHILIPS SONICARE (FIG 1.)
- ACCESSORIES
- GETTING STARTED
- USING YOUR PHILIPS SONICARE TOOTHBRUSH
- BRUSHING INSTRUCTIONS
- QUADPACER
- MODES
- BRUSHSYNC TECHNOLOGY
- FEATURES
- PRESSURE SENSOR FEEDBACK
- BRUSH HEAD REPLACEMENT REMINDER
- EASYSTART
- DISCLAIMER
- SMARTIMER
- ACTIVATING OR DEACTIVATING FEATURES
- OR
- UV SANITIZER
- CHARGING AND BATTERY STATUS
- CHARGING
- CHARGING ON CHARGER OR UV SANITIZER
- BATTERY STATUS
- BATTERY STATUS (HANDLE ON PLUGGED-IN CHARGER)
- BATTERY STATUS (WHEN HANDLE IS NOT PLACED ON CHARGER)
- CLEANING
- TOOTHBRUSH HANDLE
- BRUSH HEAD
- CHARGER
- TRAVEL CASE
- CLEANING THE SANITIZER
- ENGLISH
- STORAGE
- REPLACEMENT
- LOCATING THE MODEL NUMBER
- WARRANTY AND SUPPORT
- WARRANTY EXCLUSIONS
- RECYCLING
- REMOVING THE RECHARGEABLE BATTERY
- PRODUCT FEATURES
- CHARGING ON THE CHARGER OR IN THE UV SANITIZER
- BATTERY STATUS (HANDLE ON CONNECTED CHARGER)
- ITALIANO
- CHARGING ON CHARGER OR UV CLEANER
- CHARGING IN CHARGER OR UV CLEANER
- USING YOUR PHILIPS SONICARE TOOTHPASTE
- CHARGING WITH THE CHARGER OR ULTRAVIOLET SANITIZER
- BATTERY STATUS (WHEN NOT PLACED ON THE CHARGER)
- CHARGING DEVICE
- CHARGING ON THE CHARGER OR ON THE UV SANITIZER
- CHARGING IN THE CHARGER OR IN THE UV SANITIZER
- NTCHUTN
- BRUSHSYNC UNTHUÜNQHW
- NΡΔΩΝΗΓΡΕΎΤΗ
- PROGRAMMABLE AND NON-PROGRAMMABLE OPERATION
- INSTALLATION INSTRUCTIONS
- INSTALLATION INSTRUCTIONS (FOR QUALIFIED ELECTRICIANS ONLY)
- DESCRIPTION
- THE DEVICE IS INTENDED FOR USE
- LHGPWQNNHZ
- اللهمني
- ΦNĦUĦPHĦUNI
- HÙWǑU QÚNǓL ÚNNTǏH HUÒWÙN
- WARNING
- WWW.PHILIPS.COM/SUPPORT §
- BRUSHSYNC
Brand : PHILIPS
Model : Sonicare ProtectiveClean 4500
Category : Electric toothbrush