
POWX1347MC - Multitools PowerPlus - Free user manual and instructions
Find the device manual for free POWX1347MC PowerPlus in PDF.
| Product type | Electric multi-function tool |
| Brand | PowerPlus |
| Model | POWX1347MC |
| Supply voltage | 220-240 V |
| Frequency | 50 Hz |
| Power | 300 W |
| No-load speed | 15 000 - 22 000 min⁻¹ |
| Sound pressure level | 81 dB(A) |
| Sound power level | 92 dB(A) |
| Vibration level | 3 m/s² |
| Protection class | II (double isolation) |
| Power supply | Mains (with cable) |
| Functions | Sawing, sanding, scraping, polishing, cutting, stripping |
| Included accessories | Saw blades (1.0 / 2.0 / 3.2 / 6.5 cm), wood segment blade 8.5 cm, carbide segment blade 9.3 cm, carbide blade 3.2 cm, scraping blade 5.2 cm, triangular sanding pad, sanding finger, abrasive papers (grits 120/180/240), extraction hose, lateral handle |
| Weight | Approx. 1.5 kg |
| Dimensions (L x W x H) | Approx. 30 x 10 x 10 cm |
| Maintenance | Clean with a soft cloth and soapy water; do not use solvents; clean ventilation slots |
| Safety | Wear safety goggles, ear protection and gloves; do not use outdoors in the rain |
| Warranty | 36 months |
| Spare parts and repairability | Available via authorized service center; repairs by qualified personnel only |
Frequently Asked Questions - POWX1347MC PowerPlus
User questions about POWX1347MC PowerPlus
0 question about this device. Answer the ones you know or ask your own.
Ask a new question about this device
Download the instructions for your Multitools in PDF format for free! Find your manual POWX1347MC - PowerPlus and take your electronic device back in hand. On this page are published all the documents necessary for the use of your device. POWX1347MC by PowerPlus.
USER MANUAL POWX1347MC PowerPlus
natural_image
Yellow POWERPLUS power amplifier with black and silver casing (no visible text or symbols on body)
NL NEDERLANDS VERTAALDE VERSIE VAN DE ORIGINELE HANDLEIDING
FR FRANÇAIS TRADUCTION DU MODE D'EMPLOI D'ORIGINE
EN ENGLISH ORIGINAL INSTRUCTION MANUAL
Fig A

natural_image
Close-up of a hand using a yellow and black power tool to cut the blade, with additional tools partially visible (no text or symbols)Fig 1

Fig 2

Fig 3

Fig 4

natural_image
Top-down view of a yellow and black power tool with labeled parts (0 and 1), no readable text or symbols beyond measurement indicators.Fig 5
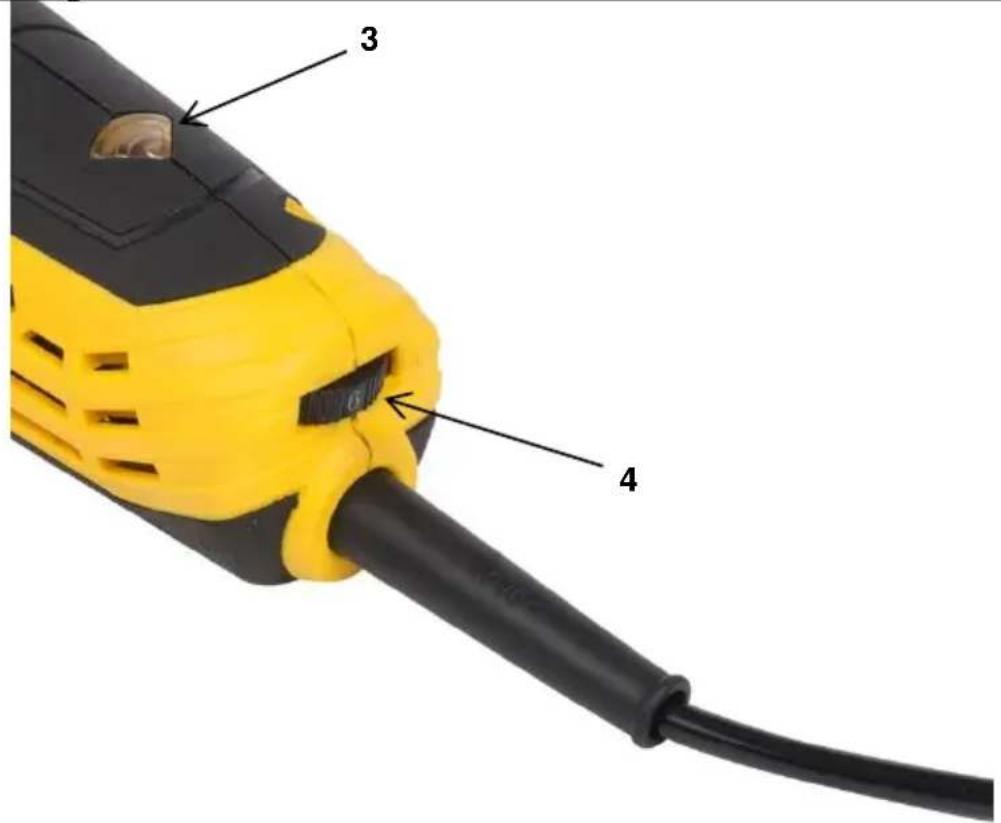
Fig 6

A.

natural_image
Close-up of a black powerplush tool with symmetrical cutouts (no text or symbols visible)B.

natural_image
Close-up of a black powerbrush with white decorative cutouts (no text or symbols visible)C.

natural_image
Black powerbrush blade with white decorative cutouts (no text or symbols visible)D.
E.

natural_image
Close-up of a black wood or plastic metal saw blade with teeth pattern (no text or symbols visible)F.

G.

H.

natural_image
Black and white product image of a powerplus device with decorative cutouts (no readable text or symbols)
natural_image
Black triangular mechanical component with a central oval and multiple holes (no text or symbols visible)1.

natural_image
Triangular brown surface with five evenly spaced circular holes (no text or symbols)J.
K.

natural_image
Close-up of a metallic cutting tool with a pointed blade and curved base (no text or symbols visible)L.

natural_image
Solid maroon triangular shape with no text or symbolsFig 7
1 TOEPASSING 2
2 BESCHRIJVING (FIG. A – FIG. 7)......2
3 INHOUD VAN DE VERPAKKING....2
4 TOELICHTING VAN DE SYMBOLEN 3
5 ALGEMENE VEILIGHEIDSVOORSCHRIFTEN ....3
5.1 Werkplaats ....3
5.2 Elektrische veiligheid....3
5.3 Veiligheid van personen....4
5.4 Zorgvuldige omgang met en gebruik van elektrisch gereedschap ....4
5.5 Service....5
6 GEREEDSCHAPSPECIFIEKE VEILIGHEIDSVOORSCHRIFTEN 5
7 ASSEMBLAGE 5
7.1 Aanbrengen van de schuurplaat/zaagblad/schaafblad (Fig. 1)....5
7.2 Aanbrengen/vervangen van het schuurpapier....6
7.3 Monteren van de stofafzuiging (Fig. 4)....6
8 GEBRUIK 6
8.1 IN-/UITschakelen (Fig. 5)....6
8.2 De snelheid regelen (Fig. 6)....6
8.3 Toepassingstips 7
8.3.1 Inzetgereedschap kiezen....7
8.3.2 Zagen....7
8.3.3 Schuren....7
8.3.4 Afkrabben....8
9 REINIGING EN ONDERHOUD 8
10 TECHNISCHE GEGEVENS 8
11 GELUID 8
12 GARANTIE 9
13 MILIEU....9
14 CONFORMITEITSVERKLARING....10
MULTIFUNCTIONEEL GEREEDSCHAP 300 W POWX1347MC
1 TOEPASSING
2 BESCHRIJVING (FIG. A - FIG. 7)
Certification Manager
10/03/2021, Lier - Belgium
14 DÉCLARATION DE CONFORMITÉ


VARO N.V. -- Vic. Van Rompuy N.V. Joseph Van Instraat 9 - BE2500 Lier - BELGIQUE, déclare que :
10/03/2021, Lier - Belgium
1 APPLICATION 2
2 DESCRIPTION (FIG. A - FIG. 7) ...... 2
3 PACKAGE CONTENT LIST....2
4 SYMBOLS....3
5 GENERAL POWER TOOL SAFETY WARNINGS....3
5.1 Working area....3
5.2 Electrical safety 3
5.3 Personal safety....3
5.4 Power tool use and care....4
5.5 Service....4
6 MACHINE-SPECIFIC SAFETY WARNINGS....4
7 ASSEMBLY 5
7.1 Mounting sanding plate/ saw blade/ spatula (Fig. 1)....5
7.2 Mounting/changing the sand paper....5
7.3 Mounting dust extraction (Fig. 4)....6
8 OPERATION....6
8.1 Switching ON/OFF (Fig. 5)....6
8.2 Speed adjusting (Fig. 6)....6
8.3 Application tips....6
8.3.1 Selecting the Application Tool/Accessory....6
8.3.2 Sawing....7
8.3.3 Sanding....7
8.3.4 Scraping....7
9 CLEANING AND MAINTENANCE 7
10 TECHNICAL DETAILS....8
11 NOISE....8
12 WARRANTY....8
13 ENVIRONMENT 9
14 DECLARATION OF CONFORMITY 9
MULTI-USE TOOL 300 W
POWX1347MC
1 APPLICATION
Depending on which accessory mounted this power tool is intended for dry sanding small areas and for sawing, scraping polishing, rasping, cutting and separating.

WARNING! Read this manual and general safety instructions carefully before using the appliance, for your own safety. Your power tool should only be passed on together with these instructions.
2 DESCRIPTION (FIG. A - FIG. 7)
- Quick release lever
- On/Off switch
- Power-on led
- Speed dial
- Vent holes
-
Saw blade
-
Quick release clamp
- Locating pins
- Cover clamp
- Dust adaptor
- Dust pipe
- Sanding plate
3 PACKAGE CONTENT LIST
■ Remove all packaging materials.
- Remove remaining packing and package inserts (if included).
- Check that the package contents are complete.
- Check the appliance, the power cord, the power plug and all accessories for transportation damage.
- Keep the packing materials as far as possible till the end of the warranty period. Dispose it into your local waste disposal system afterwards.

WARNING: Packaging materials are not toys! Children must not play with plastic bags! Danger of suffocation!
1 x multi-use tool
1 x sanding plate
1 x finger-sanding plate
12 x 3" sanding papers
4 x grain 120
4 x grain 180
4 x grain 240
12 x 2" sanding papers
4 x grain 120
4 x grain 180
4 x grain 240
1 x 3,2cm saw blade
1 x 6,5cm saw blade
1 x 2,0cm saw blade
1 x 1.0cm saw blade
1 x 9,3cm carbide segment blade
1 x 3,2cm carbide blade
1 x 5;2cm scraping blade
1 x 8,5cm segment blade wood
1 x vacuum pipe
1 x vacuum attachment
1 x side handle
1 x manual

If any parts are missing or damaged, please contact your dealer.
4 SYMBOLS
In this manual and/or on the machine the following symbols are used:
 | Denotes risk of personal injury or damage to the tool. |  | Wear ear guards and goggles. |
 | |||
 | Read manual before use. |  | Wear gloves. |
 | In accordance with essential requirements of the European directive(s). |  | Class II - The machine is double insulated; Earthing wire is therefore not necessary. |
5 GENERAL POWER TOOL SAFETY WARNINGS
Read all safety warnings and instructions. Failure to heed warnings and follow instructions may result in electric shock, fire and/or serious injury. Keep safety warnings and instructions for future reference. The term "power tool" in the safety warnings refers to your mains-operated (corded) power tool or battery-operated (cordless) power tool.
5.1 Working area
- Keep working area clean and well lit. Untidy and dark areas can lead to accidents.
- Do not operate power tools in potentially explosive surroundings, for example, in the presence of inflammable liquids, gases or dust. Power tools create sparks which may ignite the dust or fumes.
- Keep children and bystanders at a distance when operating a power tool. Distractions can cause you to lose control of it.
5.2 Electrical safety
- Always check that the power supply corresponds to the voltage on the rating plate.
- Power tool plugs must match the outlet. Never modify the plug in any way. Do not use adapter plugs with earthed power tools. Unmodified plugs and matching outlets will reduce the risk of an electric shock.
- Avoid body contact with earthed surfaces such as pipes, radiators, kitchen ranges and refrigerators. There is an increased risk of an electric shock if your body is earthed.
- Do not expose power tools to rain or wet conditions. If water gets inside a power tool, it will increase the risk of an electric shock.
- Do not damage the cord. Never use the cord for carrying, pulling or unplugging the power tool. Keep the cord away from heat, oil, sharp edges or moving parts. Damaged or entangled cords increase the risk of an electric shock.
- When operating a power tool outdoors, use an extension cable suitable for outdoor use. Using a cord suitable for outdoor use reduces the risk of an electric shock.
- If operating a power tool in a damp location is unavoidable, use a power supply protected by a residual current device (RCD). Using an RCD reduces the risk of an electric shock.
5.3 Personal safety
- Stay alert, watch what you are doing and use common sense when operating a power tool. Do not use a power tool when you are tired or under the influence of drugs, alcohol or medication. A moment of inattention when operating a power tool may result in serious personal injury.
- Use safety equipment. Always wear eye protection. Using safety equipment such as a dust mask, non-skid safety shoes, a hard hat, or hearing protection whenever it is needed will reduce the risk of personal injury.
- Avoid accidental starts. Ensure the switch is in the off position before inserting the plug. Carrying power tools with your finger on the switch or plugging in power tools when the switch is in the on position makes accidents more likely.
- Remove any adjusting keys or spanners before turning on the power tool. A spanner or key left attached to a rotating part of the power tool may result in personal injury.
- Do not reach out too far. Keep your feet firmly on the ground at all times. This will enable you retain control over the power tool in unexpected situations.
- Dress properly. Do not wear loose clothing or jewellery. Keep your hair, clothing and gloves away from the power tool. Loose clothes, jewellery or long hair can become entangled in the moving parts.
- If there are devices for connecting dust extraction and collection facilities, please ensure that they are attached and used correctly. Using such devices can reduce dust-related hazards.
5.4 Power tool use and care
- Do not expect the power tool to do more than it can. Use the correct power tool for what you want to do. A power tool will achieve better results and be safer if used in the context for which it was designed.
- Do not use the power tool if the switch cannot turn it on and off. A power tool with a broken switch is dangerous and must be repaired.
- Disconnect the plug from the power source before making adjustments, changing accessories, or storing power tools. Such preventive safety measures reduce the risk of starting the power tool accidentally.
- Store power tools, when not in use, out of the reach of children and do not allow people who are not familiar with the power tool or these instructions to operate it. Power tools are potentially dangerous in the hands of untrained users.
- Maintain power tools. Check for misalignment or jammed moving parts, breakages or any other feature that might affect the operation of the power tool. If it is damaged, the power tool must be repaired. Many accidents are caused by using poorly maintained power tools.
- Keep cutting tools sharp and clean. Properly maintained cutting tools with sharp cutting edges are less likely to jam and are easier to control.
- Use the power tool, accessories and cutting tools, etc., in accordance with these instructions and in the manner intended for the particular type of power tool, taking into account the working conditions and the work which needs to be done. Using a power tool in ways for which it was not intended can lead to potentially hazardous situations.
5.5 Service
- Your power tool should be serviced by a qualified specialist using only standard spare parts. This will ensure that it meets the required safety standards.
6 MACHINE-SPECIFIC SAFETY WARNINGS
- Use the machine only for dry sanding. Penetration of water into the machine increases the risk of an electric shock.
- Keep hands away from the sawing range. Do not reach under the workpiece. Contact with the saw blade can lead to injuries.
- Use suitable detectors to determine if utility lines are hidden in the work area or call the local utility company for assistance. Contact with electric lines can lead to fire and electric shock. Damaging a gas line can lead to explosion. Penetrating a water line causes property damage or may cause an electric shock.
- When working with the machine, always hold it firmly with both hands and provide for a secure stance. The power tool is guided more secure with both hands.
POWX1347MC EN
- Secure the workpiece. A workpiece clamped with clamping devices or in a vice is held more secure than by hand.
- Do not use the machine when the quick release lever is not tightened.
- Keep your workplace clean. Blends of materials are particularly dangerous. Dust from light alloys can burn or explode.
■ Wear protective gloves when changing application tools/accessories.
■ Application tools/ accessories become hot after prolonged usage. - Do not scrape wetted materials (e. g. wallpaper) or on moist surfaces. Penetration of water into the machine increases the risk of an electric shock.
- Do not treat the surface to be worked with solvent-containing fluids. Materials being warmed up by the scraping can cause toxic vapours to develop.
- Exercise extreme caution when handling the scraper. The accessory is very sharp; danger of injury.
7 ASSEMBLY

WARNING: Always check that the power supply corresponds to the voltage on the rating name plate. Remove the power tool from the packaging. Do not plug it into the electrical grid before assembly.
7.1 Mounting sanding plate/ saw blade/ spatula (Fig. 1)

WARNING: Prior to assembly and adjustment always pull out the power plug from the mains socket.
Take care with sharp tools such as spatulas, saw blades or cutting blades.
1 Loosen the quick release clamp (7) by pulling the quick-release lever (1) completely open.
2. Spin the quick release lever anti-clock wise until the clamping plate is lose.
3 Put the quick-install saw blade, sanding plate or spatula toward the output spindle which is situated between the cover clamp (9) and quick release clamp (7). Push the accessory in and place it firmly onto the locating pins (8). Pay attention that the clamping plate is placed well into the holder of the machine, otherwise you cannot spin the quick release lever.
4 Fasten using the quick-release lever (1), spin it in a clockwise direction to fasten the clamping plate and accessory.
5. Check if the quick release lever is tightened enough.
6 Pull the quick release lever down and spin it until it is right above the holder.
7 Push the quick release lever into the holder.
8 Remove the accessory in the opposite way

WARNING: This tool is equipped with quick-install accessories during operating; do not use any unmatched accessories.

WARNING: Check the tight seating of the application tool/accessory. Incorrect or not securely fastened application tools/accessories can come loose during operation and pose a hazard.
7.2 Mounting/changing the sand paper
With fast hook and quick release system.
■ Position the sand paper and press by hand.
- Press on the sand paper by giving it a short, firm push against the flat surface of sanding plate (12) and switch on the power tool.
- This ensures good adhesion and prevents premature wear.
- If the point has become worn, pull off the sand paper, turn it through 120^ and place it on again, or change the sanding paper.
7.3 Mounting dust extraction (Fig. 4)
Take the dust adaptor (10) and screw it on the bottom part of the machine. Keep in mind that the screw has to be on the bottom part of the dust adaptor, this way you can screw it nice and gently in the screw hole. After this piece is mounted on the machine, you can attach the dust pipe (11) on the dust adaptor. Give the pipe a firm push. You can always adjust the direction of the pipe by moving it a bit in the desired direction.
8 OPERATION
8.1 Switching ON/OFF (Fig. 5)
First check that the cable and plug are not damaged.
- Connect the plug to the power supply.
- Switching the power tool ON: slide ON/OFF switch button (2) forward onto position (1).
- Switching the power tool OFF: slide ON/OFF switch button backward onto position (O).
8.2 Speed adjusting (Fig. 6)
The tool can be set at 6-speed adjustment positions. The "1" position indicates the lowest and the "6" position indicates the highest speed, you can adjust different speed by turning the speed control dial (4) from "1" to "6" position. The operator may have to vary the speed to optimize working efficiency.
8.3 Application tips
8.3.1 Selecting the Application Tool/Accessory
| Accessory (Fig 7) | Material |
| A: 3,2cm saw blade | Wooden materials, plastic, metal, gypsum and other soft materials. |
| B: 6,5cm saw blade | Wooden materials, plastic, metal, gypsum and other soft materials. |
| C: 2,0cm saw blade | Wooden materials, plastic, metal, gypsum and other soft materials. |
| D: 1,0cm small saw blade | Wooden materials, plastic, metal, gypsum and other soft materials. |
| E: 8,5cm Segment blade | Wooden materials, plastic, metal, gypsum and other soft materials. |
| F: 5,2cm Scraping blade | Suitable for the removal of paint and carpet. |
| G: 9,3cm Carbide segment blade | Cuts grooves in drywall, plaster, lightweight concrete and similar materials |
| H: 3,2cm Carbide blade | Cuts grooves in drywall, plaster, lightweight concrete and similar materials |
| I: Triangular sanding pad | Sanding pad for 90x90x90 sized sanding papers. |
| J: Triangular sanding papers | Sanding papers in different grains:• 120• 180• 240 |
| K: Finger sanding pad | Sanding pad for finger sanding papers. |
| L: Finger sanding papers | Finger sanding papers in different grains: |
• 120
• 180
• 240
8.3.2 Sawing

Use undamaged faultless saw blades only. Deformed, blunt saw blades or saw blades that are otherwise damaged can break.
Plunge cuts may only be applied to soft materials, such as wood, gypsum plaster boards, etc.!
Before sawing with saw blades in wood, particle board, building materials, etc., check these for foreign objects such as nails, screws, or similar. If required, remove foreign objects or use saw blades for metal.
8.3.3 Sanding
The removal rate and the sanding pattern are primarily determined by the choice of sanding sheet, the pre-set oscillation rate and the applied pressure.
Only flawless sanding sheets achieve good sanding capacity and extend the service life of the machine.
Pay attention to apply uniform sanding pressure; this increases the working life of the sanding sheets.
Intensifying the sanding pressure does not lead to an increase of the sanding capacity, but to increased wear of the machine and the sanding sheet.
For precise on-the-spot sanding of edges, corners and hard to reach areas, it is also possible to work with the finger sanding pad.
When selectively sanding on the spot, the sanding sheet can heat up considerably. Reduce the orbital stroke rate and allow the sanding sheet to cool down regularly.
A sanding sheet that has been used for metal should not be used for other materials.
8.3.4 Scraping
For scraping, select a high oscillation rate.
Work on a soft surface (e.g. wood) at a flat angle and apply only light pressure. Otherwise the scraper can cut into the surface.
9 CLEANING AND MAINTENANCE

Before performing any work on the equipment, pull the power plug.
- Keep the ventilation slots of the machine clean to prevent overheating of the engine.
- Regularly clean the machine housing with a soft cloth, preferably after each use.
- Keep the ventilation slots free from dust and dirt.
- If the dirt does not come off use a soft cloth moistened with soapy water.
- Never use solvents such as petrol, alcohol, ammonia water, etc. These solvents may damage the plastic parts.

Make sure no water can reach the inside of the power tool!
10 TECHNICAL DETAILS
| Model nr. | POWX1347MC |
| Voltage | 220-240 V |
| Mains frequency | 50 Hz |
| Power | 300 W |
| No load speed | 15000-22000 /min-1 |
11 NOISE
Noise emission values measured according to relevant standard. (K=3)
Acoustic pressure level LpA 81 dB(A)
Acoustic power level LwA 92 dB(A)

ATTENTION! Wear hearing protection when sound pressure is over 85 dB(A).
aw (Vibration)
3 m/s²
K = 1,5 ~m / s^2
12 WARRANTY
- This product is warranted for a 36-month period effective from the date of purchase by the first user.
- This warranty covers all material or production flaws excluding : batteries, chargers, defective parts subject to normal wear & tear such as bearings, brushes, cables, and plugs, or accessories such as drills, drill bits, saw blades, etc. ; damage or defects resulting from maltreatment, accidents or alterations; nor the cost of transportation.
- Damage and/or defects resulting from inappropriate use also do not fall under the warranty provisions.
- We also disclaim all liability for any bodily injury resulting from inappropriate use of the tool.
- Repairs may only be carried out by an authorised customer service centre for Powerplus tools.
- You can always obtain more information at the number 00 32 3 292 92 90.
- Any transportation costs shall always be borne by the customer, unless agreed otherwise in writing.
- At the same time, no claim can be made on the warranty if the damage of the device is the result of negligent maintenance or overload.
- Definitely excluded from the warranty is damage resulting from fluid permeation, excessive dust penetration, intentional damage (on purpose or by gross carelessness), inappropriate usage (use for purposes for which the device is not suitable), incompetent usage (e.g. not following the instructions given in the manual), inexpert assembly, lightning strike, erroneous net voltage. This list is not exhaustive.
- Acceptance of claims under warranty can never lead to the prolongation of the warranty period nor commencement of a new warranty period in case of a device replacement.
- Devices or parts which are replaced under the warranty therefore remain the property of Varo NV.
- We reserve the right to reject a claim whenever the purchase cannot be verified or when it is clear that the product has not been properly maintained. (Clean ventilation slots, carbon brushes serviced regularly, etc.).
- Your purchase receipt must be kept as proof of date of purchase.
- Your appliance must be returned undismantled to your dealer in an acceptably clean state, (in its original blow-moulded case if applicable to the unit), accompanied by proof of purchase.
13 ENVIRONMENT

Should your appliance need replacement after extended use, do not dispose of it with the household refuse, but in an environmentally safe way. Waste produced by electrical machine items should not be handled like normal household rubbish. Please recycle where recycle facilities exist. Check with your Local Authority or retailer for recycling advice.
14 DECLARATION OF CONFORMITY


VARO N.V. -- Vic. Van Rompuy N.V. Joseph Van Instraat 9 - BE2500 Lier - BELGIUM, declares that,
Product: Multi-use tool Trade mark: POWERplus Model: POWX1347MC
is in conformity with the essential requirements and other relevant provisions of the applicable European Directives, based on the application of European harmonized standards. Any unauthorized modification of the apparatus voids this declaration.
European Directives (including, if applicable, their amendments up to the date of signature):
2011/65/EU 2006/42/EC 2014/30/EU
European harmonized standards (including, if applicable, their amendments up to the date of signature):
EN62841-1:2015
EN62841-2-4:2014
EN55014-1:2017
EN55014-2:2015
EN61000-3-2:2014
EN61000-3-3:2013
Keeper of the Technical Documentation: Philippe Vankerkhove, VARO – Vic. Van Rompuy N.V.
The undersigned acts on behalf of the company CEO,
Mertens Ludo
Ludo Mertens
Certification Manager
10/03/2021, Lier - Belgium
1 EINSATZBEREICH 2
10/03/2021, Lier - Belgium
1 APLICACIÓN 2
2 DESCRIPCIÓN (FIG. A-FIG. 7)......2
Certification Manager
10/03/2021, Lier - Belgium
10/03/2021, Lier - Belgium
1 BRUKSOMRÅDE....2
2 BESKRIVELSE (FIG. A - FIG.7) 2
3 PAKKENS INNHOLD 2
4 SYMBOLFORKLARING ....3
5 GENERELLE SIKKERHETSADVARSLER....3
5.1 Arbeidsplassen....3
5.2 Elektrisk sikkerhet....3
5.3 Personsikkerhet....3
5.4 Vær nøyaktig og omhyggelig når du omgås elektroverktøy....4
5.5 Service....4
6 MASKINAVHENGIG SIKKERHETSINFORMASJON ....4
7 MONTERING....5
7.1 Montere slipeplate/sagblad/spatel (Fig. 1)....5
7.2 Montere/skifte slipepapir (Fig. 2)....6
7.3 Montere støvavtrekk (Fig. 4)....6
8 BRUK....6
8.1 Slå PÅ/AV (Fig. 5)....6
8.2 Hastighetsjustering (Fig. 6)....6
8.3 Tips om bruken....6
8.3.1 Valg av innsatsverktøy....6
8.3.2 Saging 7
8.3.3 Sliping....7
8.3.4 Skraping....7
9 RENGJ∅RING OG VEDLIKEHOLD 7
10 TEKNISKE DATA....8
11 ST∅Y 8
12 GARANTI....8
13 MILJ∅ 8
14 SAMSVARSERKLÆRING....9
300 W MULTIVERKT∅Y
POWX1347MC
1 BRUKSOMRÅDE
7 Skvv hurtigspaken inn i holderen.
10/03/2021, Lier - Belgium
Regulatory Affairs (afdelingen for juridiske anliggender) – Compliance Manager 10/03/2021, Lier - Belgium
1 ANVÄNDNINGSOMRÅDE 2
2 BESKRIVNING (FIG. A – FIG. 7)......2
3 FÖRPACKNINGSINNEHÅLL 2
4 SYMBOLER....3
5 ALLMÄNNA SÄKERHETSANVISNINGAR FÖR ELEKTRISKA VERKTYG....3
3 FÖRPACKNINGSINNEHÅLL
10/03/2021, Lier - Belgium
1 ΕΦΑΡΜΟΓΗ....3
2 ПЕРИГРАФН (ЕИК. А – ЕИК.7)......3
10/03/2021, Lier - Belgium
1 PRIMJENA 2
2 OPIS (SL. A – SL. 7)....2
3 POPIS SADRŽAJA PAKETA 2
4 SIMBOLI 3
5 OPĆA UPOZORENJA O SIGURNOSTI RUKOVANJA ELEKTRIČNIM ALATIMA....3
10/03/2021, Lier - Belgium
1 PRIMENE....2
2 OPIS (SL. A - SL.7) 2
3 SPISAK SADRŽAJA PAKOVANJA 2
4 SIMBOLI 3
5 OPŠTA BEZBEDNOSNA UPUTSTVA ZA ELEKTRIČNE ALATE 3
5.1 Radna oblast....3
5.2 Električna bezbednost....3
5.3 Lična bezbednost ....4
5.4 Korišćenje i održavanje električnog alata 4
5.5 Servisiranje 4
6 SIGURNOSNA UPUTSTVA SPECIFIČNA ZA APARATE....5
7 SKLAPANJE 5
7.1 Postavljanje brusne ploče / lista testere / špahtle (Sl. 1)....5
7.2 Nameštanje/zamena brusnog papira....6
7.3 Montaža uklanjivača prašine (Sl. 4)....6
8 RAD....6
8.1 Uključivanje/isključivanje (Sl. 5)....6
8.2 Podešavanje brzine (Sl. 6)....6
8.3 Saveti za primenu 7
8.3.1 Biranje upotrebljenog alata/pribora 7
8.3.2 Testerisanje....7
8.3.3 Fino brušenje....8
8.3.4 Čišćenje šaberom....8
9 ČIŠĆENJE I ODRŽAVANJE 8
10 TEHNIČKI PODACI....8
11 BUKA....8
12 GARANCIJA....9
13 ŽIVOTNA SREDINA....9
14 IZJAVA O USKLAĐENOSTI....10
MULTIFUNKCIONALNI ALAT 300W POWX1347MC
1 PRIMENE
10/03/2021, Lier - Belgium
2 POPIS (OBR. A - OBR. 7)....2
3 OBSAH BALENIA....2
4 SYMBOLY 3
5 VŠEOBECNÉ BEZPEČNOSTNÉ VAROVANIA PRE ELEKTRICKÉ NÁRADIE ....3
5.1 Pracovná plocha....3
10/03/2021, Lier - Belgium
1 UPORABA....2
2 OPIS (OD SLIKE A DO 7)....2
3 SEZNAM VSEBINE PAKETA....2
4 SIMBOLI 3
5 SPLOŠNA VARNOSTNA OPOZORILA IN NAVODILA ....3
5.1 Delovno mesto....3
5.2 Električna varnost....3
5.3 Osebna varnost....4
5.4 Uporaba in nega električnega orodja 4
5.5 Servisiranje 4
6 VARNOSTNA OPOZORILA ZA TO NAPRAVO....5
7 SESTAVLJANJE....5
7.1 Namestitev brusne plošča / žaginega lista / lopatice (slika 1) ....5
7.2 Namestitev/menjava brusnega papirja....6
7.3 Namestitev nastavka za odvajanje prahu (slika 4)......6
8 UPORABA....6
8.1 Vklop in izklop (slika 5)....6
8.2 Nastavitev hitrosti (slika 6)....6
8.3 Napotki za uporabo ....7
8.3.1 Izbira orodja/nastavka....7
8.3.2 Žaganje 7
8.3.3 Brušenje 7
8.3.4 Strganje 8
9 ČIŠČENJE IN VZDRŽEVANJE....8
10 TEHNIČNI PODATKI....8
11 HRUP 8
12 GARANCIJA....9
13 OKOLJE 9
14 IZJAVA O SKLADNOSTI....10
VEČNAMENSKO ORODJE, 300 W POWX1347MC
1 UPORABA
To električno orodje je, odvisno od nameščenega nastavka, namenjeno suhemu brušenju majhnih površin, žaganju, strganju, poliranju, brušenju, glajenju, rezanju in ločevanju.

10/03/2021, Lier - Belgium
1 DOMENII DE UTILIZARE....2
2 DOMENII DE UTILIZARE (FIG. A – FIG.7) ...... 2
3 CONTINUTUL PACHETULUI 2
4 SIMBOLURI....3
5 AVERTISMENTE GENERALE DE SIGURANTĂ PRIVIND APARATUL ELECTRIC....3
5.1 Zona de lucru....3
10/03/2021, Lier - Belgium
POWX1347MC PL
10/03/2021, Lier - Belgium
1 ALKALMAZÁS....2
2 LEÍRÁS (A ÁBRA – 7 ÁBRA)....2
3 CSOMAGOLÁS TARTALMA....2
4 JELZÉSEK 3
5 ÁLTALÁNOS BIZTONSÁGI SZABÁLYOK....3
10/03/2021, Lier - Belgium
10/03/2021, Lier - Belgium

natural_image
Yellow and black electric drill bit with handle and screwdriver (no visible text or symbols)
WWW.VARO.COM
DESIGNED AND MARKETED BY VARO
©copyright by varo
VARO - VIC. VAN ROMPUY nv
JOSEPH VAN INSTRAAT 9 - 2500 LIER - BELGIUM
OFFICES:


- GEREEDSCHAPSPECIFIEKE VEILIGHEIDSVOORSCHRIFTEN 5
- MULTIFUNCTIONEEL GEREEDSCHAP 300 W POWX1347MC
- TOEPASSING
- BESCHRIJVING (FIG. A - FIG. 7)
- DÉCLARATION DE CONFORMITÉ
- MULTI-USE TOOL 300 W
- POWX1347MC
- APPLICATION
- DESCRIPTION (FIG. A - FIG. 7)
- PACKAGE CONTENT LIST
- SYMBOLS
- GENERAL POWER TOOL SAFETY WARNINGS
- Working area
- Electrical safety
- Personal safety
- Power tool use and care
- Service
- MACHINE-SPECIFIC SAFETY WARNINGS
- POWX1347MC EN
- ASSEMBLY
- Mounting sanding plate/ saw blade/ spatula (Fig. 1)
- Mounting/changing the sand paper
- Mounting dust extraction (Fig. 4)
- OPERATION
- Switching ON/OFF (Fig. 5)
- Speed adjusting (Fig. 6)
- Application tips
- Sawing
- Sanding
- Scraping
- CLEANING AND MAINTENANCE
- TECHNICAL DETAILS
- NOISE
- ATTENTION! Wear hearing protection when sound pressure is over 85 dB(A).
- WARRANTY
- ENVIRONMENT
- DECLARATION OF CONFORMITY
- W MULTIVERKT∅Y
- BRUKSOMRÅDE
- FÖRPACKNINGSINNEHÅLL
- MULTIFUNKCIONALNI ALAT 300W POWX1347MC
- PRIMENE
- VEČNAMENSKO ORODJE, 300 W POWX1347MC
- UPORABA
- POWX1347MC PL
Brand : PowerPlus
Model : POWX1347MC
Category : Multitools