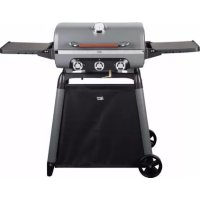
Explorer 6500 - Barbecue Jamie Oliver - Free user manual and instructions
Find the device manual for free Explorer 6500 Jamie Oliver in PDF.

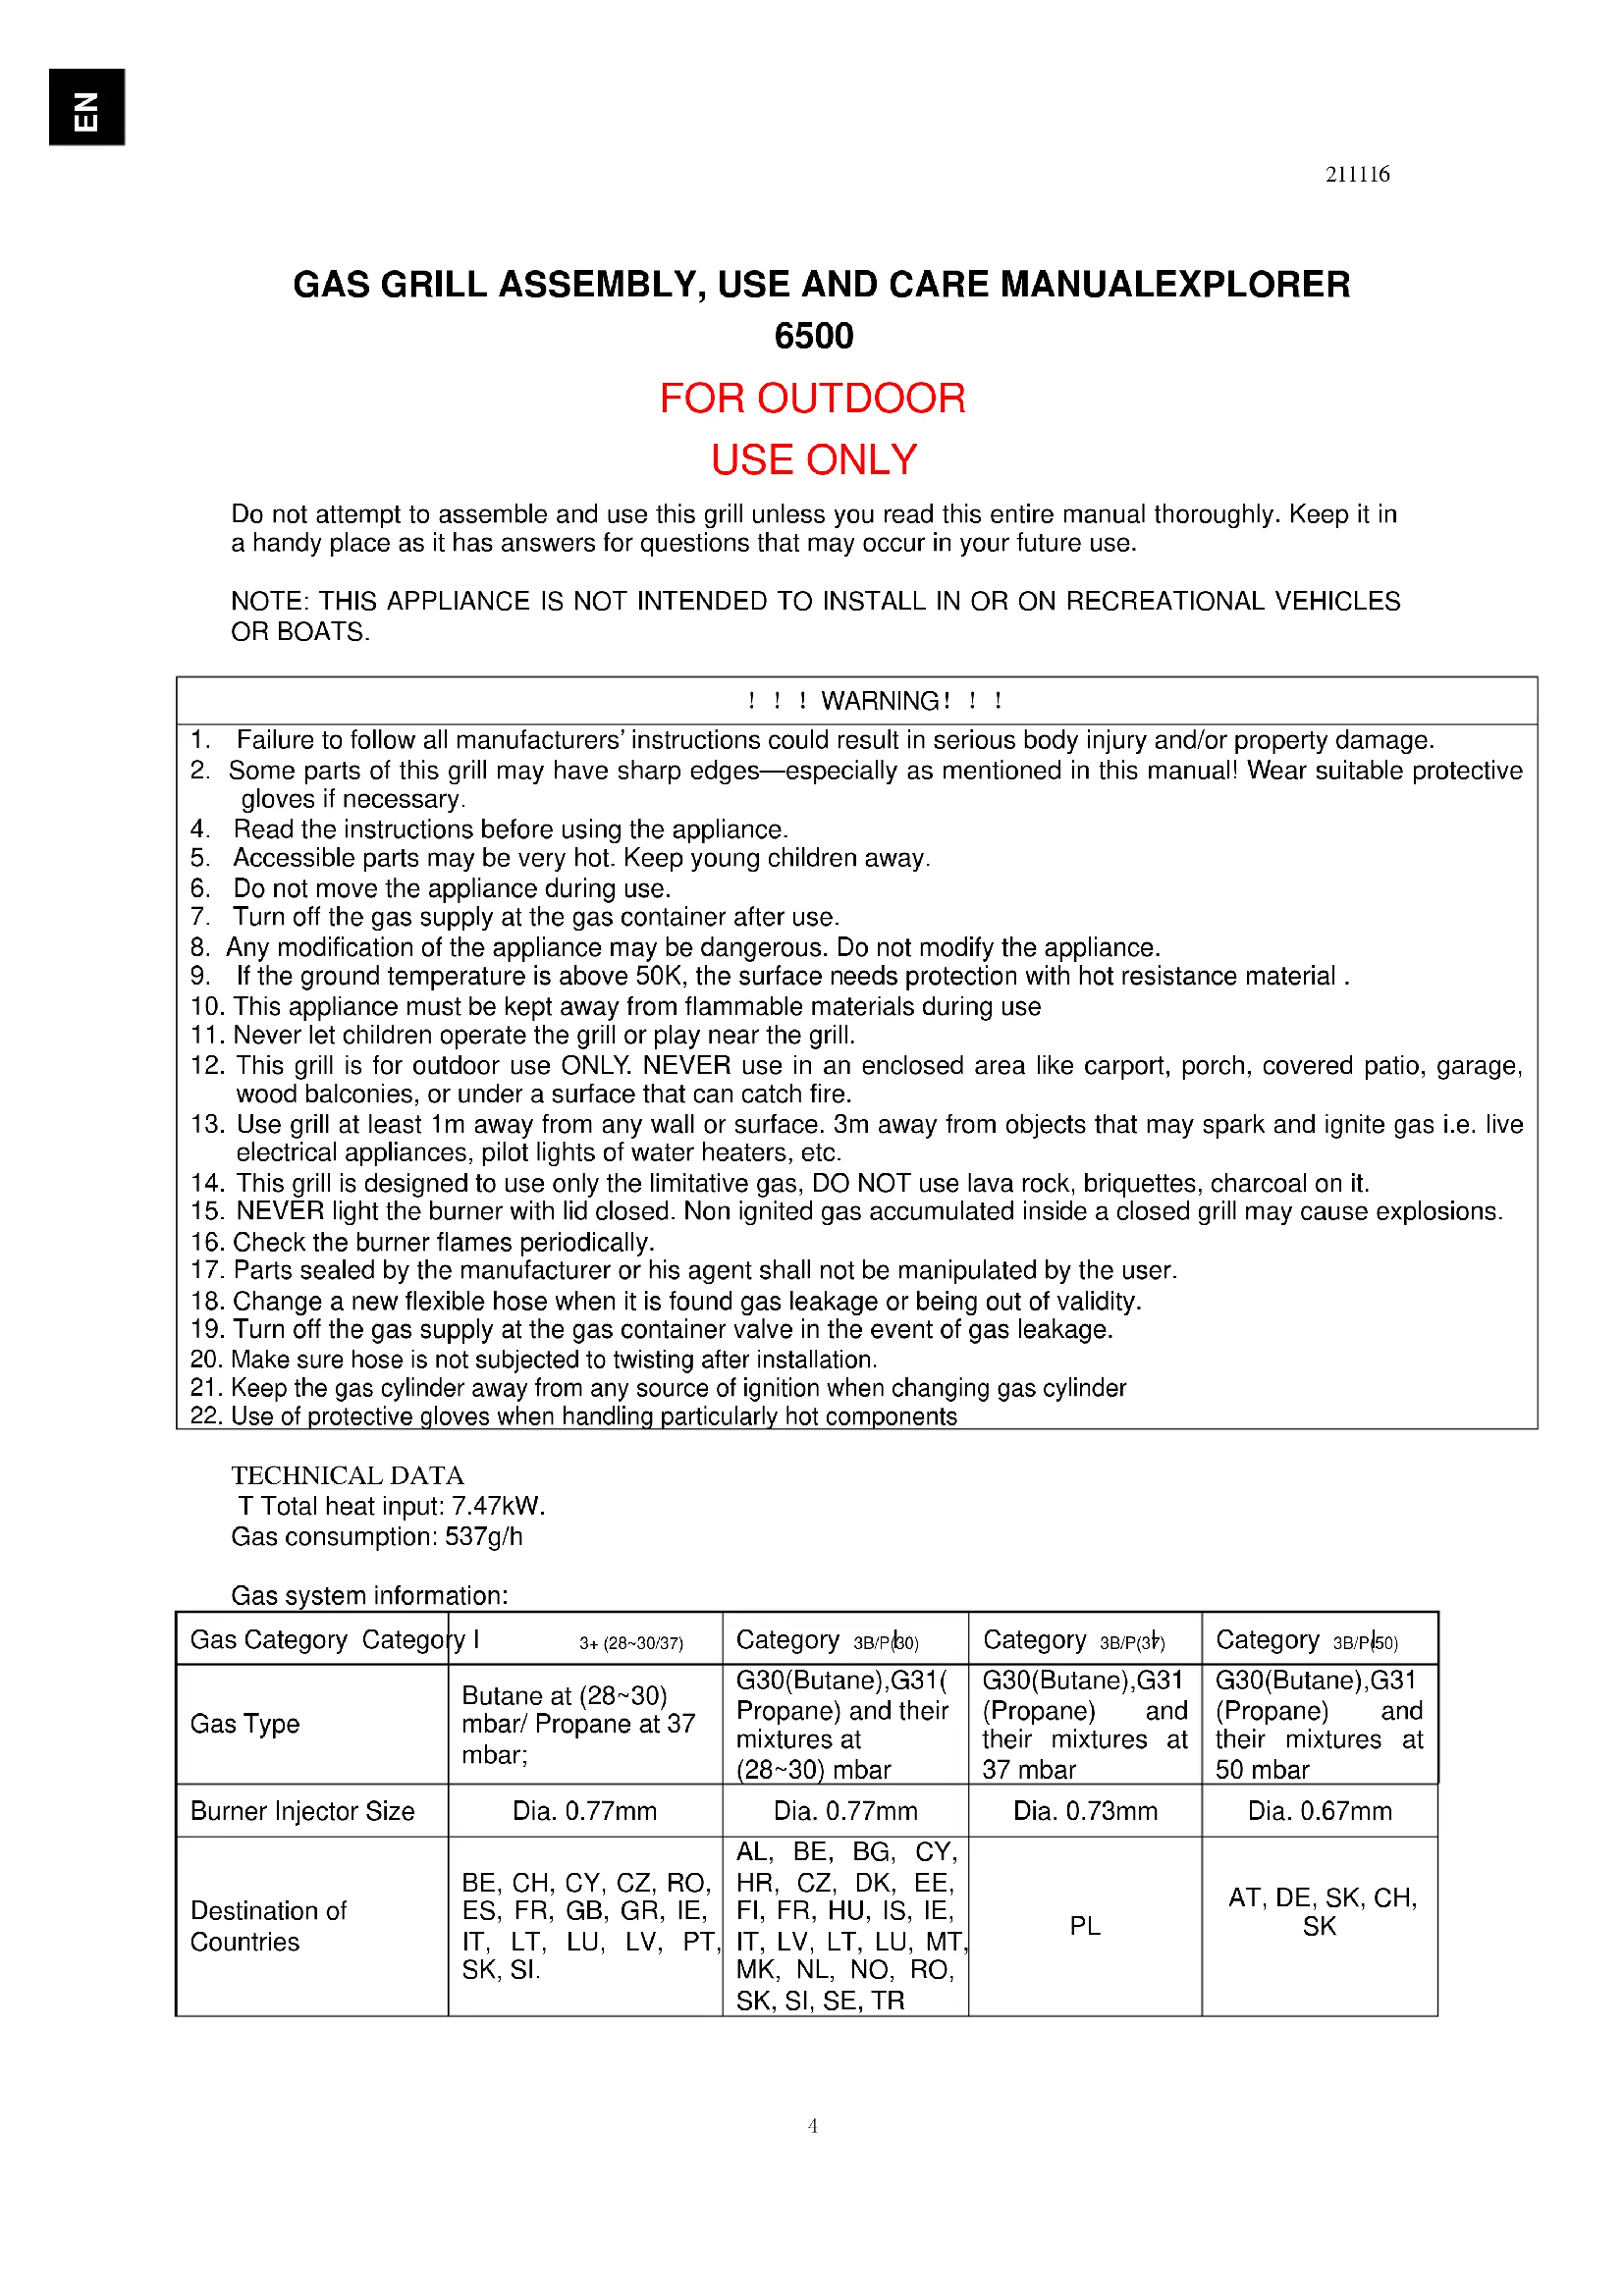


| Product Type | Gas Barbecue |
| Brand | Jamie Oliver |
| Model | Explorer 6500 |
| Gas Categories | I3+(28~30/37), 3B/P(30), 3B/P(37), 3B/P(50) |
| Gas Types | Butane (28~30 mbar), Propane (37 mbar), Butane/Propane mixtures |
| Total Power | 7.47 kW |
| Gas Consumption | 537 g/h |
| Power Supply | Gas cylinder (max. 15 kg, height ≤ 0.6 m, diameter ≤ 320 mm) |
| Usage | Outdoor only (do not use in an enclosed space or on a vehicle) |
| Main Functions | Barbecue cooking with lid, preheating 15 min, flame adjustment |
| Safety | Do not use with lid closed when lighting; keep 1 m from walls, 3 m from ignition sources; wear gloves for hot parts |
| Maintenance and Cleaning | Clean every 2 months or after non-use; use mild detergents; check the venturi |
| Spare Parts and Repairability | Warranty: chassis 5 years, grid 3 years, burner tubes 2 years, ignition 2 years, other parts 1 year |
| General Information | Manual available in multiple languages; online registration for extended warranty |
Frequently Asked Questions - Explorer 6500 Jamie Oliver
User questions about Explorer 6500 Jamie Oliver
0 question about this device. Answer the ones you know or ask your own.
Ask a new question about this device
Download the instructions for your Barbecue in PDF format for free! Find your manual Explorer 6500 - Jamie Oliver and take your electronic device back in hand. On this page are published all the documents necessary for the use of your device. Explorer 6500 by Jamie Oliver.
USER MANUAL Explorer 6500 Jamie Oliver
natural_image
Black J Amie Olive grill with open lid and wheels, displayed against a brick wall background (no text or symbols on the device itself)Jamie Oliver
EXPLORER 6500
EN......4
DK......8
FI.....12
SE......16
NL.....20
NO......25
FR.....29
natural_image
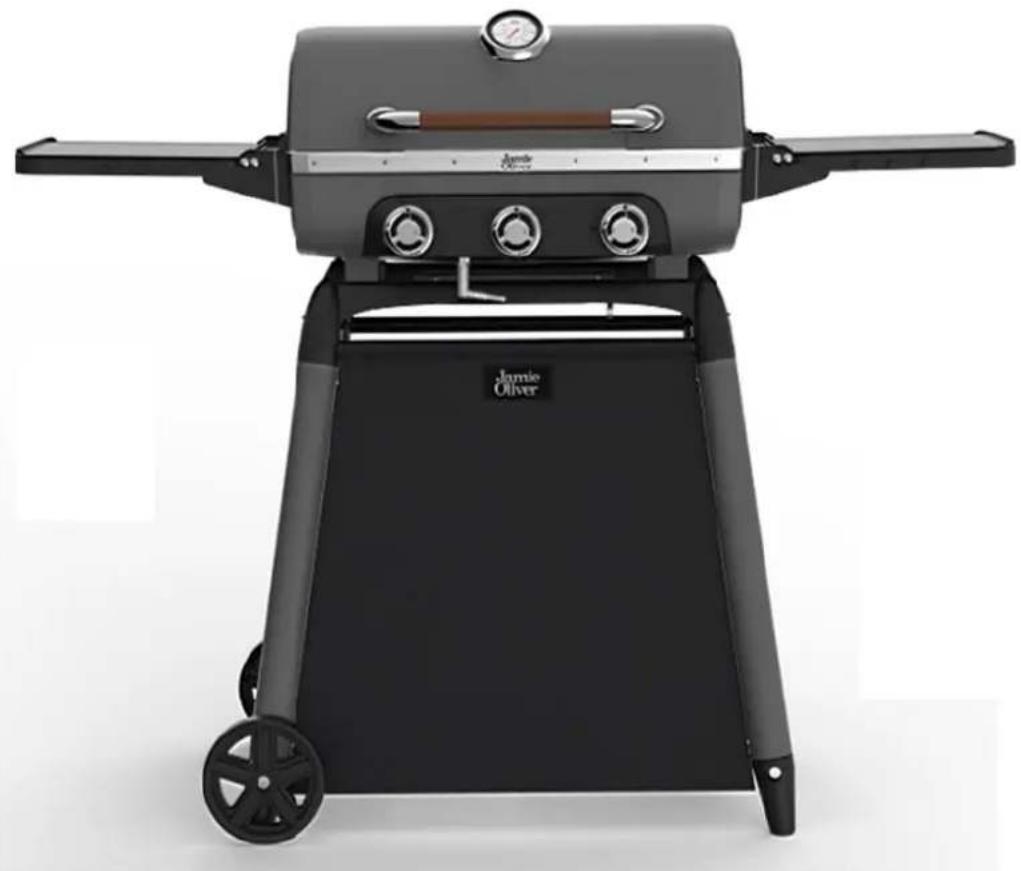
Black and gray Jamiè Oliver electric grill with three speakers and wheels (no visible text or symbols)CE
0845-16
0359CR01407
GAS GRILL ASSEMBLY, USE AND CARE MANUALEXPLORER 6500
FOR OUTDOOR USE ONLY
Do not attempt to assemble and use this grill unless you read this entire manual thoroughly. Keep it in a handy place as it has answers for questions that may occur in your future use.
NOTE: THIS APPLIANCE IS NOT INTENDED TO INSTALL IN OR ON RECREATIONAL VEHICLES OR BOATS.
| ! ! ! WARNING ! ! ! |
| 1. Failure to follow all manufacturers' instructions could result in serious body injury and/or property damage.2. Some parts of this grill may have sharp edges—especially as mentioned in this manual! Wear suitable protective gloves if necessary.4. Read the instructions before using the appliance.5. Accessible parts may be very hot. Keep young children away.6. Do not move the appliance during use.7. Turn off the gas supply at the gas container after use.8. Any modification of the appliance may be dangerous. Do not modify the appliance.9. If the ground temperature is above 50K, the surface needs protection with hot resistance material .10. This appliance must be kept away from flammable materials during use11. Never let children operate the grill or play near the grill.12. This grill is for outdoor use ONLY. NEVER use in an enclosed area like carport, porch, covered patio, garage, wood balconies, or under a surface that can catch fire.13. Use grill at least 1m away from any wall or surface. 3m away from objects that may spark and ignite gas i.e. live electrical appliances, pilot lights of water heaters, etc.14. This grill is designed to use only the limitative gas, DO NOT use lava rock, briquettes, charcoal on it.15. NEVER light the burner with lid closed. Non ignited gas accumulated inside a closed grill may cause explosions.16. Check the burner flames periodically.17. Parts sealed by the manufacturer or his agent shall not be manipulated by the user.18. Change a new flexible hose when it is found gas leakage or being out of validity.19. Turn off the gas supply at the gas container valve in the event of gas leakage.20. Make sure hose is not subjected to twisting after installation.21. Keep the gas cylinder away from any source of ignition when changing gas cylinder22. Use of protective gloves when handling particularly hot components |
TECHNICAL DATA
T Total heat input: 7.47kW.
Gas consumption: 537g/h
Gas system information:
| Gas Category Category I 3+ (28~30/37) | Category 3B/P(30) | Category 3B/P(31) | Category 3B/P(50) | |
| Gas Type | Butane at (28~30)mbar/ Propane at 37mbar; | G30(Butane),G31(Propane) and their mixtures at (28~30) mbar | G30(Butane),G31(Propane) and their mixtures at 37 mbar | G30(Butane),G31(Propane) and their mixtures at 50 mbar |
| Burner Injector Size | Dia. 0.77mm | Dia. 0.77mm | Dia. 0.73mm | Dia. 0.67mm |
| Destination of Countries | BE, CH, CY, CZ, RO, ES, FR, GB, GR, IE, IT, LT, LU, LV, PT, SK, SI. | AL, BE, BG, CY, HR, CZ, DK, EE, FI, FR, HU, IS, IE, IT, LV, LT, LU, MT, MK, NL, NO, RO, SK, SI, SE, TR | PL | AT, DE, SK, CH, SK |
GAS CONNECTION
This is a limitative configured grill. Do not attempt to use other type gas supply unless the grill has been reconfigured for other gas use. The installation of this appliance must conform to local codes.
Make sure that both gas cylinder and gas hose do not come in contact with high temperature part.
- Make sure cylinder valve is in its full "O" position (turn clockwise to stop).
- Check cylinder valve to assure it has proper external male threads.
- Inspect valve connection port and regulator assembly. Look for any damage or debris. Remove any debris. Inspect hose for damage. Never attempt to use damaged or plugged equipment.
- When connect regulator assembly to the valve, hand tighten nut clockwise to a positive stop. Do not use a wrench to tighten. Use of a wrench may damage quick coupling nut and result in a hazardous condition.
- Open cylinder valve fully (counterclockwise). Use a soapy water solution to check all connections for leaks before attempting to light grill. If a leak is found, turn cylinder valve off and do not use grill until a local gas dealer can make repairs.
■ Regulator and Hose Requirements:
- Pressure regulator: comply with EN 16129 and comply with local code (Flow rate: max. 2 kg/h).
- Gas hose: comply with EN 16436-1 and local market standard. (max. 1.5m, max. FI 1.2m).
- The type of flexible tube connecting the appliance to the gas cylinder and the length recommended which shall not exceed 1,50 m.
- Care should be taken so the gas hose and gas cylinder do not come in contact with hot surfaces (above 140^ F, 60^ C) or sharp edges, and should not pass under the barbecue
■ Gas Cylinder Requirements:
- Always place gas cylinder on a flat level surface DO NOT fix on trolley.
- Maximum Capacity Maximum 15 kg and comply with local codes.
- Measurement: the height could not exceed 0.6m, the dia. of the gas cylinder should not exceed 320mm.
- Make sure the gas cylinder is lower than the gas inlet connection and avoid touching with hot surface.
- The gas cylinder shall be 0.5m away from the appliance.
!!!WARNING!!!
- DO NOT USE THE GRILL UNTIL LEAK TESTED.
- Stop using and call the fire department if any leak detected.
- Replacement hose assemblies must be those specified by the manufacturer.
- Never insert any foreign objects into the valve outlet. It may damage the valve and cause leak, leaking gas may result in fire, explosion, heavy body injury, or even death.
- Do not connect this grill to the self-contained the gas system of a motor home or camper trailer.
- If you cannot stop a gas leak, close the gas cylinder valve IMMEDIATELY; call the gas supplier or the fire department.
- Always turn off the gas cylinder and detach from the grill after use or before moving.
- VERY IMPORTANT: DISCONNECTED THE CYLINDER WHEN THIS GRILL IS NOT IN USE.
■ Leak testing
- Make sure all control knobs are closed.
- Make sure the regulator is connected to the gas cylinder tightly and the cylinder is full.
- Make a soap solution with one part liquid detergent and one part water. Prepare a spray bottle, brush, or rag to apply the solution to the connections.
- Completely open the cylinder valve by turning counter clockwise. If you hear a "POP" sound, turn gas off IMMEDIATELY, it indicates a heavy leak at the connection. Call your gas dealer or fire department.
- Check every connection from the gas cylinder up to and including the connection to the manifold pipe assembly (the pipe that goes to the burner) by brushing or spraying the soapy solution on the connections.
-
If soap bubbles appear, there is a leak. Turn off the cylinder valve IMMEDIATELY and retighten connections, Open the cylinder valve again, and recheck.
-
If leaks cannot be stopped, DO NOT ATTEMPT TO REPAIR. Call our service center for help.
- Always close the cylinder valve after leak test by turning clockwise.
■ To disconnect the gas cylinder:
- Turn all the knobs off.
- Turn the cylinder valve off fully (turn clockwise to stop).
- Detach the regulator assembly from cylinder valve by turning the quick coupling nut counterclockwise.
- Install the protective cap back gas cylinder valve.
GRILL LIGHTING INSTRUCTIONS
Make sure the "O" position on control knob point to the "starting point" on control panel.
- Open the lid when lighting the burner.
- Open valve control on gas cylinder.
- Turn the control knob and make the "MAX" position point to the "starting point". The burner will be ignited.
- If ignition does NOT occur in 5 seconds, turn the knob and make the "O" position point to "starting point", and repeat step 3 up to 2 or 3 times.
- If the burner does not ignite after step 4, turn off the gas and wait 5 minutes for any excess gas to dissipate, then either repeat step 3 and 4 or light with an external flame.
- Adjust control knob to appropriate setting by making the position point to "starting point" on control panel. When you have finished using your barbeque, close all the gas control knob make the "O" point to "starting point".
■ Flame characteristics: Burner flames should be blue and stable with no yellow tips, excessive noise, or lifting.
OPERATION INSTRUCTIONS
- Make sure the grill has been leak tested and is properly located.
- Grilling requires high heat for searing and proper browning.
- Close the lid. Turn the control knob and make the "MAX" position point to "starting point" and preheat the grill for 15 minutes.
PLACEMENT OF THE GRILL
- Clean the grill.
- Store the grill in dry indoors ONLY after the gas cylinder is turned off and removed, the gas cylinder must store outdoors, out of the reach of children
- Put on the cover supplied with this grill.
CARE & MAINTENANCE
- You are suggested to have your barbecue cleaned / maintained every two months or after period of not using.
- Always use the mildest cleaning the enameling parts.
- Always clean the cooking area, burner, grease tray under safe condition.
- Check and clean the venturi in the case of blockage found. You are suggested to inspect the venturi every two months
- Call the after service center warranty if any troubles
Jamie Oliver
JAMIE OLIVER GAS BBQ GUARANTEE
In addition to the store guarantee from which this product was purchased, Jamie Oliver BBQ agrees that if any defect in materials or workmanship appears in the product within the given guarantee after the original date of customer purchase, it will issue replacement parts.
This applies only if the barbecue has been subject to:
a. Normal domestic use on domestic premises.
b. Has not been subject to alterations or repairs carried out by unauthorized persons.
c. Has been stored in dry conditions throughout the winter.
d. The barbecue has not been damaged.
e. There is a valid receipt as proof of purchase.
f. Registered for guarantee purposes as per the instructions.
Given guarantee per element of the gas barbecue;
| Jamie Oliver frame warranty | 5 year |
| Jamie Oliver lid warranty | 3 year |
| Jamie Oliver grill warranty | 3 year |
| Jamie Oliver burner tubes warranty | 2 year |
| Jamie Oliver ignition warranty | 2 year |
| All remaining parts | 1 year |
This warranty does not cover:
a. Parts affected by rust, corrosion, oxidation or discoloration which may occur due to moisture or overheating.
b. Labour, or labour related charges.
c. Normal wear and tear and scratches or unblocking of pipes.
d. Negligent use or misuse of the product.
e. Use of the wrong fuel/gas.
f. Use, contrary to operating instructions included in the instruction manual.
g. Regulator, hose and clips.
h. Consumable parts eg: batteries (when applicable).
This warranty does not affect a customer's statutory rights in any way. The warranty is globally applicable
Jamie Oliver BBQ reserves the right to modify this product without notice. If the model is no longer available we will discuss an alternative replacement or settlement.
Only by registering within 30 days from date of purchase will the guarantee be valid for up to ten years for some parts. To benefit from the GUARANTEE register on-line on www.jamieoliverbbq.com, or complete the mandatory sections under REGISTER NOW on the separate sheet, and post to Jamie Oliver BBQ Registration.
To make a claim download the claim form from www.jamieoliverbbq.com, or write to Jamie Oliver BBQ Helpline, Joop Geesinkweg 224, 1114AB Amsterdam- Duivendrecht., The Netherlands. to receive a form.
The claim will require:
a. Legible copy of the purchase/sales receipt (showing purchase date, model name and store).
b. Barbecue model name & number.
c. Purchase date.
d. Store name & location / or other, eg: on-line.
e. Photographs of all the damaged parts listed in your claim.
Please keep this document in a safe place.
BETJENINGS- OG VEDLIGEHOLDELSESVEJLEDNING TIL GASGRILLEN EXPLORER 6500
KUN TIL UDEND∅RSBRUG
text_image
Exploded view diagram of a portable electric cooker with numbered parts for identification| A | 4 | |
| B | 4 | |
| C+D | M5×23 + | 8 |
| E | 4 | |
| F | 4 | |
| D | M5×23 | 8 |
| G+H | 4 | |
| J | 1 | |
| 16 |  | 1 |
| 17 |  | 1 |
| 18 | [YSOT] | 2 |
| 19 |  | 1 |
| 01 |  | 1 |
| 02 |  | 1 |
| 03 |  | 1 |
| 04 |  | 2 |
| 05 |  | 2 |
natural_image
Technical line drawing of a mechanical frame structure with grid base and two vertical supports (no text or symbols)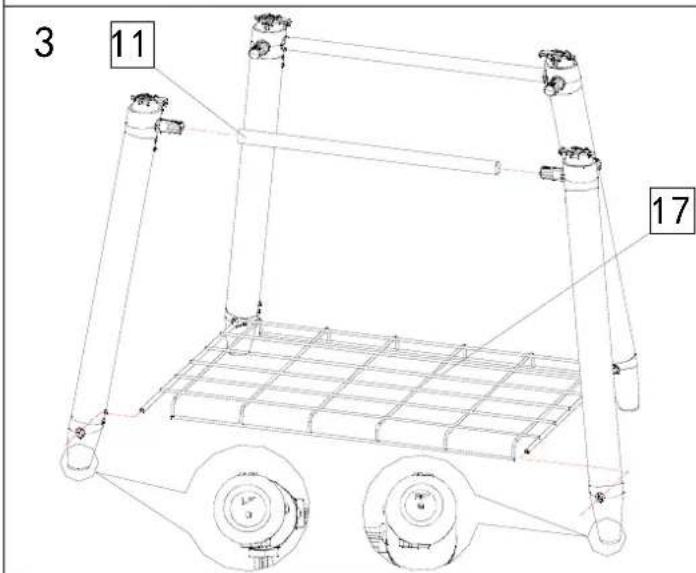
text_image
3 11 17
text_image
4 12 12 14 13 16 15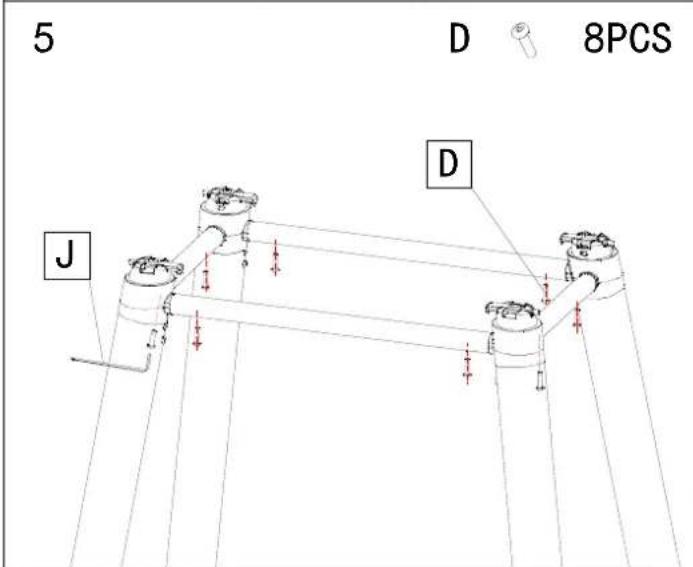
text_image
5 D 8PCS J D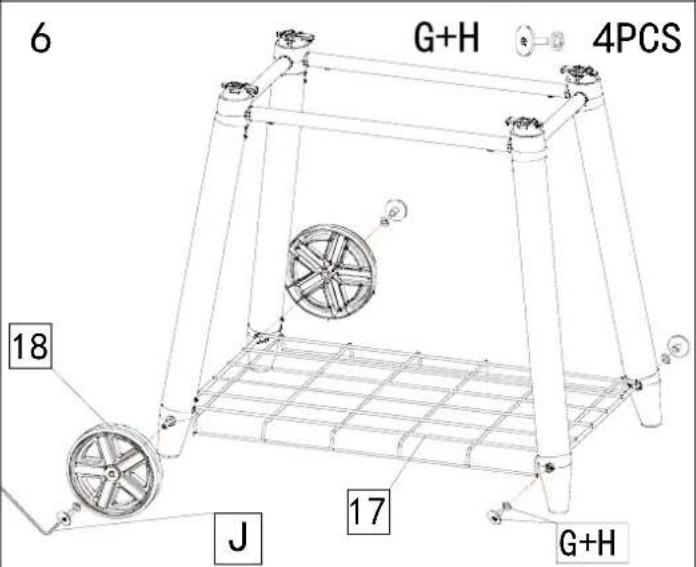
text_image
6 G+H 4PCS 18 J 17 G+H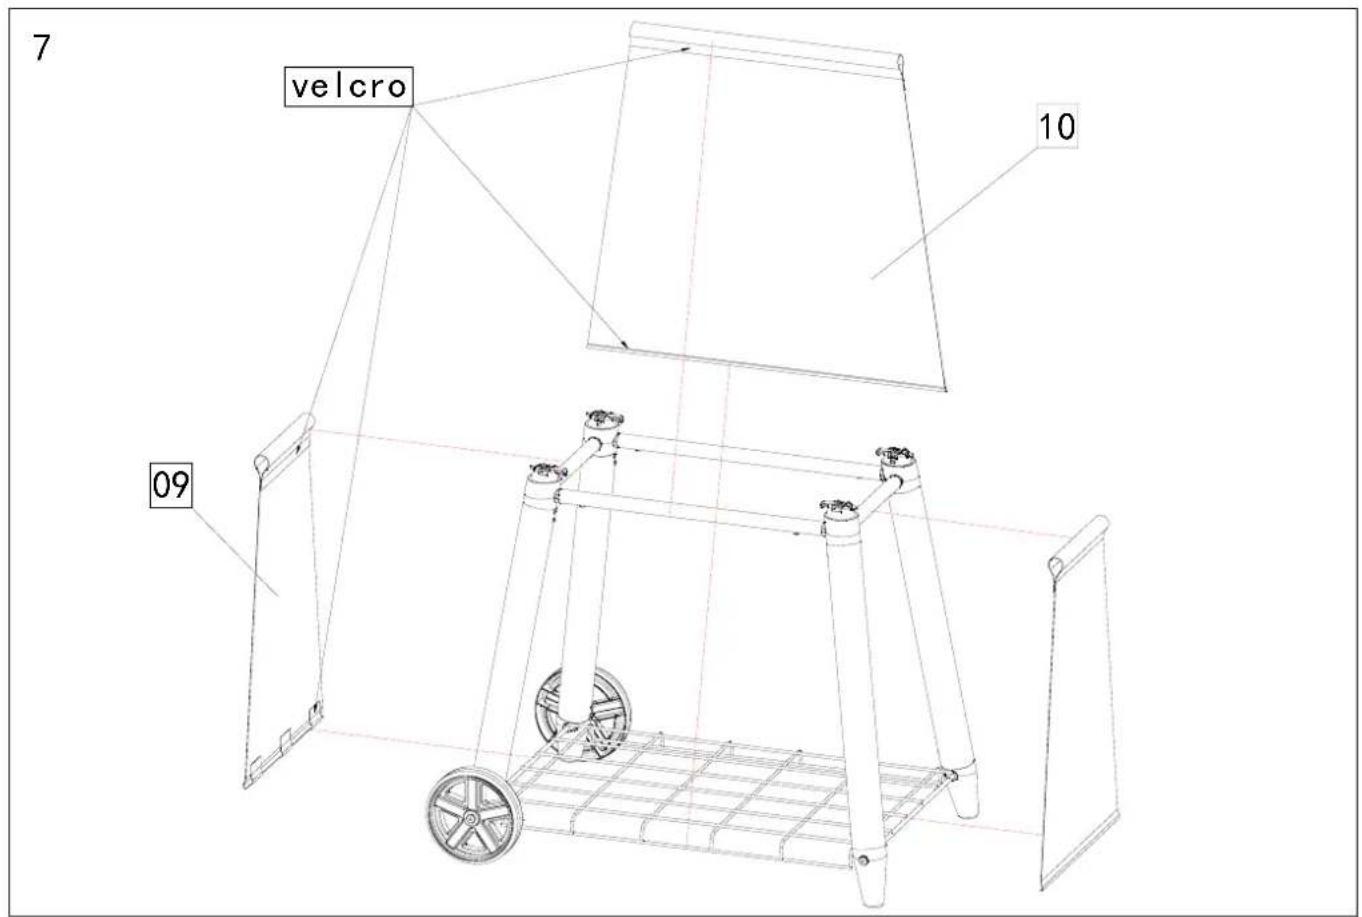
text_image
7 velcro 10 09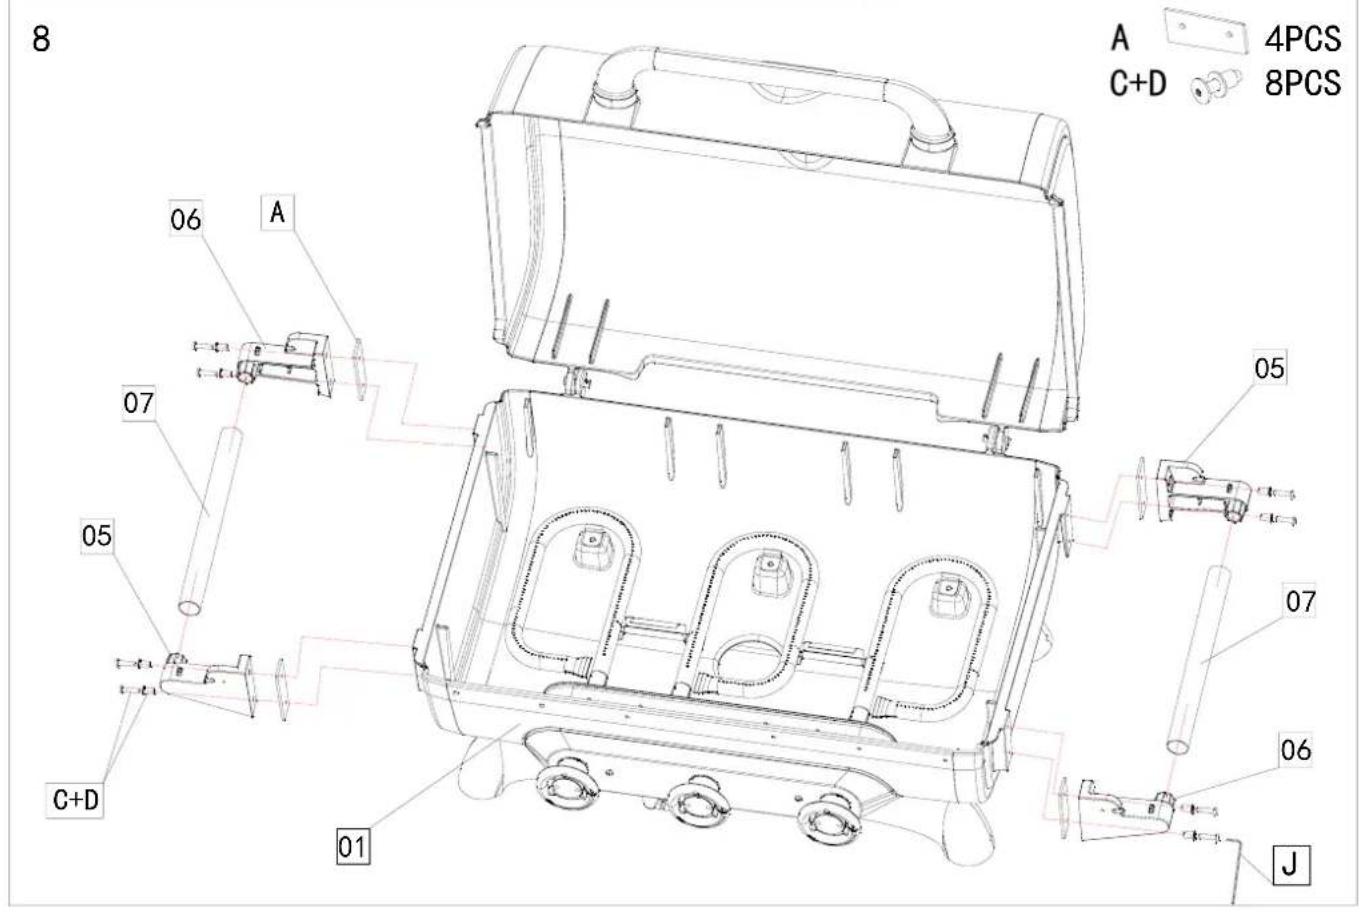
text_image
8 A C+D 06 A 07 05 C+D 01 05 07 06 J 4PCS 8PCS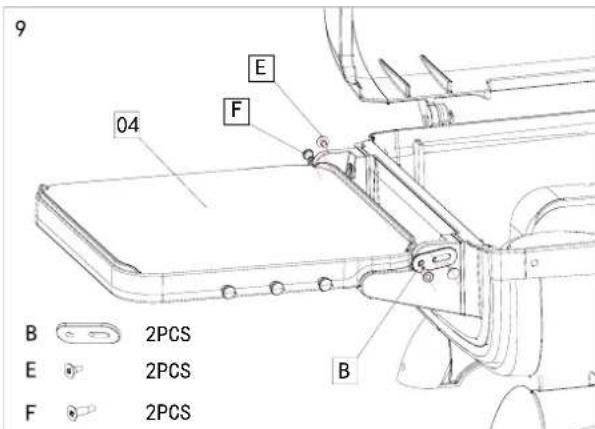
text_image
9 04 E F B 2PCS E 2PCS F 2PCS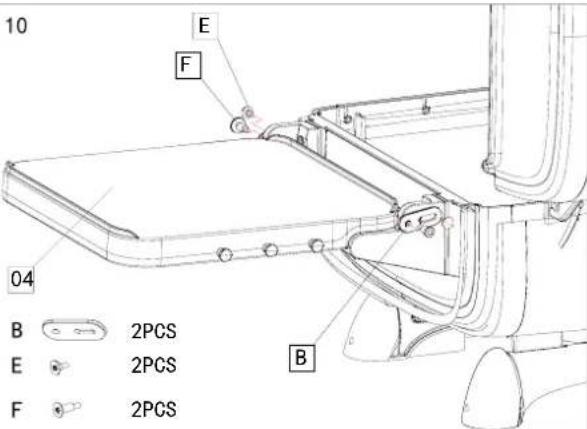
text_image
10 E F 04 B 2PCS E 2PCS F 2PCS B
natural_image
Technical line drawing of a mechanical assembly with labeled components (no readable text or symbols)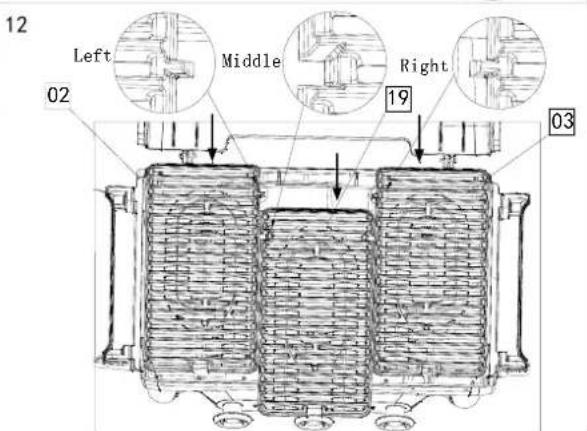
text_image
12 Left Middle Right 02 19 03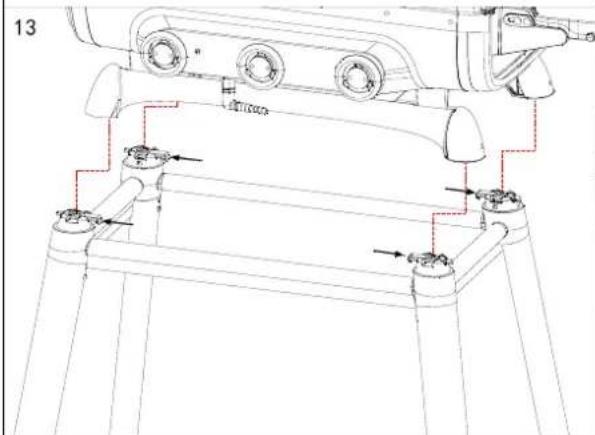
text_image
13
text_image
14 plug in connection Fixed trachea thread connection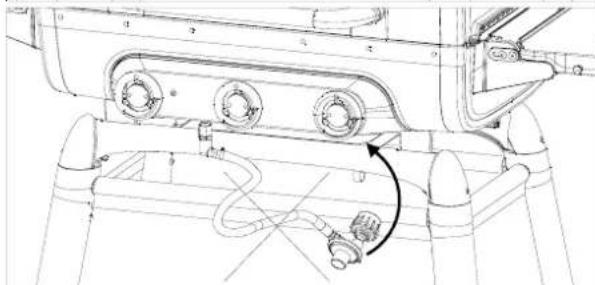
natural_image
Technical line drawing of a mechanical assembly with no visible text or symbols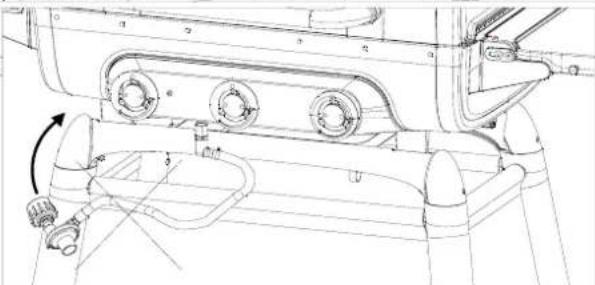
natural_image
Technical line drawing of a mechanical assembly with rollers and housing (no text or symbols)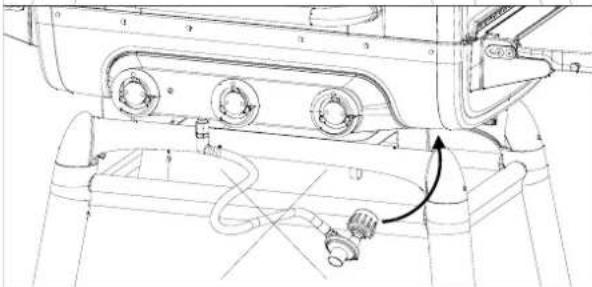
natural_image
Technical line drawing of a mechanical assembly with no visible text or symbols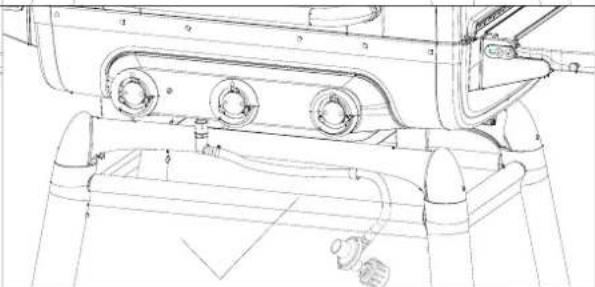
natural_image
Technical line drawing of a mechanical assembly with rollers and components (no text or symbols)Visit Jamie's FOD Channel on
for great recipes
YouTube
Please go to www.jamieoliverbbq.com and register your barbecue.