Cloud Stinger - Helmet HYPERX - Free user manual and instructions
Find the device manual for free Cloud Stinger HYPERX in PDF.
| Technical Features | Wired stereo headset with virtual 7.1 surround sound |
|---|---|
| Connection Type | 3.5 mm audio jack and USB for surround sound |
| Weight | 275 g |
| Microphone | Flexible and retractable microphone with noise reduction |
| Compatibility | PC, PS4, Xbox One, Nintendo Switch, mobile devices |
| Usage | Ideal for gaming, voice chats, and multimedia |
| Maintenance | Regularly clean the ear pads and microphone with a soft cloth |
| Safety | Avoid prolonged use at high volume to protect hearing |
| General Information | 2-year warranty, availability of spare parts |
Frequently Asked Questions - Cloud Stinger HYPERX
User questions about Cloud Stinger HYPERX
0 question about this device. Answer the ones you know or ask your own.
Ask a new question about this device
Download the instructions for your Helmet in PDF format for free! Find your manual Cloud Stinger - HYPERX and take your electronic device back in hand. On this page are published all the documents necessary for the use of your device. Cloud Stinger by HYPERX.
USER MANUAL Cloud Stinger HYPERX
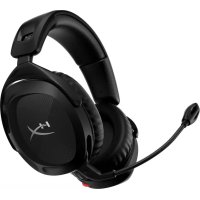
HyperX Cloud Stinger Wireless™ Headset
Find the language and latest documentation for your HyperX Cloud Stinger Wireless headset here.
HyperX Cloud Stinger Wireless Headset Installation Guide
For instructions in English
Para instrucciones en Espanol
Fur Anleitungen in Deutsch
Pour des instructions en Francais
Per le istruzioni in Italiano
...... Por as instruções em Português
Instrukcje w jezyku Polskim
IyHCTpyKunHa PyccKom
C. Turkce talimatlar icin
日本語マニアル用
..
nunusunnu
...De xem hong dan bang tieng Viet
Simplified Chinese......简体中文说明书
Traditional Chinese ... 繁體中文說明
HyperX Cloud Stinger Wireless™
Part numbers
HX-HSCSW-BK
TABLE OF CONTENTS
Overview 3
Specifications 4
Headset Controls 5
Headset Battery Indicator LED States 6
Headset Charging 7
Using with PS4^TM 8
Using with Nintendo SwitchTM 9
Using with PC 10
Manually Pairing Headset and Wireless Adapter 12
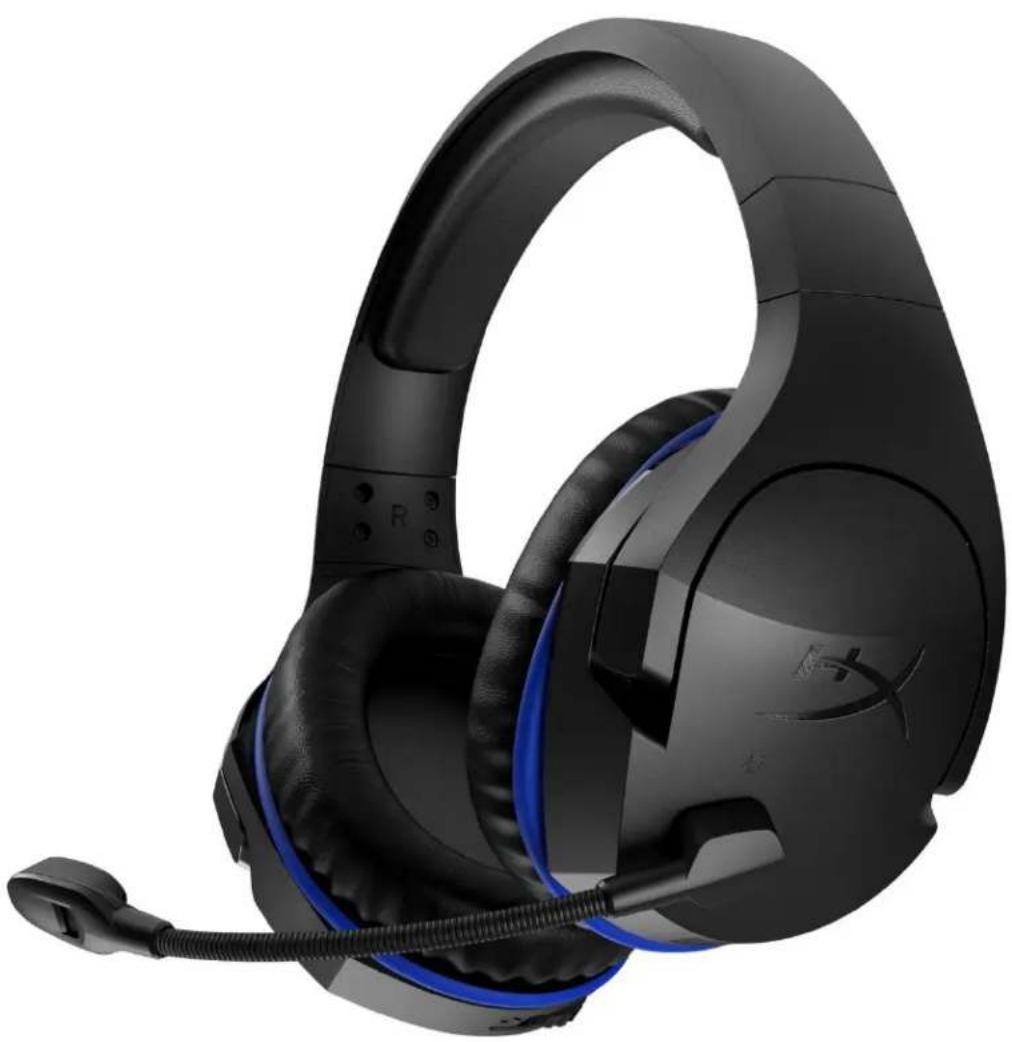
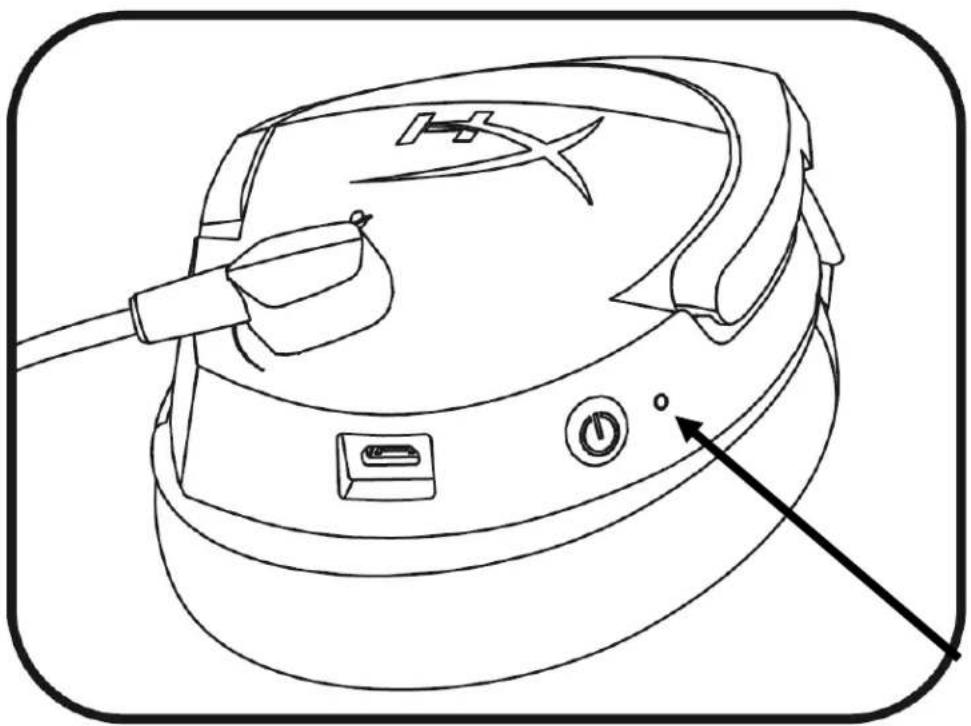
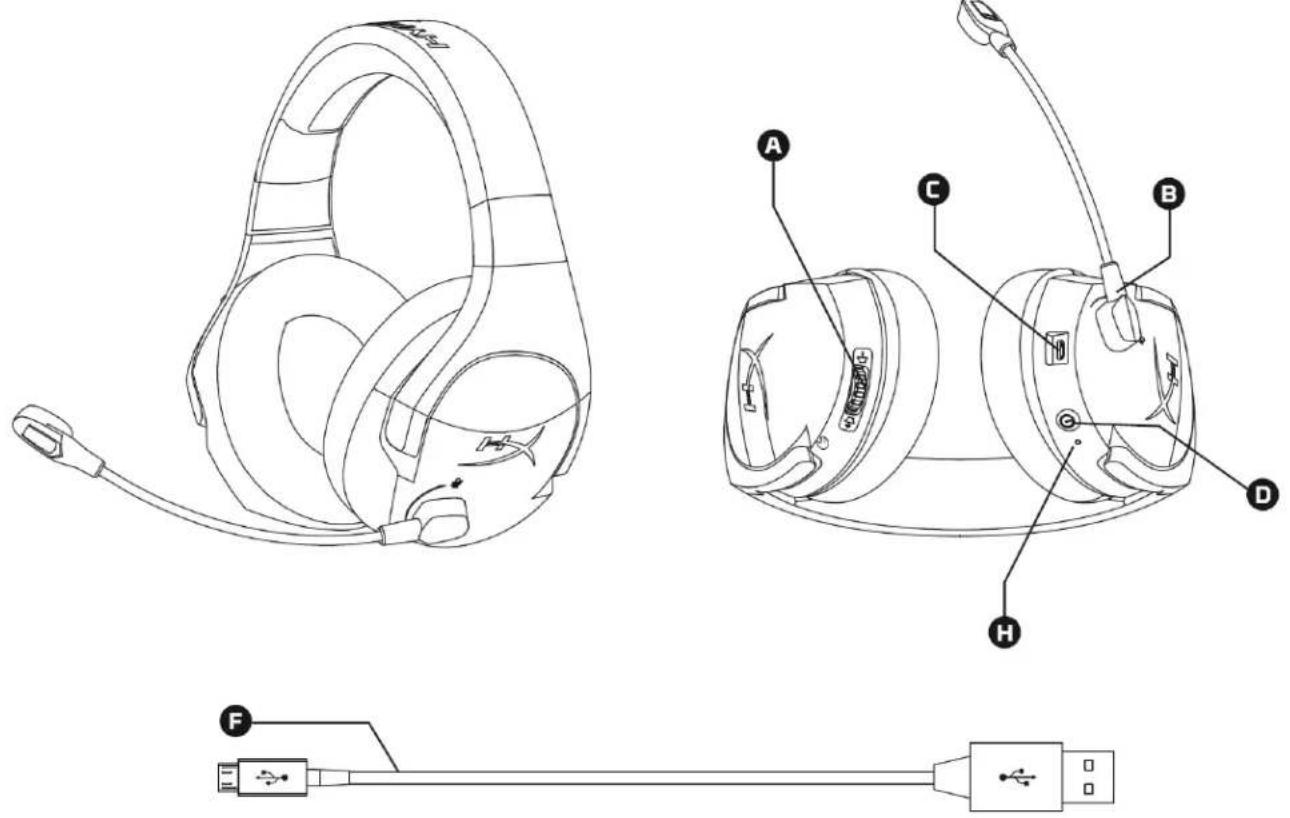
Overview
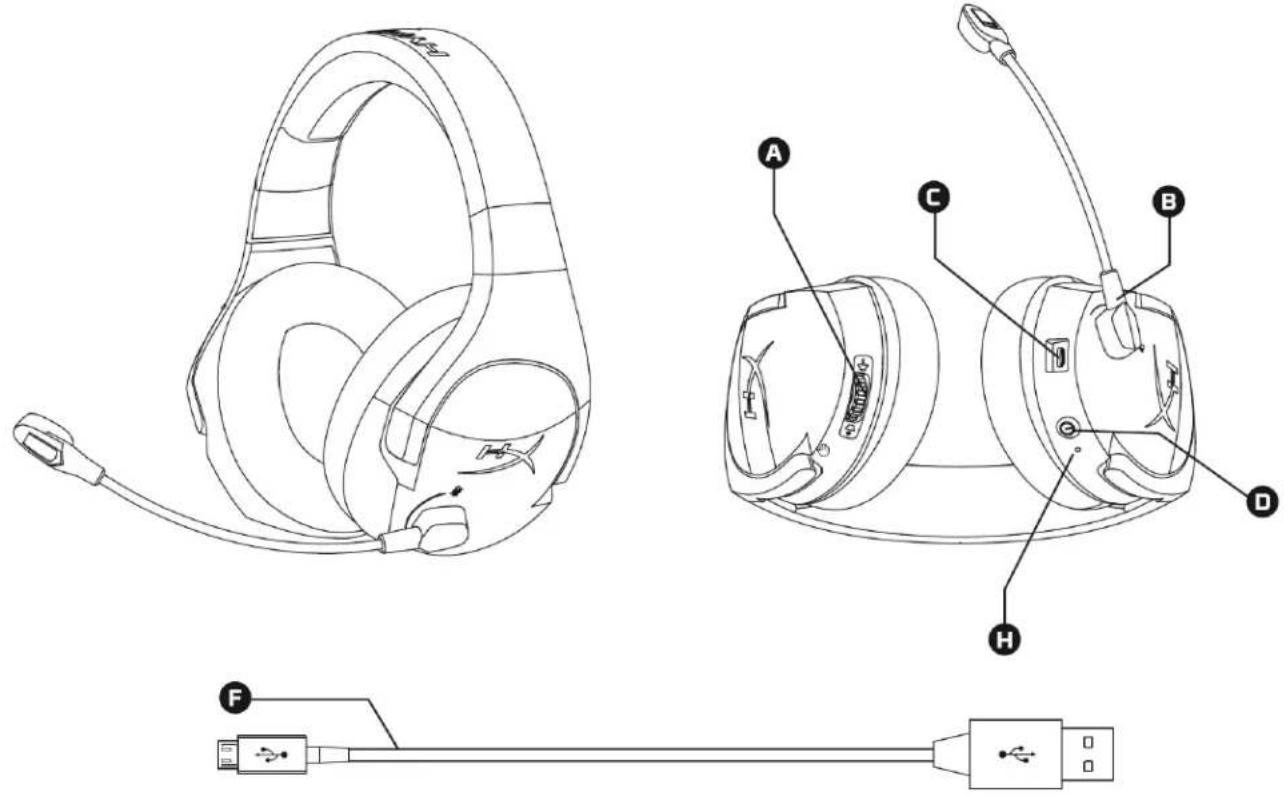
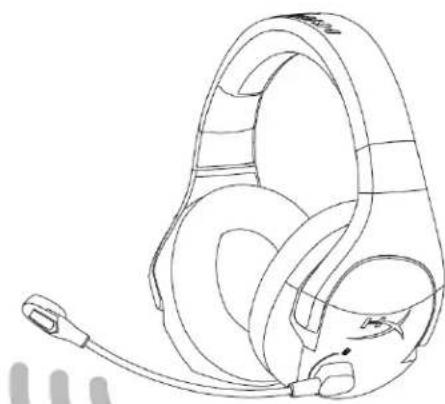
A. Volume wheel
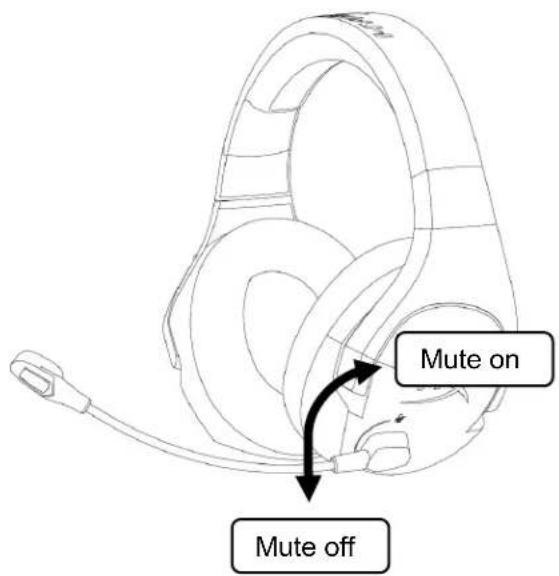
B. Swivel to mute microphone
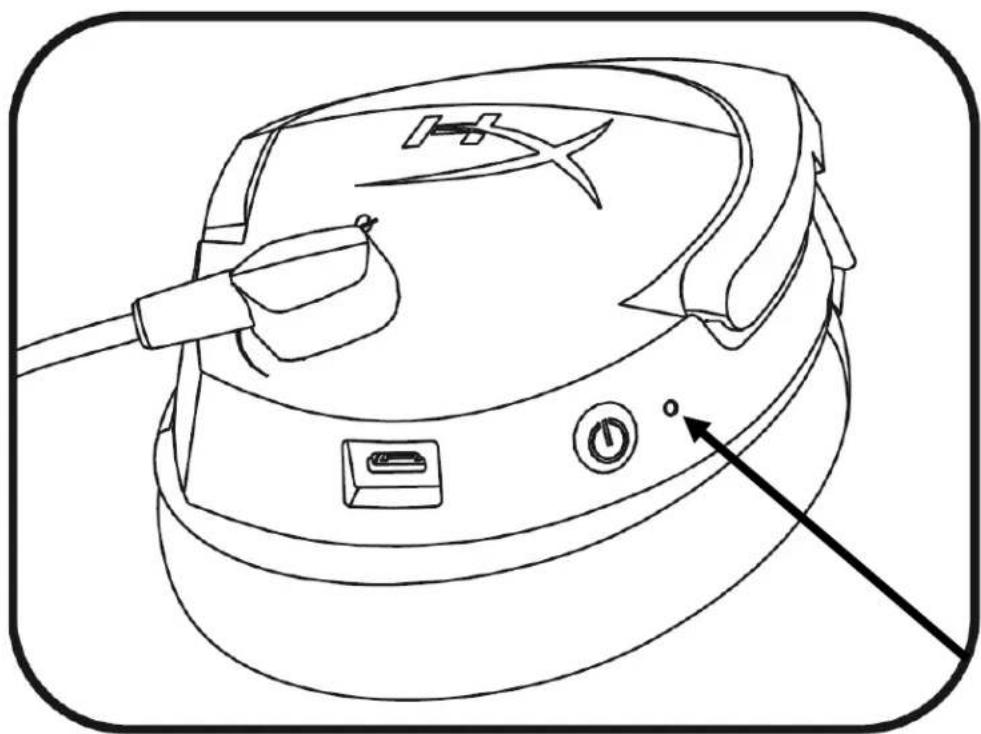
C. USB charge port
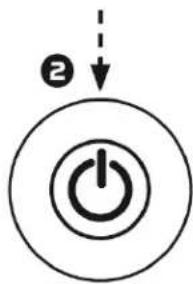
D. Power button
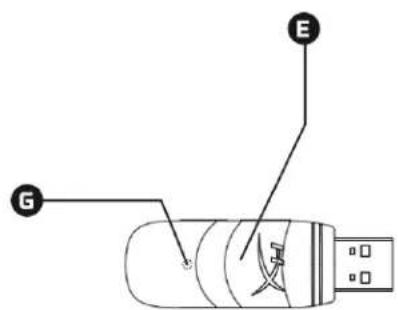
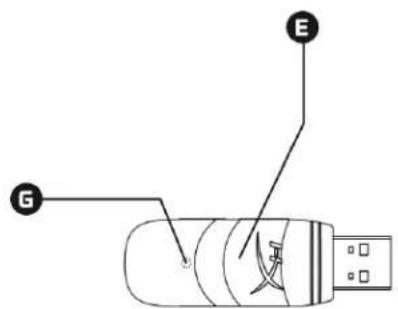
E. Wireless adapter
F. USB charge cable
G. Wireless status light
H. Battery indicator LED
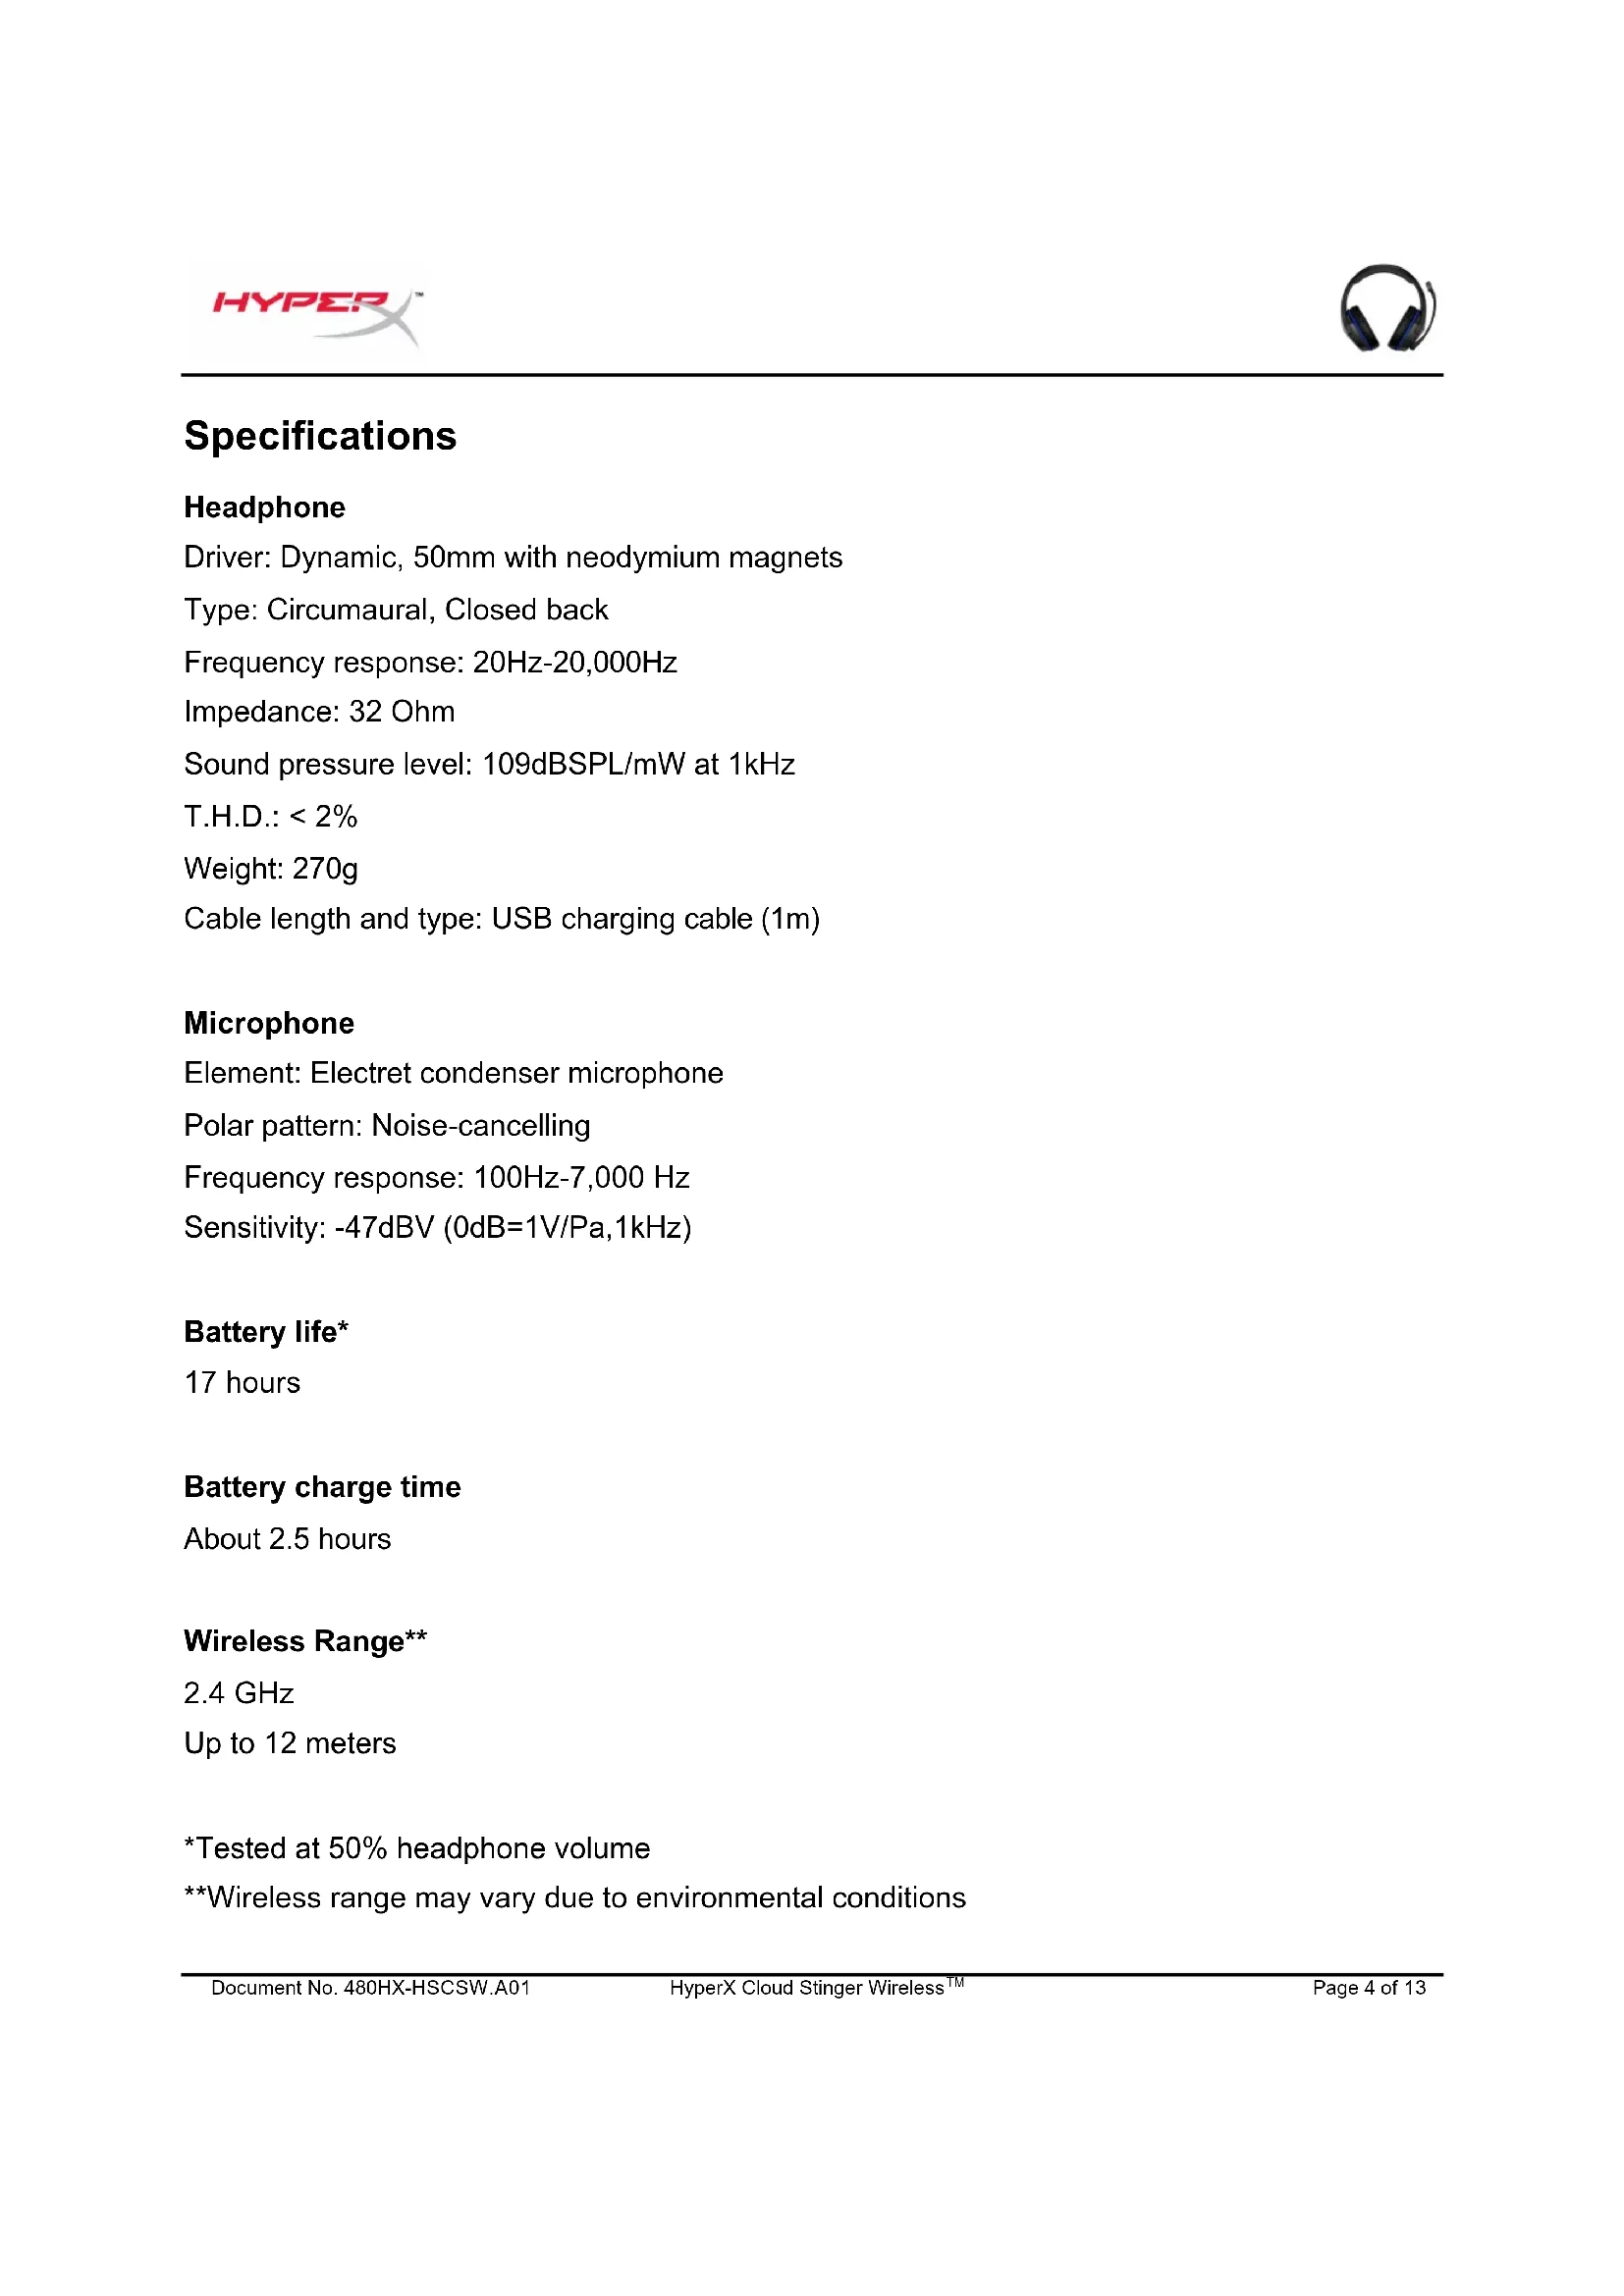
Specifications
Headphone
Driver: Dynamic, 50mm with neodymium magnets
Type: Circumaural, Closed back
Frequency response: 20Hz-20,000Hz
Impedance: 32 Ohm
Sound pressure level: 109dB SPL/mW at 1kHz
T.H.D.: < 2%
Weight: 270g
Cable length and type: USB charging cable (1m)
Microphone
Element: Electret condenser microphone
Polar pattern: Noise-cancelling
Frequency response: 100Hz-7,000 Hz
Sensitivity: -47dBV (0dB=1V/Pa, 1kHz)
Battery life*
17 hours
Battery charge time
About 2.5 hours
Wireless Range**
2.4 GHz
Up to 12 meters
*Tested at 50% headphone volume
**Wireless range may vary due to environmental conditions
Headset Controls
Power button
Hold the power button for 3 seconds to power on/off the headset.
Volume wheel
Move the volume wheel towards the ^+ sign to increase the volume. Move the volume wheel towards the - sign to decrease the volume.

Microphone mute
Swivel the microphone upwards to mute the microphone.
Swivel the microphone downwards to unmute the microphone.
Headset Battery Indicator LED States
The headset battery indicator LED indicates the current state of the headset.
| Battery Indicator LED | Headset Status |
| Slow breathing orange | Searching for wireless adapter |
| Fast blinking red and green | Pairing mode |
| Solid green | 90% – 100% battery remaining |
| Blinking green | 50% – 90% battery remaining |
| Blinking orange | 25% – 50% battery remaining |
| Blinking red | <25% battery remaining |
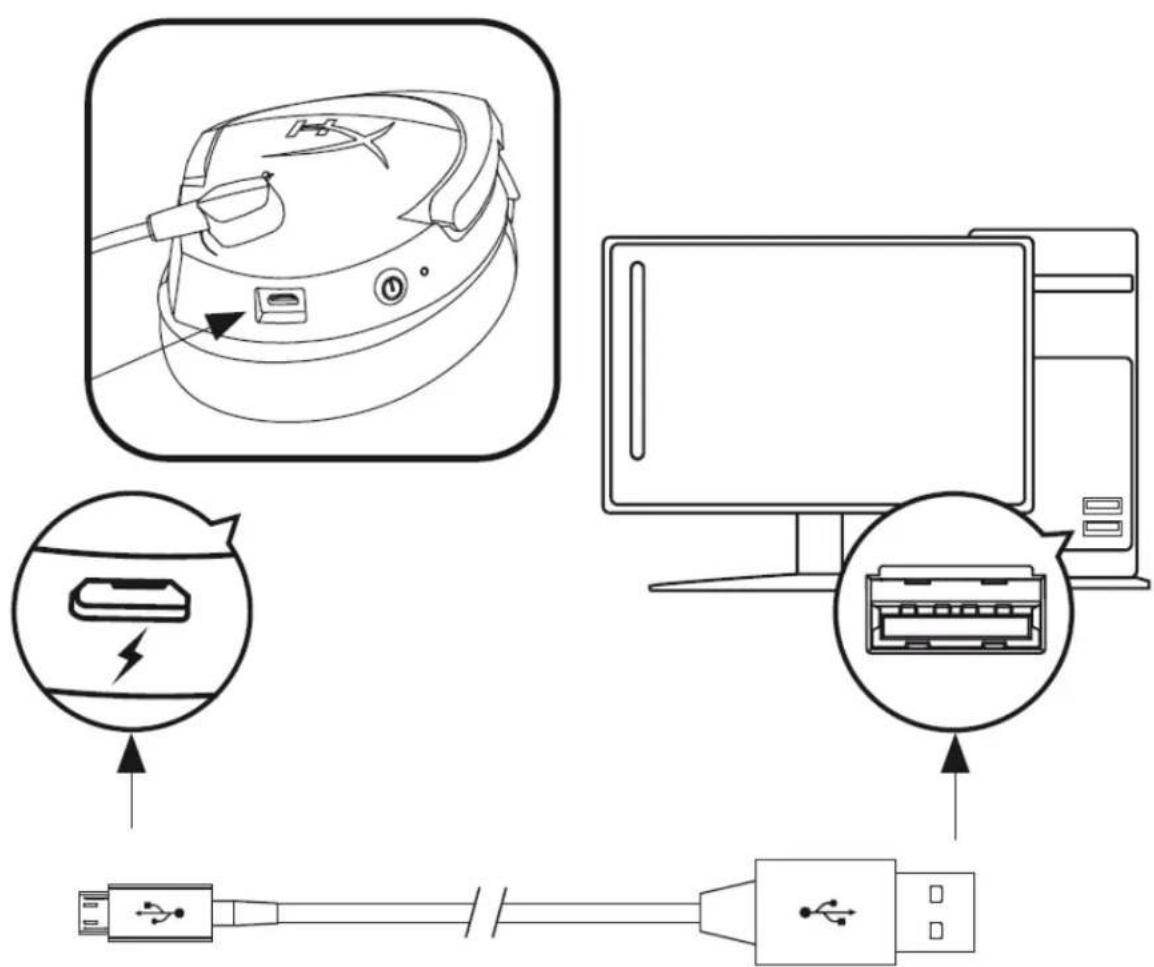
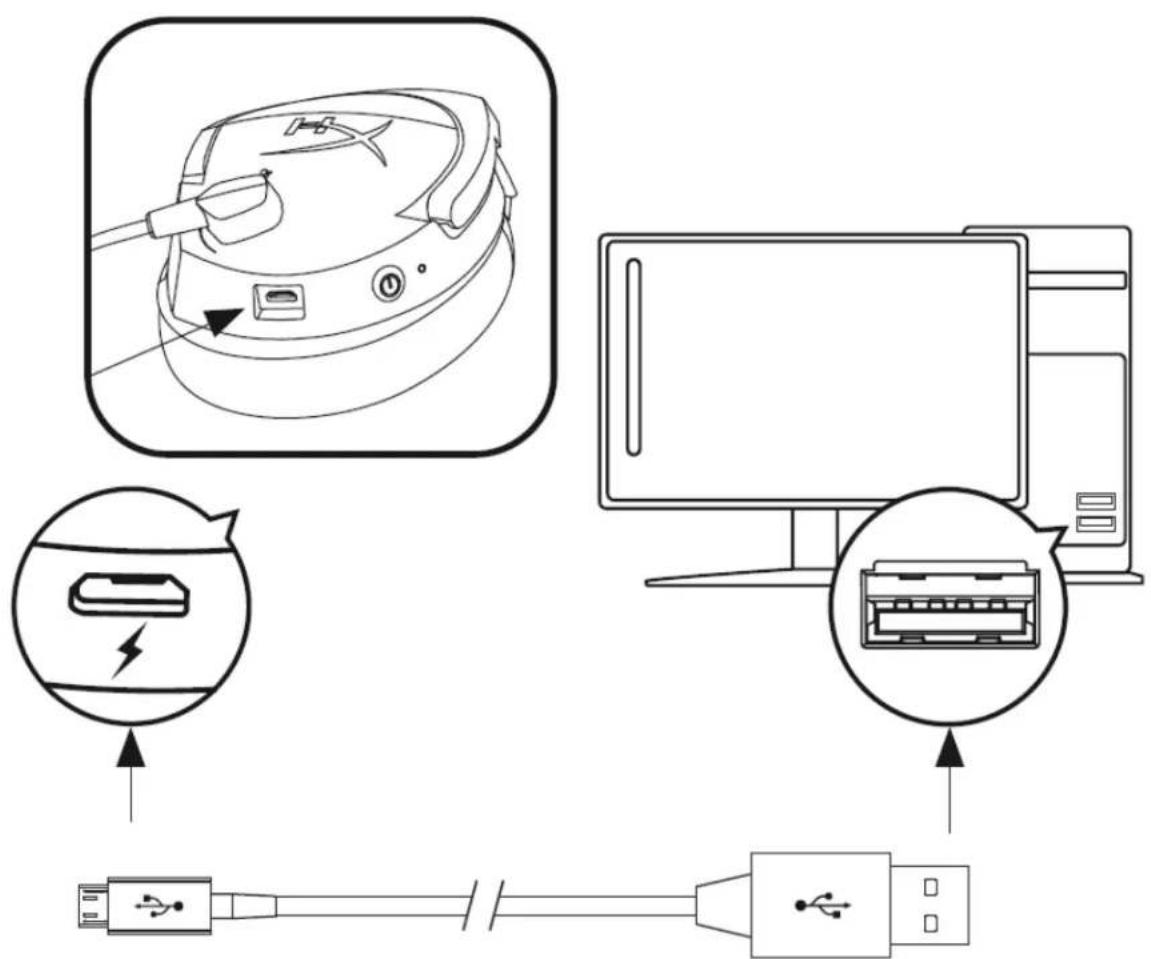
Headset Charging
When the headset is connected to a charger with the USB charge cable, the battery indicator LED will indicate the charge status. The headset will take approximately 2.5 hours to fully charge.
| Battery Indicator LED | Charging Status |
| Solid green | 100% charged |
| Breathing green | 50% – 99% charged |
| Breathing orange | 25% – 50% charged |
| Breathing red | <25% charged |
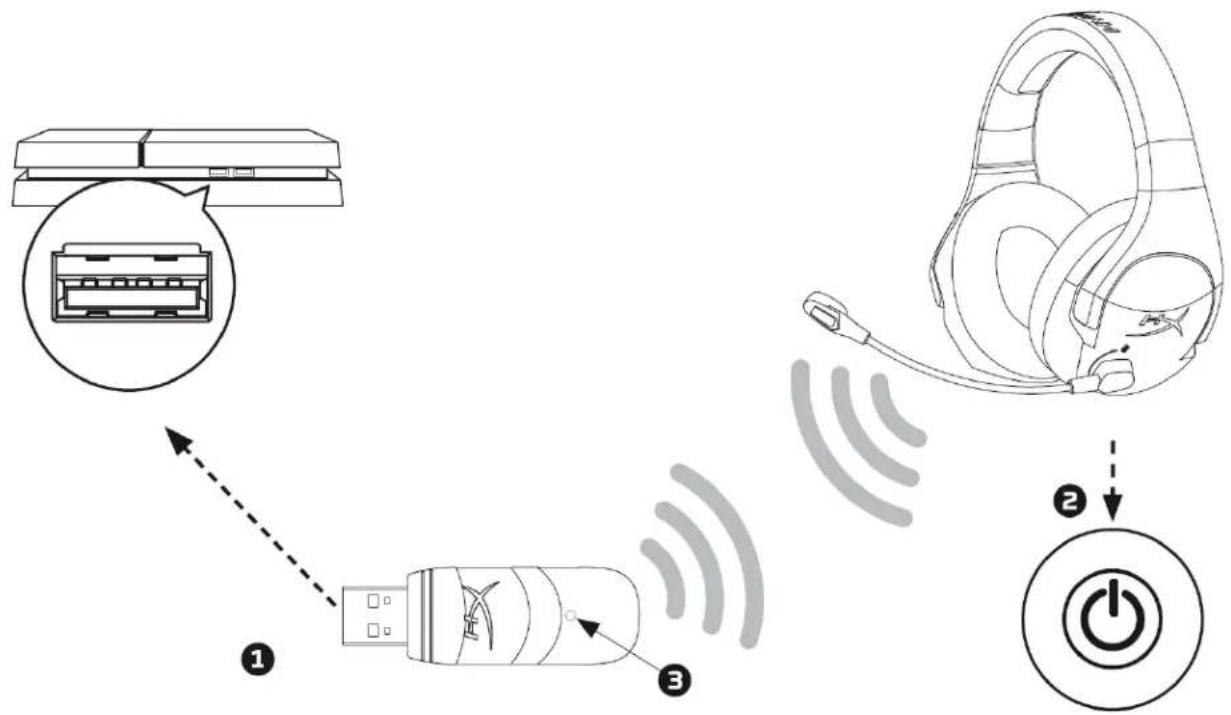
Using with PS4TM
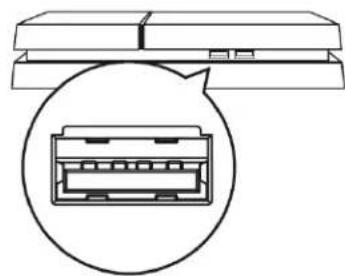
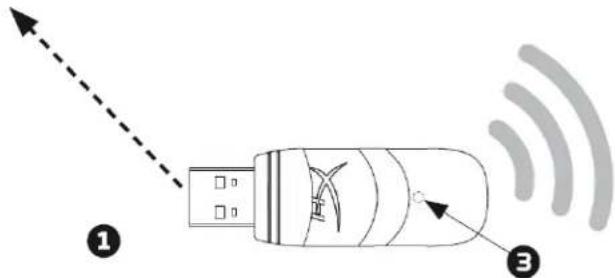
- Connect the wireless adapter to a front USB port on the PS4TM system.
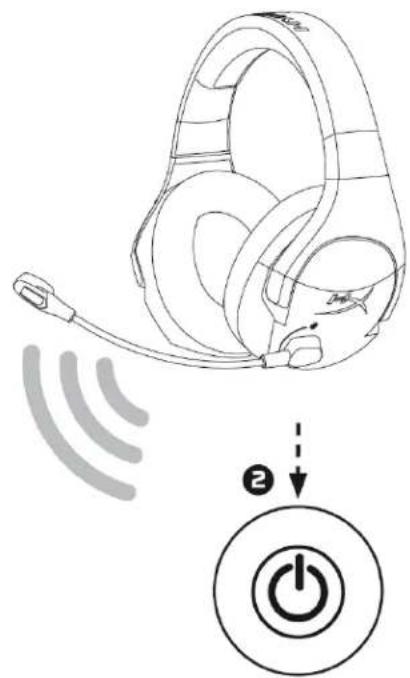
- Power on the headset.
- When the wireless adapter status light is solid, the headset is now connected to the adapter.
To ensure the headset is configured with the most optimal settings on the PS4, follow the steps below:
- From the PS4 main menu, go to Settings > Devices > Audio Devices
- Set Input Device to USB Headset (HyperX Cloud Stinger Wireless)
- Set Output Device to USB Headset (HyperX Cloud Stinger Wireless)
- Set Output to Headphones to All Audio
- Set Volume Control (Headphones) to 100% volume
Using with Nintendo Switch™
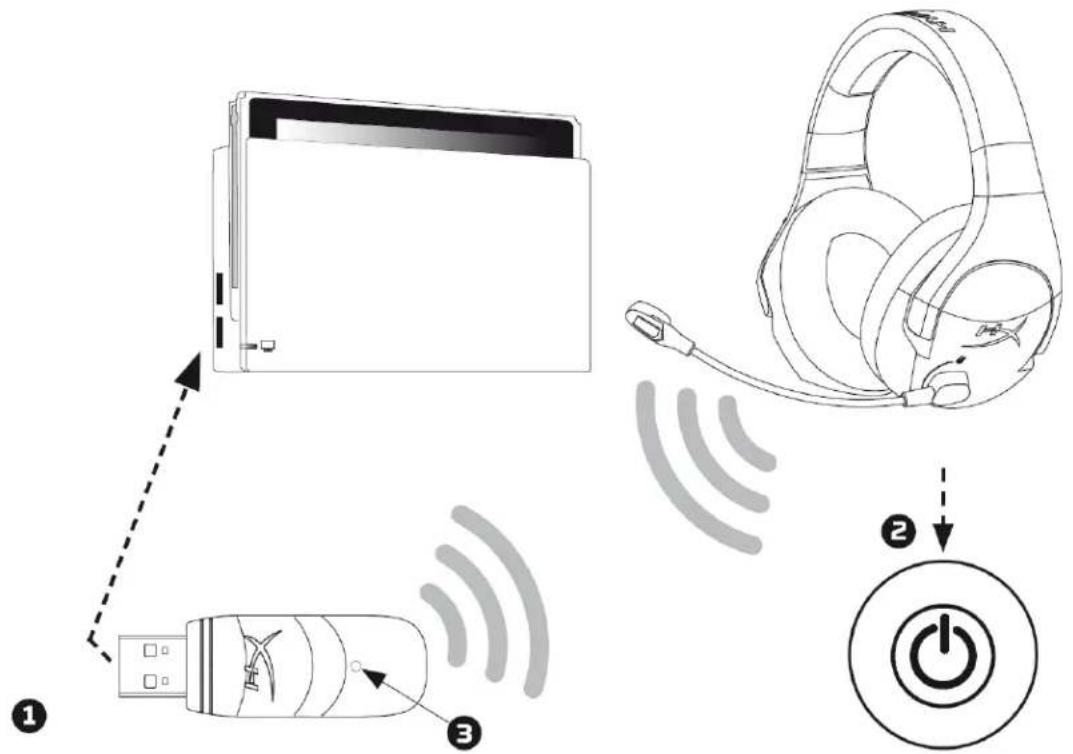
- Connect the wireless adapter to a side USB port on the Nintendo Switch dock.
- Power on the headset.
- When the wireless adapter status light is solid, the headset is now connected to the adapter.
You may set the USB audio volume on Switch to maximum by using the volume buttons on the Switch console, then adjust the volume with the headset volume wheel.
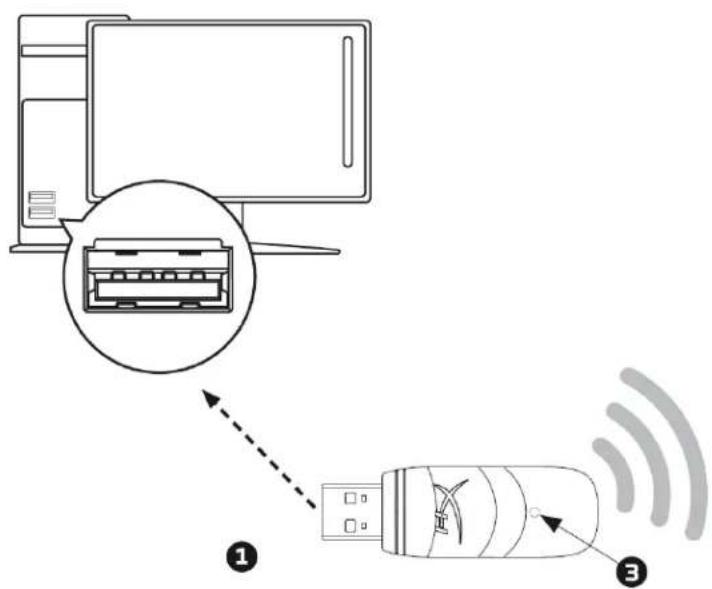
Using with PC
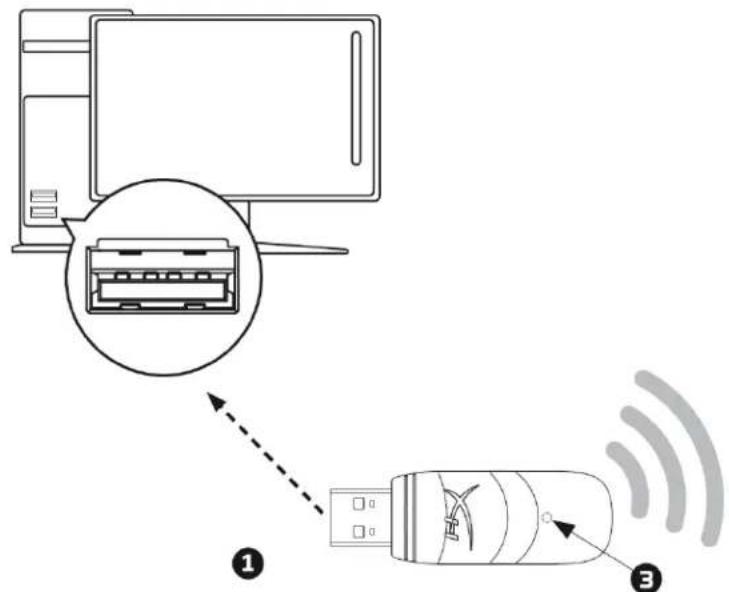

- Connect the wireless adapter to a USB port on the PC.
- Power on the headset.
- When the wireless adapter status light is solid, the headset is now connected to the adapter.
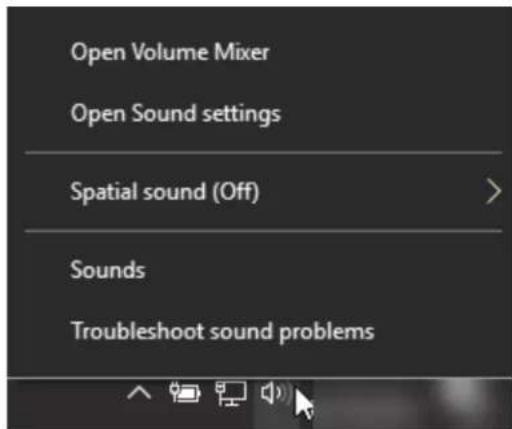
To ensure the headset is configured correctly on the PC, follow the steps below:
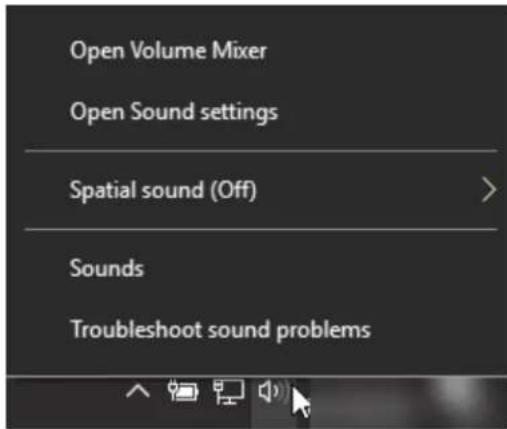
- Right-click on the sound icon on the system tray and select Sounds.
-
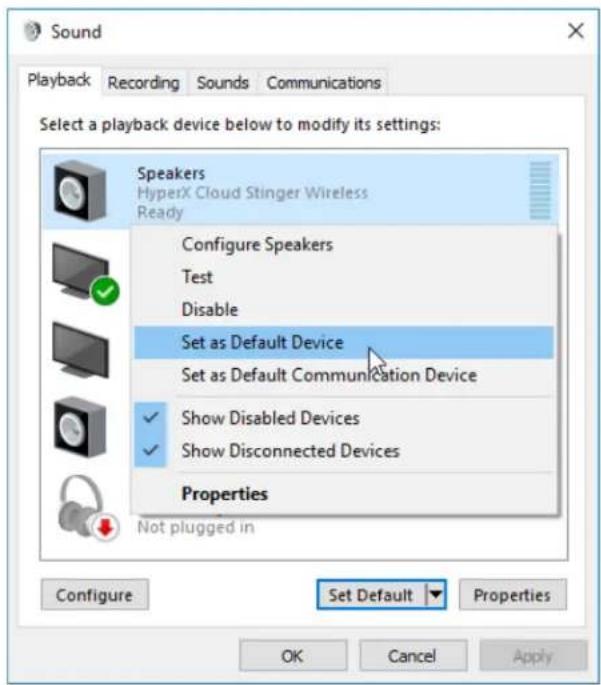
On the Playback tab, right-click on Speakers HyperX Cloud Stinger Wireless and select Set as Default Device.
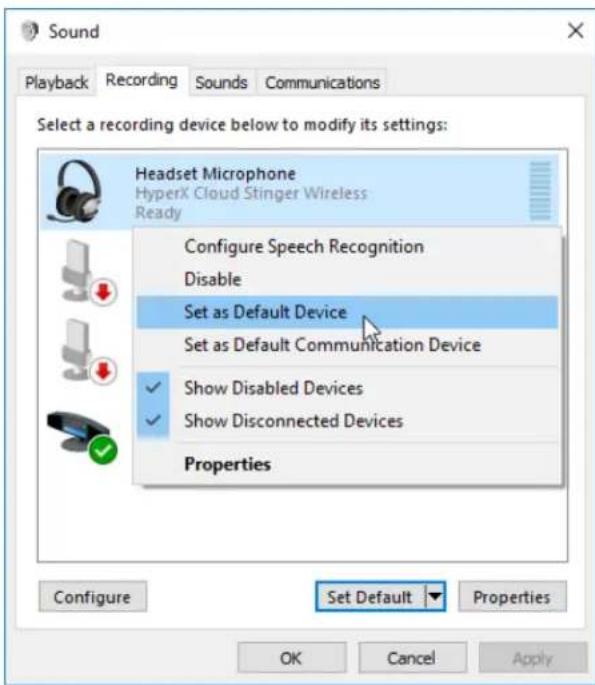
-
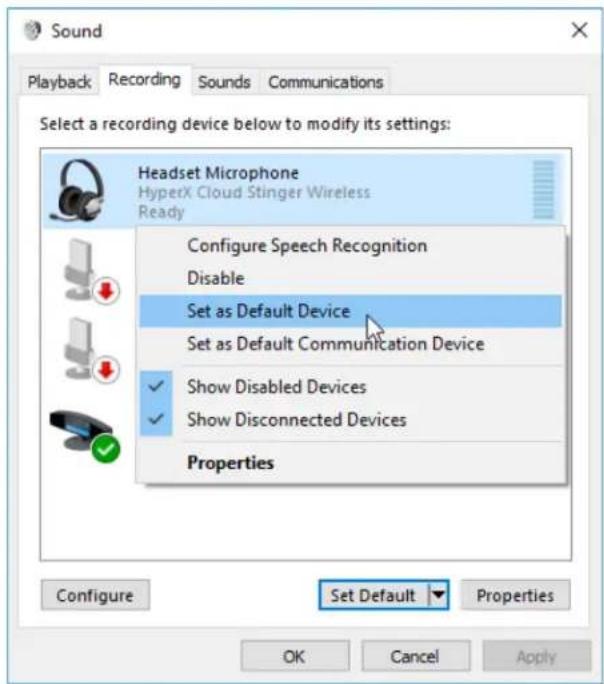
On the Recording tab, right-click on Headset Microphone HyperX Cloud Stinger Wireless and select Set as Default Device.
Manually Pairing Headset and Wireless Adapter
The headset and wireless adapter are already paired together for first time use. If manual pairing is necessary, follow the steps below to pair the headset and wireless adapter together.
- Make sure the headset is powered off.
- Plug the USB wireless adapter into the PC or PS4TM system.
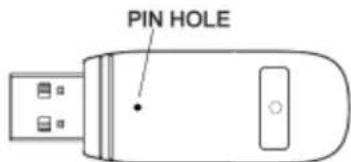
- Use a small pin to press the small button on the back side of the USB wireless adapter for 3 seconds. The USB wireless adapter LED will be fast blinking.
- Long press the headset power button for 10 seconds to enter the pairing mode. The headset battery indicator LED will be fast blinking.

- When both the USB wireless adapter LED and the headset battery indicator LED are both solid, pairing is completed.
Questions or Setup Issues?
Contact the HyperX support team at: hyperxgaming.com/support/headsets
HyperX Cloud Stinger Wireless™

FIGURE: 1. The black line is the center of the circle.
藥拉::
孕加:100Hz-7,000 Hz
[ \text{IN} = -47\text{dBV}(0\text{dB} = 1\text{V} / \text{Pa}, 1\text{kHz}) ]
BateRi SuMy
17.
BabTRII
2.5
无望
2.4 GHz
12m
due hyperxgaming.com/support/headsets
HyperX Cloud Snger Wireless™
V
HX-HSCSW-BK
#
a n u z LED u wu wuuuua
LED uonuunwou
| LEDaretuunruanrul | aretuunruanrul |
| namuunruanrul | namuunruanrul |
| namuunruanrul | namuunruanrul |
| namuunruanrul | namuunruanrul |
| namuunruanrul | namuunruanrul |
| namuunruanrul | namuunruanrul |
| namuunruanrul | namuunruanrul |
| nauunruanrul | nauunruanrul |
nns
WuWuWuWuWuWuWuWuWuWuWuWuWuWuWuWuWuWuWuWuWuWuWuWuWuWuWuWuWuWuWuWuWuWuWuWuWuWuWuWuWuWuWuWuWuWuWuWuWuWuWwUwUwUwUwUwUwUwUwUwUwUwUwUwUwUwUwUwUwUwUwUwUwUwUwUwUwUwUwUwUwUwUwUwUwUwUwUwUwUwUwUwUwUwUwUwUwUwUwUwUw
| LED LED LED LED LED LED LED LED LED LED LED LED LED LED LED LED LED LED LED LED LED LED LED LED LED LED LED LED LED LED LED LED LED LED LED LED LED LED LED LED LED LED LED LED LED LED LED LED LED LED LED LED LED LED LED LED LED LED LED LED LED LED LED LED LED LED LED LED LED LED LED LED LED LED LED LED LED LED LED LED LED LED LED LED LED LED LED LED LED LED LED LED LED LED LED LED LED LED LED LED LED LEDs | LED LED LED LED LED LED LED LED LED LED LED LED LED LED LED LED LED LED LED LED LED LED LED LED LED LED LED LED LED LED LED LED LED LED LED LED LED LED LED LED LED LED LED LED LED LED LED LED LED LED LED LED LED LED LED LED LED LED LED LED LED LED LED LED LED LED LED LED LED LED LED LED LED LED LED LED LED LED LED LED LED LED LED LED LED LED LED LED LED LED LED LED LED LED LED LED LED LED LEDs |
PS4TM
- 1
- 150
- wanuuaaunnnae nnne nnnnnae nnne nnne nnne nnne nnne nnne nnne nnne
- 1
- 150
- waiwannauuauauauauauauauauauauauauauauauauauauauauauauauauauauauauauauauauauauauauauauauauauauauauauauauauauauuuuuuuuuuuuuuuuuuuuuuuuuuuuuuuuuuuuuuuuuuuuuuuuuuuuuuuuuuuuuuuuuuuuuuuuuuuuuuuuuuuuuuuuuuuuuuuuuuuuuuuuuuuuuuuuuuuuuuuuuuuuuuuuuuuuuuuuuuuuuuuuuuuuuuuuuuuuuuuuuuuuuuuuuuuuuuuuuuuuuuuuuuuuuuuuuuuUU
n5Jvnu PC
- 1
- 1aiy
- 1aWanuruauaaiaaae aae ane ae ane ane ane ane ane ane ane ane ane
Waiuuiuunnnnnsanrnnnnaaannnwnpu PC ngnnnaivinnnnaaaiaulii
- nannnnaaennnnnnae nnne annnnnnae
-
Playback Speakers HyperX Cloud Stinger Wireless Set as Default Device
-
Recording Headset Microphone HyperX Cloud Stinger Wireless Set as Default Device

nnaaennnnnnaaaananaananaananaananaananaananaananaananaananaananaananaananaananaananaananaananaananaananaananaananaananaananaananaananaananaananaananaananaananaananaananaananaananaananaananaananaananaananaananaananaananaananaananaananaananaananaananaananaananaananaanaraannnnaaannnnaaannnnaaannnnaaannnnaaannnnaaannnnaaannnnaaannnnaaannnnaaannnnaaannnnaaannnnaaannnnaaannnnaaannnnaaannnnaaannnnaaannnnaaannnnaaannnnaaannnnaaannnnaaannnnaaannnnaaannnna
yauwauauuunuaa aunuun uauauauuunununuunuun uun
HyperX: hyperxgaming.com/support/headsets
HyperX Cloud Stinger Wireless™

Ma san pham
HX-HSCSW-BK
MucLuc
Tong quat 3
Thong so ky thuat 4
Nut diu khi n tai nghe 5
Cacrang thai cua den LED bao pin tren tai nghe 6
Sac tai nghe 7
Sudung voi PS4TM 8
Sudung voi Nintendo SwitchTM 9
Srdung voi may tinh. 10
Tuayghepnoi tai nghe va bo chuyendoi khongday. 12
Tóng quán
A. Num am luong
B. Xoay de tát tiéng micro
C. Cong sac USB
D. Nut nguàn
E. Bô chuyén doi khong day
F. Cap sac USB
G. Den trang thai khong day
H. Den LED bao pin
Thòng sǒ kǔ thuator
Tai nghe
Màng loa: Dong, 50mm voi nam cham dát hiém
Loai: Chup dαu, Dong kín
Dap tuyén tan so: 20Hz-20.000Hz
Tro khang: 32 Ohm
Múc bó suát am: 109dB SPL/mW o' 1kHz