
POWEG3010 - Hedge Trimmers PowerPlus - Free user manual and instructions
Find the device manual for free POWEG3010 PowerPlus in PDF.
| Product Type | Portable gas hedge trimmer |
| Brand | PowerPlus |
| Model | POWEG3010 |
| Engine displacement | 22.5 cm³ |
| Output power | 650 W |
| Weight | 5.65 kg |
| Fuel tank capacity | 580 ml |
| Blade length | 600 mm |
| Blade speed | 2400 rpm |
| Max engine speed | 10,000 rpm |
| Idle speed | 3000 rpm |
| Clutch engagement speed | 4000 rpm |
| Oil/gas mixture | 40:1 |
| Acoustic pressure (LpA) | 88 dB(A) |
| Acoustic power (LwA) | 109 dB(A) |
| Vibration level (aw) | 7.0 m/s² (K=1.5 m/s²) |
| Fuel type | Unleaded gasoline mixed with 2-stroke oil |
| Main functions | Cutting hedges, bushes and shrubs; adjustable handle at 45° and 90°; cold and hot start |
| Maintenance and cleaning | Regular blade lubrication, air filter cleaning, spark plug check, fuel drainage before storage |
| Safety | Safety lock, hand guard, emergency stop, mandatory wearing of protective equipment |
| Spare parts and repairability | Genuine parts available through authorized service center; repair by qualified personnel only |
| General information | 24-month warranty; non-professional use; CE declaration according to EN ISO 10517 |
Frequently Asked Questions - POWEG3010 PowerPlus
User questions about POWEG3010 PowerPlus
0 question about this device. Answer the ones you know or ask your own.
Ask a new question about this device
Download the instructions for your Hedge Trimmers in PDF format for free! Find your manual POWEG3010 - PowerPlus and take your electronic device back in hand. On this page are published all the documents necessary for the use of your device. POWEG3010 by PowerPlus.
USER MANUAL POWEG3010 PowerPlus
BG bIAPCKN IPEBOHHAOPBKOBOCTBO

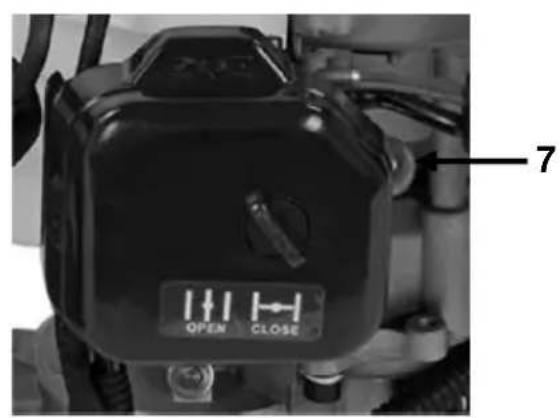
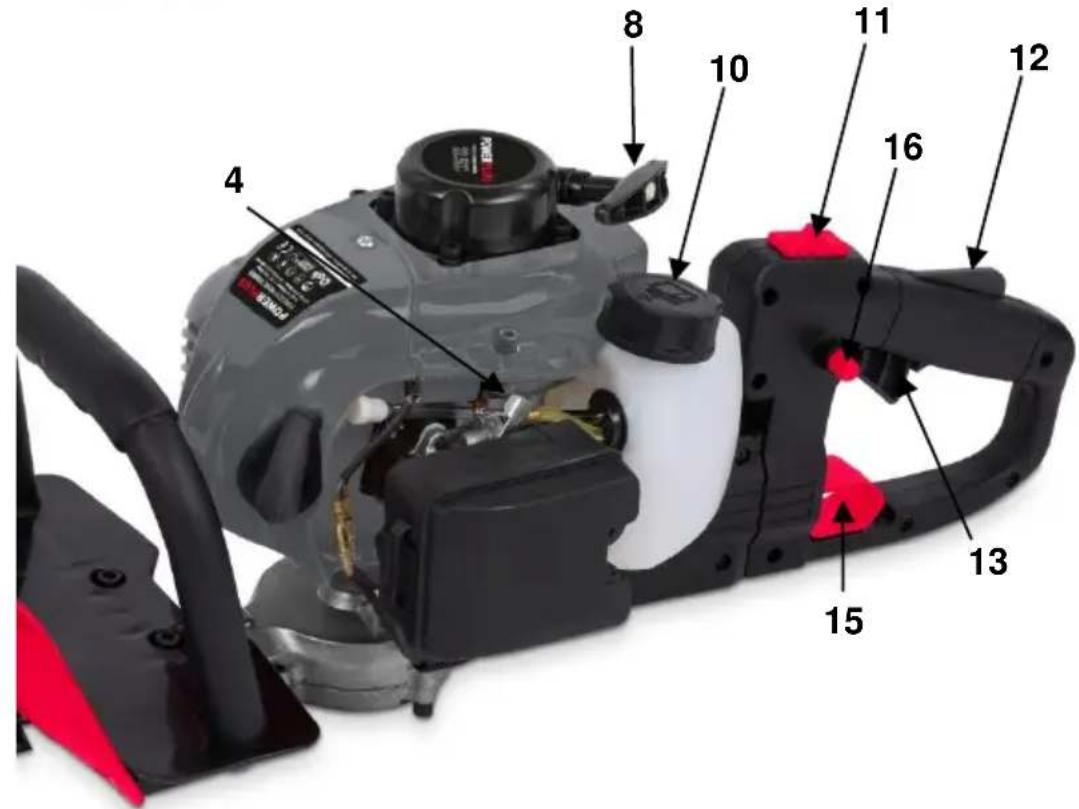
Fig. A
Fig. 1
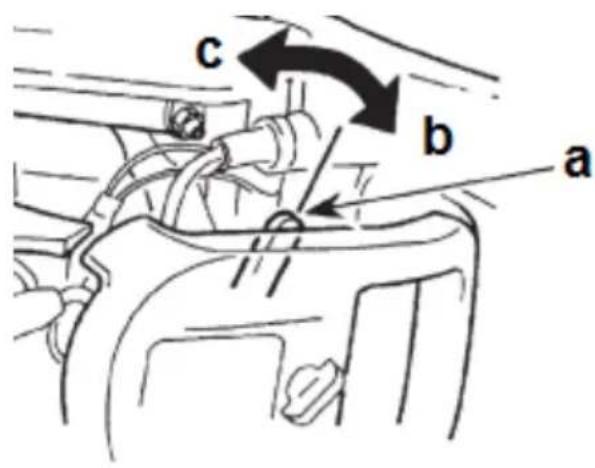
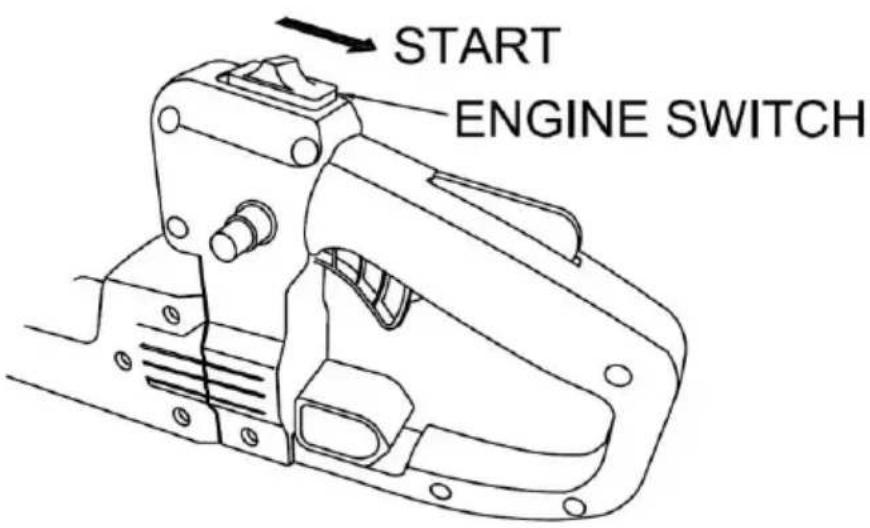
Fig. 2
Fig. 3
POWERPLUS POWEG3010

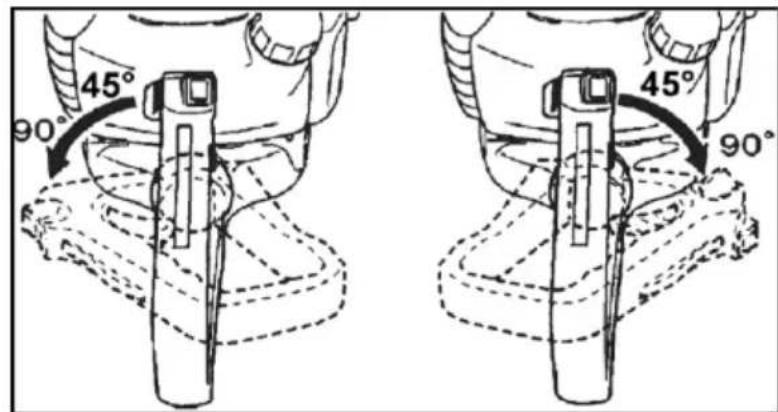
Fig. 4
Fig. 5
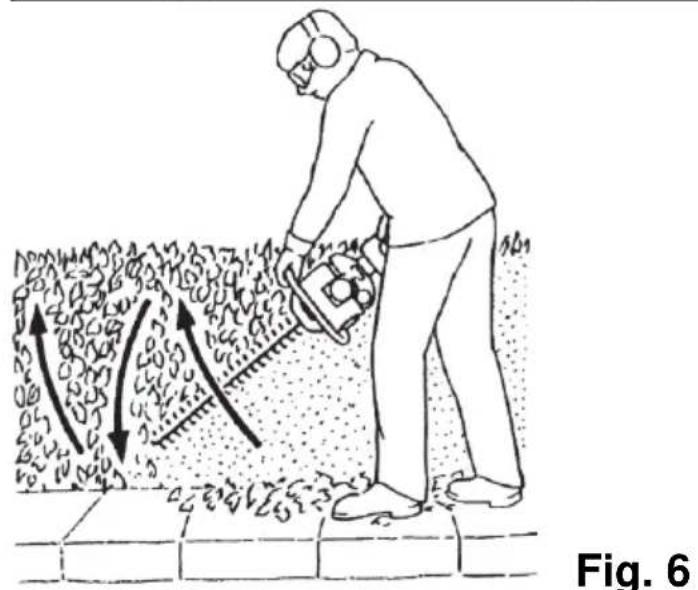
Fig. 6
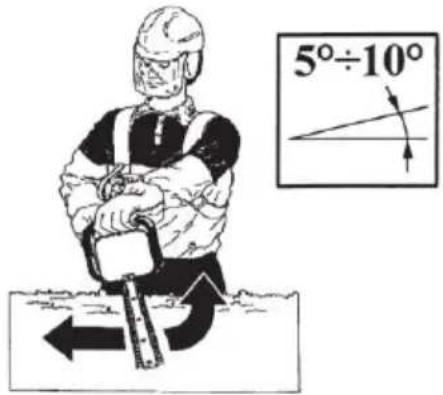
Fig. 7
POWERPLUS POWEG3010

Fig. 8
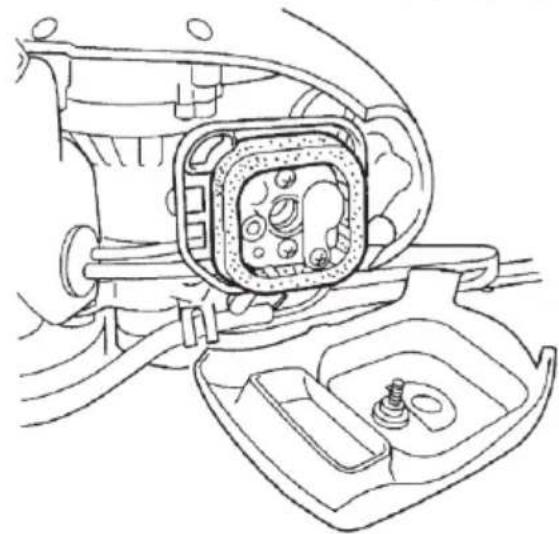
Fig. 9
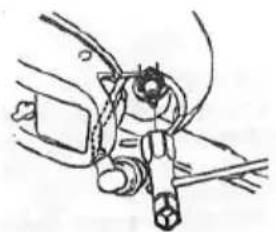
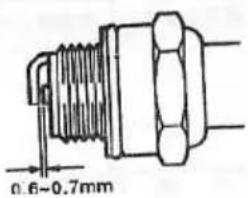

Fig. 10
Fig. 11
POWERPLUS POWEG3010 NL
16 PROBLEEMOPLOSSING
11/08/2021, Lier - Belgium
POWERPLUS POWEG3010 FR
11/08/2021, Lier - Belgium
POWERPLUS POWEG3010 EN
1 APPLICATION 3
2 DESCRIPTION 3
3 PACKAGE CONTENT LIST 3
4 SYMBOLS 3
5 GENERAL SAFETY WARNINGS 4
5.1 Work area 4
5.2 Personal safety 4
5.3 Engine tool use and care 5
5.4 Service 5
6 PETROL SAFETY WARNINGS 5
7 FUEL 5
7.1 Fuel and oil mixture 5
7.1.1 Mixing fuel 6
7.2 Refuelling 6
7.3 Storage of fuel 6
8 OPERATING INSTRUCTIONS 6
8.1 Starting the engine 6
8.1.1 Cold starting. 7
8.1.2 Hot starting 7
8.2 Stopping the engine 7
8.3 Angle change of rear handle 7
8.3.1 How to change the angle (Fig. 5)
8.3.2 Vertical operation (Fig. 6) 8
8.3.3 Horizontal operation (Fig. 7) 8
9 MAINTENANCE 8
9.1 Blade lubrication 9
9.2 Safety lock (Fig. 8) 9
9.3 Air cleaner (Fig. 9) 9
9.4 Air cooling 9
9.5 Spark Plug (Fig. 10) 9
9.6 Gearbox 10
POWERPLUS POWEG3010 EN
9.7 Silencer (Fig. 11) 10
9.7.1 After 100 hours of use 10
9.7.2 Maintenance before storage 10
10 CLEANING 10
11 STORAGE 10
12 STARTING UP AFTER LONGER PERIODS OF INACTIVITY ....10
13 TECHNICAL DATA 11
14 NOISE 11
15 SERVICE DEPARTMENT 11
16 TROUBLE SHOOTING 12
17 WARRANTY 13
18 ENVIRONMENT 13
19 DECLARATION OF CONFORMITY 14
POWERPLUS POWEG3010 EN HEDGE TRIMMER 22,5CC POWEG3010
1 APPLICATION
The hedge trimmer should be used only for trimming hedges, bushes and shrubs. Other uses of the trimmer not mentioned in this manual may damage the trimmer or seriously injure the operator and are therefore expressly excluded from the application range. It is not designed for commercial use.

WARNING! For your own safety, read this manual and the general safety instructions carefully before using the appliance. Your power tool should only be given to other users together with these instructions.
2 DESCRIPTION
- Blades
- Shield
- Front handle
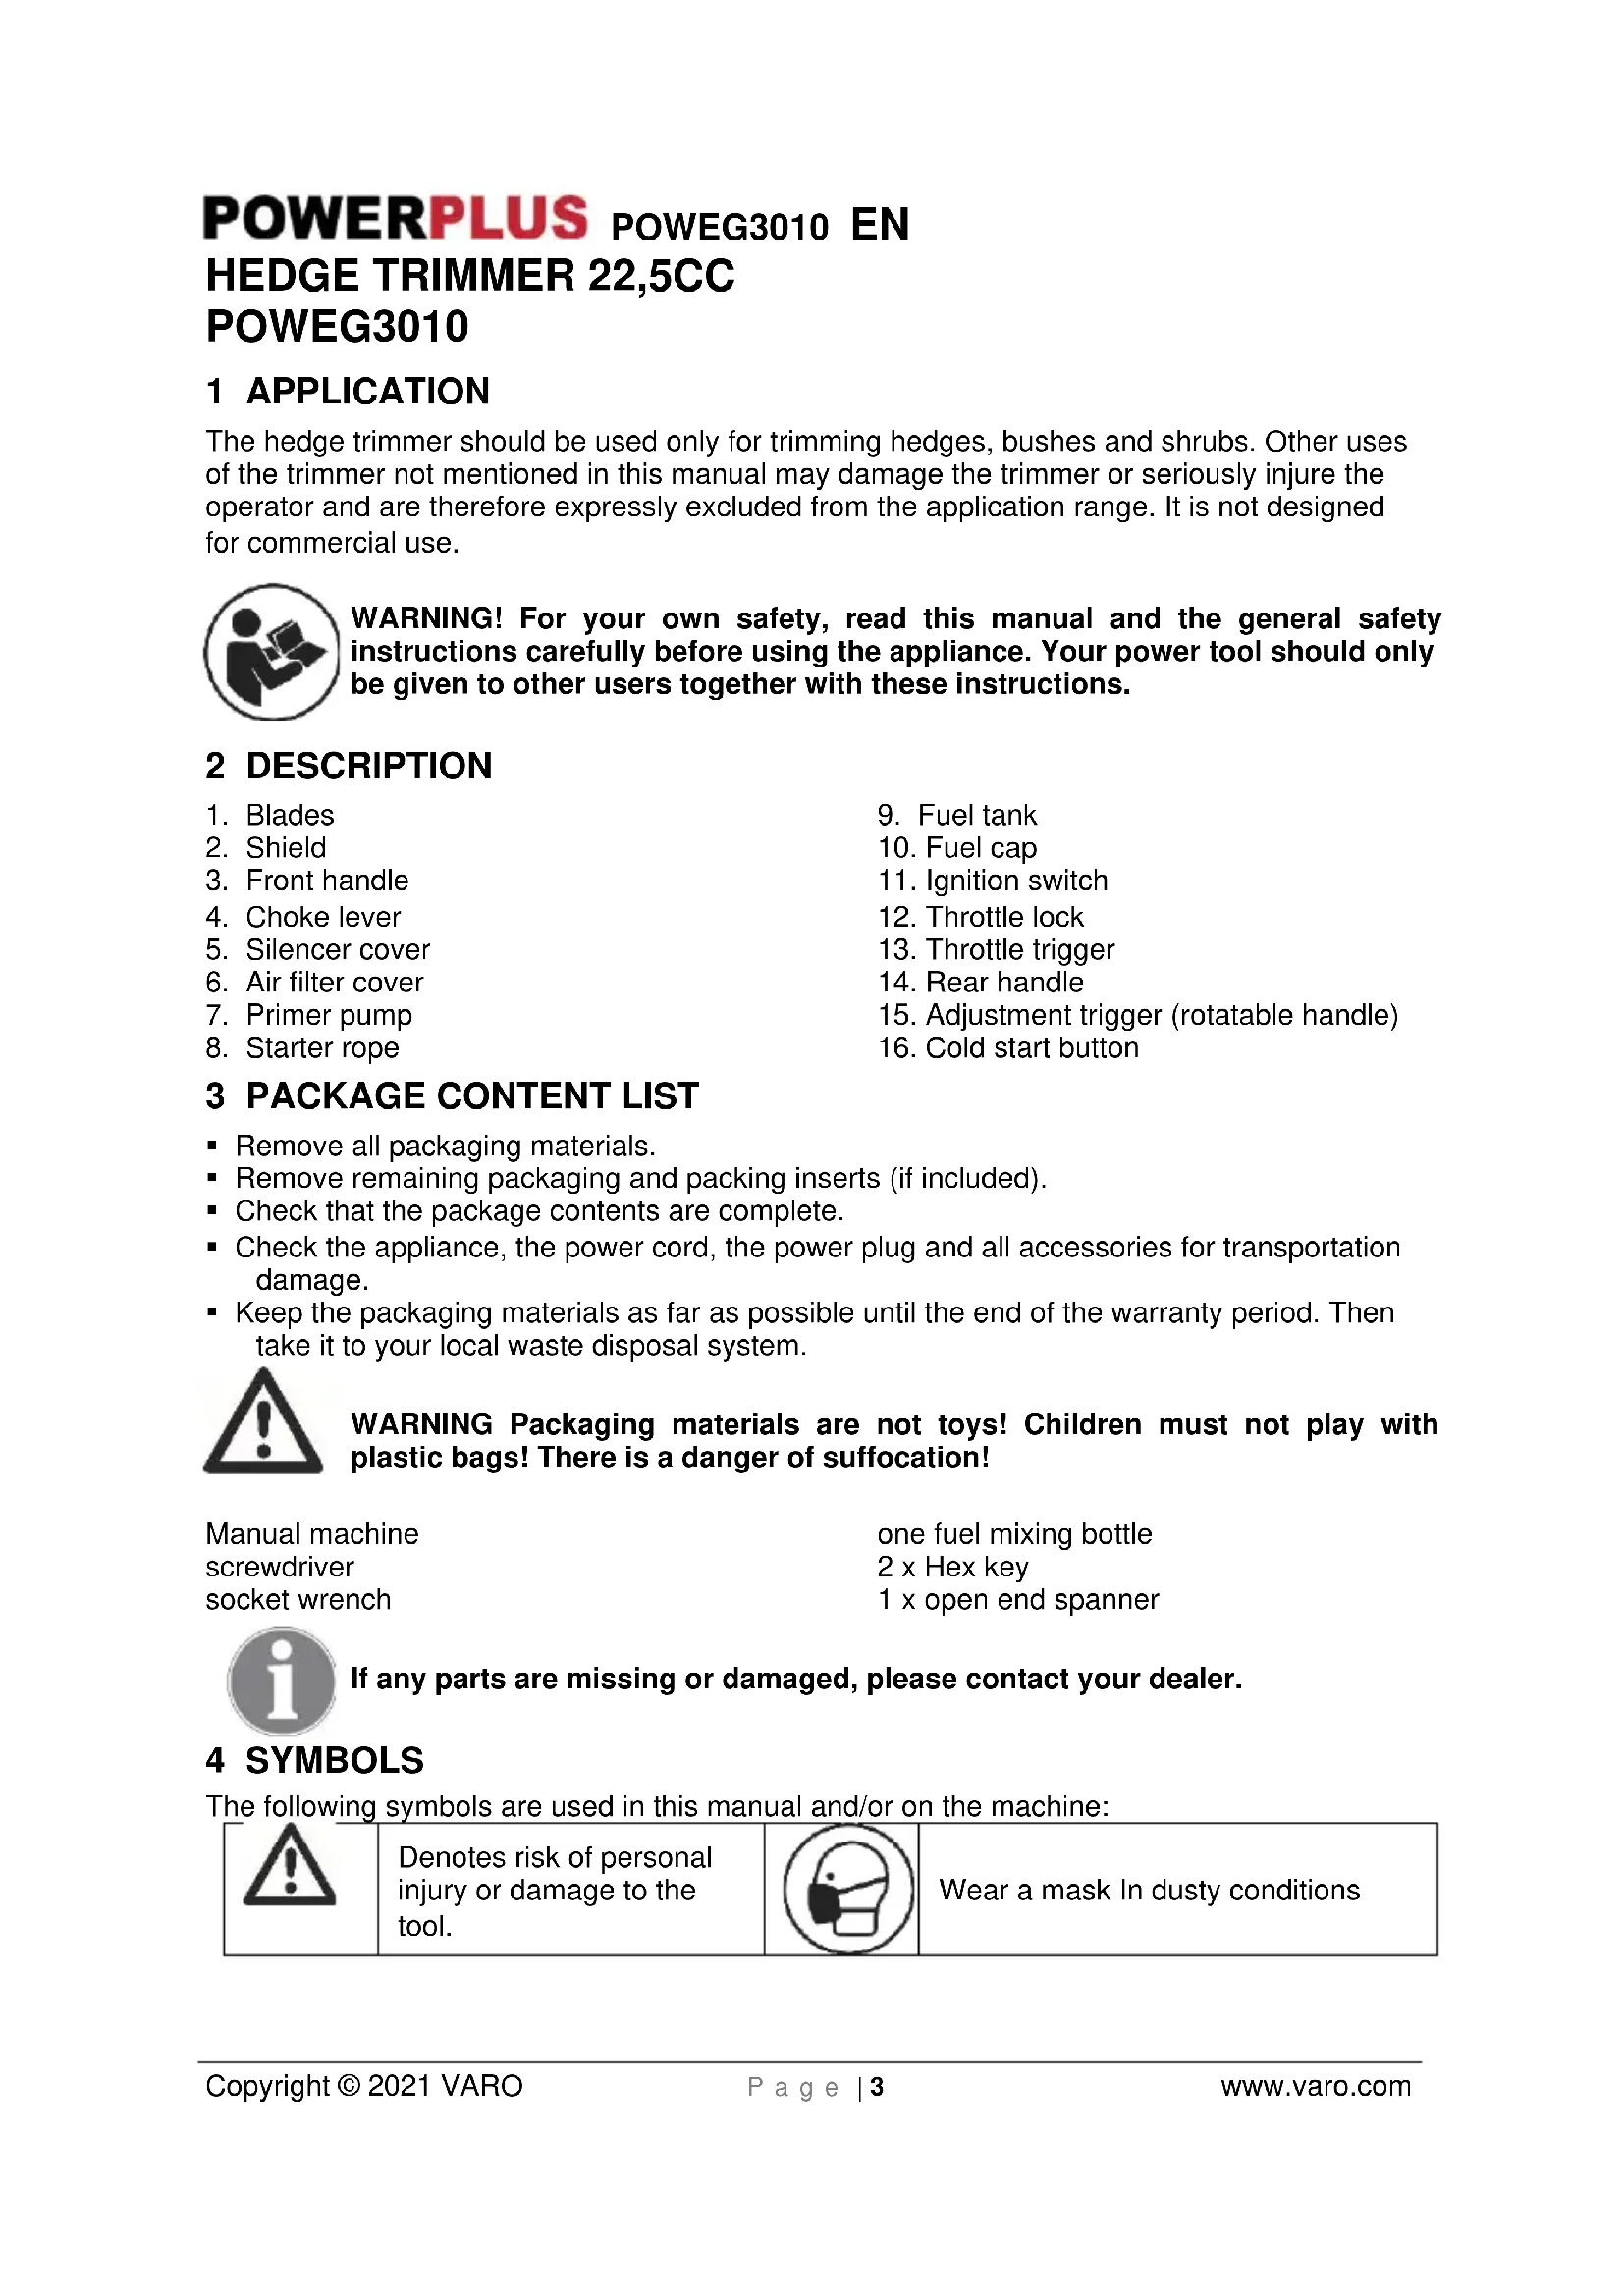
- Choke lever
- Silencer cover
- Air filter cover
- Primer pump
-
Starter rope
-
Fuel tank
- Fuel cap
- Ignition switch
- Throttle lock
- Throttle trigger
- Rear handle
- Adjustment trigger (rotatable handle)
- Cold start button
3 PACKAGE CONTENT LIST
- Remove all packaging materials.
- Remove remaining packaging and packing inserts (if included).
- Check that the package contents are complete.
- Check the appliance, the power cord, the power plug and all accessories for transportation damage.
- Keep the packaging materials as far as possible until the end of the warranty period. Then take it to your local waste disposal system.

WARNING Packaging materials are not toys! Children must not play with plastic bags! There is a danger of suffocation!
Manual machine screwdriver socket wrench
one fuel mixing bottle 2xHex key 1x open end spanner

If any parts are missing or damaged, please contact your dealer.
4 SYMBOLS
The following symbols are used in this manual and/or on the machine:

Denotes risk of personal injury or damage to the tool.

Wear a mask in dusty conditions
POWERPLUS POWEG3010 EN
| Read manual before use | Never operate the machine in the rain or in damp or wet conditions. Moisture is an electrical shock hazard. | ||
| Wear noise protection | Wear gloves | ||
| Wear eye protection | Wearing of protective shoes advised | ||
| CE | In accordance with essential safety standards of applicable European directives | No smoking | |
| No naked flame | Fuel and oil mixture | ||
| Keep hands away from blades. Do not touch the blades when starting or while operating the unit. | |||
5 GENERAL SAFETY WARNINGS

Read all safety warnings and all instructions. Failure to follow all warnings and instructions may result in electric shock, fire and/or serious injury. Save all warnings and instructions for future reference.
5.1 Work area
- Keep work area clean and well lit. Cluttered and dark areas invite accidents.
- Do not operate tools in explosive atmospheres, such as in the presence of flammable liquids, gases or dust. Tools create sparks which may ignite the dust or fumes.
- Keep children and bystanders away while operating a tool. Distractions can cause you to lose control.
5.2 Personal safety
- Stay alert, watch what you are doing and use common sense when operating a tool. Do not use a tool while you are tired or under the influence of drugs, alcohol or medication. A moment of inattention while operating tools may result in serious personal injury.
- Use safety equipment. Always wear eye protection. Safety equipment such as dust mask, non-skid safety shoes, hard hat, or hearing protection used whenever conditions require will reduce personal injuries.
- Avoid accidental starting. Ensure the switch is in the off position before plugging in. Carrying tools with your finger on the switch or plugging in tools that have the switch on invites accidents.
- Remove any adjusting key or wrench before turning the tool on. A wrench or a key left attached to a rotating part of the tool may result in personal injury.
- Do not overreach. Keep proper footing and balance at all times. This enables better control of the tool in unexpected situations.
- Dress properly. Do not wear loose clothing or jewellery. Keep your hair, clothing and gloves away from moving parts. Loose clothes, jewellery or long hair can be caught in moving parts.
POWERPLUS POWEG3010 EN
If devices are provided for the connection of dust extraction and collection facilities, ensure these are connected and properly used. Use of these devices can reduce dust related hazards.
5.3 Engine tool use and care
Use the correct tool for your application. The correct tool will do the job better and safer at the rate for which it was designed.
- Store idle tools out of the reach of children and do not allow persons unfamiliar with the tool or these instructions to operate the tool. The tools are dangerous in the hands of untrained users.
- Maintain tools. Check for misalignment or sticking of moving parts, breakage of parts and any other condition that may affect the tool's operation. If damaged, have the tool repaired before use. Many accidents are caused by poorly maintained tools.
- Keep cutting tools sharp and clean. Properly maintained cutting tools with sharp cutting edges are less likely to stick and are easier to control.
- Use the tool, accessories and tool bits etc., in accordance with these instructions and in the manner intended for the particular type of tool, taking into account the working conditions and the work to be performed. Use of the tool for operations different from intended could lead to a hazardous situation.
5.4 Service
- Have your tool serviced by a qualified person using only identical replacement parts. This will ensure that the safety of the tool is maintained.
6 PETROL SAFETY WARNINGS
- Do not operate in a hazardous location. Such areas include where there is a risk of explosion of petrol fumes, leaking gas or explosive dust.
- Do not operate in a confined area. Exhaust gases, smoke or fumes could reach dangerous concentrations.
- Protect your tool. This hedge trimmer is NOT WEATHERPROOF and should not be exposed to direct sunlight, high ambient temperature and damp, wet or high humidity conditions.
- Do not smoke while refueling. This is potentially dangerous as it may ignite the fuel and cause an explosion.
- Take care not to spill fuel. When refueling the hedge trimmer ensure that the motor has been switched off. Prevent the spilling of fuel as this may also ignite with the hot motor. Never refuel whilst the engine running.
- Be careful where you store the hedge trimmer. Store the hedge trimmer in a dry area away from flammable liquids.
- Keep your distance. The hedge trimmer emits exhaust fumes. Ensure bystanders keep a safe distance.
- Ensure you use oil-mix fuel. Ensure that you mix 40 parts unleaded fuel to 1 part 2-stroke oil. If not, the engine will overheat and cause damage to your hedge trimmer.
7 FUEL
7.1 Fuel and oil mixture
For best results use regular unleaded petrol mixed with 2-stroke air-cooled engine oil on a ratio of 40:1.

WARNING: Never use unmixed petrol in your engine. This will cause permanent damage and void the manufacturer's warranty for the product. Never use a fuel mixture that has been stored for more than 30 days.
POWERPLUS POWEG3010 EN

WARNING: 2-stroke lubricant must be a premium grade oil for 2-stroke air-cooled engines mixed at a 40:1 ratio. Do not use any 2-stroke oil product with a recommended mix ratio of 100:1. If insufficient lubrication is the cause of engine damage, it voids the manufacturer's engine warranty.
7.1.1 Mixing fuel
Pour oil into an approved fuel canister followed by the petrol so that the petrol can mix with the oil. Shake container to ensure a thorough mix.

WARNING: Lack of lubrication voids engine warranty. Petrol and oil must be mixed at a 40:1 ratio.
7.2 Refuelling
- The engine must be switched off.
- Stop the engine during refuelling, keep away from naked flames and do not smoke.
- Take care not to spill either fuel or oil in order to prevent soil contamination (environmental protection). Clean the hedge trimmer immediately after fuel has been spilt.
- Do not spill any fuel onto the engine. Wipe up if necessary to avoid fire.
- Avoid any fuel contact with your clothing. Change your clothing instantly if fuel has been split on it (to prevent it catching fire).
- Inspect the fuel cap at regular intervals, making sure that it can be securely fastened and does not leak.
- Carefully tighten the fuel tank cap. Change location to start the engine (at least 3 metres away from the place of refuelling).
- Never refuel in enclosed rooms. Fuel vapours accumulate at ground level. (risk of potential explosions).
- Transport and store fuel only in approved containers. Make sure the fuel stored is not accessible to children.
Thoroughly clean the area around the tank cap to prevent dirt from getting into the fuel tank. - Unscrew the plug and fill the tank with fuel. Use a gauge funnel to filter the fuel.
- Tightly screw on the plug by hand only.
- Clean around the screw plug and the tank after refuelling.
Always wipe up any spilt fuel to prevent a fire.
7.3 Storage of fuel
- Fuel cannot be stored for an unlimited period of time.
Purchase only the quantity required for a 4-week operating period. - Use approved fuel storage containers only.
8 OPERATING INSTRUCTIONS
8.1 Starting the engine
Move at least 3 metres away from the place of refuelling. Place the hedge trimmer on a clean area of ground and make sure that the cutting tool does not come into contact with the ground or any other objects.

Keep the blades clear of everything around, since they will start moving as soon as the engine starts.
POWERPLUS POWEG3010 EN
8.1.1 Cold starting
If the engine is cold or if it has been stopped for more than 5 minutes or if fuel has been added to the engine.
-
Push the primer pump gently (7 to 10 times) until fuel begins to flow into it. (Fig. 1)
-
Move the choke lever (4) to position "CLOSE / N" (Fig. 2)
(a) choke lever
(b) open
(c) close
- Set the ignition switch to the "START" position. (Fig. 3)
- Hold the unit down firmly so that you will not lose control while cranking the engine. If not held down properly, the engine could make you lose your balance or swing the cutting blade into a nearby object or your body.
- Pull out the starter handle slowly (10 to 15 cm), and check the pressure. Pull strongly when you feel the pressure and start the engine.
- When the engine starts, return the choke lever to "OPEN /".
- Run the engine for approximately one minute at a moderate speed before moving up to full speed

Note: When restarting the engine immediately after stopping it, leave the choke open.

Note: Overchoking can make it hard to start the engine due to excess fuel. If the engine fails to start after several attempts, open the choke and pull the rope again, or remove the spark plug and dry it.
8.1.2 Hot starting
Restarting immediately after the engine has stopped. If the engine does not start, repeat the above steps

Do not pull the rope to the end or return it by releasing the knob. This can cause starter failures.
8.2 Stopping the engine
- Release the throttle lever completely.
- Move the engine switch to the "STOP" position. The engine will now slow down and stop (Fig. 4)

Note: If the engine does not stop after moving the switch, close the choke to make it stop.
8.3 Angle change of rear handle
To permit vertical operation of the unit, the angle of the rear handle can be changed. To reduce fatigue when trimming hedges, the handle can be swivelled 45^ or 90^ to the left or to the right.
8.3.1 How to change the angle (Fig. 5)
- Push back the throttle lever, and rotate the rear handle, pulling the adjustment trigger.
- Rotate the rear handle 90 or 45 degrees to the right or to the left.
- After completing the rotation, release the adjustment trigger To secure the rear handle, hold the adjustment trigger gently with one finger
POWERPLUS POWEG3010 EN
- Use only as much throttle as is needed to do the job. Excessive engine speed is unnecessary.
Always keep your body to the carburettor side of your trimmer, and never to the silencer side. - During the first few minutes when a new machine is first used, grease may come out of the gearbox. Since this is excess grease, it is not a cause for alarm. Just wipe it off when the engine is switched off.
8.3.2 Vertical operation (Fig. 6)
- When rotating the rear handle to the right, hold the rear handle with your right hand, and the front handle with your left hand.
- When rotating the rear handle to the left, hold the front handle with your right hand, and the rear handle with your left hand. Cut using a circular movement.
8.3.3 Horizontal operation (Fig. 7)
- Tilting the trimmer 5 to 10^ towards the object to be cut will make things easier and produce good results.

Always follow the safety precautions. The hedge-trimmer must only be used to trim hedges or small bushes. It is forbidden to cut other types of material. Do not use the hedge-trimmer as a lever to lift, move or break objects, nor lock it on fixed supports.
9 MAINTENANCE
Our machines have been designed to operate for a long period of time with a minimum of maintenance. Continuous and satisfactory operation presupposes proper machine care and regular cleaning.
| System / component | Procedure | Before use | Every 25 hours | Every 50 hours | Every 100 hours | note | |
| Engine | Fuel leaks, fuel spillage | Wipe up | V | ||||
| Fuel tank, air filter, fuel filter | Inspect/clean | V | V | Replace if necessary | |||
| Idle adjusting screw | See adjusting idling speed | V | Replace carburettor if necessary. | ||||
| Spark plug | Clean and readjust electrode gap | V | GAP: 0,6-0,7mm, replace if necessary | ||||
| Cylinder fins, intake air cooling vent | Clean | V | |||||
| Silencer, spark arrester, cylinder exhaust port | Clean | V |
POWERPLUS POWEG3010 EN
| Shaft | Throttle lever, ignition switch | Check operation | V | ||||
| Cutting parts | Replace if something is wrong | V | |||||
| Gearbox | Grease | V | |||||
| Screw/nuts/bolts | Tighten/replace | V | Not adjusting screws |

Warning: Before cleaning, inspecting, or repairing the unit, make sure that the engine has stopped and is cool.
9.1 Blade lubrication

Warning: before lubricating, be sure your unit is switched off and that the blade has come to a complete stop.
- For easier operation and longer blade life, lubricate the blade before and after each use. Apply light machine oil along the edge of the blade bar
9.2 Safety lock (Fig. 8)

Warning: Stop using the trimmer if the safety lock is defective
Safety lock is the device which stops the throttle lever from being activated unintentionally. If you push the safety lock, you will activate the throttle lever.
Safety lock:
- Check that the throttle lever does not move if you do not push the safety lock.
- Check that the throttle lever moves if you activate or release it while pushing the safety lock.
- Check that the safety lock returns to its original position if you take your hand from safety lock.
- If these checks reveal any defects, contact your nearest dealer and ask to have them repaired
9.3 Air cleaner (Fig. 9)
Release the air cleaner cover and remove the dust. If the element is dirty, clean it by tapping it or by blowing away the dirt. If the element is bent or damaged, replace it. After you have cleaned the element reattach it to the cleaner body with the stamp on the outside (facing the cleaner cover). After that, replace the cleaner cover
Important: a clogged air cleaner reduces engine performance. Operating with no element or with a bent or damaged element causes irregular wear and tear of the engine mechanism
9.4 Air cooling
This engine is air-cooled. Dust clogging up the air cooling inlet port and the cylinder fins will cause the engine to overheat. Periodically check and clean the cylinder fins after removing the air cleaner and the cylinder cover.
9.5 Spark Plug (Fig. 10)
Starting problems and misfiring are often caused by a fouled sparkplug
Periodically clean the spark plug, and replace with a new one as and when required.
POWERPLUS POWEG3010 EN

Important: When dismounting the plug cap, be careful not to remove the seal. Operating the engine without the seal may cause the engine to overheat.

Important: When inserting the spark plug, first screw it in with your fingers, and then tighten it with the help of a suitable plug spanner. Overtightening will damage the cylinder and the piston
9.6 Gearbox
Apply multipurpose grease after every 25 hours of use.
9.7 Silencer (Fig. 11)
9.7.1 After 100 hours of use
Check to see if any oil or grease has worked its way in between the clutch lining and drum, and if it has, wipe it away using oil-free and unleaded petrol
9.7.2 Maintenance before storage
Use a dry rag to wipe away any fuel which has been spilt onto the unit.
- Extract fuel from the tank and run the engine until it stops naturally.
- Remove the spark plug and put in 1-2cc of 2- stroke oil in the engine. Pull the starter rope 2-3 times, set the plug back, and stop it at the contraction position.
Apply anti-rust oil to the metal parts such as the throttle wire, etc., put the cover on the blade, and keep it indoors to avoid exposing it to dampness.
10 CLEANING
- Use a damp cloth to clean the plastic parts.
- Do not use any detergents, solvents or pointed objects.
11 STORAGE
So that the hedge trimmer will work again after a long period of inactivity, you should observe the following points:
- Empty the petrol tank. To do this, start the engine and let it run until it reaches a standstill. Dispose of the remaining petrol in an environmentally friendly way.
- Let the engine cool and take out the spark plug.
- Pour a small spoonful of 2-stroke mixture into the spark plug opening and slowly pull the starter cord right through to the end several times. This gets rid of small deposits of rust and lubricates the piston and cylinder.
- Check the spark plug and replace it if too much of the firing tip has been burnt off.
- Keep the blade in a dry place - out of the reach of fire.
12 STARTING UP AFTER LONGER PERIODS OF INACTIVITY
- Remove the spark plug.
- Quickly pull the starter cord right through several times in order to remove oil and deposits in the engine compartment.
- Check the spark plug, replace it if necessary and screw it in.
- Fill the petrol tank with the 2-stroke mixture.
POWERPLUS POWEG3010 EN
13 TECHNICAL DATA
| Engine displacement | 22,5cc |
| Construction | Hand-held |
| Weight | 5,65 kg |
| Fuel tank capacity | 580ml |
| Blade length | 600mm |
| Blade speed | 2400 r/min |
| Max. engine speed | 10000 r/min |
| Engine idle speed | 3000 r/min |
| Clutch engagement speed | 4000 r/min |
| Output power | 650W |
| Engine oil / gasoline mixed ratio | 40:1 |
14 NOISE
Noise emission values measured according to relevant standard. (K = 3)
| Acoustic pressure level LpA | 88 dB(A) |
| Acoustic power level LwA | 109 dB(A) |

ATTENTION! Wear hearing protection when sound pressure is over 85 dB(A).
aw (Vibration):
Max 7.0m / s^2
K = 1.5m / s^2
15 SERVICE DEPARTMENT
Damaged switches must be replaced by our after-sales service department.
If the connecting cable (or mains plug) is damaged, it must be replaced by a special connecting cable which is available from our service department. Replacement of the connecting cable should only be carried out by our service department (see last page) or by a qualified specialist (qualified electrician).
POWERPLUS POWEG3010 EN
16 TROUBLE SHOOTING
| PROBLEM | PROBABLE CAUSE | CORRECTIVE ACTION |
| Unit won't start or starts but will not run. | Incorrect starting procedures.Incorrect carburettor mixture adjustment setting.Fouled sparking plugEmpty fuel tank.Primer bulb was not pressed enough. | Follow instructions in the User Manual.Have carburettor adjusted by an Authorized Service CentreCLEAN/gap or replace plug.Fill fuel tank with properly mixed fuel.Press primer bulb fully and slowly 10 times. |
| Unit starts, but engine has low power. | Fuel filter is plugged.Incorrect lever position.Dirty spark arrester screenDirty air filter.Incorrect carburettor mixture adjustment setting service dealer. | Replace the fuel filter.Move to RUN position.Replace spark arrester screen.Remove, clean and reinstall filter.Have carburettor adjusted by an Authorized Service Centre. |
| Engine sputters. ! | Incorrect carburettor mixture adjustment setting.Air filter is plugged.Old or improperly mixed fuel. | Have carburettor adjusted by an Authorized Service Centre.Replace or clean the air filter.Drain gas tank/add fresh fuel mixture. |
| No power under load. | Incorrect carburettor mixture adjustment setting.Old or improperly mixed fuel.Air filter is plugged.Fouled spark plug. | Have carburettor adjusted by an Authorized Service Centre.Drain gas tank /add fresh fuel mixture.Replace or clean the air filter.Clean/gap or replace plug. |
| Runs erratically | Incorrectly gapped sparking plug.Plugged spark arrester.Dirty air filter. | Clean/gap or replace plugCLEAN or replace spark arresterCLEan or replace air filter. |
| Smokes excessively. | Incorrect carburettor mixture adjustment setting.Incorrect fuel mixture. | Have carburettor adjusted by an Authorized Service Centre.Use properly mixed fuel (40:1 mixture). |
POWERPLUS POWEG3010 EN
17 WARRANTY
This product is warranted for a 24-month period effective from the date of purchase by the first user.
- This warranty covers all material or production flaws excluding : batteries, chargers, defective parts subject to normal wear & tear such as bearings, brushes, cables, and plugs, or accessories such as drills, drill bits, saw blades, etc. ; damage or defects resulting from maltreatment, accidents or alterations: nor the cost of transportation.
- Damage and/or defects resulting from inappropriate use also do not fall under the warranty provisions.
We also disclaim all liability for any bodily injury resulting from inappropriate use of the tool.
- Repairs may only be carried out by an authorised customer service centre for Powerplus tools.
- You can always obtain more information at the number 00 32 3 292 92 90.
- Any transportation costs shall always be borne by the customer, unless agreed otherwise in writing.
- At the same time, no claim can be made on the warranty if the damage of the device is the result of negligent maintenance or overload.
- Definitely excluded from the warranty is damage resulting from fluid permeation, excessive dust penetration, intentional damage (on purpose or by gross carelessness), inappropriate usage (use for purposes for which the device is not suitable), incompetent usage (e.g. not following the instructions given in the manual), inexpert assembly, lightning strike, erroneous net voltage. This list is not exhaustive.
- Acceptance of claims under warranty can never lead to the prolongation of the warranty period nor commencement of a new warranty period in case of a device replacement.
Devices or parts which are replaced under the warranty therefore remain the property of Varo NV.
- We reserve the right to reject a claim whenever the purchase cannot be verified or when it is clear that the product has not been properly maintained. (Clean ventilation slots, carbon brushes serviced regularly, etc.).
- Your purchase receipt must be kept as proof of date of purchase.
- Your appliance must be returned undismantled to your dealer in an acceptably clean state, (in its original blow-moulded case if applicable to the unit), accompanied by proof of purchase.
18 ENVIRONMENT
Should your appliance need replacement after extended use, do not dispose of it with the household refuse, but in an environmentally safe way.
Please dispose of used motor oil in a manner that protects the environment. We suggest you take it in a sealed container to your local service station for recycling. Do not throw it into the refuse or pour it on the ground.
POWERPLUS POWEG3010 EN 19 DECLARATION OF CONFORMITY


VARO - Vic. Van Rompuy N.V. - Joseph Van Instraat 9 - BE2500 Lier - BELGIUM, declares that,
Product: Hedge trimmer 22,5cc
Trade mark: PowerPlus
Podel:POwEG3010
is in conformity with the essential requirements and other relevant provisions of the applicable European Directives, based on the application of European harmonized standards. Any unauthorized modification of the apparatus voids this declaration.
European Directives (including, if applicable, their amendments up to the date of signature);
2006/42/EC
2014/30/EU
2000/14/EC Annex V LwA
Guaranteed
Measured
110dB(A)
108dB(A)
European harmonized standards (including, if applicable, their amendments up to the date of signature);
EN ISO 10517:2019
EN ISO 14982:2009
Keeper of the Technical Documentation : Philippe Vankerkhove, VARO - Vic. Van Rompuy N.V.
The undersigned acts on behalf of the company CEO,

Philippe Vankerkhove
Regulatory Affairs - Compliance Manager
11/08/2021, Lier - Belgium
POWERPLUS POWEG3010 DE
11/08/2021, Lier - Belgium
POWERPLUS POWEG3010 ES
11/08/2021, Lier - Belgium
POWERPLUS POWEG3010 IT
Regulatory Affairs - Compliance Manager
11/08/2021, Lier - Belgium
POWERPLUS POWEG3010 PT
1 APLICACAO 3
2 DESCRIÇÃO 3
3 LISTA DE CONTEUDO DA EMBALAGEM 3
4 SIMBOLOS 3
5 PROCEDIMENTOS GERAIS DE SEGURANCA. 4
5.1 Area de trabajo 4
5.2 Segurancapessoal 4
5.3 Manuseamento e emprego de ferramentas acontedas por motor com precauçao 5
5.4 Assistance Tecnica 5
6 ADVERTÉNCIAS DE SEGURANÇA SOBRE A GASOLINA ....5
7 COMBUSTIVEL 6
7.1 Mistura de combustivel e oleo 6
7.1.1 Mistura de combustivel 6
7.2 Reabastecer 6
7.3 Armazenamento do combustivel 7
8 UTILIZACAO 7
8.1 Iniciar o motor 7
8.1.1 Arranque a frio 7
8.1.2 Arranque a quente 8
8.2 Parar o motor 8
8.3 Mudança de angulo do punho traseiro 8
8.3.1 Como mudar o angulo: (Fig. 5)
8.3.2 Operacao vertical (Fig. 6) 8
8.3.3 Operacao horizontal (Fig. 7) 8
9 MANUTENCAO 9
9.1 Lubrificacao da lamina 10
9.2 Bloqueio de segurarca (Fig. 8) 10
9.3 Agente de limpeza do ar (Fig. 9) 10
9.4 Processo do ar de refrigeracao 10
9.5 Vela de ignicao (Fig. 10) 10
POWERPLUS POWEG3010 PT
11/08/2021, Lier - Belgium
POWERPLUS POWEG3010 NO
1 BRUKSOMRADE 3
2 BESKRIVELSE. 3
3 PAKKENS INNHOLD 3
4 SYMBOLFORKLARING 3
5 GENERELLE SIKKERHETSADVARSLER 4
5.1 Arbeidsplassen 4
5.2 Personsikkerhet 4
5.3 Vær noyaktig og omhyggelig nár du omgås verktoy.. 5
5.4 Service 5
6 SIKKERHET VED HändTERING AV BENSIN 5
7 DRIVSTOFF 5
7.1 Blanding av bensin og olje.. 5
7.1.1 Blanding av drivstoff 6
7.2 Fylling 6
7.3 Lagring av drivstoff.. 6
8 BRUK. 6
8.1 Startemotoren 6
8.1.1 Kaldstart 7
8.1.2 Varmstart 7
8.2 Stoppe motoren 7
8.3 Endre vinkel pa bakre handtak.. 7
8.3.1 Slik endrer du vinkelen: (Fig. 5)
8.3.2 Vertical klipping (Fig.6) 8
8.3.3 Horizontal klipping (Fig. 7) 8
9 VEDLIKEHOLD 8
9.1 Smoring av kniver 9
9.2 Sikkerhetslas (Fig.8) 9
9.3 Luftfilter (Fig. 9) 9
9.4 Kjoleluftveiene 9
9.5 Tennplugg (Fig. 10) 9
9.6 Girkasse 10
POWERPLUS POWEG3010 NO
9.7 Lyddemper (Fig. 11) 10
9.7.1 Etter 100 timers bruk 10
9.7.2 Vedlikehold for oppbevaring 10
10 RENGJØRING 10
11 LAGRING 10
12 OPPSTART ETTER LANG TIDS OPPBEVARING 10
13 TEKNISKE DATA 10
14 STOY 11
15 SERVICEAVDELING. 11
16 FEILsOKING 11
17 GARANTI 12
18 MILJ0 12
19 SAMSVARSERKLÄERING 13
POWERPLUS POWEG3010 NO
HEKKEKLIPPER 22,5CC
POWEG3010
1 BRUKSOMRADE
11/08/2021, Lier - Belgium
POWERPLUS POWEG3010 DA
1 ANVENDELS
2 BESKRIVELSE. 3
3 MEDFØLGENDE INDHOLD 3
4 SYMBOLER 3
5 ALMINDELIGE SIKKERHEDSANVISNINGER FOR VÆRKTØJ ...4
5.1 Arbejdsomrade 4
5.2 Personlig sikkerhed 4
5.3 Omhyggelig handtering og anvendelse af varktojer.. 5
5.4 Service 5
6 SIKKERHEDSADVARSLER FOR BENZIN 5
7 BRaENDSTOF 6
7.1 Brændstof og olieblanding.. 6
7.1.1 Opblanding af brændstof 6
7.2 Genoptankning 6
7.3 Opbevaring af brandstof 6
8 BRUG 7
8.1 Start of motoren 7
8.1.1 Koldstart 7
8.1.2 Varmstart 7
8.2 Stop af motoren 7
8.3 AEndring af det bageste handtags vinkel.. 8
8.3.1 Sdan aendres vinklen: (Fig. 5) 8
8.3.2 Lodret klipning (Fig. 6)
8.3.3 Horizontal betjening (Fig. 7) 8
9 VEDLIGEHOLDELSE 8
9.1 Smaring af knivene 9
9.2 Sikkerhedslas (Fig. 8) 9
9.3 Luftfilter (Fig. 9) 10
9.4 Koleuftens blaeseretning 10
9.5 Taendr (Fig. 10) 10
9.6 Gearhus 10
POWERPLUS POWEG3010 DA
9.7 Stojdaimper (Fig. 11) 10
9.7.1 After hver 100 timers brug.. 10
9.7.2 Vedligeholdelse for opbevaring 10
10 RENGORING 11
11 OPBEVARING 11
12 OPSTART EFTER EN LÄNGERE OPBEVARINGSPERIODE....11
13 TEKNISKE DATA 11
14 STOJ. 11
15 SERVICEAFDELING. 11
16 FEJLFINDING 12
17 GARANTI. 13
18 MILJ0 13
19 KONFORMITETSERKLÄERING. 14
POWERPLUS POWEG3010 DA
HAEKKEKLIPPER 22,5CC
POWEG3010
1 ANVENDELS
11/08/2021, Lier - Belgium
POWERPLUS POWEG3010 CS
1 OBLASTPOUZITI 3
2 POPIS 3
3 SEZNAM OBSAHU BALENI 3
4 SYMBOLY 4
5 OBECNÁ BEZPEČNOSTNI UPOZORNÉNÍ PRO NASTROJE ....4
5.1 Pracovni oblast 4
5.2 Osobni bezpečnost 4
5.3 Pouzivani nastroju a pece o ne 5
5.4 Servis 5
6 BEZPECNOSTNI UPOZORNENI OHLEDNE BENZINU 5
7 PALIVO 6
7.1 Smespaliva a oleje 6
7.1.1 Michanipaliva 6
7.2 Doplnovani paliva 6
7.3 Skladovani paliva 7
8 OBSLUHA 7
8.1 Spousteni motoru 7
8.1.1 Studeny start 7
8.1.2 Teply start 7
8.2 Vypnuti motoru 8
8.3 Změna uhlu zadní rukojeti 8
8.3.1 Jakzmelnit uhel: (obr. 5) 8
8.3.2 Svisly provoz (Fig. 6). 8
8.3.3 Vodorovna operace (obr.7) 8
9 UDRZBA 8
9.1 Mazani cepele 9
9.2 Pojistka (Fig. 8) 10
9.3 Cisticvzduchu (Fig. 9) 10
9.4 Draha chladiciho vzduchu 10
9.5 Zapalovaci svicka (Fig. 10) 10
9.6 Převodová skřiž 10
POWERPLUS POWEG3010 CS
9.7 Tlumic (Fig. 11) 10
9.7.1 Po 100 hodinach pouzivani 10
9.7.2 Udrzba prd skladovanim 11
10 CISTENI 11
11 USAZENINY 11
12 SPOUSTENI PO DLOUHE ODSTAVCE 11
13 TECHNICKE UDAJE 11
14 HLUCNOST 11
15 SERVISNI ODDELENI 12
16 RESENI PROBLEMU 12
17 ZARUKA 13
18 ZIVOTNI PROSTREDI 13
19 PROHLASENI O SHODE 14
POWERPLUS POWEG3010 CS
PLOTOREZ 22,5CC POWEG3010
1 OBLAST POUZITI
11/08/2021, Lier - Belgium
POWERPLUS POWEG3010 RO
1 DOMENII DE UTILIZARE 3
2 DESCRIERE 3
3 CONTINUTUL PACHETULUI 3
4 SIMBOLURI 4
5 AVERTISMENTE GENERALE DE SIGURANă PRIVIND APARATELE 4
B HactoIHHnH N/INN Bbpxy MaunHaTa Ca n3NOJ3BaHN CJIeHNTE CNMBOJN:
(a) NocHa Bb3DyUHa KJana
(b) OToBopeHa
(c) 3aTBopeHa
- IocTabete npeBknHouBaTeIa 3a 3anaJbHaHeTo B no3nua "START" (CTAPT). (Phi. 3)
POWERPLUS POWEG3010 BG
-ДрьжTe 3dpaBO ypeDA haOJy, 3a DA He 3ary6nte KOHTpON DOkATO 3anaNTe DBnIaTeNc MaHnBeJIATA. Ako He CE dIbpxn npabUNHO haOJy, DBnIaTeJIrT MOKe Da Bu n3Bede ot paBHOBecne, NIN DA O6bpHe pexeunia HOK KbM HraKaKBO ppeTCTBne NIN TAYOTO Bu.
- 3dbpnaite pkoxbatkata Ha cnaptepa 6abho Ha okono 10 do 15 cm n npobepete MCTOTO Ha HnraHTo.
-ДрнгетсинTOKORAToHajraHETOMOKEдбдпОчВСТВАНИЗANAJIte DBNIGATEJI.
Korato DniratetaTcTapTnpa, BbPHeTe NoCTa Ha Bb3DyHHaTa KnaA B no3nra "OPEN/
- Ipei Da npEbnoute Ha nbHa ckopoCT, octaTe DnraTeIa pa6oHa cpeHaCKOPOCT 3a OKOIO eHb MHNVTA.

3a6eJekka: Korato pectaptpate Dnuratela BeHara cIeD cnupaHTo My, OCTaBeTe Bb3dUHaTa KJana OTBopeHa.

3a6eIexka: IpekaneHOTO dpoceInpaHe MOKe Da 3aTpduHn CTapTnpaHeTo Ha DBnraTeJ npaDNuN3nUshO rOpuBO. Korato DBrnraTeJrT OTKaKe Da cTapTnpa Cnei HeKoIKNKpAHTN OINTN, OTBOpTe Bb3dUShHaTa KJIana N NOBTOpeTe DbpNaHETo Ha BbXeTo, INN CBaNte 3anaNTeHNHaTa CBeu N IPOcSywete.
8.1.2 Tonbl cTap
Pecaptnapahe BeHara cneI kaTo dBnraTeJIe 6nI cnprH. Ako DnBnraTeJIr He pectaptnpa, NOBTOpe TROPHe CTbNKn..

N36raBaiTe Da N3dIbPnBaTe BbXeTo Do Kpa, NNn Da ro BbPHeTe KaTo OCBo6oAnTe pBcKaTa. Te3n DeiCTBna MoaT Da npuHrT NobpeDn Ha CTapTepa.
8.2 CnupaHe Ha deuameJia
- Ocbo6oTeIocTaHaIpoCeHaHbJHo.
- IpnemecTe Te npEbnuBateJHa nDburatEn B no3nucn "STOP" (CTO); BbptehTo Ha DbrarTeJIe Ce 3abnn n DbrarTeTt Tne cnpe. (Fig. 4)

3a6eJekka: Ako DnraTeJrHe cnpe cIeJ 3aJeCTBaHe Ha npeBKnIOyBaTeJ, 3aTbOpTe Bb3dUHATA KJana N cIeJ MaNKo TOn Iue cnpe.
8.3 CmHa Ha bebna Ha 3aDhama pbkoxeamka
3aHaTa pBkoXBaTka e KOHCTpyupaHa Taka, Ye bIbT MoKe da Ce npomeHry, KoETO 03BOJRA Pn6OpbT Da ce H3NON3Ba BEPTKAnHO.
3a da ce HamaH yMopata no BpeMe Ha noDpr3BaHe Ha nIeTOBe, pbKoXBaTKaTa MoKe da 6bJe 3aBbPTHa Ha 45^ nnn 90° HnraBO nnn HnraCHO.
8.3.1 KaKa da ce cMeHn bTbT: (ΦnR. 5)
Bbpe He IocTa Ha dpocela n 3aBbptete 3aHaTa pkoBaTka KaTo n3DbpnaTe cnycbKa 3a pervnpahe.
3aBbTpTe cnycbka 3a perylnpaHe hAraCHO nIi HAIyBO Ha 90 IJN 45rpaDyca.
Cne3aBbptaHToOCBO6OJeTe 6nOKpaunu uΦT.3a da Ocnrypnte 3aHaTa pkoXBtKa,3aDpbKTe CNVCbKa 3a perVnnpaHE BHIMATEIHO C nPbCT.
- DpocenipaTe cMo ToJkoBa, KOJIKOTe e Heo6xOJMo 3a pa6oTaTa Bn. PpeBnIaBaHe Ha o6opOTnte Ha DBnIraTeJr He e Heo6xOJMo.
POWERPLUS POWEG3010 BG
TAnoto Bn Tp8Ba BnHarn da 6bJe Ha cTpaHaTa Ha Kap6ypaTopa Ha BaWata MaunHa HNKora Ha cTpaHaTa Ha 3arnyuHTeJ.
Korato 3a nbpBn nT ce n3no13Ba HOBa MaunHa, ppe3 nbpBNTe HAKo1KO MHyTN OT peDyKTopa moKe da n3ne3e rpec. Ho Tb' kato TOba e n3nnuHa rpec, Hma npuHa 3a 6e3nOKoIcTBO.CAMo Ja nouchTe KOrato CnpTe DnuratEn.
8.3.2 BepTnKaIHo onepupaHe (Fig 6)
- Пи 3аьртане Ha 3aДнота рьКoxВТка Ндясно, ДржTe 3aДнота рьКoxВТкa сяСНа, a npeДнота рьКoxВТкa - C JЯВATA рьКa.
- Pn 3aBbPtaHe Ha 3aHaTa pBkoXBaTKa HnRABO, DpbXTe npeHATA pBkoXBaTKa C dAChata, a 3aHaTa pBkoXBaTKa - C JnBAt a pbka. Nopdpa3BaIe c KpbroBO DnHexHe.3
8.3.3 Xopn3oHTaJIHo OneepupaHe (Фиr.7)
HaKNoHbHeTo Ha MaunHata Ha bIbI 5 do 10^ cnpyMo npdr3BaHn o6eT ue yneChn pa6oTaTn ige DoBeDe do Do6pn pe3yntaTn.

BnHar n cna3BaTe npedna3Hnte MEPKn. Xpactope3bT-tpmep Tpr6Ba da 6bnde n3noJ3BaH cAmO 3a noDpyraHe Ha nIeTOBe nn MaIKn XpactN. 3a6paHeHO e pyrBnMATEpHa. He n3noJ3BaTe xpactope3a- TpImep KaTO loCT 3a NOBdUraHe, npdBvXBAHe nn CuynBAHe Ha npedMeTN, HnTO 3a 3actOnopRaHeTo My BbB fNKcnpaHn ONOpn.
9 TEXHnuecko OBCJyKBAHE
HaunTe MaunHn ca KOHCTpyuPaHn Taka, Ye da pa6oTAT npOdbJXHTeJeH nepnoD OT BpeMe npMHNMaHNO TexHuecko 0cCnyKBaHe. NocToHHaTa 3aOBOJIteHa pa6oTa 3aBnCn OT npaBnHInTe rPnKn 3a MaunHaTa n peOBHO To NouchTaHe.
| Систema /Комно ent | Пюостура | Прedeура | На Всесура | На Всесура | На Всесура | Забелега | |
| Тech на горов, разлamb на горво | Почисте | V | |||||
| Розерboaр за горво, Вьздuyшen фелър, горовен фелър | Правереше/почисте | V | V | Смене пri небхдимост | |||
| Виnt 3a разулиpane оборOTITE на празенхod | Вижтуларе на оборOTITE на празенхod | V | Смене kapбу ratopa пri небхдимost | ||||
| Запалителна сveц | Почисте и разулиpane искровата менинa | V | МекдиHA: 0,6- 0,7 mm;смене пri небхдимost | ||||
| Робamba на цлиндана, | Почисте | V |
POWERPLUS POWEG3010 BG
HnBO Ha 3ByKObaTa MoUHOcT LwA
109 dB(A)

BHIMAHHE! Hocete nHdNbDyaJIHn npeIa3Hn cpeIcTba 3a clyxa (aHTnΦoH), aKO 3BykoBOTO haJraHe npeBnu85 dB(A).
aw(Bn6paun):
Max 7.0M / c^2
K=1,5M/c²
POWERPLUS POWEG3010 BG 15 OTДЕЛ CEPВИЗHQ
IobpeHHeIe npBkIOUbATEJI TpA6Ba Da 6bDaT CMeHEn OT HaUNr OTo yCnyn cnE npOdaX6a.
Ako cbeHnHTeHNHa Ka6en (nnu uencen) e nobpehen, ToT Tp8Ba Da 6bde 3aMeHen Cbc Cneunphueh cbeHnTeHn Ka6en Ha pa3noJoxKeHne B HauHn OToDen no 0cbnyXbaHe. CmHaTa Ha cbeHnHTeHNHa Ka6en MoKe da 6bDe n3BbPseHa camo OT HauHn OTdEi NO 0bcnyXbaHe (BxK nocJeHaTa CTpaHua) nnO T KBaJIncu npaHO Jnue (KBaJIncu npaH eNeKTpoTexHnK).
16 HAMNPAHE N OTCTPAHRAHE HA HEN3INPABHOCTN
| HEN3ПРABHOC CT | ПИЧИHA | ДЕЛСТВЕ |
| Уреьт не стартура, по стартура на hoсяюп. | • Ненин поочури на стартура. • Ненин наостroduка на karбуразорна за смес. • 3amьрсан 3аалителна с蜱ц. • Празен peзервоар за горив. • Бутоьт на подоча за поима нае нахочат досотьчно силино. | • Спазыte иструкципente в Ръковомоството на по tradeь; • Дайыт karбуразора за настroduка в оторизиран сөрөзөн центь. • Почистete/perugларей лөсрова т мждина, по сөнөгүдү. • Нальныpe stервоар за рорив с павилна роривни сөмс. • Натickайныstыогон на подоча за поима дokраи и бавно 10 пыт. |
| Уреьт стартура, по мошистта на двигателяе e поска. | • 3адьстен гориев филььр. • Ненин поочия на поста. • 3amьрсан ekpan на посрогаспелета. • 3amьрсан вьздуншев филььр. • Ненин наостroduка на karбуразорна за смес. • 3amьрсан наостroduка на karбуразорна за смес. • 3amьрсан наостroduка на karбуразорна за смес. • 3amьрсан наostroduка на karбуразорна за смес. • 3amьрсан наostroduка на karбуразорна за смес. • 3amьрсан наostroduка на karбуразорна за смес. • 3amьрсан наostroduка на karбуразорна за смес. • 3amьрсан наostroduка на karбуразORNA. • 3amьрсан наostroduка на karбуразORNA. • 3amьрсан наostroduка на karбуразORNA. • 3amьрсан наostroduка на karбуразORNA. • 3amьрсан наostroduка на karбуразORNA. • 3amьрсан наostroduка на karбуразORNA. • 3ainder_STEN Bb3dUnen Филььр. • 3ainder_STEN Bb3dUnen Филььр. • 3ainder_STEN Bb3dUnen Филььр. • 3ainder_STEN Bb3dUnen Филььр. • 3ainder_STEN Bb3dUnen Филььр. • 3ainder_STEN Bb3dUnen ФилььP. • 3ainder_STEN Bb3dUnen ФилььP. • 3ainder_STEN Bb3dUnen ФилььP. • 3ainder_STEN Bb3dUnen ФилььP. • 3ainder_STEN Bb3dUnen ФилььP. • 3ainder_STEN Bb3dUnen ФилььР. • 3ainder_STEN Bb3dUnen ФилььP. • 3ainder_STEN Bb3dUnen ФилььP. • 3ainder_STEN Bb3dUnen ФилььP. • 3ainder_STEN Bb3dUnen ФилььP. • 3ainder_STEN Bb3dUnen ФилььR. • 3ainder_STEN Bb3dUnen ФилььR. • 3ainder_STEN Bb3dUnen ФилььR. • 3ainder_STEN Bb3dUnen ФилььR. • 3ainder_STEN Bb3dUnen ФилььR. • 3ainder_STEN Bb3dUnen ФилььP. • 3ainder_STEN Bb3dUnen ФилььP. • 3ainder_STEN Bb3dUnen ФилььP. • 3ainder_STEN Bb3dUnen ФилььP. • 3ainder_STEN Bb3dUnen ФилььF. • 3ainder_STEN Bb3dUnen ФилььF. • 3ainder_STEN Bb3dUnen ФилььF. • 3ainder_STEN Bb3dUnen ФилььF. • 3ainder_STEN Bb3dUnen ФилььF. • 3ainder_STEN Bb3dUnen ФилььR. • 3ainder_STEN Bb3dUnen ФилььR. • 3ainder_STEN Bb3dUnen ФилььR. • 3ainder_STEN Bb3dUnen ФилььR. • 3ainder_STEN Bb3dUnen ФилььF. • 3ainder_STEN Bb3dUnen ФилььF. • 3ainder_STEN Bb3dUnen ФилььF. • 3ainder_STEN Bb3dUnen ФилььF. • 3ainder_STEN Bb3dUnen ФилььP. • 3ainder_STEN Bb3dUnen ФилььP. • 3ainder_STEN Bb3dUnen ФилььP. • 3ainder_STEN Bb3dUnen ФилььP. • 3ainder_STEN Bb3dUnen ФилььY. • 3ainder_STEN Bb3dUnen ФилььY. • 3ainder_STEN Bb3dUnen ФилььY. • 3ainder_STEN Bb3dUnen ФилььY. • 3ainder_STEN Bb3dUnen ФилььY. • 3ainder_STEN Bb3dUnen Фильь Y. • 3ainder_STEN Bb3dUnen Фильь Y. • 3ainder_STEN Bb3dUnen Фильь Y. • 3ainder_STEN Bb3dUnen Фильь Y. • 3ainder_STEN Bb3dUnen Фильь Y. • 3ainder_STEN Bb3dUnen ФилььY. • 3ainder_STEN Bb3dUnen ФилььY. • 3ainder_STEN Bb3dUnen ФилььY. • 3ainder_STEN Bb3dUnen ФилььY. • 3ainder_STEN Bb3dUnen Фильь.Y. • 3ainder_STEN Bb3dUnen ФилььY. • 3ainder_STEN Bb3dUnen ФилььY. • 3ainder_STEN Bb3dUnen ФилььY. • 3ainder_STEN Bb3dUnen ФилььY. • 3ainder_STEN Bb3dUnen ФилььYN. • 3ainder_STEN Bb3dUnen ФилььYN. • 3ainder_STEN Bb3dUnen ФилььYN. • 3ainder_STEN Bb3dUnen ФилььYN. • 3ainder_STEN Bb3dUnen ФилььYN. • 3ainder_STEN Bb3dUnen ФилььY. • 3ainder_STEN Bb3dUnen ФилььY. • 3ainder_STEN Bb3dUnen ФилььY. • 3ainder_STEN Bb3dUnen ФилььY. • 3ainder_STEN Bb3dUnen ФилььN. • 3ainder_STEN Bb3dUnen ФилььN. • 3ainder_STEN Bb3dUnen ФилььN. • 3ainder_STEN Bb3dUnen ФилььN. • 3ainder_STEN Bb3dUnen ФилььN. • 3ainder_STEN Bb3dUnen ФилььY. • 3ainder_STEN Bb3dUnen ФилььY. • 3ainder_STEN Bb3dUnen ФилььY. • 3ainder_STEN Bb3dUnen ФилььY. • 3ainder_STEN Bb3dUnen ФилььW. • 3ainder_STEN Bb3dUnen ФилььW. • 3ainder_STEN Bb3dUnen ФилььW. • 3ainder_STEN Bb3dUnen ФилььW. • 3ainder_STEN Bb3dUnen ФилььW. • 3ainder_STEN Bb3dUnen ФилььY. • 3ainder_STEN Bb3dUnen ФилььY. • 3ainder_STEN Bb3dUnen ФилььY. • 3ainder_STEN Bb3dUnen ФилььY. • 3ainder_STEN Bb3dUnen ФилььX. • 3ainder_STEN Bb3dUnen ФилььX. • 3ainder_STEN Bb3dUnen ФилььX. • 3ainder_STEN Bb3dUnen ФилььX. • 3ainder_STEN Bb3dUnen ФилььX. • 3ainder_STEN Bb3dUnen ФилььY. • 3ainder_STEN Bb3dUnen ФилььY. • 3ainder_STEN Bb3dUnen ФилььY. • 3ainder_STEN Bb3dUnen ФилььY. • 3ainder_STEN Bb3dUnen ФилььZ. • 3ainder_STEN Bb3dUnen ФилььZ. • 3ainder_STEN Bb3dUnen ФилььZ. • 3ainder_STEN Bb3dUnen ФилььZ. • 3ainder_STEN Bb3dUnen ФилььZ. • 3ainder_STEN Bb3dUnen ФилььY. • 3ainder_STEN Bb3dUnen ФилььY. • 3ainder_STEN Bb3dUnen ФилььY. • 3ainder_STEN Bb3dUnen ФилььY. • 3ainder_STEN Bb3dUnen ФилььT. • 3ainder_STEN Bb3dUnen ФилььT. • 3ainder_STEN Bb3dUnen ФилььT. • 3ainder_STEN Bb3dUnen ФилььT. • 3ainder_STEN Bb3dUnen ФилььT. • 3ainder_STEN Bb3dUnen ФилььY. • 3ainder_STEN Bb3dUnen ФилььY. • 3ainder_STEN Bb3dUnen ФилььY. • 3ainder_STEN Bb3dUnen ФилььY. • 3ainder_STEN Bb3dUnen ФилььS. • 3ainder_STEN Bb3dUnen ФилььS. • 3ainder_STEN Bb3dUnen ФилььS. • 3ainder_STEN Bb3dUnen ФилььS. • 3ainder_STEN Bb3dUnen ФилььS. • 3ainder_STEN Bb3dUnen ФилььY. • 3ainder_STEN Bb3dUnen ФилььY. • 3ainder_STEN Bb3dUnen ФилььY. • 3ainder_STEN Bb3dUnen ФилььY. • 3ainder_STEN Bb3dUnen ФилььV. • 3ainder_STEN Bb3dUnen ФилььV. • 3ainder_STEN Bb3dUnen ФилььV. • 3ainder_STEN Bb3dUnen ФилььV. • 3ainder_STEN Bb3dUnen ФилььV. • 3ainder_STEN Bb3dUnen ФилььY. • 3ainder_STEN Bb3dUnen ФилььY. • 3ainder_STEN Bb3dUnen ФилььY. • 3ainder_STEN Bb3dUnen ФилььY. • 3ainder_STEN Bb3dUnen ФилььM. • 3ainder_STEN Bb3dUnen ФилььM. • 3ainder_STEN Bb3dUnen ФилььM. • 3ainder_STEN Bb3dUnen ФилььM. • 3ainder_STEN Bb3dUnen ФилььM. • 3ainder_STEN Bb3dUnen ФилььМ. • 3ainder_STEN Bb3dUnen ФилььМ. • 3ainder_STEN Bb3dUnen ФилььМ. • 3ainder_STEN Bb3dUnen ФилььМ. • 3ainder_STEN Bb3dUnen ФилььМ. • 3ainder_STEN Bb3dUnen ФилььM. • 3ainder_STEN Bb3dUnen ФилььM. • 3ainder_STEN Bb3dUnen ФилььM. • 3ainder_STEN Bb3dUnen ФилььM. • 3ainder_STEN Bb3dUnen ФилььY. • 3ainder_STEN Bb3dUnen ФилььY. • 3ainder_STEN Bb3dUnen ФилььY. • 3ainder_STEN Bb3dUnen ФилььY. • 3ainder_STEN Bb3dUnen ФилььP. • 3ainder_STEN Bb3dUnen ФилььP. • 3ainder_STEN Bb3dUnen ФилььP. • 3ainder_STEN Bb3dUnen ФилььP. • 3ainder_STEN Bb3dUnen ФилььN. • 3ainder_STEN Bb3dUnen ФилььN. • 3ainder_STEN Bb3dUnen ФилььN. • 3ainder_STEN Bb3dUnen ФилььN. • 3ainder_STEN Bb3dUnen ФилььM. • 3ainder_STEN Bb3dUnen ФилььM. • 3ainder_STEN Bb3dUnen ФилььM. • 3ainder_STEN Bb3dUnen ФилььM. • 3ainder_STEN Bb3dUnen ФилььN. • 3ainder_STEN Bb3dUnen ФилььN. • 3ainder_STEN Bb3dUnen ФилььN. • 3ainder_STEN Bb3dUnen ФилььN. • 3ainder_STEN Bb3dUnen Фильь N. • 3ainder STEN Bb3dUnen ФилььN. • 3ainder STEN Bb3dUnen ФилььN. • 3ainder STEN Bb3dUnen ФилььN. • 3ainder STEN Bb3dUnen ФилььN. • 3ainder STEN Bb3dUnen ФилььN. • 3ainder STEN Bb3dUnen Фильь N. • 3ainder STEN Bb3dUnen ФилььN. • 3ainder STEN Bb3dUnen ФилььN. • 3ainder STEN Bb3dUnen ФилььN. • 3ainder STEN Bb3dUnen ФилььN. • 3ainder StEN Bb3dUnen ФилььN. • 3ainder STEN Bb3dUnen ФилььN. • 3ainder STEN Bb3dUnen ФилььN. • 3ainder STEN Bb3dUnen ФилььN. • 3ainder STEN Bb3dUnen ФилььN. • 3ainder StEN Bb3dUnen ФилььS. • 3ainder STEN Bb3dUnen ФилььS. • 3ainder STEN Bb3dUnen ФилььS. • 3ainder STEN Bb3dUnen ФилььS. • 3ainder STEN Bb3dUnen ФилььS. • 3ainder STEN Bb3dUnen ФилььS. • 3ainder StEN Bb3dUnen ФилььS. • 3ainder STEN Bb3dUnen ФилььS. • 3ainder STEN Bb3dUnen ФилььS. • 3ainder STEN Bb3dUnen ФилььS. • 3ainder STEN Bb3dUnen Фильь S. • 3ainder STEN Bb3dUnen Фильь S. • 3ainder STEN Bb3dUnen Фильь S. • 3ainder STEN Bb3dUnen Фильь S. • 3ainder STEN Bb3dUnen Фильь S. • 3ainder STEN Bb3dUnen ФилььS. • 3ainder STEN Bb3dUnen ФилььS. • 3ainder STEN Bb3dUnen ФилььS. • 3ainder STEN Bb3dUnen ФилььS. • 3ainder STEN Bb3dUnen Фильь S. • 3ainder StEN Bb3dUnen Фильь S. • 3ainder STEN Bb3dUnen Фильь S. • 3ainder STEN Bb3dUnen Фильь S. • 3ainder STEN Bb3dUnen Фильь S. • 3ainder STEN Bb3dUnen Фильь S. • 3ainder StEN Bb3dUnen Фильь S. • 3ainder STEN Bb3dUnen Фильь S. • 3ainder STEN Bb3dUnen Фильь S. • 3ainder STEN Bb3dUnen ФилььS. • 3ainder STEN Bb3dUnen Фильь S. • 3ainder STEN Bb3dUnen Фильь S. • 3ainder STEN Bb3dUnen Фильь S. • 3ainder STEN Bb3dUnen ФилььS. • 3ainder STEN Bb3dUnen Фильь S. • 3ainder StEN Bb3dUnen Фильь S. • 3ainder STEN Bb3dUnen Фильь S. • 3ainder STEN Bb3dUnen ФилььS. • 3ainder STEN Bb3dUnen ФилььS. • 3ainder STEN Bb3dUnen ФилььS. • 3ainder StEN Bb3dUnen ФилььS. • 3ainder STEN Bb3dUnen Фильь S. • 3ainder STEN Bb3dUnen Фильь S. • 3ainder STEN Bb3dUnen Фильь S. • 3ainder STEN Bb3dUnen Фильь S. • 3ainder StEN Bb3dUnen ФилььS. • 3ainder STEN Bb3dUnen Фильь S. • 3ainder STEN Bb3dUnen Фильь S. • 3ainder STEN Bb3dUnen Фильь S. • 3ainder STEN Bb3dUnen ФилььS. • 3ainder StEN Bb3dUnen Фильь S. • 3ainder STEN Bb3dUnen Фильь S. • 3ainder STEN Bb3dUnen Фильь S. • 3ainder STEN Bb3dUnen Фильь S. • 3ainder STEN Bb3dUnen ФилььS. • 3ainder StEN Bb3dUnen ФилььS. • 3ainder STEN Bb3dUnen ФилььS. • 3ainder STEN Bb3dUnen ФилььS. • 3ainder STEN Bb3dUnen Фильь S. • 3ainder STEN Bb3dUnen Фильь S. • 3ainder StEN Bb3dUnen Фильь S. • 3ainder STEN Bb3dUnen Фильь S. • 3ainder STEN Bb3dUnen ФилььS. • 3ainder STEN Bb3dUnen Фильь S. • 3ainder STEN Bb3dUnen Фильь S. • 3ainder StEN Bb3dUnen Фильь S. • 3ainder STEN Bb3dUnen ФилььS. • 3ainder STEN Bb3dUnen Фильь S. • 3ainder STEN Bb3dUnen Фильь S. • 3ainder STEN Bb3dUnen Фильь S. • 3ainder StEN Bb3dUnen Фильь S. • 3ainder STEN Bb3dUnen ФилььS. • 3ainder STEN Bb3dUnen ФилььS. • 3ainder STEN Bb3dUnen ФилььS. • 3ainder STEN Bb3dUnen ФилььS. • 3ainder StEN Bb3dUnen Фильь S. • 3ainder STEN Bb3dUnen Фильь S. • 3ainder STEN Bb3dUnen Фильь S. • 3ainder STEN Bb3dUnen ФилььS. • 3ainder STEN Bb3dUnen ФилььS. • 3ainder StEN Bb3dUnen ФилььS. • 3ainder STEN Bb3dUnen ФилььS. • 3ainder STEN Bb3dUnen Фильь S. • 3ainder STEN Bb3dUnen Фильь S. • 3ainder STEN Bb3dUnen Фильь S. • 3ainder StEN Bb3dUnen ФилььS. • 3ainder STEN Bb3dUnen ФилььS. • 3ainder STEN Bb3dUnen ФилььS. • 3ainder STEN Bb3dUnen ФилььS. • 3ainder STEN Bb3dUnen Фильь s. • 3ainder STEN Bb3dUnen Фильь S. • 3ainder STEN Bb3dUnen Фильь S. • 3ainder STEN Bb3dUnen Фильь S. • 3ainder STEN Bb3dUnen Фильь S. • 3ainder STEN Bb3dUnen Фильь s. • 3ainder STEN Bb3dUnen Фильь S. • 3ainder STEN Bb3dUnen Фильь S. • 3ainder STEN Bb3dUnen Фильь S. • 3ainder STEN Bb3dUnen Фильь s. • 3ainder STEN Bb3dUnen Фильь s. • 3ainder STEN Bb3dUnen Фильь s. • 3ainder STEN Bb3dUnen Фильь s. • 3ainder STEN Bb3dUnen Фильь s. • 3ainder STEN Bb3dUnen Фильь S. • 3ainder STEN Bb3dUnen Фильь S. • 3ainder STEN Bb3dUnen Фильь S. • 3ainder STEN Bb3dUnen ФилььS. • 3ainder STEN Bb3dUnen Фильь s. • 3ainder STEN Bb3dUnen Фильь s. • 3ainder STEN Bb3dUnen Фильь s. • 3ainder STEN Bb3dUnen Фильь s. • 3ainder STEN Bb3dUnen ФилььS. • 3ainder STEN Bb3dUnen Фильь s. • 3ainder STEN Bb3dUnen Фильь s. • 3ainder STEN Bb3dUnen Фильь s. • 3ainder STEN Bb3dUnen Фильь S. • 3ainder STEN Bb3dUnen Фильь s. • 3ainder STEN Bb3dUnen Фильь s. • 3ainder STEN Bb3dUnen Фильь s. • 3ainder STEN Bb3dUnen Фильь S. • 3ainder STEN Bb3dUnen ФилььS. • 3ainder STEN Bb3dUnen Фильь S. • 3ainder STEN Bb3dUnen Фильь S. • 3ainder STEN Bb3dUnen ФилььS. • 3ainder STEN Bb3dUnen Фильь S. • 3ainder STEN Bb3dUnen ФилььS. • 3ainder STEN Bb3dUnen Фильь S. • 3ainder STEN Bb3dUnen Фильь S. • 3ainder STEN Bb3dUnen Фильь s. • 3ainder STEN Bb3dUnen Фильь S. • 3ainder STEN Bb3dUnen Фильь s. • 3ainder STEN Bb3dUnen Фильь S. • 3ainder STEN Bb3dUnen Фильь S. • 3ainder STEN Bb3dUnen Фильь s. • 3ainder STEN Bb3dUnen Фильь S. • 3ainder STEN Bb3dUnen ФилььS. • 3ainder STEN Bb3dUnen Фильь S. • 3ainder STEN Bb3dUnen ФилььS. • 3ainder STEN Bb3dUnen ФилььS. • 3ainder STEN Bb3dUnen Фильь S. • 3ainder STEN Bb3dUnen Фильь S. • 3ainder STEN Bb3dUnen ФилььS. • 3ainder STEN Bb3dUnen ФилььS. • 3ainder STEN Bb3dUnen Фильь S. • 3ainder STEN Bb3dUnen ФилььS. • 3ainder STEN Bb3dUnen Фильь S. • 3ainder STEN Bb3dUnen ФилььS. • 3ainder STEN Bb3dUnen Фильь s. • 3ainder STEN Bb3dUnen Фильь S. • 3ainder STEN Bb3dUnen Фильь S. • 3ainder STEN Bb3dUnen ФилььS. • 3ainder STEN Bb3dUnen Фильь S. • 3ainder STEN Bb3dUnen Фильь s. • 3ainder STEN Bb3dUnen Фильь S. • 3ainder STEN Bb3dUnen Фильь S. • 3ainder STEN Bb3dUnen ФилььS. • 3ainder STEN Bb3dUnen ФилььS. • 3ainder STEN Bb3dUnen Фильь s. • 3ainder STEN Bb3dUnen Фильь S. • 3ainder STEN Bb3dUnen ФилььS. • 3ainder STEN Bb3dUnen Фильь S. • 3ainder STEN Bb3dUnen Фильь s. • 3ainder STEN Bb3dUnen ФилььS. • 3ainder STEN Bb3dUnen Фильь S. • 3ainder STEN Bb3dUnen Фильь S. • 3ainder STEN Bb3dUnen Фильь S. • 3ainder STEN Bb3dUnen Фильь s. • 3ainder STEN Bb3dUnen ФилььS. • 3ainder STEN Bb3dUnen Фильь S. • 3ainder STEN Bb3dUnen ФилььS. • 3ainder STEN Bb3dUnen Фильь S. • 3ainder STEN Bb3dUnen Фильь s. • 3ainder STEN Bb3dUnen Фильь s. • 3ainder STEN Bb3dUnen Фильь S. • 3ainder STEN Bb3dUnen Фильь S. • 3ainder STEN Bb3dUnen Фильь s. • 3ainder STEN Bb3dUnen Фильь s. • 3ainder STEN Bb3dUnen Фильь S. • 3ainder STEN Bb3dUnen Фильь s. • 3ainder STEN Bb3dUnen Фильь S. • 3ainder STEN Bb3dUnen Фильь s. • 3ainder STEN Bb3dUnen Фильь s. • 3ainder STEN Bb3dUnen Фильь S. • 3ainder STEN Bb3dUnen ФилььS. • 3ainder STEN Bb3dUnen Фильь s. • 3ainder STEN Bb3dUnen Фильь S. • 3ainder STEN Bb3dUnen Фильь s. • 3ainder STEN Bb3dUnen Фильь S. • 3ainder STEN Bb3dUnen ФилььS. • 3ainder STEN Bb3dUnen Фильь s. • 3ainder STEN Bb3dUnen Фильь s. • 3ainder STEN Bb3dUnen Фильь S. • 3ainder STEN Bb3dUnen Фильь S. • 3ainder STEN Bb3dUnen ФилььS. • 3ainder STEN Bb3dUnen Фильь s. • 3ainder STEN Bb3dUnen Фильь S. • 3ainder STEN Bb3dUnen ФилььS. • 3ainder STEN Bb3dUnen Фильь s. • 3ainder STEN Bb3dUnen ФилььS. • 3ainder STEN Bb3dUnen Фильь S. • 3ainder STEN Bb3dUnen Фильь S. • 3ainder STEN Bb3dUnen ФилььS. • 3ainder STEN Bb3dUnen Фильь s. • 3ainder STEN Bb3dUnen ФилььS. • 3ainder STEN Bb3dUnen ФилььS. • 3ainder STEN Bb3dUnen Фильь S. • 3ainder STEN Bb3dUnen Фильь S. • 3ainder STEN Bb3dUnen Фильь s. • 3ainder STEN Bb3dUnen Фильь s. • 3ainder STEN Bb3dUnen ФилььS. • 3ainder STEN Bb3dUnen Фильь S. • 3ainder STEN Bb3dUnen Фильь S. • 3ainder STEN Bb3dUnen Фильь s. • 3ainder STEN Bb3dUnen ФилььS. • 3ainder STEN Bb3dUnen ФилььS. • 3ainder STEN Bb3dUnen Фильь S. • 3ainder STEN Bb3dUnen ФилььS. • 3ainder STEN Bb3dUnen ФилььS. • 3ainder STEN Bb3dUnen ФилььS. • 3ainder STEN Bb3dUnen Фильь S. • 3ainder STEN Bb3dUnen ФилььS. • 3ainder STEN Bb3dUnen Фильь s. • 3ainder STEN Bb3dUnen ФилььS. • 3ainder STEN Bb3dUnen Фильь s. • 3ainder STEN Bb3dUnen Фильь S. • 3ainder STEN Bb3dUnen Фильь S. • 3ainder STEN Bb3dUnen Фильь s. • 3ainder STEN Bb3dUnen ФилььS. • 3ainder STEN Bb3dUnen Фильь s. • 3ainder STEN Bb3dUnen Фильь S. • 3ainder STEN Bb3dUnen Фильь s. • 3ainder STEN Bb3dUnen Фильь s. • 3ainder STEN Bb3dUnen ФилььS. • 3ainder STEN Bb3dUnen Фильь s. • 3ainder STEN Bb3dUnen Фильь S. • 3ainder STEN Bb3dUnen ФилььS. • 3ainder STEN Bb3dUnen ФилььS. • 3ainder STEN Bb3dUnen Фильь S. • 3ainder STEN Bb3dUnen Фильь s. • 3ainder STEN Bb3dUnen Фильь S. • 3ainder STEN Bb3dUnen Фильь s. • 3ainder STEN Bb3dUnen ФилььS. • 3ainder STEN Bb3dUnen Фильь S. • 3ainder STEN Bb3dUnen Фильь s. • 3ainder STEN Bb3dUnen Фильь S. • 3ainder STEN Bb3dUnen ФилььS. • 3ainder STEN Bb3dUnen ФилььS. • 3ainder STEN Bb3dUnen ФилььS. • 3ainder STEN Bb3dUnen Фильь s. • 3ainder STEN Bb3dUnen Фильь s. • 3ainder STEN Bb3dUnen Фильь S. • 3ainder STEN Bb3dUnen Фильь s. • 3ainder STEN Bb3dUnen ФилььS. • 3ainder STEN Bb3dUnen Фильь s. • 3ainder STEN Bb3dUnen Фильь s. • 3ainder STEN Bb3dUnen Фильь S. • 3ainder STEN Bb3dUnen ФилььS. • 3ainder STEN Bb3dUnen ФилььS. • 3ainder STEN Bb3dUnen Фильь s. • 3ainder STEN Bb3dUnen Фильь s. • 3ainder STEN Bb3dUnen Фильь s. • 3ainder STEN Bb3dUnen ФилььS. • 3ainder STEN Bb3dUnen Фильь S. • 3ainder STEN Bb3dUnen Фильь s. • 3ainder STEN Bb3dUnen Фильь s. • 3ainder STEN Bb3dUnen Фильь s. • 3ainder STEN Bb3dUnen ФилььS. • 3ainder STEN Bb3dUnen ФилььS. • 3ainder STEN Bb3dUnen Фильь S. • 3ainder STEN Bb3dUnen Фильь s. • 3ainder STEN Bb3dUnen Фильь s. • 3ainder STEN Bb3dUnen ФилььS. • 3ainder STEN Bb3dUnen ФилььS. • 3ainder STEN Bb3dUnen Фильь s. • 3ainder STEN Bb3dUnen Фильь S. • 3ainder STEN Bb3dUnen Фильь s. • 3ainder STEN Bb3dUnen ФилььS. • 3ainder STEN Bb3dUnen ФилььS. • 3ainder STEN Bb3dUnen Фильь s. • 3ainder STEN Bb3dUnen Фильь s. • 3ainder STEN Bb3dUnen ФилььS. • 3ainder STEN Bb3dUnen Фильь S. • 3ainder STEN Bb3dUnen ФилььS. • 3ainder STEN Bb3dUnen Фильь s. • 3ainder STEN Bb3dUnen Фильь s. • 3ainder STEN Bb3dUnen ФилььS. • 3ainder STEN Bb3dUnen Фильь s. • 3ainder STEN Bb3dUnen ФилььS. • 3ainder STEN Bb3dUnen Фильь S. • 3ainder STEN Bb3dUnen Фильь s. • 3ainder STEN Bb3dUnen ФилььS. • 3ainder STEN Bb3dUnen Фильь s. • 3ainder STEN Bb3dUnen ФилььS. • 3ainder STEN Bb3dUnen Фильь s. • 3ainder STEN Bb3dUnen ФилььS. • 3ainder STEN Bb3dUnen ФилььS. • 3ainder STEN Bb3dUnen ФилььS. • 3ainder STEN Bb3dUnen Фильь S. • 3ainder STEN Bb3dUnen Фильь s. • 3ainder STEN Bb3dUnen ФилььS. • 3ainder STEN Bb3dUnen ФилььS. • 3ainder STEN Bb3dUnen ФилььS. • 3ainder STEN Bb3dUnen ФилььS. • 3ainder STEN Bb3dUnen Фильь s. • 3ainder StEN Bb3dUnen Фильь S. • 3ainder STEN Bb3dUnen Фильь S. • 3ainder STEN Bb3dUnen Фильь S. • 3ainder STEN Bb3dUnen Фильь S. • 3ainder STEN Bb3dUnen Фильь s. • 3ainder StEN Bb3dUnen Фильь S. • 3ainder STEN Bb3dUnen Фильь S. • 3ainder STEN Bb3dUnen Фильь S. • 3ainder STEN Bb3dUnen Фильь s. • 3ainder STEN Bb3dUnen Фильь S. • 3ainder StEN Bb3dUnen Фильь S. • 3ainder STEN Bb3dUnen Фильь S. • 3ainder STEN Bb3dUnen Фильь S. • 3ainder STEN Bb3dUnen Фильь s. • 3ainder STEN Bb3dUnen Фильь s. • 3ainder StEN Bb3dUnen Фильь S. • 3ainder STEN Bb3dUnen Фильь S. • 3ainder STEN Bb3dUnen Фильь S. • 3ainder STEN Bb3dUnen ФилььS. • 3ainder STEN Bb3dUnen Фильь s. • 3ainder StEN Bb3dUnen Фильь S. • 3ainder STEN Bb3dUnen Фильь S. • 3ainder STEN Bb3dUnen Фильь s. • 3ainder STEN Bb3dUnen Фильь S. • 3ainder STEN Bb3dUnen Фильь S. • 3ainder StEN Bb3dUnen Фильь S. • 3ainder STEN Bb3dUnen Фильь S. • 3ainder STEN Bb3dUnen Фильь s. • 3ainder STEN Bb3dUnen Фильь S. • 3ainder STEN Bb3dUnen Фильь s. • 3ainder StEN Bb3dUnen Фильь S. • 3ainder STEN Bb3dUnen Фильь S. • 3ainder STEN Bb3dUnen Фильь s. • 3ainder STEN Bb3dUnen Фильь s. • 3ainder STEN Bb3dUnen Фильь S. • 3ainder StEN Bb3dUnen Фильь S. • 3ainder STEN Bb3dUnen Фильь S. • 3ainder STEN Bb3dUnen Фильь s. • 3ainder STEN Bb3dUnen Фильь s. • 3ainder STEN Bb3dUnen Фильь s. • 3ainder StEN Bb3dUnen Фильь S. • 3ainder STEN Bb3dUnen Фильь S. • 3ainder STEN Bb3dUnen Фильь s. • 3ainder STEN Bb3dUnen ФилььS. • 3ainder STEN Bb3dUnen Фильь S. • 3ainder StEN Bb3dUnen Фильь S. • 3ainder STEN Bb3dUnen Фильь S. • 3ainder STEN Bb3dUnen Фильь s. • 3ainder STEN Bb3dUnen ФилььS. • 3ainder STEN Bb3dUnen Фильь s. • 3ainder StEN Bb3dUnen Фильь S. • 3ainder STEN Bb3dUnen Фильь S. • 3ainder STEN Bb3dUnen ФилььS. • 3ainder STEN Bb3dUnen Фильь S. • 3ainder STEN Bb3dUnen Фильь s. • 3ainder StEN Bb3dUnen Фильь S. • 3ainder STEN Bb3dUnen Фильь S. • 3ainder STEN Bb3dUnen ФилььS. • 3ainder STEN Bb3dUnen Фильь s. • 3ainder STEN Bb3dUnen Фильь S. • 3ainder StEN Bb3dUnen Фильь S. • 3ainder STEN Bb3dUnen Фильь S. • 3ainder STEN Bb3dUnen ФилььS. • 3ainder STEN Bb3dUnen Фильь s. • 3ainder STEN Bb3dUnen Фильь s. • 3ainder StEN Bb3dUnen Фильь S. • 3ainder STEN Bb3dUnen Фильь S. • 3ainder STEN Bb3dUnen ФилььS. • 3ainder STEN Bb3dUnen ФилььS. • 3ainder STEN Bb3dUnen Фильь S. • 3ainder StEN Bb3dUnen Фильь S. • 3ainder STEN Bb3dUnen Фильь s. • 3ainder STEN Bb3dUnen Фильь S. • 3ainder STEN Bb3dUnen Фильь S. • 3ainder STEN Bb3dUnen Фильь S. • 3ainder StEN Bb3dUnen Фильь S. • 3ainder STEN Bb3dUnen Фильь s. • 3ainder STEN Bb3dUnen Фильь S. • 3ainder STEN Bb3dUnen Фильь s. • 3ainder STEN Bb3dUnen Фильь S. • 3ainder StEN Bb3dUnen Фильь S. • 3ainder STEN Bb3dUnen Фильь s. • 3ainder STEN Bb3dUnen Фильь S. • 3ainder STEN Bb3dUnen ФилььS. • 3ainder STEN Bb3dUnen Фильь S. • 3ainder StEN Bb3dUnen Фильь S. • 3ainder STEN Bb3dUnen Фильь s. • 3ainder STEN Bb3dUnen Фильь s. • 3ainder STEN Bb3dUnen Фильь S. • 3ainder STEN Bb3dUnen Фильь S. • 3ainder StEN Bb3dUnen Фильь S. • 3ainder STEN Bb3dUnen Фильь s. • 3ainder STEN Bb3dUnen Фильь s. • 3ainder STEN Bb3dUnen Фильь s. • 3ainder STEN Bb3dUnen Фильь s. • 3ainder StEN Bb3dUnen Фильь s. • 3ainder STEN Bb3dUnen Фильь s. • 3ainder STEN Bb3dUnen Фильь s. • 3ainder STEN Bb3dUnen Фильь s. • 3ainder STEN Bb3dUnen Фильь s. • 3ainder StEN Bb3dUnen Фильь S. • 3ainder STEN Bb3dUnen Фильь s. • 3ainder STEN Bb3dUnen Фильь s. • 3ainder STEN Bb3dUnen Фильь s. • 3ainder STEN Bb3dUnen Фильь S. • 3ainder StEN Bb3dUnen Фильь s. • 3ainder STEN Bb3dUnen Фильь s. • 3ainder STEN Bb3dUnen Фильь s. • 3ainder STEN Bb3dUnen Фильь s. • 3ainder STEN Bb3dUnen Фильь S. • 3ainder StEN Bb3dUnen Фильь S. • 3ainder STEN Bb3dUnen Фильь s. • 3ainder STEN Bb3dUnen Фильь s. • 3ainder STEN Bb3dUnen ФилььS. • 3ainder STEN Bb3dUnen Фильь s. • 3ainder StEN Bb3dUnen Фильь s. • 3ainder STEN Bb3dUnen Фильь s. • 3ainder STEN Bb3dUnen Фильь s. • 3ainder STEN Bb3dUnen Фильь S. • 3ainder STEN Bb3dUnen Фильь s. • 3ainder StEN Bb3dUnen Фильь s. • 3ainder STEN Bb3dUnen Фильь s. • 3ainder STEN Bb3dUnen Фильь s. • 3ainder STEN Bb3dUnen ФилььS. • 3ainder STEN Bb3dUnen Фильь s. • 3ainder StEN Bb3dUnen Фильь S. • 3ainder STEN Bb3dUnen Фильь s. • 3ainder STEN Bb3dUnen Фильь s. • 3ainder STEN Bb3dUnen Фильь S. • 3ainder STEN Bb3dUnen Фильь s. • 3ainder StEN Bb3dUnen Фильь S. • 3ainder STEN Bb3dUnen Фильь s. • 3ainder STEN Bb3dUnen Фильь S. • 3ainder STEN Bb3dUnen Фильь s. • 3ainder STEN Bb3dUnen Фильь s. • 3ainder StEN Bb3dUnen Фильь s. • 3ainder STEN Bb3dUnen Фильь s. • 3ainder STEN Bb3dUnen Фильь S. • 3ainder STEN Bb3dUnen Фильь s. • 3ainder STEN Bb3dUnen Фильь s. • 3ainder StEN Bb3dUnen Фильь S. • 3ainder STEN Bb3dUnen Фильь s. • 3ainder STEN Bb3dUnen Фильь S. • 3ainder STEN Bb3dUnen Фильь S. • 3ainder STEN Bb3dUnen Фильь s. • 3ainder StEN Bb3dUnen Фильь S. • 3ainder STEN Bb3dUnen Фильь s. • 3ainder STEN Bb3dUnen Фильь s. • 3ainder STEN Bb3dUnen ФилььS. • 3ainder STEN Bb3dUnen Фильь S. • 3ainder StEN Bb3dUnen Фильь s. • 3ainder STEN Bb3dUnen Фильь S. • 3ainder STEN Bb3dUnen Фильь S. • 3ainder STEN Bb3dUnen Фильь S. • 3ainder STEN Bb3dUnen Фильь S. • 3ainder StEN Bb3dUnen Фильь s. • 3ainder STEN Bb3dUnen Фильь S. • 3ainder STEN Bb3dUnen Фильь S. • 3ainder STEN Bb3dUnen Фильь s. • 3ainder STEN Bb3dUnen Фильь S. • 3ainder StEN Bb3dUnen Фильь s. • 3ainder STEN Bb3dUnen Фильь S. • 3ainder STEN Bb3dUnen Фильь S. • 3ainder STEN Bb3dUnen ФилььS. • 3ainder STEN Bb3dUnen Фильь S. • 3ainder StEN Bb3dUnen Фильь s. • 3ainder STEN Bb3dUnen Фильь S. • 3ainder STEN Bb3dUnen Фильь s. • 3ainder STEN Bb3dUnen Фильь S. • 3ainder STEN Bb3dUnen Фильь S. • 3ainder StEN Bb3dUnen Фильь s. • 3ainder STEN Bb3dUnen Фильь S. • 3ainder STEN Bb3dUnen Фильь s. • 3ainder STEN Bb3dUnen Фильь s. • 3ainder STEN Bb3dUnen Фильь s. • 3ainder StEN Bb3dUnen Фильь s. • 3ainder STEN Bb3dUnen Фильь S. • 3ainder STEN Bb3dUnen Фильь s. • 3ainder STEN Bb3dUnen Фильь s. • 3ainder STEN Bb3dUnen Фильь S. • 3ainder StEN Bb3dUnen Фильь s. • 3ainder STEN Bb3dUnen Фильь S. • 3ainder STEN Bb3dUnen Фильь s. • 3ainder STEN Bb3dUnen ФилььS. • 3ainder STEN Bb3dUnen Фильь s. • 3ainder StEN Bb3dUnen Фильь s. • 3ainder STEN Bb3dUnen Фильь S. • 3ainder STEN Bb3dUnen Фильь s. • 3ainder STEN Bb3dUnen Фильь S. • 3ainder STEN Bb3dUnen Фильь s. • 3ainder StEN Bb3dUnen Фильь s. • 3ainder STEN Bb3dUnen Фильь S. • 3ainder STEN Bb3dUnen Фильь s. • 3ainder STEN Bb3dUnen ФилььS. • 3ainder STEN Bb3dUnen Фильь S. • 3ainder StEN Bb3dUnen Фильь s. • 3ainder STEN Bb3dUnen Фильь s. • 3ainder STEN Bb3dUnen Фильь s • 2ainder STEN Bb |
POWERPLUS POWEG3010 BG
| 3ambyrcseHa ropnbHnabceu. | CmeheTe nii noocsteteBb3duuHnA φnlTbp.Πoocctete/peylnpaai Te nckpoBaTa MejdIna, nii cmehete CbeuTa. | |
| Pa60tneHepocToHHo. | He npabunHa nckpobAmexdIna pri3anaiTeJnHaTa Cbeu.3ambypcen HnckporacnteJ.3ambypcen Bb3duuSeH φnlTbp. | Πoocctete/peylnpaai Te nckpoBaTa MejdIna, nii cmehete CbeuTa.Πoocctete nii cmehete nckporacnteJ.Πoocctete nii cmehete Bb3duuHnA φnlTbp. |
| CnilenДим. | He npabunHa nactrojkaHa karbypatopHaTacomec.HenrabunHa ropnbHa cmec. | Даite karbypatopa 3a hactrojkaВOTOpn3iPAn cepBn3eH ueTbp.ИзрлбайтeprabunHa ropnbHa cmec(40:1 cmec). |
17 TAPAHUN
To3n npOdyKT nMa rapaHcNoHcPok 24 Meceua, KOITOBn3a BCnna OT daTata Ha NOKynka Ha NbpBnra Notpe6nteJ.
Ta3n rapaHnI npKpBa BCnKn DepeKTn Ha MaTePnAIn n IpOn3BOJCTBeHn DepeKTn, HO He BkIIOUyBa: BaTePnN, 3apAnHn ycTpoNCTBa, DepeKTn Yactn BCJeDCTBne Ha HopMaJIHO n3HOCBaHe n N3TpNbAHe KaTo NaRePn, YeTK, Ka6eN n IeNcEeN nII na akcecoApn KaTO CBpeNdna, HApKaHnUs 3a npoNBn INHCTpyMeHTn, pexeNs dNCKOB e T.H., NOBpeN n DepeKTn npOn3TuAaun OT HenpaBnHa yNoTpe6a, 3IonoJyKn nIIN HAnpaBeHn npomeHn, HnTO TpaHCnpTHnte pa3XoDN.
IobpeHn Hnn n deoektn npoun3Tuauon OTHenpaBnHo ynoTpe6a He ce 0xbaaat OT Te3n rapaHnOHHyCNOBna.
OcbEH TOBa He HocIM HnKaKbA OTROBOpHoc 3a TeNeCHn HapaHraHn npOn3TuHaU OHTHe npPabUNHaTa yNoTpe6a Ha nHCTpyMeHTa.
PemOHn Moar Da 6bDat N3BpWBAHc Camo OT ynbHOMOueH nOTpe6nteN cepBu3eH ceHTbp 3a eJNEKTPONHCTpyMeHTn.
MokTe Da noJyUte DoIbJIHnTeJIHa IHOpMaun Ha Homep 00 32 3 292 92 90.
Bcnu TpaHcnpTH pa3xoOnI ue 6bDat noeTn OT nOte6nteJe,OCBeH aKO nncMeHO He e dorobopeHo npyro.
B cIto BpeMe, He Morat da ce IpeJRABaT IpeTeHcNn NO rapaHcNtA, aKO NOBpeDaTa Ha ypeDa e BCJeCDTBHe OT IpeHe6perBaHe Ha TexHueCKOTO 06CnyXBAHe nII npetOBapBaHe.
- Ot rapaunra KaTeOpuHc Ce n3KnUoyBa NOBpeDa, KOrTO e B pe3yIaT OT npOHKBaHe Ha TeuHOCT, MHOTo npax, IpeHaMepeHa IOBpeDa (ymnJleHa NnI NopadN TotAnHO 6e3prKne), HeNoXoJaIo n3NoJ3BaHe (n3NoJ3BaHe 3a cJIeN, 3a KOnTO ypeDbT He e NoxOJa), HEKOMTeHTHO n3NoJ3BaHe (HaNP. Hecna3BaHe Ha IHCTpyKUnTE B pkoBOdCTBOTO), HEKOMTeHTeH MOtAq, rpbMOTeBuYeH yAp, HnpabINHO HanpeKeHne. To3n cnncbK He e n3uePnateJeH.
- Ipnemaheto Ha rapaunohn npTeHn HnKora He MoKe Da DoBede Do yIbJxBaHe Ha rapaunOHn cPok, HnTo Do 3anOuBaHe Ha HOB rapaHnOHe CpOK B CnyaH Ha 3amHa Ha yCTpoiCTBO.
- YcTpoIcTBaTa nIN DeTaIIInTe, KOnTO ca 3aMeHeH cBo6pa3HO rapaHcUNOHnTe ycNoBna, CJIeIOBaTeJIHo OCTaBAt Co6CTBeHocT Ha Varo NV.
Hne cn 3ana3BaMe npabOT Da OTXBbPnIM BcraKa npeTeHcNIA, B cnyaIYe nOKyPkata He MoKe da 6bJe npOBepeHa nn, KOrato e rCHO, Ye npOdyKTbT He e NODbPxkAn npabuHIO.
POWERPLUS POWEG3010 BG
(NouchteBaHe Ha BeHTnlaUOHHTe OTBOpN, peoBHa NoDpBxKKa Ha Kap6oHOBtE YeTkn,...)
CbxpaHbAaTeΦakTypata 3a NOKyPkata KaTO DOKa3aTeJIcTBO 3a DaTata, Ha KOrTo e HAnpabeHa T.
Tp6Ba Da BbPHeTe HeMeHTnpaHn HNCTpyMeH Na IpoDaBaHa B IpnEMJInBO YnCTO CbCToHnE, B OPIINHaJIHOT My JIATO Kyapue, aKO yCTPOJCTBOTO hMa TAKOBa, PnDpyKabAo HO OT DOKa3aTeJICTBOTO 3a NOKyPkata.
18 OKOJIHA CPEIa
Ako cne npoIbJxHteHa ynoTppe6a MaunHaTa Bn Ce hyKdae OT NOmHa, He 3XBpIyTe CTapa Tnp IOMaKNHcKe OTnAbu, a r yHnOxKeTe No HauH, 6e30naceH 3a OKoHaTcpeDa.
MOnJa da ce ocB6oDnTe OT n3nOJ3BaHOTo MOTOPHO MacNo NO HaunH, cbo6pa3eH C OKoJIHaTa CpeDa. Hne CbBcTBaMe Da ro OTHeCte B 3aNeuTaH KOHTeHep Do BaIIN MecTeH cepBn3 3a peKnAmauN. He ro n3XbPnIe THe 6okIyKa n He rO n3CnNBaIe Ha 3emrTa.
19ДЕКЛAPALE3AСБOTBETCTBNEC


VARO - Vic. Van Rompuy N.V. - Joseph Van Instraat 9 - BE2500 Lier - Bérrigny de KnappaT,
TnMaunHa/ycTroiCtBO:MaunHa 3a noDpr3BaHe Ha nIeT 22,5cm3
Mapka: PowerPlus
Home hapaaptkyana:POWEG3010
e B cbOTbETCTBnE C OCHOBHnTE N3NCKBaHnry n DpyrN CbOTBeTHn pa3nope6n Ha npNIOXmNTe Ebponeeckn DnpeKtNB, 6a3npaHn Bbpxy npJlaraHeto Ha EbponeecknTe xapMOH3npaHn CTahdaptn. Bcya HeynbHnOMoSeHa MoDnΦnKauaHa anapaTa anynpa Ta3n DeKnapaua.
Ebponeckn DnpekTbN (BkIIOHTeJHO TexHITe npomeH NkM daTaTa Ha noDnncBaHe, aKO ca npNJIOXUMN);
2006/42/EC
2014/30/EU
2000/14/EC Annex V LwA
Measured
108dB(A)
Guaranteed
110dB(A)
Ebponeeckn XapMOH3npaHn CTaHdapTN (BkJIIOHTeJIHO TexHNTe npOMEHN KbM daTaTa Ha NOIINCBaHe, aKo ca npINOJXIMN);
EN ISO 10517:2019
EN ISO 14982:2009
CbXpaHnTeHa TeXnueckaTa DOKyMeHTaUa: HnInn BaHKePkXOB, VARO - Vic. Van Rompuy N.V.
DonyoDncaHnT DeiCTBa OT IMeTo Ha N3nbJIHnTeJHnA DnpeKTop Ha KOMnaHnTa,

Philippe Vankerkhove
PerynaHnHH Bbnpocn-MeHNJXkbp NO CbotBeCTBnraTa
11/08/2021, Lier - Belgium

Vario
WWW.VARO.COM
DESIGNED AND MARKETED BY VARO
Copyright by varo
VARO - VIC. VAN ROMPUY nv
JOSEPH VAN INSTRAAT 9 - 2500 LIER - BELGIUM
OFFICES:
IBERICA BRICOLAGE S.L. - ESPANA
ASIA PACIFIC HONG KONG Ltd / SHANGHAI PRC
AUSTRALIA Pty Ltd


- POWERPLUS POWEG3010
- POWERPLUS POWEG3010 NL
- PROBLEEMOPLOSSING
- POWERPLUS POWEG3010 FR
- POWERPLUS POWEG3010 EN
- POWERPLUS POWEG3010 EN HEDGE TRIMMER 22,5CC POWEG3010
- APPLICATION
- DESCRIPTION
- PACKAGE CONTENT LIST
- SYMBOLS
- GENERAL SAFETY WARNINGS
- Work area
- Personal safety
- Engine tool use and care
- Service
- PETROL SAFETY WARNINGS
- FUEL
- Fuel and oil mixture
- Mixing fuel
- Refuelling
- Storage of fuel
- OPERATING INSTRUCTIONS
- Starting the engine
- Cold starting
- Hot starting
- Stopping the engine
- Angle change of rear handle
- How to change the angle (Fig. 5)
- Vertical operation (Fig. 6)
- Horizontal operation (Fig. 7)
- MAINTENANCE
- Blade lubrication
- Safety lock (Fig. 8)
- Air cleaner (Fig. 9)
- Air cooling
- Spark Plug (Fig. 10)
- Gearbox
- Silencer (Fig. 11)
- After 100 hours of use
- Maintenance before storage
- CLEANING
- STORAGE
- STARTING UP AFTER LONGER PERIODS OF INACTIVITY
- TECHNICAL DATA
- NOISE
- ATTENTION! Wear hearing protection when sound pressure is over 85 dB(A).
- SERVICE DEPARTMENT
- TROUBLE SHOOTING
- WARRANTY
- ENVIRONMENT
- POWERPLUS POWEG3010 EN 19 DECLARATION OF CONFORMITY
- POWERPLUS POWEG3010 DE
- POWERPLUS POWEG3010 ES
- POWERPLUS POWEG3010 IT
- POWERPLUS POWEG3010 PT
- POWERPLUS POWEG3010 NO
- HEKKEKLIPPER 22,5CC
- POWEG3010
- BRUKSOMRADE
- POWERPLUS POWEG3010 DA
- HAEKKEKLIPPER 22,5CC
- ANVENDELS
- POWERPLUS POWEG3010 CS
- PLOTOREZ 22,5CC POWEG3010
- OBLAST POUZITI
- POWERPLUS POWEG3010 RO
- AVERTISMENTE GENERALE DE SIGURANă PRIVIND APARATELE 4
- POWERPLUS POWEG3010 BG
- Tonbl cTap
- CnupaHe Ha deuameJia
- CmHa Ha bebna Ha 3aDhama pbkoxeamka
- KaKa da ce cMeHn bTbT: (ΦnR. 5)
- BepTnKaIHo onepupaHe (Fig 6)
- Xopn3oHTaJIHo OneepupaHe (Фиr.7)
- TEXHnuecko OBCJyKBAHE
- POWERPLUS POWEG3010 BG 15 OTДЕЛ CEPВИЗHQ
- TAPAHUN
- OKOJIHA CPEIa
- 19ДЕКЛAPALE3AСБOTBETCTBNEC
Brand : PowerPlus
Model : POWEG3010
Category : Hedge Trimmers