Combo Duo YV56 - Vibratory plate BH FITNESS - Free user manual and instructions
Find the device manual for free Combo Duo YV56 BH FITNESS in PDF.
| Product type | Vibration plate |
| Brand | BH Fitness |
| Model | Combo Duo YV56 |
| Power | 1 motor of 550 W |
| Voltage | 220-240 V ~ 50/60 Hz |
| Vibration frequency | 25 to 50 Hz |
| Duration programming | 30, 45, 60 or 90 seconds |
| Vibration type | Triplane (three spatial axes) |
| Material | Fiberglass |
| Dimensions (L x W x H) | 65 x 60 x 125 cm |
| Net weight | 42 kg |
| Maximum user weight | 120 kg |
| Electrical protection | 7 A fuse |
| Included accessories | Handlebar, vibration head, massage belts (3 types), column, platform, hand straps |
| Safety instructions | Clearance of at least 0.5 m around the device; mandatory grounding; do not use without supervision |
| Maintenance and cleaning | Unplug before cleaning; dust with a damp cloth; do not use solvents; check and tighten fasteners every 3 months |
| Warranty | 2 years (according to directive 1999/44/EC) |
| Customer service | +34 902 170 258 / service@bhfitness.es |
| Moving | Integrated wheels; do not move on non-smooth floors |
Frequently Asked Questions - Combo Duo YV56 BH FITNESS
User questions about Combo Duo YV56 BH FITNESS
0 question about this device. Answer the ones you know or ask your own.
Ask a new question about this device
Download the instructions for your Vibratory plate in PDF format for free! Find your manual Combo Duo YV56 - BH FITNESS and take your electronic device back in hand. On this page are published all the documents necessary for the use of your device. Combo Duo YV56 by BH FITNESS.
USER MANUAL Combo Duo YV56 BH FITNESS
natural_image
Black and white photo of a hybrid outdoor fitness device with a vertical cylindrical body and attached base (no visible text or symbols)Instrucciones de montaje y utilización Instructions for assembly and use Instructions de montage et utilisation Montage- und Gebrauchsanleitung Instruções de montagem e utilização Istruzioni di montaggio e uso Montage-en gebruiksinstrukties
Fig.1
text_image
Technical diagram of a medical or laboratory device with numbered parts, likely for identification or assembly reference.Fig.2

text_image
37 19 17 5 18 6 10 23 22 21 46Fig.3
text_image
11 9 8 12 17 2 13 3 18Fig.4
text_image
Technical diagram of a medical device with numbered parts labeled 1 through 17Fig.5
text_image
24 37 24Fig.6
text_image
L M 220V 45 14Español
Tecnovita by BH
Thank you for purchasing our product. While we do our best to ensure the quality of all our products, occasional errors or omissions may occur. If you notice a defect or missing parts, contact the distributor of the product. Carefully read through the instructions contained in this manual before using this machine. It provides you with important information about safety, use and maintenance.
GENERAL INSTRUCTIONS.-
In the interest of safety, the equipment must have at least 0.5 metres of free space around it.
You should always observe certain safety precautions when using electrical appliances, including the following:
1 To reduce the risk of electrical shock, always unplug the unit immediately after use and before proceeding to clean it.
2 Make sure that the mains supply voltage is suitable for the machine and it is connected to earth before plugging it in. The supply voltage must be the same as that stated on the characteristics plate and the holes in the wall socket outlet must match the pin configuration for the plug on the machine. Do not use any type of adapter. If this is not the case, please consult your supplier.
3 This unit has been designed for home use only.
4 Never leave the unit unattended when it is plugged in. Unplug it from the wall socket after each exercise
session.
5 Do not place your unit on any surface that might block a ventilation opening. Place a protective sheet below your unit to protect the floor or carpet from possible damage.
6 Parents and/or those responsible for children must always be aware of their curious nature and how this can often lead to hazardous situations and behaviour which could cause accidents. This is why they should always be supervised. Do not allow children or the disabled to use the appliance without the strict supervision of a qualified person. Under no circumstances should this appliance be used as a toy.
7 The Combo vibration platform is designed to withstand a user weight of 120Kg or less.
8 Keep your hands well away from any of the moving parts.
9 Use suitable clothing and footwear. Make sure that all laces/cords are tied correctly. To avoid injury and unnecessary wear on the belt, make sure that your footwear is not dirty.
10 It is not advisable to keep your unit in a damp place for long periods as it will be prone to rust.
Caution: Consult your doctor before beginning to use this appliance. This advice is especially important for those suffering from health problems.
SAFETY INSTRUCTIONS.-
This product is supplied with a mains cable that has an earth wire and a plug with an earth pin. In the event that the appliance malfunctions then the earth connection will redirect the electrical current away from the machine and reduce the risk of an electrical shock.
DANGER! If the equipment is not earthed correctly then there is a risk of electrical shock.
Do not modify the plug supplied with the equipment, if it does not fit the wall socket then get an electrician to install an electrical socket that does.
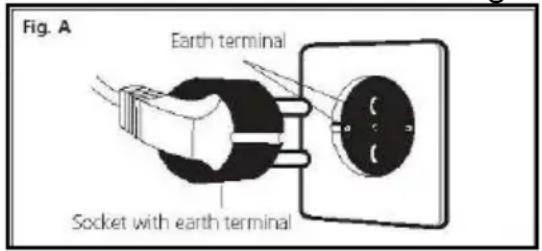
This product must only be used on a 220-240 volt circuit, with an earthed socket similar to that shown in Fig.A.
text_image
Fig. A Earth terminal Socket with earth terminalAlways observe the following recommendations:
1 Never use accessories not recommended by the manufacturer.
2 Do not use the machine if the mains cable becomes damaged or worn.
3 Keep the mains cable away from hot surfaces.
4 Do not use the machine outdoors.
5 To unplug the machine, first put the switch to the "0" position and then unplug it from the wall socket.
SAFETY BREAKER.-
This model is equipped with an electronic circuit breaker to protect both the electronic and electrical circuits. This safety device (fuse) will be automatically triggered if the unit is subjected to abnormal force or heat.
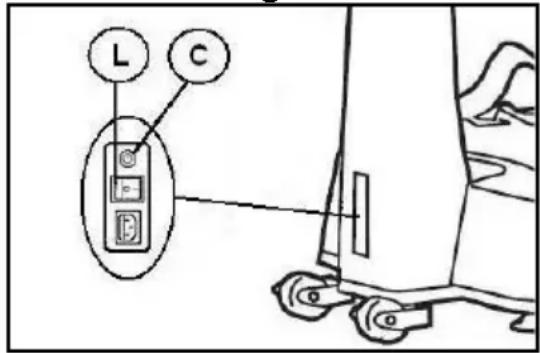
1.- Set switch (L), located on the casing, to the "0" (OFF) position.
2.- Change the fuse (C) (7 Amp).
3.- Next, set switch (L) to the "I" (ON) position and the unit will be ready for use again. (Fig B)
Fig B
text_image
L CASSEMBLY INSTRUCTIONS.-
Take the unit out of the box and place it on the floor as shown in Fig.1.
The assistance of a second person is advisable for the assembly work.
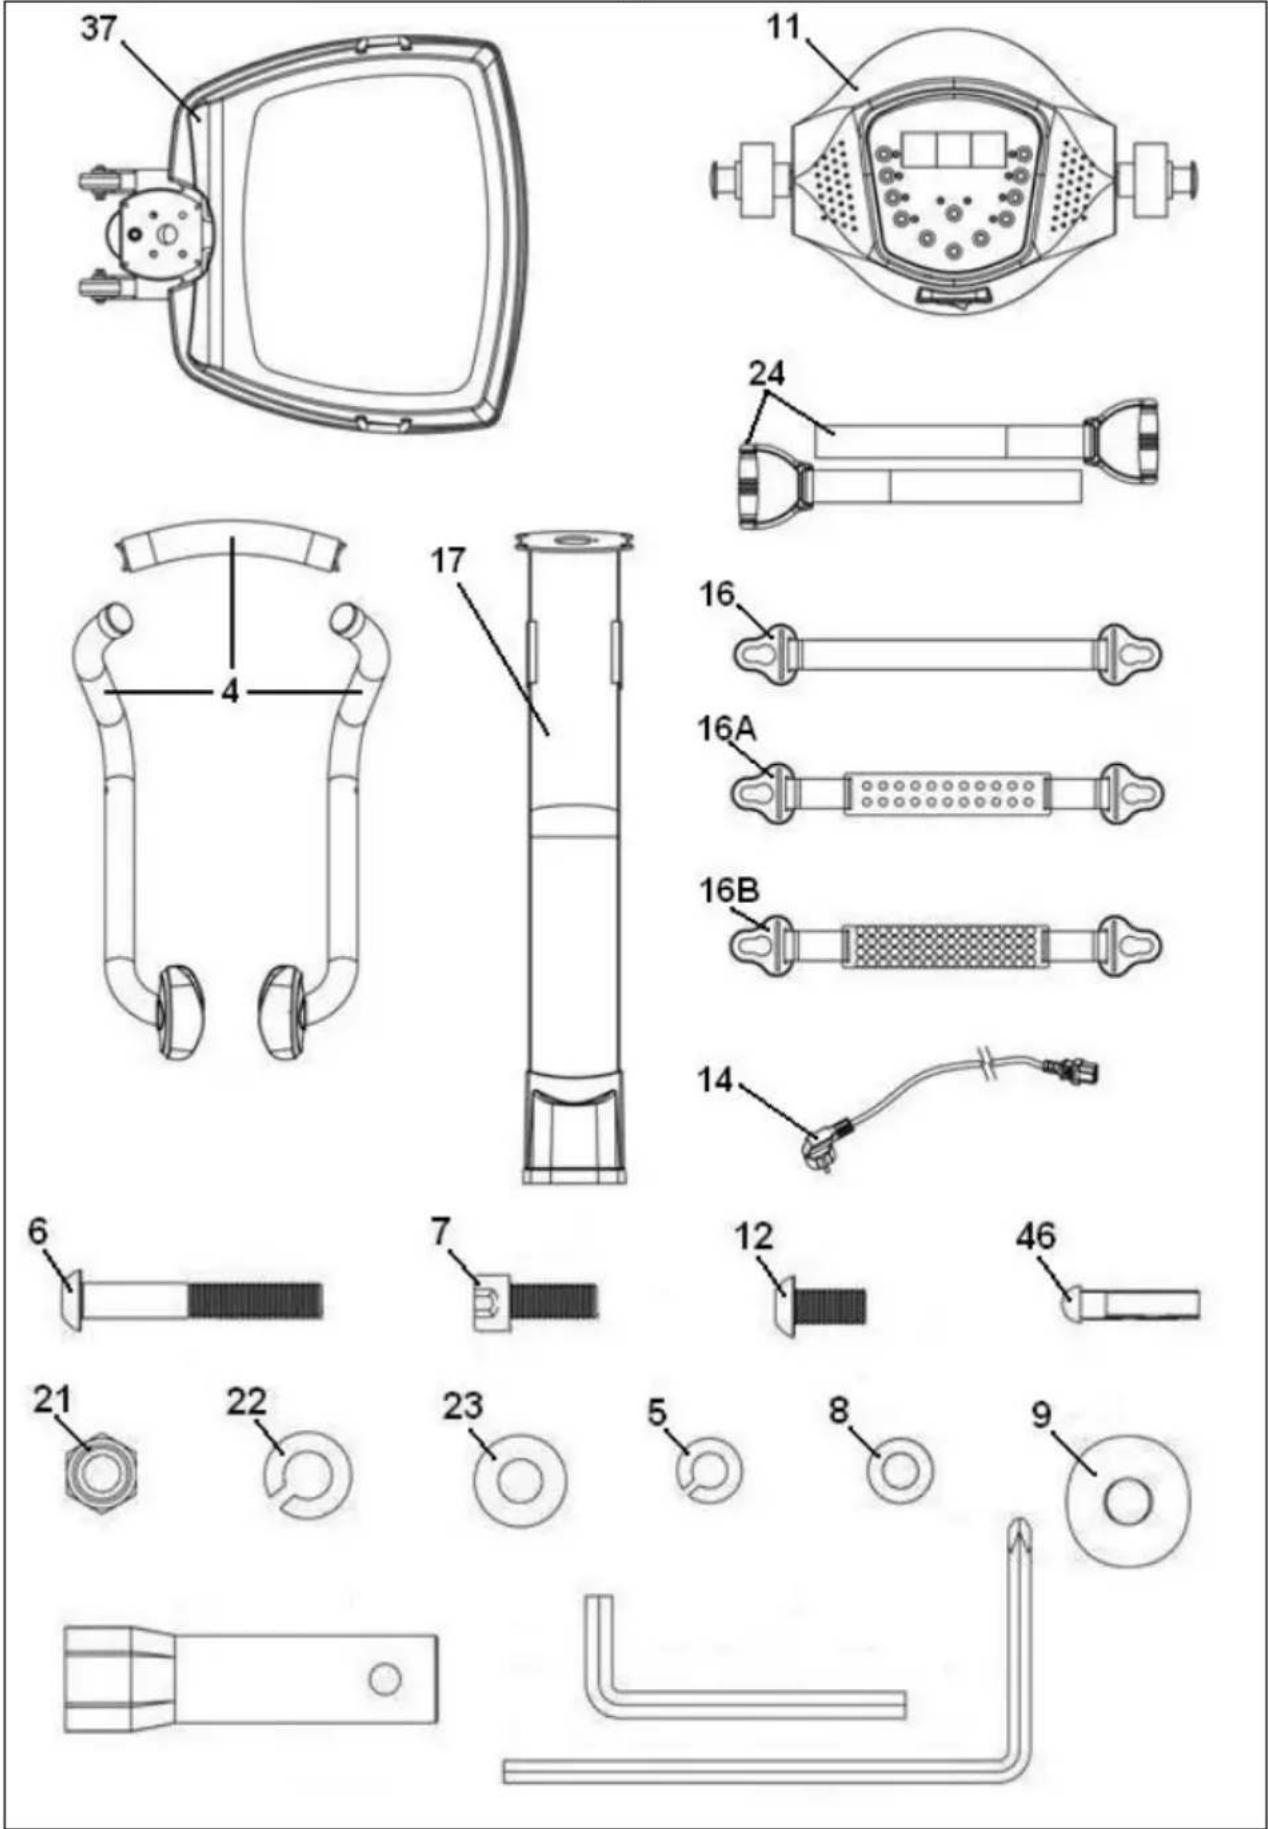
Make sure that all of the pieces are there: (4) Handlebar; (11) Vibration head; (14) Mains cable; (16) Double strip massage band; (16A) Massage band with rounded ribbing; (16B) Massage band with irregular ribbing; (17) Top platform column; (37) Platform; (5) Corrugated washer M-10; (6) Allen screw M-8x55; (7) Allen screw M-8x20; (8) Safety washer security M-8; (9) Flat washer M-8; (12) Allen screw M-8x15; (21) Self-locking nuts M-10; (22) Safety washer security M-10; (23) Flat washer M-10; (46) Allen screw M-5x25; Box spanner; Allen key 6mm; Allen key 5mm.
Follow these step-by-step assembly instructions.
The assistance of a second person is recommended when assembling this platform. Position the platform as shown in Fig.2, lifting and resting the four feet on a table, for example.
1.- At least two people are needed for this step. When fitting the column, one person should hold the column while the other one follows the assembly instructions. This will prevent any possible accidents.
First take the column (17) and put it into assembly position, Fig.2, connect terminal (5), sticking out of the column (17) with the terminal (6) sticking out of the platform (37).
Next, connect terminal (18), sticking out of the column (17), to terminal (10), sticking out of the platform (37).
Once all of the terminals have been connected, push them inside the column (17) to protect them and fit the column (17) on the platform, lining up the bolt holes.
Fit Self-locking nuts (21), safety washers (22) and flat washers (23) and use the key to tighten them securely.
Lower the bottom trim section (19) for the main post (10) down over the boss section of the main body (37), fit the screws (46), and tighten securely Fig.2.
For the next stage of the assembly it is advisable to place the platform back on the floor with the help of a second person.
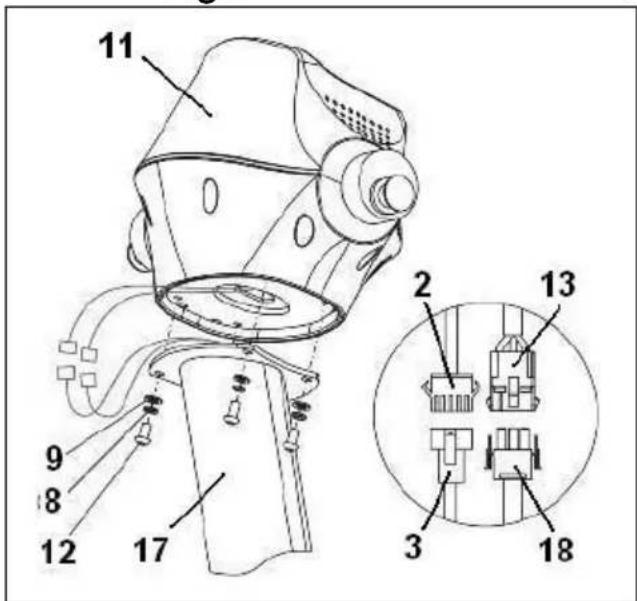
2.- Take the vibration head (11) and position it onto the plate of the column (17) Fig.3.
Connect terminal (2) coming out of the vibration head with terminal (3) coming out of the column (17), connect terminal (13) coming out of the vibration head with terminal (18) coming out of the column (17).
Now fit bolt (12), along with the safety washer (8), washers (9) and tighten securely.
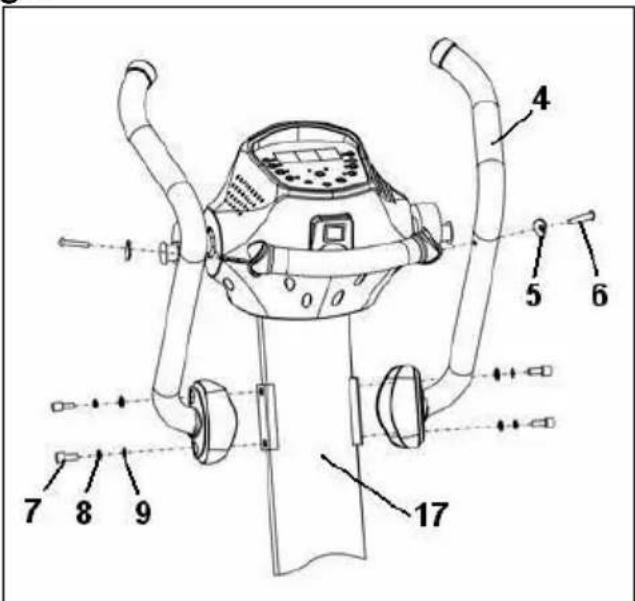
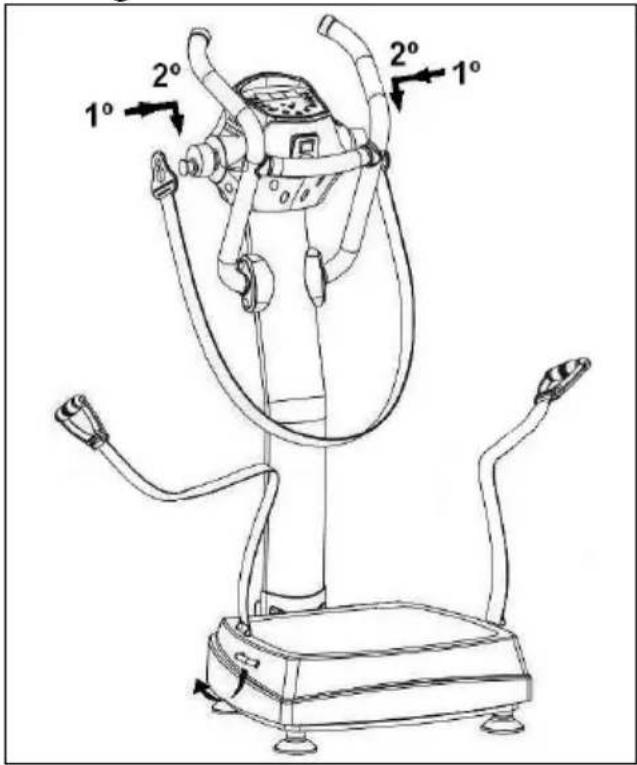
3.- Take the handlebar (4), and slot it into position as shown in Fig.4 by lining up the holes.
Fit the screws (7) safety washer (8) and flat washers (9) and use the 6mm Allen key to tighten them securely.
Now fit bolt (6), washers (5) and tighten securely.
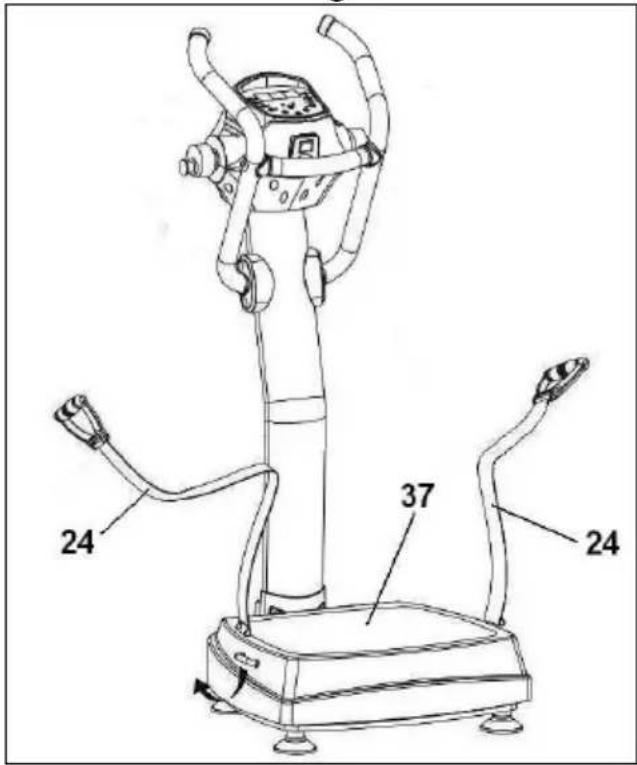
4.- Fit the hand straps (24) onto the platform's outer rings (37) as shown in Fig.5.
5.- Take one of the massage bands and fit it as shown in Fig.6.
First fit the end of the band into the eccentric and then lower it so that it is inserted properly.
START-UP.-
Plug the mains cable (14) into the socket (M) on the column, Fig.7.
The other end of the cable is plugged into the electric wall socket (220V).
Set switch (L) to position (I), Fig.7.
MOVEMENT & STORAGE.
The unit is equipped with wheels (45), Fig.7, to make it easier to move.
Make sure that the mains cable is unplugged from the wall socket.
To prevent accidents DO NOT move the platform across uneven floors.
INSPECTION & MAINTENANCE
Switch the unit off and unplug the mains cable.
Use a damp cloth or towel to clean the dust off the platform, especially the handrails and the electronic console.
Do not use solvents.
ATTENTION:
Periodically check that all of the fastening elements are duly tightened and connected correctly.
Check and tighten all the parts on your unit every three months.
When in doubt about any parts on the machine, do not hesitate to get in touch with the Technical Assistance Service by phoning customer services (see last page in manual).
We recommend that your use original
spare parts to replace any worn components. The use of other spare parts may cause injuries or affect the performance of the machine.
THE MANUFACTURER KEEPS THE RIGHT TO MODIFY THE PRODUCT SPECIFICATIONS WITH NO PREVIOUS ADVISE.
TECHNICAL SPECIFICATIONS
| MODEL | COMBO YV56 |
| POWER | 1 x 550 W MOTORS |
| VOLTAGE | 220/240V. 50/60Hz. |
| VIBRATION FREQUENCY | 25 -50Hz. |
| PROGRAMMING | 30, 45, 60, 90 Seconds |
| VIBRATION TYPE | TRIAXIAL (Three spatial axes) |
| MATERIAL | FIBREGLASS |
| DIMENSIONS | Length -65; Width -60; Height -125 cm. |
| NET WEIGHT | 42Kg. |
| USER MAXIMUM WEIGHT: | 120Kg. |
| ELECTRICAL PROTECTION | 7 Amp fuse. |
Warranty
The warranty certificate guarantees this product for 2 years in accordance with that stated in Directive 1999/44/EC of the European Parliament and of the Council 25 ^th May, 1999, regarding certain aspects of the sale of consumer goods and associated guarantees, incorporated into Spanish Law by virtue of Law 23/2003, 10 ^th July; Guarantees on the sale of consumer goods. To this effect, EXERCYCLE, S.L. VAT n° B-01029032, with business address c/ Zurrupitieta 22, Vitoria, Spain, guarantees this product.
Please keep the receipt as proof of purchase.
Should you have any queries please do not hesitate to phone our customer service line:
+44 0844 335 3988 service@bh-uk.co.uk
Français
Tecnovita by BH
text_image
Fig.B L CVERPLAATSING & OPSLAG.-
text_image
Technical diagram of a spray gun with numbered parts for identification and assembly reference.To order replacement parts:
State the machine model Corresponding parts N° Quantity
Unit 1A Britannia Business Park
Union Road, The Valley
Bolton BL2 2HP
UK
Tel.: +44 (0)870 381 0277
Fax: +44 (0)870 381 0278
e-mail: info@bhfitness.co.uk
BH FITNESS PORTUGAL
MAQUINASPORT, S.A.
No.139, Jhongshan Rd.
Daya Township
Taichung 428, Taiwan. R.O.C.
Tel.: +886 4 25609200
Fax: +886 4 25609280
info@bhasia.com.tw
BH FITNESS CHINA
BH China Co., Ltd.
Block A, NO.68, Branch Lane 455, Lane 822,
Zhen Nan RD., Li Zi Yuan, Putuo, Shanghai
200331, P.R.C.
Tel: +86-021-5284 6694
Fax:+86-021-5284 6814
BH SE RESERVA EL DERECHO A MODIFICAR LAS ESPECIFICACIONES DE SUS PRODUCTOS SIN PREVIO AVISO.
SPECIFICATIONS MAY BE CHANGED WITHOUT PRIOR NOTICE DUE TO OUR PROGRAMME OF CONTINUOUS PRODUCT DEVELOPMENT.
BH SE RÉSERVE LE DROIT DE MODIFIER LES SPECIFICATIONS DE SES PRODUITS SANS PRÉAVIS.