
CyberShot DSCHX95 - Camera SONY - Free user manual and instructions
Find the device manual for free CyberShot DSCHX95 SONY in PDF.


| Product Type | Compact digital camera |
| Brand | Sony |
| Model | CyberShot DSCHX95 |
| Dimensions (L × H × D) | 102.0 × 58.1 × 35.5 mm |
| Weight (with battery and memory card) | 243 g |
| Power supply | Rechargeable battery NP-BX1 (3.6 V, 1.8 W) |
| Charger | AC adapter AC-UUD12/AC-UUE12 (5 V, 1.5 A) or AC-UB10C (5 V, 0.5 A) |
| Memory card type | microSD, microSDHC, microSDXC, Memory Stick Micro |
| Main features | Photo shooting, video recording (AVCHD, XAVC S), built-in flash, optical zoom, Wi-Fi, NFC, electronic viewfinder, LCD screen |
| Connectivity | Wi-Fi, micro-USB (USB 2.0), micro HDMI (not mentioned but likely) |
| Operating temperature | 0 °C to 40 °C |
| Storage temperature | -20 °C to 55 °C |
| Maintenance and cleaning | Clean with a soft, dry cloth. Do not use solvents. Protect from dust and moisture. |
| Safety | Do not expose the lens to sunlight. Keep out of reach of children. Avoid shocks. Use only Sony accessories. |
| Spare parts and repairability | Battery NP-BX1, memory card, micro-USB cable, AC adapter. Repair by Sony authorized center. |
| General information | Manual available in multiple languages. Online help guide: http://rd1.sony.net/help/dsc/1815/h_zz/ |
Frequently Asked Questions - CyberShot DSCHX95 SONY
User questions about CyberShot DSCHX95 SONY
0 question about this device. Answer the ones you know or ask your own.
Ask a new question about this device
Download the instructions for your Camera in PDF format for free! Find your manual CyberShot DSCHX95 - SONY and take your electronic device back in hand. On this page are published all the documents necessary for the use of your device. CyberShot DSCHX95 by SONY.
USER MANUAL CyberShot DSCHX95 SONY
http://www.sony.net/SonyInfo/Support/
SONY®
4-746-011-31(1)
Digital Still Camera / Startup Guide GB
Refer to "Help Guide" for in-depth instructions on the many functions of the camera.
©2018 Sony Corporation Printed in China

4746011310
Cyber-shot
http://rd1.sony.net/help/dsc/1815/h_zz/
DSC-HX99/DSC-HX95/DSC-WX800/DSC-WX700
This guide describes the necessary preparations to start using the product, basic operations, etc. For details, refer to the "Help Guide" (web manual).
"Help Guide" (Web manual)
http://rd1.sony.net/help/dsc/1815/h_zz/

Preparations
Checking the supplied items
The number in parentheses indicates the number of pieces.
- Camera (1)
• Power cord (mains lead) (1) (supplied in some countries/regions) - Rechargeable battery pack NP-BX1 (1)
-
Micro USB cable (1)
-
AC Adaptor (1)
The type of the AC Adaptor may differ depending on the country/region. - Wrist strap (1)
- Startup Guide (this manual) (1)
• Reference Guide (1)
Inserting the battery pack (supplied)/memory card (sold separately) into the camera
Open the battery/memory card cover, and insert the battery pack and a memory card into the camera. Then, close the cover.

Battery pack
Make sure that the battery pack is facing in the correct direction, and insert it while pressing the battery lock lever.
Memory card
microSD memory card/microSDHC memory card/microSDXC memory card: Insert the card straight with the terminal side facing the monitor side of the camera.
Memory Stick Micro: Insert the card with the terminal side facing the lens side of the camera.
This camera is compatible with microSD memory cards or
Memory Stick Micro media. For details on the compatible memory cards, refer to the "Help Guide."
When you use a memory card with this camera for the first time, it is recommended that you format the card using the camera in order to stabilize the performance of the memory card.
Charging the battery pack
1 Turn the power off.
If the camera is turned on, the battery pack will not be charged.
2 Connect the camera with the battery pack inserted to the AC Adaptor (supplied) using the micro USB cable (supplied), and connect the AC Adaptor to the wall outlet (wall socket).
The charge lamp will light up when charging starts. When the charge lamp turns off, charging is completed.

Setting the language and the clock

Select items: ▲/▼/◄/►/▼↓
Confirm : Center button
1 Press the ON/OFF (Power) button to turn on the camera.
2 Select the desired language and then press the center of the control wheel.
3 Make sure that [Enter] is selected on the screen and then press the center.
4 Select the desired geographic location and then press the center.
5 Set [Daylight Savings], [Date/Time], and [Date Format], and then select [Enter] and press the center.
If you want to reconfigure the date/time or the area setting at a later point, select MENU → ⚙(Setup) → [Date/Time Setup] or [Area Setting].
Shooting
Shooting still images
1 Select the desired shooting mode by turning the mode dial.
2 Press the shutter button halfway down to focus.
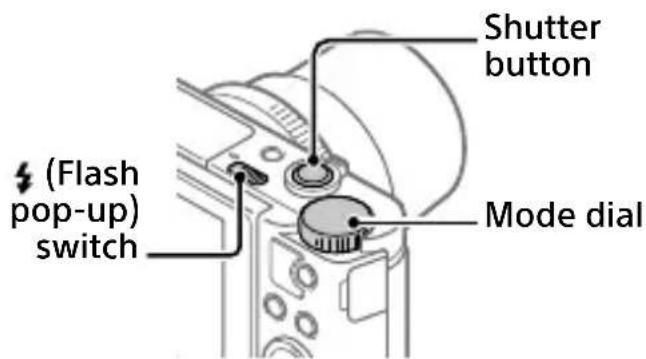
3 Press the shutter button all the way down.
Using the flash
GB
Slide the ♣ (Flash pop-up) switch to pop up the flash.
Restore the flash to its original position after using it. Make sure that the flash portion is not sticking up.
Shooting movies
1 Press the MOVIE (Movie) button to start recording.
Movie recording can be started from any shooting mode in the default setting.
2 Press the MOVIE button again to stop recording.

Using the viewfinder (only for models with a viewfinder)
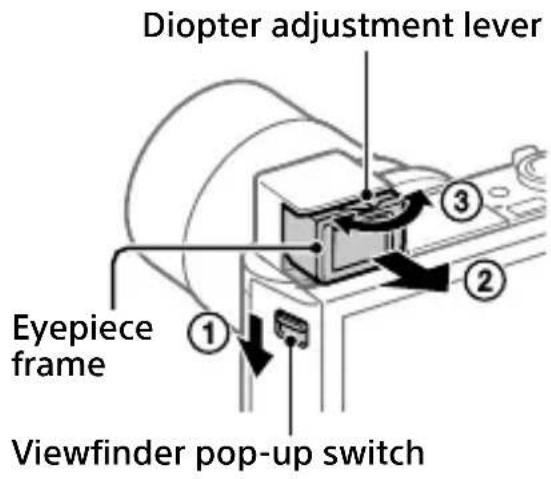
Slide down the viewfinder pop-up switch to raise the viewfinder. Then, grasp both sides of the eyepiece frame and pull it toward the monitor side until it clicks. Use the diopter adjustment lever to adjust the visibility of the image in the viewfinder.
To store the viewfinder, grab both side of the eyepiece frame, and push it back into the viewfinder until it clicks. Then, push down the top of the viewfinder.
| Viewing
1 Press the (Playback) button to switch to the playback mode.

2 Select an image with the control wheel.
You can move to the previous image/next image by pressing the left/right side of the control wheel.
To start playing back a movie, press the center button on the control wheel.
■ Deleting a displayed image
Press the ⏻ (Delete) button while the image is displayed, and then select [Delete] using the control wheel.
Once you have deleted an image, you cannot restore it. Confirm the image before deleting it.
Transferring images to a smartphone
You can transfer images to a smartphone by connecting the camera and a smartphone via Wi-Fi.
1 ☐: Install PlayMemories Mobile on your smartphone.
To connect the camera and your smartphone, PlayMemories Mobile is required.
Install PlayMemories Mobile to your smartphone in advance.
If PlayMemories Mobile is already installed on your smartphone, be sure to update it to the latest version.


http://www.sony.net/pmm/
2 Connect the camera and your smartphone using the QR Code (only for the first time).
① : MENU → Ⓗ (Network) → [Snd to Smrtphn Func] → [Send to Smartphone] → [Select on This Device] → images to transfer. If you want to select images on the smartphone, select [Select on Smartphone].
② : Launch PlayMemories Mobile on your smartphone, and select [Scan QR Code of the Camera].
③ : Scan the QR Code displayed on the camera using your smartphone.

Perform the steps that follow only if using an iPhone or iPad.
④ Install the profile by following the instructions on the iPhone or iPad screen.
⑤ On the "Home" screen of the iPhone or iPad, select [Settings] → [Wi-Fi].
⑥ Select the SSID displayed on the camera.
After the first time, you can connect the camera and the smartphone just by selecting the SSID.
3 The images will be transferred.
Transferring images to your smartphone (after the first time)
1: Perform Step 2-① under "Transferring images to a smartphone."
2 : Launch PlayMemories Mobile on your smartphone.
The images will be transferred.
For details on how to connect to a smartphone, refer to the following support sites:
https://www.sony.net/dics/pmm1801/
- For details on other connection methods or how to use the smartphone as a remote commander to operate the camera, refer to the "Help Guide."
- The Wi-Fi functions introduced in this manual are not guaranteed to operate on all smartphones or tablets.
- The Wi-Fi functions of this camera are not available when connected to a public wireless LAN.
Managing and editing images on a computer
Images can be imported to a computer by connecting the camera and your computer using a micro USB cable, or inserting the memory card of the camera into the computer.
In addition, by using the following computer software, you can enhance your enjoyment of photos/movies.
PlayMemories Home
PlayMemories Home allows you to import still images and movies to your computer and view or use them. You need to install PlayMemories Home to import XAVC S movies or AVCHD movies to your computer.
Imaging Edge
Imaging Edge is a software suite that includes the functions below:
- Remote shooting from a computer
- Adjusting or developing RAW images recorded with the camera*
* Only for models that support RAW images
For details on the computer software, refer to the following URL.
https://www.sony.net/disoft/
Notes on use
Refer to "Precautions" in the "Help Guide" as well.
Illustrations in this manual
Illustrations used in this manual are of the DSC-HX99, unless otherwise noted.
Screen language
You can select the language displayed on the screen using the menu.
Notes on handling the product
- The camera is neither dust-proof, nor splash-proof, nor water-proof.
- Do not leave the lens or the viewfinder exposed to a strong light source such as sunlight. Because of the lens's condensing function, doing so may cause smoke, fire, or a malfunction inside the camera body or the lens.
- Do not leave the camera, the supplied accessories, or memory cards within the reach of infants. They may be accidentally swallowed. If this occurs, consult a doctor immediately.
Notes on the monitor and electronic viewfinder
- The monitor and electronic viewfinder are manufactured using extremely high-precision technology, and over 99.99% of the pixels are operational for effective use. However, there may be some small black dots and/or bright dots (white, red, blue or green in color) that constantly appear on the monitor and electronic viewfinder. These are imperfections due to the manufacturing process and do not affect the recorded images in any way.
- When shooting with the viewfinder, you may experience symptoms such as eyestrain, fatigue, motion sickness, or nausea. We recommend that you take a break at regular intervals when you are shooting with the viewfinder.
- If the monitor or electronic viewfinder is damaged, stop using the camera immediately. The damaged parts may harm your hands, face, etc.
Notes on continuous shooting
During continuous shooting, the monitor or viewfinder may flash between the shooting screen and a black screen. If you keep watching the screen in this situation, you may experience uncomfortable symptoms such as feeling of unwellness. If you experience uncomfortable symptoms, stop using the camera, and consult your doctor as necessary.
Notes on recording for long periods of time or recording 4K movies
- Depending on the camera and battery temperature, the camera may become unable to record movies or the power may turn off automatically to protect the camera. A message will be displayed on the screen before the power turns off or you can no longer record movies. In this case, leave the power off and wait until the camera and battery temperature goes down. If you turn on the power without letting the camera and battery cool sufficiently, the power may turn off again, or you may still be unable to record movies.
- The camera body and battery may become warm with use – this is normal.
- If the same part of your skin touches the camera for a long period of time while using the camera, even if the camera does not feel hot to you, it may cause symptoms of a low-temperature burn such as redness or blistering. Pay special attention in the following situations and use a tripod, etc.
- When using the camera in a high temperature environment
- When someone with poor circulation or impaired skin sensation uses the camera
- When using the camera with [Auto Pwr OFF Temp.] set to [High]
Notes on recording/playback
- Before you start recording, make a trial recording to make sure that the camera is working correctly.
- Playback of images recorded with your product on other equipment and playback of images recorded or edited with other equipment on your product are not guaranteed.
- Sony can provide no guarantees in the event of failure to record, or loss of or damage to recorded images or audio data, due to a malfunction of the camera or recording media, etc. We recommend backing up important data.
- Once you format the memory card, all the data recorded on the memory card will be deleted and cannot be restored. Before formatting, copy the data to a computer or other device.
Sony accessories
Using this unit with products from other manufacturers may affect its performance, leading to accidents or malfunction.
Warning on copyrights
Television programs, films, videotapes, and other materials may be copyrighted. Unauthorized recording of such materials may be contrary to the provisions of the copyright laws.
Notes on location information
If you upload and share an image tagged with a location, you may accidentally reveal the information to a third party. To prevent third parties from obtaining your location information, set [Loc. Info. Link Set.] to [Off] before shooting images.
Notes on discarding or transferring this product to others
Before discarding or transferring this product to others, be sure to perform the following operation to protect private information.
- Select [Setting Reset] [Initialize].
Notes on discarding or transferring a memory card to others
Executing [Format] or [Delete] on the camera or a computer may not completely delete the data on the memory card. Before transferring a memory card to others, we recommend that you delete the data completely using data deletion software. When discarding a memory card, we recommend that you physically destroy it.
Notes on wireless LAN
If your camera is lost or stolen, Sony bears no responsibility for the loss or damage caused by illegal access or use of the registered access point on the camera.
Notes on security when using wireless LAN products
- Always make sure that you are using a secure wireless LAN to avoid hacking, access by malicious third parties, or other vulnerabilities.
- It is important that you set the security settings when using a wireless LAN.
- If a security problem arises because no security precautions are in place or due to any inevitable circumstances when using a wireless LAN, Sony bears no responsibility for the loss or damage.
How to turn off wireless network functions (Wi-Fi, etc.) temporarily
When you board an airplane, etc., you can turn off all wireless network functions temporarily using [Airplane Mode].
For Customers in the U.S.A.
For question regarding your product or for the Sony Service Center nearest you, call 1-800-222-SONY (7669).
Supplier's Declaration of Conformity
Trade Name : SONY
Model : DSC-HX99, DSC-HX95, DSC-WX800, DSC-WX700
Responsible Party : Sony Electronics Inc. Address : 16535 Via Esprillo, San Diego, CA 92127 U.S.A.
Telephone Number : 858-942-2230
This device complies with part 15 of the FCC rules. Operation is subject to the following two conditions: (1) This device may not cause harmful interference, and (2) this device must accept any interference received, including interference that may cause undesired operation.
Specifications
Camera
DSC-HX99
Rated input: 3.6 V —— 1.8 W
Operating temperature: 0 to 40°C (32 to 104°F)
Storage temperature: -20 to 55°C (-4 to 131°F)
Dimensions (W/H/D) (Approx.): 102.0 × 58.1 × 35.5 mm (4 1/8 × 2 3/8 × 1 7/16 in.)
Mass (CIPA compliant) (Approx.): 242 g (8.6 oz) (including battery pack, microSD memory card)
DSC-HX95
Rated input: 3.6 V ——, 1.8 W
Operating temperature: 0 to 40°C (32 to 104°F)
Storage temperature: -20 to 55°C (-4 to 131°F)
Dimensions (W/H/D) (Approx.): 102.0 × 58.1 × 35.5 mm (4 1/8 × 2 3/8 × 1 7/16 in.)
Mass (CIPA compliant) (Approx.): 243 g (8.6 oz) (including battery pack, microSD memory card)
DSC-WX800
Rated input: 3.6 V=, 1.5 W
Operating temperature: 0 to 40°C (32 to 104°F)
Storage temperature: -20 to 55°C (-4 to 131°F)
Dimensions (W/H/D) (Approx.): 101.6 × 58.1 × 35.5 mm (4 1/8 × 2 3/8 × 1 7/16 in.)
Mass (CIPA compliant) (Approx.): 233 g (8.3 oz) (including battery pack, microSD memory card)
DSC-WX700
Rated input: 3.6 V=, 1.5 W
Operating temperature: 0 to 40°C (32 to 104°F)
Storage temperature: -20 to 55°C (-4 to 131°F)
Dimensions (W/H/D) (Approx.): 101.6 × 58.1 × 35.5 mm (4 1/8 × 2 3/8 × 1 7/16 in.)
Mass (CIPA compliant) (Approx.): 233 g (8.3 oz) (including battery pack, microSD memory card)
AC Adaptor
AC-UUD12/AC-UUE12
Rated input: 100 - 240 V ∼, 50/60 Hz, 0.2 A
Rated output: 5 V ---, 1.5 A
AC-UB10C
Rated input: 100 - 240 V ∼, 50/60 Hz, 70 mA
Rated output: 5 V, 0.5 A
Rechargeable battery pack
NP-BX1
Rated voltage: 3.6 V ---
Design and specifications are subject to change without notice.
Trademarks
- XAVC S and XAVC S are registered trademarks of Sony Corporation.
- AVCHD and AVCHD logotype are trademarks of Panasonic Corporation and Sony Corporation.
- iPhone and iPad are trademarks of Apple Inc., registered in the U.S. and other countries.
- Android and Google Play are trademarks or registered trademarks of Google Inc.
- Wi-Fi, the Wi-Fi logo and Wi-Fi Protected Setup are registered trademarks or trademarks of the Wi-Fi Alliance.
• QR Code is a trademark of Denso Wave Inc. - In addition, system and product names used in this manual are, in general, trademarks or registered trademarks of their respective developers or manufacturers. However, the ^TM or ^® marks may not be used in all cases in this manual.
Additional information on this product and answers to frequently asked questions can be found at our Customer Support Website.
http://www.sony.net/
Préparatifs
natural_image
Technical line drawing of a mechanical device with no visible text or symbolsBouton MOVIE (Film)

https://www.sony.net/dics/pmm1801/
Batterie rechargeable
NP-BX1
Preparativos
natural_image
Technical line drawing of a mechanical device with no visible text or symbolshttps://www.sony.net/dics/pmm1801/
Preparazioni
https://www.sony.net/dics/pmm1801/
Preparativos
https://www.sony.net/dics/pmm1801/
Vorbereitungen
https://www.sony.net/dics/pmm1801/
Voorbereidingen
natural_image
Technical line drawing of a camera module with no visible text or symbolshttps://www.sony.net/dics/pmm1801/
Przygotowania
Příprava
https://www.sony.net/dics/pmm1801/
Előkészületek
https://www.sony.net/dics/pmm1801/
Príprava
natural_image
Technical line drawing of a camera module with no visible text or symbolshttps://www.sony.net/dics/pmm1801/
Förberedelser
https://www.sony.net/dics/pmm1801/
Valmistelut
Forberedelser
Kontrollere leverte deler
Tallet i parentes angir antall deler.
- Kamera (1)
- Strømkabel (1) (inkludert i visse land/regioner)
• Oppladbart batteri NP-BX1 (1) - Mikro-USB-kabel (1)
natural_image
Technical line drawing of a mechanical component with no visible text or symbolsMOVIE (filmknapp)
NO
NO
https://www.sony.net/dics/pmm1801/
Justert spenning: 3,6 V ---
Forberedelser
natural_image
Technical line drawing of a camera module with no visible text or symbolsMOVIE (Film)- knap
https://www.sony.net/dics/pmm1801/
- SONY®
- Preparations
- Checking the supplied items
- Inserting the battery pack (supplied)/memory card (sold separately) into the camera
- Battery pack
- Memory card
- Charging the battery pack
- Turn the power off.
- Connect the camera with the battery pack inserted to the AC Adaptor (supplied) using the micro USB cable (supplied), and connect the AC Adaptor to the wall outlet (wall socket).
- Setting the language and the clock
- Shooting
- Shooting still images
- Press the shutter button all the way down.
- Using the flash
- Shooting movies
- Press the MOVIE (Movie) button to start recording.
- Press the MOVIE button again to stop recording.
- Using the viewfinder (only for models with a viewfinder)
- | Viewing
- Transferring images to a smartphone
- Managing and editing images on a computer
- PlayMemories Home
- Imaging Edge
- Notes on use
- Illustrations in this manual
- Screen language
- Notes on handling the product
- Notes on the monitor and electronic viewfinder
- Notes on continuous shooting
- Notes on recording for long periods of time or recording 4K movies
- Notes on recording/playback
- Sony accessories
- Warning on copyrights
- Notes on location information
- Notes on discarding or transferring this product to others
- Notes on discarding or transferring a memory card to others
- Notes on wireless LAN
- Notes on security when using wireless LAN products
- How to turn off wireless network functions (Wi-Fi, etc.) temporarily
- For Customers in the U.S.A.
- Supplier's Declaration of Conformity
- Specifications
- Camera
- DSC-HX99
- DSC-HX95
- DSC-WX800
- DSC-WX700
- AC Adaptor
- AC-UUD12/AC-UUE12
- AC-UB10C
- Rechargeable battery pack
- NP-BX1
- Trademarks
- Préparatifs
- Batterie rechargeable
- Preparativos
- Preparazioni
- Vorbereitungen
- Voorbereidingen
- Przygotowania
- Příprava
- Előkészületek
- Príprava
- Förberedelser
- Valmistelut
- Forberedelser
- Kontrollere leverte deler
Brand : SONY
Model : CyberShot DSCHX95
Category : Camera