
Dolce Bacio - Ice machine Klarstein - Free user manual and instructions
Find the device manual for free Dolce Bacio Klarstein in PDF.

| Product type | Ice cream maker |
| Brand | Klarstein |
| Model | Dolce Bacio |
| Item number | 10032322 |
| Power supply | 220-240 V~ 50 Hz |
| Power consumption | 180 W |
| Capacity | 2 liters (max 60% fill) |
| Weight | 12 kg |
| Refrigerant | Isobutane (R600a), flammable but eco-friendly |
| Operating modes | Ice cream, cooling only, mixing only |
| Adjustable timer | 5 to 60 minutes |
| Motor protection | Automatic shutdown if blade is blocked |
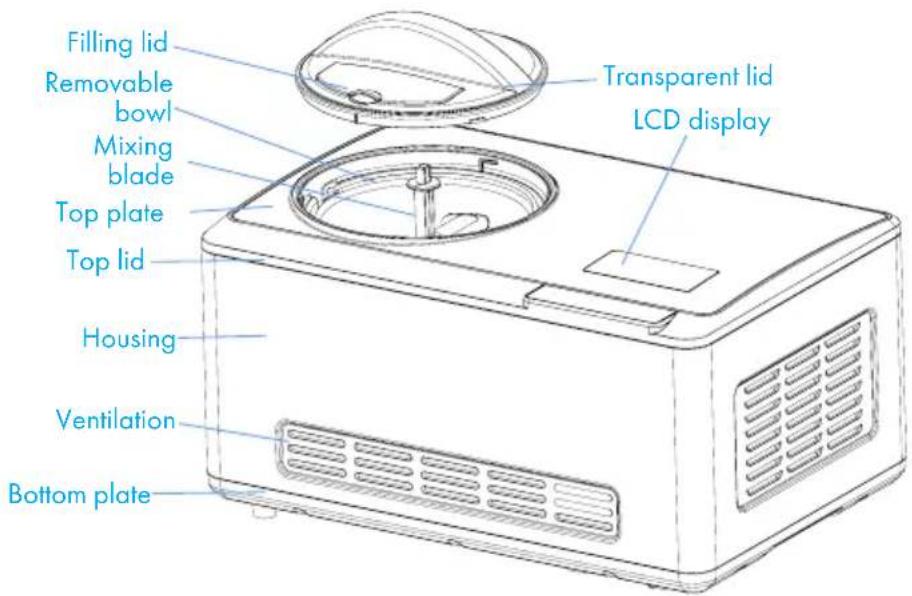
| Mixing bowl | Removable, 2 liter capacity |
| Lid | Transparent with fill opening |
| Stirring blade | Removable, for mixing ingredients |
| Built-in compressor | No pre-freezing required |
| Care and cleaning | Clean contact parts with a damp cloth; do not immerse |
| Safety | Grounding required; lid closed required |
| Compliance | EMC, LVD, RoHS, ErP directives |
Frequently Asked Questions - Dolce Bacio Klarstein
User questions about Dolce Bacio Klarstein
0 question about this device. Answer the ones you know or ask your own.
Ask a new question about this device
Download the instructions for your Ice machine in PDF format for free! Find your manual Dolce Bacio - Klarstein and take your electronic device back in hand. On this page are published all the documents necessary for the use of your device. Dolce Bacio by Klarstein.
USER MANUAL Dolce Bacio Klarstein
Congratulations on purchasing this equipment. Please read this manual carefully and take care of the following hints to avoid damages. Any failure caused by ignoring the items and cautions mentioned in the instruction manual is not covered by our warranty and any liability. Scan the QR code to get access to the latest user manual and other information about the product

CONTENT
Safety Instructions 18
Device Description 20
Making Ice Cream 21
Operation 23
Care 24
Recipes 25
Hints on Disposal 30
Declaration of Conformity 30
TECHNICAL DATA
| Item number 10032322 | |
| Power supply 220 -240 V~50 Hz | |
| Power 180 W | |
| Capacity 2 litres | |
| Weight 12 kg |
SAFETY INSTRUCTIONS
- Check that the mains voltage corresponds to the rating of the appliance before operating.
- Use handles or knobs when moving. Place on a flat stable surface for use. Do not use outdoors.
- Do not use near or in the immediate vicinity of a bath or swimming pool or any source of liquid.
- Unplug from socket outlet when not in use.
- To protect against electric shock, do not immerse cord or plug in water or any other liquid.
- The use of accessory attachments not recommended by the appliance manufacturer, may cause injury.
- Do not locate this appliance immediately below a socket outlet.
- Do not allow cord to overhang the counter top where it can be easily pulled by children.
- Do not use this appliance for anything else other than its intended use.
- Do not overfill as this may cause a hazard. Ensure lid is closed when in operation
- To remove plug from outlet, do not pull on supply cord. Grasp plug firmly and pull to remove.
- No liability can be accepted for any damage caused by non compliance with these instructions or any other improper use or mishandling. This appliance is for household use only
- This appliance is not intended to be operated by means of an external timer or separate remote control system.
- This appliance is not intended to be immersed in water.
- If the supply cord is damaged, it must be replaced by the manufacturer or its service agent or a similarly qualified person in order to avoid a hazard.
- Please according to local regulations regarding disposal of the appliance for its flammable blowing gas.
- Do not store explosive substances such as aerosol cans with a flammable propellant in this appliance.
- Fill with potable water only.
- This appliance is not intended for use by persons (including children) with reduced physical, sensory or mental capabilities, or lack of experience and knowledge, unless they have been given supervision or instruction concerning use of the appliance by a person responsible for their safety. Children should be supervised to ensure that they do not play with the appliance.
This appliance contains the coolant isobutane (R600a), a natural gas which is environmentally friendly. Although it is flammable, it does not damage the ozone layer and does not increase the greenhouse effect. The use of this coolant has, however, led to a slight increase in the noise level of the appliance. In addition to the noise of the compressor, you might be able to hear the coolant flowing around the system. This is unavoidable, and does not have any adverse effect on the performance of the appliance. Care must be taken during the transportation and setting up of the appliance that no parts of the cooling system are damaged. Leaking coolant can damage the eyes.

WARNING
Danger from fire/flammable materials. Please observe the local regulations for the disposal of units with flammable refrigerants and gases.
- Keep ventilation openings in the unit housing free of obstacles.
- Do not damage the refrigerant circuit.
- Do not use any mechanical devices or other means to accelerate the defrosting process or the ice recovery process.
- Do not use other types of electrical appliances inside the ice cube machine.
Special Notes
- When positioning the unit, make sure that the power cord is not pinched or damaged.
- Make sure that there are no multiple sockets or power supplies on the back of the unit.
To avoid contamination of food, please follow the instructions below:
- Regularly clean surfaces that may come into contact with food. Clean the water drain regularly.
- If the appliance contains a water tank, clean it if it has not been used for 48 hours. Rinse the tank if no water has been removed for 5 days.

WARNING
When using, servicing and disposing of the unit, pay attention to the left symbol on the rear of the unit or on the compressor. This symbol warns of possible fires. There are flammable substances in the refrigerant lines and in the compressor. Keep the appliance away from sources of fire during use, maintenance and disposal.
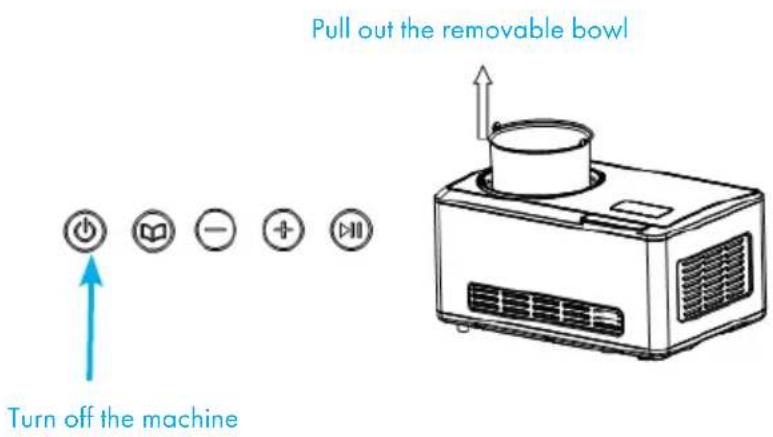
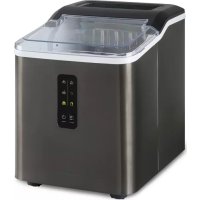
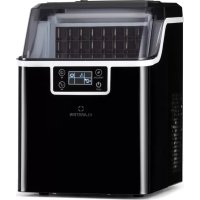
DEVICE DESCRIPTION
Function buttons
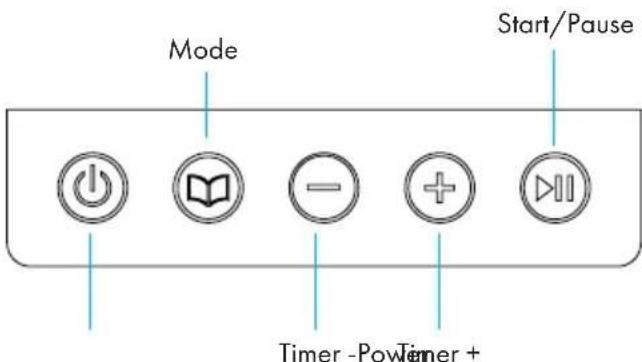
| Key Function | |
| ◎ | After power up, the machine enters standby mode. |
| ◎ | Press button to enter the setting mode, prompting you to input the working time. |
| ◎ | After setting the working time, press this button to start the working mode. During operation, by pressing this button, the mixing will pause and the time countdown will pause as well. |
| ⊕ | Timer setting: Press to decrease working time. |
| - | Timer setting: Press to increase working time. |
MAKING ICE CREAM
Cleanliness
Before use, thoroughly wash all parts that will come into contact with the ice cream (including the fixed bowl, removable bowl, mixing blade, transparent lid, refill lid, measuring cup and spoon).
Warning: Please be sure the power cord is unplugged while cleaning.
Step 1: Prepare recipe ingredients
Prepare recipe ingredients from your own recipe or from the recipe booklet here.
Note: You do not need to freeze the bowl for hours in a freezer in advance, as this machine has a BUILT-IN COMPRESSOR that freezes the recipe ingredients in operation thus ensures the output of ice cream.
Step 2
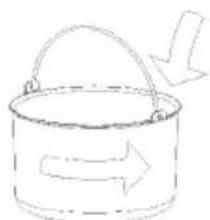
Pour the well prepared recipe ingredients into the removable bowl, then mix uniformly (see picture below).
Step 3
Place the mixing blade into the removable bowl and keep the mixing blade bottom hole fitted well with the motor axis. Then put the transparent lid onto the machine and lock it anticlockwise (see picture below).

Step 4
Plug in power, and press the button to turn the machine.
Step 5
Press the button to set the working mode.
Step 6
Press and button to set the working time.
Step 7
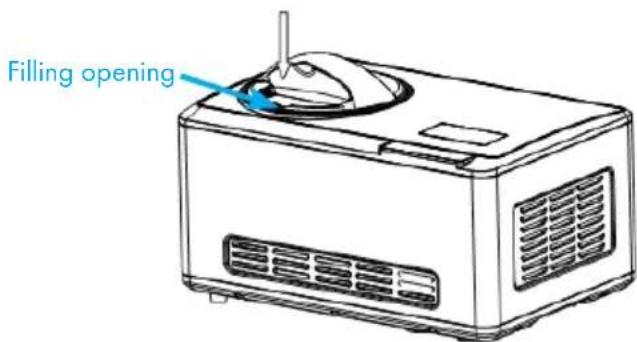
You can add the favourite ingredients by opening the refill cover (see picture below).
Step 8
After operation is over, turn off the machine first, and then pull out the removable bowl.
OPERATION
Ice Cream Making
- To turn on the power, press the button, the LCD display will show 60:00, and the default mode is "Ice cream making", will show up. Press the button to get back to the standby mode. Connect the power supply and switch on the device.
- Press the button to select the mode of "Ice cream" "Cooling only" "Mixing only". If one of the modes is selected, the will show up. If you have not done any operation for 15s, the light will disappear. Press the button to return to the selection mode while working.
- Once the "Ice cream" mode was selected, set the time by pressing the button to increase the time. The time will be increased by 1 minute by pressing each time. If you press for 2s, the time will be increased quickly until 60 minutes and then will stay at 60:00. To reduce the time, press the button. The time will be reduced by 1 minute by pressing each time. If you press for 2s, the time will be reduced quickly until 5 minutes.
- Press the button to start making ice cream. The LCD display will keep working while making ice cream, then the time will start to count down. If you press the button while making ice cream, the mixing blade will stop, the LCD will show the stopping time in the meantime. If you press the button again, the machine will start to work again with the setting mode and remaining time. If you press button, the mixing motor will stop. The compressor will stop after 3 minutes without any operation, will go back to power on after 10 minutes, and 3 buzzers will be heard. If you press the button for 3s, the machine will stop working and go back to the selection mode. If there is no operation, the light will turn off after 15s. Press the and button while working to set the time.
- Once the ice cream making was finished making is complete or the preparation time has elapsed, the appliance will turn off after 10 minutes if there is no operation. After 10 minutes of no operation, the compressor and the fan will turn off.
Keep cool function
To prevent the ice cream from melting after preparation, the cooling function will automatically activate and keep the ice cream cold for 1 hour. After 1 hour, the device will switch to Standby mode.
Motor self-protection function
When the ice cream gets harder, the mixing motor might be blocked. Then the motor protection device makes the mixing motor stop working by detecting its temperature to ensure the life of the motor.
Controlling the Volume of the Ingredients
To avoid overflow and waste, please make sure that the ingredients do not exceed 60% of capacity of the removable bowl (ice cream expands when being formed).
CARE

Warning: Danger of electrical shock
The plug must be removed before cleaning to avoid electric shock.
- Take out the mixing blade, wipe it with a dampened cloth
- Take out the removable bowl, clean it with a dampened soft cloth
- Wipe the transparent lid and refill lid with a dampened cloth
- Remove the dirt on the body or other places with a dampened cloth, and do not pour water on cord, plug or ventilation, or immerse the appliance in water or any other liquid
- Allow to dry thoroughly with a dry cloth, then return the component to its home position.
RECIPES
VANILLA ICE CREAM
Makes eight one-cup servings
Ingredients
1 cup whole milk
1/2 cup granulated sugar
3/2 cups heavy cream, well chilled
1 - 2 teaspoons pure vanilla extract, to taste
Preparation
In a medium bowl, use a hand mixer or a whisk to combine the milk and granulated sugar until the sugar is dissolved, about 1 - 2 minutes on low speed. Stir in the heavy cream and vanilla to taste. Turn machine on, pour mixture into freezer bowl through ingredient spout and let mix until thickened, about 30 - 40 minutes.
Variations
Mint Chip: Omit the vanilla and replace with 1 to 1-1/2 teaspoons pure peppermint extract (to taste). Chop your favorite 4-ounce bittersweet or semi-sweet chocolate bar into tiny uneven pieces. Add the chopped chocolate during the last 5 minutes of mixing.
Butter Pecan: Melt 1 stick unsalted butter in a 10-inch skillet. Add 1 cup roughly chopped pecans and 1 teaspoon kosher salt. Cook over medium-low heat, stirring frequently until the pecans are lightly browned. Remove from the heat, strain (the butter will have a pecan flavour and may be reserved for another use). Allow the pecans to cool completely. Add the toasted buttered pecans during the last 5 minutes of mixing.
Cookies & Cream: Add 3/4 cup coarsely chopped cookies or your favourite candy (chocolate chip, Oreos, Mint Oreos., etc.) during the last 5 minutes of mixing.
BASIC CHOCOLATE ICE CREAM
Makes eight one-cup servings
Ingredients
1 cup whole milk
1/2 cup granulated sugar
240g or 8 ounces bittersweet or semi-sweet chocolate (your favorite)
Preparation
Heat the whole milk until it is just bubbling around the edges (this may be done on the stovetop or in a microwave). In a blender or food processor fitted with the metal blade, pulse to process the sugar with the chocolate until the chocolate is very finely chopped. Add the hot milk, process until well blended and smooth. Transfer to a medium bowl and let the chocolate mixture cool completely. Stir in the heavy cream and vanilla to taste. Turn the machine on, pour mixture into freezer bowl through ingredient spout and let mix until thickened, about 30 - 40 minutes.
Variations
Chocolate Almond: Add 1/2 teaspoon pure almond extract along with the vanilla. Add 1/2 - 3/4 cup chopped toasted almonds or chopped chocolate-coated almonds during the last 5 - 10 minutes of freezing.
Chocolate Cookie: Add 1/2 - 1 cup chopped cookies during the last 5 minutes of freezing.
Chocolate Fudge Brownie: Add 1/2 - 1 cup chopped day-old brownies during the last 5 minutes of freezing.
Chocolate Marshmallow Swirl: When removing the ice cream to a container for freezing, layer it with dollops of your favourite chocolate sauce and scoops of marshmallow crème (fluff).
FRESH STRAWBERRY ICE CREAM
Makes eight half-cup servings.
Ingredients
250 g or 1 pint fresh ripe strawberries, stemmed and sliced
3/2 tablespoons freshly squeezed lemon juice
1/2 cup sugar, divided
1 cup whole milk
1 cups heavy cream
1 teaspoon pure vanilla extract
Preparation
In a small bowl, combine the strawberries with the lemon juice and 1/2 cup of the sugar; stir gently and allow to the strawberries to macerate in the juices for 2 hours. In a medium bowl, use a hand mixer or a whisk to combine the milk, and granulated sugar until the sugar is dissolved, about 1 - 2 minutes on low speed. Stir in the heavy cream plus any accumulated juices from the strawberries and vanilla. Turn the machine on, pour mixture into freezer bowl through ingredient spout and let mix until thickened, about 30 - 40 minutes. Add the sliced strawberries during the last 5 minutes of freezing.
Note: this ice cream will have a "natural" appearance of very pale pink; if a deeper pink is desired, sparingly add drops of red food coloring until desired color is achieved.
Makes eight half-cup servings.
Ingredients
3/2 cups sugar
3/2 cups water
1 cup freshly squeezed lemon juice
1 tablespoon finely chopped lemon zest
Preparation
Combine the sugar and water in a medium saucepan and bring to a boil over medium-high heat. Reduce heat to low and simmer without stirring until the sugar dissolves, about 3 - 5 minutes. Cool completely. This is called a simple syrup, and may be made ahead in larger quantities to have on hand for making fresh lemon sorbet. Keep refrigerated until ready to use.
When cool, add the lemon juice and zest; stir to combine. Turn the machine on, pour the lemon mixture into freezer bowl through ingredient spout and mix until thickened, about 30 - 40 minutes.
When zesting a lemon or lime use a vegetable peeler to remove the colored part of the citrus rind.
Variations
Substitute 1-1/2 cups freshly squeezed pink grapefruit juice for the lemon juice, and 1 tablespoon finely chopped grapefruit zest for the lemon zest. Add 1/4 cup orgeat syrup to the mixture (orgeat syrup is used for cocktails such as a Mai Tai or Scorpion and can be found with the drink mixers in most grocery stores).
CHOCOLATE FROZEN YOGURT
Makes eight half-cup servings
Ingredients
1 cup whole milk
180 g or 6 ounces bittersweet or semisweet chocolate, chopped
2 cups low-fat vanilla yogurt
1/4 cup sugar
Preparation
Combine the milk and chocolate in a blender or food processor fitted with a metal blade and process until well blended and smooth, 20 - 30 seconds. Add the yogurt and sugar; process until smooth, about 15 seconds. Turn the machine ON, pour mixture into freezer bowl through ingredient spout and let mix until thickened, about 50 - 60 minutes.
HINTS ON DISPOSAL

According to the European waste regulation 2012/19/EU this symbol on the product or on its packaging indicates that this product may not be treated as household waste. Instead it should be taken to the appropriate collection point for the recycling of electrical and electronic equipment. By ensuring this product is disposed of correctly, you will help prevent potential negative consequences for the environment and human health, which could otherwise be caused by inappropriate waste handling of this product. For more detailed information about recycling of this product, please contact your local council or your household waste disposal service.
DECLARATION OF CONFORMITY
Producer:
CE
Chal-Tec GmbH, Wallstraße 16, 10179 Berlin, Germany.
This product is conform to the following European Directives:
2014/30/EU (EMC)
2014/35/EU (LVD)
2011/65/EU (RoHS)
643/2009/EC (ErP)
1060/2010/EU (ErP)
Cher client,
- CONTENT
- TECHNICAL DATA
- SAFETY INSTRUCTIONS
- WARNING
- Special Notes
- DEVICE DESCRIPTION
- MAKING ICE CREAM
- Cleanliness
- Step 1: Prepare recipe ingredients
- Step 2
- Step 3
- Step 4
- Step 5
- Step 6
- Step 7
- Step 8
- OPERATION
- Ice Cream Making
- Keep cool function
- Motor self-protection function
- Controlling the Volume of the Ingredients
- CARE
- Warning: Danger of electrical shock
- RECIPES
- VANILLA ICE CREAM
- Ingredients
- Preparation
- Variations
- BASIC CHOCOLATE ICE CREAM
- FRESH STRAWBERRY ICE CREAM
- CHOCOLATE FROZEN YOGURT
- HINTS ON DISPOSAL
- DECLARATION OF CONFORMITY
- Producer:
- CE
- This product is conform to the following European Directives:
- Cher client,
Brand : Klarstein
Model : Dolce Bacio
Category : Ice machine