WCR5050 - Cooker Wolf Power - Free user manual and instructions
Find the device manual for free WCR5050 Wolf Power in PDF.

| Technical Specifications | Details |
|---|---|
| Type of stove | Gas stove |
| Number of burners | 4 burners |
| Dimensions (W x D x H) | 60 x 60 x 85 cm |
| Weight | 50 kg |
| Surface material | Stainless steel |
| Type of oven | Gas oven |
| Oven capacity | 60 liters |
| Oven features | Grill, convection |
| Energy consumption | Energy class A |
| Usage | Ideal for cooking a variety of dishes, easy to use with manual controls. |
| Maintenance | Regular cleaning of surface and grates, checking gas injectors. |
| Safety | Safety system to prevent gas leaks, integrated thermocouple. |
| General information | 2-year warranty, after-sales service available. |
Frequently Asked Questions - WCR5050 Wolf Power
User questions about WCR5050 Wolf Power
0 question about this device. Answer the ones you know or ask your own.
Ask a new question about this device
Download the instructions for your Cooker in PDF format for free! Find your manual WCR5050 - Wolf Power and take your electronic device back in hand. On this page are published all the documents necessary for the use of your device. WCR5050 by Wolf Power.
USER MANUAL WCR5050 Wolf Power
GAS ELECTRIC FREE STANDING COOKER INSTRUCTION MANUAL
NOTICE D'UTILISATION DU FOUR GAZ ELECTRICITE
KOMBINOVANY SPORÁK PLYN- ELEKT INA NÁVOD K POUŽITÍ
KOMBINÁLT T ZHELY HASNZÁLATI UTMUTATÓ
Our objective is to make this product provide you with the best output which is manufactured in our modern facilities in a careful working environment, in compliance with total quality concept.
Therefore, we suggest you to read the user manual carefully before using the product and, keep it permanently at your disposal.
NOT:
This user manual is prepared for more than one model. Some of the features specified in the Manual may not be available in your appliance.
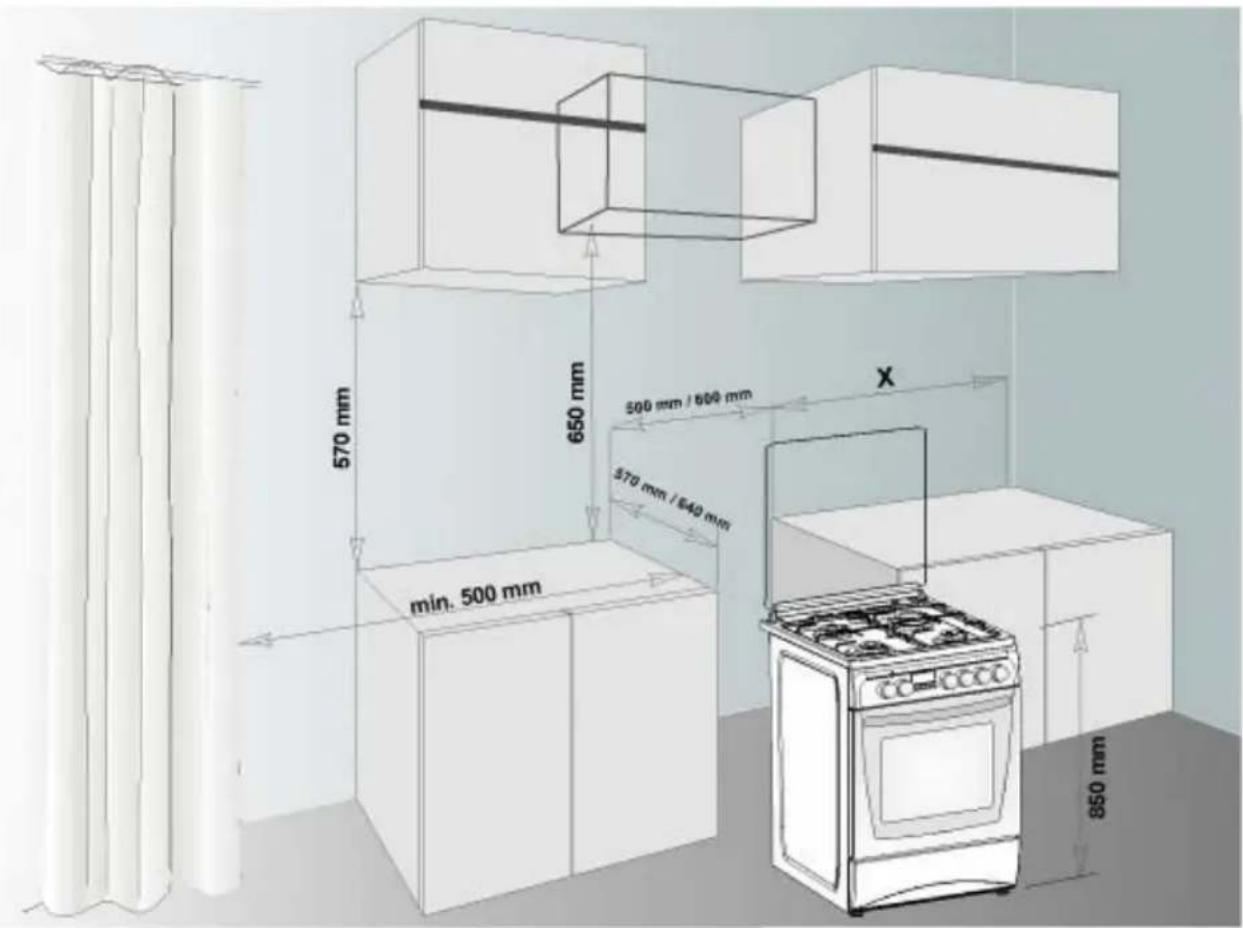
THIS APPLIANCE SHALL BE INSTALLED IN ACCORDANCE WITH THE REGULATIONS IN FORCE AND ONLY USED IN A WELL VENTILATED SPACE. READ THE INSTRUCTIONS BEFORE INSTALLING OR USING THIS APPLIANCE
CONTENTS
Installation of your oven
Technical features of your oven
Important warnings
If the appliance does not operate
Description of oven & control panel
Using cooker section
Using oven section
Using the heat shield
Maintenance and cleaning
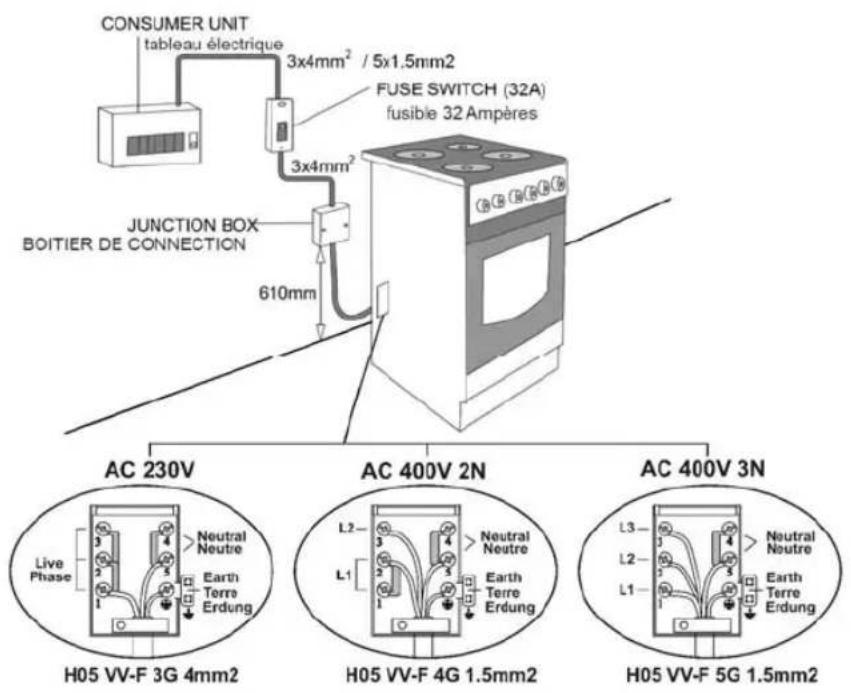
Electrical Connection and Security:
- Your oven requires 6 or 32 Ampere fuse according to the appliance's power. If necessary, installation by a qualified electrician is recommended.
- Your oven is adjusted in compliance with 220-240 V AC, 50-60 Hz (or 230 V / 400 V AC, 50 - 60 Hz.) electric supply. If the mains are different from this specified value, contact your authorized service.
- Electrical connection of the oven should only be made by the sockets with earth system installed in compliance with the regulations. If there is no proper socket with earth system in the place where the oven will be placed, immediately contact a qualified electrician. Manufacturer shall never be responsible from the damages that will arise because of the sockets connected to the appliance with no earth system. If the ends of the electrical connection cable are open, according to the appliance type, make a proper switch installed in the mains by which all ends can be disconnected in case of connecting / disconnecting from / to the mains.
- If your electric supply cable gets defective, it should definitely be replaced by the authorized service or qualified electricians in order to avoid from the dangers.
- Electrical cable should not touch the hot parts of the appliance.
- Please operate your oven in dry atmosphere.
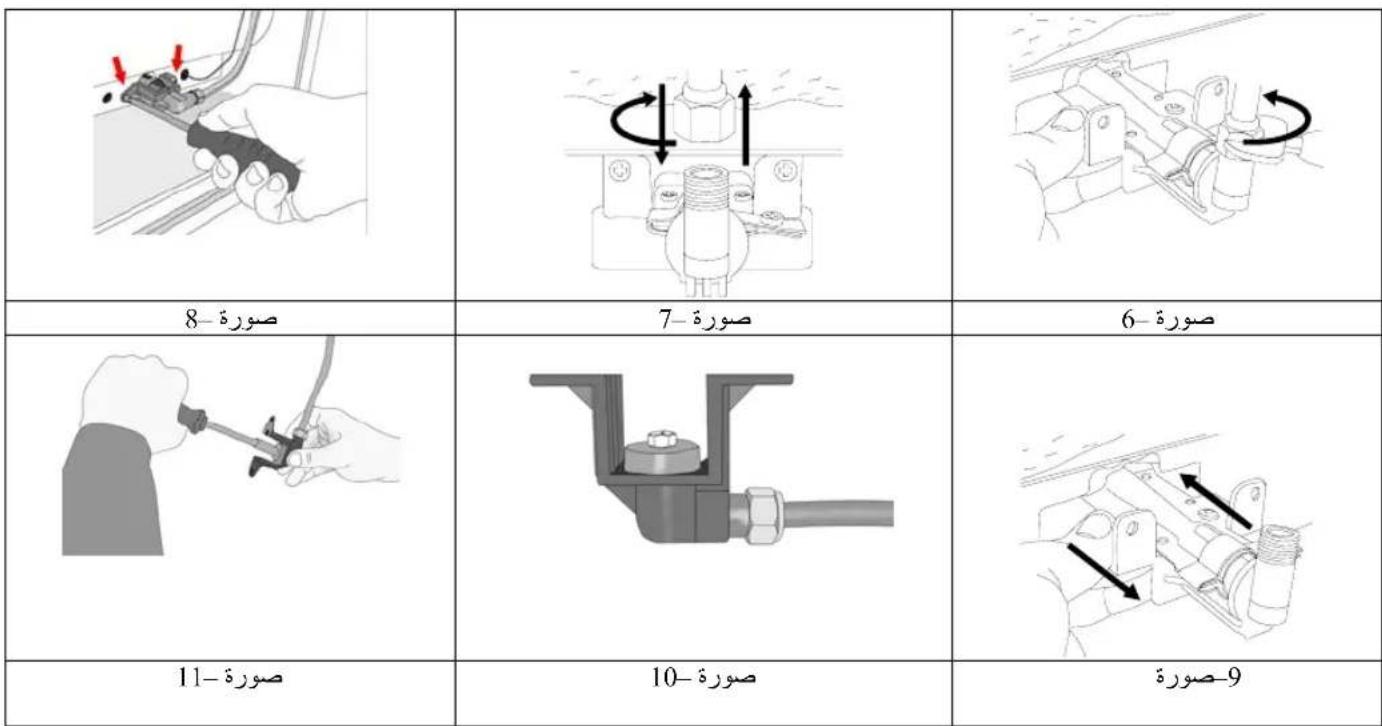
Gas Connection and Security:
- Fit the clamp to the hose. Push one of the hose until it goes to the end of the pipe.
- For the sealing control; ensure that the buttons in the control panel are closed, but the gas cylinder is open. Apply some soap bubbles to the connection. If there is gas leakage, there will be foaming in the soaped area.
- The oven should be using a well ventilation place and should be install on flat ground.
- Re-inspect the gas connection.
- When placing your oven to its location, ensure that it is at the counter level. Bring it to the counter level by adjusting the feet if necessary.
- Do not make gas hose and electrical cable of your oven go through the heated areas, especially through the rear side of the oven. Do not move gas connected oven. Since the forcing shall loosen the hose, gas leakage may occur.
TECHNICAL FEATURES OF YOUR OVEN
| SPECIFICATIONS 50 x 5 | 5 50 x 60 60 x 58 | 60 x 60 | ||
| Outer width 500 mm 500 mm | 500 mm 600 mm | |||
| Outer depth 565 mm 635 mm | 580 mm 635 mm | |||
| Outer height 855 mm 855 mm | 855 mm 855 mm | |||
| Inner width 365 mm 365 mm | 465 mm 465 mm | |||
| Inner depth 410 mm 410 mm | 410 mm 410 mm | |||
| Inner height 355 mm 355 mm | 355 mm 355 mm | |||
| Lamp power * 15 W | ||||
| Thermostat 50 - 280 °C | ||||
| Bottom heating element 1000 W | 1000 W 1200 W | 1200 W | ||
| Top heating element 800 W 800 | W 1000 W 1000 W | |||
| Turbo heating element * | ---- | 1800 W 2200 W 2200 W | ||
| Grill heating element * | 1500 W 1500 W 2000 W 2000 W | |||
| Supply voltage | 220-240 V AC, 50-60 Hz (or 230V/400V AC, 50 - 60 Hz.) | |||
| Hot plate 145 mm* | 1000 W | |||
| Hot plate 180 mm* | 1500 W | |||
| Hotplate rapid 145 mm* | 1500 W | |||
| Hotplate rapid 180 mm* | 2000 W | |||
*: Optional
IF THE APPLIANCE DOES NOT OPERATE
- Please check the plug of power supply cord has a well connection with wall socket or not.
- Please check the electric network.
- Please check the fuse.
- Please check power supply cord for any damage problems.
- If you can not solve the problem, get in contact with manufacturer-supplier service agent or similar qualified persons.
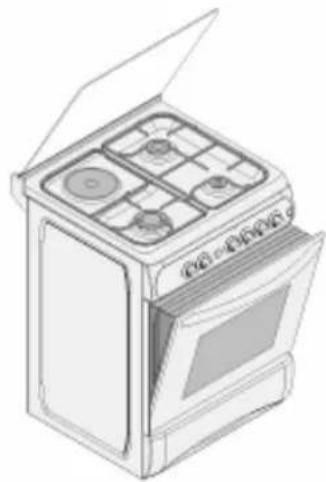
DESCRIPTION OF OVEN AND CONTROL PANELS
| Turnspit | Fan |
| Top+bottom heating element | Turbo heating element+fan |
| Lamp | Bottom/Top heating elemens+fan |
| Bottom heating element+fan | Grill heating element+fan |
| Grill heating element+turnspit | Grill burner / grill heating element |
| Grill heating element+lamp | Top heating element |
| Electrical timer | Oven burner / Bottom heating element |
| Flame | Ignition lighter |
THERMOSTAT KNOB; In order to operate the oven, thermostat must be adjusted to desired temperature. Your thermostat has a feature of adjustment to 50 - 280 degree.
MECHANIC TIMER KNOB (Optional); In order to operate the oven, timer switch should be adjusted to desired time from 0-90 minute. You can use cooking time table.
DESCRIPTION OF THE OVEN AND CONTROL PANELS
| 1. | Rapidburner |
| 2. | Semi-rapidburner |
| 3. | Auxiliaryburner |
| 4. | Commandpanel |
| 5. | Ovenhandle |
| 6.Top | plate |
| 7.Top | lid(Glass or Metal) |
| 8. | Ovendoor |
| 9.Hot | plate(optional) |
| 10.Dish warmer drawer | |
| 11.Grill deflector sheet | |
USING COOKER SECTION
Using Gas Burners:
| Wok Burner 24 - 28 cm | |
| Big Burner 22 - 26 cm | |
| Normal Burner 18 - 22 cm | |
| Small Burner 12 - 18 cm Closed Fully |
- In order to obtain maximum output, be careful that the saucepan which will be used should be flat bottomed, and use the saucepans with dimensions given herein above.
- The valves controlling the gas cookers have special security mechanism. In order to light the cooker; Always press on the switch forward and bring it to flame symbol by turning anticlockwise. All of the lighters
shall operate and the cooker you controlled shall light only. Keep the switch pressed until ignition is performed.
Press on the lighter button and turn the knob counter clockwise.
- Do not continuously operate the igniter for more than 15 seconds. If the burner does not ignite, wait minimum one minute before try again. If the burner is extinguished because of any reason, close the gas control valve and wait minimum one minute before try again.
- In models with Gas Security System, when flame of the cooker is extinguished, control valve cuts off the gas automatically. For operate the burners with gas security system you must press the knob and turn counter-clockwise. After the ignition you must wait nearly 5-10 second for gas security systems activation. If the burner is extinguished for of the any reason, close the gas control valve and wait a minimum of one minute before trying again.
Using Hot Plates:
| Hot Plate | LEVEL 1 | LEVEL 2 | LEVEL 3 | LEVEL 4 | LEVEL 5 | LEVEL 6 | |
| 145 mm | 95 W | 155 W | 250 W | 400 W | 750 W | 1000 W | |
| 180 mm 115 W | 250 W | 600 W | 850 W | 1500 W | |||
| 145 mm Rapid 135 W | 165 W | 250 W | 500 W | 750 W | 1500 W | ||
| 180 mm Rapid 175 W | 220 W | 300 W | 850 W | 150 W | 2000 W |
- Electric hotplates have standard of 6 temperature levels (as described herein above)
- When using first time, operate your electric hotplate in position 6 for 5 minutes. This will make the agent on your hotplate which is sensitive to heat get hardened by burning.
- Use flat bottomed saucepans which fully contact with the heat as much as you can, so that you can use the energy more productively.

USING OVEN SECTION
Using oven burners:
- If your oven equipped with burners that operates with gas, appropriate knob should be used in order to ignite the burners. Some models have automatic ignition from the knob; it is easy to ignite the burner by turning the knob. Also, burners can be ignited by pressing the ignition button or they can be ignited with a match.
- Do not continuously operate the igniter for more than 15 seconds. If the burner does not ignite, wait minimum one minute before trying again. If the burner is extinguished for of the any reason, close the gas control valve and wait a minimum of one minute before trying again.
Using oven heating elements:
- When your oven is operated first time, an odor will be spread out which will be sourced from using the heating elements. In order to get rid of this, operate it at 250^ for 45 minutes while it is empty.
- Oven control knob should be positioned to desired value; otherwise oven does not operate.
- Kinds of meals, cooking times and thermostat positions are given in cooking table. The values given in the cooking table are characteristic values and were obtained as a result of the tests performed in our laboratory. You can find different flavors suitable for your taste depending on your cooking and using habits.
- You can make chicken revolving in your oven by means of the accessories.
- Cooking times: The results may change according to the area voltage and material having different quality, amount and temperatures.
- During the time when cooking is being performed in the oven, the lid of the oven should not be opened frequently. Otherwise circulation of the heat may be imbalanced and the results may change.
- Using cake forms while cooking cake gives better result.
- 5 - 10 min. preliminary heating should be done prior cooking.
Cooking Time Table:
| Meals Temperature (℃) Rack position Cooking time (min.) | |||
| Creamed cake 150 - 170 | 2 | 30 - 35 | |
| Pastry | 200 - 220 | 2 | 35 - 45 |
| Biscuit | 160 - 170 | 3 | 20 - 25 |
| Cookie | 160 - 170 | 3 | 20 - 35 |
| Cake | 160 - 180 | 2 | 25 - 35 |
| Braided cookie | 200 - 220 | 2 | 30 - 40 |
| Filo pastry | 180 - 220 | 2 | 35 - 45 |
| Savory pastry | 160 - 180 | 2 | 20 - 30 |
| Lamb meat | 200 - 230 | 1 | 90 - 120 |
| Veal | 200 - 230 | 1 | 90 - 120 |
| Mutton | 210 - 230 | 1 | 90 - 120 |
| Chicken (in pieces) | 210 - 230 | 1 | 75 - 100 |
| Fish | 190 - 210 | 2 | 40 - 50 |
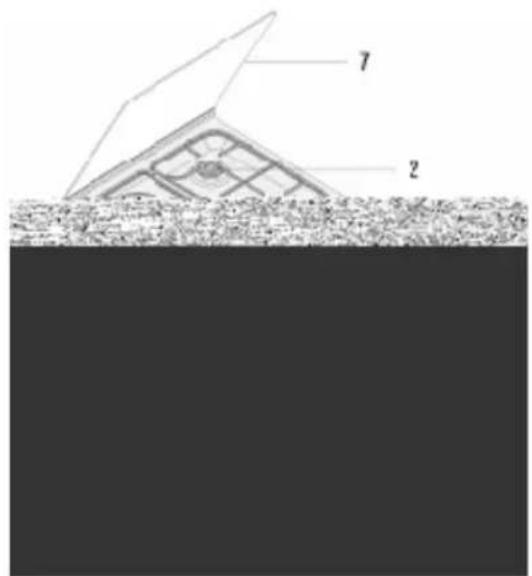
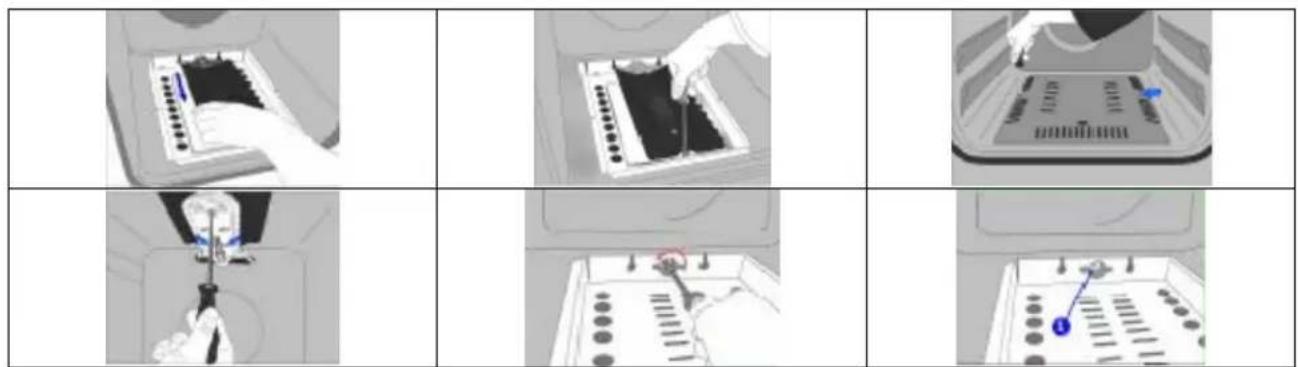
USING GRILL DEFLECTOR PANEL (optional)
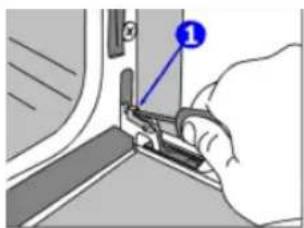
- A safety panel is designed to protect control panel and the buttons when the oven is in Grill mode (Figure 1)
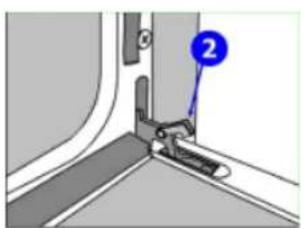
- Place the safety panel under control panel by opening the oven front cover glass (Figure 2)
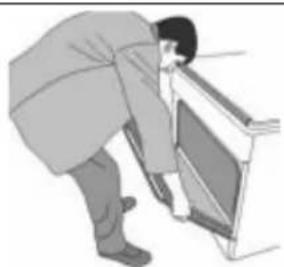
- And then secure the safety panel in between oven and front cover by gently closing the cover. (Figure 3)
- Please use this safety panel in order to avoid the heat to damage control panel and the buttons when the oven is Grill mode.
- It is important for cooking to keep the cover open in specified distance when cooking in grill mode.
- Safety panel will provide an ideal cooking circumstance while protecting control panel and buttons.
Figure 1
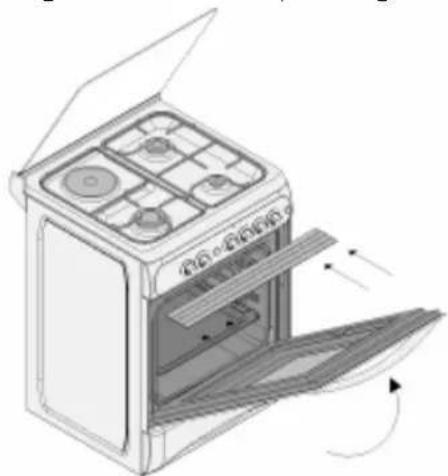
Figure 2 Figure 3
MAINTENANCE and CLEANING
- Disconnect the plug supplying electricity for the oven from the socket.
- While oven is operating or shortly after it starts operating, it is extremely hot. You must avoid touching from heating elements.
- Never clean the interior part, panel, lid, trays and all other parts of the oven by the tools like hard brush, cleaning mesh or knife. Do not use abrasive, scratching agents and detergents.
- After cleaning the interior parts of the oven with a soapy cloth, rinse it and then dry thoroughly with a soft cloth.
- Clean the glass surfaces with special glass cleaning agents.
- Do not clean your oven with steam cleaners.
- Before opening the upper lid of the oven, clean spilled liquid off the lid. Also, before closing the lid, ensure that the cooker table is cooled enough.
- Never use inflammable agents like acid, thinner and gasoline when cleaning your oven.
- Do not wash any part of your oven in dishwasher.
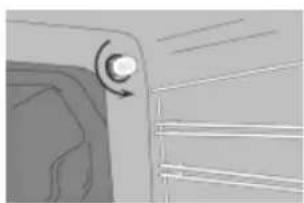
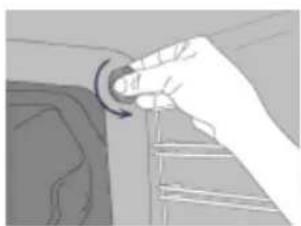
- In order to clean the front glass lid of the oven; remove the fixing screws fixing the handle by means of a screwdriver and remove the oven door. Than clean and rinse it thoroughly. After drying, place the oven glass properly and re-install the handle.
□
□
□

NOTICE D'UTILISATION DU FOUR GAZ - ELECTRICITE
Cherutilisateur,
| Figure - 6 | Figure - 7 | Figure - 8 |
| Figure - 9 | Figure - 10 | Figure - 11 |
MISES EN GARDE IMPORTANTES
VEDLIKEHOLD OG RENGJØRING
MODELLBETEGNELSER OG ULIKE TILLEGGSFUNKSJONER
MONTERING OG PLASSERING AV KOMFYREN
ELEKTRISK TILKOBLING og SIKKERHETSANVISNINGER
- Komfyren mä kobles til en 10 A kurs. Om nödvendig mä installasjonen foretas av en autorisert elektriker.
- Komfyren er forberedt til 12V likestrom (DC) Dersom den tilgengelige penningen er ulik dette, Kontakt din lokale forhandler.
- Komfyren må bare tilkobles en jordet kontakt med egnet stöpsel. Dersom jording ikke er tilgengelig, ta kontakt med en elektriker. Produsenten fraskriver seg et hvert ansvar for skade på person eller materiell som følge av at komfyren ikke er jordet i henhold til reglene. Dersom komfyren skal kobles direkte til det elektriske anlegget, må det installereres en bryter som kutter strømmen til alle lederne i tilfelle man skal koble komfyren til eller fra strømtilfselen.
- Skulle det oppsta feil med kontakten ell bryteren, ta kontakt med en elektriker for utbedring sik at fare for skade unngas.
- Sorg for at den elektriske ledningen ikkekommen i kontakt med varme flater eller blir liggende i klem.
GASSTILKOBLING og SIKKERHETSANVISNINGER
jiaai jia jia jia jia jia jia 2
.3
4
5
jui jy jll jai aai y 6
ailll 1 1 1 1 1 1 1 1 1 1 1 1 1 1 1 1 1 1 1 1 1 1 1 1 1 1 7
aai jai jai jai g jai jai jai


A
a. 与 = 90^
a
ai a ai
= ( x1,y1) = ( x2,y2)
a
a1 = 2,a2 = - 4
a
ai a ai 为正整数, 0 < a_i ≤ 1
a. gdc a
J
sall sia aieal allanai 5i: (aie jll)
5-4 4s jll jll jll jll jll jll jll jll jll jll jll jll jll jll jll jll jll jll jll jll jll jll jll jll jll jll jll jll jll jll jll jll jll jll jll jll jll jll jll jll jll jll jll jll jll jll jll jll jll jll jill jll jill jill jill jill jill jill jill jill jill jill jill jill
algol
| . | a1yjyjyjyjyjyjyjyjyjyjyjyjyjyjyjyjyjyjyjyjyjyjyjyjyjyjyjyjyjyjyjyjyjyjyjyjyjyjyjyjyjyjyjyjyjyjyjyjyjyjy |
| . | j050230 |
| . | .3 |
| . | .4 |
| . | .5 |
| . | .6 |
| . | .7 |
| . | .8 |
| . | .9 |
aaiil
| 60 x 60 | 60 x 58 | 50 x 60 | 50 x 55 | الإستعمال |
| 600 mm | 600 mm | 500 mm | 500 mm | الإستعمال |
| 635 mm | 580 mm | 635 mm | 565 mm | الإستعمال |
| 855 mm | 855 mm | 855 mm | 855 mm | الإستعمال |
| 465 mm | 465 mm | 365 mm | 365 mm | ال,enoughing |
| 410 mm | 410 mm | 410 mm | 410 mm | ال,enoughing |
| 355 mm | 355 mm | 355 mm | 355 mm | ال,enoughing |
| 15 W | (*) رهشامان | |||
| 50 - 280 °C | الإستعمال | |||
| 1200 W | 1200 W | 1000 W | 1000 W | ال,enoughing |
| 1000 W | 1000 W | 800 W | 800 W | ال,enoughing |
| 2200 W | 2200 W | 1800 W | ---- | (*) رهشامان |
| 2000 W | 2000 W | 1500 W | 1500 W | (*) |
| 220-400 V AC, 50 - 60 Hz. (230 V / 400 V, 50 - 60 Hz.) | ال,enoughing | |||
| 1000 W | topl pl | |||
| 1500 W | topl pl | |||
| 1500 W | (*) Rapid pl | |||
| 2000 W | (*) Rapid pl | |||
Optional: (*)
jll alw gie aiaai aiil jie
jglalxysgysy
jgl j 1000
aaiy aill ay, jll Jllaii 1j, li lal slo J, aolo JaoJe Ioo Jia
Lg 12y jy jll Jaaill Jiaai I y aai g ll g y g aag y dall ldo gie 1
aalaa aagaa gall jauall yaiy aiaai alalll jae iiall qie ne dai sle ciy jaii jaii jaii gilg jjill
aill 1
#
1
1 1
50 230
3
a 1 1 1 1 1 1 1 1 1 1 1 1 1 1 1 1 1 1 1 1 1
j j 1
.5
:1
1 2
jll jll jll jll jll jll jll
1
J 2
.
Jagal gaiy 1gag 2 g jai 3 4 5 6 7 8 9 10
aal aal alal yaiy jilal yaiy d jll ayagj gao


jI j
Jaaaall 8j
aill 15 yll y lgl 4y blaal y g alaiy cll Jlaoiyl Jd aellbny sgs iall o jia j
a
J 1 J 1 J 1 J 1 J 1 J 1 J 1 J 1 J 1 J 1 J 1 J 1 J 1 J 1 J 1 J 1 J 1 J 1 J 1
1
yai jai
alglilgii
&
gabla 1000
jll 1
aill
C