WGC6060CER - Cooker Wolf Power - Free user manual and instructions
Find the device manual for free WGC6060CER Wolf Power in PDF.

| Technical Features | Gas stove with 4 burners, gas oven, dimensions: 60 cm x 60 cm |
|---|---|
| Usage | Ideal for cooking various dishes, with simple and intuitive controls |
| Maintenance and Repair | Easy access to internal components for regular maintenance, spare parts available |
| Safety | Safety system to prevent gas leaks, electronic ignition |
| General Information | Energy: Gas, color: stainless steel, manufacturer warranty 2 years |
Frequently Asked Questions - WGC6060CER Wolf Power
User questions about WGC6060CER Wolf Power
0 question about this device. Answer the ones you know or ask your own.
Ask a new question about this device
Download the instructions for your Cooker in PDF format for free! Find your manual WGC6060CER - Wolf Power and take your electronic device back in hand. On this page are published all the documents necessary for the use of your device. WGC6060CER by Wolf Power.
USER MANUAL WGC6060CER Wolf Power
VITROCERAMIC TOP PLATE FREE STANDING COOKER USER MANUAL
Dear User,
We aim to provide you with a high quality product manufactured in our modern factory with great care and in compliance with total quality control principles.
Therefore, we suggest you read the user manual carefully before using the product and, keep it safe for future reference.
Note:
This user manual covers more than one model. Some of the features specified in the Manual may not be available in your appliance.
CONTENTS
Installation of your oven
Technical features of your oven
Important warnings
If your oven does not operate
Description of oven & control panels
Using and description hob section for vitroceramic
Adjustment of electronic timer (optional)
Using grill deflector plate
Maintenance and cleaning
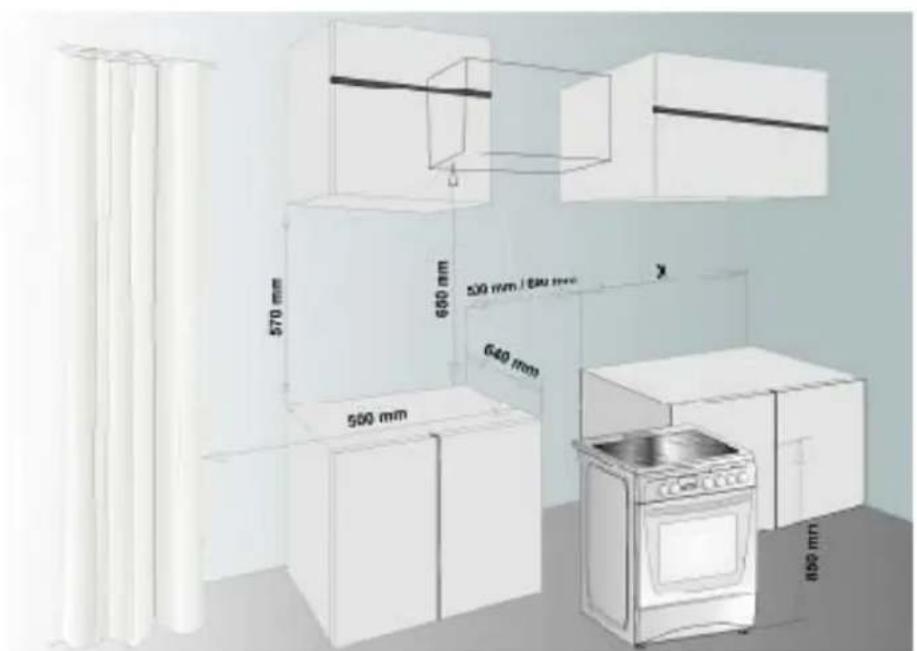
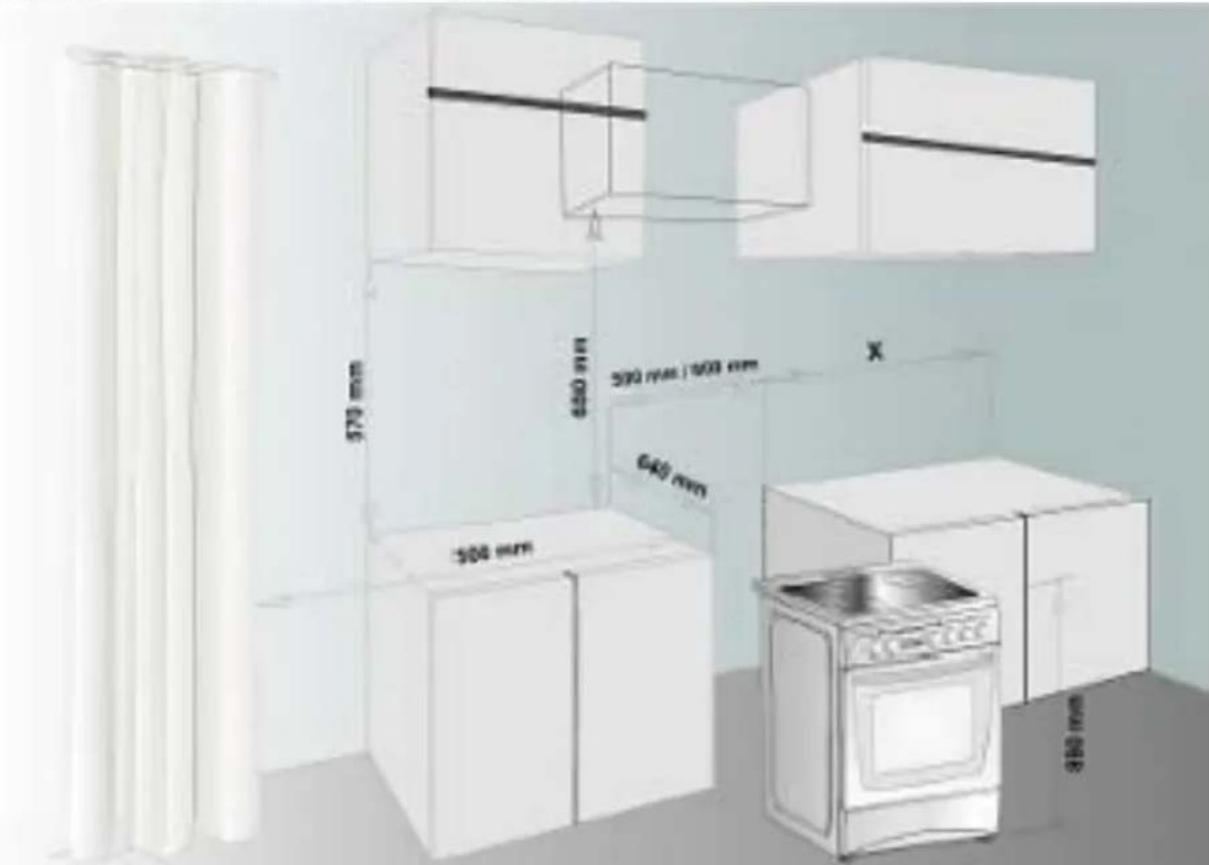
INSTALLATION OF YOUR OVEN
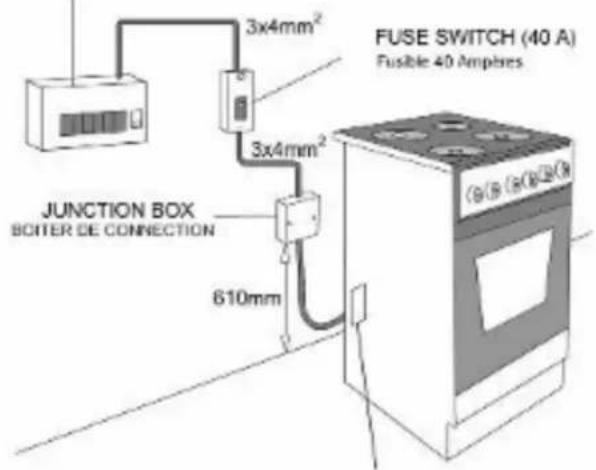
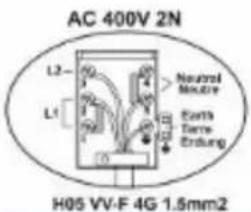
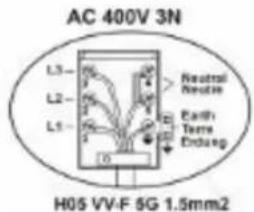
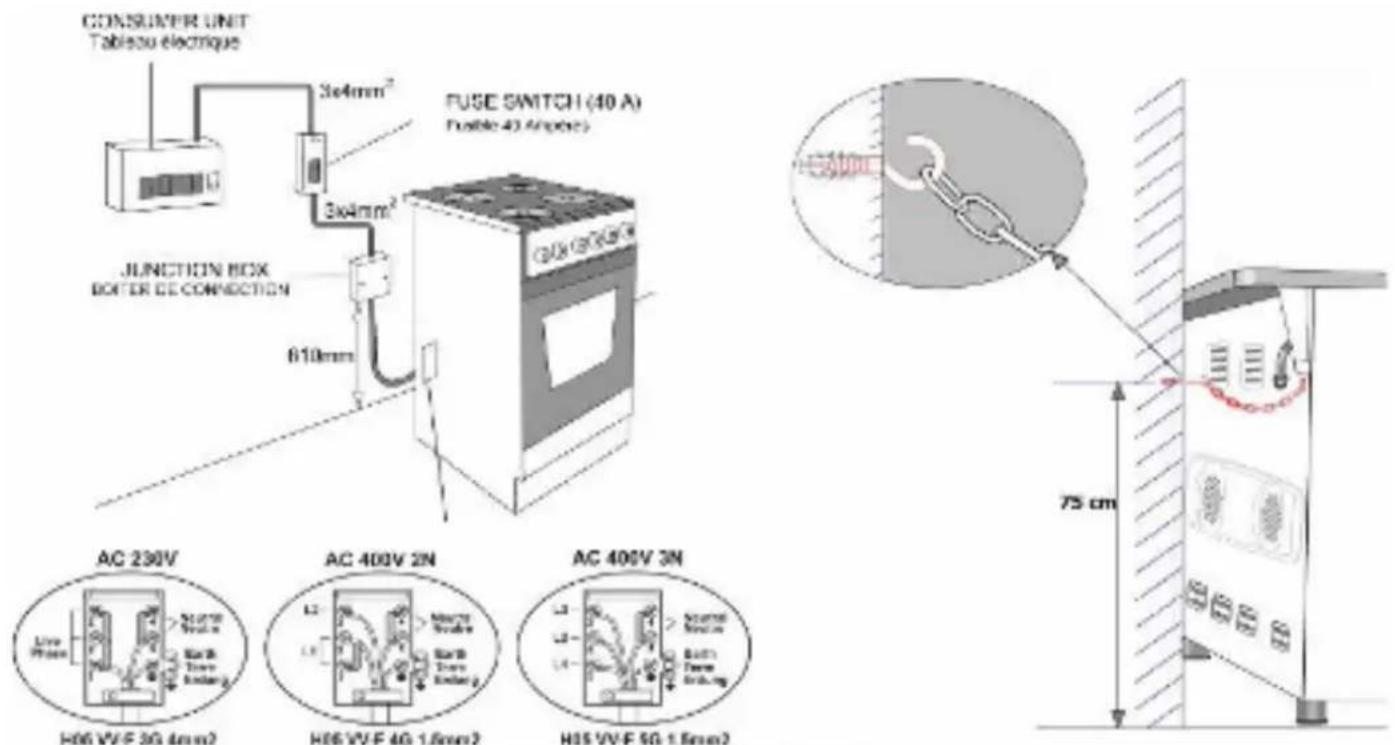
- Your oven requires 40 Amp fuse for mono phase or 3x16 Amp fuse for 3 phase supply according to electrical power for cooker section has 4 ceramic heater and oven section has electric models. Installation by a qualified electrician is mandatory.
- Your oven is adjusted in compliance with 230/400 V AC, 50/60 Hz electric supply. If the mains are different from this specified value, contact your authorized service.
- Electrical connection of the oven should only be made to connections/sockets with an earth system installed in compliance with local regulations. If there are no connections/sockets with an earth system in place where the oven will be installed, immediately contact a qualified electrician to install. The manufacturer is not responsible for damages that will arise because of the appliance not be connected to an earth system.
- If your supply cable gets damaged, it should be replaced by an authorized service agent or qualified electrician in order to avoid danger or electric shock.
- Electrical cable should not touch the hot parts of the appliance.
- The oven should be using a well ventilation place and should be install on flat ground.
- Operate your oven in dry atmosphere.
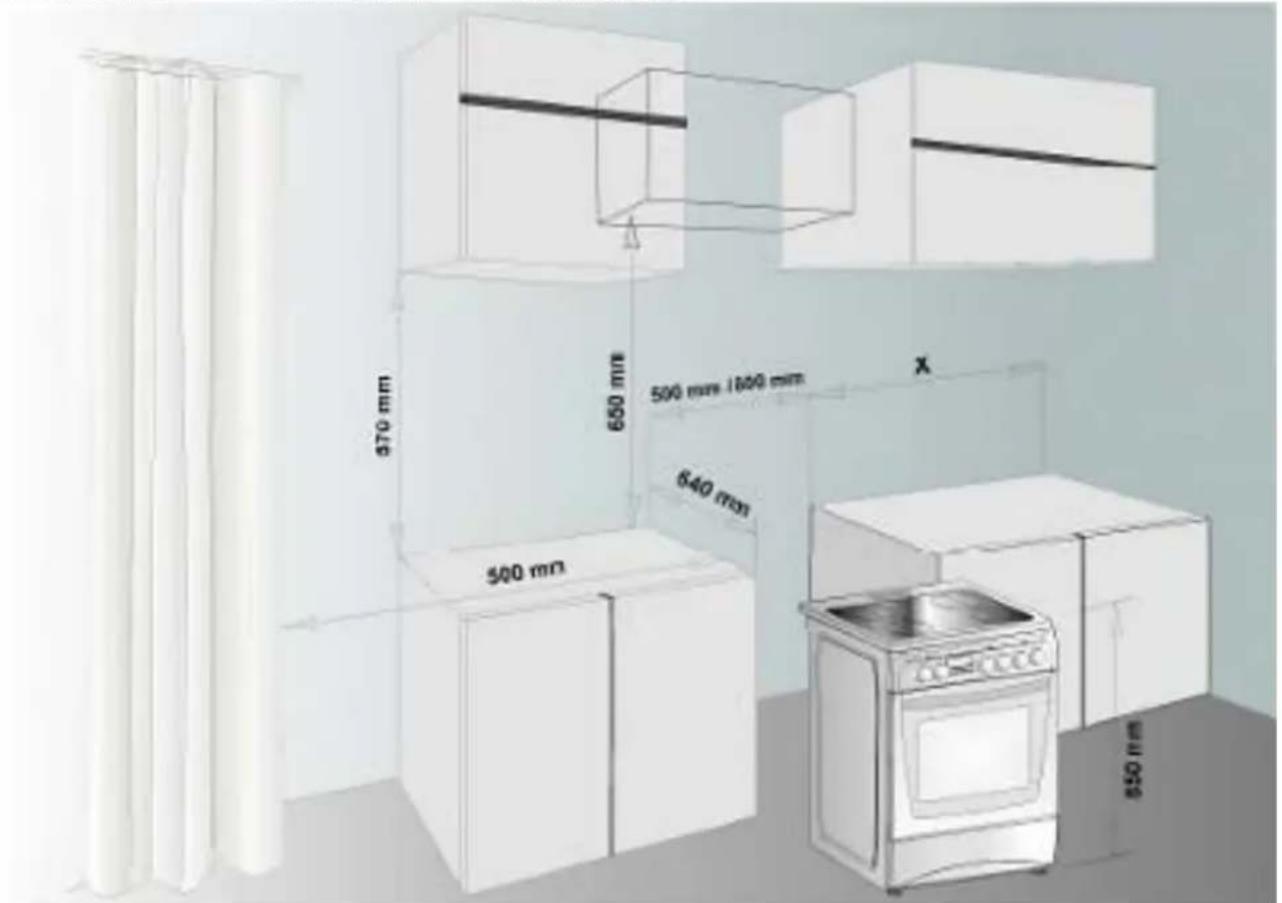
- When placing your oven to its location, ensure that it is at the counter level. Bring it to the counter level by adjusting the feet if necessary.
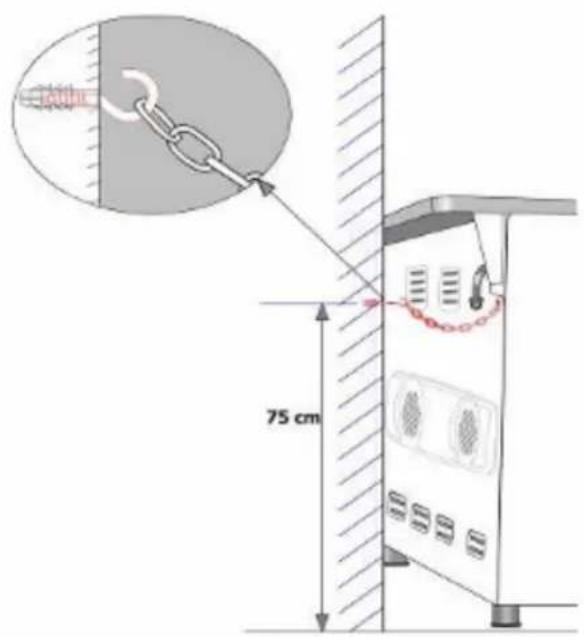
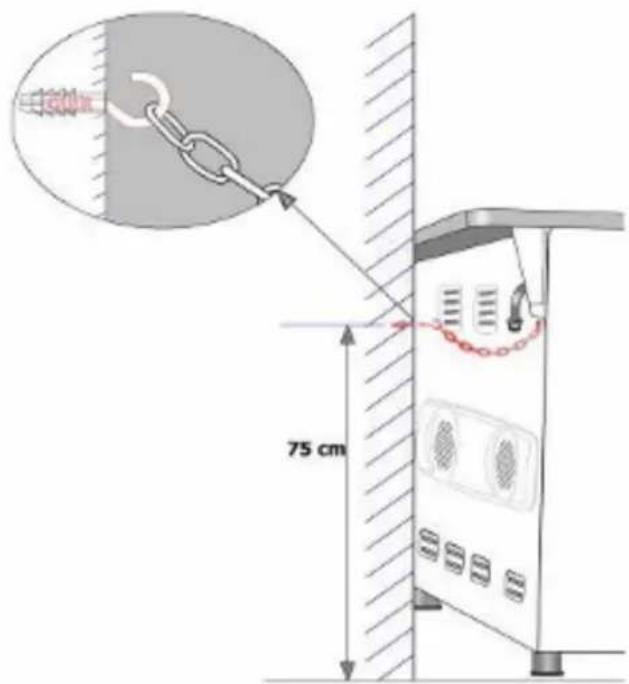
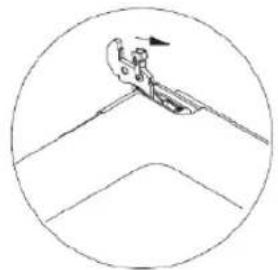
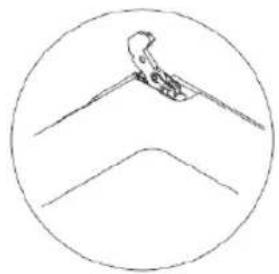
Before using the appliance, in order to ensure safe use, be sure to fix the appliance to the wall using the chain and hooked screw supplied. Ensure that the hook is screwed into the wall securely.
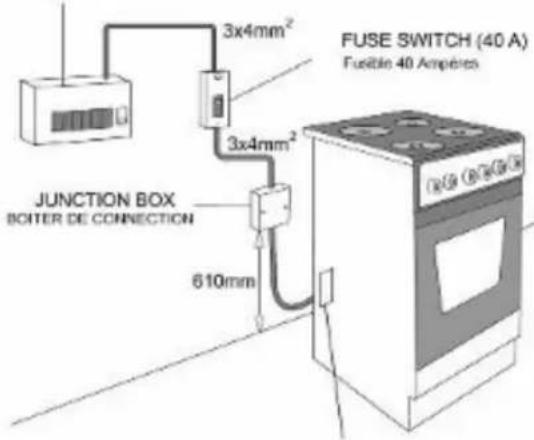
CONSUMER UNIT Tableau technique
TECHNICAL FEATURES OF YOUR OVEN
| Specifications 50 x 60 60 x 60 | ||
| Outer width 500 mm 600 mm | ||
| Outer depth 630 mm 630 mm | ||
| Outer height 855 mm 855 mm | ||
| Inner width 365 mm 465 mm | ||
| Inner depth 410 mm 410 mm | ||
| Inner height 355 mm 355 mm | ||
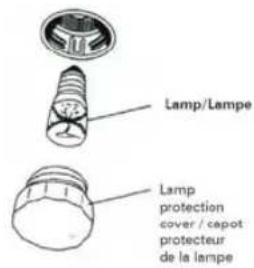
| Lamp power 15 W 15 W | ||
| Thermostat 50 - 280 C 50 - 280 | °C | |
| Bottom heating element 1000 W 1200 W | ||
| Top heating element 800 W | 1000 W | |
| Turbo heating element | 1800 W 2200 W | |
| Grill heating element | 1500 W 2000 W | |
| Supply voltage | 230 / 400 V, 50-60 Hz | 230 / 400 V, 50-60 Hz |
| Ceramic heaterø140 | 1200 W 1200 W | |
| Ceramic heaterø180 | 1800 W 1800 W | |
Before starting to use the appliance, read the user manual carefully. In this user Manual, there is important information regarding your safety, oven usage and maintenance.
- Keep this user manual somewhere safe, and make it available to anyone who uses the oven.
IMPORTANT WARNINGS
- Pay attention to minimum health and safety requirements.
- Children should be supervised to ensure that they do not play with the appliance
- This appliance is not intended for use by persons (including children) with reduced physical, sensory or mental capabilities, or lack of experience and knowledge, unless they have been given supervision or instruction concerning use of the appliance by a person responsible for their safety
- During use the appliance becomes hot. Care should be taken to avoid touching heating elements inside the oven
- Accessible parts may become hot during use. Young children should be kept away
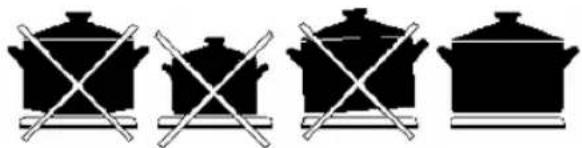
- Metallic objects such as knives, forks, spoons and lids should not be placed on the hob surface since they can get hot.
- Keep the gas hose and electrical cable of your oven away from the hot areas; do not let them touch the appliance. Keep them away from sharp sides and heated surfaces.
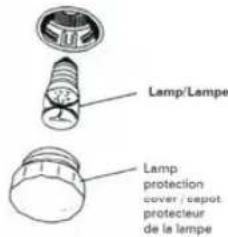
- Ensure that the appliance is switched off before replacing the lamp to avoid the possibility of electric shock.
- In case of power failure, readjust your timer definitely. Otherwise, the oven will not operate (Digital Timer).
- Usage of your appliance creates moisture and heath in the room it is placed, make sure that your kitchen is ventilated well. Maintain the natural ventilation ducts properly.
- When the oven is being used, some parts may become hot, even when you turned off the switches the parts can be hot still; children should be kept away and supervised at all times., do not touch to cooking zone on vitroceramic hob during warning indicators are lighting. The indicators stay lighting during danger temperature on the surface of cooker zone even you turned off cooking switches of hob.
- When the oven is hot never touch the oven glass by hand.
- Before starting to use your appliance, keep curtain, tulle, paper or inflammable things away from your appliance. Do not keep combustible or inflammable things in or on the appliance.
- The oven produced for cooking purpose. Please do not use except for purpose.
- For disconnection from the supply mains having a contact separation in all poles that provide full disconnection, must be incorporated in fixed wiring in accordance with the wiring rules.
- When connecting to a cooker panel, the supply switch must have a double pole switch with contact separation of 3 mm minimum
- Use glove when using cooker. Do not touch on hot surfaces and hot parts.
- Do not splash water onto the cooker.
- Do not use cooker in potentially explosive atmospheres.
- Do not carry cooker holding with handle.
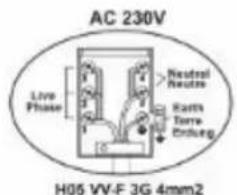
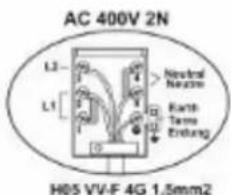
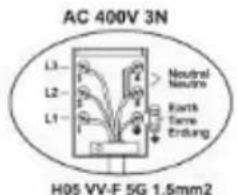
- Some models are supplied without a plug-an-lead set. In this case please use a flexible cable to suitable for connection to mono phase: H05 VV-F 3 G 4 mm2 or for 3 phase: H05 VV - F 5 G 1.5 mm2
- The glass ceramic can be damaged by objects falling onto it.
- If the surface is cracked, switch off the appliance to avoid the possibility of electric shock, for hob surfaces of glass-ceramic or similar material which protect live parts
- Please check that the electrical supply is connected and turned-on to the oven
- Please check that there is electricity supply to the property.
- Please check the fuse.
- Please check the clock / auto programmer is set to the manual mode. (For Digital Timer option)
- If you cannot solve the problem, contact the manufacturer-supplier, services agent or similar qualified persons.
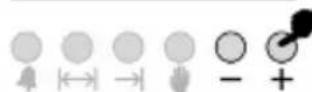
DESCRIPTION OF THE OVEN AND CONTROL PANELS
| Fan | Top+bottom heating element |
| Turbo heating element+fan | Lamp |
| Bottom/Top heating elemens+fan | Bottom heating element+fan |
| Grill heating element+fan | Electrical timer |
| Grill heating element | Turnspit |
| Top heating element | Bottom heating element |
THERMOSTAT KNOB; In order to operate the oven, thermostat must be adjusted to desire temperature. Your thermostat has a feature of adjustment to 50 - 280 degree.
MECHANIC TIMER KNOB (Optional); In order to operate the oven, timer switch should be adjusted to desired time.
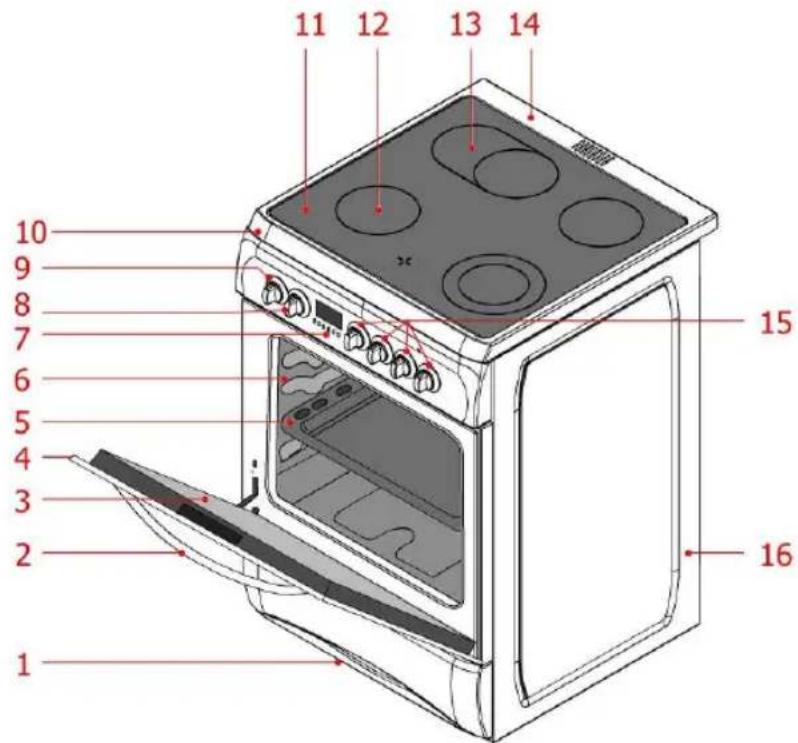
DESCRIPTION OF THE OVEN AND CONTROL PANELS
| 1. | Drawer |
| 2. | Handle |
| 3. | Inner glass of oven door |
| 4. | Glass oven door |
| 5. | Oven tray |
| 6. | Cavity |
| 7. | Digital timer (optional) |
| 8. | Command knob for oven |
| 9. | Thermostat knob |
| 10. | Command panel |
| 11. | Glass top plate |
| 12. | Heating place |
| 13. | Heating place |
| 14. | Metal top plate |
| 15. | Regulators for vitroceramic hobs |
| 16. | Side panel |
USING AND DESCRIPTION OF HOB SECTION FOR VITROCERAMIC
- You operate the hob with the ring switches on the control panel of oven. This switch regulates the energy in order to reach desired temperature set by you.
- In order to have a good cooking result from the hob, the pans bottom should be as thick and flat as possible.
- Bottom of pans and cooking zones should be the same size. If possible, always place lids on the pans. Always place cookware on the cooking zone before it is switched on. Switch cooking zones off before the end of the cooking time, to take advantage of residual heat.
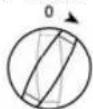
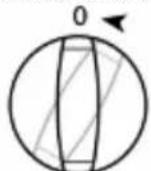
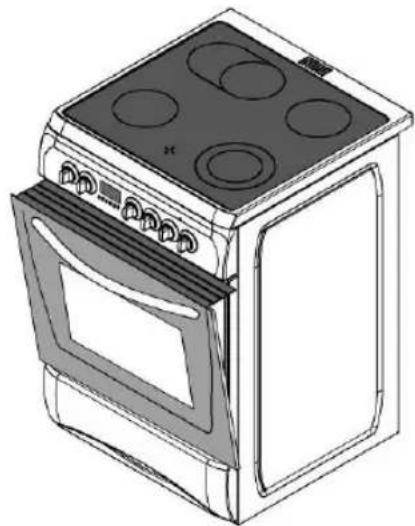
- Turn the knob to clockwise for starting to operate. Temperature set up by the knob position on the line gradually increasing up to max. (Single zone)
- For dual cooking zone the first ring operating like single zone; second ring starts to operate after extra turning by some more force to clockwise on the "max" region end of the ring sign. When you turn to counter clockwise, the first ring will operate as maximum range and the second ring's power will reduce up to you desire temperature.
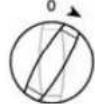
- At the "0" position, all the rings become off.
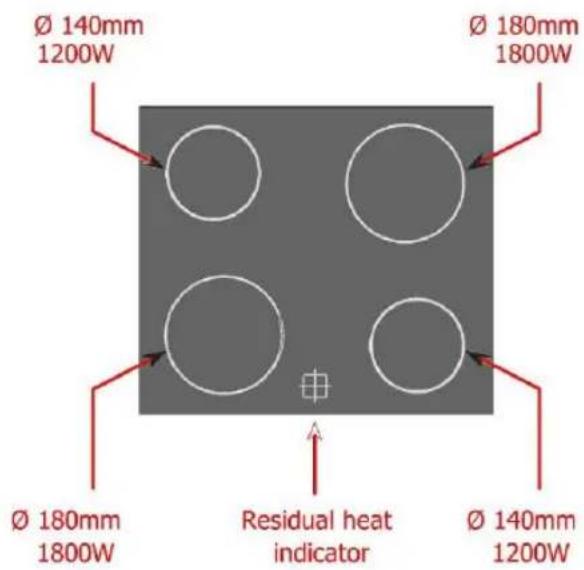
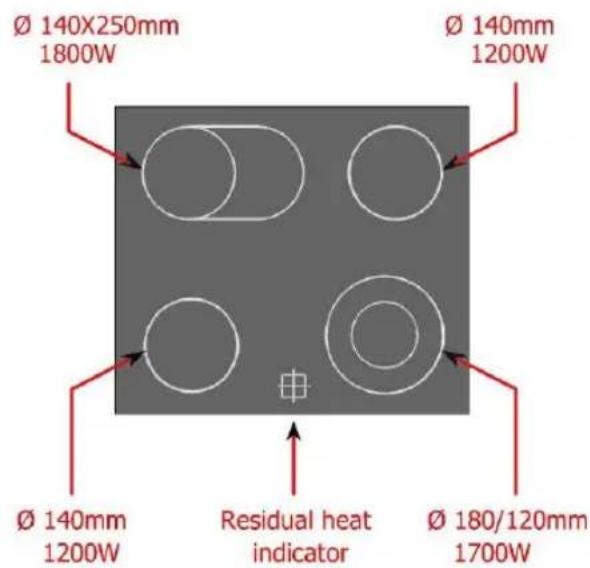
| Features |
| 140mm hilight 1200W |
| 180mm hilight 1800W |
| 180/120mm Dual hilight 1700W |
| 140x250mm Oval hilight 1800W |
USING OVEN SECTION
- When your oven is operated first time, an odor will be spread out which will be sourced from using the heating elements. In order to get rid of this, operate it at 250^ for 45 minutes while it is empty.
- In order to make cooking in your oven; oven switch must have been rotated; otherwise oven does not operate.
- Kinds of meals you will cook, cooking times and Thermostat positions were given in cooking table. The values given in the cooking table are characteristic values and were obtained as a result of the tests performed in our laboratory. You can find different flavors suitable for your taste depending on your cooking and using habits.
- You can make chicken revolving in your oven by means of the accessories.(optional)
- Cooking times: The results may change according to the area voltage and material having different quality, amount and temperatures.
- During the time when cooking is being performed in the oven, the lid of the oven should not be opened frequently.
- Otherwise circulation of the heat may be imbalanced and the results may change.
- Using cake forms while cooking cake gives better result.
COOKING TIME TABLE
| Meals Temperature (℃) Rack position Cooking time (min.) | |||
| Creamed cake 150 - 170 2 30 - 35 | |||
| Pastry 200 - 220 2 35 - 45 | |||
| Biscuit 160 - 170 3 20 - 25 | |||
| Cookie 160 - 170 3 20 - 35 | |||
| Cake 160 - 180 2 25 - 35 | |||
| Braided cookie 200 - 220 2 30 - 40 | |||
| Filo pastry 180 - 200 2 35 - 45 | |||
| Savory pastry 160 - 180 2 20 - 30 | |||
| Lamb meat | 210 - 230 1 | 90 - 120 | |
| Veal | 210 - 230 | 1 | 90-120 |
| Mutton | 210 - 230 | 1 | 90-120 |
| Chicken (in pieces) | 210 - 230 1 | 75 - 100 | |
| Fish | 190 - 210 3 40 - 50 | ||
Note: The values in the Table are the results obtained in our laboratories. You can find flavors different and suitable to your taste by experience. 5 - 10 min. preliminary heating should be done prior cooking.
ADJUSTMENT OF ELECTRONIC TIMER (OPTIONAL)
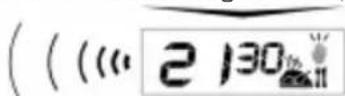
is an electronic timer, which enables your oven to get the food ready to serve at the desired time. The only thing to be done is to program the cooking time and ready time. It can also be used as an alarm clock, where you just give in the amount of time after which it should remind you by a buzzer tone.
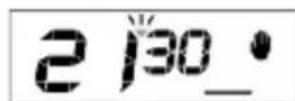
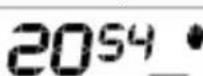
Time Of Day Adjustment
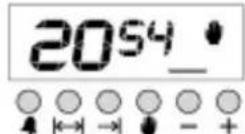
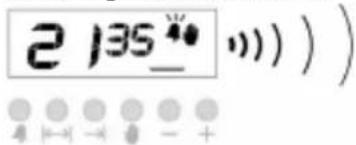
You can adjust the displayed time only if no automatic cooking program is in progress (there is just the time and the hand icon on the screen). Press the button, a small triangle between the hours and minutes will start to flash.(1) Use the + or - buttons for adjustment.(2) Long presses of those buttons will enable fast adjustments.
1) Switch into the time adjustment mode.
2) Adjust the time using the + or - buttons.
3) Screen will be stabilized in 5 seconds.
Adjusting The Buzzer Alarm
With this feature, you can program after how much elapsed time you should be warned by a buzzer sound.
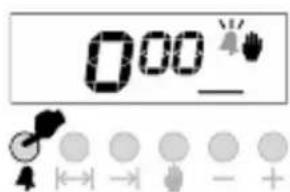
1) Switch into the buzzer alarm mode.
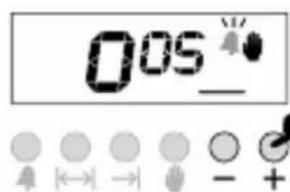
2) Give in the period of time to be counted down
3) After a few seconds, screen will return to clock mode
Note: Once programmed, the remaining time can be seen by pressing the 4 button once
Cancelling The Buzzer Sound

1) Buzzer will sound after the 2) Press the button to cancel. programmed amount of time elapses.
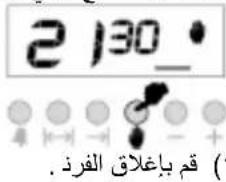
Automatic Cooking Program
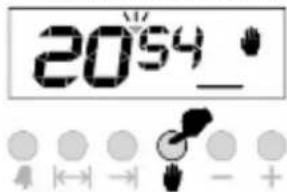
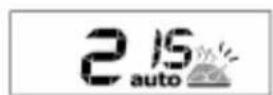
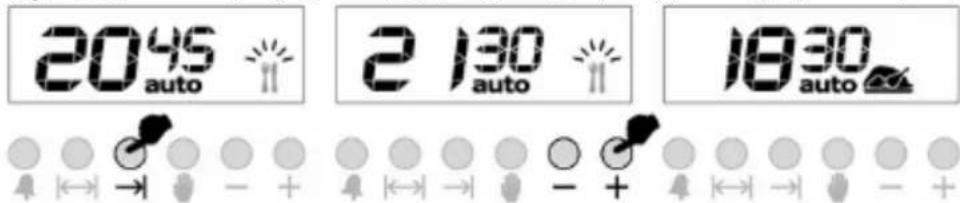
If you want to start cooking immediately, you just have to give in the cooking period. Example: We placed our food into the oven and want it to be cooked for 2 hours and 15 minutes

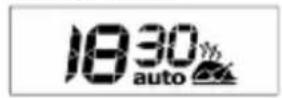
1) Current time. is 18:30
2) Switch into the cooking mode.
3) Adjust the cooking period 4) After a few seconds, the screen will indicate using the + or - buttons. That cooking has started and show the current time
Now, you have programmed your oven to cook the food for 2 hours and 15 minutes. Please do not forget to bring the function and/or temperature knobs of your oven to appropriate positions.
NOTE: You may cancel the automatic cooking mode any time by pressing the button.
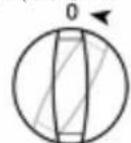
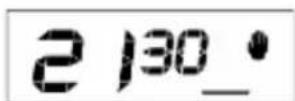
Adjusting the Cooking Time That You Desire
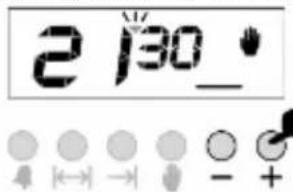
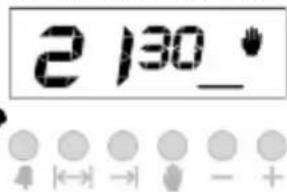
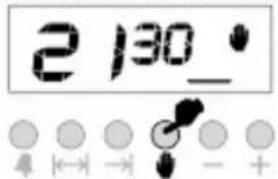
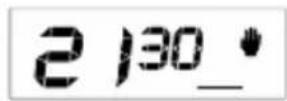
In the above example, cooking immediately started after giving the cooking period. By pressing the button, you can see the ready time which is when the food will be ready to serve, and if you want, you can also change it. In the example below, the ready time will be changed to 21:30.


1) Displayed is the ready 2) Set it to the desired time 3) In a few seconds, screen time 18:30 + 2:15 = 20:45 by using the + or - buttons. switches to clock mode.
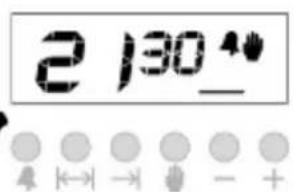
Now, we have programmed our oven to get the food ready at 21:30. (1) Since the cooking time was preprogrammed as 2 hours 15 minutes, your oven will start cooking at 19:15, so that the food is ready at 21:30.

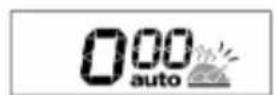
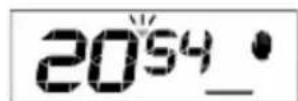
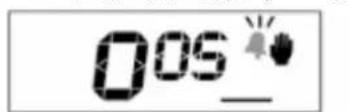
1) Screen just when cooking starts 2) Screen just when cooking ends
When automatic cooking is completed, a buzzer alarm is heard and will sound, if not stopped, for 7 minutes.
1) Switch your oven OFF 2) Reset the timer NOTE: Your oven will be inoperative until you reset the timer.
In the example above, cooking time has been programmed first; the ready time was calculated automatically and was edited by us. It is also possible first to program the ready time, in that case the cooking time will be calculated automatically and should be edited thereafter.
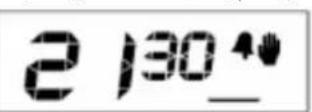
During the automatic cooking program, the backlight color of the screen will be green before and red during cooking.
Mains power interrupts will switch your oven into OFF mode. In that case the hand icon on the screen will flash and 12:00 will be displayed. Any cooking program will also be cancelled. Press the button to get your oven operative, press once again to the button switch to adjust the clock (See Time of Day Adjustment)
NOTE: If you will not use your oven right now, be sure that it is in OFF position.
FLASHING ICON INDICATES THAT YOUR OVEN IS INOPERATIVE AND YOU SHOULD PRESS THE BUTTON TO RESET
Buzzer Volume Adjustment
Programmable Options
Buzzer tone adjustment
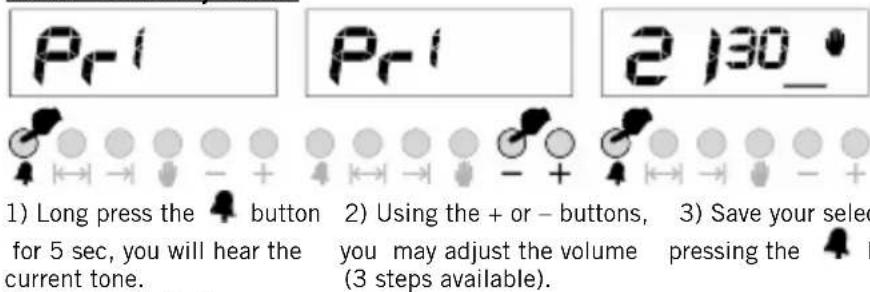
- Press the button for 5 seconds (till you see 'pr 1' on the screen).
- Press the button to decrease buzzer volume
- Press the + button to increase buzzer volume (default is already high)
- Press the 4 button to record the last heard tone.
NOTE: to exit without recording press the button.
Defaults: Buzzer : High tone Click tone : On
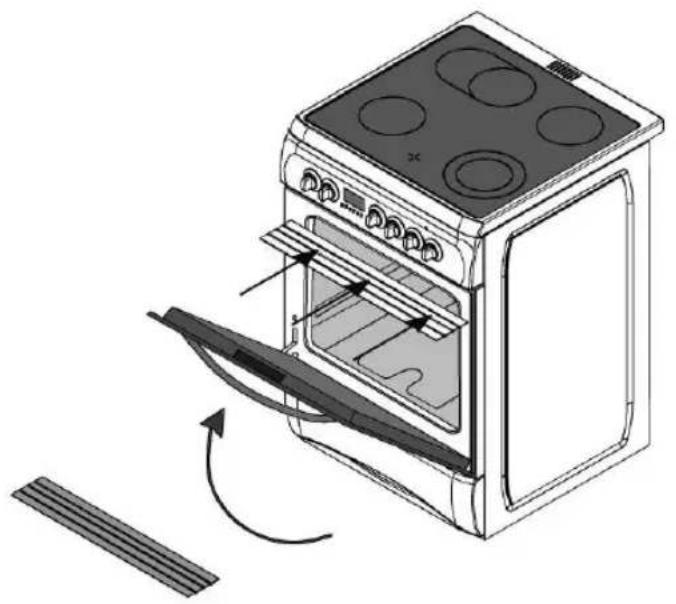
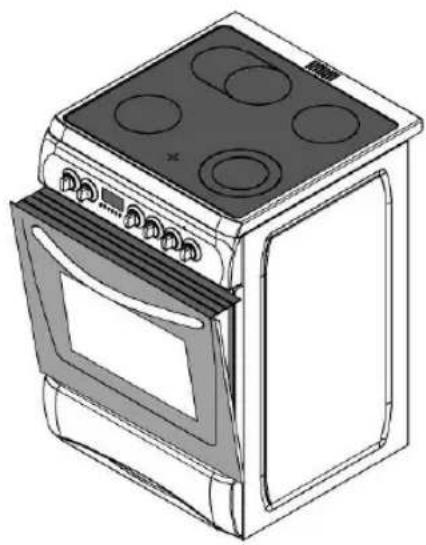
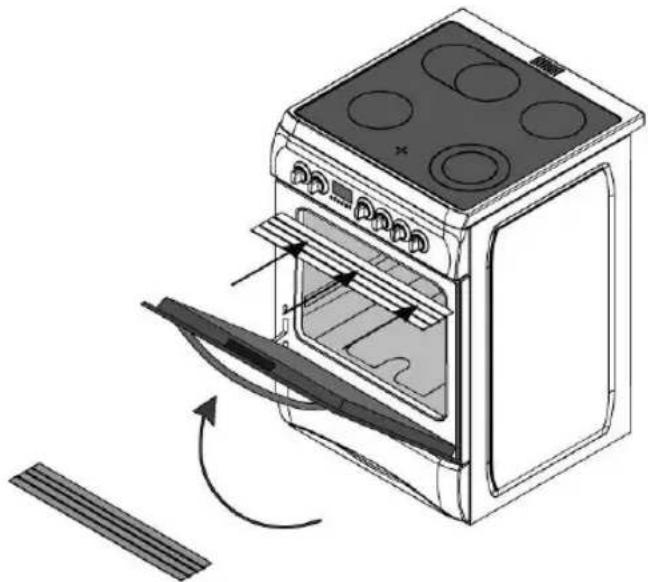
USING GRILL DEFLECTOR PLATE (optional)
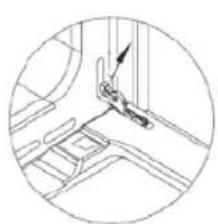
- A safety panel is designed to protect control panel and the buttons when the oven is in Grill mode (Figure 1)
- Please use this safety panel in order to avoid the heat to damage control panel and the buttons when the oven is Grill mode.
- Place the safety panel under control panel by opening the oven front cover glass (Figure 2)
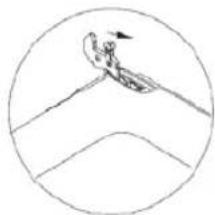
- And then secure the safety panel in between oven and front cover by gently closing the cover. (Figure 3)
- It is important for cooking to keep the cover open in specified distance when cooking in grill mode.
- Safety panel will provide an ideal cooking circumstance while protecting control panel and buttons.

Figure 1 Figure 2 Figure 3
MAINTENANCE and CLEANING
- Disconnect the plug supplying electricity for the oven from the socket.
- While oven is operating or shortly after it starts operating, it is extremely hot. You must avoid touching heating elements.
- Never clean the interior part, panel, lid, trays and all other parts of the oven by the tools like hard brush, cleaning mesh or knife. Do not use abrasive, scratching agents and detergents.
- Do not use harsh abrasive cleaners or sharp metal scrapers to clean the oven door glass since they can scratch the surface, which may result in shattering of the glass.
- After cleaning the interior parts of the oven with a soapy cloth, rinse it and then dry thoroughly with a soft cloth.
- Clean the glass surfaces with special glass cleaning agents.
- Do not clean your oven with steam cleaners.
- Wash the heads of the burners sometimes with soapy water and clean the gas ducts by means of a brush.
- Never use inflammable agents like acid, thinner and gasoline when cleaning your oven.
- Do not wash any part of your oven in dishwasher.
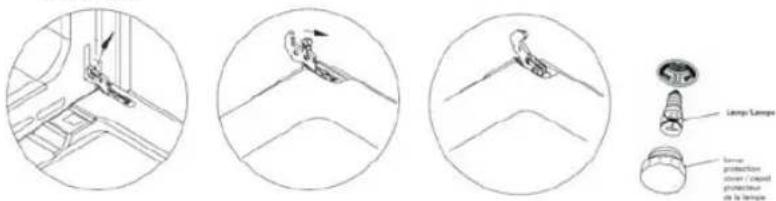
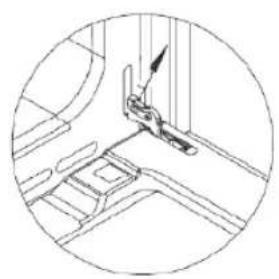
- In order to clean the front glass lid of the oven; remove the fixing screws fixing the handle by means of a screwdriver and, remove the oven door. Than clean and rinse it thoroughly. After drying, place the oven glass properly and re-install the handle.
GEBRAUCHSANWEISUNG
STANDHERDE MIT GLASKERAMIK - KOCHFELD

Figure 1 Figure 2 Figure 3
NETTOYAGE ET ENTRETIEN
EcJH IIeYb He pa6oTaet
OncaHne neu n naHeJy npabJeHH
IcnoJIb3OBAHHe n OIIncAHne KOHΦopOK n3 KepaHa
Пльзоване духовков.
PerynpoBka 3IcktpoHoro taMepa (OIIu)
IcnoJIb3OBaHHe oTpaxKaTeJIA
O6cIyKbAHne n Ounchka
YCTAHOBKAIIEQUI
Jektpueckoe CoedneHne H Beonacnoctb
- Ha neb tpe6yctc IJIaBKn IIpeIOxpaHHTeJb Ha 40 aMnepa IJI4 HArpeBaTeJe KepaHOBXK KOHΦopOK HIIJI dyXOBKn. IIpH Heo6xoIIMOCTH 3aMeHbI yCTAHOBKa IOJIXHa BbIIIOJIHTbc KBAIHINPOBAHHbIM 3JIeKTpHKOM.
- BaIIa IIeYb OIpeRyJIINpOBaHa Ha IIepemeHHbI TK HOMHbIOM 230 / 400 V, 50 / 60 Hz. EcJIH cETb OTIHuaETcR OTRHX 3HaueHH, 6OpaHTTecB B cepBHCII bIeITp.
- 3EIEKTPHueckoe coeHHHe HeuH DoJHKHO 6bItb ToJbKO Upe3 pO3eTK C 3a3eMJIeHHem B COOTBeCTBn C HOPMaH. EcHn Ha Mece TcAHOBN Het PO3eTKC 3a3eMJIeHHem, HeMeJIOEHNO O6paHTncB K KBaJINΦNUPOBAHHomy 3JEKTPKNy. IPOHNBOINTeJb He Hecet OTBeTCTBEHIOCTb 3aYIIep6, BO3IINKIII IN IO PpHnHne IIOKIIIOeHHa Upe3 PO3eTK 6e3 3a3eMJIeHH. EcHn KOINb EJEKTPNHecKOro IPOBOda OTKpbITb, B 3aBHCHMOCTh OT yCtpoHCTBa, IocTaBBte IpeKIIIOaTeJb IIOKIIIOeHH/OTKIIIOeHHcETH.
- EcJH 3JIeKTPnueckn IIpoBOII HNCIIpaBcH, BO H36eKaHHc HHePnTHOCTeI cRO HeIPcMeHHo DOJIkeH 3aMeHHb cIeIIHaJIHCT.
- 3ncktpnuecknn npoBn Hc noJkeh cnpHKacatbca ropqHm NctaJIaMn nCn.
- IeHb HxKHO yCTaHOBHTb Ha POBHb II IOJI B XOPOIO IIPOBETPbAemOM MecTe.
- 3KcIpyHpyTe Hb B cyxOarMocpepe.
- Ipn yctaHOBKe nCHn Ha MccTo y6cHHTecb, YTO OHa cTOnT HopMaJIbHo. Ipn HcO6XoHNMOCTH oTperyJInpyTe HOxKn.
CONSUMER UNIT Tableau electrique

TEXHNUECKHEXAPAKTEPHKIIEN
IppMeHHe: NeB He 6yET paOaTb, noka He IpeyeCTAHOBJIe H TaHMeP.
B IIpHBeJeHHOM IpnHMepe cHaJa 6blIO 3aIIpoIpaMMHPOBaHO BpEM IIpHIROBJIeHH, BpEM ITOBHOCTH 6blIO paccHTaHO ABROMATHueckn H 3MeHeHO HaMn. MoKHO cHaJa 3aIIpoIpaMMHPOBaTb BpEM ITOBHOCTH, B 3TOM Clyuae BpEM IIpHIOTOBJIeHH 6byET paccHTaIO ABROMATHueckn H MOKeT 6blTb H3MeHeHO IOTOM.
Bo BpemBbIOJIeHHI INporpaMMbABTOmatHueCKoro IIpHrOToBJIeHHI NOcBETKa 3KpHaNb6yTeT 3eJIHOIpeE IaJOM N KpaHIOB BpemIIpHrOToBJIeHHI.
Ipe6oB B 3JcKToHHTaHH BIKIOHT dyXOBky. B 3OM cnyae HKOIIka pykN HauHET MHRaTb N OTO6pa3HTcB Pemr 12:00. IporpamMa IIHHOTOBJIeHH TAKKe 6yJeT OTMeHeHa. HaKMITE KHOIIky , YTO6b IyXOBKa 3apa6OraJa, eHpe pa3 HaKMITE H OTpeYJHPyHtbe Bpemr (cm. PEYJIINPOBKA BPEMEHN).
PnHmueaHHe: EcH JyXOBKa B DaHHbI MOpHr He HcIIIOJIb3yETcH, BbKIOIOHTe ee, IIOCTaHBpyKyBIOIOJKeHne OFF. MHAIIOIIAR PYKA YKA3bIBAET, YTO JyXOBKa HE PABOTAET. IINI IPE3A rpy3KN HADIO HAKATb KHOTKY
PeryJHpOBKa FpOMKocTH 3BOHka


1)HaKMHTe H yIepKHaBtE KHOIIky 2)KJIaBBHImn +HIN -MOXHO B TeueHHe 5ceKyH, Bby ycJIbHITte OTpeYJHPoBaTb rPOMKOCTb 3aHaHH bCHHaJI. (IOCTyIHb 3 BaPaHaHTa).
3) CoxpaHHTe BbI6Op, HaaKaB KHOIIKy.
IporpamMhpyembIe oHINH PeryJnPobKaToHa 3BOHka
HaKMMTe KHOIIky Ha 5cekyHn (IOKA He yBnHTHe Ha KpaHe 'pr 1')
HaKMITE KIOIky -yMeHbIIeHHraPOMKoCTN 3BOITKa
HaKMHTe KHOIIKy +IyBcJInueHHraPOMKocTH 3BOHka (IO yMOJuaHHIO BbICOKa)
HaKMHTe KHOIKY 4IJIa3IINHIOJIeHrOYoCJIbHaaHHORoTOHa
ABTomathueckoe H3meiHHe POna
HaKMHTe KHOIIky Ha 5 cKyH (IOKA IIcIIIE He IOKaKeT ON HIN OFF). IBET fOHa IpeKJIIOHaetcMckJY BKJI H BbIKJI H HAO6OpOT. Ecln OTA OIIHBA KJIIOHcHa, IBET IOIcBCTKN KpaCHB BO BpEMI PPHIOTOBICHH N 3CJIcHb BO BpEMI OKHIAHNA B ABTOMATHCCKOM pKHMc. ECLN OIIHBA KJIIOHcHa, IBET fOHa B ABTOMATHCCOM pcKHMc HC H3MCHHTcR.
BKJI/BbIKIIOcBeTKH
HaKMHTe KIOHky 15 cekyI (noka dncJIe IIE nokakET ON HIN OFF).PiOcBcTKa nepeKIOaTcM EMeJy BKJIu BbIKJIu HAO6OpOT. Ecln 3ra OIIHH BkIOOHcHa, POcBcTKa Bccrda pa6oTAc. Ecln OIIHH BbIKIOChHa, POcBcTKa He pa6oTAc T pyHOM pcKHMc. PIOCBCTKa BkIOOHcTa Ha 15 cekyI pIh HaKaTHN AKTHBOH KHOHKn.
BkJI/BbIKI IIe.IyKa
HaKMHTe KHOHky + Ha 5 cekyH (IOKA dncJIe He NOKaKeT ON HIN OFF). OIIuI HAeIcKpeKIOUaETcM EKdy BKJI n BblKJI. EcIn 3a OnnB BkIOUeHa, IIp HauKaTHN KHOHKn 6yDet CbIshn IeJIOK. EcIn OIIuN BbIKIOUeHa, IeJIuKa He 6yDet.
Bo3Bpar K Hactpoikam IIO YmoJuaHHIO
HaKMHTe ha 10 ckyHn (IOKA Ha IINcIIIEe He IOBHTc8 pr d).
HactpoiknIIO yMOJIaHHIO:3BOHOK: BBICOKN TOH IIeJIOK:BKJI
HcIOJIb3OBAHHe IJIAHKN 3AUNTbI PYUEK
- IIITOK 6e30IaHcOEt H IpeHa3HaYeHa IJI 3aIIHTb IaHcJIH yIpaBJIeHH N KHOIOK, KOJa dYXOBKa HAXOJNTcB B peKHMc rpNJIA (pncyHok 1)
- IIOkaJIyIcTa, HcIIIOJIb3yIte IIHTOK 6e3OIIaHOCtH, YTO6bl JAp He IIOBpeINI IIHeJIb yIpaBJIeHHN H KHOIIKN, KOJIa IyXOBKa HaxoITcB BpeKHMc IprHJ.
- IocTaBbTe 6e30IaChOcTH NIOI NaHeJIyIpaBJIeHHN,OTKpbIB IIpeHIOIO CTKeJHHHyO KpbIbK Ky dYxOBKn (pHcyHOK 2)
- 3aTeM 3aKpeHHTe IHTOK MExy dy dYXOBKO H IpeHHe KpbIHKO, octOpOxHO 3aKpbIB KpbIHKy (phcyHOK 3)
5.Bo Bpemn npHroTOBJIeHHa HpJHeBaKHOepKaTH KpbHIOY OKpbHIOHa OHpeJeHoe pacCTOHHe. - ⅢTOK 6e30nacHocTH o6ecneHT nDeaIbHbIe ycIOBHN IINPnroTOBJIeHHN, OINHOBpeMeHHO 3aunuuaan Hnnn KHOIIKN.
PncyHOK1
PcCyHOK2 OBCJYKBAHNE H OCHCTKA
PncyHOK3
- OTKHIOHTe IITaHHe, IOJdAbaEmoe Ha neyb.
2.BoBpMaPbOHTHHeKOTOpocPiocBbIKIOChHHneB OCHb TropaHa.He npHKacaiTeCk HArpeBaTcJIbHbIM 3JMcHTAM. - HNKOrJa He ChcHTHe dyxOBky, NaHeIb, KpbHIIKy, IpOTHBHH IpyrHe DeTaJIH Neu TaKHMn HHeTpymeHrMaH KaK JeeCTKa IIETKa, cTeKa HIN HOK. He HcNoJb3yIte a6pa3HBHbc I npapaaHOHc MaTePhaJIb.
- IocJIe OHTKIN BHYtpHHX DeTaeJIe MblbHOI TpRIOKO ONIOJOCHHTC HN NTIIaTeJIbHO BbITpHTc MRKoTKaHbIO.
- OuHnHaTe cTeKJIaHHbIe IOBcpxHOCTn CnCIIHaJIbHbIMN OHCTHTeJIaMn.
6.He HcHTHe IITy npom. - IepnoHnueckn MoTe roJIOBKn rOpeJIOK MblbHOI BOIOH, a ra3oIIpOBOIb II icETKOH.
- IpeKJe Yem cHrTB BepxHIO KpbIHKy IIeHN, OCHCTHTe KpbIHKy OT pa3JIHTOJ XHIKOCTH. IpeKJe Yem 3aKpbITb KpbIHKy y6eIHTECb, YTO JXAPoHbI CT0JI OCTBJI.
- HNKoIa He HcIOJIb3yIte IJIa YHcTKn IIeHN RopOHe MaTePHaJIbI, TaKHe KAc KNCIOTa, pa36aBHTeJIb N 6eH3HH.
10.He MoTe DetaJIH PeuB INOCyDOMOeHIOI MaHHIE. - TIO6bI OUHCTHTB NcpeDHIIO CTekJIHHYIO IBCpIHy NcH, CHHMHTe OTBePTKoI ΦHKCHpyIOHHe BHNTHK, KOTOpBc KpeNIT pyKy, H CHMMTE IBCpIHy JyXOBKn. 3aTeM OUHCTHTe N TIIATcJIbHO ONoJocHNTe. PocIe TORO KA K OHa BBICOXHET, NOCTABBte JIBepu H pyKy HA MecTo.
1
aiaaiiiee iieae 1
3
AaBaaBaaBaaBaaBaaBaaBaaBaaBaaBaaBaaBaaBaaBaaBaaBaaBaaBaaBaaBaaBaaBaaBaaBaaBaaBaaBaaBaaBaaBaaBaaBaaBaaBaaBaaBaaBaaBaaBaaBaaBaaBaaBaaBaaBaaBaaBaaBaaBaaBaaBaaa
-5
jai jai jai 6
a 7
8
A( 1,0) .B( -34,34)
i j 9
10
a 11
Jyall plisdy jzj 3 yj g j j j j j j j j j j j j
aalal alalal
(1)
Aigssll 1
(2.1)
(3.1) 1
alil aie 1iie 1aiae iiae g cie eaiie aiie gaiie y
6.

gill 0yie aill g
7 1
AaBaaBaaBaaBaaBaaBaaBaaBaaBaaBaaBaaBaaBaaBaaBaaBaaBaaBaaBaaBaaBaaBaaBaaBaaBaaBaaBaaBaaBaaBaaBaaBaaBaaBaaBaaBaaBaaBaaBaaBaaBaaBaaBaaBaaBaaBaaBaaBaaBaaBaaBaaa
(1):
aaii i 1
4iial iio jie bua


5 100
signal 5. sinuJ i.i.d. e.i.d. (2)
. 与 2 = 2 all
( )
411al Cgclg
("Pr1" aaiiie 5a 4j jie bia
- jle baiiai aiial 5g s gina jao Jdiill,
().
4 jie biai, jiall all gail 1


Jellll Jle Jbuaa Jaa 1
a_i a j = f( x)
·s + j 即 j_0
(3)
5
aieil jus b
Ssii i j yj j 111 100


aill jie aol 1
Lusclic
jainu 1aui 1y 3
aellll
15, 15, 15, 15, 15, 15, 15, 15, 15, 15, 15, 15, 15, 15, 15, 15, 15, 15,
21:30 1
1 2 3
20:45=2:15+18:30
19:15 15230
.21:30 9 palaal
y (gall)
psssslll lclcdLCD
tale o jbi

JL 15
aalee
01 111111111111111111111111111111111111
jglg 15b
J 1
45 250 250
. 2
3
jglj jol jilj 11 jll jll j 1
. 4 aolalilalilalilalilalilalilalilalilalilalilalilalil
.3
()
.5
1 1
jll jglg l aagl y j g j
a 280-50
jglgglgglgglggl gll
1
.5
.2
.3
.4
.5
.6
.7
.8
.9
.10
.11
.12
.13
.14
.15
.16
.17
.18
.19
.20
.21
.22
.23
.24
.25
.26
.27
.28
.29
.30
.31
.32
.33
.34
.35
.36
.37
.38
.39
.40
.41
.42
.43
.44
.45
.46
.47
.48
.49
.50-60, 50-60, 50-60, 50-70, 50-80, 50-90, 50-100, 50-110, 50-120, 50-130, 50-140, 50-150, 50-160, 50-170, 50-180, 50-190, 50-200, 50-210, 50-220, 50-230, 50-240, 50-250, 50-260, 50-270, 50-280, 50-290, 50-300, 50-310, 50-320, 50-330, 50-340, 50-350, 50-360, 50-370, 50-380, 50-390, 50-400, 50-410, 50-420, 50-430, 50-440, 50-450, 50-460, 50-470, 50-480, 50-490, 50-500, 50-510, 50-520, 50-530, 50-540, 50-550, 50-560, 50-570, 50-580, 50-600, 50-610, 50-620, 50-630, 50-640, 50-650, 50-660, 50-670, 50-680, 50-690, 50-700, 50-710, 50-720, 50-730, 50-740, 50-750, 50-760, 5
SA
1 1
()
4yie yll lii i 10g jiaall lgljai gil
iJ 1
aaii 100
a.b.c.
J 100 g aalll algall glll lal y jai jai jai Jaa 100 piaaall Jla dsc! p
5j
j jll gill
il jia jia jiu po
Jaa:paal 15
a 1111 1000
jzglzblb 100gol
jell 1
yS11 (a)all yaii
iLai
a.b.c. d.e.f.
COCINA CON PLACAS VITROCERAMICAS
Guía del usuario
4 placas vitroceramicas
Horno: Eléctrico
Estimado usuario,