WGC9060E - Cooker Wolf Power - Free user manual and instructions
Find the device manual for free WGC9060E Wolf Power in PDF.

| Technical specifications | Wolf Power WGC9060E cooker, 60 cm, 4 gas burners, convection oven, 70-liter capacity. |
|---|---|
| Usage | Ideal for cooking a variety of dishes, with intuitive controls and precise temperature settings. |
| Maintenance and repair | Easy cleaning thanks to smooth surfaces, removable parts for simplified maintenance. |
| Safety | Safety system for gas burners, overheating protection in the oven. |
| General information | 2-year warranty, energy consumption A, modern and elegant design, available in several colors. |
Frequently Asked Questions - WGC9060E Wolf Power
User questions about WGC9060E Wolf Power
0 question about this device. Answer the ones you know or ask your own.
Ask a new question about this device
Download the instructions for your Cooker in PDF format for free! Find your manual WGC9060E - Wolf Power and take your electronic device back in hand. On this page are published all the documents necessary for the use of your device. WGC9060E by Wolf Power.
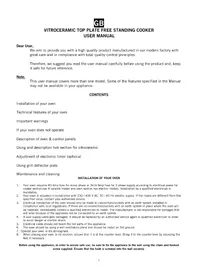
USER MANUAL WGC9060E Wolf Power
It is our ultimate desire that you achieve the best performance from our product, which has been passed through meticulous quality control checks and is manufactured in modern facilities.
To this effect, we recommend that you read the entire guide carefully before operating the product and keep it as a reference.
All our appliances are only for domestic use, not for commercial use.
ATTENTION!
THIS APPLIANCE SIALL BE INSTALLED IN ACCORDANCE WITH THE REGULATIONS IN FORCE AND ONLY USED IN A WELL VENTILATED LOCATION. READ THE INSTRUCTIONS BEFORE INSTALLING OR USING THIS APPLIANCE.
TABLE OF CONTENTS
Part 1 Index
Part 2 Installation of your oven
Part 3 Installation of the oven feel
Part 4 Technical features of your oven
Part 5 Nozzle change operation
Part 6 Important warnings
Part 7 Descriptions of the control panel
Part 8 Descriptions of the oven section
Part 9 Using the burner groups
Part 10 Using oven section
Part 11 Using the grill deflector sheet
Part 12 Maintenance and cleaning
INSTALLATION OF YOUR OVEN
Electrical Connection and Security
- Your cooker is adjusted in compliance with 220-240 V for mono phase or 220-240 V /380-415 V for three phase and 16 or 32 Ampere electric supply. If the mains is different from these values, contact your authorized service.
- Electrical connection of the oven should only be made by the sockets with earth system installed in compliance with the regulations. If there is no proper socket with earth system in the place where the oven will be installed, immediately contact a qualified electrician. Manufacturer shall never be responsible from the damages that will arise because of the sockets connected to the appliance with no earth system.
- Electrical cable should not touch the hot parts of the appliance.
- For disconnection from the supply mains having a contact separation in all poles that provide full disconnection, must be incorporated in fixed wiring in according with the wiring rules.
Gas Connection and Security
- Before your appliance is connected to the gas supply, ensure that the gas category and pressure specifications shown in the data plate corresponds with your gas supply. If necessary call authorized service for adjusting to gas category.
- This appliance shall be installed in accordance with the regulations in force and only used in a well ventilated space. Read the instructions before installing or using this appliance. In the interest of safety this appliances must be installed and / or serviced by a competent person as stated in the gas safety regulations current editions.
- The appliance must not be installed in a room without a window or other controllable opening. If it is installed in a room without a door which opens directly to the outside, a permanent opening is required. The air circulation should be 2m^3/h per kW of humers.
- The gas connection should be performed from the right or left. For this reason, change the hose nozzle, plug and the seals.
- Please use flexible hose for gas connection.
- If you make a connection with a flexible metal hose, locate a seal between the main gas pipes.
- The inner diameter of the flexible hose, which the butane hose nozzle is connected, should be 6mm for the house-type gas tubes. The inner diameter of the flexible hose, which the natural hose nozzle is connected, should be 15mm . The hose should tightly be fitted to the hose nozzle by squeezing with a clamp. The hose should be replaced before its last expiry date.
- Caution! Make the oven connection to the gas inlet valve, the hose length must be short and be sure that there is no leakage. The flexible hose used should not be longer than 125cm for safety.
- RE-INSPECT THE GAS CONNECTION
- When placing your oven to its location, ensure that it is at the counter level. Bring it to the counter level by adjusting the feet if necessary.
DO NOT MAKE GAS IHOSE and ELECTRICAL CABLE OF YOUR OVEN GO THROUGH THE HEATED AREAS, ESPECIALLY THROUGH THE REAR SIDE OF THE OVEN. DO NOT MOVE GAS CONNECTED OVEN. SINCE THE FORCING SHALL LOOSEN THE HOSE, GAS LEAKAGE MAY OCCUR.
INSTALLATION OF THE OVEN FEET
In order to install the oven feet,
- Foot attachment lath is installed on the oven from the bottom of the oven as shown in Figure 1. Nuts are centered on these lathes in order to screw feet (Figure 2). Complete the feet installation process by screwing the feet to the nuts (Figure 3).
- You can balance your oven by turning the screwed feet according to the surface type you are using.
- If your oven has plastic food as in Figure-4 you can adjust your ovens height from these feet as turned clockwise or anticlockwise.
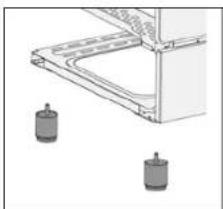
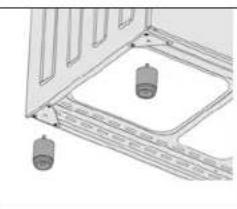
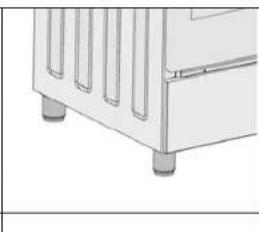
Figure 1 Figure 2 Figure 3 Figure 4
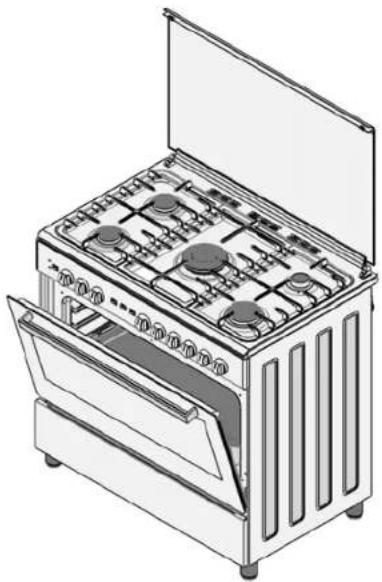
TECHNICAL FEATURES OF YOUR COOKER
Before making the connections of your appliance:
Before starting to use the appliance, read the user manual of the appliance carefully. In this user Manual, there are important information regarding your, our customers' security, how you will use it and how you will make its maintenance. The conversion to the natural gas will be made by exchanging the auxiliary material (injector) given in the delivery of the oven with the equivalent one which was installed to the oven and mentioned in the user manual Idling adjustment will be made according to the flame high pursuant to the below data by turning counter clockwise of the adjustment screw in the tap shaft.
| Specifications | 90x60 C | |||||
| Outer width 900 mm | Natural gas | LPG | ||||
| G 20-20 G | 30-30 | |||||
| Outer depth 635 mm | ||||||
| Outer height 925 mm | ||||||
| Inner width 765 mm | ||||||
| Inner depth 410 mm | ||||||
| Inner height 355 mm | ||||||
| Lamp power 15 W | ||||||
| Bottom heating element | 2000 W | |||||
| Top heating element | 1500 W | |||||
| Grill heating element | 2500 W | |||||
| Turbo Heating element | 1250 W x 2 | |||||
| Supply voltage | 220-240V, 50-60 Hz | |||||
| Hotplate 145 mm | 1000 W | |||||
| Hotplate 180 mm | 1500 W | |||||
| Hotplate Rapid 145 mm | 1500 W | |||||
| Hotplate Rapid 180 mm | 2000 W | |||||
Reduced Flame Gas Cock Adjustment:
to adjust your oven acc. to the gas type, make the adjustment for reduced flame carefully by turning with a small screwdriver as shown below on the screw in the middle of the gas cocks as well as nozzle changes (figure 5 and 6).
| From LPG to Natural gas | From Natural gas to LPG | |
| Rapid Burner | 3 turns anticlockwise | 3 turns clockwise |
| Semi-rapid Burner | 2.5 turns anticlockwise | 2.5 turns clockwise |
| Auxiliary Burner | 2 turns anticlockwise | 2 turns clockwise |
| Wok Burner | 4 turns anticlockwise | 4 turns clockwise |
| Oven Burner | 4,5 turns anticlockwise | 4,5 turns clockwise |
| Grill Burner | 4 turns anticlockwise | 4 turns clockwise |
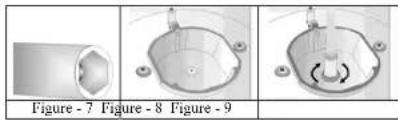
NOZZLE CHANGEMENT OPERATION
- Please use driver with special head to remove and install nozzle as figure-7
- Please remove nozzle (figure-8) from burner with special nozzle driver and install new nozzle (figure-9)
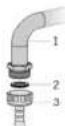
Change the pipe for the connection gas: Following operation must be done only by authorized service. If your oven is adjustment for use LPG, hose nipple (3) is connected as shown in figure. During convert to NG from LPG, hose nipple (3) must be disassembled by authorized service and the flexible metal hose with mechanical connection from the gas network is connected to the hose shown in figure number 1 that using a new seal (2) If your oven is adjustment for use NG, there is no any nipple at the end of the hose. Every change the pipe for the connection gas, ensure that leak proofing between on the surface of the connection should be placed to the seal (2). This seal is single-used.
1- Main gas pipe 2-Leak proofing sca 3-Hose nipple (for LPG)
IMPORTANTWARNINGS
- The cooker is supplied setup according to the conditions shown on the rating label which is stuck to the rear of the appliance. From this sticker you can learn for which gas type (LPG or NG) this appliance is configured when supplied.
- Power supply voltage of your oven is 220 - 240V 50 - 60Hz for mono phase and 230V / 400V 50 - 60Hz for 3 phases.
- If the current rate of the fuse in your installation is less than 16 Ampere (for mono phase) 32 Ampere (for 3 phase), make a qualified electrician fit a 16 / 32 Ampere fuse.
- Since the plug of your oven has earth system, ensure using socket with earth system. If it is used without earth system, our firm is not responsible for any loss which may arise.
- Keep the gas hose and electrical cable of your oven away from the hot areas; do not let them touch the appliance. Keep them away from sharp sides and heated surfaces.
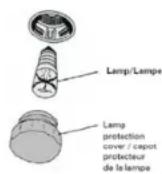
- When the supply cable gets defective, gel is replaced by conducting our service as soon as possible. 7. Before changing the oven lamp, disconnect the power plug from the wall socket.
- Be sure that the cooker is configured correctly for local requirements (for example, the jets must be suitable for local gas type and gas pressure)
- Connect your oven to LPG cock in shortest way and without any leakage. Minimum 40 cm - Max. 125 cm
- When making gas leakage check, never use any flame type like those of lighter, matches, cigarette fire or similar ones.
- Usage of your appliance creates moisture and heat in the room it is placed, make sure that your kitchen is ventilated well.
- Maintain the natural ventilation ducts properly.
- When the oven is being used, the reachable parts may be hot, children should be kept off from hot surfaces and the areas where charged with electricity.
- When the oven is hot never touch the oven glass by hand or touch by means of a tool.
- Before starting to use your appliance, keep curtain, tulle, paper or inflammable things away from your appliance. Do not keep flammable materials inner side of or around the appliance.
- You must use the safety sheath of control panel when the oven section is in grill mode.
- Gas tapes are secured by locks. Do not turn before pressing the button
- Oven valve has safety cock. Flumes are kept about 3-5 sec. If the oven burner can not flame, repeat this procedure 5-6 times. If the problem persists, please contact with the nearest service.
- Please place the tray to the lowest shelf and add 200ml water when you cook something in chicken roast section.
- Make sure that rear pulley section of the grill swelling is fixed on V-bed on the grill when you use the grill swelling.
- It is not suitable to operate both lower and upper burners simultaneously. The lower burner is designed for cooking and upper burner is designed for frying.
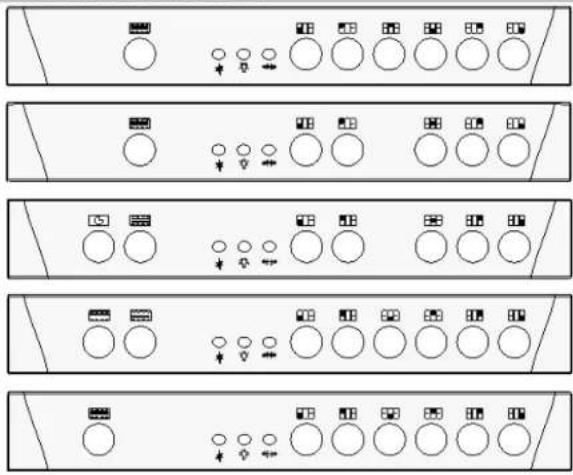
DESCRIPTION OF THE CONTROL PANELS
| Front right burner (small burner) | Rear right burner (middle burner) | Wok burner or hotplate | Front electric hot plate | Rear electric hot plate | Rear left burner (middle burner) | Front left burner (big burner) |
| ←→ | ★ | |||||
| Grill burner or heating element | Oven burner (optional) or heating element | Bottom heating element or Oven burner | Timer (optional) | Turnspit | Lamp | Ignition lighter |
DESCRIPTION OF THE OVEN SECTION
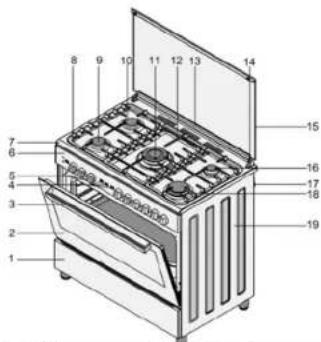

| 1- | Dishwarmer | 11- | Wok burner |
| 2- | Glass oven door | Grid | of wok burner 2- Glass |
| 3- | Door handle | 13 | Aluminum profile of glass lid |
| 4- | Push button switches | 14- | Flinges of glass lid |
| 5- | Command knobs | 15- | Glass top lid |
| 6- | Command panel | 16- | Auxiliary burner |
| 7- | Top cooker plate | 17- | Hose cutry |
| 8- | Cooker grids | 18- | Rapid burner |
| 9- | Semi-rapid burner | 19- | Side panel |
| 10- | Semi-rapid burner |
| Dishwarmer 1 | Hotplate | |
| en door 12- Hotplate | ||
| 3- | Door handle | 13- Aluminum profile of glass lid |
| 4- | Push button switches | 14- Hinges of glass lid |
| 5- | Command knobs | 15- Glass top lid |
| 6- | Command panel | 16- Auxiliary burner |
| 7- | Top cooker plate | 17- Hose catry |
| 8- | Cooker grids | 18- Rapid burner |
| 9- | Semi-rapid burner | 19- Side panel |
| 10- | Semi-rapid burner | |
USING THE BURNER GROUPS
Using Gas Cooker:
- Our gas ovens top and bottom burner working system is one by one. When you want use your preference burner, before you must make press the tap knob and wait nearly 5-10 second. Then you can to inflame through with automatic ignition system (optional) or match. You must wait 10-15 second after inflame to have press by tap knob and after you can make allow the knob. If you can not made this operation you must try again.
- The cocks controlling the gas cookers have special mechanism. In order to light the cooker;
- Always press on the switch forward and bring it to flame symbol by turning anticlockwise (left). All of the lighters shall operate and the cooker you controlled shall light only. Keep the switch pressed until ignition is performed. (OPTIONAL.)
- If your oven has ignition system from push button switch please press and turn gas valve open position and same time press ignition button.
- In models with security system, when flame of the cooker is extinguished, control valve cuts off the gas automatically. For operate the burners with gas security system you must make press the knob and turn antilock wise. After the ignition (with optional automatic ignition system or match) you must wait nearly 5-10 second for gas security systems activation.
- Do not continuously operate the igniter for more than 15 seconds. After 15 seconds, if the burner does not ignite, then stop and if you are trying to ignite the oven then open the door and wait a minimum of one
minute before trying again. If the burner is extinguished for of the any reason, close the gas control valve and wait a minimum of one minute before trying again.
| Wok Burner 24 - 28 cm | |
| Big Burner 22 - 26 cm | |
| Normal Burner 18 - 22 cm | |
| Small Burner 12 - 18 cm | Closed Fully open |
Half open.
-
Electric Hotplates have standard of 6 temperature levels (as described herein above)
-
When using first time, operate your electric hotplate in position 6 for 5 minutes. This will make the agent on your hotplate which is sensitive to heat get hardened by burning. Use flat bottomed saucepans which fully contact with the heat as much as you can, so that you can use the energy more productively.
-
In order to obtain maximum output, be careful that the saucepan which will be used should be flat, bottomed, and use the saucepans with dimensions given below.
| LEVEL 1 | LEVEL 2 | LEVEL 3 | LEVEL 4 | LEVEL 5 | LEVEL 6 | |
| 145 mm | 95 W | 155 W | 250 W | 400 W | 650 W | 1000 W |
| 180 mm | 115 W | 175 W | 250 W | 600 W | 850 W | 1500 W |
| 145 mmRapid | 135 W | 165 W | 250 W | 500 W | 750 W | 1500 W |
| 180 mmRapid | 175 W | 220 W | 300 W | 850 W | 1150 W | 2000 W |

USINGOVENSECTION
- When your oven is operated first time, an odor will be spread out which will be sourced from using the heating elements. In order to get rid of this, operate it for 45 minutes while it is empty. In order to make cooking in your oven; oven switch must have been rotated and ignition must have been made. Otherwise, your oven will not run.
- Kinds of meals you will cook, cooking times and Thermostat positions (Optional) were given in cooking table. The values given in the cooking table are characteristic values and were obtained as a result of the tests performed in our laboratory. You can find different flavors suitable for your taste depending on your cooking and using habits.
- Open the oven cover at level 1 and use the safety panel when grilling on your oven
- Cooking times: The results may change according to the local voltage and material having different quality, amount, and temperatures.
- During the time when cooking is being performed in the oven, the lid of the oven shouldn't be opened frequently. Otherwise circulation of the heat may be imbalanced and the results may change.
- Cake forms while cooking cake gives better result.
- MECHANIC TIMER KNOB (Optional): In order to operate the oven, timer switch should be adjusted to desired time.
COOKING TABLE
| Meals | Rack position | Cooking time (min.) |
| Creamed cake | 2 | 30 - 35 |
| Pastry | 2 | 35 - 45 |
| Biscuit | 3 | 20 - 25 |
| Cooky | 3 | 20 - 35 |
| Cake | 2 | 25 - 35 |
| Braided cooky | 2 | 30 - 40 |
| File pastry | 2 | 35 - 45 |
| Savory pastry | 2 | 20 - 30 |
| Lamb meat | 3 | 20 - 25 |
| Veal | 3 | 30 - 40 |
| Mutton | 3 | 30 - 40 |
| Chicken (in pieces) 3 | 30 - 40 | |
| Fish | 3 | 20 - 30 |
Note: The values in the Table are the results obtained in our laboratories. You can find flavours different and suitable to your taste by experience. 5 - 10 min. preliminary heating should be done prior cooking.
USING THE GRILL DEFLECTOR SHEET
- A safety panel is designed to protect control panel and the buttons when the oven is in Grill mode (Figure 1)
- Please use this safety panel in order to avoid the heat to damage control panel and the buttons when the oven is Grill mode.
WARNING: Accessible parts may be hot when the grill in use. Young children should be kept away. 3. Place the safety panel under control panel by opening the oven front cover plates (Figure 2).
- And then secure the safety panel in between oven and front cover by gently closing the cover. (Figure 3)
- It is important for cooking to keep the cover open in specified distance when cooking in grill mode.
- Safety panel will provide an ideal cooking circumstance while protecting control panel and buttons.
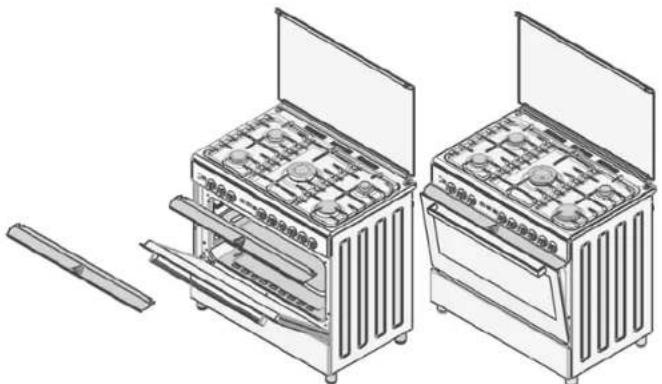
If the cooker has the "CLOSED GRILL FUNCTIONED" option with thermostat, you can keep the oven door closed during operation; in this case the grill defector sheet will be unnecessary.
Figure 1 Figure 2 Figure 3
MAINTENANCE and CLEANING
- Disconnect the plug supplying electricity for the oven from the socket and cutoff the gas by closing the gas valve.
- Never clean the interior part. panel, lid, trays and all other parts of the oven by the tools like hard brush, cleaning mesh or knife. Do not use abrasive, scratching agents and detergents.
- After cleaning the interior parts of the oven with a soapy cloth, rinse it and then dry thoroughly with a soft cloth.
- Clean the glass surfaces with special glass cleaning agents.
- Wash the heads of the burners sometimes with soapy water and clean the gas ducts by means of a brush.
- Never use inflammable agents like acid, thinner and gasoline when cleaning your oven.
- Do not clean your oven with steam cleaners.
- Don't wash any part of your oven in dishwasher.
- In order to clean the front glass lid of the oven; remove the fixing washers fixing the inner glass by means of a screwdriver, clean and rinse it thoroughly. After drying, place the gasket properly and re-install the glass.
- While oven is operating or shortly after it starts operating, it is extremely hot. You must avoid touching heating elements.
- Before opening the upper lid of the oven, clean spilled liquid off the lid. Also, before closing the lid, ensure that the cooker table is cooled enough.
- Please check main gas valve.
- Gas hose is can be broken or bend
- Please check the connection of gas hose with oven.
- Please check noise of gas rate.
- Please check the gas valve, suitable or unsuitable for your oven.
- If you can not to solve the problem, to apply manufacturer-supplier services agent or similar qualified
persons.
- We are recommended per 2 year chance your ovens gas valve.
- Please check the plug of power supply cord has a well connection with wall socket or not.
- Please check the electric network.
- Please check the fuse.
- Please check power supply cord for any damage problems.

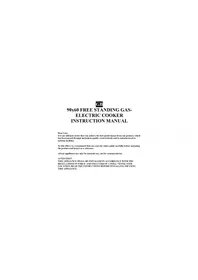
90x60 CUISINIERE A GAZ-
ELECTRIQUE
MANUEL D'INSTRUCTIONS
Cher client.
RECOMMANDATIONS IMPORTANTES
a a a a a a a a a a a a a a a a a a a a a a a a a a a a
| 24-28 |
| 22-26 |
| 18-22 |
| 12-18 |