Salon Expert LAS 100 - IPL hair remover BEURER - Free user manual and instructions
Find the device manual for free Salon Expert LAS 100 BEURER in PDF.
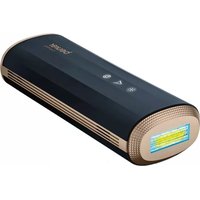
| Product Type | Intense Pulsed Light (IPL) epilator (laser diode) |
| Brand | Beurer |
| Model | Salon Expert LAS 100 |
| Laser Type | Class 1 diode laser |
| Wavelength | 810 nm |
| Output Fluence | 7–22 J/cm² |
| Energy Levels | 5 adjustable levels |
| Power Supply | Battery charger: input 100–240 V, 50/60 Hz; output 5 V DC, 3.0 A / 2.3 A |
| Battery Life | Approximately 600 flashes per full charge |
| Charging Time | Approximately 2 hours |
| Treatable Areas | Legs, arms, bikini line, underarms, feet, hands, chest, back, stomach, women's face (below cheek line) |
| Compatible Skin Types | White, ivory, beige, light brown (according to shade card) |
| Hair Colors Treated | Naturally dark brown or black (does not work on blonde, white, red, or gray hair) |
| Safety | Integrated skin sensor: unlocks device only if skin color is compatible; automatic lock |
| Display Functions | Flash counter, battery indicator, treatment level, lock and skin sensor indicator |
| Maintenance and Cleaning | Clean treatment window and skin sensor with a soft cloth moistened with water and mild soap; dry completely |
| Operating Conditions | Temperature: 5°C to 30°C; relative humidity: 15–85% (non-condensing) |
| Storage Conditions | Temperature: –20°C to 50°C; relative humidity: 0–93% (non-condensing) |
| Expected Lifespan | Maximum 3 years |
| Included Accessories | Battery charger, shade card, instruction manual |
Frequently Asked Questions - Salon Expert LAS 100 BEURER
User questions about Salon Expert LAS 100 BEURER
0 question about this device. Answer the ones you know or ask your own.
Ask a new question about this device
Download the instructions for your IPL hair remover in PDF format for free! Find your manual Salon Expert LAS 100 - BEURER and take your electronic device back in hand. On this page are published all the documents necessary for the use of your device. Salon Expert LAS 100 by BEURER.
USER MANUAL Salon Expert LAS 100 BEURER
Instructions for Use

NLPLDEITFRGB
ity.com

natural_image
Close-up of a hand with light green skin and pink lipstick, no visible text or symbols
bar
| Category | Value | |---|---| | Category 1 | 100 | | Category 2 | 100 | | Category 3 | 100 | | Category 4 | 100 | | Category 5 | 100 | | Category 6 | 100 | | Category 7 | 100 | | Category 8 | 100 | | Category 9 | 100 | | Category 10 | 100 | | Category 11 | 100 | | Category 12 | 100 | | Category 13 | 100 | | Category 14 | 100 | | Category 15 | 100 | | Category 16 | 100 | | Category 17 | 100 | | Category 18 | 100 | | Category 19 | 100 | | Category 20 | 100 | | Category 21 | 100 | | Category 22 | 100 | | Category 23 | 100 | | Category 24 | 100 | | Category 25 | 100 | | Category 26 | 100 | | Category 27 | 100 | | Category 28 | 100 | | Category 29 | 100 | | Category 30 | 100 | | Category 31 | 100 | | Category 32 | 100 | | Category 33 | 100 | | Category 34 | 100 | | Category 35 | 100 | | Category 36 | 100 | | Category 37 | 100 | | Category 38 | 100 | | Category 39 | 100 | | Category 40 | 100 | | Category 41 | 100 | | Category 42 | 100 | | Category 43 | 100 | | Category 44 | 100 | | Category 45 | 100 | | Category 46 | 100 | | Category 47 | 100 | | Category 48 | 100 | | Category 49 | 100 | | Category 50 | 100 | | Category 51 | 100 | | Category 52 | 100 | | Category 53 | 100 | | Category 54 | 100 | | Category 55 | 100 | | Category 56 | 100 | | Category 57 | 100 | | Category 58 | 100 | | Category 59 | 100 | | Category 60 | 100 | | Category 61 | 100 | | Category 62 | 100 | | Category 63 | 100 | | Category 64 | 100 | | Category 65 | 100 | | Category 66 | 100 | | Category 67 | 100 | | Category 68 | 100 | | Category 69 | 100 | | Category 70 | 100 | | Category 71 | 100 | | Category 72 | 100 | | Category 73 | 100 | | Category 74 | 100 | | Category 75 | 100 | | Category 76 | 100 | | Category 77 | 100 | | Category 78 | 100 | | Category 79 | 100 | | Category 80 | 100 | | Category 81 | 100 | | Category 82 | 100 | | Category 83 | 100 | | Category 84 | 100 | | Category 85 | 100 | | Category 86 | 100 | | Category 87 | 100 | | Category 88 | 100 | | Category 89 | 100 | | Category 90 | 100 | | Category 91 | 100 | | Category 92 | 100 | | Category 93 | 100 | | Category 94 | 100 | | Category 95 | 100 | | Category 96 | 100 | | Category 97 | 100 | | Category 98 | 100 | | Category 99 | 100 | | Total (Total) = [sum of bars] / [values] * (sum of bars + bars) * (sum of bars + bars) * (sum of bars + bars). The values in the table represent the sum of the bars and the corresponding sum of the bars. There is no additional data series or categories specified in the code.SKIN TONE CHART
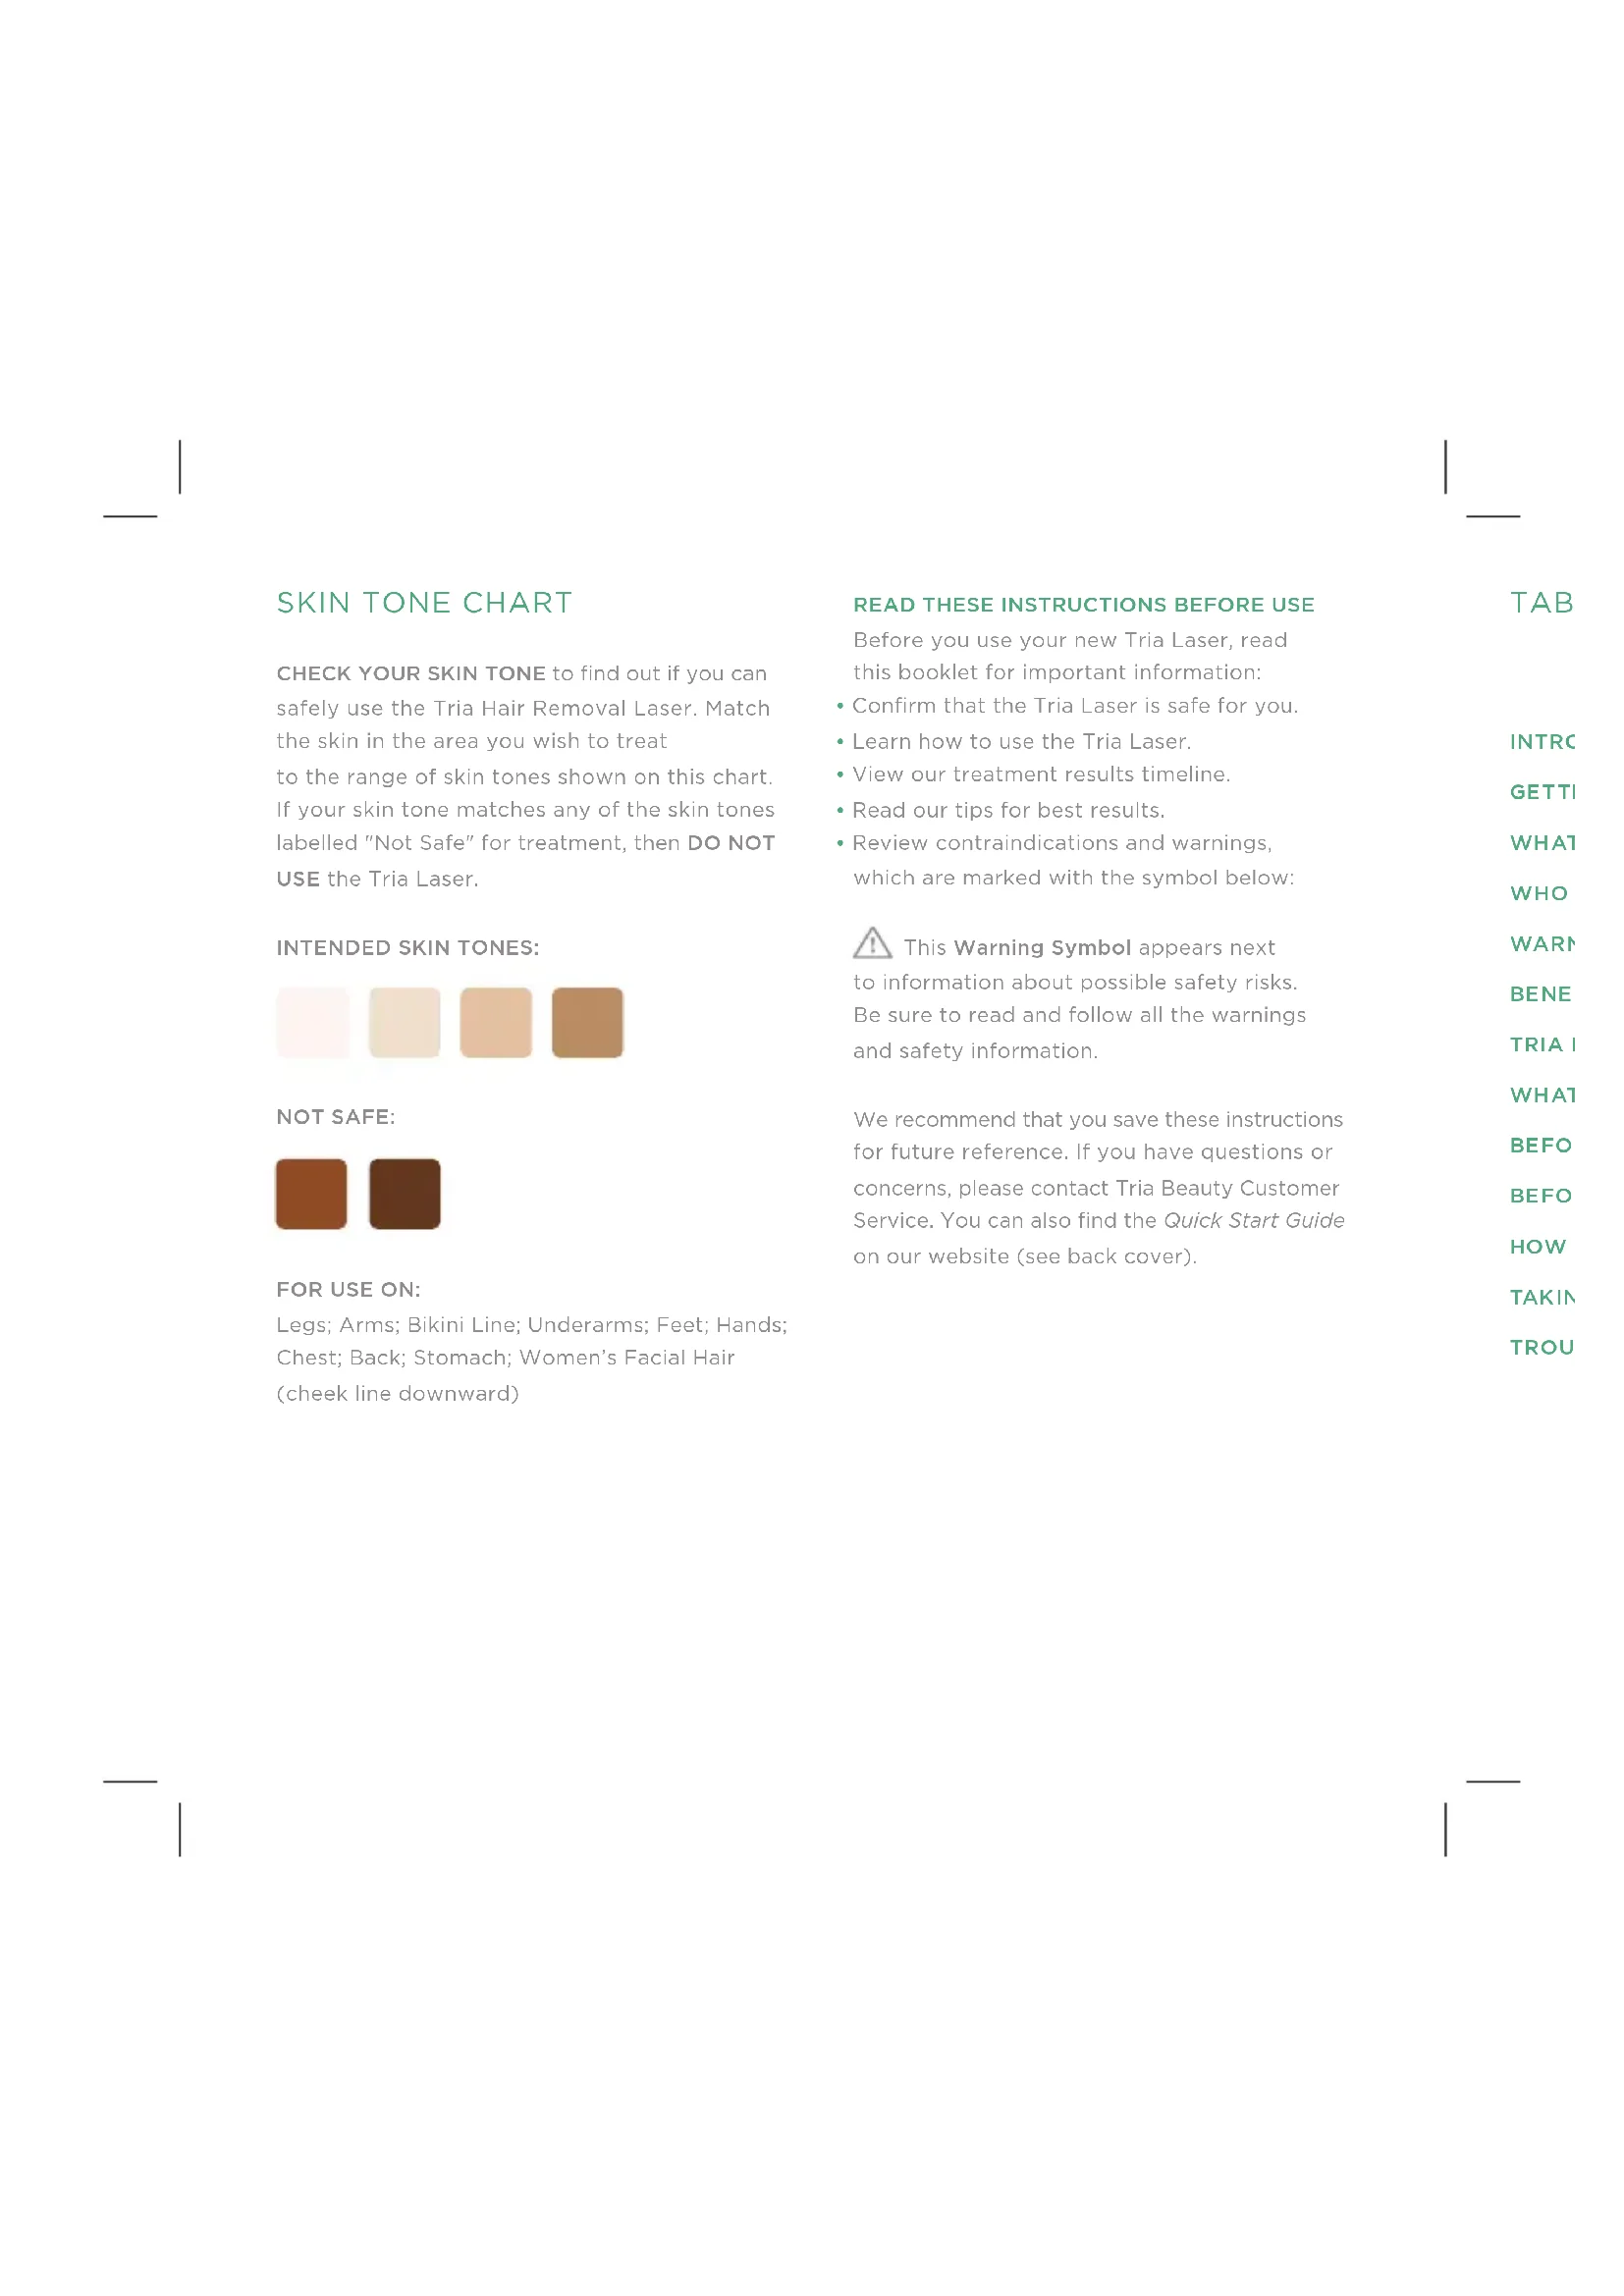
CHECK YOUR SKIN TONE to find out if you can safely use the Tria Hair Removal Laser. Match the skin in the area you wish to treat to the range of skin tones shown on this chart. If your skin tone matches any of the skin tones labelled "Not Safe" for treatment, then DO NOT USE the Tria Laser.
INTENDED SKIN TONES:

NOT SAFE:

FOR USE ON:
Legs; Arms; Bikini Line; Underarms; Feet; Hands; Chest; Back; Stomach; Women's Facial Hair (cheek line downward)
READ THESE INSTRUCTIONS BEFORE USE
Before you use your new Tria Laser, read this booklet for important information:
- Confirm that the Tria Laser is safe for you.
- Learn how to use the Tria Laser.
• View our treatment results timeline. - Read our tips for best results.
- Review contraindications and warnings, which are marked with the symbol below:

This Warning Symbol appears next information about possible safety risks. Sure to read and follow all the warnings of safety information.
We recommend that you save these instructions for future reference. If you have questions or concerns, please contact Tria Beauty Customer Service. You can also find the Quick Start Guide on our website (see back cover).
TABLE OF CONTENTS
INTRODUCTION 2
GETTING TO KNOW YOUR TRIA LASER 3.
WHAT THE TRIA LASER IS USED FOR (INDICATIONS) 5
WHO SHOULD NOT USE THE TRIA LASER (CONTRAINDICATIONS) 5
WARNINGS 5
BENEFITS AND RISKS 7
TRIA LASER TREATMENT OVERVIEW ...8
WHAT TO EXPECT 9.
BEFORE YOUR FIRST TREATMENT .9
BEFORE EVERY TREATMENT .10
HOW TO TREAT 12
TAKING CARE OF YOUR TRIA LASER 14
TROUBLESHOOTING 14
CONGRATULATIONS ON YOUR NEW TRIA LASER
The Tria Hair Removal Laser gives you permanent results at home, unlike temporary solutions such as shaving and waxing. The Tria Laser works in the same way as professional laser hair removal. It treats the hair follicle, not just the hair, giving you permanent hair reduction after a series of treatments.
LET'S GET STARTED!
INTRODUCTION
HOW DOES LASER HAIR REMOVAL WORK?
The Tria Laser deactivates the follicles in your skin that produce hair. It emits a pulse of laser light, which heats up the dark pigment inside the hair and deactivates the hair follicle. That's why it can deliver permanent results and works only on naturally brown or black hair.
To be most effective, the Tria Laser needs to treat each hair follicle during its active growth period. Hair grows in cycles, so multiple treatments are necessary. For best results, treat every two weeks for up to 3 months or until you are satisfied with the amount of hair reduction.
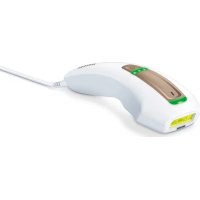
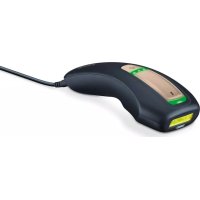
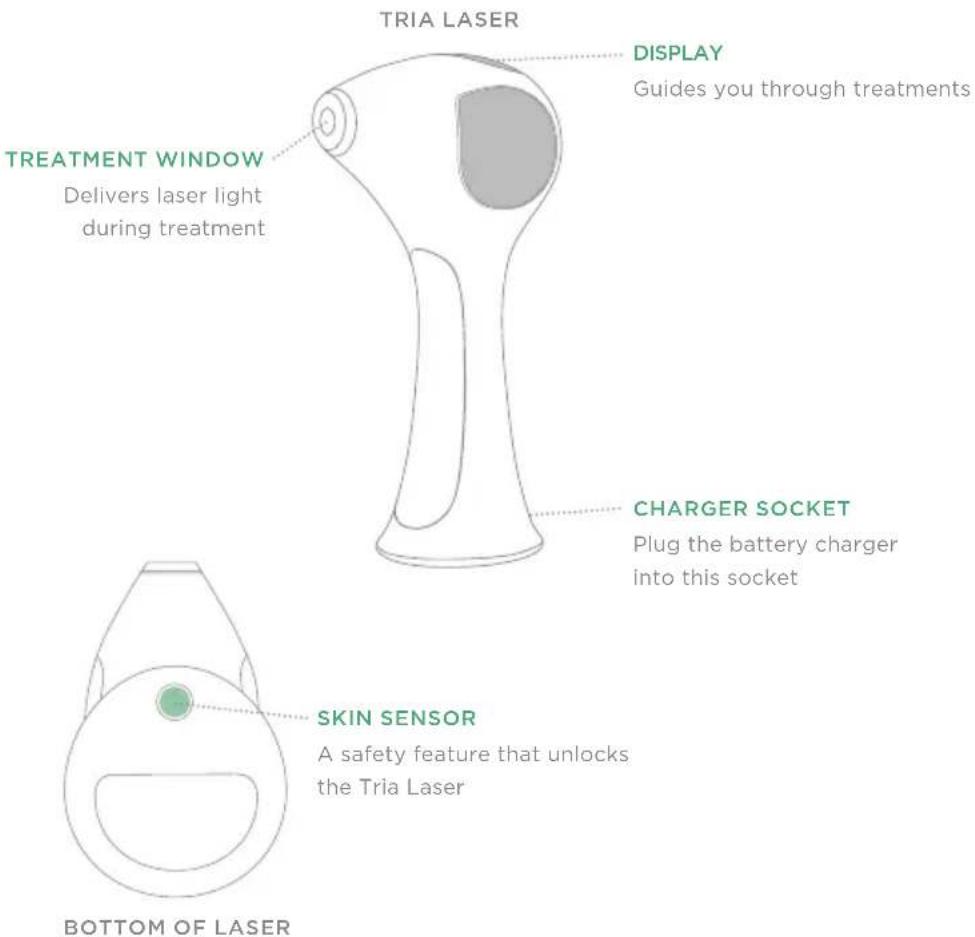
GETTING TO KNOW YOUR TRIA LASER
text_image
TRIA LASER DISPLAY Guides you through treatments TREATMENT WINDOW Delivers laser light during treatment CHARGER SOCKET Plug the battery charger into this socket SKIN SENSOR A safety feature that unlocks the Tria Laser BOTTOM OF LASERIs to treat period. nts are wo weeks ied with
eauty 32
text_image
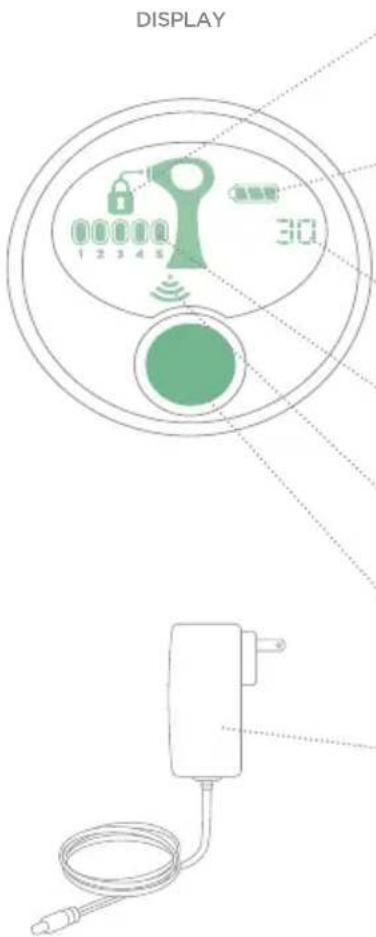
DISPLAY 1 2 3 4 5 30LOCK
The Tria Laser will lock when it is not in use.
Unlock it with the skin sensor.
BATTERY INDICATOR
This light indicates battery charge. It will blink when the battery is low and needs to be recharged.
PULSE COUNTER
Counts the number of pulses in a treatment session.
TREATMENT LEVEL
Your Tria Laser energy settings.
SKIN SENSOR INDICATOR
This light indicates that the skin sensor is ready for use.
POWER BUTTON
Adjusts the treatment level and turns the Tria Laser on and off.
BATTERY CHARGER
Charges the Tria Laser. The Tria Laser will not operate while plugged in.
WHAT THE TRIA LASER IS USED FOR (INDICATIONS)
The Tria Hair Removal Laser is used to remove unwanted hair. It is an over-the-counter system intended for adjunctive use with shaving for hair removal sustained with periodic treatments. It is also intended for permanent reduction in hair regrowth defined as long-term, stable reduction in the number of hairs regrowing when measured out to 6, 9 and 12 months after the completion of the treatment regime.
It is intended for use only on light to medium skin tones (see the Skin Tone Chart on the inside front cover) and naturally brown or black hair. It will not work on white, grey, blonde or red hair.
WHO SHOULD NOT USE THE TRIA LASER (CONTRAINDICATIONS)
DO NOT use the Tria Laser if your skin tone matches one listed as "Not Safe" on the Skin Tone Chart on the inside front cover of this booklet. If you use the Tria Laser on skin deemed "Not Safe" for treatment, the skin may absorb too much laser light and be injured (burned, discoloured or scarred).
PLEASE NOTE: The skin sensor is a safety feature that unlocks the Tria Laser. If it is not safe for you to use the Tria Laser, you won't be able to unlock it with the skin sensor.
DO NOT use the Tria Laser if you are under the age of 18 or use it on anyone else under the age of 18. The use of the Tria Laser on or by children has not been studied and could result in serious injury.
DO NOT use the Tria Laser if you have a lighter hair colour, such as blonde, white, red or grey. In order for the laser to work, you must have naturally dark hair where you are treating. Lighter hair pigments will not absorb enough of the laser's energy to disable the hair follicle.
WARNINGS
⚠️ DO NOT use the Tria Laser on or around the eyes, eyebrows or eyelashes. Doing so can cause permanent eye injury.
DO NOT use the Tria Laser if the Skin Tone Chart shows that your skin tone is not suitable. If you have African, Indian, Native American or Pacific Island heritage, you may have a skin tone that is not suitable—be sure to check the Skin Tone Chart. Darker skin tones can absorb too much laser light, which can injure the skin.
DO NOT use the Tria Laser anywhere on the ears, nipples, genitals or around the anus. These areas may have more sensitive skin, a darker skin tone, and/or a greater hair density, and using the Tria Laser there may cause serious skin injury.
DO NOT use the Tria Laser on parts of your skin that are darker than your usual skin tone: tattoos, dark brown or black spots (such as large freckles, birthmarks or moles) or skin that is red or swollen from a previous treatment. Dark skin may absorb too much laser light, which can injure the skin.
DO NOT use the Tria Laser on a man's face, jaw or neck. The hair in a man's beard area is too dense, and using the Tria Laser in these areas may result in skin injury.
Hair removal by laser can cause increased hair growth in some individuals. Based upon currently available data, the highest risk groups for this response are females of Mediterranean, Middle Eastern and South Asian heritage treated on the face and neck.
DO NOT use the Tria Laser on damaged skin, including open wounds, cold sores, sunburns or areas where you have had a skin peel or other skin resurfacing procedure within the last 6-8 weeks (check with your doctor). These conditions can make the skin more susceptible to injury.
⚠ DO NOT use the Tria Laser if you are pregnant or breast-feeding. The Tria Laser has not been tested on pregnant women. Hormonal changes could increase skin sensitivity and the risk of skin injury.
DO NOT use the Tria Laser if it appears damaged, and DO NOT attempt to open or repair the Tria Laser. These actions increase the risk of skin or eye injury. Please contact Customer Service for assistance.
Always follow the basic safety precautions for electrical devices: DO NOT get the Tria Laser or the charger damp or wet. DO NOT use the Tria Laser while bathing or put it next to a bath or sink. DO NOT operate a charger with a damaged plug or cord. ALWAYS keep the cord away from heated surfaces. Failure to follow these precautions can cause electrocution or electric shock.
⚠️ DO NOT use the Tria Laser for any purpose other than hair removal.
The Tria Laser is for personal use. The Tria Laser is not for use in a medical office, clinic, salon or other commercial setting.
DO NOT use the Tria Laser on any area where you may someday want your hair to grow back. The results may be permanent and irreversible.
Invisible Laser Radiation. Do Not View Directly with Optical Instruments. Class 1 Laser Product.
Viewing the laser output with certain optical instruments (for example eye loupes, magnifiers, and microscopes) within a distance of 100 mm may pose an eye hazard.
⚠️ No modification of this equipment is allowed.
This device uses RF energy only for its internal function. Therefore, its RF emissions are very low and are not likely to cause any interference in nearby electronic equipment.
BENEFITS AND RISKS
A medically supervised clinical study has shown that the Tria Laser is safe and works when used as directed.
Seventy-nine (79) users performed a 6-week course of treatment (3 treatments) and all side effects were observed. The number of hairs at each treatment site was counted before each treatment and at 1, 2, 3, 6 and 12 months after the last treatment. No additional treatments were performed after the third treatment.
BENEFITS
When used as directed, the Tria Laser gives you permanent results. The results vary from person-to-person and depend on which body area is treated and how closely treatment instructions are followed. The clinical study demonstrated the following benefits:
- 61% average reduction in hair count 3 weeks after the first treatment
- 70% average reduction in hair count 3 weeks after the second treatment
- 60% average reduction in hair count 1 month after the third treatment
• 33% average reduction in hair count 12 months following the third treatment In the study, 69 of 79 users (87%) reported finer hair at 1 month after the last treatment than before any treatment. And 55 of 79 users (70%) reported lighter hair at 1 month after the last treatment than before any treatment.
These results were obtained with only 3 treatments. For best results, treat every 2 weeks for 3 months or until you are satisfied with the amount of hair reduction.
RISKS
It is important to use the Tria Laser properly. Make sure that you understand and follow all warnings (see pages 5-7). The skin sensor will prevent use of the device on contraindicated skin types (see page 5).
If you use the Tria Laser as directed, the risks are low:
- In the clinical study, almost all users reported mild to moderate pain or discomfort during their first treatment, with a reduction in sensitivity reported in their later treatments. This is normal. You may feel warmth, burning, tingling or itching; some users described feeling the same level of discomfort as when a rubber band snaps against the skin. If the pain is too intense or persists after a treatment, stop using the Tria Laser and check with your doctor before using it again.
- Your skin may become red right after treatment or within 24 hours. This redness generally clears up within a few hours. See your doctor if the redness does not go away within 2-3 days.
- In rare cases, some users may see an increase in the number of hairs in the treated area after the initial treatment. If this increase persists over several treatments, stop using the Tria Laser and see your doctor.
The following symptoms affected no users in the clinical study (0 out of 88) but have been reported with other hair removal lasers:
- Skin swelling, especially around the hair follicle. If the swelling doesn't go away within 2-3 days, stop using the Tria Laser and see your doctor.
- Temporary or permanent skin discolouration. If your skin colour changes, stop using the Tria Laser and see your doctor.
- Blisters. This is very unlikely for people with a light or medium skin tone. If you do develop a blister, stop using the Tria Laser and don't let the blister become infected. Consult your doctor if needed.
TRIA LASER TREATMENT OVERVIEW
BEFORE YOUR FIRST TREATMENT
- 6 weeks before your treatment, stop waxing or plucking hair and do not get a skin peel.
- At least 1 day before treatment, perform a patch test on your skin (see page 10).
BEFORE EVERY TREATMENT
- Charge your Tria Laser (see page 9).
- Unplug it from the battery charger.
- Cleanse, shave and dry your skin (see page 10).
- Turn on the Tria Laser (see page 11).
- Unlock it with the skin sensor (see page 11).
- Set the treatment level (see page 11).
BETWEEN TREATMENTS
- Shave, but don't wax or pluck hair.
TREAT UNTIL YOU'RE DONE
- Be consistent and follow treatment instructions.
- For best results, treat every two weeks for up to 3 months or until you see the desired results.
• The setreatn users snapp prickli
- As the decrea For th treatment
- Some away'
- After : chang cause
-
With a gradu each t
• The ha lighter -
Hair fc Tria La
- Do oc if nece
WHAT TO EXPECT
WHILE USING THE TRIA LASER
- The sensation varies, depending on the person, treatment area and treatment level. Some users may feel the sensation of a rubber band snapping on the skin. Others will feel a warm, prickling sensation.
- As the amount of hair in the treated areas decreases, the sensation will also decrease. For this reason, you may be able to use a higher treatment level after your initial treatments.
- Some users experience mild redness that goes away within 24 hours.
DURING YOUR FIRST 3 MONTHS
OF TREATMENT
• After your first treatment, there will be no visible change to the hair. Laser hair removal does not cause hair to immediately fall out.
- With additional treatments, there will be a gradual reduction in the number of hairs with each treatment.
- The hair that does regrow will also begin to lighten and become finer.
AFTER 3 MONTHS OF TREATMENT
- Hair follicles that have been deactivated by the Tria Laser will not grow back.
- Do occasional touch-ups or additional treatments if necessary.
BEFORE YOUR FIRST TREATMENT
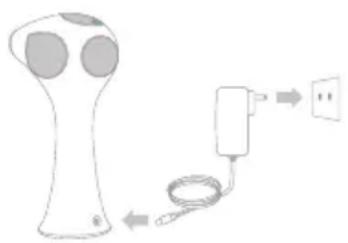
CHARGE THE TRIA LASER
Charge the Tria Laser for at least 2 hours before you use it or anytime the battery indicator is "empty" and blinking. If you are covering a large area or have the Tria Laser set to a high energy level, you may need to charge the Tria Laser in the middle of a treatment. This is normal.
natural_image
Diagram showing a device with a bulb and cable connected to an electrical outlet (no text or symbols present)TO CHARGE:
- Plug the battery charger into the Tria Laser charger socket and into a power outlet.
- The battery indicator will show it is "filling up" while the Tria Laser is charging.
- Once fully charged, the battery light will stay on and you may unplug the charger. The Tria Laser can remain plugged in for extended periods of time without damage.
NOTE: To prevent damage to your Tria Laser, use only the included Tria battery charger. If you lose the charger, please contact Customer Service.
NOTE: You may charge the laser in Quiet mode (charges without the sound of cooling fan), but it will take longer. To change charging modes, press and hold the power button while charging until you hear a tone.
TEST THE LASER ON A PATCH OF SKIN
Before your first full treatment on a new area of your body, we recommend you test the Tria Laser on a patch of skin there and try different energy levels.
- Prepare your skin and unlock the Tria Laser (see page 10). The Tria Laser will be set to Level 1 (low).
- Place the treatment window flat against your skin, and test one laser pulse.
- If Level 1 was tolerable for you, then move to another test area and increase to Level 2, testing a patch at that level with one laser pulse. To adjust the Tria Laser setting up or down, press the power button (see page 11).
- If Level 2 was tolerable for you, change test locations and increase by one level until you find
the highest setting that is still tolerable. Treating at the highest level possible will maximise results.
- Wait 24 hours and then examine the test areas. If the skin appears normal, start your first treatment at the highest level you are comfortable using.
Retest your skin if your skin tone changes dramatically (due to tanning).
⚠️ If you notice blistering, burns, changes in your skin tone or any other side effects, or if you are not sure about the outcome of the test, DO NOT USE your Tria Laser. Contact Customer Service or your doctor.
BEFORE EVERY TREATMENT
PREPARE YOUR SKIN
- Cleanse the treatment area, removing all cosmetics, lotions and creams that may block the laser light.
- Shave the treatment area. This removes the surface hair, which improves comfort and allows the light to better reach the hair in the follicle.
- Dry the treatment area.
ting
sults.
reas.
tment
ng.
in
f
test,
er
ck
3
llows
:le.
eauty 1110
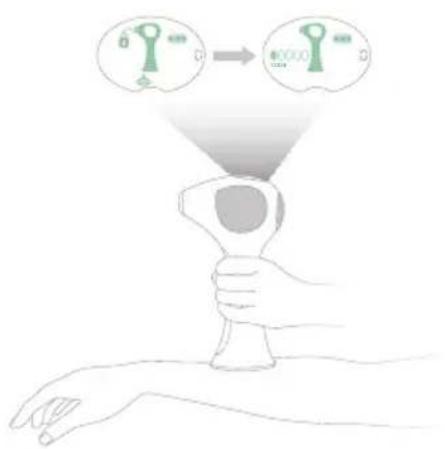
UNLOCK THE LASER
The Tria Laser will lock when it's not in use. To unlock the Tria Laser, use the skin sensor, which helps confirm that the Tria laser is safe for your skin tone. To unlock:
- Unplug the Tria Laser from the battery charger and press the power button to turn it on. The display will show the lock and skin sensor icons.
- Hold the skin sensor (red light at the base of the Tria Laser) against the skin in the area you wish to treat. The skin sensor will automatically sense and check your skin. If the Tria Laser is safe for your skin tone, the Tria Laser will emit a series of beeps and unlock.
- Hold the skin sensor (red light at the base of the Tria Laser) against the skin in the area you wish to treat. The skin sensor will automatically sense and check your skin. If the Tria Laser is safe for your skin tone, the Tria Laser will emit a series of beeps and unlock.
text_image
Diagram illustrating a hand holding a device with a key icon and a light source, showing a warning or alert mechanism.- If the lock icon is still visible and you do not hear a series of beeps, then it may not be safe for you to use the Tria Laser. Or, you may be using the skin sensor incorrectly and need to try again. To try again, lift the skin sensor from your skin and follow Steps 1 and 2 above. If you still cannot unlock the Tria Laser, please contact Customer Service for assistance.
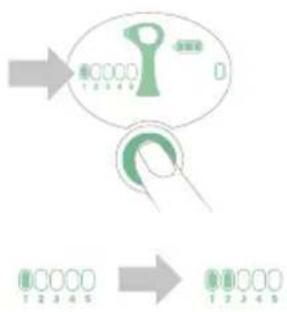
SET THE TREATMENT LEVEL
The Tria Laser has different energy levels. In a clinical study, higher levels were found to be 2-3 times more effective. So for best results, we recommend you use the highest setting that you can tolerate.
When the Tria Laser is on and unlocked, press the power button to select your desired level. Each time you press the power button, the level will increase. Once the Tria Laser is at the maximum level, pressing the power button again will return it to the lowest level.
text_image
Diagram illustrating a process with labeled steps and a green key icon, showing two sequential states of a process.HOW TO TREAT
- TURN ON THE LASER, UNLOCK IT AND SET THE TREATMENT LEVEL (SEE PAGE 11).
text_image
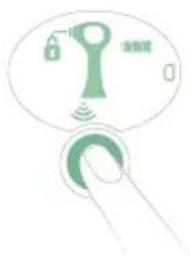
防雷阀-
TOUCH AND HOLD THE TREATMENT WINDOW TO THE SKIN UNTIL YOU HEAR TWO BEEPS.
-
If you do not hear beeps, make sure that the treatment window is flat against your skin. The laser will only pulse when the whole window is touching your skin.
• If you hear a buzzing tone instead of the second beep, you lifted the device from the skin before the pulse was over. - Do not move the treatment window between the first and second beep because this will disrupt the laser pulse and reduce its effectiveness.
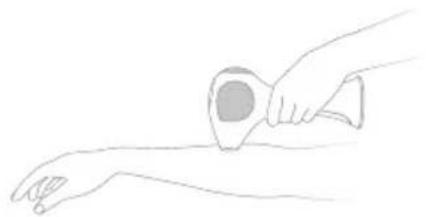
natural_image
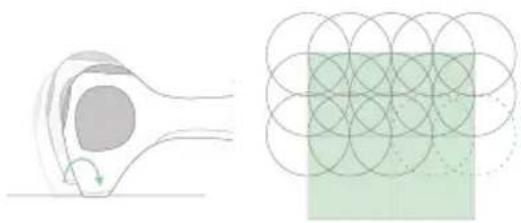
Line drawing of a hand holding a medical device on a patient's arm (no text or symbols)- LIFT THE LASER AND PLACE IT BACK ON THE SKIN SO THAT IT OVERLAPS THE PREVIOUS SPOT.
• Each time you reposition the treatment window, move it about half the distance of the window (about 1/4 inch or 5 mm). This creates an overlapping pattern in the treatment area, which ensures you cover all the hair follicles. This works out to about 25 laser pulses per square inch or 40 pulses per 10 square cm.
DO NOT treat repeatedly in the same spot. Always move the treatment window to a new area after each laser pulse. Failure to do so may result in discomfort or skin heating, which could cause skin injury.
natural_image
Diagram showing a cross-section of a biological structure with a circular region and a grid overlay (no text or symbols)4. KEEP GOING UNTIL YOU HAVE COMPLETELY COVERED THE AREA YOU WANT TO TREAT.
Use the Tria Laser Pulse Counter to help get the best results. See the table below as a guide to how many pulses you may need to cover each area per treatment. These pulse counts and times are approximations - your actual treatment area and number of pulses may vary. Always follow the treatment instructions and warnings provided in this booklet.
NOTE: When treating larger areas like legs and back, you may need more than 600 pulses to cover the area using an overlapping pattern. If so, please recharge the Tria Laser and continue treating until you've covered the desired treatment area.
PULSE COUNTER GUIDE
| BODY PART | APPROXIMATE # OF PULSES PER TREATMENT | APPROXIMATE MINUTES |
| Underarms 100 per side 4-5 per side | ||
| Bikini 200 per side 8-10 per side | ||
| Upper Lip 25 2-3 | ||
| Upper Leg 600 per side 25-30 per side | ||
| Lower Leg 600 per side 25-30 per side |
Pulse counts and times are approximations.
5. TURN OFF THE LASER BY HOLDING DOWN THE POWER BUTTON.
Repeat treatment every 2 weeks for up to 3 months or until you reach the desired results.
NOTE: The cooling fan may go on and off during your treatment. This is normal and nothing to worry about.
TAKING CARE OF YOUR TRIA LASER
The Tria Laser doesn't require special care, but we do recommend that you keep it clean, especially the treatment window and skin sensor.
CLEANING INSTRUCTIONS
- Make sure that the Tria Laser is turned off and unplug the battery charger from the Tria Laser and the power outlet.
- To clean the Tria Laser and battery charger, moisten a soft cloth with water and mild soap, and wipe the treatment window and the exterior of the device. Be careful not to damage the treatment window. Allow to dry completely before charging or turning on your Tria Laser.
- To clean the skin sensor located at the base of the Tria Laser. wipe it gently with a dry, lint-free cloth.
⚠️ DO NOT get the Tria Laser or battery charger damp or wet. If it gets wet, DO NOT use the Tria Laser or the battery charger. Contact Customer Service. Performing a treatment with a wet Tria Laser (or component) can cause electrocution or electric shock.
LONG-TERM STORAGE
If you do not plan on using your device for a long period of time, we recommend that you recharge the device every 3 months to maintain the life of the battery.
RECYCLING/DISPOSAL
The Tria Laser contains lithium batteries that cannot be replaced. To recycle or dispose, please follow the regulations where you live or contact Customer Service for information.
TROUBLESHOOTING
Please contact Customer Service for additional help.
| YOUR QUESTION IT'S POSSIBLE THAT HOW TO TROUBLESHOOT | ||
| My Tria Laser won't turn on. | Your Tria Laser is not charged. | Charge your Tria Laser.(see page 9) |
| While I'm charging my Tria Laser, the battery indicator on the display doesn't "fill up." | Your Tria Laser is not connected properly. | Confirm that your Tria Laser is firmly plugged into the charger and the wall outlet. |
| Your Tria Laser is already fully charged and ready to use. | Unplug the battery charger from the wall and from the Tria Laser. | |
| Even after I charge my Tria Laser, the battery indicator is still "filling up." | Your Tria Laser isn't fully charged. | Charge your Tria Laser. (see page 9) |
| When I put my Tria Laser against my skin, nothing happens. | Your Tria Laser is locked. | The Tria Laser will lock when it's not in use. Unlock your Tria Laser with the skin sensor. (see page 11) |
| When I put my Laser against my skin, nothing happens. | Your Tria Laser is plugged into the battery charger. | Your Tria Laser will not work when it is plugged in to the battery charger. Unplug your Tria Laser. |
| The treatment window isn't completely in contact with your skin. | Confirm that the treatment window is completely flat against your skin. | |
| YOUR QUESTION IT'S POSSIBLE | THAT HOW TO TROUBLESHOOT | |
| When I put my Laser against my skin, nothing happens. | The area you're trying to treat is too small, curved or bony to treat. | Try again, pulling the skin flat. If you can't get the whole treatment window to touch the treatment area, then the Tria Laser won't work. |
| I can't use my Tria Laser and an image of a lock shows on the display. | Your Tria Laser is locked. | The Tria Laser will lock when it's not in use. Unlock your Tria Laser with the skin sensor. (see page 11) |
| The display is flashing quickly. | Your Tria Laser is not working properly. | Please contact Customer Service for assistance. |
| Dirt or debris is stuck to the treatment window. | Your Tria Laser needs to be cleaned. | See cleaning instructions on page 14. If you can't get the area clean, contact Customer Service for assistance. |
| I tried to unlock the Tria Laser, but it's still locked. | It may not be safe for you to use the Tria Laser. | Match your skin tone to the Skin Tone Chart on the inside cover of this booklet, and contact Customer Service with any questions. |
| You didn't use the skin sensor correctly. | Try again, holding the skin sensor flat and firm against your skin. (see page 11) | |
| YOUR QUESTION IT'S POSSIBLE THAT HOW TO TROUBLESHOOT | ||
| When I reposition the Tria Laser, it seems to take a long time before the next pulse of laser light. | The room is warm.The Tria Laser may pulse at a slower rate in a warm environment. | Use the Tria Laser in a cooler environment. |
| My Tria Laser was working properly, but then it stopped working. The display is off and does not turn on even when I press the power button. | The battery needs to be charged. | Charge your Tria Laser.(see page 9) |
| When I'm using my Tria Laser, I can hear a fan working. | This is normal. Continue your treatment. | |
TECHNICAL SPECIFICATIONS
LASER TYPE: Diode laser
BATTERY CHARGER INPUT:
100-240 V - , 50/60Hz, 37 VA
LASER CLASS: 1
OUTPUT WAVELENGTH: 810 nm
BATTERY CHARGER OUTPUT:
5.0 V DC, 3.0 A/2.3 A
OUTPUT FLUENCE: 7-22 J/cm²
EXPECTED SERVICE LIFE: 3 Years minimum
PHYSICAL
PHYSICAL OPERATING TEMPERATURE:
5°C to 30°C
OPERATING RELATIVE HUMIDITY:
Non-condensing 15-85%
OPERATING ATMOSPHERIC PRESSURE:
700 hPa to 1060 hPa
TRANSPORT AND
STORAGE TEMPERATURES:
-20°C to 50°C
TRANSPORT RELATIVE HUMIDITY:
Non-condensing 0-93%
SYMBOL GLOSSARY

Warning Symbol

Laser Warning Symbol

WEEE Symbol

Type BF Symbol

Serial Number Symbol

CE Mark

Date of Manufacture Symbol

Manufacturer Symbol

Temperature Limitation Symbol

Accompanying Documentation: be Consulted Symbol

ss II Equipment

Keep Dry
ÉPILATEUR LASER DE TRIA SALON EXPERT
natural_image
Diagram showing a device with two circular ports connected to a power outlet, with an arrow indicating direction (no text or symbols present)natural_image
Line drawing of a hand holding a circular object on a forearm (no text or symbols)natural_image
Diagram showing a cross-section of a bone structure and its corresponding circular pattern (no text or symbols)4. CONTINUEZ LE TRAITEMENT JUSQU'À LA COUVERTURE COMPLÈTE DE LA ZONE QUE VOUS SOUHAITEZ TRAITER
natural_image
Diagram showing a device with a bulb and cable connected to an electrical outlet (no text or symbols present)PER CARICARE:
text_image
Diagram illustrating a hand holding a device with a key icon and a light source, showing a warning symbol.natural_image
Line drawing of a hand holding a circular object over a forearm, with no text or symbols present.3. SOLLEVA IL LASER E RIMETTILO SULLA PELLE IN MODO DA SOVRAPPORLO AL PUNTO PRECEDENTE.
natural_image
Diagram showing a cross-section of a biological structure with a magnified view of its layered structure (no text or labels)4. CONTINUA FINO A COPRIRE COMPLETAMENTE LA ZONA CHE DESIDERI TRATTARE.
FLUENZA IN USCITA: 7-22 J/cm²
5.0 V CC 3,0 A/2,3 A
natural_image
Diagram of a handheld device connected to a power outlet via cable (no text or symbols)AUFLADEN:
text_image
Diagram illustrating a hand holding a device with two labeled components and a light source, showing a warning or alert message.natural_image
Illustration of a finger pressing a button with a key icon and Wi-Fi signal, no text or symbols present.natural_image
Line drawing of a hand holding a medical device on a forearm (no text or symbols)3. HEBEN SIE DEN LASER AN UND PLATZIEREN SIE IHN WIEDER AUF DER HAUT, SO DASS ER DIE VORHERIGE STELLE ÜBERLAPPT
natural_image
Diagram showing a cross-section of a bone structure with internal organs and a corresponding magnified view of a green square (no text or labels)5,0 V DC, 3,0 A/2,3 A
natural_image
Diagram of a handheld device connected to an electrical outlet, showing cable and power connection (no text or symbols)text_image
Illustration showing a hand holding a trophy with two green keys above, one labeled '0' and the other '1246', illustrating a visual cue or notification.text_image
Diagram showing a hand holding a green key with numeric labels and a circular button, illustrating a step-by-step process.SPOSÓB DEPILOWANIA
natural_image
Illustration of a finger pressing a button with a key icon and Wi-Fi signal, no text or symbols present.natural_image
Line drawing of a hand holding a medical device on a forearm (no text or symbols)- ODSUŃ LASER I PRZYŁÓŻ PONOWNIE DO SKÓRY TAK, ABY ZACHODZIŁ NA POPRZEDNIE MIEJSCE
natural_image
Diagram showing a neuron with internal structure and its corresponding neural network diagram (no text or labels)4. KONTYNUUJ DEPILACJE NA CAŁYM OBSZARZE, KTÓRY CHCESZ DEPILOWAĆ
VEILIGHEIDSWAARSCHUWINGEN 114
PLUSPUNTEN EN RISICO'S 116
TRIA LASER BEHANDELINGSOVERZICHT 118
HOE GAAT LASERONTHARING IN ZIJN WERK?
VEILIGHEIDSWAARSCHUWINGEN
natural_image
Diagram showing a device with two circular components connected to a power outlet, with an attached cable and plug (no text or symbols)text_image
Diagram illustrating a medical procedure with labeled components and directional arrows indicating process flownatural_image
Line drawing of a hand holding a medical device on a forearm (no text or symbols)natural_image
Diagram showing a neuron with internal structure and its corresponding circular grid pattern (no text or symbols)4. GA DOOR TOT U DE HELE PLEK DIE U WILT BEHANDELEN, GEHAD HEBT.
5.0 V DC, 3.0 A/2.3 A
VERMOGEN FLUENTIE: 7-22 J/cm²