
Multiquick 3 MQ 3035 Sauce - Blender BRAUN - Free user manual and instructions
Find the device manual for free Multiquick 3 MQ 3035 Sauce BRAUN in PDF.
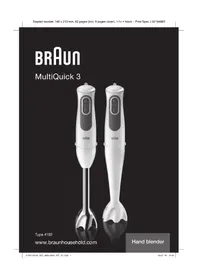

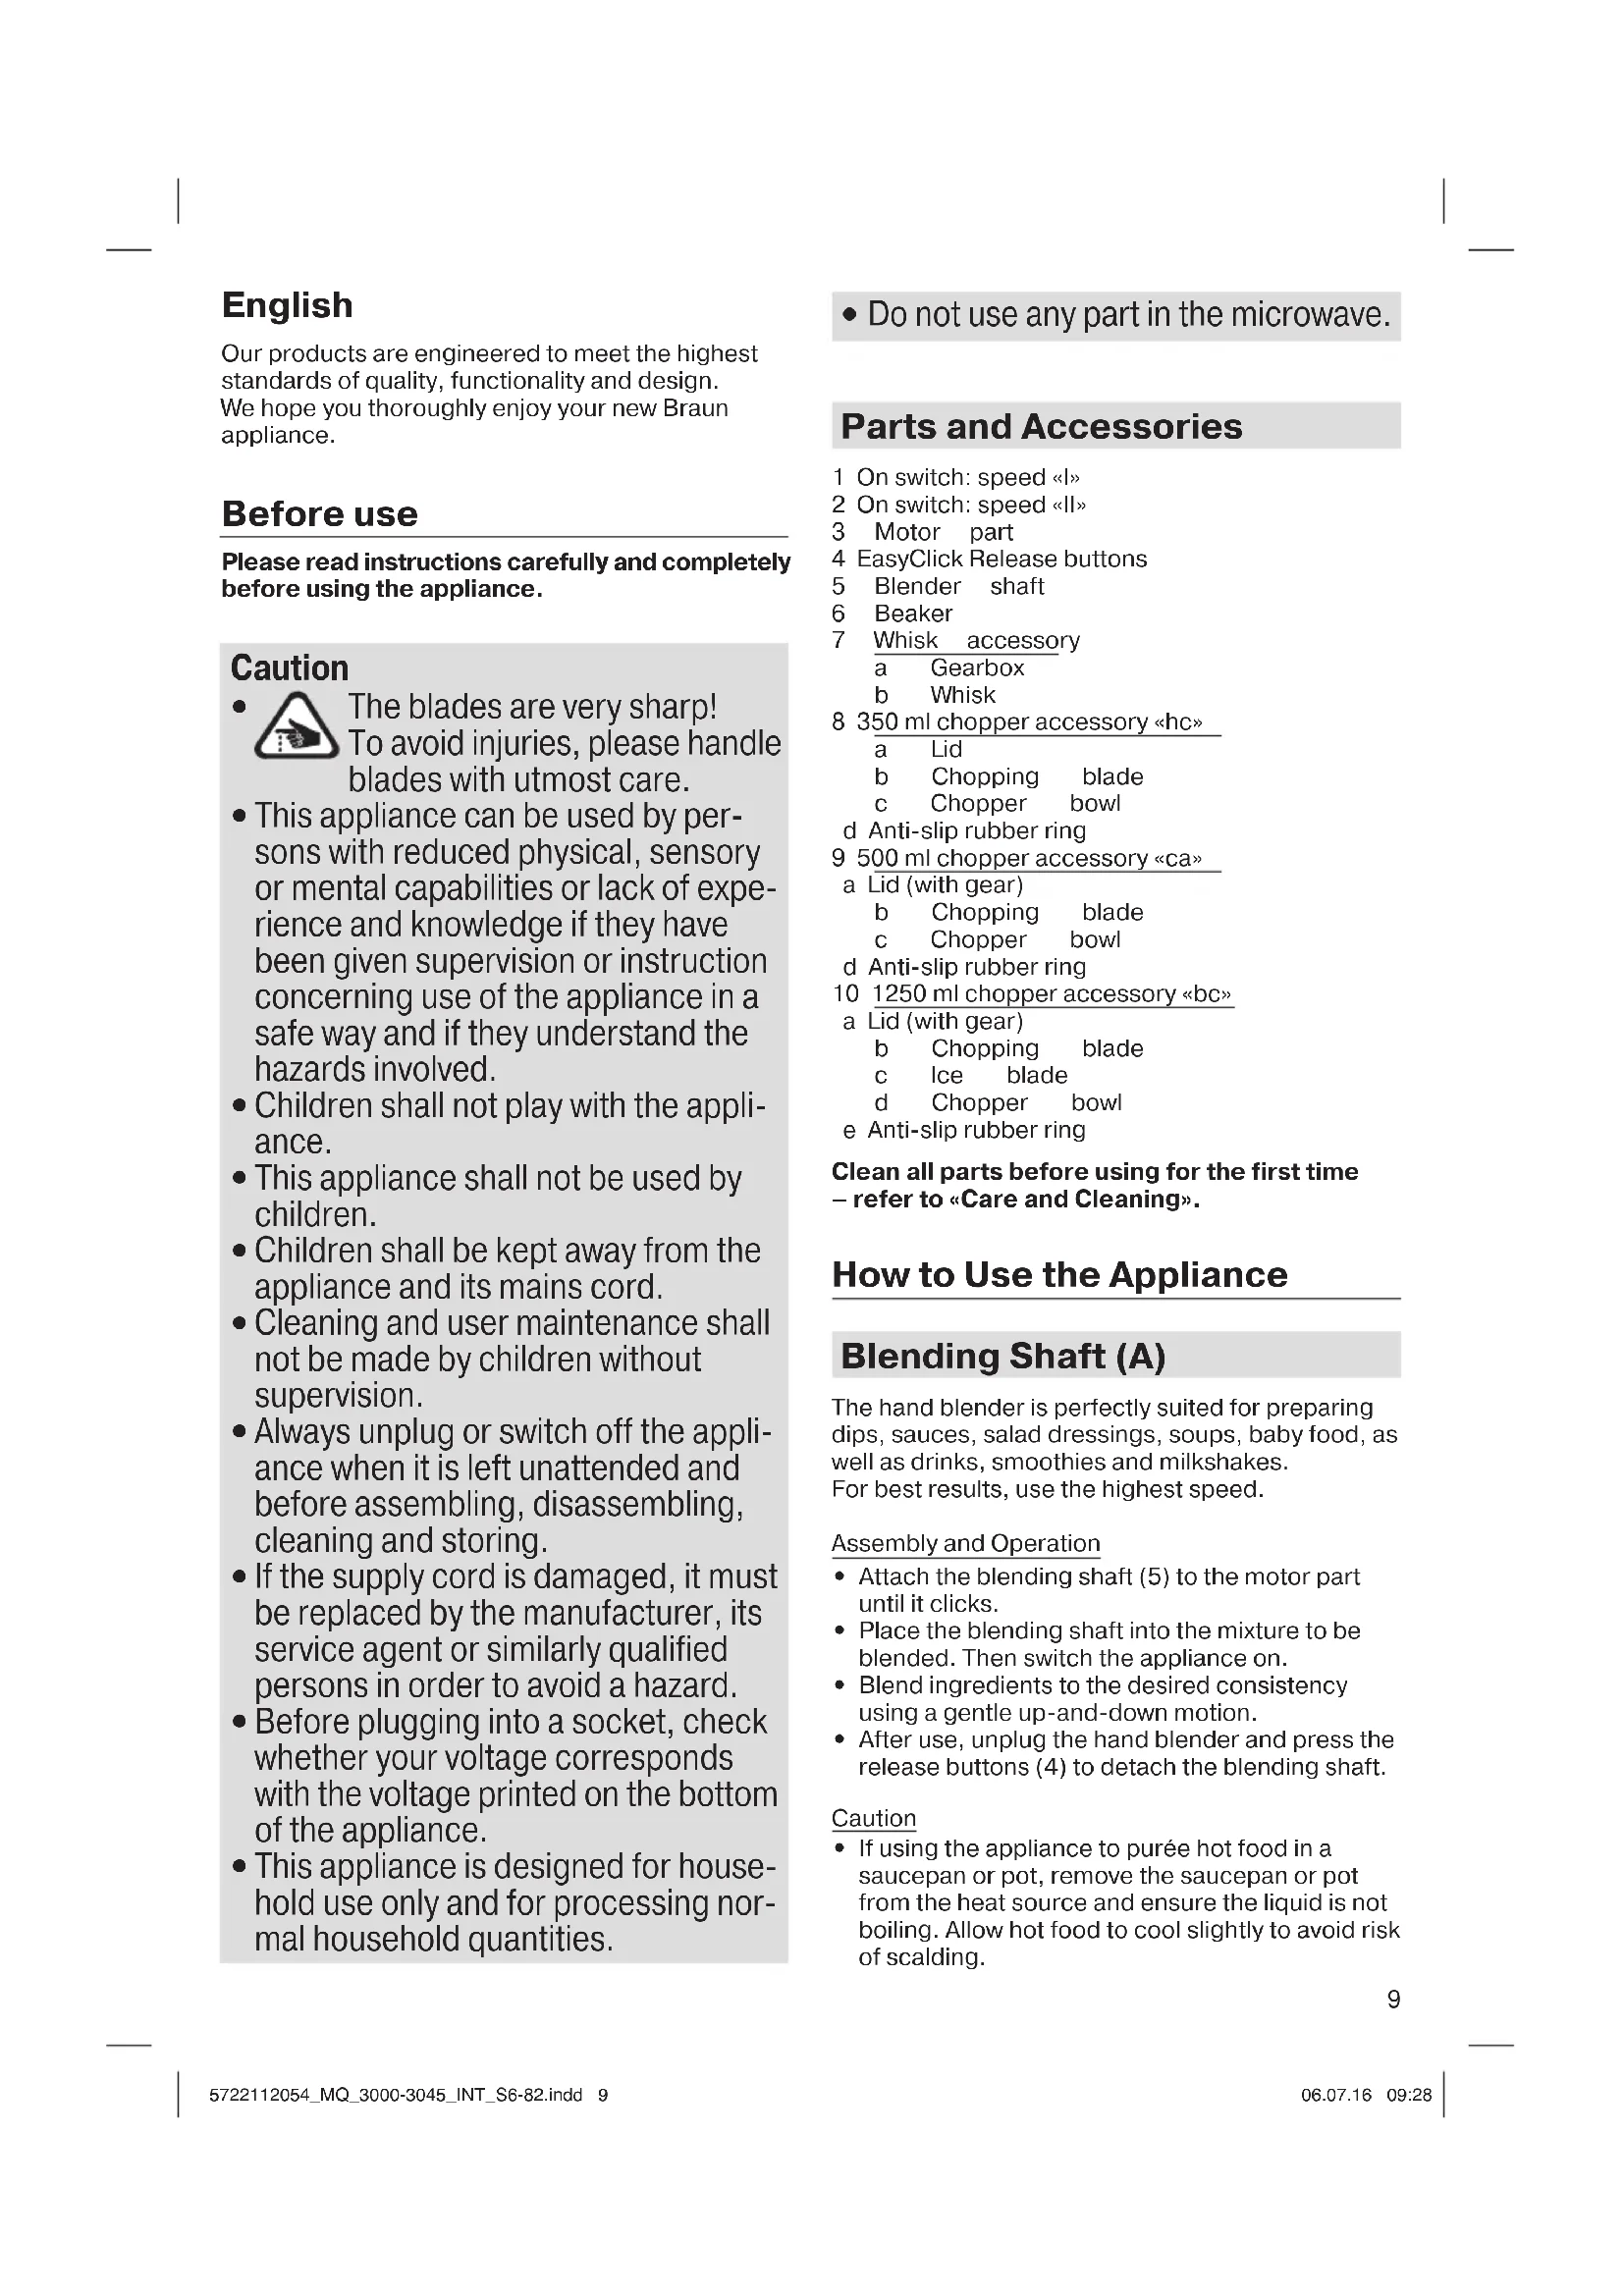


| Product type | Immersion blender with accessories |
| Brand | Braun |
| Model | Multiquick 3 MQ 3035 Sauce |
| Speeds | 2 speeds (I and II) |
| Included accessories | Blending foot, whisk, 350 ml chopper (hc), 500 ml chopper (ac), 1250 ml chopper (bc) with ice crusher |
| Functions | Blending, whisking, chopping, ice crushing |
| Safety | EasyClick locking, protected blades, easy release |
| Maintenance | Parts dishwasher safe except motor block and ac/bc chopper lids |
| Blade material | Stainless steel |
| Graduated beaker capacity | 600 ml (estimated) |
| Chopper hc capacity | 350 ml |
| Chopper ac capacity | 500 ml |
| Chopper bc capacity | 1250 ml |
| Use | Domestic |
| Power | Check voltage on appliance (motor block) |
| Repairability | Braun authorized after-sales service |
| Warranty | See provided warranty certificate |
Frequently Asked Questions - Multiquick 3 MQ 3035 Sauce BRAUN
User questions about Multiquick 3 MQ 3035 Sauce BRAUN
0 question about this device. Answer the ones you know or ask your own.
Ask a new question about this device
Download the instructions for your Blender in PDF format for free! Find your manual Multiquick 3 MQ 3035 Sauce - BRAUN and take your electronic device back in hand. On this page are published all the documents necessary for the use of your device. Multiquick 3 MQ 3035 Sauce by BRAUN.
USER MANUAL Multiquick 3 MQ 3035 Sauce BRAUN
*certain models only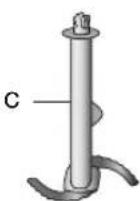
A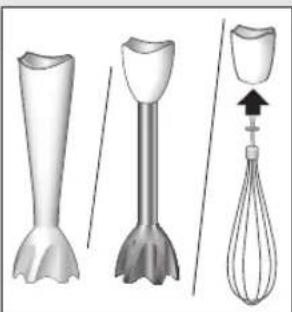
B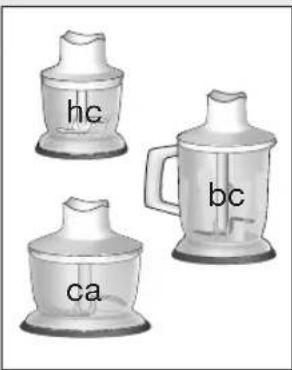
Deutsch
Our products are engineered to meet the highest standards of quality, functionality and design. We hope you thoroughly enjoy your new Braun appliance.
Before use
Please read instructions carefully and completely before using the appliance.
Caution

The blades are very sharp! To avoid injuries, please handle blades with utmost care. - This appliance can be used by persons with reduced physical, sensory or mental capabilities or lack of experience and knowledge if they have been given supervision or instruction concerning use of the appliance in a safe way and if they understand the hazards involved. Children shall not play with the appliance. - This appliance shall not be used by children. Children shall be kept away from the appliance and its mains cord. - Cleaning and user maintenance shall not be made by children without supervision. - Always unplug or switch off the appliance when it is left unattended and before assembling, disassembling, cleaning and storing. - If the supply cord is damaged, it must be replaced by the manufacturer, its service agent or similarly qualified persons in order to avoid a hazard. - Before plugging into a socket, check whether your voltage corresponds with the voltage printed on the bottom of the appliance. - This appliance is designed for household use only and for processing normal household quantities.
- Do not use any part in the microwave.
Parts and Accessories
1 On switch: speed «I» 2 On switch: speed «II» 3 Motor part 4 EasyClick Release buttons 5 Blender shaft 6 Beaker 7 Whisk accessory
Gearbox
b Whisk
8 350 ml chopper accessory «hc»
a Lid b Chopping blade c Chopper
d Anti-slip rubber ring
9 500 ml chopper accessory «ca»
a Lid (with gear)
b Chopping c Chopper
blade
bowl
d Anti-slip rub
10 1250 ml chopper accessory «bc»
a Lid (with gear)
b Chopping c Ice bl d Chopper
blade
bowl
e Anti-slip rubber ring
Clean all parts before using for the first time - refer to «Care and Cleaning».
How to Use the Appliance
Blending Shaft (A)
The hand blender is perfectly suited for preparing dips, sauces, salad dressings, soups, baby food, as well as drinks, smoothies and milkshakes.
For best results, use the highest speed.
Assembly and Operation
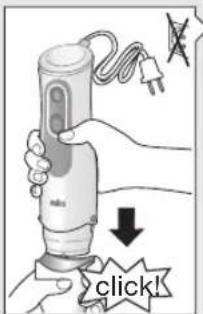
- Attach the blending shaft (5) to the motor part until it clicks.
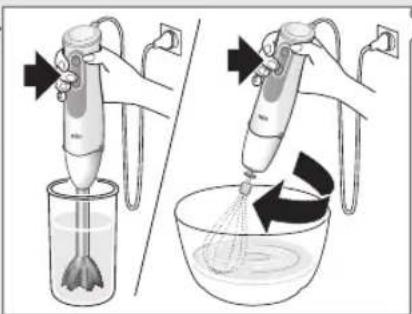
- Place the blending shaft into the mixture to be blended. Then switch the appliance on.
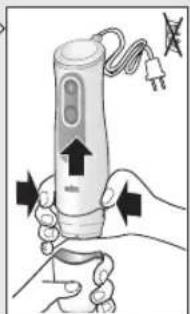
- Blend ingredients to the desired consistency using a gentle up-and-down motion. After use, unplug the hand blender and press the release buttons (4) to detach the blending shaft.
Caution
If using the appliance to purée hot food in a saucepan or pot, remove the saucepan or pot from the heat source and ensure the liquid is not boiling. Allow hot food to cool slightly to avoid risk of scalding.
- Do not let the hand blender sit in a hot pan on the cooktop when not in use.
Recipe Example: Mayonnaise
250 g oil (e.g. sunflower oil),
1 egg and 1 extra egg yolk
1-2 tbsp. vinegar
Salt and pepper to taste
- Place all ingredients (at room temperature) into the beaker in the order as above.
- Place the hand blender at the bottom of the beaker. Blend at maximum speed until the oil starts emulsifying.
- With the hand blender still running, slowly raise the shaft to the top of the mixture and back down to incorporate the rest of the oil. NOTE: Processing time: approx. 1 minute for salads and up to 2 minutes for a thicker mayonnaise (e.g. for dip).
Whisk Accessory (A)
Use the whisk only for whipping cream, beating egg whites, making sponge cakes and ready-mix desserts.
Assembly and Operation
- Attach the whisk (7b) to the gearbox (7a).
- Align the motor part with the assembled whisk attachment and push the pieces together until they click.
- After use, unplug and press the release buttons to detach the motor part. Then pull the whisk out of the gearbox.
Tips for Best Results
- Move the whisk clockwise while holding it at a slight incline.
- To prevent splattering, start with speed «I» and use the whisk attachment in deep containers or pans.
- Place the whisk in a bowl and only then switch the appliance on. Always ensure the whisk and mixing bowl are completely clean and free of fat before whisking egg whites. Only whip up to 4 egg whites.
Recipe Example: Whipped Cream
400 ml chilled cream (min. 30% fat content, 4 - 8 °C)
- Only use speed "I" to operate the whisk. Always use fresh chilled cream to achieve greater and more stable volume when whisking.
Chopper Accessory (B)
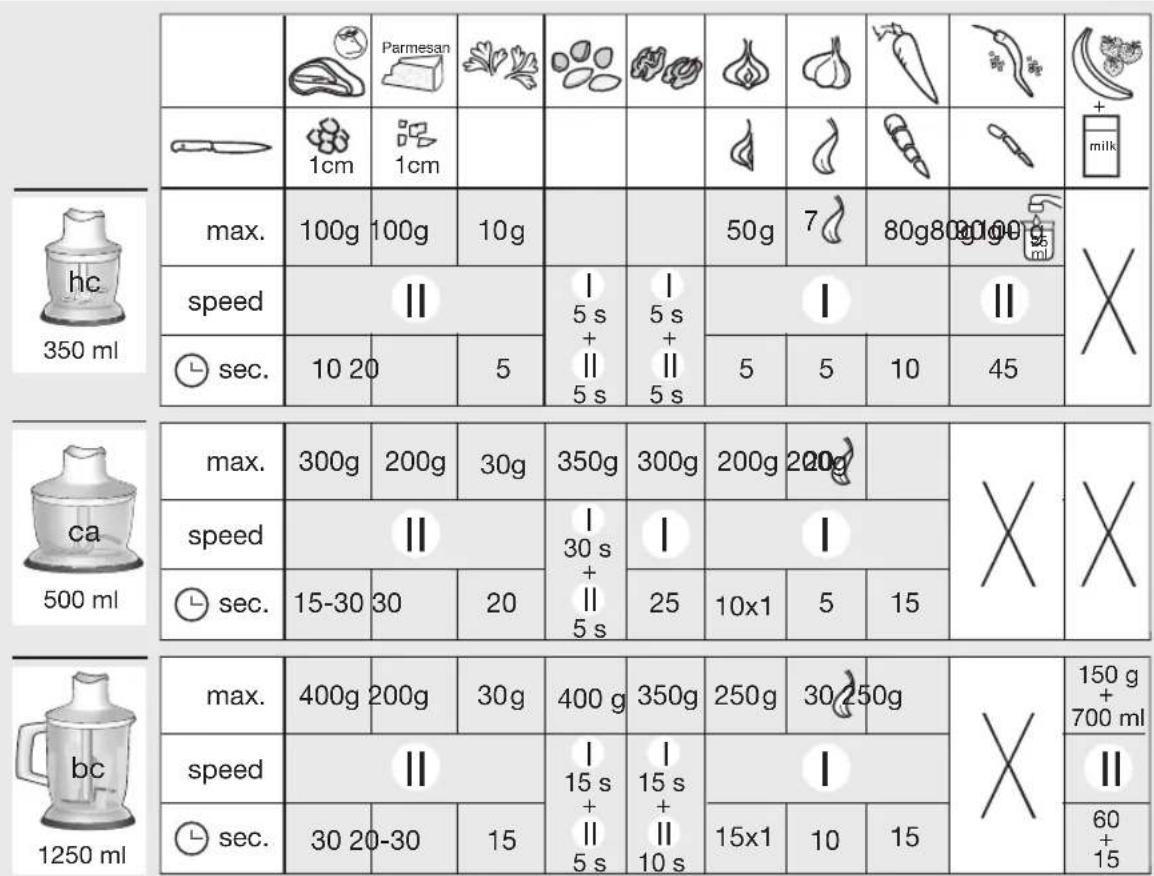
The choppers (8/9/10) are perfectly suited for chopping meat, hard cheese, onions, herbs, garlic, vegetables, bread, crackers and nuts.
Use the "hc" chopper (8) for fine results.
10
Use the "ca" (9) and "bc" chopper (10) for larger quantities and for hard foods.
Furthermore, the "bc" chopper offers a variety of other applications like shakes, drinks, purées, batter or crushed ice.
Refer to the Processing Guide B for maximum quantities, recommended times and speeds.
Maximum operation time for the "hc" chopper: 2 minutes for large amounts of wet ingredients, 30 seconds for dry or hard ingredients or amounts < 100 g. Immediately stop processing when motor speed decreases and/or strong vibrations occur.
Before Use
- Pre-cut foods into small pieces for easier chopping.
- Remove any bones, tendons and gristle from meat to help prevent damage to the blades.
- Make sure the anti-slip rubber ring (8d/9d/10e) is attached to the bottom of the chopper bowl.
Assembly and Operation
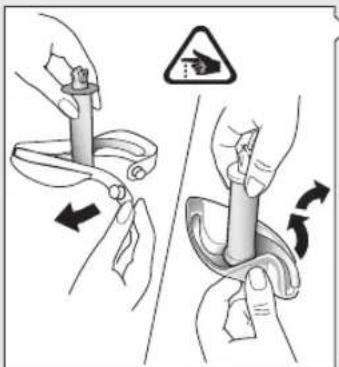
- Carefully remove the plastic cover from the blade.
- The blades (8b/9b/10b/10c) are very sharp! Always hold them by the upper plastic part and handle them carefully.
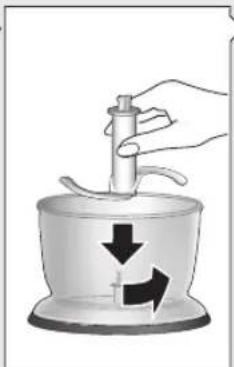
- Place the blade on the center pin of the chopper bowl (8c/9c/10d). Press it down and give it a turn so that it locks into place.
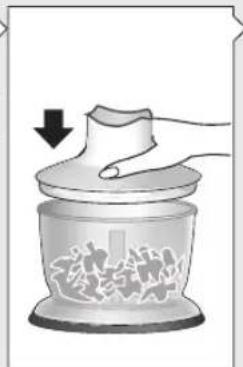
- Fill the chopper with food and put on the lid (8a/9a/10a).
- For ice crushing, fill up to 7 ice cubes into the chopper bowl (10d) and use the special ice blade (10c).
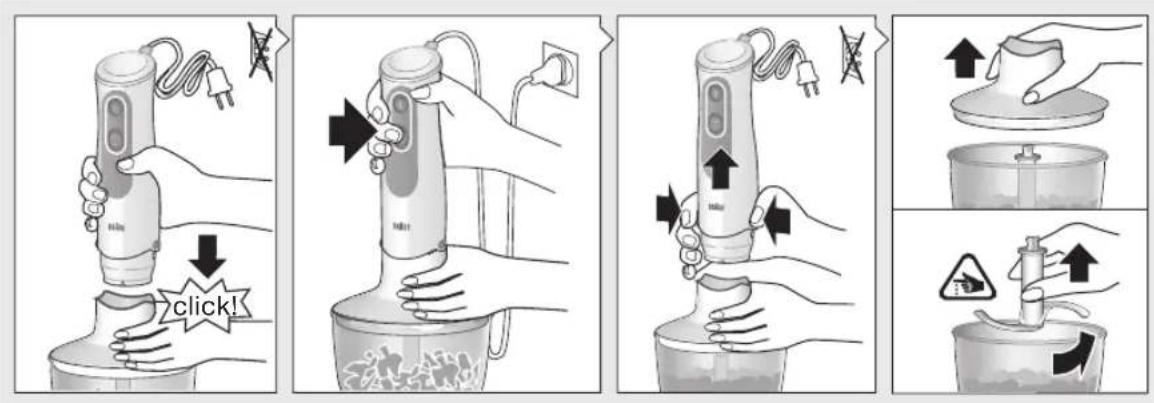
- Align the chopper with the motor part (3) and click together.
- To operate the chopper, switch on the appliance. During processing, hold the motor part with one hand and the chopper bowl with the other. Always chop harder foods (e.g. parmesan cheese) at full speed.
- When chopping is complete, unplug and press the release buttons (4) to detach the motor part.
- Lift the lid up. Carefully take out the blade before pouring out the contents of the bowl. To remove the blade, slightly turn it then pull it off.
Caution
- Do not use the chopper accessories (8/9/10) to process extremely hard foods, such as unshelled nuts, coffee beans, grains, or hard spices e.g. nutmeg. Processing these foods could damage the blades.
- Only the «bc» chopper accessory with the special ice blade is allowed to crush ice cubes.
- Never place the chopper bowl in the microwave oven.
«bc» Recipe Example: Pancake Batter
375 ml milk
250 g plain flour
2 eggs
- Pour milk into the bowl, then add flour and finally the eggs.
- Using speed II, mix the batter until smooth.
Recipe example: Honey-Prunes (as a pancake stuffing or spread):
50 g prunes
70 g creamy honey
10 ml water (vanilla-flavoured)
- Fill the chopper bowl with prunes and creamy honey.
- Chop 4 seconds at maximum speed
- Add 10 ml water (vanilla-flavoured).
- Resume chopping for another 1.5 seconds.
Care and Cleaning (C)
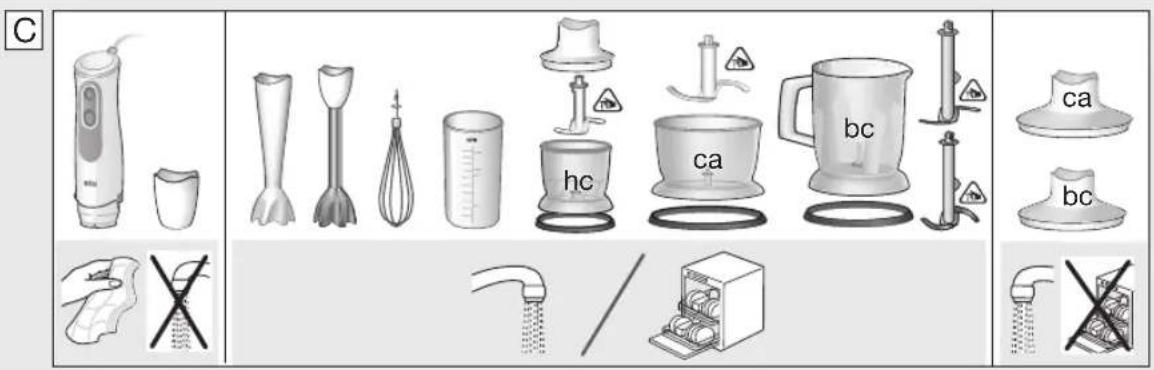
Always clean the hand blender thoroughly after use. - Unplug hand blender before cleaning. - Do not immerse the motor part (3) or gearbox (7a) in water or any other liquid. Clean with a damp cloth only. - The lid (9a/10a) can be rinsed under running water. Do not immerse in water, nor place in a dishwasher. - All other parts can be cleaned in a dishwasher. Do not use abrasive cleaners that could scratch the surface. - You may remove the anti-slip rubber rings from the bottom of the bowls for an extra thorough clean. - When processing foods with high pigment content (e.g. carrots), the accessories may become discolored. Wipe these parts with vegetable oil before cleaning them.
Both the design specifications and these user instructions are subject to change without notice.
Do not dispose of the product in household waste at the end of its useful life.

Materials and accessories coming into contact with food conform to EEC regulation 1935/2004.
For UK Only
Guarantee Information
All Braun Household products carry a minimum guarantee period of two years. The rights and benefits under this guarantee are additional to your statutory rights which are not affected.
Please keep your receipt as this will form the basis of your guarantee.
In the unlikely event of a breakdown you have access to professional help from our team simply by calling: 02392 392333
For service in the Republic of Ireland please call:
012475471
Braun Household undertakes within the specified period to repair or replace any part of the appliance, free of charge (with the exception of any glass or porcelain-ware incorporated in the product) found to be defective provided that;
We are promptly informed of the defect. - The product is used and maintained in accordance with the User Instructions. - The appliance has not been altered in any way or subjected to misuse or repair by a person other than an authorized service agent for Braun Household. - No rights are given under this guarantee to a person acquiring the appliance second hand or for commercial or communal use. - Any repaired or replaced appliance will be guaranteed on these terms for the unexpired portion of the guarantee. - The need for repair has not been caused by insufficient aftercare or cleaning: or damage caused by the chemical or electrochemical effects of water.
Under no circumstances shall the application of this guarantee give rise to the complete replacement of the appliance or entitle the consumer to damages.
Braun Household, New Lane, Havant, Hampshire PO9 2NH
www.braunhousehold.co.uk
Thank You for choosing Braun. We are confident that you will get excellent service from this product.
TO IMPROVE YOUR EXPERIENCE
Register now at www.braunhousehold.co.uk By registering we may send you from time to time details on exclusive offers, promotions, recipes and inside tips.
Anti-slip rubber ring
Anti-slip rubber ring
Tips for best results
10 ml water (vanilla-flavoured)
Fill the jug with milk for frothing. - Blend for 4 seconds at maximum speed. - Add 10 ml water (vanilla-flavoured). - Continue to froth for another 1.5 seconds.
Cleaning and maintenance (C)
Clean the blender after each use. - Before cleaning, unplug the appliance from the mains. Do not immerse the motor unit (3) or the power cord (7a) in water or any other liquid. Wipe only with a damp cloth. The jug (9a/10a) can be rinsed under running water. Do not immerse in water or place in the dishwasher. All other parts can be washed in the dishwasher. Do not use abrasive cleaning agents that could scratch the surface. You can remove the stubborn residue from the bottom of the jug with additional thorough cleaning. When processing food products with high pigment content (e.g., carrots), the jug may become discolored. Wipe these parts with vegetable oil before cleaning them.
The design specifications and the current user instructions are subject to change without prior notice.
Subject to change without prior notice.
Do not dispose of the product with household waste at the end of its service life. Disposal can be carried out at a Braun service center or at appropriate collection points provided in your country.

The materials and items intended for contact with food products comply with the provisions of European Regulation 1935/2004.

All safety requirements must be met in accordance with the standards. The device must be used carefully.
Safety precautions
Read all instructions carefully before using this device.
Expert

The device may become hot! To avoid burns, handle the device with care.
To avoid electric shock, do not open the device or touch its internal parts with wet hands. Do not allow children to play with the device. Do not let children use the device without supervision. Do not place the device where it can be exposed to water or moisture. Do not pull the plug from the socket by the cord. If the power cord is damaged, it must be replaced by the manufacturer, its service agent, or similarly qualified persons to avoid hazard. Before cleaning or maintenance, unplug the device from the power outlet.
- This device is intended for household use only and should not be used for commercial purposes. Do not immerse the device in water.
a Power cord
b Housing
c Control knob
d Base
e Rubber feet
Before cleaning, unplug the device and remove all accessories. See "Cleaning and Maintenance" section.
The device must be used correctly
Technical data (A)
To prepare salads, snacks, sauces, ketchup, baby food, soups, chemical compounds and liquid dishes, use the bowl. For more thorough mixing of thick ingredients, use the high-speed mode.
Operation and use
- Blender attachment (5) is intended for mixing liquids and pureeing soft foods.
- To use the blender attachment, insert it into the bowl. Then turn the knob to position I. Add ingredients and blend until smooth. After use, remove the attachment and rinse it under running water, or clean it with the cleaning brush (4).
Caution!
If the knob is set to position I or II while the bowl is empty, the motor may overheat and the safety cut-off may activate. To avoid this, always add ingredients before turning on the appliance. If the safety cut-off activates, unplug the appliance and let it cool down before using it again.
Recipe: Mayonnaise
250 g oil (vegetable or olive oil),
1 egg yolk and 1 teaspoon of mustard,
1-2 tablespoons of lemon juice,
Ingredients for the recipe
Place all ingredients (at room temperature) into the blender jar and add salt to taste. Insert the blender attachment into the jar. Start at low speed and gradually increase to high speed. Blend until the mixture thickens. Then remove the attachment, pour the mayonnaise into a container, and refrigerate for at least 1 hour before serving.
If the mixture is too thick: add 1 tablespoon of water for salads and 2 tablespoons for mayonnaise (with oil and egg yolk).
Accessories (A)
Accessories for the device: filter, pump, hoses, and other components are included in the delivery set.
Do not use the device
- Remove the protective cap (7b) from the boat (7a).
- Connect the motor housing to the protective cap using the screw, then insert the supplied hose into the opening. After connection, pull the hose to ensure it is secure, then tighten the screws on the motor housing. After that, remove the protective cap from the boat.
Spare parts and accessories
Before starting the device, check it for damage. - To start, press the switch and connect the device to the power supply. - Do not start the device without water, as this may damage the pump. The pump should be checked regularly for wear and tear. Replace the pump seals every 4 years.
Replacement: pump
400 ml of pump oil (use 30% mineral oil, 4-8°C)
- When connecting the device, use only the «I» switch.
- To prevent the pump from running dry, fill it with oil before use.
Troubleshooting (B)
Check the hoses (8/9/10) for kinks, bends, cracks, leaks, and blockages, and clean them if necessary.
For proper operation, use the «hc» hose (8).
For models with a higher flow rate, use the hoses (9/10) with a larger diameter.
OraH KocA 四 _ 口 TpyaybIbIKoKTeNbepdi, CcBihIaPdbI, NIOpeJIepDi, cyBikKaMbIPdbHEMeCe YHTaKTaJFaH My3DbI 33ipJeY CnRAKTBi KOCbIMwa MymKiHIDTEpDi yCbHaDbI.
Tamak MeIiepi, yaKbIT KHe XbJIaMdbIK KaJIbI KeheTepi B HycaylbIFHaH KapaHbI3. TypaybiuBH MaKcImaIbI KOJaHy YaKbITbI: MeIupei Ken bIaIbI INrpeDneHTTep ywiH 2 MNHT, aI Kypfak HeMece KaTbI INrpeDneHTTep ywiH HeMece < 100r MeIupei ywiH 30 cekyHd. Motop XblamdbfBi 6aaynaFaH Ke3e JeHe/ Hemece Tep6enic naJa 6oJFaH Ke3e eHJeY 6apbcih Depey TOkTaTbHbI3.
KoIdaHaap aIbHda
- OhaT pyaIy yuH TaFAMbI aIbIH-aIa YCaK TaI Tpyan aIbIHbI3. Kv3epiHe 3akbIM KeJImey ywiH eTTIH cyIeKTepiH, ciHiPiH XaHE WEmipWeKTepiH aIbIn TaCTaHbI3. CbipyfKaKapcbCaKnHa(8d/9d/10e)Typay TaabafHbIH TY6iHe 6ekitin TpyFaHbHa Ke3 XETkiHjI3.
Kypactbipy xHe kondaHy
Ky3diH nlaactNK Ka6bI a6aHn anaHbHb3. Ky3depi (8b/9b/10b, 10c) eTe eTKip! Onapbl epdaibm INaCTNKTeh XacaJFaH XOFapFbI 6eJIirHeH yCTaHb3. Ky3di typay tabakwacbHbIH (8c/9c/10d) optaIbIK,6inirHe opHaTbHbI3. TeMeH kapaBacbIn, opHbHa 6ekitinyuHbip pet 6ypaHbI3. - Typay bIDbICbIHa TaFaMdbI CaJIbIN, KaKNaFbIH Xa6bHb3 (8a/9a/10a). - My3blI YHTaKTAy UUINH MY3Fa apHaJIFaH apHaIbI KY3di (10c) KOJdaHbIHbI3 KHe Tpyay bIDCbHa (10d) 7My3 WApUbICbIHaH apTbIK, CaIMaHbI3. TpyabHn HmOTop 6eJIirH (3) KaTAP KOIbI, OIapDbI bipikTiPiH3. TypaybIHTbKoJaHyuHIN KypblfBhlKocbIHbI3. XyMbIC Ke3iHe MOTOP 6eNirih 6ip KOJIbHb36eH, an Typay bIDCbHe EkiHui KoJIbHb36eH yCTan TypblHb3. KaTbIay TaFamDapDbI (MbicaIbI, napMe3aH ipimwiri) apKaUah XOFapFbl XbldAmdbIKneH TypaHbI3. - Typan 601FaH COH, Kyat Ke3iHeH CybIPbIn, MOTOP 6eJIirH axbipaty yuIN bocaty tymeJepin (4) 6acblb3. KaKnaTbI KOFapbl KeTePiH3. bIDbcTb 6ocatnac 6ypbl, ky3di a6aIIan anbIN wblfblHb3. Ky3di anbln WbIFy yuiH OHbl cAe 6ypblHb3, cOdaH KeiH TaPTbl aBlHb3.
CaKaTaNDbipy
Ka6bIFbHaH Ta3apTbImMaFaH KaHaKTabp, My3 WapuBnapbl, KOFe dAnHepei, dHep Hemece Xynap KaHFaBc CnAeKbI KaTbI dAmDeyiwTePdi XaHE KaTbI TaFamApDbI eHdey yuHIn Typay Xa6bIKTapbIH (8/9/10) Typay Ky3epimeH KoJdaHbIs. AtaJFaH TaFamAp Ky3epre 3aKbIM KeTIpyi MymKiH. - Tek KaHa BC Tpyay Xa6bIfb MeH apHaBb My3 yHTaKtayFa apHaJIFaH Jy3di FaHa My3 ⅢapMbIapbIH YHTaKtay yUinh KOndaHya foJaIbI. Typay bIbICIH MKNPOTOIKbIHDbI neHTe KOJaHyFa 60MaJdbI.
peuertMbicaJIb:KyIMakKaMbIpbI
375 ml cytT
250 g eJenHReH yH
2xmybipyTka
Cytti bc bIbICbHa Kynblb3,coaHKein YHdbj XeHe XyMbIpTKanapbl KOcbHb3. KocnabHbI I|XbIaMdbIbIMeH 6ipKeJIki 6oJFaHa apaIaCTbIPbIHbI3.
Peuent Mbicalb: BaI KocblFaH epiK (KyIMak, caImacbl Hemece Tocan petiHde):
50g kappa epik
10 ml of water (warm)
- According to the instructions, add the required amount.
- Turn it on within 4 seconds.
10 ml of water (warm). Add it within 1.5 seconds.
Cleaning and maintenance (C)
- After using the comb, it must be cleaned thoroughly. When cleaning the comb, dry it carefully.
- Do not immerse the motor unit (3) or the connection cord (7a) in water or other liquids. Wipe with a damp cloth. The cap (9a/10a) can be removed and washed under running water. Do not immerse in water and do not place the device under running water. The accessories may be washed with water. Do not use any other cleaning agents.
- For thorough cleaning, the brushes at the bottom of the plates can be removed. When using the appliance (e.g., with steam), it is possible to remove the caps. These parts should be cleaned with a soft cloth.
The technical specifications are subject to change without prior notice.
When using the appliance, do not touch it with wet hands. You can contact the manufacturer's service center or the authorized service centers.

Disposal
To dispose of the appliance, refer to the local waste disposal regulations. The appliance should be disposed of separately from household waste. For example, you can take it to a local collection point. The appliance was manufactured after 1992 and is marked with the symbol shown. Example: 30421- the appliance was manufactured in April 2013.
EAC
Quick Multi 3 Tn 4192 220-240 V, 50-60 Hz, 700 W
PymbHnaJxKacanFaH yuH IeNoHn Bpayn XaycxOJIg FM6X FepMaHn 3aHbI eHdipyuii: IeNoHn Bpayn XaycxOJIg FM6X Kapn-Ynpnx-Itpaccce H 63263 HoN-N3eH6ypr
Kenii Kbi3MeT KepCety MEPiHne Hemece OdaH KeHH Kbi3MeT KepCety, COHdA-ak aKayIbIKapDbI aHbIKay Mecelenepi BoHHa Braun KOMnHaHcBih TTyBiHyuBilapFa Kbi3MeT KepCety KbI3MeTIHe 8 800 200 5262 TelefoHbI apKbIbI xa6apJaacBhl3.
BiybIMdbicke naaHny HcykaybIfbHa cKeec 3MaKcTaHda naDnAHy Kepe. BiybIMhIH Kbi3MeT Mep3iM TyTbHyUbifa CatbIFAH KyHHEN 6actan 2XblDbkypaNdbI.
Hmnpotep: "JeOnnAAK, Pecen, 127055, MocKa KaIacb,CuueBcKaeWeci, 27/3-yn (27-yi, 3-KypbblIM) TeJ. +7 (495) 781-26-76
AkaynbikTbI Ty3eTy
| Акayльк Себбі | Бшшim | |
| Кол бlenдері куmbісістемій Тур. | Куат кok | Курсынfyын.TOKka Косьлfaын Tekсеріи3. Уйderi сakтадырfyышту/ Кыіcka Туьытafышту Tekсеріи3. Егет олардиь, шkaісысы акayльы boлмаса, Braun ceрвис optалыфын хабарпасыз. |
Pycckn
Haun npOdyKTb COOTBETCTBYOT CaMbIM BbICOKM CTaHapTaM KaeeCTBa, FyHKUHOHaJIbHOCTn INI3aHa. Mbl HaeemCry, YTO BaM NOHpABITcB aW HObI np6op Braun.
Ipeed nCnoJb3OBAHHneM
IoxaanyiCTa, BHNMaTeJIbHO npOuHTaTe DaHHoe pyKOBOdCTBO NO 3KcnJyatauHn neped nCNoJIb3OBaHHem np6opa.
BhimaHne

Hoxn ouheb octpble!Bo n36exaHne TpaBM, noxayncta, obaaunTecb C HoxaMn cOCo60B OCTOPOXHOCTbIO.
- UCTPOINCTBO MOXET NCNOJb3OBaTbcRAIaMn C ORpaHnueHHbIMN φn3nueCKIMN, CEHCOPHBIMN INY UMCTBeHNbIMN CNOOC6HOCTaMn INI JIaMn,HE OblaIaIOUIMN DOCTaTOHbIM ONbITOM N 3HaHnAIMN, INY cNoBNI, ECIN NCNOJb3OBAHne OcyuieCTBJIeTcR NOI HaI3OpOM INI OH INPOJIN INHCTpykTAX NO 6e3OJaCHOMY nOLb3OBaHIO YCTPOINCTBOM IN OCO3HaIOT NOTEHuaJIbHbIE ONaCHOCTN.
- DeTAM 3aPpeSeHo nIgpaTb C npn6oPOM.
- UcTpoIcTBo He npeHa3HaueHcO dJIy NCNoJIb3OBaHnA DeTbMn. XpaHntb npn6op n ero rnaBhbl coeDHHHTeHbI Ka6eJIb BdaJIb OT DeTei.
- 3anpeueHa YnCTka N yXoJ 3a np60pom DeTbMn 6e3 npncMOtpa. Bcerda OTKIouaHTe np6Op OT cetn IIN BbIKIOUaHTe erO,ecn OH OCTa-ETc8be3 npncMOTpa,a TaKxe nepei C6OpKO,pa36OpKO,ynCTKO INxpaHeHEm.
- If the connecting cable is damaged, it must be replaced by the manufacturer, service department, or qualified specialists to prevent danger to the user.
- Before connecting, check that the mains voltage matches the voltage indicated on the appliance. This appliance is intended exclusively for household use and is designed for processing quantities of products typical for a home household. The appliance parts are not intended for use in microwave ovens.
Appliance parts
1 Start button: speed "I" 2 Start button: speed II 3 Motor unit 4 EasyClick attachment buttons 5 Working bowl 6 Lid 7 Beater attachment
a Gearbox
b Beater
8 Chopper attachment, 350 ml "hc" a Lid
b Chopper blade
c Chopper bowl d Rubber ring preventing slipping
9 Chopper attachment, 500 ml "ca" a Lid (with gear mechanism) b Chopper blade
c Chopper bowl
d Rubber ring preventing slipping
10 Chopper attachment, 1250 ml "ca" a Lid (with gear mechanism) b Chopper blade
A rubber ring that prevents sliding.
Before first use, read all parts - see section "Cleaning".
Used parts
Troubleshooting
a Cover, b Nozzle for thick nozzles
Wiper rings
9 Nozzle 500 ml "Ca"
a Cover (with liquid container)
b Nozzle for thick nozzles
Wiper rings
10 Nozzle 1250 ml
a Cover (with liquid container)
b Nozzle for thick nozzles
Wiper rings
Before first use, read all parts - see section "Filling".
Hacaika-6jeHep (A)
The blender is ideal for preparing sauces, gravies, dressings, soups, minced meat, as well as drinks, smoothies and other cocktails. For best results, set the highest speed.

Braun 1
J 1
- \ 20 & 0 \ 10 & 0 20
∴ θ = 1/2t θ = 1/2( t - 1)
4
#
Loy
12
A
a 1
from left to right
JU UJS JULC Jusll dS jut Lusie dA
.
[1]
aolal U.Sg g1. zaiai a 42 abw g dui
a
yblao ayolao yjxuyd
00 1
jlaol jawl eg.bol gylssll
ba jiai1 pluowu Jgaii iuaa
auii i jiooi 0000
jol jol jol jol jol jol jol
∴ 2999 < 8 + 1 = 9997
. jlaJI JlaIbJl . jlaJI iJoo JIaK ∴ S ΔOBC = S ΔBOC + SΔCOD - 1 9j4011 2


- DEUTSCH
- BEFORE USE
- CAUTION
- PARTS AND ACCESSORIES
- HOW TO USE THE APPLIANCE
- BLENDING SHAFT (A)
- ASSEMBLY AND OPERATION
- RECIPE EXAMPLE: MAYONNAISE
- WHISK ACCESSORY (A)
- TIPS FOR BEST RESULTS
- RECIPE EXAMPLE: WHIPPED CREAM
- CHOPPER ACCESSORY (B)
- BC» RECIPE EXAMPLE: PANCAKE BATTER
- RECIPE EXAMPLE: HONEY-PRUNES (AS A PANCAKE STUFFING OR SPREAD)
- CARE AND CLEANING (C)
- FOR UK ONLY
- PLEASE KEEP YOUR RECEIPT AS THIS WILL FORM THE BASIS OF YOUR GUARANTEE
- CLEANING AND MAINTENANCE (C)
- SAFETY PRECAUTIONS
- EXPERT
- THE DEVICE MUST BE USED CORRECTLY
- TECHNICAL DATA (A)
- OPERATION AND USE
- RECIPE: MAYONNAISE
- ACCESSORIES (A)
- DO NOT USE THE DEVICE
- SPARE PARTS AND ACCESSORIES
- REPLACEMENT: PUMP
- TROUBLESHOOTING (B)
- KOIDAHAAP AIBHDA
- KYPACTBIPY XHE KONDAHY
- CAKATANDBIPY
- PEUERTMBICAJIB:KYIMAKKAMBIPBI
- PEUENT MBICALB: BAI KOCBLFAH EPIK (KYIMAK, CAIMACBL HEMECE TOCAN PETIHDE)
- DISPOSAL
- EAC
- PYCCKN
- IPEED NCNOJB3OBAHHNEM
- BHIMAHNE
- APPLIANCE PARTS
- USED PARTS
- HACAIKA-6JEHEP (A)
Brand : BRAUN
Model : Multiquick 3 MQ 3035 Sauce
Category : Blender