
TE654319RW - Coffee maker SIEMENS - Free user manual and instructions
Find the device manual for free TE654319RW SIEMENS in PDF.

| Product type | Automatic coffee machine with grinder |
| Brand | Siemens |
| Model | TE654319RW |
| Dimensions (H x W x D) | 385 mm x 280 mm x 468 mm |
| Weight | Approx. 10-12 kg |
| Power supply | 220-240 V ~, 50/60 Hz, 1500 W |
| Pump pressure | 15 bar |
| Water tank capacity | 1.7 L |
| Bean hopper capacity | Approx. 300 g |
| Grinder type | Adjustable ceramic grinder |
| Power cord length | 100 cm |
| Main functions | Espresso, coffee, cappuccino, latte macchiato, café au lait, milk foam, hot water, hot milk, Americano, Flat white, Café cortado, Kleiner Brauner, carafe function, two-cup preparation |
| Settings | Coffee strength (5 levels), quantity, temperature, grind fineness |
| Child safety lock | Yes, button lock |
| Auto shut-off | Yes, adjustable |
| Water filter | Yes, compatible with BRITA INTENZA |
| Maintenance | Automatic descaling, cleaning and calc'nClean programs; manual cleaning of brewing unit and milk system |
| Spare parts and repairability | Extended spare parts availability for 10 years (after January 1, 2023) |
| Included accessories | Dosing spoon, water hardness test strip, cleaning and descaling tablets, milk tube, milk container |
Frequently Asked Questions - TE654319RW SIEMENS
User questions about TE654319RW SIEMENS
0 question about this device. Answer the ones you know or ask your own.
Ask a new question about this device
Download the instructions for your Coffee maker in PDF format for free! Find your manual TE654319RW - SIEMENS and take your electronic device back in hand. On this page are published all the documents necessary for the use of your device. TE654319RW by SIEMENS.
USER MANUAL TE654319RW SIEMENS
m = 311
13
13/14

15
13/14
17

19
21
23
25
You can find additional information and explanations online. Scan the QR code on the title page.
Table of contents
1 Safety 7
1.1 General information 7
1.2 Intended use 7
1.3 Restriction on user group 7
1.4 Safety information 8
2 Environmental protection and saving energy 10
2.1 Disposing of packaging 10
2.2 Tips for saving energy 10
3 Installation and connection .... 11
3.1 Scope of delivery 11
3.2 Installing and connecting the appliance 11
4 Familiarising yourself with your appliance 11
4.1 Appliance 11
4.2 Control panel 12
4.3 Display 12
5 Drinks overview 12
6 Accessories 13
6.1 Storing the measuring spoon 13
7 Before using for the first time .. 13
7.1 Preparing and cleaning the appliance 13
7.2 Checking the water hardness 13
7.3 Overview of water hardness levels 14
7.4 Water filter 14
7.5 General information 15
8 Basic operation 16
8.1 Switching the appliance on or off 16
8.2Dispensing drinks 16
8.3 Dispensing a coffee drink made from fresh beans 16
8.4 Dispensing a coffee drink made from ground coffee 16
8.5 Dispensing drinks with milk .... 17
8.6 Dispensing a coffee drink with milk 17
8.7 Dispensing milk froth 17
8.8 Dispensing special drinks 18
8.9 Dispensing hot water 18
8.10 Dispensing "Warm milk"2 .... 18
8.11 Dispensing "Americo"2 .... 18
8.12 Dispensing a "Flat White", "Café Cortado" or "Kleiner Brauner"² 19
8.13 Using "Pot function"2 19
8.14 Drink settings 19
8.15Grinder 20
9 Childproof lock 21
9.1 Activating the childproof lock 21
9.2 Deactivating the childproof lock 21
10 Favourites 21
10.1 Setting a favourite 21
10.2 Changing a favourite 21
10.3 Dispensing a favourite 21
11 Basic settings 21
11.1 Changing the basic settings 21
11.2 Overview of the basic settings 22
12 Cleaning and servicing 23
12.1 Dishwasher-safe components 23
12.2 Cleaning agent 23
12.3 Cleaning the appliance 24
12.4 Cleaning the drip tray and coffee dregs container 24
12.5 Cleaning the milk system .... 25
12.6 Cleaning the ground coffee drawer 25
12.7 Cleaning brewing unit 25
12.8 Service programmes 26
13 Troubleshooting 27
14 Transportation, storage and disposal 31
14.1 Activating frost protection .... 31
14.2 Disposing of old appliance … 31
15 Customer Service 32
15.1 Product number (E-Nr.) and production number (FD) 32
16 Technical specifications 32

Safety
Observe the following safety instructions.
1.1 General information
- Read this instruction manual carefully.
- Keep the instruction manual and the product information safe for future reference or for the next owner.
- Do not connect the appliance if it has been damaged in transit.
1.2 Intended use
Only use this appliance:
for preparing hot drinks.
- in private households and in enclosed spaces in a domestic environment.
up to an altitude of max. 2000m above sea level.
1.3 Restriction on user group
This appliance may be used by children aged 8 or over and by people who have reduced physical, sensory or mental abilities or inadequate experience and/or knowledge, provided that they are supervised or have been instructed on how to use the appliance safely and have understood the resulting dangers.
Do not let children play with the appliance.
en Safety
Children must not perform cleaning or user maintenance unless they are at least 8 years old and are being supervised.
Keep children under the age of 8 years away from the appliance and power cable.
1.4 Safety information
WARNING - Risk of suffocation!
Children may put packaging material over their heads or wrap themselves up in it and suffocate.
- Keep packaging material away from children.
- Do not let children play with packaging material.
Children may breathe in or swallow small parts, causing them to suffocate.
- Keep small parts away from children.
- Do not let children play with small parts.
WARNING - Risk of electric shock!
Incorrect installation is dangerous.
- Connect and operate the appliance only in accordance with the specifications on the rating plate.
- Connect the appliance to a power supply with alternating current only via a properly installed socket with earthing.
- The protective conductor system of the domestic electrical installation must be properly installed.
If the appliance or the power cord is damaged, this is dangerous.
- Never operate a damaged appliance.
- Never operate an appliance with a cracked or fractured surface.
- Never pull on the power cord to unplug the appliance. Always unplug the appliance at the mains.
- If the appliance or the power cord is damaged, immediately unplug the power cord or switch off the fuse in the fuse box.
- Call customer service. Page 32 Improper repairs are dangerous.
- Repairs to the appliance should only be carried out by trained specialist staff.
- Only use genuine spare parts when repairing the appliance.
- If the power cord of this appliance is damaged, it must be replaced by the manufacturer, the manufacturer's Customer Service or a similarly qualified person in order to prevent any risk.
An ingress of moisture can cause an electric shock.
- Never immerse the appliance or the power cord in water.
- Liquids must not be spilled on the appliance plug connection.
- Only use the appliance in enclosed spaces.
- Never expose the appliance to intense heat or humidity.
- Do not use steam- or high-pressure cleaners to clean the appliance.
WARNING - Risk of fire!
The appliance will become hot.
- Ventilate the appliance adequately.
- Never operate the appliance in a cabinet.
It is dangerous to use an extended power cord and non-approved adapters.
- Do not use extension cables or multiple socket strips.
- Only use adapters and power cords approved by the manufacturer.
- If the power cord is too short and a longer one is not available, please contact an electrician to have the domestic installation adapted.
WARNING - Risk of burns!
Some parts of the appliance become very hot.
- Never touch hot appliance parts.
After use, allow hot appliance parts to cool down before touching.
WARNING - Risk of scalding!
Freshly prepared drinks are very hot.
- Leave drinks to cool down if necessary.
- Do not let escaping liquids or steam come into contact with your skin.
WARNING - Risk of injury!
Improper use of the appliance may endanger the user.
- To avoid injuries, only use the appliance for its intended purpose.
Trapped fingers when closing the appliance door.
- Be careful of your fingers when closing the appliance door.
The grinder rotates.
- Never reach into the grinder.
WARNING - Danger: Magnetism!
The appliance contains permanent magnets. These may affect electronic implants, e.g. pacemakers or insulin pumps.
- People with electronic implants must stand at least 10 cm away from the appliance.
- This minimum distance of 10cm must also be observed for the water tank when removed.
WARNING - Risk of harm to health!
During filtering there may be a slight increase in the potassium level, which is possibly not good for dialysis patients and people with kidney disease.
- Consult a doctor before use if you have kidney disease or follow a special potassium diet.
Soiling on the appliance may be harmful to health.
To ensure hygiene, follow the cleaning instructions for the appliance.
Water from the hot water circuit can be harmful to health. - Only ever use the appliance with fresh, cold, non-carbonated drinking water.
2 Environmental protection and saving energy
2.1 Disposing of packaging
The packaging materials are environmentally compatible and can be recycled.
- Sort the individual components by type and dispose of them separately.
2.2 Tips for saving energy
If you follow these instructions, your appliance will use less energy.
Set the interval for automatic switchoff to the smallest value.
- If the appliance is not being used, it will switch itself off earlier.
"Basic settings", Page 21
If the appliance is not being used, switch it off using the on/off button on the front.
- Switched-off appliances do not use any energy.
Do not interrupt the dispensing process prematurely.
- The amount of water or milk that is heated is used optimally.
Descale the appliance regularly.
Limescale deposits increase the appliance's energy consumption.
3 Installation and connection
3.1 Scope of delivery
After unpacking all parts, check for any damage in transit and completeness of the delivery.
Note: Different accessories are enclosed depending on the appliance model. This accessory is shown in a frame with a dashed line.
Fig. 1
| A | Fully automatic coffee machine |
| B | Milk tube and suction pipe |
| C | User manual |
| D | Milk container 1 |
| E | Measuring spoon |
| F | Water hardness testing strip |
| G | Cleaning tablet 1 |
| H | Descaling tablet 1 |
| I | Water filter 1 |
3.2 Installing and connecting the appliance
ATTENTION
Risk of damage to the appliance. If the appliance is not started up correctly, it may be damaged.
Use the appliance in frost-free rooms only.
If the appliance has been transported or stored below 0^ , wait 3 hours at room temperature before starting it up.
After plugging in, always wait approx. 5 seconds.
- Place the appliance on a level, water-resistant surface that is capable of bearing its weight.
- Using the mains plug, connect the appliance to an earthed socket that has been correctly installed.
- The appliance's ventilation slits must not be covered or obscured.
4 Familiarising yourself with your appliance
4.1 Appliance
You can find an overview of the parts of your appliance here.
Note: Individual details and colours may differ, depending on the appliance model.
Fig. 2
| 1 | On/off button |
| 2 | Water tank |
| 3 | Control panel |
| 4 | Display |
| 5 | Drink selection |
| 6 | Storage compartment for meas-uring spoon with insertion aid for water filter |
| 7 | Cover for water tank |
| 8 | Aroma lid |
| 9 | Bean container |
| 10 | Beverage outlet cover |
| 11 | Milk system |
| 12 | Brewing unit |
| 13 | Beverage outlet, height-adjustable |
| 14 | Rating plate |
| 15 | Drip tray |
4.2 Control panel
You can use the control panel to configure all functions of your appliance and to obtain information about the operating status.
Note: If you press a symbol, a touch key tone sounds. You can switch the touch key tone on or off in the basic settings.
"Overview of the basic settings", Page 22
| Symbol Explanation | |
| start stop | Start or stop the process Note: To interrupt the beverage dispensing pro-cess prematurely, press again in the meantime. |
| menu | Open or exit the menu Note: The menu buttons are only visible when the menu is open. |
| Go back in the menu | |
| √ | Navigate downwards in the menu |
| ok√ | Confirm in the menu or save |
| Dispense two cups | |
| ∅ | Set coffee strength |
| ml | Set per-cup quantity |
| Symbol | Explanation |
| Press briefly to call up the favourites Press for at least 3 seconds to activate or deactivate the childproof lock |
4.3 Display
The display shows the selected beverages, settings and setting options, as well as messages about the appliance's operation status.
The display shows additional information and action steps. The information is hidden after a short period or by pressing a button. The action steps are hidden when they have been completed.
Note: If no display language is available in your national language, select a display language that is available, e.g. English.
5 Drinks overview
You can prepare a wide range of different drinks with your appliance.
Note: Pre-warm cups with hot water, e.g. small, thick-walled espresso cups.
Use original accessories. These have been made especially for your appliance.
| Accessories Retail Customer service | ||
| Cleaning tablets TZ80001A | TZ80001B | 00312097 00312098 |
| Descaling tablets TZ80002A | TZ80002B | 00312094 00312095 |
| Water filter TZ70003 00575491 | ||
| Care set TZ80004A | TZ80004B | 00312105 00312106 |
| Milk container with freshLock lid TZ80009N 00576166 | ||
6.1 Storing the measuring spoon
Your appliance has a special compartment for storing the measuring spoon.
- To store the measuring spoon, remove the water tank and place the spoon in the preformed recess.
7 Before using for the first time
Prepare the appliance for use.
7.1 Preparing and cleaning the appliance
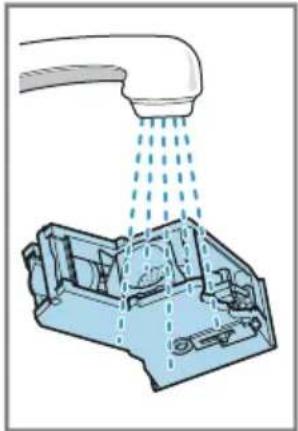
Remove the protective foils and clean the appliance and individual parts. Follow the illustrated instructions at the beginning of this manual.
ATTENTION
Unsuitable beans can block the grinder.
- Only use pure, roasted bean mixes that are suitable for use in fully
automatic coffee or espresso machines.
Do not use glazed coffee beans.
- Do not use caramelised coffee beans.
- Do not use coffee beans that have been treated with additives containing sugar.
Do not add instant coffee.
→Fig. 3 - 11
Note: Fill the water tank with fresh, cold, non-carbonated drinking water every day.
Tip: To keep the coffee beans at their best, store them in a sealed container in a cool place. You can keep the coffee beans in the bean container for several days without them losing their aroma.
7.2 Checking the water hardness
It is important to set the water hardness correctly so that your appliance indicates in good time that it needs.
descaling.You can use the enclosed
en Before using for the first time
test strip to check the water hardness or ask your local water company.
- Briefly dip the test strip in fresh tap water.
- Allow the water to drain off the test strip.
- Read the water hardness off the test strip after 1 minute.
"Overview of water hardness levels", Page 14
Note: If a water softening system is installed in your house, you can select "Water softening system".
Tips
- You can change the settings at any time.
"Basic settings", Page 21
- If the water hardness exceeds 21^ (3.8 mmol/l), you can fill the water tank with prefiltered water to reduce limescale deposits.
7.3 Overview of water hardness levels
The table shows allocation of the levels to the different degrees of water hardness.
| Setting Ring setting on INTENZA filter | German degrees in °dH | Total hardness in mmol/l |
| 1 A 1 - 7 < 1.3 | ||
| 2 A 8 - 14 1.3 - 2.5 | ||
| 3 B 15 - 21 2.5 - 3.8 | ||
| 4¹ | C 22 - 30 > 3.8 |
7.4 Water filter
You can use a water filter to minimise limescale deposits and reduce impurities in the water.
The limescale content of the water influences the aroma and crema of coffee. There is an aroma ring on the underside of the BRITA INTENZA water filter. Turn the aroma ring to set the optimum aroma level for your mains water.
Inserting and activating the water filter
ATTENTION
Possible damage to the appliance due to limescale build-up.
- Change the water filter in good time.
- Change the water filter after 2 months at the latest.
- Observe the display messages.
Note: If you are not inserting a new filter, select "No filter" and confirm with OK
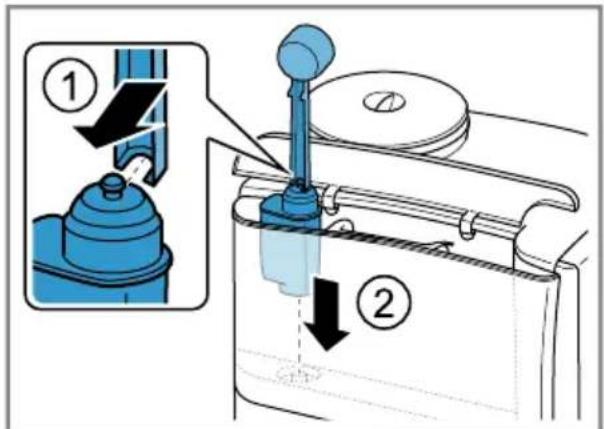
- Immerse the water filter in a glass of water with the opening facing up and press the sides together lightly
until no more air bubbles rise to the surface.
Fig. 5
- Use the measuring spoon to press the water filter firmly into the water tank.
Fig. 12 - Fill the water tank with water up to the "max" mark and press OK
- Connect the milk tube to the milk system and the suction pipe.
- Insert the end of the suction pipe in the drip plate.
- Press menu
- Use to select "Water filter".
- Press oand use to select "Activate new filter".
- Empty and insert the drip tray.
- Press OK to start the process.
- The filter is rinsed.
- The appliance is ready to use.
- Empty and insert the drip tray.
Tips
- You should also change your water filter for reasons of hygiene.
- With a water filter you need to descale your appliance less frequently.
If your appliance has not been used for a long time, for example if you were on holiday, you should rinse the water filter before use by dispensing a cup of hot water.
The water filter can be purchased from retailers or customer service. "Accessories", Page 13
Note: If "Please change water filter" is shown on the display, replace the water filter.
If you are not inserting a new filter, select "No filter" and follow the instructions on the display.
7.5 General information
Please bear this information in mind so that you can get the best out of your appliance.
Notes
The appliance has been programmed at the factory with standard settings for optimum operation.
- The grinder has been factory-set for optimum operation. If coffee is only dispensed drop by drop or is too thin and with too little crema, you can adjust the grinding level when the grinder is running.
"Adjusting the grinding level", Page 20
- During operation water droplets may form at the ventilation slits.
If you do not perform any actions on the appliance for a certain period, it will switch off automatically. You can change the duration in the basic settings. Page 21 -
For technical reasons steam can escape from the appliance.
The first beverage will not yet have its full aroma if: -
You are using the appliance for the first time.
- You have run a service programme.
- You have not used the appliance for a long time.
Do not drink the beverage.
Tip: You will get a stable, fine-pored crema after you have started up your appliance and dispensed a few cups.
8 Basic operation
8.1 Switching the appliance on or off
Press ①
When the appliance is switched on or off, it will rinse automatically.
The appliance will not rinse if it is still warm when switched on or if no coffee was dispensed before it was switched off.
8.2 Dispensing drinks
Find out how to prepare a drink of your choice.
WARNING
Risk of scalding!
Freshly prepared drinks are very hot.
- Leave drinks to cool down if necessary.
- Do not let escaping liquids or steam come into contact with your skin.
Tips
- You can directly select the drink you want using the quick-selection buttons. The display shows you the drink and the current settings.
- Your appliance has other drinks besides the ones that you can obtain via the quick-selection buttons.
- You can adapt your drink to your personal taste.
"Drink settings", Page 19
Notes
If you do not change any settings for approx. 5 seconds, the appliance will exit settings mode. The settings will be automatically saved.
- With a number of settings your coffee is prepared in several steps. Wait until the process is fully completed.
8.3 Dispensing a coffee drink made from fresh beans
- Place your pre-warmed cup under the outlet system.
- Press the drinks symbol for a coffee drink without milk, e.g. "Espresso" or "Coffee".
-
The display will show the beverage and your current beverage settings. "Drink settings", Page 19
-
Change the settings where necessary:
To adjust the per-cup quantity, press ml
To adjust the coffee strength, press
- Press start
The coffee beans are freshly ground for each brewing process.
- The coffee is brewed and then dispensed into the cup.
- To stop dispensing prematurely, press
8.4 Dispensing a coffee drink made from ground coffee
You can also operate your appliance using ground coffee.
ATTENTION
The ground coffee compartment can become blocked.
- Do not use coffee beans.
Do not use instant coffee. - Use a soft brush to gently direct the ground coffee residue into the shaft.
Note
When using ground coffee, the following selections are not available:
Two cups at once
- Coffee strength
1. Place your pre-warmed cup under the outlet system.
- Press the symbol for the required beverage.
- Press repeatedly until the display shows "ground coffee".
- Open the ground coffee drawer.
- Add no more than 2 level measuring spoons of ground coffee.
- Close the ground coffee drawer.
- Press start to start dispensing.
- The coffee is brewed and then dispensed into the cup.
- To stop dispensing prematurely, press start stop
8.5 Dispensing drinks with milk
Your appliance features a milk system. You can use it to prepare coffee drinks with milk and milk froth as well as warm milk.

WARNING
Risk of burns!
The milk system can become extremely hot.
- Never touch the milk system when it is hot.
- Allow the hot milk system to cool down before touching it.
ATTENTION
Milk residues can dry on surfaces and are difficult to remove.
Clean the milk system after every use.
Note: When dispensing drinks with milk, the milk system may produce whistling noises for technical reasons.
Tips
- You can also use plant-based alternatives to milk, e.g. soya milk.
The quality of the milk froth depends on the type of milk or plant-based alternative used.
8.6 Dispensing a coffee drink with milk
Requirements
The milk tube is connected.
The suction pipe is connected.
-
Insert the suction pipe in the milk.
-
Place your pre-warmed cup under the outlet system.
- Press the drinks symbol for a coffee drink with milk.
- The display will show the drink and your current settings.
"Drink settings", Page 19
- Change the settings where necessary:
To adjust the per-cup quantity, press ml
To adjust the coffee strength, press
Use the ground coffee compartment. Dispensing a coffee drink made from ground coffee Page 16
-
Press start to start dispensing.
-
The milk or milk froth is dispensed into the cup or glass first. The coffee is then brewed and dispensed into the cup or the glass.
After preparing the beverage, the milk system will automatically clean itself with a short jet of steam.
Tip: If you want to stop dispensing milk early, press start stopIf you want to stop the dispensing process altogether, press ① twice.
8.7 Dispensing milk froth
Requirements
The milk tube is connected.
The suction pipe is connected.
- Insert the suction pipe in the milk.
- Place your pre-warmed cup under the outlet system.
- Press the symbol for "Milk froth".
en Basic operation
- To set the per-cup quantity, press ml
- Press start stop to start dispensing.
- To stop dispensing prematurely, press start stop
8.8 Dispensing special drinks
Your appliance has other drinks besides the ones that you can obtain via the quick-selection buttons.
-
Press repeatedly until the display shows your desired drink. You can choose from the following drinks:
-
"Hot water"
-Warm milk
-Pot function" 1 - "Kleiner Brauner" 1
- "Americano" 1
- "Flat White" 1
- "Café Cortado" 1
8.9 Dispensing hot water
WARNING Risk of burns!
The milk system can become extremely hot.
- Never touch the milk system when it is hot.
- Allow the hot milk system to cool down before touching it.
Note: If the milk system has not been cleaned, small amounts of milk may be dispensed with the water.
Requirements
The milk system has been cleaned.
The milk tube has been removed.
- Place a cup or glass underneath the beverage outlet.
-
Press repeatedly until the display shows "Hot water".
-
Change the setting if necessary:
To adjust the per-cup quantity, press ml
4. Press start to start dispensing. If the following message appears: "Please remove suction hose", remove the milk hose and press start stop
- Hot water will run out of the outlet system.
5. To stop dispensing prematurely, press start stop
8.10 Dispensing "Warm milk"
- Press repeatedly until the display shows "Warm milk".
- Change the setting if necessary:
To adjust the per-cup quantity, press ml
- Press start to start dispensing.
- Warm milk is dispensed from the beverage outlet.
- To stop dispensing prematurely, press start stop
8.11 Dispensing "Americano"
- Place a pre-warmed cup underneath the beverage outlet.
- Press repeatedly until the display shows "Americano".
- When the display shows "Please remove suction hose", pull off the milk hose and the suction pipe.
- Change the setting if necessary:
To adjust the per-cup quantity, press ml
To adjust the strength, press → "Adjusting the coffee strength", Page 19
- Press start to start dispensing.
- The coffee is brewed and then dispensed into the cup.
- To stop dispensing prematurely, press start stop
8.12 Dispensing a "Flat White", "Café Cortado" or "Kleiner Brauner"
- Place a cup or glass underneath the beverage outlet.
- Press repeatedly until the display shows "Flat White", "Café Cortado", or "Kleiner Brauner".
- Change the setting if necessary:
To adjust the per-cup quantity, press ml
To adjust the strength, press → "Adjusting the coffee strength", Page 19
-
Press start to start dispensing.
-
The coffee is brewed and runs into the cup or glass. Milk or milk froth is dispensed depending on the beverage. The sequence in which coffee or milk is dispensed depends on the beverage.
- To stop dispensing prematurely, press start stop
- Press start again to stop the dispensing process altogether.
8.13 Using "Pot function"
- Place a coffee pot underneath the beverage outlet.
- Press repeatedly until the display shows "Pot function".
- Change the setting if necessary:
To adjust the per-cup quantity, press ml
To adjust the strength, press → "Adjusting the coffee strength", Page 19
- Press start to start dispensing.
- The coffee is brewed and then dispensed into the coffee pot.
- To stop dispensing prematurely, press start stop
8.14 Drink settings
Prepare a drink according to your taste.
Adjusting the coffee strength
- Press the symbol for the required beverage.
-
Press repeatedly until the display shows your desired coffee strength. You can select the following coffee strengths:
-
"very mild"
- "mild"
- "regular"
- "strong"
- "very strong"
-doubleshot strong"
-doubleshot strong+
Tip: For a strong taste of coffee, select a high coffee strength when setting a large capacity.
Selecting ground coffee
Press repeatedly until the display shows "ground coffee".
"Dispensing a coffee drink made from ground coffee", Page 16
AromaDouble Shot
You can make your coffee extra strong by using the setting "doubleshot strong".
The longer coffee is brewed, the more bitter substances and undesirable aromas are released. These bitter substances and undesirable aromas affect the taste and digestibility of coffee. To ensure that only pleasant-tasting and easily digestible aromatic substances are released, fresh coffee beans are ground and brewed when half the quantity has been prepared.
en Basic operation
Note: The setting "doubleshot strong" is not available for every drink and drink volume.
Adjusting the amount
- Press the symbol for the required beverage.
- Press millepeatedly until the required per-cup quantity is shown on the display.
You can choose from the following per-cup quantities:
- "small"
- "medium"
"large"
An arrow or multiple arrows next to the per-cup quantity indicate(s) that the preset per-cup quantity has been changed, e.g. "large".
Dispensing two cups at once
With certain drinks you can dispense 2 cups at once.
Note: Depending on your type of appliance the function may be available only for black coffee, not for milky coffee drinks.
- Press the symbol for the required beverage.
- Press
- The setting is shown on the display.
- Place two cups on the left and right underneath the beverage outlet.
- Press start stop
The drink is prepared in 2 steps. The beans are ground in 2 grinding operations.
- The beverages are brewed and then run into the cups.
- Wait until the process is complete.
8.15 Grinding
Your appliance has an adjustable grinder, which you can use to cus
tomise the grinding level of your coffee beans.
Adjusting the grinding level
Set the desired grinding level while the coffee beans are being ground.
WARNING
Risk of injury!
The grinder rotates.
- Never reach into the grinder.
ATTENTION
Risk of damage to the grinder. The grinder may be damaged if the grinding level is not set properly.
- Only set the grinding level when the grinder is running.
- Select the grinding level using the rotary selector step by step.
Grinding level Setting
Fine grinding level for lightly roasted beans
Turn rotary selector anticlockwise

Coarse grinding level for dark-roasted beans
Turn rotary selector clockwise

The grinding level setting only takes effect after the second cup.
Tip: If the coffee is only dispensed drop by drop, set a coarser grinding level.
If the coffee is dispensed too quickly and with too little crema, set a finer grinding level.
9 Childproof lock
You can lock the appliance, to protect children against scalding and burns.
9.1 Activating the childproof lock
Requirement: The appliance is switched on.
Press for at least 3 seconds.
- The display shows [key symbol] and the childproof lock is activated.
9.2 Deactivating the childproof lock
Press for at least 3 seconds.
- The display no longer shows [key symbol] and the childproof lock is de-activated.
10 Favourites
Save and edit individual beverages in the menu "Favourite". The number of favourites depends on the model of the appliance.
Note: To exit the settings, press
10.1 Setting a favourite
- Press menu
- Use to select "Favourite" and press OK
- To set a new favourite, press and confirm with ok
- Select your desired beverage, press the relevant symbol and confirm with OK
-
The display shows the selection of beverage settings for that specific drink, e.g. the per-cup quantity ml or the ratio of coffee to milk.
-
Select the beverage settings and press OK
The settings are saved.
10.2 Changing a favourite
- Briefly press to call up the menu "Favourite".
- Use to select "Favourite" and press OK
- Select the favourite 1-4 that you want to change and press OK
- Select your desired beverage, press the relevant symbol and confirm with OK
- Select the beverage settings and press OK
The settings are saved.
10.3 Dispensing a favourite
- Briefly press to call up the menu "Favourite".
- To select an existing favourite, press
- To begin dispensing the drink, press start step
11 Basic settings
You can configure the basic settings for your appliance to meet your needs and call up additional functions.
11.1 Changing the basic settings
- Press menu
-
Use to select the desired basic setting and press OK
-
The display will show the setting options and the navigation symbols will light up. The display indicates the current setting.
The setting has been saved. - Use to go back.
- Press menuexit the menu.
11.2 Overview of the basic settings
You can find an overview of the basic settings here.
| Setting Selection Description | ||
| Cleaning and care Rince the milk system • Descale • Clean • calc'nClean | Start service programmes | |
| Info on service programmes¹ | Coffee Milk beverages | Display the number of beverages that can still be dispensed before one of the service programmes needs to be run |
| Coffee-milk ratio¹ | See selection on the appliance | Set "Coffee-milk ratio" in stages |
| Favourite Add or change favourites | → "Favourites", Page 21 | |
| Set cup size Set the per-cup quantity in stages | ||
| Water hardness 1 soft • 2 medium • 3 hard • 4 very hard² • Water softening system | Set the appliance to the local water hardness → "Overview of water hardness levels", Page 14 | |
| Automatic shut-down See selection on the appliance | Set how long the appliance should wait after preparing the last drink before automatically switching it-self off | |
| Coffee temperature normal • high • max. | Set the temperature for coffee drinks Note: The setting is effective for all preparation types. | |
| Water filter Activate new filter • No filter | Set the use of the water filter → "Water filter", Page 14 | |
| Languages Set the menu language | The display shows any changes you make immediately. | |
| Frost protection Set the frost protection | ||
| Key tones Key tones ON1 • Key tones OFF | Switch the touch key tones on or off | |
| Beverage statistics2 | See selection on the appliance | Display the number of beverages dispensed |
| Factory settings Full reset? • Continue: Press start • Cancel: Press ← | Restore settings to the factory settings Note: The appliance deletes all individual settings and resets to the factory settings. | |
12 Cleaning and servicing
To keep your appliance working efficiently for a long time, it is important to clean and maintain it carefully.
12.1 Dishwasher-safe components
Here you can find an overview of the components you can clean in the dishwasher.
ATTENTION
Some components are sensitive to heat and may be damaged if they are cleaned in a dishwasher.
- Follow the operating instructions of the dishwasher.
- Only clean dishwasher-safe components in the dishwasher.
- Only use programmes that do not heat the components above 60^ .
Suitable:
- Drip tray
Drip plate - Coffee dregs container
- Measuring spoon
Top and bottom section of the milk system
Not suitable:
Panel of drip tray
- Beverage dispenser cover
Brewing unit
Water tank
12.2 Cleaning agent
Only use suitable cleaning agents.
ATTENTION
Unsuitable cleaning products may damage the surfaces of the appliance.
- Do not use harsh or abrasive detergents.
Do not use cleaning agents containing alcohol or spirits. - Do not use hard scouring pads or cleaning sponges.
Unsuitable cleaning and descaling agents may damage the appliance.
-
Do not use pure citric acid, vinegar or any vinegar-based agents to descale the appliance.
-
Do not use descending agent with phosphoric acid.
Only use cleaning tablets and descaling tablets that have been specially developed for the appliance.

Tips
- Wash new sponge cloths thoroughly to remove any salt adhering to them. Salt can cause rust film to develop on stainless steel surfaces.
Always remove any residues of limescale, coffee, milk and cleaning/descaling solutions immediately to prevent corrosion.
12.3 Cleaning the appliance
WARNING
Risk of electric shock!
An ingress of moisture can cause an electric shock.
- Never immerse the appliance on the power cord in water.
- Liquids must not be spilled on the appliance plug connection.
- Do not use steam- or high-pressure cleaners to clean the appliance.
WARNING
Risk of burns!
Some parts of the appliance become very hot.
-
Never touch hot appliance parts.
After use, allow hot appliance parts to cool down before touching. -
Clean the housing, the high-gloss surfaces and the control panel with a microfibre cloth.
- Rinse the water tank with fresh, clean water.
- If the appliance has not been used for a long time, e.g. after a holiday, clean the entire appliance, including moving parts such as the brewing unit or water tank.
Note: The appliance will rinse itself automatically if you switch it on when it is cold or switch it off after it has dispensed coffee. The system is therefore self-cleaning.
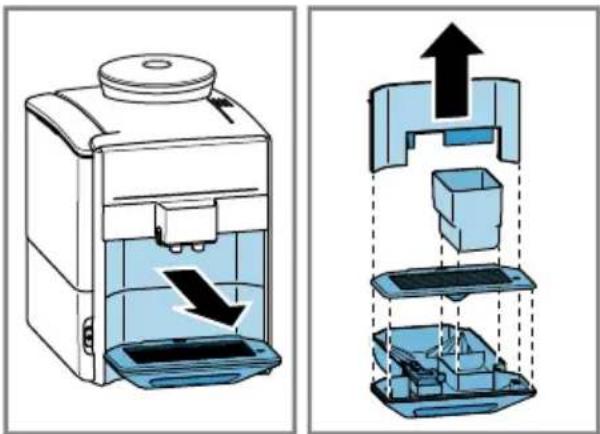
12.4 Cleaning the drip tray and coffee dregs container
Clean and empty the drip tray and coffee dregs container every day to prevent deposits.
- Pull the drip tray and the coffee dregs container forwards and out. Fig. 13
- Take off the panel of the drip tray and the drip plate.
- Clean the appliance interior. Fig. 14
- To remove the mechanical fill level indicator, press both brackets in- wards. Fig. 15
- Clean the mechanical fill level indicator with a damp cloth.
- Clean the drip tray and the coffee dregs container and re-insert them in the appliance. Fig. 16
12.5 Cleaning the milk system
Clean the milk system regularly.
WARNING
Risk of burns!
The milk system can become extremely hot.
- Never touch the milk system when it is hot.
- Allow the hot milk system to cool down before touching it.
ATTENTION
The appliance may be damaged by improper cleaning.
- Do not put the cover of the outlet system in the dishwasher.
Note: Immediately after preparing the beverage, the milk system will clean itself with a jet of steam.
Tip: If you want to give the milk system a particularly thorough clean, you can use the [Clean milk system] service programme.
-
Push the beverage outlet completely down.
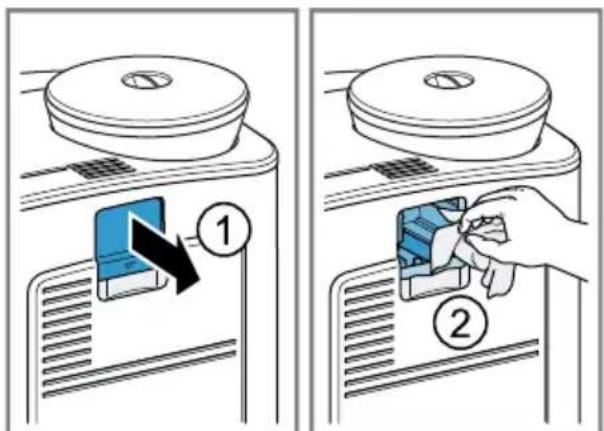
-
Pull the cover forwards and remove the milk tube. Fig. 8
- Remove the milk system by pulling straight forwards.
$$ \rightarrow F i g. \quad 9 $$
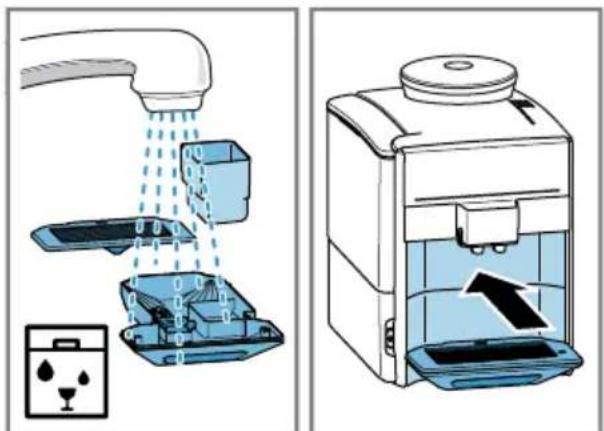
- Remove all coffee residues from the milk system holder. Fig. 17
- Take the top and bottom section of the milk system apart.
$$ \rightarrow \text {F i g .} \quad 1 0 $$
-
Detach the milk tube from the suction pipe.
-
Clean the components with detergent solution and a soft cloth.
- Rinse all appliance parts with clean water and dry.
- Place the milk system back in the appliance from the front, making sure it is straight.
- Replace the cover.
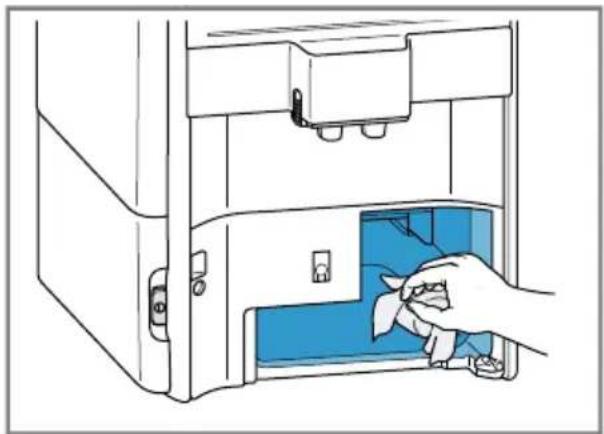
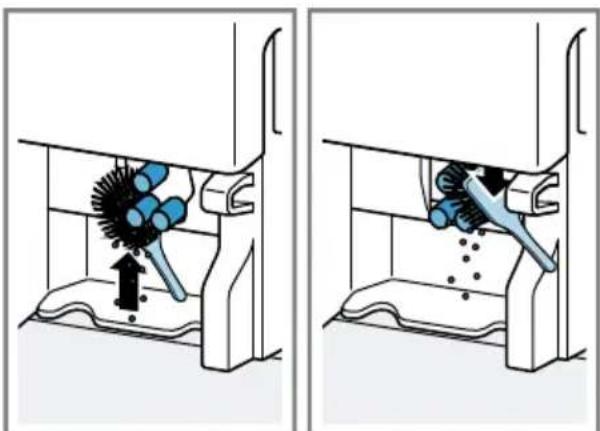
12.6 Cleaning the ground coffee drawer
- Open the ground coffee drawer. Fig. 18
- Clean the ground coffee drawer with a cloth.
12.7 Cleaning brewing unit
In addition to the automatic rinsing process, regularly remove and clean the brewing unit.
Note: Do not clean the brewing unit in the dishwasher and do not use detergent.
WARNING
Risk of burns!
Some parts of the appliance become very hot.
- Never touch hot appliance parts.
After use, allow hot appliance parts to cool down before touching.
en Cleaning and servicing
- Press ①to switch the appliance off.
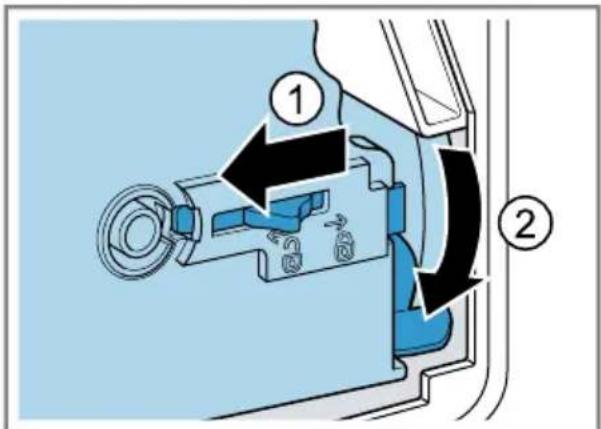
- Open the brewing chamber door.
$$ \rightarrow \text {F i g .} \quad 1 9 $$
- Slide the red locking mechanism on the brewing unit all the way to the left.
$$ \rightarrow \text {F i g .} \quad 2 0 $$
- Press the eject lever right down.
The brewing unit is released.
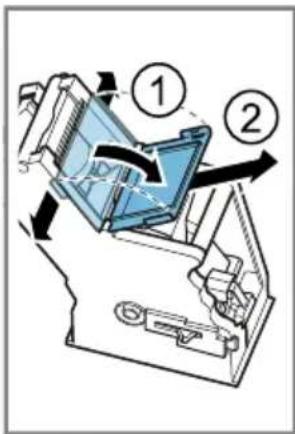
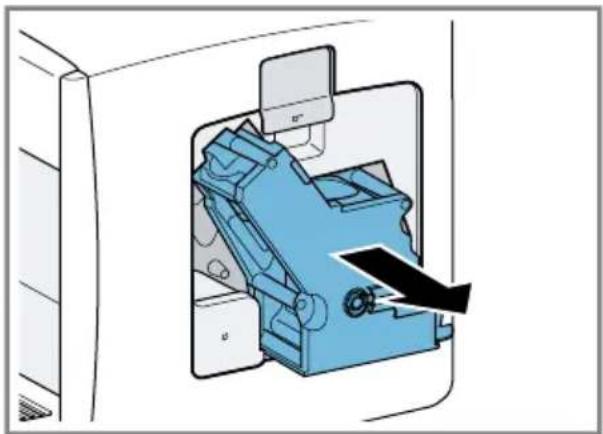
- Take hold of the brewing unit by the recessed grips and carefully remove it.
$$ \rightarrow \text {F i g .} \boxed {2 1} $$
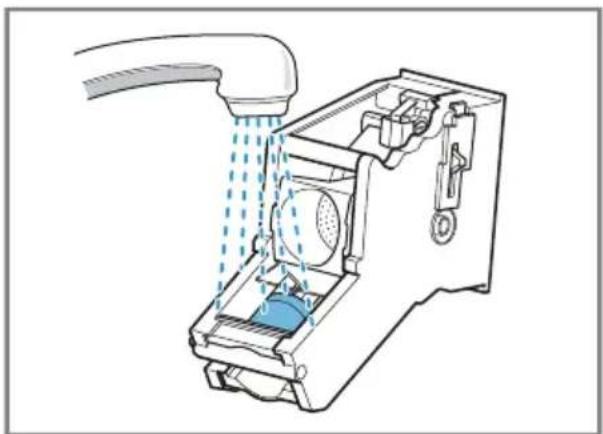
- Remove the cover of the brewing unit and clean the brewing unit thoroughly under running water.
$$ \rightarrow \text {F i g .} \quad 2 2 $$
- Thoroughly clean the sieve of the brewing unit under the water jet.
$$ \rightarrow \text {F i g .} \quad 2 3 $$
-
Clean the appliance interior with a damp cloth and remove any coffee residues.
-
Leave the brewing unit and the appliance interior to dry.
-
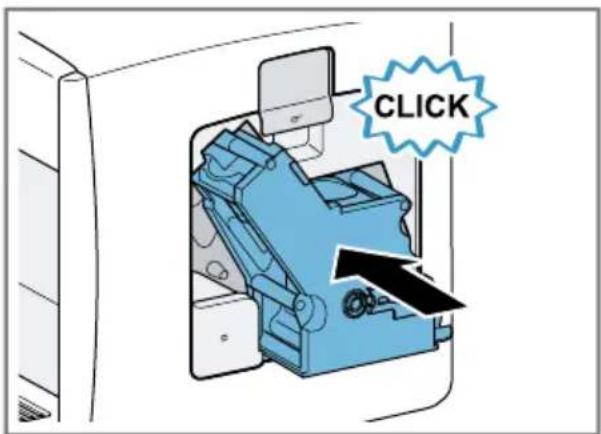
Place the cover of the brewing unit back on the brewing unit and then push the brewing unit all the way into the appliance.
$$ \rightarrow \text {F i g .} \quad 2 4 $$
-
Press the eject lever right up.
-
Slide the red locking mechanism all the way to the right.
$$ \rightarrow \text {F i g .} \quad 2 5 $$
13.Close the brewing chamber door.
$$ \rightarrow \text {F i g .} \quad 2 6 $$
12.8 Service programmes
Use the service programmes if you insert or remove a water filter or in order to clean your appliance thoroughly. Your appliance will tell you when you need to perform a service programme, e.g. cleaning.
ATTENTION
Improper cleaning and descaling or a delay in doing so may damage the appliance.
- Immediately perform the descending process in accordance with the instructions.
- Never put descending tablets or other descalers into the ground coffee drawer.
Notes
- The display indicates the progress of the descending or cleaning process.
If your appliance has been locked, you can only operate it again once the descending process has been carried out.
Tip: In addition to the automatic rinsing process, also remove and clean the brewing unit regularly.
Using the service programmes
- Press menu
- Use to select "Cleaning and care" and press OK
- Use to select the desired service programme and press OK
- To start the programme, press start
- The display indicates the progress of the programme.
Overview of service programmes
You can find an overview of the service programmes here.
Rinse the milk system
The display shows optimum cleaning of the milk system step by step.
Note: Once the programme has finished, empty the glass and clean the suction pipe.
Tip: If you want to clean the milk system particularly thoroughly, clean it regularly by hand.
Descale Remove residues of limescale from the pipes
Note: To prevent corrosion, remove any residual descending solution on the appliance using a soft, damp cloth. Thoroughly clean the suction pipe of the beverage outlet.
Clean Remove residues of coffee from the pipes
calc'nClean Combine cleaning and descaling
- Remove residues of limescale and coffee from the pipes
Tips
If you are starting the "Dscaling" or "calc'nClean" programme, keep
a container with a capacity of min. 1 I at the ready.
If you use a water filter, this will prolong the time until you have to run a service programme.
- You can combine "Dscaling" and "Cleaning" with the "calc'nClean" service programme.
Resetting a service programme
Perform the following steps if a service programme is interrupted, e.g. due to a power failure.
- Empty the container, place it under the beverage outlet and put the end of the suction pipe in the container.
- Empty the container and put the end of the suction pipe in the container.
- Rinse out the water tank.
- Fill the water tank with fresh, cold, non-carbonated drinking water up to the max mark.
- Press start stop
- The appliance rinses for approx. 2 minutes.
- Empty and clean the drip tray.
- Restart the service programme.
13 Troubleshooting
You can rectify minor faults on your appliance yourself. Read the troubleshooting information before contacting after-sales service. This will avoid unnecessary costs.
WARNING
Risk of electric shock!
Improper repairs are dangerous.
- Repairs to the appliance should only be carried out by trained specialist staff.
- Only use genuine spare parts when repairing the appliance.
- If the power cord of this appliance is damaged, it must be replaced by the manufacturer, the manufacturer's Customer Service or a similarly qualified person in order to prevent any risk.
| Fault Cause and troubleshooting | ||
| Appliance no longer responds. | Appliance has a fault. 1. Pull out the mains plug and wait 60 seconds. 2. Re-insert the mains plug. | |
| Grinder won't start. Appliance is too hot. 1. Disconnect the appliance from the mains. 2. Wait 1 hour so the appliance can cool down. | ||
| Coffee or milk froth quality varies widely. | Build-up of limescale in the appliance. • Descale the appliance. → "Service programmes", Page 26 | |
| Milk froth quality varies widely. | Milk froth quality depends on the type of milk or plant-based alternative used. • Optimise the result through the selection of the milk or vegetable-based drink type. | |
| Appliance is not dis-pensing hot water. | Milk system or milk system holder is soiled. • Clean the milk system or the milk system holder. → "Cleaning and servicing", Page 23 | |
| Too little milk froth, none at all, or the milk system is not taking in any milk. | Milk system or milk system holder is soiled. • Clean the milk system or the milk system holder. → "Cleaning and servicing", Page 23 Milk is not suitable. Note: Do not use milk that has already been boiled. • Use cold milk with a fat content of at least 1.5%. | |
| The milk system is assembled incorrectly. • Assemble the milk system correctly. | ||
| Build-up of limescale in the appliance. • Descale the appliance. → "Service programmes", Page 26 | ||
| Milk or milk-based drinks are too cold. | Milk is too cold. • Use lukewarm milk. | |
| Coffee is not dis-pensed or has slowed to a trickle. Set quantity is not reached. | Grinding level or ground coffee is too fine. • Set the grinding level coarser or use coarser-ground coffee. | |
| Heavy build-up of limescale in the appliance. • Descale the appliance. → "Service programmes", Page 26 | ||
| Coffee has no crema. Type of coffee is not optimal. • Use a coffee variety with a higher proportion of Robusta beans. | ||
| Coffee beans are no longer freshly roasted. • Use fresh coffee beans. | ||
| Coffee has no crema. Grinding level is not appropriate for coffee beans. → "Adjust the grinder to a finer setting. → "Adjusting the grinding level", Page 20 | ||
| Coffee is too acidic. Grinding level or ground coffee is too coarse. → Adjust the grinding level to a finer setting or use finer ground coffee. | ||
| Type of coffee is not optimal. → Use beans with a darker roast. | ||
| Coffee is too bitter. Grinding level or ground coffee is too fine. → Set the grinding level coarser or use coarser-ground coffee. | ||
| Type of coffee is not optimal. → Change the coffee variety. | ||
| Coffee tastes burnt. Brewing temperature is too high. → Set the brewing temperature lower. → "Basic settings", Page 21 | ||
| Grinding level or ground coffee is too fine. → Set the grinding level coarser or use coarser-ground coffee. | ||
| Type of coffee is not optimal. → Change the coffee variety. | ||
| Appliance is not dis-pensing drinks. | Air is in the water filter. 1. Immerse the water filter in water with the opening fa-cing upwards until no more air bubbles escape. 2. Reinsert the filter. | |
| Residues of limescale remover are blocking the water tank. 1. Remove the water tank. 2. Clean the water tank thoroughly. | ||
| Water filter does not stay in position in wa-ter tank. | Water filter is not properly secured. → Firmly press the water filter straight into the tank con- nection. | |
| Coffee grounds are not compact and are too wet. | The grinding level is not set optimally. → Adjust the grinder to a coarser or finer setting. → "Adjusting the grinding level", Page 20 | |
| Too little ground coffee. → Use 2 level measuring spoons of ground coffee. | ||
| There is dripping wa-ter on the inner floor of the appliance. | Drip tray was removed too soon. → Wait a few seconds after the last drink was dis-pensed before removing the drip tray. | |
| Display shows "Please refill bean" despite the bean container being filled. | Beans are too oily and do not fall into the grinder. • Gently tap the bean container. • Change the coffee variety. • Do not use oily beans. • Clean the empty bean container with a damp cloth. | |
| Display shows "Please empty drip tray" despite the drip tray being empty. | Appliance is switched off and does not detect emptying. 1. Switch the appliance on, and remove the drip tray. 2. Re-insert the drip tray. | |
| Drip tray is soiled. • Clean the drip tray thoroughly. | ||
| Display shows "Refill with still water or change filter". | Water tank is wrongly inserted. • Insert the water tank correctly. | |
| Carbonated water is in the water tank. • Fill the water tank with fresh drinking water. | ||
| Float is stuck in the water tank. 1. Remove the water tank. 2. Clean the water tank thoroughly. | ||
| New water filter was not rinsed as per instructions. 1. Rinse the water filter according to the instructions. 2. Place the water filter into operation. | ||
| Air is in the water filter. 1. Immerse the water filter in water with the opening facing upwards until no more air bubbles escape. 2. Reinsert the filter. | ||
| Water filter is old. • Insert a new water filter. | ||
| Display shows "De-scaling necessary" very frequently. | Decalcified water still contains small amounts of lime. 1. Insert a new water filter. 2. Set the corresponding water hardness. | |
| Beverage outlet is soiled. • Clean the beverage outlet. → "Cleaning and servicing", Page 23 | ||
| Display shows "Please clean brewing unit, then replace". | Brewing unit is soiled. • Clean the brewing unit. | |
| Too much ground coffee in the brewing unit. • Use no more than 2 level measuring spoons of ground coffee. | ||
| Mechanism of brewing unit is stiff. • Clean the brewing unit. | ||
Fault Cause and troubleshooting
| Display shows "Please restart appliance". | Brewing unit is soiled. • Clean the brewing unit. • Restart the appliance. |
| Display shows "Scaling insufficient Re-peat process". | Incorrect or too little descaling agent used. • Run the descaling programme again. |
| Display shows "Please let appliance cool down". | Appliance is too hot. 1. Disconnect the appliance from the mains. 2. Wait 1 hour so the appliance can cool down. |
| Display shows "Error Please contact hot-line". | Appliance has a fault. • Call. → "Customer Service", Page 32 |
14 Transportation, storage and disposal
14.1 Activating frost protection
Protect your appliance from frost during transport and storage.
ATTENTION
Residues of liquid in the appliance may damage it during transport or storage.
- Empty the pipe system before transport or storage.
Requirements
The appliance is ready to use.
- The water tank has been filled.
- Press menu
- Use to select "Frost protection" and press OK
- Press start
-
Remove the water tank.
-
The appliance will automatically empty its pipe system and switch itself off.
- Empty the water tank and drip tray.
14.2 Disposing of old appliance
Valuable raw materials can be reused by recycling.
- Unplug the appliance from the mains.
- Cut through the power cord.
- Dispose of the appliance in an environmentally friendly manner. Information about current disposal methods are available from your specialist dealer or local authority.
This appliance is labelled in accordance with European Directive 2012/19/EU concerning used electrical and electronic appliances (waste electrical and electronic equipment - WEEE). The guideline determines the framework for the return and recycling of used appliances as applicable throughout the EU.
15 Customer Service
BSH Hausgeräte GmbH is extending the availability of spare parts to 10 years. This refers to all functionally relevant and storable parts for appliances produced after 1st January 2023.
Note: Under the terms of the manufacturer's warranty the use of Customer Service is free of charge.
Detailed information about the warranty period and the warranty conditions in your country is available via the QR code on the enclosed document on service contacts and warranty conditions, from our customer service or on our website.
If you contact Customer Service, you will require the product number (E-Nr.) and the production number (FD) of your appliance.
You can find the contact details for our customer service via the QR code on the enclosed document on service contacts and warranty conditions or on our website.
You can find the information required as per Regulation (EU) 2023/826 online at siemens-home.bsh-group.com on the product and service pages for your appliance, in the area of user manuals and additional documents.
15.1 Product number (E-Nr.) and production number (FD)
You can find the product number (ENr.) and the production number (FD) on the appliance's rating plate.
Make a note of your appliance's details and the Customer Service telephone number to find them again quickly.
16 Technical specifications
| Voltage 220- | 240 V ~ |
| Frequency 50 / 60 Hz | |
| Connection rating 1500 W | |
| Maximum static pump pressure | 15 bar (TE651.., TE653.., TE654.); 19 bar (TE655.., TE657.) |
| Maximum capacity of water tank (without filter) | 1,7 l |
| Maximum capacity of bean container | ≈300 g |
| Length of the power cable | 100 cm |
| Appliance height 385 mm | |
| Appliance width 280 mm | |
| Appliance depth 468 mm | |
| Weight, empty ≈10-12 kg | |
| Type of grinder Ceramic |
WAARSCHUWING - Kans op verstikking!
WAARSCHUWING - Brandgevaar!
WAARSCHUWING Kans op verbranding!
Versbereide dranken zicheer heet.
WAARSCHUWING Kans op letsel!
WAARSCHUWING Kans op brandwonder
11 Ba3ObIe yCTaHOBKn 167
11.1 N3meHHeNe 6a3OBbIX yCTaHOBOK 167
11.2 O63op 6a3OBbIX yCTaHOBOK ... 167
12 Ouchstka n yxoi 169
12.1ПриговocьдЯMbITьВпocудомоевно Maшине 169
12.2 YnCTaIe e cpeIcTBO 169
12.3 Ouchka npnbopa 170
12.4 OuNTka IOTka dIa c6opa KaIeJIb N KOHTeHepa dIa Ko- FeiHOJ rUsi 170
12.5 OuNTka cNCTeMbI NOdaH M0- JOKa 170
12.6 OuInCTka BblBnXHOrO KOHTeHepa IJI MOnOTOro Kofo ... 171
12.7 OuInCTka 3aBapOuHoro 6Ioka 171
12.8 CepBnchIe nporpaMMbl 172
13 YcTpaHHe HeNCnPaBHoCTe 173
14 TpaHcnpTnpoBka, XpaHeHne n yTuJIu3aunr 177
14.1 AkTnBaun 3aunTbI OT 3aMepe 3aHn .177
14.2 Ytuln3aunr cTaporo 6bITOBOROpnbopa 177
15 CepBnCna cnyK6a 178
15.1 Hoomep n3eJIy (E-Nr.) n 3a- BOIDCKoHoomep (FD) 178
16 Texnueckne xapaKTepcntu KI 178

Бeэпасноctь
Co6IouaTe cIeDyUoUne yKa3aHnI NO TexHnke 6e3OpaChocTn.
1.1 O6uNe yka3aHnA
BHHMaTeIbHo npOuHTaIte daHHOe pyKOBOdCTBO.
CoxpaHnTe HnCTpyKcIIO n HΦOpMaclIO O npnbope IaJIaJIbHeJ- Wero hCNoJIb3OBAHnI nn dnnpeDaun cIeDyUoIeMy BnaJeIbUy.
B clyuae oHapyKeHnI NOBpeKdEHN, CBa3aHHbIX C TpaHCnOpTINPOBko, He IODKnIOUaTe np6Op.
He donyckaTe TeTeMnaIe 8 let K npbOpu I erO cTeBOMy npoBODy.
He noDnyckaIte deTei K MeIKNM DeTaIaM.
He nO3BOJnTe DeTm HrpaTb C MeIKNMn DeTaJIaMn.
I PENEYPENKDEHNE - OnacHOCTb nopaXeHnA 3JIeKTPnuecknM TOKOM!
I P E D U N P E X D E H N E - O n a c h o c t b o w n a p n b a n h y!
CBeXeepnroToBleHHbIe HAnNTKn OueHb rOpYne.
Ecnn noTpe6yETc, daTe OCTbITb HApNTKaM.
H36eraIte KOHTaKTa BbIeJIIOxXcJxIDKOCTe I napOB C KoxeJ.
I P E D U N P E X I E H N E - O n a c h o c t b T p a B M n p o b a H N A!
HarpeToe KOnuYeCTBO BoIy MoJIOka IcNoB3yETcO NTMaJIbHO.
Peryarnho ouuau Te npboop ot hknnn.
HaKnIb npBODNT K NOBblEHHOMy 3HeprOnonTpe6JIeHIO.
3 YctaHObKa I NOdkJIIO-ueHne
3.1 Komnlekt noctabkn
Iocne paacnakOBKn npOBepbTe Bce DeTaN Ha OTCyTCTBnE TpaHCnOpTHbIX NOBpeKdHn, a TaKKe KOMJIeKTHOcTB NoCTaBKn.
PpimmeaHne:B 3aBnCmOCTn OT Tnpa np6opa OH nocTaBnaTcra C pa3nUHbIMn PpHaadJeKHOCTMa. 3TN pInHaJLeXHOCTn O603HaueHbI UTPnxOBaHHoIpaMKoI.
→PnC. 1
A IOnHOCTbHO aBTOMaTnueckaKo-ΦeMaunHa
B ⅢaHrДЯMOLOKaNBCaCbBaIO-
C Hnctpykunno 3Kcnnyataa
D EmKoCTb dIa MoIoka
E Мерная loжka
F HndnkaTopna noLocka dny onpeJeHnJ XeCTKoCTN BObl
G YnCTaJaa Ta6neTka 1
H TabJeTka dIyuaJIeHnHaKInn
ΦnIbTpДЯ BOIby
3.2 YcTaHOBKa n PoJKnIoueHne 6bITOBOro npH6opa
BHHIMAHNE
Ppno6op n03B0JareT npnroTOBntb MHOro pa3Hoo6pa3HbIX HaNTKOB.
IodroTOBbTe np6op K nCnoJb3OBAHnIO.
7.1 Побrotовka пибopa и erо ouhctka
CHIMTE 3auntHbIe PJIeHKn I OChTnte np6Op n ero deTaJI. CJeDyIte HNCTpyKcIn B KapTHKax, PnBBeDEHHoB B Haayane 3TOrO DOkymeHTa.
BHHMAHNE
Bo3MoJHa 3a6nBka KoΦeMOLKn HeNoI-XoJaUIMN KoΦeHbIMN 3epHaMn.
HcnoIb3yIte TOnbKO uNCTbie CMeCN npOxkapENHbIX KOFeINbIX 3epeH dJI npnroTOBHeHnE cnpcecco nII dJI aBTOMaTnueCKNX KOFemaunH.
He nCnoB3yIte KofoeHbIe 3epHa, NOKpbITbIe rla3ypbIO.
He nCnoB3yIte KapameN3npoBaHnBle KOFeINHbIe 3epHa.
He nCnoJIb3yInTe KoFeINHbIe 3epHa, o6pa6oTaHHbIe caxapocOdepJkaUIMN Do6aBkAmN.
He 3acbIaIe TMolOtBn KoΦe.
→Pc. 3 -11
IpnmeaHne: HanoJnhte pe3epByap IJIy BObl CBexKei, XoIoONHOITbEBOI BOOn 6e3 yrKeKNCOTbl.
PekomeHdaun:YTo6bIcoxpaHnTb ONTmAlbHoe KaueCTBO,XpaHnTe KOFeHNbIe 3epHa B IpoXlaHOM MecTe N B3aKpbItbIX EMKOCTx.
B emkoctn IJI KOFeHbIX 3epeH MOKHO XpaHnTb KOFeHbIe 3epHa B TeueHne HeCKoJIbKnx IHei 6e3 nOTepn apomata.
7.2 OnpeJeHHe JecTKoCTN BOIbl
IpaBnIbHaj NaCTpoiKa JecTKoCTN BOIbI BaJHa IJIa OBeCneueHn CBOEbpeMeHHOrO HaONHAnHn O HeOxOIMoCTn YdaJIeHn HAKIN. XecTKoCTb BoDbI MOXHO ONpeJIHTb Pn NOMOuPiJIaRaEMo INDkATOPHO NOLCKN IJIy3HaTb ee B MeCTHO BODOCHAIO-UeJ opraHn3aun.
- Ha kopotkoe Bpemr norgy3nte HnDnKATOPHyIO pIoCKy B CBexKyIO BO-DOnpoBOdHyIO BODy.
2.ДаиTe TECT-ПОЛOCKe CTeUb. - CunTaIe XecTKOcTB BOIbI Ha HnDnKaTOpHOn IIOLOCKe CnyCTA 1 MmHyTa. "O63Op CTepeHei XecTKoCTN BOIbI:," CtpaHnca 159
PpmeHne: EcIn B DOME nMeetcYCTaHOBka IJy YMrgHeHH BOdbI, MOX-HO BbIOJIHNt b HAcTpoiKy "CnCTemaYMrgHeHH BOdbI".
PekomeHdaun
BbIMoKeTe N3MeHHTb yCTaHOBKn BJIIO6oe BpEma.
"Ba3OBbIe yCTaHOBKN", CtpaHnua 167
EcnJxKcKbBODbBbIe 21 HeMeKnx rpaYcoB XeCTKOCTn (3,8 MMoJIb/),MOxHO HApOJIHHTb pe3epByap IJI BAoBbl PpeDbapNTeJIb-
HO OTΦHbTpOBAHHO BODO, YTOObI yMeHbUHTb O6pa3OBaHHe HaKINB pe3epByape DnA BObl.
7.3 O63op cTepeHeJ XeCTKoCTN BOIbI:
B Ta6nue npeiCTaBHeHO COOTBeTCTBHe peXHMOB pa3nUHbIM CTepeHm XeCTKoCTN BObl.
PpimmeaHne: Ecnn He nCnoJb3yeTcHOBblnBtp, BblOpTe "He yctaHOB-
JIENΦIINbTp" IN NOITBepdnte, HaxaB OK√.
$$ \rightarrow P u c. \quad 5 $$
$$ \rightarrow P n c. \quad 1 2 $$
1.Погу3nteФиьтДЯВОдыOTBepCTHEM BBePbVB CTaKaH BOdBi N CJIerKa CxImaIte 6OKOBbie NOBepxHOCTNФиьТpa,NOKa He NepectaHyT BbIXOДNTbpy3bIPbKN Bo3dYxa.
2. BCTaBbTe ΦnIbTp dIy BoIb I B pe3epByap dIy BOIbI, XOPOIo pIpxKaB eIOMepHOJIOKKoI.
3. 3aIeITe BOyu B pe3epByap IJIa BOIbI DO OTMeTKN «max» n HaXMMTe ok√.
4. CoeHHTe IJIaHr IJIa MOLOKa C cnCTeMoI IOaUN MOLOKA N BCaCbBaHOUeN Tpy6KoN.
5. BCTaBbTe KOHeC BCaCbBaIOuSei Tpy6-KN B NOdOH.
6. Hαχmnte Khoŋky menu
7. C nOMOuH BbIepeHte "ΦnJIbTp DnRA BOdbl".
8. Haxmte ok/c nOMOuBbO Bbl6epnte "Aktubnp.HOB. qnlbTp".
9. OnopoxkHnTe n BCTaBbTe NOdONH.
Ecn He nCnOJIb3YeTcHOBBI HnJIbTp, Bbl6epnte "He yCTaHOBJeHnJIbTp" n CLeNyIte yKa3aHnMaHa dNcPnee.
7.5 O6uNe yka3aHnA
CobIouaTe yka3aHnI dIa ONTImaJIb-Horo IcNoJIb3OBAHnI npI6opa.
Yka3aHHa
Ha 3aBoJe-n3rOToBHTeIe 3a npOrpaMMnpOBaHbI cTaNdapTHbIe HacTpOuKNДЯ ONTImaJIbHO rEJIMa pa6Otbl np6Opa.
Ha 3aBoJe yCTaHOBJIeH ONTImaJIb-HbIpeXIMpa6OTbl KOΦemOLKN. EcIn KoΦe BbIXOJIT JINsB OTdEJIbHbIM KApJIaMn INCINcIKOM XNkN IN Meet CInxKOM MaIO NeHKN,MOXHO N3MeHHTb CTeNEHb NOMoJa Prn pa-60TaIOUSei KOΦemOLKe.
"YcTaHOBKa CTeNEHn NOMOJa", CtpaHnua 165
Bo Bpempa6oTbHa BeHTnlaCIOH HbIX OTBepCTnx MOryT O6pa3OBaTbc KaIeJIbKN BObl.
EcnBbI He N0JIb3yeTecb np6OpOM B TeueHne ONpeJeHHO BpeMeHN, OH aBTOMaTHueCKN OTKJIHouHTcJ.ДЛNTeJIbHOCTb MOxHO H3MeHHTb B 6a3OBbIX HacTpOyKaX. CtpaHnua 167
- По ТхнчесКИМ РпунHam ИЗ Рпбора может Выховпт Nap.
- Первий нашиток[euple He обладает
нолным apomatOM, eclin:
- Bbl nCpOJIb3YeTe npI6Op B nepBbI pa3;
- Bbl BblIOJIHNI IN CepBnCHyIO IPOIgpaMMy;
- BblДЛNTeJIbHoeВpeMЯ He NcPOnIb-30BaJIn npN6Op.
He neiTe 3TOT HannToK.
PekomeHdaun: CtaBnIbHO MeKOnOpnCTaKoHCnCTeHcN IeHbI DOCTnIgAETCnIocLe BBODa npnbopa B 3KcnIyatauIO n PnIroTOBHeHn HeCKOJIbKnx Ya-WeK.
8 Ctaндартhoeупразьени
8.1 Bключени nIи ВьIKЛючене npнбopa
HaKMnTe ①
Pn PnroTOBHeHn HAnrKOB n3 MoIOToro KoFe BbIOp CneDyUOxN Ha-CTpoE KHeBO3MOXeH.
-ДBEчашкnccpa3y
Kpenoctb kope
- NocTaBbTe noDorpeTuO uAaKy noD nCnEHcep.
- HaxmTe Ha cIMBOJ HyxHOro HaNTKa.
- HaximaiTe 0, noka Ha dncnlee He NOBHTcra "6oJee rpy6oro nomola."
- OTKpoIe BblBnXHOn KOHTeHep Ia MOnOTOro KoPe.
- 3acbinaTe He 6oJee 2 MePbIX loXek MOnOTOrO KoΦe 6e3 rOpKn.
ru CtaHapTHoe ynpaBneHne
- 3aKpoIe BblBnXHoi KOHTeHep IJI MOnOTOrO KoIe.
- Haxmte start stop yTObI hauaTb npnroTOBJIeHHe HAnNTka.
KoΦeBapKa CBapNT KoΦe n 3aTeM Hanelbet erO B yauKy.
8. UTo6bI npexKeBpeMeHHO 3aKOHHTb npnroTOBHeHne HaNTka, HaxMnte start stop.
8.5 ПпгOTOBЛЕнne HaNTKOB C MOJOKOM
Baw npibop Imeet BCTpoeHHyO cnCTemy noaun MOloka. HcnoIb3yra 3Ty cnCTemy,MOXHO rTOOBnTB KoFeHbIe HaNTKN C MOLOKOM, a TaKKe MOnoHyu NeHy n TeNIOe MOlOKO.
I PEPdYnpEJKDEHNE Onachocb oXora!
CnCTema nOaun MOIoka cnIbHO Ha-rpeBaetc.
HnB Koem clyuae He npKacaiTecb K cnCTeMe IOnaun MOJOKa.
- Перед Контам С гораян систем модачни молoka дайтей ec OCTытб.
BHHIMAHNE
OCTaTkn MOIOKa MOrYT 3aCOXHyTb, INx 6yJeT TpydHNo ydaJIITb.
- Haxmte start stop YTObI Haayatb npnroTOBJIeHne HAnNTka.
Chauana B yaShky nI n CtaKaH noa-etcra MOLOKO nIIM MOLOuHa r neHa. 3aTeM 3aBapnBaetc Ka o n Oda-etcra B yaShky nIIN CtaKaH.
Molouhaj CnCTema NocJe npiroTOBJIeHnHaNTKa aBTOMaTnueCKN OUnIaETcKpaTKOBpeMeHHoN NOdaeH napa.
PekomeHdaun: UTo6bl npexdeBpeMeHHO 3aKOHHTb NODauy MOLOKA, HaXMMTe start UTo6bl npeKpaTntb npnroTOBJIeHHe, HaxMMTe ①DBAxDbI.
8.7 Ппг罗TOВлЕне молочипehы
Tpe6obahna
-
LJIaHr DnI MOLOKa NODCOeINHeH.
BcacbBaIOUaTpy6KaNoDCoeHHeHa. -
Iorpy3nte KOHeC BCacbBaIOUeI Tpy6Kn B MOLOKO.
2.ПocTaBbTe ПОДогрetyuЧИКУ ПОДДИСпЕнсер. - Haxmte Ha cIMBOJ "MolouHa neHa".
- YTO6bl OTpeRyIInpoBaTb KOJIInueCTBO, HaxMnTe ml
- Haxmte start yTObI hauaTb npnroTOBJIeHHe HAnNTka.
- UTo6bI npexKeBpeMeHHO 3aKOHuNTb npHrTOBLeHHe HApNTKa, HaxMnTe start stop.
8.8 Приноюнения особьх HaHTKOB
Kpome HAnNTKOB, BblbpaembIX HaXaTneM KHOJOK 6bICTPOrO BbIOopa, npHOBpMOxET pNIROTOBHTb TaKxE dpyrHe HAnNTKN.
HaximaiTe, noka Ha dinCnlee He NOBHTcH HyxhBi HAnITOK. Bbl MoKeTe BbIpaTb CneDyIOUne HAnITKN:
-
"TopyaBoda"
-
"Teŋnoe MŋOKO" 1
-
"KoФeинк" 1
-
"Kleiner Brauner" 1
-
"AmeprikaHOn" 1
-
"Флэт yaиТ" 1
-
"KaΦe κορτaДо" 1
- Haxmte start yTObI hauaTb npiroTOBJIeHHe HAnNTka.
Ecnn noBnreTc coocheHne "ChmTe IaHr dIy MOLOKa",OTcoeHnTe IaHr dIy MOLOKa n HaxMNTe KHONKy
TopyaBoda BbIXoNT n3 dncnEh-cepa.
5. UTo6bI npexJeBpeMeHNO 3aKOHnTb IpNFOTOBJIeHHe HAnNTka, HaxMnTe
- HaxmTe start UTObI Haayatb npiroTOBJIeHne HAnNTka.
Kofo 3aBapnBaetc n 3aTeM nOda- etc B KOfoeHnK.
5. UTo6bI npexKeBpeMeHNO 3aKOHcHTb IprnroTOBJIeHHe HaNTKa, HaxMHTe
8.14 Hac troponi dIa HAnrKOB
PnroToBbTe HAnrTOK NO BaWemy BkyCy.
Hac troponka Kpenoctn Kofoe
- Haxmte Ha cIMBOJ HyXHOro HAnNTKa.
- HaximaiTe 0 noka Ha dinCnlee He NOBHTcH HyxHa KpeNoCTb Kofe.
BbIMoXeTe BbIbpaTb CJIeNyUOuNe Ha-CTpOiKN KpeNoCTN KoΦe:
"OueHcIaObiB"
-cna6bi"
-HOpMaJIbHbI"
"KpePkni"
"Ou. KpeKnI"
-doubleshot kpenkni"
-doubleshot kpenkni+
PekomeHdaun: Yoobl COxpaHnTb HHTeHcHBhB Bkyc Kofoe, npn 60lbwOM KOJnueCTBe HaNTka Bbi6epnTe HactpoKy 6OJIbwe KpeNoCTn.
Bb6op moIOToro Kofoe
HajimaTe O noka Ha dncnlee He IOBNTc "6oJee rpy6oro nomola."
"PpHrTOBJIeHHe KOeHHO HAnNTKa N3 MOnOTOro KoPe", CToPAHnca 161
aromaDouble Shot
Bb mokeTe npnroTOBHTb ouehb kpenKn KoFe, nCnoJIb3OBaB HacTpOuKy "doubleshot KpeKN".
YemdoJIbWe 3aBapnBaETcKoFe,TeM 60JIbWe TOpbKnx BeIeCTB N HeKeJaTeJIbHbIX apOMaTOB IOnaDaET B HAnITOK.TOpbKne BeIeCTBa N HeKeJaTeJIbHbIe apOMaTBI OTPiuCaTeJIbHO BInraIOT Ha BKycN DeLaIOT KoFe MeHee PpIrTHbIM DnA yNoTpe6IeHn. IocNe npIrTOBLeHNr POIOBnHbIK OJInuCeTBA HApNTKa CHOBA BblIOJHReTcI NOMOI KoFeiHbIX 3epeH N 3aBapNBaHne,B pe3yJIbTaTe Yero NOLyuaeTcI JeKoUcBOReEMbl BKChbIKoFe C pPrAHTbIM apOMaTOM.
Приимеанно: Habстpoиka "doubleshot Kрелки" BO3MOЖна He ДлЯ BCEX HAnITKOB И IX KOЛИЧЕТВ.
H3meHeHne KOJInYeCTBa HAnHTka
- Haxmte Ha cIMBOJ HxHOrO HAnITKa.
- HaximaiTe mInoka Ha dinCnlee He IORBHTcH yxhbl Obem.
BbIMoXeTe BbIbpaTb cNeDyUOuNe OObembl:
"MaJIeHbKnI"
-cpeHnI"
- "БОЛьшой"
CTpeIka HnH HeCKoJIbKO CTpeIOK PAnOM C O6bEMOM yKa3bIBaIOT Ha TO, UTO YCTaHOBJIeHHbI N3rOToBNTeJIeM O6bEM HAnITKa 6bl N3MeHeH, HApP. "00JIbIoN".
IprnoTOBJIeHne IbUx YaUeK cpa3y
I P E D U N P E X J D E H N E
Onachoctb TpaBMnpoBaHna!
KofoemolkaBpaaetaTc.
He npikacaiTecb K BVHyTpEHNM qaCTaMKoΦeMOJKN.
BHHMAHNE
ONaCHocTb NOBpeJdeHnKoΦeMOLKn.
Pn HnPaBnBHOYcTaHOBKe CTeHn
NOMoJa BO3MOxHo NOBpeJdeHne KO-
ΦeMOLKn.
YcTaHaBnBaIe CTeNehb NOMoJa ToJIbKO pR paOToUoUeKoΦemOnKe.
CTepeHb NOMoJa yCTaHaBnBaETcR CTypeHuaTo NOBOpOTbIM NepeKIOu-yaTeJIem.
PekomeHdaun: Ecni KoFe BbIXOINT NnB OTdEJIbHbIM KApIaMNI, YCTaHOBNTe 6oJee KpyNbI NOMOI. Ecni KoFe nprirotabINBaETCnNtKOM 6bICTPO n CnNtKOM MaIO neHKN, YCTaHOBNTe 6oJee MeIKN NOMOI.
9Блokирвka Дя 6e3- onaCHOCTN DeTei
YTO6bI npeDoTbpaTb OwnpaHne N OXKOrn y DeTeN, PnOBp MOxHO 3aOKnPOBaTb.
9.1 Bключен He 6JoknpoBkn IЯ 6e3onacHocTn DeTei
Tpe6oBaHne: Pn6op BkIoueH.
HaxmTe ydepxnBaIte He MeHee 3 cekyHd.
Дисплей поka3ыBaet [Symbol Schlussel],блOKировka дя 6e3- onaCHOCTN DeTei aKTINBnPOBaHa.
9.2 BbIKIIOUeHHe 6IOKnPOBKn IJIa 6e3ONaChOCTN DeTei
HaxmTe ydepxnBaIte He MeHee 3 cekyHd.
Диспелей бolyше He noka3bIBaet [Symbol Schlüssel], И Solokinpobka Ддя 6e3oNaChOCTn DeTei DeaAaTnBn-poBaHa.
10 N36paHHoe
CoxpaHnTe H3MeHnTe HnDnBnDyaJIb-HbIe HaHTKn B MeHIO "N36paHHoe".KoJInueCTBO H36paHHbIX HaHTKOB 3aBN-CNT OT MoJeI npHbopa.
11 Ba3ObblyeYCTaHOBKN
BblMOxKeTe 3aTaTb 6a3OBbIe yCTaHOBKn
Pn6Opa B COOTBeTCTBn C BAuIMN NO-
Tpe6HOCTaMn N Bbl3BaTb DOONHHTeJIb-
HbIe FyHKU.
TtataTeIbHO npOMoIte HOBbie r6yBaTbIE caIeTKN, UTObI ydaIHTb CoII, KOTOpbie MOrY TmEbCn Ha HIX. CoIIN MOrY TnpIBecTI K O6pa3OBAHIO HaJIeta PjKaBcHbI Ha NOBepXHOCTaX I3 CTaII.
OCTaTKn HAKIN, KOFe, MOLOKa, MOHux CpeIcTB IN CpeIcTB dJa ydaJIeHN HaKIN BcERDa YdaJIaYTe He-
MeIeHNO, UTo6bI IpeIoTbpaTITb O6pa3ObaHne Koppo3n.
12.3 OuNTka npH6opa
I PEPdUYPeXJDEHNE OnacHOCTb npaKeHnA 3JIeKtpnueCKHM TOKOM!
- OuNCTIte MexaHnueckn yKa3aTeJIb yPOBHaNoJIHeHnI N OUcNCTIte eRO BlaJxHO TkaHeBO CaIΦeTKOJ.
- OuHCTIte IoJIOH IN KOHTeINHeP dJI KOFeHON rUzN, 3aTeM yCTaHOBnTE INx O6paTHO B npNoOp.
$$ \rightarrow P _ {H C}. \quad 1 6 $$
12.5 OuNTka cHCTeMbI NOda-yn MOJOKa
OuHuaTe cHCTeMy nOaun MOLOKa peTyrIaRHO.
I PEPdYIpEeXJDeHNE Onachoctb oXora!
CnCTema IODaun MOLOKa CnilbHo Ha- rpeBaetc.
HnB Koem clyuae He npKacaiTecb K cnCTeMe NOaUN MOLOKa.
- Перед Контам Соряец сизем модачни молoka дайтей ec OCTытб.
BHIMAHNE
- OTKpoIte BbIDBnKHOJ KOHTeHep IJI MOnOTOrO KoΦe.
PnC. 18 - OuNTte BbIDBHXHOJ KOHTeHep IJI MOnOTOrO KoFe BnaXHOJ TkaHeBOJ caIΦeTKoJ.
12.7 OuNTka 3aBapouHoro 6Joka
IOnoHnTeIbHO K aBTOMaTHueCKO npombIBKe HeoOxOdIMO peYJARpHO BblHMaTb N OUYIaTb 3aBapOuHbI 6lOK.
PpmeaHne:OuNCTnTe 3aBapOHybI 6IOK,He nCNoJIb3yMaOUIne CpeIcTba I NocydOMoeHu MaunHy.
I P E D U N P E X J D E H N E Onachoctb oxora!
HeKoToPbIe yactn npnbopa cnIbHo Ha- rpeBaIOTcR.
He npikacaiTecb K ropaym yactam npnbopa.
HcnoIb3OBaB npn6Op,nepeKoHTaKTOM C ropyHM uactrM daHTe HM OCTbITb.
- BbIKJIouHTe npHOBp KHOJKOJ ①
- OTKPOIte IDbepCy KINPATINbHnKa.
→PnC. 19
- KpacHbI ΦHKcTOp Ha 3aBapOuHOM 6IOKe CdBnHbTe Do yNopa BHeBO.
→PnC. 20
- Haxmte pbiar Ia BbIpaBbAHnAoynopaBn3.
3abapouhBn6lOKOTCOeINHReTc.
5.Bo3bMHTe 3aBapOuHbI 6IoK 3a yIy6JIeHnI N OCTOpOxHo I3BLeKeNTe erO.
→Pnc. 21
- Chmnte KpbIshky C 3aBapOuHOro 6IOKa N TuaTeJIbHO IpOMOte 3aBaApOHbI 6IOK IpOTouHoi BOIo.
→PnC. 22 - TtataTeIbHo npOMoIe fIbTp 3aBaapOuHOrO 6loKa nOd cTpye BODbl.
→PnC. 23 - TuaTeIbHo OunCTHe BHyTpHHee npoctpaHCTBO npnbopa BlaXHOI TKaHbIO uJaInTe OCTaTK KoFe.
- Пождente,пoka 3abapoHyн 6LOK n BHyTppeHHee npoctpaHCTBO npnOpa BBICOXHyT.
10.CHOBA yCTaHOBnTe KpbIuKy Ha 3aBaApOuHbI OLOK N BCTaBBte 3aBaOpUHbI 6LOK Do yNopa B npNoOp.
→PnC. 24
ru OuNTka n yxoJ
11.HaMnte pbIur IJIy BbIpaCbIBaHnI do ynpa BBepx.
12.CdBnHbTe KpaChbI ΦHKcTOp Do ynpa BnpaBO.
→PnC. 25
13.3aKpoTe DBepy KINrTnIbHnKa.
P C. 26
12.8 CepBnchbIe nporpaMMbl
e-mail: ala-infokz@bshg.com
Cpok cnjxkbly yctpoiCTBa - 7 let.
Ha TeppnTopnn Pecny6nkn Ka3axCTaH, npn O6hApyXeHHn HenCnpaBHOCTN, 3BOHnTe B CepBnCHbI KOHTaKT-ueHtp 5454 (ToIbKO dJa MO6nIbHbIX TeJeΦoHOB).
CdeIaHO B CIOBHeHH
1.1 Advertencias de character general
Los granos de café inapropriadosSEOSEOSEOSEOSEOSEOSEOSEOSEOSEOSEOSEOSEOSEOSEOSEOSEOSEOSEOSEOSEOSEOSEOSEOSEOSEOSEOSEOSEOSEOSEOSEOSEOSEOSEOSEOSEOSEOSEOSEOSEOSEOSEOSEOSEOSEOSEOSEOSEOSEOSEOSEOSEOSEOSEOSEOSEOSEOSEOSEOSEOSEOSEOSEOSEOSEOSEOSEOSEOSEOSEOSEOSEOSEOSEOSEOSEOSEOSEOSEOSEOSEOSEOSEOSEOSEOSEOSEOSEOSEOSEOSEOSEOSEOSEOSEOSEOSEOSEOSEO SEO
8.11 Dispenser "Americano"
Valid within Great Britain:
Imported to Great Britain by
BSH Home Appliances Ltd.
Grand Union House
Old Wolverton Road
Wolverton, Milton Keynes
MK12 5PT
United Kingdom
BSH Hausgeräte GmbH
Carl-Wery-StraBe 34
81739 Munchen, GERMANY
siemens-home.bsh-group.com

8001320331 (050519)
en, fr, nl, pl, cs, ru, de, es